


The Quick Guide is not intended as a substitute for your
Owner’s
Manual
. We strongly encourage you to review the
Owner’s
Manual
and supplementary manuals so you will have a better
understanding of your vehicle’s capabilities and limitations.
Air Conditioning System (vehicles with a navigation system)
Using the automatic mode.........................................................................................................60
Adjusting the temperature.........................................................................................................60
Air Conditioning System (vehicles without a navigation system)
Using the automatic mode.........................................................................................................73
Adjusting the temperature.........................................................................................................73
Audio System (vehicles with a navigation system)
Audio control screen....................................................................................................................55
Basic operation...............................................................................................................................56
Radio...................................................................................................................................................56
DVD player/CD player...............................................................................................................57
Operating an iPod.........................................................................................................................59
Remote control (steering wheel switches)..........................................................................59
Audio System (vehicles without a navigation system)
Basic operation...............................................................................................................................67
Radio...................................................................................................................................................68
CD player..........................................................................................................................................69
Operating an iPod...........................................................................................................................71
Remote control (steering wheel switches).......................................................................... 72
Cruise Control...................................................................................................................................... 27
Door Locks .............................................................................................................................................87
Dynamic Radar Cruise Control.....................................................................................................29
Energy Monitor/Consumption Screen........................................................................................ 12
Fuel Tank Cap ........................................................................................................................................90
Garage Door Opener........................................................................................................................81
Hands-free System For Cellular Phone (vehicles with a navigation system)
Bluetooth
®
phone pairing .........................................................................................................49
Phonebook transfer..................................................................................................................... 50
Registering a voice tag.................................................................................................................51
Registering a speed dial..............................................................................................................52
Calling by name..............................................................................................................................53
Calling by speed dial....................................................................................................................54
Receiving a call...............................................................................................................................55
1

Hands-free System For Cellular Phone (vehicles without a navigation system)
Bluetooth
®
phone pairing .......................................................................................................... 61
Calling by number.........................................................................................................................62
Calling by name..............................................................................................................................62
Calling by speed dial....................................................................................................................63
Phonebook transfer......................................................................................................................64
Changing the registered name................................................................................................65
Registering a speed dial..............................................................................................................66
Headlights ...............................................................................................................................................33
Hybrid System........................................................................................................................................10
Hybrid Transmission............................................................................................................................. 21
Intuitive Parking Assist .......................................................................................................................32
Keys.............................................................................................................................................................15
Lexus Enform with Safety Connect............................................................................................. 85
Moon Roof............................................................................................................................................. 89
Multi-information Display.................................................................................................................25
Navigation System
Register home.................................................................................................................................43
Destination input - Search by address ..................................................................................44
Destination input - Search points of interest by name....................................................46
Destination input - Search points of interest by category............................................. 47
Destination input - Search points of interest by telephone number.........................48
Portable Audio Device Adapters................................................................................................. 80
Power (Ignition) Switch.......................................................................................................................19
Power Windows................................................................................................................................... 88
Remote Touch........................................................................................................................................40
Rear Window Wiper and Washer.................................................................................................39
Safety Connect .................................................................................................................................... 83
Smart Access System with Push-button Start...........................................................................16
Theft Deterrent System ......................................................................................................................18
Turn Signal Lever..................................................................................................................................26
Voice Command System
Basic operation................................................................................................................................74
Command list ..................................................................................................................................75
Windshield Wipers and Washer....................................................................................................35
2
Overview
P.87
P.35
P.21
P.33
P.26
P.19
P.25
P.88
P.87
P.22
P.88
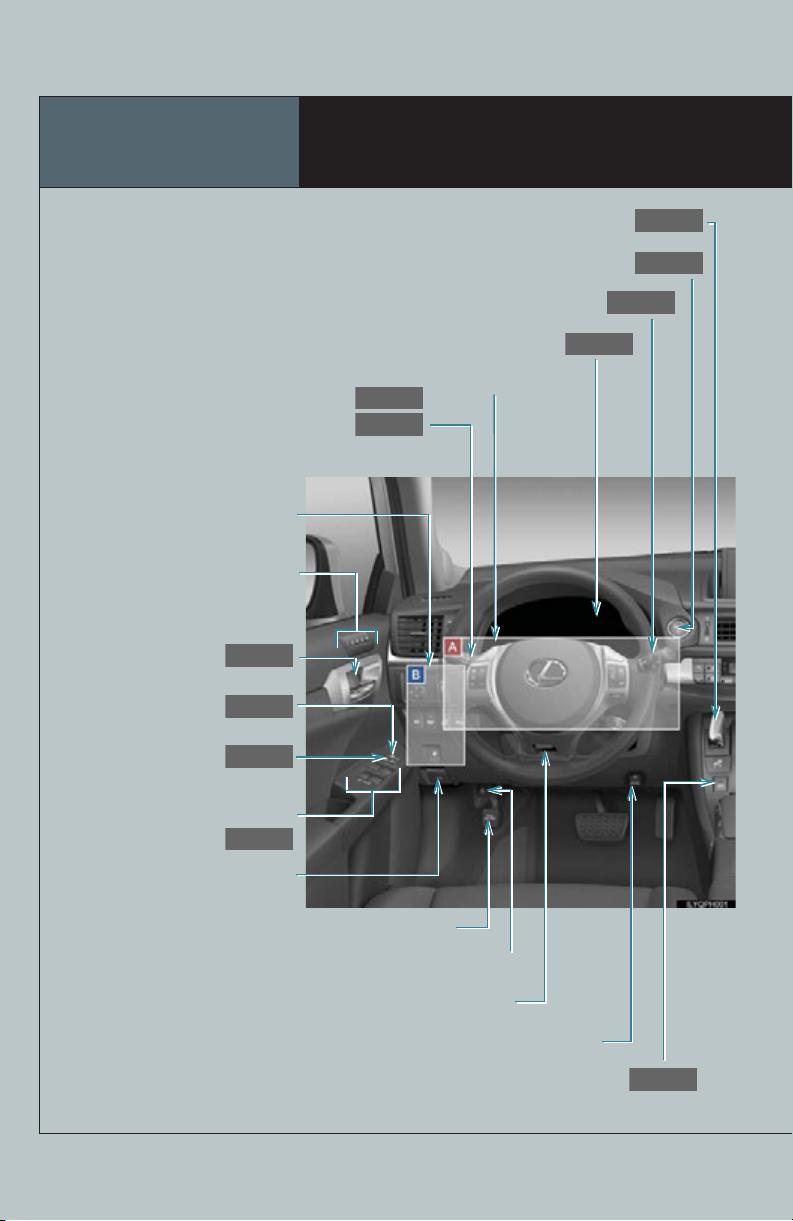
Instrument Panel
Shift lever
Power (ignition) switch
Windshield wipers and washer switch
Multi-information display
Driving position memory
switches
Inside door lock button
Window lock switch
Door lock switch
Power window switches
Hood lock release lever*
Tilt and telescopic steering control lever*
Headlight switch
Turn signal lever
Fog light switch
*
See P.6
1
*
1
Parking brake pedal*
Pre-collision braking off switch*
Tire pressure warning reset button*
See P.5
1
1
1
1
1
3
P position switch
P.18
P.55, 67
P.23
P.24
P.60, 73
Rear window and outside rear view mirror
defoggers switch
2, *3
*
Audio system
Air conditioning system
2, *3
Clock*
See P.7
Security indicator
Driving mode select switch
EV drive mode switch
: If equipped
1
: Refer to “Owner’s Manual”.
*
2
: For vehicles without a navigation system, refer to the “Owner’s Manual”.
*
3
: For vehicles with a navigation system, refer to the “Navigation System Owner’s Manual”.
*
Seat heater switches*
See P.8
1
4
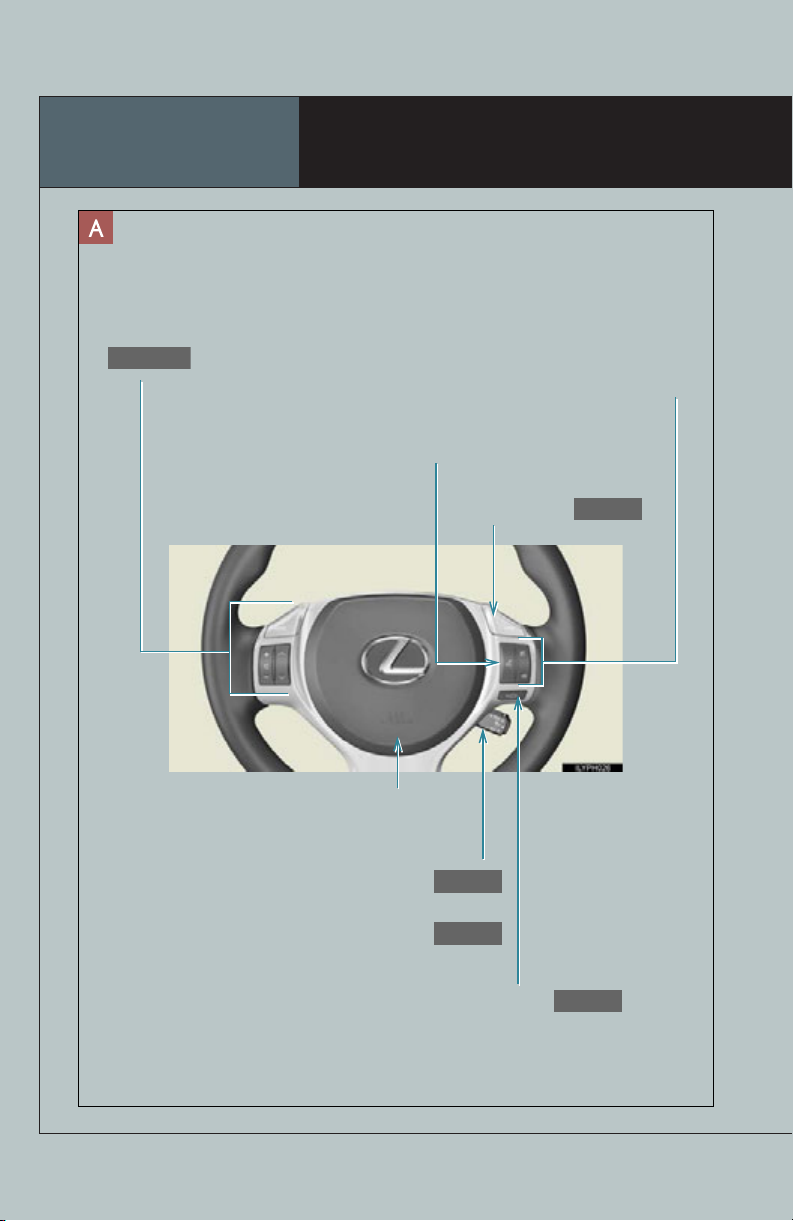
Overview
P.59, 72
P.25
P.27
P.29
P.31
Audio remote control switches
Instrument Panel
Telephone switches*
2, *3
Talk switch*
2, *3
“DISP” button
1
Horn*
Cruise control switch
Dynamic radar cruise control switch
Vehicle-to-vehicle distance button
5
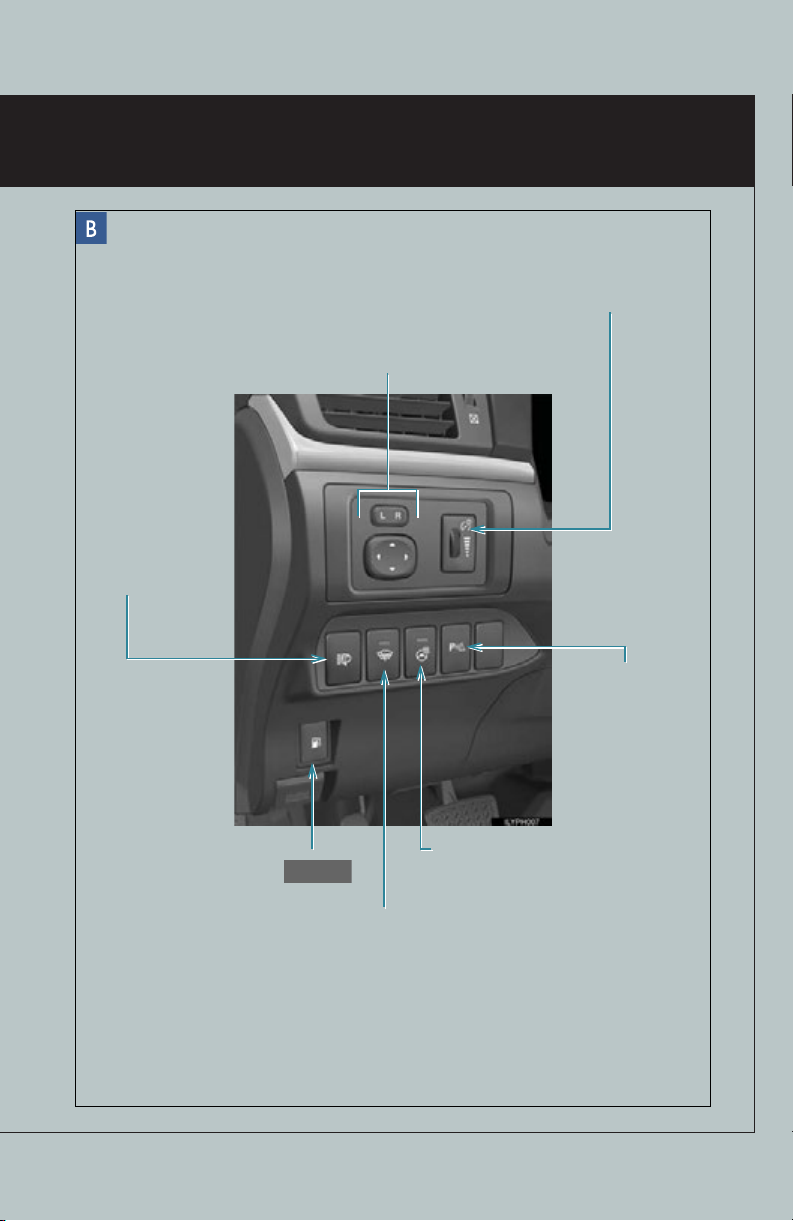
Instrument panel light control dial*
P.90
1
Headlight cleaner
switch
*
1
Fuel filler door opener
Outside rear view mirror switches*
Heated steering wheel switch*
Windshield wiper de-icer switch*
1
Intuitive parking
assist switch
2, *3
2, *3
*
1
: If equipped
1
: Refer to “Owner’s Manual”.
*
2
: For vehicles without a navigation system, refer to the “Owner’s Manual”.
*
3
: For vehicles with a navigation system, refer to the “Navigation System
*
Owner’s Manual”.
6
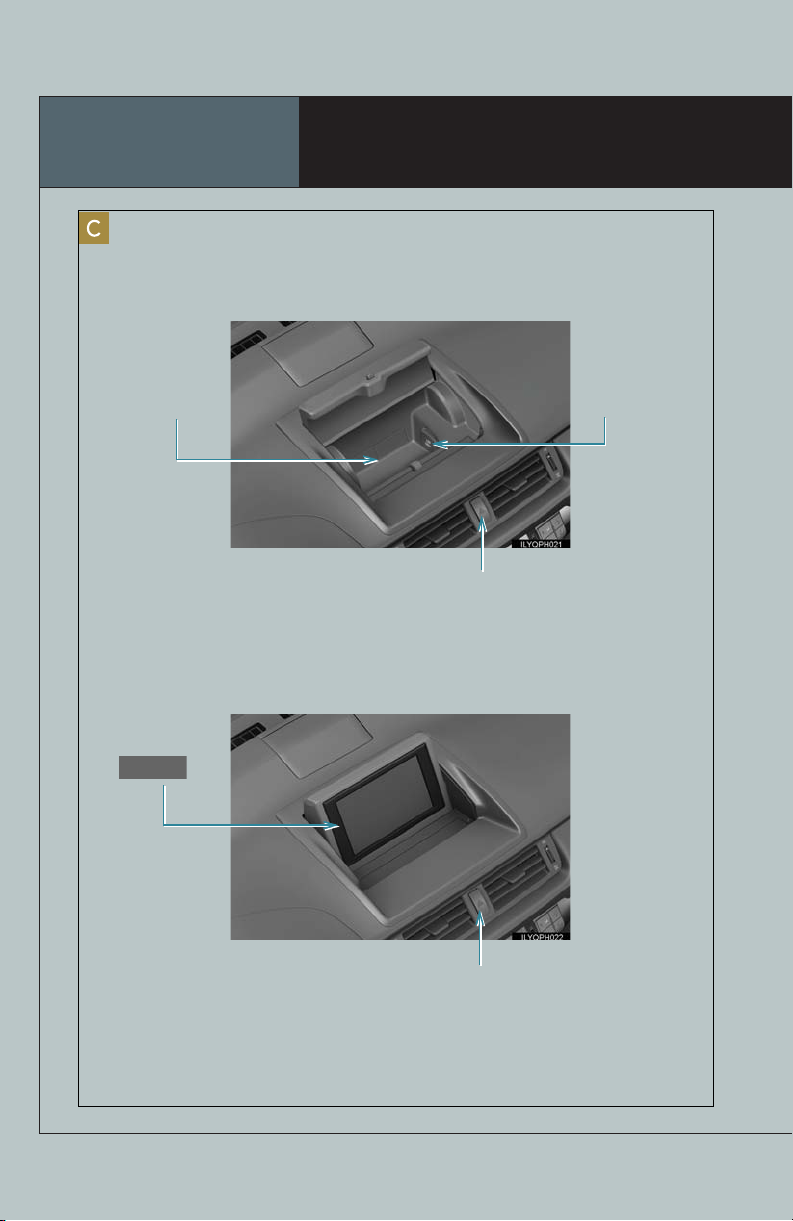
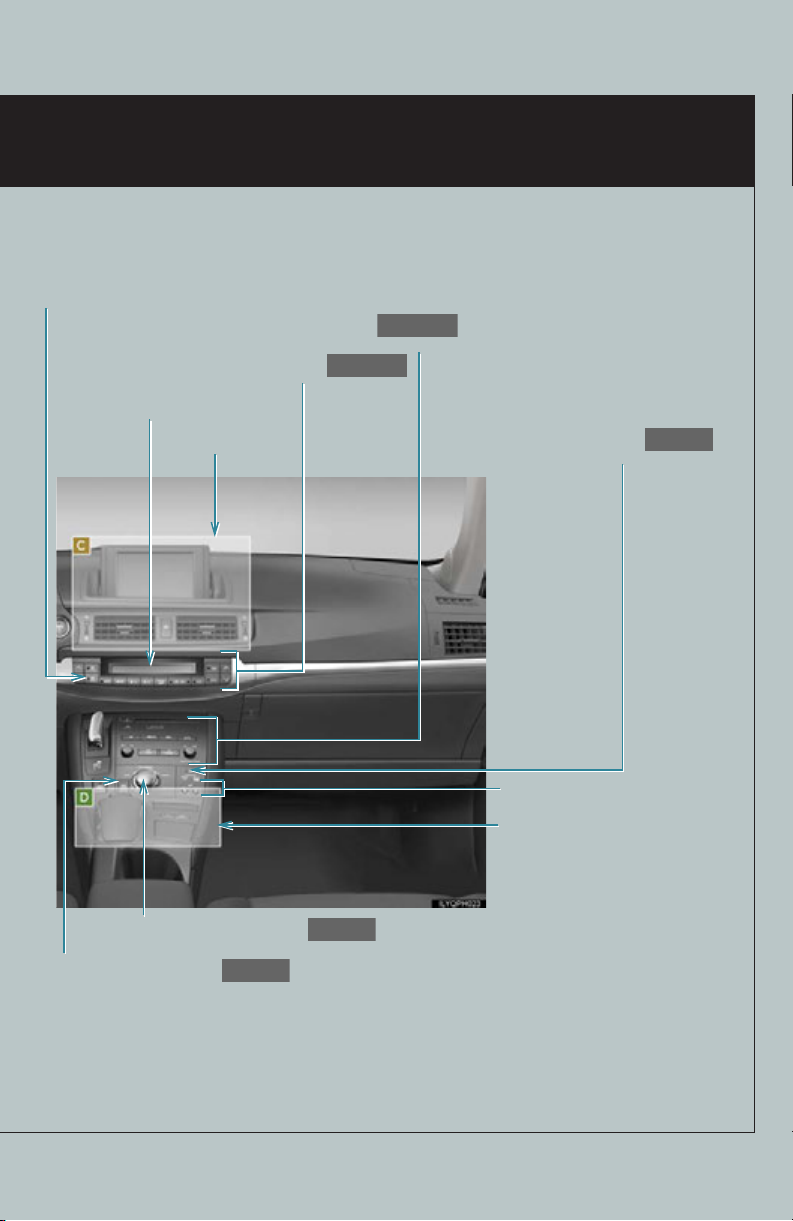
Overview
P.43
Without navigation system
Instrument Panel
Auxiliary box*
1
With navigation system
Navigation
system
Power outlet*
Emergency flasher switch*
Emergency flasher switch*
1
1
1
7
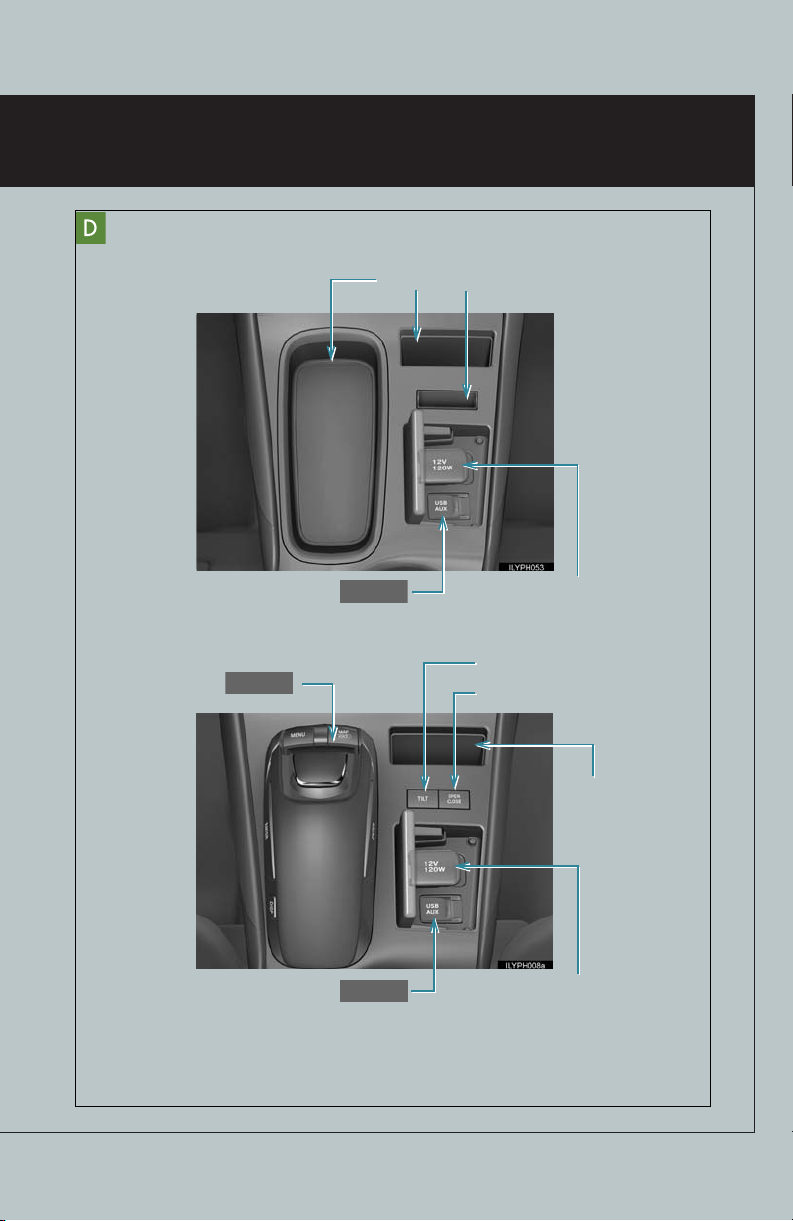
Without navigation system
P.80
P.40
P.80
Auxiliary boxes*
1
AUX port/USB port
With navigation system
Remote touch
AUX port/USB port
Power outlet*
TILT switch*
1
4
OPEN CLOSE switch*
Auxiliary box*
Power outlet*
: If equipped
1
: Refer to “Owner’s Manual”.
*
4
: Refer to the “Navigation System Owner’s Manual”.
*
4
1
1
8
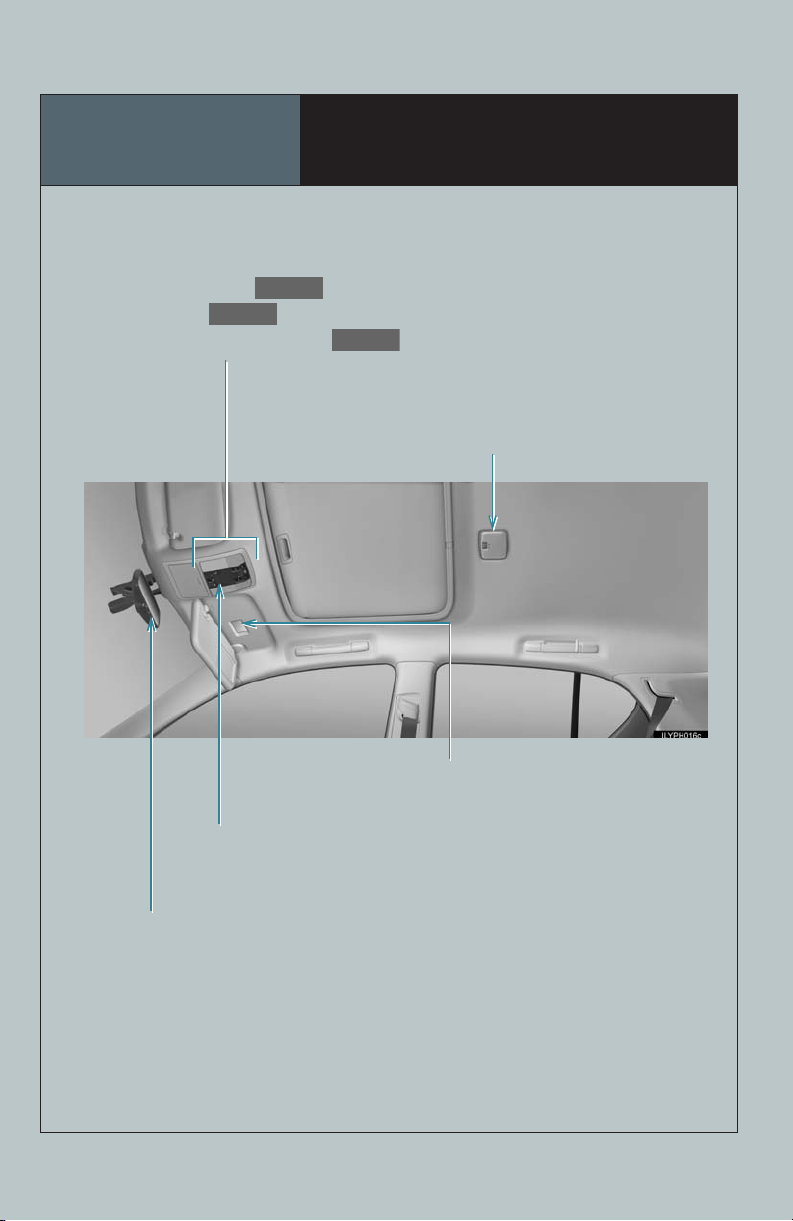
Overview
P.89
P.83
P.81
Moon roof switches
“SOS” button
Garage door opener switches
Roof
Interior lights*
Personal lights*
Compass*1
Interior light*
Vanity lights*
1
1
1
1
9
: If equipped
1
: Refer to “Owner’s Manual”.
*
Hybrid System
Your vehicle is a hybrid vehicle. It has characteristics different from conventional vehicles.
Be sure you are closely familiar with the characteristics of your vehicle, and operate with
care.
The hybrid system combines the use of a gasoline engine and an electric motor (traction
motor) according to driving conditions, improving fuel efficiency and reducing exhaust
emissions.
For details, refer to the “Owner’s Manual”.
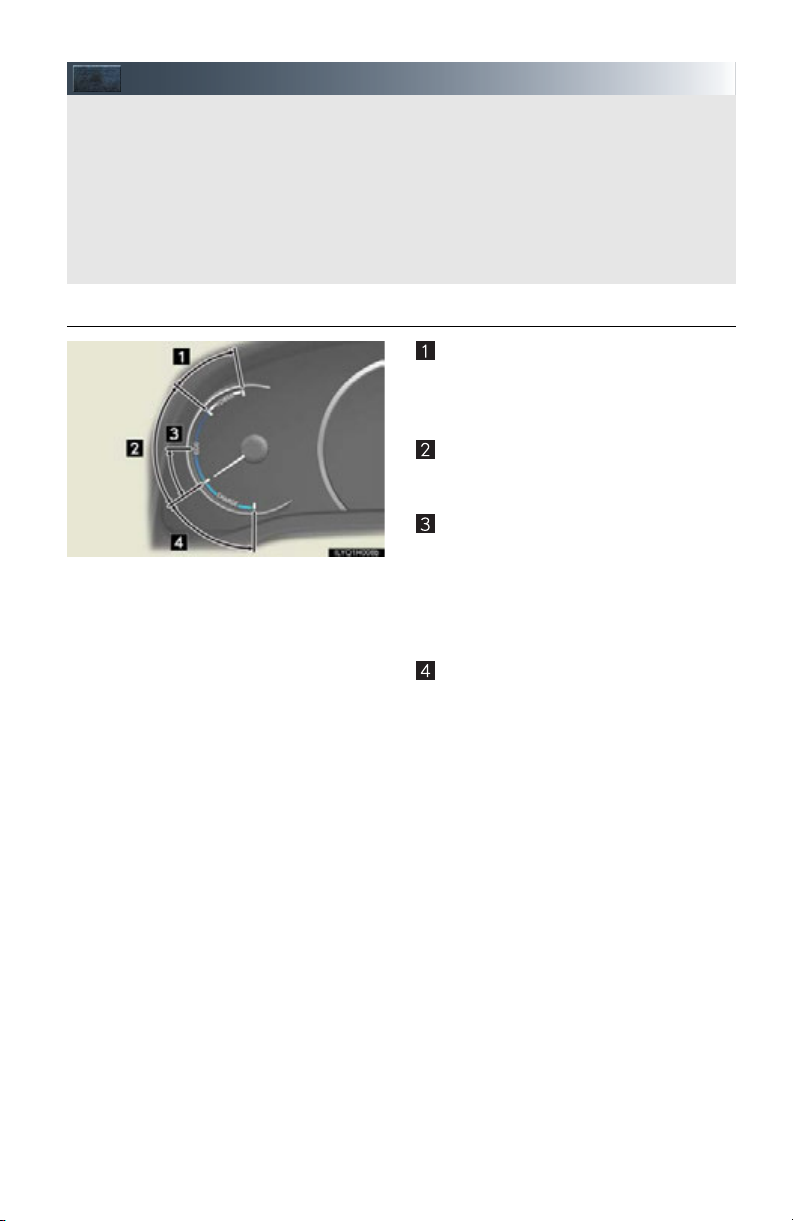
■ Hybrid System Indicator
Power area
Shows that an Eco-friendly driving range
is being exceeded (during full power
driving etc.)
Eco area
Shows that the vehicle is being driven in
an Eco-friendly manner.
Hybrid Eco area
Shows that gasoline engine power is not
being used very often.
The gasoline engine will automatically
stop and restart under various conditions.
Charge area
Shows that energy is being recovered
via the regenerative brake.
● Hybrid System Indicator is displayed when the driving mode is other than the sport
mode.
● By keeping the indicator needle within Eco area, more Eco-friendly driving can be
achieved.
● Charge area indicates regeneration
the battery.
*: When used in this manual, “regeneration” refers to the conversion of energy created by
the movement of the vehicle into electrical energy.
* status. Regenerated energy will be used to charge
10

■ Charging the hybrid battery (traction battery)
When shift position N is selected, the hybrid battery (traction battery) will not be charged.
Thus, select P when the vehicle is stopped.
In addition, when driving in heavy traffic, use D or B.
■ Regenerative braking
The motor generator converts kinetic energy to electric energy when:
● The accelerator pedal is released while driving with the shift position in D or B.
● The brake pedal is depressed while driving with the shift position in D or B.
■ Sounds and vibrations specific to a hybrid vehicle
There may be no engine sounds or vibration even though the vehicle is able to move. For
safety, apply the parking brake and make sure to shift the shift position to P when parked.
The following sounds or vibrations may occur when the hybrid system is operating and are
not a malfunction:
● Motor sounds may be heard from the engine compartment.
● Sounds may be heard from the hybrid battery (traction battery) behind the rear seats
when the hybrid system starts or stops.
● Sounds may be heard from the transmission when the gasoline engine starts or stops,
when driving at low speeds, or during idling.
● Engine sounds may be heard when accelerating sharply.
● Sounds may be heard due to regenerative braking when the brake pedal is depressed
and accelerator is loosened.
● Other sounds, such as motors and mechanical noises, may be heard from the brake system when the brake pedal is depressed.
● Vibration may be felt when the gasoline engine starts or stops.
● Cooling fan sounds may be heard from the air intake vent on the side of rear right seat-
back.
■ Running out of fuel
When the vehicle has run out of fuel and the hybrid system cannot be started, refuel the
vehicle with at least enough gasoline to make the low fuel level warning light go off. If there is
only a small amount of fuel, the hybrid system may not be able to start.
(The minimum amount of fuel to add to make the low fuel level warning light go out is about
3.1 gal. [11.8 L, 2.6 Imp.gal.], when the vehicle is on a level surface. This value may vary when
the vehicle is on a slope.)
11
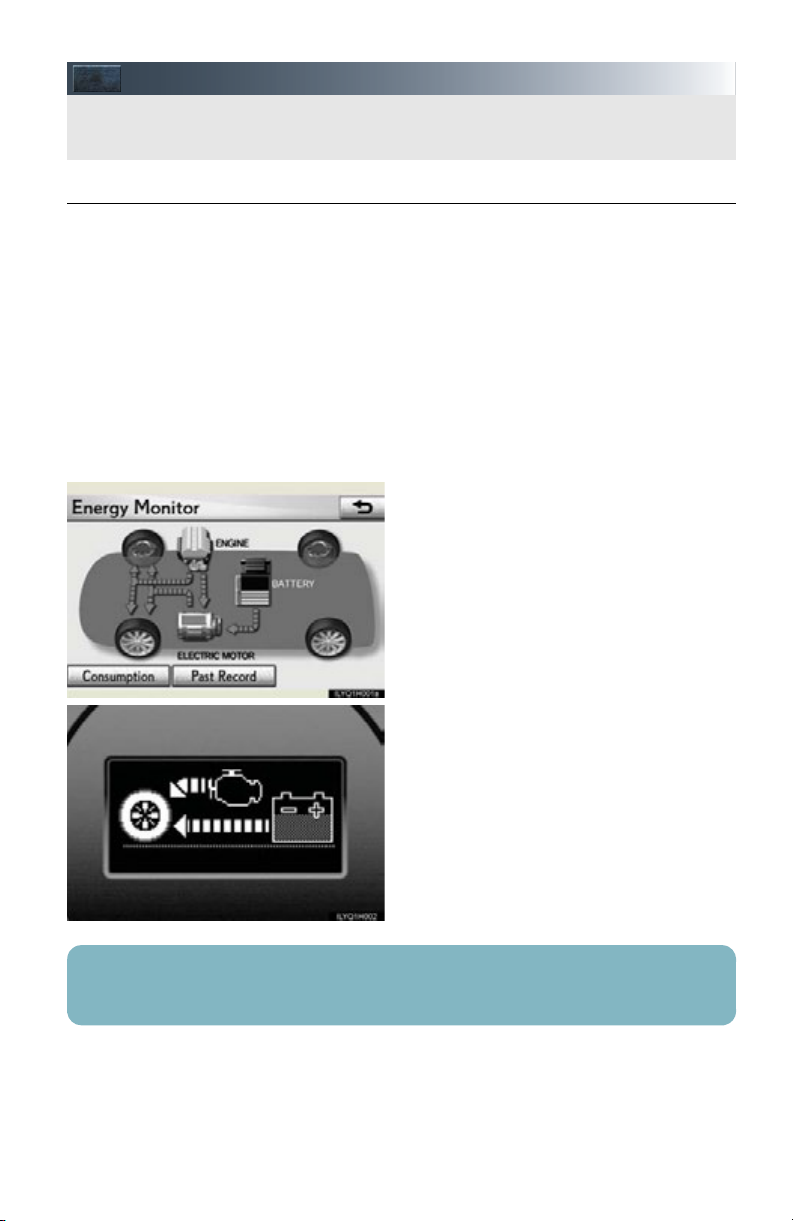
Energy Monitor/Consumption Screen
You can view the status of your hybrid system on the multi-information display and the
navigation system screen.
■ Energy monitor
The energy monitor can be displayed on both the navigation system screen and the multiinformation display.
● How to display on the navigation system screen (if equipped):
Press the “MENU” button on the Remote Touch, and select “Info. Phone” after that select
“Fuel consumption”.
If the “Consumption” or “Past Record” screen is displayed, select “Energy” and press the
“ENTER” button on the Remote Touch.
Please refer to P.40 for the Remote Touch operation.
● How to display on the multi-information display:
Press the “DISP” button on the steering wheel several times to select the energy monitor
display.
● The flow of energy is displayed on the
navigation system screen.
Amber: gasoline energy
Yellow: electrical energy
Green: energy recovery
A green arrow appears when regenerative braking occurs.
● The flow of energy is indicated by the
movement of the arrows on the multiinformation display.
The displayed energy flow, battery level, etc. will change in response to the current driving
conditions.
12
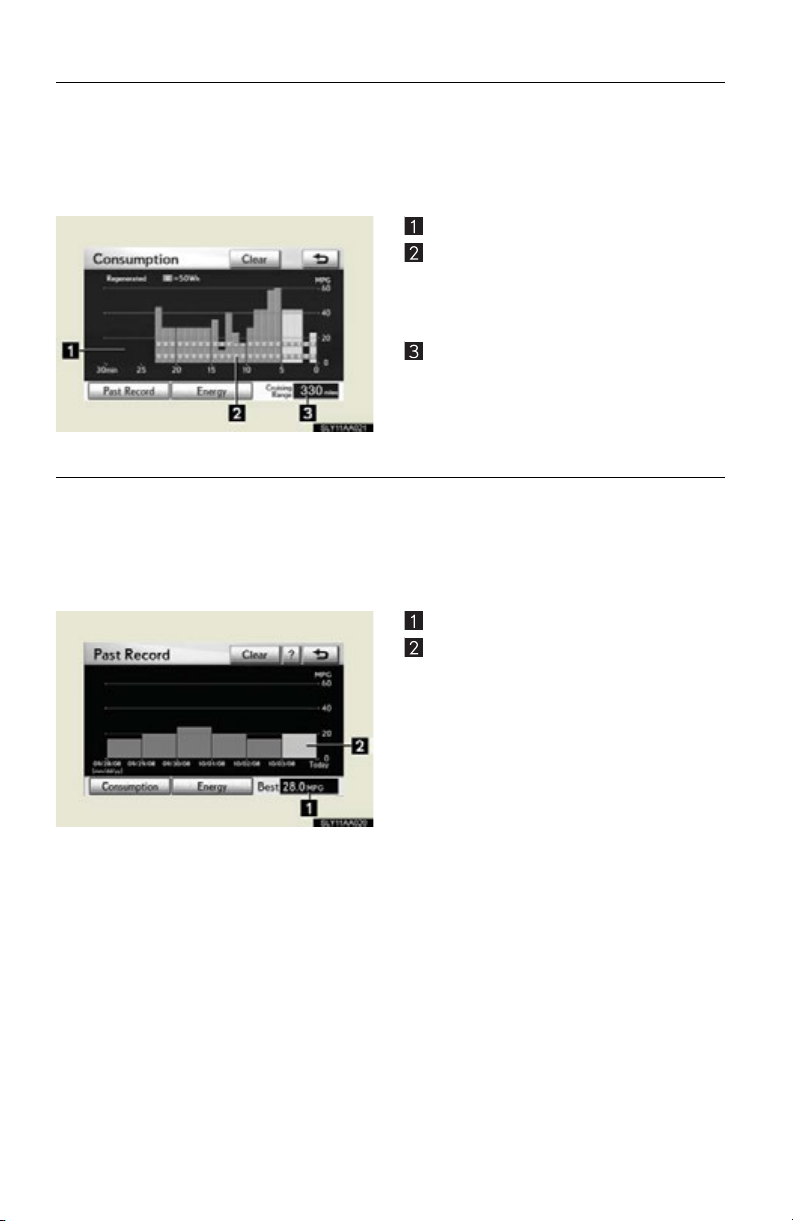
■ Consumption (vehicles with a navigation system)
Press the “MENU” button on the Remote Touch and select “Info. Phone”, after that select
“Fuel consumption” and press the “ENTER” button on the Remote Touch.
If the “Consumption” screen does not appear, select “Consumption” and press the “ENTER”
button on the Remote Touch.
Please refer to P.40 for the Remote Touch operation.
Fuel consumption in the past 30 minutes
Regenerated energy in the past 30 min-
utes
One symbol indicates 50 Wh. Up to 4
symbols are shown.
Cruising range
■ Past record (vehicles with a navigation system)
Press the “MENU” button on the Remote Touch and select “Info. Phone”, after that select
“Fuel consumption” and press the “ENTER” button on the Remote Touch.
If the “Past Record” screen does not appear, select “Past Record” and press the “ENTER”
button on the Remote Touch.
Please refer to P.40 for the Remote Touch operation.
Best past fuel consumption
Average fuel consumption
Displays the average fuel consumption
between each reset of the total average
fuel consumption on the multi-information display.
When resetting, if the total average fuel
consumption is better than the best past
fuel consumption, the best past fuel consumption will be updated.
13

■ Hybrid warning message
A message is automatically displayed when a malfunction occurs in the hybrid system or an
improper operation is attempted.
If a warning message is shown on the multiinformation display, read the message and
follow the instructions.
14
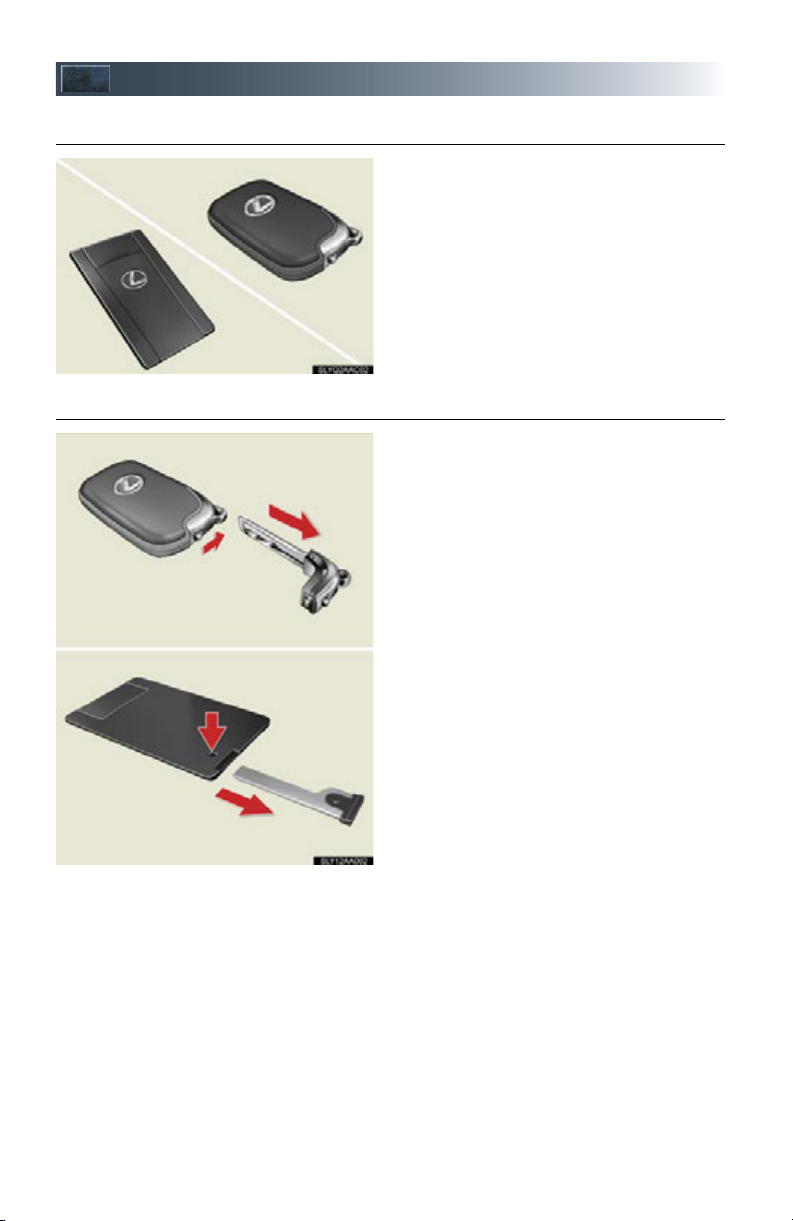
Keys
Card key*
■ Electronic key
■ Mechanical key
Smart access system with push-button start
(P.1 6 )
Wireless remote control (P. 1 6 )
*: If equipped
.
Carry the mechanical key together with the
electronic key. If the electronic key battery
is depleted or the entry function does not
operate properly, you will need the
mechanical key.
To take out the mechanical key:
Electronic keys: Slide the release lever
and take the key out.
Card key: Press the lock release button
and take the key out.
15
■ Wireless remote control
The following operations can be performed simply by carrying the electronic key
(including the card key) on your person, for example in your pocket.
For details on starting the hybrid system, see page 19.
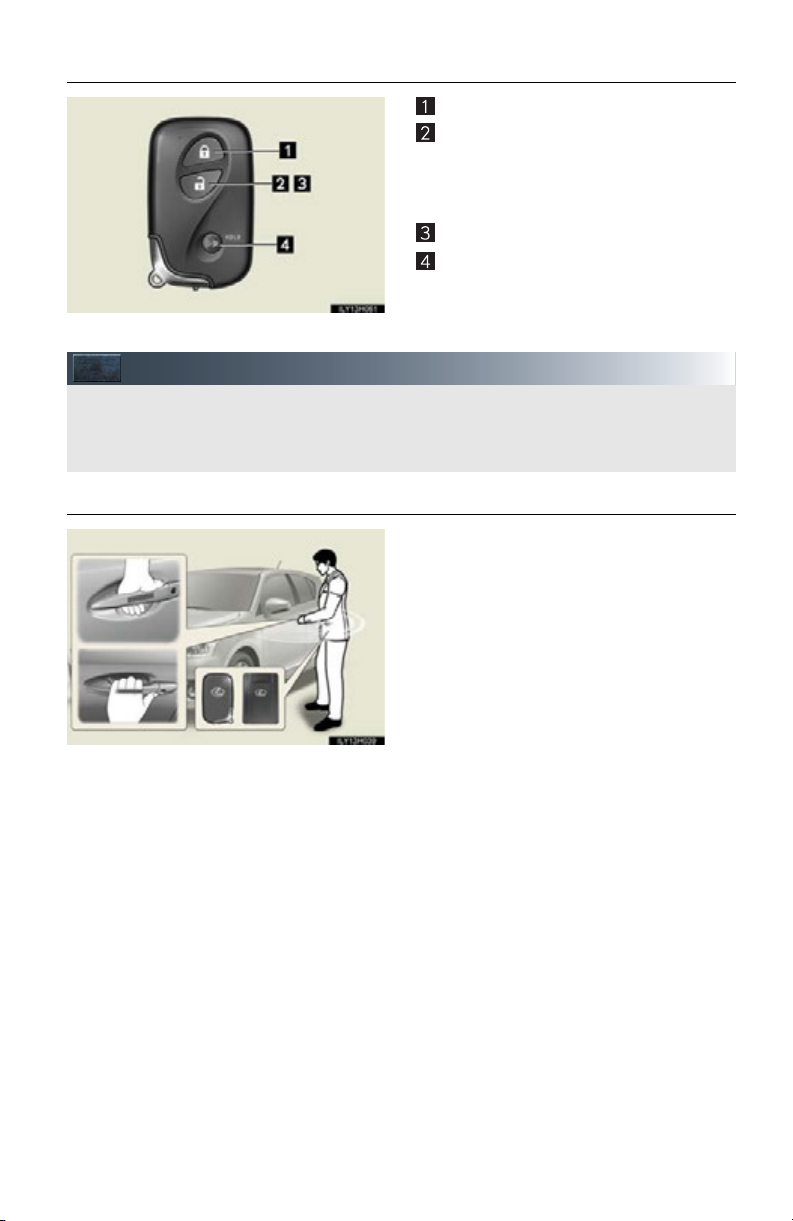
Smart Access System with Push-button Start
■ Entering the vehicle
Locks all the doors
Unlocks all the doors
Pressing the button unlocks the driver’s
door. Pressing the button again within 3
seconds unlocks the other doors.
Opens the windows (press and hold)
Sounds the alarm (press and hold)
*
*: This setting must be customized at
your Lexus dealer.
Grip the driver’s door handle to unlock the
door. Grip the passenger’s door handle to
unlock all the doors.
Make sure to touch the sensor on the
back of the handle.
The doors cannot be unlocked for 3 seconds after the doors are locked.
16
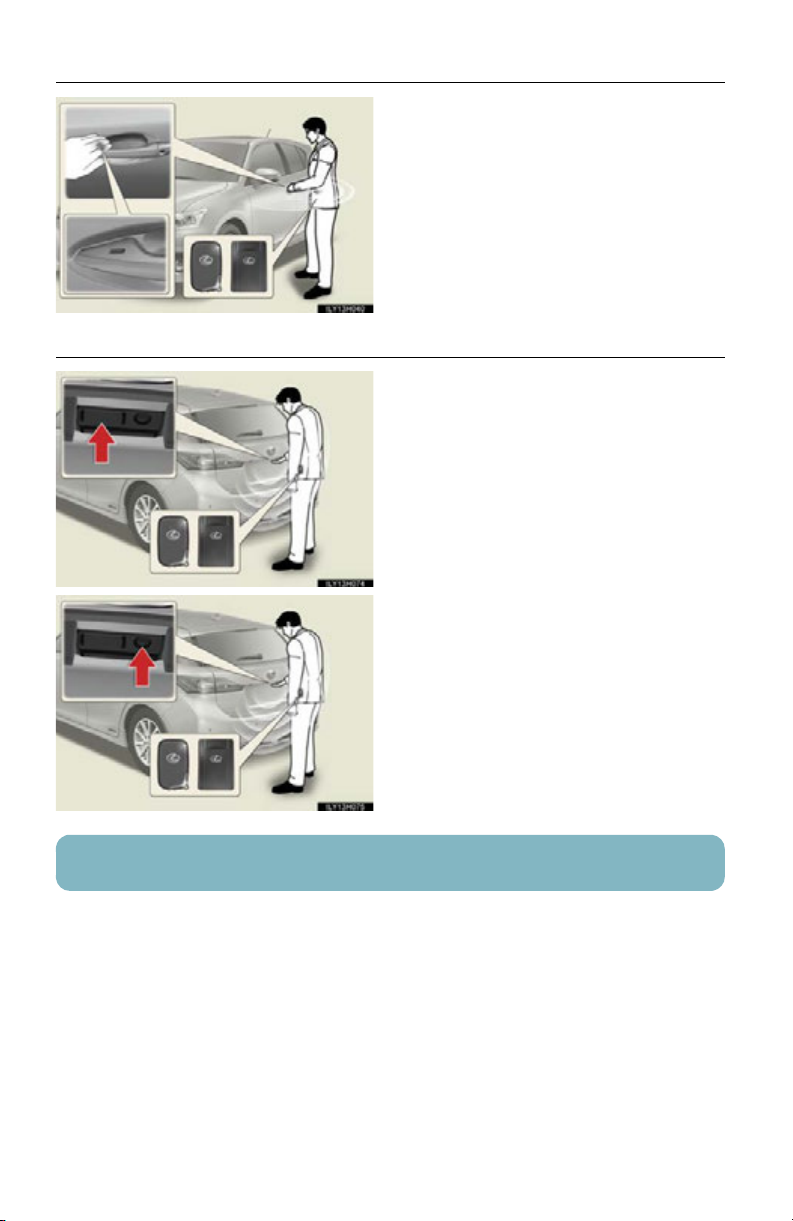
■ Exiting the vehicle
■ Unlocking and locking the back door
Touch the lock sensor (the indentation on
the upper part of the door handle) to lock
the doors.
Press the unlock button to unlock all the
doors.
The doors cannot be unlocked for 3 seconds after the doors are locked.
Press the lock button to lock all the doors.
For details on what to do when the electronic key does not operate properly, see page 93.
17
Theft Deterrent System
■ Immobilizer system
The indicator light flashes after the
“POWER” switch has been turned off to
indicate that the system is operating.
The indicator light stops flashing after
the “POWER” switch has been turned to
ACCESSORY or ON mode to indicate
that the system has been canceled.
■ Alarm
The system sounds the alarm and flashes the lights when forced entry is detected.
To set the alarm: Close the doors and hood, and lock all the doors. The system will be set
automatically after 30 seconds.
The indicator light changes from being on to flashing when the system is set.
To deactivate or stop the alarm:
● Unlock the doors
● Turn the “POWER” switch to ACCESSORY or ON mode, or start the hybrid system.
(The alarm will be deactivated or stopped after a few seconds.)
18
Power (Ignition) Switch
Performing the following operations when carrying the electronic key on your person
starts the hybrid system or changes “POWER” switch modes.
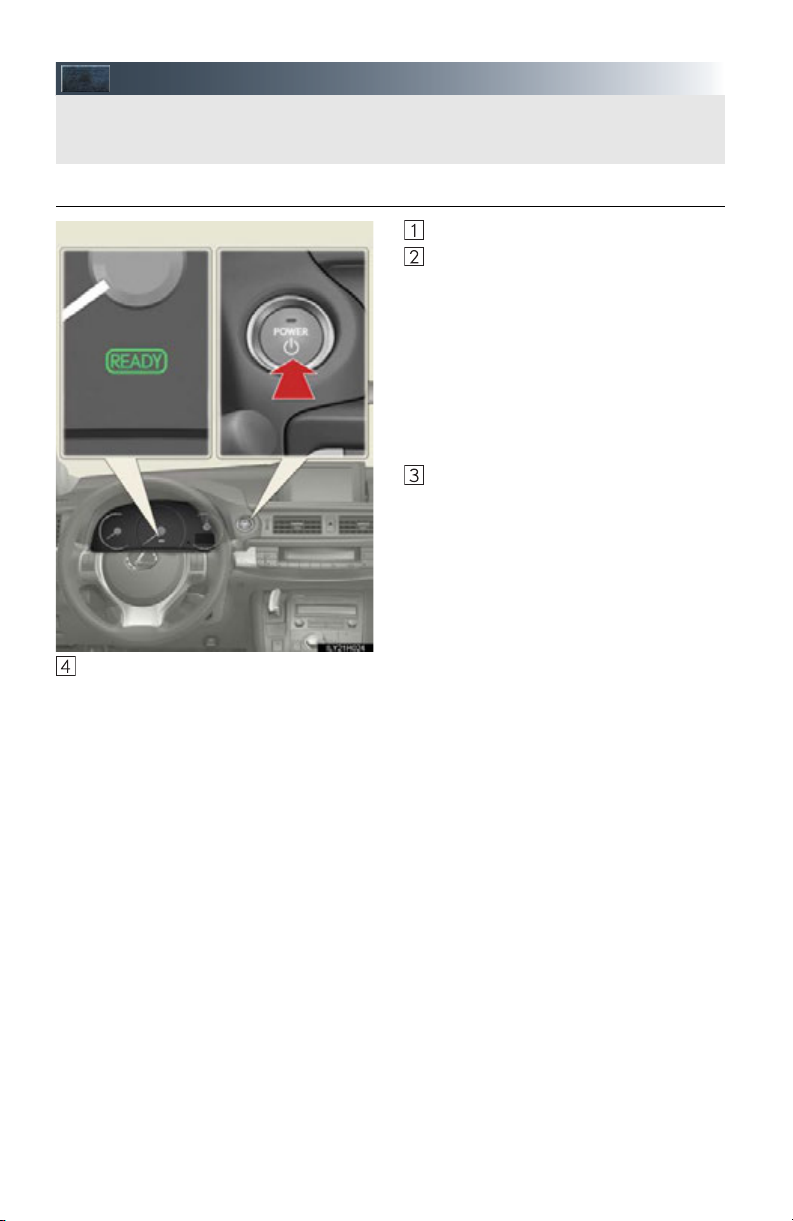
■ Starting the hybrid system
Check that the parking brake is set.
Firmly depress the brake pedal.
Check that the “POWER” switch
indicator turns green. If the indicator
does not turn green, the hybrid system cannot be started.
When the shift position is N, the
hybrid system cannot start. Shift the
shift position to P, when starting the
hybrid system. (P.22)
Press the “POWER” switch.
Continue depressing the brake pedal
until the hybrid system is completely
started.
The hybrid system can be started
from any “POWER” switch mode.
Check that the “READY” indicator is on.
If the “READY” indicator changes from a flashing light to a solid light and the buzzer
sounds, the hybrid system is starting normally.
The vehicle will not move when the “READY” indicator is off.
The vehicle can move when the “READY” indicator is on even if the engine is stopped.
(The gasoline engine starts or stops automatically in accordance with the state of the
vehicle.)
19

■ Stopping the hybrid system
Stop the vehicle completely.
Set the parking brake.
Shift the shift position to P.
Check that the shift position indicator shows P.
Press the “POWER” switch.
The hybrid system will stop, and the meter display will be extinguished (the shift position
indicator will be extinguished a few seconds after the meter display).
Slowly release the brake pedal and check that the indicator on the “POWER” switch is
off.
■ Changing “POWER” switch modes
Modes can be changed by pressing the “POWER” switch with the brake pedal released.
(The mode changes each time the switch is pressed.)
Off
The emergency flashers can be used.
ACCESSORY mode
Some electrical components such as the
audio system can be used.
The “POWER” switch indicator turns
amber.
ON mode
All electrical components can be used.
The “POWER” switch indicator turns
amber.
20
Hybrid Transmission
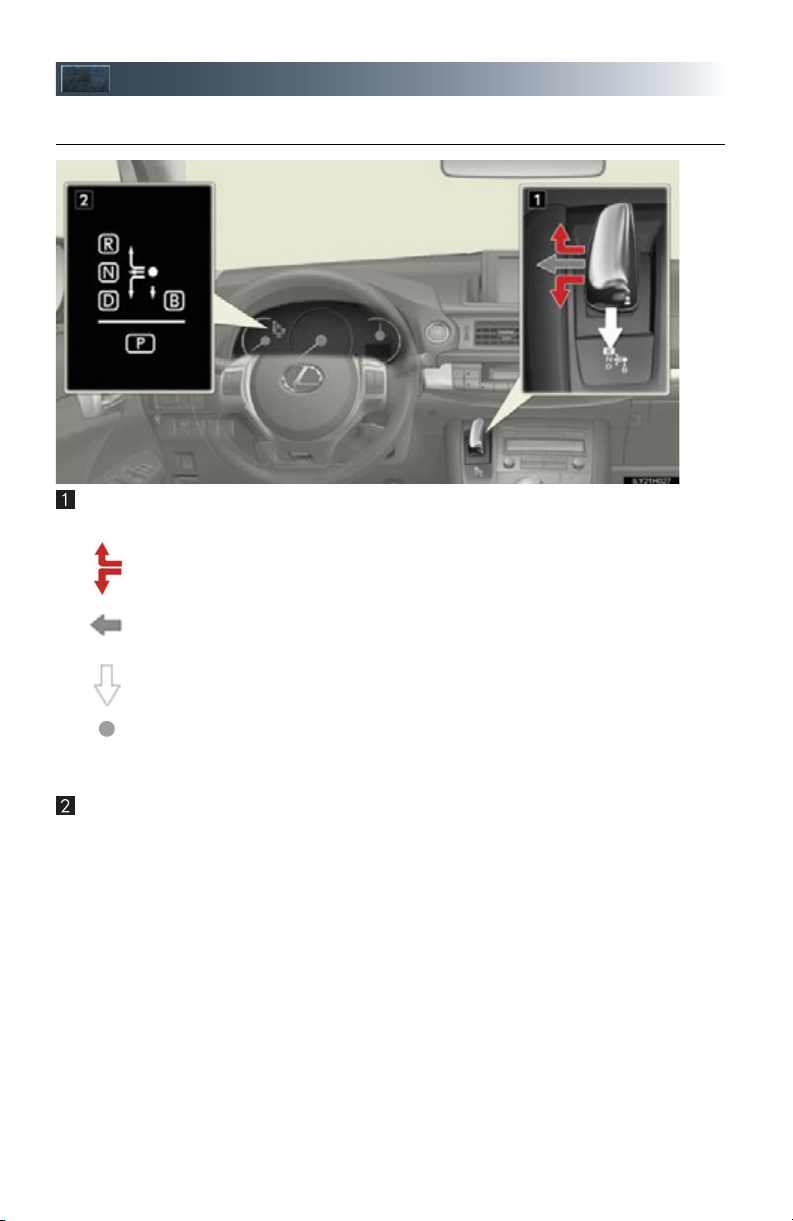
■ Shifting the shift lever
Shift lever
Operate the shift lever gently and ensure correct shifting operation.
When shifting to the D or R positions, move the shift lever along the shift gate.
To shift to the N position, slide the shift lever to the left and hold it. The shift position will change to N.
Shifting to B is only possible when shift position D is selected.
The shift lever will always return to this original position after a shifting operation.
When shifting from P to N, D or R, from D to R, or from R to D, ensure that the brake
pedal is being depressed and the vehicle is stationary.
Shift position indicator
The current shift position is illuminated.
When any shift position other than D or B is selected, the arrow toward B disappears
from the shift position indicator.
When selecting the shift position, make sure that the shift position has been changed to the
desired position by checking the shift position indicator provided on the instrument cluster.
21
■ Shift position purpose
Shift position Func tion
P Parking the vehicle/starting the hybrid system
R Reversing
N Neutral
D
B
Applying engine braking or strong braking when the accelerator
pedal has been released on steep downward slopes etc.
Normal driving*
*: For good fuel economy and noise reduction, the D position should usually be used.
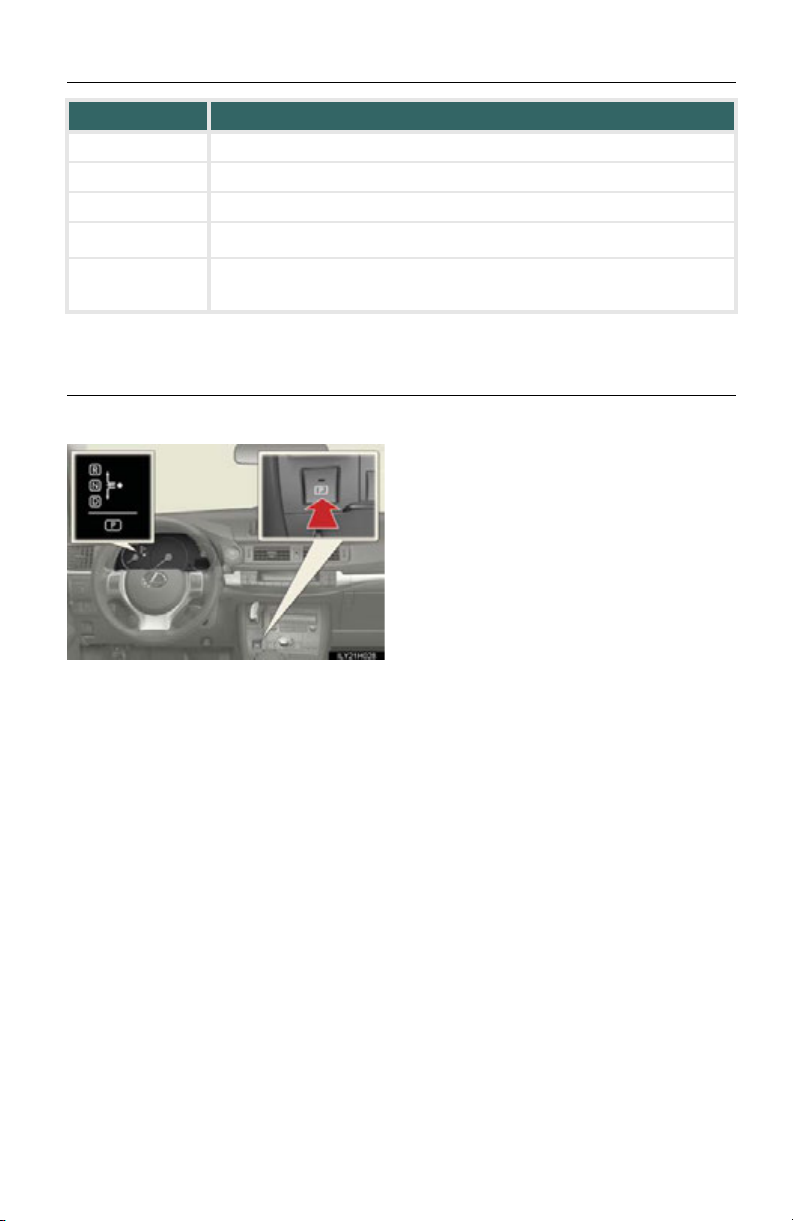
■ P position switch
When shifting the shift position to P
■
Fully stop the vehicle and set the parking
brake, and then press the P position switch.
When the shift position is changed to P,
the switch indicator comes on.
Check that the P position is illuminated
on the shift position indicator.
■ Shifting the shift position from P to other positions
● While depressing the brake pedal firmly, operate the shift lever. If the shift lever is
operated without depressing the brake pedal, the buzzer will sound and the shifting
operation will be disabled.
● When selecting the shift position, make sure that the shift position has been changed
to the desired position by checking the shift position indicator provided on the instrument cluster.
● The shift position cannot be changed from P to B directly.
22
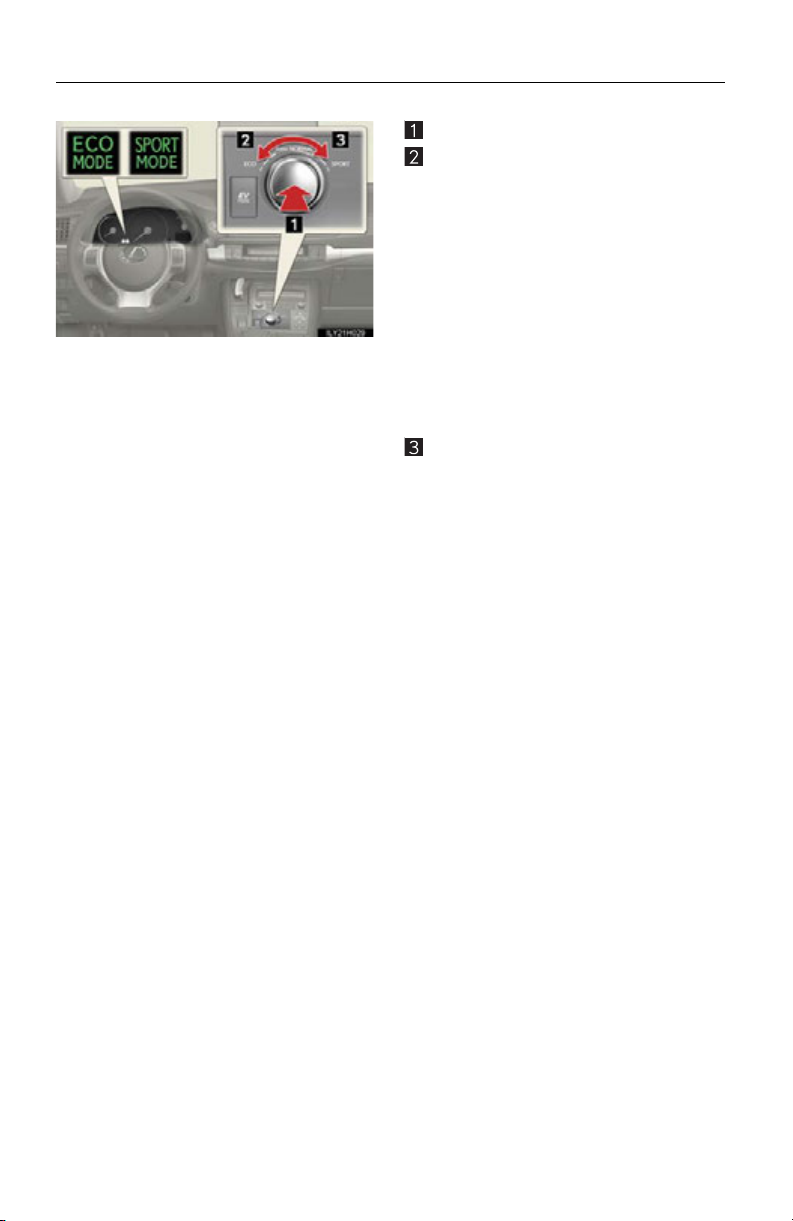
■ Selecting a driving mode
The following modes can be selected to suit driving conditions:
Normal mode
Eco drive mode
The torque generated in response to
accelerator pedal depression will lessen
compared to normal, and air conditioning operation (heating/cooling) will be
restrained, thus suiting driving with
improved fuel efficiency.
When the driving mode select switch is
turned left, the “ECO MODE” indicator
comes on in the instrument cluster.
Press the switch to change the driving
mode to normal mode.
Sport mode
Use when high levels of response and
feeling are desirable, such as when driving in mountainous regions or when
overtaking.
When the driving mode select switch is
turned right, the “SPORT MODE” indicator comes on in the instrument cluster.
Press the switch to change the driving
mode to normal mode.
23

■ EV drive mode
In EV drive mode, the electric motor (traction motor), powered by the hybrid battery (traction battery), is used to drive the vehicle.
This mode allows you to drive in residential areas late at night, or in indoor parking lots etc.
without concern for noises and exhaust gas emissions.
Turns EV drive mode on/off
When EV drive mode is turned on, the
EV drive mode indicator will come on.
Pressing the switch when in EV drive
mode will return the vehicle to normal
driving (using the gasoline engine and
electric motor [traction motor]).
■ Situations in which EV drive mode cannot be turned on
It may not be possible to turn EV drive mode on in the following situations. If it cannot be
turned on, a buzzer will sound and a message will be shown on the multi-information display.
• The temperature of the hybrid system is high.
The vehicle has been left in the sun, driven on a hill, driven at high speeds, etc.
• The temperature of the hybrid system is low.
The vehicle has been left in temperatures lower than about 68F (20C) for a long
period of time etc.
• The gasoline engine is warming up.
• The hybrid battery (traction battery) is low.
An “Energy Monitor” display of level 3 or lower may indicate a low battery level.
• Vehicle speed is high.
• The accelerator pedal is depressed firmly or the vehicle is on a hill etc.
• The windshield defogger is in use.
24
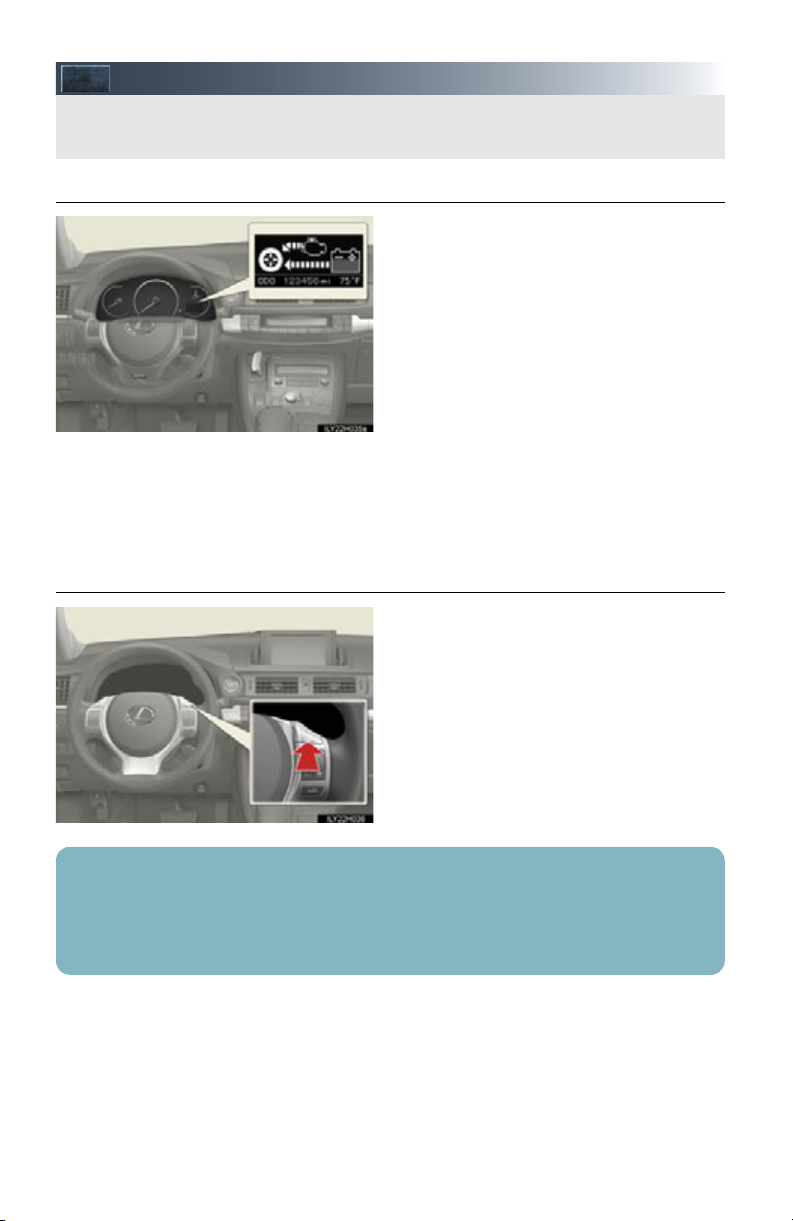
Multi-information Display
The multi-information display presents the driver with a variety of driving-related data
including the warning messages.
■ Display contents
■ Switching the display
● Energy monitor
● Trip information
• Current fuel consumption/Average
fuel consumption after refueling
• Average fuel consumption
• Cruising range
•Elapsed time
• Average vehicle speed
● Instrument cluster setting
● Intuitive parking assist display (if
equipped)
● Dynamic radar cruise control display (if
equipped)
● Warn in g m es sa ge s
Items displayed can be switched by pressing the “DISP” button.
■ When using the intuitive parking assist or dynamic radar cruise control, the appropriate
display is shown on the screen.
■ If a problem is detected in any of the vehicle’s systems, a warning message is shown on
the multi-information display.
25
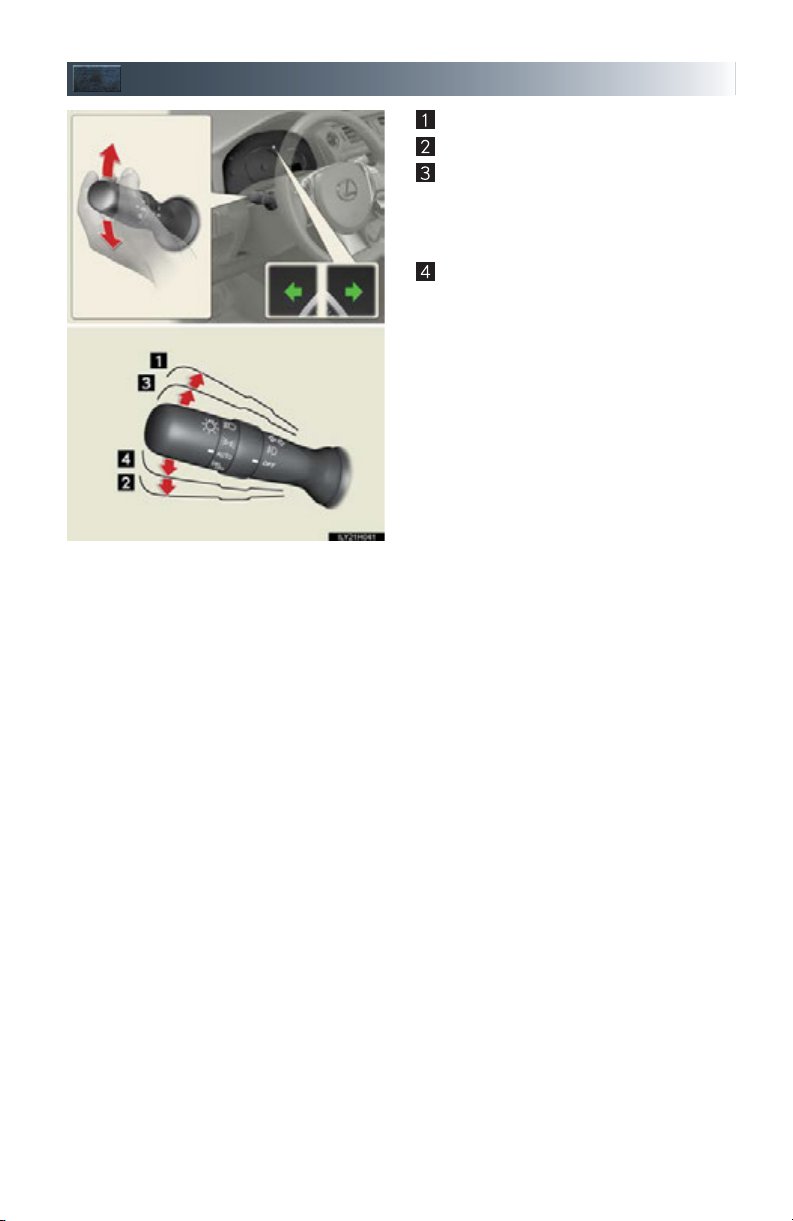
Turn S i g nal L ev e r
Right turn
Left turn
Lane change to the right (push and hold
the lever partway)
The right hand signals will flash until you
release the lever.
Lane change to the left (push and hold
the lever partway)
The left hand signals will flash until you
release the lever.
26
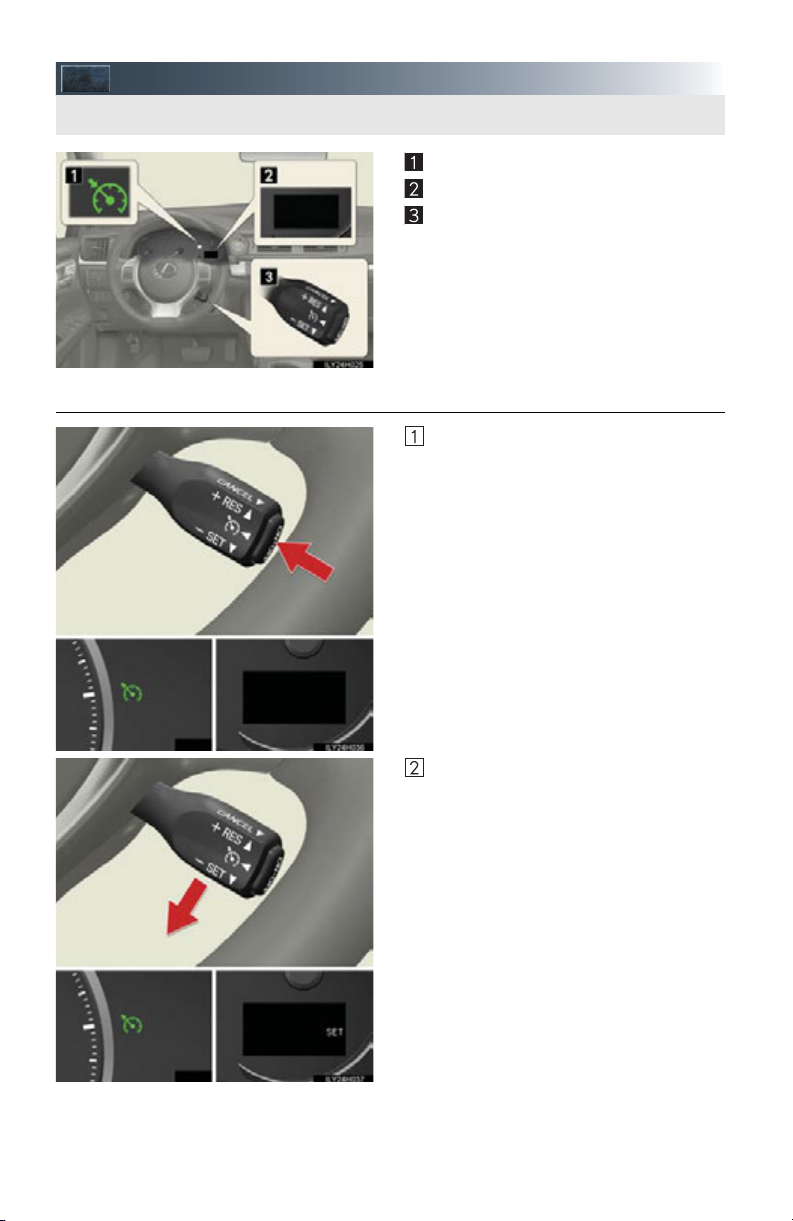
Cruise Control (if equipped)
Use the cruise control to maintain a set speed without depressing the accelerator pedal.
■ Setting the vehicle speed
Indicators
Display
Cruise control switch
Press the “ON-OFF” button to activate
the cruise control.
Cruise control indicator will come on.
Press the button again to deactivate
the cruise control.
Accelerate or decelerate the vehicle to
the desired speed, and push the lever
down to set the speed.
“SET” will be displayed.
The vehicle speed at the moment the
lever is released becomes the set
speed.
27
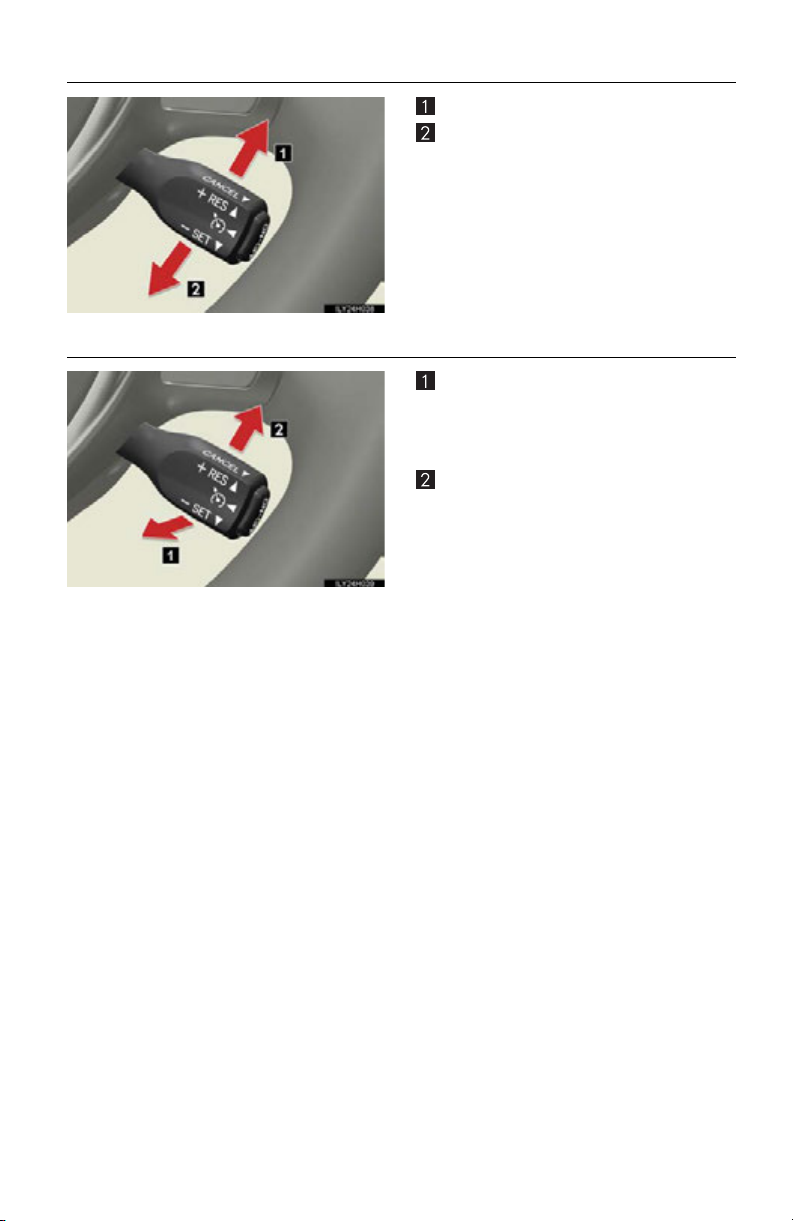
■ Adjusting the set speed
Increases the speed
Decreases the speed
Fine adjustment: Momentarily move the
lever in the desired direction.
Large adjustment: Hold the lever in the
desired direction.
■ Canceling and resuming the constant speed control
Pulling the lever toward you cancels the
constant speed control.
The speed setting is also canceled when
the brakes are applied.
Pushing the lever up resumes the constant speed control.
Resuming is available when the vehicle
speed is more than approximately 25
mph (40 km/h).
28
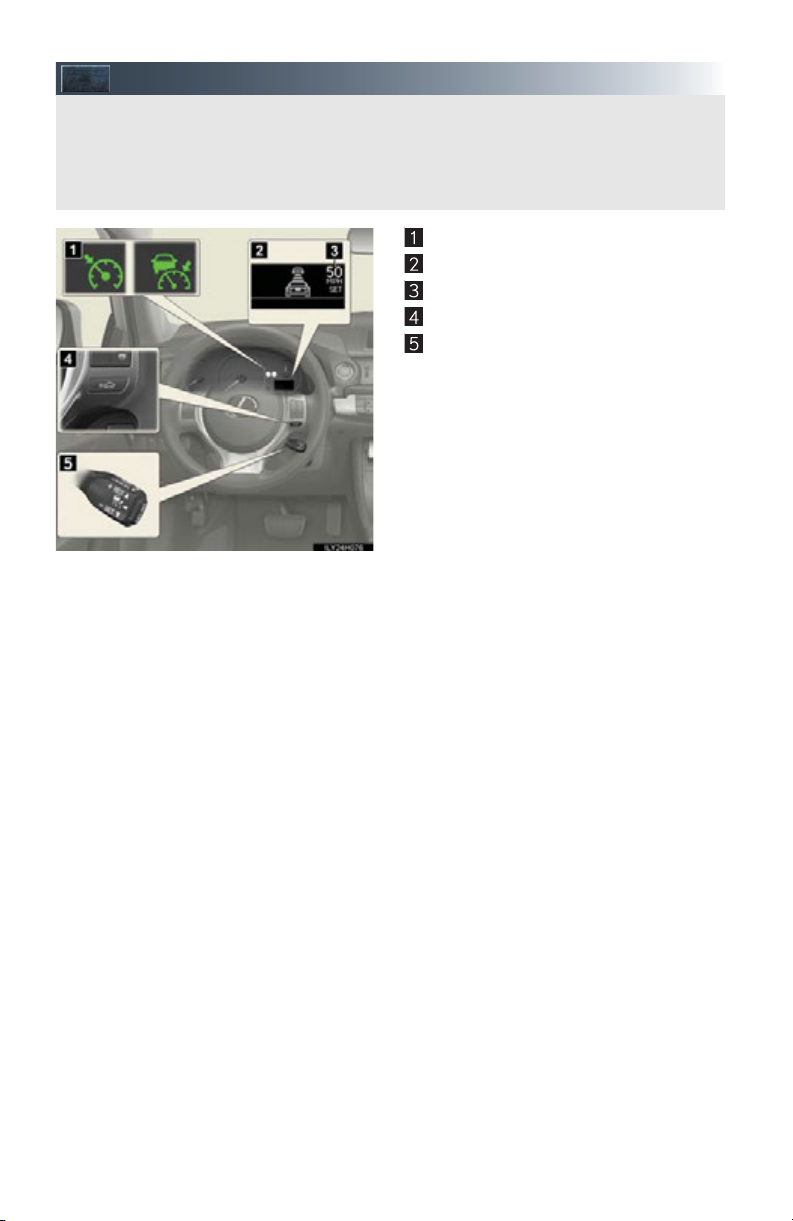
Dynamic Radar Cruise Control (if equipped)
Dynamic radar cruise control supplements conventional cruise control with a vehicle-tovehicle distance control. In vehicle-to-vehicle distance control mode, the vehicle automatically accelerates or decelerates in order to maintain a set following distance from vehicles ahead.
Indicators
Display
Set speed
Vehicle-to-vehicle distance button
Cruise control switch
29
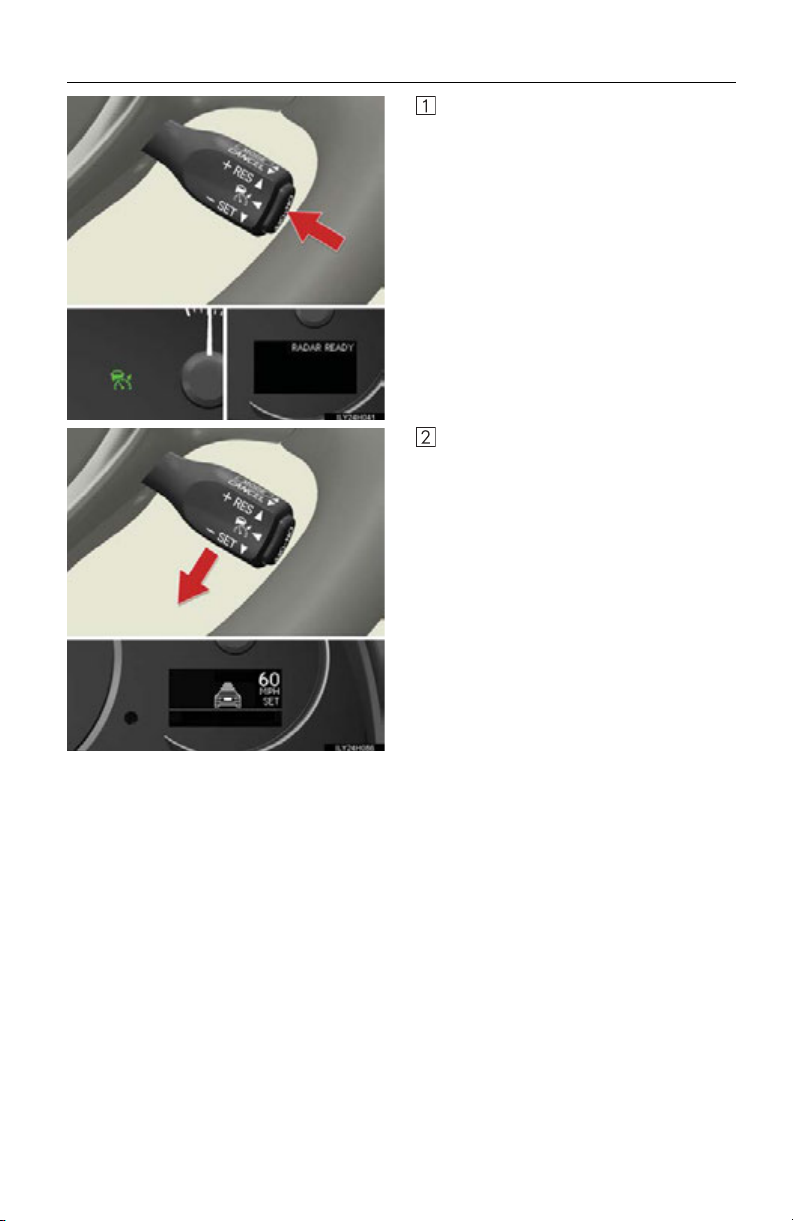
■ Setting the vehicle speed (vehicle-to-vehicle distance control mode)
Press the “ON-OFF” button to activate
the cruise control.
Rader cruise control indicator will
come on.
Press the button again to deactivate
the cruise control.
Accelerate or decelerate the vehicle to
the desired speed, and push the lever
down to set the speed.
“SET” will be displayed.
The vehicle speed at the moment the
lever is released becomes the set
speed.
30
 Loading...