

Page 1
Software Installation Guide
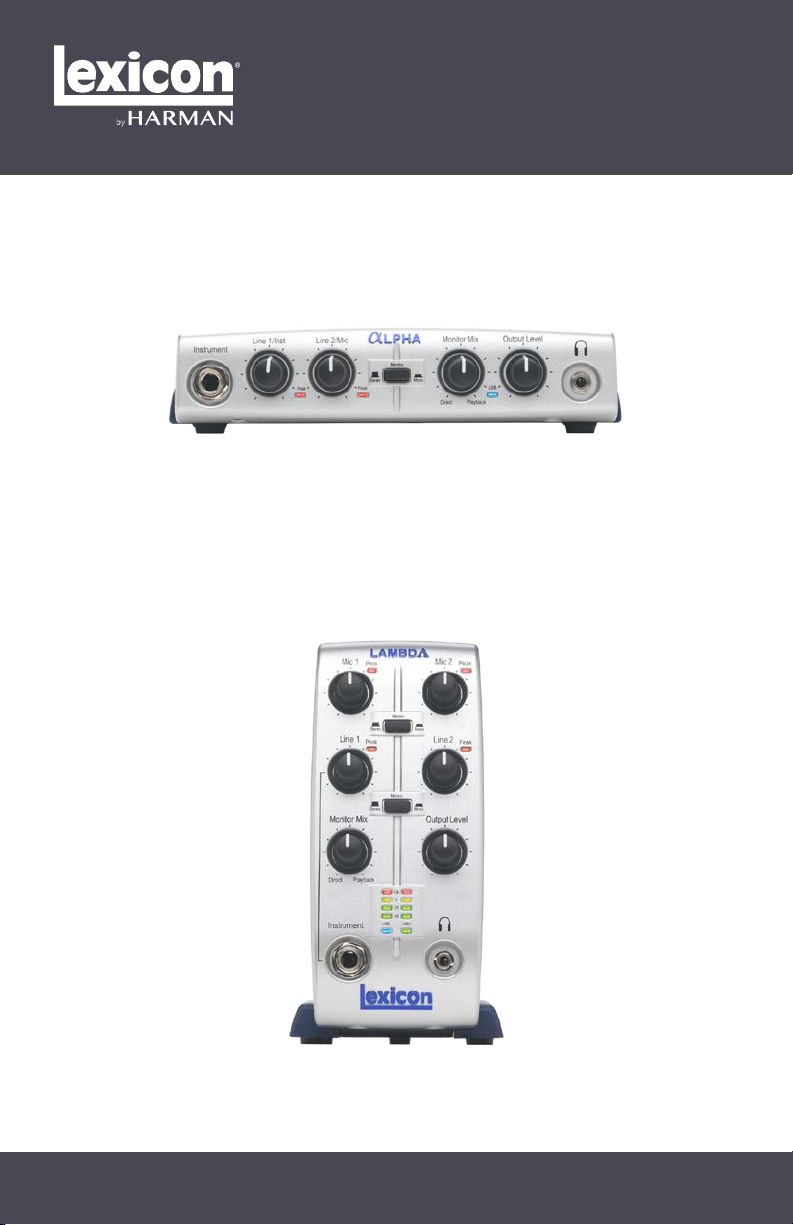
ALPHA STUDIO
LAMBDA STUDIO
TM
TM
• Windows® USB Driver • Lexicon® MPX-i Reverb Plug-in • Cubase® LE Recording Software
Page 2

Table of Contents
TABLE OF CONTENTS
MINIMUM COMPUTER REQUIREMENTS �������������������������������������������� 1
Windows® ���������������������������������������������������������������������������������������������������������������������������������������1
®
Macintosh
WINDOWS® INSTALLATION ������������������������������������������������������������� 2
A� Downloading & Installing The Lexicon USB Driver ����������������������������������������������������������������� 2
B� Downloading, Installing, & Activating Cubase
C� Downloading & Installing The Lexicon MPX-i Plug-In ����������������������������������������������������������2
D� Configuring Windows Audio Settings ���������������������������������������������������������������������������������������� 3
E� Using Cubase LE With The Alpha/Lambda ������������������������������������������������������������������������������� 4
MAC® INSTALLATION ��������������������������������������������������������������������10
A� Connecting to the Lexicon Alpha/Lambda ������������������������������������������������������������������������������ 10
B� Downloading, Installing, & Activating Cubase
C� Downloading & Installing The Lexicon MPX-i Plug-In ��������������������������������������������������������10
D� Configuring Mac Audio Settings (Optional) ��������������������������������������������������������������������������� 11
E� Using Cubase LE With The Alpha/Lambda ����������������������������������������������������������������������������� 11
������������������������������������������������������������������������������������������������������������������������������������ 1
®
LE ����������������������������������������������������������������� 2
®
LE ��������������������������������������������������������������� 10
Page 3

Minimum Computer Requirements
This guide contains the information needed to install the required USB driver, Lexicon MPX-i reverb plugin, and Steinberg
®
’s Cubase® LE recording software for use with your Lexicon Alpha or Lambda Studio™
hardware� Please follow these instructions carefully and in the documented order to ensure smooth installation
of each of the software components�
MINIMUM COMPUTER REQUIREMENTS
WINDOWS®
• Intel or AMD Dual Core
• 4 GB RAM
• 6 GB free HD space
• Windows® 7, 8�x, 10 (32 and 64-bit)
• Display resolution of 1366 x 768 pixels
• Graphics card with DirectX 10 and WDDM 1�1 support
• Internet access required for software downloads and Cubase LE license activation
MACINTOSH
• Intel Dual Core
• 4 GB RAM
• 6 GB free HD space
• OS X Version 10�8�5 or higher
• Display resolution of 1366 x 768 pixels
• Internet access required for software downloads and Cubase LE license activation
®
NOTE: The requirements listed above are for the Lexicon Alpha/Lambda hardware only� For the latest
Cubase LE computer requirements, visit https://www�steinberg�net/en/products/cubase/specs_downloads�
html� If using another recording software program, consult the software manufaturer’s website for computer
requirement details for that software�
1
Page 4

Windows® Installation
WINDOWS® INSTALLATION
A� DOWNLOADING & INSTALLING THE LEXICON USB DRIVER
The Windows USB driver must be installed to use your Lexicon audio interface with your Windows computer�
To install the Windows USB driver:
1. Connect the Alpha/Lambda to your computer’s USB port�
2. Download the Windows USB driver for your Lexicon audio interface from http://lexiconpro�com/en-US/
software�
3. Once the download is complete, close any running software programs�
4. Launch the Lexicon Driver Installer and follow the on-screen instructions� Once installation is
complete, restart the computer if prompted by Windows and wait for the computer to reboot�
5. The USB LED should now light solid blue on the Alpha/Lambda, indicating a USB connection has been
established with the computer�
B� DOWNLOADING, INSTALLING, & ACTIVATING CUBASE
1. Go to https://www�steinberg�net/en/mysteinberg/my_products�html and create or log into your
®
LE
MySteinberg account�
2. Go to the Enter Download Access Code area and enter the Cubase LE download code provided
with the Alpha/Lambda to register and download Cubase LE� You will receive an activation code after
registering that will be used to activate Cubase LE on your computer� Copy the activation code�
3. Once the download is complete, unzip the file to your hard drive then close any running software
programs�
4. Go into the downloaded folder and launch the Start Center application� Follow the on-screen
instructions to install Cubase LE� Once complete, restart the computer if prompted�
5. With the Lexicon audio interface still connected to the computer, launch Cubase LE� A prompt will appear
asking you to activate the software� Click the
Activation button then paste the activation code copied
from step 2 to activate the software�
C� DOWNLOADING & INSTALLING THE LEXICON MPX-I PLUG-IN
1. To download the Lexicon MPX-i reverb plug-in, follow the instructions provided on the license card
included with the Alpha/Lambda�
2. Once the download is complete, close any running software programs�
3. Launch the Lexicon MPX-i reverb installer and follow the on-screen instructions� When prompted, enter
the license code provided with the Alpha/Lambda�
4. Once complete, restart the computer if prompted and wait for the computer to reboot�
5. The Lexicon MPX-i reverb plug-in is now installed and available for use�
2
Page 5
Windows® Installation
D� CONFIGURING WINDOWS AUDIO SETTINGS
When the Lexicon USB audio driver was installed, Windows may have automatically configured it as your
default audio outputs� This can potentially cause a problem where audio cannot be heard when played back
from your recording software; it can also cause Window’s system alerts to play loudly out of your speakers and
headphones� To remedy these issues, configure your computer to playback sound using the internal sound card
by default�
To view/edit Window’s default audio output setting:
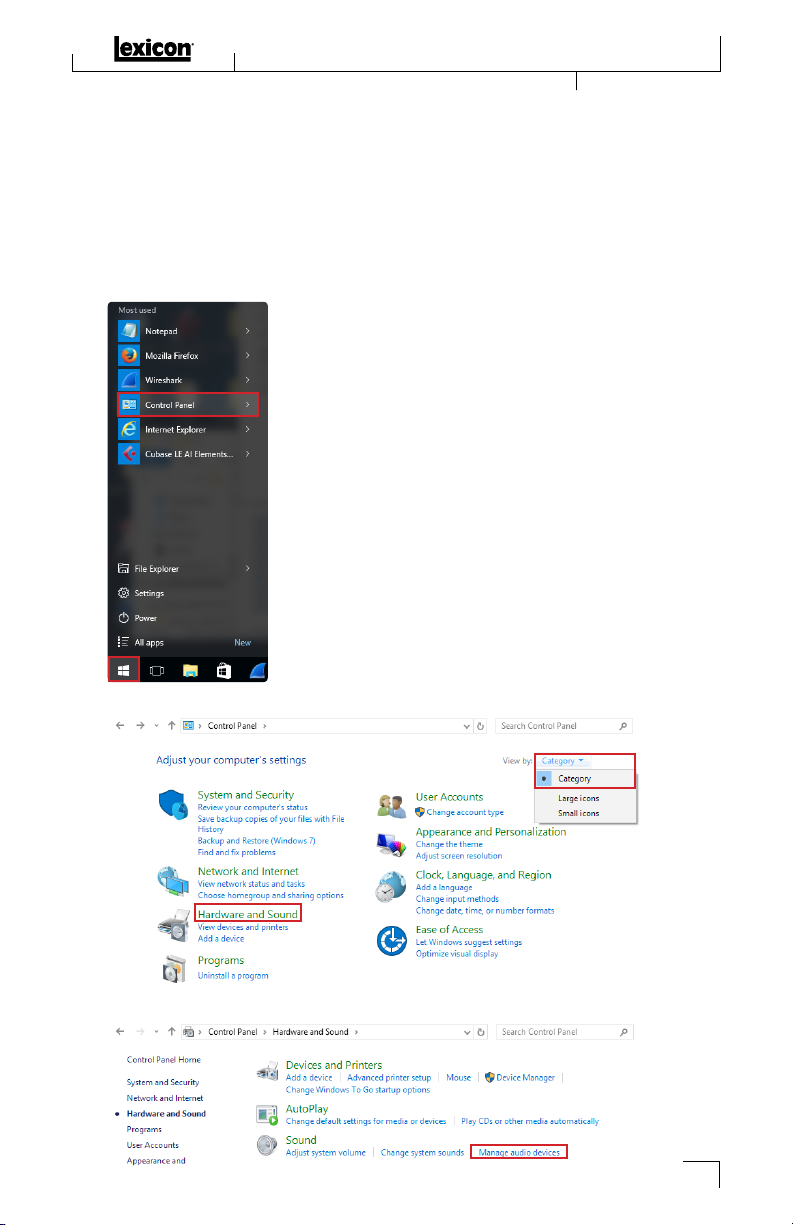
1. Go to Window’s Start Menu and select Control Panel�
2. Set the view to Category if it isn’t already then click on Hardware and Sound�
3. Click on Manage Audio Devices�
3
Page 6
Windows® Installation
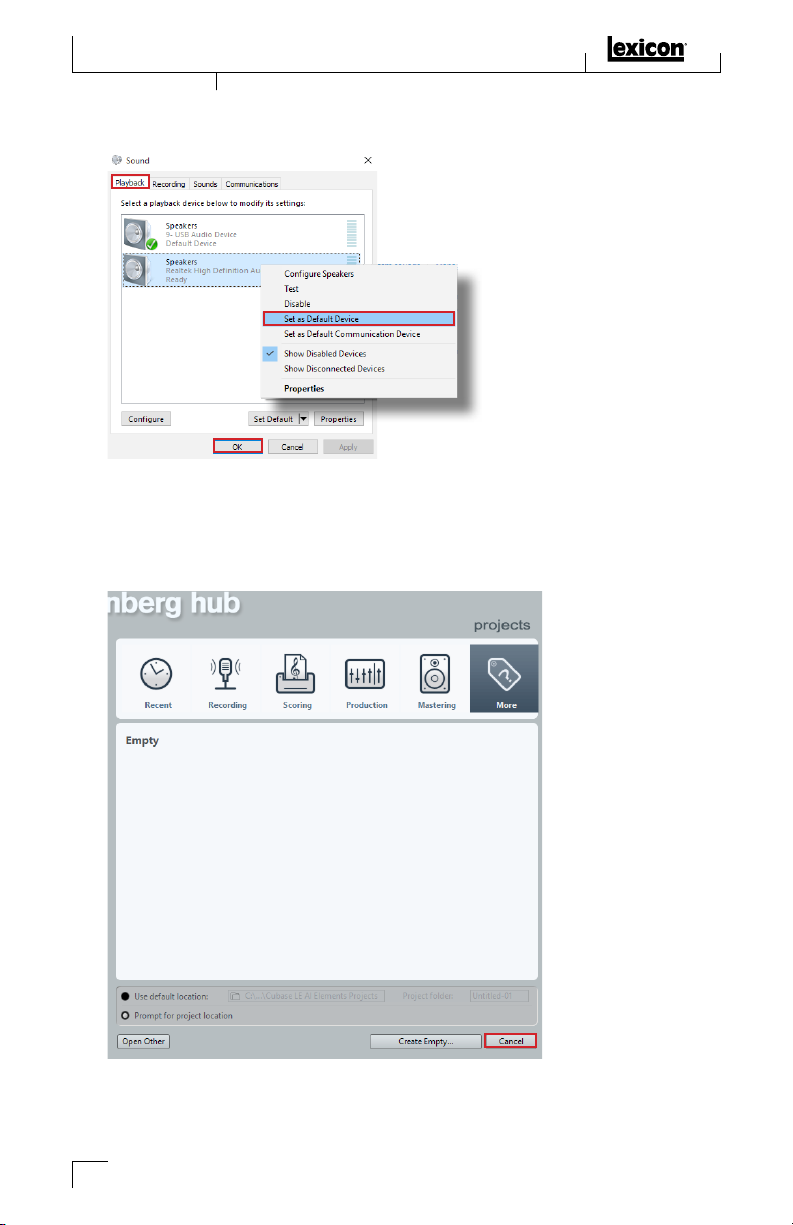
4. Under the Playback tab, right click on your computer’s sound card and select Set as Default Device�
Click
OK to close the window�
E� USING CUBASE LE WITH THE ALPHA/LAMBDA
1. Launch the Cubase LE application�
2. When the default window appears, click the Cancel button to close the window�
4
Page 7

Windows® Installation
3. Select Devices>Device Setup�
4. Under Devices, select VST Audio System then select your Lexicon audio interface from the ASIO
Driver drop down list (
the
Switch button�
Alpha ASIO or Lambda ASIO)� When the confirmation prompt appears, click
5
Page 8

Windows® Installation
5. The Lexicon audio interface’s inputs and outputs must be active in Cubase LE in order to be available for
assignment within the software� Typically, the inputs and outputs will automatically be made active for
you� The exception is when Cubase LE has been launched without the Lexicon audio interface connected
to the computer�
To confirm the inputs and outputs are active, click on the Lexicon audio driver under
verify all inputs and outputs are in the ‘Active’ state (displayed on the right-hand side of the Device Setup
window)� If they are active, go to step 13� If they are ‘Inactive’ (as shown below), proceed to the next step
to activate the inputs and outputs� Click the
OK button to close the Device Setup window�
Devices and
6. Go to Devices>VST Connections�
6
Page 9

Windows® Installation
7. With the Inputs tab selected, select the 2 x Mono option from the Presets drop down list�
8. The inputs are now active�
9. Click the Outputs tab then select the 1 x Stereo option from the Presets drop down list�
7
Page 10

Windows® Installation
10. The outputs are now active� Close the window�
11. Go back to Devices>Device Setup�
8
Page 11

Windows® Installation
12. Click on the Lexicon audio driver under Devices and verify all inputs and outputs now say ‘Active’ in the
right-hand side of the Device Setup window� Click the
13. You are now ready to begin recording using your Lexicon audio interface and Cubase LE� For information
on recording with Cubase LE and using the audio interface, please refer to the owner’s manual for your
Lexicon audio interface�
Alpha Owner’s Manual
http://lexiconpro�com/en-US/products/alpha#documentation
Lambda Owner’s Manual
http://lexiconpro�com/en-US/products/lambda#documentation
For more information on using Cubase LE, refer to the documentation available in the Cubase LE Help
menu�
OK button to close the Device Setup window�
9
Page 12

Mac® Installation
MAC® INSTALLATION
A� CONNECTING TO THE LEXICON ALPHA/LAMBDA
The Alpha and Lambda are designed to interface directly with a Mac computer via USB using OS X’s CoreAudio
driver� This means no separate driver installation is needed as long as your Mac OS software is 10�4 or higher�
Note that although the Alpha/Lambda are compatible with OS X 10�4, your recording software, including
Cubase LE, may require a higher version of OS X for proper operation�
To connect the Lexicon Alpha/Lambda to your Mac computer:
1. Connect the Alpha/Lambda to the computer’s USB port�
2. The USB LED should now light solid blue on the Alpha/Lambda, indicating a USB connection has been
established with the computer�
B� DOWNLOADING, INSTALLING, & ACTIVATING CUBASE
1. Go to https://www�steinberg�net/en/mysteinberg/my_products�html and create or log into your
®
LE
MySteinberg account�
2. Go to the Enter Download Access Code area and enter the Cubase LE download code provided
with the Alpha/Lambda to register and download Cubase LE� You will receive an activation code after
registering that will be used to activate Cubase LE on your computer� Copy the activation code�
3. Once the download is complete, close any running software programs�
4. Go into the downloaded folder and launch the Start Center application� Follow the on-screen
instructions to install Cubase LE� Once complete, restart the computer if prompted�
5. With the Lexicon audio interface still connected to the computer, launch Cubase LE� A prompt will appear
asking you to activate the software� Click the
Activation button then paste the activation code copied
from step 2 to activate the software�
C� DOWNLOADING & INSTALLING THE LEXICON MPX-I PLUG-IN
1. To download the Lexicon MPX-i reverb plug-in, follow the instructions provided on the license card
included with the Alpha/Lambda�
2. Once the download is complete, close any running software programs�
3. Launch the Lexicon MPX-i reverb installer and follow the on-screen instructions� When prompted, enter
the license code provided with the Alpha/Lambda�
4. Once complete, restart the computer if prompted and wait for the computer to reboot�
5. The Lexicon MPX-i reverb plug-in is now installed and available for use�
10
Page 13

Mac® Installation
D� CONFIGURING MAC AUDIO SETTINGS (OPTIONAL)
When using the Alpha/Lambda with Cubase LE, it’s recommended that you set the audio interface as the default
audio device under MAC OS
To edit OS X’s default audio output setting:
1. Go to the main Mac OS Applications folder and open the Utilities folder�
2. Launch the Audio MIDI Setup utility application�
3. In the Audio Devices window, right-click on Lexicon Alpha (or Lambda) In/Out and select to use the
Lexicon interface for ‘sound input’ and ‘sound output’�
E� USING CUBASE LE WITH THE ALPHA/LAMBDA
1. Launch the Cubase LE application�
2. When the default window appears, click the Cancel button to close the window�
Utility<Audio MIDI Setup�
11
Page 14

Mac® Installation
3. Select Devices>Device Setup�
4. Under Devices, select VST Audio System then select your Lexicon audio interface from the ASIO
Driver drop down list (
prompt appears, click the
Lexicon Alpha In/Out or Lexicon Lambda In/Out)� When the confirmation
Switch button�
12
Page 15

Mac® Installation
5. The Lexicon audio interface’s inputs and outputs must be active in Cubase LE in order to be available for
assignment within the software� Typically, the inputs and outputs will automatically be made active for
you� The exception is when Cubase LE has been launched without the Lexicon audio interface connected
to the computer�
To confirm the inputs and outputs are active, click on the Lexicon audio driver under
verify all inputs and outputs are in the ‘Active’ state (displayed on the right-hand side of the Device Setup
window)� If they are active, go to step 13� If they are ‘Inactive’ (as shown below), proceed to the next step
to activate the inputs and outputs� Click the
OK button to close the Device Setup window�
Devices and
6. Go to Devices>VST Connections�
13
Page 16

Mac® Installation
7. With the Inputs selected, select the 2 x Mono option from the Presets drop down list�
8. The inputs are now active�
9. Click the Outputs button then select the 1 x Stereo option from the Presets drop down list�
14
Page 17

10. The outputs are now active� Close the window�
11. Go back to Devices>Device Setup�
Mac® Installation
15
Page 18

Mac® Installation
12. Click on the Lexicon audio driver under Devices and verify all inputs and outputs now say ‘Active’ in the
right-hand side of the Device Setup window� Click the
13. You are now ready to begin recording using your Lexicon audio interface and Cubase LE� For information
on recording with Cubase LE and using the audio interface, please refer to the owner’s manual for your
Lexicon audio interface�
Alpha Owner’s Manual
http://lexiconpro�com/en-US/products/alpha#documentation
Lambda Owner’s Manual
http://lexiconpro�com/en-US/products/lambda#documentation
For more information on using Cubase LE, refer to the documentation available in the Cubase LE Help
menu�
OK button to close the Device Setup window�
16
Page 19

PHONE:
SUPPORT:
(801) 566-8800
WEB:
lexiconpro�com
lexiconpro�com/en-US/support
Alpha/Lambda Studio Software Installation Guide
PN: 5074674-A
© 2016 Harman�
All rights reserved�
Lexicon is a registered trademark of Harman�
Cubase and ASIO are trademarks of Steinberg Media Technologies GmBH�
Lexicon uses the Nullsoft Scriptable Install System (NSIS) - Copyright ©1999-2007 Nullsoft, Inc�
 Loading...