


Lenovo Tab P11
Safety, Warranty & Quick Start Guide
Lenovo TB-J606F
Lenovo TB-J606L
English/Deutsch/Français/Italiano/Português/Nederlands/ Dansk/Svenska/Norsk bokmål/Suomi/Español/Eesti/Latviešu/ Lietuvių/Íslenska
Contents |
|
English............................................................................................................ |
1 |
Deutsch....................................................................................................... |
19 |
Français...................................................................................................... |
37 |
Italiano........................................................................................................ |
56 |
Português.................................................................................................. |
74 |
Nederlands................................................................................................ |
93 |
Dansk............................................................................................................ |
111 |
Svenska....................................................................................................... |
121 |
Norsk bokmål........................................................................................... |
131 |
Suomi......................................................................................................... |
141 |
Español..................................................................................................... |
159 |
Eesti.............................................................................................................. |
177 |
Latviešu....................................................................................................... |
195 |
Lietuvių........................................................................................................ |
213 |
Íslenska...................................................................................................... |
231 |

English
https://support.lenovo.com
https://forums.lenovo.com
Read this guide carefully before using your device.
All information labeled with * in this guide only refers to the WLAN + LTE model.
Reading before using your device
Reading first - regulatory information
Device models equipped with wireless communications comply with the radio frequency and safety standards of any country or region in which it has been approved for wireless use. In addition, if your product contains a telecom modem, it complies with the requirements for connection to the telephone network in your country.
Be sure to read the Regulatory Notice for your country or region before using the wireless devices contained in your device. To obtain a PDF version of the Regulatory Notice, go to https://support.lenovo.com.
Getting support
To get support on network services and billing, contact your wireless network operator. To learn how to use your device and view its technical specifications, go to https://support.lenovo.com.
Accessing your User Guide
Your User Guide contains detailed information about your device. To download the publications for your device, go to https://support.lenovo.com and follow the instructions on the screen.
Legal notices
Lenovo and the Lenovo logo are trademarks of Lenovo in the United States, other countries, or both.
Other company, product, or service names may be trademarks or service marks of others.
Manufactured under license from Dolby Laboratories. Dolby, Dolby Atmos, and the double-D symbol are trademarks of Dolby Laboratories.
LIMITED AND RESTRICTED RIGHTS NOTICE: If data or software is delivered pursuant a General Services Administration “GSA” contract, use, reproduction, or disclosure is subject to restrictions set forth in Contract No. GS-35F-05925.
1
Device overview
Model |
|
|
|
|
Version |
|
Lenovo TB-J606F |
|
|
|
|
WLAN |
|
Lenovo TB-J606L |
|
|
|
|
WLAN + LTE |
|
|
|
|
4 |
|
7 |
|
1 |
2 |
|
3 |
3 |
5 |
|
|
|
|
|
6 |
||
|
|
|
|
|
|
|
8 |
|
|
|
|
|
9 |
9 |
|
|
|
|
|
|
|
|
|
|
|
|
10 |
9 |
|
|
|
|
|
9 |
|
|
11 |
12 |
|
13 |
|
|
|
|
|
|
||
|
|
|
|
|
|
14
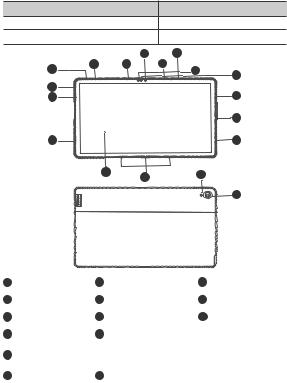
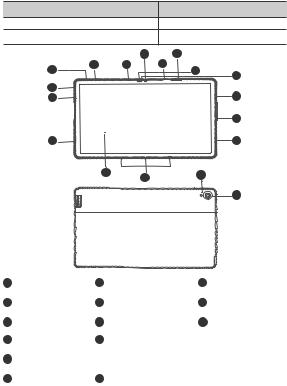
1 |
Volume up button |
2 |
Volume down button |
3 |
Microphone |
4 |
Front-facing camera |
5 |
Light sensor |
6 |
ToF sensor |
7 |
Card tray |
8 |
Power button |
9 Speakers |
|
10 |
USB-C connector |
11 |
Touch screen |
|
|
124-point pogo-pin smart connector (for the compatible keyboard and Smart Charging Station)
13 Flashlight |
14 Rear camera |
2

•The WLAN version does not have a Nano-SIM card slot.
•All pictures and illustrations in this document are for your reference only and may differ from the final product.
Preparing your device
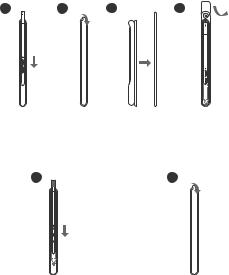
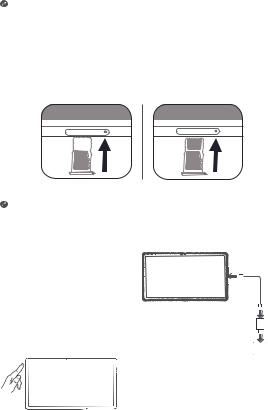
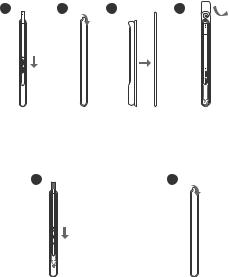
Installing cards
Install the cards as shown in the figure.
*
D S o r ic m
Nano
SIM
D S ro ic m
WLAN |
WLAN+LTE |
•Power off the device before inserting or removing a card.
•Note that the WLAN version does not have a Nano-SIM card slot.
Charging your device
Connect your device to a power outlet using the USB cable and power adapter provided.
Turning on
Press and hold the Power button until the Lenovo logo appears.
3

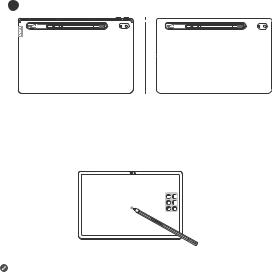
Accessories (optional)
The accessories do not come with all models, and are sold separately.
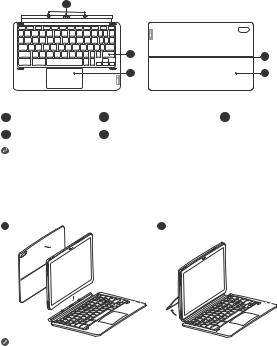
Keyboard pack
|
1 |
|
|
|
|
|
|
2 |
4 |
|
|
|
|
|
|
|
|
3 |
5 |
|
Keyboard |
|
|
Stand Cover |
1 |
Keyboard connector |
2 |
Keyboard |
3 Trackpad |
4 |
Hinge |
5 |
Kickstand |
|
Keyboard layouts vary from country to country. The Keyboard layout in this document is for reference only and your Keyboard may differ.
Attaching the Keyboard pack
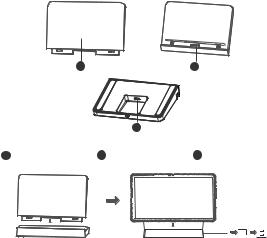
Attach the stand cover and keyboard to the tablet as shown in the following figure.
1 |
2 |
When you are attaching the Stand Cover to the Tablet, make sure that the camera hole is aligned with the tablet’s rear camera.
4
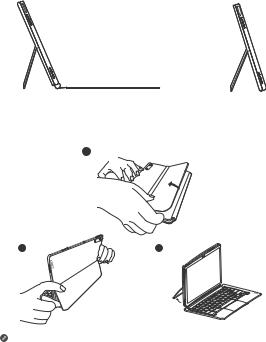
Keyboard pack configurations
The Tablet can be used with the entire Keyboard pack attached, or with the Stand Cover alone.
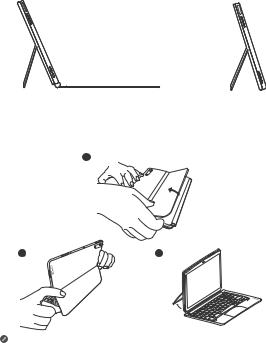
Opening and adjusting the Kickstand
You can adjust the Tablet angle using the Stand Cover. Grasp either side of the kickstand and gently open it until you reach the desired angle.
1
2 |
3 |
To prevent damage, do not apply excessive pressure to the Stand Cover or force the Kickstand beyond its natural range of motion.
5
1.Do not overtilt or apply excessive pressure to the Stand Cover, doing so may damage the hinges.
2.Adjust the tablet angle by opening the Kickstand and changing the position of the tablet until the desired angle is found.
3.The Tablet, Keyboard, and Stand Cover all contain magnetic materials. To avoid loss of magnetism, avoid exposing the Tablet, Keyboard, and Stand Cover to high temperatures or direct sunlight.
4.To prevent demagnetization of credit cards and other items with magnetic data, keep them away from the Tablet, Keyboard, and Stand Cover.
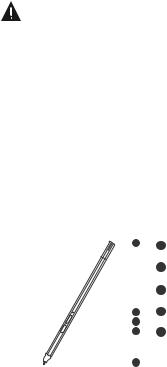
Lenovo Precision Pen 2
You can use Lenovo Precision Pen 2 in place of your fingers for a better experience, such as working with specific applications to write or draw on the screen.
Overview
|
|
|
|
|
|
|
|
1 |
1 |
Pen cap |
|
|
|
|
|
|
|
|
|
2 |
Indicator LED |
|
|
|
|
|
|
|
|
|
3 |
Upper button |
|
|
|
|
|
|
|
2 |
4 |
Lower button |
|
|
|
|
|
|||||||
|
|
|
3 |
5 |
Tip |
|||||
|
||||||||||
|
|
4 |
||||||||
|
||||||||||
|
|
|
|
|
|
|
|
|
|
|
|
|
|
|
|
|
|
|
|
|
|
6
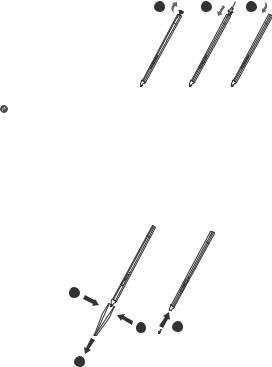
Charging the pen
1. Remove the pen cap in |
1 |
2 |
3 |
the direction shown in the figure.
2.Connect the pen to a charger with a USB-C cable.
3.Replace the pen cap on the pen. You can start to use
the pen after charging.
• When you charging the pen, the indicator light will turn amber, and when it is fully charged, the indicator light automatically goes out.
•Please be cautious when using the pen. The pen contains sensitive electronic components. Dropping it may cause damage.
Replace tip
1.Pinch the tip with tweezers or another suitable tool.
2.Remove the tip.
3.Install the stand-by tip (supplied).
1
1 3
2
7
Store the Pen
Method one:
1.Slide the pen into the pen case.
2.Remove the transparent film on the back of the pen case.
3.Stick the pen case to the plastic panel.
4.Thread the ring through the X-shaped hole in the top of the plastic panel.
1 |
2 |
3 |
4 |
|
|
|
|
|
|
|
|
|
|
|
|
|
|
|
|
Method two:
1.Slide the pen into the pen case.
2.Remove the transparent film on the back of the pen case.
3.Stick the pen case to the back of the tablet or stand cover.
1 |
2 |
8
3
Use the Pen
1.Hold the pen close to the tablet until a white dot appears on the screen.
2.Use the upper and lower button functions of the pen.
Using the pen on a coated screen may interfere with the pen-writing experience.
If your pen is not responsive, please try switching pen protocols. Hold both buttons consecutively for 25 seconds to switch between pen protocols (WGP & AES).
9
Smart Charging Station
Name |
Model |
|
|
Smart Charging Station |
Lenovo CR-421 |
|
|
|
1 |
|
2 |
|
|
3 |
|
1 |
Removable back |
2 Smart connector |
3 USB-C connector |
support |
As shown in the picture, you can charge the battery through the Smart Charging Station.
 • Frequent insertion and removal of back support may result in looseness.
•This product is designed to work only with bundled adaptor and charging cable, please use them in order to make the product work correctly.
10

Important safety and handling information
Plastic bag notice
Danger: Plastic bags can be dangerous. Keep plastic bags away from babies and children to avoid danger of suffocation.
Caution about high volume usage
Warning: Exposure to loud noise from any source for extended periods of time may affect your hearing. The louder the sound, the less time is required before your hearing could be affected. To protect your hearing:
•Limit the amount of time you use headsets or headphones at high volume.
•Avoid turning up the volume to block out noisy surroundings.
•Turn the volume down if you can’t hear people speaking near you.
If you experience hearing discomfort, including the sensation of pressure or fullness in your ears, ringing in your ears or muffled speech, you should stop listening to the device through your headset or headphones and have your hearing checked.
To prevent possible hearing damage, do not listen at high volume levels for long periods.
Safety instructions for parents and adult supervisors
Your mobile device is not a toy. As with all electrical products, precautions should be observed during handling and using of electrical products to reduce the risk of electric shock. If parents choose to allow children to use the device, they should caution his or her child about the potential hazard while using and handling the mobile device.
Parents should inspect the mobile device (including the ac power adapter and the small part, as applicable) periodically for damage. Routinely check this mobile device to ensure that the device is working properly and is safe for children to use.
Internal rechargeable battery warning
Danger: Do not attempt to replace the internal rechargeable lithium ion battery. Replacing the original battery with an incompatible type may result in an increased risk of personal injury or property damage due to explosion, excessive heat, or other risks. Do not attempt to disassemble or modify the battery pack. Attempting to do so can cause a harmful explosion or battery fluid leakage.
11

When disposing of the battery, comply with all relevant local ordinances or regulations. Do not dispose the battery pack in municipal waste. Dispose used batteries according to the instructions.
The battery pack contains a small amount of harmful substances. To avoid injury:
•Keep the battery pack away from open flames or other heat sources.
•Do not expose the battery pack to water, rain, or other corrosive liquids.
•Do not leave the battery in an environment with extremely high temperature.
•Avoid short-circuiting the battery pack.
•Keep the battery pack out of reach of small children and pets.
•Do not leave the battery in an environment with extremely low air pressure. It may result in an explosion or the leakage of flammable liquid or gas from the battery.
To extend battery life, we recommend charging the battery to at least 30% to 50% capacity each time, and recharging it every three months to prevent over discharge.
Eye Protection and Safety Information
While concentrating on the performance capabilities of its screens, Lenovo also places importance on user’s eye health. This product has received TÜV Rheinland’s “Low Blue Light” certification and can be used with confidence.
For further information, please visit https://support.lenovo.com.
EurAsia compliance mark
12

Service and support information
Lenovo Limited Warranty notice
This product is covered by the terms of the Lenovo Limited Warranty (LLW), version L5050010-02 08/2011. Read the LLW at https://www.lenovo.com/warranty/llw_02. You can view the LLW in a number of languages from this website.
Warranty information
Lenovo provides a warranty period for your device. To check the warranty status of your device purchase upgrades, go to https://support.lenovo.com/warrantylookup, and then select the product and follow the on-screen instructions.
Get support
To download Lenovo service tool - LMSA: https://support.lenovo.com/downloads/ds101291
 Visit the website above for information on devices compatible with LMSA.
Visit Lenovo’s support website (https://support.lenovo.com) with the device serial number to get more Lenovo support options, or scan the QR code, and then follow the on-screen instructions.
13
Environmental, recycling, and disposal information
General recycling statement
Lenovo encourages owners of information technology (IT) equipment to responsibly recycle their equipment when it is no longer needed. Lenovo offers a variety of programs and services to assist equipment owners in recycling their IT products. For information on recycling Lenovo products, go to http://www.lenovo.com/recycling.
Important battery and WEEE information
Batteries and electrical and electronic equipment marked with the symbol of a crossed-out wheeled bin may not be disposed as unsorted municipal waste. Batteries and waste of electrical and electronic equipment (WEEE) shall be treated separately using the collection framework available to customers for the return, recycling, and treatment of batteries and WEEE. When possible, remove and isolate batteries from WEEE prior to placing WEEE in the waste collection stream. Batteries are to be collected separately using the framework available for the return, recycling, and treatment of batteries and accumulators.
Country-specific information is available at: http://www.lenovo.com/recycling
Recycling information for Japan
Recycling and disposal information for Japan is available at:
http://www.lenovo.com/recycling/japan
Additional recycling statements
Additional information about recycling device components and batteries is in your
User Guide. See “Accessing your User Guide” for details.
Battery recycling marks
Battery recycling information for Taiwan
Battery recycling information for the United States and Canada
14

Battery recycling information for the European Union
Restriction of Hazardous Substances Directive (RoHS)
Turkey
Lenovo products sold in Turkey, on or after June 1, 2009, meet the requirements of the former Republic of Turkey Restriction of Hazardous Substances legislation from 30th of May 2008 and the Control of Waste Electrical and Electronic Equipment Regulations from 22nd of May 2012(“Turkey RoHS”).
Ukraine
Lenovo products sold in Ukraine, on or after January 1, 2011, meet the requirements of the Technical Directive on Restriction of Hazardous Substances in Electric
and Electronic Equipment enforced by the Government, Decision No 1057 dated 2008/12/03” (“Ukraine TR on RoHS”).
India
Lenovo products sold in India, on or after May 1, 2012, meet the requirements of the India E-waste (Management) Rules (“India RoHS”).
Vietnam
Lenovo products sold in Vietnam, on or after September 23, 2011, meet the requirements of the Vietnam Circular 30/2011/TT-BCT (“Vietnam RoHS”).
European Union
Lenovo Products meet the requirement of Directive 2011/65/EC on the restriction of the use of the certain hazardous substances in electrical and electronic equipment (“RoHS 2”). Lenovo products sold in the European Union, from the 21st July 2019, meet the requirement of Commission Delegated Directive (EU 2015/863) amending Directive 2011/65/EU. For more information about Lenovo progress on RoHS, go to: https://www.lenovo.com/us/en/social_responsibility/RoHS-Communication.pdf
Singapore
Lenovo products sold in Singapore, on or after June 1, 2017, meet the requirements of Government Gazette order No. S 263/2016 Restriction of Hazardous Substances in Electrical and Electronic Equipment in Singapore (“SG-RoHS”).
15

European Union compliance statement
European Union conformity
Compliance with the RE Directive
Lenovo PC HK Limited declares that the radio equipment type Lenovo TB-J606L and Lenovo TB-J606F are in compliance with Directive 2014/53/EU.
The full text of the EU declaration of conformity is available at the following internet address:
https://www.lenovo.com/us/en/compliance/eu-doc
This radio equipment operates with the following frequency bands and maximum radio-frequency power:
Model Name |
Frequency Bands |
Maximum Conducted |
|
Power (dBm) |
|||
|
|
||
|
|
|
|
|
GSM 900 |
33.5 |
|
|
|
|
|
|
GSM 1800 |
31.5 |
|
|
|
|
|
|
UMTS B1 |
25 |
|
|
|
|
|
|
UMTS B8 |
24.5 |
|
|
|
|
|
|
LTE B7 |
24 |
|
|
|
|
|
Lenovo TB-J606L |
LTE B1/B8/B20/B28 |
23 |
|
|
|
||
LTE B3/B38/B40 |
23.5 |
||
|
|||
|
|
|
|
|
WLAN 2400-2483.5 |
20 |
|
|
|
|
|
|
WLAN 5150-5350 |
20 |
|
|
|
|
|
|
WLAN 5470-5725 |
20 |
|
|
|
|
|
|
WLAN 5725-5850 |
14 |
|
|
|
|
|
|
Bluetooth 2400-2483.5 |
10 |
|
|
|
|
16

|
WLAN 2400-2483.5 |
20 |
|
|
|
|
WLAN 5150-5350 |
20 |
Lenovo TB-J606F |
|
|
WLAN 5470-5725 |
20 |
|
|
|
|
|
WLAN 5725-5850 |
14 |
|
|
|
|
Bluetooth 2400-2483.5 |
10 |
|
|
|
Restrictions of use: |
|
|
Usage of this device is limited to indoor in the band 5150 to 5350MHz.
The above information is for EU countries only. Please refer to the actual product for supported frequency bands in other countries.
Specific Absorption Rate information
YOUR MOBILE DEVICE MEETS INTERNATIONAL GUIDELINES FOR EXPOSURE TO RADIO WAVES.
Your mobile device is a radio transmitter and receiver. It is designed not to exceed the limits for exposure to radio waves (radio frequency electromagnetic fields) recommended by international guidelines. The guidelines were developed by an independent scientific organization (ICNIRP) and include a substantial safety margin designed to assure the safety of all persons, regardless of age and health. The
radio wave exposure guidelines use a unit of measurement known as the Specific Absorption Rate, or SAR.
Tests for SAR are conducted using standard operating positions with the device transmitting at its highest certified power level in all tested frequency bands. The highest SAR values under the ICNIRP guidelines for your device model are listed below:
17
Maximum SAR for this model and conditions under which it was recorded. |
||||
Europe 10g |
|
Body-worn |
|
|
SAR Limit |
|
GSM, |
0.61 W/kg |
|
|
(0mm) |
|||
(2.0 W/kg) |
|
|
||
|
WCDMA & |
|
||
Lenovo TB-J606L |
|
|
||
|
|
|
||
Europe 10g |
Limb |
LTE, WLAN, |
|
|
|
|
|||
|
Bluetooth |
|
||
SAR Limit |
|
0.77 W/kg |
||
|
(0mm) |
|||
|
|
|||
(4.0 W/kg) |
|
|
|
|
|
|
|
|
|
|
|
|
|
|
Europe 10g |
|
Body-worn |
|
|
SAR Limit |
|
|
1.59 W/kg |
|
|
(0mm) |
|
||
(2.0 W/kg) |
|
WLAN, |
|
|
Lenovo TB-J606F |
|
|
||
|
|
|
||
Europe 10g |
Limb |
Bluetooth |
|
|
|
|
|||
|
|
|
||
SAR Limit |
|
|
1.59 W/kg |
|
|
(0mm) |
|
||
(4.0 W/kg) |
|
|
|
|
|
|
|
|
|
|
|
|
|
|
During use, the actual SAR values for your device are usually well below the values stated. This is because, for purposes of system efficiency and to minimize interference on the network, the operating power of your mobile device is
automatically decreased when full power is not needed for the data connection. The lower the power output of the device, the lower its SAR value. If you are interested in further reducing your RF exposure then you can easily do so by limiting your usage or simply using a hands-free kit to keep the device away from the head and body.
18
Deutsch
https://support.lenovo.com
https://forums.lenovo.com
Lesen Sie diese Anleitung vor der Verwendung Ihres Geräts sorgfältig durch. Alle Informationen mit einem Stern (*) beziehen sich nur auf das Modell „WLAN + LTE“.
Vor Verwendung Ihres Geräts lesen
Zuerst lesen: Vorschriften und Gesetze
Mit drahtloser Kommunikationstechnik ausgestattete Gerätemodelle erfüllen die Funkfrequenzund Sicherheitsnormen aller Länder oder Regionen,
in denen sie für den drahtlosen Gebrauch zugelassen wurden. Wenn Ihr Produkt ein Telekommunikationsmodem enthält, erfüllt es außerdem die Anforderungen hinsichtlich des Anschlusses an das Telefonnetz Ihres Landes.
Lesen Sie unbedingt die Gesetzlichen Hinweise für Ihr Land oder Ihre Region, bevor Sie die in Ihrem Gerät enthaltenen drahtlosen Geräte verwenden. Um eine PDF-Version der Gesetzlichen Hinweise zu erhalten, gehen Sie zu https://support.lenovo.com.
Support
Für Support bei Netzwerkdiensten und Rechnungsstellung kontaktieren Sie den Betreiber Ihres Mobilfunk-Netzwerks. Um zu erfahren, wie Sie Ihr Gerät nutzen und seine technischen Spezifikationen anzeigen, gehen Sie zu https://support.lenovo.com.
Zugriff auf das Benutzerhandbuch
Das Benutzerhandbuch enthält ausführliche Informationen zu Ihrem Gerät. Um die Veröffentlichungen für Ihr Gerät herunterzuladen, rufen Sie https://support.lenovo.com auf und folgen Sie den Anweisungen auf dem Bildschirm.
Rechtshinweise
Lenovo und das Lenovo-Logo sind Marken von Lenovo in den USA und/oder anderen Ländern.
Sonstige Unternehmens-, Produktoder Dienstleistungsnamen können Marken oder Dienstleistungsmarken anderer Markeninhaber sein. Hergestellt unter Lizenz der Firma Dolby Laboratories. Dolby, Dolby Atmos und das Doppel-D-Symbol sind Markenzeichen von Dolby Laboratories.
HINWEISE ZU EINGESCHRÄNKTEN RECHTEN: Werden Daten oder Software gemäß einem GSA-Vertrag (General Services Administration) bereitgestellt, unterliegt die Verwendung, Vervielfältigung oder Offenlegung den in VertragNr. GS-35F-05925 aufgeführten Einschränkungen.
19
Geräteübersicht
Modell |
|
|
|
|
Version |
|
Lenovo TB-J606F |
|
|
|
|
WLAN |
|
Lenovo TB-J606L |
|
|
|
|
WLAN + LTE |
|
|
|
|
4 |
|
7 |
|
1 |
2 |
|
3 |
3 |
5 |
|
|
|
|
|
6 |
||
|
|
|
|
|
|
|
8 |
|
|
|
|
|
9 |
9 |
|
|
|
|
|
|
|
|
|
|
|
|
10 |
9 |
|
|
|
|
|
9 |
|
|
11 |
12 |
|
13 |
|
|
|
|
|
|
||
|
|
|
|
|
|
14
1 |
Lauter-Taste |
2 |
Leiser-Taste |
3 |
Mikrofon |
4 |
Nach vorne zeigende |
5 |
Lichtsensor |
6 |
ToF-Sensor |
|
Kamera |
|
|
|
|
7 |
Kartenfach |
8 |
Netzschalter |
9 Lautsprecher |
|
10 |
USB-C-Anschluss |
11 |
Touchscreen |
|
|
124-poliger Smart-Anschluss mit Federkontakten (für kompatible Tastatur und Smart-Ladestation)
13Taschenlampe 14 Kamera an der Rückseite
20
• Das WLAN-Modell weist kein Nano-SIM-Kartenfach auf.
•Alle Bilder und Illustrationen in diesem Dokument dienen nur zu Ihrer Information und können vom Endprodukt abweichen.
Vorbereiten Ihres Geräts
Einsetzen von Karten
Setzen Sie die Karten wie in der Abbildung beschrieben ein.
D S o r ic m
*
Nano
SIM
D S ro ic m
WLAN |
WLAN+LTE |
•Schalten Sie das Gerät vor dem Einsetzen oder Entfernen einer Karte aus.
•Hinweis: Das WLAN-Modell weist keinen Nano-SIM- Kartensteckplatz auf.
Laden Ihres Geräts
Schließen Sie Ihr Gerät mithilfe des mitgelieferten USBKabels und -Netzteils an eine Netzsteckdose an.
Einschalten
Halten Sie den Netzschalter gedrückt, bis das Lenovo-Logo erscheint.
21
Zubehör (optional)
Das Zubehör ist nicht bei allen Modellen im Lieferumfang enthalten und wird separat verkauft.
Tastatursatz
|
1 |
|
|
|
|
|
|
2 |
4 |
|
|
|
|
|
|
|
|
3 |
5 |
|
Tastatur |
|
|
Cover mit Standfunktion |
1 |
Tastaturanschluss |
2 |
Tastatur |
3 Trackpad |
4 |
Scharnier |
5 |
Ausklappbarer Standfuß |
|
Tastatur-Layouts unterscheiden sich in unterschiedlichen Ländern. Das in diesem Dokument abgebildete Tastatur-Layout dient nur Referenzzwecken und kann von Ihrer Tastatur abweichen.
Anbringen des Tastatursatzes
Bringen Sie das Cover mit Standfunktion und die Tastatur wie in der folgenden Abbildung gezeigt am Tablet an.
1 |
2 |
Stellen Sie beim Anbringen des Covers am Tablet sicher, dass das Kameraloch an der rückseitigen Kamera des Tablets ausgerichtet ist.
22
Konfigurationen des Tastatursatzes
Das Tablet kann mit dem gesamten Tastatursatz oder nur mit der Standabdeckung verwendet werden.
Öffnen und Einstellen des ausklappbaren Standfußes
Sie können den Tabletwinkel mithilfe der Standabdeckung einstellen. Greifen Sie eine Seite des ausklappbaren Standfußes und öffnen Sie ihn behutsam, bis Sie den gewünschten Winkel erreichen.
1
2 |
3 |
Üben Sie keinen übermäßigen Druck auf den Standfuß aus und versuchen Sie nicht, den natürlichen Bewegungsumfang zu überschreiten, damit Schäden vermieden werden.
23
1.Die Standabdeckung nicht überkippen und keinen übermäßigen Druck auf sie ausüben, da dies die Scharniere beschädigen könnte.
2.Stellen Sie den Tabletwinkel ein, indem Sie den Standfuß öffnen und die Position des Tablets so weit ändern, bis der gewünschte Winkel erreicht ist.
3.Das Tablet, die Tastatur und die Standabdeckung enthalten alle magnetische Materialien. Um Entmagnetisierung zu vermeiden, vermeiden Sie es, das Tablet, die Tastatur und die Standabdeckung hohen Temperaturen oder direktem Sonnenlicht auszusetzen.
4.Um zu verhindern, dass Kreditkarten und andere Gegenstände mit magnetischen Daten entmagnetisiert werden, halten Sie sie von Tablet, Tastatur und Standabdeckung fern.
Lenovo Precision Pen 2
Sie können den Lenovo Precision Pen 2 anstelle Ihrer Finger verwenden, um z. B. mit bestimmten Anwendungen zu arbeiten und auf dem Bildschirm zu schreiben oder zu zeichnen.
Überblick
|
|
|
|
|
|
|
|
1 |
1 |
Kappe des Pens |
|
|
|
|
|
|
|
|
|
2 |
Anzeige-LED |
|
|
|
|
|
|
|
|
|
3 |
Obere Taste |
|
|
|
|
|
|
|
2 |
4 |
Untere Taste |
|
|
|
|
|
|||||||
|
|
|
3 |
5 |
Stiftspitze |
|||||
|
||||||||||
|
|
4 |
||||||||
|
||||||||||
|
|
|
|
|
|
|
|
|
|
|
|
|
|
|
|
|
|
|
|
|
|
24

Laden des Pens
1. Entfernen Sie die Kappe |
1 |
2 |
3 |
des Pens in der auf der Abbildung gezeigten Richtung.
2.Schließen Sie den Pen mit einem USB-C-Kabel an ein Ladegerät an.
3.Setzen Sie die Kappe
des Pens wieder auf den Pen. Nach dem Aufladen können Sie mit der Verwendung des Pens beginnen.
• Beim Aufladen des Pens leuchtet die Anzeigeleuchte gelb. Wenn der Pen vollständig aufgeladen ist, erlischt die Anzeigeleuchte automatisch.
•Benutzen Sie den Pen mit Vorsicht. Der Pen enthält empfindliche Elektronikbauteile. Fällt er herunter, kann es zur Beschädigung kommen.
Spitze ersetzen
1.Drücken Sie die Spitze mit einer Pinzette oder einem anderen geeigneten Werkzeug zusammen.
2.Entfernen Sie die Spitze.
3.Installieren Sie die Ersatzspitze (mitgeliefert).
1
1 3
2
25
Den Stift aufbewahren
Methode eins:
1.Schieben Sie den Stift in die Stifttasche.
2.Entfernen Sie die durchsichtige Folie auf der Rückseite der Stifttasche.
3.Kleben Sie die Stifttasche auf die Kunststoffplatte.
4.Führen Sie den Ring durch das X-förmige Loch oben in der Kunststoffplatte.
1 |
2 |
3 |
4 |
|
|
|
|
|
|
|
|
|
|
|
|
|
|
|
|
Methode zwei:
1.Schieben Sie den Stift in die Stifttasche.
2.Entfernen Sie die durchsichtige Folie auf der Rückseite der Stifttasche.
3.Kleben Sie die Stifttasche auf die Rückseite des Tablets oder der Standabdeckung.
1 |
2 |
26
3
Den Stift verwenden
1.Halten Sie den Stift nahe an das Tablet, bis ein weißer Punkt auf dem Bildschirm erscheint.
2.Verwenden Sie die Funktionen der oberen und unteren Taste des Stiftes.
Die Verwendung des Stiftes auf einem beschichteten Bildschirm kann das Schreiben mit dem Stift beeinträchtigen.
Wenn Ihr Stift nicht reagiert, wechseln Sie bitte das Stiftprotokoll. Halten Sie beide Tasten nacheinander 25 Sekunden lang gedrückt, um zwischen den Stiftprotokollen (WGP und AES) zu wechseln.
27

Smart-Ladestation
Name |
Modell |
|
|
Smart-Ladestation |
Lenovo CR-421 |
|
|
|
1 |
|
2 |
|
|
3 |
|
1 |
Abnehmbare hintere |
2 Smart-Anschluss |
3 USB-C-Anschluss |
Stütze |
Wie in der Abbildung dargestellt, können Sie den Akku über die SmartLadestation aufladen.
 • Häufiges Einsetzen und Entfernen der hinteren Stütze kann dazu führen, dass diese sich lockert.
•Dieses Produkt ist so konzipiert, dass es nur mit dem mitgelieferten Adapter und Ladekabel funktioniert. Bitte verwenden Sie diese, damit das Produkt korrekt funktioniert.
28
 Loading...