


 Loading...
System Update Solution Deployment Guide
Note: Before using this information and the product it supports, read the general information in Appendix B “Notices” on page 85.
Sixth Edition (June 2014)
© Copyright Lenovo 2009, 2014.
LIMITED AND RESTRICTED RIGHTS NOTICE: If data or software is delivered pursuant a General Services Administration “GSA” contract, use, reproduction, or disclosure is subject to restrictions set forth in Contract No. GS-35F-05925.

Contents
Preface . . . . . . . . . . . . . . . . |
iii |
Chapter 1. Overview. . . . . . . . . . . |
1 |
System Update . . . . . . . . . . . . . . . |
1 |
Update Retriever . . . . . . . . . . . . . . . |
1 |
Thin Installer . . . . . . . . . . . . . . . . |
1 |
Managing the update process . . . . . . . . . |
1 |
System Update . . . . . . . . . . . . . |
2 |
System Update and Update Retriever . . . . . |
2 |
Using System Update and Update Retriever on |
|
non-Lenovo systems . . . . . . . . . . . . . |
5 |
Chapter 2. Installation . . . . . . . . . . |
7 |
Installation requirements . . . . . . . . . . . . |
7 |
.Net . . . . . . . . . . . . . . . . . . |
8 |
Installation components . . . . . . . . . . . . |
8 |
System Update languages . . . . . . . . . |
8 |
Update Retriever languages. . . . . . . . |
10 |
Installation considerations . . . . . . . . . . |
10 |
Installation procedures and command-line |
|
parameters . . . . . . . . . . . . . . |
11 |
A scenario of installing System Update and Update |
|
Retriever in an enterprise environment . . . . . |
13 |
Uninstall . . . . . . . . . . . . . . . . . |
13 |
Silent uninstall on Windows Vista or Windows |
|
7 operating systems. . . . . . . . . . . |
14 |
Chapter 3. Configurations. . . . . . . |
15 |
Connection configurations . . . . . . . . . . |
15 |
Configuring System Update . . . . . . . . . |
15 |
Configuring System Update with the registry . |
16 |
Configuring System Update with Active |
|
Directory . . . . . . . . . . . . . . . |
29 |
Configuring System Update with the start.reg |
|
file. . . . . . . . . . . . . . . . . . |
36 |
Chapter 4. Working with System |
|
Update. . . . . . . . . . . . . . . . . |
39 |
About System Update . . . . . . . . . . . . |
39 |
Extras tab . . . . . . . . . . . . . . . |
39 |
System Update billboard . . . . . . . . . |
39 |
Working with update packages . . . . . . . . |
39 |
Downloading and installing updates . . . . |
40 |
Working with license agreements . . . . . |
41 |
Using System Update . . . . . . . . . . . . |
41 |
Scheduling the search for updates . . . . . |
42 |
Viewing the download and installation |
|
history . . . . . . . . . . . . . . . . |
43 |
Hiding and restoring hidden updates . . . . |
43 |
Working with updates that force a reboot . . |
43 |
Keyboard shortcuts. . . . . . . . . . . . . |
43 |
Chapter 5. Working with Update |
|
Retriever . . . . . . . . . . . . . . . |
45 |
About Update Retriever . . . . . . . . . . . |
45 |
About update packages . . . . . . . . . . . |
45 |
Update Retriever first time setup . . . . . . . |
46 |
Using Update Retriever . . . . . . . . . . . |
47 |
Manual searching for new updates . . . . . |
47 |
Scheduling the search for updates . . . . . |
48 |
Managing the repository . . . . . . . . . |
49 |
Modifying settings . . . . . . . . . . . |
51 |
Viewing history . . . . . . . . . . . . . |
51 |
Hiding updates. . . . . . . . . . . . . |
52 |
Exporting updates . . . . . . . . . . . |
52 |
Keyboard shortcuts. . . . . . . . . . . . . |
53 |
Chapter 6. Working with Thin |
|
Installer . . . . . . . . . . . . . . . . |
55 |
About Thin Installer . . . . . . . . . . . . . |
55 |
Configuring Thin Installer . . . . . . . . . . |
55 |
Using Thin Installer . . . . . . . . . . . . . |
58 |
Return error codes . . . . . . . . . . . |
61 |
Logs . . . . . . . . . . . . . . . . . |
61 |
Windows Vista and Windows 7 |
|
considerations . . . . . . . . . . . . . |
62 |
Web server configuration . . . . . . . . . |
62 |
Best practices . . . . . . . . . . . . . . . |
62 |
Uninstalling Thin Installer . . . . . . . . . . |
62 |
Chapter 7. Best practices . . . . . . . |
63 |
Scenario 1 - Managing the update process . . . |
63 |
Step 1 - Installing the programs . . . . . . |
63 |
Step 2 - Customizing the programs . . . . . |
64 |
Step 3 - Working with the programs . . . . |
64 |
Scenario 2 - Deploying specific update packages . |
65 |
Creating repository folders . . . . . . . . |
65 |
Configuring System Update on client |
|
computers . . . . . . . . . . . . . . |
65 |
Working with Update Retriever . . . . . . |
65 |
Deploying the packages . . . . . . . . . |
66 |
Scenario 3 - Deploying to non-Lenovo systems . . |
66 |
Scenario 4 - Disabling the Web upgrade for System |
|
Update. . . . . . . . . . . . . . . . . . |
67 |
Scenario 5 - Installing specific update packages |
|
with the MSDOS prompt . . . . . . . . . . . |
67 |
© Copyright Lenovo 2009, 2014 |
i |
Scenario 6 - Deploying update packages to client |
|
computer repositories . . . . . . . . . . . . |
68 |
Step 1 - Setting up the administrator system . |
68 |
Step 2 - Configuring System Update on client |
|
computers . . . . . . . . . . . . . . |
68 |
Scenario 7 - Working with firewalls and the |
|
scheduler function . . . . . . . . . . . . . |
68 |
Scenario 8 - Working with Thin Installer . . . . . |
69 |
Deploying the packages using USB, CD, or |
|
DVD media . . . . . . . . . . . . . . |
69 |
Deploying the update packages using a |
|
network share repository . . . . . . . . . |
69 |
Deploying the update packages using a |
|
system management tool. . . . . . . . . |
69 |
Integrating Thin Installer with the ImageUltra |
|
Builder program . . . . . . . . . . . . |
69 |
Integrating Thin Installer with a Sysprep
Image . . . . . . . . . . . . . . . . 70
Appendix A. Command line |
|
parameters . . . . . . . . . . . . . . |
71 |
Automatic search . . . . . . . . . . . . . |
71 |
Command line scripts . . . . . . . . . . . . |
71 |
Search modes . . . . . . . . . . . . . . . |
78 |
Notification parameters . . . . . . . . . . . |
79 |
MapDrv utility . . . . . . . . . . . . . . . |
81 |
Command line interface . . . . . . . . . |
81 |
Using the MapDrv utility . . . . . . . . . |
82 |
Appendix B. Notices. . . . . . . . . . 85
Trademarks . . . . . . . . . . . . . . . . 86
ii System Update Solution Deployment Guide

Preface
Information presented in this guide is to support computers worked with the ThinkVantage® System Update program (hereafter refer to as System Update), the Update Retriever program (hereafter refer to as Update Retriever), or the Thin Installer program (hereafter refer to as Thin Installer).
System Update is a program that you can use to help keep your system up-to-date. Update Retriever is an administrative program that you can use to customize the update process for your enterprise. Thin Installer is a lighter version of System Update, and it does not require installation, does not create any registry keys, and does not have any services.
This guide is intended for IT administrators or those who are responsible for deploying updates on computers in their organizations. If you have suggestions or comments, communicate with your Lenovo® authorized representative. This guide is updated periodically, and you can check the latest publication on the Lenovo Web site at:
http://www.lenovo.com/thinkvantage
© Copyright Lenovo 2009, 2014 |
iii |
iv System Update Solution Deployment Guide

Chapter 1. Overview
The programs documented in this deployment guide are System Update, Update Retriever, and Thin Installer. This deployment guide defines each program, explains the update process, and explains how each program can be configured to fit your needs. In this deployment guide, you also will find installation procedures, application configurations, and best practices on how to use these programs in different environments.
System Update
System Update is a program that helps you keep the software on your system up-to-date. Using System Update, the update packages that are stored on Lenovo servers can be downloaded from the Lenovo Help Center Web site. Update packages can be applications, device drivers, BIOS flashes, and software updates. When System Update connects to the repository folder, System Update automatically recognizes your computer machine type, model number, and other system information to determine whether your system needs the available updates. System Update will display a pick list of update packages where you can select update packages to download and install. System Update can be configured to install packages either manually or automatically. System Update also provides a method to defer the installation of update packages. System Update can be configured to search for and download update packages from any combination of the following locations:
•The Lenovo Help Center Web site
•The Repository folder on a local system
•The Repository folder on a network share
Update Retriever
Update Retriever is a program that enables you to search for and download updates from the Lenovo Help Center Web site to a repository folder on a network share. You can configure System Update to search for update packages from a repository folder on a network share instead of searching the Lenovo Help Center Web site. Update Retriever can help you with the following:
•Downloading updates for specific Lenovo systems according to machine types, languages, and operating systems
•Downloading update packages for more than one machine type
•Importing update packages
Thin Installer
Thin Installer is a lighter version of System Update. Unlike System Update, Thin Installer does not require installation, does not create any registry keys, and does not have any services. Thin Installer can search for update packages from the repository folder on a local hard disk drive, a network share, a Web share, or external media such as a CD, DVD, or USB hard disk drive.
Managing the update process
The update process is a method to obtain, configure, and install update packages.
To complete the update process, use one of the following options:
• System Update
© Copyright Lenovo 2009, 2014 |
1 |
If you use only System Update, System Update will connect to the Lenovo Help Center Web site through an Internet connection, search for update packages, and generate a list of update packages for further installation.
•System Update and Update Retriever
If you use System Update and Update Retriever in an enterprise environment, Update Retriever will search the Lenovo Help Center Web site for update packages, download those packages to the network share folder, and enable you to customize the update content relevant to your enterprise; System Update can be configured to obtain updates from the shared folder and complete the installation of updates
on a client computer.
•Thin Installer and Update Retriever
If you use Thin Installer and Update Retriever in an enterprise environment, Update Retriever will search the Lenovo Help Center Web site for update packages, download those packages to the network share folder, and enable you to customize the update content relevant to your enterprise; Thin Installer will search for updates on the shared folder and complete the installation of updates on a client computer.
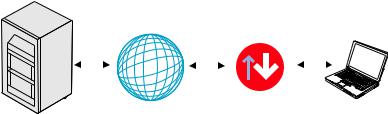
System Update
The following illustration shows the communication path of update packages from the Lenovo Help Center to a client computer using only System Update.
Internet |
System |
Client system |
Update |
Lenovo
Help Center
Figure 1. Update process using only System Update
System Update and Update Retriever
In an enterprise environment with multiple systems, you can use Update Retriever on an administrative system to download update packages from the Lenovo Help Center to a repository folder on your network share or a local system. System Update on a client computer can be configured to obtain updates from the repository folder on a network share or a local system. The repository folder provides the storage for update packages. This provides greater control of the updates that are available over your network.
Downloading update packages to the administrator system
The following illustration provides the communication path of update packages from the Lenovo Help Center to your administrator system using Update Retriever.
2 System Update Solution Deployment Guide

Figure 2. Communication path between Lenovo Help Center and the administrator system
Obtaining updates from the repository folder on a network share
The following illustration provides the communication path of update packages from an administrator system with Update Retriever to client computers with System Update:
Figure 3. Communication path of update packages on a local area network
For more information on configuring repository locations for package storage, see Chapter 3 “Configurations” on page 15.
Deploying update packages to client computers
Instead of using a network share on a local area network (LAN), you can use a local system such as the administrator system to store update packages. Once you have created a repository folder, you can deploy the folder to client computers. The deployment of repository folder enables you to use Update Retriever on an administrator system to download update packages to a repository folder and deploy the folder containing the update packages to client computers. When the client computer runs System Update, System Update will obtain updates directly from the folder you deployed to the client computer.
The following illustration provides the communication path of update packages from an administrator system to client computers.
Chapter 1. Overview 3
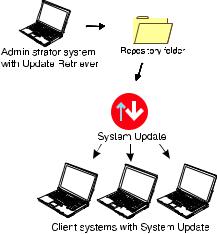
Figure 4. Communication path of update packages from the repository folder to client computers
Customizing update packages for client computers
For enterprises that need to create custom update packages for client computers, use both System Update and Update Retriever to manage the update process. As an administrator, you can use Update Retriever to download selected update packages from the Lenovo Help Center to a repository folder on a network share. You can use Update Retriever to edit an existing package or create a new package in the repository folder.
Update Retriever uses an XML descriptor file to define when an update package is relevant and how to install the update package. For example, you can create an XML descriptor file that enables a specific update
to be downloaded and installed on a client computer depending on the version of the software already installed or existing hardware devices found in the system. After using Update Retriever to customize update packages to fit the needs of your enterprise, import the update packages into the repository folder on the network share using Update Retriever.
On client computers, use System Update to search the network share repository folder for update packages. System Update can then download and install relevant packages from the network share repository folder to client computers.
The following illustration shows the communication path among the Lenovo Help Center, System Update, and Update Retriever when using Update Retriever to manage the update process:
4 System Update Solution Deployment Guide
Figure 5. Update process for client computers managed by administrators using Update Retriever
Using System Update and Update Retriever on non-Lenovo systems
By design, System Update and Update Retriever can be leveraged with non-Lenovo systems. Non-Lenovo systems are not configured to utilize the Lenovo Help Center Web site to download and install packages. If you are using a non-Lenovo system with System Update installed, use Update Retriever to download update packages to a repository folder on your network or your local system, and use System Update to search for update packages from your network.
Chapter 1. Overview 5
6 System Update Solution Deployment Guide

Chapter 2. Installation
This chapter provides the installation instructions, installation requirements, components, and considerations for System Update and Update Retriever. You can download System Update and Update Retriever from the following Web site:
http://www.lenovo.com/support/site.wss/document.do?lndocid=TVAN-ADMIN#tvsu
You can also download Thin Installer from the Lenovo Support Web site and then use it directly. It requires no installation. For information about Thin Installer, see Chapter 6 “Working with Thin Installer” on page 55.
Installation requirements
System Update 5.x is supported on the following operating systems:
•Microsoft® Windows® 7 Starter
•Windows 7 Business
•Windows 7 Home Basic
•Windows 7 Home Premium
•Windows 7 Ultimate
•Windows 7 Enterprise
•Windows 7 Professional
•Windows 8
•Windows 8.1
System Update 3.x is supported on the following operating systems:
•Windows Vista®
•Windows XP Professional with Service Pack 2 or later
•Windows 2000 Professional with Service Pack 4
Note: System Update supports systems with the Windows 2003 operating system installed only if update packages are stored in a repository on your local network. Connection to the Lenovo Help Center Web site is not supported on the Windows 2003 operating system.
Update Retriever is supported on the following operating systems:
•Windows 7 Starter
•Windows 7 Business
•Windows 7 Home Basic
•Windows 7 Home Premium
•Windows 7 Ultimate
•Windows 7 Enterprise
•Windows 7 Professional
•Windows Vista
•Windows XP Professional (32-bit only)
•Windows XP Home (32-bit only)
•Windows Server® 2003 Standard Edition
© Copyright Lenovo 2009, 2014 |
7 |

•Windows Server 2003 Enterprise Edition
•Windows Small Business Server 2003 Standard Edition (32-bit only)
•Windows Small Business Server 2003 Premium Edition
•Windows Server 2003 R2 Standard
•Windows Server 2003 R2 Enterprise
•Windows Server 2008 Standard Edition
•Windows Server 2008 Standard without Hyper-V
•Windows Server 2008 Enterprise
•Windows Server 2008 Enterprise without Hyper-V
•Windows Server 2008 DataCenter
•Windows Server 2008 DataCenter without Hyper-V
•Windows Web Server 2008
•Windows 8
•Windows 8.1
Note: Unless otherwise stated, the supported operating systems refer to both the 32-bit version and the 64-bit version.
.Net
System Update requires Microsoft.NET Framework 4.0 or a later version. Update Retriever requires Microsoft.NET Framework 3.5 or a later version. You can download a compatible version of .NET Framework from the following Microsoft Web site:
http://update.microsoft.com/windowsupdate
Note: When performing a silent installation of Update Retriever on a system without Microsoft.Net Framework 3.5 or a later version, the following message will be written to the %temp%\tvursetup.log file: “Before installing Update Retriever silently, you need to download and install Microsoft .Net Framework 3.5 or a later version. To download and manually install Microsoft .Net Framework 3.5 or a later version, go to the Microsoft Web site at http://www.microsoft.com/net/download.aspx.”
Installation components
This section provides information on installation components for System Update and Update Retriever. These programs are installed with the InstallShield software tool.
System Update languages
The following table presents the languages and the corresponding language override codes for System Update.
Table 1. System Update language codes
Language |
Identifier |
Language override code |
|
|
|
Danish |
1030 |
DA |
|
|
|
Dutch (Standard) |
1043 |
NL |
|
|
|
English |
1033 |
EN |
|
|
|
Finnish |
1035 |
FI |
|
|
|
French |
1036 |
FR |
|
|
|
8 System Update Solution Deployment Guide

Table 1. System Update language codes (continued)
Language |
Identifier |
Language override code |
|
|
|
German |
1031 |
DE |
|
|
|
Italian |
1040 |
IT |
|
|
|
Japanese |
1041 |
JP |
|
|
|
Korean |
1042 |
KO |
|
|
|
Norwegian (Bokmal) |
1044 |
NO |
|
|
|
Portuguese (Brazilian) |
1046 |
PT |
|
|
|
Spanish |
1034 |
ES |
|
|
|
Swedish |
1053 |
SV |
|
|
|
Simplified Chinese |
2052 |
CHS |
|
|
|
Traditional Chinese |
1028 |
CHT |
|
|
|
System Update supports all NLS (National Language Support) language packs. In normal cases, System Update loads the language pack set in the LanguageOverride field. That is, at startup, System Update checks the Windows registry for a valid language override code in the LanguageOverride field. If the language override code in the LanguageOverride field is valid and the language pack is available on the system, System Update will load the language pack corresponding to the language override code specified in the LanguageOverride field, and display the rest of the session in that language.
The registry location for the LanguageOverride field is:
HKEY_LOCAL_MACHINE\SOFTWARE\Lenovo\System Update\LanguageOverride
The following are scenarios in which System Update will load the substitute NLS language pack.
•Loading the language pack set in the Windows Regional and Language Options settings:
If the LanguageOverride field is empty or with an invalid value, or the value specified in the LanguageOverride field is not installed on the system, System Update will get the language override code of the operating system set in the Regional and Language Options settings. If System Update successfully loads the language pack corresponding to the language set in the Regional and Language Options settings, System Update will display the rest of the session in that language.
•Loading the language pack set in the DefaultLanguage field:
If the language pack corresponding to the language set in the Regional and Language Options settings is not available on the system, System Update will attempt to get the default language that has been set in the DefaultLanguage field when the end user used the System Update installer and selected a language during the installation. System Update will load the language pack corresponding to the default language set in the DefaultLanguage field, and display the rest of the session in that language. If the language pack corresponding to the default language set in the DefaultLanguage field is on the system, System Update will load the default language pack and display the rest of the session.
The registry location for the DefaultLanguage field is:
HKEY_LOCAL_MACHINE\SOFTWARE\Lenovo\System Update\DefaultLanguage
•Loading the US English language pack:
If the DefaultLanguage field is empty or with an invalid value, or if the language pack corresponding to the default language set in the DefaultLanguage field is not on the system, the default language will not be used. System Update will attempt to load the US English language pack. If the US English language pack is not on the system, an error message will be displayed, saying "System Update has found a critical problem and must close." This error message is in the US English language.
Chapter 2. Installation 9

Update Retriever languages
The following table presents the languages and the corresponding language override codes for Update Retriever.
Table 2. Update Retriever language codes
Language |
Identifier |
Language override code |
|
|
|
English |
1033 |
EN |
|
|
|
French |
1036 |
FR |
|
|
|
German |
1031 |
DE |
|
|
|
Japanese |
1041 |
JP |
|
|
|
Simplified Chinese |
2052 |
CHS |
|
|
|
The registry location for the LanguageOverride field is:
HKEY_LOCAL_MACHINE\SOFTWARE\Lenovo\Update Retriever\LanguageOverride
Installation considerations
System Update and Update Retriever are installed as standalone applications and deployed with default preferences for all configuration options. The installation scenarios listed below are supported:
•Clean installation: System Update and Update Retriever are installed with default preferences for their respective configurable options.
•Upgrade or over-installation (current version already exists): The Windows Installer will remove the old version of System Update or Update Retriever and install the new version. Your network share repository folder and contents will be preserved.
During installation, a shortcut is added to the following Start menu folder on ThinkPad® systems:
Start Menu\Programs\ThinkVantage
For Lenovo systems, the following shortcut is added to the Start menu folder:
Start Menu\Programs\Lenovo Care
Preferences are stored as settings in the following Windows registry keys:
•For System Update:
HKLM\Software\Lenovo\System Update
•For Update Retriever:
HKLM\Software\Lenovo\Update Retriever
The default folders where application files are installed are the following:
•For System Update:
%PROGRAMFILES%\Lenovo\System Update
10 System Update Solution Deployment Guide

•For Update Retriever:
%PROGRAMFILES%\Lenovo\Update Retriever
Installation procedures and command-line parameters
System Update and Update Retriever can use the same command line parameters for installation. The following example starts a non-silent command line installation for System Update or Update Retriever.
c:\>[System Update installation file name].exe
To do a silent command line extraction followed by an installation, use the /VERYSIELNT parameter. The extract defaults to the Windows Temp folder, for example:
c:\>[System Update installation file name].exe/VERYSILENT /NORESTART
To silently extract to a specific folder followed by an installation, use the DIR parameter, for example:
[System Update installation file name].exe/VERYSILENT /NORESTART/DIR="C:\TVT\tvsut"
The /DIR parameter causes the files to be extracted to the c:\tvt\tvsut folder.
You can use the -e parameter to extract the contents of the installation file. If you want the Update Retriever installation file to start the executable, specify the file name after the –e parameter, for example:
-e[Update Retriever installation file name]
The following table provides examples where the file name is not specified.
Table 3. Extract command scripts
Product |
Command line |
Comment |
Extraction folder |
|
|
|
|
Update Retriever |
UpdateRetriever-setup.exe |
Extracts Update Retriever |
c:\tvt\tvurfolder\setup.exe |
|
-fc:\tvt\tvurfolder -e |
to c:\tvt\tvurfolder |
|
|
|
|
|
List of parameters
The application is packaged as a self-extracting installation file. Therefore, the Update Retriever installation file specifies the executable to start after the extraction. If you use the -a parameter, then any parameter following the -a will be passed to the installation file executable, and then prompts the execution to start after the extraction, for example:
c:\>[Update Retriever installation file name].exe –s –fc:\tvt\tvsut –a [list of parameters]
The following table provides the parameters used with the -a parameter.
Chapter 2. Installation 11

Table 4. List of parameters with -a
Parameter |
Description |
Example |
|
|
|
/s |
This parameter is used for silent mode. |
[Update Retriever installation |
|
It suppresses the initialization window |
file name].exe -s -a /s |
|
defined in the installation file to execute |
|
|
after the extraction. |
|
|
|
|
/v |
This parameter passes the command line |
[Update Retriever installation |
|
switches and values of public properties |
file name].exe -s -a /s /v" /qn |
|
to the MSI file included in the installation |
|
|
file. This parameter is used to suppress |
|
|
the MSI file user interface. You would |
|
|
use this parameter in conjunction with |
|
|
other parameters and the executable |
|
|
file that the installation file will start |
|
|
after the extraction when you want to |
|
|
do a silent installation. You can pass |
|
|
information to the MSI file using the |
|
|
command line to execute the installation |
|
|
file. All parameters within the double |
|
|
quote marks (" ") after the /v parameter |
|
|
are passed to the MSI file. |
|
|
|
|
/L |
This parameter specifies the language |
[Update Retriever installation |
|
used by a multi-language installation |
file name].exe -s -a /s /v" |
|
program and requires a decimal language |
/qn" /L1033 |
|
ID. A decimal language ID corresponds |
|
|
to an identifier in the table. See System |
The above command line will use English. |
|
Update language codes. |
|
|
|
|
/w |
This parameter forces the executable |
[Update Retriever installation |
|
defined in the installation file to execute |
file name].exe -a /w |
|
after the extraction and to wait until the |
|
|
installation is complete before exiting. |
If you extract the installation file contents first, and |
|
|
want to use the /w parameter with the executable, |
|
|
the installation file will point to the folder where file |
|
|
contents are extracted and then start the executable |
|
|
file specified in the installation file as the executable |
|
|
file to start after the extraction, for example: |
|
|
Setup.exe /w |
|
|
|
reboot=r" |
This parameter suppresses the reboot |
[Update Retriever installation |
|
request during the process of clean |
file name].exe -s -a /s /v" |
|
installation, upgrading or over-installation. |
/qn reboot=r" |
|
|
|
Installation log file
The installation log file contains information that can be used to debug installation problems. For System Update, the log file name is tvsusetup.log; for Update Retriever, the log file name is tvursetup.log.
If you install the program by double-clicking the setup.exe file, the log file will be automatically generated and stored in the %temp% directory.
If you want to install the program silently and generate installation log files, use the following commands:
•For System Update:
[System Update installation file name].exe/VERYSILENT /NORESTART/LOG=c:\tvsu.log
To specify the detailed log directory, use the /LOG command.
•For Update Retriever:
12 System Update Solution Deployment Guide

-s -a /s /v"/qn REBOOT=R /L*v %temp%\tvursetup.log"
where %temp% is the directory that you can specify for storing the log file. You do not need to restart the system after the silent installation completes.
Windows Vista and Windows 7 considerations
With considerations for Windows Vista and Windows 7 operating systems, the System Update silent installation prompts a User Account Control (UAC) message. You can find information on disabling and enabling the User Account Control message on the following Web site: http://technet2.microsoft.com/WindowsVista/en/library /0d75f774-8514-4c9e-ac08-4c21f5c6c2d91033.mspx?mfr=true
Note: If the UAC is active, a silent uninstall will not work with Windows Vista and Windows 7 operating systems.
A scenario of installing System Update and Update Retriever in an enterprise environment
Complete the following steps to install System Update and Update Retriever using a silent command:
1.Download Update Retriever to an administrator system from the following Lenovo Web site: http://www.lenovo.com/support/site.wss/document.do?lndocid=TVAN-ADMIN#tvsu
2.Download System Update to client computers from the following Lenovo Web site: http://www.lenovo.com/support/site.wss/document.do?lndocid=TVAN-ADMIN#tvsu
3.Perform a silent installation of System Update on client computers by using the following command at the command prompt:
setup.exe/VERYSILENT /NORESTART
The following example provides the install command with a pipe symbol that represents each space in the command. For each pipe symbol, replace with a space:
setup.exe│-s│-a│/s│/v"/qn"│/L1033
L1033 is the language code for English. For information about using other language codes, see “System Update languages” on page 8.
Note: After you install System Update or Update Retriever, restart your system to set the Scheduler function for either program. If you are not going to use the Scheduler function of System Update or Update Retriever, a restart is not needed.
Uninstall
System Update and Update Retriever can be uninstalled by using the Add or Remove Programs applet in Windows operating systems. After the uninstall is complete, all program files and settings are deleted.
Alternatively, you can use command lines to perform a silent uninstall.
To silently uninstall System Update or Update Retriever, do the following:
•For System Update, use the following command:
MsiExec.exe /X{8675339C-128C-44DD-83BF-0A5D6ABD8297} /qn
•For Update Retriever, use the following command:
Chapter 2. Installation 13
siExec.exe /X{F25C538D-3F57-4AF4-80DD-B1DD1558F038} /qn
Silent uninstall on Windows Vista or Windows 7 operating systems
The User Account Control (UAC) function on Windows Vista or Windows 7 operating systems is turned on by default to prevent unauthorized changes to the computer. You need to disable the UAC function before performing a silent uninstall.
To perform a silent uninstall of System Update from a Windows Vista or Windows 7 operating system, do the following:
1.From the Start menu, open Control Panel, and double-click the User Accounts option.
2.Click Turn User Account Control on or off.
3.Click Continue in the Windows permission dialog box.
4.Deselect the Use User Account Control (UAC) to help protect your computer option, and click OK.
5.Restart the computer.
6.Click Start, and type the following command line in the Start Search box:
MsiExec.exe /X{8675339C-128C-44DD-83BF-0A5D6ABD8297} /qn
7.Press Enter. System Update will be uninstalled.
14 System Update Solution Deployment Guide
Chapter 3. Configurations
This chapter provides you with conceptual information and procedures to configure connectivity settings, repository locations, and the user interface.
Connection configurations
System Update and Update Retriever support three types of connectivity configuration: direct connection, static proxy connection, and automatic configuration script.
•Direct connection
This type of configuration is used when no proxy is required to connect to the Internet. It means the application can connect directly to the Lenovo Help Center servers.
•Static proxy connection
System Update and Update Retriever support two types of proxies, HTTP (Hypertext Transfer Protocol) proxy and SOCKS (Socket Security) proxy.
–Connection through HTTP proxy
In this type of configuration, System Update and Update Retriever connect to an HTTP proxy server to access the Internet. The proxy server connects to the Lenovo Help Center.
Note: HTTP basic and NTLM (NT LAN Manager) authentications are supported. The following elements are obtained from the system configuration:
–Proxy server name or IP address
–Proxy server port
The proxy server might require to authenticate each client before it can be granted access to the Internet. In that case, the end user must additionally provide a user name and password. The user name and password values can be set for the end user by the administrator.
The HTTP proxy authenticator, an integrated component in System Update, displays a logon dialog whenever System Update detects that the HTTP proxy server needs the end user to provide a user name and password in order to successfully connect to the proxy serve. After providing the correct user name and password, the end user will be authenticated to connect to the HTTP proxy server. SOCKS authentication is not supported.
–Connection through a SOCKS proxy
In this type of configuration, System Update and Update Retriever connect to a SOCKS server and then the SOCKS server connects to the Lenovo Help Center.
The following elements must be configured:
–Server name or IP address
–Server port
Note: Only SOCKS 4 without authentication is supported.
•Automatic configuration script
By enabling Use automatic configuration script in the Internet Explorer® Web browser, System Update and Update Retriever can access the Internet according to the automatic configuration script file.
Configuring System Update
Configurations for System Update can be done through the registry, Active Directory®, or the start.reg file. If you are configuring just one system, you can use the registry to configure System Update. If you
© Copyright Lenovo 2009, 2014 |
15 |
are configuring multiple systems, you can use Active Directory to configure policies for System Update. If your enterprise does not use Active Directory, Lenovo provides the start.reg file that you can configure and then deploy to multiple systems. For additional information about each configuration method, see the following sections:
•“Configuring System Update with the registry” on page 16
•“Configuring System Update with Active Directory” on page 29
•“Configuring System Update with the start.reg file” on page 36
Configuring System Update with the registry
Attention: To edit registry configurations, exit System Update. If System Update is running while changes are made in the registry, the old registry entries will be recovered.
The following table lists the configurable and modifiable items for System Update and their registry locations, after the first launch of System Update.
Table 5. Registry locations
Setting |
Registry location |
|
|
Disable the System Update billboard. See “UCSettings |
HKLM\SOFTWARE\Lenovo\System |
configurable items” on page 17. |
Update\Preferences\UCSettings\General |
|
|
Disable registration on billboard |
HKLM\Software\Lenovo\Registration\RegStatus |
|
|
Disable System Update user interface. See “UCSettings |
HKLM\SOFTWARE\Lenovo\System |
configurable items” on page 17. |
Update\Preferences\UCSettings\General |
|
|
RetryLimit for HTTPSHelloSettings. See |
HKLM\SOFTWARE\Lenovo\System |
“\UCSettings\HTTPSHelloSettings” on page 18. |
Update\Preferences\UCSettings\HTTPSHelloSettings |
|
|
RetryWaitTime for HTTPSHelloSettings. See |
HKLM\SOFTWARE\Lenovo\System |
“\UCSettings\HTTPSHelloSettings” on page 18. |
Update\Preferences\UCSettings\HTTPSHelloSettings |
|
|
Disable System Update Web upgrade (Update Thyself). |
HKLM\SOFTWARE\Lenovo\System |
See “\UCSettings\HTTPSHelloSettings” on page 18. |
Update\Preferences\UCSettings\HTTPSHelloSettings |
|
|
RetryLimit for HTTPSPackageSettings. See |
HKLM\SOFTWARE\Lenovo\System |
“\UCSettings\HTTPSPackageSettings” on page 19. |
Update\Preferences\UCSettings\HTTPSPackageSettings |
|
|
RetryWaitTime for HTTPSPackageSettings. See |
HKLM\SOFTWARE\Lenovo\System |
“\UCSettings\HTTPSPackageSettings” on page 19. |
Update\Preferences\UCSettings\HTTPSPackageSettings |
|
|
Proxy server connection. See |
HKLM\Software\Lenovo\System |
“\UserSettings\Connection” on page 19. |
Update\Preferences\UserSettings\Connection |
|
|
DebugEnable. See “UserSettings configurable items” on |
HKLM\SOFTWARE\Lenovo\System |
page 19. |
Update\Preferences\UserSettings\General |
|
|
DisplayInformationScreen. See “UserSettings |
HKLM\SOFTWARE\Lenovo\System |
configurable items” on page 19. |
Update\Preferences\UserSettings\General |
|
|
DisplayLicenseNotice. See “UserSettings configurable |
HKLM\SOFTWARE\Lenovo\System |
items” on page 19. |
Update\Preferences\UserSettings\General |
|
|
DisplayLicenseNoticeSU. See “UserSettings configurable |
HKLM\SOFTWARE\Lenovo\System |
items” on page 19. |
Update\Preferences\UserSettings\General |
|
|
ExtrasTab. See “UserSettings configurable items” on |
HKLM\SOFTWARE\Lenovo\System |
page 19. |
Update\Preferences\UserSettings\General |
|
|
IgnoreLocalLicense. See “UserSettings configurable |
HKLM\SOFTWARE\Lenovo\System |
items” on page 19. |
Update\Preferences\UserSettings\General |
|
|
IgnoreRMLicCRCSize. See “UserSettings configurable |
HKLM\SOFTWARE\Lenovo\System |
items” on page 19. |
Update\Preferences\UserSettings\General |
|
|
16 System Update Solution Deployment Guide

Table 5. Registry locations (continued)
Setting |
Registry location |
|
|
NotifyInterval. See “UserSettings configurable items” on |
HKLM\SOFTWARE\Lenovo\System |
page 19. |
Update\Preferences\UserSettings\General |
|
|
RepositoryLocation1. See “UserSettings configurable |
HKLM\SOFTWARE\Lenovo\System |
items” on page 19. |
Update\Preferences\UserSettings\General |
|
|
UNCMaxAttempts. See “UserSettings configurable items” |
HKLM\SOFTWARE\Lenovo\System |
on page 19. |
Update\Preferences\UserSettings\General |
|
|
Scheduler Frequency. See “\UserSettings\Scheduler” |
HKLM\SOFTWARE\Lenovo\System |
on page 23. |
Update\Preferences\UserSettings\Scheduler |
|
|
Scheduler Notify Options. See “\UserSettings\Scheduler” |
HKLM\SOFTWARE\Lenovo\System |
on page 23. |
Update\Preferences\UserSettings\Scheduler |
|
|
Scheduler RunAt. See “\UserSettings\Scheduler” on |
HKLM\SOFTWARE\Lenovo\System |
page 23. |
Update\Preferences\UserSettings\Scheduler |
|
|
Scheduler RunOn. See “\UserSettings\Scheduler” on |
HKLM\SOFTWARE\Lenovo\System |
page 23. |
Update\Preferences\UserSettings\Scheduler |
|
|
SchedulerAbility. See “\UserSettings\Scheduler” on page |
HKLM\SOFTWARE\Lenovo\System |
23. |
Update\Preferences\UserSettings\Scheduler |
|
|
SchedulerLock. See “\UserSettings\Scheduler” on page |
HKLM\SOFTWARE\Lenovo\System |
23. |
Update\Preferences\UserSettings\Scheduler |
|
|
SearchMode. See “\UserSettings\Scheduler” on page 23. |
HKLM\SOFTWARE\Lenovo\System |
|
Update\Preferences\UserSettings\Scheduler |
|
|
UCSettings configurable items
This section provides descriptions for the configurable items available in the UCSettings key.
\UCSettings\Billboard
The following table and example provides the setting and values for the Billboard key.
Table 6. \UCSettings\Billboard
Configurable item |
Description |
Value |
Action |
|
|
|
|
|
|
LiveFeed |
Disables the live feed |
Default: Lenovo Live Feed |
• If Default, the live feed |
|
|
to the System Update |
|
|
image will be displayed |
|
Possible values: |
|||
|
billboard. |
on the System Update |
||
|
|
|
||
|
|
• |
Default |
user interface. |
|
|
• |
Blank |
• If Blank, the default |
|
|
|
|
billboard image will not |
|
|
|
|
be displayed on the |
|
|
|
|
System Update user |
|
|
|
|
interface. |
|
|
|
|
|
Example:
\Billboard \LiveFeed = Blank
\UCSettings\General
The following table and example provides the setting and values for the General key.
Chapter 3. Configurations 17

Table 7. \UCSettings\General
Configurable item |
Description |
Value |
Action |
||
|
|
|
|
|
|
Disable |
Disables the System |
Default value: NO |
• |
If YES, the System |
|
|
Update user interface. |
|
|
|
Update user interface |
|
Possible values: |
|
|||
|
Use this setting when |
|
will not be displayed. |
||
|
|
|
|
||
|
you want to configure |
• |
YES |
• |
If NO, the System |
|
System Update using the |
|
|
||
|
• |
NO |
|
Update user interface |
|
|
command prompt. |
|
|||
|
|
|
|
will be displayed. |
|
|
|
|
|
|
|
|
|
|
|
|
|
Example:
\GENERAL \Disable = NO
\UCSettings\HTTPSHelloSettings
The following table and example provides the settings and values for the HTTPSHelloSettings key.
Table 8. \UCSettings\HTTPSHelloSettings
Configurable item |
Description |
Value |
Action |
|
|
|
|
RetryLimit |
Specifies the maximum |
Default value: 0 |
System Update will stop |
|
number of times that |
|
trying to connect to the |
|
Possible values: Any valid |
||
|
System Update will try to |
Lenovo Help Center Web |
|
|
integer |
||
|
connect to the Lenovo |
site after the connection |
|
|
|
||
|
Help Center Web site. |
|
attempts reach the |
|
|
|
maximum number of |
|
|
|
tries. |
|
|
|
|
RetryWaitTime |
Specifies the maximum |
Default value: 0 |
System Update will wait |
|
amount of time (in |
|
the number of seconds |
|
Possible values: Any valid |
||
|
seconds) that System |
when attempting to |
|
|
integer |
||
|
Update will wait before |
connect to the Lenovo |
|
|
|
||
|
it tries to connect to the |
|
Help Center Web site after |
|
Lenovo Help Center Web |
|
the previous attempt fails. |
|
site for another time after |
|
|
|
the previous attempt fails. |
|
|
|
|
|
|
ServerName |
Specifies the server name |
The default value is |
System Update searches |
|
that System Update will |
pre-configured. By default, |
the Lenovo Help Center |
|
search for updates for |
System Update will connect to |
Web site for updates |
|
itself. Changing the |
the Lenovo Help Center Web |
for itself, even if it is |
|
default value will disable |
site to search for updates for |
connected to a local |
|
the Update Thyself |
itself. |
system or network share |
|
function of System |
|
repository. You can |
|
Possible values: Server name |
||
|
Update. |
disable the Web upgrade |
|
|
or empty |
||
|
|
for System Update by |
|
|
|
|
|
|
|
|
clearing this value. |
|
|
|
|
Example:
\HTTPSHelloSettings \RetryLimit = 2 \RetryWaitTime = 2 \ServerName = https://
Note: When System Update connects to the Lenovo Help Center Web site, it communicates with different servers. The RetryLimit and RetryWaitTime settings under the HTTPSHelloSettings key control the
18 System Update Solution Deployment Guide

connection between System Update and the server from which System Update downloads the self-update package (If a new version exists).
\UCSettings\HTTPSPackageSettings
The following table and example provides the settings and values for the HTTPSPackageSettings key.
Table 9. \UCSettings\HTTPSPackageSettings
Configurable item |
Description |
Value |
Action |
|
|
|
|
RetryLimit |
Specifies the maximum |
Default value: 0 |
System Update will stop |
|
number of times that System |
|
trying to connect to the |
|
Possible values: Any valid |
||
|
Update will try to connect to |
Lenovo Help Center Web |
|
|
integer |
||
|
the Lenovo Help Center Web |
site after the connection |
|
|
|
||
|
site. |
|
attempts reach the |
|
|
|
maximum number of |
|
|
|
tries. |
|
|
|
|
RetryWaitTime |
Specifies the maximum |
Default value: 0 |
System Update will wait |
|
amount of time (in seconds) |
|
the number of seconds |
|
Possible values: Any valid |
||
|
that System Update will wait |
when attempting to |
|
|
integer |
||
|
before it tries to connect to |
connect to the Lenovo |
|
|
|
||
|
the Lenovo Help Center Web |
|
Help Center Web site |
|
site for another time after the |
|
after the previous attempt |
|
previous attempt fails. |
|
fails. |
|
|
|
|
Example:
\HTTPSPackageSettings \RetryLimit = 2 \RetryWaitTime = 2
Note: The RetryLimit and RetryWaitTime settings under the HTTPSPackageSettings key control the connection between System Update and the server from which System Update downloads update packages.
UserSettings configurable items
This section provides descriptions for the configurable items available in the UserSettings key.
\UserSettings\Connection
The following table and example provides the settings and values for the Connections key. Those configurable items are for proxy server connections.
Table 10. \UserSettings\Connection
Configurable |
|
|
|
item |
Description |
Value |
Action |
|
|
|
|
User |
Specifies the user |
Default value: None |
This setting is used for |
|
name to use for the |
|
authentication to access the |
|
connection. |
This setting is only used for the |
HTTP proxy server. |
|
|
connection type of proxy, the HTTP |
|
|
|
proxy, when the proxy server requires |
|
|
|
authentication. |
|
|
|
|
|
|
|
Possible values: Any string |
|
|
|
|
|
Chapter 3. Configurations 19

Table 10. \UserSettings\Connection (continued)
Configurable |
|
|
|
item |
Description |
Value |
Action |
|
|
|
|
Password |
Specifies the |
Default value: None |
This setting is used for |
|
password to use |
|
authentication to access the |
|
Possible values: Any string |
||
|
for the connection. |
HTTP proxy server. |
|
|
|
||
|
|
|
System Update will connect to |
|
|
|
the HTTP proxy server defined in |
|
|
|
ServerName using the user name |
|
|
|
defined in User. The end user |
|
|
|
is prompted for this information |
|
|
|
when the information is needed. |
|
|
|
|
Example:
\Connection\ \User = Billek
\Password = ************
\UserSettings\General
The following table and example provides the settings and values for the General key.
Table 11. \UserSettings\General
Configurable item |
Description |
Value |
Action |
||
|
|
|
|
|
|
ContentMode |
Refers to the status of |
Default value: Active |
• |
If Active, System Update |
|
|
the update packages that |
|
|
|
will search the Update |
|
Possible values: |
|
|||
|
System Update will search |
|
Retriever repository for |
||
|
|
|
|
||
|
for in the Update Retriever |
• |
Active |
|
the update packages in |
|
repository. |
• |
Test |
|
active status. |
|
|
• If Test, System Update |
|||
|
|
|
|
||
|
|
|
|
|
will search the Update |
|
|
|
|
|
Retriever repository for |
|
|
|
|
|
the update packages in |
|
|
|
|
|
test status. |
|
|
|
|
Note: If there is no |
|
|
|
|
|
database.xml file in the |
|
|
|
|
|
Update Retriever repository |
|
|
|
|
|
folder, System Update |
|
|
|
|
|
will ignore the value of |
|
|
|
|
|
ContentMode and search |
|
|
|
|
|
for all the update packages. |
|
|
|
|
|
|
|
DebugEnable |
Enables you to log process |
Default value: NO |
• |
If YES, System Update |
|
|
results to the log file named |
|
|
|
will log the process |
|
Possible values: |
|
|||
|
ApplicabilityRulesTrace.log. |
|
results to the log file. |
||
|
|
|
|
||
|
|
• |
YES |
• |
If NO, System Update |
|
|
|
|
||
|
|
• |
NO |
|
will not log the process |
|
|
|
|
|
results. |
|
|
|
|
|
|
DisplayInformationScreen |
Enables you to skip the User |
Default value: YES |
• |
If YES, the User |
|
|
Information panel of System |
|
|
|
Information panel will |
|
Possible values: |
|
|||
|
Update. |
|
be displayed. |
||
|
|
|
|
||
|
|
• |
YES |
• |
If NO, the User |
|
|
|
|
||
|
|
• |
NO |
|
Information panel will |
|
|
|
|
|
not be displayed. |
|
|
|
|
|
|
20 System Update Solution Deployment Guide
Table 11. \UserSettings\General (continued)
Configurable item |
Description |
Value |
Action |
||
|
|
|
|
|
|
DisplayLicenseNotice |
Enables you to skip the |
Default value: YES |
• |
If YES, the license |
|
|
license agreement that will |
|
|
|
agreement screen will |
|
Possible values: |
|
|||
|
be displayed before the |
|
be displayed prior to the |
||
|
|
|
|
||
|
update packages pick list is |
• |
YES |
|
update packages pick |
|
populated. |
• |
NO |
|
list. |
|
|
• |
If NO, the license |
||
|
|
|
|
||
|
|
|
|
|
agreement screen will |
|
|
|
|
|
not be displayed. |
|
|
|
|
|
|
DisplayLicenseNoticeSU |
Enables you to skip the |
Default value: YES |
• |
If YES, the license |
|
|
license agreement that is |
|
|
|
agreement will be |
|
Possible values: |
|
|||
|
displayed in the Schedule |
|
displayed prior to |
||
|
|
|
|
||
|
updates panel of System |
• |
YES |
|
saving the changes in |
|
Update. |
• |
NO |
|
the Schedule updates |
|
|
|
panel. |
||
|
|
|
|
|
|
|
|
|
|
• |
If NO, the license |
|
|
|
|
|
agreement will be |
|
|
|
|
|
displayed and the |
|
|
|
|
|
changes will be saved |
|
|
|
|
|
directly to the Windows |
|
|
|
|
|
Registry subkey. |
|
|
|
|
|
|
ExtrasTab |
Enables you to show or hide |
Default value: YES |
• |
If YES, the Extras tab |
|
|
the Extras tab in the System |
|
|
|
will be displayed in |
|
Possible values: |
|
|||
|
Update workspace. |
|
the System Update |
||
|
|
|
|
||
|
|
• |
YES |
|
workspace. |
|
|
• |
NO |
• |
If NO, the Extras tab |
|
|
|
|
|
will not be displayed |
|
|
|
|
|
in the System Update |
|
|
|
|
|
workspace. |
|
|
|
|
|
|
IgnoreLocalLicense |
Enables you to show or |
Default value: NO |
• |
If YES, the license dialog |
|
Note: By implementing |
hide the license dialog |
|
|
|
will not be displayed |
Possible values: |
|
||||
this setting, you are |
when System Update is |
|
when a repository is |
||
|
|
|
|||
accepting the End User |
downloading and installing |
• |
YES |
|
used to store update |
License Agreement |
an update package located |
• |
NO |
|
packages. |
and the Terms and |
in a repository folder such as |
|
|
||
|
|
|
Note: If you obtain |
||
Conditions on behalf of |
the network share repository. |
|
|
|
|
the end user for each |
|
|
|
|
packages directly |
package to be installed. |
|
|
|
|
from the Lenovo Help |
Do not use this setting |
|
|
|
|
Center and do not use |
if you do not have the |
|
|
|
|
a repository to store |
authority to accept |
|
|
|
|
update packages, the |
the End User License |
|
|
|
|
IgnoreLocalLicense |
Agreement and the |
|
|
|
|
value will be ignored and |
Terms and Conditions |
|
|
|
|
the license dialog will be |
on behalf of the end user. |
|
|
|
|
displayed. |
|
|
|
|
• If NO, the license dialog |
|
|
|
|
|
|
will be displayed when |
|
|
|
|
|
a repository is used to |
|
|
|
|
|
store update packages. |
|
|
|
|
|
|
Chapter 3. Configurations 21

Table 11. \UserSettings\General (continued)
Configurable item |
Description |
Value |
Action |
||
|
|
|
|
|
|
IgnoreRMLicCRCSize |
Enables you to enable |
Default value: YES |
• |
If YES, System Update |
|
|
or disable the following |
|
|
|
will ignore these files and |
|
Possible values: |
|
|||
|
functions when System |
|
will not check for the file |
||
|
|
|
|
||
|
Update downloads update |
• |
YES |
|
corruption and file size. |
|
packages from the Lenovo |
• |
NO |
• |
If NO, System Update |
|
Help Center Web site: |
||||
|
|
|
|
will check for the file |
|
|
|
|
|
|
|
|
• CRC (Cyclic |
|
|
|
corruption and file size. |
|
Redundancy Check): |
|
|
Note: System Update |
|
|
checks for file corruption |
|
|
||
|
|
|
does not check file size |
||
|
of readme and license |
|
|
||
|
|
|
and corruption of readme |
||
|
agreement files when |
|
|
||
|
|
|
files and license agreement |
||
|
you download update |
|
|
||
|
|
|
files when you download |
||
|
packages from the Lenovo |
|
|
||
|
|
|
update packages from a |
||
|
Help Center Web site. |
|
|
||
|
|
|
local repository even if you |
||
|
• File size: checks the file |
|
|
||
|
|
|
set this value to NO. |
||
|
size of readme and license |
|
|
|
|
|
agreement files. |
|
|
|
|
|
|
|
|
||
NotifyInterval |
Specifies the amount of time |
Default value: 300 (seconds) |
You can specify any value |
||
|
between restart notifications |
|
|
between 60 seconds and 86 |
|
|
Possible values: Any value |
||||
|
when you download and |
400 seconds. By default, |
|||
|
between 60 seconds and 86 |
||||
|
install update packages that |
you will be prompted with a |
|||
|
400 seconds |
||||
|
require a reboot. |
restart notification every 300 |
|||
|
|
|
|||
|
|
|
|
seconds when you begin |
|
|
|
|
|
to download and install |
|
|
|
|
|
an update package that |
|
|
|
|
|
forces a reboot or defer the |
|
|
|
|
|
download and installation |
|
|
|
|
|
process. |
|
|
|
|
|
System Update will use |
|
|
|
|
|
the default value when an |
|
|
|
|
|
invalid value is set. For |
|
|
|
|
|
example, if you set a value |
|
|
|
|
|
greater than 86 400 seconds |
|
|
|
|
|
(24 hours), System Update |
|
|
|
|
|
will use the default value of |
|
|
|
|
|
300 seconds. |
|
|
|
|
|
||
RepositoryLocation1 |
Specifies the repository |
Default value: |
System Update will search |
||
|
folder path. The key value |
SUPPORTCENTER |
for update packages in the |
||
|
name should be Repository |
|
|
specified repository folder. |
|
|
Possible values: |
||||
|
Location%N% where N is a |
|
|
||
|
|
|
|
|
|
|
number between 1 and 20, |
• |
SUPPORTCENTER |
|
|
|
including 1 and 20. |
• |
A folder path |
|
|
|
|
|
|
||
|
|
|
|
||
UNCMaxAttempts |
Specifies the maximum |
Default value: 2 |
System Update will attempt |
||
|
number of tries that System |
|
|
the number of tries when |
|
|
Possible values: Any valid |
||||
|
Update will attempt when |
connecting to a network |
|||
|
integer |
||||
|
connecting to a network |
share folder. |
|||
|
|
|
|||
|
share folder before it |
|
|
|
|
|
completely fails. |
|
|
|
|
|
|
|
|
|
|
Example:
\GENERAL \CheckLocalCRC = YES
22 System Update Solution Deployment Guide
\DebugEnable = NO \DisplayInformationScreen = YES \DisplayLicenseNotice = YES \DisplayLicenseNoticeSU = YES \ExtrasTab = NO \IgnoreLocalLicense = NO \IgnoreRMLicCRCSize = NO \NotifyInterval = 300
\RepositoryLocation1 = SUPPORTCENTER \UNCMaxAttempts = 2
\UserSettings\Scheduler
Using the scheduler function, you can configure System Update to search for update packages at designated intervals. To increase the speed of downloading update packages from Lenovo servers, change the Run On setting to a day that fits the needs of your enterprise. Do this when you install System Update.
Note: System Update for Windows 7 operating systems does not provide scheduler settings because the Task Scheduler tool on Windows 7 operating systems has the same function. To employ the scheduler function through the Task Scheduler tool on Windows 7 operating systems, do the following:
1.Click Start, and type "Task Scheduler" in the Search programs and files field and then press Enter. The Task Scheduler program is launched and the Task Scheduler window is displayed.
2.Right-click Task Scheduler (Local) in the left pane of the window and select Create Basic Task. The Create Basic Task Wizard is displayed.
3.Type a name for the new task in the Name field, for example, “TVSU.”You can also add descriptions for the task in the Description field (optional). Then click Next.
4.Select the desired frequency to run the scheduled update and click Next. It is recommended to select Monthly or Weekly.
5.Configure the detailed settings of the frequency you selected on the previous screen to specify when you wish System Update will run to get updates.
Take Monthly as an example, if you select Select all months from the Months drop-down list box, System Update will run once every month. Then from the Days drop-down list box, select one day on which you wish to run the scheduled update. You can also select one day from the On drop-down list box, and then System Update will run on the designated day of the month(s) you specified. Click Next.
6.Select Start a program, and then click Next.
7.Type the installation directory of System Update in the Program/script field, or click Browse to locate the folder where System Update is installed. You can also type desired scheduler settings and values in the Add arguments field (optional) and the Start in field (optional). For detailed information about settings and values for the System Update scheduler, see Table 12 “\UserSettings\Scheduler” on page 23.
Note: The installation directories of System Update are different on computers with the 32-bit Windows 7 operating system and computers with the 64-bit Windows 7 operating system.
8.Click Next to view the summary of your configuration.
9.Click Finish to confirm and complete your configuration.
The default settings and values for the System Update scheduler are provided in the following table.
Table 12. \UserSettings\Scheduler
Configurable item |
Description |
Value |
Action |
|
|
|
|
|
|
SchedulerAbility |
Enables you to activate or |
Default value: YES |
• If YES, System Update will run |
|
|
inactivate the scheduler. |
|
|
on the specified schedule. |
|
Possible values: |
|||
|
|
• If NO, System Update will not |
||
|
|
• |
YES |
|
|
|
run on a schedule. |
||
|
|
|
|
|
|
|
• |
NO |
|
|
|
|
|
|
Chapter 3. Configurations 23
Loading...