

Page 1

LEICA SOFORT
INSTRUCTIONS
Page 2
EN
76
1 2 1a
3
4a
4
4
4b
5 5
22
21
19
20a
20
18
17
16
8
9
10
11
12
13
2
15 14
14a
Page 3
15
EN
24
23
g
f
e
d
a
b
c
25
3
Page 4

EN
FOREWORD
Dear Customer,
We wish you a great deal of pleasure and success using your new
Leica Sofort.
With its fully automatic program control, the Leica Sofort offers
photography fun at its best. Furthermore, scene modes and
manual settings enable you to make adjustments to various
subjects and situations at any time.
Important Notes:
• Please read these instructions in their entirety so that you can
make the most of your Leica Sofort.
• Before using the camera for the first time, please also read the
‘Safety and Approval Notes and Information’ on the relevant
leaflet enclosed in the camera packaging. You must always
observe and follow this information to ensure safe operation of
the camera!
SCOPE OF DELIVERY
Please check the scope of included items for completeness before
using your Leica Sofort for the first time.
a. Leica BP-DC17 battery
b. BC-DC17 battery charger with interchangeable plugs
c. Carrying strap
d. Quick Start Guide leaflet
e. ‘Safety and Approval Notes and Information’ leaflet
4
Page 5
EN
5
Page 6

EN
CONTENTS
FOREWORD .............................................................................................. 4
PACKAGE CONTENTS .............................................................................. 4
DESIGNATION OF PARTS ......................................................................... 7
ATTACHING THE CARRYING STRAP ........................................................8
CHARGING THE BATTERY ........................................................................ 9
PREPARING THE CHARGER .................................................................. 9
CHARGING ............................................................................................. 9
STATUS DISPLAYS ...............................................................................9
INSERTING THE BATTERY .....................................................................10
CHECKING THE BATTERY CAPACITY .................................................10
TURNING ON THE CAMERA ..................................................................10
INSERTING/REMOVING A FILM PACK .................................................11
DISTANCE SETTING ...............................................................................13
TAKING PHOTOGRAPHS ........................................................................14
ADJUSTING PICTURE BRIGHTNESS ......................................................15
FLASH MODES ....................................................................................... 16
SELF-TIMER ............................................................................................ 17
SCENE MODES AND SPECIAL FUNCTIONS ......................................... 18
APPENDIX ............................................................................................... 20
TROUBLESHOOTING ...........................................................................20
IMPORTANT NOTES ............................................................................21
CAMERA ........................................................................................... 21
BATTERY ........................................................................................... 22
FILM PACK/PICTURES ..................................................................... 23
CARE INSTRUCTIONS .........................................................................24
CAMERA ........................................................................................... 24
BATTERY ........................................................................................... 24
STORAGE .............................................................................................25
LEICA PRODUCT SUPPORT ................................................................26
LEICA CUSTOMER CARE .....................................................................26
6
Page 7
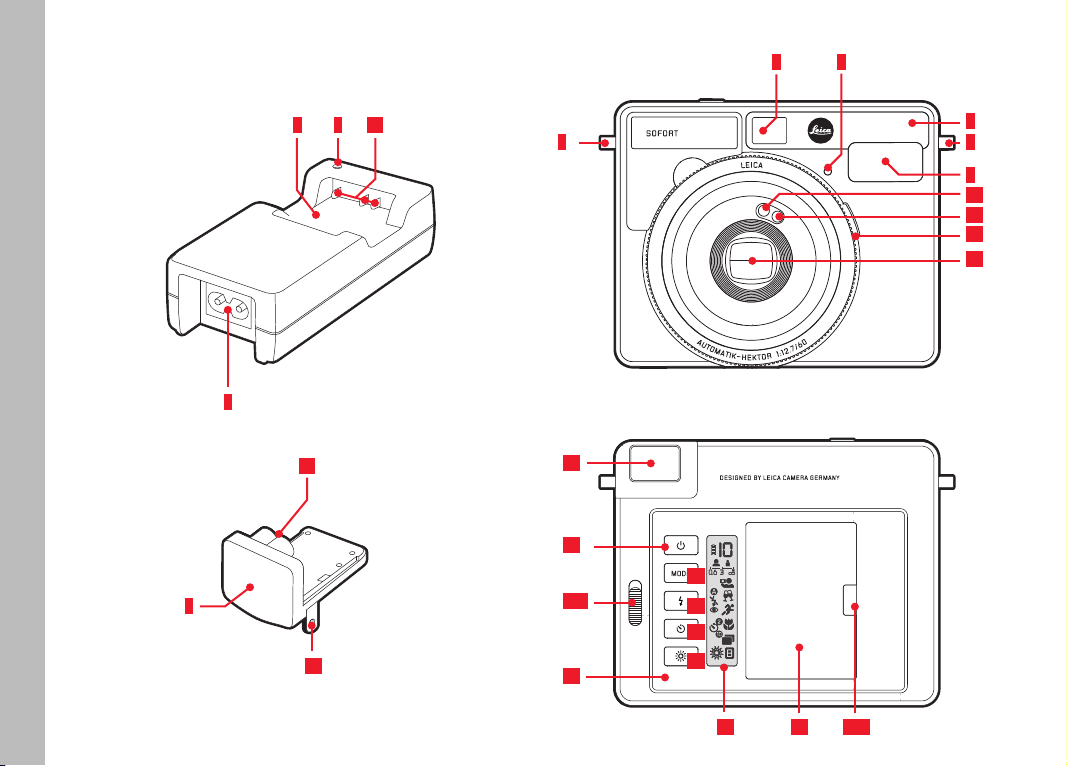
PART DESIGNATIONS
Charger
1 Battery tray
a Contacts
2 Charging pilot light
3 Socket for interchangeable plug/mains cable
4 Interchangeable plug
a Charger contacts
b Mains contacts
Camera Front
5 Carrying strap attachment
6 Selfie mirror
7 Self-timer LED
8 Viewfinder
9 Flash
10 Exposure measuring cell
11 Flash exposure measuring cell
12 Setting ring for dirtance ranges
13 Lens
Camera Back
14 Battery compartment cover
a Release tab
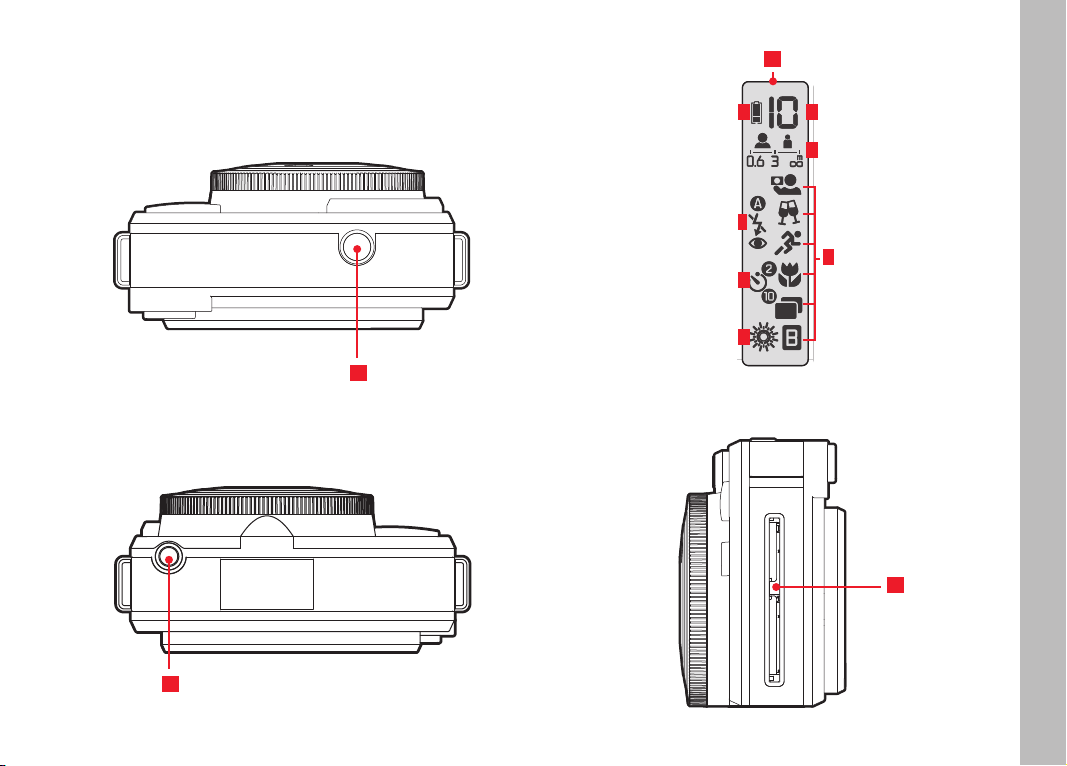
15 Display
a Counter
b Range
15 Display (cont.)
c Scene modes/special functions
= Selfie / Party / Sport / = Macro /
= Double exposure / = Long exposure
d Brightness stage:
= slightly brighter / = slightly darker
e Self-Timer:
2s delay time / 10s delay time
f Flash mode:
= Automatic fill-in flash control (standard setting) /
= always flash / = with preflash (against red-eye effect) /
= off
g Battery capacity
16 Button for brightness setting
17 Self-timer button
18 Button for flash modes
19 Button for scene modes
20 Back cover
a Unlocking slider
21 Main switch
22 Viewfinder eyepiece
Camera Top
23 Shutter release button
Camera Bottom
24 Tripod thread
1
⁄4"
Camera Left
25 Eject slot
EN
7
Page 8
EN
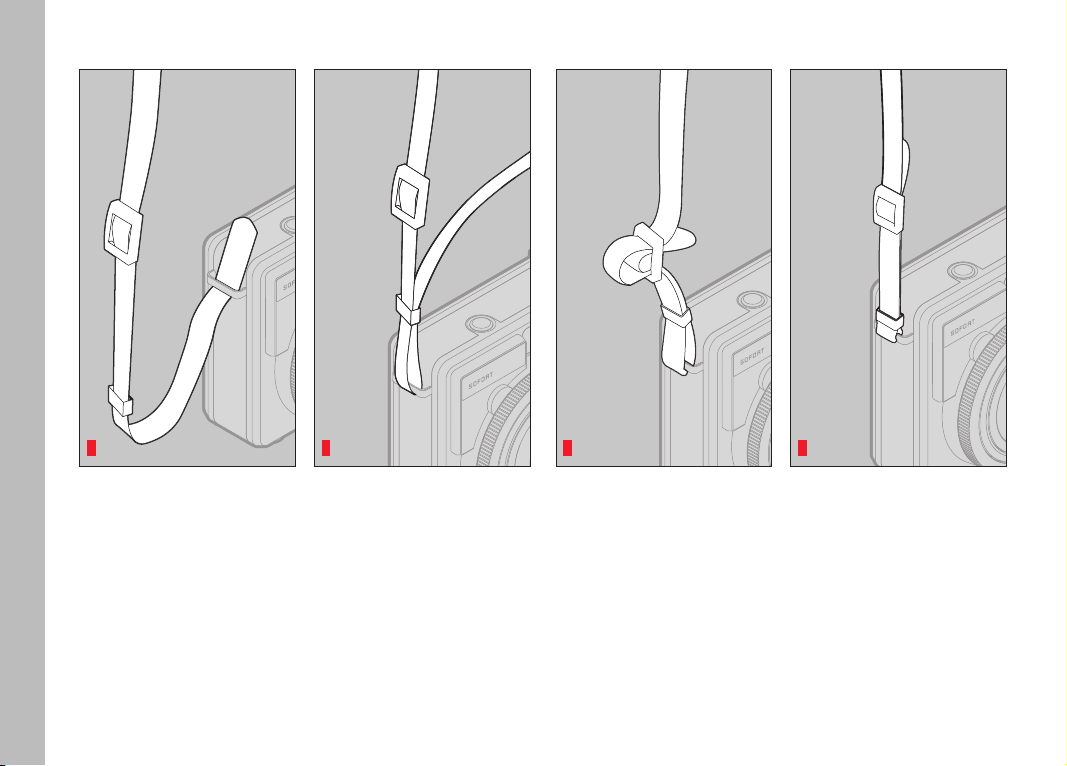
ATTACHING THE CARRYING STRAP
1 2 3 4
8
Page 9
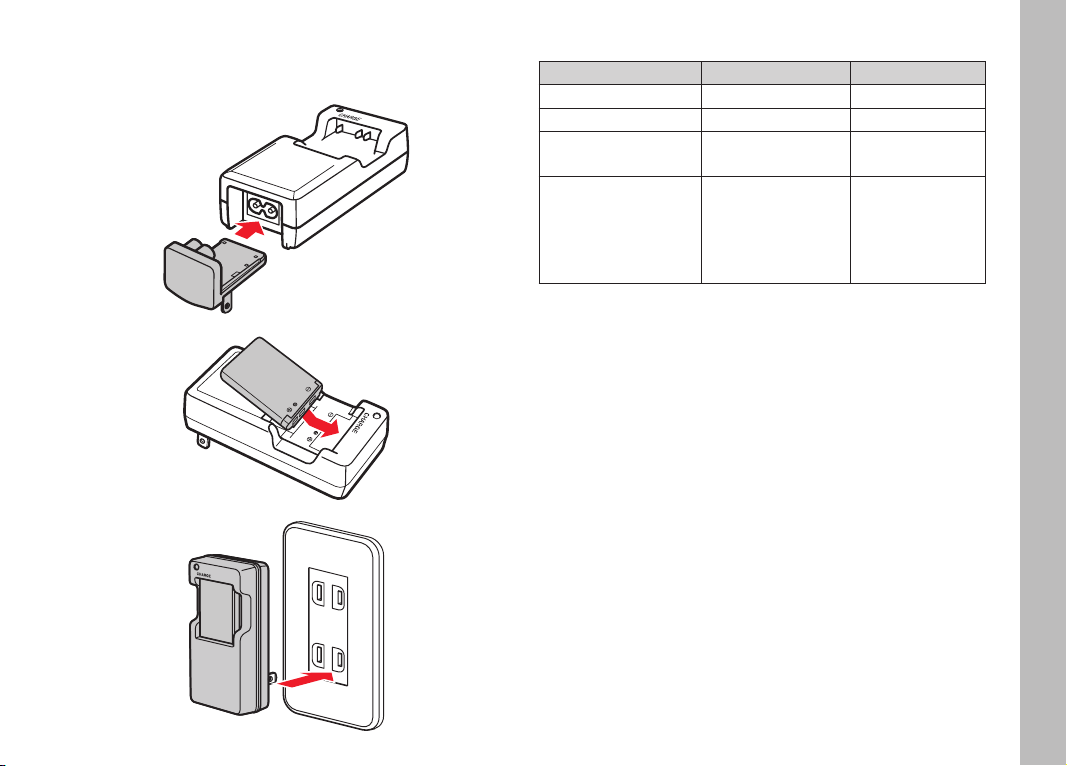
CHARGING THE BATTERY
PREPARING THE CHARGER
CHARGING
STATUS DISPLAYS
Charging pilot light Battery status Notes
Off
Lights up orange Battery charging
Lights up green Battery charged Remove the battery
from the charger
Flashes orange Battery faulty Remove the battery
from the charger,
disconnect the
charger from the
mains
Note:
Please see the ‘Troubleshooting’ section on p. 20.
EN
9
Page 10

EN
INSERTING THE BATTERY
Note:
The battery to be inserted should be fully charged.
CHECKING THE BATTERY CAPACITY
The battery is fully charged
The battery is partially discharged
The battery is largely discharged; charging is recommended
The battery is discharged; charging essential
TURNING ON THE CAMERA
The lens moves to the working position. appears
in the display as confirmation (flashing at first).
When the flash is ready, appears permanently.
Notes:
• The lens cover must be able to open itself, i.e. make sure that
you are not holding it with a finger, for example.
• Always switch the camera off when you are not using it to save
the battery capacity.
• The camera switches itself off if it is not used for 5 minutes, i.e.
if no operation is run during that time.
10
Page 11

INSERTING / REMOVING A FILM PACK
Inserting
The counter shows the number of pictures remaining, i.e. 10 at first.
At 0 you can remove the empty film pack.
Removing
EN
11
Page 12

EN
Notes:
• A charged battery must be used when a film pack is being
inserted.
• If no film pack has been inserted, 0 appears in the counter.
• Please use only the following film pack types:
– LEICA INSTANT COLOR FILM
– LEICA INSTANT MONOCHROM FILM
• Remove the film pack from its sealed packaging only immediately before inserting.
• An unused film pack contains 10 pictures and a black cover
sheet. This is automatically ejected after the back is closed.
• Wait until the automatic ejection is complete before you remove
the cover sheet or the pictures out of the camera.
• In addition to the notes on handling pictures from this camera
below, please also note the relevant precautionary notes in
‘Safety and Approval Notes and Information’ (on the leaflet
enclosed in the camera packaging), and the relevant notes in the
film pack packaging.
12
Page 13

DISTANCE SETTING
In the default setting, the camera is set to pictures of subjects at
distances of approx. 0.6 to 3 meters/2 to 10 feet. This corresponds to the distance range used for selfies, full-frame head
portraits and photographs of small groups.
Furthermore, you can also choose a second distance range of 3
meters/10 feet to infinity that you should use for landscape
photography, for example.
Close-up (0.6-3m/ 2-10ft)
For example, for “selfies”,
full-frame head portraits and photographs of small groups
Long-distance range
(3m/10ft - ∞)
For example, for landscape shots
The distance range setting ring is spring-loaded, i.e. it always
returns to its original position.
Note:
When the camera is switched on, the factory settings are always
the default, i.e. close-up is switched on, even if you set long-distance range before switching the camera off.
EN
13
Page 14

EN
TAKING PHOTOGRAPHS
1 2 3
–
1. Determine your trimming while looking through the viewfinder
eyepiece.
2. Hold the camera steadily and press the shutter release button.
The picture is ejected, the counter counts back. After the last
picture, 0 appears.
3. When the picture has finished ejecting (the corresponding
noise has come to an end), you can fully remove it. To do this,
only grasp the picture at the edges - and for the following 5
minutes.
The picture will develop completely automatically without any
special treatment. At room temperature (25°C/77°F) the final
appearance has been achieved after approx. 90 seconds, after
approx. 5 minutes it has developed completely.
Notes:
• For portrait pictures, hold the camera so that the flash is at the
top.
• Make sure that the exposure measurement cells, the lens, the
viewfinder and the ejection slot are not covered, e.g. by the
carrying strap or your finger.
• While flashes, i.e. if the flash is not yet ready, the shutter
remains locked.
• For the first 5 minutes, protect the picture from direct sunlight,
and do not exert any pressure on the picture surface during this
time.
14
Page 15

ADJUSTING PICTURE BRIGHTNESS
If a picture is too bright or too dark for you with the factory
settings, two correction stages are available to you.
For slightly brighter pictures
For slightly darker pictures
Notes:
• A correction setting is only ever valid for one picture, i.e. it must
be reset for every picture.
• When the camera is switched on, no correction has been set (=
no display), even if one had been set before the camera was
switched off.
EN
15
Page 16

EN
FLASH MODES
In the factory setting, flash mode is controlled automatically
depending on the ambient brightness. Three optional modes are
available.
Factory setting
Flash output is controlled automatically depending on the ambient
brightness.
Flash before every shot
For example to light up your main
subject if it is much darker than the
rest of the image field.
Preflash
For example to reduce the red-eye
effect three weaker preflashes are
fired immediately before a flash shot.
Note:
Hold the camera steadily until the
shot has been taken.
Flash off
For example, if the use of flash is
prohibited in a museum or to
represent the light mood in a darker
setting more naturally.
Note:
Hold the camera steadily while taking
the shot.
16
Page 17

SELF-TIMER
You can either create self-timer pictures with a 2 second delay
time, e.g. to avoid wobbling from pressing the shutter release
button, or with a 10 second delay time, e.g. so that you can be in
the picture.
Factory setting
-Delay time:
For example, so that you can be in
the picture. Press the shutter release
button
self-timer LED lights up for
approx. 7 s, then flashes for approx.
3 s
shot
-Delay time:
For example, to prevent wobble when
pressing the shutter release button.
Press the shutter release button
self-timer LED flashes for approx.
2 s
shot
Notes:
• After one run, the function is switched off (= no display).
• When the camera is switched on, the function is switched off,
even if it was set before the camera was switched off.
EN
17
Page 18

EN
SCENE MODES AND SPECIAL FUNCTIONS
Factory setting (0.6 - 3m/2 - 10ft)
Selfie (0.3 - 0.6m/1 - 2ft)
Party (0.6 - 3m/2 - 10ft)
Sport (0.6 - 3m/2 - 10ft)
Macro (0.3 - 0.6m/1 - 2ft)
Double exposure (0.6 - 3m/
1 - 2ft)
Long exposure (3m/10ft - ∞)
Factory setting (No display)
Exposure and flash use are controlled automatically in a way that is
suitable for many normal subjects and situations depending on the
ambient brightness.
Six specially designed programs are available to you for a few
common subject types and situations or to achieve certain effects:
Macro
Macro mode allows a larger depiction of your subjects than in
normal mode. This is achieved by shorter distances from the
subject. Whereas the close-focus range in normal mode is
60cm/2ft, the range between 30 and 60cm/ 1 and 2ft is available
to you in macro mode. At a distance of 30cm/1ft, the depiction is
twice as big as at 60cm/2ft.
Note:
Hold the camera steadily while taking the shot.
Selfie
For spontaneous pictures of people at distances between ‘arm’s
length’ (minimum 30cm/1ft) and 60cm/2ft. Determine the
desired framing with the help of the selfie mirror above the lens.
18
Page 19

Party
For example to reduce the red-eye effect.
Sport
For example, to depict moving subjects in focus.
Long exposure
For example, for pictures of fireworks, where several firework
cascades, explosions, etc. are to be photographed.
Note:
The camera should be held steadily, preferably by being mounted
on a tripod.
Double exposure
For example, to allow a person to appear in a picture twice.
Note:
Hold the camera steadily until the second shot has been taken.
EN
19
Page 20

EN
20
APPENDIX
TROUBLESHOOTING
– Problem – Possible Cause – Remedy
– The camera cannot
be switched on.
– The battery
discharges quickly.
– The camera switches
itself off suddenly.
– Charging
does not start.
– Charging takes a long
time.
– The charging pilot
light lights up, but the
battery does not
charge.
– The battery is flat. – Charge the battery or insert a
fully charged battery.
– The battery has not been inserted
properly.
– The battery compartment cover has
not been closed properly.
– The battery is cold. – Warm the battery, e.g. in a pants pocket or another warm place, and
– The battery contacts are dirty. – Clean the contacts with a soft, dry cloth.
– The battery has already been charged
many times.
– The battery is flat. – Charge the battery or insert a
– The battery has not been inserted
properly.
– The charger is not sitting properly in
the mains socket.
– The ambient temperature is too high
or too low.
– The battery contacts are dirty. – Clean the contacts with a soft, dry cloth.
– The battery has already been charged
many times.
– The battery is too hot or too cold. – Wait until the battery temperature has settled.
– Insert the battery in the right direction.
– Close the cover, i.e. press it until
it engages.
insert it immediately before taking the first picture.
– The battery has reached the end of its useful life. Buy a new battery.
fully charged battery.
– Insert the battery in the right direction.
– Make sure that the charger has been plugged in properly.
– Only charge the battery at room temperature.
– The battery has reached the end of its useful life. Buy a new battery.
Page 21

IMPORTANT NOTES
CAMERA
• Protect the camera from contact with insect sprays and other
aggressive chemicals. Benzene (cleaning solvent), thinner and
alcohol must not be used for cleaning.
• Certain chemicals and liquids can damage the camera’s housing
or the surface finish.
• As rubber and plastics sometimes emit aggressive chemicals,
they should not remain in contact with the camera for a long
time.
• Your camera is a precision instrument. Protect it from jolts.
• Ensure that sand and dust cannot get into the camera, e.g. on
the beach. Sand and dust can damage the camera, battery and
film pack. Take particular care when inserting and removing the
battery and film pack.
• If salt water spray gets onto the camera, wet a soft cloth with
tap water, wring it out thoroughly and wipe the camera with it.
Then wipe down thoroughly with a dry cloth.
• The correct functioning of the camera is only guaranteed within
the temperature range of 5-40°C/41-104°F.
• When using on a tripod:
– Make sure that the tripod is steady.
– The tripod screw must only be hand-tight.
– Change direction only by moving the tripod or turning the
tripod head, never by turning the camera.
– Do not transport the tripod with the camera attached.
• In the event of malfunctions, switch the camera off and remove
the battery. If the problem persists after replacing the battery
and switching the camera on, please contact your dealer, the
Leica office in your country or Leica Camera AG.
EN
21
Page 22

EN
22
BATTERY
• A new battery only reaches its full capacity after it has been fully
charged and – by use in the camera – discharged two or three
times. This discharge procedure should be repeated roughly
every 25 cycles.
• Lithium ion batteries can be charged at any time, regardless of
their current charge level. If a battery is only partly discharged
when charging starts, it is charged to full capacity faster.
• Lithium ion batteries generate power through internal chemical
reactions. This reaction is influenced by ambient temperature
and humidity.
• At temperatures below 10°C or above 35°C (50°/95°F) the
charging time is longer. At temperatures below 0°C/32°F the
battery cannot be charged (the charger does not switch on or
switches itself off again).
• Both battery and charger become warm during charging. This is
normal and not a malfunction.
• Remove the battery if you will not be using the camera for a long
period of time. Turn the camera off using the main switch before
removing the battery. Otherwise, after several weeks the battery
could become totally discharged, i.e. the voltage is sharply
reduced as the camera still consumes a small amount of current
even when it is turned off (e.g. for saving your settings).
• Even with optimum conditions of use, every battery has a limited
service life. After several hundred charging cycles, this becomes
noticeable as the operating times get significantly shorter.
• Dispose of damaged batteries in accordance with the relevant
regulations at an approved collection point for proper recycling.
• If the charger is used in the vicinity of radio receivers it can
interfere with reception; maintain a distance of at least 1m/3ft
between the devices.
• When the charger is in use, it can make a noise (buzzing) – this
is quite normal and is not a malfunction.
• When it is not in use, disconnect the charger from the mains as
otherwise it uses a certain (very small) amount of power even
when no battery is inserted.
• If the LEDs on the charger flash orange after the battery has
been inserted, this indicates a charging error (e.g. maximum
charging time exceeded, voltages or temperatures outside the
permitted ranges, or short circuit). In this case, disconnect the
charger from the mains and remove the battery. Ensure that the
above temperature conditions are met and then restart the
charging process.
• If the problem persists, please contact your dealer, the Leica
office in your country or Leica Camera AG.
Page 23

FILM PACK/PICTURES
• Store the film packs in a cool and dry place. Avoid leaving them
in warm places (e.g. inside a vehicle in the sun) for an extended
period.
• Film packs should be at around ambient temperature when
inserted. If they have been stored in a much colder or warmer
environment, you should therefore first of all allow them to reach
ambient temperature outside the camera before inserting them.
• Protect the film packs against strong X-rays, e.g. during security
checks – this can lead to fogging on the unexposed images.
During flights, for example, we recommend that you put the film
packs in your hand luggage and ask the security staff to check it
separately.
• After a film pack has been inserted, the 10 pictures should be
taken within a few weeks.
• Film packs should always be used before the expiration date on
the outer packaging.
• Pictures should not be bent or shaken, not exposed to intensive
sunshine, and not cut or opened.
• Preferably, store the pictures in a dark, cool and dry place.
• Keep the pictures out of the reach of young children.
• Pay attention to the notes in the documentation enclosed with
every film pack.
EN
23
Page 24

EN
CARE INSTRUCTIONS
CAMERA
• Since any soiling also represents a growth medium for
microorganisms, you should take care to keep your camera
clean.
• Only clean the camera with a soft, dry cloth. Stubborn dirt
should first of all be covered with a well-thinned cleaning agent
and then wiped off with a dry cloth.
• To remove marks and fingerprints, wipe the camera with a clean
lint-free cloth. Tougher dirt in hard to reach corners of the
camera body can be removed with a small brush.
• All mechanically operated bearings and sliding surfaces on your
camera are lubricated. Please remember this if you will not be
using the camera for a long period of time. To prevent the
lubrication points becoming gummed up, the camera shutter
should be operated several times every three months. We also
recommend repeated adjustment and use of the setting dials.
BATTERY
• Lithium ion batteries should only be stored partly charged, i.e.
not when fully discharged or fully charged. For very long storage
periods, the battery should be charged for around 15 minutes
twice a year to prevent total discharge.
• To ensure a maximum service life of the battery, it should not be
exposed to constant extremes of temperature (e.g. in a parked
car in the summer or winter).
• Always keep the charger contacts clean, and never short circuit
them.
24
Page 25

STORAGE
• If you are not using the camera for a longer period of time, we
recommend that you switch it off and remove the battery.
• A lens works like a magnifying glass if bright sunlight shines on
the front of the camera. The camera must therefore never be
stored without lens protection. Keeping the camera in the shade
(or immediately putting it away in the case) will help prevent
damage to the interior of the camera.
• You should preferably store the camera in a closed and padded
container so that nothing can damage it and it is protected from
dust.
• Store the camera in a dry, adequately ventilated place, where
neither high temperatures nor high humidity will occur. When
used in humid conditions, the camera should be completely free
of all moisture before being stored away.
• Photo cases that become wet during use should be emptied to
prevent damage to your camera caused by moisture and any
leather-tanning residue released.
• To prevent fungal growth during use in hot, humid tropical
climates, the camera should be exposed to the air as much as
possible. Storage in airtight containers or cases is recommended only if a desiccant such as silica gel is used.
To prevent the formation of fungus, do not store the camera in a
leather case for extended periods of time.
• Note down the serial number of your camera, as this is
extremely important in case of loss.
EN
25
Page 26

EN
LEICA PRODUCT SUPPORT
The Product Support Department at Leica AG can answer any technical questions relating to Leica products, including support for the
supplied software in writing, on the phone or by email.
They are also the contact point for purchasing advice and to order
instruction manuals. Alternatively, you can send us your questions
using the contact form on the Leica Camera AG homepage.
Leica Camera AG
Product Support/Software Support
Am Leitz-Park 5
35578 Wetzlar, Germany
LEICA SERVICE WORLDWIDE
Tel.: +49 (0)6441-2080-111 /-108
Fax: +49(0)6441-2080-490
info@leica-camera.com / software-support@leica-camera.com
LEICA CUSTOMER CARE
The Leica Camera AG Customer Care department or the repair
service provided by authorized Leica agents in your country are
available for service, maintenance and repairs of your Leica
equipment (see pp.28/29 for a list of addresses).
Leica Camera AG
Customer Care
Am Leitz-Park 5
35578 Wetzlar, Germany
Tel.: +49(0)6441-2080-189
Fax: +49(0)6441-2080-339
customer.care@leica-camera.com
26
Page 27

LEICA CAMERA AG GUARANTEE
Dear Customer,
Congratulations on your well-considered purchase. With this Leica
camera, you have acquired a world-famous branded product.
In addition to your statutory warranty rights from your dealer, for
this Leica camera you will also have guarantee rights from Leica
Camera AG for two years according to the rules below. The Leica
guarantee neither restricts the statutory rights of the consumer under the relevant national legislation, nor the rights of the consumer
vis-a-vis the dealer arising from the purchase contract concluded
between them.
Leica Camera AG
GUARANTEE RULES
By purchasing this Leica camera you have acquired a product that
is manufactured according to special quality guidelines and tested
in the individual stages of manufacture by experienced specialists.
We shall assume the guarantee of two years provided for this product from the day of sale by the dealer under the following conditions:
1) Within the guarantee period, claims related to manufacturing
defects will be met free of charge at our discretion by repairing
the defect, replacing defective parts or exchanging the product
for an equivalent defect-free one. Claims of any type other than
those mentioned above, irrespective of the legal basis, are not
covered by this guarantee.
2) Entitlements to guarantee benefits shall lapse if the fault in question can be attributed to incorrect handling – which can also
include the use of accessories from another manufacturer –,
interventions have been made by unauthorized persons or repair
shops or the fabrication number has been rendered illegible.
3) Guarantee claims may be asserted only if the sales certificate is
presented – marked with the date of purchase, address and signature of the dealer.
4) If the guarantee is used, please send the Leica camera together
with the sales certificate and an outline of the complaint to the
Leica Camera AG Customer Care department or a Leica national
representation.
5) If necessary, tourists can use the representation in the country
in which they are traveling by presenting the warranty certificate
in line with the guarantee rules of Leica Camera AG.
EN
LEICA SERVICE WORLDWIDE
27
Page 28

EN
LEICA SERVICE WORLDWIDE
GERMANY & AUSTRIA
Leica Camera AG
Customer Care
Am Leitz-Park 5
D-35578 Wetzlar
Tel. +49 6441-2080-189
customer.care@leica-camera.com
EUROPE
France
Leica Camera SARL Customer Care France
54 Boulevard Beaumarchais
75011 Paris
Tel. +33 0148053285
serviceclient@leica-camera.fr
Italy
Leica Camera Italia Srl
Via Mengoni 4
20121 Milano
Tel. +39 02 7274021
CC-ITA@leica-camera.com
Netherlands
Transcontinenta
Tarwestraat 29
NL 2153 GE Nieuw-Vennep
Tel. +31 2 52 68 75 55
leica@transcontinenta.nl
Russia
Leica Camera AG,
representative office & LEICA STORE Leninsky
prospect 61/1
Moscow, 119333
Tel. +7 499 727 0307
service@leicacamera.ru
Switzerland
Leica Camera AG
Hauptstrasse 104
CH-2560 Nidau
Tel. +41 32 332 90 90
service@leica-camera.ch
Denmark / Sweden
Nordisk Foto Import A/S
Gl.Köge Landevej 497
DK-2650 Hvidovre
Tel. +45 36 77 19 77
nofi@leica-camera.dk
Greece
Skiadopoulos Ltd
12 George Street / Sq. Kanigos
10677 Athen
Tel. +30 21 03 84 12 36
support@skiadopoulos.gr
Luxembourg
Lecuit Opto-Technical S.A.
3, rue des Joncs
L-1818 Howald
Tel. +352 49 56 07-1
info@lecuit.lu
Norway
Bresson AS
Drammensveien 130, Bygg C-19 Postboks 600
N-0214 Oslo
Tel. +47 99 50 13 50
mail@bresson.no
Poland
Millroy Fotodystrybucja Ul.
Gwiazdzista 71
01-651 Warszawa
Tel. +48 22 732 2660 w. 111
serwis@leicacamera.pl
Great Britain
Leica Camera Limited
27 Bruton Place
London
W1J 6NQ
Tel. +44 20 7629 1351
customercare.uk@leica-camera.com
28
Page 29

NORTH & SOUTH AMERICA
USA & Canada
Leica Camera Inc.
1 Pearl Court, Unit A Allendale,
New Jersey 07401
Tel. +1 201 995 0051
repair@leicacamerausa.com
SOUTH AFRICA
South Africa
Tudortech (Pty) Ltd Park on Long
66 Long Street Cape Town 8001
Tel. +27 21 4242978
leicasales@tudortech.co.za
AUSTRALIA / NEW ZEALAND
Australia
Leica Camera Australia Pty Ltd.
3/876 Lorimer Street
Port Melbourne VIC 3207
Tel. +61 3 9248 4444
info.lcau@leica-camera.com
New Zealand
Lacklands Limited
33 George Street
Mt Eden Auckland
Tel. +64 96 30 07 53
info@lacklands.co.nz
ASIA
China - Guanghzou
2601,Peace World Plaza,
No.362-366 Huanshi Road
GuangZhou 510060,
China
Tel. +86 020 8375 3992 i
nfogz@schmidtmarketing.com
Japan
Leica Camera Japan Co., Ltd. 6-4-1 Ginza
Chuo-ku
Tokyo 104-0061 Japan
Tel. +81 3 62 15 70 72
repair@leica-camera.co.jp
Singapore / Thailand / Malaysia
Leica Camera Asia Pacific Pte Ltd
600 North Bridge Road
#11-09/10
Parkview Square Singapore 188778
Tel. +65 6511 9388
Korea
Leica Camera Korea
Bongeunsa-ro 169 5F Gangnam-gu
Seoul, Korea 135-545
Tel. +82 2 2285 4421
Fax +82 70 8630 7466
EN
29
 Loading...