

Page 1

LEICA SFC1
INSTRUCTION MANUAL
Page 2
EN
5 6
9a
9c
9e
9b
4
3
2
9
7
9d
8
1
10a
11
12
10
10b
2
Page 3

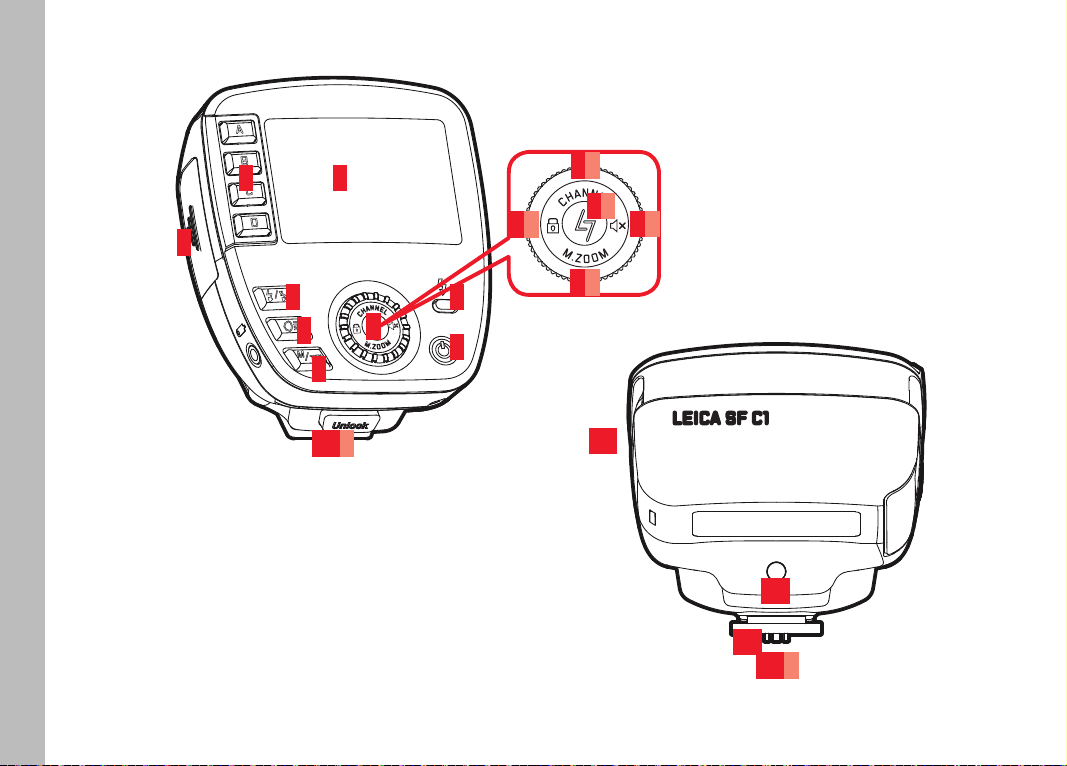
PART DESIGNATIONS
1 Button for toggling between manual and TTL flash exposure
control
2 On/Off button for modeling light
3 On/Off button for flash array
4 Battery compartment cover
5 Group keys
6 LCD panel
7 Ready LED/Test flash button
8 Main switch
9 Combination dial / rocker switch with settings for
a Channel selection
b Audible signal
c Device pairing
d Zoom mode/Focal length
e Button lock
10 Mounting foot with
a Unlock button
b Locking pin
11 Memory card slot
12 AF assist light
EN
3
Page 4
EN
FOREWORD
Dear Customer,
MEANING OF THE VARIOUS REMARK CATEGORIES
Thank you for purchasing the Leica SFC1 remote control – you
have chosen an excellent product. We hope you will thoroughly
Note:
Additional information
enjoy your purchase.
Please read this manual in its entirety so that you can enjoy the full
scope of functionality in this remote control.
Important:
Failure to observe this information can result in damage to the
camera, accessories, or the photos
Attention:
Failure to observe this information can result in personal injury
Note:
You will find the manufacturing date of your Leica SFC1 on the
labels provided in the Warranty Card and/or on the packaging. The
date format is L Y M DD XXXXXXX:
L
Y
M
DD
4
XXXXXXX
= Leica
= Year (1-0 (=2011-2020))
= Month (1-9 = Jan.-Sep., A = Oct., B = Nov., C = Dec.)
= Day (0-31)
= Firmware version
Page 5

TABLE OF CONTENT
Part designations .................................................................... 2/3
Foreword .....................................................................................4
Safety precautions .......................................................................6
Disposal of electric and electronic equipment ..............................7
Compatible flash units ..................................................................8
Compatible cameras ....................................................................9
Camera type-dependent functions ................................................9
Preparations
Power supply .............................................................................10
Changing the power source ........................................................10
Battery disposal .........................................................................11
Operation
Attaching/detaching device .......................................................12
Switching on and off ..................................................................13
Tethering the remote control to the flash unit .............................14
Selecting the flash array .............................................................15
Channel selection ......................................................................16
Flash unit settings via the remote control
Flash modes ..............................................................................17
Flash exposure compensation and partial light power levels ........17
Zoom reflector ...........................................................................18
Other settings/functions
Audible signal ............................................................................19
Modeling light ............................................................................19
Button lock ................................................................................20
AF assist light ............................................................................20
Appendix
Maintenance and care ................................................................21
Troubleshooting .........................................................................21
Technical data ............................................................................22
Leica service addresses .............................................................23
EN
5
Page 6

EN
SAFETY PRECAUTIONS
Attention:
Intended use
• Flash units are designed and certified for the lighting of objects
for photography purposes only. These devices must not be used
for any other purpose.
• Flash units must never be fired in proximity of flammable gases
or liquids (benzene, solvents, etc.)! Non-compliance may pose
EXPLOSION or FIRE HAZARDS!
• Avoid flash photography too close to the subject's eyes. The
extreme light output can cause retinal damage in humans and
animals, resulting in permanently impaired vision or even
blindness.
• Never use flash photography in the direction of oncoming traffic,
as cyclists and other traffic users may be momentarily blinded,
which may cause accidents. Deactivate the flash unit and ensure
that no flash will be triggered before taking pictures of oncoming
traffic.
• Never touch the contacts in the mounting foot of the controller.
• Do not handle the remote control under any circumstances if the
housing has been damaged and internal components are visible
– HIGH VOLTAGE HAZARD!
• This also applies if there is a risk that water or other liquids
could have penetrated the device case, or any kind of metallic or
flammable object.
• In these cases, remove the batteries. Take great care when
doing so.
• Even after battery removal, the high-voltage circuitry can still
hold a sufficient charge to cause electric shock, burns or other
injuries.
• The device must therefore continue to be kept safe from
moisture (e.g. rain or splash water) and must not be handled
with moist hands. Do not attempt to disassemble, repair, or
modify the device! The device interior does not hold any
components that could be repaired by a layman.
• Please only use the batteries specified and approved in this
manual.
• Do not short-circuit batteries or expose them to excessive heat
(e.g. direct sunshine or fire).
• Depleted batteries must never be thrown into a fire!
• Do not attempt to recharge single-use dry cell batteries (primary
cells).
6
Page 7
Important:
• Protect your flash unit against excessive heat and humidity. Do
not store the flash unit in the glove compartment of your vehicle.
• Rapid changes in ambient temperature can result in condensation. Allow the flash unit time to acclimatize before using!
• Make sure that no opaque objects are positioned directly in
front of the diffuser or directly on it when the flash is triggered.
The diffuser must be clean. Failure to observe this can result in
burn damage to the objects or the diffuser due to the extremely
high energy output of the flash.
• The flash unit must only be used together with a camera-integrated flash if this can be fully opened out or extended.
• Do not use batteries that are damaged in any way!
• Depleted batteries can leak battery acid, which could damage
the contacts. Always remove depleted batteries from the device.
DISPOSAL OF ELECTRIC AND
ELECTRONIC EQUIPMENT
(Applies within the EU and for other European
countries with active waste separation policies.)
This device contains electrical and/or electronic components and
must therefore not be disposed of with normal household waste!
Make sure you bring this device to an approved electronic waste
collection point for recycling. The service is free of charge.
If the device contains batteries, whether rechargeable or not, these
must be removed first and disposed of separately in line with the
applicable regulations. Please contact your local authority, waste
disposal service, or the retailer from whom you purchased the
device for more information on correct waste disposal.
Note:
Correct exposure values were evaluated as part of EMC
testing within the scope of the CE certification.
Do not touch the SCA contacts!
Direct skin contact may in some instances result in damage to
the device.
EN
7
Page 8

EN
COMPATIBLE FLASH UNITS
Leica SFC1 is a remote control device for the wireless operation of
system-compatible flash units arranged at a distance to the
camera. These include Leica SF60 and system-compatible flash
units by Nissin1.
Any number of SF60 units can be operated and triggered with this
remote control at distances up to 100m2. The flash units can be
Note:
The descriptions in this manual are generally limited to the use of
the LeicaSFC1 in conjunction with the Leica flash unit SF60. In
principle, they also apply to all other flash units that should be
controlled remotely by the LeicaSFC1. Please read their
respective manuals for details on the operation and settings of
other flash units.
operated simultaneously or can be grouped into max. three arrays3.
Settings can be configured for all flash units in an array simultaneously, but fully independent of the units in the other arrays4.
The following settings can be done remotely:
– Focal length and/or automatic operation of the zoom reflector
– manual flash control M, including power level selection, or
automatic flash control TTL including optional flash exposure
control
Please read the respective manual for configuring the LeicaSF60
settings.
1
A firmware update for the flash unit may be required. Please contact your Nissin
dealer for more information.
2
Range at optimal conditions. The “line of sight” of the remote control to all controlled
flash units must not be obstructed. Electric cables, metal parts, walls, as well as other
2.4GHz remote controls and other devices in the vicinity can impact on the range.
3
This applies to Leica SF60. Other system-compatible and relevantly equipped flash
units allow a configuration of up to four groups.
4
8
Depending on the setting for SFC1, see p. 15
Page 9

COMPATIBLE CAMERAS
The Leica SFC1 remote control is designed for use with Leica
digital cameras of the S, SL, M, CL and Q series, which control
flash exposure autonomously by way of internal TTL (Through the
Lens) calculations. LeicaSFC1 can, however, also be used with
other Leica camera models when the flash units used are set to
manual mode.
Using the LeicaSFC1 remote control with third-party cameras
may, however, be problematic. Similarly positioned contacts with
differing electric values in the accessory shoes of other camera
makes may result in incompatibility, which may negatively impact
the function of one – or both – devices. Leica Camera AG can
therefore not extend liability, and specifically not for damage
outside the actual remote control.
CAMERA TYPE-DEPENDENT FUNCTIONS
The flash functions listed below are available (some may depend on
the equipment of the camera system used).
– Automatic flash sync speed control
– TTL flash mode
– Automatic fill-in flash mode
– Manual flash exposure compensation
– Normal or end-of-exposure synchronization (camera setting)
– Automatic high speed synchronization, if supported by camera
model
– Automatic zoom reflector control
– Pre-flash function to prevent “red eye” (camera setting)
– Wireless triggering and control of flash exposure in system-com-
patible, camera-external flash units
EN
Note:
Please also note the information provided regarding flash operation
in the manual of your camera, and specifically details regarding the
flash functions supported, the possible/necessary flash-related
settings, and the information provided regarding flash-related
displays of the camera used.
Note:
If the camera model used does not supply the required data, or if
the lens used does not have the required data contacts for the lens
mount, functional restrictions can be expected.
9
Page 10

EN
2
1
PREPARATIONS
POWER SUPPLY
The remote control can be operated with the following power
sources:
– 2 alkaline manganese batteries 1.5V, type IEC LR03 (AAA/
Micro)
This type of battery is maintenance-free and suitable for
moderate power requirements.
– 2 lithium-ion batteries 1.5V, type IEC FR03 (AAA/Micro)
This type of battery is maintenance-free, suitable for high power
requirements and features low self-discharge.
– 2 nickel/metal-hydride (NiMH) rechargeable batteries 1.2V,
type IEC HR03 (AAA/Micro)
This type of rechargeable battery has a significantly higher
capacity than nickel cadmium ones and are more environmentally friendly as they don’t contain cadmium.
Important:
• Please only use the power sources listed above. Non-compliance
may result in damage to the remote control.
• Always remove the batteries if the remote control will not be
used for an extended period of time.
CHANGING THE POWER SOURCE
Once the ready LED 7 delays in lighting up or doesn’t light up at all
anymore, then the battery is depleted.
Procedure
1. Switch the remote control off (see also the next section)
2. Slide down and release the battery compartment cover
It will automatically spring open.
2
1
3. Replace/insert the batteries as shown in the illustration
Make sure to get the polarity right!
10
Page 11

Attention:
2
1
Incorrectly inserted batteries can destroy the remote control!
Improper battery use poses an EXPLOSION HAZARD!
4. Close the battery compartment cover and slide it upward
1
2
Notes:
• Always replace both batteries at the same time.
• Both units should be of high quality and the same type.
BATTERY DISPOSAL
Never dispose of depleted batteries in household waste! Do your
part for the environment and take your depleted batteries to a
collection point.
Only dispose of batteries once they are completely spent. A battery
counts as spent when the device it powers no longer functions
correctly after extended battery use.
Cover the battery poles with adhesive tape to prevent a short
circuit.
Germany: As a consumer, you are required by law to return used
batteries. You can return batteries free of charge wherever they are
sold. Additionally, your town or local authority offers free public
collection points.
The following abbreviations can be found on the label of batteries
containing hazardous materials:
Pb = battery contains lead
Cd = battery contains cadmium
Hg = battery contains mercury
Li = battery contains lithium
EN
11
Page 12

EN
OPERATION
ATTACHING/DETACHING THE DEVICE
Attaching
Detaching
1
2
1. Switch off the camera and the remote control (see next page)
2. Press the lock release button (10a) and slide the remote
control out of the accessory shoe of the camera
12
1. Switch off the camera and the remote control (see next page)
2. Push the mounting foot of the controller into the camera’s
accessory shoe
• You will hear the locking pin (10b) clicking into place.
The spring-loaded locking pin in the housing of the remote control
will fold in if the camera housing doesn’t offer a locking opening,
so as to not damage the camera housing.
Important:
Never carry the combined weight of the camera, lens and remote
control by simply holding the remote control housing. Make sure to
support the weight of the camera by holding the camera and/or
lens with the other hand!
Page 13

SWITCHING ON AND OFF
Switching on
Press the button 8
Displays when the flash unit is switched on
• The ready LED 7 initially lights up in red and turns green, as soon
as the flash is ready (after a few seconds, provided the battery
has sufficient charge).
• The icons appear in the LCD panel 6.
Auto power off
The icons in the LCD panel will get darker approx. 30 seconds after
the last operation to save the battery. The remote control switches
to “Ready” after about 2minutes, which is signified by the ready
LED flashing green. The remote control will power down completely
if it is not used for more than 60minutes, i.e. if no button is
pressed and no combination dial is moved.
Reactivating the remote control from standby:
Press the combination dial 9 in any position
EN
Notes:
• You can press the ready LED for a test flash.
• The flash readiness icon is always visible in the viewfinder of the
camera, i.e. whether or not the tethered flash arrays (s. next
page) are actually ready to fire.
Switching off
Press the button
Note:
We recommend removing the power sources from the remote
control if it will not be used for an extended period of time.
13
Page 14

EN
TETHERING THE REMOTE CONTROL TO THE FLASH UNIT
The devices must be tethered before the Leica SFC1 (sender) can
be used to remotely control a Leica SF60 (receiver). This tethering
process only has to be done once for each flash unit. This process
will ensure that the tethered flash unit will accept control signals
from the tethered remote control only.
The tethering process
The LeicaSF60 and the LeicaSFC1 must not be attached to the
camera during the tethering process.
1. Switch off the Leica SF60 and the Leica SFC1
2. On the Leica SF60, simultaneously press the main switch and
the directional pad in the middle at (≥3s) until the ready
LED flashes yellow and you can hear repetitive beeping
3. While the ready LED on the flash unit is still flashing, simulta-
neously press the main switch 8 and the combination dial 9 of
the Leica SFC1 in the middle at (≥3s) until the ready LED 7
flashes yellow as well
Note:
The LeicaSF60 and the LeicaSFC1 should not be attached to the
camera during the tethering process.
The beeping and flashing will stop, once the tethering is completed
successfully.
Once the tether is correctly established, the Leica SF60 flash unit
can be triggered by pressing the ready LED on the Leica SFC1
remote control.
Should the tethering have been unsuccessful – signified by the
continued flashing and beeping of the Leica SF60 – then you will
have to repeat the process with a lesser distance between the two
devices.
Notes:
• Do not attempt any other device operations while tethering is in
progress.
• The tethered connection will remain intact after the devices are
switched off and on again and after a battery replacement.
The connection will only be removed if the devices are reset to
their factory settings.
14
Page 15

SELECTING THE FLASH ARRAY
Sophisticated lighting scenarios, e.g. for studio portraits, often
require the use of multiple flash units. The Leica SFC1 allows you
to independently configure the Leica SF60 and additional
system-compatible flash units. The flash units are assigned to one
of a total of eight groups (arrays), with each array configured
separately by individually selecting each group on the Leica SFC1.
Note:
In the following, “array” denotes all flash units within a group, no
matter if the group contains only one or several flash units.
Selecting an array
You can optionally configure all arrays simultaneously or individually. The relevant arrays must be switched on or off accordingly.
Only arrays that are switched on can be configured. The configurations will be applied to all arrays with switched on devices
simultaneously, which means that devices that should not be
configured must be switched off.
1. Press the desired array button 5
• The relevant array letter will flash.
2. Press the button 3
• An array that is switched off will appear as - - - - on the
LCD panel instead of the current settings.
3. Press the array button again
• The relevant array letter will light permanently.
Switching on an array is the same procedure.
• The display for an active array appears with the relevant settings
after the second step (instead of - - - -).
Notes on operation with the Leica SF60:
• Please read the manual for instructions on how to select an
array via the flash unit.
• Array D is unavailable.
EN
15
Page 16

EN
CHANNEL SELECTION
Remote control occurs via a digital RF connection on the 2.4GHz
frequency band, which is subdivided into a large number of
channels. This means that several photographers can use their
SF60-/SFC1 equipment in close proximity to each other without
interfering with each other’s devices.
The channel setting of each Leica SFC1, with which system-compatible flash units are to be controlled remotely, must match the
setting of the controlled devices.
The SFC1 offers manually selectable channels (1 - 8) for this
purpose:
1. Combination dial 9 top - press Channel - for approx 1s
• Appears in the LCD panel 6.
2. Turn the combination dial to the desired position
3. Again press the combination dial at the top for about 1s to
exit the function
• The channel icon disappears from the LCD panel.
Notes on operation with the Leica SF60:
• The channel selection on the Leica SF60 is analog to the
channel selection on the Leica SFC1 described on the left.
• Automatic mode (A) in the Leica SF60 guarantees successful
tethering to a Leica SFC1, no matter what channel is currently
selected on that device.
• The Leica SF60 Auto mode cannot be exited while tethering is
enabled.
• When selecting a tethering channel manually on the Leica SF60,
the same channel must also be selected on the Leica SFC1. In
case of an active tethering of the two devices, the channel
setting of the Leica SF60 can, however, be changed at any time
via the Leica SFC1. Channel 1 is not available for tethering with
the Leica SF60.
All further operation of the flash units will then be done exclusively
via the Leica SFC1. Please see the following page for a description
of operations using the example Leica SF60.
16
Page 17

FLASH UNIT SETTINGS ON THE REMOTE CONTROL
FLASH MODES
The flash modes to be used on the tethered, remotely controlled
flash units can be set via the Leica SFC1. Choose TTL or manual
mode:
Press the M/TTL button 1 to change the mode.
• The LCD panel will show
– TTL or M at the bottom
– next to the array letters of all activated groups
• The Leica SF60 will confirm successful settings with an audible
beep, provided the function is switched on (see p. 19).
Note:
The setting is done via the Leica SF60 for all flash arrays
simultaneously.
FLASH EXPOSURE COMPENSATION AND PARTIAL LIGHT
POWER LEVELS
Flash exposure compensation (in TTL mode) and/or partial light
power levels (in M mode) can be set on the tethered, remotely
controlled flash units via the Leica SFC1:
Turn the combination dial 9 until the desired compensation value
(in TTL mode) or the desired power level (in M mode) appears on
the LCD panel
Set the EV back to 0.0 if you want to return to normal operation
without flash exposure compensation
Notes:
• A compensation value previously set via menu control on the
camera will become void once a compensation value is entered
via the Leica SFC1.
• This setting can be done for each flash array individually.
EN
17
Page 18

EN
ZOOM REFLECTOR
The Leica SF60 comes equipped with a zoom reflector for the
adjustment of the illumination angle for lens focal lengths between
24 and 200mm. This setting can also be done via the Leica SFC1:
1. Combination dial 9 bottom - press M.ZOOM - for approx 1s
• The current setting is showed in the LCD panel 6.
2. Turn the combination dial to select the Auto setting - A or a
specific focal length (settings are available in 9 increments
from 24mm to 200mm)
3. Press the combination dial again on at the bottom for approx.
1s to exit the function
Note:
This setting can be done for each flash array individually.
18
Page 19
OTHER SETTINGS/FUNCTIONS
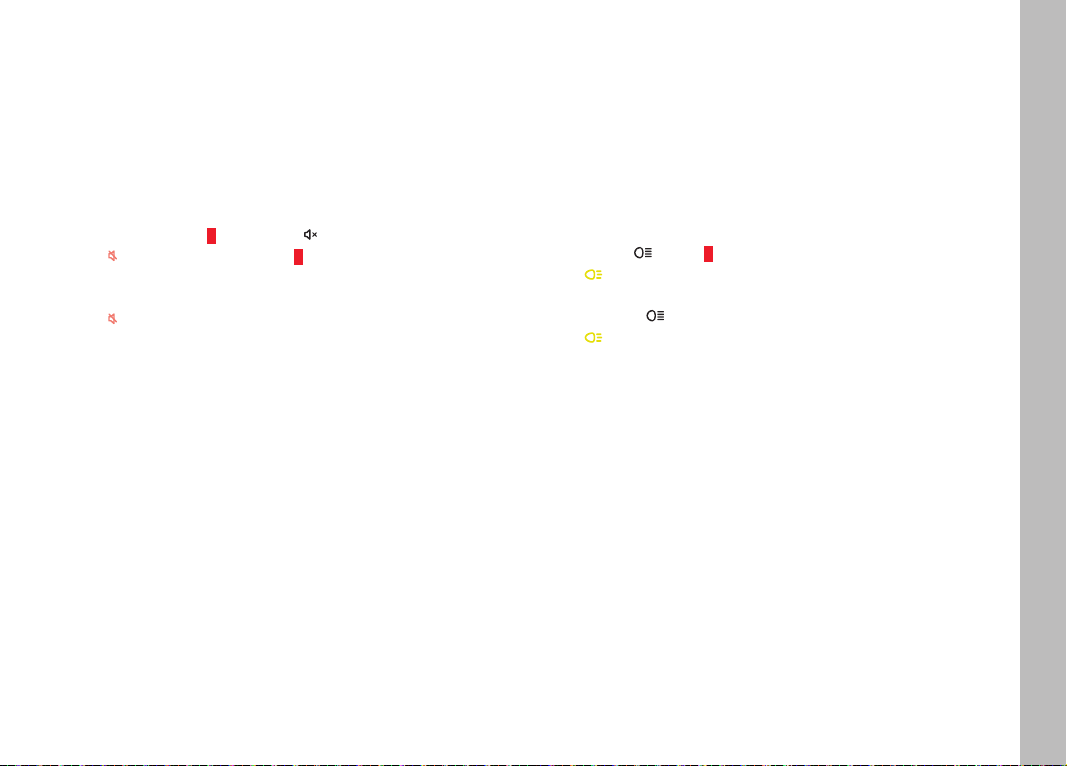
AUDIBLE SIGNAL
Settings done on a remotely set up Leica SF60 via the remote
control can optionally be confirmed with an audible beep. This
signal gives you the assurance that your settings were applied
correctly at larger distances between the devices.
MODELING LIGHT
Some flash units come equipped with a permanent light source to
help simulate flash illumination before the picture is taken. This
function can make the arrangement and setup of remote flash units
considerably easier. Please note, however, that the in comparison
with flash illumination significantly weaker permanent light will
allow you to only somewhat estimate the final image effect.
EN
On/Off
1. Combination dial 9 right - press - for approx 1s
• appears in the LCD panel 6.
2. Press the combination dial to the right again for approx. 1s to
activate the function
• Disappears from the LCD panel.
Note:
This function is available on the Leica SFC1 and on the Leica
SF60. The function must be enabled on both devices to be active!
On/Off
1. Press the button 2
• Appears on the LCD panel next to the letters of all
activated arrays.
2. Press the button again
• disappears from the LCD panel.
Note:
This function is available only in relevantly equipped flash units;
Leica SF60 does not come with modeling light.
19
Page 20

EN
BUTTON LOCK
All functions of the combination dial 9, i.e. those selected by
turning the wheel and the four functions activated/deactivated by
pressing the wheel can be protected against accidental changes:
1. Combination dial left - press - for approx 1s
• appears in the LCD panel 6.
2. Press the combination dial to the left again for approx. 1s to
remove the button lock
• disappears from the LCD panel.
AF ASSIST LIGHT
Autofocus metering systems in cameras rely on the contrast in the
image subject. These cameras will activate an AF assist light if the
contrast is insufficient due to low light. When the remote control is
attached to a relevantly equipped camera, then the AF assist light
12 integrated in the remote control will switch on. It illuminates the
image object, which the camera then focuses on.
The range of the AF assist light is approx. 0.7 to 5m (with a 50mm
lens).
The Autofocus mode “Single-AF (S-AF)” must be enabled on the
camera for it to activate the AF assist light and the remote control
must be in readiness.
Some cameras only support a camera-internal AF assist light.
Where that is the case, then the AF assist light of the remote
control will not be activated (see camera manual).
Notes:
• Some low-light lenses (largest initial aperture ≥5.6) will limit the
range of the AF assist light considerably.
• The AF assist light can be deactivated for short distances to the
image subject in combination with a long lens. The AF mode will
then not be available.
20
Page 21

APPENDIX
MAINTENANCE AND CARE
Clean the device with a dry, soft cleaning cloth (e.g. microfibre).
Use a slightly moist cloth to remove stubborn dirt.
Important:
Never use liquid cleaning agents. The components inside the
device could suffer irreparable damage if cleaning liquid penetrates
the housing.
TROUBLESHOOTING
Should the remote control ever not function as expected, then
simply switch it off on the main switch and wait for about 10s.
Check that the mounting foot of the controller has been properly
inserted into the accessory shoe of the camera and check the
camera settings. Replace the batteries where needed. The remote
control should now function correctly, once it is switched back on.
Please contact your retailer if that is not the case.
In the following is a list of problems you may encounter in practical
operation: Each issue lists possible causes and their remedies.
AF assist light of the remote control won’t activate
– The remote control is not ready for use.
– The camera won’t work in “Single-AF (S-AF)” mode.
– The camera only supports the function of its own internal AF
assist light.
Some camera types support the remote control AF assist light
via the middle AF sensor in the camera.
The AF assist light of the remote control will not work if any
other sensor but the middle one is selected!
→ Activate the AF sensor in the middle!
The device doesn’t automatically switch to flash sync speed
– The camera or the lens used has a central shutter (most
compact cameras).
→ A switch to flash sync speed is unnecessary.
– The camera works with shutter speeds greater than the flash
synch speed.
Depending on the exposure mode chosen on the camera, no
switch to flash sync speed will occur (see camera manual).
EN
21
Page 22

EN
TECHNICAL DATA
Function
Digital 2.4GHz remote control for Leica SF60 and other
system-compatible flash units, 8-channel manual selection or
automatic channel selection
Function scope
Activation/deactivation of flash unit arrays (up to 8), setting the
flash mode (M or TTL), the flash power level (M), or a flash
exposure compensation value (TTL), the flash unit’s zoom reflector,
the modeling light individually by flash array
Range
Up to 100m
AF assist light
Automatic activation, focus range approx. 0.7 - 5m
Compatible memory cards (for firmware updates only)
Micro-SDHC cards with max. 32GB
Power supply
2 x alkaline manganese batteries 1.5V, type IEC LR03 (AAA/
Micro), or lithium batteries 1.5V, type IEC FR03 (AAA/Micro), or
nickel/metal-hydride (NiMH) rechargeable batteries 1.2V, type IEC
HR03 (AAA/Micro)
Power save system
The device automatically switches to standby after 2min and
powers down after 60min
Dimensions (W x H x D)
approx. 65 x 60 x 60mm
Weight (without batteries)
approx. 73g
Delivery package
Remote control, case, quick start guide
22
Technical changes and errors excepted.
Page 23

LEICA PRODUCT SUPPORT
The Product Support Department at Leica AG offers support for
technical questions relating to Leica products and the software
supplied in writing, on the phone or by email. They are also the
contact point for purchasing advice and to order instruction
manuals.
Alternatively, you can send us your questions using the contact
form on the Leica Camera AG homepage.
Leica Camera AG
Product Support / Software Support
Am Leitz-Park 5
35578 Wetzlar, Germany
Telephone: +49(0)6441-2080-111/-108
Fax: +49(0)6441-2080-490
info@leica-camera.com/software-support@leica-camera.com
LEICA CUSTOMER CARE
The Leica Camera AG Customer Care department or the repair
service provided by authorized Leica agents in your country are
available for service, maintenance and repairs of your Leica
equipment (visit the Leica Camera AG website for a list of
addresses).
Leica Camera AG
Customer Care
Am Leitz-Park 5
35578 Wetzlar, Germany
Tel.: +49(0)6441-2080-189
Fax: +49(0)6441-2080-339
customer.care@leica-camera.com
EN
23
Page 24

EN
24
Leica Camera AG I Am Leitz-Park 5 I 35578 WETZLAR I DEUTSCHLAND
Telefon +49 (0) 6441-2080-0 I Telefax +49 (0) 6441-2080-333 I www.leica-camera.com
 Loading...