

Page 1

LEICA RANGEMASTER CRF 1600-B
Anleitung / Instructions
Notice d’utilisation / Gebruiksaanwijzing
Istruzioni / Instrucciones / Bruksanvisning
Инструкция по эксплуатации
Leica Camera AG I Oskar-Barnack-Straße 11 I 35606 SOLMS I DEUTSCHLAND
Telefon +49 (0) 6442-208-0 I Telefax +49 (0) 6442-208-333 I www.leica-camera.com
93 447XII/12/DLW/B&S
Page 2
1 2
3a
USEU
US
EU
bALL
US1/EU1
US2/EU2
US12/EU12
OFF
100
200
300
GEE
SId
(yds/m)
(yds/m)
(yds)
(m)
1-4
1-3
AbC
EHr
HOLd
1
(1MOA)
(1MOA)
(1MOA)
10
5
3
4
5
8
4
6
9
7
Markenzeichen der Leica Camera Gruppe
Trademark of the Leica Camera Group
Marque du Groupe Leica Camera
® = Registriertes Warenzeichen
Änderungen in Konstruktion und Ausführung vorbehalten.
® = Registered Trademark
Design subject to alterations without notice.
® = Marque déposée
Sous réserve de modifications.
® = Gedeponeerd handelsmerk
Wijzingen in constructie en uitvoering voorbehouden.
® = Marchio registrato
Ci riserviamo id diritto di modificare i nostri apparecchi.
® = Marca registrada
Se reserva el derecho a modificaciones en construcción y terminicación.
© 2012 Leica Camera AG
Varemerke som tilhører Leica Camera gruppen
© = Registrert varemerke
Det tas forbehold om endringer i konstruksjon og utførelse.
© 2012 Leica Camera AG
Фирменный знак Группы Leica Camera
© = Зарегистрированный товарный знак
Мы оставляем за собой право на изменение конструкции и дизайна.
© 2012 Leica Camera AG
This product is manufactured under license from Leupold & Stevens, Inc.
Page 3
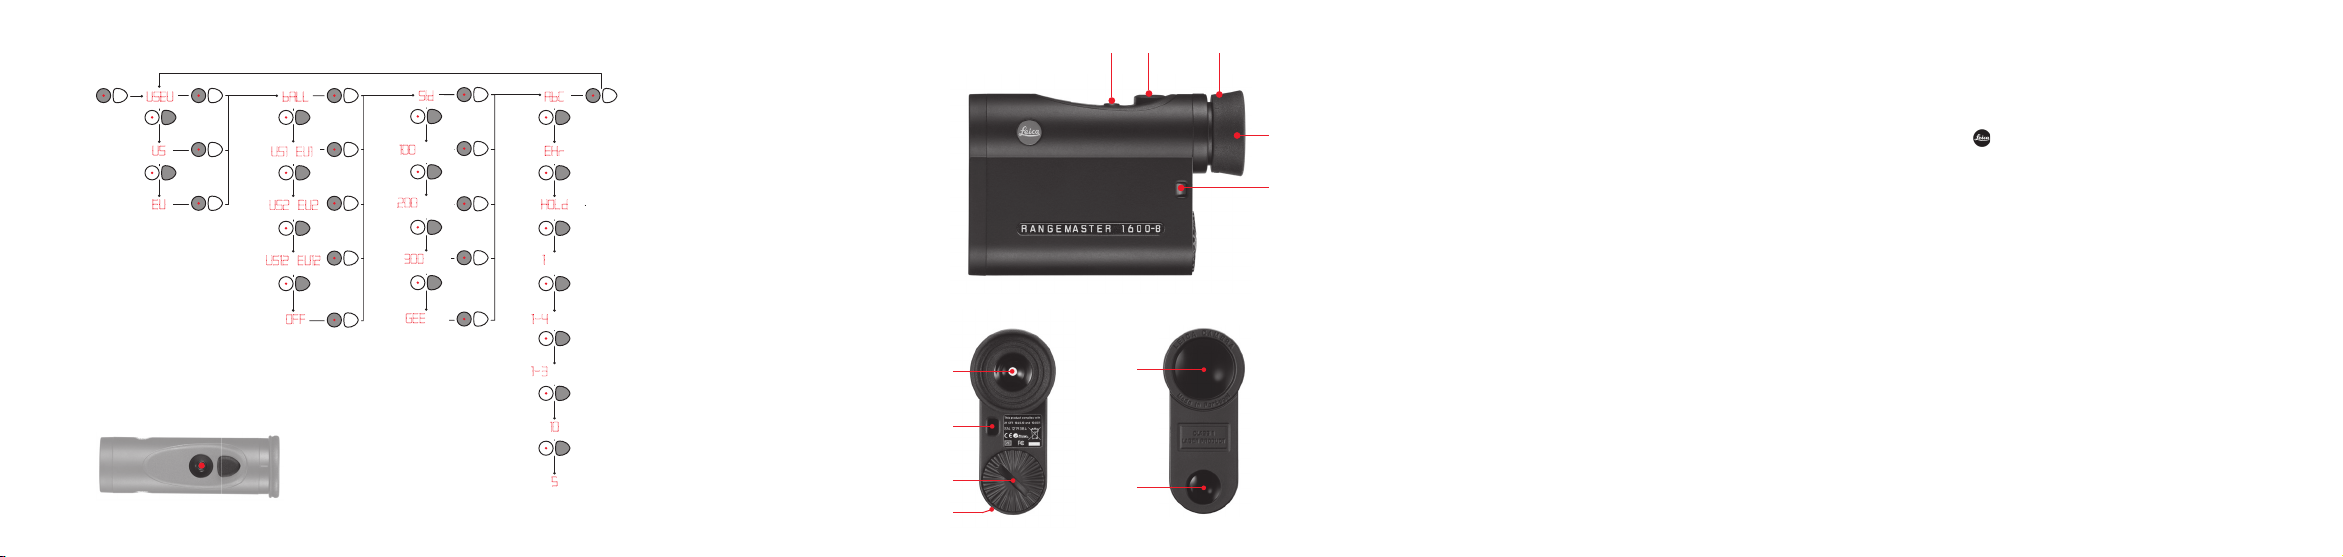
BEZEICHNUNG DER TEILE
1 Nebentaste
2 Haupttaste
3 Augenmuschel mit
a. Dioptrienskala
4 Öse für Trageschnur
5 Okular
6 Batteriefachdeckel
7 Batteriefach
8 Objektivlinse
9 Laser-Sendeoptik
Warnhinweis
Vermeiden Sie, wie bei jedem Fernglas, den direkten
Blick mit Ihrem Leica Rangemaster CRF 1600-B in helle
Lichtquellen, um Augenverletzungen auszuschließen.
LIEFERUMFANG
– Entfernungsmesser
– 1 Lithium-Batterie 3 V Typ CR 2
– Trageschnur
– Corduratasche
– Garantiekarte
LEICA RANGEMASTER CRF 1600-B
Bestell-Nr. 40 534
1
Page 4

VORWORT
Sehr geehrte Kundin, sehr geehrter Kunde,
Der Name Leica steht weltweit für höchste Qualität, feinmechanische Präzision bei äußerster Zuverlässigkeit und langer
Lebensdauer.
Wir wünschen Ihnen viel Freude und Erfolg mit Ihrem neuen
Leica Rangemaster CRF 1600-B.
Dieser Entfernungsmesser sendet unsichtbare und für das
Auge unschädliche Infrarot-Impulse aus und berechnet über
einen eingebauten Mikroprozessor aus dem reflektierten
Signalanteil die Objektentfernung. Darüber hinaus erfasst er
Umgebungs- und Einsatzbedingungen, mit denen er – zusammen mit den gemessenen Entfernungen - für verschiedene,
wählbare Ballistik-Kurven entsprechende Korrekturen des
Haltepunkts ermittelt und anzeigt.
Er ist mit einer hervorragenden, 7fach vergrößernden Zieloptik ausgestattet, die auch unter schwierigen Bedingungen
eine sichere Peilung ermöglicht, und er ist einfach und funktional zu bedienen.
Damit Sie alle Möglichkeiten dieses hochwertigen und vielseitigen Laser-Entfernungsmessgerätes richtig nutzen können,
empfehlen wir Ihnen, zunächst diese Anleitung zu lesen.
ENTSORGUNG ELEKTRISCHER UND
ELEKTRONISCHER GERÄTE
(Gilt für die EU, sowie andere euro -päische
Länder mit getrennten Sammelsystemen)
Dieses Gerät enthält elektrische und/oder elektronische
Bauteile und darf daher nicht im normalen Hausmüll entsorgt
werden! Stattdessen muss es zwecks Recycling an entsprechenden, von den Ge-meinden bereitgestellten Sammelstellen abgegeben werden. Dies ist für Sie kostenlos.
Falls das Gerät selbst wechselbare Batterien oder Akkus
enthält, müssen diese vorher entnommen werden und ggf.
ihrerseits vorschriftsmäßig entsorgt werden (siehe dazu die
Angaben in der Anleitung des Geräts).
Weitere Informationen zum Thema bekommen Sie bei Ihrer
Gemeindeverwaltung, Ihrem Entsorgungs-unternehmen, oder
dem Geschäft, in dem Sie dieses Gerät erworben haben.
2
Page 5

INHALTSVERZEICHNIS
Diagramm Menüstruktur / Bedienschema .................... U3
Bezeichnung der Teile .................................................... 1
Lieferumfang .................................................................. 1
Vorwort .......................................................................... 2
Entsorgung elektrischer und elektronischer Geräte ......... 2
Anbringen der Trageschnur ............................................ 4
Einsetzen und Auswechseln der Batterie ......................... 4
Ladezustand der Batterie................................................ 5
Verwendung mit und ohne Brille ..................................... 6
Dioptrien-Ausgleich ........................................................ 6
Grundsätzliches zur Menüsteuerung ............................... 7
Einstellung der gewünschten Maßeinheit ........................ 7
Entfernungsmessung ...................................................... 8
Scan-Betrieb .................................................................. 9
Messreichweite und Genauigkeit .................................. 10
Anzeige der atmosphärischen Bedingungen .................. 11
Bestimmen der Ballistik-Kurve ...................................... 12
Einstellen der Fleckschuss-Entfernung .......................... 13
Ballistische Ausgabeformate......................................... 14
Die Äquivalente Horizontale Entfernung ........................ 15
Der Haltepunkt ............................................................ 15
Treffpunktkorrektur mittels Elevationsverstellung .......... 16
Einstellungen und Auswahl der Ballistischen
Ausgabeformate ........................................................... 16
Anzeige und Überprüfung der eingestellten
Ballistik-Parameter ....................................................... 17
Pflege/Reinigung ......................................................... 18
Ersatzteile .................................................................... 18
Was tun, wenn ............................................................. 19
Technische Daten ........................................................ 20
Leica Akademie ........................................................... 21
Leica im Internet .......................................................... 21
Leica Infodienst ........................................................... 21
Leica Kundendienst ...................................................... 21
Anhang / Ballistik-Tabellen ........................................ 178
3
Page 6

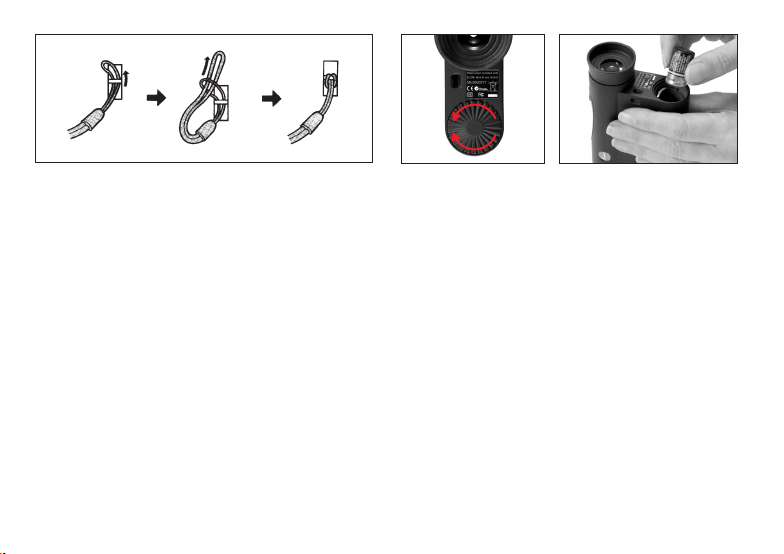
ANBRINGEN DER TRAGESCHNUR
Bitte die kleine Schlaufe der Trageschnur durch die Öse (4)
am Gehäuse des Leica Rangemaster CRF 1600-B schieben.
Dann das Ende der Trageschnur durch die kleine Schlaufe
fädeln und so festziehen, dass sich die entstandene Schlinge
fest um die Öse am Gehäuse legt.
EINSETZEN UND AUSWECHSELN DER BATTERIE
Der Leica Rangemaster CRF 1600-B wird zur Energieversorgung mit einer 3 Volt Lithium-Rundzelle (z.B. Duracell
DL CR2, Ucar CR2, Varta CR2, oder anderen CR2 Typen)
bestückt.
1. Öffnen Sie den Deckel (6) des Batteriefachs (7) indem Sie
ihn gegen den Uhrzeigersinn drehen.
2. Legen Sie die Batterie mit ihrem Pluskontakt voran (entsprechend der Kennzeichnung im Batteriefach) ein.
3. Schließen Sie den Deckel wieder durch Drehen im Uhrzeigersinn.
4
Page 7

Hinweise:
•KältereduziertdieBatterieleistung.BeiniedrigenTemperaturen sollte der Leica Rangemaster CRF 1600-B deshalb
möglichst in Körpernähe getragen und mit einer frischen
Batterie betrieben werden.
•WennderLeicaRangemasterCRF1600-BlängereZeit
nicht benutzt wird, sollte die Batterie herausgenommen
werden.
•Batteriensolltenkühlundtrockengelagertwerden.
Achtung:
•BatteriendürfenkeinesfallsinsFeuergeworfen,erhitzt,
wieder aufgeladen, zerlegt oder aufgebrochen werden.
•VerbrauchteBatteriendürfennichtindennormalenHausmüll geworfen werden, denn sie enthalten giftige, Umwelt
belastende Substanzen. Um sie einem geregelten Recycling zuzuführen, sollten sie beim Handel abgegeben oder
zum Sondermüll (Sammelstelle) gegeben werden.
LADEZUSTAND DER BATTERIE
Eine verbrauchte Batterie wird durch eine blinkende Messwert- und Zielmarkenanzeige signalisiert. Nach dem erstmaligen Blinken der Anzeige sind noch mehr als 100 Messungen
mit fortschreitend verringerter Reichweite möglich.
5
Page 8
A B C
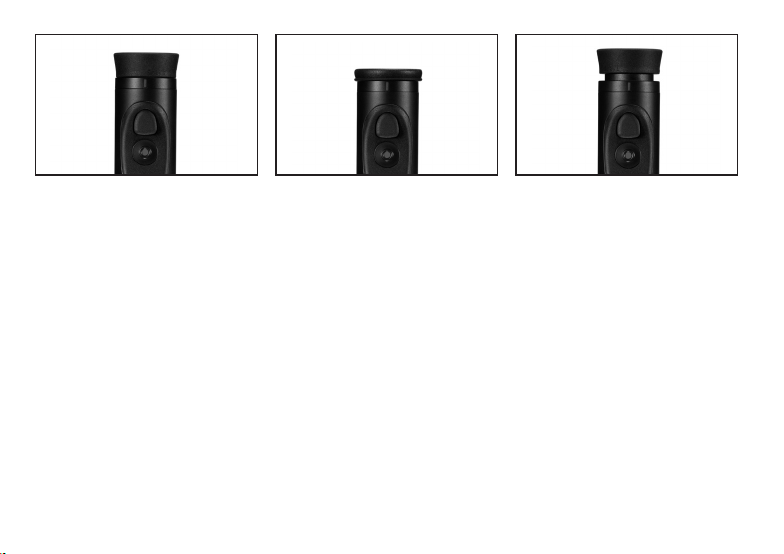
VERWENDUNG MIT UND OHNE BRILLE
Beobachter, die keine Brille tragen, lassen die Gummi-Augenmuschel (3) hochgeklappt (Bild A, Lieferzustand). In dieser
Position ist der richtige Abstand des Leica Rangemaster CRF
1600-B zum Auge gegeben. Beim Beobachten mit Brille wird
die Gummi-Augenmuschel nach unten umgestülpt (Bild B).
DIOPTRIEN-AUSGLEICH
Mit dem Dioptrien-Ausgleich können Sie die Schärfe der
Zielmarke auf den für Sie optimalen Wert einstellen. Einfach
durch den Leica Rangemaster CRF 1600-B ein weit entferntes Objekt anpeilen und durch Drehen an der Gummiaugenmuschel (3) die Zielmarke auf optimale Schärfe einstellen.
Die Zielmarke erscheint bei Druck auf die Haupttaste (2).
Den eingestellten Wert können Sie an der „+“ oder „–“ Skala
(3b) auf der Gummiaugenmuschel ablesen. Ein DioptrienAusgleich ist für Fehlsichtigkeiten bis ±3,5 Dioptrien möglich.
6
Page 9
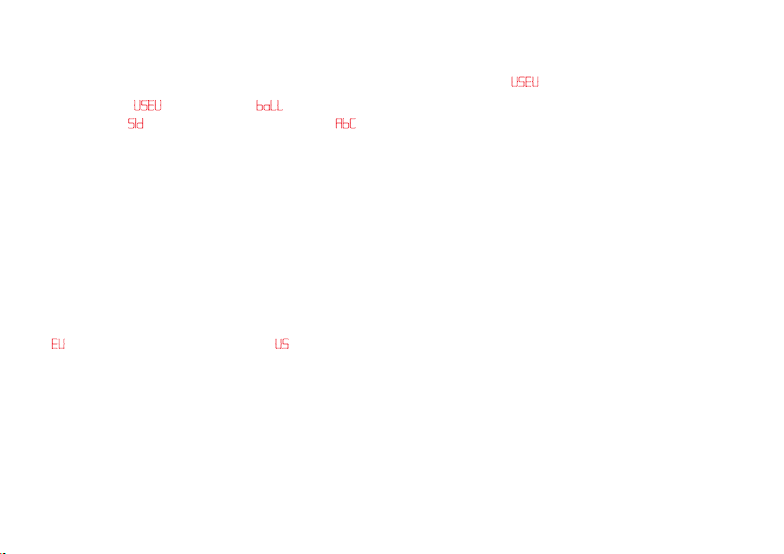
GRUNDSÄTZLICHES ZUR MENÜSTEUERUNG
Bei allen Einstellungen gilt:
- Das Hauptmenü besteht aus den vier Menüpunkten Meter-/
Yard-Anzeige (
sentfernung (
Einzelheiten zu den Funktionen finden sie in den jeweiligen
Abschnitten.
- Sowohl das Hauptmenü als auch die jeweiligen Einstel-
lungsoptionen sind als Endlos-Schleifen geschaltet, d.h. alle
Punkte/Einstellungen sind durch mehrfachen Tastendruck
immer wieder zu erreichen.
EINSTELLUNG DER GEWÜNSCHTEN MASSEINHEIT
Der Leica Rangemaster CRF 1600-B kann auf das metrische
EU) oder imperiale Maßeinheitensystem (US) eingestellt
(
werden, d.h. für Entfernung/Temperatur/Luftdruck entweder
Meter/Celsius/Millibar oder Yards/Fahrenheit/InHg (Inches
of Mercury). Diese Einstellung bestimmt auch die Einheitendes Haltepunktes, der Ballistik-Kurven und der Fleckschussentfernungen (s. S. 15/14/13).
USEU), Ballistik-Kurve (baLL), Fleckschus-
SId) und ballistisches Ausgabeformat (AbC).
Die Einstellung
1. Drücken Sie die Nebentaste (1) lang (≥3s).
•Eserscheint
2. Drücken Sie die Haupttaste (2) um die gewünschte Maßeinheit auszuwählen.
US = für Anzeige in Yards
EU = für Anzeige in Meter
Hinweis:
Die jeweilige Einstellung ist stets an der Anzeige zu erkennen –
sind metrische Werte gewählt, erscheint neben der Zielmarke
rechts unten ein Punkt.
3. Speichern Sie Ihre Einstellung durch kurzes Drücken der
Nebentaste.
•DiegespeicherteEinstellungleuchtetzurBestätigung
zunächst dauerhaft, anschließend wechselt die Anzeige
zunächst zum nächsten Menüpunkt (Ballistik-Kurve
„bALL“) und erlischt danach, sofern keine weitere Einstellungen vorgenommen wurden.
7
USEU (blinkend)
Page 10
ENTFERNUNGSMESSUNG
98
Um die Entfernung zu einem Objekt zu messen, muss es
genau angepeilt werden. Gehen Sie dazu wie folgt vor:
1. Drücken Sie die Haupttaste (2). Das Gerät schaltet sich
ein.
• Die Zielmarke erscheint.
Nach dem Loslassen der Haupttaste leuchtet die Zielmarke
noch für ca. 6 Sekunden weiter. Wird sie gedrückt gehalten,
leuchtet die Zielmarke permanent.
2. Peilen Sie das Objekt an während die Zielmarke leuchtet.
3. Drücken Sie erneut die Haupttaste.
•a.Die Zielmarke erlischt während der Messung kurzzeitig.
b. Der Messwert wird angezeigt.
Solange die Zielmarke noch leuchtet, kann jederzeit eine
neue Messung durch erneuten Druck auf die Haupttaste
gestartet werden.
Es erscheint: - - -, wenn
- die Objektentfernung weniger als 10 Meter beträgt,
oder
- die Reichweite überschritten wird, oder
- das Objekt ungenügend reflektiert.
Mit dem Erlöschen der Anzeige schaltet sich der Leica
Range master CRF 1600-B automatisch ab.
8
Page 11
SCAN-BETRIEB
61 65
72
Mit dem Leica Rangemaster CRF 1600-B kann auch im Dauerbetrieb (Scan-Betrieb) gemessen werden:
Halten Sie die Haupttaste (2) bei der 2. Betätigung gedrückt.
Nach ca. 2,5 Sekunden schaltet sich das Gerät in den ScanBetrieb und führt dann permanent Messungen durch. Zu
erkennen ist dies an der wechselnden Anzeige. Nach jeweils
ca. 1 Sekunde wird ein neuer Messwert ausgegeben.
Der Scan-Betrieb ist besonders praktisch bei der Messung
auf kleine und sich bewegende Ziele.
Hinweise:
•ImScan-BetriebwirdderABC-Korrekturwert(s.S.14)erst
nach der letzten Messung angezeigt..
•ImScan-BetriebistderStromverbrauchaufgrundderpermanenten Messungen höher als bei Einzelmessungen.
9
Page 12

MESSREICHWEITE UND GENAUIGKEIT
Die Messgenauigkeit des Leica Rangemaster CRF 1600-B
beträgt bis zu ca. ±1 Meter. Die maximale Reichweite wird
erreicht bei gut reflektierenden Zielobjekten und einer visuellen Sichtweite von etwa10km. Hohe Reichweiten können
sicherer gemessen/erreicht werden, wenn der Leica Rangemaster CRF 1600-B entweder sehr ruhig gehalten und/
oder aufgelegt wird. Die Messreichweite wird von folgenden
Faktoren beeinflusst:
Reichweite höher geringer
Farbe weiß schwarz
Winkel zum senkrecht spitz
Objektiv
Objektgröße groß klein
Sonnenlicht wenig (bewölkt) viel (Mittagssonne)
Atmosphärische klar dunstig
Bedingungen
Objektstruktur homogen inhomogen
(Hauswand) (Busch, Baum)
Bei Sonnenschein und guter Sicht gilt folgende Reichweite,
bzw. Genauigkeiten:
Reichweite ca. 10 m 1460m
Genauigkeit ca. ±1m bis 500m
ca. ±2 m bis 1000m
ca. ±0,5 % über 1000m
10
Page 13

ANZEIGE DER ATMOSPHÄRISCHEN BEDINGUNGEN
1 5
2 5 C
1 0 3 0
Für die genaue Berechnung der Treffpunktlage (siehe dazu
den folgenden Abschnitt) ermittelt der Leica Rangemaster
CRF 1600-B während der Entfernungsmessung zusätzlich
drei wichtige Zusatzinformationen: die Neigung des Geräts,
die Temperatur und den Luftdruck. Die jeweiligen Werte können Sie sich jederzeit anzeigen lassen.
Drücken Sie die Nebentaste (1) 1x kurz .
•DieZielmarkeerscheintkurzzeitig(fallsnichtvorherbereits
die Entfernungsmessung eingeschaltet war) anschließend
erscheinen statt der Entfernung für jeweils ca. 2s nacheinander
- der Neigungswinkel
- die Temperatur
- der Luftdruck
Hinweis:
Wenn das Gehäuse des Leica Rangemaster CRF 1600-B beispielsweise beim Übergang von Innenräumen nach draußen
zunächst eine deutlich unterschiedliche Temperatur aufweist
als die Umgebung, kann es bis zu 30min dauern, bis der innen
liegende Messfühler wieder die korrekte Umgebungstemperatur anzeigen kann.
11
Page 14
BESTIMMEN DER BALLISTIK-KURVE
Zur präzisen Bestimmung der Treffpunktkorrektur bezieht
der Leica Rangemaster CRF 1600-B die Geschossflugbahn in
die Berechnung mit ein. Für die Anpassung an die von Ihnen
verwendete Ausrüstung stehen 12 unterschiedliche BallistikKurven zur Auswahl.
Suchen Sie aus der passenden Tabelle im Anhang (s. S.
178-183) diejenige Ballistik-Kurve heraus, die den Angaben
des Munitionsherstellers zum Geschossabfall am nächsten
kommt. Achten Sie dabei auf die Auswahl der passenden
Fleckschussentfernung.
Beispiel:
Das Zielfernrohr ist auf 100 Meter eingeschossen, es gilt
also Tabelle 1. Als Treffpunktlage für die verwendete Munition wird -15,0 cm auf 200m angegeben. In der entsprechenden Spalte entspricht das am ehesten dem Wert 14,5cm in
der Zeile EU7 – dies ist also die passende Ballistik-Kurve.
Hinweis:
Bei der Verwendung der Ballistik-Funktion des Leica
Rangemaster CRF 1600-B auf Entfernungen >300m
empfehlen wir Ihnen, die ballistischen Daten Ihrer Munition
durch praktische Versuche zu ermitteln, um die entsprechend
passende Kurve auswählen zu können.
Einstellen der Ballistik-Kurve
Beginnen Sie mit Schritt 1., wenn Sie die Menüsteuerung vorher noch nicht aufgerufen hatten, oder mit Schritt 3., wenn
Sie vorher gerade die Maßeinheit eingestellt hatten und die
bAll noch blinkt.
Anzeige
1. Drücken Sie die Nebentaste (1) lang (≥3s).
•Eserscheint
2. Drücken Sie die Nebentaste 1x kurz (<2s).
•DieAnzeigewechseltzudenBallistik-Kurven„
3. Drücken Sie die Haupttaste (2).
•DieAnzeigewechseltzu
EU1 oder
–
US1
–
12
USEU.
bALL“.
Page 15
4. Durch mehrfaches kurzes Drücken der Haupttaste wählen
Sie die gewünschte Ballistik-Kurve, d.h.
EU1 bis EU12 oder
–
US1 bis US12, bzw.,
–
wenn Sie die Entfernungsanzeige ohne Treffpunkt-Korrek-
turanzeige (
-
5. Speichern Sie Ihre Einstellung durch kurzes Drücken der
Nebentaste.
•DiegespeicherteEinstellungleuchtetzurBestätigung4s
Ist eine Ballistik-Kurve eingestellt, wird nach jeder Entfernungsmessung zunächst für 2s der Entfernungswert angezeigt, danach für 6s der errechnete Korrekturwert.
AbC) (s. S. 14) wünschen
OFF.
dauerhaft, anschließend wechselt die Anzeige zunächst
zur Einstellung der Fleckschussentfernung (
erlischt danach
SId) und
EINSTELLEN DER FLECKSCHUSS-ENTFERNUNG (
Beginnen Sie mit Schritt 1., wenn Sie die Menüsteuerung
vorher noch nicht aufgerufen hatten, mit Schritt 3., wenn Sie
vorher gerade die Ballistik-Kurve festgelegt hatten und die
SId noch blinkt.
Anzeige
1. Drücken Sie die Nebentaste (2) lang (≥3s).
•Eserscheint
2. Drücken Sie die Nebentaste 2x kurz (<2s)
•DieAnzeigewechseltüber
3. Durch mehrfaches Drücken der Haupttaste (2) wählen Sie
die gewünschte Fleckschuss-Entfernung.
100 [m],
–
200 [m], oder
–
GEE [m], bzw.
–
100 [y], oder
–
200 [y], oder
–
300 [y].
–
4. Speichern Sie Ihre Einstellung durch kurzes Drücken der
Nebentaste.
•DiegespeicherteEinstellungleuchtetzurBestätigung4s
dauerhaft, anschließend wechselt die Anzeige zunächst
zu
13
USEU.
bALL zu SId.
AbC und erlischt danach.
SId
)
Page 16
BALLISTISCHE AUSGABEFORMATE (
ABC
TM
)
Die Advanced Ballistic Compensation (AbC) des Leica Rangemaster CRF 1600-B ermöglicht es Ihnen, sich im Anschluss
an die gemessene Entfernung auf Wunsch einen der folgenden drei ballistischen Werte anzeigen zu lassen:
- die äquivalente horizontale Entfernung (
- den entsprechenden Haltepunkt (
EHr)
HOLd)
- die Anzahl der erforderlichen Klicks an der AbsehenSchnellverstellung (MOA/Klicks)
Sowohl der angezeigte Haltepunkt, als auch der angezeigte
EHr-Wert berücksichtigen:
a. die gemessene Entfernung zum Ziel ,
b. den Neigungswinkel der Waffe,
c. die eingestellte Ballistik-Kurve ,
d. die gemessenen Temperatur- und Luftdruck-Werte
e. die eingestellte Fleckschuss-Entfernung
Hinweise:
•DieBerechnungdergenanntenWerteberuhtaufder
jeweils eingestellten Ballistik-Kurve, d.h. diese muss vorher
ausgewählt werden (s. S. 12).
•BallistischeAusgabewertewerdenausSicherheitsgründen
nur bis zu einer Entfernung von 800m angegeben. Darüber
hinaus wird nur die tatsächlich gemessene Entfernung
angegeben.
Wichtig:
•BittebeachtenSie,dassgeradebeigroßenEntfernungen
der Einfluss aller ballistisch relevanten Einflussfaktoren
deutlich zunimmt und es zu erheblichen Abweichungen
kommen kann. Die angezeigten ballistischen Werte sind
deshalb ausdrücklich als Hilfsmittel zu verstehen!
•UnabhängigvonderNutzungdieserInformationunterliegt
die Einschätzung der jeweiligen jagdlichen Situation Ihrer
Verantwortung!
14
Page 17
DIE ÄQUIVALENTE HORIZONTALE ENTFERNUNG (
Schüsse auf höher oder tiefer gelegene Ziele unterliegen veränderten ballistischen Bedingungen. Sie erfordern daher die
Kenntnis der - jagdlich relevanten - äquivalenten horizontalen
Entfernung (Equivalent Horizontal Range). Die Kenntnis der
EHR
EHr ist z. B. beim Einsatz von ballistischen Absehen wichtig.
Hinweis:
Auch horizontale EHr-Messungen können Werte ergeben,
die von der „geradlinig“ gemessenen Entfernung abweichen,
wenn beispielsweise die Temperatur und/oder der Luftdruck
von den Normalwerten abweichen.
)
DER HALTEPUNKT (
Als Haltepunkt wird derjenige Punkt bezeichnet, der anstatt
des eigentlichen Zielpunkts mit der Waffe anvisiert wird, um
die durch die Flugbahn des Geschosses verursachte Abweichung auszugleichen. (z.B. bei der Verwendung klassischer
jagdlicher Absehen)
Durch die Anzeige des Haltepunkts kann der Leica Rangemaster CRF 1600-B im jagdlichen Einsatz wertvolle Unterstützung für das Anbringen möglichst präziser Schüsse
leisten.
Grundlage der Berechnung sind neben der Entfernung die im
vorigen Abschnitt erwähnten Rahmenbedingungen und die
von Ihnen gewählte Ballistik-Kurve.
Hinweis:
Der angezeigte Haltepunkt/Aufsatzwert wird immer in Bezug
zur Entfernung zum Ziel ausgegeben.
Beispiel: Wird
Objekt 30cm höher anhalten, als es ohne Korrektur der Fall
wäre.
15
HOLd
)
300m H30 angezeigt, müssten Sie auf dem
Page 18

TREFFPUNKTKORREKTUR MITTELS
ELEVATIONSVERSTELLUNG
(Klick-/MoA-Verstellung)
Abweichungen der Treffpunktlage können durch entsprechende Verstellung des Absehens an Ihrem Zielfernrohr
ausgeglichen werden.
Der Leica Rangemaster CRF 1600-B kann Ihnen – unter
Berücksichtigung der Geschossflugbahn und der Fleckschuss-Entfernung (s. S. 13) - die dazu erforderliche Verstellung, d.h. die jeweilige Anzahl der Klicks anzeigen.
Für verschiedene Elevationen können Sie dabei vorgeben, ob
die Klick-Stufen
- auf der Grundlage der international üblichen MOA-Einteilung
(Minutes Of Angle), oder
- in 5-, bzw. 10-Millimeter-Abstufungen ausgegeben werden
sollen.
Einstellungen und Auswahl der Ballistischen
Ausgabeformate
Beginnen Sie mit Schritt 1., wenn Sie die Menüsteuerung
vorher noch nicht aufgerufen hatten, mit Schritt 3., wenn Sie
vorher gerade die Fleckschuss-Entfernung eingestellt hatten
und die Anzeige
ABC noch blinkt.
1. Drücken Sie die Nebentaste (1) lang (≥3s).
•Eserscheint
USEU.
2. Drücken Sie die Nebentaste 3x kurz (<2s)
•DieAnzeigewechseltüber
bAll und SId zu AbC.
3. Durch mehrfaches Drücken der Haupttaste (2) wählen Sie
die gewünschte ballistische Einstellung.
EHr, oder
–
HOLd, oder
–
1-1 (1MOA), bzw.
–
1
1-3 (
/
MOA), bzw.
–
3
1
1-4 (
/4 MOA), bzw.
–
10 mm, bzw.
–
5 mm.
–
4. Speichern Sie Ihre Einstellung durch kurzes Drücken der
Nebentaste.
•DiegespeicherteEinstellungleuchtetzurBestätigung4s
dauerhaft, anschließend erlischt die Anzeige.
16
Page 19

Anzeige und Überprüfung der eingestellten
Ballistik-Parameter
Wenn Sie Ihre Einstellungen überprüfen möchten, können
Sie sich die Werte jederzeit anzeigen lassen.
Drücken Sie dazu die Nebentaste 2x kurz.
•UnterhalbderZielmarkeerscheinen(ggf.stattderEntfernung) für jeweils ca. 2s nacheinander
- die eingestellte Ballistik-Kurve (s. S. 12)
- die eingestellte Fleckschuss-Entfernung (s. S. 13)
- der eingestellte ballistische Ausgabewert (s. S. 14)
Bei Abschaltung aller ballistischen Funktionen (
wird lediglich die Einstellung
OFF angezeigt.
bALL = OFF)
17
Page 20

PFLEGE/REINIGUNG
Eine besondere Pflege Ihres Leica Rangemaster CRF 1600-B
ist nicht notwendig. Grobe Schmutzteilchen, wie z. B. Sand
sollten mit einem Haarpinsel entfernt oder weggeblasen
werden. Fingerabdrücke u. ä. auf Objektiv- und Okularlinsen
können mit einem feuchten Tuch vorgereinigt und mit einem
weichen, sauberen Leder oder staubfreien Tuch abgewischt
werden.
Wichtig:
Üben Sie auch beim Abwischen stark verschmutzter Linsenoberflächen keinen großen Druck aus. Die Vergütung ist
zwar sehr abriebfest, durch Sand oder Salzkristalle kann sie
dennoch beschädigt werden.
Das Gehäuse sollte nur mit einem feuchten Leder gereinigt
werden. Bei Verwendung von trockenen Tüchern besteht die
Gefahr der statischen Aufladung. Alkohol und andere chemische Lösungen dürfen nicht zur Reinigung der Optik oder des
Gehäuses verwendet werden.
Jeder Leica Rangemaster CRF 1600-B trägt außer der Typbezeichnung seine „persönliche“ Fabrikationsnummer. Notieren
Sie sich diese Nummer zur Sicherheit in Ihren Unterlagen.
Achtung:
Das Gerät darf auf keinen Fall geöffnet werden!
ERSATZTEILE
Falls sie einmal Ersatzteile für Ihren Leica Rangemaster CRF
1600-B benötigen sollten, wie z.B. Augenmuschel oder Trageschnur, wenden Sie sich bitte an unseren Kundendienst
(Adresse s. S. 21) oder Ihre Leica Landesvertretung (Adressen siehe Garantiekarte).
18
Page 21
WAS TUN, WENN ...
Fehler Ursache Abhilfe
Bei der Beobachtung wird kein
kreisrundes Bild erreicht.
Anzeige unscharf Dioptrienausgleich nicht exakt Dioptrienausgleich erneut durchführen
Bei der Entfernungsmessung erscheint
die Anzeige „
Anzeige blinkt oder keine Messung
möglich
- - -“
a) Pupille des Beobachters liegt nicht in
der Austrittspupille des Okulars.
b) Stellung der Augenmuschel ent-
spricht nicht der richtigen Benutzung
mit und ohne Brille.
a) Messbereich über- oder unter-
schritten
b) Reflexionsgrad des Objekts unzu-
reichend
Batterie verbraucht Batterie auswechseln (s. S. 4)
19
a) Augenposition korrigieren.
b) Anpassung korrigieren: Brillenträger
knicken die Augenmuschel um; bei
Beobachtung ohne Brille bleibt sie
hochgeklappt (s. S. 6).
(s. S. 6)
Angaben zum Messbereich
berücksichtigen (s. S. 10)
Page 22
TECHNISCHE DATEN
Vergrößerung
Objektivdurchmesser
Austrittspupille
Dämmerungszahl
Geometrische Lichtstärke
Sehfeld (auf 1.000m/yds) /
Objektiver Sehwinkel
Austrittspupillen-Längsabstand
Prismenart
Vergütung auf Linsen
auf Prismen
Dioptrienausgleich
Brillenträgertauglich
Funktionstemperatur
Lagertemperatur
Wasserdichtigkeit
Gehäuse-/Chassismaterial
Maximale Reichweite
Mindestentfernung
Messgenauigkeit
Anzeige/Maßeinheit
Batterie
Batterielebensdauer
Laser
Laserstrahl-Divergenz
Maximale Messdauer
Abmessungen (B x H x T)
Gewicht (mit Batterie)
7x
24mm
3,4mm
13
11,8
115m / 6,5°
15mm
Dachkant
High Durable Coating (HDC™) und Aqua-Dura Vergütung auf Außenlinsen
Phasenkorrekturbelag P40
±3,5dpt.
ja
-10 bis 55°C
-15 bis 75°C
für 30min: druckwasserdicht bis 1m Wassertiefe
Kohlefaser-verstärkter Kunststoff, softlackiert / Aluminium-Druckguss
ca. 1460m
ca.10m
ca. ±1m/yd bis 500m / ca. ± 2m bis 1000m / ca. ± 0,5% über 1000m
LED mit 4 Ziffern/wahlweise in Meter/Zentimeter, bzw. Yards/Inches
3V/Lithium-Rundzelle Typ CR2
ca. 2.000 Messungen bei 20°C
unsichtbar, augensicher nach EN und FDA Klasse 1
ca. 0,5 x 2,5mrad
ca. 0,9s
ca. 75 x 34 x 113mm
ca. 185g
20
Page 23

LEICA AKADEMIE
In den verschiedenen Seminaren wird dem Teilnehmer in praxisorientierter, zeitgemäßer Form die Werte-Welt der Leica und
die Faszination des gekonnten Umgangs mit den Leica Produkten vermittelt. Die Inhalte sind anwendungsorientiert und bieten
eine Fülle von Anregungen, Informationen und Ratschlägen
für die Praxis. Nähere Auskünfte und das aktuelle Seminarprogramm sind erhältlich bei:
Leica Camera AG
Leica Akademie
Oskar-Barnack-Str. 11
D 35606 Solms
Tel: +49 (0)6442-208 421
Fax: +49 (0)6442-208 425
la@leica-camera.com
LEICA INFODIENST
Anwendungstechnische Fragen zum Leica Programm beantwortet Ihnen, schriftlich, telefonisch, per Fax oder per e-mail
der Leica Informations-Service:
Leica Camera AG
Informations-Service
Postfach 1180
D 35599 Solms
Tel: +49 (0)6442-208 111
Fax: +49 (0)6442-208 339
info@leica-camera.com
LEICA KUNDENDIENST
Für die Wartung Ihrer Leica Ausrüstung sowie in Schadensfällen
steht Ihnen die Customer Care-Abteilung der Leica Camera AG
oder der Reparatur-Service einer Leica Landesvertretung zur
Verfügung (Adressenliste siehe Garantiekarte).
Leica Camera AG
Customer Care
Solmser Gewerbepark 8
D 35606 Solms
Tel: +49 (0)6442-208 189
Fax: +49 (0)6442-208 339
customer.care@leica-camera.com
21
Page 24

22
Page 25
DESIGNATION OF PARTS
1 Secondary button
2 Main button
3 Eyecup with
a. Dioptric scale
4 Eyelet for carrying cord
5 Eyepiece
6 Battery compartment cover
7 Battery compartment
8 Lens
9 Laser transmission optics
Warning
As with any binoculars, to prevent eye injury avoid looking directly at bright sources of light when using your
Leica Rangemaster CRF 1600-B.
SCOPE OF DELIVERY
– Range finder
– 1 lithium battery 3 V, type CR2
– Carrying cord
– Cordura case
– Warranty Card
LEICA RANGEMASTER CRF 1600-B
Order no. 40 534
23
Page 26
FOREWORD
Dear Customer,
All over the world, Leica is synonymous with top quality
precision engineering with extreme reliability and a long life.
We wish you a great deal of enjoyment and success with your
new Leica Rangemaster CRF 1600-B.
This range finder emits invisible infrared impulses that are not
harmful to the eyes and uses an integrated microprocessor
to calculate the distance to an object from the reflected
signal component. In addition, it detects environmental and
usage conditions, which it combines with the measured
range to determine and indicate corrections to the holdover
to obtain different selectable ballistic curves.
It features an outstanding scope with 7x magnification,
ensuring a reliable bearing even under difficult conditions,
and is easy to operate and functional.
To ensure that you get the best out of this high-quality and
versatile laser range finder, we recommend reading these
instructions first.
DISPOSAL OF ELECTRICAL AND
ELECTRONIC EQUIPMENT
(Applies within the EU, and for other European
countries with segregated waste collection
systems)
This device contains electrical and/or electronic components
and should therefore not be disposed of in general household
waste! Instead it should be disposed of at a recycling
collection point provided by the local authority. This costs
you nothing.
If the device itself contains removable batteries or
rechargeable batteries, these should first be removed and, if
necessary, properly disposed of (refer to the specifications in
the manual for your device).
Further information on this point is available at your local
administration, your local waste collection company, or in the
store where you purchased this device.
24
Page 27

TABLE OF CONTENTS
Menu structure / operating diagram ............................ U3
Designation of parts ..................................................... 23
Items supplied ............................................................. 23
Foreword ..................................................................... 24
Disposal of electrical and ............................................ 24
Attaching the carrying cord .......................................... 26
Inserting and changing the batteries ............................. 26
Battery charge level ..................................................... 27
Use with and without glasses ....................................... 28
Diopter compensation .................................................. 28
Basic information on menu control ............................... 29
Setting the unit of measure .......................................... 29
Distance measurement ................................................ 30
Scan mode .................................................................. 31
Measurement range and accuracy ................................ 32
Indication of atmospheric conditions ............................ 33
Determining the ballistic curve ..................................... 34
Setting the zeroing range ............................................. 35
Ballistic output formats ................................................ 36
Equivalent horizontal distance ...................................... 37
Holdover ...................................................................... 37
Impact point correction by elevation adjustment .......... 38
Settings and selecting the ballistic
output formats ............................................................. 38
Displaying and checking the set
ballistic parameters ...................................................... 39
Maintenance / cleaning ............................................... 40
Spare parts .................................................................. 40
Troubleshooting ........................................................... 41
Technical data ............................................................. 42
Leica Academy ............................................................ 43
Leica on the Internet .................................................... 43
Leica information service ............................................. 43
Leica customer care..................................................... 43
Appendix / Ballistics tables ........................................ 178
25
Page 28
ATTACHING THE CARRYING CORD
Feed the small loop on the carrying cord through the eyelet
(4) on the housing of the Leica Rangemaster CRF 1600-B.
Then thread the end of the cord through the small loop and
pull tight, so that the resulting loop is securely around the
eyelet on the housing.
INSERTING AND CHANGING THE BATTERIES
The Leica Rangemaster CRF 1600-B is powered by a 3 Volt
lithium round cell (e.g. Duracell DL CR2, Ucar CR2, Varta
CR2, or other CR2 types).
1. Open the cover (6) on the battery compartment (7) by
turning it anticlockwise.
2. Insert the battery so that the positive contact goes in first
(as shown by the markings in the battery compartment).
3. Close the cover again by turning it clockwise.
26
Page 29

Notes:
•Cold conditions impair the battery performance. At low
temperatures the Leica Rangemaster CRF 1600-B should
be kept as close to the body as possible and a new battery
should be fitted.
•If the Leica Rangemaster CRF 1600-B will not be used for
a long period, the battery should be removed.
•Batteries should be stored in a cool dry place.
Attention:
•Batteries should never be put in a fire, heated, recharged,
taken to pieces or broken apart.
•Used batteries may not be disposed of as normal,
household waste as they contain toxic materials that
are harmful to the environment. To ensure that they are
properly recycled, they should be returned to the dealer or
disposed of as special waste (at a collection point).
BATTERY CHARGE LEVEL
A used battery is indicated by a flashing measured value and
reticule display. Once the display starts flashing, at least
another 100 measurements are possible, with a gradually
reducing range.
27
Page 30

A B C
USE WITH AND WITHOUT GLASSES
Users who do not wear glasses can leave the rubber eyepiece cup (3) raised (Figure A, as supplied). This position
gives the correct distance between the Leica Rangemaster
CRF 1600-B and the eye. When using with glasses, the
rubber eyepiece cup should be pressed down (Figure B).
DIOPTER COMPENSATION
Diopter compensation enables you to adjust the sharpness
of the reticule to the optimum value for you. Simply aim
the Leica Rangemaster CRF 1600-B at a distant object and
adjust the reticule until it has optimum sharpness by turning
the rubber eyepiece cup (3). The reticule appears when you
press the main button (2). You can read the set value on the
„+“ or „-“ scale (3b) on the rubber eyepiece cup. Diopter
compensation is available for vision defects of up to ±3.5
diopters.
28
Page 31

BASIC INFORMATION ON MENU CONTROL
For all settings:
- The main menu contains four items - Meters/Yards
USEU), Ballistic curve (baLL), Zeroing range (SId)
display (
and Ballistic output format (
functions can be found in the relevant sections.
- Both the main menu and the setting options are set up as
a continuous loop - i.e. all items/settings will be displayed
over and over as you continue pressing the button.
SETTING THE UNIT OF MEASURE
The Leica Rangemaster CRF 1600-B can be set to a
EU) or imperial (US) unit system, i.e. for distance/
metric (
temperature/atmospheric pressure either meters/Celsius/
millibar or yards/Fahrenheit/InHg (Inches of Mercury). This
setting also determines the unit for the holdover, the ballistic
curves and the zeroing range (see p. 37/36/35).
AbC). Details of the individual
Setting
1. Press and hold the secondary button (1) (≥3s).
•The display shows
2. Press the main button (2) to select the desired unit of
measure.
US = for display in yards
EU = for display in meters
Note:
The current setting can always be seen in the display - if
metric values are selected, a dot appears to the bottom right
of the reticule.
3. Save your setting by briefly pressing the secondary button.
•The saved setting is initially lit continuously as
confirmation, then the display switches to the next item
in the menu (ballistic curve „bALL“) and then disappears
if no further settings have been made.
29
USEU (flashing)
Page 32

RANGE MEASUREMENT
98
To measure the distance to an object, you must aim directly
at it. To do this, proceed as follows:
1. Press the main button (2). This switches on the device.
•The reticule appears.
When you release the main button, the reticule remains lit for
around another 6 seconds. If you hold it down, the reticule
remains lit continuously.
2. Aim at the object while the reticule is lit.
3. Press the main button again.
• a. The reticule disappears briefly during the
measurement.
b. The measured value is displayed.
As long as the reticule remains lit, you can carry out another
measurement at any time by pressing the main button.
The display shows: - - -, if
- the distance to the object is less than 10 meters/yards, or
- the range is exceeded, or
- the object is not sufficiently reflective.
When the display disappears, the Leica Rangemaster CRF
1600-B shuts down automatically.
30
Page 33

SCAN MODE
61 65
72
The Leica Rangemaster CRF 1600-B can also be used for
continuous measurements (scan mode):
Hold down the main button (2) at the 2
After around 2.5 seconds, the device switches to scan mode
and then carries out continuous measurements. This can be
seen by a change in the display. Around every 1 second, a
new measured value is shown.
Scan mode is particularly useful for measuring the range to
small or moving targets.
Notes:
•In scan mode, the ABC correction value (see p. 36) is only
displayed after the last measurement.
•Because of the continuous measurements, power
consumption is greater in scan mode than for single
measurements.
31
nd
press.
Page 34

MEASURING RANGE AND ACCURACY
The measuring accuracy of the Leica Rangemaster CRF
1600-B is up to ±1 meter/yard. The maximum range is
achieved with highly reflective target objects and a visual
range of around 10km/6.2 miles. Long ranges can be reliably
measured / achieved by holding the Leica Rangemaster CRF
1600-B very steadily and/or placing it on a solid surface. The
measuring range is influenced by the following factors:
Range Longer Shorter
Color
Angle to lens
Object size
Sunlight
Atmospheric
conditions
Object structure
White Black
Perpendicular Acute
Large Small
Low (cloudy) High (midday sun)
Clear Hazy
Homogeneous
(wall of building)
Inhomogeneous
(bush, tree)
In sunlight and with good vision, the following ranges and
accuracies can be achieved:
Range
Accuracy
approx. 10m/yds to 1460m/1600 yds
approx. ± 1 m/yds up to 500m/yds
approx. ± 2m/yds up to 1000m/yds
approx. ± 0,5% over 915 m/1000 yds
32
Page 35

INDICATION OF ATMOSPHERIC CONDITIONS
1 5
2 5 C
To accurately calculate the impact point (see following
section), the Leica Rangemaster CRF 1600-B also determines
three crucial pieces of additional information when measuring
the range: the inclination of the unit, the temperature and the
atmospheric pressure. You can display the relevant values
at any time.
Press the secondary button (1) briefly once.
•The reticule appears briefly (if range measurement was not
previously activated) and then the following items appear
in succession for around 2s each instead of the range:
- Angle of inclination
- Temperature
- Atmospheric pressure
1 0 3 0
Note:
If the housing of the Leica Rangemaster CRF 1600-B
initially has a significantly different temperature than the
surroundings, for example when moving from inside to
outside, it can take up to 30 minutes before the internal
sensor can display the correct ambient temperature again.
33
Page 36

DETERMINING THE BALLISTIC CURVE
To accurately determine the impact point correction, the
Leica Rangemaster CRF 1600-B incorporates the trajectory
of the bullet into the calculation. Twelve different ballistic
curves are available for adaptation to the equipment you are
using.
From the appropriate table in the appendix (see p. 178-
183), find the ballistic curve that is closest to the bullet drop
specified by the ammunition manufacturer. Make sure you
choose the appropriate zeroing range.
Example:
The rifle scope is zeroed to 100 meters, which means that
Table 1 is applicable. The specified impact point for the
ammunition used is -15.0cm at 200m. In the corresponding
column, this is closest to the value 14.5cm in row EU7 - this
is therefore the appropriate ballistic curve.
Note:
When using the ballistic function on the Leica Rangemaster
CRF 1600-B at a range of > 300m / 330 yards, we
recommend determining the ballistic data for your
ammunition by practical testing, so that you can be sure to
select the appropriate curve.
Setting the ballistic curve
Start with step 1 if you have not previously opened the menu
control, or with step 3 if you have just set the unit of measure
bAll is still flashing in the display.
and
1. Press and hold the secondary button (1) (≥3s).
•The display shows
2. Press the secondary button briefly (<2s) once.
•The display switches to the ballistic curves „
3. Press the main button (2).
•The display changes to '
EU1 or
-
US1
-
34
USEU.
bALL“.
Page 37

4. Press the main button several times to select the relevant
ballistic curve, i.e.
EU1 to EU12 or
-
US1 to US12, or
if you want the range to be displayed without the impact
point correction (
OFF.
-
5. Save your setting by briefly pressing the secondary button.
•The saved setting is lit continuously for 4s as
confirmation, then the display changes first to the
zeroing range setting (
If a ballistic curve is set, after each range measurement
the range value is first displayed for 2s, then the calculated
correction value for 6s.
AbC) (see p. 36).
SId) and then disappears
SETTING THE ZEROING RANGE (
Start with step 1 if you have not previously opened the menu
control, or with step 3 if you have just specified the ballistic
Sld is still flashing in the display.
curve and
1. Press and hold the secondary button (1) (≥3s).
•The display shows
2. Press the secondary button briefly (<2s) twice.
•The display changes to
3. Press the main button (2) several times to select the
required zeroing range.
100 [m],
-
200 [m], or
-
GEE [m], or
-
100 [y], or
-
200 [y], or
-
300 [y].
-
4. Save your setting by briefly pressing the secondary button.
•The saved setting is lit continuously for 4s as
confirmation, then the display changes first to
then disappears.
35
USEU.
SId
)
bALL and then to SId.
AbC and
Page 38

BALLISTIC OUTPUT FORMATS (
ABC
TM
)
The advanced ballistic compensation (AbC) on the Leica
Rangemaster CRF 1600-B allows you to display one of the
following three ballistic values after the measured range if
required:
- the equivalent horizontal range (
- the corresponding holdover (
EHr)
HOLd)
- the number of clicks required on the rapid reticle
adjustment (MOA/clicks)
To include both the displayed holdover and the displayed
EHrvalue:
a. the measured range to the target
b. the angle of inclination of the weapon
c. the set ballistic curve
d. the measured temperature and atmospheric pressure
values
e. the set zeroing range
Notes:
•Calculation of the specified values is based on the
currently set ballistic curve, i.e. the curve must be selected
first (see p. 34).
•For safety reasons, ballistic output values are only
specified up to a range of 800m/875yds. The actual
measured range is also specified.
Important:
•Please note that particularly at long ranges, the influence
of all relevant ballistic influencing factors is greatly
increased and considerable variations can occur. The
ballistic values displayed should therefore only be viewed
as a guideline.
•Regardless of whether this information is used, you are
responsible for assessing the relevant hunting situation.
36
Page 39

EQUIVALENT HORIZONTAL RANGE (
Shots at targets at a higher or lower position are subject
to changed ballistic conditions. Therefore, they require
knowledge of the equivalent horizontal range, which is
relevant for hunting. For example, knowledge of the
important when using ballistic reticles.
Note:
Horizontal EHr measurements can also result in values that
differ from the „straight line“ measured range, for example if
the temperature and/or the atmospheric pressure vary from
the normal values.
EHR
)
EHr is
HOLDOVER (
Holdover is defined as the point that you aim at with the
weapon instead of the actual target point to compensate for
the variation caused by the trajectory of the bullet (e.g. when
using classic hunting reticles).
By displaying the holdover, the Leica Rangemaster CRF
1600-B can provide valuable support in achieving the most
accurate shots possible when hunting.
In addition to the range, the calculation is based on the
general conditions discussed in the previous section and the
ballistic curve you have selected.
Note:
The holdover/elevation is always shown with reference to the
range to the target.
Example: If
30cm higher on the object than without correction.
37
HOLd
)
300m H30 is displayed, you would have to stop
Page 40

IMPACT POINT CORRECTION USING ELEVATION
ADJUSTMENT
(Click/MoA adjustment)
Variations in the point of impact can be compensated by
adjusting the reticle on your telescopic sight accordingly.
Based on the bullet trajectory and the zeroing range (see p.
35), the Leica Rangemaster CRF 1600-B can show you the
required adjustment, i.e. the relevant number of clicks.
For different elevations, you can specify whether the click
levels will be
- based on the international standard MOA (minutes of
angle) graduation, or
- displayed in 5 or 10 millimeter increments.
Settings and selecting the ballistic output formats
Start with step 1 if you have not previously opened the menu
control, or with step 3 if you have just specified the zeroing
ABC is still flashing in the display.
range and
1. Press and hold the secondary button (1) (≥3s).
•The display shows
USEU.
2. Press the secondary button briefly (<2s) three times.
•The display changes to
bAll, then to SId, and then to AbC.
3. Press the main button (2) several times to select the
required ballistic setting.
EHr or
-
HOLd, or
-
1-1 (1MOA), or
-
1
1-3 (
/
MOA), or
-
3
1
1-4 (
/
MOA), or
-
4
10 mm or
-
5 mm.
-
4. Save your setting by briefly pressing the secondary button.
•The saved setting is lit continuously for 4s as
confirmation and then disappears.
38
Page 41

Displaying and checking the set ballistic parameters
If you want to check your settings, you can display the values
at any time.
To do this, briefly press the secondary button twice.
•Below the reticule (or instead of the range), the following
will appear in turn for around 2s each:
- the set ballistic curve (see p. 34)
- the set zeroing range (see p. 35)
- the set ballistic output value (see p. 36)
When all ballistic functions are deactivated (
OFF setting is displayed.
the
bALL = OFF), only
39
Page 42

MAINTENANCE / CLEANING
Your Leica Rangemaster CRF 1600-B does not require any
special care. Coarse dirt particles, such as sand, should be
removed with a fine hair brush or blown away. Marks such
as fingerprints on the front lens and eyepiece lenses can be
cleaned with a damp cloth and then wiped off with a soft,
clean leather or dust-free cloth.
Important:
Do not exert heavy pressure when wiping highly soiled
lens surfaces. Although the coating is extremely abrasion
resistant, it can be damaged by sand or salt crystals.
The housing should only be cleaned with a moist leather
cloth. Using dry cloths brings a risk of static charge. Alcohol
and other chemical solutions must not be used to clean the
optical system or the housing.
Every Leica Rangemaster CRF 1600-B has a unique serial
number in addition to its model name. Note this number in
your documentation for security.
Attention:
Never open the unit.
SPARE PARTS
Should you ever require spare parts for your Leica
Rangemaster CRF 1600-B, such as eyepiece cups or
a carrying cord, please contact our Customer Service
department (for address, see page 43) or your national Leica
agent (for addresses, see Warranty Card).
40
Page 43

TROUBLESHOOTING
Problem
The image is
not circular when viewing.
Display not focused Diopter compensation not exact. Repeat diopter compensation
When measuring the range, the display
- - -“
shows „
Display flashes or no measurement is
possible
Cause
a) The viewer's pupil is not located in
the eyepiece exit pupil.
b) The position of the eyepiece cup
does not match that for correct use
with and without glasses.
a) Above or below measuring range
b) Object is not sufficiently reflective
Battery dead Replace battery (see p. 26)
41
Remedy
a) Correct the eye position.
b) Correct the adjustment: If wearing
glasses, push down the eyepiece
cup; without glasses, it should
remain raised (see p. 28).
(see p. 28)
Refer to measuring range
specifications (see p. 32)
Page 44

TECHNICAL DATA
Magnification
Lens diameter
Exit pupil
Twilight number
Geometric luminous intensity
Field of vision (at 1000m/yards)
Objective field of view
Exit pupil longitudinal distance
Prism type
Coating on lenses
on prisms
Diopter compensation
Suitable for use when wearing glasses
Operating temperature
Storage temperature
Water tightness
Housing / chassis material
Maximum range
Minimum range
Measuring accuracy
Display/Unit of measure
Battery
Battery life
Laser
Laser beam divergence
Maximum measurement duration
Dimensions (W x H x D)
Weight (with battery)
7x
15
24mm /
/16in
9
/64in
3.4mm /
13
11.8
115m/yd 6.5°
19
/64in
15mm /
Ridge
High Durable Coating (HDC™) and Aqua-Dura coating on external lenses
Phase correction coating P40
±3.5dpt.
Yes
-10 to 55°C / 14 to 131°F
-25 to 75°C / -13 to 167°F
For 30min: Impermeable to press water up to 1m deep
Carbon fiber reinforced plastic, soft lacquered / cast aluminum
Approx. 1460m / 1600yds
Approx. 10m / yds
Approx. ±1m/yds up to 500m/yds / approx. ± 2m/yds up to 1000m/yds / Approx. ± 0.5% over 1000m/yds
4-digit LED/choice of meters/centimeters or yards/inches
3V lithium round cell, type CR2
Approx. 2000 measurements at 20°C
Invisible, safe for eyes in compliance with EN and FDA Class 1
Approx. 0.5 x 2.5mrad
Approx. 0.9s
Approx. 75 x 34 x 113mm / 2
Approx. 185g / 6.52oz
61
/64 x 1 11/32 x 4 29/64 in
42
Page 45

LEICA ACADEMY
Our various seminars allow participants to discover the Leica
values and the fascination of expert use of Leica products, all
in a practical, contemporary form. The content of the courses
are focused on use of the products and offer an array of
practical ideas, information and advice. More details, along
with the current seminar program, are available from:
Leica Camera AG
Leica Akademie
Oskar-Barnack-Str. 11
D- 35606 Solms
Tel: +49 (0)6442-208 421
Fax: +49 (0)6442-208 425
la@leica-camera.com
LEICA INFORMATION SERVICE
The Leica information Service can provide you with an answer
to any technical application questions relating to the Leica
range either in writing, on the telephone or by e-mail.
Leica Camera AG
Information Service
PO Box 1180
D- 35599 Solms
Tel: +49 (0)6442-208 111
Fax: +49 (0)6442-208 339
info@leica-camera.com
LEICA CUSTOMER SERVICE
For servicing your Leica equipment or in the event of damage, the
Leica Camera AG Customer Care department or the repair service
provided by authorized Leica agents in your country are available
(see the Warranty Card for a list of addresses).
Leica Camera AG
Customer Care
Solmser Gewerbepark 8
D- 35606 Solms
Tel: +49 (0)6442-208 189
Fax: +49 (0)6442-208 339
customer.care@leica-camera.com
This is a Class B product based on the standard of
the Voluntary Control Council for Interference from
Information Technology Equipment (VCCI). If this is
used near a radio or television receiver in a domestic
environment, it may cause radio interference.
Install and use the equipment according to the
instruction manual.
43
Page 46

FCC NOTE: (U.S. ONLY)
This equipment has been tested and found to comply with the limits
for a Class B digital device, pursuant to Part 15 of the FCC Rules.
These limits are designed to provide reasonable protection against
harmful interference in a residential installation. This equipment
generates, uses, and can radiate radio frequency energy and, if not
installed and used in accordan ce with the instructions, may cause
harmful interference to radio communications. However, there is no
guarantee that interference will not occur in a parti cular installation. If
this equipment does cause harmful interference to radio or television
reception, which can be determined by turning the equipment off and
on, the user is encouraged to try to correct the interference by one or
more of the following measures:
• Reorientorrelocatethereceivingantenna.
• Increasetheseparationbetweentheequipmentandreceiver.
• Connecttheequipmentintoanoutletonacircuitdifferentfrom
that to which the receiver is connected.
• Consultthedealeroranexperiencedradio/TVtechnicianfor
help.
FCC CAUTION:
To assure continued compliance, follow the attached installation
instructions and use only shielded interface cables with ferrite core
when connecting to computer or peripheral devices. Any changes
or modifications not expressly ap proved by the party responsible for
compliance could void the user’s authority to operate this equipment.
Trade Name: LEICA
Model: RANGEMASTER CRF 1600-B
Responsible party/
Support contact: Leica Camera Inc.
1 Pearl Count, Unit A
Allendale, New Jersey 07401
Tel.: +1 201 995 0051
Fax: +1 201 995 1684
technicalinfo@leicacamerausa.com
THIS DEVICE COMPLIES WITH PART 15 OF THE FCC RULES.
Operation is subject to the following two conditions:
(1) This device may not cause harmful inter ference, and
(2) this device must accept any interference re ceived, including inter-
ference that may cause undesired operation.
This Class B digital apparatus complies with Canadian ICES-003
LEICA RANGEMASTER CRF 1600-B
Tested To Comply
With FCC Standards
FOR HOME OR OFFICE USE
44
Page 47

DESCRIPTION DES PIÈCES
1 Touche secondaire
2 Touche principale
3 Œilleton avec
a. Echelle de dioptrie
4 Œillet pour courroie de port
5 Oculaire
6 Couvercle du compartiment des piles
7 Compartiment des piles
8 Lentille d‘objectif
9 Optique d‘émission laser
Avertissement
Eviter, comme avec des jumelles, de regarder avec le
Leica Rangemaster CRF 1600-B directement dans des
sources de lumière claires afin d‘écarter tout risque de
lésion oculaire.
LIVRAISON
– Télémètre
– 1 pile lithium 3 V type CR 2
– Courroie de port
– Etui cordura
– Carte de garantie
LEICA RANGEMASTER CRF 1600-B
Référence 40 534
45
Page 48

AVANT-PROPOS
Chère cliente, cher client,
Partout dans le monde, le nom de Leica est synonyme de
qualité optimale, de haute précision, de grande fiabilité et de
durabilité.
Nous espérons que vous prendrez grand plaisir à utiliser
votre nouveau Leica Rangemaster CRF 1600-B.
Ce télémètre émet des impulsions infrarouges invisibles
et sans danger pour les yeux et utilise le signal
réfléchi pour calculer la distance d'un objet à l'aide du
microprocesseur intégré. En outre, il enregistre les conditions
environnementales et d'utilisation et les utilise, ainsi que les
distances mesurées, pour calculer et afficher les corrections
du point de visée pour différentes courbes balistiques
sélectionnables.
Equipé d'un grossissement exceptionnel de 7 fois, qui assure
une mesure précise même dans des conditions difficiles, il
est pratique et simple d'emploi.
Afin que vous puissiez exploiter toutes les fonctionnalités
de ce télémètre laser hautes performances polyvalent, nous
vous recommandons de lire d'abord ce mode d'emploi.
ELIMINATION DES APPAREILS
ELECTRIQUES ET ELECTRONIQUES
(applicable à l'UE ainsi qu'aux autres pays
européens avec des systèmes de collecte
séparés)
Cet appareil contient des composants électriques et/ou
électroniques et ne peut donc pas être jeté dans les ordures
ménagères ordinaires! Il doit être déposé à un point de
collecte municipal adapté afin d'être recyclé. Ce dépôt est
gratuit.
Si l'appareil contient des piles ou des accumulateurs
remplaçables, ils doivent être préalablement retirés et, le cas
échéant, éliminés séparément conformément aux règlements
en vigueur (à cet égard, voir les instructions correspondantes
dans le mode d'emploi de l'appareil).
D'autres informations à ce sujet sont disponibles auprès de
l'administration municipale, de la société de traitement des
déchets ou du magasin dans lequel vous avez acheté cet
appareil.
46
Page 49

TABLE DES MATIÈRES
Diagramme arborescence / schéma de commande ........U3
Description des pièces ................................................. 45
Equipement fourni ........................................................ 45
Avant-propos ............................................................... 46
Elimination des appareils électriques et
électroniques ............................................................... 46
Fixation de la courroie de port ...................................... 48
Insertion et changement des piles ................................ 48
Etat de charge de la pile ............................................... 49
Utilisation avec et sans lunettes ................................... 50
Compensation dioptrique ............................................. 50
Notions de base de la commande des menus ............... 51
Réglage de l'unité de mesure désirée ........................... 51
Mesure de la distance .................................................. 52
Mode Scan .................................................................. 53
Portée et précision ....................................................... 54
Affichage des conditions atmosphériques ..................... 55
Définition de la courbe balistique ................................. 56
Réglage de la distance du tir dans le mille .................... 57
Compensation balistique .............................................. 58
Distance horizontale équivalente .................................. 59
Point de visée .............................................................. 59
Correction du point d'impact par
réglage de l'élévation ................................................... 60
Réglage et sélection de la compensation
balistique ..................................................................... 60
Affichage et vérification des paramètres
balistiques réglés ......................................................... 61
Entretien/nettoyage .................................................... 62
Pièces de rechange ...................................................... 62
Que faire quand... ........................................................ 63
Caractéristiques techniques ......................................... 64
Leica Akademie ........................................................... 65
Leica sur Internet ......................................................... 65
Service d'information Leica .......................................... 65
Service après-vente Leica ............................................ 65
Annexe / tableaux balistiques .................................... 178
47
Page 50

FIXATION DE LA COURROIE DE PORT
Glissez le petit passant de la courroie de port à travers
l'œillet (4) sur le boîtier du Leica Rangemaster CRF 1600-B.
Ensuite, enfilez l'extrémité de la courroie à travers le passant
et serrez-la de manière à ce que la boucle ainsi formée soit
bien fixée à l'œillet.
INSERTION ET CHANGEMENT DE LA PILE
Le Leica Rangemaster CRF 1600-B est alimenté par une
pile ronde lithium 3volts (p. ex. Duracell DL CR2, Ucar CR2,
Varta CR2 ou d'autres piles de type CR2).
1. Ouvrez le couvercle (6) du compartiment de la pile (7) en
le faisant tourner dans le sens inverse des aiguilles d'une
montre.
2. Insérez la pile, avec la borne "plus" vers l'avant
(conformément à l'illustration dans le compartiment de
la pile).
3. Refermez le couvercle en tournant dans le sens des
aiguilles d'une montre.
48
Page 51

Remarques:
•Le froid diminue les performances de la pile. Par
conséquent, à basse température, le Leica Rangemaster
CRF 1600-B doit être porté le plus près possible du corps
et utilisé avec une pile neuve.
•Si vous ne comptez pas utiliser le Leica Rangemaster CRF
1600-B pendant un certain temps, vous devez retirer la
pile.
•Les piles doivent être stockées dans un endroit frais et
sec.
Attention:
•Ne jetez jamais les piles au feu, ne les chauffez pas, ne les
rechargez pas, ne les démontez pas et ne les cassez pas.
•Ne jetez pas les piles usagées avec les ordures ménagères
ordinaires car elles contiennent des substances toxiques
nuisibles pour l'environnement. Pour autoriser un
recyclage correct, remettez-les à un commerçant ou
éliminez-les avec les ordures spéciales dans un collecteur.
ETAT DE CHARGE DE LA PILE
Une pile usagée est signalée par un clignotement de
l'affichage des valeurs de mesure et du repère de cible.
Lorsque l'affichage commence à clignoter, vous pouvez
encore effectuer plus de 100mesures, avec une portée de
plus en plus réduite.
49
Page 52

A B C
UTILISATION AVEC ET SANS LUNETTES
Les utilisateurs qui ne portent pas de lunettes laissent
l'œilleton en caoutchouc (3) relevé (illustration A, état à la
livraison). Dans cette position, le Leica Rangemaster CRF
1600-B est maintenu à une distance correcte de l'œil. Les
porteurs de lunettes doivent repousser l'œilleton vers le bas
(illustration B).
COMPENSATION DIOPTRIQUE
La compensation dioptrique permet de régler la netteté du
repère de cible de manière optimale. Il suffit de viser un objet
éloigné à l'aide du Leica Rangemaster CRF 1600-B et de régler
le repère de cible de manière optimale en faisant tourner
l'œilleton en caoutchouc (3). Le repère de cible apparaît
lorsque l'on appuie sur la touche principale (2). Vous pouvez
lire la valeur réglée sur l'échelle "+" ou "–" (3b) sur l'œilleton
en caoutchouc. Une compensation dioptrique est possible
pour les amétropies jusqu'à ±3,5dioptries.
50
Page 53

NOTIONS DE BASE DE LA COMMANDE DES MENUS
Ceci s'applique à tous les réglages:
- Le menu principal dispose de quatre options: affichage
en mètres ou en yards (
distance du tir dans le mille (
AbC). Ces fonctions sont détaillées dans les
balistique (
sections suivantes.
- Le menu principal et les différentes options de réglage
s'affichent en boucle, c'est-à-dire que vous pouvez
réafficher toutes les options en continuant d'appuyer sur
les touches.
USEU), courbe balistique (baLL),
SId) et format de sortie
Réglage
1. Appuyez longuement sur la touche secondaire (1) (≥3s).
USEU (clignotant) s'affiche
•
2. Appuyez sur la touche principale (2) pour sélectionner
l'unité de mesure désirée.
US = pour l'affichage en yards
EU = pour l'affichage en mètres
Remarque:
Le réglage sélectionné est toujours indiqué sur l'affichage:
si le système métrique est choisi, un point apparaît en bas à
droite du repère de cible.
REGLAGE DE L'UNITE DE MESURE DESIREE
Le Leica Rangemaster CRF 1600-B peut être réglé sur le
système métrique (
mètres/degrés Celsius/millibars ou des yards/degrés
Fahrenheit/InHg (pouces de mercure) pour le réglage de la
distance/température/pression atmosphérique. Ce réglage
se répercute également sur le point de visée, les courbes
balistiques et les distances du tir dans le mille (voir p. 59/58/57).
EU) ou impérial (US) afin d'utiliser des
3. Enregistrez le réglage en appuyant brièvement sur la
touche secondaire.
•Le réglage enregistré reste allumé pour confirmation,
puis l'option suivante s'affiche (courbe balistique
"bALL") avant de s'éteindre si aucun autre réglage n'est
effectué.
51
Page 54

MESURE DE LA DISTANCE
98
Pour mesurer la distance d'un objet, vous devez le viser
précisément. Procédez comme suit:
1. Appuyez sur la touche principale (2). L'appareil se met
sous tension.
•Le repère de visée apparaît.
Lorsque vous relâchez la touche principale, le repère de
cible reste allumé pendant environ 6secondes. Si vous la
maintenez enfoncée, le repère de cible reste allumé.
2. Visez l'objet pendant que le repère de visée est allumé.
3. Rappuyez sur la touche principale.
• a. Le repère de cible s'éteint brièvement pendant la
mesure.
b. La valeur de mesure s'affiche.
Tant que le repère de cible est allumé, vous pouvez effectuer
une nouvelle mesure à tout moment en rappuyant sur la
touche principale.
Le symbole suivant s'affiche: - - - lorsque
- l'objet se situe à moins de 10mètres ou
- la portée a été dépassée ou
- l'objet ne reflète pas suffisamment la lumière.
Lorsque l'affichage disparaît, le Leica Range master CRF
1600-B se met automatiquement hors tension.
52
Page 55

MODE SCAN
61 65
72
Le Leica Rangemaster CRF 1600-B permet également
d'effectuer des mesures en continu (mode Scan):
Maintenez la touche principale (2) enfoncée lors de la
deuxième pression.
Après 2,5secondes environ, l'appareil passe en mode Scan
et effectue des mesures en continu. Le mode Scan est
indiqué par un changement de l'affichage. Au bout d'env. 1
seconde, une nouvelle valeur de mesure est indiquée.
Le mode Scan est particulièrement pratique pour les mesures
concernant des cibles petites et mouvantes.
Remarques:
•En mode Scan, la valeur de correction ABC (voir p. 58)
n'est affichée qu'après la dernière mesure.
•En mode Scan, la consommation est plus élevée qu'en
mode normal en raison des mesures permanentes.
53
Page 56

PORTEE ET PRECISION
La précision de mesure du Leica Rangemaster CRF 1600-B
est de ±1 mètre. La portée maximale est atteinte dans le
cas d'objets bien réfléchissants, avec une visibilité d'environ
10 km. De grandes portées peuvent être mesurées/atteintes
avec plus de précision lorsque le Leica Range master CRF
1600-B est maintenu et/ou posé avec une grande stabilité.
La portée est influencée par les facteurs suivants:
Portée supérieure inférieure
Couleur
Angle par
rapport à
l'objectif
Taille de l'objet
Lumière du
soleil
Conditions
atmosphériques
Structure de
l'objet
blanc noir
vertical aigu
grand petit
faible (nuageux) forte (soleil de
midi)
claires brumeuses
homogène (mur) hétérogène
(buisson, arbre)
La portée et la précision suivantes peuvent être obtenues
avec un temps ensoleillé et une bonne visibilité:
Portée
Précision
env. 10 m 1460 m
env. ±1 m jusqu'à 500 m
env. ±2 m jusqu'à 1000 m
env. ± 0,5 % au-delà de 1000 m
54
Page 57

AFFICHAGE DES CONDITIONS ATMOSPHERIQUES
1 5
2 5 C
1 0 3 0
Pour un calcul précis de la position du point d'impact
(voir section suivante), le Leica Rangemaster CRF 1600-B
calcule également trois importantes informations
complémentaires pendant la mesure de la distance: l'angle
de tir, la température et la pression atmosphérique. Vous
pouvez afficher les valeurs correspondantes à tout moment.
Appuyez une fois brièvement sur la touche secondaire (1).
•Le repère de cible apparaît pendant un court instant (si la
mesure de la distance n'était pas préalablement activée),
puis l'affichage de la distance est remplacé pendant
environ 2s successivement par
- l'angle de tir
- la température
- la pression atmosphérique
Remarque:
Si le boîtier du Leica Rangemaster CRF 1600-B présente un
écart de température important avec son environnement, par
exemple lors du passage d'un intérieur chauffé à l'extérieur,
il peut être nécessaire d'attendre 30min avant que les
capteurs de mesure internes puissent afficher la température
environnementale correcte.
55
Page 58

DEFINITION DE LA COURBE BALISTIQUE
Pour une définition précise de la correction du point
d'impact, le Leica Rangemaster CRF 1600-B inclut
la trajectoire de tir dans le calcul. Vous avez le choix
entre 12courbes balistiques différentes en fonction de
l'équipement utilisé.
Dans le tableau correspondant en annexe (voir p. 178-183),
recherchez la courbe balistique la plus proche des données
du fabricant des munitions en termes de chute de la balle.
Veillez à sélectionner la distance du tir dans le mille correcte.
Exemple:
Si la lunette de visée est réglée sur 100mètres, utilisez le
tableau 1. Le point d'impact pour les munitions utilisées
est de -15,0 cm à 200m. Dans la colonne correspondante,
cela coïncide avec la valeur 14,5cm à la ligne EU7, ce qui
constitue la courbe balistique adaptée.
Remarque:
Lorsque vous utilisez la fonction balistique du Leica
Rangemaster CRF 1600-B à des distances supérieures à
300m, il est conseillé de calculer les données balistiques
de vos munitions dans la pratique, afin de pouvoir choisir la
courbe appropriée.
Réglage de la courbe balistique
Commencez par l'étape 1., si vous n'avez pas encore affiché
la commande de menu, ou par l'étape 3., si vous avez déjà
réglé l'unité de mesure et si l'affichage
1. Appuyez longuement sur la touche secondaire (1) (≥3s).
USEU s'affiche
•
2. Appuyez une fois brièvement sur la touche secondaire
(<2s).
•Les courbes balistiques "
3. Appuyez sur la touche principale (2).
•L'affichage passe à
EU1 ou
-
US1
-
56
bAll clignote.
bALL" s'affichent.
Page 59

4. Sélectionnez la courbe balistique désirée en appuyant
plusieurs fois brièvement sur la touche principale, à savoir
EU1 à EU12 ou
-
US1 à US12 ou
si vous souhaitez afficher la distance sans correction du
point d'impact (
OFF.
-
5. Enregistrez le réglage en appuyant brièvement sur la
touche secondaire.
•Le réglage enregistré reste allumé pendant 4s pour
confirmation, puis le réglage de la distance du tir dans le
mille s'affiche (
Si une courbe balistique est réglée, la valeur de distance
est d'abord affichée pendant 2s après chaque mesure de
distance, suivie de la valeur de correction calculée, pendant
6s.
AbC) (voir p. 58)
SId) avant de s'éteindre.
REGLAGE DE LA DISTANCE DU TIR DANS LE MILLE (
Commencez par l'étape 1., si vous n'avez pas encore affiché
la commande de menu, ou par l'étape 3., si vous avez déjà
défini la courbe balistique et si l'affichage
1. Appuyez longuement sur la touche secondaire (1) (≥3s).
•
USEU s'affiche
2. Appuyez deux fois brièvement sur la touche secondaire
(<2s).
•L'affichage passe au-dessus de
3. Sélectionnez la distance de tir dans le mille désirée en
appuyant plusieurs fois sur la touche principale (2).
100 [m],
-
200 [m] ou
-
GEE [m], ou
-
100 [y] ou
-
200 [y] ou
-
300 [y].
-
4. Enregistrez le réglage en appuyant brièvement sur la
touche secondaire.
•Le réglage enregistré reste allumé pendant 4s pour
confirmation, puis
57
AbC s'affiche avant de s'éteindre.
SId clignote.
bALL pour atteindre Sld.
SId
)
Page 60

COMPENSATION BALISTIQUE (
ABC
TM
)
La technologie Advanced Ballistic Compensation (AbC)
du Leica Rangemaster CRF 1600-B permet d'afficher sur
demande l'une des trois valeurs balistiques suivantes après la
distance mesurée:
- distance horizontale équivalente (
- point de visée correspondant (
EHr)
HOLd)
- nombre de clics nécessaires sur le réglage rapide du
réticule (MOA/clics)
Le point de visée et la valeur
EHr affichés tiennent compte
des éléments suivants:
a. distance mesurée avec la cible,
b. angle de tir de l'arme,
c. courbe balistique réglée,
d. valeurs de température et de pression atmosphérique
mesurées,
e. distance du tir dans le mille réglée.
Remarques:
•Le calcul des valeurs indiquées repose sur la courbe
balistique préalablement sélectionnée (voir p. 56).
•Pour des raisons de sécurité, les valeurs de compensation
balistique ne sont pas indiquées au-delà d'une distance
de 800m. En outre, seule la distance réellement mesurée
est affichée.
Important:
•N'oubliez pas qu'à grande distance, l'influence de tous
les facteurs pertinents d'un point de vue balistique
augmente considérablement, ce qui peut entraîner des
écarts importants. Les valeurs balistiques affichées ne
constituent donc qu'une indication!
•Indépendamment de l'utilisation de ces informations,
l'évaluation de chaque situation de chasse relève de votre
responsabilité!
58
Page 61

DISTANCE HORIZONTALE EQUIVALENTE (
Les tirs sur des cibles en hauteur ou en contrebas sont
soumis à des conditions balistiques différentes. Vous
devez donc connaître la distance horizontale équivalente
(Equivalent Horizontal Range), pertinente pour la chasse. Il
est important de connaître la valeur
l'utilisation du réticule.
Remarque:
Même les mesures EHr horizontales peuvent renvoyer
des valeurs différentes des distances mesurées de
manière "rectiligne", par exemple en cas de déviation de la
température et/ou de la pression atmosphérique par rapport
aux valeurs normales.
EHR
)
EHr, notamment lors de
POINT DE VISEE (
Le point de visée est le point utilisé pour viser avec l'arme
en lieu et place du point de mire réel, afin de compenser
la déviation causée par la trajectoire du tir (p. ex. en cas
d'utilisation d'un réticule de chasse classique).
Grâce à l'affichage du point de visée, le Leica Range master
CRF 1600-B peut vous aider à tirer avec une précision
nettement accrue lors de la chasse.
Outre la distance, les conditions environnantes mentionnées
à la section précédente et la courbe balistique sélectionnée
sont utilisées pour le calcul.
Remarque:
Le point de visée/la valeur d'impact affichée est toujours
indiquée en rapport avec la distance vous séparant de la
cible.
Exemple: si l'affichage indique
placer 30cm plus haut que la normale par rapport à l'objet.
59
HOLd
)
300m H30, vous devriez vous
Page 62

CORRECTION DU POINT D'IMPACT PAR REGLAGE DE
L'ELEVATION
(réglage clic/MoA)
Les déviations de la position du point d'impact peuvent être
compensées par un réglage correspondant du réticule sur
votre lunette de visée.
Le Leica Rangemaster CRF 1600-B peut, en tenant compte
de la trajectoire de tir et de la distance du tir dans le mille
(voir p. 57) afficher le réglage nécessaire pour y parvenir,
c'est-à-dire le nombre correspondant de clics.
Pour différentes élévations, vous pouvez indiquer si les
incréments des clics doivent se baser sur
- une graduation selon la norme internationale MOA
(Minutes Of Angle) ou
- des incréments de 5 ou 10millimètres.
Réglage et sélection de la compensation balistique
Commencez par l'étape 1., si vous n'avez pas encore affiché
la commande de menu, ou par l'étape 3., si vous avez déjà
défini la distance du tir dans le mille et si l'affichage
clignote.
1. Appuyez longuement sur la touche secondaire (1) (≥3s).
USEU s'affiche
•
2. Appuyez trois fois brièvement sur la touche secondaire (<2s).
•L'affichage passe au-dessus de
bAll et SId pour atteindre
AbC.
3. Sélectionnez le réglage balistique désiré en appuyant
plusieurs fois sur la touche principale (2).
EHr,
-
HOLd ou
-
1-1 (1MOA),
-
1
1-3 (
/
MOA),
-
3
1
1-4 (
/
MOA),
-
4
10 mm, ou
-
5 mm.
-
4. Enregistrez le réglage en appuyant brièvement sur la
touche secondaire.
•Le réglage enregistré reste allumé 4s pour confirmation
et s'éteint ensuite.
60
ABC
Page 63

Affichage et vérification des paramètres balistiques
réglés
Si vous souhaitez vérifier vos réglages, vous pouvez afficher
les valeurs à tout moment.
Appuyez brièvement deux fois sur la touche secondaire (1).
•Sous le repère de cible, les indications suivantes
apparaissent consécutivement (au lieu de la distance)
pendant env. 2s chacune
- courbe balistique réglée (voir p. 56)
- distance du tir dans le mille réglée (voir p. 57)
- compensation balistique réglée (voir p. 58)
Si toutes les fonctions balistiques sont désactivées (
bALL =
OFF), seul le réglage OFF est affiché.
61
Page 64

ENTRETIEN/NETTOYAGE
Il n'est pas nécessaire de prendre des précautions
d'entretien particulières avec le Leica Rangemaster CRF
1600-B. Enlever les particules grossières, telles que le
sable, avec un pinceau fin ou en soufflant dessus. Traiter
les empreintes digitales, etc. sur les lentilles d'objectif et
d'oculaire d'abord avec un chiffon humide puis les essuyer
avec une peau de chamois douce propre ou avec un chiffon
non pelucheux.
Important:
Veillez à ne pas exercer de pression importante sur la surface
de la lentille lors de son nettoyage, même si elle est très sale.
Bien que la couche anti-reflet soit très résistante aux rayures,
elle peut être endommagée par le sable ou les cristaux de
sel. Le boîtier ne doit être nettoyé qu'à l'aide d'une peau de
chamois humide. L'utilisation d'une lingette sèche risque
de générer une charge statique. Il est interdit d'utiliser de
l'alcool ou d'autres substances chimiques pour le nettoyage
du boîtier ou de l'optique. Chaque Leica Rangemaster CRF
1600-B porte, outre la désignation de son type, son numéro
de fabrication "personnel". Veuillez, par mesure de sécurité,
noter ce numéro dans votre documentation.
Attention:
L'appareil ne doit jamais être ouvert!
PIECES DE RECHANGE
Si vous avez besoin d'une pièce de rechange pour votre Leica
Rangemaster CRF 1600-B, p. ex. un œilleton ou une courroie
de port, contactez notre service après-vente (adresse, voir p.
65) ou votre représentant national Leica (adresse, voir Carte
de Garantie).
62
Page 65

QUE FAIRE QUAND...
Défaut
Aucune image circulaire
n'apparaît à l'observation.
Cause
a) La pupille de l'utilisateur ne se
trouve pas dans la pupille de sortie
de l'oculaire.
b) La position de l'œilleton ne
correspond pas au mode
d'observation (avec/sans lunettes).
Remède
a) Corriger la position de l'œil.
b) Corriger le réglage: les porteurs
de lunettes replient l'œilleton; les
utilisateurs sans lunettes le laissent
relevé (voir p. 50).
L'affichage est flou Compensation dioptrique incorrecte Recommencer la compensation
Lors de la mesure de distance,
l'affichage "
L'affichage clignote ou la mesure est
impossible
- - -" apparaît
a) Portée dépassée ou non atteinte
b) Degré de réflexion de l'objet
insuffisant
Pile usagée Changer de pile (voir p. 48)
63
dioptrique
(voir p. 50)
Tenir compte des indications
(voir p. 54)
Page 66

CARACTÉRISTIQUES TECHNIQUES
Grossissement
Diamètre d'objectif
Pupille de sortie
Indice crépusculaire
Luminosité géométrique
Champ visuel (à 1000m/yds) /
angle de vue objectif
Distance longitudinale de la pupille de sortie
Type de prisme
Couche anti-reflet sur les lentilles
Compensation dioptrique
Adaptation aux porteurs de lunettes
Température de service
Température de stockage
Etanchéité
Matériau du boîtier/châssis
Portée maximale
Distance minimale
Précision de mesure
Affichage/Unité de mesure
Pile
Autonomie
Laser
Divergence de faisceau laser
Durée de mesure maximale
Dimensions (l x H x P)
Poids (avec pile)
sur les prismes
7x
24mm
3,4mm
13
11,8
115m/6,5°
15mm
En toit
High Durable Coating (HDC™) et revêtement Aqua-Dura sur la surface externe des lentilles
Couche de correction de phase P40
±3,5dpt.
oui
-10 à 55°C
-15 à 75°C
pendant 30min: étanchéité à 1m de profondeur
Plastique renforcé en fibre de carbone, laqué mat/aluminium moulé sous pression
env. 1460m
env. 10m
env. ±1m jusqu'à 500m/env. ± 2m jusqu'à 1000m/env. ± 0,5% au-delà de 1000m
LED à 4 chiffres/au choix en mètres/centimètres ou yards/pouces
Pile ronde lithium 3V type CR2
env. 2000 mesures à 20°C
Invisible, inoffensif pour les yeux selon EN et FDA classe 1
env. 0,5 x 2,5mrad
env. 0,9s
env. 75 x 34 x 113mm
env. 185g
64
Page 67

LEICA AKADEMIE
Les différents séminaires présentent aux participants
l'univers fascinant du savoir-faire Leica sous une forme
moderne. Axés sur les applications, ils fournissent
d'innombrables informations, astuces et suggestions pour la
pratique. Pour plus de renseignements sur le programme de
formation courant:
Leica Camera AG
Leica Akademie
Oskar-Barnack-Str. 11
D35606 Solms
Tél: +49 (0)6442-208 421
Fax: +49 (0)6442-208 425
la@leica-camera.com
SERVICE D'INFORMATION LEICA
Le service d'information Leica répondra volontiers par
écrit, par téléphone, fax ou e-mail à vos questions d'ordre
technique se rapportant à la gamme de produits Leica:
Leica Camera AG
Service d'information
Postfach 1180
D35599 Solms
Tél: +49 (0)6442-208111
Fax: +49 (0)6442-208339
info@leica-camera.com
SERVICE APRÈS-VENTE LEICA
Pour l'entretien de votre équipement Leica et en cas
d'endommagement, le Customer Care de Leica Camera AG ou celui
d'une des représentations nationales Leica (liste d'adresses sur la
Carte de Garantie) se tiennent à votre disposition.
Leica Camera AG
Customer Care
Solmser Gewerbepark 8
D35606 Solms
Tél: +49 (0)6442-208189
Fax: +49 (0)6442-208339
customer.care@leica-camera.com
65
Page 68

66
Page 69

BESCHRIJVING VAN DE ONDERDELEN
1 Kleine knop
2 Grote knop
3 Oogschelp met
a. Dioptrieschaal
4 Oog voor draagriem
5 Oculair
6 Batterijvakdeksel
7 Batterijvak
8 Objectieflens
9 Laser-zendoptiek
Waarschuwing
Voorkom — zoals bij elke verrekijker — met uw Leica Rangemaster CRF 1600-B het rechtstreeks kijken in heldere
lichtbronnen om oogletsel te vermijden.
LEVERINGSOMVANG
– Afstandsmeter
– 1 lithiumbatterij 3 V type CR2
– Draagkoord
– Corduratas
– Garantiekaart
LEICA RANGEMASTER CRF 1600-B
Bestelnr. 40 534
67
Page 70

VOORWOORD
Geachte klant
De naam Leica staat wereldwijd voor hoogste kwaliteit,
fijnmechanische precisie in combinatie met buitengewone
betrouwbaarheid en lange levensduur.
Wij wensen u veel plezier en succes met uw nieuwe Leica
Rangemaster CRF 1600-B.
Deze afstandsmeter zendt onzichtbare en voor het oog
onschadelijke infraroodimpulsen uit en berekent met
een ingebouwde microprocessor uit het gereflecteerde
signaal de afstand tot het object. Bovendien worden
de omstandigheden van de omgeving en de situatie
geregistreerd, waarmee - in combinatie met de gemeten
afstanden - voor verschillende, instelbare ballistische banen
de nodige correcties van het mikpunt worden berekend en
weergegeven.
De meter is van een uitstekend 7-voudig vergrotend optiek
voorzien, dat ook onder moeilijke omstandigheden een
betrouwbare peiling mogelijk maakt, en is eenvoudig en
functioneel te bedienen.
Om alle mogelijkheden van dit hoogwaardige en veelzijdige
laserapparaat voor afstandsmeting goed te kunnen benutten,
adviseren wij u eerst deze handleiding te lezen.
AFVOEREN VAN ELEKTRISCHE EN
ELEKTRONISCHE APPARATUUR
(geldt voor de EU en overige Europese landen
met gescheiden inzamelsystemen)
Dit toestel bevat elektrische en/of elektronische onderdelen
en mag daarom niet met het normale huisvuil worden
meegegeven! In plaats daarvan moet het voor recycling
op door de gemeente bepaalde inzamelpunten worden
afgegeven. Dit is voor u gratis.
Indien het apparaat verwisselbare batterijen of batterij‘s
bevat, moeten deze eerst worden verwijderd en evt.
volgens de voorschriften worden afgevoerd (zie hiervoor de
aanwijzingen in de handleiding van het apparaat).
Meer informatie over dit onderwerp ontvangt u bij uw
gemeentelijke instantie, uw afvalverwerkingsbedrijf of de
zaak waar u het toestel hebt gekocht.
68
Page 71

INHOUDSOPGAVE
Diagram van de menustructuur / Bedieningsschema ........ U3
Beschrijving van de onderdelen .................................... 67
Leveringsomvang ......................................................... 67
Voorwoord ................................................................... 68
Milieuvriendelijk afvoeren van elektrische
en elektronische apparatuur ......................................... 68
Aanbrengen van het draagkoord ................................... 70
Plaatsen en vervangen van de batterij .......................... 70
Batterijconditie ............................................................ 71
Gebruik met en zonder bril ........................................... 72
Dioptrieëncompensatie ................................................ 72
Principes van de menubediening .................................. 73
Instelling van de gewenste maateenheid ....................... 73
Afstandsmeting ............................................................ 74
Scan-modus ................................................................. 75
Reikwijdte en meetprecisie .......................................... 76
Weergave van de atmosferische omstandigheden ......... 77
Bepalen van de ballistische banen ................................ 78
Instellen van de mikpuntafstand ................................... 79
Ballistische weergaveformatien .................................... 80
De equivalente horizontale afstand ............................... 81
Het mikpunt ................................................................. 81
Trefpuntcorrectie d.m.v. elevatie-aanpassing ................ 82
Instelling en selectie van de ballistische
weergaveformaten ....................................................... 82
Weergave en controle van de ingestelde
ballistische parameters ................................................ 83
Onderhoud/reiniging ................................................... 84
Reserve-onderdelen ..................................................... 84
Wat doen als... ............................................................. 85
Technische gegevens ................................................... 86
Leica Akademie ........................................................... 87
Leica op Internet .......................................................... 87
Leica Infodienst ........................................................... 87
Leica klantenservice .................................................... 87
Appendix / ballistische tabellen ................................. 178
69
Page 72

AANBRENGEN VAN HET DRAAGKOORD
De kleine lus van het draagkoord door het oog (4) van de
behuizing van de Leica Rangemaster CRF 1600-B schuiven.
Daarna het einde van het draagkoord door de kleine lus halen
en zodanig vasttrekken dat de lus strak om het oog van de
behuizing zit.
PLAATSEN EN VERVANGEN VAN DE BATTERIJ
De LEICA Rangemaster CRF 1600-B wordt gevoed met een 3
Volt lithiumbatterij (bijv. Duracell DL CR 2, Ucar CR 2, Varta
CR 2, of andere CR 2- typen).
1. Open het deksel (6) van het batterijvak (7) door dit tegen
de wijzers van de klok in te draaien.
2. Plaats de batterij met het pluscontact naar voren (volgens
de aanduiding in het batterijvak).
3. Sluit het deksel weer door dit met de wijzers van de klok
mee te draaien.
70
Page 73

Aanwijzingen:
•Kou vermindert de batterijcapaciteit. Bij lage temperaturen
moet de Leica Rangemaster CRF 1600-B daarom zo dicht
mogelijk in de buurt van het lichaam worden gedragen en
met nieuwe batterijen worden gebruikt.
•Wanneer de Leica Rangemaster CRF 1600-B langere tijd
niet wordt gebruikt, moet de batterij worden verwijderd.
•Batterijen moeten koel en droog worden bewaard.
Opgelet:
•Batterijen mogen in geen geval in het vuur worden
gegooid, verwarmd, opgeladen, gedemonteerd of
opengebroken worden.
•Lege batterijen niet met het gewone afval meegeven - ze
bevatten giftige, milieubelastende substanties. Voor
recycling moet u ze bij de handelaar of een verzamelpunt
van chemisch afval afgeven.
BATTERIJCONDITIE
Een lege batterij wordt aangegeven door een knipperende
indicatie van meetwaarde en richtpunt. Nadat de indicatie
voor het eerst knippert, zijn nog meer dan 100 metingen met
steeds kleinere reikwijdte mogelijk.
71
Page 74

A B C
GEBRUIK MET EN ZONDER BRIL
Waarnemers die geen bril dragen, dienen de rubberen
oogschelp van (3) omhoog geklapt te laten (situatie bij
levering, figuur A). In deze stand is dit de juiste afstand
van de Leica Rangemaster CRF 1600-B tot het oog. Bij het
waarnemen met bril dient de oogschelp van rubber omlaag te
worden geklapt (figuur B).
DIOPTRIE-COMPENSATIE
Met de dioptrieëncompensatie kunt u de scherpte van
het richtpunt op de voor u optimale waarde instellen. Richt
de LEICA Rangemaster CRF 1600-B gewoon op een ver
verwijderd object en stel het richtpunt op optimale scherpte
in door aan de rubberen oogschelp (3) te draaien. Het
richtpunt verschijnt als u op de grote knop (2) drukt. De
ingestelde waarde kunt u op de „+“ of „—“ schaal (3b) op de
rubberen oogschelp aflezen. Een dioptrieëncompensatie is
voor visuele afwijkingen tot ±3,5 dioptrieën mogelijk.
72
Page 75

BASISINFORMATIE OVER DE MENÜSTEUERUNG
Bij alle instellingen geldt:
- Het hoofdmenu bestaat uit de vier menu-opties
Meter-/Yard-aanduiding (
baLL), Mikpunt=trefpunt-afstand (SId) en ballistisch
(
weergaveformaat (
vindt u in de betreffende secties.
- Het hoofdmenu en de betreffende instellingsopties zijn als
eindeloze lus ingericht, d.w.z. dat alle opties/instellingen
telkens opnieuw verschijnen als u op de knop blijft
drukken.
USEU), Ballistische baan
AbC). Meer informatie over de opties
Instellen
1. Druk lang (=3s) op de kleine knop (1).
•Er verschijnt
2. Druk op de grote knop (2) om de gewenste maateenheid
te selecteren.
US = voor weergave in yards
EU = voor weergave in meters
Opmerking:
U kunt de instelling op het display zien - als de metrische
waarden zijn ingesteld, verschijnt er naast het richtpunt
rechtsonder een punt.
USEU (knipperend)
INSTELLING VAN DE GEWENSTE MAATEENHEID
De Leica Rangemaster CRF 1600-B kan op metrische (EU)
of imperiale maateenheden (
voor afstand/temperatuur/luchtdruk ofwel meter/Celsius/
millibar of yards/Fahrenheit/InHg (Inches of Mercury). Met
deze instelling bepaalt u ook de eenheden van het mikpunt,
de ballistische banen en de mikpunt=trefpunt-afstanden (zie
p. 81/80/79).
US) worden ingesteld, d.w.z.
3. Sla uw instellingen op door kort op de kleine knop te
drukken.
•De opgeslagen instelling zal ter bevestiging eerst
continu oplichten, daarna zal de indicatie naar de
volgende optie springen (Ballistische baan „bALL“) en
daarna uitgaan als u verder niets meer instelt.
73
Page 76

AFSTANDSMETING
98
Om de afstand tot een object te meten, moet het precies
worden gepeild. Ga als volgt te werk:
1. Op de grote knop drukken (2). Het toestel gaat aan.
•Het richtpunt verschijnt.
Na het loslaten van de grote knop zal het richtpunt nog
gedurende ca. 6 seconden blijven oplichten. Als u de knop
ingedrukt houdt, zal het richtpunt continu blijven oplichten.
2. Peil het object terwijl het richtpunt oplicht.
3. Druk opnieuw op de grote knop.
• a. Het richtpunt verdwijnt kort tijdens de peiling.
b. De meetwaarde verschijnt.
Zolang het richtpunt nog oplicht, kunt u altijd een nieuwe
peiling starten door opnieuw op de grote knop te drukken.
Er verschijnt: - - -, wanneer
- de afstand tot het object minder dan 10 meter bedraagt, of
- de reikwijdte overschreden is, of
- het object onvoldoende reflecteert.
Als de indicatie verdwijnt, schakelt de Leica Rangemaster
CRF 1600-B zichzelf automatisch uit.
74
Page 77

SCANMODUS
61 65
72
Met de Leica Rangemaster CRF 1600-B kan ook continu
(scanmodus) worden gepeild:
Houdt u de grote knop ingedrukt (2) na de 2e keer indrukken.
Na 2,5 seconden zal het toestel naar de scanmodus
omschakelen en dan continu blijven peilen. Dit is te
herkennen aan de gewijzigde indicatie. Telkens na ca. 1
seconde wordt er een nieuwe meetwaarde gemeld.
De scanmodus is vooral praktisch bij het peilen van kleine en
bewegende onderwerpen.
Aanwijzingen:
•In de scanmodus wordt de ABC-correctiewaarde (zie pag.
80) pas na de laatste peiling weergegeven.
•In de scan-modus is het stroomverbruik op basis van
de permanente metingen hoger dan bij afzonderlijke
metingen.
75
Page 78

REIKWIJDTE EN MEETPRECISIE
De meetnauwkeurigheid van de Leica Rangemaster CRF
1600-B bedraagt t/m ca. 1 meter. De maximale reikwijdte
wordt bereikt bij goed reflecterende doelobjecten en
vrij zicht van ca. 10 km. U kunt zekere, hoge reikwijdten
bereiken door de Leica Rangemaster CRF 1600-B ofwel
goed stil te houden en/of hem ergens op neer te leggen. Het
meetbereik wordt door de volgende factoren beïnvloed:
Reikwijdte groter kleiner
Kleur
Hoek tot object
Grootte object
Zonlicht
Atmosferische
omstandigheden
Structuur object
wit zwart
verticaal scherp
groot klein
weinig (bewolkt) veel (middagzon)
helder nevelig
homogeen
(huismuur)
niet homogeen
(struik, boom)
Bij zonneschijn en goed zicht geldt de volgende reikwijdte,
ofwel precisie:
Reikwijdte
Precisie
ca. 10m 1460m
ca. ± 1m t/m 500m
ca. ± 2m t/m 1000m
ca. ± 0.5% op 1000m
76
Page 79

WEERGAVE VAN ATMOSFERISCHE SITUATIE
15
25C
Voor de exacte berekening van de positie van het trefpunt
(zie ook de volgende paragraaf) registreert de Leica
Rangemaster CRF 1600-B tijdens de afstandsmeting
bovendien drie belangrijke waarden: de kanteling van
het toestel, de temperatuur en de luchtdruk. U kunt deze
waarden ook altijd individueel laten weergeven.
Druk 1x kort op de kleine knop (1).
•Het richtpunt verschijnt kortstondig (als de afstandsmeter
niet eerst al was ingeschakeld) en daarna verschijnen, in
plaats van de afstand, 2 sec. lang, achter
- de hellingshoek
- de temperatuur
- de luchtdruk
1030
Opmerking:
Als de behuizing van de Leica Rangemaster CRF 1600-B
bijvoorbeeld bij verplaatsing van binnen naar buiten zelf een
hogere temperatuur heeft dan de omgeving, kan het wel
30 min. duren totdat de interne meetsensor weer de juiste
omgevingstemperatuur kan weergeven.
77
Page 80

DE BALLISTISCHE BAAN BEPALEN
Voor de exacte bepaling van de trefpuntcorrectie houdt
de Leica Rangemaster CRF 1600-B rekening met de
projectielbaan. Voor de aanpassing aan de door u gebruikte
uitrusting zijn er 12 verschillende ballistische banen ter
selectie.
Zoek in de passende tabel in de appendix (zie pag. 178-183)
naar de ballistische baan die het dichtst bij de gegevens
van de munitieproducent ligt. Houd hierbij rekening met de
selectie van de juiste afstand mikpunt=trefpunt.
Voorbeeld:
de richtkijker is op 100 meter ingesteld, dus geldt tabel 1.
De hoogte van het trefpunt van de gebruikte munitie wordt
aangegeven met -15,0 cm op 200 m. In de betreffende kolom
benadert de waarde 14,5 cm in de rij EU7 dit het best - en is
dus de passende ballistische baan.
Opmerking:
Bij gebruik van de ballistische optie van de Leica
Rangemaster CRF 1600-B bij afstanden >300m adviseren wij
u de ballistische gegevens van uw munitie door testen zelf te
bepalen, om dan de juiste curve te selecteren.
Instellen van de ballistische baan
Begin met stap 1. als u de menubediening nog niet had
geopend, of met stap 3. als u de meeteenheid van tevoren al
had ingesteld en de indicatie
1. Druk lang (=3s) op de kleine knop (1).
•Er verschijnt
2. Druk kort op de kleine knop (<2s).
•De indicatie springt naar de ballistische banen „
3. Druk op de grote knop (2).
•Op de indicatie verschijnt nu
EU1 of
-
US1
-
78
USEU.
bAll nog knippert.
bALL“.
Page 81

4. Door meerdere keren kort op de grote knop te drukken,
kiest u de gewenste ballistische baan, d.w.z.
EU1 t/m EU12 of
-
US1 of US12, resp.,
als u de afstandsindicatie zonder trefpuntcorrectie (
(zie pag. 80) wenst
OFF.
-
5. Sla uw instellingen op door kort op de kleine knop te
drukken.
•De opgeslagen instelling brandt ter bevestiging 4s
continu, daarna springt de indicatie eerst naar de
instelling van de afstand mikpunt=trefpunt (
verdwijnt vervolgens
Als de ballistische baan is ingesteld, wordt, afhankelijk van de
afstandsmeting, eerst 2 s. de afstandswaarde weergegeven
en daarna 6 s. lang de berekende correctiewaarde.
AbC)
SId) en
AFSTAND MIKPUNT=TREFPUNT INSTELLEN (
Begin met stap 1. als u de menubediening nog niet had
geopend, of met stap 3. als u de ballistische baan van
tevoren al had ingesteld en de indicatie
1. Druk lang (=3s) op de kleine knop (1).
•Er verschijnt
2. Druk 2x kort op de kleine knop (<2s)
•De indicatie springt via
3. Als u meerdere keren op de grote knop (2) druk, kiest u
zodoende de gewenste afstand mikpunt=trefpunt.
100 [m],
-
200 [m], of
-
GEE [m], ofwel
-
100 [y], of
-
200 [y], of
-
300 [y].
-
4. Sla uw instellingen op door kort op de kleine knop te
drukken.
•De opgeslagen instelling licht ter bevestiging 4s continu
op, daarna springt de indicatie eerst naar
verdwijnt vervolgens.
79
USEU.
bALL naar SId.
SId nog knippert.
AbC en
SId
)
Page 82

BALLISTISCHE WEERGAVEFORMATEN (
ABC
TM
)
Met de Advanced Ballistic Compensation (AbC) van de
Leica Rangemaster CRF 1600-B kunt u in aansluiting aan
de gepeilde afstand naar wens een van de volgende drie
ballistische waarden laten weergeven:
- De equivalente horizontale afstand (
- Het betreffende mikpunt (
EHr)
HOLd)
- het aantal nodige kliks van de snelafstelling van het vizier
(MAO kliks)
Zowel het weergegeven mikpunt alsook de weergegeven
waarde houden rekening met:
a. de gemeten afstand tot het doel
b. de kantelhoek van het wapen
c. de ingestelde ballistische baan
d. de gemeten temperatuur en luchtdrukwaarden
e. de ingestelde afstand mikpunt=trefpunt
Aanwijzingen:
•De calculatie van de genoemde waarden berust op de
betreffende ingestelde ballistische baan, d.w.z. dat deze
eerst moet worden geselecteerd (zie pag. 78).
•Ballistische waarden worden om veiligheidsredenen maar
tot een afstand van 800m weergegeven. Daarboven wordt
enkel de gemeten afstand weergegeven.
Belangrijk:
•denkt u eraan dat vooral bij grote afstanden de invloed
EHr-
van alle ballistisch relevante factoren toeneemt en er
aanzienlijke afwijkingen kunnen optreden. De weergegeven
ballistische waarden zijn daarom uitdrukkelijk slechts als
hulpmiddel bedoeld!
•Onafhankelijk van het gebruik van deze informatie blijft u te
allen tijde zelf voor de inschatting van de situatie tijdens de
jacht verantwoordelijk!
80
Page 83

DE EQUIVALENTE HORIZONTALE AFSTAND (
Schoten op een hoger of lager gelegen doel zijn onderhevig
aan andere ballistische invloeden. Hiervoor is dus kennis
vereist van de - op de jacht toepasselijke - equivalente
horizontale afstand (Equivalent Horizontal Range). Kennis van
EHr is bijv. belangrijk bij toepassing van een ballistisch
de
vizier.
Opmerking:
Ook horizontale EHr-metingen kunnen waarden opleveren die
niet met de „rechtuit“ gemeten afstanden overeenstemmen,
als de temperatuur en/of de luchtdruk van de normwaarden
afwijken, bijvoorbeeld.
EHr
)
HET MIKPUNT (
Met mikpunt wordt het punt aangeduid waar met de wapen
op moet worden gericht in plaats van op het eigenlijke doel,
om de afwijking van de projectielbaan te compenseren. (bijv.
bij gebruik van een klassiek jachtvizier)
Door weergave van het mikpunt kan de Leica Rangemaster
CRF 1600-B tijdens de jacht waardevolle ondersteuning
bieden bij het uitvoeren van een zo precies mogelijk schot.
De basis voor de berekening bieden, behalve de afstand, de
in het vorige gedeelte genoemde omstandigheden en de door
u gekozen ballistische baan.
Opmerking:
Het weergegeven mikpunt/de bijtelwaarde staat altijd in
verhouding tot de afstand van het doel.
Voorbeeld: Als er
30 cm hoger op het object richten dan zonder correctie het
geval zou zijn.
81
HOLd
)
300m H30 wordt weergegeven, dan moet u
Page 84

TREFPUNTCORRECTIE DOOR MIDDEL VAN
ELEVATIE-AANPASSING
(Kliks-/MoA-afstelling)
Afwijkingen van de positie van het trefpunt kunt u
compenseren met de betreffende instelling van het vizier van
uw richtkijker.
De Leica Rangemaster CRF 1600-B kan – rekening houdend
met de projectielbaan en de afstand mikpunt=trefpunt (zie
pag. 79) – de hiertoe nodige instelling, d.w.z. het aantal kliks
weergeven.
Voor verschillende elevaties kunt u hiervoor bepalen of de
kliktrappen
- op basis van de internationaal gebruikelijke MOA-indeling
(Minutes Of Angle), of
- met 5-, ofwel 10-millimeter-trappen moeten worden
ingesteld.
Instelling en selectie van de ballistische
weergaveformaten
Begin met stap 1. als u de menubediening nog niet had
geopend, of met stap 3. als u de afstand mikpunt=trefpunt
van tevoren al had ingesteld en de indicatie
ABC nog knippert.
1. Druk lang (=3s) op de kleine knop (1).
•Er verschijnt
USEU.
2. Druk 3x kort op de kleine knop (<2s)
•De indicatie gaat via
bAll en SId naar AbC.
3. Als u meerdere keren op de grote knop (2) druk, kiest u
zodoende de gewenste ballistische instelling.
EHr, of
-
HOLd, of
-
1-1 (1MOA), ofwel
-
1
1-3 (
/
MOA), ofwel
-
3
1
1-4 (
/4 MOA), ofwel
-
10?mm, ofwel
-
5?mm.
-
4. Sla uw instellingen op door kort op de kleine knop te
drukken.
•De opgeslagen instelling licht ter bevestiging 4 s. continu
op en gaat vervolgens uit.
82
Page 85

Weergave en controle van de ingestelde
ballistische parameters
Als u de instellingen wenst te controleren, kunt u de waarden
altijd laten weergeven.
Druk kort 2x op de kleine knop (1).
•Onder het richtpunt verschijnen (eventueel in plaats van de
afstand) telkens 2 s. achter elkaar
- de ingestelde ballistische baan (zie pag. 78)
- de ingestelde afstand mikpunt=trefpunt (zie pag. 79)
- de ingestelde ballistische weergavewaarde (zie pag. 80)
Als de ballistische opties uitgeschakeld zijn (
enkel de instelling
OFF te zien zijn.
bALL = OFF) zal
83
Page 86

ONDERHOUD/REINIGING
Speciaal onderhoud van uw Leica Rangemaster CRF 1600B is niet nodig. Grove vuildeeltjes, zoals bijv. zand, dient
met een haarborstel te worden verwijderd of weggeblazen.
Vingerafdrukken op bijv. de lens van het objectief of oculair
kunnen eerst met een vochtige doek worden gereinigd en
daarna met een zacht zeemleer of stofvrije doek worden
afgeveegd.
Belangrijk:
Oefen geen grote druk uit bij het reinigen van sterk vervuilde
lenzen. De coatings zijn wel zeer goed tegen slijtage bestand,
maar zand- en zoutkristallen zouden deze toch kunnen
beschadigen.
De behuizing dient alleen met een vochtige zemen lap te
worden gereinigd. Droge doeken kunnen statische lading
veroorzaken. Gebruik nooit alcohol of andere chemische
oplosmiddelen voor de reiniging van de lenzen of de
behuizing.
Elke Leica Rangemaster CRF 1600-B kent naast de
typeaanduiding een „individueel“ productienummer.
Noteer dit nummer en berg het voor de veiligheid bij uw
documentatie op.
Opgelet:
Het apparaat mag in geen geval worden geopend!
VERVANGENDE ONDERDELEN
Als u reserveonderdelen voor uw Leica Rangemaster
CRF 1600-B nodig hebt, zoals een oogschelp of een een
draagkoord, neem dan contact op met onze klantenservice
(adres zie pag. 87) of de vertegenwoordiging van Leica in uw
land (zie de Garantiekaart voor adressen).
84
Page 87

WAT MOET IK DOEN ALS...
Storing
Bij de observatie wordt geen
cirkelvormig beeld bereikt.
Oorzaak
a) De pupil van de waarnemer
correspondeert niet met de
uittreepupil van het oculair.
b) De stand van de oogschelp is niet
zoals het hoort voor gebruik met en
zonder bril.
Oplossing
a) Positie van ogen corrigeren.
b) Aanpassing corrigeren: Brildragers
dienen de oogschelp om te klappen;
bij observatie zonder bril blijft deze
omhoog staan (zie pag. 72).
Weergave onscherp Dioptrieëncompensatie is niet juist Dioptrieëncompensatie opnieuw
Bij de afstandsmeting verschijnt de
- - -“
indicatie„
Indicatie knippert of geen meting
mogelijk
a) Meetbereik te hoog of te laag
b) De reflectie van het object is
onvoldoende
Batterij leeg Batterij vervangen (zie pag. 70)
85
uitvoeren
(zie pag. 72)
Gegevens van het meetbereik
in aanmerking nemen (zie pag. 76)
Page 88

TECHNISCHE GEGEVENS
Vergroting
Diameter objectief
Uittrede pupil
Schemeringsgetal
Geometrische lichtsterkte
Gezichtsveld (op 1000m/yds)
Objectieve gezichtshoek
Uittrede pupillen - lengteafstand
Prismasoort
Coatings op lenzen
op prisma's
Dioptrie-compensatie
Voor brildragers geschikt
Gebruikstemperatuur
Opslagtemperatuur
Waterdichtheid
Materiaal behuizing / chassis
Maximale reikwijdte
Minimumafstand
Meetprecisie
Indicatie / eenheid
Batterij
Levensduur batterij
Laser
Laserstraal-divergentie
Maximale meetperiode
Afmetingen (B x H x D)
Gewicht (met batterij)
7x
24mm
3,4mm
13
11,8
115m / 6,5°
15mm
dakkant
High Durable Coating (HDC™) en Aqua-Dura Coating op de buitenste lenzen
phasecorrectie-coating P40
ca. 3,5 dpt.
ja
-10 tot +55°C
-15 tot +75°C
30 min. lang: drukwaterdicht tot 1m waterdiepte
koolstofvezelversterkte kunststof, zacht gelakt / Aluminiumspuitgietstuk
ca. 1460m
ca.10m
ca. 1m tot 500m / ca. 2m tot 1000m / ca. 0,5% bij meer dan 1000m
LED met 4 cijfers / naar keuze in meters/centimeters, ofwel yards/inches
3V/Lithium-knoopcel, type CR2
ca. 2000 metingen bij 20°C
onzichtbaar, oogveilig conform EN en FDA class 1
ca. 0,5 x 2,5mrad
ca. 0,9s
ca. 75 x 34 x 113mm
ca. 185g
86
Page 89

LEICA AKADEMIE
Op de verschillende cursussen krijgt de deelnemer in
een moderne vorm praktijkgerichte informatie over de
waardenwereld van Leica en leert hij/zij de fascinatie van
de vakkundige omgang met de Leica-producten kennen.
De inhoud is op het gebruik gericht en biedt een massa
inspiratie, informatie en advies voor de praktijk. Nadere
inlichtingen en het actuele seminar-programma zijn
verkrijgbaar bij:
Leica Camera AG
Leica Akademie
Oskar-Barnack-Str. 11
D-35606 Solms
Tel: +49 (0)6442-208 421
Fax: +49 (0)6442-208 425
la@leica-camera.com
LEICA INFORMATIEDIENST
Technische vragen over het Leica-programma worden
schriftelijk, telefonisch, per fax of per e-mail beantwoord door
de Leica informatiedienst:
Leica Camera AG
Informations-Service
Postfach 1180
D-35599 Solms
Tel: +49 (0)6442-208 111
Fax: +49 (0)6442-208 339
info@leica-camera.com
LEICA KLANTENSERVICE
Voor het onderhoud van uw Leica-uitrusting en in geval
van schade kunt u gebruik maken van de Customer Care
van Leica Camera AG of de reparatieservice van een Leica
vertegenwoordiging in uw land (voor adressenlijst zie
Garantiekaart).
Leica Camera AG
Customer Care
Solmser Gewerbepark 8
D-35606 Solms
Tel: +49 (0)6442-208 189
Fax: +49 (0)6442-208 339
customer.care@leica-camera.com
87
Page 90

88
Page 91

DENOMINAZIONE DEI COMPONENTI
1 Tasto secondario
2 Tasto di azionamento
3 Conchiglia con
a. Scala diottrica
4 Occhiello per cinghia a tracolla
5 Oculare
6 Coperchio del vano batterie
7 Vano batterie
8 Lente dell‘obiettivo
9 Ottica di emissione laser
Avvertenza
Come per ogni binocolo, non usare Leica Range master
CRF 1600-B per l‘osservazione diretta di
fonti luminose intense per evitare lesioni agli occhi.
MATERIALE IN DOTAZIONE
– Telemetro
– 1 batteria al litio da 3 V tipo CR 2
– Cinghia a tracolla
– Borsa in cordura
– Certificato di Garanzia
LEICA RANGEMASTER CRF 1600-B
Codice ordinazione 40 534
89
Page 92

PREFAZIONE
Gentile Cliente,
in tutto il mondo il nome Leica è sinonimo di altissima qualità
e precisione meccanica unite a un'estrema affidabilità e a
una lunga durata di vita.
Le auguriamo di ottenere il massimo piacere e le migliori
soddisfazioni con il nuovo Leica Rangemaster CRF 1600-B.
Questo telemetro invia impulsi a infrarossi invisibili e non
dannosi per gli occhi e, dalla componente di segnale riflessa,
tramite un microprocessore integrato calcola la distanza
dell'oggetto. Inoltre registra le condizioni ambientali e di
utilizzo con le quali, impiegando anche le distanze misurate,
definisce e mostra le correzioni del punto di mira per diverse
curve balistiche selezionabili.
È dotato di uno straordinario elemento ottico, in grado di
ingrandire l'oggetto target fino a 7 volte, che consente un
rilevamento sicuro anche in condizioni avverse e ha un
funzionamento semplice e pratico.
Per poter sfruttare pienamente tutte le possibilità offerte da
questo eclettico misuratore laser della distanza a elevata
precisione, Le consigliamo di leggere attentamente le
istruzioni prima dell'uso.
SMALTIMENTO DEI DISPOSITIVI ELETTRICI
ED ELETTRONICI
(Vale per l’UE e per gli altri paesi europei con
sistemi di raccolta differenziata)
Il presente apparecchio contiene componenti elettrici e/o
elettronici. Non può quindi essere smaltito come un normale
rifiuto domestico, ma va depositato presso gli appositi
centri di raccolta allestiti dalle autorità municipali per essere
riciclato. La procedura è gratuita per chi la esegue.
Qualora l'apparecchio contenga batterie sostituibili o
ricaricabili, queste devono essere rimosse ed eventualmente
smaltite in conformità alle normative vigenti (ved. al riguardo
quanto riportato nelle Istruzioni per l’uso dell'apparecchio).
Per ulteriori informazioni sull’argomento rivolgersi
all’amministrazione comunale, all’azienda addetta allo
smaltimento o al rivenditore dell’apparecchio.
90
Page 93

INDICE
Diagramma struttura menu / schema di funzionamento .........U3
Denominazione dei componenti ................................... 89
Materiale in dotazione .................................................. 89
Prefazione .................................................................... 90
Smaltimento dei dispositivi elettrici ed elettronici ......... 90
Applicazione della cinghia da polso .............................. 92
Inserimento e sostituzione della batteria ....................... 92
Stato di carica della batteria ......................................... 93
Utilizzo con e senza occhiali ......................................... 94
Regolazione diottrica .................................................... 94
Principi di base sui comandi a menu ............................. 95
Impostazione dell'unità di misura desiderata ................. 95
Misurazione della distanza ............................................ 96
Modalità Scan .............................................................. 97
Portata di misura e precisione ...................................... 98
Visualizzazione delle condizioni atmosferiche................ 99
Definizione della curva balistica .................................. 100
Regolazione della distanza di azzeramento ................. 101
Formati balistici di output ........................................... 102
La distanza orizzontale equivalente ............................. 103
Il punto di mira ........................................................... 103
Correzione del punto di impatto con
regolazione dell'elevazione ......................................... 104
Impostazioni e selezione dei formati
balistici di output ....................................................... 104
Visualizzazione e verifica dei parametri
balistici impostati ....................................................... 105
Cura/Pulizia............................................................... 106
Ricambi ..................................................................... 106
Che cosa fare se ........................................................ 107
Dati tecnici ................................................................ 108
Leica Akademie ......................................................... 109
Leica in Internet ......................................................... 109
Leica Infoservice ........................................................ 109
Servizio di assistenza Leica ........................................ 109
Appendice / Tabelle balistiche ................................... 178
91
Page 94

APPLICAZIONE DELLA CINGHIA DA POLSO
Spingere il passante piccolo della cinghia da polso attraverso
l’occhiello (4) fissato al corpo di Leica Rangemaster CRF
1600-B. Infilare quindi l'estremità della cinghia da polso
attraverso il passante piccolo e stringerla in modo che il
cappio formatosi chiuda saldamente l'occhiello.
INSERIMENTO E SOSTITUZIONE DELLA BATTERIA
Per l’alimentazione di Leica Rangemaster CRF 1600-B
viene utilizzata una batteria al litio da 3 Volt (ad es. Duracell
DL CR2, Ucar CR2, Varta CR2 o altri tipi CR2).
1. Aprire il coperchio (6) del vano batterie (7) ruotandolo in
senso antiorario.
2. Introdurre una batteria al litio con il contatto positivo
rivolto in avanti (come indicato nel vano batteria).
3. Chiudere nuovamente il coperchio avvitandolo in senso
orario.
92
Page 95

Note:
•Il freddo riduce la capacità della batteria. Se possibile,
in presenza di basse temperature, è quindi opportuno
custodire il Leica Rangemaster CRF 1600-B a contatto con
il corpo e utilizzarlo con una batteria nuova.
•Rimuovere la batteria se non si utilizza il Leica
Rangemaster CRF 1600-B per lunghi periodi di tempo.
•Conservare sempre le batterie in un luogo fresco e
asciutto.
Attenzione:
•Le batterie non devono assolutamente essere gettate nel
fuoco, surriscaldate, ricaricate, aperte o smontate.
•Non gettare le batterie usate nei rifiuti comuni, poiché
contengono sostanze tossiche e dannose per l’ambiente.
Esse devono essere depositate negli appositi contenitori
presso il proprio rivenditore oppure presso i centri di
raccolta rifiuti speciali.
STATO DI CARICA DELLA BATTERIA
Quando la batteria è scarica l’indicatore dei valori di
misurazione e del collimatore lampeggia. Dopo il primo
lampeggio dell‘indicatore è ancora possibile effettuare oltre
100 misurazioni con un raggio di azione progressivamente
ridotto.
93
Page 96

A B C
UTILIZZO CON E SENZA OCCHIALI
Gli osservatori che non portano occhiali devono lasciare
l’oculare di gomma (3) ribaltato verso l’alto (fig. A, stato di
consegna). In questa posizione si ottiene inoltre la distanza
corretta di Leica Rangemaster CRF 1600-B dall’occhio. Gli
osservatori con occhiali devono ribaltare l’oculare di gomma
verso il basso (fig. B).
CORREZIONE DIOTTRICA
La correzione diottrica consente di regolare la messa a fuoco
del collimatore a un valore individuale ottimale. Inquadrare
semplicemente un oggetto distante con il Leica Rangemaster
CRF 1600-B e regolare il collimatore girando l’oculare di
gomma (3). Il collimatore viene mostrato quando si preme
il pulsante principale (2). Il valore regolato può essere
letto nella scala “+” o “–” (3a) sull’oculare di gomma. La
correzione diottrica è possibile per disturbi visivi fino a ±3,5
diottrie.
94
Page 97

PRINCIPI DI BASE SUI COMANDI A MENU
Per tutte le impostazioni vale quanto segue:
- Il menu principale è formato dalle quattro voci di menu
Visualizzazione metri/iarde (
Distanza di azzeramento (
AbC). Per i particolari sulle funzioni, consultare i rispettivi
(
capitoli.
- Sia il menu principale, sia le rispettive opzioni di
regolazione, sono commutati in un ciclo infinito, cioè tutti i
punti/tutte le impostazioni si possono sempre raggiungere
premendo più volte i pulsanti.
USEU), Curva balistica (baLL),
SId) e Formato balistico di output
Impostazione
1. Premere a lungo (≥3s) il pulsante secondario (1).
•Compare
2. Premere il pulsante principale (2) per selezionare l'unità di
misura desiderata.
US = per la visualizzazione in iarde
EU = per la visualizzazione in metri
Nota:
L’indicatore mostra sempre l’impostazione – se sono stati
selezionati valori in metri in basso a destra, a fianco del
collimatore, compare un punto.
USEU (lampeggiante)
IMPOSTAZIONE DELL'UNITÀ DI MISURA DESIDERATA
Il Leica Rangemaster CRF 1600-B può essere impostato sul
sistema di misura metrico (
misurare distanza/temperatura/pressione dell’aria in metri/
Celsius/millibar oppure in iarde/Fahrenheit/InHg (Inches of
Mercury, pollici di mercurio). Questa impostazione influenza
anche il punto di mira unitario delle curve balistiche e delle
distanze di azzeramento (ved. pag. 103/102/101).
EU) o imperiale (US), ovvero può
3. Salvare l'impostazione premendo brevemente il pulsante
secondario.
•Dapprima l'impostazione memorizzata si accende
in modo fisso per la conferma, poi viene mostrata
la successiva voce di menu (curva balistica "bALL"),
che scompare se non viene definita alcuna ulteriore
impostazione.
95
Page 98

MISURAZIONE DELLA DISTANZA
98
Per misurare la distanza di un oggetto è necessario rilevarne
esattamente la posizione. Procedere nel modo seguente:
1. Premere il pulsante principale (2). L'apparecchio si
accende.
•Compare il collimatore.
Quando si rilascia il pulsante principale il collimatore rimane
illuminato ancora per circa 6 secondi. Tenendo premuto il
pulsante, il collimatore rimane costantemente illuminato.
2. Puntare l'oggetto mentre il collimatore è acceso.
3. Premere di nuovo il pulsante principale.
• a. Durante la misurazione il collimatore si spegne
brevemente.
b. Viene mostrato il valore di misura.
Premendo nuovamente il pulsante principale si può avviare
in qualsiasi momento una nuova misurazione, finché il
collimatore rimane illuminato.
Compare: - - -, se
- la distanza dell’oggetto è inferiore a 10 metri oppure
- si supera la portata oppure
- l’oggetto riflette in misura insufficiente.
Dopo la scomparsa della visualizzazione il Leica Range master
CRF 1600-B si disattiva automaticamente.
96
Page 99

MODALITÀ SCAN
61 65
72
Con il Leica Rangemaster CRF 1600-B è possibile eseguire
misurazioni anche a regime continuo (modalità Scan):
premere il pulsante principale (2) e alla seconda selezione
tenerlo premuto.
Dopo ca. 2,5 secondi l’apparecchio passa alla modalità Scan
ed esegue misurazioni in modo continuo. La modalità Scan
si riconosce dal cambiamento dell’indicatore. All'incirca ogni
secondo viene visualizzato un nuovo valore.
La modalità Scan è particolarmente pratica per la
misurazione di obiettivi piccoli e in movimento.
Note:
•Nella modalità Scan il valore di correzione ABC (ved. pag.
102) compare solo dopo l’ultima misurazione.
•Nella modalità Scan, a causa delle misurazioni continue, il
consumo di corrente è superiore rispetto alle misurazioni
singole.
97
Page 100

PORTATA DI MISURA E PRECISIONE
La precisione di misura di Leica Rangemaster CRF 1600-B
arriva fino a ca. ±1 metro. La portata massima si ottiene
quando l’oggetto osservato riflette bene a una distanza
visiva di circa 10 km. Portate maggiori si possono misurare/
raggiungere in modo sicuro se il Leica Range master CRF
1600-B viene mantenuto e/o appoggiato in una posizione
stabile. La portata di misurazione è influenzata dai seguenti
fattori:
Portata maggiore minore
Colore
Angolo rispetto
all’obiettivo
Dimensioni
dell’oggetto
Luce solare
Condizioni
atmosferiche
Struttura
dell’oggetto
bianco nero
perpendicolare acuto
grandi piccole
ridotta (nuvoloso) elevata (sole di
cielo limpido foschia
omogenea (parete
di una casa)
mezzogiorno)
disomogenea
(cespuglio, albero)
Con il sole e con una buona visibilità valgono i seguenti valori
di portata e precisione:
Portata
Precisione
da circa 10 m a 1460 m
da ca. ±1 m a 500 m
da ca. ± 2 m a 1000 m
da ca. ± 0,5% a oltre 1000 m
98
 Loading...