

Page 1

™
Leica PELORIS
Leica PELORIS II
Rapid Tissue Processor
User Manual
™
Living up to Life
Page 2
Legal Notices
Intended Use Statement
The Peloris™ dual retort rapid tissue processor prepares tissue samples for sectioning by transforming fixed samples into wax
embedded samples. This is achieved by exposing the tissue samples to a sequence of reagents in the processing retorts.
Trademarks
Leica and the Leica logo are registered trademarks of Leica Microsystems IR GmbH and used under license.
PELORIS, PELORIS II, Waxsol, Parablocks, ActivFlo and RemoteCare are trademarks of Leica Biosystems Melbourne Pty Ltd
ACN 008 582 401. Other trademarks are the property of their owners.
Copyright
Leica Biosystems Melbourne Pty Ltd owns the copyright on this document and any associated software.
Leica Biosystems Melbourne is part of the Leica Microsystems group of companies. Under law, our written permission is
required before either the documentation or the software is copied, reproduced, translated, or converted to electronic or
other machine-readable form, in whole or in part.
Doc. 26.7501.500 Rev K
© Leica Biosystems Melbourne Pty Ltd 2011
Manufacturer
Leica Biosystems Melbourne Pty Ltd
495 Blackburn Rd
Mt. Waverley VIC 3149
Australia
Important Information for All Users
Persons operating the Peloris tissue processor MUST:
Follow the instructions for use exactly as described in this user manual. Any deviation from the
instructions may result in sub-optimal tissue processing, potential loss of the patient sample and the
consequent inability to make a diagnosis.
Receive sufficient training to ensure that the instrument is used in accordance with this user manual.
Be aware of any potential hazards or hazardous procedures before operating the instrument as described
in this user manual.
Warranty claims can be made only if the system has been used for the specified application and operated according to the
instructions in this document. Damage resulting from inappropriate handling and/or misuse of the product will invalidate the
warranty. Leica Microsystems cannot assume liability for any such damage.
Due to a policy of continuous improvement, Leica Microsystems reserves the right to change specifications without notice.
Only trained staff are to remove any covers or parts from the processor, and only if instructed within this manual. Repairs
must only be carried out by qualified service personnel authorized by Leica Microsystems.
The term “Leica Microsystems” when used in text in this document refers to Leica Biosystems Melbourne Pty Ltd.
The term “Peloris” when used in text in this document refers to Peloris and Peloris II.
Revision Record
Rev. Issued Detail
K02 July 2011 Updates to Important Information for All Users and Safety Notices
Section 5.1.5 Tissue Marking added.
Chapter 9 "Troubleshooting" added.
Leica PELORIS™ User Manual Rev K © Leica Biosystems Melbourne Pty Ltd 2011 2
Page 3

Contacting Leica Microsystems
For service or support contact your local representative or see www.leica-microsystems.com.
Leica PELORIS™ User Manual Rev K © Leica Biosystems Melbourne Pty Ltd 2011 3
Page 4

Software Licence Terms
1 Defined terms & interpretation
1.1 Defined terms
In this agreement:
“Leica Microsystems” includes Vision BioSystems Pty Ltd ACN 008 582 401, prior to changing its company name, and Leica
Biosystems Melbourne Pty Ltd ACN 008 582 401 after changing its name.
“Confidential Information” means all information:
(a) treated by Leica Microsystems as confidential or of its nature confidential; and
(b) disclosed by Leica Microsystems to the Licensee or of which the other party becomes aware,
except information:
(c) the other party creates independently of Leica Microsystems; or
(d) that is public knowledge (otherwise than as a result of a breach of confidentiality by the Licensee or any of its
permitted disclosees).
“Designated Computer” means the computer or microprocessor controlled unit supplied by Leica Microsystems to the
Licensee under the Supply Agreement or otherwise recommended for use by Leica Microsystems.
“Documentation” means the manuals, user documentation, proprietary notices, product catalog, website notices and bulletins
generally supplied by Leica Microsystems with or relating to the Software.
“Effective Date” means the date the Goods, as defined in the Supply Agreement, are delivered by Leica Microsystems.
“Intellectual Property” means all existing and future intellectual property rights including:
(e) patents, copyright (including all copyright and software), software and associated documentation including the
specific design and structure of individual programs, registered designs, trade marks, proprietary documentation and
notices, and any right to have information or know-how kept confidential; and
(f) any application or right to apply for registration of any of the rights referred to in paragraph (e) above.
“Licensee” means the Purchaser or lessee of the Goods containing the Software, or, where the Licensee is a distributor of the
Goods containing the Software, the end user of the Goods containing the Software.
“Licensor IP” means all Intellectual Property relating to:
(a) the Software and Documentation;
(b) any modifications, upgrades, new versions or new releases of the materials referred to in paragraph (a) above; and
(c) other works created by Leica Microsystems in the course of, or as a result of, performing this Agreement.
“Release” means each release of a new Version of the Software.”
“Software” means any program, firmware or electronic files that provides instructions or data to a computer or
microprocessor and, shall for the purposes of this agreement, include original versions, modified versions, upgrades, updates,
bug fixes, and backup copies.
“Supply Agreement” means the agreement between the Licensee and Leica Microsystems, or where the Licensee is not a
direct customer of Leica Microsystems, between Leica Microsystems’ distributor and Leica Microsystems, for the sale, lease or
use of the Goods.
“Third Party Material” means any Material owned by a third party that is not a Related Body Corporate (as that term is
defined in the Corporations Act 2001 (Cth)) of Leica Microsystems.
1.2 Other definitions
In this agreement, “Goods”, “Purchaser”, and “Leica Microsystems” have the same meaning as in the Supply Agreement.
Leica PELORIS™ User Manual Rev K © Leica Biosystems Melbourne Pty Ltd 2011 4
Page 5

Software Licence Terms
2 Grant of licence
2.1 Licensee gives consent
The Licensee agrees to be bound by all the terms of this Licence by downloading or installing the Software, or by agreeing to
purchase, lease or otherwise use the Software or the Goods containing the Software.
2.2 Leica Microsystems grants licence
Subject to this agreement, Leica Microsystems grants the Licensee a non-transferable, non-exclusive licence to use the
Software and Documentation for its internal business purposes in accordance with the terms of this agreement.
3Restrictions on use
The Licensee must:
(a) only use the Software on the Designated Computer and in conformity with:
(i) laboratory practices that are consistent with industry practice;
(ii) all applicable laws, regulations, guidelines and decisions of judicial or regulatory bodies;
(iii) any patent or other proprietary rights of third parties; and
(iv) as envisaged by the Documentation, and this agreement;
(b) not install, or procure the installation of, any software on the Designated Computer without Leica Microsystems' prior
written consent;
(c) not copy all or part of the Software or Documentation, or allow all or part of the Software or Documentation to be
copied (other than one copy of the Software for backup purposes), without obtaining Leica Microsystems' prior
written permission;
(d) not publish, distribute or commercialise all or part of the Software or Documentation, or any adaptation, modification
or derivative of the Software or Documentation;
(e) not sell, rent, lease, sub-license, assign or transfer all or part of the Software or Documentation or any of its rights
under this agreement;
(f) not use the Software or the Documentation for the benefit of any third party, or disclose the Software or the
Documentation to any third party, except with Leica Microsystems' prior written consent;
(g) not adapt, reverse engineer, make error corrections, or otherwise modify the Software or Documentation or create
derivative works based on the Software or Documentation (other than to the extent permitted by applicable copyright
laws) or permit third parties to do the same;
(h) not decompile, decrypt, reverse engineer, disassemble or otherwise reduce the Software to human readable form to
gain access to trade secrets or confidential information in the Software or permit third parties to do the same; and
(i) comply with any reasonable directions of Leica Microsystems from time to time in relation to the installation or use of
the Software and the Documentation.
4 Intellectual property
4.1 Licensor IP
All Licensor IP, including but not limited to any images, audio, video and text in the Software, is owned by or licensed to Leica
Microsystems, and no Licensor IP is transferred to the Licensee under this agreement.
4.2 Proprietary markings
The Licensee must not alter or remove any notices of proprietary rights, any rights management information or any serial
numbers appearing on, attached to or incorporated in Licensor IP or any copies thereof, and must not use or attempt to
register any trademark, trade name, business name or company name which is confusingly similar to any trademark or trade
name of Leica Microsystems.
4.3 Violations of intellectual property
The Licensee must:
(a) notify Leica Microsystems immediately if it knows of or suspects any unauthorised use, or violation, of any Licensor
IP; and
Leica PELORIS™ User Manual Rev K © Leica Biosystems Melbourne Pty Ltd 2011 5
Page 6

Software Licence Terms
(b) provide promptly, at its cost, all assistance reasonably requested by Leica Microsystems to protect the relevant rights
in Licensor IP and prosecute any claims arising from such uses or violations.
4.4 Compliance
The Licensee must comply, at all times, with any terms and conditions relating to the Third Party Material notified to the
Licensee by Leica Microsystems and/or the third party supplier of that Third Party Material.
5 Upgrades and support
5.1 New releases and new versions
Leica Microsystems may, at its sole discretion, provide the Licensee with new Releases or new Versions of the Software.
5.2 Installation
If requested by the Licensee to do so, Leica Microsystems, its designated distributor or agent may, at its sole discretion,
install a new Release or new Version of the Software on the Designated Computer.
5.3 Downloading of data
Leica Microsystems, or its designated agent may, at its sole discretion, download data that has been generated by the use of
the Software by the Licensee as a means of debugging Software faults and otherwise analyzing the performance of the
Software or Goods containing the Software supplied by Leica Microsystems under the Supply Agreement.
6 Back up and security of data
It is the Licensee's responsibility to:
(a) perform regular backups of data and to store these; and
(b) provide contingency plans for the event of a failure of any sort (eg: fire, flood, and theft);
and Leica Microsystems has no liability (including for negligence) for any loss whether direct or indirect, that could have been
prevented by the Licensee performing the above responsibilities, or which occurs as a consequence of inadequate back up,
computer viruses or the ongoing functions of computer hardware (including backup hardware), whether supplied by Leica
Microsystems or any other supplier.
7 Confidentiality and privacy
7.1 Use and disclosure
The Licensee must, in relation to the Confidential Information:
(a) keep it confidential;
(b) use it only as permitted under this agreement and only disclose it:
(i) to employees, contractors and agents that have a need to know and who have undertaken to comply with this
clause 7; or
(ii) to the extent (if any) the Licensee is required by law to do so; and
(c) promptly comply with any request by Leica Microsystems to return or destroy the Confidential Information unless
required by law to be retained.
7.2 Recipient's obligations
The Licensee must:
(a) safeguard the Confidential Information from unauthorised access or use; and
(b) notify Leica Microsystems of, and take all steps to prevent or stop, unauthorised copying, use or disclosure.
7.3 Privacy
In performing its obligations under this agreement, the Licensee must comply, and use all reasonable efforts to ensure that
its contractors comply, with all applicable legislation relating to privacy of personal information.
Leica PELORIS™ User Manual Rev K © Leica Biosystems Melbourne Pty Ltd 2011 6
Page 7

Software Licence Terms
8 Exclusions and limitations
8.1 Acknowledgments
The Licensee acknowledges that:
(a) it has selected the Goods from a range of products and has satisfied itself that the Goods meet the Licensee's
requirements;
(b) no oral or written information, representation or advice given by or on behalf of Leica Microsystems, other than as
contained in this agreement, creates a warranty or in any way increases the scope of this agreement; and
(c) unless expressly agreed otherwise in writing, the Licensee has not relied on any information, representation or advice
given by or on behalf of Leica Microsystems in selecting the Goods; and
(d) Leica Microsystems makes no representation that the Goods conform to country, state or local laws, ordinances,
regulations, codes or standards (except as may otherwise be agreed to in writing by Leica Microsystems) and the
Licensee is responsible for complying with all local laws relating to use of the Goods at its own cost.
8.2 Exclusion of implied terms
Leica Microsystems excludes from this agreement all conditions, warranties and liabilities implied or imposed by law or
custom except any liability or implied condition or warranty the exclusion or limitation of which would contravene any statute
or cause any part of this
8.3 Non-excludable conditions
To the extent permitted by law, Leica Microsystems’ liability for any breach of any Non-Excludable Condition is limited to:
(a) in the case of services, the resupply of the services or the cost of having the services supplied again (at Leica
Microsystems' option); and
clause 8 to be void (‘non-excludable conditions’).
(b) in the case of goods, the lowest of the cost of replacing the goods, acquiring equivalent goods or having the goods
repaired.
8.4 Exclusion of liability
To the extent permitted by law, Leica Microsystems excludes all liability (including liability for negligence) for:
(a) any indirect or consequential expenses, losses, damages or costs (including, without limitation, loss of profits, loss of
revenue, loss of or damage to data, failure to achieve anticipated savings or benefits, and any third party claims)
incurred by or awarded against the Licensee under or in any way connected with this agreement or the use of the
Software or Documentation;
(b) without limiting the foregoing, any expenses, losses, damages or costs incurred by or awarded against the Licensee
arising directly or indirectly in respect of clinical (including without limitation diagnostic, prescription and other
treatment) errors made while using, or otherwise associated with the use of, the Software or Documentation; and
(c) the operation or performance of, and any expenses, losses, damages or costs suffered or incurred by the Licensee as
a result of its use of, any Third Party Material.
8.5 Limitation of liability
To the extent permitted by law, Leica Microsystems limits its total aggregate liability (including liability for negligence) for any
damage arising under or in any way connected with this agreement or the use of the Software to
Licensee for the Software or the Goods containing the Software under the Supply Agreement.
the price paid by the
9 Indemnity
The Licensee indemnifies Leica Microsystems against all expenses, losses, damages and costs (on a solicitor and own client
basis) incurred by or awarded against Leica Microsystems arising directly or indirectly from or in relation to:
(a) any use of the Software not in compliance with this agreement;
(b) any breach of any Third Party Licence Terms by the Licensee;
(c) the Licensee's infringement of Leica Microsystems' Intellectual Property rights;
(d) clinical (including without limitation diagnostic, prescription and other treatment) errors made while using, or
otherwise associated with the use, of the Software or Documentation;
Leica PELORIS™ User Manual Rev K © Leica Biosystems Melbourne Pty Ltd 2011 7
Page 8

Software Licence Terms
(e) any failure by the Licensee to comply with laboratory practices that are consistent with industry practice, laws,
guidelines or decisions in the handling or use of the Software
(f) the Licensee's negligent acts or omissions; and/ortany other use or misuse of the Software by the Licensee.
10 Term and termination
10.1 Term
This agreement commences on the Effective Date and continues until terminated in accordance with this agreement.
10.2 Termination
(a) The Licensee may terminate this agreement at any time by destroying all copies of the Software and Documentation.
(b) The Licensee’s rights under this agreement will terminate immediately without notice from Leica Microsystems if the
Licensee fails to comply with any provision of this agreement or if the Licensee does not strictly observe the terms of
payment under the Supply Agreement, and on termination, the Licensee must destroy all copies of Software and
Documentation in its possession or control.
10.3 Accrued rights and remedies
Termination of this agreement under this clause 10 does not affect any accrued rights or remedies of either party.
10.4 Survival
Clauses 4 (Intellectual property), 7 (Confidentiality and privacy), 8 (Exclusions and limitations), 9 (Indemnity), 10.3
(Accrued rights and remedies), 10.4 (Survival), 11 (Force majeure) and 12 (General) continue after termination of this
agreement.
11 Force majeure
Neither party will be liable for any delay or failure to perform its obligations pursuant to this agreement (other than on
obligation to pay money) if that delay is due to Force Majeure. If a delay or failure of a party to perform its obligations is
caused by or anticipated due to Force Majeure, the performance of that party’s obligations will be suspended. Either party
may terminate this agreement if a Force Majeure persists for a continuous period of 90 days.
12 General
12.1 Severance
Part or all of any provision of this agreement that is illegal or unenforceable may be severed from this agreement and the
remaining provisions will continue in force.
12.2 Entire agreement
This agreement (including any additional terms notified to the Licensee by Leica Microsystems) constitutes the entire
agreement between the parties and supersedes any prior representations, warranties, understandings or agreements that
relate to the same subject matter.
12.3 Variation
This agreement may only be amended by agreement in writing between the parties.
12.4 Governing law
This agreement is governed by the laws of the State of Victoria, Australia, and the parties submit to the non-exclusive
jurisdiction of the courts in that State.
Leica PELORIS™ User Manual Rev K © Leica Biosystems Melbourne Pty Ltd 2011 8
Page 9
Safety Notices
The Peloris™ tissue processor is designed to provide safe, trouble-free operation when used in accordance with this
document. Follow all safety precautions to avoid personal injury, damage to patient samples, and damage to the instrument.
Clean and maintain the instrument as described in
The Safety Notice Types section below describes the types of safety notices in the manual.
The General Warnings and Cautions section has general warnings for the Peloris instrument – other notices appear in
relevant sections in the manual.
Safety Notice Types
Safety notices in this manual are either warnings or cautions.
Warnings
Warnings are notifications of hazards that could lead to personal injury to Peloris users or people in the vicinity of the
instrument.
Warnings are also used when there is the possibility of damaging patient tissue samples.
Warnings in this manual use symbols with a red border, as illustrated below:
TOXIC HAZARD
There is danger of ingestion, inhalation or skin contact with toxic material.
Chapter 7, Cleaning and Maintenance.
HEAT HAZARD
There is danger of burns.
CHEMICAL HAZARD
There is a danger of exposure to corrosive chemicals.
ELECTRICAL HAZARD
There is danger of electric shock.
GENERAL HAZARD
There is danger of personal injury or damage to patient tissue samples.
Cautions
Cautions are notifications of hazards that could lead to damage to the Peloris instrument or other equipment.
Cautions in this manual use symbols with a yellow border, as illustrated below:
CAUTION
There is danger of damage to the Peloris instrument or other equipment.
Leica PELORIS™ User Manual Rev K © Leica Biosystems Melbourne Pty Ltd 2011 9
Page 10
Safety Notices
General Warnings and Cautions
Persons operating the Peloris must be fully aware of the following warnings, in order to mitigate possible tissue damage or
loss.
Reagent Configuration
WARNING
Always ensure that the reagents configured in the software are the actual reagents loaded on the instrument.
A station containing different reagent could damage tissue samples.
Replacing Reagents
WARNING
Always change reagents when prompted.
Always update station details correctly – never update the details without replacing the reagent.
Failure to follow these directives can lead to tissue damage or loss.
WARNING
Do not alter the concentration of a used reagent unless you are able to verify the actual concentration. If the
concentration is incorrect a reduction in tissue processing quality or damage to the tissue sample may result.
Protocol Validation
WARNING
Do not set new protocols as validated until they have passed the validation procedures for your laboratory.
Only then should you edit the protocol to set it as valid, making it available to operators for clinical use (
4.1.4 Protocol Validation). Use of nonvalidated protocols may result in tissue damage or loss.
Basket and Cassette Loading
WARNING
Always ensure the cassettes are correctly inserted into the baskets and that the baskets are correctly placed in
the retorts. Incorrectly placed cassettes or baskets may lead to samples being damaged as some tissue may not
be fully covered by reagent during processing (see 2.2.4 Cassette Baskets).
WARNING
Never place three baskets into a retort when the instrument is configured with a two-basket fill level. If this
occurs, reagent will not cover the top basket and tissue samples will be damaged.
Cleaning Protocol
WARNING
Remove all tissue from the retort before running a cleaning protocol as the dry step will damage the tissue.
see
Leica PELORIS™ User Manual Rev K © Leica Biosystems Melbourne Pty Ltd 2011 10
Page 11
WARNING
Do not use cleaning protocols for reprocessing as the dry step will damage the tissue.
WARNING
Do not load unprocessed tissue samples into a retort prior to running a cleaning protocol. Formalin in the
residue purged to the wax bath at the start of the cleaning run may damage tissue on subsequent runs.
If you inadvertently load unprocessed samples into a retort prior to running a cleaning protocol, remove the
samples and attempt to load a processing protocol before loading the cleaning protocol. The purge before the
cleaning run will be skipped.
Instrument Setup
WARNING
Do not use the instrument without installing the drip tray.
WARNING
The instrument must be installed and configured by an approved service representative.
Safety Notices
WARNING
Always use suitably rated lifting equipment (such as a trolley or forklift) when moving a Peloris tissue
processor more than a few metres.
Only use the instrument’s castors to reposition an instrument for service access.
Electrical Hazards
WARNING
The Peloris tissue processor must be connected to an earthed mains power outlet socket.
WARNING
Dangerous voltages are present inside the Peloris tissue processor. Only service technicians approved by the
Biosystems Division of Leica Microsystems should remove any of the instrument’s covers or access the internal
components.
WARNING
The instrument’s operating voltage is factory set and it must not be changed.
Severe damage will occur if an instrument is connected to an incorrect power supply voltage.
WARNING
Do not pull out the mains cable whilst the instrument is operating unless there is an emergency situation and
both the front panel power button and the mains wall switch are inaccessible.
Leica PELORIS™ User Manual Rev K © Leica Biosystems Melbourne Pty Ltd 2011 11
Page 12
Reagents
Safety Notices
WARNING
Locate the instrument so that either the mains wall outlet or the instrument’s appliance inlet socket is
accessible. You must be able to disconnect the mains power cable without moving the instrument.
WARNING
Do not move the instrument unless the power cable is disconnected.
WARNING
Chloroform vapors may cause severe injury, incapacitation, or death.
When using chloroform with the Peloris tissue processor, Leica Microsystems recommends that an external
fume extraction system be installed. Chloroform vapors may accumulate during normal operation or in the
unlikely event of a spill. The extraction system must keep these vapors below dangerous levels.
Never open a retort that contains chloroform or chloroform residue.
WARNING
Do not heat reagents above their boiling points. Boiling reagents will release large quantities of fumes that
may overload the internal carbon filter or (if fitted) the external filtering system. Boiling reagents are also likely
to lead to excessive pressures within the instrument, increased reagent contamination and reagent spills.
Reagent boiling points are lower when in a retort operating with a vacuum or with pressure/vacuum cycling.
WARNING
Handle and dispose of reagents and condensate in accordance with all relevant procedures and government
regulations that apply at the laboratory site.
WARNING
Do not use fixatives containing picric acid as picric acid is explosive when dry.
WARNING
Molten wax is hot and may cause burns. Use caution when handling wax and removing baskets.
CAUTION
Do not use acetone or other ketones. These damage the instrument’s valves.
CAUTION
Do not use reagents containing corrosive chemicals such as mercuric salts, picric acid, nitric acid and
hydrochloric acid.
Leica PELORIS™ User Manual Rev K © Leica Biosystems Melbourne Pty Ltd 2011 12
Page 13

Regulatory Approvals
IEC 61010-1
2nd Edition
UL 61010A-1 Safety requirements for electrical equipment for measurement, control and laboratory use – Part 1
CAN/CSA C22.2
No.1010-1
IEC 61010-2-010 Safety requirements for electrical equipment for measurement, control and laboratory use – Part 2
IEC 61010-2-081 Safety requirements for electrical equipment for measurement, control and laboratory use – Part 2
IEC 61326 Electrical equipment for measurement, control and laboratory use – EMC requirements
FCC Part 15 Class A/B Unintentional Radiators
ISO 13485: 2003 Medical Devices – Quality management systems – Requirements for regulatory compliance
Safety requirements for electrical equipment for measurement, control and laboratory use – Part 1
General requirements
General requirements
Safety requirements for electrical equipment for measurement, control and laboratory use – Part 1
General requirements
Particular requirements for the heating of materials
Particular requirements for automatic and semi-automatic laboratory equipment for analysis and
other purposes
FCC Compliance
This device complies with part 15 of the FCC Rules. Operation is subject to the following two conditions:
1. This device may not cause harmful interference
2. This device must accept any interference received, including interference that may cause undesired operation.
FCC Class B compliance statement
This equipment has been tested and found to comply with the limits for a Class B digital device pursuant to part 15 of the
FCC Rules. These limits are designed to provide reasonable protection against harmful interference in a residential
installation. This equipment generates, uses, and can radiate radio frequency energy and, if not installed and used in
accordance with the instructions, may cause harmful interference to radio communications. However, there is no guarantee
that interference will not occur in a particular installation. If this equipment does cause harmful interference to radio or
television reception, which can be determined by turning the equipment off and on, the user is encouraged to try to correct
the interference by one or more of the following measures:
Reorient or relocate the receiving antenna
Increase the separation between the equipment and receiver
Connect the equipment into an outlet on a circuit different from that to which the receiver is connected
Consult the dealer or an experienced radio or television technician for help.
CE Marking and European Union Notice
The CE mark on the equipment indicates compliance with the EEC Directives for Electromagnetic
Compatibility (89/336/EEC), Waste Electrical and Electronic Equipment (02/96/EC), Restriction on the Use
of Certain Hazardous Substances in Electrical and Electronic Equipment (02/95/EC), and In Vitro Diagnostic
Medical Devices (98/79/EC). Marking of equipment in this manner denotes that the equipment meets the
technical standards detailed above.
Declaration of Conformity
A “Declaration of Conformity” in accordance with the preceding directives and standards has been made, and is on file at
Leica Biosystems Newcastle Ltd, Balliol Business Park West, Benton Lane, Newcastle upon Tyne, NE12 8EW, United Kingdom.
Note: To maintain compliance with the above CE and FCC Rules and Regulations, use only the cables supplied with the
equipment.
Leica PELORIS™ User Manual Rev K © Leica Biosystems Melbourne Pty Ltd 2011 13
Page 14

Contents
Legal Notices . . . . . . . . . . . . . . . . . . . . . . . . . . . . . . . . . . . . . . . . . . . . . . . . . . . . . . . . . . . . . . . . . 2
Contacting Leica Microsystems . . . . . . . . . . . . . . . . . . . . . . . . . . . . . . . . . . . . . . . . . . . . . . . . . . . . . 3
Software Licence Terms . . . . . . . . . . . . . . . . . . . . . . . . . . . . . . . . . . . . . . . . . . . . . . . . . . . . . . . . . . 4
Safety Notices. . . . . . . . . . . . . . . . . . . . . . . . . . . . . . . . . . . . . . . . . . . . . . . . . . . . . . . . . . . . . . . . . 9
Regulatory Approvals. . . . . . . . . . . . . . . . . . . . . . . . . . . . . . . . . . . . . . . . . . . . . . . . . . . . . . . . . . . 13
1 Introduction. . . . . . . . . . . . . . . . . . . . . . . . . . . . . . . . . . . . . . . . . . . .17
1.1 Summary of Chapters . . . . . . . . . . . . . . . . . . . . . . . . . . . . . . . . . . . . . . . . . . . . . . . . . . . . . .18
1.2 Using the Software. . . . . . . . . . . . . . . . . . . . . . . . . . . . . . . . . . . . . . . . . . . . . . . . . . . . . . . . 18
Basic Operation . . . . . . . . . . . . . . . . . . . . . . . . . . . . . . . . . . . . . . . . . . . . . . . . . . . . . . . . . . 19
Navigation . . . . . . . . . . . . . . . . . . . . . . . . . . . . . . . . . . . . . . . . . . . . . . . . . . . . . . . . . . . . . . 20
Access Levels. . . . . . . . . . . . . . . . . . . . . . . . . . . . . . . . . . . . . . . . . . . . . . . . . . . . . . . . . . . . 22
1.3 Help . . . . . . . . . . . . . . . . . . . . . . . . . . . . . . . . . . . . . . . . . . . . . . . . . . . . . . . . . . . . . . . . . . 22
2 Hardware. . . . . . . . . . . . . . . . . . . . . . . . . . . . . . . . . . . . . . . . . . . . . .23
2.1 Switching On and Shutting Down. . . . . . . . . . . . . . . . . . . . . . . . . . . . . . . . . . . . . . . . . . . . . . 24
2.2 Retorts . . . . . . . . . . . . . . . . . . . . . . . . . . . . . . . . . . . . . . . . . . . . . . . . . . . . . . . . . . . . . . . . 25
Opening and Closing Retort Lids . . . . . . . . . . . . . . . . . . . . . . . . . . . . . . . . . . . . . . . . . . . . . . 25
Fill Levels . . . . . . . . . . . . . . . . . . . . . . . . . . . . . . . . . . . . . . . . . . . . . . . . . . . . . . . . . . . . . . 26
Magnetic Stirrer . . . . . . . . . . . . . . . . . . . . . . . . . . . . . . . . . . . . . . . . . . . . . . . . . . . . . . . . . . 28
Cassette Baskets . . . . . . . . . . . . . . . . . . . . . . . . . . . . . . . . . . . . . . . . . . . . . . . . . . . . . . . . . 28
2.3 Wax Bath . . . . . . . . . . . . . . . . . . . . . . . . . . . . . . . . . . . . . . . . . . . . . . . . . . . . . . . . . . . . . . 32
2.4 Reagent Cabinet . . . . . . . . . . . . . . . . . . . . . . . . . . . . . . . . . . . . . . . . . . . . . . . . . . . . . . . . . 33
Reagent Bottles . . . . . . . . . . . . . . . . . . . . . . . . . . . . . . . . . . . . . . . . . . . . . . . . . . . . . . . . . . 34
Condensate Bottle . . . . . . . . . . . . . . . . . . . . . . . . . . . . . . . . . . . . . . . . . . . . . . . . . . . . . . . .34
Carbon Filter . . . . . . . . . . . . . . . . . . . . . . . . . . . . . . . . . . . . . . . . . . . . . . . . . . . . . . . . . . . . 34
2.5 Touch-screen. . . . . . . . . . . . . . . . . . . . . . . . . . . . . . . . . . . . . . . . . . . . . . . . . . . . . . . . . . . . 35
2.6 External Vapor Removal Systems. . . . . . . . . . . . . . . . . . . . . . . . . . . . . . . . . . . . . . . . . . . . . . 35
2.7 Alarm Connections . . . . . . . . . . . . . . . . . . . . . . . . . . . . . . . . . . . . . . . . . . . . . . . . . . . . . . . . 38
3 Running Protocols. . . . . . . . . . . . . . . . . . . . . . . . . . . . . . . . . . . . . . . .40
3.1 Quick Start – Running a Protocol . . . . . . . . . . . . . . . . . . . . . . . . . . . . . . . . . . . . . . . . . . . . . . 40
3.2 Cleaning Protocols . . . . . . . . . . . . . . . . . . . . . . . . . . . . . . . . . . . . . . . . . . . . . . . . . . . . . . . . 43
3.3 Status Screen . . . . . . . . . . . . . . . . . . . . . . . . . . . . . . . . . . . . . . . . . . . . . . . . . . . . . . . . . . . 45
Status Area . . . . . . . . . . . . . . . . . . . . . . . . . . . . . . . . . . . . . . . . . . . . . . . . . . . . . . . . . . . . . 46
Protocol Panels . . . . . . . . . . . . . . . . . . . . . . . . . . . . . . . . . . . . . . . . . . . . . . . . . . . . . . . . . . 49
3.4 Protocol Run Options . . . . . . . . . . . . . . . . . . . . . . . . . . . . . . . . . . . . . . . . . . . . . . . . . . . . . . 50
Scheduling Protocols . . . . . . . . . . . . . . . . . . . . . . . . . . . . . . . . . . . . . . . . . . . . . . . . . . . . . .50
Editing the Protocol for a Single Run . . . . . . . . . . . . . . . . . . . . . . . . . . . . . . . . . . . . . . . . . . . 53
Leica PELORIS™ User Manual Rev K © Leica Biosystems Melbourne Pty Ltd 2011 14
Page 15

3.5 Pausing and Abandoning Protocols. . . . . . . . . . . . . . . . . . . . . . . . . . . . . . . . . . . . . . . . . . . . . 54
3.6 Retort Scheduling. . . . . . . . . . . . . . . . . . . . . . . . . . . . . . . . . . . . . . . . . . . . . . . . . . . . . . . . . 56
Delayed End Times and Initial Fills. . . . . . . . . . . . . . . . . . . . . . . . . . . . . . . . . . . . . . . . . . . . . 56
Unavoidable Reagent Clashes . . . . . . . . . . . . . . . . . . . . . . . . . . . . . . . . . . . . . . . . . . . . . . . . 56
Unavailable Reagents . . . . . . . . . . . . . . . . . . . . . . . . . . . . . . . . . . . . . . . . . . . . . . . . . . . . . . 57
4 Protocol Setup . . . . . . . . . . . . . . . . . . . . . . . . . . . . . . . . . . . . . . . . . .58
4.1 Protocol Overview . . . . . . . . . . . . . . . . . . . . . . . . . . . . . . . . . . . . . . . . . . . . . . . . . . . . . . . . 58
Protocol Types . . . . . . . . . . . . . . . . . . . . . . . . . . . . . . . . . . . . . . . . . . . . . . . . . . . . . . . . . . . 59
Reagent Selection Method. . . . . . . . . . . . . . . . . . . . . . . . . . . . . . . . . . . . . . . . . . . . . . . . . . . 60
Pre-defined Protocols . . . . . . . . . . . . . . . . . . . . . . . . . . . . . . . . . . . . . . . . . . . . . . . . . . . . . .61
Protocol Validation . . . . . . . . . . . . . . . . . . . . . . . . . . . . . . . . . . . . . . . . . . . . . . . . . . . . . . . . 62
Carryover Setting . . . . . . . . . . . . . . . . . . . . . . . . . . . . . . . . . . . . . . . . . . . . . . . . . . . . . . . . . 62
Saving Protocol Files. . . . . . . . . . . . . . . . . . . . . . . . . . . . . . . . . . . . . . . . . . . . . . . . . . . . . . . 65
4.2 Creating, Editing and Viewing Protocols . . . . . . . . . . . . . . . . . . . . . . . . . . . . . . . . . . . . . . . . . 65
The Protocol Selection Screen . . . . . . . . . . . . . . . . . . . . . . . . . . . . . . . . . . . . . . . . . . . . . . . . 65
Editing Protocols . . . . . . . . . . . . . . . . . . . . . . . . . . . . . . . . . . . . . . . . . . . . . . . . . . . . . . . . . 66
Creating New Protocols. . . . . . . . . . . . . . . . . . . . . . . . . . . . . . . . . . . . . . . . . . . . . . . . . . . . . 70
Viewing Protocols . . . . . . . . . . . . . . . . . . . . . . . . . . . . . . . . . . . . . . . . . . . . . . . . . . . . . . . . . 71
5 Reagent Setup . . . . . . . . . . . . . . . . . . . . . . . . . . . . . . . . . . . . . . . . . .72
5.1 Reagents Overview . . . . . . . . . . . . . . . . . . . . . . . . . . . . . . . . . . . . . . . . . . . . . . . . . . . . . . . 72
Reagent Groups, Types and Stations . . . . . . . . . . . . . . . . . . . . . . . . . . . . . . . . . . . . . . . . . . . 73
Concentration Management . . . . . . . . . . . . . . . . . . . . . . . . . . . . . . . . . . . . . . . . . . . . . . . . . 74
Thresholds . . . . . . . . . . . . . . . . . . . . . . . . . . . . . . . . . . . . . . . . . . . . . . . . . . . . . . . . . . . . . 76
Recommended Reagents . . . . . . . . . . . . . . . . . . . . . . . . . . . . . . . . . . . . . . . . . . . . . . . . . . . 78
Tissue Marking. . . . . . . . . . . . . . . . . . . . . . . . . . . . . . . . . . . . . . . . . . . . . . . . . . . . . . . . . . . 79
Reagent Compatibility. . . . . . . . . . . . . . . . . . . . . . . . . . . . . . . . . . . . . . . . . . . . . . . . . . . . . .80
5.2 Managing Reagent Types . . . . . . . . . . . . . . . . . . . . . . . . . . . . . . . . . . . . . . . . . . . . . . . . . . . 80
Pre-defined Reagents . . . . . . . . . . . . . . . . . . . . . . . . . . . . . . . . . . . . . . . . . . . . . . . . . . . . . . 80
Editing Active Reagent Types . . . . . . . . . . . . . . . . . . . . . . . . . . . . . . . . . . . . . . . . . . . . . . . . 81
Managing the Reagent Types Lists . . . . . . . . . . . . . . . . . . . . . . . . . . . . . . . . . . . . . . . . . . . . . 83
5.3 Managing Reagent Stations. . . . . . . . . . . . . . . . . . . . . . . . . . . . . . . . . . . . . . . . . . . . . . . . . . 84
Reagent Stations Screen . . . . . . . . . . . . . . . . . . . . . . . . . . . . . . . . . . . . . . . . . . . . . . . . . . . . 84
Setting Reagent Station Properties. . . . . . . . . . . . . . . . . . . . . . . . . . . . . . . . . . . . . . . . . . . . . 86
5.4 Replacing Reagents . . . . . . . . . . . . . . . . . . . . . . . . . . . . . . . . . . . . . . . . . . . . . . . . . . . . . . . 88
Remote Fill/Drain Screen . . . . . . . . . . . . . . . . . . . . . . . . . . . . . . . . . . . . . . . . . . . . . . . . . . . 88
Remote Fill/Drain Connections. . . . . . . . . . . . . . . . . . . . . . . . . . . . . . . . . . . . . . . . . . . . . . . . 89
Replacing Reagent – Remote Fill and Drain. . . . . . . . . . . . . . . . . . . . . . . . . . . . . . . . . . . . . . . 91
Replacing Reagent – Manual . . . . . . . . . . . . . . . . . . . . . . . . . . . . . . . . . . . . . . . . . . . . . . . . . 94
Replacing Wax . . . . . . . . . . . . . . . . . . . . . . . . . . . . . . . . . . . . . . . . . . . . . . . . . . . . . . . . . . . 95
Filling and Draining Retorts . . . . . . . . . . . . . . . . . . . . . . . . . . . . . . . . . . . . . . . . . . . . . . . . . . 97
6 Settings & Ancillary Operations . . . . . . . . . . . . . . . . . . . . . . . . . . . . . .98
6.1 Reagents Menu . . . . . . . . . . . . . . . . . . . . . . . . . . . . . . . . . . . . . . . . . . . . . . . . . . . . . . . . . . 98
Manual Operations . . . . . . . . . . . . . . . . . . . . . . . . . . . . . . . . . . . . . . . . . . . . . . . . . . . . . . . .99
Reagent Management. . . . . . . . . . . . . . . . . . . . . . . . . . . . . . . . . . . . . . . . . . . . . . . . . . . . . 101
Leica PELORIS™ User Manual Rev K © Leica Biosystems Melbourne Pty Ltd 2011 15
Page 16

6.2 Control Menu. . . . . . . . . . . . . . . . . . . . . . . . . . . . . . . . . . . . . . . . . . . . . . . . . . . . . . . . . . . 103
Instrument Settings . . . . . . . . . . . . . . . . . . . . . . . . . . . . . . . . . . . . . . . . . . . . . . . . . . . . . . 103
Device Settings . . . . . . . . . . . . . . . . . . . . . . . . . . . . . . . . . . . . . . . . . . . . . . . . . . . . . . . . . 105
Service Settings . . . . . . . . . . . . . . . . . . . . . . . . . . . . . . . . . . . . . . . . . . . . . . . . . . . . . . . . . 106
Event Log . . . . . . . . . . . . . . . . . . . . . . . . . . . . . . . . . . . . . . . . . . . . . . . . . . . . . . . . . . . . . 106
Alarms . . . . . . . . . . . . . . . . . . . . . . . . . . . . . . . . . . . . . . . . . . . . . . . . . . . . . . . . . . . . . . . 107
Access Level . . . . . . . . . . . . . . . . . . . . . . . . . . . . . . . . . . . . . . . . . . . . . . . . . . . . . . . . . . . 108
File Transfer . . . . . . . . . . . . . . . . . . . . . . . . . . . . . . . . . . . . . . . . . . . . . . . . . . . . . . . . . . . 109
7 Cleaning and Maintenance. . . . . . . . . . . . . . . . . . . . . . . . . . . . . . . . .114
7.1 Cleaning and Maintenance Schedule . . . . . . . . . . . . . . . . . . . . . . . . . . . . . . . . . . . . . . . . . . 115
7.2 Daily Tasks . . . . . . . . . . . . . . . . . . . . . . . . . . . . . . . . . . . . . . . . . . . . . . . . . . . . . . . . . . . . 117
7.3 Weekly Tasks. . . . . . . . . . . . . . . . . . . . . . . . . . . . . . . . . . . . . . . . . . . . . . . . . . . . . . . . . . . 120
7.4 60–90 Days . . . . . . . . . . . . . . . . . . . . . . . . . . . . . . . . . . . . . . . . . . . . . . . . . . . . . . . . . . . . 122
7.5 Retort Acid Clean . . . . . . . . . . . . . . . . . . . . . . . . . . . . . . . . . . . . . . . . . . . . . . . . . . . . . . . . 123
8 Reference . . . . . . . . . . . . . . . . . . . . . . . . . . . . . . . . . . . . . . . . . . . .124
8.1 Reagent Threshold Guidelines . . . . . . . . . . . . . . . . . . . . . . . . . . . . . . . . . . . . . . . . . . . . . . . 125
8.2 Protocols . . . . . . . . . . . . . . . . . . . . . . . . . . . . . . . . . . . . . . . . . . . . . . . . . . . . . . . . . . . . . . 126
Specimen Type and Protocol Duration . . . . . . . . . . . . . . . . . . . . . . . . . . . . . . . . . . . . . . . . . 126
List of Pre-defined Protocols . . . . . . . . . . . . . . . . . . . . . . . . . . . . . . . . . . . . . . . . . . . . . . . . 126
Xylene Protocols . . . . . . . . . . . . . . . . . . . . . . . . . . . . . . . . . . . . . . . . . . . . . . . . . . . . . . . . 127
Xylene-free Protocols . . . . . . . . . . . . . . . . . . . . . . . . . . . . . . . . . . . . . . . . . . . . . . . . . . . . . 131
Cleaning Protocol . . . . . . . . . . . . . . . . . . . . . . . . . . . . . . . . . . . . . . . . . . . . . . . . . . . . . . . . 134
8.3 Station Configurations . . . . . . . . . . . . . . . . . . . . . . . . . . . . . . . . . . . . . . . . . . . . . . . . . . . . 135
8.4 Protocol Step Temperatures . . . . . . . . . . . . . . . . . . . . . . . . . . . . . . . . . . . . . . . . . . . . . . . . 137
8.5 Reagent Compatibility Tables . . . . . . . . . . . . . . . . . . . . . . . . . . . . . . . . . . . . . . . . . . . . . . . 137
9 Troubleshooting . . . . . . . . . . . . . . . . . . . . . . . . . . . . . . . . . . . . . . . .139
9.1 Preliminary Questions . . . . . . . . . . . . . . . . . . . . . . . . . . . . . . . . . . . . . . . . . . . . . . . . . . . . . 139
9.2 Flowcharts. . . . . . . . . . . . . . . . . . . . . . . . . . . . . . . . . . . . . . . . . . . . . . . . . . . . . . . . . . . . . 140
Under-processed Tissue – Instrument Setup . . . . . . . . . . . . . . . . . . . . . . . . . . . . . . . . . . . . . 141
Over-processed Tissue – Instrument Setup. . . . . . . . . . . . . . . . . . . . . . . . . . . . . . . . . . . . . . 142
Under- or Over-processed Tissue – Reagents . . . . . . . . . . . . . . . . . . . . . . . . . . . . . . . . . . . . 143
Poor Processing – Incorrect Protocol . . . . . . . . . . . . . . . . . . . . . . . . . . . . . . . . . . . . . . . . . . 144
Poor Processing – Correct Protocol. . . . . . . . . . . . . . . . . . . . . . . . . . . . . . . . . . . . . . . . . . . . 145
Cutting Artifact . . . . . . . . . . . . . . . . . . . . . . . . . . . . . . . . . . . . . . . . . . . . . . . . . . . . . . . . . 146
Staining Artifact . . . . . . . . . . . . . . . . . . . . . . . . . . . . . . . . . . . . . . . . . . . . . . . . . . . . . . . . 147
Block Artifact . . . . . . . . . . . . . . . . . . . . . . . . . . . . . . . . . . . . . . . . . . . . . . . . . . . . . . . . . . . 148
9.3 Reprocessing Recommendations . . . . . . . . . . . . . . . . . . . . . . . . . . . . . . . . . . . . . . . . . . . . . 149
10 Consumables and Accessories . . . . . . . . . . . . . . . . . . . . . . . . . . . . . .153
11 Specifications . . . . . . . . . . . . . . . . . . . . . . . . . . . . . . . . . . . . . . . . . .154
Index. . . . . . . . . . . . . . . . . . . . . . . . . . . . . . . . . . . . . . . . . . . . . . . . . . .156
Leica PELORIS™ User Manual Rev K © Leica Biosystems Melbourne Pty Ltd 2011 16
Page 17

1
Introduction
The Leica Peloris™ rapid tissue processor is a dual retort tissue processor that offers fast, high quality tissue
processing for histology laboratories. With reagent capacity sufficient to run the two retorts independently, it
allows a high degree of scheduling flexibility. Intelligent software lets you configure the instrument to suit your
laboratory’s workflows while providing checks and restrictions that help you avoid mistakes that could damage
tissue. The reagent management system closely tracks reagent condition. Depending on your setup, it uses this
information to select the optimal reagent for each protocol step. It alerts you when to replace reagent so that
quality is never compromised, at the same time ensuring you get full use of all reagents. The clear, intuitive,
touch-screen interface makes loading and monitoring runs easy, and protocol configuration, reagent setup and
other system settings are equally straightforward. And behind all this you have the support of Leica
Microsystems, with years of experience developing top quality, industry-leading histology equipment.
Congratulations on your purchase of the Leica Peloris rapid tissue processor. We trust it will provide you with
years of fast, efficient, high quality tissue processing.
This chapter has the following sections:
1.1 Summary of Chapters
1.2 Using the Software
1.3 Help
Leica PELORIS™ User Manual Rev K © Leica Biosystems Melbourne Pty Ltd 2011 17
Page 18

1.1 Summary of Chapters
Chapter 1, Introduction: general introduction, chapter summary, general instructions for
using the software, and help resources.
Chapter 2, Hardware: descriptions of the main components of the Peloris instrument.
Chapter 3, Running Protocols: main steps for running protocols, further configuration
options and scheduling, monitoring processing on the Status screen.
Chapter 4, Protocol Setup: descriptions of protocol types and the reagent selection
methods used; protocol validation and the carryover setting. Creating and editing protocols.
Chapter 5, Reagent Setup: reagent groups, types and stations, and reagent management
on the Peloris. Setting up reagent types and stations in the software. Replacing reagents.
Chapter 6, Settings & Ancillary Operations: basic instrument settings, independent
operation of instrument components, event monitoring, alarms, and transfer of system files.
Chapter 7, Cleaning and Maintenance: daily and as-required maintenance, accessories
available from Leica Microsystems.
Chapter 8, Reference: descriptions of the pre-defined protocols and recommended bottle
configurations. Recommended reagent thresholds and reagent compatibility tables.
Introduction
Chapter 10, Consumables and Accessories: a list of Peloris consumables and accessories
with part numbers for easy ordering.
Chapter 11, Specifications: system specifications.
1.2 Using the Software
Control all instrument functions from the touch-screen. This section describes basic touch-screen
operation and how to navigate the software, with a summary of all the software screens. It also
describes user access levels.
See sections:
1.2.1 Basic Operation
1.2.2 Navigation
1.2.3 Access Levels
Leica PELORIS™ User Manual Rev K © Leica Biosystems Melbourne Pty Ltd 2011 18
Page 19
1.2.1 Basic Operation
Buttons
Tap buttons to open menus, screens and dialogs, and to start and stop actions in the instrument.
Enabled buttons are blue and appear raised. Selected buttons are orange and appear sunken.
Disabled buttons are dimmed.
Figure 1. Button states—selected, available and unavailable
Icons
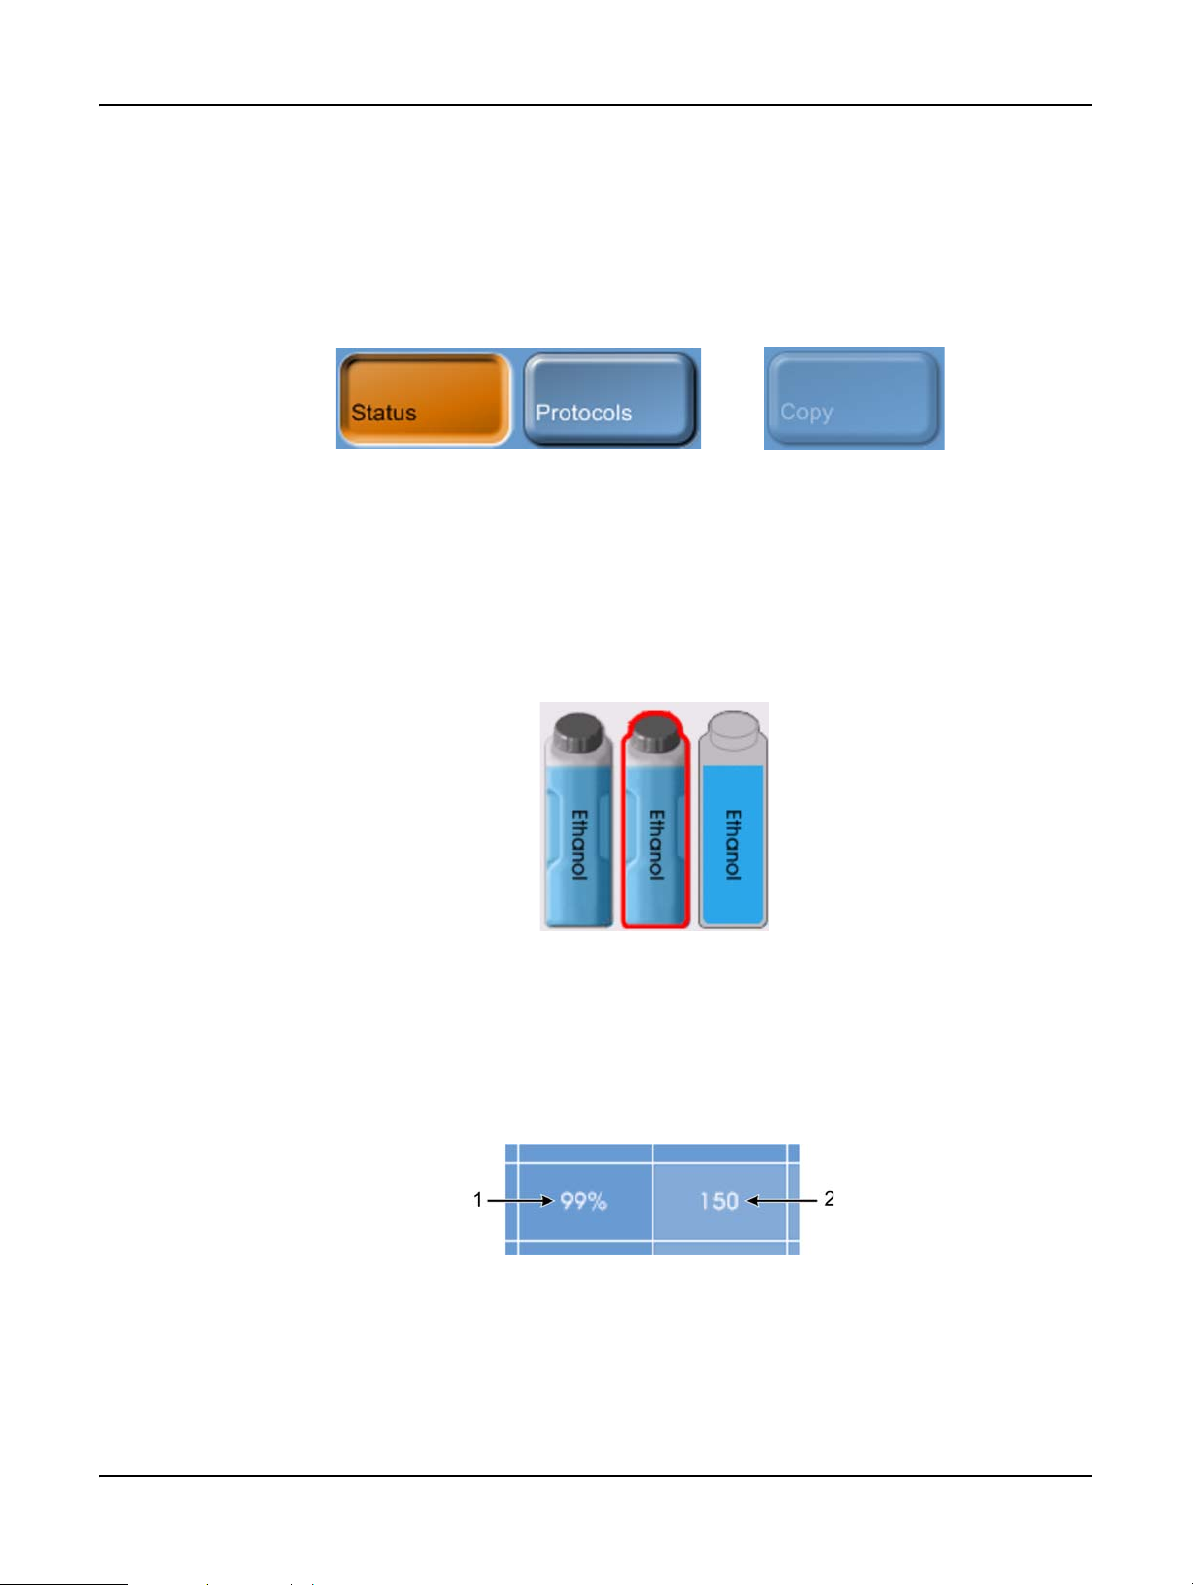
Icons are used to represent various Peloris tissue processor elements including reagent stations and
retorts. Selectable icons appear raised. A selected icon appears raised with a red outline.
Nonselectable elements appear flat and are used for indication only. Select an icon by tapping it, as
you would a button.
Introduction
Figure 2. Reagent station—selectable, selected, not selectable
Tables
Tables display configuration information such as reagent station and protocol setup. You can edit
some table cells but others are locked. The background color of locked cells is dimmed. Select
editable table cells by tapping within the cell boundaries.
Figure 3. Table cells—editable (1) and locked (2)
Leica PELORIS™ User Manual Rev K © Leica Biosystems Melbourne Pty Ltd 2011 19
Page 20
Introduction
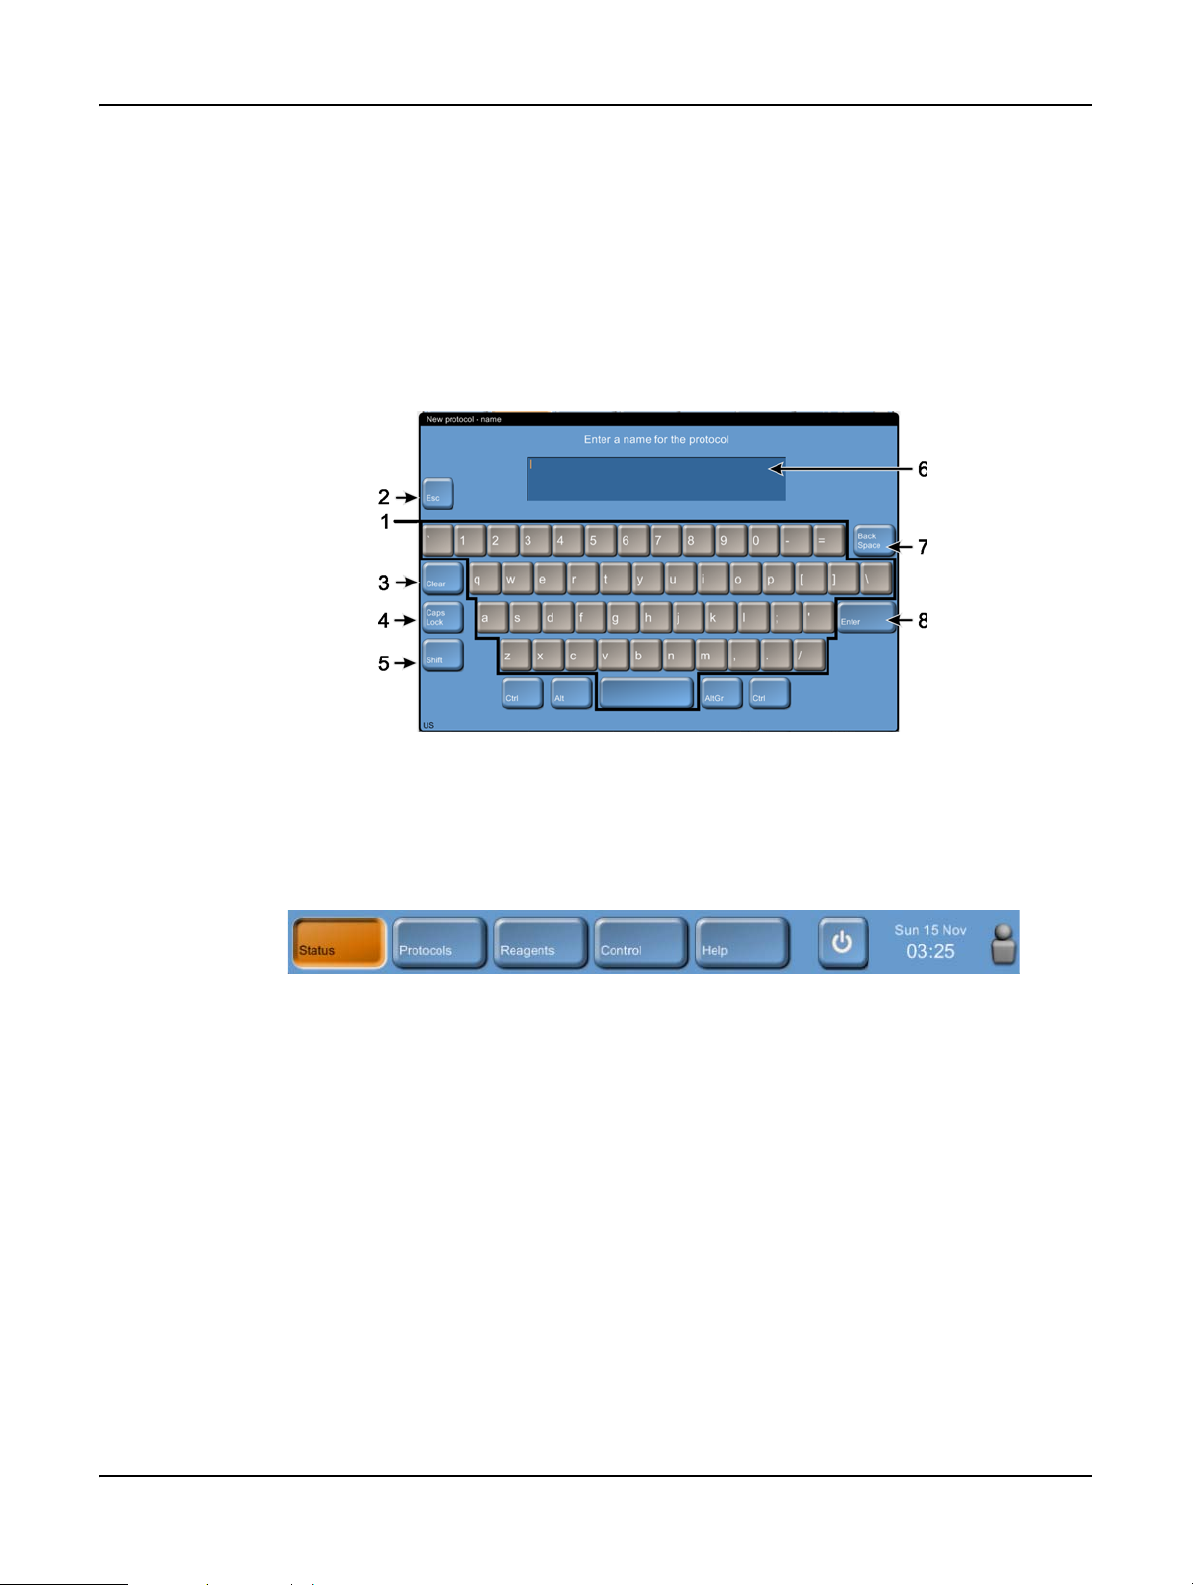
Keypads
Keypads appear as needed to allow you to enter text and numbers. There are two types of keypad:
alphanumeric (text and numbers) and numeric (numbers only). The keypads are analogous to a
computer keyboard with on-screen buttons acting as keys (1). Enter text and numbers by tapping
the appropriate buttons in order and use the Caps Lock button (4) or Shift button (5) to select
upper or lower case characters. As you type, the characters you select are displayed in the text
window (6). The alphanumeric keypad has a Back Space button (7) to delete the last character
while all keypads include a Clear button (3) to remove all characters. When you have finished, tap
the Esc button (2) to exit without saving or the Enter button (8) to confirm your entry.
1.2.2 Navigation
Navigate the software from the Function bar at the top of the screen.
The Function bar is always visible, so you can always find the screen you want. Tap a button in the
bar to change screens immediately or open a menu with buttons for a number of related screens.
Some screens have alternative “views” to divide the information presented. For example, the
Reagent stations screen has two views, one each for bottle and wax chamber information. Use
buttons on the screens themselves to move between the alternative views.
Figure 4. Alphanumeric keypad
Figure 5. The Function bar
Leica PELORIS™ User Manual Rev K © Leica Biosystems Melbourne Pty Ltd 2011 20
Page 21

Introduction
The table below lists all the screens in the Peloris software with brief descriptions of the screen
functions, and links to relevant sections of the manual.
Function
bar button
Menu button Screen purpose Refer to:
Status —
Protocols —
Stations
Types
Reagents
Remote fill/
drain
Manual
operations
Management
Instrument
settings
Device
settings
Load and run protocols, and view system
3.3 Status Screen
status.
Select, create, edit and manage protocols. 4.2 Creating, Editing
and Viewing Protocols
Set up reagent stations. You can also view
the current reagent concentrations and wax
5.3 Managing Reagent
Stations
bath temperatures.
Manage your list of active reagent types. 5.2 Managing Reagent
Typ e s
Fill or drain reagent bottles and drain wax
5.4 Replacing Reagents
stations.
Manually control individual instrument components.
6.1.1 Manual Operations
Set basic reagent management options. 6.1.2 Reagent Manage-
ment
Set options for time display, the carbon filter, fill levels and manual operation drip
6.2.1 Instrument Settings
time.
Change sound, touch-screen and alarm set-
6.2.2 Device Settings
tings.
Service
Control
settings
Event log
Alarms
Access level
File transfer
Help —
View the instrument serial number and soft-
6.2.3 Service Settings
ware versions.
View all system events. 6.2.4 Event Log
Clear or silence active alarms. 6.2.5 Alarms
Set the access level. 6.2.6 Access Level
Transfer files to and from the instrument. 6.2.7 File Transfer
Open an HTML version of the user manual
1.3 Help
in the Peloris software.
Leica PELORIS™ User Manual Rev K © Leica Biosystems Melbourne Pty Ltd 2011 21
Page 22
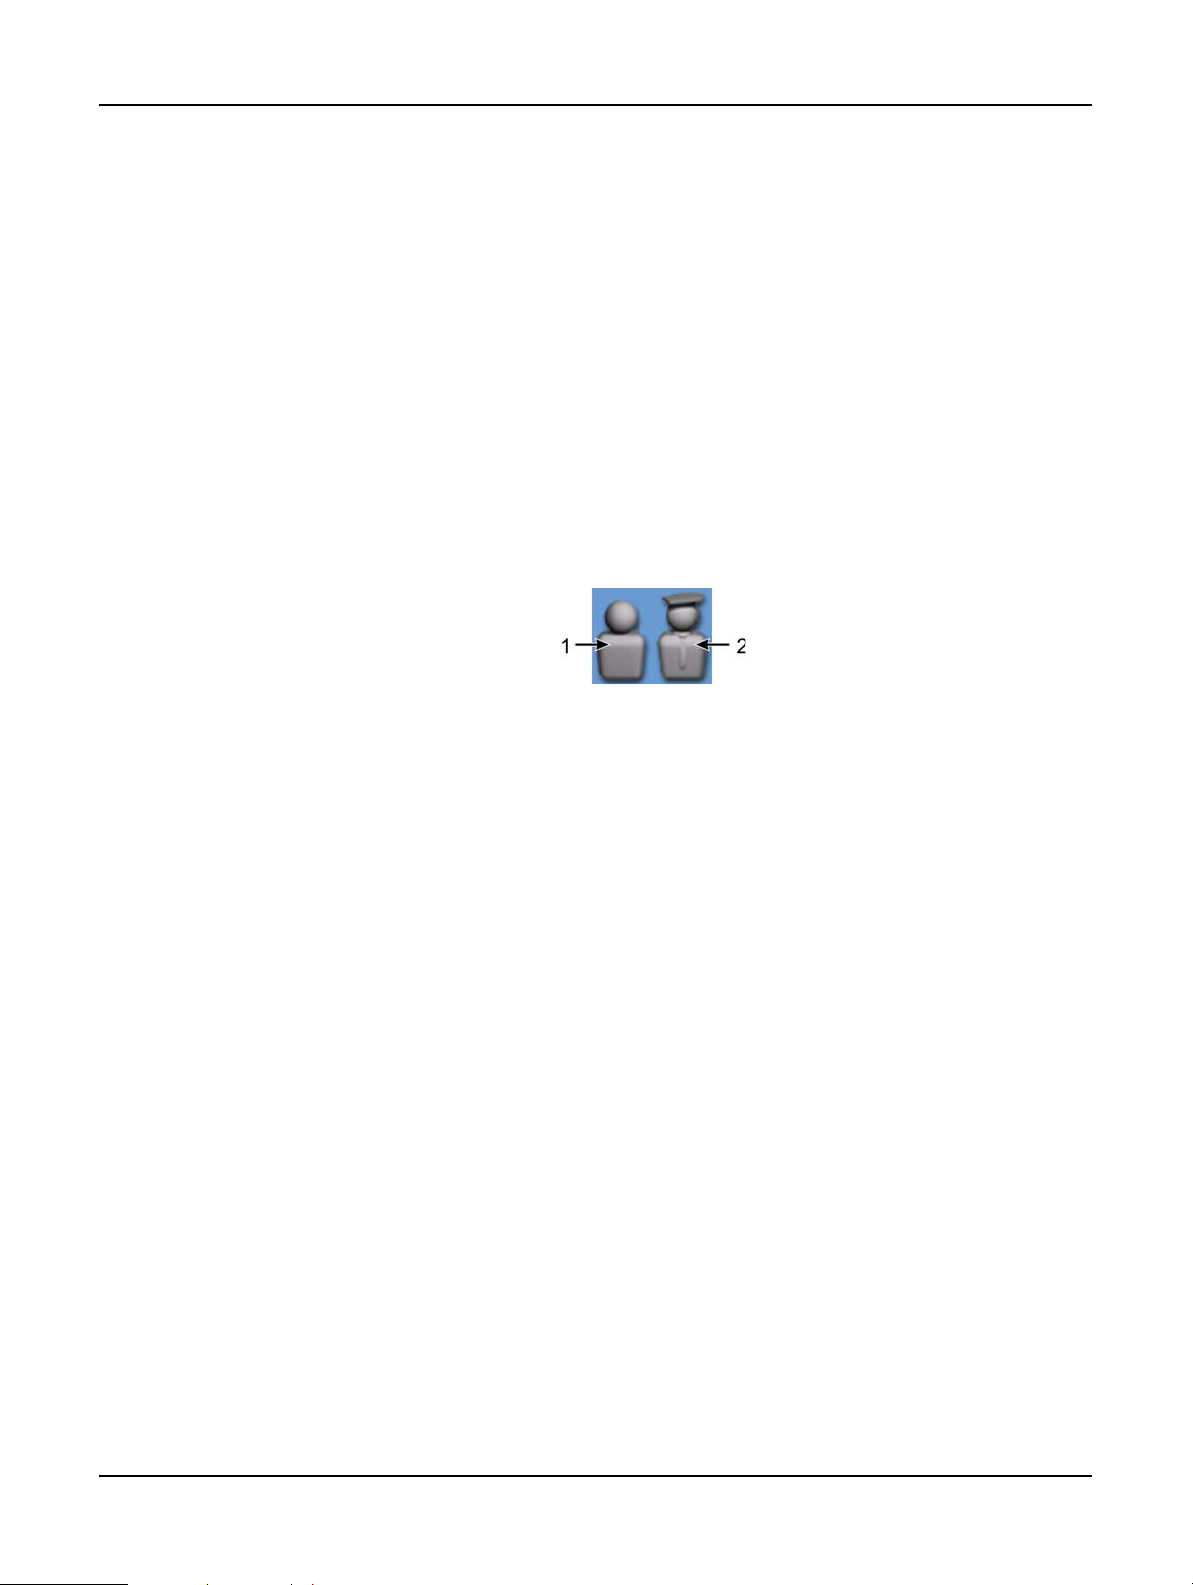
1.2.3 Access Levels
Peloris has two user access levels available to laboratory staff: operator and supervisor. Operators
can carry out all routine tasks such as running protocols and replacing reagents. But operators
cannot edit protocols or set bottle configurations – you must have supervisor rights for these
actions. Supervisors also have greater rights to configure the system.
Some configuration settings displayed in the software require service level access to change. These
are provided so you can view the settings, but you must contact your customer support
representative if you want to change them.
You automatically begin at operator level when you start the software. Supervisors need a
password to change to their access level on the access level screen (Control menu, Access level).
If a supervisor does not interact with the software for more than 10 minutes the access level
automatically reverts to operator.
An icon on the Function bar indicates your current access level.
Introduction
1.3 Help
This user manual is provided in PDF format on a CD. It is also included (in HTML format) in the
Peloris software. Tap the Help button in the Function bar to open. Use buttons on the Help screen
and links in the text to navigate the online Help.
Figure 6. Access level icons with operator (1) and supervisor (2)
Leica PELORIS™ User Manual Rev K © Leica Biosystems Melbourne Pty Ltd 2011 22
Page 23
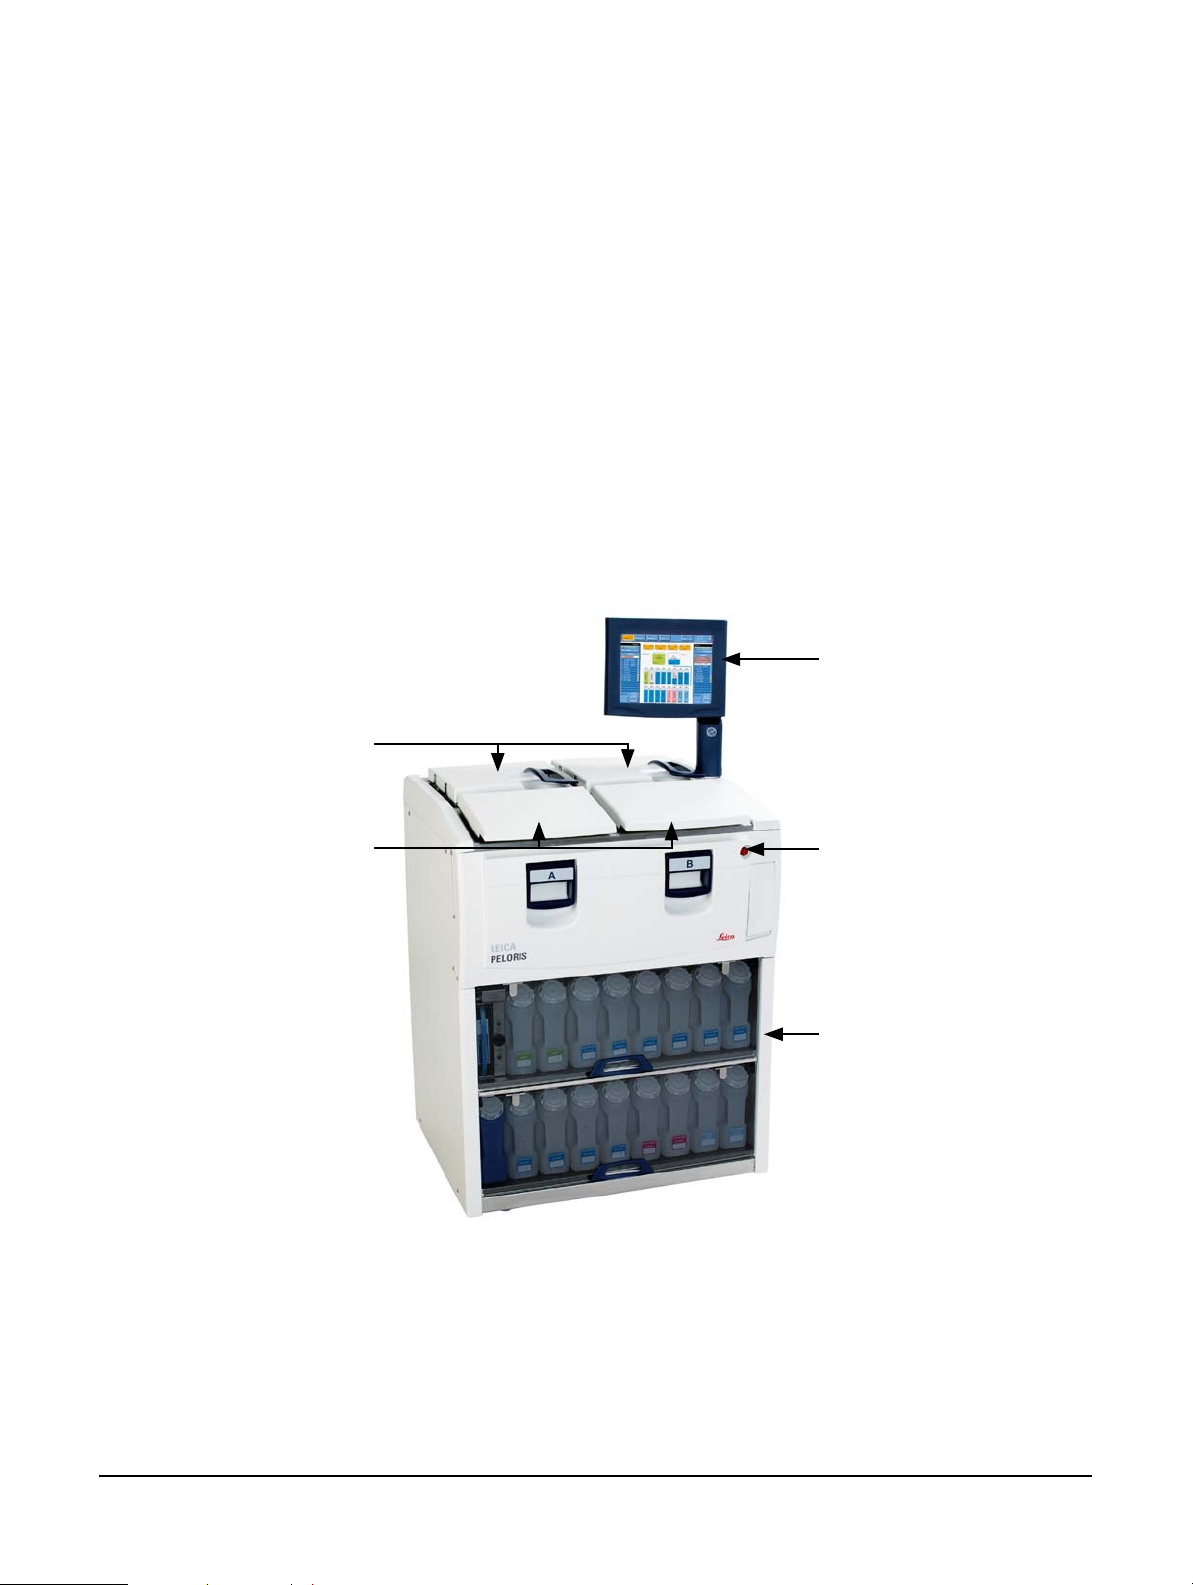
2
Two r e tor t s
Reagent cabinet
Wax bath:
with four wax chambers
Touch-screen
Power button
Hardware
The Peloris™ tissue processor is a free-standing processor with two retorts, sixteen reagent bottles and four wax
chambers. A touch-screen mounted on the top of the instrument connects to an on-board computer for control
of all instrument operations.
Leica PELORIS™ User Manual Rev K © Leica Biosystems Melbourne Pty Ltd 2011 23
Figure 1. Peloris tissue processor – main features
Page 24

This chapter describes the main features of Peloris instrument.
See sections:
2.1 Switching On and Shutting Down
2.2 Retorts
2.3 Wax Bath
2.4 Reagent Cabinet
2.5 Touch-screen
2.6 External Vapor Removal Systems
2.7 Alarm Connections
2.1 Switching On and Shutting Down
Under normal conditions keep the Peloris on at all times, even when idle for extended periods. Shut
down for servicing or if moving the instrument.
Hardware
Start
1. Plug the power cable into the mains socket and switch on the power.
2. Press the power button to start the instrument.
Normal Shutdown
For a normal shutdown the instrument must be idle with no protocols or other operations in
progress:
1. Tap the shutdown button on the Function bar to shut down the software in an orderly
manner.
2. Wait for the touch-screen to go blank then press the power button to remove all power from
the instrument.
3. Switch the power off at the mains socket and pull out the power cable.
Emergency Shutdown
For emergency shutdown, press the power button immediately.
If conditions permit, switch the power off at the mains socket and pull out the power cable.
Leica PELORIS™ User Manual Rev K © Leica Biosystems Melbourne Pty Ltd 2011 24
Page 25
2.2 Retorts
The Peloris tissue processor has two independent processing retorts with each retort holding up to
300 tissue samples in three Peloris cassette baskets. Each retort operates independently with
separate temperature, pressure/vacuum and stirrer speed control. The Peloris tissue processor
schedules resources to ensure both retorts operate efficiently with one set of reagents.
2.2.1 Opening and Closing Retort Lids
2.2.2 Fill Levels
2.2.3 Magnetic Stirrer
2.2.4 Cassette Baskets
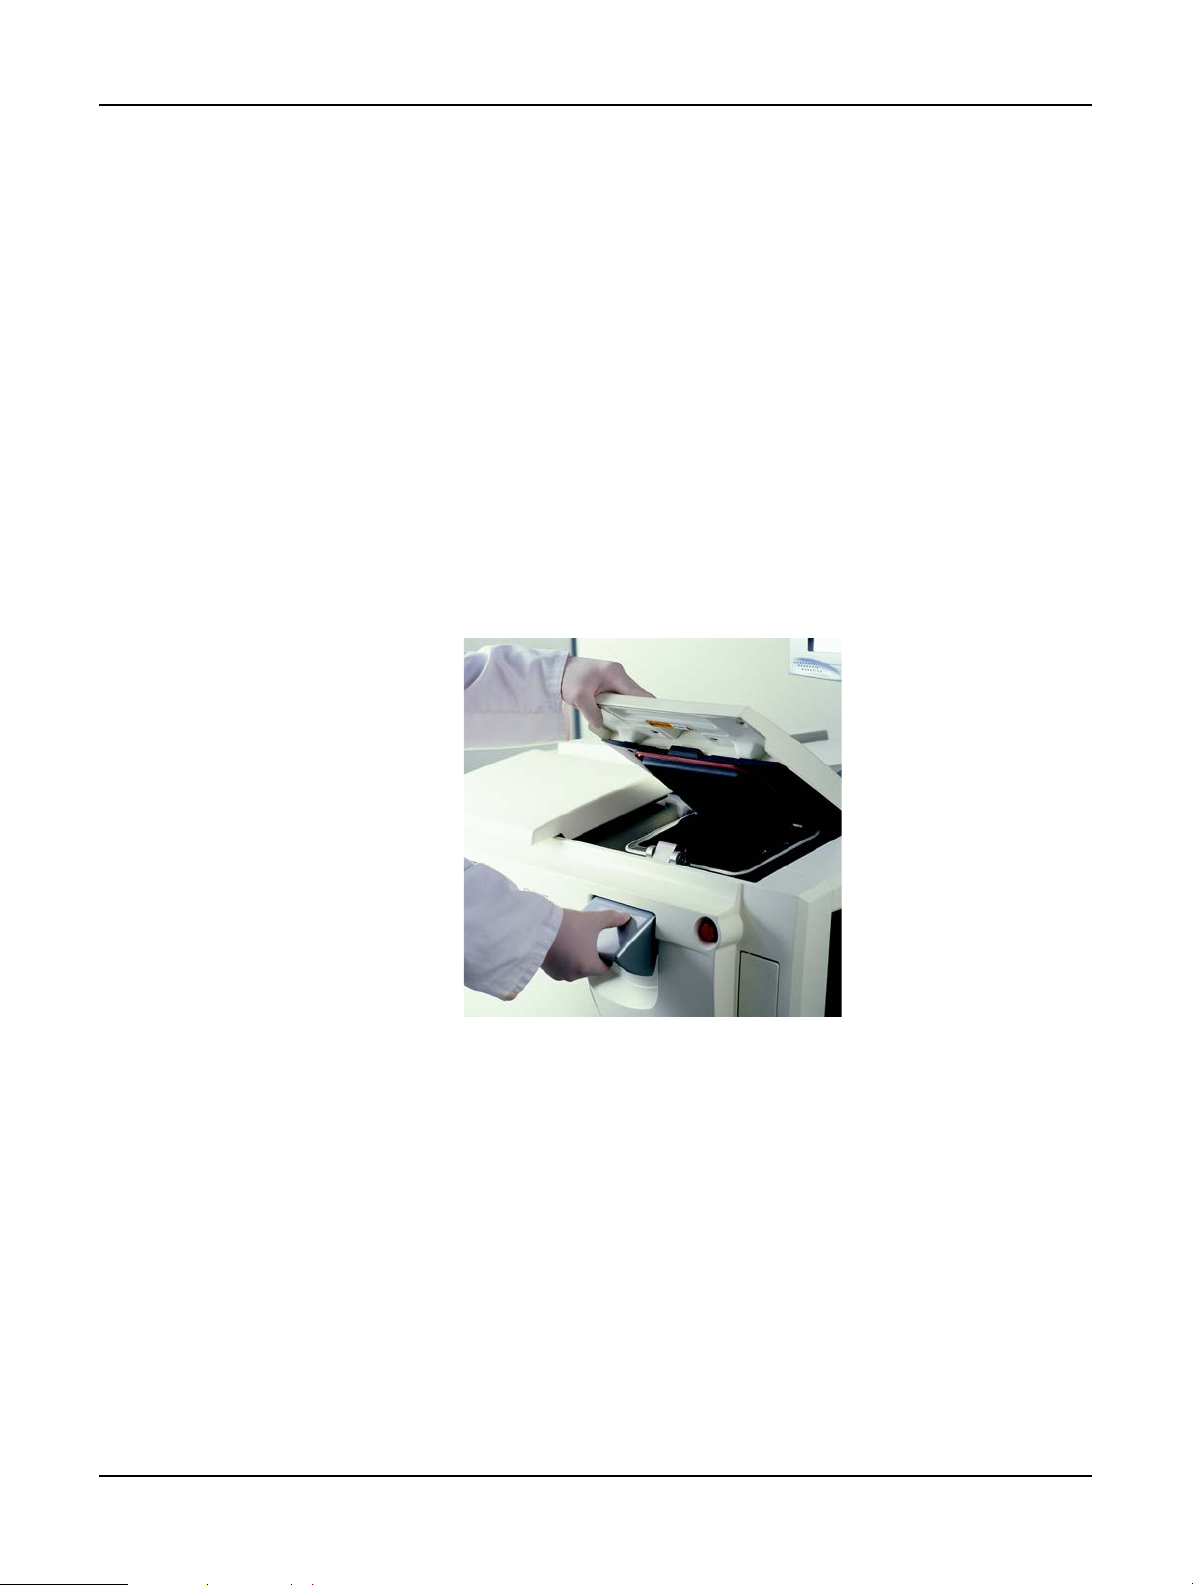
2.2.1 Opening and Closing Retort Lids
Use the handles on the front of the instrument to latch and unlatch the retort lids.
Hardware
Figure 2. Opening a retort lid
Always be aware of the contents, temperature and pressure of a retort before opening it. In some
cases you may need to set the retort pressure and temperature manually before you can safely
open it (see
You may see a warning if the retort temperature is greater than either the retort empty access
temperature (view on the Reagent management screen) or the safe access temperature
associated with the reagent in the retort (set on the Reagent types screen).
The retort lids can be removed for cleaning (see Clean Lids and Seals in 7.2 Daily Tasks).
Leica PELORIS™ User Manual Rev K © Leica Biosystems Melbourne Pty Ltd 2011 25
Venting a Retort below).
Page 26
Hardware
Some instruments have retort latch locks to disallow opening retorts when a protocol is running or
the retort temperature is high. See your service representative if you have latch locks on your
instrument.
WARNING
Retorts may contain very hot fluid that could cause severe burns. Wear suitable protective
clothing and eyewear when opening a retort.
WARNING
Retorts may contain hazardous reagents and vapors. Wear suitable protective clothing and
eyewear and ensure adequate ventilation when opening a retort.
WARNING
Take care not to knock retort lids when they are open. They could crush fingers or hands.
Venting a Retort
You must ensure there is no pressure or vacuum inside a retort before you open the lid. The retorts
automatically vent at the start and end of a protocol, and also during a pause in a protocol.
However, you may need to manually vent a retort if an automatic vent fails or if you wish to access
a pressurized or evacuated retort at other times.
Use the Manual operations screen to manually vent the retorts. Set the Pressure button to
Ambient for the retort that you want to open. You may need to wait up to one and a half minutes
for the pressure to equalize. If your instrument has retort latch locks, use the Lock/Unlock retort
button; it may take several cycles to successfully vent a retort.
If you leave a hot retort closed for an extended time, the air in the retort will cool and create a
vacuum. You must then vent the retort before attempting to open the lid.
2.2.2 Fill Levels
Retorts can be filled with enough reagent for two or three cassette baskets. Supervisors set the
required fill level on the Instrument settings screen (see
Settings).
The two basket fill volume is 3.8 liters (1 gallon US) and the three basket fill volume is 5 liters (1.32
gallon US).
Use markings on the reagent bottles (Figure 3) and wax chambers (Figure 4) to ensure you have
enough reagent to fill the retorts to the required level. Always keep the reagent or wax volumes
Reagent Fill Levels in 6.2.1 Instrument
Leica PELORIS™ User Manual Rev K © Leica Biosystems Melbourne Pty Ltd 2011 26
Page 27
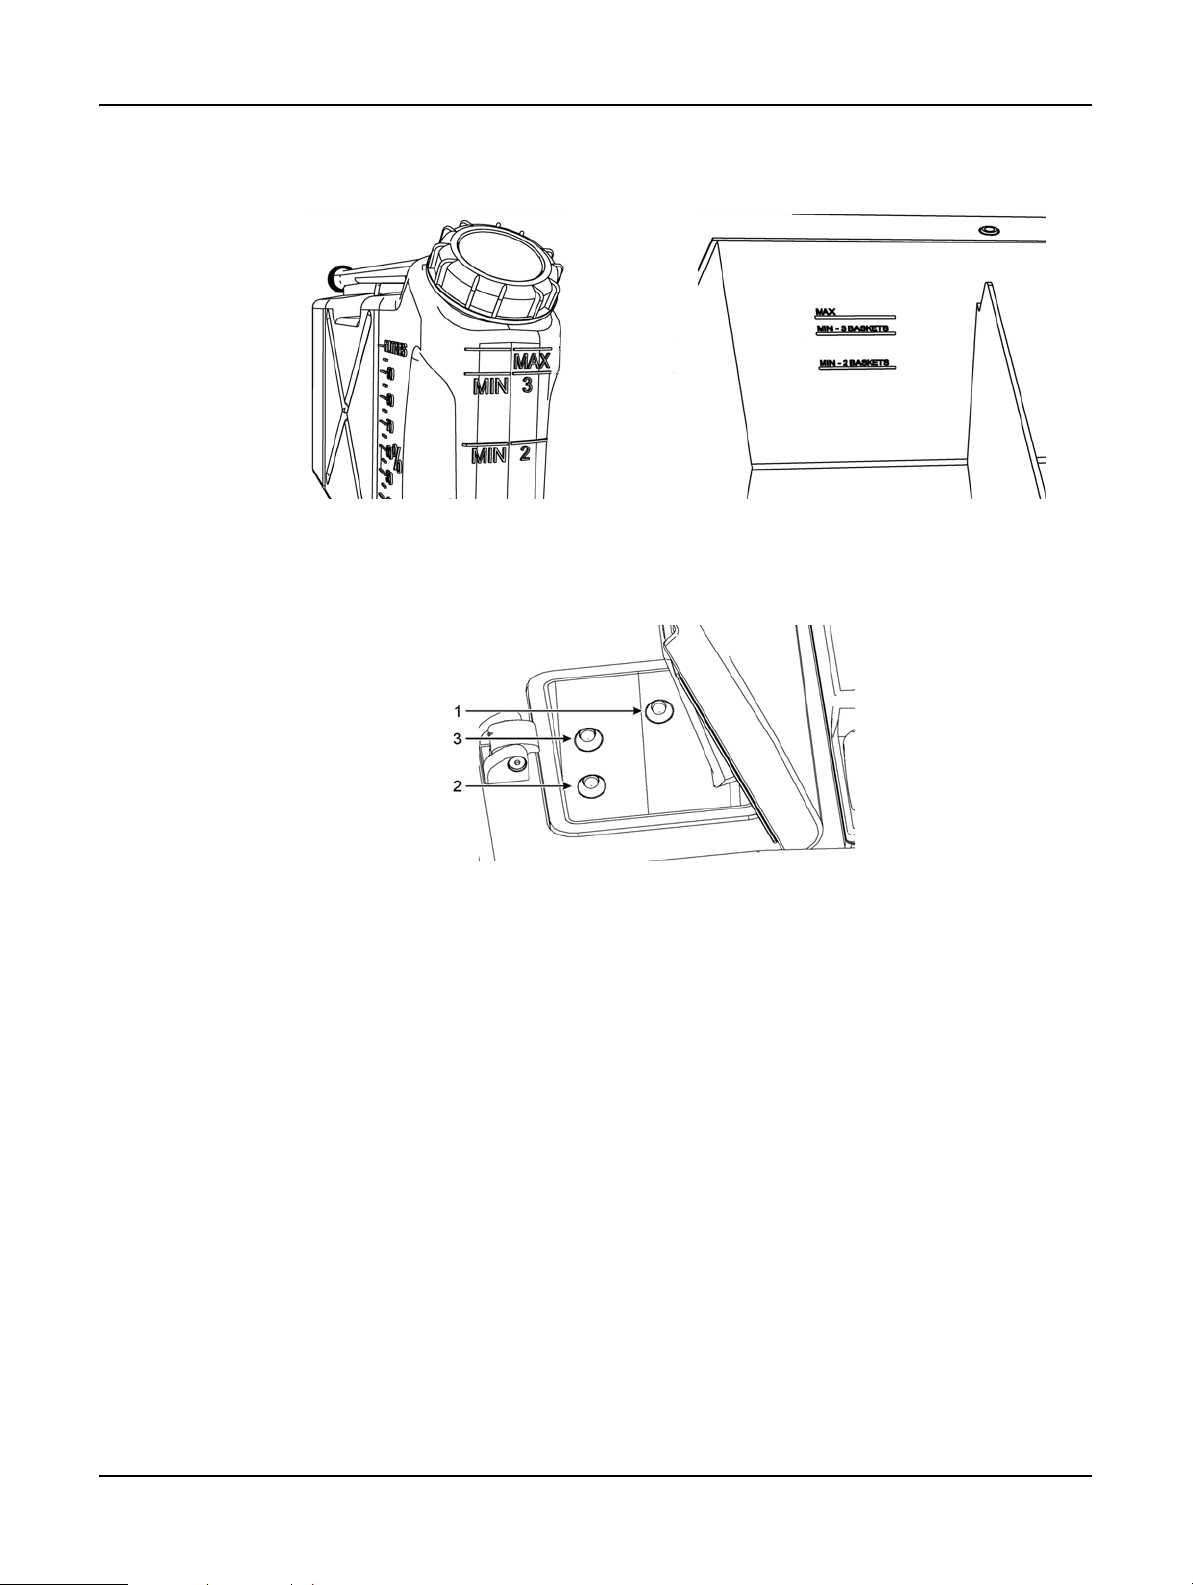
Hardware
well above the markings, but below the maximum (MAX) level. Reagent levels below the minimum
will cause protocols to either fail or use a sub-optimal reagent sequence.
Figure 3. Bottle fill levels Figure 4. Wax chamber fill levels
Liquid Level Sensors
Figure 5. Liquid level sensors for—
maximum (1), three-basket (3) and two-basket (2) retort fill levels
Each retort has three liquid level sensors to monitor fluid levels. The two lower sensors monitor the
two and three basket levels. The top, maximum, sensor responds to a fluid level of 5.3 liters. It
serves a safety function ensuring no more reagent is pumped into the retort if triggered.
The sensors may occasionally be affected by a buildup of condensation or deposited material. If
this occurs the software will direct you to wipe the appropriate sensor. Always ensure the sensors
are kept clean as part of regular retort cleaning (see
Clean Retorts in 7.2 Daily Tasks).
Leica PELORIS™ User Manual Rev K © Leica Biosystems Melbourne Pty Ltd 2011 27
Page 28
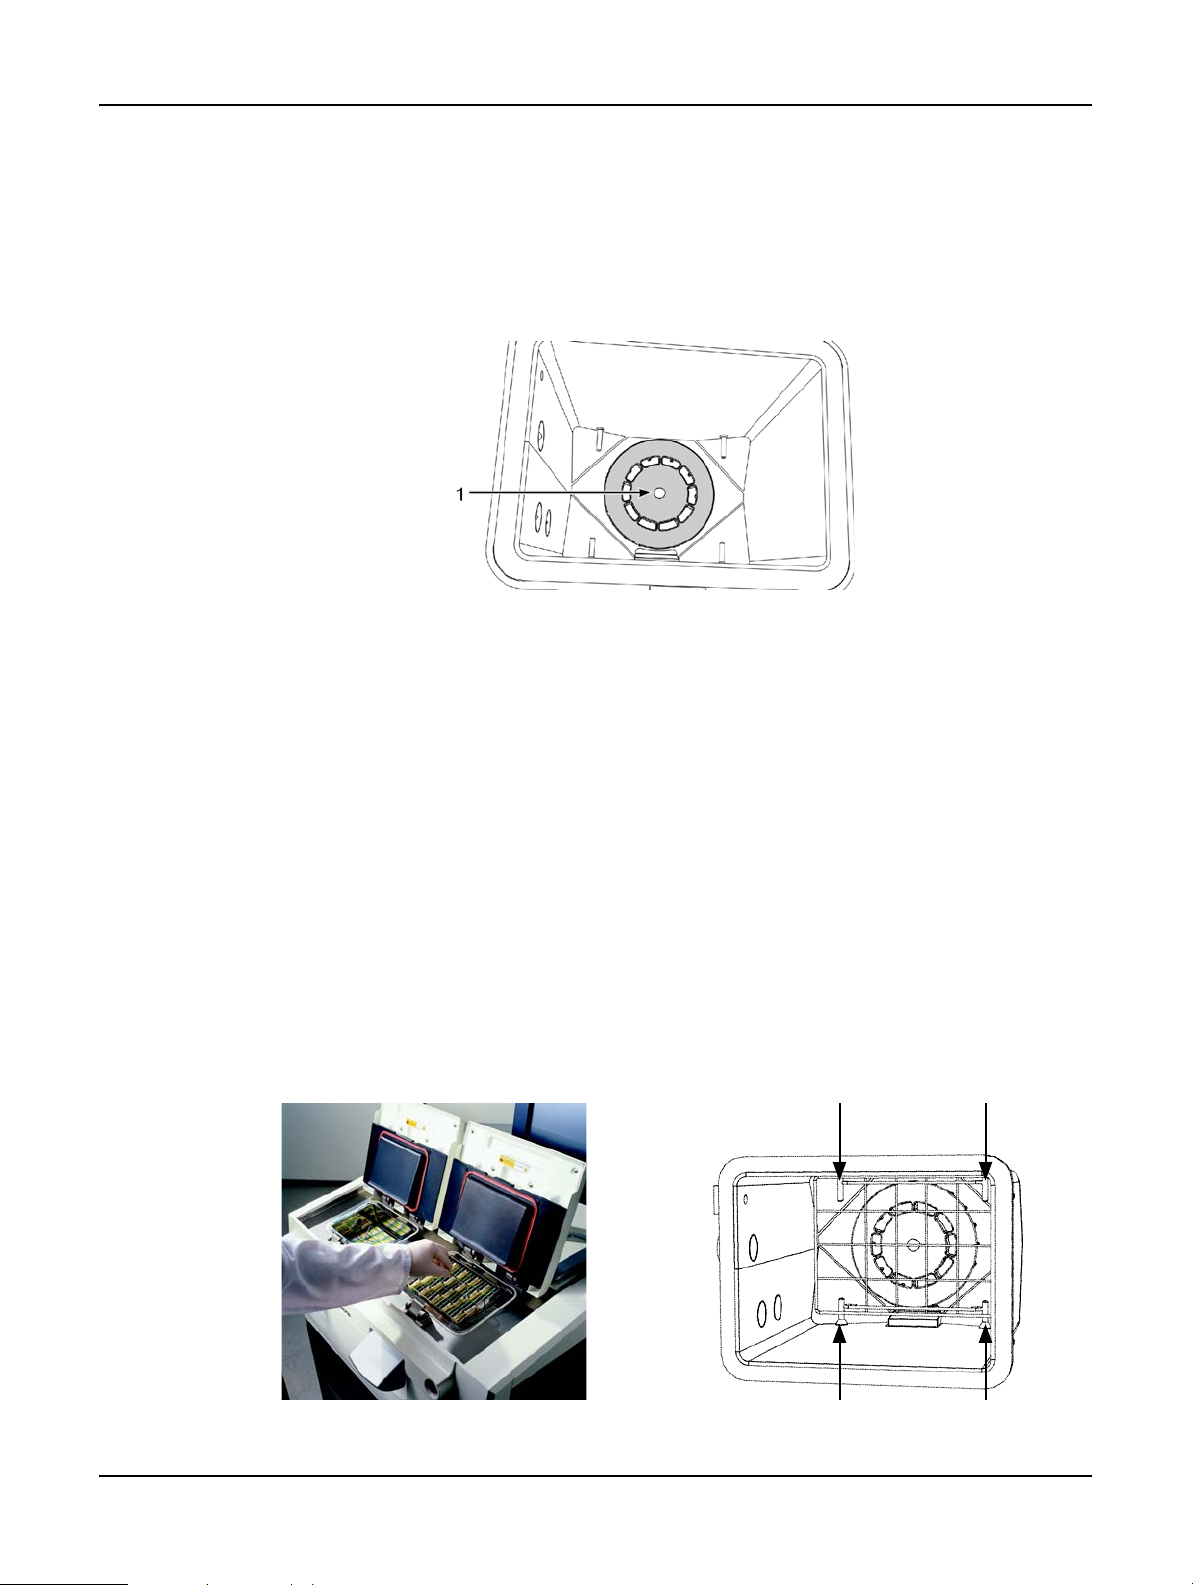
2.2.3 Magnetic Stirrer
Each retort has as magnetic stirrer that stirs the reagent or wax to ensure temperature consistency
and good tissue penetration. The stirrer is driven by a magnetically-coupled external motor. The
stirrer speed can be controlled for each protocol step and is easily removed for cleaning (see
Retorts in 7.2 Daily Tasks).
Hardware
Clean
Figure 6. Magnetic stirrer (1)
2.2.4 Cassette Baskets
There are two Peloris basket types: the configurable high-capacity basket that accommodates the
maximum number and type of cassettes; and the spaced basket that ensures optimal reagent flow.
The high-capacity cassette baskets accept most common cassette types and include configurable
dividers that allow for different cassette sizes and packing densities.
The spaced baskets include dividers that ensure optimum reagent flow with minimal carryover. This
basket type accepts 72 standard cassettes. Spaced baskets must be used for all xylene-free
protocols.
Cassette baskets stack into the retorts with the lids upwards and handles dropped flat. Make sure
the first basket sits flat on the rack on the pins at the bottom of the retort (
additional baskets so they sit flat on the lower ones – crooked baskets can leave cassettes exposed,
damaging the tissue in them.
Figure 8). Stack
Figure 7. Placing a basket into a retort Figure 8. Retort pins
Leica PELORIS™ User Manual Rev K © Leica Biosystems Melbourne Pty Ltd 2011 28
Page 29
WARNING
Always ensure the cassettes are correctly inserted into the baskets and that the baskets are
correctly placed in the retorts. Incorrectly placed cassettes or baskets may lead to samples being
damaged as some tissue may not be fully covered by reagent during processing.
WARNING
Never place three baskets into a retort when the instrument is configured with a two-basket fill
level. If this occurs, reagent will not cover the top basket and tissue samples will be damaged.
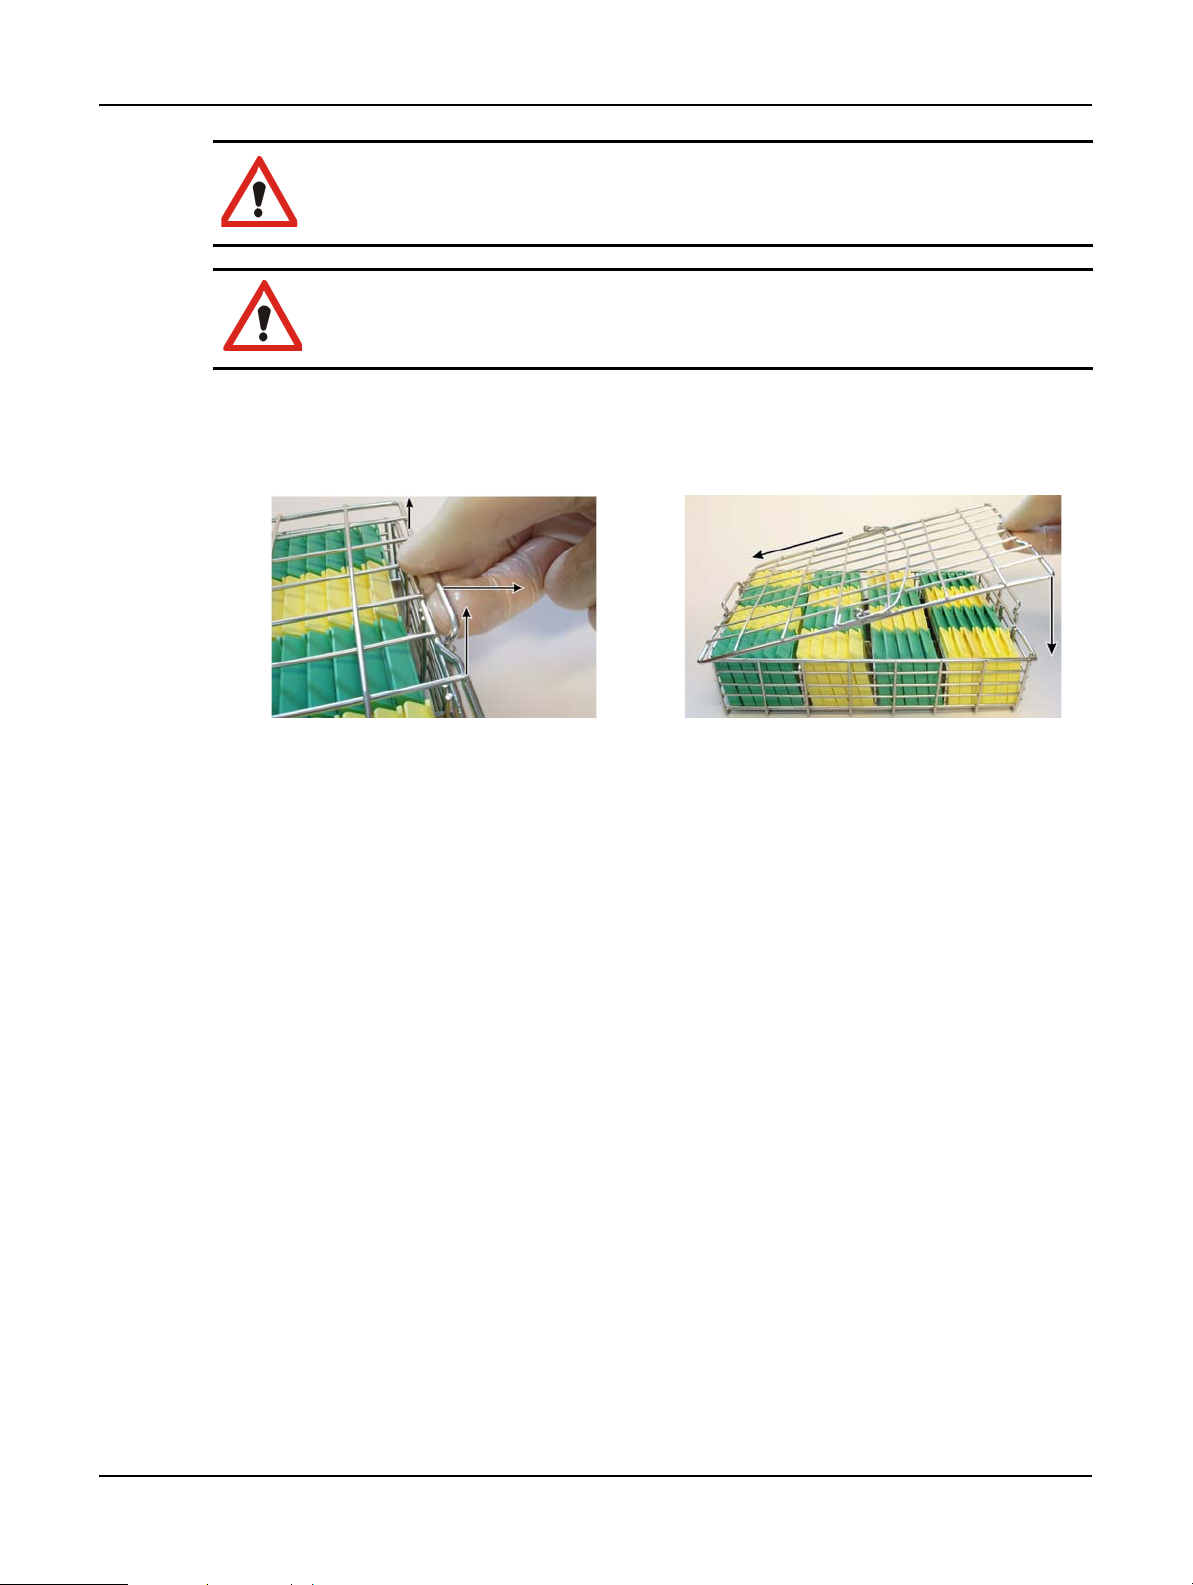
Opening and Closing Cassette Baskets
The lid is held by two catches and is completely removable to aid cassette access.
Hardware
Figure 9. Releasing the lid Figure 10. Replacing the lid
To remove the lid, release one catch then swing the lid up and off the basket (see Figure 9).
To replace the lid, insert one end into a catch then swing the other end down so it firmly
engages the second catch (see
Make sure the lid is firmly held by both catches or the body and cassettes may fall when the
Figure 10).
basket is lifted.
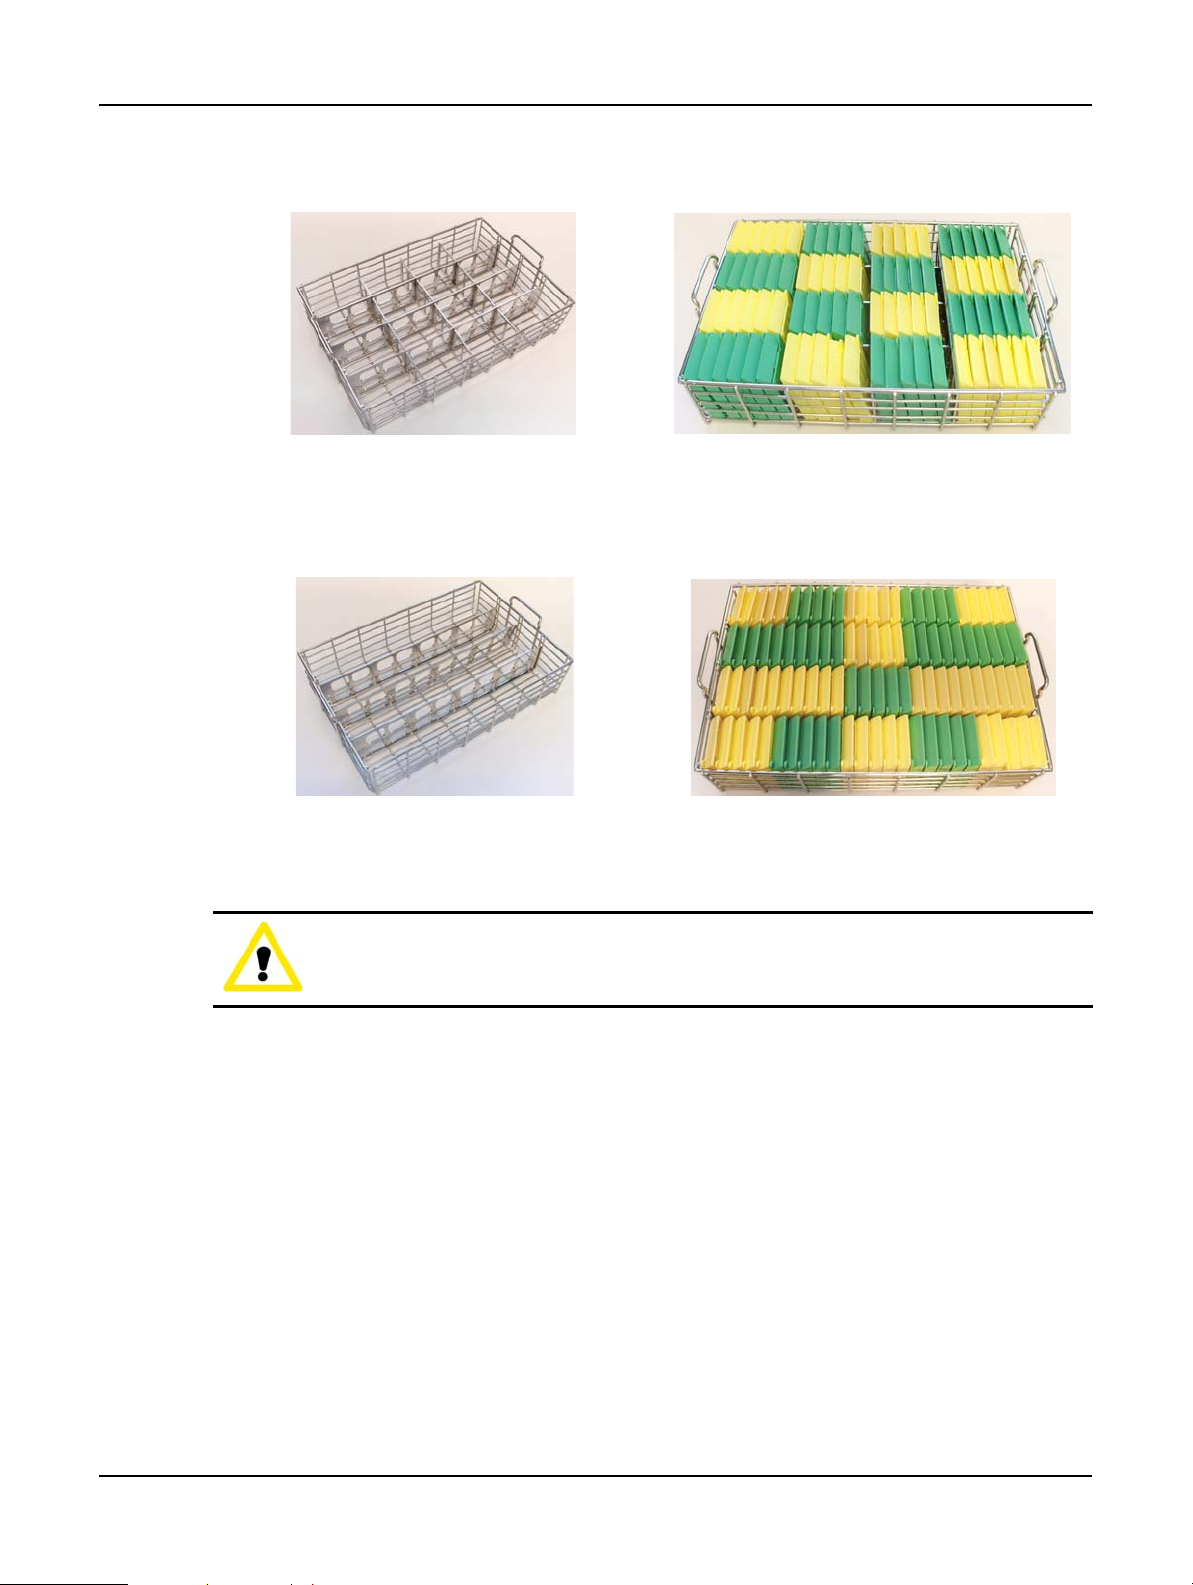
High-capacity Baskets
High-capacity baskets include dividers to configure the baskets to hold different numbers of
cassettes. Use all the dividers to configure the baskets for orderly packing (up to 88 cassettes) or
the long dividers only for tight packing (up to 100 cassettes).
For orderly packing, insert both the long and short dividers into the basket. This arrangement
makes it easier to insert and remove the cassettes (see
Figure 11 and Figure 12). Six standard
Leica PELORIS™ User Manual Rev K © Leica Biosystems Melbourne Pty Ltd 2011 29
Page 30
Hardware
cassettes can be placed in the end sections of each row and five in the middle sections, giving 88
cassettes per basket.
Figure 11. Basket arranged for orderly packing Figure 12. Basket packed with 88 cassettes
For tight packing, insert only the long dividers. This allows you to pack the maximum number of
cassettes — 25 per row (see
Figure 13 and Figure 14).
Figure 13. Basket arranged for tight packing Figure 14. Basket packed with 100 cassettes
For large or unusually shaped cassettes use the baskets with all dividers removed.
CAUTION
Do not use high-capacity baskets for xylene-free protocols as this may lead to wax build up that
will eventually require service intervention.
Leica PELORIS™ User Manual Rev K © Leica Biosystems Melbourne Pty Ltd 2011 30
Page 31

Hardware
Spaced Baskets
The spaced baskets include a fixed divider that ensures that the cassettes are correctly spaced for
optimal processing. Each spaced basket can fit up to 72 standard cassettes inserted into the
spacing springs as shown in
You must use spaced baskets when running xylene-free protocols.
Figure 15.
Figure 15. Detail of cassettes packed into a spaced basket
Leica PELORIS™ User Manual Rev K © Leica Biosystems Melbourne Pty Ltd 2011 31
Page 32

2.3 Wax Bath
The wax bath at the top rear of the instrument has four wax chambers accessed by two lids. Each
chamber acts independently, holding enough wax to fill a retort. Although wax does not move
between the chambers, they are connected for air flow and so always have the same pressure.
Use the lid handles to open the lids. Always use the handles to close the lids, ensuring the lids are
properly latched. Be sure not to knock the lids when they are open as they may slam shut.
Always ensure the wax bath pressure is at ambient pressure before opening the lids. If the pressure
is not ambient, vent the bath first. You can do this when you pause a running protocol or from the
Manual operations screen.
Hardware
Figure 16. Opening a wax bath lid
View the current temperature of each wax station in the wax chambers view of the Reagent
stations screen.
Depending on the reagents you use you can set the instrument to clean the wax in the bath (see
Wax Bath Settings in 6.1.2 Reagent Management).
Drain used wax with commands on the Remote fill/drain screen. Directly fill with molten or solid
wax (see
5.4.5 Replacing Wax).
WARNING
Take care when opening the wax bath after a xylene-free protocol as the protocol will leave very
hot wax in the bath.
WARNING
Never open a wax bath lid when there is wax in a retort or wax is being transferred; hot wax
may splash out of the bath.
WARNING
Take care not to knock wax bath lids when they are open. They could crush fingers or hands.
Leica PELORIS™ User Manual Rev K © Leica Biosystems Melbourne Pty Ltd 2011 32
Page 33

2.4 Reagent Cabinet
16 reagent bottles
Carbon filter
Condensate bottle
Hardware
Figure 17. Reagent cabinet
The reagent cabinet houses the reagent bottles, carbon filter, and condensate bottle. The cabinet
has two glass doors that retract into the cabinet when open.
WARNING
To reduce the risk of fluid spills, always keep the reagent cabinet doors closed during instrument
operation unless actually changing a reagent or emptying the condensate bottle.
2.4.1 Reagent Bottles
2.4.2 Condensate Bottle
2.4.3 Carbon Filter
Leica PELORIS™ User Manual Rev K © Leica Biosystems Melbourne Pty Ltd 2011 33
Page 34

2.4.1 Reagent Bottles
The reagent cabinet holds sixteen reagent bottles. This is three more than standard tissue
processors and it ensures there are sufficient reagents to simultaneously schedule protocols in both
retorts while also having ample cleaning reagents on board and ready to use. The bottle at each
station holds sufficient reagent to fill a single retort.
To remove a bottle, lift open the cabinet door and pull the bottle out. Push back in position to
return – you will feel the bottle pushing into its connection point on the back of the cabinet.
Replace reagent in the bottles either manually, with the bottles removed from the instrument, or in
position on the instrument using the Remote fill/drain screen (see
Screen).
Some chemicals may cause the bottles to expand over time; this is normal and does not impact the
performance of the instrument.
WARNING
Never run the instrument with missing bottles or with loose or missing bottle lids as fluid spills
and vapor leaks will occur.
Hardware
5.4.1 Remote Fill/Drain
2.4.2 Condensate Bottle
A separate bottle collects condensate fluid. It sits beside the reagent bottles in the lower section of
reagent cabinet. Empty weekly. Do not allow the bottle to overflow as condensate fluid will spill
from the instrument or contaminate other reagents.
WARNING
Never run the instrument with the condensate bottle missing or its lid either loose or missing as
fluid spills and vapor leaks will occur.
2.4.3 Carbon Filter
The carbon filter absorbs reagent fumes to prevent them from entering the laboratory atmosphere.
To ensure the filter is operating effectively, it must be replaced periodically. Use the Carbon filter
threshold button to set the replacement interval (see
The carbon filter can be bypassed and the instrument connected to an external vapor removal
system (see 2.6 External Vapor Removal Systems).
WARNING
Never run the instrument without the carbon filter or an external filter system; this will release
potentially dangerous fumes into the laboratory.
6.2.1 Instrument Settings).
The filter must be installed with the direction arrow on the front pointing up and the locking
mechanism closed (see
Leica PELORIS™ User Manual Rev K © Leica Biosystems Melbourne Pty Ltd 2011 34
Change Carbon Filter in 7.4 60–90 Days).
Page 35

2.5 Touch-screen
A touch-screen mounted on the right of the Peloris connects to a computer in the instrument that
controls all instrument operations.
Use the Peloris software on the touch-screen to configure the instrument, run protocols, and
perform ancillary operations such as replacing reagents. Tap buttons and icons with your finger or a
blunt object – do not use sharp objects. Ensure no strong solvents come into contact with the
touch-screen.
Optional stick-on/ peel-off touch-screen protectors, provided by Leica Microsystems, can be used to
protect to the touch-screen.
In its normal operating position the touch-screen sits over the wax bath lid, but can be rotated to
give clearance to open the lid. The screen can be remounted so its normal position is to the right of
the mounting stem rather than over the instrument. See your service representative if you want to
change the touch-screen position.
CAUTION
If the touch-screen goes blank or is unreadable, turn off the instrument immediately.
Hardware
2.6 External Vapor Removal Systems
Figure 18. Vapor select valve (1) and vapor outlet (2)
The outlet for instrument vapors can be switched between the internal carbon filter and an external
vapor extraction system. At the rear of each instrument there is a valve that directs vapors to either
the carbon filter or to an outlet that can be connected into the external system.
Leica PELORIS™ User Manual Rev K © Leica Biosystems Melbourne Pty Ltd 2011 35
Page 36

Hardware
For instructions on changing to an external vapor system, see Connecting to an External
System below.
For instructions on returning to the internal carbon filter system, see Returning to the Internal
Filter System.
Some instruments do not have the vapor select valve fitted. However your service representative
can easily connect these instruments to an external vapor system.
Connecting to an External System
WARNING
When the vapor select valve is in the external position, you must ensure an external vapor
system is correctly installed or potentially dangerous fumes will be released into the laboratory
environment.
Use the following procedure to connect the instrument to an external vapor system.
1. Connect the instrument’s vapor outlet into the external system (see item 2 in Figure 18).
2. Turn the vapor select valve a quarter turn anticlockwise to direct vapors to the vapor outlet
(see
Figure 19).
Note: to access the valve you may need to remove a blanking plug.
Figure 19. Vapor select valve in the external system position
3. Set the carbon filter threshold to one of the following options.
(i) The inspection interval for the external system (see 6.2.1 Instrument Settings).
(ii) The maximum value (1000) to limit the number of unwanted warnings (see 6.2.1
Instrument Settings).
(iii) Overridden (contact your service representative to arrange this setting).
Leica PELORIS™ User Manual Rev K © Leica Biosystems Melbourne Pty Ltd 2011 36
Page 37

Hardware
Returning to the Internal Filter System
WARNING
When the vapor select valve is in the internal position, you must ensure the carbon filter is
correctly installed or potentially dangerous fumes will be released into the laboratory
environment.
Use the following procedure to reconfigure an externally connected instrument to internal carbon
filter use.
1. Ensure a new carbon filter is correctly installed (see 2.4.3 Carbon Filter).
2. Turn the vapor select valve a quarter turn clockwise to direct the vapors to the internal carbon
filter (see
Note: to access the valve you may need to remove a blanking plug.
Figure 20).
Figure 20. Vapor select valve in the internal filter position
3. If required, disconnect the external system from the vapor outlet (see item 2 in Figure 18).
You may leave the external system connected as the vapor valve effectively isolates this outlet.
4. Set the carbon filter threshold to a value appropriate for your instrument’s work load.
We recommend an initial threshold of 60 days with adjustments only if you are sure the carbon
filter is becoming saturated earlier or is still in good condition after this time (see
6.2.1
Instrument Settings).
If the carbon filter threshold has been overridden the carbon filter buttons will not be available.
Arrange for your service representative to cancel the override.
Leica PELORIS™ User Manual Rev K © Leica Biosystems Melbourne Pty Ltd 2011 37
Page 38

2.7 Alarm Connections
Figure 21. Remote alarm (1) and local alarm (2) connectors
Each Peloris tissue processor has two external alarm connections — a local alarm connection and a
remote alarm connection (see
alarm indication devices including audible alarms, visual alarms or automatic phone dialers.
Speak to your service representative to configure the events that will trigger each of the external
alarms, and to set whether the alarms are a single signal or continuous.
Figure 21). These connections may be used to control a range of
Hardware
Alarm Connector Specifications
The load connected to either alarm connector must not exceed the following specifications.
Maximum voltage:
30 V DC
Maximum current:
1 A (resistive load)
Maximum current:
0.5 A (inductive load)
Alarm Connector Pins
Each alarm connector has three pins as follows (see Figure 22):
Pin 1 — Normally open (item 1)
Pin 2 — Normally closed (item 2)
Pin 3 — Common (item 3)
Figure 22. Alarm connector pins
Leica PELORIS™ User Manual Rev K © Leica Biosystems Melbourne Pty Ltd 2011 38
Page 39

Hardware
Pin Schematic During Normal Operation
When the instrument is operating normally (no alarm) the alarm pins connect as shown in Figure
23.
Pin 1 (normally open) is open.
Pin 2 (normally closed) is connected to
Pin 3 (common).
Figure 23. Alarm pins in normal state
Pin Schematic During Alarm Conditions
When the instrument has an active alarm, the alarm pins connect as shown in Figure 24 below.
Pin 1 (normally open) is connected to
Pin 3 (common).
Pin 2 (normally closed) is open.
Figure 24. Alarm pins in alarm state
Leica PELORIS™ User Manual Rev K © Leica Biosystems Melbourne Pty Ltd 2011 39
Page 40

3
Running Protocols
This chapter describes how to run protocols on the Peloris™ system. The first section gives all the steps to run a
protocol once reagents and protocols have been configured. The second describes cleaning protocols, and the
third describes the Status screen, where you control and monitor processing. The fourth and fifth sections give
details about modifying or pausing protocol runs. The sixth section discusses general issues about scheduling
protocols.
3.1 Quick Start – Running a Protocol
3.2 Cleaning Protocols
3.3 Status Screen
3.4 Protocol Run Options
3.5 Pausing and Abandoning Protocols
3.6 Retort Scheduling
3.1 Quick Start – Running a Protocol
Follow the instructions below to run a protocol.
Before you begin all the reagents you need must be configured and there must be a validated
protocol ready to load. See
Protocols for direction on these topics.
Instrument Checks and Setup
1. On the screen, tap the Status button to view the Status screen:
(i) Check that the retort icon shows the retort is clean or has residue of a reagent compatible
with the first reagent of the protocol.
(ii) Check for hatched bottle or wax chamber icons.
Replace the reagent in hatched stations (see 5.4 Replacing Reagents).
5.3 Managing Reagent Stations and 4.2 Creating, Editing and Viewing
Leica PELORIS™ User Manual Rev K © Leica Biosystems Melbourne Pty Ltd 2011 40
Page 41

Running Protocols
2. Check that the instrument is ready:
(i) All 16 bottles are properly installed on the instrument.
(ii) There is enough reagent in the bottles and wax chambers.
Fill to at least the MIN 2 level if you fill retorts to the two-basket level, or at least the
MIN
3 level for the three-basket level (view the instrument fill level in the Reagent fill
levels section on the Instrument settings screen).
(iii) Open the retort to use. Check that it is clean, or that any residue is a reagent compatible
with the first reagent in the protocol.
3. Prepare your cassettes and load them into baskets (see 2.2.4 Cassette Baskets).
Load Protocol
4. Tap the Select button at the bottom left or right corner of the Status screen, depending on
the retort you want to use.
The Protocol selection screen opens.
5. Select a protocol and tap Load.
Only validated protocols can be selected by operator-level users (see 4.1.4 Protocol Validation).
The Status screen reopens with the protocol loaded.
Run Protocol
6. Tap the Run button.
Review any warnings and rectify as required. If necessary, cancel the warnings dialog box
while you rectify conditions.
If the first step of the protocol uses a reagent that is incompatible with retort residue you may
need to abandon the protocol to run a cleaning protocol. Alternatively, you may be able to skip
the first steps of the protocol (see
Continue in the warnings dialog box.
7. If prompted, enter the number of cassettes in the run in the Number of cassettes dialog
box.
It is important to enter the correct number of cassettes – this is used by the reagent
management system to calculate reagent concentrations.
8. Open the retort lid and insert the cassettes when directed in the Insert cassettes dialog box.
Tap Done in the dialog box when you have inserted the cassettes and closed the retort.
9. View the protocol end-time in the Scheduling dialog box.
If acceptable, tap Start, or set a different end time (see 3.4.1 Scheduling Protocols).
Tap Edit steps in the Scheduling dialog box to skip initial protocol steps or change step
durations (see
3.4.2 Editing the Protocol for a Single Run).
10. When you tap Start the system schedules the protocol.
If the system is unable to schedule the protocol, you will see a list of errors. Tap OK and
correct all errors before attempting to run the protocol again (see
Reagent Clashes for a description of possible scheduling difficulties).
If the system was able to schedule the run, the protocol will begin.
If you have set a delayed end time, an initial fill condition will occur (see 3.6.1 Delayed
End Times and Initial Fills).
3.4.2 Editing the Protocol for a Single Run). If so, tap
3.6.2 Unavoidable
Leica PELORIS™ User Manual Rev K © Leica Biosystems Melbourne Pty Ltd 2011 41
Page 42

Running Protocols
11. View the progress of the protocol in the Status screen.
You can pause processing to add additional cassettes, or abandon protocols completely (see
3.5 Pausing and Abandoning Protocols).
Finish Protocol Run
12. When the protocol is finished the Protocol complete dialog box opens and the alarm sounds;
tap OK to continue.
13. Tap Drain retort before accessing from the Drain/Access retort dialog box.
You can remove the baskets before draining the retort (tap Access retort now) – this option
is not recommended.
14. Wait for the Retort accessible dialog box to appear then open the retort and remove the
cassettes.
Tap OK to close the dialog box.
Run Cleaning Protocol
15. The Run cleaning protocol dialog box appears.
(i) Recommended: tap Clean now to load a cleaning protocol.
If you have more than one cleaning protocol use the Prev and Next buttons to select the
protocol you want to use.
(ii) Not recommended: tap Clean later to end the procedure and leave the retort full or with
residue in it.
If you select this option heating continues to keep the wax in the retort and valves molten.
See 3.2 Cleaning Protocols below for information about cleaning protocols.
16. Place the used cassette baskets into the retort when prompted with the Insert baskets dialog
box.
Remove all tissue as the cleaning protocol will damage any tissue left in the retort.
Tap Done in the dialog box when you have inserted the baskets and closed the retort.
17. Tap Start in the Scheduling dialog box to begin the run.
If required change the protocol’s end time before starting.
18. View the progress of the protocol in the Status screen.
19. When the protocol is finished the Protocol complete dialog box opens and the alarm sounds;
tap OK to continue.
20. When the Remove baskets dialog box appears, open the retort lid and remove the baskets.
Tap OK to continue.
21. Tap Unload protocol in the Status screen so the retort is available for the next protocol.
WARNING
Do not open a retort while a protocol is running as the retort could be pressurized and may
contain hot reagent and fumes. Always follow the retort access instructions detailed in 3.5
Pausing and Abandoning Protocols if you need to access a retort during processing.
Leica PELORIS™ User Manual Rev K © Leica Biosystems Melbourne Pty Ltd 2011 42
Page 43
3.2 Cleaning Protocols
Cleaning protocols clean the retorts and reagent lines. Always run a cleaning protocol as soon as
possible after processing runs; unless there are specific reasons not to, always select the Clean
now option when prompted at the end of a run. Also clean retorts after replacing reagent by
remote fill and drain, or if you filled the retorts using manual operations.
For most laboratories the pre-defined “Quick Clean” protocol should be the only cleaning protocol
required. Under normal conditions the protocol purges residue in the retort to the wax bath before
the first step (see
(e.g. xylene) and cleaning alcohol. These are followed by a “dry step” that applies high
temperature, vacuum and air flow to evaporate all reagent residue. At the end of the dry step the
heaters turn off but air flow continues to cool the retorts before the next protocol.
Load and run cleaning protocols like other protocols, but never put tissue in the retort – the dry
step will damage it. This means cleaning protocols should never be used for reprocessing runs –
use a reprocessing protocol instead.
If required, copy the Quick Clean protocol and edit to create your own cleaning protocols. You can
add, delete and edit all the reagent steps as for other protocols, but the dry step cannot be deleted
or edited. Cleaning protocols do not require a water step and work well with conventional cleaning
reagents.
Pre-cleaning Purges below). Then there are two reagent steps – cleaning solvent
Running Protocols
To completely remove xylene from your instrument, Leica Microsystems can supply Waxsol™, a
xylene-free cleaning solution (see
WARNING
Remove all tissue from the retort before running a cleaning protocol as the dry step will damage
the tissue.
WARNING
Do not use cleaning protocols for reprocessing as the dry step will damage the tissue.
CAUTION
Always run a cleaning protocol after wax has been in the retort.
CAUTION
Do not reuse contaminated dehydrants as cleaning alcohol. The contaminated dehydrants will
contain formalin (or other fixatives) and the “dry step” will cause salts to crystallize on the
retort’s internal surfaces.
5.1.4 Recommended Reagents).
Leica PELORIS™ User Manual Rev K © Leica Biosystems Melbourne Pty Ltd 2011 43
Page 44

Running Protocols
Cleaning Laboratory Implements
You can clean metal laboratory implements such as cassette lids and metal molds during cleaning
runs, but it is important to set reagent purity thresholds that take this into account.
All the pre-defined cleaning reagents have “cycle” purity thresholds. Under these the reagents must
be replaced after ten or six cleaning runs (if they do not exceed a concentration threshold first). But
the thresholds are designed for cleaning runs with only cassette baskets in the retorts – any
additional material increases the rate that the cleaning reagents degenerate, requiring lower cycle
thresholds. If you clean implements other than baskets lower the cycle thresholds for the reagents
used, so the reagents are replaced more frequently (see
5.2.2 Editing Active Reagent Types).
Depending on the number of implements you typically place in the retorts you may need to reduce
the thresholds by half or more. Contact your technical support representative for advice if required.
CAUTION
If you clean laboratory utensils, metal cassette lids, metal molds etc. in cleaning runs lower the
cycle purity thresholds for the cleaning reagents used. Failure to do so can lead to overly
contaminated cleaning reagents and lower quality cleaning.
Modifying Cleaning Protocols for Different Retort Residues
Always run a complete cleaning protocol as soon as possible if wax or clearing reagent are left in
the retorts.
For alcohol residue skip the first step of the protocol to start at the alcohol step (see 3.4.2 Editing
the Protocol for a Single Run).
A residue of clean formalin can be allowed to stay in a retort if the next processing protocol begins
with a formalin step. If you are left with formalin in a retort at the end of a protocol tap Clean
later when prompted, to continue without cleaning. If you need to clean a retort with formalin
residue in it, start the cleaning protocol with the alcohol step, as for alcohol residue.
Pre-cleaning Purges
Cleaning protocols are generally run to clean wax residue from the retorts, as wax is the final step
of processing protocols. To help maximize the useful life of the cleaning solvent, the instrument
usually purges any wax residue from the retort to the wax chamber it came from before the
cleaning protocol begins.
If you attempt to load a processing protocol to a retort with incompatible residue you are warned
with event 10011, “Incompatible reagent in retort. Clean retort or edit protocol.” A cleaning protocol
run after this warning will not have the normal purge to the wax chamber. This is in case fresh
cassettes were placed in the retort, contaminating the wax residue with formalin. A purge under
these conditions would contaminate the wax chamber with formalin.
If you ever place fresh cassettes into a dirty retort in preparation for processing, remove the
cassettes and then attempt to load a processing protocol before loading the cleaning protocol. The
10011 warning raised when you attempt to load the processing protocol causes the cleaning
protocol to skip the wax bath purge. The retort residue, now with formalin in it, will not go into the
wax bath but into the cleaning solvent.
After the cleaning protocol finishes replace the cleaning solvent, which will now be contaminated
with formalin.
Leica PELORIS™ User Manual Rev K © Leica Biosystems Melbourne Pty Ltd 2011 44
Page 45

In general, avoid this situation by always cleaning the retort immediately after a
Retort A Retort B
16 reagent bottles
4 wax chambers Retort B protocol panelRetort A protocol panel
Select/Unload
protocol:
button to load and
unload protocols for
retort A
Run/Pause
button for
retort A
Run/Pause
button for
retort B
Select/Unload
protocol:
button to load and
unload protocols for
retort B
processing run, when prompted. Do not put fresh cassettes into a retort that is
showing residue in it, as indicated by the icon at right (formalin residue may be
acceptable).
WARNING
Do not load unprocessed tissue samples into a retort prior to running a cleaning protocol.
Formalin in the residue purged to the wax bath at the start of the cleaning run may damage
tissue on subsequent runs.
If you inadvertently load unprocessed samples into a retort prior to running a cleaning protocol,
remove the samples and attempt to load a processing protocol before loading the cleaning
protocol. The purge before the cleaning run will be skipped.
3.3 Status Screen
Use the Status screen to run protocols and monitor protocol progress. The main features of the
screen are shown in
Figure 25.
Running Protocols
Leica PELORIS™ User Manual Rev K © Leica Biosystems Melbourne Pty Ltd 2011 45
Figure 25. Status screen
The central area of the screen shows the status of the stations and retorts. Panels at either side of
the screen show protocols loaded for the retorts.
3.3.1 Status Area
3.3.2 Protocol Panels
Page 46

3.3.1 Status Area
Bottle number
Reagent type
Color-coded for
reagent group (see
Groups in 5.1.1
Reagent Groups, Types
and Stations for color
codes)
Reagent concentration
(may not be visible,
see 6.1.2 Reagent
Management)
Hatched coloring
shows reagent is out of
threshold
Color or other pattern
shows station state
(see below)
The status area provides a visual guide to the status of the bottles, wax chambers and retorts, as
shown below.
Bottle Icons
Running Protocols
Leica PELORIS™ User Manual Rev K © Leica Biosystems Melbourne Pty Ltd 2011 46
Figure 26. Bottle icons on the Status screen
Bottles have six possible station states:
Full In use Empty Dry No bottle Unknown
A reagent
transfer is in
progress or
was abandoned. The
reagent level
is between
Means
The bottle
holds sufficient reagent
to fill a retort
at the specified basket
level.
full and
empty.
Icon
The bottle has
been used to
fill a retort.
There is still
reagent in the
bottle.
The bottle has
been completely
The bottle has
been
removed.
drained leaving only a
small amount
of residue.
A previously
missing bottle has been
replaced.
Enter reagent
and state
details before
using this station.
Page 47

Wax Chamber Icons
Wax chamber number
Reagent type
(i.e. type of wax)
Color-code orange for
reagent group “Wax”
Hatched coloring
shows wax is out of
threshold
Padlock symbol shows
there is a vacuum in
the chamber
Wax concentration
(may not be visible,
see 6.1.2
Reagent Management)
Color or other pattern
shows station state
(see below)
The number of cassettes in
the retort
Retort name
Color-coded for reagent group
currently in the retort
Color or other pattern shows
retort state (see below)
Current retort operation (see
below)
Retort pressure, temperature,
and stirrer speed (supervisors
only)
Figure 27. Wax chamber icons on the Status screen
Wax chambers have four possible station states:
Means Icon
The chamber has enough wax to fill a retort
Full
to the specified basket level.
Running Protocols
Part full
Empty
Not molten
Retort Icons
A wax transfer is in progress or has been
abandoned. The wax level is between full and
empty.
The chamber has been drained to fill a retort.
There is still wax in the chamber.
The wax in the chamber has not melted and
is unavailable.
Leica PELORIS™ User Manual Rev K © Leica Biosystems Melbourne Pty Ltd 2011 47
Figure 28. Retort icon on the Status screen
Page 48

Running Protocols
There are ten operations reported for the retorts:
Ready — the retort is available for any new action
Reserved — a protocol is loaded but has not yet started
Processing — the retort is currently running a protocol
Completed — the retort has completed the loaded protocol
Drying — the retort is being dried as the final step of a cleaning protocol
Filling — the retort is currently filling
Draining — the retort is currently draining
Pending (drain or fill) — the retort is waiting for resources to perform a fill or drain
Abandoning — the retort is abandoning the current action
Unavailable — the retort cannot be used, contact your service representative.
Retorts have five possible states:
Means Icon
The retort contains the correct amount of wax or
reagent for the specified basket level.
Full
Part full
Empty
Clean
Retort
inoperative
The reagent or wax level is between full and empty,
this usually occurs during a fill or drain operation.
The retort is drained but contains residue.
There is no residue in the retort. This only occurs
after a cleaning protocol.
A red cross over a retort indicates that a hardware
failure has occurred and the retort is unavailable.
Contact your service representative.
Leica PELORIS™ User Manual Rev K © Leica Biosystems Melbourne Pty Ltd 2011 48
Page 49

3.3.2 Protocol Panels
Protocol name
Show details:
tap to expand protocol panel
Protocol finish time
Completed steps are checked
Progress through current step
Run/Pause:
start a loaded protocol, or pause a
running protocol (
see 3.5 Pausing and
Abandoning Protocols)
Select/Unload protocol:
load and unload protocols (disabled while
protocol is running)
Protocol steps
The station scheduled for the step
(a different station may be used)
Processing time:
total time to run protocol
Protocol notes
Step duration, temperature,
pressure/vacuum, and stirrer
speed
Panels on each side of the Status screen show the steps of the protocols loaded for each retort.
Use the panels to load and unload protocols, initiate processing runs, and monitor protocol runs.
You can view the panels in two modes: standard and expanded (see images below).
Running Protocols
In expanded mode the protocol notes, processing time, and step details are also shown.
Figure 29. Protocol panel: standard mode
Leica PELORIS™ User Manual Rev K © Leica Biosystems Melbourne Pty Ltd 2011 49
Figure 30. Protocol panel: extended mode
Page 50

3.4 Protocol Run Options
Edit end time:
change the end time for the
run or set a new default end
time for the retort
ASAP:
start the run as soon as
possible
–/+ Day:
keep the current end time but
change its day
Edit steps:
Edit the protocol (
see 3.4.2
Editing the Protocol for a
Single Run)
Start:
start the protocol run
Required end time:
the protocol end time you
have set
Predicted end time:
the end time predicted by the
Peloris system after
scheduling
You can schedule each protocol run so it finishes at a convenient time. You can also modify the
protocol for a run, to start at the second or later steps, and to change step durations.
3.4.1 Scheduling Protocols
3.4.2 Editing the Protocol for a Single Run
3.4.1 Scheduling Protocols
Schedule protocol runs in the Scheduling dialog box. The dialog box opens automatically for every
protocol run after you have loaded the protocol, tapped Run, cleared any warning messages, and
placed cassettes in the retort. When you tap Start in the Scheduling dialog box there are no
further configuration options or warnings and the protocol run starts.
The Scheduling dialog box also gives access to the Edit protocol instance dialog box where you
can edit some protocol features for the run (see
Running Protocols
3.4.2 Editing the Protocol for a Single Run).
Each retort (note, not each protocol) has a default scheduling setting. The Scheduling dialog box
always opens showing the retort’s default setting. You can accept the default or change the setting
for the run with options to set a different end time or run the protocol as soon as possible (the
ASAP option). Also change the retort defaults from the Scheduling dialog box.
The system considers the required end time as the latest acceptable protocol completion time. To
avoid resource clashes, protocols may be scheduled to finish earlier than the required end time. A
red highlight indicates that the required end time is not possible and a later end time has been set.
The required end time for cleaning protocols is always set to ASAP.
Leica PELORIS™ User Manual Rev K © Leica Biosystems Melbourne Pty Ltd 2011 50
Always check the predicted end time to ensure it is suitable before starting a protocol.
Figure 31. The Scheduling dialog box
Page 51

Running Protocols
How To Schedule a Protocol Run
When the Scheduling dialog box opens the retort’s default end time is shown.
If the default end time is set to ASAP the protocol is scheduled to end at the earliest possible
time.
If the default setting is a specific time of day, the dialog box defaults to that time on the
following day.
You have four options:
1. Accept the default values as they are.
Edit the protocol for the run if required (see 3.4.2 Editing the Protocol for a Single Run) then
tap Start to begin the run.
2. Keep the default time but change the day the protocol will run.
Tap th e + day or – day button to keep the default end time but change the day.
If the default setting is a specific time of day the dialog box opens with the run set to the
following day. To run the protocol on the current day tap the –
the time you do this the new end time may not be possible. If so, the Predicted end time is
highlighted red.
day button once. Depending on
3. Start the run as soon as possible.
Tap th e ASAP button.
The protocol will normally start immediately. However, if there is a reagent clash caused by a
protocol running in the other retort the actual start of the protocol may be delayed (see
Delayed End Times and Initial Fills).
4. Set a new end time.
Tap th e Edit end time button to open the Run protocol – edit end time dialog box (see
the next section for instructions).
3.6.1
Leica PELORIS™ User Manual Rev K © Leica Biosystems Melbourne Pty Ltd 2011 51
Page 52

Running Protocols
Keypad to enter time in top
field above.
Use 24 hour clock.
Scheduled time of day
Scheduled day
ASAP:
Use if setting the “as soon as
possible” option as the retort
default
–/+15:
change the scheduled time of
day in 15 minute increments
–/+ Day:
change the scheduled day
Set as default:
Set the time of day currently
entered or “as soon as
possible” setting as the retort
default
Entering a New End Time or Default Scheduling Setting
Change the end time for a specific run in the Run protocol – edit end time dialog box, opened
from the Scheduling dialog box with the Edit end time button.
Also set the default scheduling setting for the current retort in the Run protocol – edit end time
dialog box.
To set a new end time for a protocol run use the keypad to enter the required end time of day
To set a new retort scheduling default enter a time of day (as you would to change the end
Figure 32. The Run protocol – edit end time dialog box
(24-hour format) or use the –15 or +15 buttons to increment the time in 15 minute steps.
Use the + Day and – Day buttons to change the day. Tap OK when finished.
time for an individual run) or tap ASAP. The day is not relevant to the default setting. Tap Set
as default then OK.
Leica PELORIS™ User Manual Rev K © Leica Biosystems Melbourne Pty Ltd 2011 52
Page 53

3.4.2 Editing the Protocol for a Single Run
No check in the circle shows
this step will be skipped
Tap the step that will be the
first to run in the protocol
Tap on a step time to open
the Duration dialog box to
set a new step duration
You can edit the protocol for an individual run just before the run is started. You can make two
types of change:
1. Skip the first steps of the protocol
2. Change step durations
Make both types of change in the Edit protocol instance dialog box opened from the
Scheduling dialog box. Start a protocol run as normal from the Status screen and continue until
the Scheduling dialog box opens. Tap the Edit steps button to open the Edit protocol instance
dialog box.
Running Protocols
To skip protocol steps tap the step that you want to start the run with. Steps prior to this are
To change a step time tap the current step time. Set a new time in the Duration dialog box.
Skipping steps and changing step durations will affect protocol scheduling – confirm that the new
Predicted end time shown in the Scheduling dialog box is acceptable before you start the run.
Leica PELORIS™ User Manual Rev K © Leica Biosystems Melbourne Pty Ltd 2011 53
Figure 33. Edit protocol instance dialog box
unchecked to show they will not run.
The reagent selected as the new first step will be used for an initial fill if required (see 3.6.1
Delayed End Times and Initial Fills).
Page 54

3.5 Pausing and Abandoning Protocols
Emergency stop:
abandon protocols in both
retorts
5-minute count down – if you
do not select an option within
5 minutes processing
automatically resumes
Abandon:
abandon the protocol running
in the retort. The protocol in
the other retort will resume.
Access retort:
prepare the retort to allow you
to open it, e.g. to add more
cassettes
Resume:
continue processing in both
retorts
Vent wax:
vent the wax chambers to
allow you to open them
Abandon and Access retort
buttons for retort B
Abandon and Access retort
buttons for retort A
To stop a protocol that has started use one of the Pause buttons on the Status screen protocol
panels. When you tap either Pause button protocols in both retorts stop running, and the Paused
dialog box opens with a number of options:
Abandon all processing or just the protocol in one retort.
Access a retort, for example to add more cassettes, and then resume the protocol running in it.
Vent the wax baths so you can open them.
After you pause the instrument you have five minutes to select an option, after which processing
automatically resumes.
Running Protocols
Leica PELORIS™ User Manual Rev K © Leica Biosystems Melbourne Pty Ltd 2011 54
Figure 34. Paused dialog box
WARNING
Take care if opening a retort or wax chamber after pausing the instrument. Retorts may contain
very hot fluid that could cause severe burns, and hazardous reagents and vapors. Read any
warning messages, e.g. if the retort is above safe access temperature, and take appropriate
precautions before continuing.
Page 55

Running Protocols
Emergency Stop and Abandon
After you have paused the instrument you can abandon all protocols with the Emergency stop
button. Note that this does not shut down or remove power from the instrument (see
2.1 Switching
On and Shutting Down).
Alternatively, abandon the protocol run in one retort only with the appropriate Abandon button.
Any protocol running in the other retort will resume.
When processing stops the Peloris goes through the same routines carried out at the end of a
normal protocol run. It prompts you to drain the retort (if full), remove cassettes, and run a
cleaning protocol.
After abandoning a protocol you may wish to run a reprocessing protocol to recover your cassettes.
In this case do not remove your cassettes or run a cleaning protocol when prompted to do so.
If the last reagent was a fixative you may skip the cleaning protocol as the residue will not prevent
you running a typical processing protocol. If you decide to run a cleaning protocol, set the first step
to a cleaning alcohol. Cleaning solvents are incompatible with fixatives.
Access Retort
You can access retorts in a paused instrument in order to add or retrieve samples.
CAUTION
Take care when adding fixed samples to a running protocol. The additional fixative will
contaminate the reagent used in the current step and this contamination will not be tracked by
the reagent management system.
CAUTION
The further a protocol has progressed before you add more samples the more compromised the
processing quality for those samples. We therefore recommend that you only add samples
during fixative steps or during the first dehydrant step.
To access a retort while the instrument is processing:
1. Pause the instrument with one of the Pause buttons on the Status screen.
2. Tap the appropriate Access retort button in the Paused dialog box.
3. Select to drain the retort or not in the Temporary access drain dialog box.
Follow the prompt to wait if draining.
4. When the Retrieve samples dialog box opens remove the baskets from the retort and add or
retrieve cassettes, as required.
5. Return the baskets to the retort and tap OK in the Retrieve samples dialog box.
6. If prompted, enter the new number of cassettes in the Number of cassettes dialog box.
Follow the prompt to wait if refilling the retort.
7. Tap Resume in the Paused dialog to resume the protocol.
Leica PELORIS™ User Manual Rev K © Leica Biosystems Melbourne Pty Ltd 2011 55
Page 56

3.6 Retort Scheduling
The Peloris tissue processor allows you to simultaneously run protocols in both retorts. The
automatic scheduling function attempts to assign reagent stations and start times so that there are
no clashes and it may alter your requested end time by starting the protocol early or by inserting a
delay time (see
Also, when starting a second protocol you may notice that the reagent stations assigned when a
protocol was loaded change as it begins to run. This occurs when the instrument must alter the
assignment to allow for the first protocol’s current reagent requirements.
It is sometimes not possible to schedule a second protocol. This situation and possible remedies are
discussed in
station unexpectedly becomes unavailable. 3.6.3 Unavailable Reagents describes the best ways to
avoid this situation.
3.6.1 Delayed End Times and Initial Fills
Protocols do not need to start immediately and it is possible to set a required end time that
necessitates a delay before the actual protocol begins. This delay period can extend to many days.
Also, when selecting the ASAP (As Soon As Possible) scheduling option, or if you have requested an
end time that is not achievable, the Peloris tissue processor may be forced to delay the start of the
protocol. During the protocol delay period the Peloris tissue processor will protect your cassettes by
covering them with reagent; this process is called an initial fill.
3.6.1 Delayed End Times and Initial Fills).
3.6.2 Unavoidable Reagent Clashes. Also, protocols will sometimes fail if a reagent
Running Protocols
During the initial fill, the retort is filled with the first scheduled reagent (usually a fixative) to protect
the samples. Unless the reagent is wax no heating or agitation occurs. If the initial step is wax (for
reprocessing or wax only protocols), the retort temperature will be set to wax standby, and the
stirrer will be set to the first step’s speed. Once the initial fill period is over the protocol will run
normally and will finish at the predicted end time.
We recommend that all protocols start with a fixative step (even if only very short) so that a fixative
is used for any initial fill. If there is no fixative step, an initial fill may leave your tissue covered with
dehydrant for a long period and this can cause the tissue to become hard and brittle.
3.6.2 Unavoidable Reagent Clashes
Unavoidable clashes often occur when there are insufficient reagent stations available for both
protocols to satisfy the reagent selection rules (see
more frequently when using “by type” and “by station” protocols as they have limited station
assignment flexibility.
Always ensure sufficient stations of the first reagent group or type so a station is available for an
initial fill.
4.1.2 Reagent Selection Method). This occurs
Leica PELORIS™ User Manual Rev K © Leica Biosystems Melbourne Pty Ltd 2011 56
Page 57

3.6.3 Unavailable Reagents
Once a protocol starts, group and type select protocols may reassign stations to recover from errors
caused by unavailable reagents (for example when a bottle is removed or if a station contains
insufficient reagent). This reassignment may use reagents assigned to the other protocol.
Station-selection protocols will fail if an assigned reagent becomes unavailable. Type-selection
protocols will fail if there is only one station with an assigned type and it becomes unavailable.
Some common causes of station unavailability, and ways to avoid them, are described below.
The station contains insufficient reagent.
Prior to each run, check the reagent level in each station is sufficient for the current fill level
(see Instrument settings screen for the reagent fill level).
A bottle scheduled for use is removed from the reagent cabinet.
For safety reasons you should not remove any bottle whilst a protocol is running. However if
you choose to do so, you must make sure the bottle you intend to remove is not scheduled for
use in either retort.
A wax station is not molten at the time it is required.
Make sure there is adequate time for the wax to melt and that the correct wax station state is
set (see
5.3.2 Setting Reagent Station Properties).
Running Protocols
Leica PELORIS™ User Manual Rev K © Leica Biosystems Melbourne Pty Ltd 2011 57
Page 58

4
Protocol Setup
Protocols control all aspects of the tissue processing runs carried out on the Peloris. This chapter gives an
overview of Peloris protocols and how to create, edit and view protocols with the software interface.
4.1 Protocol Overview
4.2 Creating, Editing and Viewing Protocols
4.1 Protocol Overview
Protocols consist of sequences of steps applied to tissue in a retort. In each step (with one
exception) the retort is filled with reagent and held for a time under conditions controlled by the
protocol. Protocol steps have the following properties:
the reagent used
the time the reagent is in the retort
the temperature of the reagent
the retort pressure: ambient, pressurized or vacuum, or cycling between pressurized and
vacuum
the retort stirrer speed
the drip time: the time allowed for reagent to drip from the cassettes and retort walls before
ending a drain. Longer drip times reduce carryover.
The one step type that is an exception is the final “dry” step of a cleaning protocol, where no
reagent is used.
There are five protocol types. A protocol’s type sets limits on which reagents can be used and the
order of their use.
Leica PELORIS™ User Manual Rev K © Leica Biosystems Melbourne Pty Ltd 2011 58
Page 59

Other protocol properties are the reagent selection method and a carryover value that must be set
for each protocol. These, and protocol validation, pre-defined protocols and file saving are
described in the sections below.
4.1.1 Protocol Types
4.1.2 Reagent Selection Method
4.1.3 Pre-defined Protocols
4.1.4 Protocol Validation
4.1.5 Carryover Setting
4.1.6 Saving Protocol Files
4.1.1 Protocol Types
The Peloris tissue processor uses five protocol types for different processing functions. The protocol
types allow different reagent sequences and temperature ranges (see
Tab le s and 8.4 Protocol Step Temperatures). Once a protocol is created you cannot change its type.
The protocol types are:
Protocol Setup
8.5 Reagent Compatibility
Standard — conventional tissue processing sequences using a clearer such as xylene. Suitable
for normal processing requirements. These protocols can be constructed with or without
defatting steps.
Standard reprocessing — to recover under-processed tissue on an instrument configured for
standard processing. These protocols start with cleaning reagents before moving to a standard
tissue processing sequence.
Xylene-free — protocols with high temperature wax steps and advanced processing
techniques to process tissue without conventional clearing steps. Suitable for normal
processing requirements.
Xylene-free reprocessing — to recover under-processed tissue on an instrument configured
for xylene-free processing. These protocols start with cleaning reagents before moving to a
xylene-free tissue processing sequence.
Cleaning — protocols to clean the retorts and reagent lines. Always run a cleaning protocol as
soon as possible after wax has been in the retort. See
3.2 Cleaning Protocols for further
information.
See Protocol Icons in 4.2.1 The Protocol Selection Screen for the icons used for each protocol type.
Note the following points:
Xylene-free reagent selection — xylene-free protocols use two sets of dehydrants rather
than dehydrant followed by clearer, as used in standard protocols. This means xylene-free
protocols cannot use group reagent selection (see 4.1.2 Reagent Selection Method).
Xylene-free baskets — always use spaced cassette baskets for xylene-free protocols.
Reprocessing carryover — during reprocessing protocols there is significant reagent carry-
over following the cleaning stages. After running a reprocessing protocol you should replace
the first three processing reagents that are used after the last cleaning reagent.
Leica PELORIS™ User Manual Rev K © Leica Biosystems Melbourne Pty Ltd 2011 59
Page 60

4.1.2 Reagent Selection Method
All protocols use one of three reagent selection methods: group, type or station (see 5.1.1 Reagent
Groups, Types and Stations for definitions of these terms). Once a protocol is created you cannot
change its reagent selection method.
A protocol’s reagent selection method determines the way the system selects reagent stations when
the protocol is run. With the station selection method you define exactly the station to use for each
step, so the system makes no “choices”. For group and type selection the system selects a station
from a number that are available to it, to get the best concentration for the protocol step (see
Station Selection Rules below). In summary:
Group selection — the system selects from all stations with reagent of the group defined for
the protocol step. A station’s reagent name (its type) is not used for selection, only the reagent
group and concentration.
For example, if you have bottles with reagent types “Ethanol 70%” and “Ethanol 90%” on the
instrument, the system will pick an “Ethanol 90%” bottle for the first dehydrant step if that
bottle has the lowest (in-threshold) concentration. Both reagent types are dehydrants, so are
equal candidates for dehydrant steps.
Type selection — the system selects from all stations with reagent of the type defined for the
protocol step. Station reagent names (i.e. types) and concentration are used for selection.
Using the example above, with “Ethanol 70%” and “Ethanol 90%” bottles on the instrument, if
the first dehydrant step in the protocol specifies “Ethanol 70%” then the Ethanol 70% bottle
with the lowest (in-threshold) concentration will be used, even if there is an Ethanol 90%
bottle with lower concentration. Because Ethanol 70% and Ethanol 90% are different reagent
types the system does not consider them both.
Protocol Setup
Station selection — the system uses the stations defined in the protocol (typically, users
define the bottles in order: bottle 1 first, then bottle 2, 3, etc.). Stations are defined by number,
so the name of the reagent in a station (its type), nor the reagent group are used for selection.
Again using the example above, if there are two Ethanol 70% bottles on the instrument and
the first dehydrant step of the protocol is configured to the first of these bottles, that bottle will
be used regardless of the concentration of reagent in the other bottle.
Station Selection Rules
The system uses the following rules to select stations for protocols with group and type reagent
selection. “Sequence”, as used below, means a series of protocol steps using the same reagent
group or reagent type.
The first step of a sequence uses the lowest concentration station available.
The last step of a sequence uses the highest concentration station available.
Intermediate steps in a sequence use the lowest concentration station that has not already
been used.
Where there is a single step for a particular reagent group or type the highest concentration
station is used.
Stations that have exceeded any of their use thresholds (and are not locked out) are not
selected unless there is no other station available.
Leica PELORIS™ User Manual Rev K © Leica Biosystems Melbourne Pty Ltd 2011 60
Page 61

Protocol Setup
Reagent Selection Methods Compared
When creating protocols decide which method best suits your processing needs and reagent
management strategy. Note, however, that xylene-free protocols cannot use group selection.
Xylene-free protocols use dehydrants for two different functions and group selection cannot
differentiate these.
Group selection ensures optimal reagent selection with minimal management. You get maximal use
from reagents and with the widest range of stations to select from scheduling conflicts are
minimized. You must however take some care when using group selection as the Peloris tissue
processor may use a reagent type you wished to reserve for a particular purpose. In these cases
use the type or station selection method or, for one-off instances, temporarily block a station by
setting its state to “In use” (see
Type selection offers the same sorts of benefits as group selection – optimal selection of reagents
according to concentration, minimal reagent management, efficient reagent use, and minimal
scheduling conflicts. However, (provided there is more than one reagent type per group) the system
selects from a smaller range of stations, so the benefits are lessened. On the other hand you have
greater control over reagent selection.
Station selection gives you total control over reagent selection. However, as reagents degrade, you
need to rearrange bottles between protocols if you want to ensure the most suitable reagents are
used. This is a significant management burden that opens the possibility for errors. Also, the station
select method does not allow the instrument any flexibility when scheduling protocols and it will not
be able to recover from a processing error caused by unexpected reagent unavailability.
Setting Station States in 5.3.2 Setting Reagent Station Properties).
Station selection protocols are not recommended for overnight processing. If a reagent becomes
unavailable for any reason then the protocol cannot be completed.
When running station selection protocols always check the concentration of the assigned stations
before starting a run as the concentrations may not be correctly ordered if other protocols have
run.
Your decision about the reagent selection method must be made in combination with decisions
about how many, and which, reagent types you use, and the concentration thresholds to set for
these. Note that all the pre-defined protocols in the Peloris system use type selection but with
recommended bottle configurations that have the minimal number of reagent types (see
of Pre-defined Protocols and 8.3 Station Configurations). This combination provides a system that is
similar to group selection, with all the consequent benefits.
4.1.3 Pre-defined Protocols
Each Peloris system includes 11 pre-defined protocols – 1, 2, 4, 8 and 12 hour protocols for
standard and xylene-free processing, and a cleaning protocol (see
Protocols). Access the pre-defined protocols from the Protocol selection screen by selecting New
and then selecting the Pre-defined icon.
The pre-defined protocols are designed for use with the bottle configurations described in 8.3
Station Configurations. Leica Microsystems has extensively tested the protocols and found they give
excellent results (in combination with proper reagent management and instrument maintenance).
However, users should validate all protocols, including the pre-defined protocols, for use in their
laboratories, where different conditions could give different outcomes.
8.2.2 List
8.2.2 List of Pre-defined
Leica PELORIS™ User Manual Rev K © Leica Biosystems Melbourne Pty Ltd 2011 61
Page 62
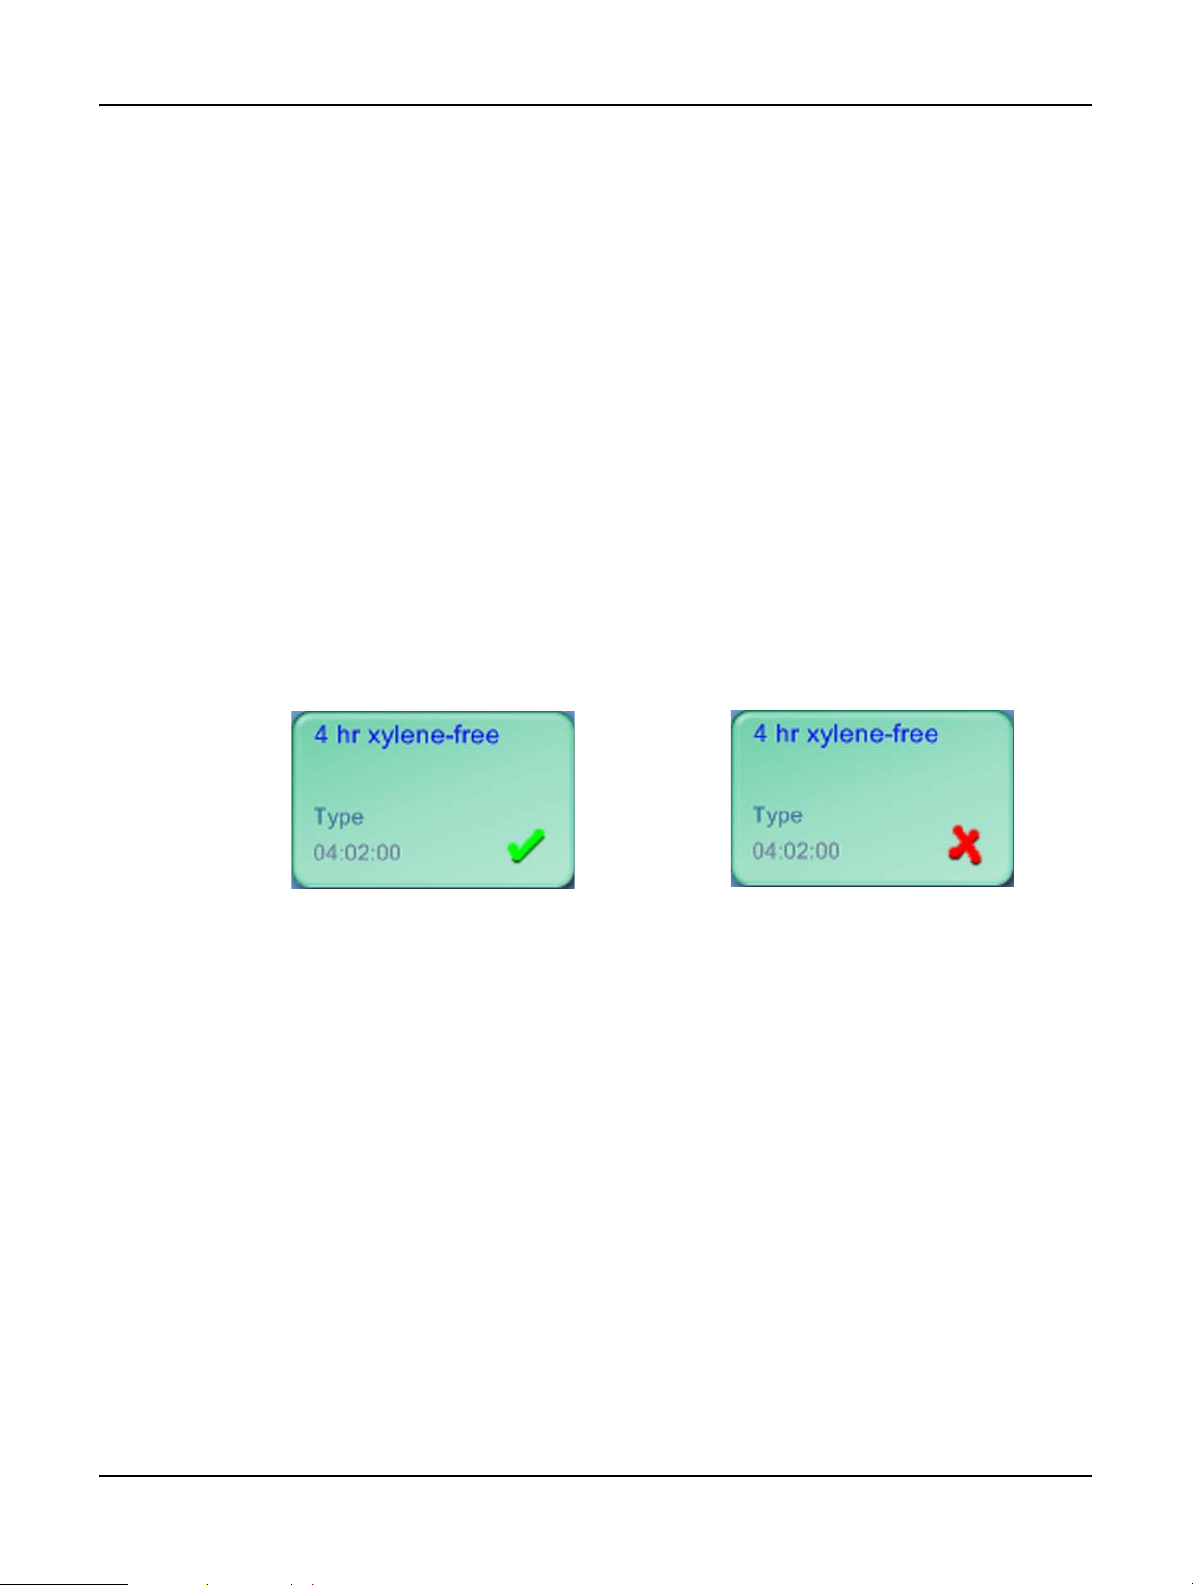
Pre-defined protocols can be copied to appear in the Protocol selection screen where they
become available for use. They can be copied as they are, even keeping the name unchanged, or
once copied you can modify them to suit your purposes. The original versions cannot be changed.
See
Copying Protocols in 4.2.3 Creating New Protocols for directions to copy a pre-defined protocol.
In new Peloris systems the pre-defined protocols are all provided, ready for use, in the Protocol
selection screen. In case these versions are edited or deleted, however, the original versions
remain available under the Pre-defined icon accessed with the New button.
4.1.4 Protocol Validation
Supervisors creating or editing protocols (or copying pre-defined protocols) have the option to
“validate” them in the Peloris software. This serves as a sign that the protocols have passed the
laboratory’s validation tests and can be used for regular clinical processing. Supervisors can also
make valid protocols invalid.
Protocols that have been marked as valid can be run by operator-level users, while invalid protocols
cannot. Invalid protocols can be run by supervisors.
Icons for validated protocols have a green check, while the icons for invalid protocols have a red
cross:
Protocol Setup
Figure 35. Icon for a valid protocol Figure 36. Icon for an invalid protocol
Set protocol validity status on the Edit protocol screen, with the Validate protocol / Invalidate
protocol button.
4.1.5 Carryover Setting
The Carryover setting is a protocol setting for the additional carryover due to biopsy pads and
other small-tissue carriers.
This section has, first, a general overview of carryover in the Peloris system, then describes how to
use the Carryover setting in particular.
Carryover – Overview
When reagent drains out of a retort and is replaced with reagent from another station a certain
amount of the first reagent remains in the retort and mixes with the new reagent. The Peloris
reagent management system calculates the amount of this “carryover” and uses it to determine
reagent concentrations.
Leica PELORIS™ User Manual Rev K © Leica Biosystems Melbourne Pty Ltd 2011 62
Page 63

Protocol Setup
Carryover has three main components:
Reagent on retort walls and baskets
Reagent on cassettes, and on and infiltrated into tissue
Reagent on and infiltrated into small-tissue carriers (e.g. biopsy pads, biopsy cassettes, wraps
etc.).
The reagent management system automatically calculates the carryover on retort walls and
baskets, taking into account the retort fill level and drip time.
The carryover due to cassettes and tissue is calculated using the number of cassettes entered by
users at the start of each run (in some cases an average number of cassettes may be used, see
6.1.2 Reagent Management). The amount of carryover on a standard cassette is used in the
calculation. Drip time is also included.
The reagent management system calculates carryover from small-tissue carriers using the protocol
Carryover value you set.
Carryover values are on a scale from 0 to 100:
A setting of 0 indicates that there is no carryover due to small-tissue carriers like biopsy pads,
i.e. the run has only standard cassettes with no small-tissue carriers.
A setting of 100 indicates there is carryover equivalent to having all the tissues in a run using
biopsy pads (biopsy pads have the maximum carryover of all small-tissue carriers).
Because biopsy pads can have up to 10 times the carryover of standard cassettes it is important to
set a truly representative Carryover value in your protocols (as it is to accurately enter the number
of cassettes in each run). If you set too high a Carryover value the system calculates too rapid
degradation of reagents and requires you to replace them sooner than necessary. With too low a
setting the system calculates that reagents are more pure than they are. You will use reagents
beyond their optimal effectiveness resulting in poor processing quality.
Protocol carryover values are set by supervisors on the Edit protocol screen (the default value is
set on the Reagent management screen). Tap the Carryover button and enter a number
between 0 (no carryover from small-tissue carriers) and 100 (maximum carryover from small-tissue
carriers).
How to Calculate Carryover Values
Carryover is dependent on the types of cassettes and other small-tissue carriers used: e.g. biopsy
pads, paper or tissue inserts, mini cassettes, biopsy cassettes etc. It also depends on the proportion
of these in each run.
The carryover setting is a protocol property, so it must be set to the average carryover value for
runs that use the protocol.
The following table shows the carryover values that should be used for a range of cassettes and
pads etc. provided by Leica Microsystems. The values in the table apply when all the tissue in the
Leica PELORIS™ User Manual Rev K © Leica Biosystems Melbourne Pty Ltd 2011 63
Page 64

run uses the respective cassette or pad type.
Leica Microsystems products Generic description of tiss ue carrier
Protocol Setup
Carryover value if
100% of tissue uses
carrier
Surgipath® ActivFlo™ Routine I
Surgipath Biopsy Pads in
Standard cassette 0
Biopsy pad in standard cassette 100
Surgipath ActivFlo Routine I
ActivFlo Mini Cassette in
Mini cassette in standard cassette 50
Surgipath ActivFlo Routine I
Surgipath Biopsy Wraps in
Biopsy wrap in standard cassette 20
Surgipath ActivFlo Routine I
Surgipath IP ActivFlo Biopsy I
Biopsy cassettes with >1 mm pore size 0
McCormick™ MC-605
Sample Calculation
The average run of a protocol uses the following proportions of tissue carriers:
Surgipath ActivFlo Routine I: 40%
Surgipath Biopsy Wraps in Surgipath ActivFlo Routine I: 60%
Multiply the proportion of each carrier with its value from the table above to calculate the additional
carryover value for that carrier:
Surgipath ActivFlo Routine I: 40% × 0 = 0
Surgipath Biopsy Wraps in Surgipath ActivFlo Routine I: 60% × 20 = 12
Add the resulting values:
0 + 12 = 12
Enter a carryover value of 12 for the protocol.
Peloris software versions before version 1.40 had a “Biopsy pad” setting for small-tissue carrier
carryover. Users with satisfactory “Biopsy pad” settings in those versions should use the same
numeric value for the Carryover setting.
Other Products
For small-tissue carriers other than those in the table above we recommend you start with a
carryover setting of 50. Use your own observations of tissue and reagent quality to refine this
value. Tissue shrinkage in the block and excess solvent in the wax bath might both be indications
that you have too low a carryover setting.
It is users’ responsibility to validate the carryover settings in their protocols.
Contact your technical support representative if you require assistance setting suitable carryover
settings.
Leica PELORIS™ User Manual Rev K © Leica Biosystems Melbourne Pty Ltd 2011 64
Page 65

4.1.6 Saving Protocol Files
Protocol icons
Load button: load
selected protocol
Selected protocol
Invalid protocol
Protocol creation and
editing buttons
– Operators use View
button to view protocol
configurations
Protocols are saved in “cfg” extension files that you can back up or to send to your service
representative for troubleshooting. See
to copy protocol files on and off the instrument.
Transferring Protocols in 6.2.7 File Transfer for instructions
4.2 Creating, Editing and Viewing Protocols
Supervisors can create and edit protocols from the Protocol selection screen. Operators cannot
create or edit protocols, but can view protocol details from the Protocol selection screen.
4.2.1 The Protocol Selection Screen
4.2.2 Editing Protocols
4.2.3 Creating New Protocols
4.2.4 Viewing Protocols
Protocol Setup
4.2.1 The Protocol Selection Screen
Tap th e Protocols button in the Function bar to open the Protocol selection screen where you
access all protocol configuration options.
Figure 37. The Protocol selection screen
Leica PELORIS™ User Manual Rev K © Leica Biosystems Melbourne Pty Ltd 2011 65
Page 66

Protocol Setup
Protocol name
Reagent selection method
(
see 4.1.2 Reagent Selection
Method)
Protocol duration
Validation status (
see 4.1.4
Protocol Validation)
Protocol type indicated by icon
pattern and color (see below)
Protocol Icons
On the Protocol selection screen each protocol is represented by a selectable icon. Each icon
contains the following protocol details:
Figure 38. Protocol icon
Icons for the five protocol types (see 4.1.1 Protocol Types) have different background patterns and
colors as shown below:
Standard (white) and Standard Reprocessing (white with red stripe) Cleaning (blue)
Xylene-free (green) and Xylene-free Reprocessing (green with red stripe)
4.2.2 Editing Protocols
To edit an existing protocol open the Protocol selection screen, select the protocol, then tap Edit
to open the Edit protocol screen.
Steps can be added and removed and step details – time, temperature etc. – changed. The
protocol’s name, notes, carryover setting and validation status can all be changed. You cannot
change the protocol type or reagent selection method. You cannot remove the dry step from a
cleaning protocol.
Only supervisors can edit protocols.
Leica PELORIS™ User Manual Rev K © Leica Biosystems Melbourne Pty Ltd 2011 66
Page 67

Figure 39 and Figure 40 show the Edit protocol screen and describe its use.
Each row represents a
protocol step
Cells in the step table show the settings for reagent,
time, temperature, pressure or vacuum (P/V), stirrer
speed, and drip time for each step.
Tap a cell to open a dialog box to change the setting.
Selected step:
tap the step number to
select a step
Protocol icon: updates
as protocol is edited
Protocol type (cannot
change)
Protocol configuration
buttons (see Figure 40
below for details)
Insert:
tap to insert a new step above the
currently selected step
Delete:
tap to remove the currently
selected step from the protocol
Name: change the protocol
name
Notes: enter a description or
other notes for the protocol
Carryover: set the carryover
value (
see 4.1.5 Carryover
Setting)
Validate/Invalidate protocol:
set the protocol as valid or invalid
(
see 4.1.4 Protocol Validation)
Save: save changes made to the
protocol
Figure 39. Edit protocol screen
Protocol Setup
Leica PELORIS™ User Manual Rev K © Leica Biosystems Melbourne Pty Ltd 2011 67
Figure 40. Configuration buttons on the Edit protocol screen
Page 68

Protocol Setup
Tap anywhere on the group
button to select the reagent
group
Show compatible: show
only compatible reagent
groups
Show all: show all reagent
groups
Tap on a type button to select
the reagent type
Show compatible: show
only compatible reagent
groups
Show all: show all reagent
groups
Selecting Reagents
When you select the Reagent cell in the protocol step table to add or change a reagent the dialog
box you see depends on the reagent selection method.
For all the methods you can show only reagents that are compatible with the preceding protocol
step (for the protocol’s type), or all reagents. For station selection you can hide stations that have
already been selected. If you choose an incompatible or hidden reagent it is added to the protocol
table with an asterisk to indicate that it is disallowed. You cannot load the protocol or run the
protocol.
Group Reagent Selection
If the protocol uses group reagent selection you can see the protocol types configured for the
instrument, but can only select by group.
Type Reagent Selection
If the protocol uses type reagent selection you can see the protocol types configured for the
instrument, ordered by group. Select specific types.
Figure 41. Reagent selection – Group dialog box
Figure 42. Reagent selection – Type dialog box
Leica PELORIS™ User Manual Rev K © Leica Biosystems Melbourne Pty Ltd 2011 68
Page 69

Protocol Setup
This station is “hidden”
because it has already been
used for a previous step
Hide used: show stations
that have already been
selected as unavailable
These stations are unavailable because
they are not compatible with the
preceding protocol step
These stations are available
for selection
Show compatible: show
only compatible stations as
available
Show all: show incompatible
stations as available
The wax chambers are all unavailable
because they are not compatible with the
preceding protocol step
Station Reagent Selection
If the protocol uses station reagent selection you can see the stations configured for the
instrument. Bottles that are available for selection are drawn in 3D with lids and handles. Bottles
that are not available, because they have already been used or are incompatible, are drawn in 2D
without lids or handles. Wax stations are similarly drawn as 3D buttons (available) or 2D icons
(unavailable). Select specific stations for your protocol.
Deleting a Protocol
To delete a protocol select the protocol icon on the Protocol selection screen and tap Delete.
Pre-defined protocols can be restored if required, with the normal protocol creation procedure.
Other protocols cannot be retrieved unless you have copied them to an external device using the
file transfer functions (see
Figure 43. Reagent selection – Station dialog box
6.2.7 File Transfer).
Leica PELORIS™ User Manual Rev K © Leica Biosystems Melbourne Pty Ltd 2011 69
Page 70

4.2.3 Creating New Protocols
Create new protocols from scratch or copy an existing or pre-defined protocol to modify. Make sure
you select the right protocol type and reagent selection method when you start (or copy a protocol
of the right type and reagent selection method) because these settings cannot be changed after
you have started protocol configuration.
WARNING
Do not set new protocols as validated until they have passed the validation procedures for your
laboratory. Only then should you edit the protocol to set it as valid, making it available to
operators for clinical use (
result in tissue damage or loss.
Instructions below describe how to create new protocols from scratch. See Copying Protocols below
for instructions to create a new protocol by copying another one.
Creating New Protocols From Scratch
1. Open the Protocol selection screen (Protocols in the Function bar) and tap New.
2. Select the protocol type (see 4.1.1 Protocol Types)
see 4.1.4 Protocol Validation). Use of nonvalidated protocols may
Protocol Setup
3. Select a reagent selection method (see 4.1.2 Reagent Selection Method)
Automatic dialog boxes will now guide you through the creation of the first step.
4. Tap the next row in the protocol table to add the second step.
You are prompted to supply the reagent and step duration – other step properties (pressure,
stirrer etc.) are inherited from the previous step. Tap the appropriate cell to change any of
these values.
Cleaning protocols automatically have a final dry step. You cannot edit this step.
5. Add further steps as required.
6. Tap the Name button to name your protocol.
7. Optionally tap the Notes button to add any information you want to keep with the protocol.
8. Set a carryover value with the Carryover button (see 4.1.5 Carryover Setting).
9. Tap the Save button to save the protocol.
10. Tap the Done button to finish.
Your new protocol will now be available in the protocol selection list.
Leica PELORIS™ User Manual Rev K © Leica Biosystems Melbourne Pty Ltd 2011 70
Page 71

Protocol Setup
Copying Protocols
You can copy any protocol displayed on the Protocol selection screen in order to create a new
one based on it. Alternatively copy a pre-defined protocol.
1. Open the Protocol selection screen (Protocols in the Function bar) and:
(i) select a protocol to copy on the Protocol selection screen
OR
(ii) tap the New button and then the yellow Pre-defined icon. Then select the pre-defined
protocol to copy.
2. Tap the Copy button from the control panel.
3. Use the keypad to enter a new name for your protocol.
The Edit protocol screen opens with the copied protocol.
4. Modify the protocol as described in 4.2.2 Editing Protocols.
You cannot edit the final dry step in cleaning protocols.
5. Tap the Save button to save the protocol.
6. Tap the Done button to finish.
Your new protocol will now be available in the protocol selection list.
4.2.4 Viewing Protocols
Operator-level users cannot create or edit protocols. However they can view all protocol details
including step details, notes, and the date and time the protocol was last modified.
To view a protocol’s details select the protocol icon on the Protocol selection screen (Protocols
on the Function bar) and tap the View button.
Leica PELORIS™ User Manual Rev K © Leica Biosystems Melbourne Pty Ltd 2011 71
Page 72

5
Reagent Setup
This chapter gives an overview of Peloris reagent management as well as providing instructions to replace
reagents and configure them in the software.
5.1 Reagents Overview
5.2 Managing Reagent Types
5.3 Managing Reagent Stations
5.4 Replacing Reagents
5.1 Reagents Overview
Using the right reagent at the right time, at the right concentration, is of utmost importance for
high quality tissue processing. The Peloris system has an advanced reagent management system
that helps ensure consistently high quality processing while allowing you flexibility to fit into your
laboratory’s workflows.
The Reagents Overview section describes the main features of reagent management in the Peloris
system:
5.1.1 Reagent Groups, Types and Stations
5.1.2 Concentration Management
5.1.3 Thresholds
5.1.4 Recommended Reagents
5.1.5 Tissue Marking
5.1.6 Reagent Compatibility
Leica PELORIS™ User Manual Rev K © Leica Biosystems Melbourne Pty Ltd 2011 72
Page 73

5.1.1 Reagent Groups, Types and Stations
The Peloris tissue processor manages reagents by groups, types and stations.
Groups
Groups specify reagent function. For example, the fixatives reagent group includes all reagents that
can be used as a fixative.
There are nine factory-defined groups. Each group has a color-code used in the Peloris software
and on bottle labels. Refer to the following table for a list of the groups and their colors and
functions.
Group Function Color
Fixatives Tissue preservative. Green
Dehydrants Removes fixative reagents from tissue. Blue
Defat Removes fat deposits from tissue. Yellow
Post defat The dehydrant used after a defatting step. Purple
Clearers Clears the dehydrants from the tissue. Pink
Wax The embedding medium. Orange
Cleaning solvents First cleaning reagent. Light pink
Cleaning alcohols Second cleaning reagent. Light blue
Cleaning water Third retort cleaning reagent. Grey
Reagent Setup
The reagent group determines reagent compatibility (see 5.1.6 Reagent Compatibility).
Types
Reagent types are the specific reagents within each group, e.g. formalin, xylene, Waxsol. As well as
the chemical constituent, reagent type definitions can include concentrations. For example “70%
Ethanol” and “80% Ethanol” are reagent types defined in Peloris.
Reagent types have the following properties:
A unique name
Default concentration: the concentration of the reagent when fresh.
Purity thresholds: to ensure you replace degraded reagent (see 5.1.3 Thresholds).
Temperature thresholds: used to ensure processing quality and safe usage of the reagent (see
5.1.3 Thresholds).
The Peloris software includes a number of pre-defined reagent types. These are adequate for most
laboratories, however you can create your own reagent types if needed.
Use the Reagent types screen to define and edit reagent types (see 5.2 Managing Reagent
Type s).
Leica PELORIS™ User Manual Rev K © Leica Biosystems Melbourne Pty Ltd 2011 73
Page 74

Reagent Setup
Reagent type names do not affect reagent concentration. For example, when assigning a reagent
type called “Ethanol 70%” to a station, the initial concentration value would be the type’s default
value (probably 70%) but you could set the initial concentration to anything between 0 and 100%.
Stations
The Peloris tissue processor has 20 reagent stations: the 16 reagent bottles and the 4 wax
chambers.
Each station has the following properties:
The reagent type that the station contains
The concentration of the reagent in the station, as calculated by the Peloris system
The station’s use history:
The number of cassettes processed with the reagent in the station
The number of runs (cycles) processed with the reagent in the station
The number of days the reagent has been in the station
The station’s state:
Dry: the station has been completely drained leaving only a small amount of residue. It
can be filled with any reagent.
Empty: reagent has been removed from the station to fill a retort. Reagent in excess of
the amount needed to fill the retort remains in the station.
In use: a reagent transfer is in progress or has been abandoned.
Full: the station holds enough reagent to fill a retort.
Not molten: for wax chambers only, the state to set when adding solid wax (see 5.4.5
Replacing Wax).
For wax chambers only, the chamber’s current temperature.
Use the Reagent stations management screen to define reagent stations and to monitor their
use history and concentration (see
5.3 Managing Reagent Stations).
5.1.2 Concentration Management
The high quality tissue processing delivered by the Peloris system is largely due to its accurate
monitoring of the concentration of the reagents in each station. This section describes the main
features of concentration management in the system.
Concentration in the Peloris System
Concentration is the proportion of a reagent that is of the group to which the reagent is assigned.
The following examples illustrate how the concentration is determined.
A dehydrant that is 80% ethanol (a dehydrant) and 20% water (not a dehydrant) has a
concentration of 80%.
A dehydrant that is 80% ethanol (a dehydrant) and 20% IPA (also a dehydrant) has a
concentration of 100%.
Leica PELORIS™ User Manual Rev K © Leica Biosystems Melbourne Pty Ltd 2011 74
Page 75

Reagent Setup
Absolute ethanol (100% dehydrant) contaminated by carryover from absolute IMS (100%
dehydrant) has a concentration of 100%, as both the original reagent and the contaminant are
dehydrants.
A new xylene (100% clearer) contaminated by carryover from absolute ethanol (100%
dehydrant) has a reduced concentration — typically around 94% after one cycle — as it will
consist of 94% xylene (clearer) and 6% ethanol (not a clearer).
A reagent that is used early in a sequence of the same group will have a rapid concentration decline
as most of the contamination it receives will be from the previous group. A reagent that is used late
in a sequence will have a slow concentration decline as most of the contamination it receives will be
from the same group.
Managing Concentrations
The Peloris software uses reagent concentrations to select stations when protocols are run (unless
the protocol uses station reagent selection). It selects the station with the lowest (in-threshold)
concentration of a reagent group or type for the first step using that group or type, then stations of
increasing concentration for following steps. It always uses the highest concentration reagent for
the last step before changing to another reagent group or type. The software also uses
concentration information (amongst other factors) to prompt you to change reagents that have
exceeded purity thresholds.
It is very important, then, for high quality processing and efficient reagent use, that the
concentration information the software uses is accurate. The software automatically tracks the
concentration of the reagent in each station, updating values after each run. For it to do this
effectively you must enter accurate information for it to work with, e.g. set realistic protocol
carryover values and enter the correct number of cassettes in each run. It also means you should
update the software properly whenever you change reagents.
Under default settings the software assigns concentrations “by calculation”. This uses information
such as the retort fill level, the number of cassettes processed, the carryover setting and the
reagent groups involved to calculate concentration in each station.
Concentrations can also be assigned “by cycles” or “by position” (i.e. by station). These methods
rank station concentration by the number of processing runs each station has been used for or the
physical order of the stations, respectively.
Leica Microsystems does not recommend the “by cycles” or “by position” options, which must be
set by a technical support representative.
For consistently high quality processing always replace reagents as soon as you are prompted, with
fresh reagent at the default concentration. If you remove a bottle from the instrument, always
check that you enter the correct reagent information for the bottle when you return it. Supervisors
can manually change station concentration values in the Reagent stations screen if they believe
the value there is incorrect. Be sure that you independently verify the concentration if making such
a change.
Leica PELORIS™ User Manual Rev K © Leica Biosystems Melbourne Pty Ltd 2011 75
Page 76

5.1.3 Thresholds
Each reagent type has a range of thresholds that supervisors can configure on the Reagent types
screen. The thresholds for the pre-defined reagent types should be adequate for most laboratories,
but alternative settings may suit some laboratories better – contact customer support for advice
before changing threshold settings. Validate any threshold changes using the procedures that apply
to your laboratory.
The thresholds fall into two categories:
Purity thresholds set usage limits for reagents according to their purity
Temperature thresholds set limits on the retort temperatures for reagents to help ensure high
processing quality and safety.
Purity Thresholds
Peloris uses purity thresholds to limit the use of reagent as it becomes increasingly contaminated
with reagent carried over from other groups.
When a threshold is exceeded the software warns you that you need to replace reagent. Under
default settings you are able to use a station with out-of-threshold reagent for one more run after
such a warning. Following this the station is locked (meaning it cannot be used at all), and/or you
cannot run further protocols until fresh reagent is loaded. Your customer support representative can
change the number of runs allowed after reagent replacement warnings.
Reagent Setup
Reagent purity is assessed using one or more of four different “reagent threshold check” methods:
Concentration of the reagent
Number of cassettes processed with the reagent
Number of processing runs (cycles) the reagent has been used for
Number of days the reagent has been loaded on the instrument
By default, all of these methods are available for you to configure for individual reagent types. The
Reagent threshold check section of the Reagent management screen shows the methods
enabled for your system (these settings can only be changed by customer support representatives).
The checking methods are configured to monitor two types of purity threshold:
reagent change thresholds, and
final reagent thresholds,
explained below.
Reagent Change Thresholds
Reagent change thresholds set the limits for any use of reagent on the Peloris system. Reagent that
has exceeded its change threshold should be replaced with fresh reagent immediately.
Leica PELORIS™ User Manual Rev K © Leica Biosystems Melbourne Pty Ltd 2011 76
Page 77

Reagent Setup
Stations with reagent that has exceeded its change threshold are shown with a hatched
icon on the Status screen (bottle icon shown at right).
In addition, the system displays a
warning message.
The Peloris system does not use out-of-change-threshold stations unless no other stations
are available. If no other stations are available out-of-threshold stations will be used for one
run (default setting) before being locked. Locked stations cannot be used at all until the
reagent is replaced. The system will not allow you to load protocols that require a locked
station.
Final Reagent Thresholds
Final reagent thresholds set limits on reagent purity for use in protocol steps that precede a change
to another reagent group (or type, for protocols configured by type), in the next step.
Final reagent thresholds are set higher than change thresholds. This ensures minimum
contamination from the preceding reagent group to the subsequent reagent group.
Reagents that have exceeded their final threshold are displayed as usual on the Status screen,
however Peloris displays a warning message. Following the warning you are able to process one run
(default setting) that uses reagent that is out of threshold for the final step. After this, you will not
be able to load protocols that require the reagent group affected.
When you are warned that reagent has exceeded the final threshold replace the least pure bottle of
the reagent type concerned. The bottle that exceeded the final reagent threshold, triggering the
warning, will still have reagent with a relatively high concentration. It will still be acceptable for
steps in the protocol sequence before the final step, so it is inefficient to replace it.
Temperature Thresholds
There are three temperature thresholds for each reagent type:
Ambient — the highest allowable temperature for the reagent in the retort at ambient (and
high) pressure
Vacuum — the highest allowable temperature for the reagent in the retort when the retort is
evacuated
Safe — the highest temperature at which it is safe to open a retort containing the reagent.
The Peloris software will not allow you to create protocols that put reagents in conditions that
exceed their ambient or vacuum temperature thresholds. The software warns you if you perform an
action that requires you to open a retort if the retort contains reagent above its safe temperature
threshold.
WARNING
Take extreme care if changing reagent temperature thresholds. Raised thresholds can lead to
reagents boiling and/or the release of large quantities of fumes that can overload the filtering
system. Boiling reagents can produce excessive pressures within the instrument increasing the
chance of reagent contamination and spills.
Leica PELORIS™ User Manual Rev K © Leica Biosystems Melbourne Pty Ltd 2011 77
Page 78

5.1.4 Recommended Reagents
While each laboratory is responsible for its choice of reagents and wax, using reagents other than
those recommended for Peloris can result in poor processing or compromise instrument reliability.
Compliance with the following guidelines will ensure superior tissue processing.
The use of alternative reagents must be validated by the end user according to their local or
regional accreditation requirements.
Adequate fixation of tissue samples is required for optimum results and should be achieved prior to
placement on Peloris or incorporated into the fixative step of the protocol. The following reagents
have been validated for use on Peloris.
Fixatives
10% Neutral Buffered Formalin (NBF)
Alcohols
Histological grade ethanol
Reagent (grade) ethanol
Reagent Setup
Absolute ethanol
Isopropyl alcohol (dehydrant)
Denatured ethanol is acceptable if:
It is at least 99% ethanol, and
It is denatured with methanol and/or isopropyl alcohol (IPA)
Ethanol containing acetone must not be used.
Clearing Agents
Xylene is the recommended clearing agent.
Xylene-free processing requires the use of isopropyl alcohol as the clearing agent. It has been
fully tested and validated.
Paraffin
Use histological wax for histology
Parablocks™
Paraplast®
Cleaning Agents
Use ethanol for the cleaning alcohol solution.
In xylene processing mode, we recommend xylene as the cleaning solvent.
For true xylene-free processing, we recommend Waxsol™ as the cleaning solvent.
Leica PELORIS™ User Manual Rev K © Leica Biosystems Melbourne Pty Ltd 2011 78
Page 79

5.1.5 Tissue Marking
Some laboratories have traditionally added eosin (or other dyes) to formalin or alcohol during tissue
processing, to aid in the visualization of tissue during embedding. This practise is NOT
recommended for the Peloris tissue processor. The dyes can build up on the liquid level sensors and
compromise performance. If you need to mark tissue for embedding, Leica Microsystems
recommends you add the dye at the grossing stage.
In spite of this recommendation, eosin can be used on the Peloris if the customer feels there are
strong reasons for doing so, and due care is taken. If using eosin on the Peloris add the dye to the
fixative in preference to the alcohol. However, rapid turnaround times can mean that tissue is at the
grossing stage for only a short time, and fixation steps on the Peloris can also be short. So some
customers prefer to add eosin at the alcohol stage. This is also acceptable if due care is taken.
Recommended eosin concentrations for the different stages are given below. Testing was
conducted using Surgipath Alcoholic Eosin (1%) – catalog no. 3801600.
CAUTION
If adding eosin to reagents on the Peloris be sure to clean the retorts daily to avoid
buildup of dye on the liquid level sensors, which can compromise performance. See
Clean Retorts in 7.2 Daily Tasks.
Reagent Setup
Preference 1 – At Grossing
Use 10 mL of 1% liquid eosin per liter of formalin.
You can vary the concentration to correspond with the length of the processing protocol, where
some dye will be lost. A disadvantage of staining at grossing is that specimens are not immersed in
dyed formalin for the same amount of time.
Preference 2 – In Fixative on Peloris
Use 50 mL of 1% liquid eosin per 5 L Peloris reagent bottle of formalin.
Preference 3 – In Alcohol on Peloris (Xylene)
Use 10 mL to 25 mL of 1% liquid eosin per 5 L Peloris reagent bottle of ethanol (there are eight
ethanol bottles in the recommended bottle configuration for xylene processing).
Specimens are immersed in the marking reagent for the same amount of time, giving consistent
staining. Protocols longer than two hours may cause overstaining – reduce the eosin concentration
as required.
Preference 3 – In Alcohol on Peloris (Xylene-free)
Use 250 mL of 1% liquid eosin per 5 L Peloris reagent bottle of 85% ethanol (there are three bottles
of 85% ethanol in the recommended bottle configuration for xylene-free processing).
Specimens are immersed in the marking reagent for the same amount of time, giving consistent
staining. Protocols longer than two hours may cause overstaining – reduce the eosin concentration
as required.
Leica PELORIS™ User Manual Rev K © Leica Biosystems Melbourne Pty Ltd 2011 79
Page 80

5.1.6 Reagent Compatibility
As tissue processing requires the use of incompatible reagents, the Peloris tissue processor
software uses a set of rules to ensure that only compatible reagents are allowed to mix. Reagent
mixing usually occurs when a reagent enters a retort of state Empty, containing residual amounts
of the previous reagent. This may happen as part of a protocol, during manual operations or during
remote and fill/drain procedures.
The software will not allow you to create a protocol that has an incompatible reagent sequence and
you are also prevented from mixing incompatible reagents during remote fill/drain procedures. You
cannot run a protocol where the first reagent is incompatible with the retort residue. You can
however load a protocol with an incompatible first step but the reagent sequence must be edited
during scheduling to select a new first step that is compatible with the retort residue (see
Editing the Protocol for a Single Run).
Reagent compatibility varies depending on the action or protocol being undertaken. Use the
reagent tables in
protocols, conducting manual operations or initiating remote fill/drain procedures.
8.5 Reagent Compatibility Tables to check reagent compatibility before creating
Reagent Setup
3.4.2
5.2 Managing Reagent Types
The Peloris software uses two lists of reagent types – an “active” list for reagents you use and a
“dormant” list with all reagent types configured in the system. Supervisors can edit the default
concentrations and purity and temperature thresholds (see
They can easily move reagents on and off the active list, and create new reagent types. Operators
can only view the active list.
See sections below for editing and managing reagent types:
5.2.1 Pre-defined Reagents
5.2.2 Editing Active Reagent Types
5.2.3 Managing the Reagent Types Lists
5.2.1 Pre-defined Reagents
A number of reagent types are pre-defined in the Peloris system. You can edit the properties of
these reagent types but they can cannot be deleted. There is no requirement to use the pre-defined
types however – you can leave them on the dormant list.
If you change the properties of pre-defined reagent types you cannot use the software to
automatically return them to their original values. However the default values for many of the predefined reagents are shown in
8.1 Reagent Threshold Guidelines.
5.1.3 Thresholds) for active reagents.
Leica PELORIS™ User Manual Rev K © Leica Biosystems Melbourne Pty Ltd 2011 80
Page 81

5.2.2 Editing Active Reagent Types
List of active reagent
types
Purity thresholds
and Temperature
thresholds buttons to
switch views
Selected reagent type:
select by tapping in the
name cell
Defaults/Concentration:
tap cells to change
Add reagent button:
bring dormant reagent
onto the active list
Remove reagent
button: remove
selected reagent from
the active to the
dormant list
Reagent change
thresholds:
tap cells to change
Final reagent
thresholds: tap cells
to change
Use the Reagent types screen (Reagents menu, Types) to view and edit the active reagent
types list. You also access other reagent type management options from this screen.
When you open the screen you see the list of active reagent types. These reagent types are
available to set for reagent stations. There are two views of the active list – one each for purity and
temperature thresholds (both views show default concentrations). Change views with the Purity
thresholds and Temperature thresholds buttons.
Reagent Setup
Figure 44 and Figure 45 show the two views.
Leica PELORIS™ User Manual Rev K © Leica Biosystems Melbourne Pty Ltd 2011 81
Figure 44. Reagent types screen, purity thresholds view, using recommended reagent types
for xylene-free processing
Page 82

Reagent Setup
List of active reagent
types
Purity thresholds
and Temperature
thresholds buttons to
switch views
Selected reagent type
Add reagent button:
bring dormant reagent
onto the active list
Remove reagent
button: remove
selected reagent from
the active to the
dormant list
Max. temperatures:
tap cells to change
Defaults/Concentration:
tap cells to change
Figure 45. Reagent types screen, temperature thresholds view, using recommended reagent types
for xylene-free processing
Supervisors can edit the default concentration, purity thresholds, and temperature thresholds for all
active reagent types.
You edit a type’s attributes by tapping the appropriate table cell then entering the required value
using the resultant keypad. The attributes update immediately and are applied to all reagent
stations and protocols that use the reagent type. The changes will not affect running protocols.
Lowering temperature thresholds may make protocol steps invalid. You must lower the step
temperature to comply with the new reagent threshold before you can load or run the protocol.
Leica Microsystems does not recommend you lower reagent concentration thresholds. Raising
thresholds can help to correct poor quality processing due to impure reagents.
If you no longer use a reagent in the active list you can remove it to the dormant list, to keep the
active list as small and easy to manage as possible. Select the reagent type by tapping in its name
cell, then tap Remove reagent.
Leica PELORIS™ User Manual Rev K © Leica Biosystems Melbourne Pty Ltd 2011 82
Page 83

5.2.3 Managing the Reagent Types Lists
Selected reagent type:
tap button to select
Reagent group filters: tap to
show just the reagent types
(in the left of the dialog box)
in the selected groups
Complete list of reagent types
filtered by reagent group
(with buttons at right)
Create reagent: create a
new reagent to add to the
dormant list
Delete: Delete the selected
reagent type (user defined
protocols only)
Add reagent: transfer the
selected reagent type from
the dormant to the active list
Apart from editing the properties of active reagents and moving them to the dormant list, all
management of the reagent types lists uses the Add reagents dialog box (
the Reagent types screen. The dialog box lists all reagent types, ordered by reagent group, on
the left. Filter the list by reagent group with buttons on the right.
Reagent Setup
Figure 46) opened from
To add reagent types to the active list select a reagent type from the list and tap the Add reagent
button.
To add a new reagent type to the dormant list tap the Create reagent button. Choose a reagent
group for the new reagent type and then set a unique name for it.
Use the Delete button to remove user defined reagent types from the dormant list. This deletes
them from the software completely. You cannot delete pre-defined reagent types.
Figure 46. Add reagent dialog box
Leica PELORIS™ User Manual Rev K © Leica Biosystems Melbourne Pty Ltd 2011 83
Page 84

5.3 Managing Reagent Stations
The Peloris processor has 20 stations – 16 reagent bottles and four wax chambers.
You must set the stations in the software to the reagent types loaded on the instrument. Once this
is done the system tracks each station’s use history (the numbers of runs and cassettes processed
and number of days loaded on the instrument), current concentration, and, for wax chambers, the
current temperature. See
Supervisors can set the reagent type for each station and change concentration values if they know
that actual concentrations are different from those in the system. Both supervisors and operators
can change station states if required. The use history details can only be viewed.
It is essential for safe operation of the Peloris that there are bottles loaded into all bays in the
reagent cabinet. If you do not wish to use a particular station, set its state to Dry and (for non wax
stations) insert an empty bottle into the station’s reagent cabinet location.
The choice of which reagent types to load on the instrument, and how many bottles of each, is an
important question that you must decide along with consideration of the protocols you run. See
Station Configurations for configurations suitable for the default protocols.
Stations in 5.1.1 Reagent Groups, Types and Stations for further details.
Reagent Setup
8.3
5.3.1 Reagent Stations Screen
Use the Reagent stations screen (Reagents menu, Stations) to set up and manage reagent
stations. There are two views of the screen – one for the 16 reagent bottles and the other for the
four wax chambers. Change views with the Reagent bottles and Wax chambers buttons.
Leica PELORIS™ User Manual Rev K © Leica Biosystems Melbourne Pty Ltd 2011 84
Page 85

Reagent Setup
Reagent bottles and
Wax chambers
buttons to switch
views
Selected station: tap in
Station cell to select
Hatched cell indicates
change threshold
exceeded. Out-of-
threshold
concentration value
shown in red
Since changed: the
use history of each
station – view only
Station: station
number with reagent
group color code
Type: reagent type in
station. Tap cell to
change
Conc.: current
concentration of
reagent in station. Tap
cell to change
State: current state of
station. Tap cell to
change
Temp.: current
temperature in the wax
chamber
See Figure 47 and Figure 48 for descriptions of the information and options on the Reagent
stations screen.
Figure 47. Reagent stations screen, reagent bottles view
Figure 48. Reagent stations screen, wax chambers view
Leica PELORIS™ User Manual Rev K © Leica Biosystems Melbourne Pty Ltd 2011 85
Page 86

5.3.2 Setting Reagent Station Properties
See sections:
Assigning New Reagents to Stations
Changing Reagent Concentration
Setting Station States
CAUTION
Altering reagent station configurations while protocols are running may cause abandoned
protocols.
Assigning New Reagents to Stations
If you change the type of reagent loaded in a station you must change the reagent type assigned to
the station in the software.
Follow the steps below to change the reagent type for a station:
Reagent Setup
1. Remove the bottle (or drain the wax chamber) with the reagent type you are replacing.
2. In the Reagent stations screen tap in the station’s Type cell to open the Reagent
selection dialog box.
3. Select the new reagent type from the list.
The dialog box shows all the current active reagent types (see 5.2.3 Managing the Reagent
Type s Li s ts).
4. When prompted, tap Yes to reset the station properties. This sets the use history counts to
zero and the station concentration to the default for the new reagent type.
5. Clean the bottle if necessary and fill with fresh reagent of the new type. Load the bottle back
onto the instrument (or fill the wax chamber).
6. For a bottle, in the Inserted bottle configuration dialog box, select the bottle in the table
and then tap the Emptied and refilled button.
For a wax chamber, set the station state to Full on the Reagent stations screen.
When you change the reagent type for a station on the Reagent stations screen you are always
prompted to reset the station’s concentration and use history. If you select No you will retain the
previous reagent’s concentration and use history. Use this option only if you are correcting a
previous error in the identification of the reagent in the station, and you are not actually changing
the station’s contents.
WARNING
Always ensure that the reagents configured in the software are the actual reagents loaded on
the instrument. A station containing different reagent could damage tissue samples.
Leica PELORIS™ User Manual Rev K © Leica Biosystems Melbourne Pty Ltd 2011 86
Page 87

Reagent Setup
Changing Reagent Concentration
You can set a station’s “calculated” concentration value. Tap the station’s Conc. cell. Enter the new
concentration in the keypad.
WARNING
Do not alter the concentration of a used reagent unless you are able to verify the actual
concentration. If the concentration is incorrect a reduction in tissue processing quality or
damage to the tissue sample may result.
Setting Station States
All users can change station states (Full, Empty, In use, Dry, and Not molten) in the Reagent
stations screen.
For reagent bottles you should not normally need to do this – you update the bottle states when
you remove and replace bottles and then the software tracks the state automatically. Change bottle
station states only if the wrong state is displayed or you want to make a full bottle unavailable for
use (by setting it to In use).
For wax chambers you must change the station state in the Reagent stations screen as a normal
part of wax replacement.
To change a station state tap the station’s State cell and select the appropriate icon in the dialog
box.
Figure 49. Station state dialog box for reagent stations (L) and wax stations (R)
See 3.3.1 Status Area for detailed information on reagent station states.
WARNING
Ensure you set the station state to the actual condition of the station. An incorrect reagent
station state may cause fluid leaks or abandoned processing runs.
Leica PELORIS™ User Manual Rev K © Leica Biosystems Melbourne Pty Ltd 2011 87
Page 88

5.4 Replacing Reagents
Always replace reagents as soon as possible after the system alerts you.
There are two methods to replace reagent in bottles:
Remote fill/drain — pump the old reagent out and new reagent back in without removing
the bottle, using commands on the Remote fill/drain screen.
Manually — remove the bottle, drain and refill, then replace on the instrument.
For wax you must drain the chamber using the Remote fill/drain screen, fill the chamber
manually, and then update the software.
See sections below:
5.4.1 Remote Fill/Drain Screen
5.4.2 Remote Fill/Drain Connections
5.4.3 Replacing Reagent – Remote Fill and Drain
5.4.4 Replacing Reagent – Manual
Reagent Setup
5.4.5 Replacing Wax
5.4.6 Filling and Draining Retorts
5.4.1 Remote Fill/Drain Screen
Use the Remote fill/drain screen (Reagents menu, Remote fill/drain) to drain the wax baths
and to fill and drain reagent bottles without removing them from the instrument. You are able to
fill/drain stations individually or as a group of compatible stations in a single operation. You can also
fill and drain retorts from this screen to enable recovery from partially completed fill/drain
operations.
All users can perform the functions on the Remote fill/drain screen.
Leica PELORIS™ User Manual Rev K © Leica Biosystems Melbourne Pty Ltd 2011 88
Page 89
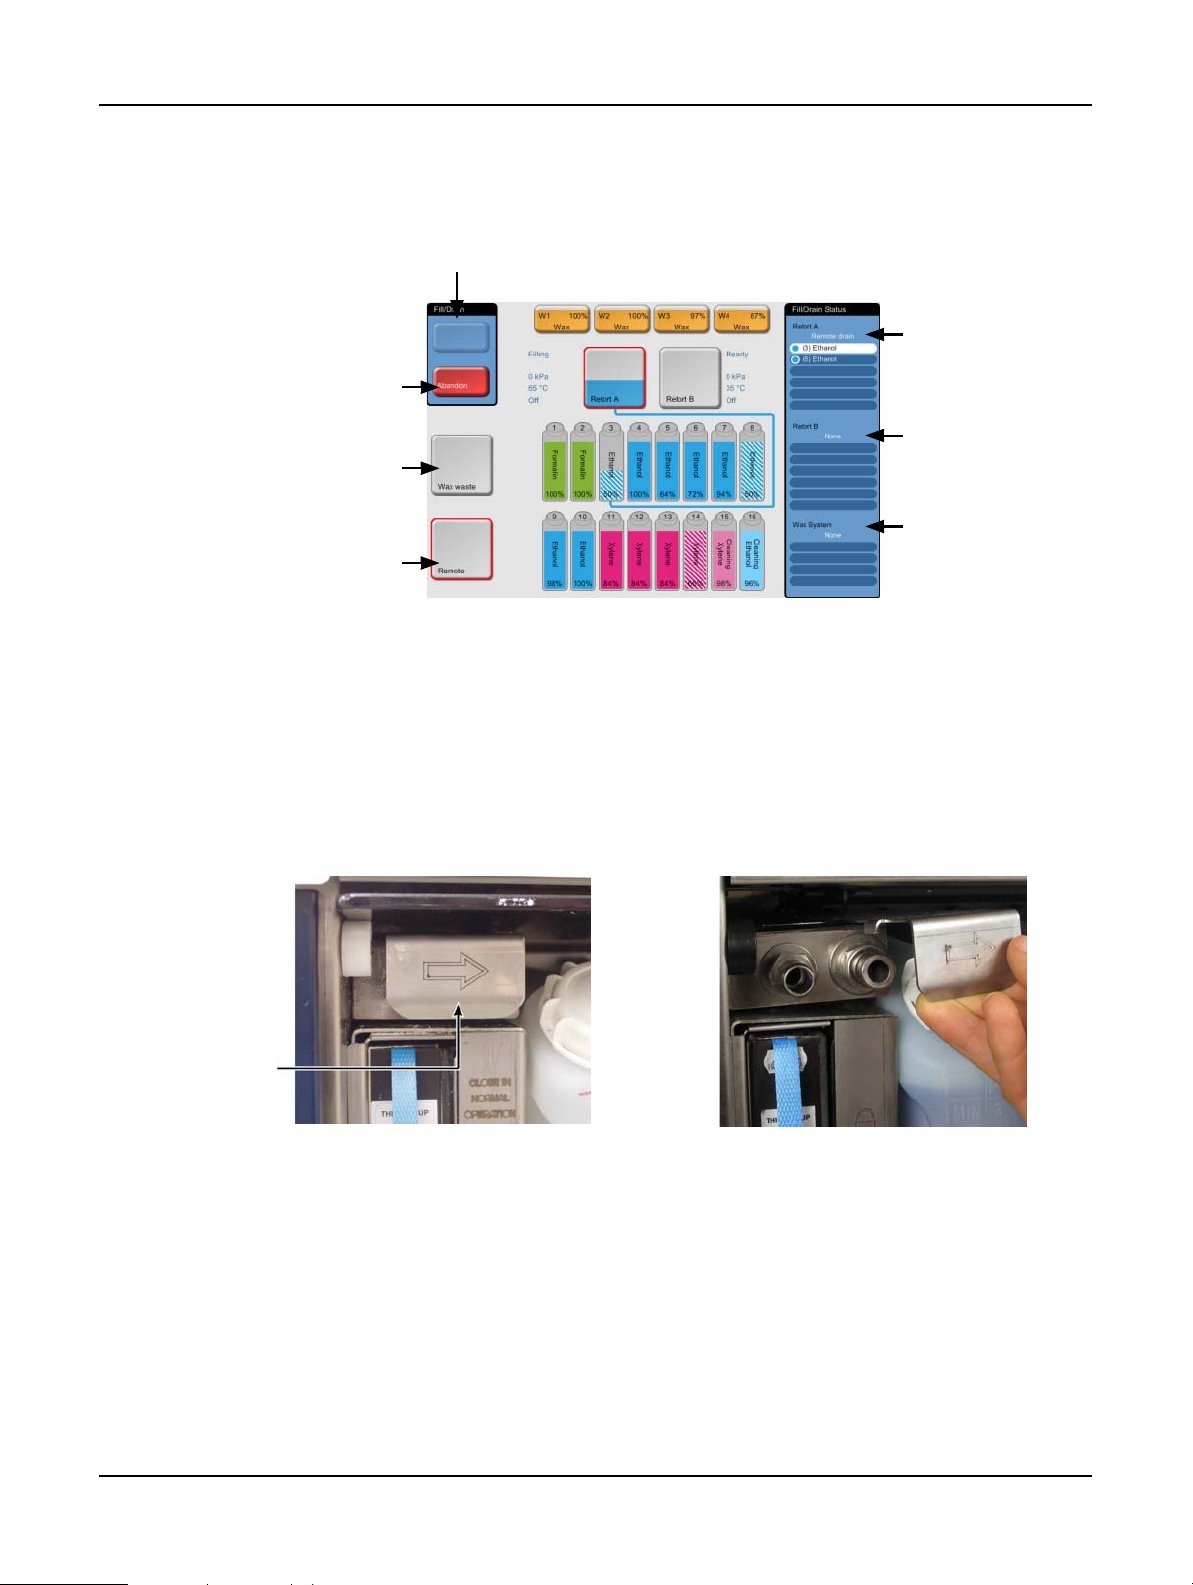
Figure 50 shows the Remote fill/drain screen with the main features described:
Fill to/Drain from bottles, Drain to waste, or
Fill/Drain retort:
start fill or drain when appropriate station, remote
source and retort are selected
Abandon:
stop the drain or fill
Wax waste:
select with a wax
chamber to drain the
chamber
Remote:
select with a retort and
bottle to fill or drain
the bottle
Retort A:
scheduled fill/drain
operations for retort A
Retort B:
scheduled fill/drain
operations for retort A
Wax System:
scheduled fill/drain
operations for the wax
chambers
Figure 50. Remote fill/drain screen
Reagent Setup
5.4.2 Remote Fill/Drain Connections
The remote fill/drain line and the wax drain outlet sit above the carbon filter in the reagent cabinet
(see
Figure 52). A protective flap covers the outlets. The wax waste line is heated to ensure that
the wax does not solidify during the drain.
Leica PELORIS™ User Manual Rev K © Leica Biosystems Melbourne Pty Ltd 2011 89
Before draining a wax station, open the upper reagent cabinet door, slide back the fill/drain flap
Before filling or draining reagent bottles, connect the remote fill/drain hose (see Figure 53) to
Figure 51. Remote fill/drain flap closed Figure 52. Remote fill/drain flap open with reagent
then fit the wax waste hose to the wax waste line (right connection in
Ensure the wax waste hose drains into a suitable container.
Ensure the hose remains out of the drained wax so that wax can’t solidify on the end of hose.
the remote fill/drain line (left connection in Figure 53). The hose has a push-fit coupling that
ensures a secure connection to the line.
line (left) and wax waste line (right).
Figure 52).
Page 90
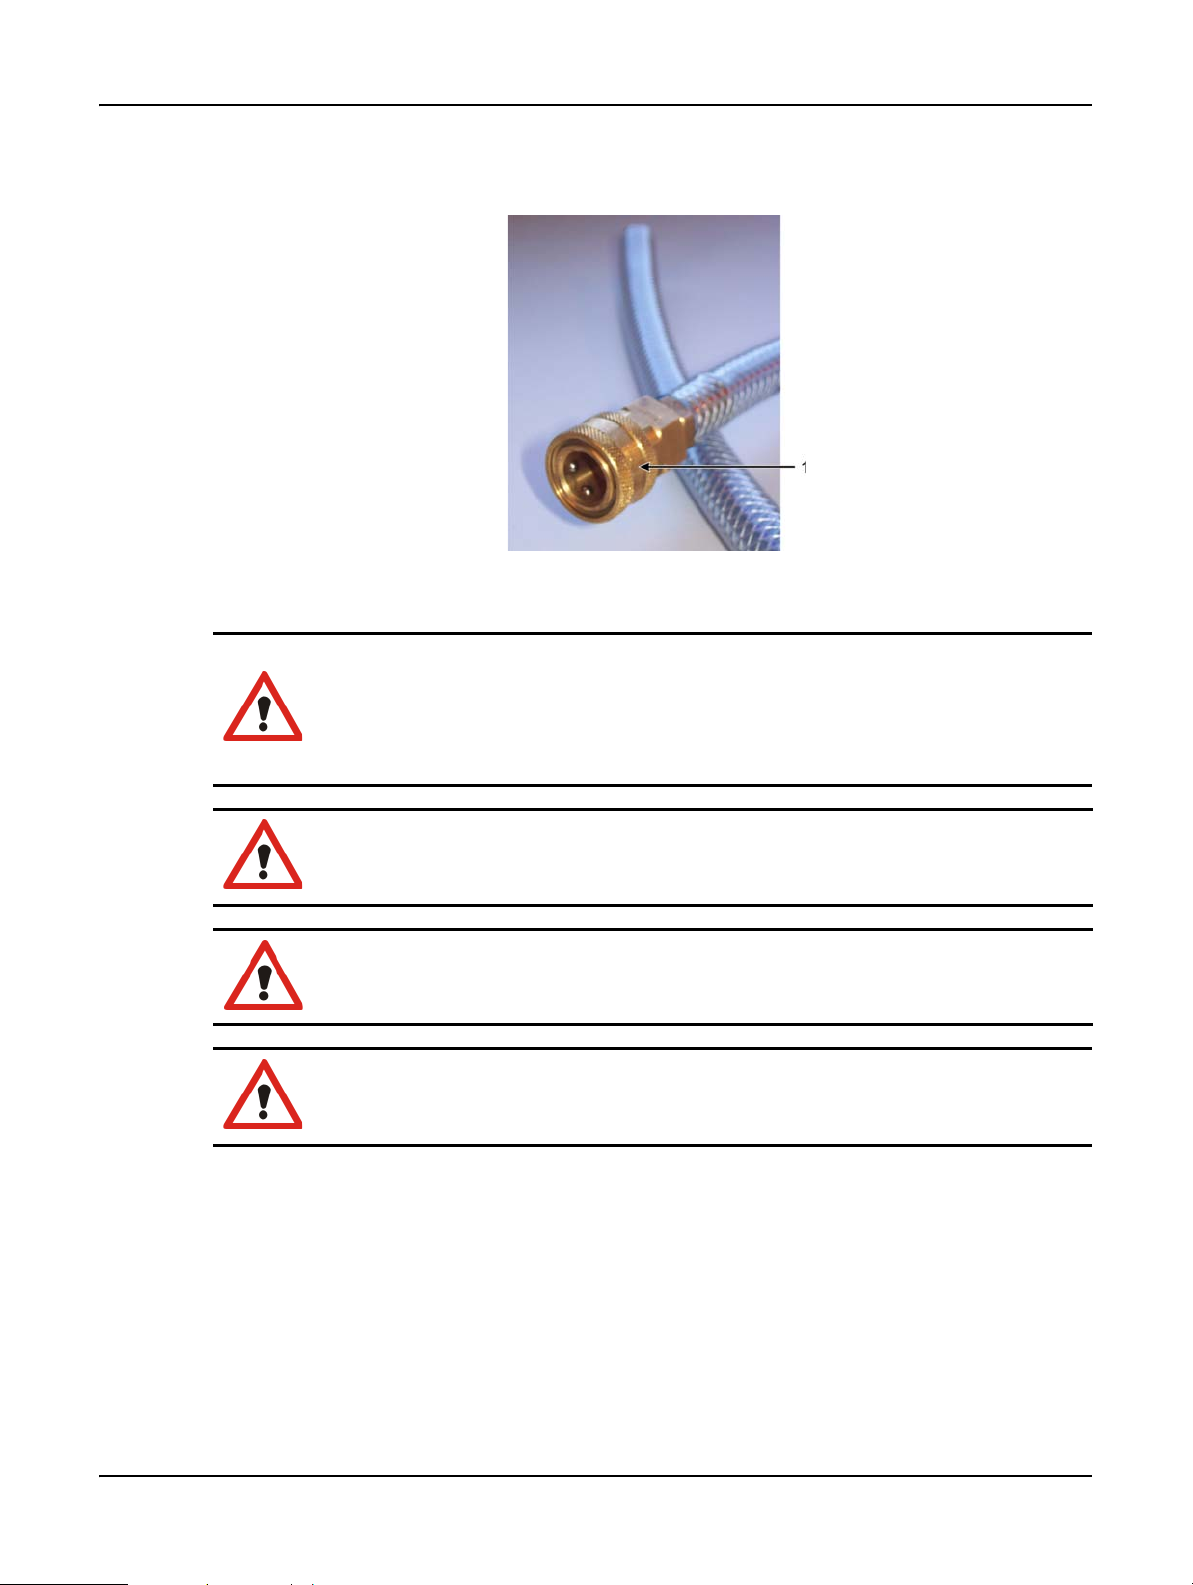
Reagent Setup
To fit the hose, open the upper reagent cabinet door, slide back the fill/drain flap, and push the
coupling onto the end of the line. To remove the hose, slide back the locking ring (item 1 in
Figure 53) and pull the hose off the remote fill/drain line.
Figure 53. Remote fill/drain hose with locking ring (1)
WARNING
Always ensure that you fill from or drain to a large stable container. The fill/drain functions
include a strong purge which may cause an unstable container to tip over and spill. The
container must also be of sufficient volume to easily accommodate all of the drained fluid.
If you need to use a small container you must support the container and hose during the fill or
drain.
WARNING
Always use the hose supplied with the Peloris system for reagent bottle operations.
WARNING
Ensure you use the correct size wax drain hose to avoid wax leakage. Old and new instruments
have different sized wax waste line connectors.
WARNING
Always wear suitable eye protection and other protective clothing when handling reagents to
protect yourself from splashed reagent.
Leica PELORIS™ User Manual Rev K © Leica Biosystems Melbourne Pty Ltd 2011 90
Page 91

5.4.3 Replacing Reagent – Remote Fill and Drain
Select the retort to use
Select the bottle or bottles to
drain
Select Remote icon
When bottle, retort and
Remote are selected tap
Drain from bottle(s) to
start the drain
You can drain and then refill reagent bottles without removing the bottles from the instrument. The
process drains each bottle to a retort then drains the retort to the remote fill/drain line. The reverse
procedure is used for the fill.
If you routinely use remote drain and fill do not forget to check if bottles need cleaning, once a
week.
Before you begin a remote fill or drain ensure there is a retort available:
the retort must not have a protocol loaded or running;
The retort must be clean or empty;
The retort residue (if any) must be compatible with the reagent in the bottle(s).
Follow the instructions below to replace reagent in a bottle.
Drain
1. Connect the remote fill/drain hose and place the end in a suitable container (see 5.4.2 Remote
Fill/Drain Connections).
Reagent Setup
2. From the Remote fill/drain screen (Reagents menu, Remote fill/drain), select:
The retort to use
The Remote icon
The bottle(s) to drain (multiple bottles must all have reagent in the same group).
Figure 54. Remote fill/drain setup for draining bottles
3. Tap Drain from bottle(s) to begin the drain.
Leica PELORIS™ User Manual Rev K © Leica Biosystems Melbourne Pty Ltd 2011 91
Page 92

Reagent Setup
4. When prompted, check that the retort lid is closed and the remote fill/drain hose is properly
connected.
Tap OK to begin the drain.
5. The instrument will now drain the bottle(s) via the selected retort.
Monitor the drain progress in the status panel.
When the drain completes, the retort state will be Empty and the bottle state Dry.
WARNING
Do not remove the remote fill/drain hose until the software indicates the process is complete
and pressurized air has cleared the hose. A cessation of reagent flow is not an indication that
the procedure is complete.
Fill
6. Place the hose into the container of fresh reagent.
The reagent source must be above 5 °C to ensure that all reagent sensors operate correctly.
7. F r o m t h e Remote fill/drain screen, select:
The retort to use
The Remote icon
The bottle(s) to fill (multiple bottles must all be Dry and set to the same reagent type)
Any bottle residue must be compatible with the new reagent.
8. Tap Fill to bottle(s) to begin filling.
9. When prompted, check that the retort lid is closed and the remote fill/drain hose is properly
connected.
Tap OK to begin the fill.
10. The Remote fill/drain - Reagent details dialog box will now appear.
Figure 55. Reagent details dialog box with reagent type, concentration and
use history for the new reagent
11. Confirm that the reagent type, concentration and use history details are correct, or tap in the
table cells for any of these values to change the settings.
If you set a new reagent type the station must have already been set to that type (see
Assigning New Reagents to Stations in 5.3 Managing Reagent Stations). The reagent must be
compatible with the retort and bottle residue.
Tap OK to start the fill.
Leica PELORIS™ User Manual Rev K © Leica Biosystems Melbourne Pty Ltd 2011 92
Page 93

Reagent Setup
12. The instrument will now fill the bottle(s) via the selected retort.
The fill volume is determined by the reagent fill level set in the Instrument settings screen
(see
6.2.1 Instrument Settings).
Monitor the fill progress in the status panel.
When finished the retort will have an Empty state and the bottle will have a Full state.
At any time during the drain or fill you can tap the Abandon button to terminate all current and
pending fill/drain operations.
If you abandon a drain such that both the retort and bottle are left partially full, you must drain the
retort back to the original bottle to continue. To drain the retort, deselect the Remote icon then
tap the Drain retort button.
WARNING
Do not open a retort while it is being used for a remote fill or drain operation as the retort could
be pressurized and may contain hot reagent and fumes. Allow the fill or drain to complete or
abandon the process before opening the retort.
Remote Fill and Drain Sequences
The following reagent sequences are recommended when filling and draining multiple bottles:
Order Drain sequence Fill sequence
1 Fixatives Cleaning solvents
2 Cleaning alcohols Clearers
3 Dehydrants Defatting solvents
4 Defatting alcohols Defatting alcohols
5 Defatting solvents Cleaning alcohols
6 Cleaning solvents Dehydrants
7 Clearers Fixatives
Leica PELORIS™ User Manual Rev K © Leica Biosystems Melbourne Pty Ltd 2011 93
Page 94
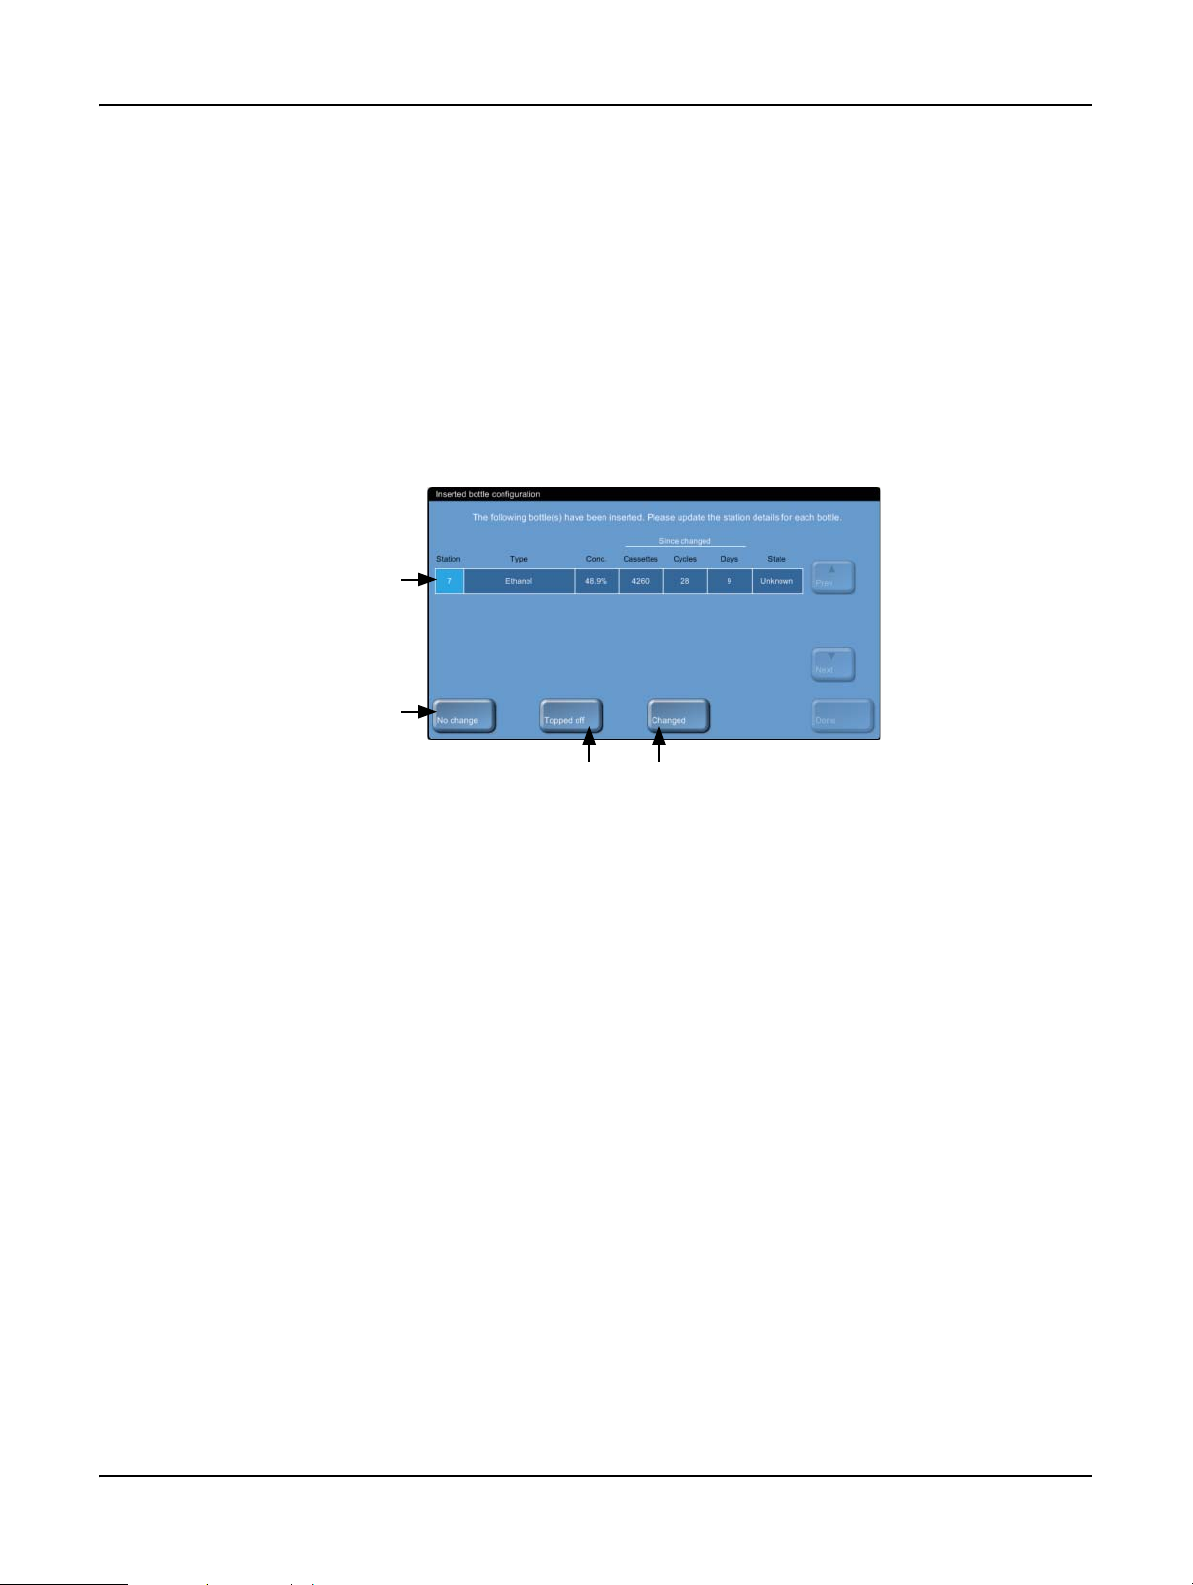
5.4.4 Replacing Reagent – Manual
Tap in the table row to
select the bottle, then
select an option button
below
No change:
select if you did not do
anything to the
reagent in the bottle
Topped off/up:
select if you added a
small amount of reagent
to the bottle to bring up
its level
Changed:
select ONLY if you replaced
the bottle contents with
fresh reagent
To replace bottles manually remove the bottles and dispose of the old reagent following your
laboratory’s standard procedures. Clean the bottle if necessary, and then fill with fresh reagent.
Load back on to the instrument.
When the bottle is reinserted the Inserted bottle configuration dialog box opens, showing the
reagent type, concentration and use history for either:
the bottle when it was removed, or
the bottle as configured in the Reagent stations screen, if you assigned a new reagent type
to the station after the bottle was removed (see
Reagent Setup
Assigning New Reagents to Stations).
Leica PELORIS™ User Manual Rev K © Leica Biosystems Melbourne Pty Ltd 2011 94
Figure 56. Inserted bottle configuration dialog box
The bottle state is set to Unknown in the dialog box.
Tap the table row and select one of the options at the bottom of the dialog box:
Changed — select if you replaced the old reagent with fresh reagent.
With this option the software prompts you to accept the default concentration for the reagent
in the station. If you know the concentration to be other than the default you can enter a
different concentration.
The use history values are all set to zero.
If you changed the reagent type in the bottle you cannot update it in the software from this
dialog box. Tap No change and then remove the bottle again. Change the reagent assigned to
the bottle in the Reagent stations screen (see
Assigning New Reagents to Stations), then
reinsert the bottle.
Topped off/up — select if you did not change all the reagent but added a small amount of
fresh reagent of the same type to bring up its level in the bottle.
With this option the bottle state changes to Full. The concentration and use history details do
not change.
No change — select if you made no changes to the reagent in the bottle at all.
Page 95

With this option you must select the bottle state. The concentration and use history details do
not change.
WARNING
Always change reagents when prompted.
Always update station details correctly – never update the details without replacing the reagent.
Failure to follow these directives can lead to tissue damage or loss.
WARNING
Ensure lids are tight and the bottles are correctly plugged into the manifold after replacing
reagent to avoid reagent spills.
5.4.5 Replacing Wax
To re pl a ce w ax :
1. drain the wax chamber using the Remote fill/drain screen commands,
2. refill the wax chamber manually with molten or solid wax, and then
Reagent Setup
3. reset the state of the wax chamber.
Before you begin ensure there is a retort available. Draining wax does not fill a retort, but it does
use retort scheduling resources, so at least one retort must be available. The retort does not need
to be clean.
The wax to be drained must be molten.
Follow the instructions below to replace wax in a chamber.
Leica PELORIS™ User Manual Rev K © Leica Biosystems Melbourne Pty Ltd 2011 95
Page 96

Reagent Setup
Select the wax chamber or
chambers to drain
Select Wax waste icon
When wax chamber and Wax
waste icon are selected tap
Drain to waste to start the
drain
Drain
1. Connect the wax waste hose and place the end in a suitable container (see 5.4.2 Remote Fill/
Drain Connections).
2. From the Remote fill/drain screen (Reagents menu, Remote fill/drain), select:
The wax stations to drain
The Wax waste icon
Figure 57. Remote fill/drain setup for draining wax chambers
3. Tap Drain to waste to begin the drain.
4. When prompted, check that the wax waste hose is properly connected and feeding into a
suitable container.
Tap OK to begin the drain.
5. The instrument will now drain the chamber(s).
Monitor the drain progress in the status panel. Wax drains may take up to three minutes.
When the drain completes, the chamber state will be Empty.
WARNING
The wax leaving the waste wax line will be hot and may cause burns. Make sure the wax drains
to a suitable container and stand clear while it drains.
WARNING
Do not remove the wax drain container or hose until the software indicates that the drain has
completed. A cessation of wax flow is not an indication that the drain procedure is complete.
If no wax drains it is likely that the wax hose is blocked. If you remove a blocked hose before
the drain is abandoned hot wax will spurt from the front of the instrument. Abandon the drain
before removing the hose and melting the wax with hot water.
6. To stop wax solidifying in the drain hose, promptly remove the hose from the drained wax.
At any time during the drain you can tap the Abandon button to terminate all current and pending
fill/drain operations.
Leica PELORIS™ User Manual Rev K © Leica Biosystems Melbourne Pty Ltd 2011 96
Page 97

Fill
7. Fill the wax chamber with molten or solid wax.
8. Open the Reagent stations screen, wax chambers view (Reagents menu, Stations, then
tap the Wax chambers button).
The row for the drained wax chamber shows the default concentration and all use history
values set to zero. The station state is Dry.
The reagent type is unchanged from the wax that you drained unless you changed the type
assigned to the station after the drain (see
9. Tap the State cell for the chamber:
If using molten wax, set the state to Full.
If using solid wax, set the state to Not molten to begin the rapid wax heating process.
While in the Not molten state the wax bath chamber temperature is higher than normal
to ensure the wax melts quickly.
You may need to add extra wax as it melts.
The station’s state automatically changes to Full when the wax is ready to use.
5.4.6 Filling and Draining Retorts
Reagent Setup
Assigning New Reagents to Stations)
The Remote fill/drain screen allows you to fill and drain the retorts to assist recovery from
incomplete remote fill/drain operations. The retort fill and drain functions operate with a series of
rules designed to avoid reagent contamination, reagent overflow spills and reagent overheating.
You can override some rules but this will often result in reduced reagent concentration.
You can also fill and drain retorts using the Manual operations screen (see 6.1.1 Manual
Operations).
The rules for manually filling and draining retorts are as follows.
The retort must be clean or empty before you commence a retort fill operation.
If the retort is empty the selected station must have compatible reagent (see 8.5 Reagent
Compatibility Tables).
You cannot fill a retort with a reagent that has a temperature threshold below the set retort
temperature.
When draining a retort, the reagent must return to its original station.
When draining a retort, the station must have sufficient capacity for the retort contents.
To avoid fluid spills, ensure adequate station capacity before overriding insufficient capacity errors.
To fill or drain a retort select the retort and the reagent station to fill from or drain to, on the
Remote fill/drain screen. Tap the Fill retort or Drain retort button. To stop the fill at any
stage, tap the Abandon button.
WARNING
Never fill a reagent station when its contents are in a retort. This may cause fluid spills.
Leica PELORIS™ User Manual Rev K © Leica Biosystems Melbourne Pty Ltd 2011 97
Page 98

6
Settings & Ancillary Operations
This chapter describes basic system configuration options and ancillary operations such as manually pressurizing
a retort or heating a wax line, viewing the event log, handling alarms, changing user access level, and
transferring system files onto external media.
Access reagent-related ancillary options from the Reagents menu:
6.1.1 Manual Operations
6.1.2 Reagent Management
All other ancillary functions are in the Control menu:
6.2.1 Instrument Settings
6.2.2 Device Settings
6.2.3 Service Settings
6.2.4 Event Log
6.2.5 Alarms
6.2.6 Access Level
6.2.7 File Transfer
6.1 Reagents Menu
Manually control reagent handling components of the instrument or configure or view basic
reagents settings in two screens opened from the Reagents menu:
6.1.1 Manual Operations
6.1.2 Reagent Management
Leica PELORIS™ User Manual Rev K © Leica Biosystems Melbourne Pty Ltd 2011 98
Page 99

6.1.1 Manual Operations
Fill/Drain retort:
fill or drain the retort
from or to the selected
station
Stirrer: set the retort
stirrer to high, medium
or low speed, or off
Temp.:
set the retort
temperature
Retort A controls
Wax heater:
turn on/off heaters for
wax path
Pressure:
set the pressure in the
retort – ambient,
vacuum, pressure, or
pressure/vacuum cycle
Abandon:
stop a fill or drain
operation
Retort B controls
Vent wax:
release pressure or
vacuum in wax chambers
The Manual operations screen (Reagents menu, Manual operations) allows you to manually
control the instrument. The screen displays the current instrument status including station states,
the retort states and the retort condition. You control the instrument by selecting instrument
elements from the status area and control functions from the panels on either side.
All users can perform manual operations functions.
You can fill a retort from any station and then set conditions in the retort: temperature, pressure
and stirrer. If intending to move wax into a retort preheat the wax path by turning on the wax
heater. Use the wax vent function to neutralize the pressure in the wax bath so the wax bath lids
can be opened easily and safely.
You cannot override a running protocol from the Manual operations screen and you cannot fill or
drain a retort that has a loaded protocol.
Figure 58 shows the Manual operations screen with function buttons explained:
Settings & Ancillary Operations
Leica PELORIS™ User Manual Rev K © Leica Biosystems Melbourne Pty Ltd 2011 99
Figure 58. Manual operations screen
Retort Temperature Range
The retort temperature range is limited to the following values.
Reagent — 35 ºC minimum to 85 ºC maximum (restricted to 65 ºC maximum when running
tissue processing protocols).
Wax — (Wax melting point + 2 ºC) minimum to 85 ºC maximum (restricted to 77 ºC when
running standard protocols).
View the current wax melting point temperature on the Reagent management screen.
Page 100

Settings & Ancillary Operations
Additional limitations may apply depending on the retort state and the reagent in the retort. You
cannot raise the retort temperature above the safe temperature threshold of the reagent.
Wax Transfers
The wax path (comprising the wax valves and the transfer pipes) and the retort must be at the wax
standby temperature before you attempt to fill a retort with wax. Use the Wax heater buttons for
at least five minutes to enable wax path heating. Use the Temp. button to set the retort to the wax
standby temperature and wait until the retort reaches the temperature before filling.
Filling and Draining Retorts
Fill or drain the retorts from any reagent station using commands on the Manual operations
screen. The fill and drain functions operate with a series of rules designed to avoid reagent
contamination, reagent overflow spills and reagent overheating. You can override some rules but
this will often result in reduced reagent concentration.
The rules for manually filling and draining retorts are as follows.
The retort must be clean or empty before you commence a retort fill operation.
When filling a retort, the selected reagent station must be compatible with the retort residue.
See
8.5 Reagent Compatibility Tables.
You cannot fill a retort with a reagent that has a temperature threshold below the set retort
temperature.
When draining a retort, the reagent should return to its original station.
You cannot drain wax to a reagent bottle or non-wax reagents to a wax station.
When draining a retort, the station must have sufficient capacity for the retort contents.
Always ensure the retort is in a suitable state before filling. To fill, select the retort and reagent
station then tap Fill retort.
To drain a retort select the retort and the station the retort contents came from. Tap the Drain
retort button. The system will not allow you to drain a retort to a station other than the one the
reagent came from.
You can stop a fill or drain at any time with the Abandon button. Recover from an abandoned fill
or drain by restarting the operation, or return the reagent to the station or retort it came from with
the opposite operation.
WARNING
Do not open a retort if it has been filled with hot reagent and pressurized using the manual
operations functions. Always use the manual operations functions to de-pressurize a retort
before opening and wear suitable protective clothing (including eye protection) if the retort
contains hot reagent.
Leica PELORIS™ User Manual Rev K © Leica Biosystems Melbourne Pty Ltd 2011 100
 Loading...