

Page 1

LEICA M-A
Instructions
Page 2

EN
FOREWORD
Dear Customer,
Leica would like to thank you for purchasing the LEICA M-A and
congratulate you on your choice. With this unique view and
Foreword
rangefinder camera, you have made an excellent selection.
We wish you a great deal of pleasure and success using your new
Leica.
In order to make best use of all the opportunities offered by this
high performance camera, we recommend that you first of all read
these instructions.
30
Page 3

CONTENTS
Foreword ...................................................................................30
Designation of parts ...................................................................32
Viewfinder displays ....................................................................33
Attaching the carrying strap .......................................................34
Shutter release button ...............................................................35
Shutter speed dial ......................................................................35
Quick wind lever ........................................................................35
Changing the film .......................................................................36
Film sensitivity indicator .............................................................40
Fitting and removing a lens ........................................................41
Bright line view and range finder .................................................42
Image field selector .................................................................42
Distance metering ...................................................................44
Exposure control ........................................................................45
Flash mode ................................................................................46
Compatible flash units ..............................................................46
Attaching and connecting the flash unit ....................................46
System accessories ...................................................................48
Spare parts................................................................ ................51
Care tips.............. ......................................................................52
Index ............................................... .........................................53
Technical data ................................................................ ..........54
Leica Product Support................................................................56
Leica Customer Care .................................................. ..............56
EN
Contents
31
Page 4

EN
DESIGNATION OF PARTS
Front view
1. Bottom cover locking pin
2. Lens release button
3. Eyes for carrying strap
4. Rewind release lever
5. Distance meter viewing window
6. Illumination window for the bright-line frames
Designation of parts
7. Viewfinder viewing window with silvering
8. Image field selector
Top view
9. Pull-out rewind button
10. Fixed ring with
a. Index for focusing
b. Depth of field scale
c. Index button for changing lenses
11. Distance setting ring
12. Aperture setting ring
13. Index point for aperture setting
14. Lens hood
15. Automatic exposure counter
16. Shutter release
a. Thread for cable release
17. Rapid action lever for cocking the shutter and advancing the
film
18. Shutter speed dial with locking settings for:
• Manually adjustable shutter speeds from 1s to
• Sync time
•
B for long exposures
s for flash mode
0
000
s
19. Accessory/flash shoe with
a. Center contact
b. Hole for retaining pin
Rear view
20. Viewfinder window
21. Rear panel
22. Film sensitivity indicator
Bottom view
23. Tripod thread A ¼, DIN 4503 (¼“)
24. Bottom cover
25. Locking toggle for bottom cover
View with bottom cover removed and rear panel open
26. Take-up spool
27. Coupling for motorized or external mechanical film winding
32
Page 5
VIEWFINDER DISPLAYS
a.
EN
a. Bright line frame for 50 mm and 75 mm (example)
b. Metering field for distance setting
a.
b.
Viewfinder displays
33
Page 6
EN
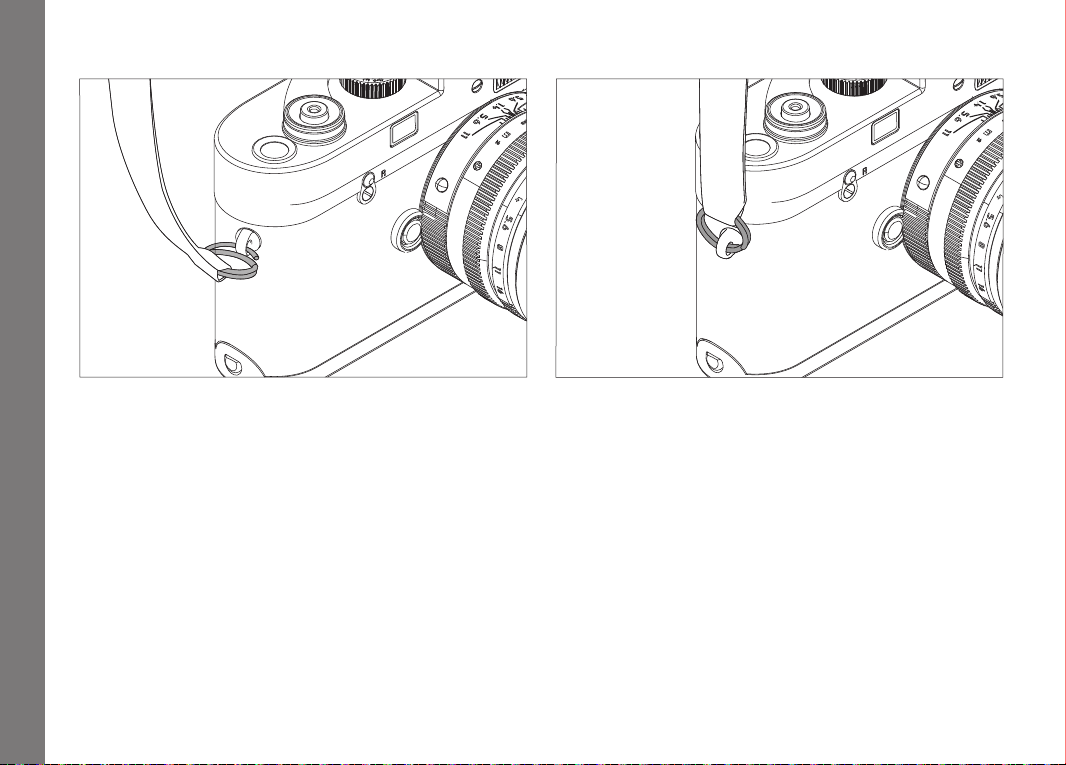
ATTACHING THE CARRYING STRAP
Attaching the carrying strap
34
a
b
Page 7
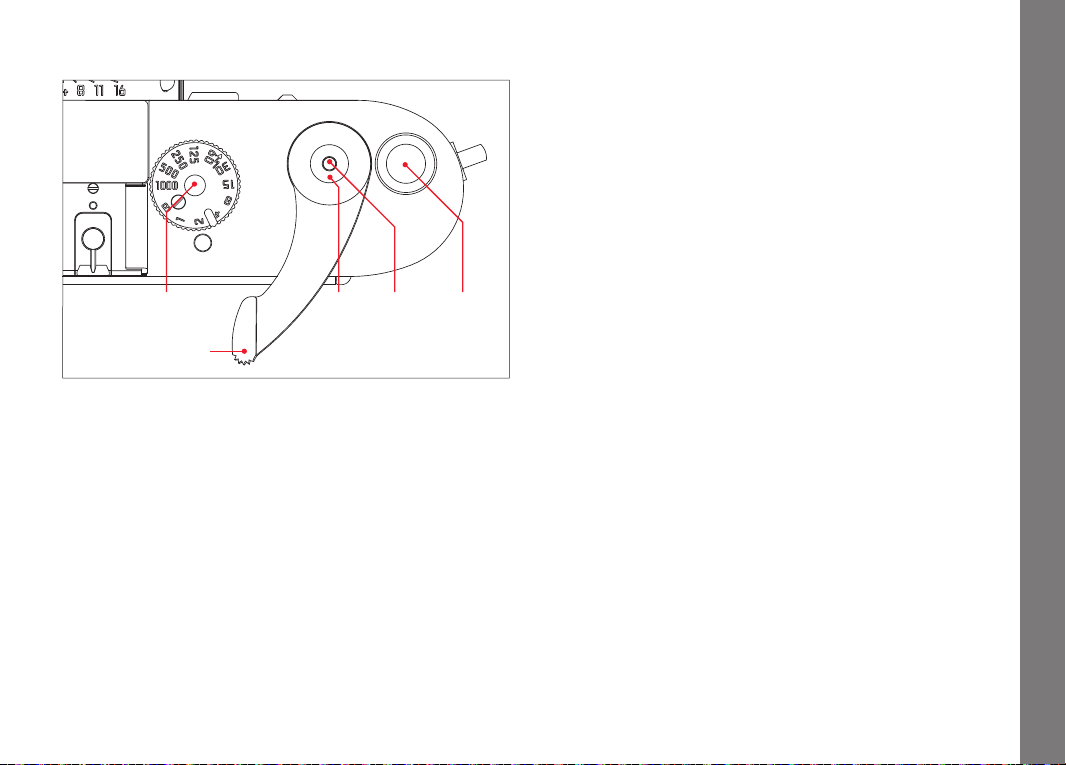
SHUTTER RELEASE BUTTON
18
16 16a 15
SHUTTER SPEED DIAL
The shutter speed dial on the Leica M-A can be used to select
shutter speeds from
mode. In the B position, the shutter remains open for long
exposures as long as the shutter release is pressed. All positions
can be felt click into place, none of them are locked.
Notes:
• Intermediate values may not be used.
• Between the 1000 and B positions there is a stop so that other
settings are only possible by turning the dial anticlockwise from
the 1000 position, or clockwise from the B position.
s to 1s, or for the sync time 0s for fl ash
000
EN
Shutter release button / Shutter speed dial / Quick wind lever
17
The shutter release button has a pressure point. Pressing past the
pressure point releases the shutter.
The shutter release button should be pressed gently – not jerkily until the shutter is released with a soft click.
The shutter release button has a standard thread for a cable
release.
QUICK WIND LEVER
The quick wind lever is used to wind the fi lm, cock the shutter and
automatically advance the exposure counter. The fi lm can be
wound either by pressing the lever as far as it will go or by pressing
the quick wind lever several times. It can be folded out and left in
its “ready position” for quick access.
35
Page 8
EN
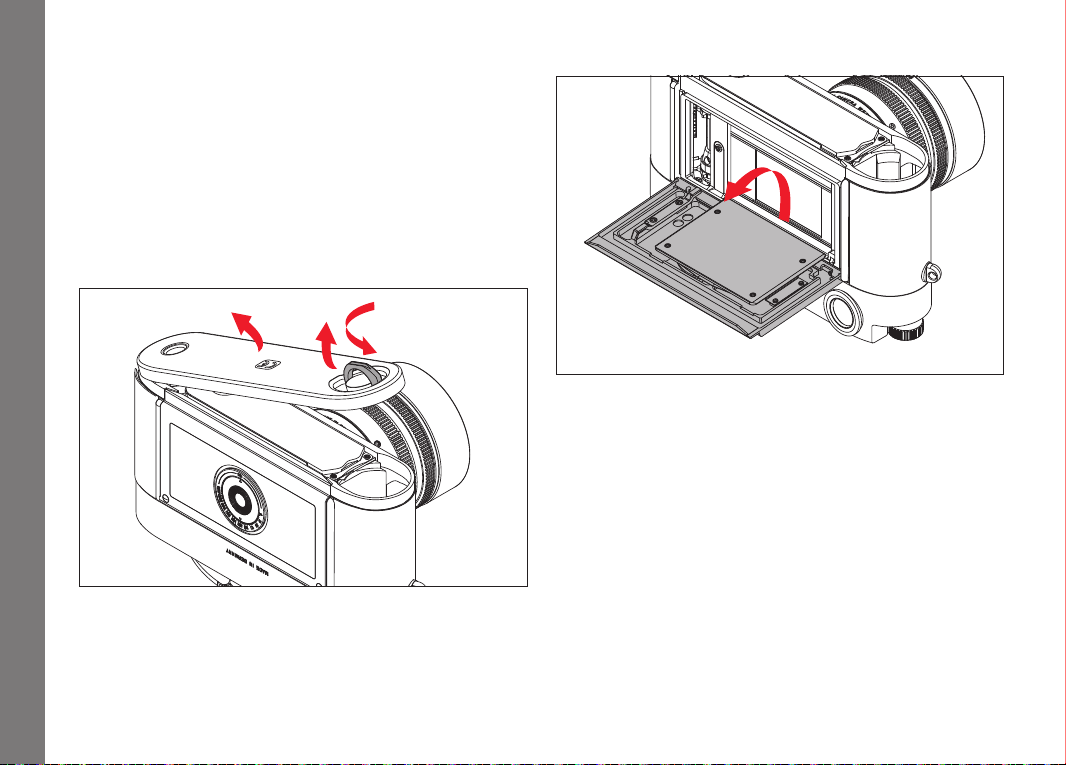
CHANGING THE FILM
First of all, always check that a fi lm is not already loaded by turning
the pull-out rewind button in the direction of the arrow. If you feel
resistance, continue as described in the “Rewinding and removing
the fi lm” section.
Take the camera in your left hand, so that the bottom cover is
facing upwards.
Changing the fi lm
OPENING THE CAMERA
LOADING A FILM
36
1.
3.
1. Fold up the toggle on the bottom cover.
2. Turn it to the left.
3. Lift off the bottom cover, and
4. Open the rear panel backwards.
2.
5. Take the fi lm cartridge in the right hand and insert it around
halfway into the appropriate cavity in the camera.
6. Take hold of the fi lm leader and, as shown in the schematic
diagram inside the housing, insert it into the take up spool.
7. Then carefully press the fi lm cartridge and fi lm leader into the
camera with the fi ngertips.
Page 9

Notes:
• As with any ready to use film, the leader must be trimmed.
• If the leader is pulled out so far that it extends a little way out of
one of the slits on the opposite side of the take-up spool, this
does not interfere with the camera’s function. It is only in
conditions of frost that the film has to be loaded exactly in
accordance with the schematic diagram, i.e. the leader may only
be held by one slit on the take-up spool, so that the protruding
end of the films cannot snap off.
Important:
The winding of the film should not be checked with the camera
open, as the bottom cover is designed in such a way that replacing
it on the camera brings the film into the correct position.
CLOSING THE CAMERA
8. Close the rear panel.
9. Lower the bottom cover onto the locking pin on the side of the
camera.
10. Close it, ensuring that the rear panel is completely pressed in
so that the bottom cover holds it in place.
11. Lock with the toggle.
WINDING TO THE 1ST PICTURE
12. Wind the film forward one frame using the quick wind lever and
release the shutter.
13. Then tension the film by carefully turning the pull-out rewind
button in the direction of the arrow. The film is properly wound
if the rewind button turns in the opposite direction to the arrow
when the quick wind lever is operated again.
14. Finally, release the shutter again and cock the shutter a third
time. The frame counter now shows 1 and the camera is ready
to take a picture.
EN
Changing the film
37
Page 10

EN
REWINDING AND REMOVING THE FILM
Changing the fi lm
If the fi lm has been exposed up to the last frame, the quick wind
lever can no longer be operated. Before removing the fi lm, it must
be rewound into the fi lm cartridge.
To do this:
1. Move the rewind release lever to R.
2. Pull out the rewind button (max. 11mm) and
3. Turn it clockwise (arrow) until the fi lm has been wound off the
take-up spool, after passing a slight resistance.
4. Open the bottom cover.
5. Open the rear panel.
6. Remove the fi lm cartridge.
38
Page 11

If a film is not correctly attached to the cartridge spool, e.g. when
using film sold by length, it can happen that the end of the film will
be torn off and will have to be removed from the take-up spool.
To do this:
1. Remove the camera’s bottom cover in a completely dark room.
2. Hold the camera so that the open bottom cover is facing
downwards.
3. Operate the quick wind lever slowly several times, until the film
comes out of the camera by itself so that you can take hold of
it and remove it. If necessary, lightly tap the camera on your
hand to assist you.
EN
Changing the film
39
Page 12

EN
FILM SENSITIVITY INDICATOR
Film sensitivity indicator
The indicator is intended as an aid to memory. It can be used to
set the fi lm sensitivity to a value in the range ISO 6 to 6400. (ISO
is the international designation for fi lm speeds)
To do this, press the non-locking
1. disc, and
2. turn it so that one of the two triangles - black for B/W fi lms or
red for color fi lms - is pointing to the desired value.
40
Page 13

FITTING AND REMOVING THE LENS
FITTING
REMOVING
EN
Fitting and removing the lens
1. Hold the lens by the fi xed ring.
2. Align the red index button on the lens with the release button
on the camera body.
3. Then push the lens straight on in this position.
4. Turn the lens slightly to the right, and you will hear and feel it
click into place.
1. Hold the lens by the fi xed ring.
2. Press down the release button on the camera body.
3. Turn the lens to the left until its red index button is aligned
with the release button.
4. Then pull the lens straight off .
Important:
With a fi lm loaded, you should change the lens in the shadow of
your own body, as direct sunlight can result in light getting in
through the shutter.
41
Page 14

EN
BRIGHT LINE VIEW AND RANGE FINDER
The LEICA M-A’s bright-line view and range finder is not only a very
high-quality, large, brilliant and bright viewfinder, it is also a highly
accurate range finder coupled to the lens.
The size of the bright-lines corresponds to an image size of 23 x
35mm (slide format) at the shortest setting distance for each focal
length. At longer distances, the camera records more of the
subject than can be seen in the bright-lines.
The bright line frame is linked to the distance setting to ensure that
parallax - the offset between the lens and the viewfinder axis - is
automatically compensated.
The Leica M-A is equipped with a 0.72x magnifying viewfinder. If
lenses with focal lengths of 28 mm (Elmarit from serial number
Bright line view and range finder
2411001 onwards), 35, 50, 75, 90 and 135mm are used, the
associated bright line frame is automatically displayed in the
combinations 28+90mm, 35+135mm, 50+75mm.
In the middle of the viewfinder image is the square distance
metering field, which is brighter than the surrounding image field.
All lenses with focal lengths from 16 to 135mm connect with the
range finder when used on the LEICA M-A.
IMAGE FIELD SELECTOR
The image field selector extends the possibilities of the Leica M-A
viewfinder. This built-in universal viewfinder allows you to display
the image frames that do not belong to the lens currently being
used at any time. You can then see immediately if, for
compositional reasons, it would be better to photograph the
relevant subject using a different focal length.
If the lever is rotated outwards, i.e. away from the lens, the image
field limits for 35 and 135mm focal length are shown.
If the lever is moved to its vertical central position, the image field
limits for the focal lengths 50 and 75mm are shown.
If the lever is moved inwards, i.e. towards the lens, the image field
limits for 28 and 90mm focal length are shown.
A
B
Set to 0.7m: The film captures approximately one
Set to 2m: The film captures exactly the image field
Set to infinity: The film captures around 1 and 4
Bright line frame
Actual image field
frame width less.
shown by the inner edges of the bright
line frame.
(vertical and horizontal respectively)
frame widths more.
42
Page 15

EN
B
A
Bright line view and range finder
50mm + 75mm
28mm + 90mm
35mm + 135mm
43
Page 16

EN
DISTANCE METERING
Due to its large effective metering basis, the range finder on the
Leica M-A is very precise. The benefits of this are particularly
noticeable when using wide-angle lenses with their relatively high
depth of field.
The range finder metering field is visible as a bright, sharply
defined rectangle in the center of the viewfinder. If you keep the
large viewfinder window closed, only the activated bright-line frame
and this metering field remain visible.
Distance metering
The focus can be set using either the superimposed image or split
image method:
SUPERIMPOSED IMAGE METHOD (DOUBLE IMAGE)
In a portrait, for example, aim the metering field at the eye and turn
the distance setting dial on the lens until the contours in the
metering field are brought into line. Then choose the subject detail.
Out of focus In focus
44
Page 17

SPLIT IMAGE METHOD
When taking photographs of architecture, for example, aim the
range finder metering field at the vertical edge or another clearly
defined vertical line and turn the distance setting ring on the lens
until the contours of the edge or line can be seen at the limits of
the metering field with no misalignment. Then choose the subject
detail.
In practice, there is often no clear distinction between the two
methods. The two criteria can be used to great effect in
combination.
Out of focus In focus
EXPOSURE CONTROL
On the Leica M-A the exposure is set manually by selecting the
shutter speed and lens aperture combination specified by an
external exposure meter or based on your own assessment.
For further details of using and adjusting exposure meters, refer to
the manual for the device you are using.
EN
Exposure control
45
Page 18

EN
FLASH MODE
The Leica M-A does not have its own flash metering and control
function. As a result, flash exposures must either be controlled by
an attached flash unit itself (computer control) or – using guide
number calculations – the aperture must be reset for each picture
according to the distance between the subject and the camera.
Flash mode
The fastest possible shutter speed for pictures using flash units,
the sync speed of
dial. For special effects, all slower shutter speeds including the
setting can also be used.
Important:
Flash units connected using the accessory shoe can still be fired
mechanically when the shutter is moving by pressing the shutter
release.
1
/50s, is indicated by on the shutter speed
COMPATIBLE FLASH UNITS
With its compact dimensions and design tailored to this camera,
the Leica SF26 is particularly well suited. Thanks to its computercontrolled automatic flash exposure, it is very easy to operate and
furthermore offers a range of interesting additional functions.
Other commercially available flash attachments with standard flash
foot and positive center contact, and fired by the center contact
can also be used.
We recommend the use of modern thyristor-controlled electronic
B
flash units.
Important:
When attaching a flash unit to the Leica M-A’s flash shoe, you
should ensure that the foot of the flash unit is fully inserted and – if
present – prevented from accidentally falling out using the
tightening nut. This is important because changes in position in the
flash show can break the required contact, which means that the
attached flash unit would not be fired.
46
Page 19

Notes:
• Before attaching the flash, the camera and the flash unit must
be turned off.
• For more information about use of the flash and the various
modes offered by the flash units, refer to the relevant
instructions.
EN
Flash mode
47
Page 20

EN
SYSTEM ACCESSORIES
Leica M lenses
The Leica M system provides a basis for optimum adaptation to
fast and unobtrusive photography. The range of lenses
incorporates focal lengths from 16 to 135mm and light intensities
up to 1:0.95.
System accessories
Filters
UVa filters and a universal polarization filter M are available for
current Leica M lenses fitted with standard filter thread sizes.
Leica Universal Wide-Angle Viewfinder M
The Leica universal wide-angle viewfinder M is a thoroughly
practical accessory. It can be used without restriction on all analog
and digital Leica M models and – just like the viewfinder on the
camera – uses a reflected bright line frame to indicate the
trimming for wide-angle focal lengths 16, 18, 21, 24 and 28mm.
The viewfinder is equipped with parallax compensation and a vial
(spirit level) for exact leveling of the camera.
(Order no. 12 011)
Leica Angle Finder M
Mirror viewfinders are available for 18, 21, and 24mm lenses. They
feature an exceptionally compact design and a bright viewfinder
image. Bright line frames like those in the camera viewfinder are
used to select the trimming.
(Order no.
18mm: 12 022 black / 12 023 silver /
21mm: 12 024 black / 12 025 silver /
24mm: 12 026 black / 12 027 silver)
48
Page 21

Leica Viewfinder magnifier M 1.25x and M 1.4x
The Leica M 1.25x and M 1.4x viewfinder magnifiers significantly
simplify picture composition when using focal lengths above
35mm. They can be used on all Leica M models and magnify the
central area of the viewfinder image. The 1.25x viewfinder
magnifier gives the 0.72x viewfinder on the Leica M-A a
magnification of 0.85x, while the 1.4x gives 0.95x magnification. A
security chain with snap fasteners prevents loss and can be used
to hang the viewfinder on the carrying strap’s fastening ring. The
viewfinder magnifiers are supplied in a leather bag. A loop on the
case allows the viewfinder magnifier to be stored on the camera’s
carrying strap, where it is protected and ready for use.
(Order no. 12 004 M 1.25x / 12 006 M 1.4x)
Flash units
With a maximum guide number of 58 (in 105mm setting), a zoom
reflector, an optional second reflector and many other functions,
the Leica SF 58 system flash unit (order no. 14 488) is both
powerful and versatile.
With its compact dimensions and design that matches the camera,
the Leica SF 26 system flash unit (order no. 14 622) is the perfect
solution. Like the Leica SF 58, it is extremely easy to operate.
EN
System accessories
49
Page 22

EN
Leica Lens Holder M
A practical little accessory, which allows you to keep a second lens
to hand, held securely under the camera, with quick and easy
access at any time. The second lens can act as a comfortable
handle. The M lens holder is attached to the camera's tripod
thread.
(Order no. 14404)
System accessories
Leica Corrective Lenses M
For optimum adaptation of the eye to the camera’s viewfinder, we
offer corrective lenses with the following positive or negative
diopter values (spherical): 0.5/1/1.5/2/3
LEICA MOTOR M
The Leica Motor M for automatic shutter cocking and film winding
for single or series exposures of either 1.5 or 3 frames per second
can be connected to the Leica M-A. It is attached to the bottom of
the camera housing instead of the bottom cover. The Motor M is
suitable for all shutter speeds, i.e. from 1s to
s including the B
000
setting. When the Motor M is turned off or its batteries are flat, the
film can be wound and the shutter cocked manually.
(Order no. 14408)
LEICAVIT M
The Leicavit M is a smooth running and low-noise manual lever
wind for winding the film and cocking the shutter, and is attached
to the bottom of the camera instead of the bottom cover. Without
having to take the camera away from your eye, you can wind the
film by moving a swing-out winding lever to the left; partial steps
are also possible. The shutter is released using the camera’s
shutter release button. The camera’s quick wind lever can also be
used.
The Leicavit M is available in silver, black chrome finish or black
painted.
(Order no. 14008 / 14450 / 14009)
50
Page 23

Cases
Two neoprene carrying cases are available for the Leica M-A with
different front sections for different lens lengths, as well as classic
leather carrying cases in various styles of leather and a range of
colors. (Order no. 14 867 short / 14 868 long / 14 875 / 14 876
/ 14 857 - 14 865 leather / 14 856 leather, for camera with
Leicavit attached).
For your full set of camera equipment, the classic Billingham
combination case made of waterproof fabric is also available. This
either holds two cameras and two lenses or one camera and three
lenses. It has enough space for even large lenses and a fitted M
hand grip. A zipped compartment also provides space for a Leica
SF 26 flash and for other accessories.
(Order no. 14 854 black / 14 855 khaki).
Spare parts Order no.
Carrying strap ........................................................ ............14 312
Housing bayonet cover ........................................................14 397
EN
System accessories
51
Page 24

EN
CARE TIPS
If your Leica will not be used for a long period, ensure that it is
stored in a dry, well ventilated location.
Photo cases that became wet during use should be emptied to
prevent damage to your equipment caused by moisture and any
Care tips
leather-tanning residue released. To prevent fungal growth during
use in hot, humid tropical climates, the camera equipment should
be exposed to the sun and air as much as possible. Storage in
airtight containers or cases is only recommended if a desiccant,
such as silica gel, is also used.
As any dirt may also be a breeding ground for micro-organisms, the
equipment should be carefully kept clean.
All mechanically operated bearings and sliding surfaces on your
Leica are lubricated. Please remember this if you will not be using
the camera for a long period of time. To prevent the lubrication
points from becoming gummy, the camera should be wound on
several times and released with every shutter speed with no film
loaded every three months. It is also recommended that you
repeatedly move and use all other controls, such as the image field
selector.
A lens works like a magnifying glass if bright sunlight shines on the
front of the camera. The camera should therefore never be set
aside without protection against strong sunlight. Fitting the lens
cover and keeping the camera in the shade (or directly in the case)
help to prevent damage to the interior of the camera. To remove
stains and fingerprints, the camera should be wiped with a clean
lint-free cloth. Tougher dirt in hard to reach corners of the camera
body can be removed with a small brush.
Do not use liquid cleaning agents to clean the housing. Dust and
lint inside the camera (e.g. on the film guides) are best removed
carefully with a soft hair brush that has been repeatedly degreased
in alcohol and then dried. Be careful not to damage the shutter
curtain with the shaft of the brush.
Note the serial number of your Leica M-A (engraved on the
accessory shoe), as it is extremely important in case of loss.
52
Page 25

INDEX
Accessories ...............................................................................48
Attaching and removing lenses ...................................................41
Bright-line / View and range finder .............................................42
Care tips ....................................................................................52
Carrying strap ............................................................................34
Cases ........................................................................................51
Corrective lenses .......................................................................50
Distance setting .........................................................................44
Split image method .................................................................45
Superimposed image method ..................................................44
Exposure control ........................................................................45
B setting ...................................................................................35
Film
Loading ...................................................................................36
Rewinding and removing ..........................................................38
Film indicator .............................................................................40
Filters ........................................................................................48
Flash mode ................................................................................46
Synchronization .......................................................................46
Image field selector ....................................................................42
Lenses, Leica M .........................................................................48
Quick wind lever ........................................................................35
Repairs / Leica Customer Care ..................................................56
Shutter release, see Technical data ..................................... 35/54
Shutter speed setting dial ..........................................................35
Shutter, see Shutter release and Technical Data .................. 35/54
Technical data ...........................................................................54
Viewfinder ..................................................................................42
Bright line frame ............................................................... 42/43
Detachable viewfinder .............................................................48
EN
Index
53
Page 26

EN
Manuell einstellbare Verschlusszeiten von 1s bis
1/1000 s
für die Synchronzeit 1/50s für Blitzbetrieb
18
17a
17
16
11 c
15
TECHNICAL DATA
Camera type LEICA M-A (Typ 127) Compact 35mm range and
viewfinder system camera with mechanically controlled shutter
Lens connection Leica M bayonet
Lens system Leica M lenses from 16–135mm
Technical data
Exposure control Manual shutter speed and aperture setting
based on readings from external exposure meter or operator
assessment
Flash exposure control
Flash unit connection Using accessory shoe with center
contact
Synchronization With 1st shutter curtain
Flash sync speed
Flash exposure control Computer control of flash unit or guide
number calculation and manual setting of required aperture
=0s; slower shutter speeds can be used
Viewfinder
Viewfinder principle Large, bright line frame viewfinder with
automatic parallax compensation
Eyepiece Calibrated to –0.5 dpt. Corrective lenses from –3 to
+3 diopter available
Image field limiter By activating two bright lines each: For 28
and 90mm or for 35 and 135mm, or for 50 and 75mm; automatic
activation when lens is fitted
Image field selector Allows the bright-line pairs to be manually
activated at any time (e.g. to compare detail)
Parallax compensation Horizontal and vertical offset between
viewfinder and lens axis is automatically compensated according to
the relevant distance setting
Correlation between viewfinder and film images At the
shortest possible distance setting for each focal length, the bright
line frame size corresponds to an image size of approx. 23 x
35mm. When set to infinity, depending on the focal length between
9% (28mm) and 23% (135mm) more is captured by the film than is
shown in the corresponding bright line frame
Magnification (For all lenses) 0.72x
Large basis range finder Split or superimposed image range
finder shown as a bright field in the center of the viewfinder image
Effective measurement basis 49.9mm (mechanical
measurement basis 69.25mm x viewfinder magnification 0.72x)
54
Page 27

Shutter and shutter release
Manuell einstellbare Verschlusszeiten von 1s bis
1/1000 s
für die Synchronzeit 1/50s für Blitzbetrieb
18
17a
17
16
11 c
15
Shutter Rubber blanket slotted shutter with horizontal
movement; extremely low-noise; mechanically controlled
Shutter speeds From 1s to
long exposures of any duration,
s in whole increments, B for
000
(0s) for flash synchronization
Shutter release Standard thread for cable release integrated
Film winding
Loading Manual film loading after opening the bottom cover and
the rear panel
Winding forwards Manually with quick wind lever or Leicavit M,
motorized using Leica Motor-M, Leica Winder-M, Leica Winder
M4-P, or Leica Winder M4-2 (from serial no. 10 350)
Rewind Manually with pull-out rewind button, after moving the R
lever on the front of the camera
Frame counter On top of camera; automatic reset when bottom
cover is removed
Camera body
Material Enclosed all-metal body with hinged rear panel;
chromed brass top and bottom cover
Tripod thread A
1
/4 DIN 4503 (1/4“)
Rear panel/equipment Indicator for film sensitivity
Dimensions (Length x Depth x Height, in mm)
Approx. 138 x 38 x 77
Weight Approx. 578g
Items supplied Housing bayonet cover, carrying strap
EN
Technical data
55
Page 28

EN
LEICA PRODUCT SUPPORT
The Product Support department at Leica AG can provide you with
an answer to any technical questions relating to Leica products,
including software supplied, either in writing, on the telephone or
by e-mail.
They are also the contact point for purchasing advice and to order
instruction manuals. Alternatively, you can send us your questions
using the contact form on the Leica Camera AG homepage.
Leica Camera AG
Product Support / Software Support
Leica service addresses
Am Leitz-Park 5
D-35578 Wetzlar
Telephone: +49(0)6441-2080-111 /-108
Fax: +49(0)6441-2080-490
info@leica-camera.com / software-support@leica-camera.com
LEICA CUSTOMER CARE
For servicing your Leica equipment or in the event of damage, the
Leica Camera AG Customer Care department or the repair service
provided by authorized Leica agents in your country are available
(see the Warranty Card for a list of addresses).
Leica Camera AG
Customer Care
Am Leitz-Park 5
D-35578 Wetzlar
Telephone: 06441 2080-189
Fax: 06441 2080-339
customer.care@leica-camera.com
56
Page 29

Leica Camera AG I Am Leitz-Park 5 I 35578 WETZLAR I DEUTSCHLAND
Telefon +49 (0) 6441-2080-0 I Telefax +49 (0) 6441-2080-333 I www.leica-camera.com
93 557 VII/14/FBW/ B
 Loading...