

Leica HistoCore AUTOCUT, 14051956472, 14 9BIO000C2, 14 9AUTO00C1 Instructions For Use Manual
HistoCore AUTOCUT
Rotary Microtome
Instructions for Use
English
Order No.: 14 0519 80101 - Revision B
Always keep this manual with the instrument.
Read carefully before working with the instrument.
Version 1.1, Revision B - 10.2018


Important Note
The information, numerical data, notes and value judgments contained in this manual represent the
current state of scientific knowledge and state-of-the-art technology as we understand it following
thorough investigation in this field.
We are under no obligation to update the present manual periodically and on an ongoing basis
according to the latest technical developments, nor to provide our customers with additional copies,
updates etc. of this manual.
To the extent permitted in accordance with the national legal system as applicable in each individual
case, we shall not be held liable for erroneous statements, drawings, technical illustrations etc.
contained in this manual. In particular, no liability whatsoever is accepted for any financial loss or
consequential damage caused by or related to compliance with statements or other information in this
manual.
Statements, drawings, illustrations and other information regarding the contents or technical details of
the present Instructions for Use are not to be considered warranted characteristics of our products.
These are determined only by the contract provisions agreed between ourselves and our customers.
Leica reserves the right to change technical specifications as well as manufacturing processes without
prior notice. Only in this way is it possible to continuously improve the technology and manufacturing
techniques used in our products.
This document is protected under copyright laws. All copyrights to this documentation are held by
Leica Biosystems Nussloch GmbH.
Any reproduction of text and illustrations (or of any parts thereof) by means of print, photocopy,
microfiche, web cam or other methods – including any electronic systems and media – requires express
prior permission in writing by Leica Biosystems Nussloch GmbH.
For the instrument serial number and year of manufacture, please refer to the nameplate on the back of
the instrument.
Leica Biosystems Nussloch GmbH
Heidelberger Str. 17 - 19
D-69226 Nussloch
Germany
HistoCore AUTOCUT
Tel.: +49 - (0) 6224 - 143 0
Fax: +49 - (0) 6224 - 143 268
Web: www.LeicaBiosystems.com
Assembly contracted to Leica Microsystems Ltd. Shanghai
3

Table of Contents
1. Important Information ................................................................................................................................ 7
1.1 Symbols used in the text and their meanings ............................................................................................. 7
1.2 Instrument type ................................................................................................................................................ 9
1.3 Intended use ..................................................................................................................................................... 9
1.4 Qualification of personnel .............................................................................................................................. 9
2. Safety .......................................................................................................................................................... 10
2.1 Safety notes .................................................................................................................................................... 10
2.2 Warnings ......................................................................................................................................................... 10
2.2.1 Markings on the instrument itself ............................................................................................................... 11
2.2.2 Transport and installation ............................................................................................................................ 11
2.2.3 Operating the instrument.............................................................................................................................. 13
2.2.4 Cleaning and maintenance .......................................................................................................................... 20
2.3 Integrated protective devices ..................................................................................................................... 21
2.3.1 Emergency-stop function ............................................................................................................................. 21
2.3.2 Handwheel lock (manual operation only) .................................................................................................. 22
2.3.3 Safety guard on the knife/blade holder...................................................................................................... 23
3. Instrument Components and Specifications ........................................................................................25
3.1 Overview — instrument components ....................................................................................................... 25
3.2 Instrument specifications............................................................................................................................. 26
3.3 Technical Data ............................................................................................................................................... 28
4. Setting up the instrument ........................................................................................................................ 30
4.1 Installation site requirements ...................................................................................................................... 30
4.2 Standard delivery - packing list................................................................................................................... 30
4.3 Unpacking and installation........................................................................................................................... 32
4.4 Assembling the handwheel.......................................................................................................................... 35
4.5 Electrical connections .................................................................................................................................. 35
4.5.1 Checking the voltage..................................................................................................................................... 36
4.5.2 Connecting the power supply ...................................................................................................................... 36
4.5.3 Connecting the dummy plug ........................................................................................................................ 37
4.5.4 Connecting the foot switch (optional accessory) .................................................................................... 37
4.5.5 Connecting the control panel ...................................................................................................................... 38
4.6 Switching on the instrument ........................................................................................................................ 38
5. Operation .................................................................................................................................................... 40
5.1 Operating elements and their functions .................................................................................................... 40
5.1.1 Instrument control panel .............................................................................................................................. 40
5.1.2 Separate control panel ................................................................................................................................. 41
5.1.3 Display and control elements ...................................................................................................................... 43
5.1.4 Electronic coarse feed wheel...................................................................................................................... 53
4
Version 1.1, Revision B

Table of Contents
5.1.5 Fine directional specimen holder fixture ................................................................................................... 53
5.1.6 Fine adjustment of the force balance......................................................................................................... 55
5.2 Inserting the two-in-one blade holder E .................................................................................................... 56
5.2.1 Setting up the blade holder base ................................................................................................................ 56
5.2.2 Inserting the two-in-one blade holder E .................................................................................................... 57
5.3 Adjusting the clearance angle .................................................................................................................... 57
5.4 Inserting the universal cassette clamp...................................................................................................... 58
5.5 Clamping the specimen ................................................................................................................................ 59
5.6 Clamping the knife/disposable blade ......................................................................................................... 59
5.7 Trimming the specimen ................................................................................................................................ 62
5.7.1 Trimming in manual operation ..................................................................................................................... 62
5.7.2 Trimming in motorized operation ................................................................................................................ 63
5.8 Sectioning ....................................................................................................................................................... 64
5.9 Changing the specimen or interrupting sectioning ................................................................................. 66
5.10 Finishing the daily routine ............................................................................................................................ 66
6. Optional Accessories ...............................................................................................................................68
6.1 Assembly for fixture for specimen clamps ................................................................................................ 68
6.1.1 Rigid fixture for specimen clamps .............................................................................................................. 68
6.1.2 Directional fixture for specimen clamps.................................................................................................... 69
6.1.3 Fine-directional fixture for specimen clamps ........................................................................................... 69
6.1.4 Quick clamping system ................................................................................................................................. 70
6.2 Specimen clamps and holders .................................................................................................................... 70
6.2.1 Standard specimen clamp ........................................................................................................................... 71
6.2.2 V-insert ............................................................................................................................................................ 72
6.2.3 Foil clamp type 1 ........................................................................................................................................... 72
6.2.4 Universal cassette clamp ............................................................................................................................. 73
6.2.5 Super mega-cassette clamp........................................................................................................................ 75
6.2.6 Holder for round specimens ........................................................................................................................ 75
6.3 Knife holder base and knife holder ............................................................................................................. 76
6.3.1 Knife holder base, without lateral displacement feature ....................................................................... 77
6.3.2 Knife holder E-TC ........................................................................................................................................... 77
6.3.3 Two-in-one blade holder E ........................................................................................................................... 78
6.3.4 Knife holder E with a water trough for low-profile blades ..................................................................... 79
6.3.5 Knife holder N/NZ .......................................................................................................................................... 80
6.4 Section waste tray ......................................................................................................................................... 82
6.5 Backlighting .................................................................................................................................................... 82
6.6 Top tray ............................................................................................................................................................ 83
6.7 Universal microscope carrier ...................................................................................................................... 83
HistoCore AUTOCUT
5

Table of Contents
6.8 Magnifying lens, LED illumination ............................................................................................................... 86
6.9 Additional accessories ................................................................................................................................. 88
6.10 Ordering information ................................................................................................................................... 100
7. Troubleshooting ......................................................................................................................................102
7.1 Error codes ................................................................................................................................................... 102
7.2 Possible faults .............................................................................................................................................. 103
7.3 Instrument malfunctions............................................................................................................................. 105
7.4 Malfunctions of the two-in-one blade holder E ...................................................................................... 107
7.4.1 Replacing the pressure plate..................................................................................................................... 107
7.4.2 Mounting the clamping top onto the segment arc ................................................................................. 108
7.5 The setting of the clamping system of the clamp mount on the base plate ...................................... 108
8. Cleaning and Maintenance ...................................................................................................................109
8.1 Cleaning the instrument.............................................................................................................................. 109
8.2 Maintenance ................................................................................................................................................ 112
8.2.1 Replacing fuses ............................................................................................................................................ 112
8.3 Maintenance instructions .......................................................................................................................... 113
8.4 Lubricating the instrument ......................................................................................................................... 114
9. Warranty and Service ............................................................................................................................116
9.1 Warranty ....................................................................................................................................................... 116
9.2 Service information ..................................................................................................................................... 116
9.3 Decommissioning and disposal................................................................................................................. 116
10. Decontamination Confirmation ............................................................................................................117
6
Version 1.1, Revision B
1. Important Information
1.1 Symbols used in the text and their meanings
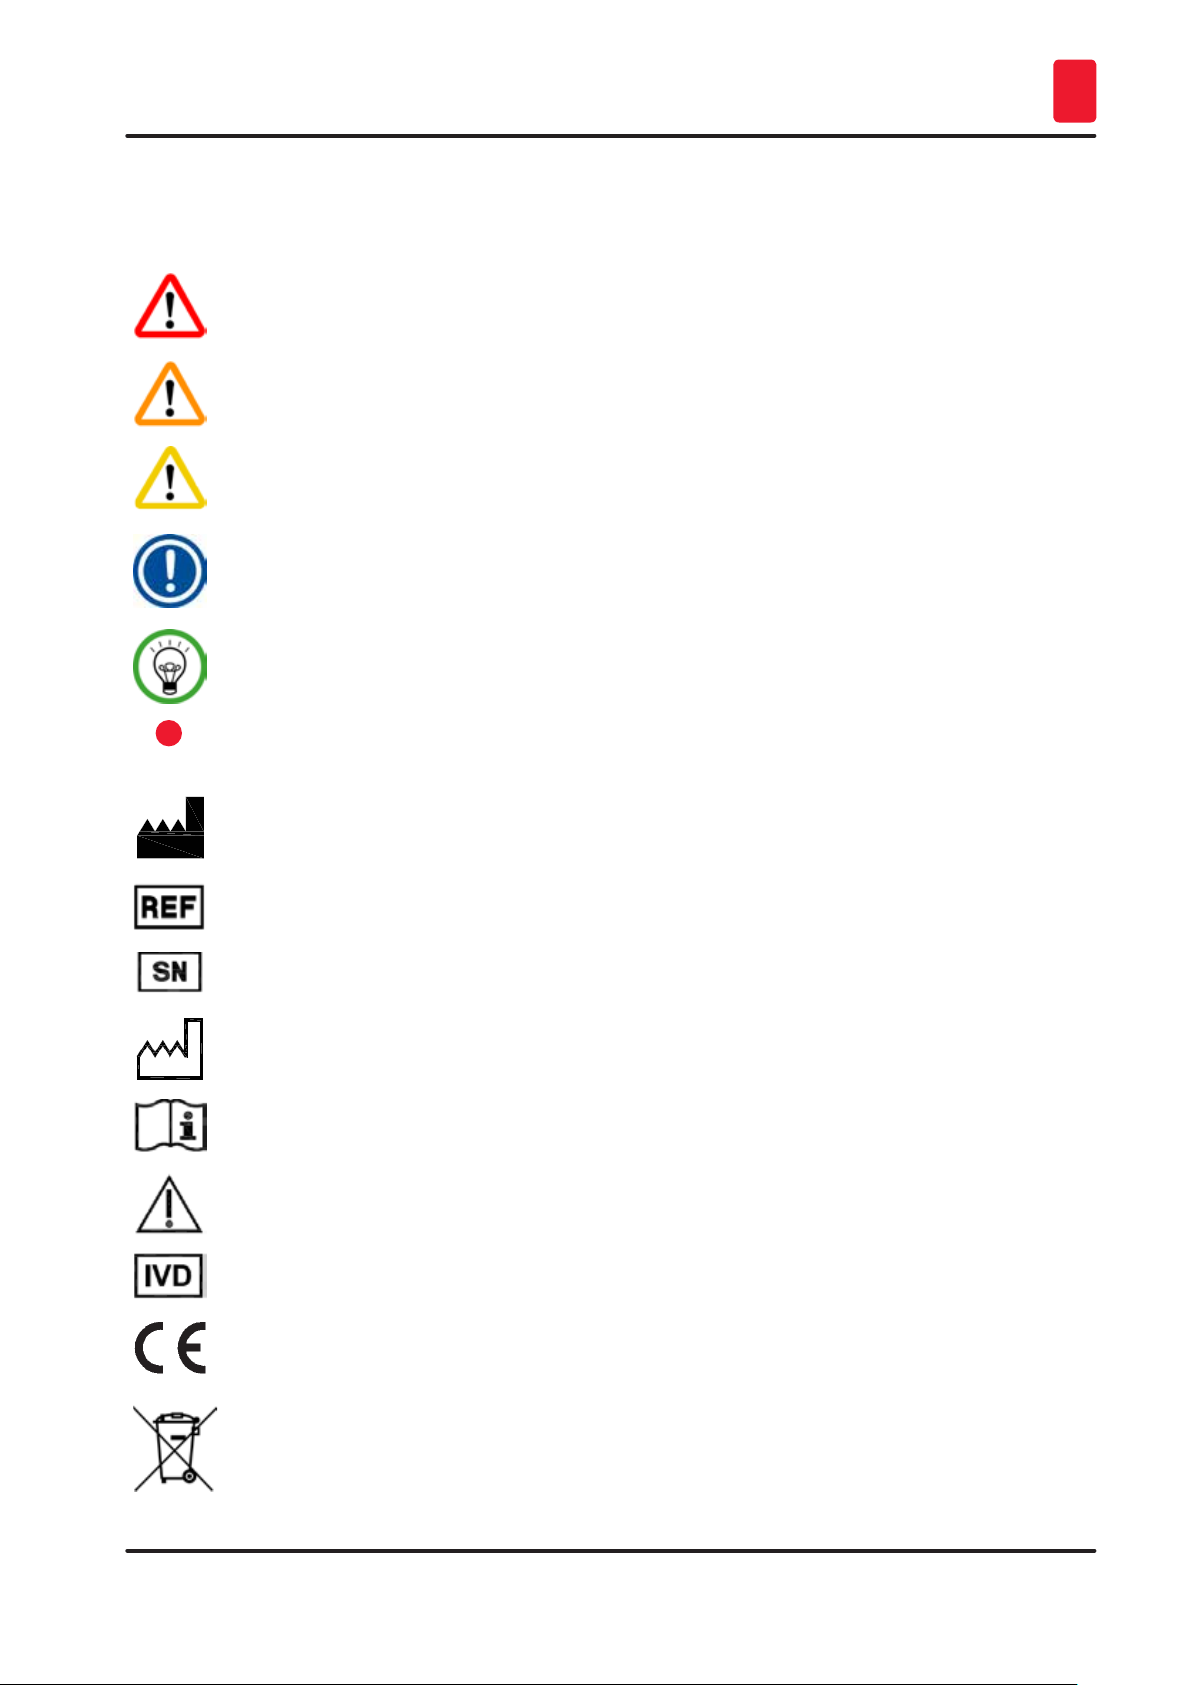
Danger:
Indicates an imminently hazardous situation which, if not avoided, will result in death
or serious injury.
Warning:
If this danger is not avoided, then this may result in death or serious injury.
Caution:
Indicates a potentially hazardous situation which, if not avoided, could result in death
or serious injury.
Note:
Indicates a situation with the potential for property damage which, if not avoided,
could result in damage to the machine or something in its vicinity.
Tip:
Gives you tips to simplify your workflow.
Important Information 1
1
→ "Fig. 7 - 1" Numbers in red refer to item numbers in illustrations.
Item numbers for numbering illustrations.
Manufacturer
Order number
Serial number
Date of manufacture
Observe the Instructions for Use.
Caution, consult the instructions for use for cautionary information.
In vitro diagnostics (IVD) medical device
HistoCore AUTOCUT
This product fulfills the requirements of the EU directives.
Symbol for labeling electrical and electronic equipment in accordance with Section 7
of the German Electrical and Electronic Equipment Act (ElektroG). ElektroG is the law
on the bringing into circulation, return and environmentally compatible disposal of
electrical and electronic equipment.
7
Important Information
1
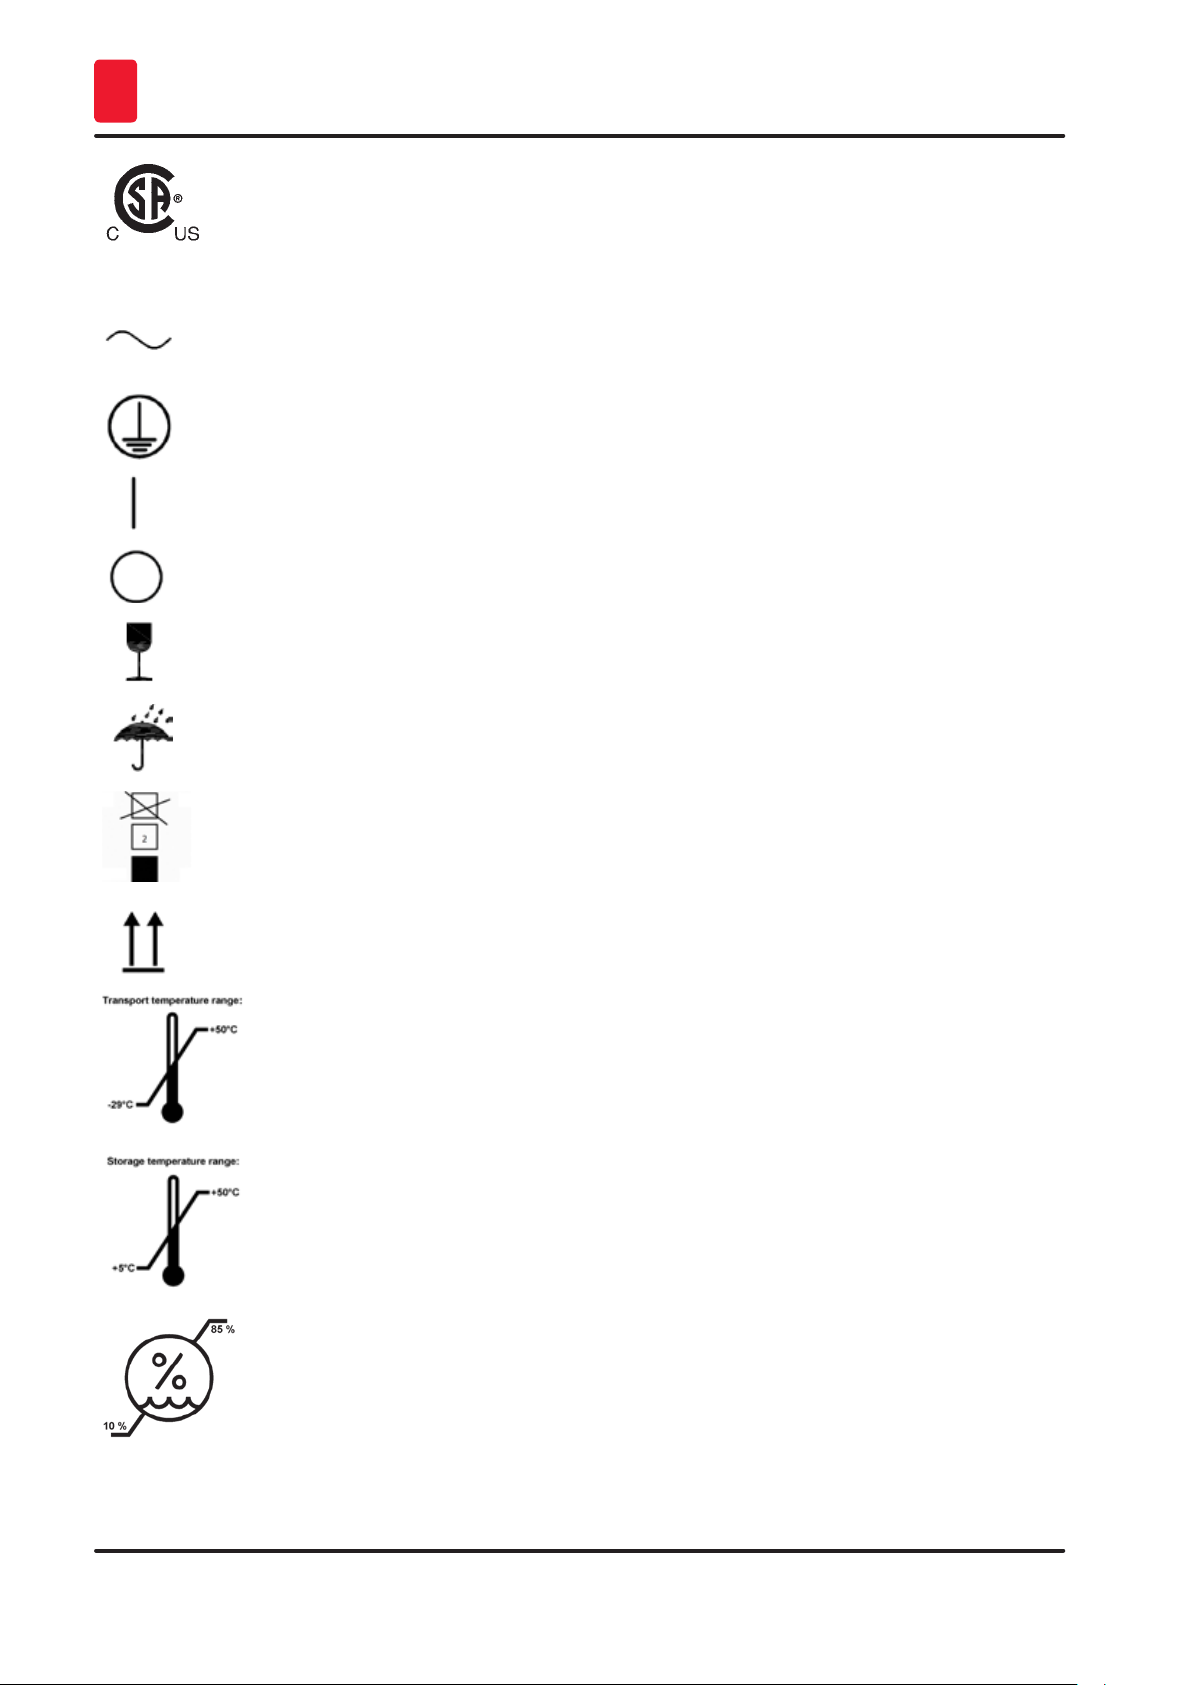
The CSA test mark means that a product has been tested and fulfills the applicable
safety and/or performance standards, including the relevant standards defined or
administered by the American National Standards Institute (ANSI), Underwriters
Laboratories (UL), the Canadian Standards Association (CSA), the National Sanitation
Foundation International (NSF) and others.
Symbol for alternating current
PE terminal
Power on
Power off
The package contents are fragile and must be handled with care.
The package must be kept in a dry environment.
Maximum of 3 stacked layers
Indicates the correct upright position of the package.
Indicates the temperature range permitted for transporting the package.
Minimum -29 °C
Maximum +50 °C
Indicates the temperature range permitted for storing the package.
Minimum +5 °C
Maximum +50 °C
Indicates the humidity range permitted for storing and transporting the
package.
minimum 10 % r.H.
maximum 85 % r.H
8
Version 1.1, Revision B
1.2 Instrument type
Important Information 1
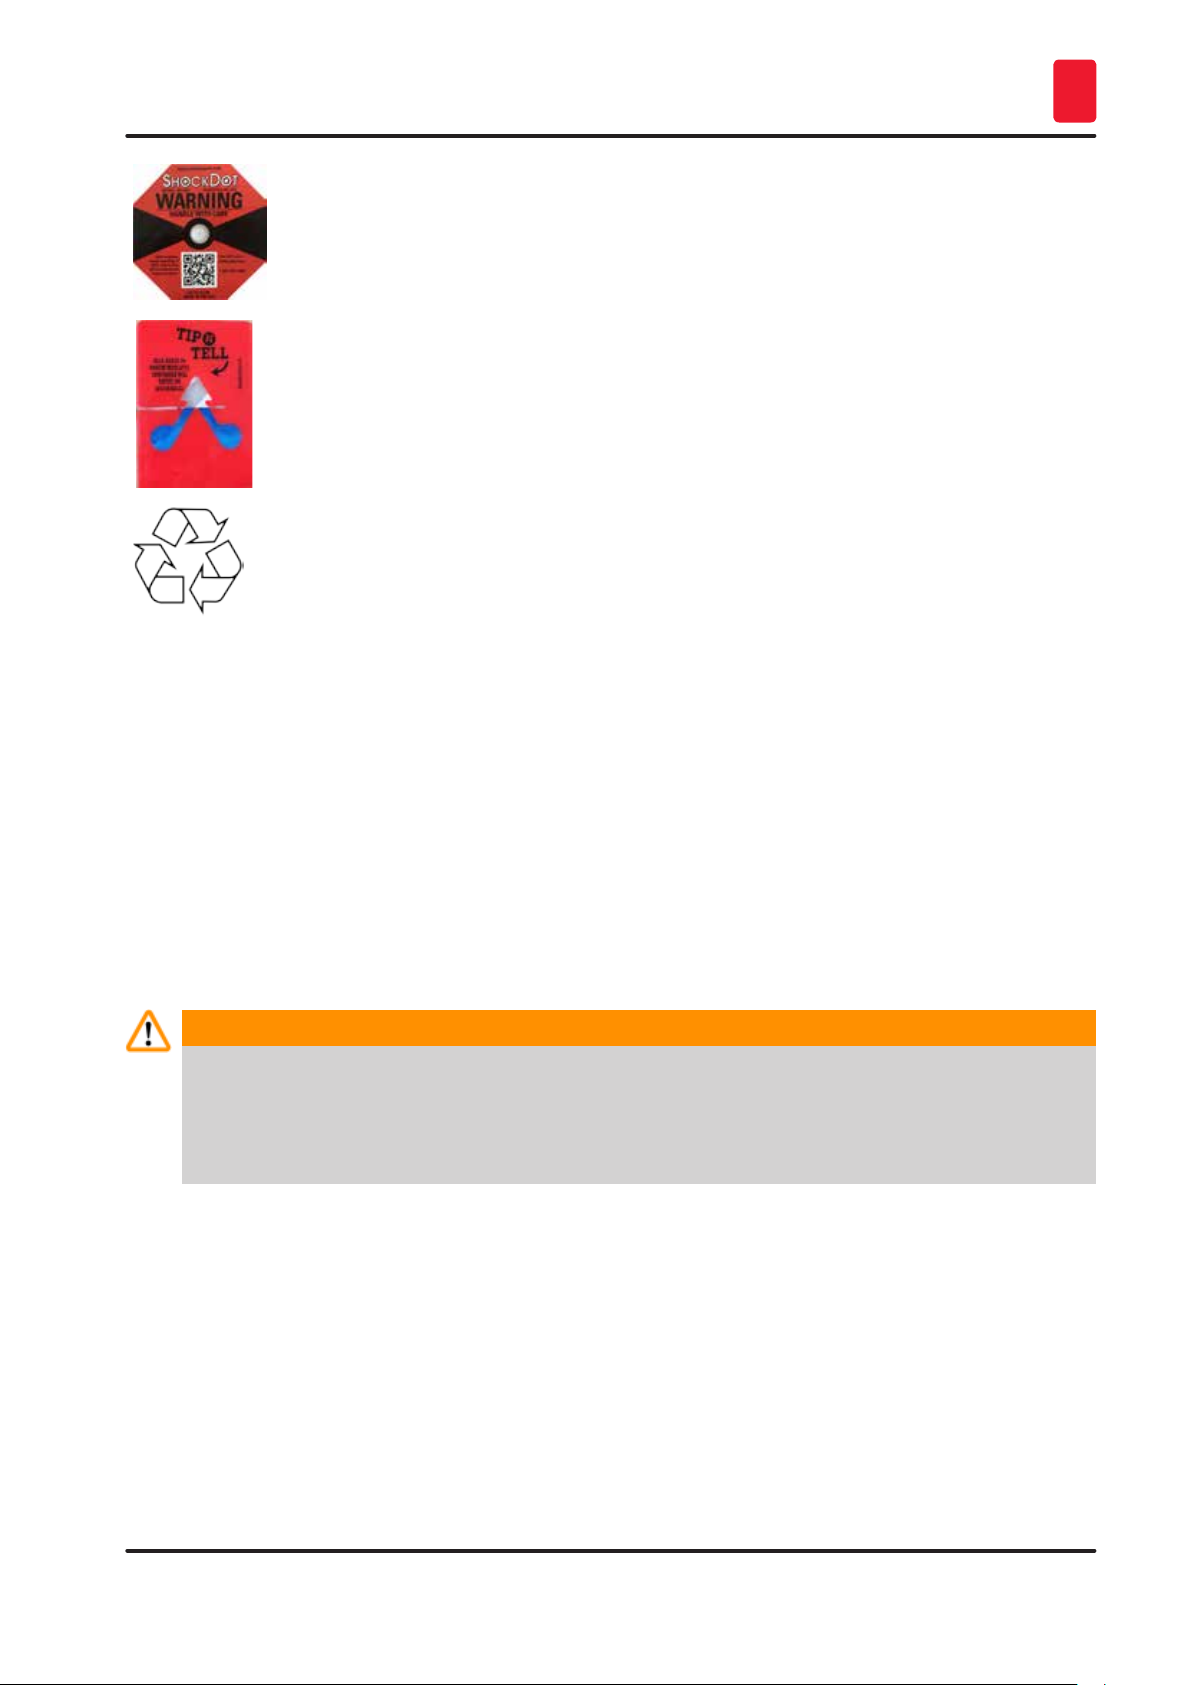
In the Shockwatch system, the shock dot shows impacts or shocks that are above a
specified intensity through red colouration. Exceeding a defined acceleration (g value)
causes the indicator tube to change colour.
Tip-n-Tell indicator to monitor whether the shipment has been transported and stored
in upright position according to your requirements. With a pitch of 60° or more, the
blue quartz sand flows into the arrow-shaped indicator window and sticks there
permanently. Improper handling of the shipment is immediately detectable and can be
proven definitively.
Indicates the item can be recycled where correct facilities exist.
All information provided in these Instructions for Use applies only to the instrument type indicated on
the title page. A nameplate indicating the instrument serial number is attached at the back side of the
instrument.
1.3 Intended use
The HistoCore AUTOCUT is a fully automatic, motorized rotary microtome with a separate control panel
specifically designed for creating thin sections of human tissue specimens of varying hardness for
histological medical diagnosis, e.g. cancer diagnosis. It is intended for sectioning soft and hard human
specimens, as long as they are suitable for being cut motorized or manually.
Warning
Any use other than the intended use.
Serious injury of persons and/or damage to specimen.
• Follow the intended use described in the Instructions for Use. Any other use of the instrument will
be considered as improper use.
1.4 Qualification of personnel
• The HistoCore AUTOCUT must be operated by trained laboratory personnel only.
• All laboratory personnel designated to operate this instrument must read these Instructions for Use
carefully and must be familiar with all technical features of the instrument before attempting to
operate it.
HistoCore AUTOCUT
9

Safety
2
2. Safety
2.1 Safety notes
The Instructions for Use include important information related to the operating safety and maintenance
of the instrument.
The Instructions for Use are an important part of the product, and must be read carefully prior to startup
and use and must always be kept near the instrument.
This instrument has been built and tested in accordance with the safety regulations for electrical
measuring, control, regulating and laboratory instruments.
To maintain this condition and ensure safe operation, the user must observe all notes and warnings
contained in the Instructions for Use.
The safety and caution notes in this chapter must be observed at all times.
Be sure to read these notes even if you are already familiar with the operation and use of other Leica
Biosystems products.
The Instructions for Use must be appropriately supplemented as required by the existing regulations on
accident prevention and environmental safety in the operator‘s country.
Warning
Protective devices or safety accessories provided by manufacturer have been removed or modified.
Serious injury of persons and/or property damage including specimen damage.
• Never remove or modify any protective devices of the instrument or any accessories. Only service
personnel qualified by Leica Biosystems may repair the instrument and access the instrument's
internal components.
• Before working with the instrument always assure that all protective devices and safety
accessories are in place and fulfill their purpose properly.
Tip
The current EC Declarations of Conformity can be found on the Internet:
http://www.LeicaBiosystems.com
The electromagnetic environment should be evaluated prior to operation of the instrument. Do not
use this instrument in close proximity to sources of strong electromagnetic radiation (e.g. unshielded
intentional RF sources), as these can interfere with the proper operation.
The instrument complies with the emission and immunity requirements described in the IEC 61326-2-6.
2.2 Warnings
The protective devices installed in this instrument by the manufacturer only constitute the basis for
accident prevention. Operating the instrument safely is, above all, the responsibility of the owner, as
well as the designated personnel who operate, service or clean the instrument.
To ensure trouble-free operation of the instrument, be sure to comply with the following instructions
and warnings.
10
Version 1.1, Revision B

2.2.1 Markings on the instrument itself
Warning
Failure to follow the correct operating instructions (as defined in the Instructions for Use) of the
corresponding markings and warning triangles on the instrument.
Serious injury of persons and/or damage to instrument, accessories or specimen.
• Pay attention to the markings on the instrument and strictly follow operating instructions
described in the Instructions for Use when operating or replacing the item marked.
2.2.2 Transport and installation
Warning
Accessories/instrument falling out of the package during unpacking.
Serious injury of persons and/or property damage.
• Be careful when unpacking the instrument.
• Once unpacked, the instrument must be moved only in an upright position.
• Thoroughly follow the instructions given in the Unpacking Instructions attached at the outside of
the package or the actions described in the Instructions for Use.
Safety 2
Warning
Instrument is lifted inappropriately.
Serious injury of persons and/or property damage.
• When lifting the instrument touch it only at the lifting points described in the Instructions for Use
and Unpacking Instructions (base plate at the front and under the instrument on the back).
• Never lift the instrument by the handwheel grip, electric coarse feed wheel, or object head.
• Always remove the section waste tray before transporting the instrument.
Warning
Careless moving of the instrument.
Serious injury of hands and/or fingers due to getting crushed between instrument and working
surface.
• When moving the instrument, touch it only at the lifting points described in the Instructions for Use
and Unpacking Instructions (base plate at the front and under the instrument on the back).
• Thoroughly pay attention that hands do not get between instrument and working surface.
Warning
Instrument not positioned safely with all 4 feet on an appropriate laboratory table.
Serious injury of persons and/or property damage.
• Put the instrument only on a stable, vibration free laboratory table with horizontal, flat table top.
Ground needs to be vibration-free as far as possible.
• Always make sure that all 4 feet are positioned completely on the laboratory table.
• If the instrument has been potentially moved by other persons (for example for servicing) always
double-check correct positioning.
HistoCore AUTOCUT
11

Safety
2
Warning
Condensation inside the instrument due to exposure to extreme differences in temperature and high
air humidity.
Damage of the instrument.
• Always make sure that for both storage and operation appropriate climate conditions are met. See
the section of Technical data (→ P. 28 – 3.3 Technical Data).
• After transporting the instrument, wait at least two hours to allow the instrument to adopt the
ambient temperature before turning it on.
Warning
Knife/blade holder falling off the instrument.
Serious injury of persons and/or property damage.
• If the knife/blade holder is not fixed, for example, during installation or cleaning, pay special
attention that the knife/blade holder is not falling off.
• Whenever possible, fix the knife/blade holder to avoid falling off.
• For installation or maintenance purposes remove the knife/blade holder from the knife holder base
to avoid accidental falling off.
Warning
Section waste tray falling down after it has been detached.
Injury of persons.
• Work especially carefully when detaching the section waste tray and put it in a safe place.
Warning
Oil is spilled and not cleaned-up immediately.
Serious injury of persons, for example, by slipping and getting in contact with dangerous parts like
the knife/blade of the instrument.
• Always make sure that no oil is spilled.
• If oil has been spilled, clean it up immediately, thoroughly and completely.
Warning
Paraffin waste falls on the floor and is not cleaned-up.
Serious injury of persons, for example, by slipping and stumbling into the knife/blade.
• Always clean up paraffin waste before it spreads, becomes slippery, and becomes a hazard.
• Wear appropriate shoes.
Warning
Wrong voltage of power supply selected at the voltage selector.
Instrument damage, delay of specimen processing.
• Assure to select the voltage fitting to your mains voltage before plugging in the instrument.
• When changing the voltage selector setting, ensure that the instrument is not connected to the
line voltage.
12
Version 1.1, Revision B

Warning
Connecting the instrument to a non-grounded socket, or use an extension cord.
Risk of electrical shock which causes injury to persons, or delayed diagnosis.
• The instrument must be connected to a grounded socket.
• Do not use an extension cord.
Caution
Accessories/components loosening/damaged during transportation.
Property damage or delayed diagnosis.
• The packaging has two indicators, ShockDot Impact Indicator and Tilt Indicator, that indicate
improper transport. When the instrument is delivered, check these first. If one of the indicators
is triggered, the package was not handled as prescribed. In this case, please mark the shipping
documents accordingly and check the shipment for damage.
2.2.3 Operating the instrument
Safety 2
Danger
Explosive hazard.
Death or Serious injury of persons, and/or property damage.
• Never operate the instrument in rooms with an explosive hazard.
Warning
Personnel with insufficient qualification working with the instrument.
Serious injury of persons and/or specimen damage can occur when specimen approaches knife/
blade due to inappropriate operator actions, for example, because object head may drop onto knife
holder when handwheel is unlocked.
• Always make sure that only laboratory personnel with dedicated and sufficient training and
qualification operates the instrument.
• Always make sure that all laboratory personnel designated to operate this instrument has read
these Instructions for Use carefully and is familiar with all technical features of the instrument
before start working with it.
Warning
Protective devices or safety accessories provided by manufacturer have been removed or modified.
Serious injury of persons and/or property damage including specimen damage.
• Never remove or modify any protective devices of the instrument or any accessories. Only service
personnel qualified by Leica Biosystems may repair the instrument and access the instrument's
internal components.
• Before working with the instrument always assure that all protective devices and safety
accessories are in place and fulfill their purpose properly.
HistoCore AUTOCUT
13

Safety
2
Warning
Personal protective equipment is not used.
Injury of persons.
• When working with microtomes, personal safety precautions must always be taken. It is
mandatory to wear work safety shoes, safety gloves, a mask and safety goggles.
Warning
Knives or blades are handled and/or disposed in an inappropriate manner.
Serious injury of persons due to contact with extremely sharp knife/blade.
• Work especially thoroughly and carefully when handling the knife/blade.
• Always wear dedicated clothes (including cut-resistant gloves) when handling knife/blade.
• Dispose knives and blades always in a safe place (for example, dedicated knife case) and an
appropriate manner that ensures that people cannot get hurt.
• Never place a knife anywhere with the cutting edge facing upwards and never try to catch a
falling knife.
• Always cover the edge of the knife/blade with the safety guard before clamping the specimen.
Warning
Knife/blade was not removed when knife/blade holder was uninstalled from the microtome.
Serious injury of persons due to contact with extremely sharp knife/blade.
• Before uninstalling the knife/blade holder from the microtome always make sure to detach the
knife/blade wearing cut-resistant gloves and store the knife/blade in a safe place.
Warning
The operator grabs into the knife/blade due to inappropriate working procedure.
Serious injury of persons when putting the specimen in place if knife/blade has been installed
before.
• Prior to uploading the specimen on the microtome, make sure that the cutting edge has been
covered by the safety guard and the hand wheel locking mechanism has been activated. Once
the operator wants to upload the specimen as well as inserting a knife/blade, always upload the
specimen block before mounting and clamping the knife/blade.
Warning
The operator installs two knives/blades on the knife/blade holder.
Serious injury of persons due to contact with extremely sharp knives and/or blades.
• Do not clamp two knives/blades on the knife holder/blade holder. Install the knife/blade in the
center of the knife/blade holder. Knives/blades must not exceed the edge of the knife/blade
holder.
14
Version 1.1, Revision B

Safety 2
Warning
The knife/blade is installed before the knife/blade holder and the knife/blade holder base are installed
on the instrument.
Serious injury of persons due to contact with extremely sharp knives and/or blades.
• Prior to inserting the knife/blade, both the knife/blade holder and the knife/blade holder base must
be installed on the microtome.
Warning
Knife/blade is not covered with the appropriate guard when not sectioning specimen.
Serious injury of persons.
• Always cover the knife/blade edge with the appropriate guard prior to any manipulation of knife/
blade or specimen clamp, prior to changing the specimen and during all work breaks.
Warning
Knife/blade stored in inappropriate manner.
Serious injury of persons, for example due to unexpected fall off.
• Always store the knife/blade in an appropriate place when not using it, for example, store it in the
dedicated knife case.
• Never place a knife anywhere with the cutting edge facing upwards and never try to catch a
falling knife.
Warning
Uploading or unloading the specimen on the microtome without appropriate clothes and in an
inappropriate manner.
Operator can get cut and injured which can lead to serious consequences.
• Always use cut resistant safety gloves when handling the specimen within the microtome.
• Lock the handwheel and cover the knife edge with the safety guard prior to any manipulation of
the specimen clamp and prior to changing the specimen.
Warning
Specimen is oriented in retraction phase.
Damage of specimen and/or knife/blade.
• Specimen blocks must not be oriented during the retraction phase. If a block is oriented during
retraction, the block will be fed by the retraction value plus the selected section thickness before
the next section. This may cause damage to both specimen and knife/blade.
Warning
Working with the instrument and brittle specimen without appropriate protective clothes.
Serious injury of persons by splinters while cutting brittle specimen.
• Always wear appropriate protective clothes (including safety goggles) and work especially
carefully when cutting brittle specimen.
HistoCore AUTOCUT
15

Safety
2
Warning
Wrong fine adjustment of the force balance.
Serious injury of the operator due to contact with knife and/or specimen damage.
• Before working with the instrument, always double-check that the fine adjustment of the force
balance is properly set.
• If fine adjustment is not properly set, do not work with the instrument but perform a readjustment.
For details, refer to chapter "Fine adjustment of the force balance".
• Especially after changing accessories at the object head, perform a fine adjustment of the force
balance immediately.
Warning
Insufficient frame conditions for sectioning.
Specimen damage or poor sectioning results, for example, sections alternating in thickness,
compressed, folded or stripped sections.
• Do not continue sectioning if you recognize insufficient sections results.
• Make sure that all prerequisites for appropriate sectioning are met. Refer to the troubleshooting
section of these Instructions for Use for further details.
• If you do not have sufficient knowledge in regards of troubleshooting insufficient sectioning
results consult persons who do have that knowledge, for example, application experts of Leica
Biosystems.
Warning
Wheel turn direction of electric coarse feed incorrectly selected.
Specimen damage.
• Always assure that you have selected the correct turn direction of the coarse feed before turning
the wheel.
Warning
Turning the handwheel counterclockwise.
People injury/Damage to specimen.
• Do not turn the handwheel counterclockwise, which may lead to handwheel locking mechanism
malfunction.
Warning
The hand wheel is unlocked and the object head drops into knife/blade holder.
People injury/Damage to specimen.
• Except sectioning phase, the handwheel must be locked at all times.
16
Version 1.1, Revision B

Safety 2
Warning
Inappropriate selection of sectioning speed.
Specimen damage.
• Always set the sectioning speed according to the hardness of the specimen. For hard specimens,
always select a slow speed.
Warning
The handwheel brake lever is not used properly, and the handwheel cannot be braked.
Serious injury of instrument/persons, or specimen damage.
• The handwheel brake lever must be exactly in the locked position. If the handwheel brake lever is
moved beyond this point, it is possible that the handwheel is no longer braked.
Warning
Handle of the handwheel is not centered while motorized sectioning mode has been activated.
Serious injury of persons and/or property damage.
• Before activating motorized sectioning mode, always assure that you have centered the handle of
the handwheel.
Warning
When doing fast manual trimming and fingers are put between the specimen and the knife/blade after
the handwheel is released.
Operator can get cut and injured due to the turning of the handwheel when it is unlocked.
• Do not put fingers between the specimen and the knife/blade during trimming and sectioning.
Warning
Emergency stop does not work after software crash.
Specimen damage.
• Try to restart the instrument.
• If restart fails, unplug the power cord and contact Leica Biosystems service representative.
Warning
Improper fix to software freeze.
Specimen damage and/or delay of diagnose.
• In case of a software freeze follow the instructions given in chapters Troubleshooting and
Operation.
• If instrument cannot set back into operation immediately, make sure that the specimen is stored in
an appropriate manner to avoid any damage to it.
• If required, contact Leica Biosystems service representative.
HistoCore AUTOCUT
17

Safety
2
Warning
Misinterpretation of the yellow LED in the M-STOP field.
Serious injury and/or property damage.
• Operate the instrument only after you have completely understood the meaning of the 3 possible
LED indications. Extinguished light: the instrument is ready to use (no brake engaged); blinking
light: the electronic brake is engaged, but mechanical locking system is deactivated; permanent
light: the mechanical locking system is activated.
• The handwheel is securely locked only when the handwheel locking mechanism is in the 12
o'clock position.
Caution
After the knife/blade holder is laterally displaced, the specimen is not retracted and retrimmed.
Specimen damage.
• Retract the object head and retrim the specimen block each time after laterally displacing the
knife/blade holder.
Caution
Rotating the handwheel and the coarse feed wheel at the same time.
Specimen damage.
• Do not turn the coarse feed wheel whilst rotating the handwheel.
Caution
The feather key is lost when mounting the handwheel.
The instrument cannot be used, and it may cause the delay of diagnosis.
• Before assembling the handwheel, check the feather key and make sure that it is in the
handwheel shaft.
Caution
Manual movement of knife/blade holder and/or object head after setting-up the memory position.
Damage of specimen.
• Do not move the knife/blade holder, the holder base and/or object head and do not readjust the
orientation without readjusting the memory position.
Caution
After trimming by using the electronic coarse feed, the user does not switch to sectioning mode.
Specimen damage or unexpected functioning of the instrument.
• After completion of trimming with the electronic coarse feed remember to switch back to sectioning
mode.
• Before starting sectioning always make sure that an appropriate sectioning thickness has been
selected.
18
Version 1.1, Revision B

Safety 2
Caution
Operating the handwheel locking mechanism during motorized sectioning.
Instrument in malfunction and delayed diagnosis.
• Never operate the handwheel locking mechanism during motorized sectioning.
• To stop the motorized sectioning, use the RUN/STOP button or ENABLE button or the BRAKE
button on the separate control panel.
Caution
Turning the electronic coarse feed wheel during fast homing or moving to the memory position.
Specimen impaired.
• Do not touch the electronic coarse feed wheel during fast homing or moving to the memory
position.
Caution
Turning the handwheel or pressing buttons on the separate control panel or the instrument control
panel during fast homing or moving to the memory position.
Specimen impaired.
• Do not turn the handwheel or press any button on the separate control panel or the instrument
control panel during fast homing or moving to the memory position.
Caution
The memory position is set too close to the knife/blade.
Specimen impaired.
• Make sure that the specimen does not touch the cutting edge of the knife/blade when setting
the memory position. Move the object head a little bit backward if the cutting edge touches the
specimen or is positioned very close to the surface of the specimen when setting the memory
position.
• Do not upload a specimen with different thickness using the same memory position.
Caution
Failure to reset the memory position after the instrument is switched off or after a power failure.
Damage to specimen.
• When the instrument is switched off or there is a power failure, previously stored memory position
data is erased. Set the memory position again after powering on the instrument.
Caution
Using the electronic brake to lock the handwheel.
People injury / Damage to specimen.
• Electronic brake is a brake mechanism which cannot work as a security lock. The handwheel is
securely locked only when the handwheel locking mechanism is in the 12 o'clock position.
HistoCore AUTOCUT
19
Safety
2
2.2.4 Cleaning and maintenance
Warning
Cleaning the instrument without unplugging the power plug.
Electrical shock which causes injury of persons.
• Before each cleaning, switch off the instrument and disconnect the power plug from the mains.
Warning
The liquids go into the interior of the instrument.
Serious injury of instrument/persons.
• Ensure that liquids do not enter the interior of the instrument during operation and maintenance.
Spray proper solvents or cleaners on a cleaning pad and not directly on the instrument to prevent
liquids from entering. If liquids go into interior of instrument, contact Leica Biosystems service.
Warning
Wiping the knife in the wrong direction during cleaning.
Serious injury of persons.
• Always wipe the knife from the back of the knife to the cutting edge.
Warning
Removing the parts from the drying chamber (65 °C) during cleaning of the knife/blade holder.
Scalding hazard.
• Wear heat insulating gloves when removing the parts from the drying chamber (65 °C).
Warning
Replacing the fuses without switching off the instrument and unplugging the power plug.
Electrical shock which causes injury of persons.
• Turn the instrument off with the power switch and disconnect the power plug from the mains
before replacing the fuses.
Caution
Using the wrong fuses which are not with the same specification defined in the section of Technical
data in the Instructions for Use.
Delayed diagnosis because the instrument does not work using wrong fuses.
• Only use fuses of the same specification defined in the section of Technical data in the
Instructions for Use.
20
Version 1.1, Revision B
Safety 2
Caution
Use of improper solvents or cleaners, or sharp/hard tools to clean the instrument or accessories.
Potential instrument malfunction or delay of diagnosis.
• Do not use any solvents containing acetone or xylene for cleaning the instrument.
• When using cleaners, please comply with the safety instructions of the manufacturer and the
laboratory safety regulations.
• Never use a sharp or hard tool to scrape the instrument surface.
• Never soak the accessories in any cleaning solvent or water.
• Clean steel knives using an alcohol-based solution or acetone.
• For cleaning and removal of paraffin, do not use xylene or cleaning fluids containing alcohol (for
example glass cleaner).
Caution
During cleaning, the parts of blade holders are mixed up.
Poor section quality.
• Do not mix up blade holders during cleaning.
2.3 Integrated protective devices
Warning
Protective devices or safety accessories provided by manufacturer have been removed or modified.
Serious injury of persons and/or property damage including specimen damage.
• Never remove or modify any protective devices of the instrument or any accessories. Only service
personnel qualified by Leica Biosystems may repair the instrument and access the instrument's
internal components.
• Before working with the instrument always assure that all protective devices and safety
accessories are in place and fulfill their purpose properly.
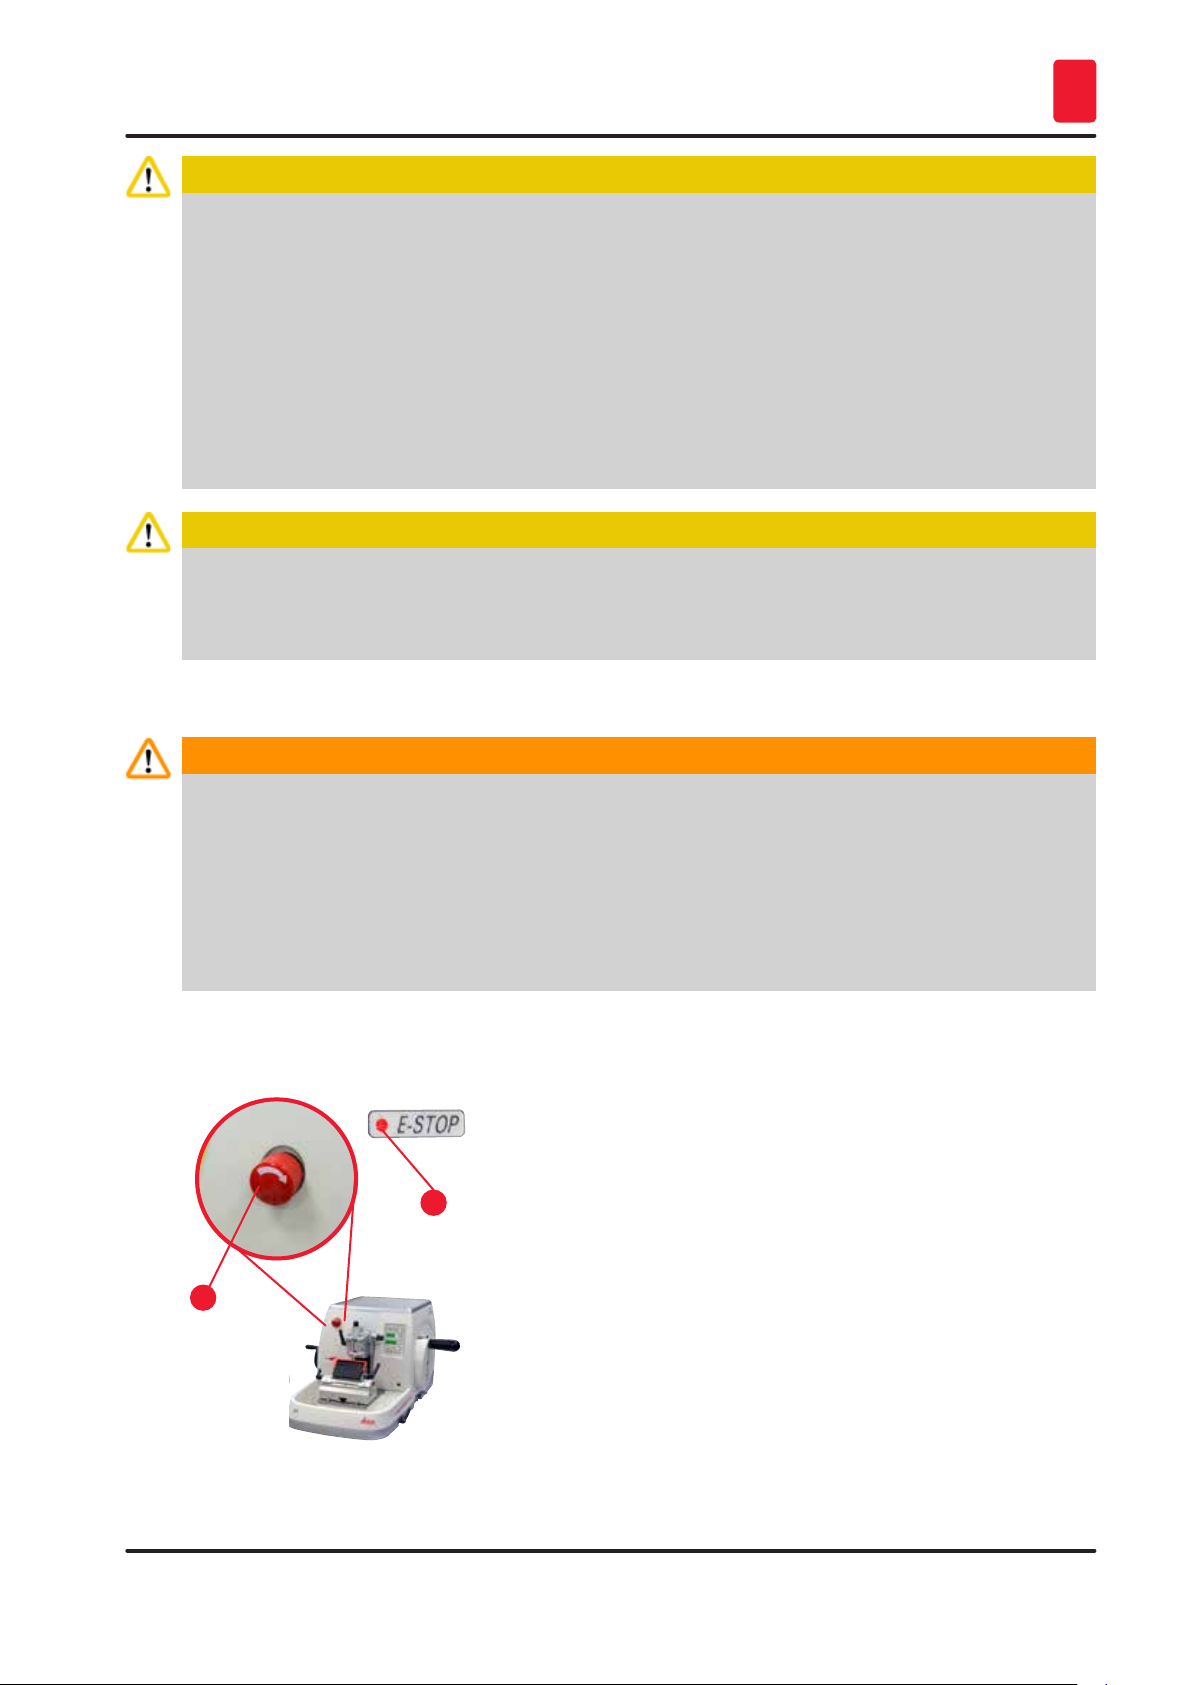
2.3.1 Emergency-stop function
1
The emergency-stop function is activated with the red emergency
stop switch (→ "Fig. 1-1") on the upper left of the front of the
microtome. The sectioning motor stops immediately when the
2
emergency stop switch is pressed. The red LED in the E-STOP
field (→ "Fig. 1-2") on the control panel of the instrument lights up,
indicating that the emergency stop function has been activated.
To deactivate this function, turn the emergency stop switch in the
direction of the arrow.
Fig. 1
HistoCore AUTOCUT
21
Safety
2
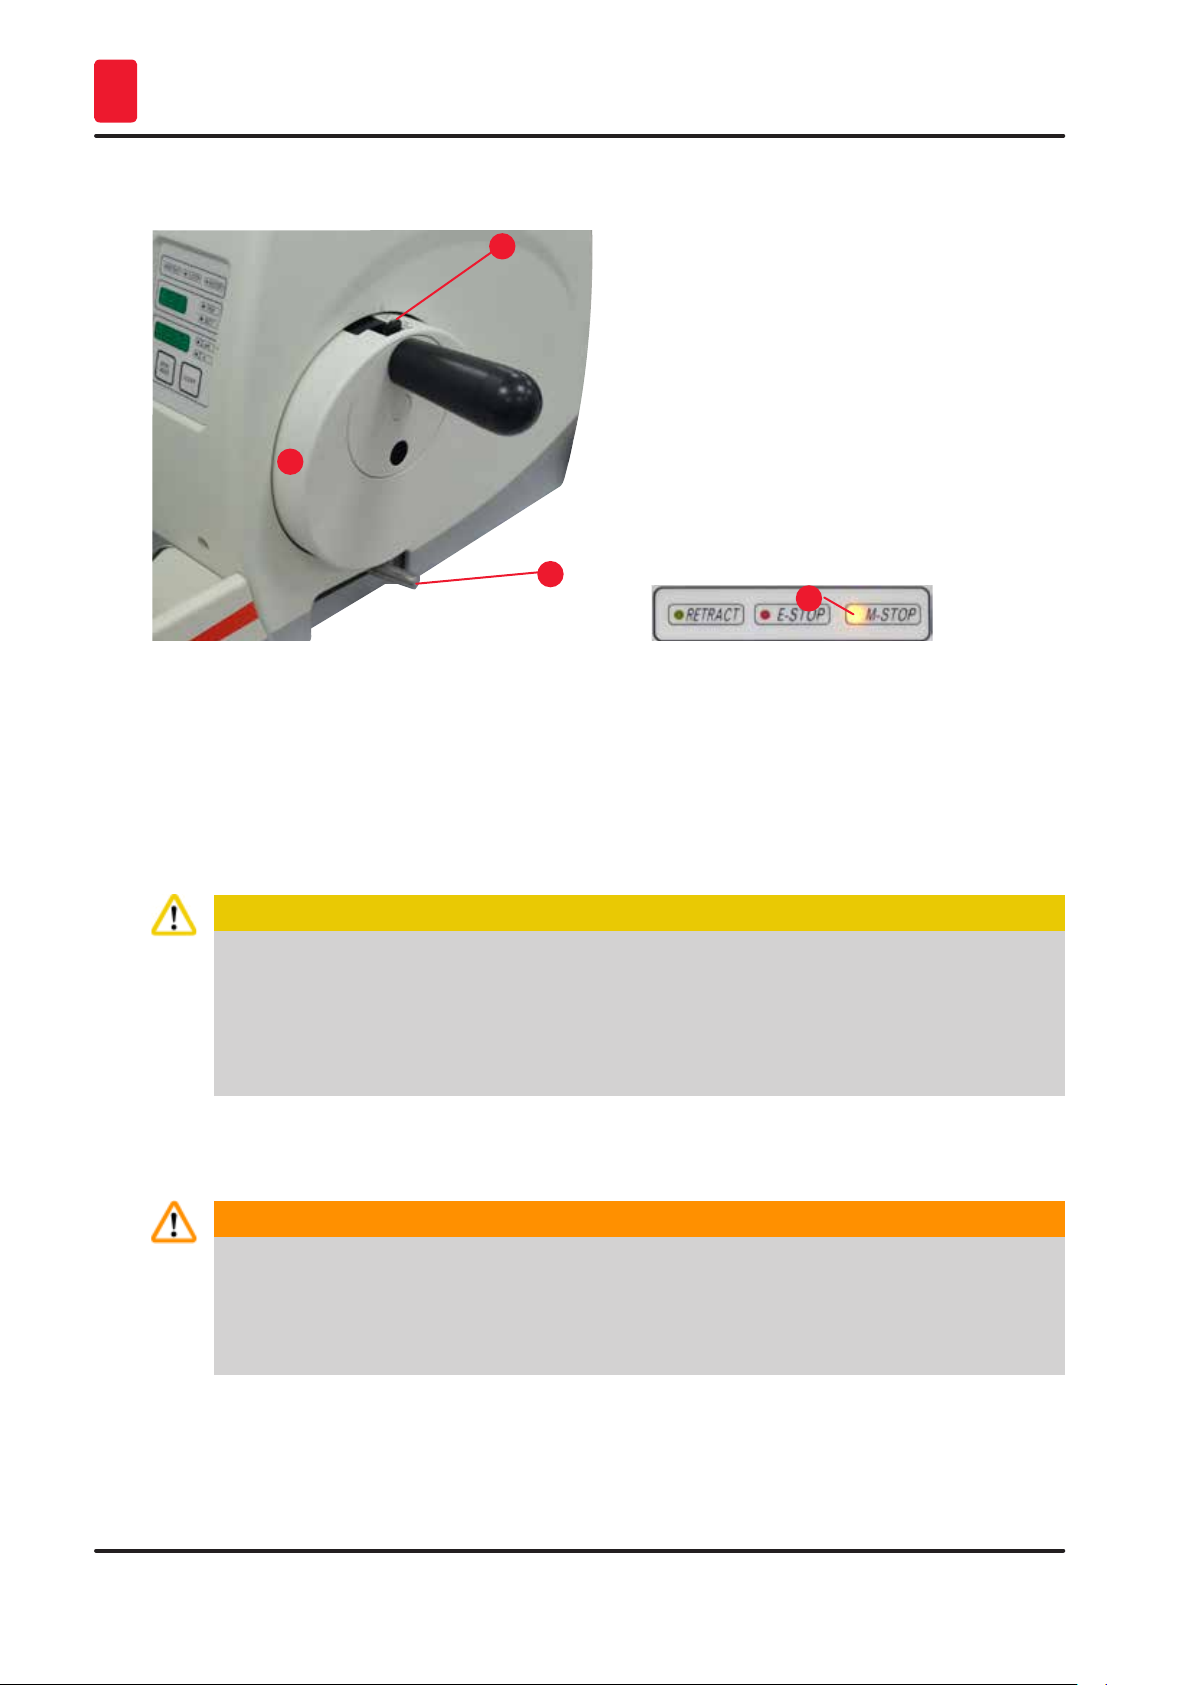
2.3.2 Handwheel lock (manual operation only)
1
2
3
1
Fig. 2
There are two ways of locking the handwheel (→ "Fig. 2-1"):
• Using the handwheel locking mechanism (→ "Fig. 2-2") on the top of the handwheel, the handwheel
can be braked in the 12 o'clock position.
1. To lock the handwheel, press the handwheel locking mechanism (→ "Fig. 2-2") outwards and
continue to turn clockwise the handwheel slowly until it locks exactly in the 12 o'clock position.
The yellow LED in the M-STOP field (→ "Fig. 3-1") lights up.
2. To unlock the handwheel, turn the handwheel locking mechanism (→ "Fig. 2-2") inwards.
Caution
Operating the handwheel locking mechanism during motorized sectioning.
Instrument in malfunction and delayed diagnosis.
• Never operate the handwheel locking mechanism during motorized sectioning.
• To stop the motorized sectioning, use the RUN/STOP button or ENABLE button or the BRAKE
button on the separate control panel (→ P. 49 – Start and stop motorized sectioning).
• Using the handwheel brake lever (→ "Fig. 2-3") on the right side of the microtome base plate, the
handwheel can be braked in any position.
1. To brake, pull the handwheel brake lever forward forcefully and completely.
Warning
Fig. 3
The handwheel brake lever is not used properly, and the handwheel cannot be braked.
Serious injury of instrument/persons, or specimen damage.
• The handwheel brake lever must be exactly in the locked position. If the handwheel brake lever
is moved beyond this point, it is possible that the handwheel is no longer braked.
2. To unlock the handwheel, push the handwheel brake lever (→ "Fig. 2-3") back to its original
position.
The yellow LED (→ "Fig. 3-1") in the M-STOP field flashes if the handwheel brake lever is not locked
completely. The handwheel brake lever (→ "Fig. 2-3") must be pulled completely forward with force so
that the handwheel brake is applied.
22
Version 1.1, Revision B
Safety 2
Warning
Misinterpretation of the yellow LED in the M-STOP field.
Serious injury and/or property damage.
• Operate the instrument only after you have completely understood the meaning of the 3 possible
LED indications. Extinguished light: the instrument is ready to use (no brake engaged); blinking
light: the electronic brake is engaged, but mechanical locking system is deactivated; permanent
light: the mechanical locking system is activated.
• The handwheel is securely locked only when the handwheel locking mechanism (→ "Fig. 2-2") is in
the 12 o'clock position.
Centering the handle
For safety reasons, the handle of the handwheel
Fig. 4
1
1
2
2
must always be centered while in motorized
sectioning mode.
• Activate the handwheel locking mechanism.
• To center the handwheel, lightly pull the handle
(→ "Fig. 4-1") outwards and swivel it into the
center of the handwheel (→ "Fig. 4-2").
• Release the handle and it will then be fixed in
the center of the handwheel.
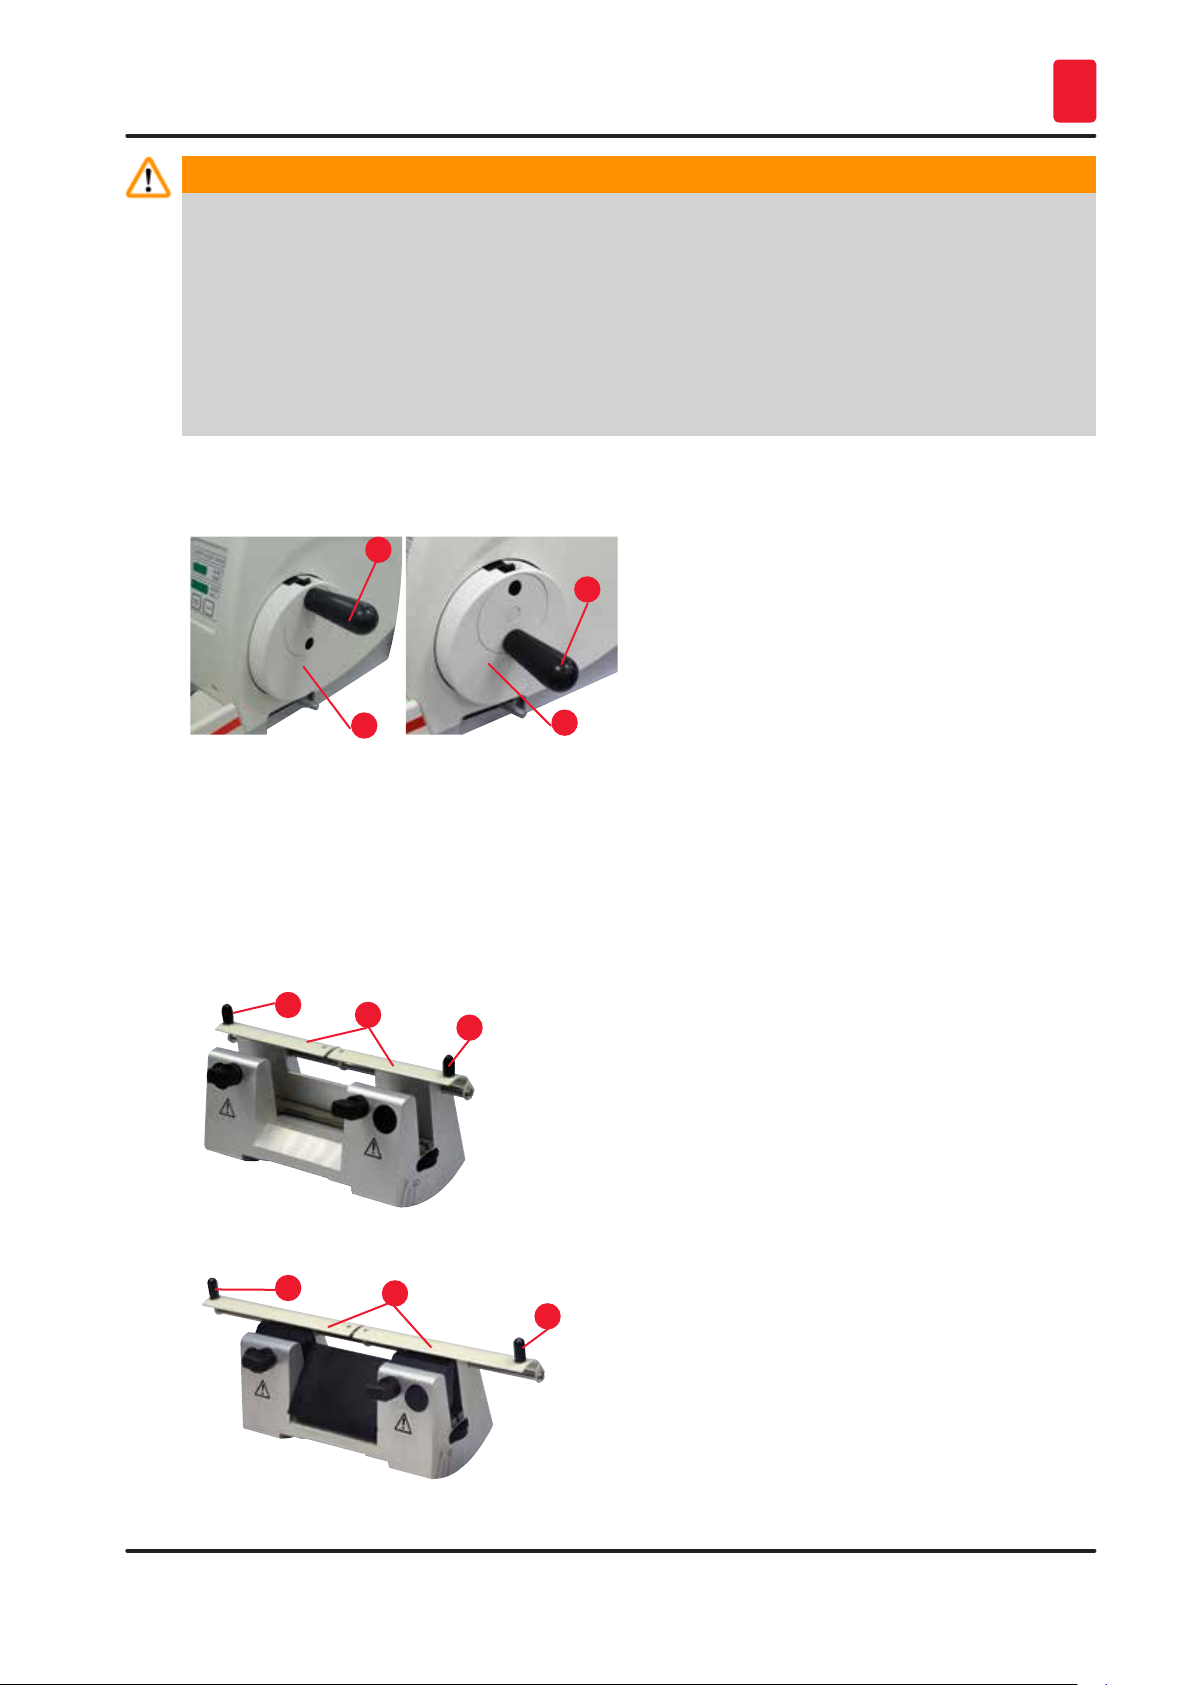
2.3.3 Safety guard on the knife/blade holder
Each knife holder is equipped with a tightly mounted safety guard (→ "Fig. 5-1") (→ "Fig. 6-1") (→ "Fig.
7-1") (→ "Fig. 8-1"). This makes it possible to cover completely the cutting edge in every knife or blade
position.
2
Fig. 5
2
1
1
2
2
Knife holder N
The safety guard (→ "Fig. 5-1") of the knife holder
N can be easily positioned via two handles
(→ "Fig. 5-2"). To cover the knife edge, push both
cover strips of the safety guard to the center.
Knife holder NZ
The safety guard (→ "Fig. 6-1") of the knife holder
NZ can be easily positioned via two handles
(→ "Fig. 6-2"). To cover the knife edge, push both
cover strips of the safety guard to the center.
Fig. 6
HistoCore AUTOCUT
23

2
Safety
1
Knife holder E-TC
The safety guard on knife holder E-TC consists
of a foldaway handle (→ "Fig. 7-1"). To cover
the cutting edge, fold the safety guard handle
upwards.
Fig. 7
1
3
2
Fig. 8
Tip
The clamping levers on the two-in-one blade holder E are not interchangeable. The two clamping
levers (→ "Fig. 8-2") (→ "Fig. 8-3") must remain in the position shown at all times, as otherwise isolated
malfunctions of the two-in-one blade holder E can occur. The clamping lever for the blade (→ "Fig.
8-2") is at the right side, the clamping lever for the lateral displacement (→ "Fig. 8-3") is at left side.
Two-in-one blade holder E for high and low
profile blades
The safety guard on the two-in-one blade holder
E consists of a red foldaway handle (→ "Fig. 8-1").
To cover the cutting edge, fold the safety guard
handle upwards as illustrated in (→ "Fig. 8").
24
Version 1.1, Revision B
Instrument Components and Specifications 3
3. Instrument Components and Specifications
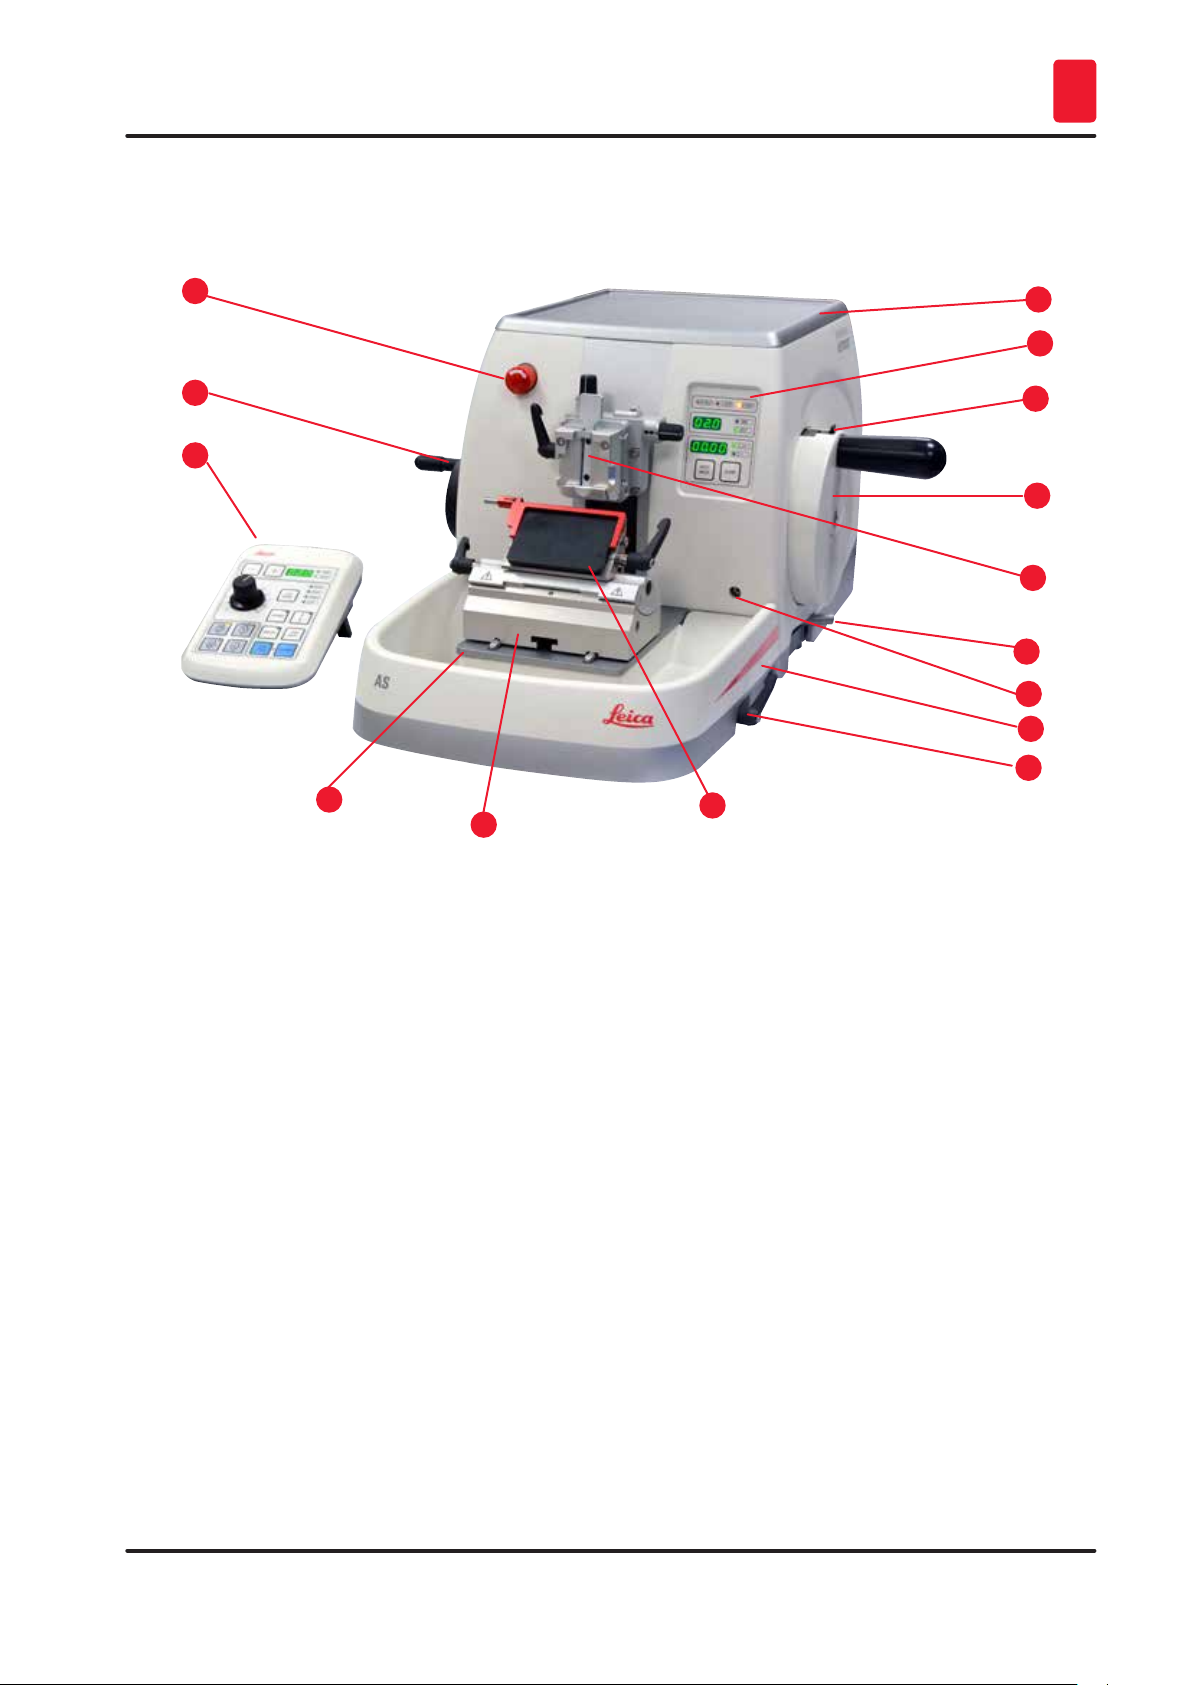
3.1 Overview — instrument components
1
2
3
Fig. 9
15
14
13
12
11
10
9
8
7
4
5
6
1 Emergency-stop switch 9 Socket for backlighting
2 Coarse feed wheel 10 Handwheel brake lever
3 Separate control panel 11 Object head with orientation and UCC
4 Microtome base 12 Handwheel
5 Blade holder base 13 Handwheel locking mechanism
6 Two-in-one blade holder E 14 Instrument control panel
7 Clamping lever of the knife/blade holder base 15 Top tray (optional)
8 Section waste tray (available as standard or
anti-static)
HistoCore AUTOCUT
25
Instrument Components and Specifications
3
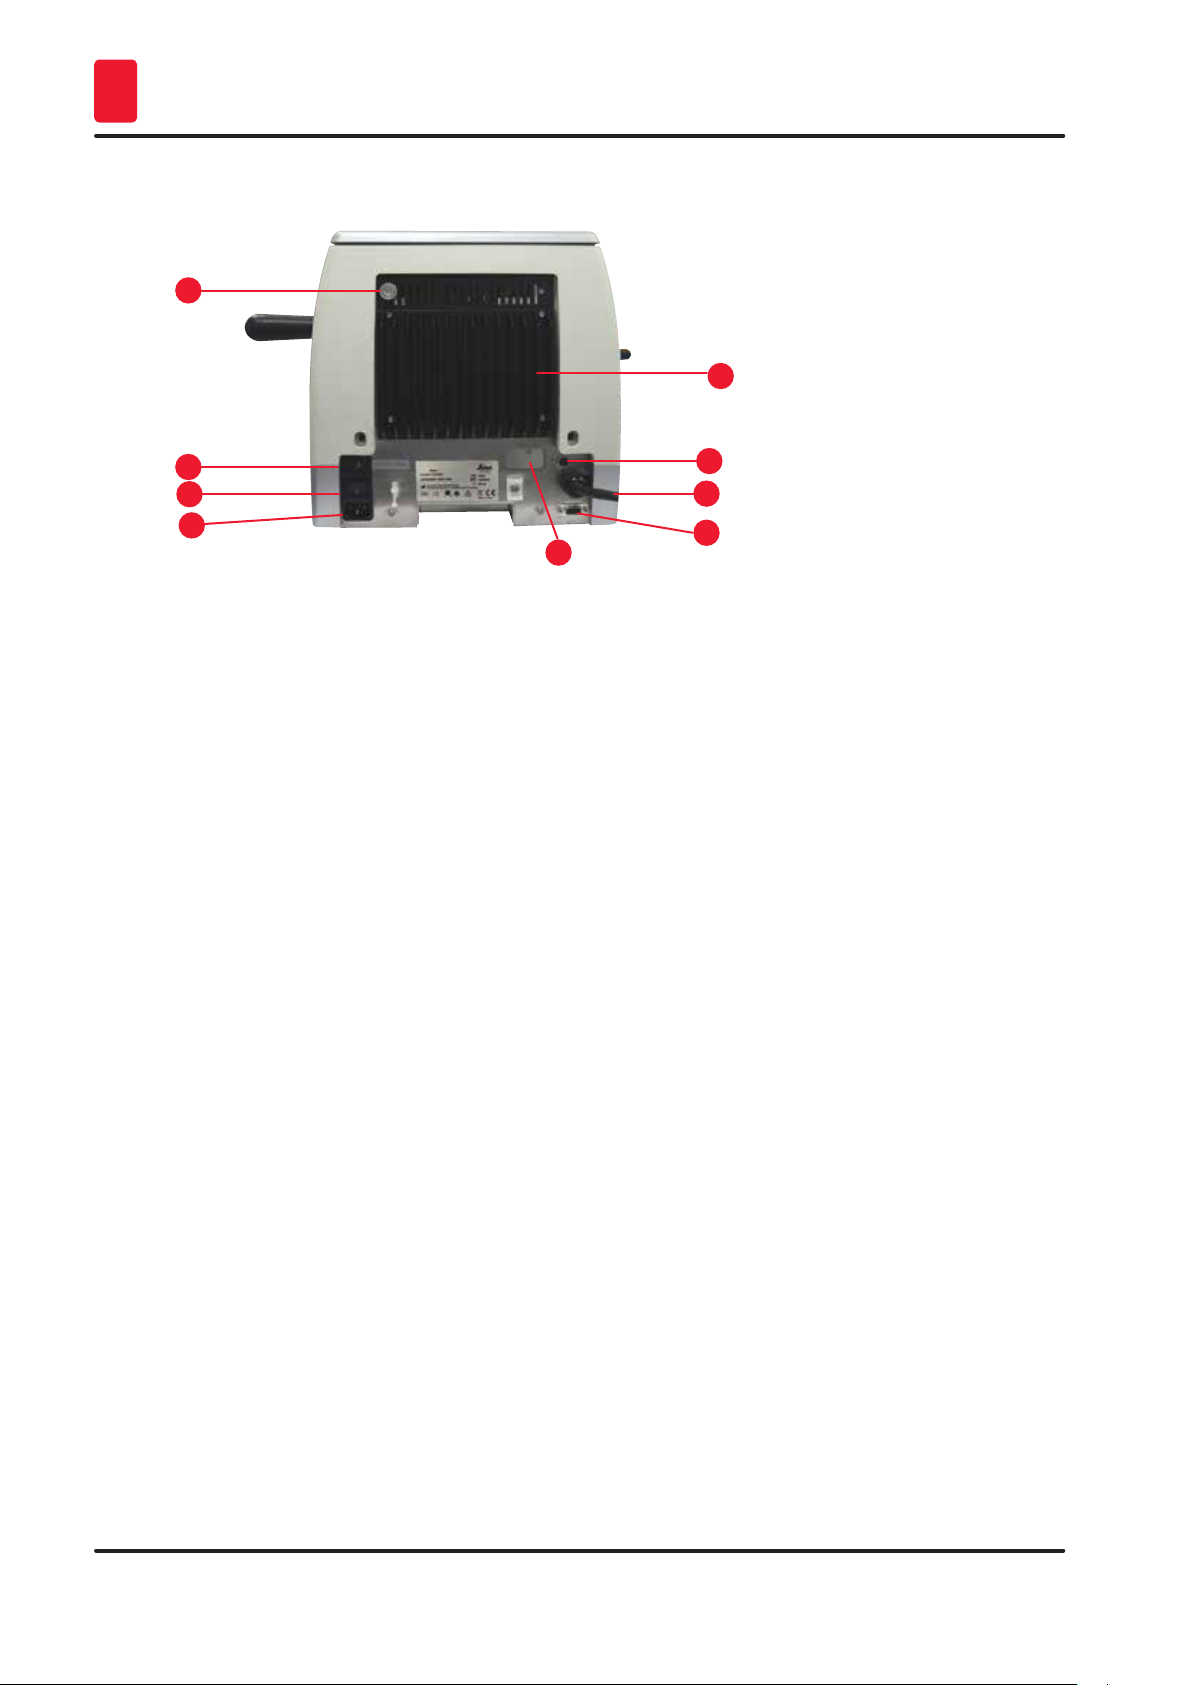
Rear view
1
5
2
3
4
Fig. 10
1 Magnet 5 Heat sink
2 Voltage selector switch with fuse 6 Motor protection fuse
3 Main switch 7 Connecting cable for control panel
4 Power supply 8 Connecting jack for foot switch or dummy plug
3.2 Instrument specifications
Basic instrument with sectioning motor, separate control panel, programmable retraction with ON/OFF
selection, unique ergonomically positioned electronical lateral coarse feed wheel with user selectable
turn directions, without specimen orientation or additional accessories. 100-240/50-60Hz.
• Fully-Motorized Rotary Microtome with low-maintenance and backlash-free precision micrometer
feed system with step motor.
• Horizontal feed and vertical stroke mechanisms are based on cross roller bearings.
• The HistoCore AUTOCUT is primarily designed for motorized sectioning, but is also suitable for
manual sectioning applications.
• Smooth-running hand-wheel allows two manual sectioning modes: rocking mode and conventional
manual sectioning with full hand-wheel rotation, and 3 motorized sectioning modes: single,
continuous and step.
• The sectioning speed can be adjusted while motorized sectioning is in progress.
• The ergonomic handle of the safety handwheel can be centered while working motorized.
• The emergency stop button on the microtome front or E-stop function in optional foot stop will
interrupt motorized sectioning immediately in case of emergency.
• Two independent hand-wheel locking systems, plus one electronic brake after motorized usage,
ensure that the hand-wheel is safely locked.
• Unique operator-adjustable force balancing system with spring force compensation offers two
advantages:
1. Flexibility to adapt the spring force to different weights of specimen/clamps, eliminating the
risk of an object head dropping into the knife.
2. No need for a heavy counter balance in the hand-wheel.
• All important controls are located on the user friendly separate control panel with adjustable
inclination angle for ergonomic operation.
6
7
8
9
9 Connection for service
26
Version 1.1, Revision B

Instrument Components and Specifications 3
• Section thickness settings for trimming and sectioning can be selected and saved independently of
each other.
• Individually adjustable sectioning range on the specimen size (sectioning window).
• Important operating information is indicated on the front of the instrument:
1. trimming or section thickness,
2. specimen retraction (Retract),
3. emergency stop (E-stop),
4. hand-wheel/specimen head locking function (Lock),
5. section counter and section thickness totalizer with reset function.
• Programmable specimen retraction system for manual cutting mode with ON/OFF function
• Self-adjusting specimen retraction in motorized sectioning mode, speed dependent.
• Unique rocking mode function on the control panel for rapid trimming. Allows turning the hand-wheel
back and forth over a short distance without the need of deactivating the retraction. Each change in
the sense of rotation will be electronically detected and automatically converted into an advance or
retraction movement of the specimen, without compromising the ribboning of the sections.
• Motorized horizontal specimen head movement can be done in 2 ways:
1. Using the coarse feed buttons on the control panel in two speeds per direction in continuous
or in step feeding mode.
2. Using the ergonomically positioned and unique coarse feed wheel which can be personalized
by user selectable preferred turn direction.
• Visual/acoustic signals indicate the remaining feed and the front and rear travel limits.
• Efficient and rapid specimen exchange
1. by using the user programmable Memo position
2. the fast homing function of the object head within 13 +/- 2 seconds from front to rear position.
• Large top surface area allows placement of objects that require a flat surface.
• Optional removable top tray allows storage of sectioning tools and prevents items from falling.
HistoCore AUTOCUT
27

Instrument Components and Specifications
3
3.3 Technical Data
General
Nominal supply voltages 100/120/230/240 V AC ±10%
Nominal frequency 50/60 Hz
Maximum power consumption 100 VA
Protection class
(according to IEC-1010, UL 3101, EN 61010)
Power fuses 2 x T 3.15 A
Pollution degree
(according to IEC-1010, UL 3101, EN 61010)
Overvoltage category
(according to IEC-1010, UL 3101, EN 61010)
IP protection class IP20
Operating temperature range +18 °C to +30 °C
Operating relative humidity 20 % to max. 80 % non-condensing
Operating altitude Up to 2000 m above sea level
Transport temperature range -29 °C to +50 °C
Storage temperature range +5 °C to +50 °C
Transport and storage relative humidity 10 % to max. 85 % non-condensing
Dimensions and weights
Basic instrument
Width (including the handwheel and the
coarse feed wheel)
I
2
II
477 mm
Depth (including the section waste tray) 620 mm
Height (without the top tray) 295 mm
Weight (without accessories) Approx. 40 kg
Volume of the section waste tray 1400 ml
Control panel
Width 119 mm
Depth 193 mm
Height 50 mm
Height (in inclined position) 81 mm
Weight (net) approx. 0.6 kg
Microtome
Sectioning thickness setting
Section thickness setting range 0.50 - 100 µm
28
Version 1.1, Revision B

Instrument Components and Specifications 3
Microtome
Setting values • From 0.5 - 5.0 µm in 0.5 µm increments
• From 5.0 - 20.0 µm in 1.0 µm increments
• From 20.0 - 60.0 µm in 5.0 µm increments
• From 60.0 - 100.0 µm in 10.0 µm increments
Trimming thickness setting range 1 - 600 µm
Setting values • From 1.0 - 10.0 µm in 1.0 µm increments
• From 10.0 - 20.0 µm in 2.0 µm increments
• From 20.0 - 50.0 µm in 5.0 µm increments
• From 50.0 - 100.0 µm in 10.0 µm increments
• From 100.0 - 600.0 µm in 50.0 µm increments
Horizontal feed range 24 ±1 mm, feed motion via step motor
Vertical stroke length 70 ± 1 mm
Maximum cutting range without retraction 65 mm without specimen orientation
Maximum sectioning area with retraction 60 mm
Maximum specimen block size for
large standard clamp (H x W x D)
Maximum specimen block size for
super mega cassette clamp (H x W x D)
Specimen retraction in manual sectioning
mode
Electric coarse feed
• slow forward and backward buttons
• fast forward
• fast backwards (fast homing)
Sectioning speed 0 - 420 mm/s ± 10 %
Return speed approx. 120 - 420 mm/s ± 10 %
Memo position 1
Coarse feed wheel turn direction
clockwise or counter-clockwise
55 x 50 x 30 mm
68 x 48 x 15 mm
5 - 100 µm in 5 µm increments; can be turned off
• 300 µm/s
• 800 µm/s
• 1800µm/s
User selectable
Optional accessories
Specimen orientation with zero postion • Horizontal rotation: ± 8°
Two-in-one blade holder
-Lateral displacement function
East-west movement
-Movement of blade holder base:
HistoCore AUTOCUT
• Vertical rotation: ± 8°
3 positions
North-south: ± 24 mm
29

Setting up the instrument
4
4. Setting up the instrument
4.1 Installation site requirements
• Stable, vibration-free laboratory table with horizontal, flat table top, as far as possible vibration-free
ground.
• No other instruments nearby which might cause vibrations.
• Room temperature consistently between + 18 °C and + 30 °C.
• Obstruction-free access to the handwheel.
• To ensure proper function of the instrument, it must be set up while maintaining a minimum distance
of 10 cm from walls and furniture.
• The instrument must be installed in a place that ensures an easy disconnection from the power
supply. The power cable must be in a place that can be easily reached.
Danger
Explosive hazard.
Death or Serious injury of persons, and/or property damage.
• Never operate the instrument in rooms with an explosive hazard.
4.2 Standard delivery - packing list
The HistoCore AUTOCUT is available in two configurations.
HistoCore AUTOCUT configuration: 14 9AUTO00C1
Quantity Part description Order No.
1 HistoCore AUTOCUT basic instrument 14 0519 56472
1 Anti-static waste tray 14 0517 56237
1 Fine-directional fixture for specimen clamp 14 0502 37717
1 Quick clamping system 14 0502 37718
1 Universal cassette clamp 14 0502 37999
1 Blade holder base 14 0502 55546
1 2-in-1 Blade holder E 14 0502 54497
HistoCore AUTOCUT configuration: 14 9BIO000C2
Quantity Part description Order No.
1 HistoCore AUTOCUT basic instrument 14 0519 56472
1 Standard waste tray 14 0518 56458
1 Fine-directional fixture for specimen clamp 14 0502 37717
1 Quick clamping system 14 0502 37718
1 Universal cassette clamp 14 0502 37999
1 Blade holder base 14 0502 55546
1 2-in-1 Blade holder E 14 0502 54497
HistoCore AUTOCUT basic instrument includes the following delivery list.
30
Version 1.1, Revision B
 Loading...