

Radio-controlled Analog Clock
TABLE OF CONTENTS
Topic Page
Inventory of Contents/Additional Equipment 2
About WWVB 2
Detailed Set-Up Guide
Battery Installation 2
Function Keys 3
Time Zone Setting 3
Daylight Saving Time Setting 3
Features
Weather Forecast Icons 4
Indoor Temperature and Humidity 5
Mounting 5
Troubleshooting 5
Maintenance & Care 5
Specifications 6
Warranty Information 7-8
WT-3131TWC
With Weather Forecast
Instruction Manual

INVENTORY OF CONTENTS
1. Radio-controlled analog clock with weather forecast
2. Instruction manual and warranty card
ADDITIONAL EQUIPMENT (not included)
1. One AA alkaline battery
2. Two AAA alkaline batteries
3. One screw for wall mounting clock
ABOUT WWVB (Radio Controlled Time)
The NIST (National Institute of Standards and Technology—Time and Frequency
Division) WWVB radio station is located in Ft. Collins, Colorado, and transmits the exact
time signal continuously throughout the United States at 60 kHz. The signal can be
received up to 2, 000 miles away through the internal antenna in the clock. However, due
to the nature of the Earth’s Ionosphere, reception is very limited during daylight hours.
The clock will search for a signal every night when reception is best. The WWVB radio
station derives its signal from the NIST Atomic clock in Boulder, Colorado. A team of
atomic physicists is continually measuring every second, of every day, to an accuracy of
ten billionths of a second per day. These physicists have created an international
standard, measuring a second as 9,192,631,770 vibrations of a Cesium-133 atom in a
vacuum. For more information about WWVB please see the NIST website at
http://www.boulder.nist.gov/timefreq/stations/wwvb.htm
DETAILED SET UP GUIDE
1. Battery Installation
There are two locations for batteries on the clock
a. The analog clock requires one AA battery for operation
b. The battery is inserted on the back of the clock above the four time zone
buttons.
c. After the battery is inserted press the desired time zone button.
d. The weather LCD requires two AAA batteries for operation.
e. The battery compartment is located directly above the “SET ºC/ºF” button
on the back of the clock.
Note:
Ensure that the correct polarity is followed when inserting the batteries
into each location.
2

2. Function Keys
There are six buttons on the back of the clock.
a. The time zone buttons are labeled “PT”, “MT”, “CT” and “ET”. These
buttons are directly above the AA battery slot for the clock.
b. In between the “CT” and “ET” buttons is the DST (Daylight Saving
Time) over ride button. Pressing this button will disable/enable the DST
recognition of the clock
c. There is a black manual time set button located directly above the AA
battery slot for the clock. By holding this button down you are able to
manually set the time on your clock.
d. The last button is the “SET ºC/ºF” button, which is located below the
AAA battery compartment. Press and release this button to switch
between ºC and ºF.
3. Time Zone Setting
Press and release one of the four time zone buttons on the back of the clock to
select your desired time zone. The clock will automatically adjust to the correct
time for that zone.
4. Daylight Saving Time (DST) Setting
Press and release the daylight saving time button to deactivate or reactivate the
daylight saving time recognition feature of the clock.
Note:
Some locations (Arizona and parts of Indiana) do not follow Daylight
Saving Time.
There is no indication of the mode the daylight saving time feature is in the
factory setting is ON.
3
FEATURES
1. Weather Forecast
The weather forecasting feature is estimated to be 75% accurate. The weather
forecast is based solely upon the change of air pressure over time. The WT-3131A
averages past air-pressure readings to provide an accurate forecast, creating a
necessity to disregard all weather forecasting for 12-24 hours after the unit has
been set-up, reset, or moved from one altitude to another (i.e. from one floor of a
building to another floor). In areas where the weather is not affected by the
change of air pressure, this feature will be less accurate.
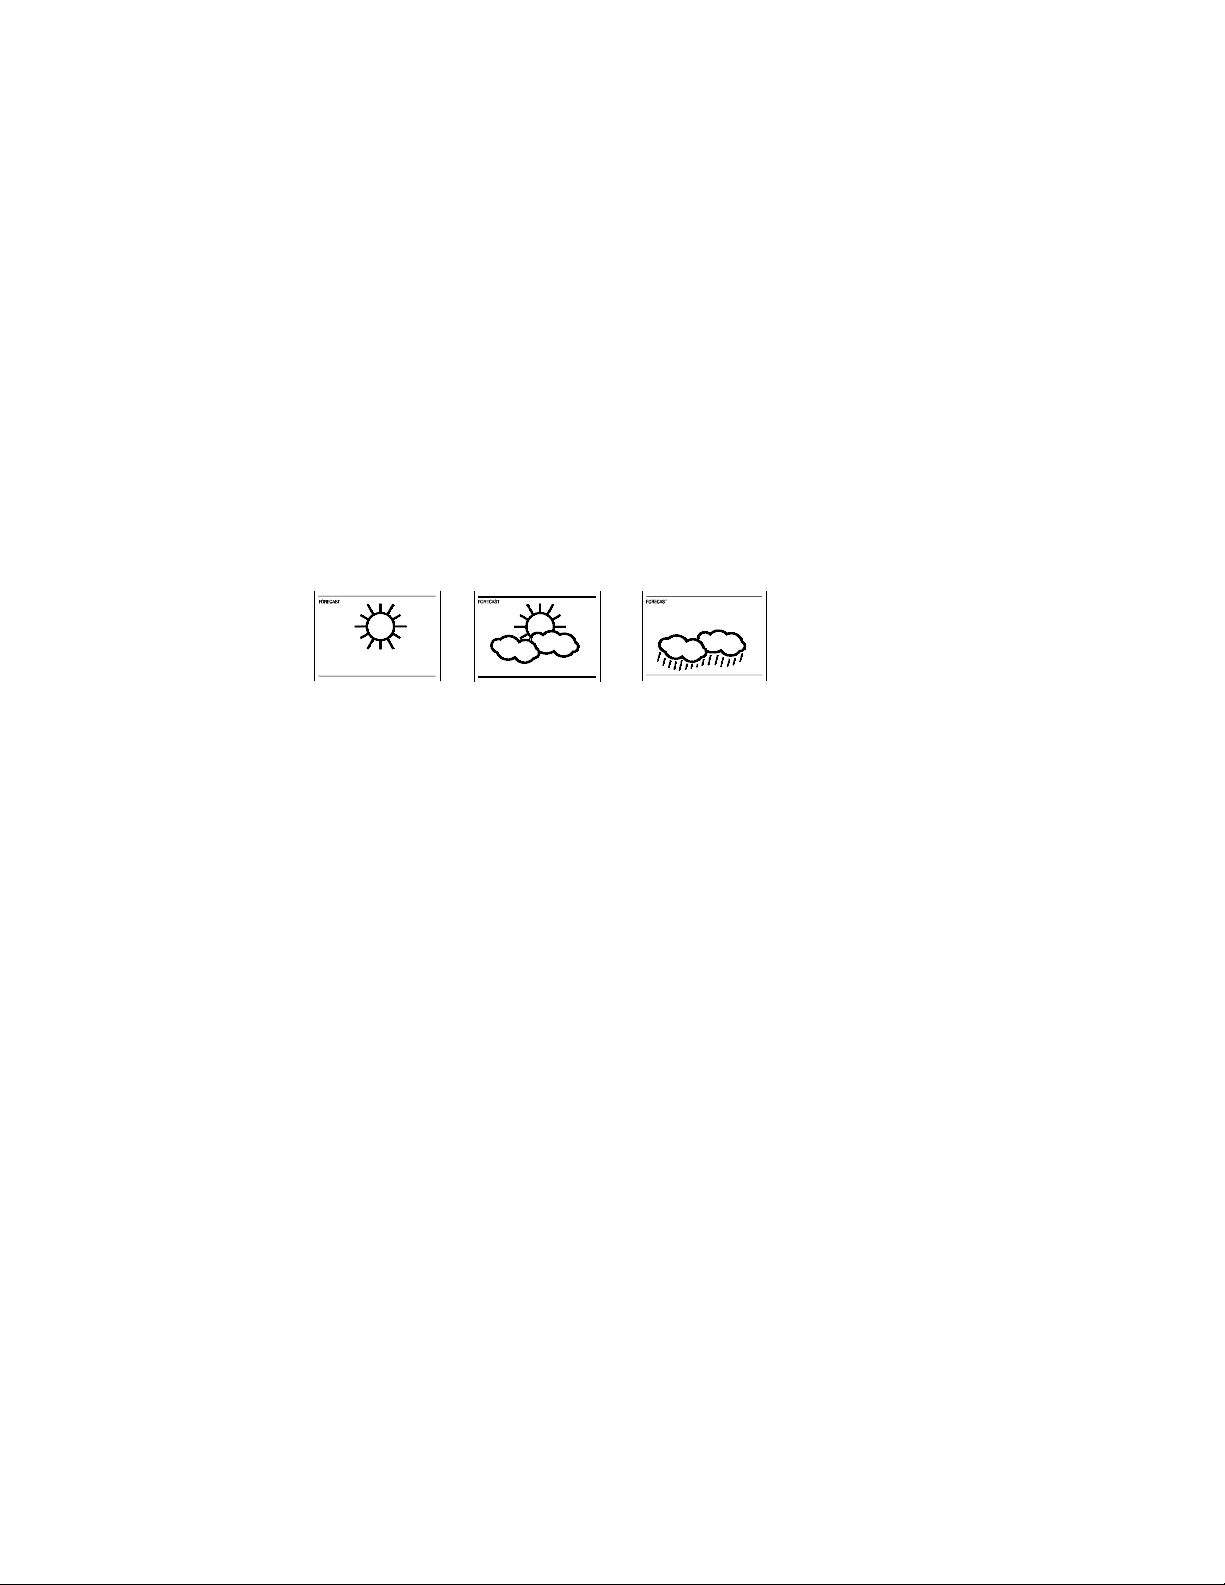
a. Weather Icons
There are 3 possible weather icons that will be displayed in the
FORECAST LCD:
Sunny—indicates that the weather is expected to improve (not that the
weather will be sunny).
Sun with Clouds—indicates that the weather is expected to be fair (not that
the weather will be sunny with clouds).
Clouds with Rain—indicates that the weather is expected to get worse (not
that the weather will be rainy).
The weather icons change when the unit detects a change in air pressure.
The icons change in order, from “sunny” to “partly sunny” to “cloudy” or
the reverse. It will not change from “sunny” directly to “rainy”, although it
is possible for the change to occur quickly. If the symbols do not change
then the weather has not changed, or the change has been slow and
gradual.
a. Weather Tendency Arrows
1. Other possible displays in the FORECAST LCD are 2 weather
tendency arrows, one that points up (on the left side of the LCD)
and one that points down (on the right side of the LCD). These
arrows reflect current changes in the air pressure.
2. An arrow pointing up indicates that the air pressure is increasing
and the weather is expected to improve or remain good.
3. An arrow pointing down indicates that the air pressure is
decreasing and the weather is expected to become worse or
remain poor.
4. No arrow means the pressure is stable.
4

2. Indoor Temperature and Humidity
The current indoor temperature (viewed on the left) and relative humidity (viewed
on the right) are displayed in the INDOOR LCD. These measurements are taken
within the clock.
MOUNTING
1. Fix a screw (not included) into the desired wall, leaving approximately 3/16 of an
inch (5mm) extended from the wall.
2. Place the indoor weather station onto the screw using the hanging hole on the
backside.
3. Gently pull the indoor weather station down to lock the screw into place.
TROUBLESHOOTING
If your clock does not receive a signal please check the following:
Battery - The clock must have a fresh battery to receive and process the time signal.
When the battery drops below 1.25 volts the clock indicates that it is time to
change the battery by advancing the second hand in two-second steps. The
operating voltage range is 1.25 to 1.75 volts.
Location - Try a different location, ideally near a window. It should be at least six feet
from computers, TVs, air conditioners, other radio-controlled clocks and other electrical
appliances that cause interference.
Weather - Electrical storms between you and Colorado during the night will interfere
with the WWVB signal.
MAINTENANCE AND CARE INSTRUCTIONS
• Extreme temperatures, vibration, and shock should be avoided to prevent
damage to the units.
• Clean displays and units with a soft, damp cloth. Do not use solvents or
scouring agents; they may mark the displays and casings.
• Do not submerge the clock in water.
• Immediately remove all low powered batteries to avoid leakage and damage.
• Opening the casing invalidates the warranty. Do not try to repair the unit.
Contact La Crosse Technology for repairs.
5
SPECIFICATIONS
Temperature measuring range:
Indoor
Relative humidity
measuring range
Indoor temperature
checking interval
Indoor humidity checking
interval
Power Supply:
Analog clock 2 x AA, 1.5V
Weather LCD 2 x AAA, 1.5V
Battery life cycle Approximately 12 months
Recommended battery
type
Dimensions
Analog clock 13 inch diameter
32°F to 122°F with 0.2°F
resolution (0°C to 50°C
with 0.1°C resolution)
“OFL” displayed if
outside this range
19% to 95% with 1%
resolution. (“- -”
displayed if outside this
range
Every 10 seconds
Every 1 minute
Alkaline
(330 mm)
1.75 inch depth
(44 mm)
6

WARRANTY INFORMATION
La Crosse Technology provides a 1-year warranty on this indoor weather station.
Contact La Crosse Technology immediately upon discovery of any defects covered by
this warranty. Before sending the indoor weather station in for repairs, contact La Crosse
Technology. The indoor weather station will be repaired or replaced with the same or
similar a similar model.
This warranty does not cover any defects resulting from improper use, unauthorized
repairs, faulty batteries, or the indoor weather station’s inability to receive a signal due to
any source of interference.
LA CROSSE TECHNOLOGY WILL NOT ASSUME LIABILITY FOR INCIDENTAL,
CONSEQUENTIAL, PUNITIVE, OR OTHER SIMILAR DAMAGES ASSOCIATED
WITH THE OPERATION OR MALFUNCTION OF THIS INDOOR WEATHER
STATION. THIS PRODUCT IS NOT TO BE USED FOR MEDICAL PURPOSES OR
FOR PUBLIC INFORMATION. THIS PRODUCT IS NOT A TOY. KEEP OUT OF
CHILDRENS’ REACH.
This warranty gives you specific legal rights. You may also have other rights specific to
your State. Some States do no allow the exclusion of consequential or incidental
damages therefore the above exclusion of limitation may not apply to you.
For warranty work, technical support, or information, contact La Crosse Technology at:
La Crosse Technology
1116 South Oak Street
La Crescent, MN 55947
Phone: 507.895.7095
Fax: 507.895.8000
e-mail
support@lacrossetechnology.com
(warranty work)
sales@lacrossetechnology.com
(information on other products)
web
www.lacrossetechnology.com
7

FCC ID: OMO-01RX
THIS DEVICE COMPLIES WITH PART 15 OF THE FCC RULES. OPERATION
IS SUBJECT TO THE FOLLOWING TWO CONDITIONS:
1. THIS DEVICE MAY NOT CAUSE HARMFUL INTERFERENCE, AND
2. THIS DEVICE MUST ACCEPT INTERFERENCE RECEIVED, INCLUDING
INTERFERENCE THAT MAY CAUSE UNDESIRED OPERATION.
All rights reserved. This handbook must not be reproduced in any form, even in excerpts,
or duplicated or processed using electronic, mechanical or chemical procedures without
written permission of the publisher.
This handbook may contain mistakes and printing errors. The information in this
handbook is regularly checked and corrections made in the next issue. We accept no
liability for technical mistakes or printing errors, or their consequences.
All trademarks and patents are acknowledged.
8
 Loading...