

La Crosse Technology 327-75167INT Instructions

Wi-Fi WIND + WEATHER
STATION
SET UP GUIDE
MODEL NUMBER V50

Table of Contents
Initial Setup
Station Settings
Buttons
LCD Display Brightness
Auto-Dim Settings
Positioning Your Sensor
Installation Options
TEMP. & HUMIDITY (TH)
Viewing Your TH Data
History Records
“Feels Like” Temp.
Add-On TH Sensor
Add-On Sensor Info
Adding an Extra Sensor
LA CROSSE VIEW
Connecting to the App
02
Connecting Your Station
06
Adding Your Sensor to
07
the App
08
08
09
10
03
04
05
FORECAST PRESSURE
Seasonal Trees
13
Standalone Forecast Icons
14
Enhanced Forecast Data
14
Daily/Hourly Forecast
15
15
16
16
APPENDIXEXTRA SENSORS SUPPORT
Specifications
17
Warranty
18
Recycling & Disposal
18
Cautions/Statements
Patents
19
20
20
20-21
22
WINDBASICS
Viewing Your Wind Data
History Records
Wind Speed Alert
Relative Pressure
Support Information
Factory Reset
Stay in Touch
11
12
12
17
22
22
22
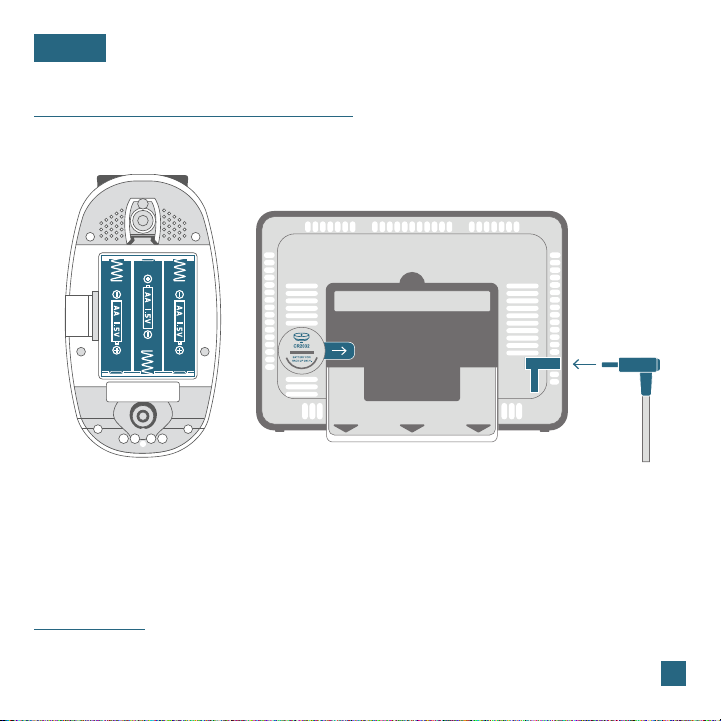
BASICS
Initial Setup
Power Up
Bottom of Breeze Pro Sensor Back of Station Power Jack
1. Install 3 “AA” batteries into the Battery Compartment of your Breeze Pro Sensor.
2. Insert the 5V Power Adapter into an outlet, and then plug it into the Power Jack
on the back of the station. Next, remove the Insulation Tab from the station’s
Battery Compartment.
Note: It may take up to 10 minutes for your sensor data to appear on your
station’s screen.
02

LA CROSSE VIEW
Connecting to the App
Stay connected to your home anytime, anywhere
with the La Crosse View app.
Monitor home conditions and set alerts so your home
can get ahold of you when something seems o.
Connecting your station is optional and the display
will function as a standalone unit without the Wi-Fi
connection. However, we recommend connecting
during the initial setup, as it will save you time and
unlock all of the advanced features right away.
Download the La Crosse View App
Visit the App Store or Google Play Store to download the free La Crosse View
app onto your mobile device.
Launch the App
Open the La Crosse View app and follow the on-screen setup instructions.
For more information, scan the QR code or visit:
www.lacrossetechnology.com/view
03

LA CROSSE VIEW
Connecting Your Station
Now that you’ve created your La Crosse View account, it’s time to connect your station to
your home router using the La Crosse View app.
Connecting to Your Wi-Fi Network
The La Crosse View app is required to connect the station to your Wi-Fi network. Download, install,
1.
and log into your La Crosse View account first.
Follow the initial app instructions or manually add the display into your account. 2.
New User Initial Setup: When first setting up
your station, the app it will lead you through a
series of instructions to help get your station
added into your account and connected to
your home Wi-Fi network.
When connected, the indicator on the display will become solid. 3.
Checking Your Station’s Wi-Fi Status
Press the SET button on the top of the station to view your Wi-Fi Status.
Manually Add & Connect Display: After the
initial walk-through, stations can be added and
connected via the Devices tab in the app’s
main menu. Simply tap the Add Device or Plus
(+) button at the bottom of the Devices page
in the app.
ALL OK CONNECTED: Your station is connected to your
Wi-Fi and its data should be available on the station and
in the app.
SEE APP TO CONNECT: Check your La Crosse View
app for notifications.
NO WEATHER SERVICE: Your Internet weather and time
services are not connecting. These should resolve on
their own, please be patient.
LOST WIFI: Check your router and network
connections.
04

LA CROSSE VIEW
Adding Your Sensor to the App
Upon getting the station connected to your Wi-Fi network, the next app screen
will explain how your connected sensor(s) should be brought in. Within the next
15 minutes, you should receive an Add Device notification in your app. This is
indicated by the Red Cloud and the numbers inside of it. Tap this icon to begin
adding your sensor(s) into the app.
Manually Add Sensor Into the App*
1.
Open your La Crosse View app. On the Main Menu, go to ADD/EDIT
and select DEVICES.
2.
On the Devices page, select the ADD DEVICE or PLUS (+) button.
3.
Scan the Barcode on your Breeze Pro Sensor or type in the
Device ID manually.
4.
Confirm the sensor image and Device ID and add a Device
Name and Location Name. Select DONE.
123456-ABC
* This step is only required if you do not receive the Add Device notification within the app.
Prior to connecting to Wi-Fi and mounting your sensor, make sure your station is receiving sensor data.
123456-ABC
05

BASICS
Station Settings
1.2.When the station is first powered on, it will begin searching for your outdoor
sensor, which should connect shortly.
To manually set your time, date, and other settings, hold the SET button to
enter the Settings Menu.
Settings Menu Order
Greeting • Language • Beep On/O • 12/24 Hour Time • Hour • Minute • Year
Month • Date • Calendar Order (Month/Date or Date/Month) • Fahrenheit/Celsius
Pressure Units (InHg/hPa) • Pressure Number Setting* • Wind Speed Units (MPH
or KMH) • Wind Direction (Letters or Degrees) • Thank You
Use the +/- buttons on the
top of the station to adjust
the values.
* The default pressure reading is 29.92 INHg (1013 hPa). The station will acclimate on it’s own if the pressure
number is not set. Learn more on page 17
Notes: Weekday will set automatically after year, month, & date settings are adjusted.
If you’re connected to the Wi-Fi, the time and date will automatically update from the
Internet. See pages 3-4 for more information.
Press the SET button to
confirm selection and move
to next step.
You may exit the Settings
Menu at any time by pressing
the LIGHT button.
06
 Loading...