

Page 1
1 | Page
22” Indoor | Outdoor Atomic Wall Clock
Model: 404-3556A
DC: 122816
www.lacrossetechnology.com/404-3556a
Page 2
2 | Page
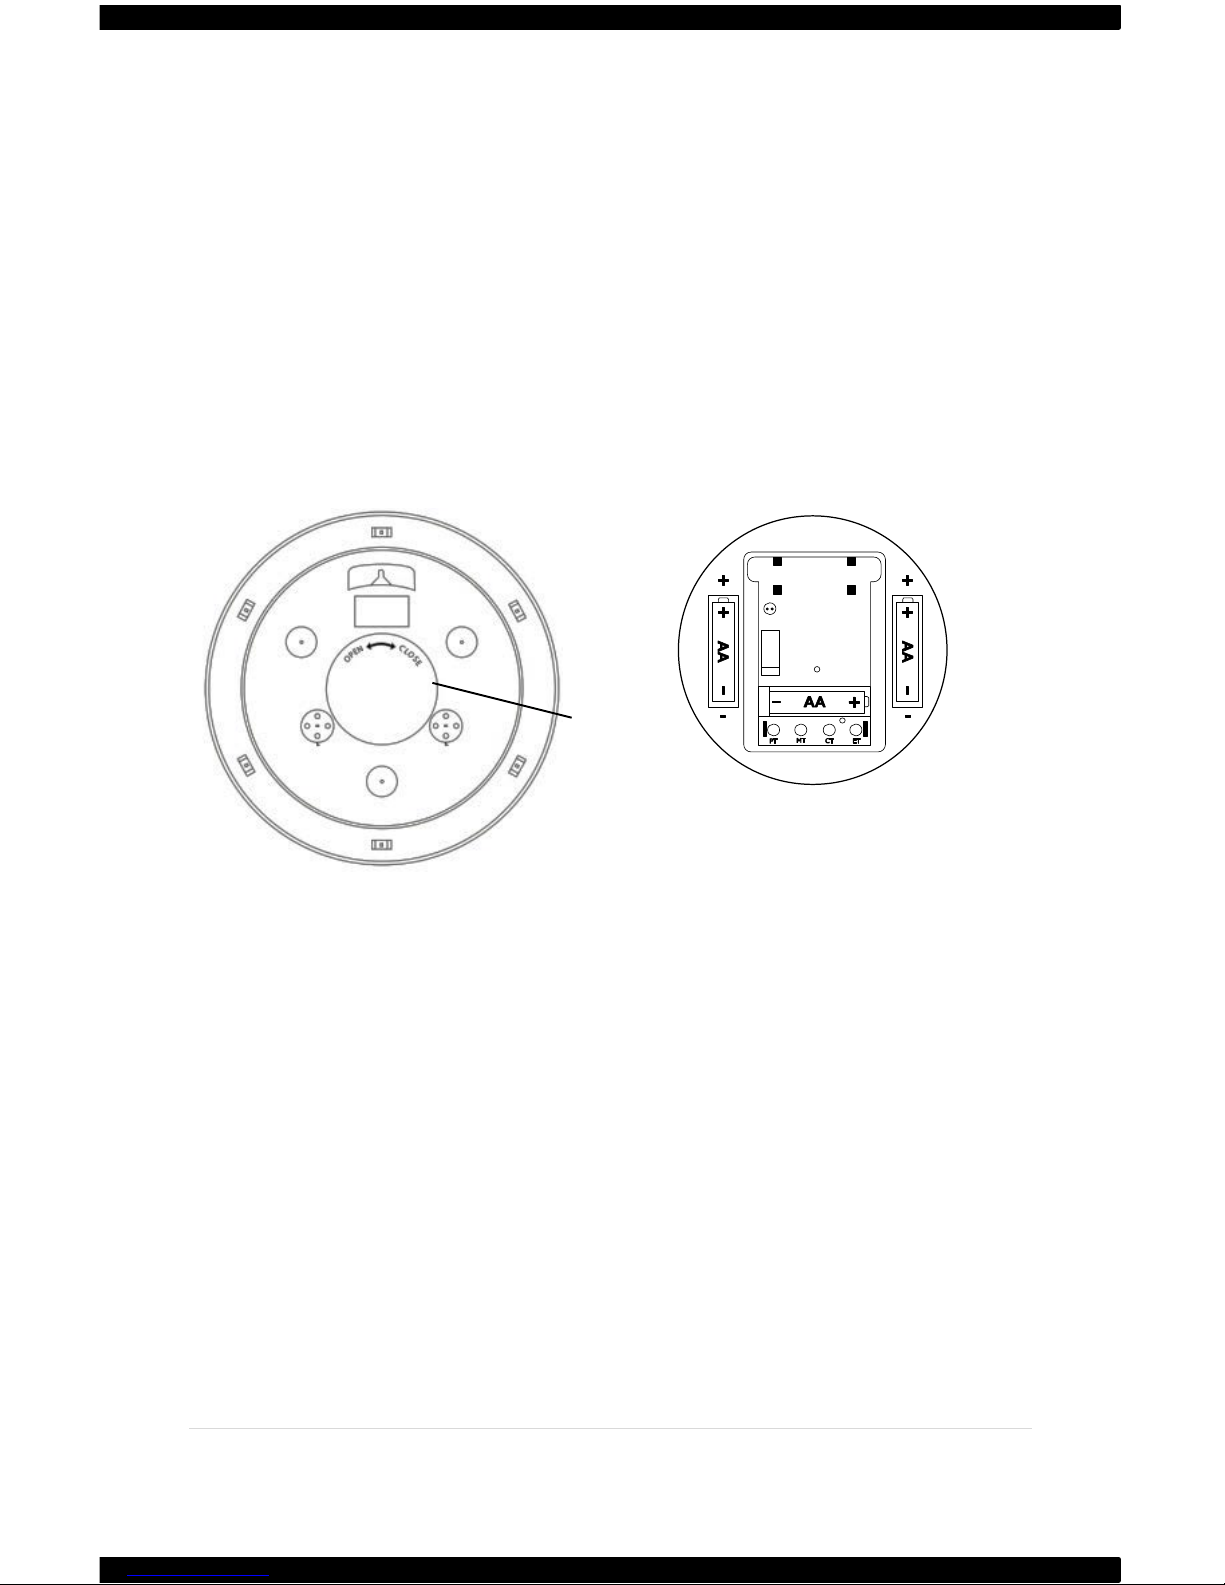
Get Started
1. Remove roun d b a tte r y cover to access clock movement and
battery compartment(s).
2. Insert 1 AA ba tter y into the movement a t the center of the clock .
3. OPTIONA L : For e xtended battery life, in stall two additiona l
batteries, on e on either side of the movement.
4. Select your specif ic time zone by firmly pressing the correct time
zone button once. Replace battery cover.
5. The defau lt tim e zone is Pacif ic Time. If the clocks s ets and the
hours are off, hold the correct time zone button for 5 seconds to
correct.
Position Clock
• Indoor: Choose a location 6 feet or more from electronics such as
cordless phones, wireless gaming systems, televisions, microwaves,
routers, baby monitors, etc., which can prevent signal reception.
• Position near an exterior wall that faces Ft. Collins, Colorado for
WWVB time signal reception.
• The antenna is available for signal reception when the front or back
of the clock faces Colorado.
• Outdoor: Choose a location with an overhang to protect the clock
from the overhead sun or standing snow or rain.
• A shaded location will prevent inaccurate temperature readings.
Mount the clock on a wall with the hanging hole on the back of the
clock. Be sure the battery cover is on snug.
Round
Battery
Cover
Page 3

3 | Page
Manual Set Time
On rare occasions in certain areas, the clock may not be able to receive
the radio controlled time signal due to the strength of the signal or the
geographic location. In this case, the clock can be set manually and
used as a regular quartz wall clock.
Note: Allow up to five nights for the clock to receive the WWVB signal
before manually setting the time.
Set the clock manually:
1. Remove battery for 15 minutes and press the Time Set tab 20 times.
2. After 15 minutes, insert the battery and allow the clock to spin to
12:00, 4:00 or 8:00.
3. Hold the Time Set Tab and the hands will spin. Continue holding
until the correct time is achieved.
Note: You can only set the clock manually for about 2 minutes after the
battery is inserted. If the clock receives the WWVB time signal, this
signal will override manually set time.
Daylight Saving
Time Indicator
Time Zone Buttons
Time Set Tab
3 Battery
Compartments
Page 4

4 | Page
Temperature and Humidity
The La Crosse Technology® atomic wall clock has two analog sensors
that measure surrounding temperature and humidity. The temperature
information is displayed in degrees Fahrenheit and Celsius, and humidity
data is displayed in percentage.
The thermometer and hygrometer have been calibrated at the factory.
To check the sensors accuracy, tune to your local weather forecast
information broadcast for the latest weather information. The sensors
may be adjusted.
To manually adjust the sensors, gently turn the temperature or humidity
sensor adjustment on the back of the clock until desired setting has been
reached.
Daylight Saving Time
The National Institute of Standards and Technology and WWVB encode
a special DST “bit” in the WWVB transmission for DST. Your clock will
read this information and aut omatically advance the hands one hour in
the spring and eleven hours in the fall.
Arizona: If you live in an area that does not recognize DST, you must
press the DST button one time only to turn OFF.
Outer ring
displays
temperature
in degrees
Fahrenheit
Inner ring
displays
temperature
in degrees
Celsius
Humidity
display
in %
Calibration for
thermometer
Calibration for
hygrometer
Page 5

5 | Page
Atomic Time Signal
For information about WWVB, atomic time signal visit:
http://bit.ly/AtomicTime
Signal Interference
In some cases, the signal is affected by weather conditions and electrical
interferences, or the location of the clock itself may result in poor
reception. If the clock has not synchronized to the correct time within a
few days of activation, you may need to move the clock to a different
location.
Visit Us on Social Media
Care and Maintenance
• Do not mix old and new batteries
• Do not mix Alkaline, Standard, Lithium or Rechargeable Batteries
• Always purchase the correct size and grade of battery most suitable
for intended use.
• Replace all batteries of a set at the same time.
• Clean the battery contacts and also those of the device prior to
battery installation.
• Ensure the batteries are installed with correct polarity (+ and -).
http://bit.ly/LaxTech_YouTube
http://bit.ly/LaxTech_Facebook
http://bit.ly/LaxTech__Twitter
http://bit.ly/LaxTech_Pinterest
Page 6

6 | Page
• Remove batteries from equipment that is not to be used for an
extended period of time.
• Promptly remove expired batteries.
Specifications
Battery Requirement s:
1 AA (IEC LR6) required in movement
(Alkaline recommended)
Optional: 2 additional AA (IEC LR6) batteries for extended battery life.
Battery life: 1 battery; over 12 months
3 batteries; over 36 months
Warranty and Support Information
La Crosse Technology, Ltd. provides a 1-year limited time warranty (from
date of purchase) on this product relating to manufacturing defects in
materials & workmanship.
Before returning a product, please contact our friendly customer support
with questions or visit our online hel p.
Phone: 1-608-782-1610
Online: www.lacrossetechnology.com/support
View full warranty details o nline at :
http://www.lacrossetechnology.
com/support/?type=warranty
 Loading...