

Page 1
KMR 1250 B
1.091-104
1.091-124
www.karcher.com 5.956–707 A2003105 (06/02)
Page 2

Deutsch
Betriebsanleitung für Anwender 3
Ersatzteilliste 228
English
Français
Español
Hrvatski
български
Slovensko
Slovensky
User Instructions 28
Spare Parts List 228
Notice d’instructions pour l`utilisateur 53
Liste des pièces de rechange 228
Instrucciones de servicio 78
Lista de repuestos 228
Uputstvo za upotrebu za korisnik 103
Popis rezervnih dijelo 228
Ръководство за работа 128
Списък на резервни части 228
Navodila za uporabo namenjena uporabniku 153
Seznam nadomestnih delov 228
Návod na obsluhu pre pouívate¾a 178
Zoznam náhradných dielcov 228
ЕллзнйкЬ
ПдзгЯет лейфпхсгЯбт гйб фпхт чсЮуфет 203
ЛЯуфб бнфбллбкфйкюн 228
Page 3

English User Instructions KMR 1250 B
Contents
For your safety ..........................................................................................................................................29
On behalf of the environment....................................................................................................................30
Intended usage..........................................................................................................................................31
Sweeper functions ....................................................................................................................................31
Prior to initial start-up ................................................................................................................................32
Operating controls ....................................................................................................................................33
Preparing the sweeper for use..................................................................................................................34
Adjusting the driver’s seat ....................................................................................................................................34
Filling the fuel tank...............................................................................................................................................34
Opening the fuel tap .............................................................................................................................................34
Starting the sweeper .................................................................................................................................35
Initial driving trials.................................................................................................................................................35
Moving off and sweeping.......................................................................................................................................35
Braking ................................................................................................................................................................36
Stopping the sweeper and s witching off ................................................................................................................36
Cleaning the filter .................................................................................................................................................36
Emptying the waste hopper..................................................................................................................................37
Typical applications...................................................................................................................................38
Sweeping on dry ground.......................................................................................................................................38
Sweeping on damp or wet ground.........................................................................................................................38
Shutting the sweeper down for longer periods..........................................................................................39
Transporting the sweeper .........................................................................................................................40
Cleaning and care.....................................................................................................................................40
Maintenance ..............................................................................................................................................41
Daily maintenance ...............................................................................................................................................41
Maintenance intervals...........................................................................................................................................41
Maintenance tasks ....................................................................................................................................42
Opening/closing the unit cover .............................................................................................................................42
Disconnecting the battery ....................................................................................................................................42
Checking tyre pressures ......................................................................................................................................43
Checking the oil level ...........................................................................................................................................43
Filling up with oil ..................................................................................................................................................43
Changing the engine oil ........................................................................................................................................43
Cleaning or replacing the air cleaner.....................................................................................................................44
Cleaning the fuel filter holder ................................................................................................................................44
Checking the hydraulic system ............................................................................................................................44
Checking the level of electrolyte in the battery......................................................................................................45
Charging the battery.............................................................................................................................................45
Replacing the sealing skirts .................................................................................................................................46
Replacing the side brush......................................................................................................................................46
Replace light unit .................................................................................................................................................46
Adjusting the sweeping pattern ............................................................................................................................47
Replacing the main brush roller ............................................................................................................................48
Replacing fuses ...................................................................................................................................................49
Replacing the dust filters......................................................................................................................................49
Troubleshooting.........................................................................................................................................50
Technical specifications............................................................................................................................51
28
Page 4

KMR 1250 B User Instructions English
For your safety
Before you use this machine for the first time, please read
the following:
– these operating instructions
– the enclosed leaflet Safety Information No. 5.956-250.
Make sure that all information contained therein is complied
with.
!
Explosion hazard while refuelling!
n Do not fill up with fuel
– in an enclosed space
– while the engine is running.
n Do not smoke while refuelling the vehicle.
n Fuel expands as it becomes warmer.
Do not fill the tank right up to the top. Leave a gap of at
least 1 cm under the bottom edge of the filler neck.
n Wipe up any fuel they may have been spilt and ensure
that the cap is replaced firmly on the tank.
!
Fire hazard while sweeper is operating!
n Keep highly inflammable materials away from the engine
and the exhaust while the sweeper is operating.
!
Danger of toppling over on steep slopes!
The sweeper could topple over while it is being driven
across or turning round on a sleep slope.
n The maximum gradient up or down which the sweeper
can be driven is 18%.
n Do not drive at right angles to a slope with a gradient
steeper than 10%.
!
Danger of toppling over if bends are negotiated at
high speed!
n The sweeper could topple over if it is driven round a bend
at high speed. Drive slowly round bends.
!
Caution when carrying out maintenance or repairs!
In order to prevent the engine from being started unintentionally, proceed as follows:
n Remove the ignition key.
n Disconnect the battery at the negative terminal.
!
Caution while handling the battery!
Observe the safety information provided by the battery
manufacturer.
Always use batteries and chargers recommended by
KÄRCHER, otherwise your warranty could be rendered
invalid.
29
Page 5

English User Instructions KMR 1250 B
!
Caution while transporting the sweeper!
Make sure that the sweeper is secured properly if you are
going to transport it to a different location.
Do not use a forklift truck for loading purposes as it could
damage the sweeper.
n Apply the parking brake.
n Secure the sweeper as shown in the illustration, using
– web belts
or
– ropes
or
– chains.
On behalf of the
environment
!
Caution, environmental hazard due to exhausted
batteries!
Exhausted batteries should not be treated as domestic
refuse. Make sure that are disposed of in an environmentally
appropriate manner.
!
Caution, environmental hazard due to engine oil or
hydraulic fluid!
After you have changed the engine oil or hydraulic fluid, take
the waste product to a recognised collection point or to a
waste disposal company.
30
Page 6
KMR 1250 B User Instructions English
Intended usage
Sweeper functions
This sweeper
– is intended to be used for sweeping outdoor surfaces,
– corresponds to application category BIA KAT ”U” for
dusts which present no health hazard
– should not be used in enclosed spaces,
– can only be used on public paths and highways if it has
been fitted with the StVZO Accessory Kit.
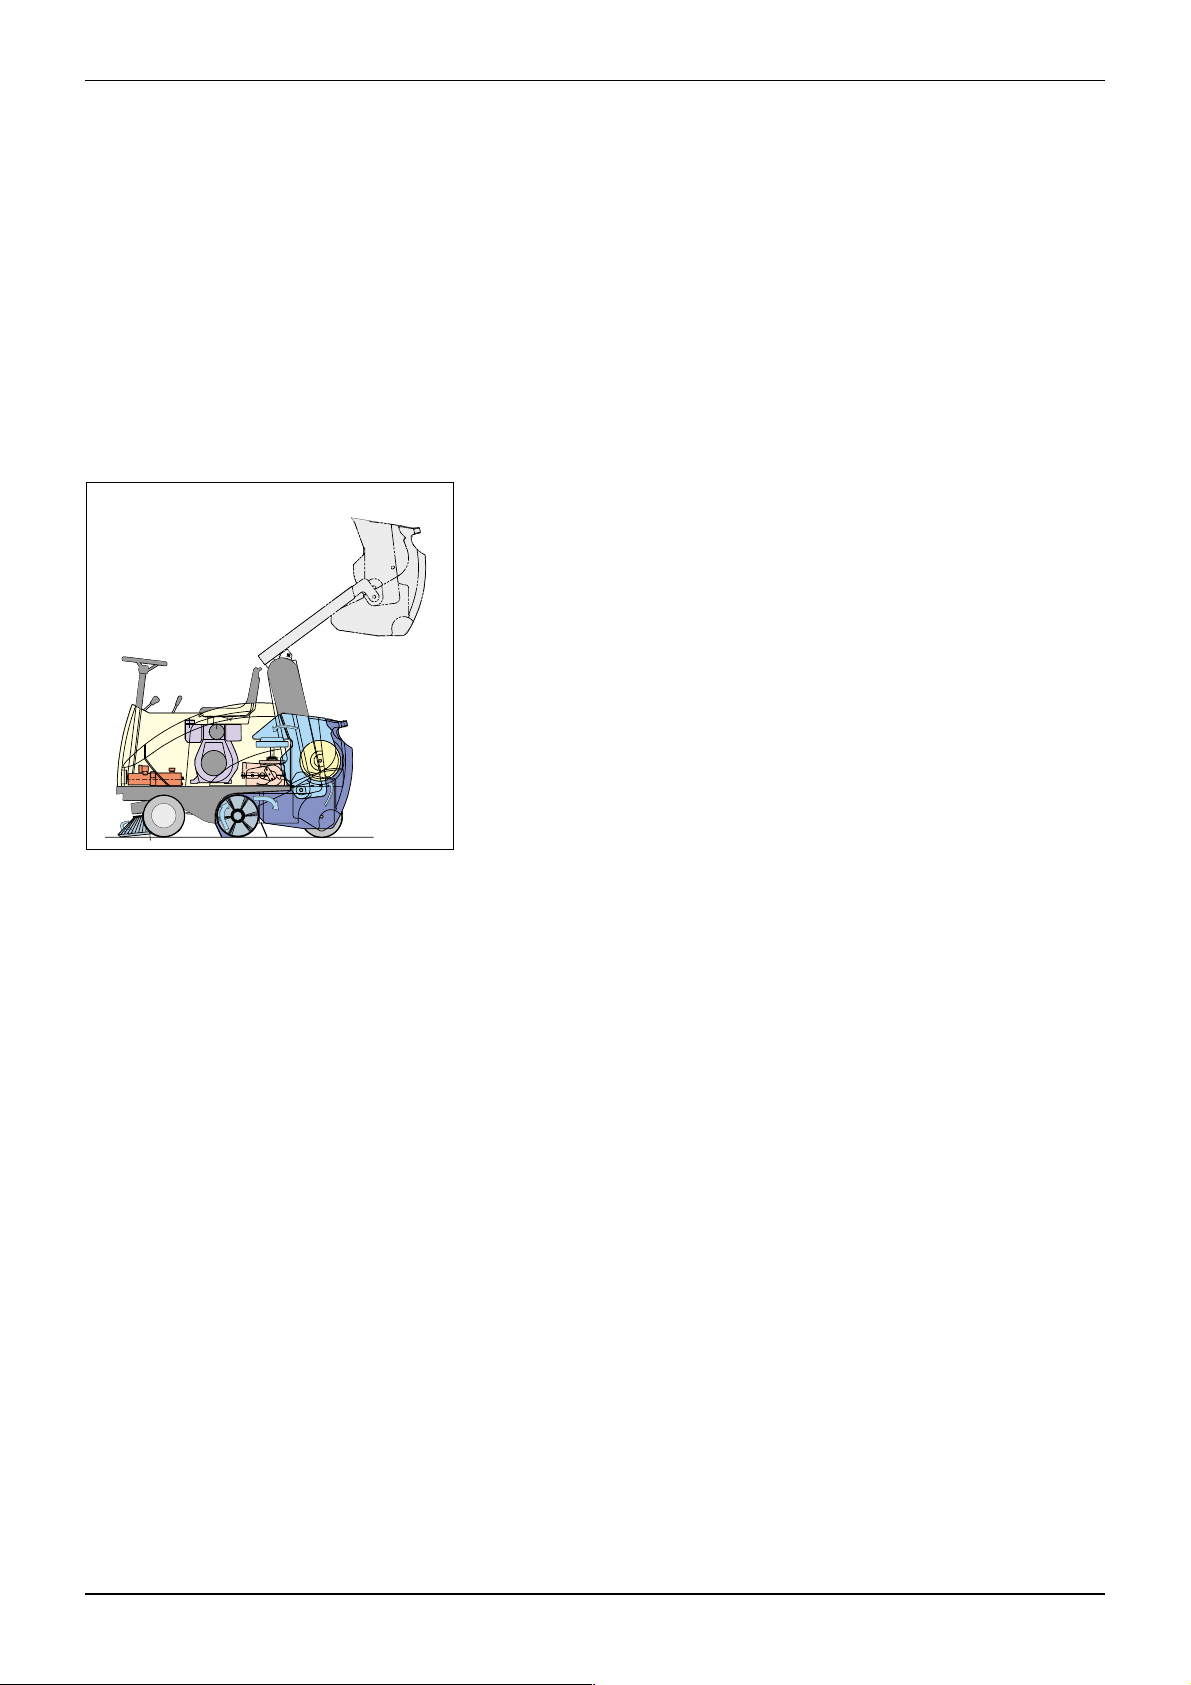
Main components
Drive unit
– single-cylinder petrol engine (6.6 kW according to SAE J
6070a)
– continuously-adjustable hydraulic drive to rear wheels
– main brush and side brush driven via belts
– hydraulically controlled emptying of waste hopper
– high-performance generator
Sweeping mechanism
– main brush employing throw-over principle for particularly
effective filling of waste hopper
– floating main brush roller with adjustable height above
ground
– quick-change mechanism for main brush
– side brush can be raised and swivels automatically
– bulk waste flap for picking up larger items (e.g. cigarette
packs or drink cans)
Filter system
– integrated dust extraction for main roller by means of
radial turbine
– 2 circular filters with 2 x 3 m
2
effective surface area
– electric filter cleaner with automatic shaking mechanism
31
Page 7
English User Instructions KMR 1250 B
Prior to initial start-up
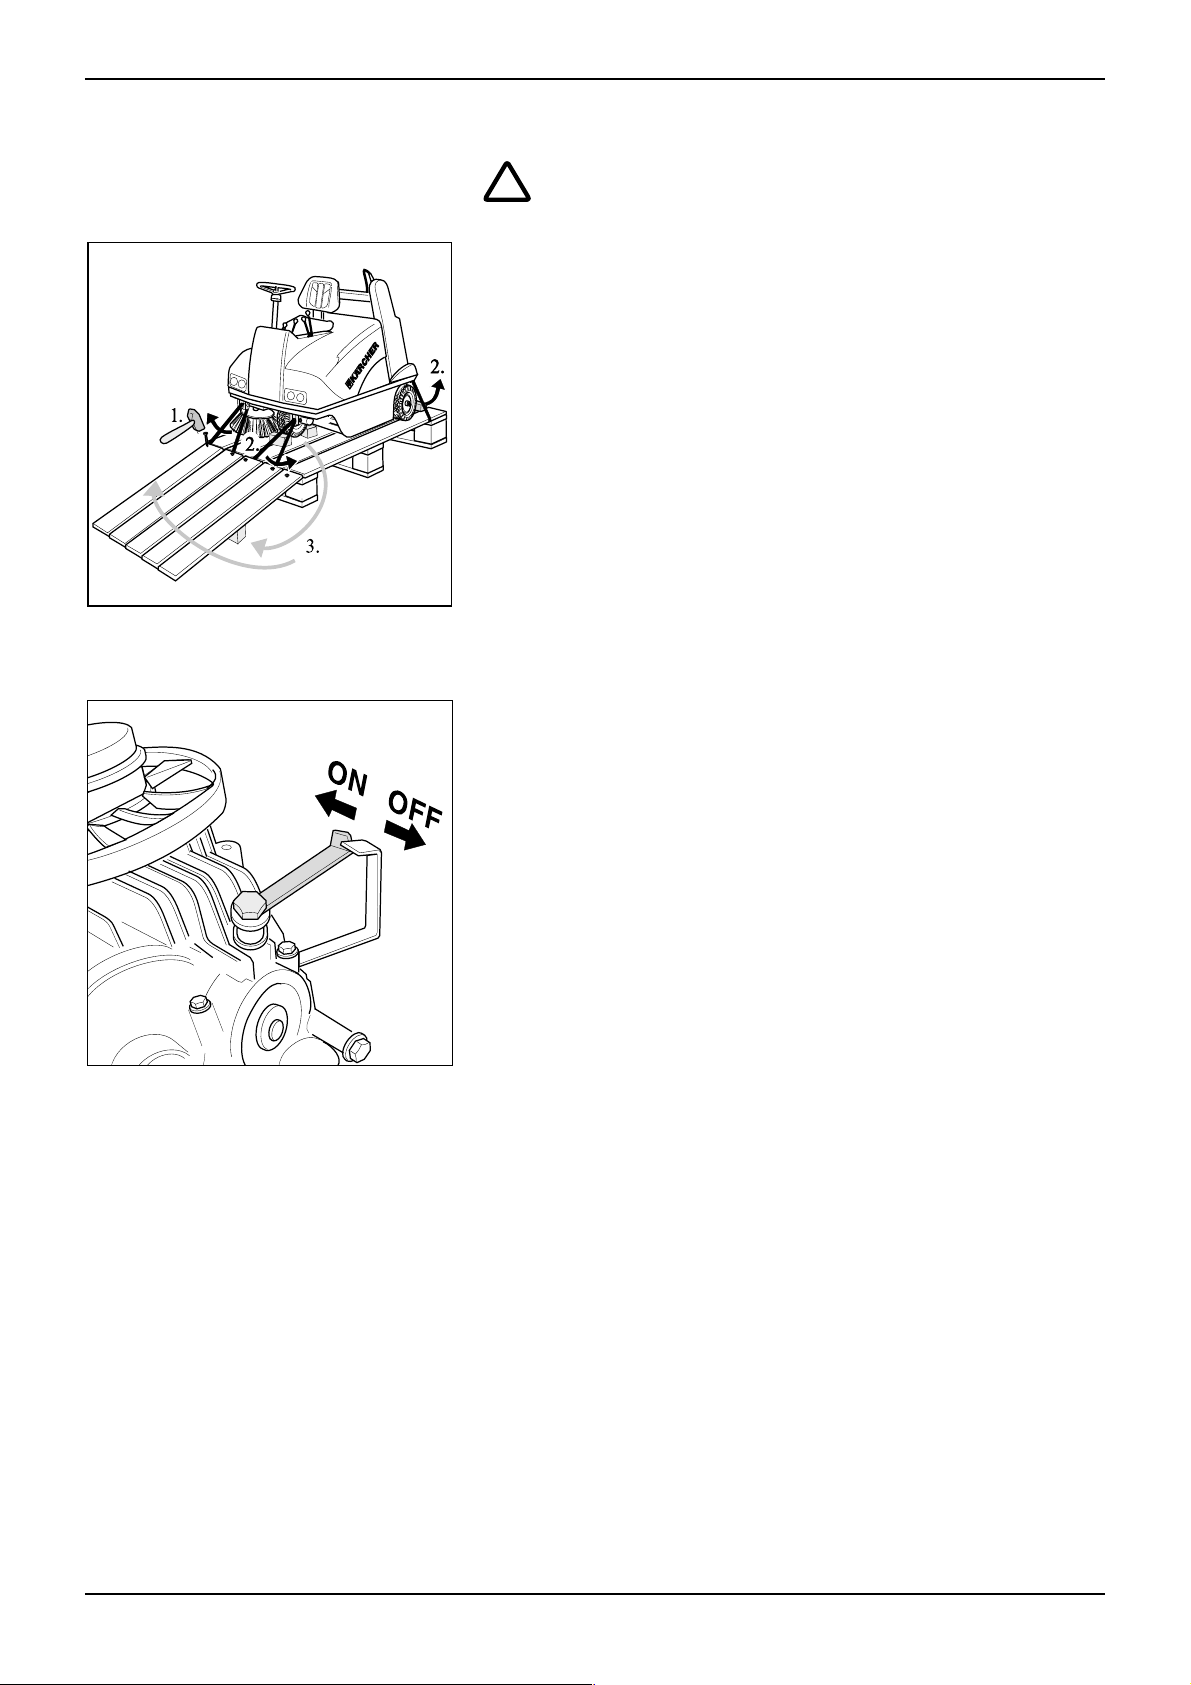
Unloading procedure
Do not use a forklift truck for unloading as it could
!
cause damage to the sweeper.
The sweeper has been lashed onto a pallet to ensure that
it can be transported safely. The procedure for unpacking
the sweeper is as follows:
1. Remove the wooden boards from the pallet and nail
them onto the end of the pallet (in front of the sweeper).
2. Detach the wires holding the sweeper in place at the
ends of the pallet.
3. Knock away the blocks used for locking the wheels and
use them for the support of the wooden planks on the left
and right.
4. Drive the sweeper off the pallet and down the ramp
made from the boards.
5. The side brush has been tied to the chassis for trans-
port. Undo the cord holding it in place.
Pushing the sweeper by hand
If you wish to move the sweeper without using its own drive:
n Open the engine cover.
n Fold the cover towards the rear; it will be held in place by
the pneumatic spring.
ç Turn the lever for allowing freewheeling to position ”OFF”.
n Release the handbrake.
n Push the sweeper to the required destination.
Note:
Do not move the sweeper over long distances without using
its own drive or at higher speeds than 10 km/h (e.g. whilst
being towed).
After moving the machine
n Put the parking brake on.
n Set free-wheeling lever to position ”ON”.
32
Page 8

KMR 1250 B User Instructions English
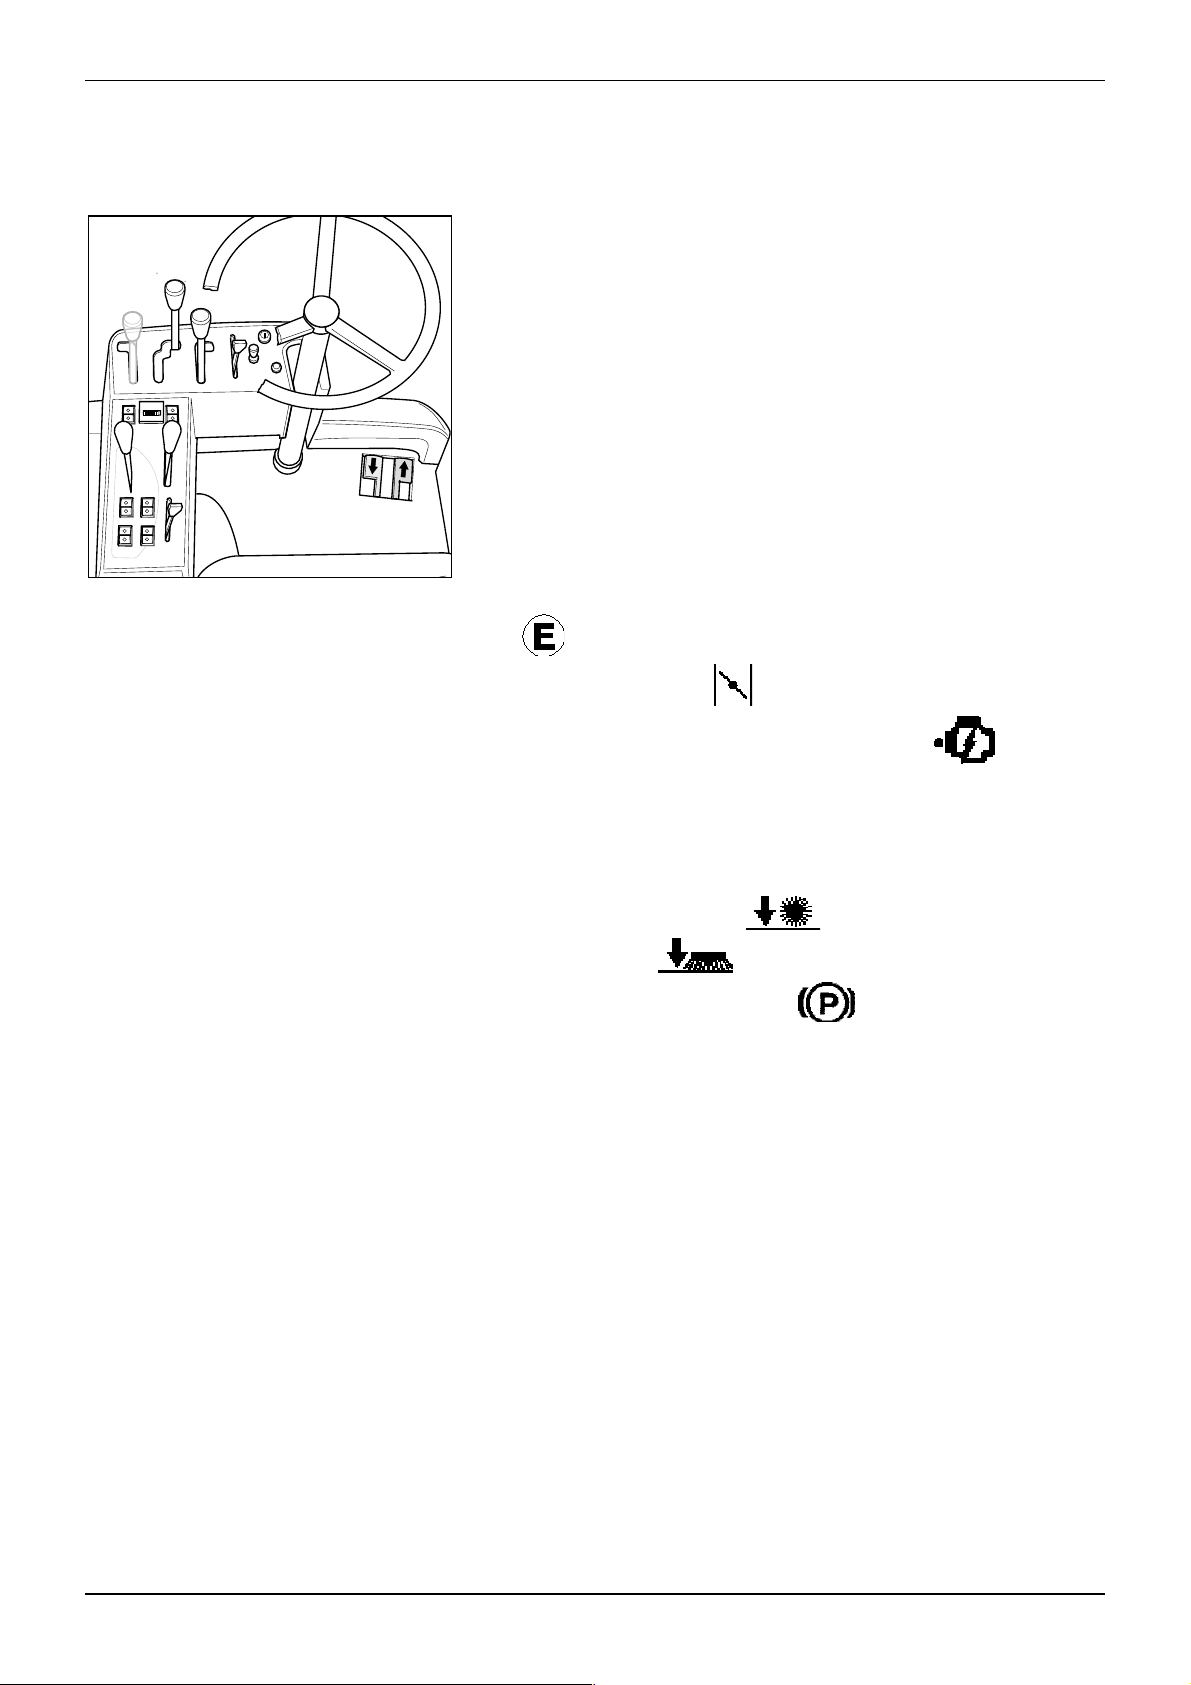
Operating controls
1. Ignition lock
2. Choke
3. Throttle lever
4. Raise / lower RH side brush
5. Raise / lower main brush
6. Raise / lower LH side brush (optional)
7. Switch for two-handed operation
8. Operating hour counter
9. Lights
10. Bulk waste flap
* Function only operative in conjunction with 7 (two-handed operation).
11. Parking brake / Driving brake
12. Tip waste hopper *
13. Raise waste hopper *
14. Lower waste hopper *
15. Filter cleaning
16. Sweeping mode, wet / dry
17a. Drive pedal backwards
17b. Drive pedal forwards
18. Horn
19. Steering wheel
20. Open/close unit cover
33
Page 9
English User Instructions KMR 1250 B
Preparing the sweeper for
use
All directions given (left/right, front/rear) are as seen from
the driver’s seat.
n Check the oil level in the engine (see Chapter: “Mainte-
nance”).
n Check the amount of fuel in the tank and fill up, if required
(see below).
n Check the level of hydraulic fluid and top up, if required
(see Chapter: “Maintenance”).
n Check the air pressure in the tyres (see Chapter:
“Maintenance”).
n Inspect the brush roller and remove any string, rope, etc.,
that may be caught up in the brushes.
n Check the dust filter. If it is very dirty, operate the shaker
to clean it off.
n Empty the waste container.
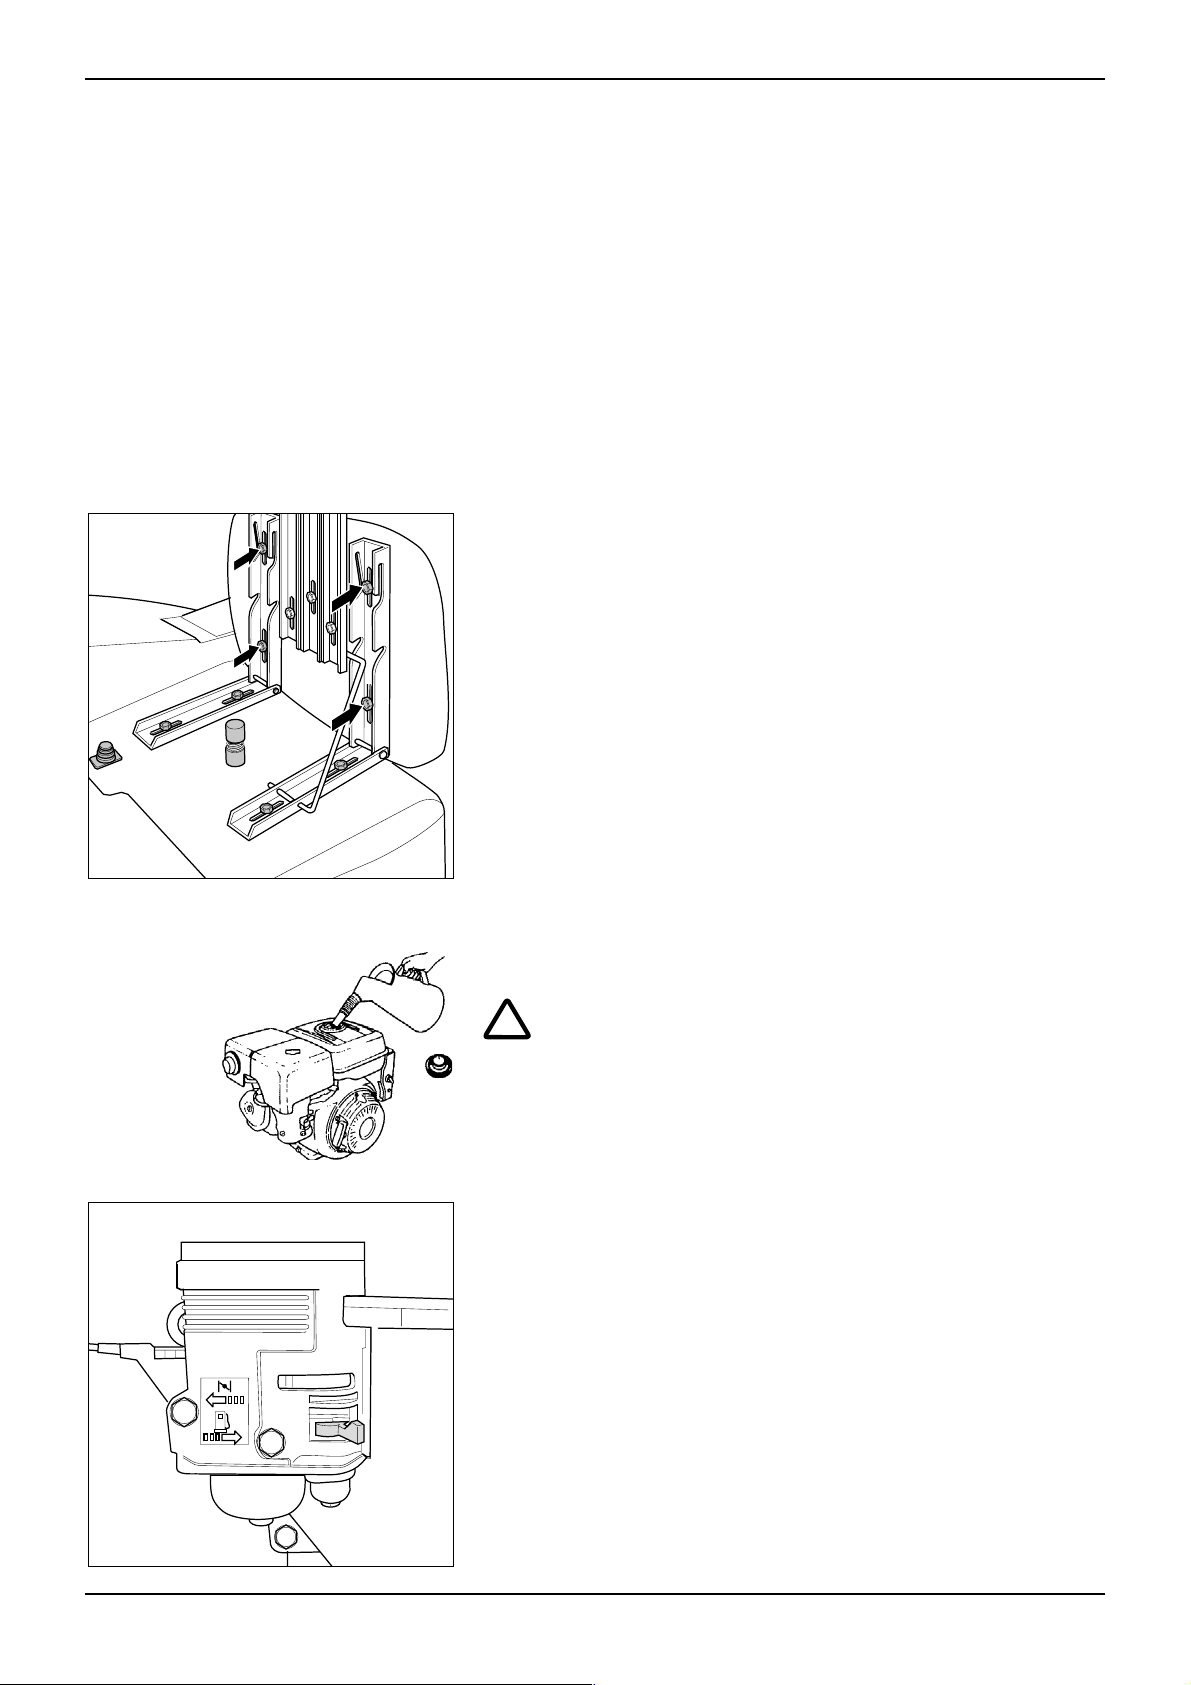
Adjusting the driver’s seat
The driver’s seat can be adjusted to suit persons of various
heights.
n Unhook the rods in the seat tilting device.
ç Undo the 4 screws.
n Move the seat to the desired position.
n Tighten the screws and hook the rods back into the tilting
device.
Filling the fuel tank
!
Explosion hazard while refuelling!
n Do not fill up with fuel
– in an enclosed space
– while the engine is running.
n Do not smoke while refuelling the vehicle.
n Fuel expands as it becomes warmer.
Do not fill the tank right up to the top. Leave a gap of at
least 1 cm under the bottom edge of the filler neck.
n Wipe up any fuel they may have been spilt and ensure
that the cap is replaced firmly on the tank.
n Use petrol, regular (lead-free).
Opening the fuel tap
n Open the unit cover.
ç Open the fuel tap.
OPEN = lever pushed to side opposite to direction of
travel
n Close the unit cover.
34
Page 10
KMR 1250 B User Instructions English
Starting the sweeper
Initial driving trials
Carry out initial driving trials in an area where there is plenty
of free space until you are familiar with individual operating
controls and their functions.
All indications of direction (right/left, front/rear) are given in
relation to the direction of travel as seen from the driver’s
seat.
n Sit down on the driver’s seat.
The engine cannot be started until the driver has sat
down (seat contact switch). As soon as driver gets up
from the seat, the engine switches off (safety cut-out).
n Make sure that
– the LH side brush (if fitted) is in the raised position,
– the RH side brush is in the raised position,
– the main brush is in the raised position.
n Set the throttle lever to the middle position
[
] (operating speed).
n Pull out the choke [
] .
n Turn the ignition key to the start position [
n When the engine has started running, set the control for
the choke back to its home position.
Moving off and sweeping
n Lower the main brush [
brush as well [ ].
n Release the parking brake [
– push the lever towards the front.
n Slowly depress drive pedal
– depress right pedal, machine travels forwards
– depress left pedal, machine travels backwards.
Whichever drive pedal is being used at the time, the driving
speed can be uniformly and smoothly regulated backwards
or forwards. Avoid jerky operation of the pedals, as the
hydraulic system could suffer damage in this way.
] and, if required, the side
]
].
35
Page 11

English User Instructions KMR 1250 B
Braking
n Release the drive pedal and the sweeper will brake auto-
matically.
Important note: Safety!
It is possible that the automatic braking function will not be
sufficient to bring the sweeper to a halt. In this case, either
make use of the parking brake as well or gently press the
drive pedal in the opposite direction to travel.
Stopping the sweeper and switching off
n Release the drive pedal. The sweeper brakes automati-
cally and comes to a halt.
Cleaning the filter
n Apply the parking brake [
n Set the throttle lever to minimum engine speed (to the
rear).
n Make sure the main roller [
are raised so that the bristles are not damaged.
n Switching off
– Turn the ignition key counter-clockwise to the 0 positi-
on and then remove it.
After the engine has been switched off, the filter is
automatically cleaned for approx. 10 seconds.
Automatic cleaning
n Stop the sweeper and switch off the engine.
After the engine has been switched off, the filter is auto-
matically cleaned for approx. 10 seconds.
].
] and side brush [ ]
36
Manual cleaning
While the sweeper is operating, the filter should be cleaned
approx. every 15–30 minutes (depending on amount of
dust).
n Stop the sweeper.
n Set the sweeping mode lever to wet [
n Briefly operate the filter cleaning button
the filter will be cleaned for a duration of approx. 10 secs.
n Set the sweeping mode lever back to dry [
n Continue with cleaning task as before.
].
, whereupon
].
Page 12

KMR 1250 B User Instructions English
Emptying the waste hopper
!
Important information
Injury hazard!
No person or animal should be allowed to stand in the area traversed by the hopper while it is
being emptied.
Danger of being crushed!
Do not reach into the shafts and linkage of the emptying mechanism.
Do not stand under the hopper.
Risk of sweeper toppling over!
If the sweeper is standing on a slope with a gradient of more than 5%, it could topple over while
the hopper is being emptied. The hopper should therefore only be emptied when the gradient at
the location where the sweeper is standing is less than 5% for the direction in which it is facing.
n Stop the sweeper.
n Raise the main brush [
Note: Following steps can only be performed with the
sweeper set to two-handed operation.
n Raise the waste hopper, [
When the hopper has reached the required height:
n Tip the hopper outwards, [
].
+ ].
+ ].
Note:
The hopper must have reached a certain minimum height
before it can be tipped out. The best position for emptying
the hopper is when it has been fully extended.
As soon as you release the button for activating the tipping
system, the hopper automatically returns to its original
position.
n Lower the hopper, + .
37
Page 13

English User Instructions KMR 1250 B
Typical applications
!
Caution while sweeping!
Do not sweep up packing bands, wires or similar items,
otherwise the sweeping mechanism will be damaged.
Do not sweep any burning/glowing objects.
Sweeping on dry ground
For a small amount of normal dirt
n
on an even surface:
lower main brush
– set the lever to the middle position [
brush wear).
n
on an uneven surface:
lower main brush
– set the lever to the lower position [
brush wear).
n switch on dust extraction
– set the switching mode lever to dry [
n for cleaning right up to the edges – lower the side brush
[
At regular intervals:
n clean the filter,
n empty the waste hopper.
Notes: If you are sweeping up fine dust, use the side brush
as little as possible as it will increase the amount of dust
stirred up by the sweeper. If the side brush encounters an
obstacle, it automatically swivels back inside the outer
contours of the sweeper. You should nevertheless try to
avoid collisions.
While the sweeper is operating, the filter should be cleaned
approx. every 15–30 minutes (depending on amount of
dust).
].
] (minimum
] (increased
].
38
Sweeping on damp or wet ground
Follow the same procedure as for sweeping on dry ground.
In order to protect the filter from moisture
n switch off the dust extraction
– set the sweeping mode lever to wet [
At regular intervals:
n empty the waste hopper.
].
Page 14

KMR 1250 B User Instructions English
Picking up larger items (sticks, tins, etc.)
Caution!
When the bulk waste flap is open, stones or grit could be
thrown at the front by the main brush. Make sure therefore
that when you open the flap no persons, animals or property
are endangered.
n Open the bulk waste flap [ ] by pulling back the
corresponding lever.
n Drive over the items to be picked up, at low speed and
with the bulk waste flap open.
Note:
In order to avoid stirring up dust unnecessarily, close the
bulk waste flap again as soon as possible.
Shutting the sweeper down
for longer periods
Overcoming obstacles
Obstacles up to 5 cm in height
– can be driven over without any problems. Before you do
so, open the bulk waste flap and raise the main brush.
Obstacles more than 5 cm in height
– can be only be driven over with the aid of a suitable ramp.
If you do not intend to use the sweeper for a longer period of
time (e.g. during the winter), please observe the following.
n It is most important that the main brush and side
brush(es) are kept raised in order to avoid damage to the
bristles.
n Clean the interior and exterior of the sweeper.
n Close the fuel tap.
n Change the engine oil (see Chapter: “Maintenance”).
n Store the sweeper in a protected environment and ensure
that it cannot roll away.
n Remove the ignition key.
n Disconnect the battery.
n Charge the battery with a suitable charger approx. every
two months (see Chapter: “Maintenance”).
39
Page 15

English User Instructions KMR 1250 B
T ransporting the sweeper
Cleaning and care
If the sweeper is going to be transported on the back of a
vehicle, it must be properly secured so that it cannot move
unintentionally.
n Apply the parking brake.
n Secure the sweeper in the manner shown in the illustrati-
on only, using
– web belts
or
– ropes
or
– chains.
Before you carry out any cleaning or general maintenance
tasks,
n park the sweeper and switch off the engine.
Cleaning the inside of the sweeper:
You can clean out the inner parts of the sweeper by blowing
them through with compressed air.
Cleaning the outside of the sweeper:
The outside of the sweeper can be wiped off with a damp
cloth. Do not use any aggressive cleaning agents which
might cause damage to the plastic components.
40
Page 16

KMR 1250 B User Instructions English
Maintenance
First engine oil change
!
Caution!
When an engine is new, it is subject to increased abrasion.
In order that the engine does not suffer any damage, we
recommend that you change the engine oil and the oil filter
after the first 8 operating hours.
Initial inspection after 8 operating hours
!
Caution!
In order to ensure that your sweeper functions safely and
reliably, it should undergo an initial inspection after approx. 8
operating hours. The inspection should be carried out by an
authorised service agent.
n Check all Bowden cables and make adjustments where
necessary.
n Change the engine oil.
n Check that there are no leaks in the hydraulic system and
all components function correctly.
n Check that the parking brake functions correctly.
n Check the air pressure in the tyres (correct level: 6 bar).
Daily maintenance
n Check the engine oil level.
n Check the tyre pressure (correct level: 6 bar).
n Inspect the brush roller and remove any string, rope, etc.,
that may be caught up in the brushes.
n Check the dust filter. If it is very dirty, operate the shaker
to clean it off.
n Empty the waste container.
Maintenance intervals
Keep to the service intervals set out in the maintenance
booklet so that your sweeper functions reliably and you
retain the full benefit of the warranty.
The maintenance booklet (Order-no. 5.950-533) can be
found in the tool compartment on the sweeper (under the
bonnet).
The necessary maintenance tasks should be carried out by
an authorised service agent.
41
Page 17
English User Instructions KMR 1250 B
!
Safety information applicable to maintenance
tasks
Before you begin any maintenance tasks, please read the
enclosed leaflet Safety Information No. 5.956-250.
Caution! Make sure engine cannot be started unintentionally.
In order to prevent the engine from being started unintentionally, proceed as follows after you have parked the
sweeper.
n Pull out the ignition key.
n Disconnect the battery at the negative terminal.
The necessary maintenance tasks or daily inspections can
be carried out with the bonnet raised.
Injury hazard!
Do not open the bonnet until the motor has been switched
off.
Burns hazard!
Take care not to touch the exhaust when you open the
bonnet.
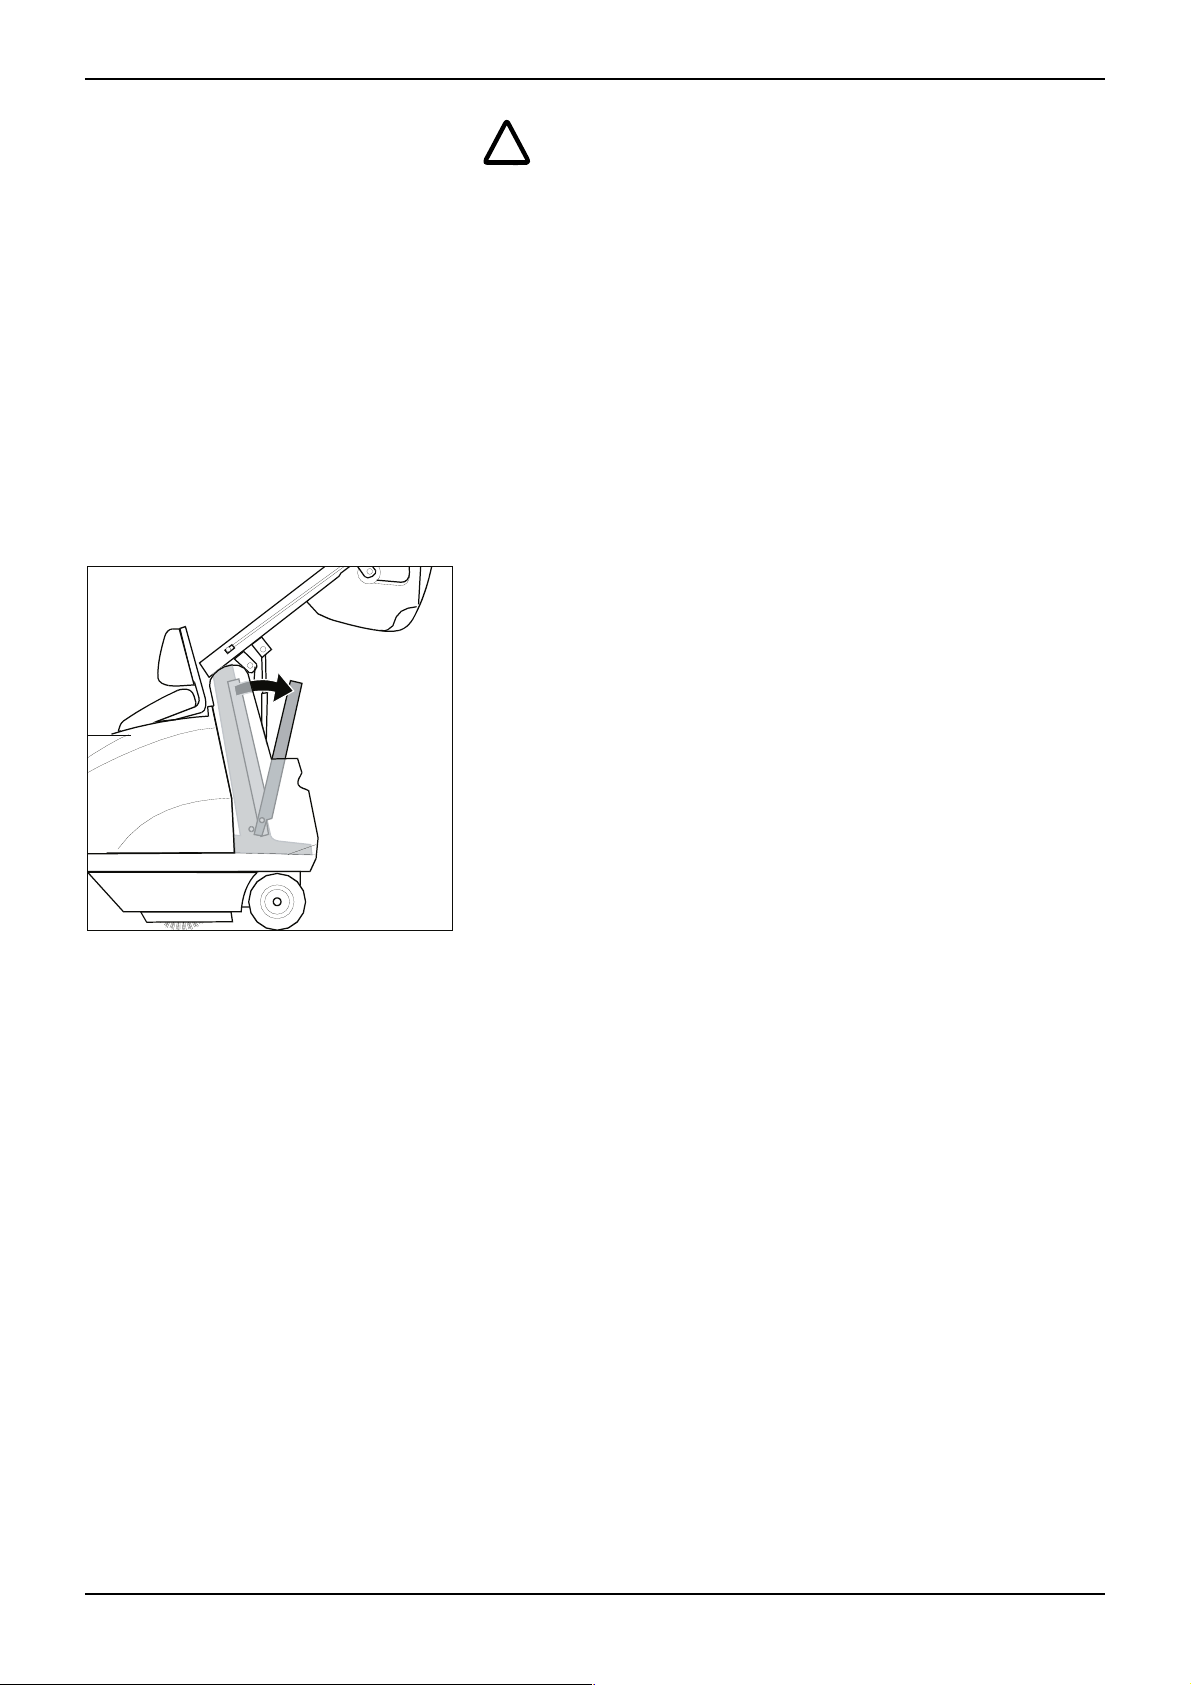
Injury hazard!
ç If you need to work under the waste container while it is
in the raised position, you must first of all secure the
container to prevent it from dropping down unintentional-
ly:
Maintenance tasks Opening/closing the unit cover
n Tip the seat forwards.
n Take hold of the unit cover by the recessed grip and open
it by pulling upwards.
Disconnecting the battery
n Open the unit cover.
n First of all disconnect the cable from the negative termi-
nal (–), then disconnect the positive terminal (+).
42
Note:
When reconnecting the battery, proceed in reverse order –
connect the positive terminal (+) first of all, then the negative terminal (–).
Page 18
KMR 1250 B User Instructions English
Checking tyre pressures
Checking the oil level
n Park the sweeper on a level surface.
n Check air pressure and adjust pressure as required.
Air pressure for front and rear wheels = 6 bar
n Park the sweeper on a level surface.
ç Pull out the dipstick.
n Wipe the dipstick clean and re-insert it in the filler hole.
n Pull out the dipstick again and check the result.
The oil level should be between the MIN and MAX marks.
If the oil level is below MIN – top up with oil.
If the oil level is above MAX – drain off the surplus.
n Insert the dipstick back into the filler hole.
Filling up with oil
Changing the engine oil
n Pour engine oil type SAE 15W40 into the hole for the
dipstick.
Caution! Danger to the environment from engine
oil
After carrying out an oil change, ensure that the waste oil is
passed to an appropriate collection point or official disposal
company.
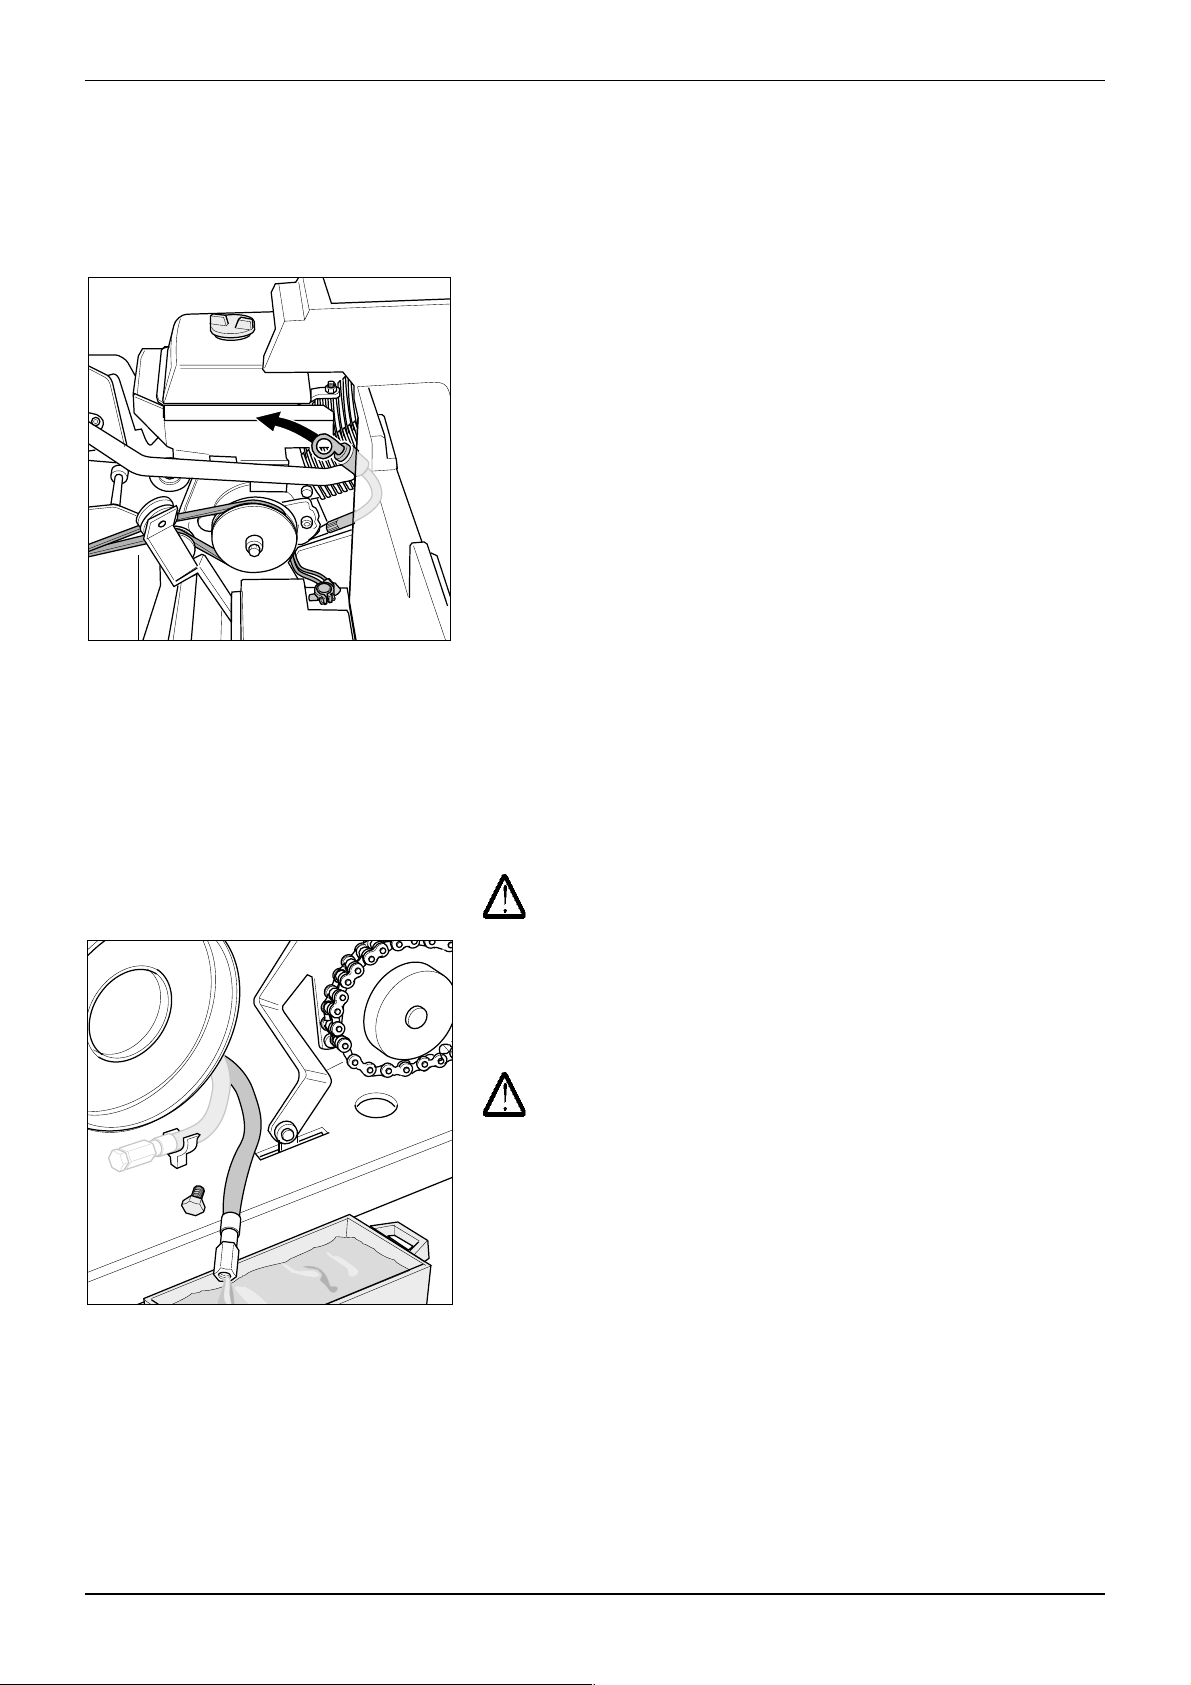
Caution,
n Run the engine until it reaches its normal operating tem-
perature.
n Make sure the sweeper is standing on a level surface.
n Open the unit cover.
n Place a drip pan under the engine.
ç Hold the end of the drain tube over the drip pan and let
the old oil run out.
n Close off the end of the drain tube again.
n Pour engine oil into the filler hole.
Capacity = 1.1 litres
n Check the oil level with the dipstick – see “Checking the
oil level”.
n Wipe up any oil spillage and dispose of the waste oil
appropriately.
43
Page 19

English User Instructions KMR 1250 B
Cleaning or replacing the air
cleaner
1
2
Do not run the engine without an air cleaner otherwise this will lead to increased wear on the engine
The air cleaner must be washed out more frequently if the
engine is run in particularly dusty environment.
Do not wash the air cleaner in petrol or a cleaning
solvent with a low flash point.
n
Paper insert 1: Replace the insert if it is very dirty. Other-
wise, blow compressed air through the insert from the
inside to out or knock it against a hard surface. Do not
brush it off, otherwise the dirt will be compacted between
the fibres.
Foam insert 2: Wash out the insert in a solution of was-
n
hing-up liquid and warm water. Rinse it out and allow it to
dry out thoroughly. Immerse the clean insert in engine oil
and squeeze out the excess fluid. If too much oil is left in
the insert, smoke will be given off by the engine when it is
next started.
Cleaning the fuel filter
holder
1
2
Checking the hydraulic
system
Petrol is highly flammable and under certain conditions it is also explosive. Do not smoke within
the working area and keep away from open flames
or sparks.
When the filter holder is refitted, check that it
seals properly and make sure the whole area is dry
before starting the engine.
n Set the fuel tap to OFF 1.
n Detach the filter holder and O-ring 2 and wash it out in a
non-flammable or flame-resistant solvent. Allow the
holder to dry out thoroughly and then screw it on tight.
n Set the fuel tap to OPEN. Check that there is no leakage.
n Carry out a visual inspection. If there is any loss of fluid
from the hydraulic unit, cylinder or hoses, call KÄRCHER
Customer Service.
44
Page 20
KMR 1250 B User Instructions English
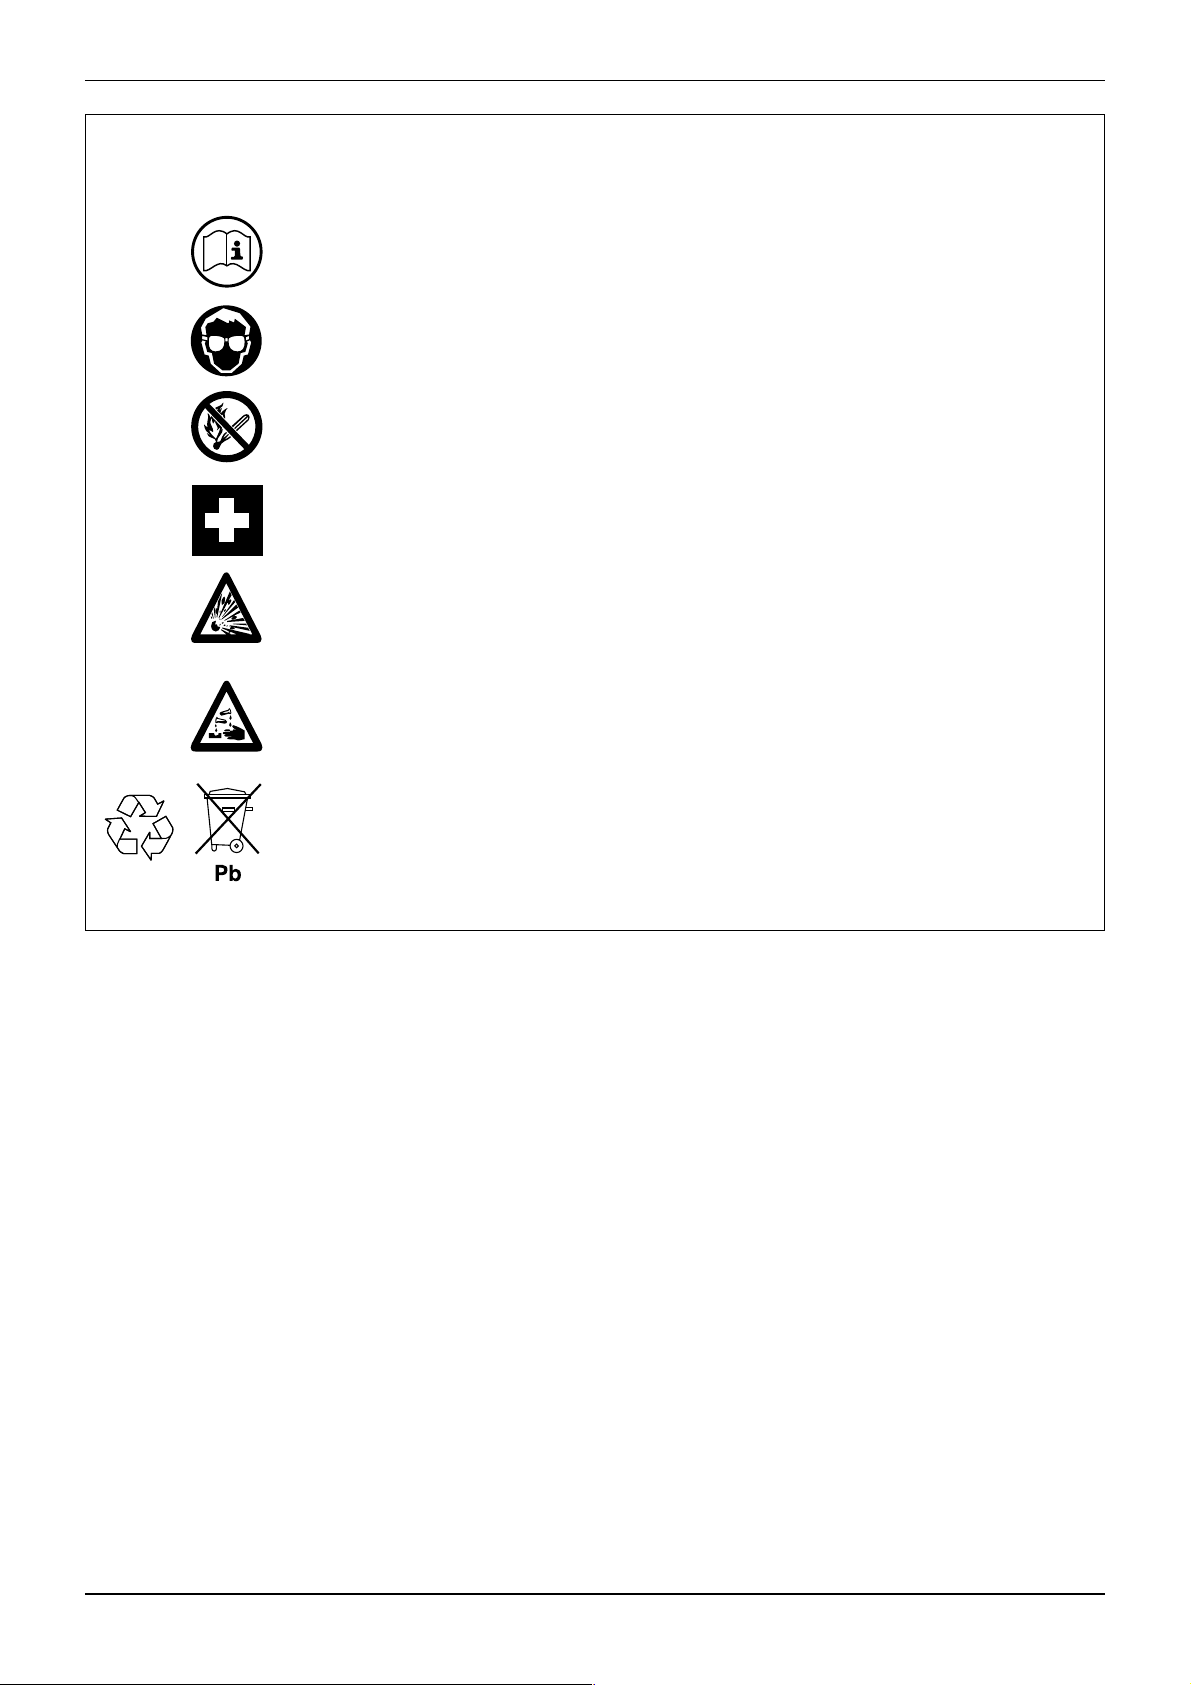
Safety information
which must be observed when handling batteries.
Comply with the user instructions and ensure that these are displayed at the
charging station. Before the operator carries out any work on batteries, he/she
must have received proper instruction from a suitably qualified person.
Wear safety goggles and protective clothing when working on batteries. Observe accident prevention regulations, as well as DIN VDE 0510, VDE 0105
Part 1.
Smoking is forbidden!
Make sure that there are no naked flames, other source of heat or sparks in
the proximity of the battery, otherwise there is a danger of explosion or fire.
If electrolyte comes into contact with skin or eyes, rinse the affected area with
plenty of clean water. The metal parts of battery cells are permanently live.
Therefore do not place any tools or other objects on top of the battery.
Explosion and fire hazard! Avoid short-circuits.
Warning! The metal parts of battery cells are permanently live. Therefore do
not place any tools or other objects on top of the battery.
Electrolyte is highly corrosive. Under normal operating conditions it is not
possible for anything to come into contact with the electrolyte. If the battery
housing is destroyed, the bound electrolyte that leaks out is just as corrosive
as liquid electrolyte.
Return to manufacturer!
Exhausted batteries bearing this symbol are a re-usable resource which
should be recycled accordingly. Exhausted batteries that are not intended to
be recycled must be disposed of as hazardous waste in compliance with all
relevant regulations.
Checking the level of
electrolyte in the battery
Charging the battery
Note: concerns only batteries which are not totally
maintenance-free.
Check the level of electrolyte in batteries filled with acid.
Make sure the battery is fully charged before you carry out
the check. If required:
n Top up each cell with distilled water until the lead plates
are covered by approx. 1 cm of liquid.
Note:
We recommend using the automatic battery charger (part
no. 6.654-116) for starter batteries. Use only battery
chargers with test certification mark.
Only undertake the charging procedure in dry, weatherprotected areas.
n Bring machine to a halt, pull out ignition key
n Tip seat forwards and open unit cover
n Connect positive post (+) to battery charger (red pole
clamp)
n Connect negative post (–) to battery charger (black pole
clamp)
n Connect battery charger to mains power supply and
switch on if applicable. Charging period as specified by
the battery charger manufacturer.
45
Page 21
English User Instructions KMR 1250 B
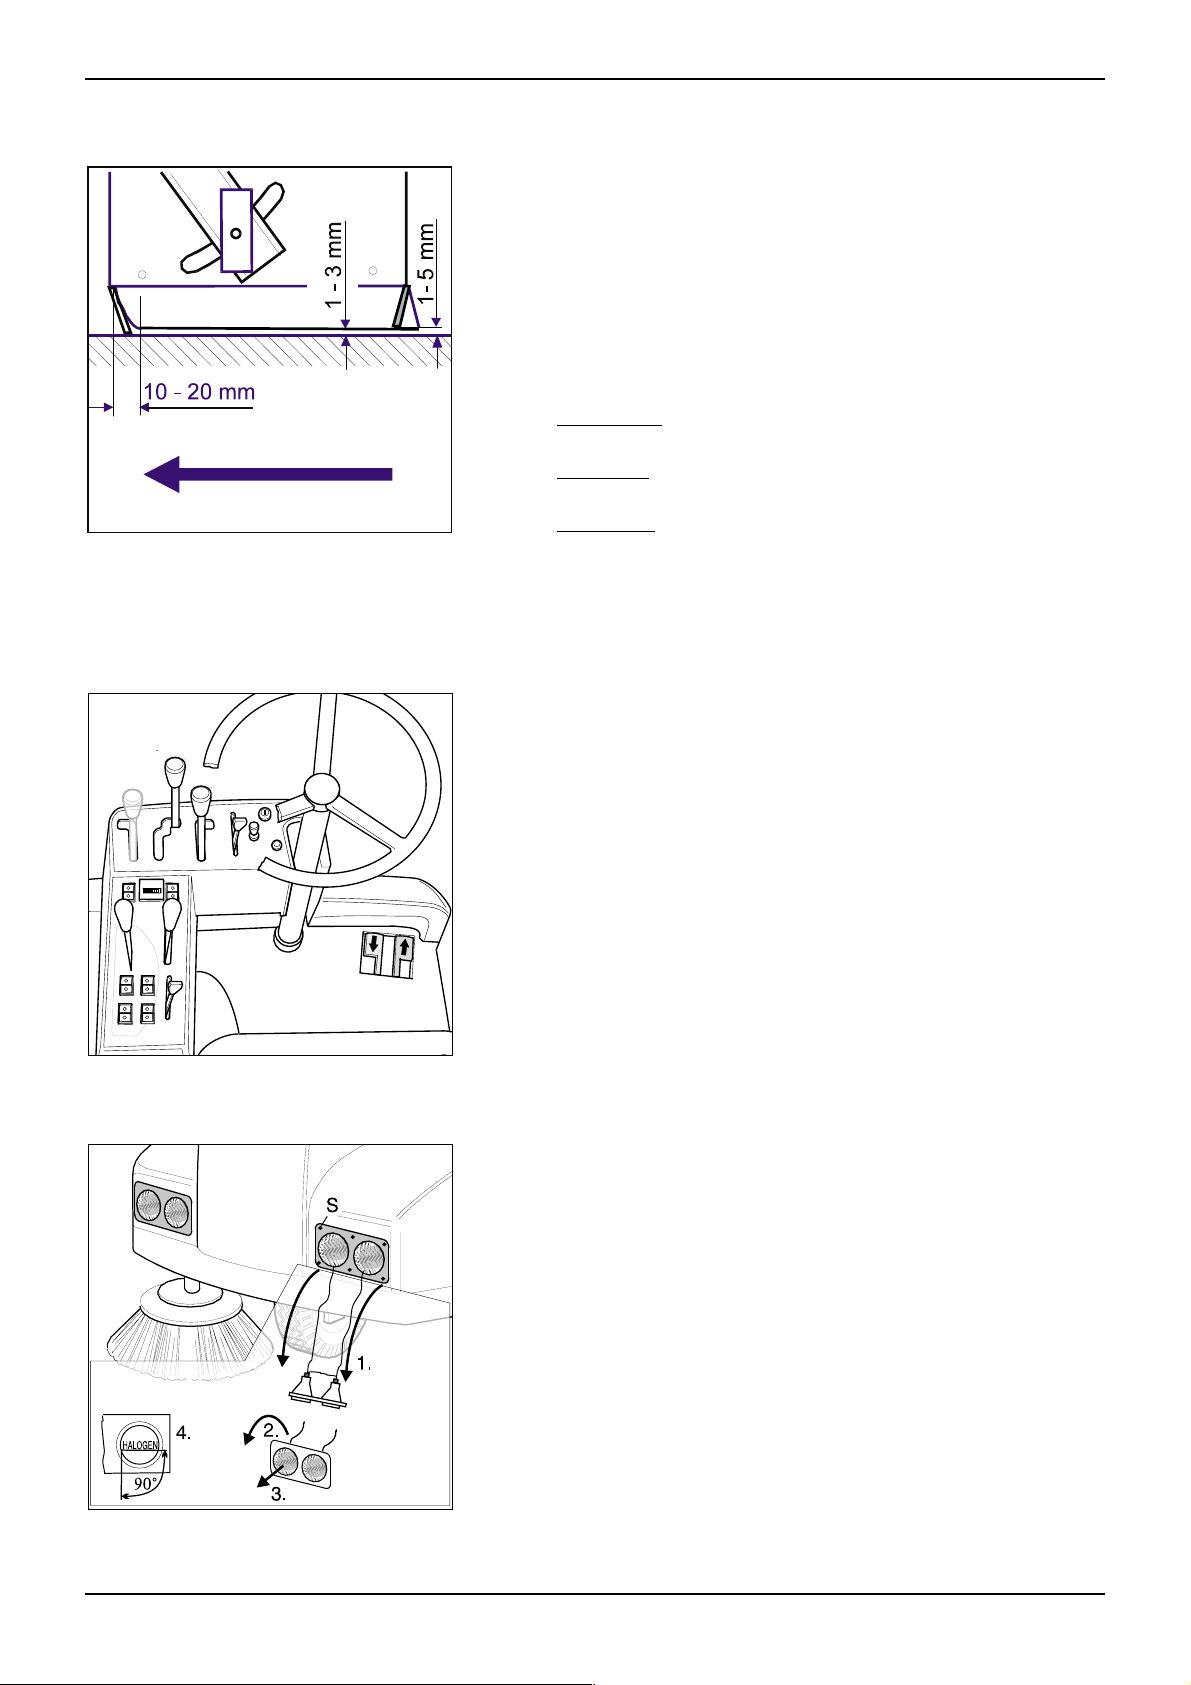
Replacing the sealing skirts
Direction of travel
Replacing the side brush
The sealing skirts fulfil an important function. They retain the
partial vacuum in the area round the brushes which is essential so that the sweeper can function properly. They
ensure that sweeping can take place without clouds of dust
being formed at the same time. If the sealing skirts are
damaged or worn out, they must be replaced immediately.
n Park the sweeper and switch off the engine.
n Remove the retaining screws and detach the sealing
skirts.
n Fit new skirts, and align them as follows:
The
side skirts should be adjusted so that they clear the
ground by 1–3 mm.
The rear skirt should be adjusted so that they clear the
ground by 1–5 mm.
n The front skirt cannot be adjusted. Replace the skirt as
soon as you see signs of excessive wear.
n Tighten the retaining screws.
n Park the sweeper and switch off the engine.
n Raise the side brush.
n Remove the three hex-socket bolts (5 mm Allen key).
n Detach the side brush.
n Push the new side brush onto the drive pin.
n Refit and tighten the three hex-socket bolts.
Replace light unit
46
n Stop the machine and turn it off.
n Take out the ignition key.
n Undo 6 screws S on the panel.
n Remove the panel 1.
n Unscrew the Phillips screw between the supports of the
lamp holder on the defective headlight.
n Turn the lens of the defective headlight anti-clockwise
about 1/4 of a turn 2 and take out reflector housing 3.
n Replace light unit.
n Insert reflector housing with new light unit in panel again
from below and secure with about 1/4 of a turn clockwise. Make certain it engages properly, the label
HALOGEN on the headlight glass must be able to be read
horizontally 4.
n Screw in again the screw between the supports, then
secure the panel with the 6 screws.
Page 22
KMR 1250 B User Instructions English
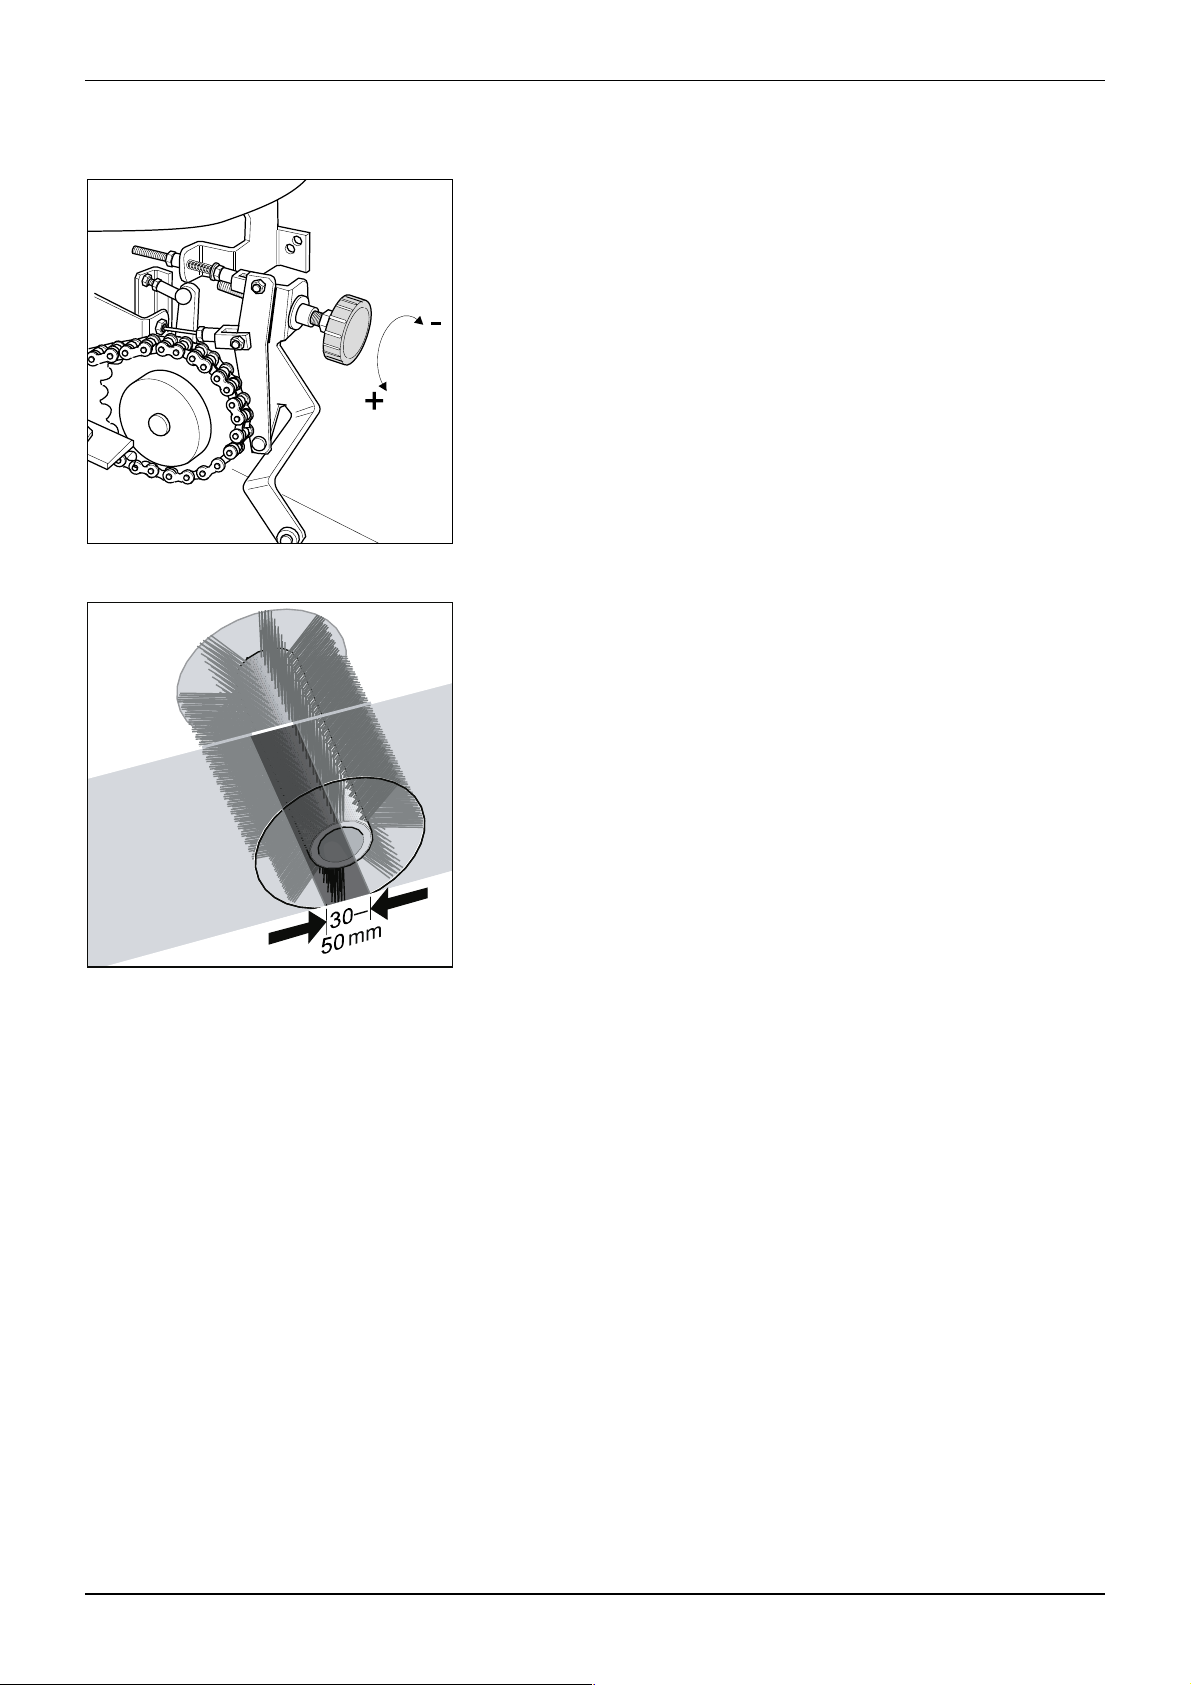
Adjusting the sweeping
pattern
(only valid for main brush roller with
”fixed setting”)
n Open the unit cover and secure it in place.
ç The sweeping pattern can be altered by turning the cen-
tral adjusting knob.
– To increase size of sweeping pattern: turn adjusting
knob counter-clockwise (towards +).
– To reduce size of sweeping pattern: turn adjusting
knob clockwise (towards –).
After any adjustments have been made, check the sweeping
pattern.
n Drive the sweeper onto a dusty surface and apply the
parking brake.
n Lower the main brush (lever set to middle position) and
allow it to brush the floor for several seconds.
n Raise the main brush and drive backwards a short di-
stance with the bulk waste flap open (first release the
parking brake).
n The width of the sweeping pattern should be 30–50 mm.
Note:
The shape of the sweeping pattern should not be trapezoidal. If it is, call customer service.
47
Page 23
English User Instructions KMR 1250 B
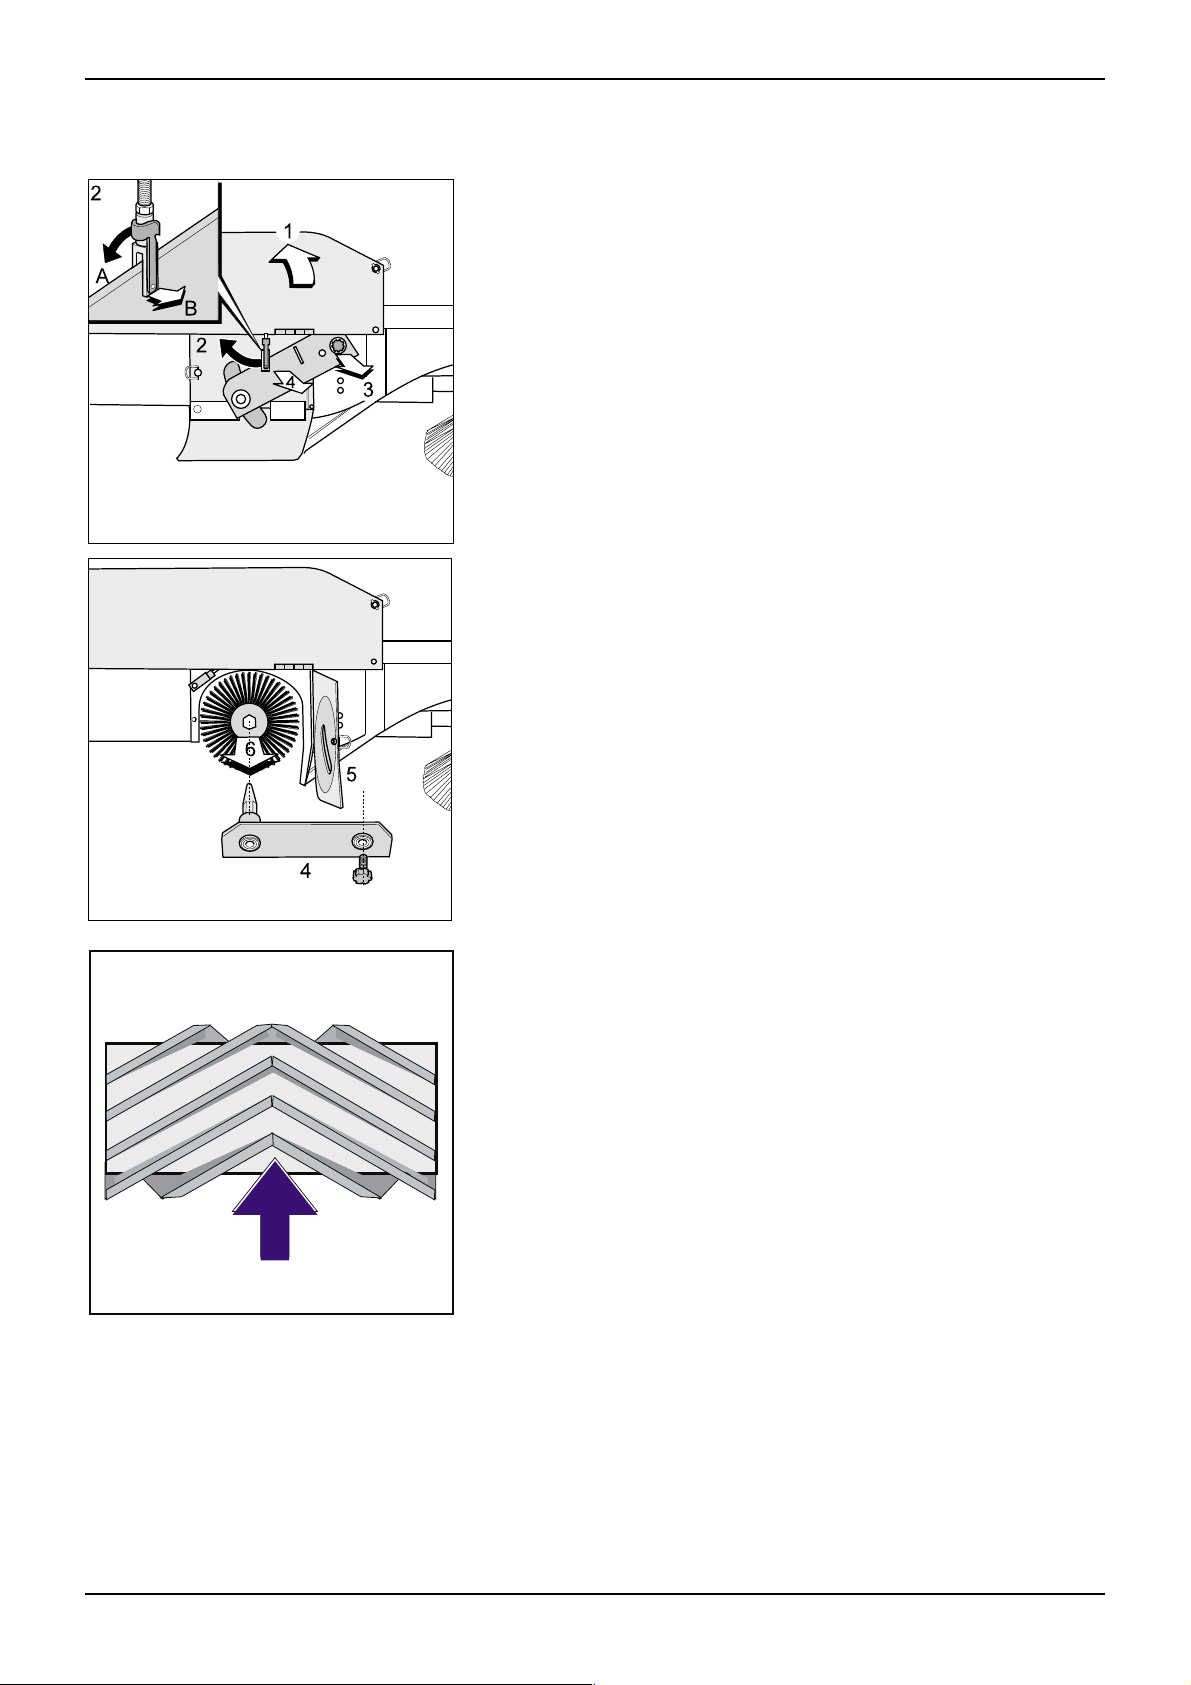
Replacing the main brush
roller
n Park the sweeper and switch off the engine
n Lower the brush roller.
n Open the RH side flap
n Undo the retaining bolt on the lower forked head
swivel the push rod towards the rear.
n Unscrew the knurled knob
n Remove the oscillating linkage
1 (seen in direction of travel).
2 and
3.
4.
Brush roller seen from above
n Open the flap over the end of the brush roller
fastener).
n Pull out the brush roller
n Screw in the knob for adjusting the sweeping pattern as
far as it will go (clockwise, towards –).
n Fit the new brush roller in reverse order to the removal
procedure.
Note:
Make sure the bristles point in the right direction – see
illustration.
n Set up the sweeping pattern by turning the adjusting knob
– see “Adjusting the sweeping pattern”.
6.
5 (turn-lock
48
Direction of travel
Page 24
KMR 1250 B User Instructions English
Replacing fuses
n Park the sweeper and switch off the engine.
n Open the unit cover.
n Replace a defective fuse with one of the same current
value.
Note:
Repeated defects of the same fuse indicate a technical fault
in the electrical system. Please call Kärcher Customer
Service.
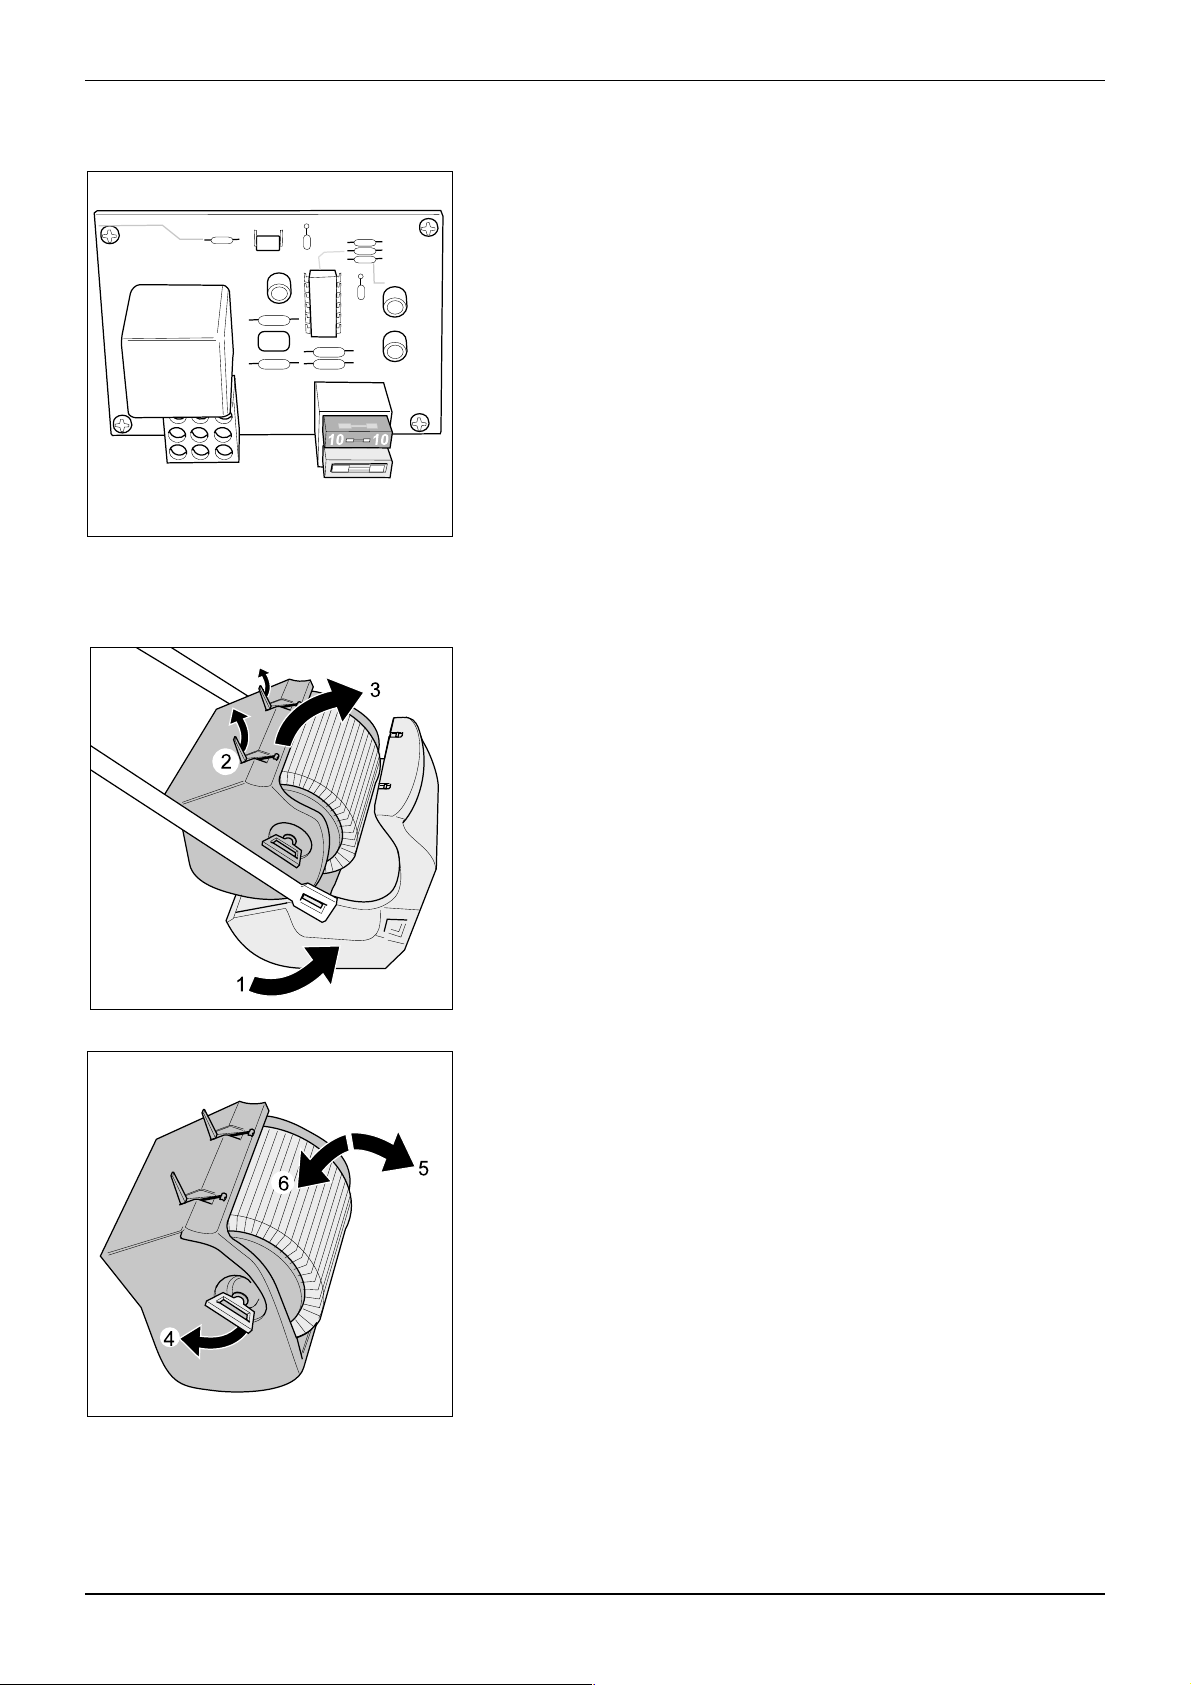
Replacing the dust filters
The dust filters should be inspected for damage every 50
operating hours.
A significant build-up of dust at the air outlet from the fan is
a sign of a filter that is not fitted properly or is defective.
n Raise the hopper half way
n Release the catches on the filter box
n Swivel the filter box forwards and lift it off
n Open out the handle, pull it outwards and turn it through
90º (make sure it engages)
n Remove the filter cartridge
n Insert a new filter cartridge (pins should fit into the
holes)
n Set the handle back to its original position and lock it.
Make sure the filter is correctly seated.
n Mount the filter box and engage the catches.
6.
1.
2.
3.
4.
5.
49
Page 25

English User Instructions KMR 1250 B
Troubleshooting
Fault Possible cause Remedy
Engine does not start
Machine does not move
Main brush roller and side
brush
Dust generation when
sweeping
Battery discharged Re-charge or replace batteries
No fuel in tank Fill up with fuel
Fuel tap closed Open fuel tap
Low oil level Fill up with oil
Hand lever (by-pass valve) on
torque converter is at OFF
V-belt torn Inform Customer Service
V-belt to loose Check V-belt tension and
Main brush roller or side brush
blocked with tape or similar
Seals on the machine worn, filter
not installed correctly or
defective
Lever for sweeping mode
wet/dry set to wet
Set hand lever to ON - see
chapter on pushing the
sweeper by hand
adjust
Remove tape
Replace seals, mount filter
correctly/replace
Set lever to “dry”
Machine sweeps badly
High-emptying does not
function
Machine moves forwards
or backwards when drive
pedal is released
Blower fan is not rotating Check V-belt
Filter is blocked Clean or replace filter
Brushes worn out Replace
Waste hopper is full Empty waste hopper
Sweeping pattern wrongly
adjusted
Fuse defective Change fuse or inform
Switch defective Inform Customer Service
Hydraulic unit is defective Inform Customer Service
Neutral position not correct Inform Customer Service
Adjust sweeping pattern
Customer Service
50
Page 26

KMR 1250 B User Instructions English
Technical specifications
* Travel speed for driving in traffic
should be reduced from 8 to
6 km/h and a 6 km/h sign
displayed, or ABS (mounting kit)
StVZO (vehicle construction and
use regulations) (Order no.
2.638-754) displayed.
Dimensions and weights
Length 1.650 mm
Width 1.000 mm
Height 1.270 mm
Unladen weight (ready for operation) 450 kg
Max. permissible overall weight 600 kg
Driving and sweeping performance
Max. travelling speed 8 * km/h
Max. climbing ability/gradient 18 %
Effective sweeping width without side brush 750 mm
Effective sweeping width with 1 side brush 1.000 mm
Effective sweeping width with 2 side brushes1.300 mm
Area rating (theoretical)
without side brush 6.000 m²/h
with 1 side brush 8.000 m²/h
with 2 side brushes 10.400 m²/h
Waste container
Theoretical capacity 100 L
Max. usable capacity 80 L
Lifting height 1.430 mm
Filter surface area 6 m²
Sweeping unit
Brush roller with V-shaped rows of bristles
Diameter of brush roller 285 mm
Diameter of side brush 450 mm
Vehicle tyres
Pneumatic, diameter 300 mm
Type 4.00-4
Air pressure, front 6 bar
Air pressure, rear 6 bar
Lighting
Light unit DIN 49848
HS3 6V/2.4 W
Engine
Model Honda GX 270
Type 4-stroke
Cylinders 1
Capacity 270 cm³
Output (9 HP at 3600 r.p.m.) 6.6 kW
Fuel petrol, regular (lead free)
Engine oil
SAE15W40 1.1 L
Battery 12 Volt
44 Ah
51
Page 27

English User Instructions KMR 1250 B
Starter electric
Drive system
Maintenance-free, fully enclosed hydrostatically driven axle
with differential
Hydraulic fluid
Class DIN HVLP 51524/2
46 c St /40 °C
Capacity * 1.4 L
* We recommend Wintershall Wiolan HX 46 Hydraulic Fluid.
Protection type typedrip-proof IPX3
Ambient conditions
- temperature -5 to + 40 °C
- air humidity, not wet with dew 0 – 90 %
Operating cycle
Under favourable conditions, the sweeper has an operating
cycle of 3 hours with a full fuel tank at the start. The actual
time is dependent upon several factors:
– surface structure of the ground and how level it is
– how well the sweeper has been maintained
– type of brush roller and its degree of wear.
Noise emission
Sound level (EN 60704-1) 79 dB(A)
Guaranteed noise level
(2000/14/EC) 101 dB(A)
Machine vibration
Rated vibration value
(ISO 5349) < 2,5 m/s²
52
Page 28

KMR 1250 B
1.091-104.0
1.091-124.0
7.654-002.0
6.348-316.0
24V 30A Wa
>>MICROMP<< LADETECHNIK
6.654-116.0
6.618-090.0
6.491-500.0
6.491-514.0
6.414-532.0
6.491-566.0
6.348-337.0
6.435-295.0
6.435-331.0
KMR
0
5
2
1
6.435-289.0
7.651-002.0
6.651-382.0
KARCHER
6.491-596.0
6.682-378.0
6.435-288.0
6.435-331.0
6.435-295.0
6.303-058.0
6.303-125.0
5.031-452.0
7.644-017.0
7.644-007.0
6.644-277.0
7.644-018.0
6.905-986.0
7.312-003.0
7.313-003.0
7.306-501.0
06/99 - S 1/2
Page 29

KMR 1250 B
1.091-104.0
1.091-124.0
KMR
0
5
2
1
KARCHER
5.190-083.0
5.365-215.0
5.190-084.0
4.038-524.0
5.190-055.0
5.394-439.0
5.190-082.0
5.190-089.0
5.365-216.0
5.031-378.0
5.190-084.0
6.905-982.0
5.190-082.0
5.190-083.0
5.365-215.0
06/99 - S 2/2
Page 30

DECLARACIÓN DE CONFORMIDAD DE LA UNIÓN EUROPEA
Por la presente declaramos los abajo firmantes que la máquina
designada a continuación cumple, tanto por su concepción y clase de
DÉCLARATION DE CONFORMITÉ EUROPÉENNE
Par la présente, nous déclarons que la machine ci-après répond, de par
sa conception et sa construction ainsi que de par le modèle que nous
construcción como por la ejecución que hemos puesto en circulación,
avons mis sur le marché, aux exigences de sécurité et d’hygiène en
las normas fundamentales de seguridad y protección de la salud
formuladas en las directivas comunitarias correspondientes.
La presente declaración pierde su validez en caso de alteraciones en la
máquina efectuadas sin nuestro consentimiento explícito.
Producto: Barredora de suelos
Modelo: 1.091-xxx
Directivas comunitarias aplicables:
Directiva comunitaria sobre máquinas (98/37/EG)
Directiva sobre compatibilidad electromagnética (89/336/EWG)
vigueur de la directive européenne.
En cas de modification de la machine effectuée sans notre accord, cette
déclaration sera caduque.
Produit: Balayeuse / machine autoporteuse
Type: 1.091-xxx
Directives européennes en vigueur:
Directive européenne sur les machines (98/37/EG)
Directive européenne sur la compatibilité électromagnétique
(89/336/EWG) modifiée par 91/263/EWG, 92/31/EWG, 93/68/EWG
Directive CE relative aux émissions sonores (2000/14/UE)
modificada mediante 91/263/EWG, 92/31/EWG, 93/68/EWG
Normativa UE sobre emisiones de ruidos (2000/14/EU)
Normes harmonisées appliquées:
DIN EN 60335-1, DIN EN 60335-2-72, DIN EN 55014-2:1997
Normas armonizadas aplicadas:
DIN EN 60335-1, DIN EN 60335-2-72, DIN EN 55014-2:1997
Normes nationales appliquées:
CISPR 12
Normas nacionales aplicadas:
CISPR 12
Proceso de valoración de conformidad utilizado
Procédure d’analyse de conformité utilisée
Annexe V
Anexo V
Nivel de potencia acústica medido:
99 dB(A)
Niveau de puissance sonore mesuré:
99 dB(A)
Niveau de puissance sonore garanti:
Nivel de potencia acústica garantizado:
101 dB(A)
101 dB(A)
La conformité permanente des appareils de série avec les exigences
consignées dans les directives actuelles de la CE et avec les normes
Mediante una serie de medidas internas, queda asegurado que los
aparatos y equipos de serie cumplan siempre las exigencias formuladas
appliquées est garantie par des mesures internes.
Les soussignés agissent par ordre et avec les pleins pouvoirs de la
en las directivas comunitarias actuales y en las normas
correspondientes a aplicar.
Los firmantes actúan autorizados y con poder otorgado por la dirección
Direction commerciale.
de la empresa
EU DECLARATION OF CONFORMITY
We hereby declare that the equipment described below conforms to the
relevant fundamental safety and health requirements of the appropriate
EU Directives, both in its basic design and construction as well as in the
version marketed by us.
This declaration will cease to be valid if any modifications are made to
the machine without our express approval.
Product: Sweeper / Ride-on unit
Model: 1.091-xxx
Relevant EU Directives:
EU Machinery Directive (98/37/EG)
EG - KONFORMITÄTSERKLÄRUNG
Hiermit erklären wir, daß die nachfolgend bezeichnete Maschine
aufgrund ihrer Konzipierung und Bauart sowie in der von uns in Verkehr
gebrachten Ausführung den einschlägigen grundlegenden Sicherheits-
und Gesundheitsanforderungen den unten aufgeführten EG-Richtlinien
entspricht. Bei einer nicht mit uns abgestimmten Änderung der
Maschine verliert diese Erklärung ihre Gültigkeit.
Produkt:Kehrsaugmaschine / Aufsitzgerät
Typ: 1.091-xxx
Einschlägige EG-Richtlinien
EG-Maschinenrichtlinie (98/37/EG)
EU Directive on Electromagnetic Compatibility (89/336/EWG)
amended by 91/263/EWG, 92/31/EWG, 93/68/EWG
EU guideline on noise emissions (2000/14/EU)
Harmonised standards applied:
DIN EN 60335-1, DIN EN 60335-2-72, DIN EN 55014-2:1997
Relevant EU Directives:
CISPR 12
EG-Richtlinie Elektromagnetische Verträglichkeit (89/336/EWG)
geändert durch 91/263/EWG, 92/31/EWG, 93/68/EWG
EG-Richtlinie über Geräuschemissionen (2000/14/EU)
Angewandte harmonisierte Normen:
DIN EN 60335-1, DIN EN 60335-2-72, DIN EN 55014-2:1997
Angewandte nationale Normen:
CISPR 12
Angewandtes Konformitäts- Bewertungsverfahren
Applied conformity valuation method
Appendix V
Measured noise level:
99 dB(A)
Anhang V
Gemessener Schallleistungspegel:
99 dB(A)
Guaranteed noise level:
Garantierter Schallleistungspegel:
101 dB(A)
101 dB(A)
Appropriate internal measures have been taken to ensure that series-
production units conform at all times to the requirements of current EU
Prüfgrundsätze des Hauptverbandes der gewerblichen
Berufsgenossenschaft Kehrsaugmaschinen
Es ist durch interne Maßnahmen sichergestellt, daß die Seriengeräte
Directives and relevant standards.
immer den Anforderungen der aktuellen EG-Richtlinien und den
The signatories are empowered to represent and act on behalf of the
angewandten Normen entsprechen.
company management.
Die Unterzeichnenden handeln im Auftrag und mit Vollmacht der
Geschäftsführung.
Page 31

Izjava o sukladnosti s EU
Ovime izjavljujemo da niže opisani stroj na temelju svoje koncepcije i
izvedbe kao i naša izvedba koju smo dali u prodaju odgovara
relevantnim osnovnim sigurnosnim i zdravstvenim zahtjevima niže
navedenih odredaba Europske unije. U slučaju izmjene na stroju koja
nije dogovorena s nama, ova izjava gubi svoju valjanost.
Proizvod: Stroj za smeæe / stroj s vozaèkim sjedalom
Tip: 1.091-xxx
Relevantne odredbe Europske unije
Odredbe o strojevima Europske unije (98/37/EU)
EU-odredbe o elektromagnetskoj kompatibilnosti (89/336/EWG)
zamijenjene sa 91/263/EWG, 92/31/EWG, 93/68/EWG
Odredbe EU emisija buke (2000/14/EU)
Primijenjene usklađene norme
DIN EN 60335-1, DIN EN 60335-2-72, DIN EN 55014-2:1997
Primijenjene nacionalne norme
CISPR 12
Primijenjeni postupak procjene konformnosti:
Dodatak V
Izmjerena razina buke:
99 dB(A)
Zajamčena razina buke:
101 dB (A)
Internim mjerama osigurano je da serijski uređaji uvijek odgovaraju
zahtjevima aktualnih odredaba Europske unije i primijenjenim normama.
Niže potpisani djeluju na osnovu naloga i punomoći uprave.
Prehlásenie o zhode ES
Týmto prehlasujeme, že tento uvedený prístroj na základe svojej
koncepcie a typu konštrukcie i v typu, ktorý sme uviedli do prevádzky,
zodpovedá základným príslušným bezpečnostným a zdravotným
požiadavkám dolu uvedených smerníc Európskych spoločenstiev.
V prípade zmeny, ktorú neschválime, stráca toto prehlásenie platnosť.
Produkt: Zametací stroj / stroj so sedadlom
Typ: 1.091-xxx
Príslušné smernice ES
Strojárenské smernice ES (98/37/EG)
Smernice ES Elektromagnetická kompatibilita (89/336/EWG)zmenené
na základe 91/263/EWG, 92/31/EWG, 93/68/EWG
EG-Smernica vyžarovanie hluku (2000/14/EU)
Izjava o konformnosti ES
S tem izjavljamo, da stroj, označen v nadaljevanju na podlagi koncepta
in načina izdelave ter izvedbe, ki jo s tem dajemo v promet, zadošča
ustreznim varnostnim in zdravstvenim zahtevam smernic ES, ki so
navedene spodaj. V primeru izvajanja samovoljnih sprememb na stroju
brez našega dovoljenja je ta izjava neveljavna.
Izdelek: Pometalni stroj z sedežem šoferja
Tip: 1.091-xxx
Ustrezne smernice ES
Strojne smernice ES (98/37/ES)
ES (89/336/EGS) spremenjena s 91/263/EGS, 92/31/EGS, 93/68/EGS
Smernica EU glede emisij hrupa (2000/14/EU)
1.091-xxx
Použité harmonizačné normy
DIN EN 60335-1, DIN EN 60335-2-72, DIN EN 55014-2:1997
Uporabljeni usklajeni standardi
DIN EN 60335-1, DIN EN 60335-2-72, DIN EN 55014-2:1997
Použité národné normy
Uporabljeni nacionalni standardi
CISPR 12
CISPR 12
Použitá metóda ocenenia zhody:
Príloha V
Uporabljen postopek o ocenitvi skladnosti
Dodatek V
Nameraná hladina akustického výkonu:
Izmerjen nivo proizvedenega hrupa:
99 dB(A)
99 dB(A)
Garantovaná hladina akustického výkonu:
Zagotovljen nivo proizvedenega
hrupa:
101 dB (A)
Na základe vnútorných opatrení je zaistené, že sériové prístroje
zodpovedajú vždy požiadavkám aktuálnych smerníc ES a použitým
101 dB (A)
Z internimi ukrepi zagotavljamo, da serijske naprave vedno ustrezajo
aktualnim zahtevam smernic ES in uporabljenim standardom.
normám. Dolu podpísaní jednajú z poverenia a na základe plnej moci
Podpisniki ravnajo po naročilu in s pooblastilom poslovodstva.
vedenia podniku.
Дюлщуз рйуфьфзфбò åê
ЕмеЯт, дзлюнпхме ìå ôçí рбспэуб, üôé ôï мзчЬнзмб ðïõ
чбсбкфзсЯжефбé рбсбкЬфщ, ëüãù ôïõ óчедйбумпэ êáé ôïõ
фсьрпх кбфбукехЮт, üðùò êáé ëüãù ôçò рбсбллбгЮт ðïõ
äéáôЯиефбй áðü ìáò óôçí бгпсЬ, бнфбрпксЯнефбé óôéò ó÷åôéêÝò
âбуйкЭт брбйфЮуейт буцблеЯбт êáé хгеЯбт ôùí Пдзгйюн ÅÊ. Óå
ресЯрфщуз бллбгюн óôï мзчЬнзмб чщсЯт рспзгпэменç
ухнненьзуз ìáæß ìáò, рбэей íá йучэей ç рбспэуб дЮлщуз.
Рспъьí: МзчбнéêÞ óêïýðá/ МзчбнЮ кбибсйумпэ ìå èÝóç ãéá ôïí
ïäçãü
Ôýðïò:
Ó÷åôéêýò ПдзгЯет ÅÊ:
ПдзгЯб ÅÊ учефйкЬ ìå ôéò мзчбнЭт (98/37/EG)
ПдзгЯб ÅÊ ðåñß злекфспмбгнзфйкЮт óõìâбфьфзфпт (89/336/EWG)
ðïõ фспрпрпйЮизке ìå ôçí ПдзгЯб 91/263/EWG, 92/31/EWG,
93/68/EWG
ПдзгЯб ÅÊ ðåñß ЕкрпмрÝò ипсэвùí (2000/14/EÅ)
ЕнбсмпнйумЭнб ðñüôõðá ðïõ Эчпхн åöáсмпуиåß:
DIN EN 60335-1, DIN EN 60335-2-72, DIN EN 55014-2:1997
ЕинйкЬ рсьфхрб ðïõ Эчпхн ецбсмпуиеЯ:
CISPR 12
ЕцбсмпуиеЯуб мЭипдпт áîéпльгзузт óõììüñöùóçò
РбсЬсфзмб V
Мефсзиåßóá уфЬимз бкпхуфйкЮт рЯеузт:
99 dB(A)
ДйбуцблйумЭнз уфЬимз бкпхуфйкЮт рЯеузт:
101 dB(A)
Ìå лзциЭнфб еущфесйкЬ мЭфсб Ý÷åé еобуцблйуиеЯ, üôé ïé
ухукехЭт уейсЬт кбфбукехЮт бнфбрпксЯнпнфбé рЬнфб óôéò
брбйфЮуейт ôùí ерйкбЯсщн пдзгйюн ÅÊ êáé óôá ецбсмпуиЭнфб
рсьфхрб. Ïé хрпгсЬцпнфет енесгпэн ìå енфплЮ êáé кбфьрйí
еопхуйпдьфзузт ôçò ГенйкЮт Дйеэихнузт.
Page 32
5.957-501 (01/02)
Alfred Kärcher Kommanditgesellschaft.
Sitz Winnenden. Registergericht: Waiblingen, HRA 169.
Persönlich haftende Gesellschafterin. Kärcher Reinigungstechnik
GmbH. Sitz Winnenden, 2404 Registergericht Waiblingen, HRB
Geschäftsführer:
Dr. Bernhard Graf, Hartmut Jenner, Georg Metz
Alfred Kärcher GmbH & Co.
Cleaning Systems
Alfred-Kärcher-Straße 28-40
P.O.Box 160
D-71349 Winnenden
Tel.:++49 7195 14-0
Fax :++49 7195 14-2212
Приложение
ЕО-обяснение за конформитет
С това ние обясняваме, че следващите машини на основание
тяхното предназначение и строеж както и заложените от нас във
връзка с изпълнението им основни изисквания за безопасност и
здраве съответстват на долу изброените стандарти на ЕО.
При несъгласувана с нас промяна на машината това обяснение
губи валидност.
Продукт: Продукт:машина за метене / възседателна машина
Тип: 1.091-xxx
Съответни ЕО-стандарти
ЕО-стандарти за машини (98/37/ЕО)
ЕО-стандарт за Електромагнитна съвместимост (89/336/ЕИО)
променен чрез 91/263/ЕИО, 92/31/ЕИО, 93/68/ЕИО
ЕО-Предписание Емисия на шум (2000/14/EU)
Използувани стандарти за
хармоничност
DIN EN 60335-1, DIN EN 60335-2-72, DIN EN 55014-2:1997
Използувани национални стандарти
CISPR 12
Използвани методи за оценка на съответствието:
V
Измерено ниво на звуковата мощност:
99 dB(A)
Гарантирано ниво на звуковата мощност: 101 dB (A)
Осигурено е чрез вътрешни мероприятия, така че сериините уреди
винаги да съответстват на изискванията на актуалните ЕО-
стандарти и използуваните стандарти. Подписващият действува по
поръчка и с пълномощие на ръководството на предприятието.
 Loading...