

Page 1
HD 3.0/20-4 M Ea
English 3
Français 14
Español 27
Register and win!
www.kaercher.com
59648920 02/13
Page 2
2
Page 3

IMPORTANT SAFETY IN-
STRUCTIONS
몇 WARNING
When using this product basic precautions should always be followed, including the following:
1 Read all the instructions before us-
ing the product.
2 High pressure jets can be danger-
ous if misused. The jet must not be
directed at persons, animals, electrical devices, or the unit itself.
3 To reduce the risk of injury, close
supervision is necessary when a
product is used near children.
4 Know how to stop the product and
bleed pressures quickly. Be thoroughly familiar with the controls.
5 Stay alert – watch what you are do-
ing.
6 Wear safety goggles.
7 Do not use acids, alkaline, solvents,
or any flammable material in this
product. These products can cause
physical injuries to the operator and
irreversible damage to the ma-
chine.
8 Do not operate the product when fa-
tigued or under the influence of al-
cohol or drugs.
9 Do not overreach or stand on unsta-
ble support. Keep good footing and
balance at all times.
10 To reduce the risk of electrocution,
keep all connections dry and off the
ground. Do not touch plug with wet
hands.
11 The Trigger Gun Safety Lock pre-
vents the trigger from accidentally
being engaged. This safety feature
DOES NOT lock trigger in the ON
position.
12 Keep operating area clear of all per-
sons.
13 Follow the maintenance instruc-
tions specified in the manual.
14 This product is provided with a
Ground Fault Circuit Interrupter
built into the power cord plug. If replacement of the plug or cord is
needed, use only identical replacement parts.
15 Risk of Injection or Injury – Do Not
Direct Discharge Stream At Persons.
16 Do not use extension cord with this
product.
GROUNDING INSTRUCTIONS
This product must be grounded. If it
should malfunction or breakdown,
grounding provides a path of least resistance for electric current to reduce
the risk of electric shock. This product
is equipped with a cord having an
equipment-grounding conductor and a
grounding plug. The plug must be
plugged into an appropriate outlet that
is properly installed and grounded in
accordance with all local codes and ordinances.
DANGER
Improper connection of the equipmentgrounding conductor can result in a
risk of electrocution. Check with a qualified electrician or service personnel if
you are in doubt as to whether the outlet is properly grounded. Do not modify
the plug provided with the product - if it
will not fit the outlet, have a proper outlet installed by a qualified electrician.
Do not use any type of adapter with this
product.
– 1
3EN
Page 4

GROUND FAULT CIRCUIT IN-
TERRUPTER PROTECTION
This Product is supplied with a Ground
Fault Circuit Interrupter (GFCI) built
into the power cord plug. This device
provides additional protection from the
risk of electric shock. If power is interrupted in the line, the GFCI will automatically re-close the circuit to the load
after power is restored. Depending on
the GFCI model, it may be necessary
to manually operate the reset button to
restore power to the GFCI load circuit.
If the replacement of the plug or cord is
needed use identical replacement
parts.
WATER SUPPLY
(Cold Water Only)
몇 CAUTION
When connecting the water inlet to the
water supply mains, local regulations
of your water company must be observed. In some areas the unit must
not be connected directly to the public
drinking water supply. This is to ensure
that there is no feedback of chemicals
into the water supply. Direct connection via a receiver tank or backflow preventer, for example, is permitted.
Dirt in the feed water will damage the
unit. To avoid this risk, we recommend
fitting a water filter.
– Garden hose must be at least 1 inch
in diameter.
– Flow rate of water supply must not
fall below 2.6 GPM (gallons per
minute).
– Flow rate can be determined by
running the water for one minute
into an empty 5-gallon container.
– The water supply temperature must
not exceed 140°F/60°C.
– Never use the pressure washer to
draw in water contaminated with
solvents, e.g. paint thinners, gasoline, oil, etc.
– Always prevent debris from being
drawn into the unit by using a clean
water source. Use additional water
filter.
CANADA
몇 WARNING
Do not spray electrical apparatus and
wiring.
Do not use with flammable liquids and
toxic chemicals.
Injection hazard: equipment can cause
serious injury if the spray penetrates
the skin. do not point the gun at anyone
or any part of the body. In case of penetration seek medical aid immediately.
This system is capable of producing
13700 kPa/2000 PSI. To avoid rupture
and injury, do not operate this pump
with components rated less than
13700 kPa/2000 PSI working pressure
(including but not limited to spray guns,
hose and hose connections).
Before servicing, cleaning or removing
any parts, shut off power and relieve
pressure.
EXTENSION CORDS
Use only 3-wire extension cords that
have 3-prong grounding-type plugs
and 3-pole cord connectors that accept
the plug from the product. Use only extension cords that are intended for outdoor use. These extension cords are
identified by a marking "Acceptable for
use with out-door appliances: store indoors while not in use." Use only extension cords having an electrical
rating not less than the rating of the
product. Do not use damaged exten-
4 EN
– 2
Page 5
sion cords. Examine extension cord
before using and replace if damaged.
Do not abuse extension cord and do
not yank on any cord to disconnect.
Keep cord away from heat and sharp
edges. Always disconnect the extension cord from the receptacle before
disconnecting the product from the extension cord.
If you are using an extension cord, it
should always be completely unwound
from the cable drum.
Up to 100 ft = 10/3 AWG.
몇 WARNING
To reduce the risk of electrocution,
keep all connections dry and off the
ground. Do not touch plug with wet
hands.
SAVE THESE INSTRUCTIONS!
Please read and comply with
these original instructions
prior to the initial operation of your appliance and store them for later use or
subsequent owners.
Contents
Device elements . . . . . . . . . EN . . 3
Safety instructions . . . . . . . . EN . . 4
Proper use. . . . . . . . . . . . . . EN . . 4
Safety Devices . . . . . . . . . . EN . . 4
Environmental protection. . . EN . . 5
Before Startup . . . . . . . . . . . EN . . 5
Start up . . . . . . . . . . . . . . . . EN . . 5
Operation. . . . . . . . . . . . . . . EN . . 7
Transport . . . . . . . . . . . . . . . EN . . 8
Storage . . . . . . . . . . . . . . . . EN . . 9
Maintenance and care. . . . . EN . . 9
Troubleshooting. . . . . . . . . . EN . . 9
Accessories and Spare Parts EN . 10
Warranty . . . . . . . . . . . . . . . EN . 10
Technical specifications. . . . EN . 11
Device elements
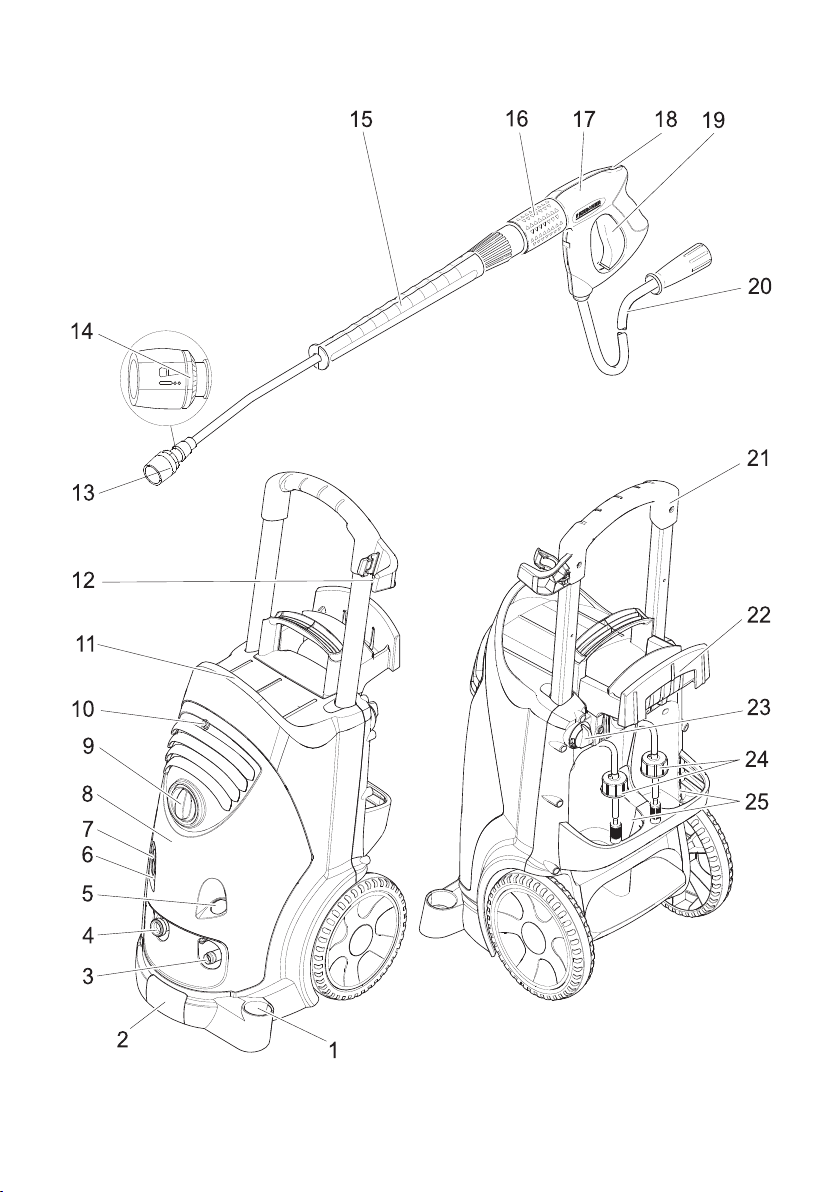
Please unfold the front picture side
1 Storage compartment for nozzles
2 Handle
3 High pressure connection
4 Water connection
5 Manometer
6 Oil level indicator
7 Oil tank
8 Cover
9 Power switch
10 Fastening screw for device hood
11 Storage compartment for hoses
12 Trigger gun storage clip
13 Nozzle
14 Marking of the nozzle
15 Spray lance
16 Pressure and volume regulation
17 Hand blowing gun
18 Safety lever
– 3
5EN
Page 6

19 Lever for hand spray gun
20 High pressure hose
21 Push handle
22 Cable clamp
23 Dosage valve for detergent
24 Detergent suction hose with deter-
gent filter and cover
25 Detergent bottle holder
Colour coding
– The operating elements for the
cleaning process are yellow.
– The controls for the maintenance
and service are light gray.
Safety instructions
– Before first start-up it is definitely
necessary to read the operating instructions and safety indications Nr.
5.951-949!
– Please follow the national rules and
regulations for fuel spray jets of the
respective country.
– Please follow the national rules and
regulations for accident prevention
of the respective country. Fuel
spray jets must be tested regularly
and the results of these tests must
be documented in writing.
Symbols in the operating in-
structions
Danger
Immediate danger that can cause severe injury or even death.
몇 Warning
Possible hazardous situation that
could lead to severe injury or even
death.
Caution
Possible hazardous situation that
could lead to mild injury to persons or
damage to property.
Symbols on the machine
High-pressure jets can be
dangerous if improperly
used. The jet may not be directed at persons, animals, live electrical equipment or at the appliance itself.
According to the applicable
regulations, the appliance
must never be used on the
drinking water net without a system
separator. Use a suitable system separator manufactured by Kärcher; or, as
an alternative, a system separator as
per EN 12729 Type BA.
Water flowing through a system separator is considered non-drinkable.
Proper use
Use this high pressure cleaner exclusively for
– Cleaning using low pressure jet and
detergent (for e.g. for cleaning machines, cars, buildings, tools),
– For cleaning using high pressure jet
without detergent (for e.g. for cleaning facades, terraces, garden appliances).
For stubborn dirt, we recommend the
use of the dirt blaster as a special accessory.
Safety Devices
Safety devices serve for the protection
of the user and must not be put out of
operation or bypassed with respect to
their function.
Overflow valve with pressure
switch
While reducing the water supply/quantity regulation at the pump head, the
overflow valve opens and part of the
water flows back to the pump suck
side.
6 EN
– 4
Page 7
If the lever on the trigger gun is released the pressure switch turns off the
pump, the high-pressure jet is stopped.
If the lever is pulled the pump is turned
on again.
Safety valve
The safety valve opens when the permissible operating pressure is exceeded; water flows back to the suction side
of the pump.
The overflow valve, pressure switch
and safety valve are set and sealed at
the factory.
Setting only by customer service.
Environmental protection
The packaging material can
be recycled. Please do not
throw the packaging material into household waste;
please send it for recycling.
Old appliances contain
valuable materials that can
be recycled; these should
be sent for recycling. Batteries, oil, and similar substances must not enter the
environment. Please dispose of your old appliances
using appropriate collection
systems.
Please do not release engine oil, fuel
oil, diesel and petrol into the environment Protect the ground and dispose
of used oil in an environmentallyclean manner.
Notes about the ingredients
(REACH)
You will find current information about
the ingredients at:
www.kaercher.com/REACH
Before Startup
Unpacking
– Check the contents of the pack be-
fore unpacking.
– In case of transport damage inform
vendor immediately
Check oil level
Read the oil level display when the
device is not running. The oil level
must be above the two pointers.
Activate deaeration of oil con-
tainer
Unscrew the fastening screws of
the device hood; remove the device
hood.
Cut off tip of oil container cover
Fasten the device hood.
Attaching the Accessories
Mount the nozzle on the spray pipe
(markings on the adjustment ring at
the top).
Install spray pipe on the hand-spray
gun with pressure and volume regulation.
Fasten the high pressure hose to
the high pressure connection.
Start up
Electrical connection
몇 Danger
Danger of injury by electric shock.
The appliance may only be connected
to an electrical supply which has been
installed in accordance with IEC
60364.
The voltage indicated on the type plate
must correspond to the voltage of the
electrical source.
– 5
7EN
Page 8
The minimum fuse rating required at
the socket outlet is (see technical
specifications).
The appliance should always be connected to the electrical mains using a
plug. It is forbidden to permanently
connect the appliance to the power
supply. The plug is only for mains separation.
Check the power cord with mains plug
for damage before every use. If the
power cord is damaged, please arrange immediately for the exchange by
an authorized customer service or a
skilled electrician.
The plug and coupling of the extension
cable used must be watertight.
Use the extension cord that has an adequate cross-section (see "Technical
Data") and unwind it fully from the cable drum.
Unsuitable extension cables can be
hazardous. Only use extension cables
outdoors which have been approved
for this purpose and labelled with a sufficient cable cross section:
For connection values, see type plate/
technical data.
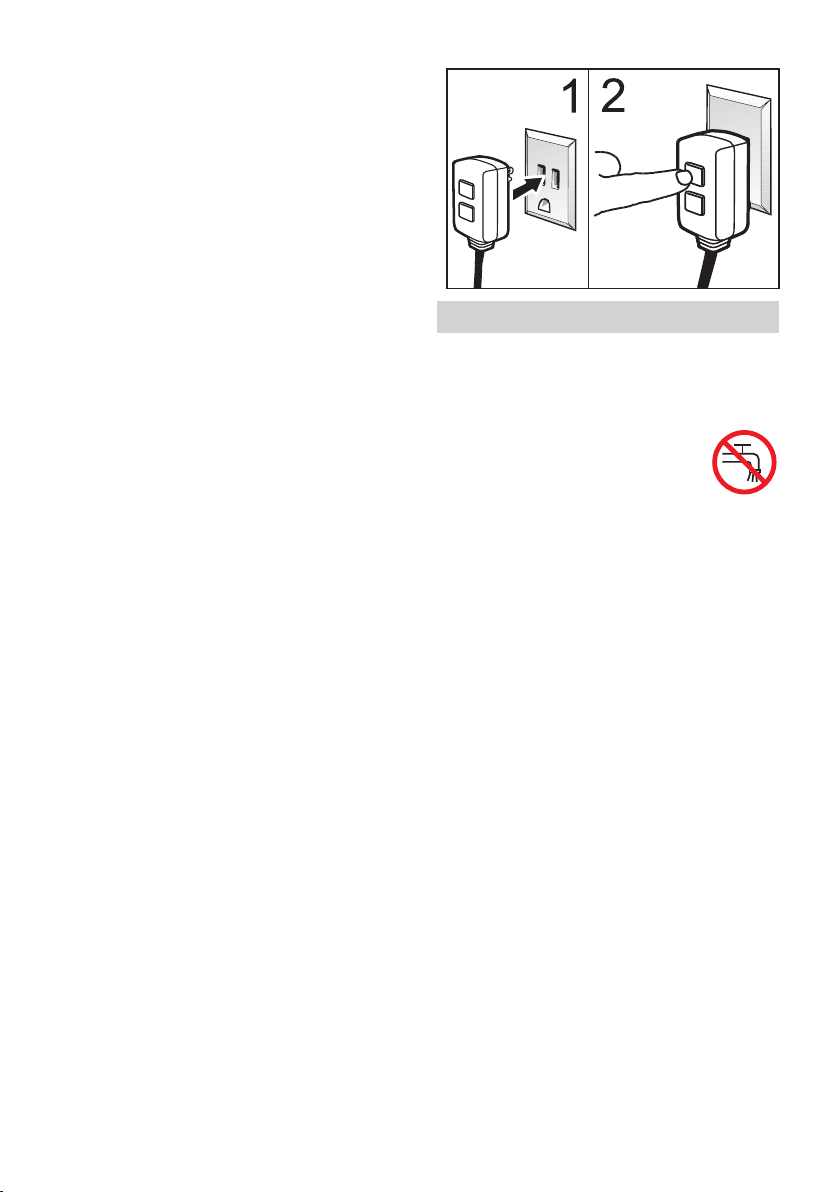
GFCI INSTRUCTIONS
– STEP 1: Plug the Ground Fault Cir-
cuit Interrupter (GFCI) into a working outlet.
– STEP 2: Press ’’TEST’’, then press
’’RESET’’ to assure proper connection to power.
Note: The actual appearance of the
GFCI may be different from this illustration.
Water connection
Connection to the water supply
몇 Warning
Observe regulations of water supplier.
According to the applicable
regulations, the appliance
must never be used on the
drinking water supply without a system
separator. Use a suitable system separator manufactured by KÄRCHER; or,
as an alternative, a system separator
as per EN 12729 Type BA. Water flowing through a system separator is considered non-drinkable.
Caution
Always connect the system separator
to the water supply, never directly to
the appliance!
For connection values refer to technical specifications
Connect the supply hose (minimum
length 7.5 m, minimum diameter 1“)
to the water connection point of the
appliance (such as the tap).
Note
The supply hose is not included.
Open the water supply.
Drawing in water from open reservoirs
Install the suction hose (order no.
4.440-270.0) to the water connection.
8 EN
– 6
Page 9
Connect filter (order-no. 4.730-
012.0) to suction hose.
Deaerate the appliance:
Unscrew the nozzle.
Switch on the appliance and let it run
until the water exiting is bubble-free.
At the end let the appliance run for
approx. 10 seconds - then switch
off. Repeat the procedure for a couple of times.
Switch off the appliance and fit the
nozzle again.
Operation
Danger
Risk of explosion!
Do not spray flammable liquids.
If the appliance is used in hazardous
areas (e.g. filling stations) the corresponding safety provisions must be observed.
Caution
Clean engines only at places with corresponding oil separators (environmental safety).
High pressure operation
Note
The appliance is equipped with a pressure switch. The motor starts up only
when the lever of the pistol is pulled.
Set the appliance switch to "I".
Unlock the hand-spray gun and pull
the lever of the gun.
Set working pressure and water
quantity by turning (rungless) at the
pressure and quantity regulation (+/
-).
Select spray type
Close the hand spray gun.
Turn the casing of the nozzle till the
desired symbol matches the marking.
Select round or flat spray using
touch-less switching:
Turn the spray-pipe that is inclined
about 45° downward to the left or
the right.
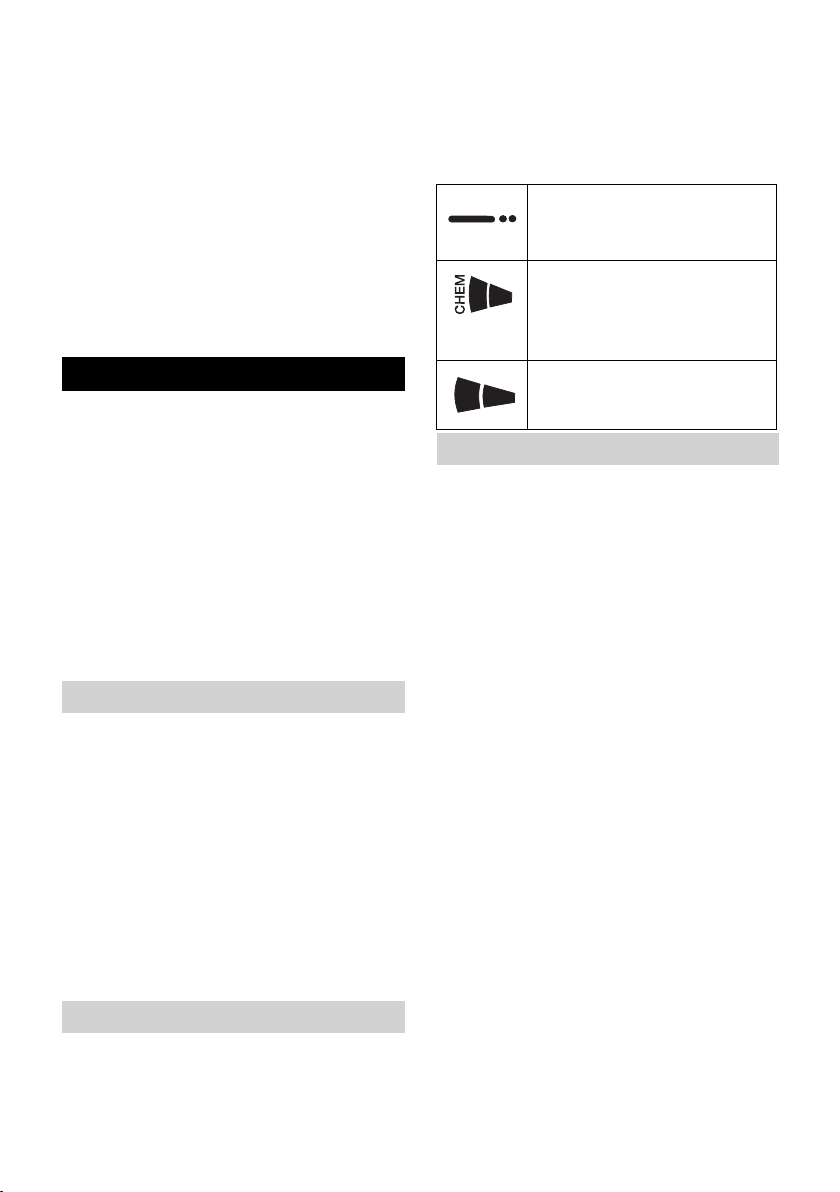
High pressure circular
spray (0°) for specially
stubborn dirt
Flat low pressure spray
(CHEM) for operating using detergents or cleaning
at low pressure.
High pressure flat spray
(25°) for large dirt areas
Operation with detergent
몇 Warning
Unsuitable detergents can cause damage to the appliance and to the object
to be cleaned. Use only those detergents that have been approved by
Kärcher. Observe the dosage and other instructions provided with these detergents. For considerate treatment of
the environment use detergent economically.
Follow the safety instructions for using
detergents.
Kärcher detergents ensure smooth
functioning. Please consult us or ask
for our catalogue or our detergent information sheets.
Place the detergent bottle into the
bottle holder on the appliance or
place a detergent container next to
the appliance.. Two different detergents can be simultaneously placed
into the appliance.
Pull the detergent suction hose out
and immerse it into the detergent
bottle or container.
Screw the lid onto the bottle or the
container.
– 7
9EN
Page 10

Set nozzle to "CHEM".
Set the deter-
gent dosing
valve to the desired detergent
and concentration.
Recommended cleaning method
Spray the detergent sparingly on
the dry surface and allow it to react,
but not to dry.
Spray off loosened dirt with the
high-pressure ray.
After operations, dip the filter in
clear water. Turn the dosing valve
to the highest detergent concentration. Start the appliance and rinse
for one minute.
Interrupting operation
Release the lever of the hand-spray
gun; the device will switch off.
Release again the lever of the
hand-spray gun; the device will
switch on again.
Turn off the appliance
Set the appliance switch to "0".
Disconnect the mains plug from the
socket.
Shut off water supply.
Activate hand spray gun until de-
vice is pressure-less.
Press the safety lever of the hand-
spray gun to secure the lever of the
pistol against being released accidentally.
Storing the Appliance
Insert the hand-spray gun in the
holder.
Wind up the high-pressure hose
and hang it over the hose storage.
Wind the connection cable around
the cable holder.
Fasten the plug with the mounted
clip.
Frost protection
몇 Warning
Frost will destroy the not completely
water drained device.
Store the appliance in a frost free area.
If you cannot store it in a frost-free
place:
Drain water.
Pump in conventional frost protec-
tion agents through the appliance.
Note
Use normal glycol-based anti-freezing
agents for automobiles.
Observe handling instructions of the
anti-freeze agent manufacturer.
Operate device for max. 1 minute
until the pump and conduits are
empty.
Transport
Caution
Risk of injury and damage! Observe
the weight of the appliance when you
transport it.
Pull the device behind you at the
handle for transporting it over longer distances.
Hold the device at the handles for
carrying, not at the push handle.
Prior to transporting the appliance
in horizontal position, remove the
detergent bottles from the bottle
holder and close them.
When transporting in vehicles, se-
cure the appliance according to the
guidelines from slipping and tipping
over.
10 EN
– 8
Page 11

Storage
Caution
Risk of injury and damage! Note the
weight of the appliance in case of storage.
This appliance must only be stored in
interior rooms.
Maintenance and care
Danger
Risk of injury by inadvertent startup of
appliance and electrical shock.
First pull out the plug from the mains
before carrying out any tasks on the
machine.
Note
Please dispose off used oil only in the
collection points provided for them.
Please hand over old oil, if any, only at
such places. Polluting the environment with used oil is a punishable offence.
Safety inspection/ maintenance
contract
You can sign with your dealer a contract for regular safety inspection or
even sign a maintenance contract.
Please take advice on this matter.
Before each use
Check connection cable for damag-
es (risk of electrical shock); get the
damaged connection cable replaced immediately by an authorised customer service person/
electrician.
Check the high pressure hose for
damages (risk of bursting).
Please arrange for the immediate
exchange of a damaged high-pressure hose.
Check appliance (pump) for leaks.
3 drops per minute are permitted
and can come out from the lower
side of the appliance. Call Customer Service if there is heavy leakage.
Weekly
Check oil level Please contact Cus-
tomer Service immediately if the oil
is milky (water in oil).
Clean the sieve in the water con-
nection.
Clean filter at the detergent suck
hose.
monthly or after 500 operating
hours
Oil change.
Oil change
Note
See "Technical Details" for details of oil
quantity and type.
Unscrew the fastening screws of
the device hood; remove the device
hood.
Remove the lid of the oil container.
Tilt the appliance forward.
Drain the oil in a collection basin.
Fill in new oil slowly; air bubbles
should go out.
Attach the lid of the oil container.
Fasten the device hood.
Troubleshooting
Danger
Risk of injury by inadvertent startup of
appliance and electrical shock.
First pull out the plug from the mains
before carrying out any tasks on the
machine.
Get the electrical components checked
and repaired only by authorised customer service persons.
– 9
11EN
Page 12

Contact an authorised customer service person in case of problems not
mentioned in this chapter or if you are
in doubt or when you have been explicitly asked to do so.
Appliance is not running
Check connection cable for damag-
es.
Check the supply voltage.
Call Customer Service in case of
electrical defects.
Pressure does not build up in the
appliance
Set nozzle to "High pressure".
Clean the nozzle.
Replace the nozzle.
Deaerate the appliance (see "Start-
up")
Check water supply level (refer to
technical data).
Clean the sieve in the water con-
nection.
Check all inlet pipes to the pump.
Contact Customer Service if need-
ed.
Pump leaky
3 drops per minute are permitted and
can come out from the lower side of the
appliance. Call Customer Service if
there is heavy leakage.
With stronger leak, have device
checked by customer service.
Pump is vibrating
Check suction pipes for water and
detergent and ensure that they are
leak-proof.
Close dosing valve for detergent to
operate the machine without detergent.
Deaerate the appliance (see "Start-
up")
Contact Customer Service if need-
ed.
Detergent is not getting sucked
in
Set nozzle to "CHEM".
Check/ clean detergent suction
hose with filter.
Open or check/clean detergent
dosing valve.
Contact Customer Service if need-
ed.
Accessories and Spare Parts
– Only use accessories and spare
parts which have been approved by
the manufacturer. The exclusive
use of original accessories and
original spare parts ensures that
the appliance can be operated
safely and trouble free.
– At the end of the operating instruc-
tions you will find a selected list of
spare parts that are often required.
– For additional information about
spare parts, please go to the Service section at www.kaercher.com.
Warranty
The warranty terms published by the
relevant sales company are applicable
in each country. We will repair potential
failures of your appliance within the
warranty period free of charge, provided that such failure is caused by faulty
material or defects in manufacturing. In
the event of a warranty claim please
contact your dealer or the nearest authorized Customer Service centre.
Please submit the proof of purchase.
12 EN
– 10
Page 13

Technical specifications
Main Supply
Voltage V 220...240
Current type Hz 1~ 60
Motor rpm 1/min 1680
Power Input hp/kw 4,7/3,5
Connected load A 20
Protection (slow, char. C) A 20
Type of protection IPX5
Extension cord 100 ft/30 m AWG/mm
Water connection
Max. feed temperature °F (°C) 140/60
Min. feed volume GPM / l/min 2.6/10
Suck height from open container (20 °C) ft/m 1.6/0.5
Max. feed pressure PSI (MPa) 145/1
Performance data
Working pressure PSI (MPa) 435...2000/
Max. operating over-pressure PSI (MPa) 2200/15.2
Nozzle size 047
Flow rate GPM / l/min 1.3...3/4.9...11.3
Detergent suck in GPM / l/min 0...0.18 (0...0.7)
Max. recoil force of hand spray gun
N30
Values determined as per EN 60355-2-79
Hand-arm vibration value
Hand spraygun m/s
Spray lance m/s
Uncertainty K m/s
Sound pressure level L
Uncertainty K
Sound power level L
pA
WA
pA
+ Uncertainty K
WA
dB(A) 69
dB(A) 2
dB(A) 84
Fuel
Amount of oil l 0.5
Oil grade -- SAE 15W40
Dimensions and weights
Length mm 554
Width mm 509
Height mm 1000
Weight kg 43
2
10/2.5
3...13.7
2
2
2
<2.5
<2.5
0.3
– 11
13EN
Page 14

CONSIGNES DE SÉCURITÉ
IMPORTANTES
몇 AVERTISSEMENT
En utilisant ce produit, toujours observer une certaine prudence élémentaire, incluant notamment :
1 Lire toutes les instructions de ser-
vice avant d'utiliser l'appareil.
2 En cas d'utilisation incorrecte, les
jets haute pression peuvent être
dangereux. Ne jamais diriger les
jets de vapeur en direction d'individus, d'animaux, de dispositifs électriques ou de l'appareil lui-même.
3 Afin de minimiser les risques de
blessure, ne jamais laisser l'appareil sans surveillance lorsque celuici est utilisé à proximité d'enfants.
4 Il est impératif de savoir arrêter et
mettre l'appareil hors pression rapidement. Une connaissance approfondie des commandes est
nécessaire.
5 Rester attentif – se concentrer sur
la tâche en cours.
6 Le port de lunettes de protection est
obligatoire.
7 N'utiliser en aucun cas d'acides, de
solutions alcalines, de solvants ou
de produits inflammables dans cet
appareil. Ces produits peuvent être
à l'origine de blessures graves ou
d'endommagement irréversible de
l'appareil.
8 L'utilisateur ne doit jamais faire
usage de l'appareil lorsqu'il est fatigué ou sous l'emprise d'alcool ou
de drogues.
9 Ne jamais passer ou monter sur
des supports instables. Toujours
rester stable et équilibré.
10 Afin de réduire le risque d'électro-
cution, garder toutes les
connexions au sec et ne pas les
laisser à terre. Ne pas toucher la
fiche avec les mains mouillées.
11 Le dispositif de sécurité de la poi-
gnée-pistolet permet d'éviter tout
actionnement accidentel de la gâchette. Ce dispositif de sécurité NE
verrouille PAS la gâchette en position marche (ON).
12 Veiller à ce qu'aucun individu ne se
trouve dans la zone de travail.
13 Respecter les consignes d'entre-
tien figurant dans le manuel.
14 Ce produit est fourni avec un dis-
joncteur différentiel monté dans la
fiche du cordon d'alimentation. Si le
remplacement de la fiche ou du cordon d'alimentation s'avère nécessaire, n'utiliser que des pièces de
rechange identiques.
15 Risque de projection ou de bles-
sure – Ne pas diriger le jet de vapeur en direction d'individus.
16 Ne pas utiliser que des rallonges.
INSTRUCTIONS DE MISE À
LA TERRE
Ce produit doit-être mis à la terre. En
cas de mauvais fonctionnement ou de
panne, la mise à la terre établit un chemin de moindre résistance pour le courant électrique afin de réduire le risque
de décharge électrique. Ce produit est
équipé d'un cordon doté d'un conducteur de mise à la terre de l'équipement
et d'une prise de mise à la terre. La
prise doit être branchée dans une prise
appropriée qui est correctement installée et mise à la terre en conformité
avec les codes et ordonnances locaux.
14 FR
– 1
Page 15

DANGER
Un conducteur de mise à la terre
d'équipement incorrectement branché
peut entraîner un risque d'électrocution. Vérifier avec un électricien ou un
technicien d'entretien qualifié en cas
de doute sur la mise à terre correcte de
la prise. Ne pas modifier la fiche fournie avec le produit - si elle ne peut pas
être branchée, faire installer une prise
appropriée par un électricien qualifié.
Ne pas utiliser n'importe quel type
d'adaptateur avec ce produit.
PROTECTION PAR DISJONC-
TEUR DIFFÉRENTIEL
Ce produit est fourni avec un interrupteur différentiel (GFCI) intégré dans la
fiche du câble d'alimentation. Cet appareil fournit une protection supplémentaire contre les risques
d'électrocution. Si le courant est interrompu dans la ligne, le GFCI refermera
automatiquement le circuit vers la
charge quand le courant sera restauré.
En fonction du modèle de GFCI, il peut
être nécessaire d'actionner manuellement le bouton de réinitialisation pour
restaurer le courant vers le circuit de
charge du GFCI. Si le remplacement
de la fiche ou du câble est nécessaire,
utiliser des pièces de remplacement
identiques.
ALIMENTATION EN EAU
(eau froide uniquement)
몇 ATTENTION
Lors de la connexion de l'entrée d'eau
à la canalisation d'alimentation en eau,
les régulations locales de votre compagnie d'eau doivent être observées.
Dans certaines zones, l'appareil ne
doit pas être connecté directement à
l'alimentation en eau potable publique.
Il s'agit de s'assurer qu'il n'y a pas de
retour de produits chimiques dans l'alimentation en eau. Une connexion directe par l'intermédiaire d'un réservoir
de réception ou d'un disconnecteur hydraulique par exemple est autorisée.
D'éventuelles impuretés dans l'eau
d'alimentation endommagent l'appareil. Pour prévenir ce risque, nous recommandons d'installer un filtre à eau.
– Le tuyau d'arrosage doit avoir un
diamètre minimum de 1 pouce.
– Le débit de l'alimentation en eau ne
doit pas être inférieur à 2,6 GPM
(gallons par minute).
– Pour calculer le débit, faire couler
l'eau pendant une minute dans un
récipient vide d'une contenance de
5 gallons.
– La température de l'eau d'alimenta-
tion ne doit pas excéder 140 °F/
60 °C.
– Ne jamais aspirer d'eau contami-
née par des solvants, par exemple
des diluants pour peinture, de l'essence, de l'huile, etc..
– Toujours utiliser une source d'eau
propre afin d'éviter toute infiltration
de débris dans l'appareil. Utiliser un
filtre à eau supplémentaire.
CANADA
몇 AVERTISSEMENT
Ne pas pulvériser sur des appareils ou
des fils électriques.
Ne pas utiliser avec des liquides inflammables et produits chimiques
toxiques.
Risque d'injection : l'équipement peur
être à l'origine de blessures sérieuses
si le jet pénètre dans la peau. Ne pas
diriger le pistolet sur une personne sur
une partie du corps. En cas de péné-
– 2
15FR
Page 16

tratrion, faire immédiatement appel à
une aide médicale.
Ce système est capable de produire
13700 kPa/2000 PSI. Pour éviter toute
rupture et blessure, ne pas faire fonctionner cette pompe avec des composants homologués pour une pression
de service inférieure à 13700 kPa/
2000 PSI (incluant sans s'y limiter les
pistolets de vaporisation, tuyaux et raccords de tuyau).
Avant tout entretien, nettoyage ou enlèvement de pièces, couper le courant
et évacuer la pression.
RALLONGES
Utiliser uniquement des rallonges à 3
fils, dotées de fiches de terre à 3
fourches et de connecteurs tripolaires
adaptés à la fiche du produit. Utiliser
uniquement des rallonges prévues
pour une utilisation extérieure. Ces rallonges sont repérables au marquage
"Peut être utilisé avec des appareils
électriques à l'extérieur : ranger à l'intérieur lorsque l'appareil n'est pas utilisé." Utiliser uniquement des rallonges
ayant une puissance nominale qui
n'est pas inférieure à celle du produit.
Ne pas utiliser de rallonges endommagées. Examiner la rallonge avant de
l'utiliser et la remplacer si elle est endommagée. Ne pas abîmer la rallonge
et ne pas tirer brusquement sur un cordon pour le débrancher. Tenir le cordon éloigné des sources de chaleur et
des bords pointus. Toujours débrancher la rallonge de la prise de courant
avant de débrancher le produit de la
rallonge.
Si vous utilisez une rallonge, elle doit
toujours être totalement déroulée de
l'enrouleur.
Jusque 100 ft = 10/3 AWG.
몇 AVERTISSEMENT
Afin de réduire le risque d'électrocution, garder toutes les connexions au
sec et ne pas les laisser à terre. Ne pas
toucher la fiche avec les mains mouillées.
CONSERVER CES INSTRUCTIONS !
16 FR
– 3
Page 17

Lire ces notice originale
avant la première utilisation
de votre appareil, se comporter selon
ce qu'elles requièrent et les conserver
pour une utilisation ultérieure ou pour
le propriétaire futur.
Table des matières
Éléments de l'appareil . . . . FR . . .4
Consignes de sécurité . . . . FR . . .4
Utilisation conforme . . . . . . FR . . .5
Dispositifs de sécurité . . . . FR . . .5
Protection de l’environnement FR . . .5
Avant la mise en service . . FR . . .6
Mise en service . . . . . . . . . FR . . .6
Utilisation . . . . . . . . . . . . . . FR . . .7
Transport . . . . . . . . . . . . . . FR . . .9
Entreposage. . . . . . . . . . . . FR . .10
Entretien et maintenance . . FR . .10
Assistance en cas de panne FR . .11
Accessoires et pièces de re-
change . . . . . . . . . . . . . . . . FR . .12
Garantie . . . . . . . . . . . . . . . FR . .12
Caractéristiques techniques FR . .13
Éléments de l'appareil
Veuillez ouvrir la page d'image devant
1 Récepteur de buse
2 Poignée
3 Raccord haute pression
4 Arrivée d'eau
5 Manomètre
6 Indicateur de niveau d'huile
7 Réservoir d'huile
8 Capot
9 Interrupteur principal
10 Vis de fixation du capot
11 Dépose du flexible
12 Support de poignée-pistolet
13 Buse
14 Marquage de la buse
15 Lance
16 Régulation de pression et de débit
17 Poignée-pistolet
18 Manette de sécurité
19 Manette de la poignée-pistolet
20 Flexible haute pression
21 Guidon de poussée
22 Attache-câble
23 Vanne de dosage du détergent
24 Tuyau d’aspiration de détergent
avec filtre à détergent et bouchon
25 Support de la bouteille de détergent
Repérage de couleur
– Les éléments de commande pour le
processus de nettoyage sont
jaunes.
– Les éléments de commande pour la
maintenance et l'entretien sont en
gris clair.
Consignes de sécurité
– Avant la première mise en service,
vous devez impérativement avoir lu
les consignes de sécurité N° 5.951949 !
– Respecter les dispositions légales
nationales respectives pour les jets
de liquide.
– Respecter les dispositions légales
nationales respectives pour la prévention des accidents. Les jets de
liquides doivent être contrôlés régulièrement et le résultat du contrôle
consigné par écrit.
Symboles utilisés dans le mode
d'emploi
Danger
Pour un danger immédiat qui peut
avoir pour conséquence la mort ou des
blessures corporelles graves.
몇 Avertissement
Pour une situation potentiellement
dangereuse qui peut avoir pour consé-
– 4
17FR
Page 18

quence des blessures corporelles
graves ou la mort.
Attention
Pour une situation potentiellement
dangereuse qui peut avoir pour conséquence des blessures légères ou des
dommages matériels.
Des symboles sur l'appareil
Une utilisation incorrecte des
jets haute pression peut pré-
senter des dangers. Le jet ne
doit pas être dirigé sur des personnes,
animaux, installations électriques actives ni sur l'appareil lui-même.
Selon les directives en vigueur, l'appareil ne doit jamais
être exploité sans séparateur
système sur le réseau d'eau potable.
Utiliser un séparateur système approprié de la Sté. Kärcher ou en alternative un séparateur système selon EN
12729 type BA.
L'eau qui s'est écoulée à travers un séparateur systeme est classifiée comme
non potable.
Utilisation conforme
Utiliser exclusivement ce nettoyeur
haute pression
– pour nettoyer au jet basse pression
et avec du détergent (par exemple
pour le nettoyage de machines, véhicules, bâtiments, outils),
– pour nettoyer au jet haute pression
sans détergent (par ex. nettoyage
de façades, de terrasses, d'appareils de jardinage).
Pour des salissures tenaces nos recommandons le fraiseur de saleté
comme accessoire en option.
Dispositifs de sécurité
Les dispositifs de sécurité ont pour but
de protéger l'utilisateur. Par conséquent, ils ne doivent en aucun cas être
désactivés ou transformés.
Clapet de décharge avec pres-
sostat
En cas de réduction de la quantité
d'eau avec le réglage de pression/
quantité, la clapet de décharge s'ouvre
et une partie de l'eau est évacuée vers
le côté aspiration de la pompe.
Si vous relâchez la gâchette, la pompe
est éteinte par un manocontacteur, le
jet haute pression est interrompu. Si
vous appuyez à nouveau sur le levier,
la pompe est remise en marche.
Soupape de sécurité
Le soupape de sûreté ouvre si la valeur de la pression de service admissible est dépassée et l’eau recoule
alors vers le côté aspiration de la
pompe.
Le clapet de décharge, le pressostat et
la soupape de sûreté sont ajustés par
défaut dans nos usines et plombés
Seul le service après-vente est autorisé à procéder aux réglages.
Protection de l’environne-
ment
Les matériaux constitutifs
de l’emballage sont recyclables. Ne pas jeter les
emballages dans les ordures ménagères, mais les
remettre à un système de
recyclage.
18 FR
– 5
Page 19

Les appareils usés
contiennent des matériaux
précieux recyclables lesquels doivent être apportés
à un système de recyclage.
Il est interdit de jeter les batteries, l'huile et les substances similaires dans
l'environnement. Pour cette
raison, utiliser des systèmes de collecte adéquats
afin d'éliminer les appareils
hors d'usage.
Ne jetez pas l'huile moteur, le fuel, le
diesel ou l'essence dans la nature.
Protéger le sol et évacuer l'huile
usée de façon favorable à l'environnement.
Instructions relatives aux ingrédients (REACH)
Les informations actuelles relatives
aux ingrédients se trouvent sous :
www.kaercher.com/REACH
Avant la mise en service
Déballage
– Vérifier le contenu du paquet lors
de l'ouverture de l'emballage.
– Contactez immédiatement le reven-
deur en cas d'avarie de transport.
Contrôle du niveau d'huile
Affichage du niveau d'huile avec
l'appareil à l'arrêt. Le niveau d'huile
doit reposer au-dessus des deux indicateurs.
Activer la purge du carter d'huile
Dévisser la vis de fixation du capot
et retirer celui-ci.
Couper la pointe du couvercle du
réservoir d'huile.
Fixer le capot.
Montage des accessoires
Monter la buse sur la lance (mar-
quage sur la bague de butée en
haut).
Monter le tube de pulvérisation sur
la poignée-pistolet avec la régulation de quantité et de pression.
Visser fermement le flexible haute
pression sur le raccord haute pression.
Mise en service
Branchement électrique
몇 Danger
Risque d'électrocution.
L’appareil doit uniquement être raccordé à un branchement électrique mis en
service par un électricien conformément à la norme IEC 60364.
La tension indiquée sur la plaque signalétique de l'appareil doit correspondre à celle de la prise.
Protection minimale par fusible de la
prise de courant (cf. Données techniques).
L'appareil doit impérativement être
raccordé au secteur avec une fiche
électrique. Une connexion au secteur
ne pouvant pas être coupée est interdite. La fiche électrique sert à la séparation du secteur.
Vérifier avant chaque utilisation que le
câble et la fiche secteur ne sont pas
endommagés. Un câble d’alimentation
endommagé doit immédiatement être
remplacé par le service après-vente ou
un électricien agréé.
Les fiches mâles et les raccords des
câbles de rallonge utilisés doivent être
étanches à l’eau.
Utiliser un câble de prolongation avec
une section suffisante (voir "Caracté-
– 6
19FR
Page 20

ristiques techniques") et le dérouler
complètement de l'enrouleur.
Des rallonges non adaptées peuvent
présenter des risques. N'utiliser en
plein air que des rallonges homologuées avec une section suffisante:
Données de raccordement, voir plaque
signalétique / caractéristiques techniques
DISJONCTEUR DIFFERENTIEL
– ETAPE 1 : Brancher le disjoncteur
différentiel dans une prise alimentée.
– ETAPE 2 : Appuyer d’abord sur
« TEST », puis sur « RESET » pour
assurer le branchement correct au
secteur.
Remarque : L’apparence effective du
disjoncteur différentiel peut différer de
l’illustration.
Arrivée d'eau
Raccordement à la conduite d'eau
몇 Avertissement
Respecter les prescriptions de votre
société distributrice en eau.
Selon les directives en vigueur,
l'appareil ne doit jamais être
exploité sans séparateur système sur le réseau d'eau potable. Utiliser un séparateur système approprié
de la Sté. Kärcher ® ou en alternative
un séparateur système selon EN
12729 type BA. L'eau qui s'est écoulée
20 FR
à travers un séparateur systeme est
classifiée comme non potable.
Attention
Toujours raccorder le séparateur du système au niveau de l'alimentation en eau
et jamais directement sur l'appareil!
Pour les valeurs de raccordement, se
reporter à la section Caractéristiques
techniques.
Raccorder la conduite d'alimentation
(longueur minimale 7,5 m, diamètre
minimum 1") au raccord d'arrivée
d'eau de l'appareil et à l'alimentation
en eau (ex. un robinet).
Remarque
La conduite d'alimentation n'est pas
comprise dans la livraison.
Ouvrir l'alimentation d'eau.
Aspiration d'eau depuis des réservoirs ouverts
Installer le tuyau d'aspiration (com-
mande n° 4.440-270.0) au raccord
d'eau.
Filter (Bestell-Nr. 4.730-012.0) am
Saugschlauch anbringen.
Purge d'air de l'appareil :
Dévisser l'injecteur.
Laisser l'appareil en route jusqu'à
l'eau sorte sans faire de bulles.
Faire tourner l'appareil éventuelle-
ment pendant 10 secondes - le
mettre hors service. Répéter le processus à plusieurs reprises.
Arrêter l'appareil et dévisser de
nouveau l'injecteur.
Utilisation
Danger
Risque d'explosion !
Ne pas pulvériser de liquides inflammables.
Si l’appareil est utilisé dans des zones de
danger (par exemple des stations es-
– 7
Page 21

sence), il faut tenir compte des
consignes de sécurité correspondantes.
Attention
Nettoyer les moteurs uniquement à
des endroits équipés des séparateurs
d'huile nécessaires (protection de l'environnement).
Fonctionnement à haute pres-
sion
Remarque
L'appareil est équipé d'un manocontacteur. Le moteur ne démarre que
lorsque le levier du pistolet est tiré.
Régler l'interrupteur principal sur "I".
Décrochez le pistolet de giclage à
main et tirer le levier du pistolet.
Ajuster la pression de travail et la
quantité d'eau en tournant (sans
échelon) à la régulation de pression
et de quantité (+/-).
Choisir le type de jet
Fermer la poignée-pistolet.
Tourner le logement de la buse jus-
qu'à ce que le symbole désiré corresponde avec le marquage :
Sélectionner jet bâton ou jet plat,
commutant sans toucher:
Tourner le tube en acier orienté à
env. 45° vers le bas vers la droite
ou vers la gauche.
Jet bâton à haute pression
(0°) pour des salissures
très tenaces
Jet plat à basse pression
(CHEM) pour le service
avec détergent ou nettoyer avec une pression
basse
Jet plat à haute pression
(25°) pour des salissures
sur des grandes surfaces
Fonctionnement avec détergent
몇 Avertissement
Des détergents peu appropriés
peuvent endommagés l'appareil et
l'objet pour nettoyer. Utiliser uniquement des détergents qui sont validés
par Kärcher. Respecter les consignes
et recommandations de dosage jointes
aux détergents. Protéger l'environnement en utilisant le détergent avec parcimonie.
Respecter les consignes de sécurité figurant sur les détergents.
Des détergents de Kärcher garantissent un travail sans défauts. Veuillez-vous conseiller ou demander notre
catalogue ou notre bulletins d'information sur des produits de nettoyage.
Placer la bouteille détergent dans le
support de bouteille figurant sur
l’appareil ou bien poser le bidon de
détergent à côté de l’appareil. Il est
possible de déposer simultanément
deux différents détergents dans
l’appareil.
Sortir le flexible d'aspiration de dé-
tergent et le plonger dans la bouteillle ou le bidon de détergent.
Visser le couvercle fileté sur la bou-
teille ou sur le bidon.
Placer l'injecteur sur la position
"CHEM".
Régler le doseur
de détergent
pour ajuster le
détergent souhaité et la
concentration
souhaitée.
– 8
21FR
Page 22

Méthode de nettoyage conseillée
Pulvériser le détergent sur la surface sèche et laisser agir sans toutefois le laisser sécher
complètement.
Ôter les salissures décollées à
l'aide du jet haute pression.
Après utilisation, plonger le filtre
dans de l'eau claire. Tourner la
valve de dosage sur la concentration en détergent la plus élevée.
Démarrer l'appareil et rincer à l'eau
claire pendant une minute.
Interrompre le fonctionnement
Relâcher le levier de la poignée-
pistolet, l'appareil se met hors service.
Tirer de nouveau sur le levier de la
poignée-pistolet, l'appareil se remet
en service.
Mise hors service de l'appareil
Mettre l'interrupteur principal sur "0".
Retirer la fiche secteur de la prise
de courant.
Couper l'alimentation en eau.
Actionner la poignée-pistolet jusqu'à
ce que l'appareil soit hors pression.
Actionner le cran de sûreté de la
poignée-pistolet pour sécuriser le
pistolet contre un déclenchement
intempestif.
Ranger l’appareil
Enficher la poignée-pistolet dans le
support.
Enrouler le flexible haute pression
et l'accrocher sur la dépose du
flexible.
Enrouler le câble d'alimentation au-
tour de l'attache-câbles.
Fixer la fiche électrique avec le clip
monté.
Protection antigel
몇 Avertissement
Le gel peut endommager l'appareil si
l'eau n'a pas été intégralement vidée.
Conserver l'appareil dans un lieu à
l'abri du gel.
Si un entreposage à l'abri du gel
n'est pas possible :
Purger l'eau.
Pomper produit antigel d'usage par
l'appareil.
Remarque
utiliser un produit antigel courant pour
automobile à base de glycol.
Respecter les consignes d'utilisation
du fabricant du produit antigel.
Faire tourner l'appareil au max. 1
minute jusqu'à ce que la pompe et
les conduites soient entièrement
vides.
Transport
Attention
Risque de blessure et
d'endommagement ! Respecter le
poids de l'appareil lors du transport.
Pour transporter l’appareil sur de
plus longues distances, le tirer derrière soi au moyen du manche de
poussée.
Soulever l'appareil avec la poignée
et le porter.
Avant de transporter l’appareil en
position horizontale, sortir la bouteille de détergent du support de
bouteille et la fermer.
Sécuriser l'appareil contre les glis-
sements ou les basculements selon
les directives en vigueur lors du
transport dans des véhicules.
22 FR
– 9
Page 23

Entreposage
Attention
Risque de blessure et d'endommagement ! Prendre en compte le poids de
l'appareil à l'entreposage.
Cet appareil doit uniquement être entreposé en intérieur.
Entretien et maintenance
Danger
Risque de blessure et de choc électrique par un démarrage inopiné de
l'appareil.
Avant d'effectuer tout type de travaux
sur l'appareil, le mettre hors service et
débrancher la fiche électrique.
Remarque
L'huile usagée doit impérativement
être éliminée auprès d'un point de collecte compétent. Y apporter l'huile usagée. L'huile usagée est polluante.
Toute élimination incorrecte est passible d'une amende.
Inspection de sécurité/Contrat
d'entretien
Vous pouvez accorder avec votre commerçant une inspection de sécurité régulière ou passer un contrat
d'entretien. Conseillez-vous.
Avant chaque mise en service
Contrôler que le câble d'alimenta-
tion n'est pas endommagé (risque
de choc électrique), faire remplacer
immédiatement tout câble d'alimentation endommagé par un service
après-vente autorisé/un électricien
spécialisé.
Vérifier le tuyau à haute pression
s'il est endommagé (danger d'éclatement).
Un flexible haute pression endommagé doit immédiatement être remplacé.
Vérifier l'étanchéité de l'appareil
(pompe).
3 gouttes d'eau par minute sont ad-
missibles et peuvent s'écoulent au
côté inférieure de l'appareil. En cas
de non étanchéité plus forte, adressez-vous au Centre de Service
Après-vente.
Hebdomadairement
Vérifier le niveau d'huile Si l'huile
est laiteux (eau dans l'huile), adressez-vous immédiatement au Centre
de Service Après-vente.
Nettoyer le tamis de l'arrivée d'eau.
Nettoyer le filtre situé sur le tuyau
d'aspiration de détergent.
Annuellement ou après 500
heures de service
Remplacer l'huile.
Vidange d'huile
Remarque
Quantités et sortes d'huiles, voir les
"Caractéristiques techniques".
Dévisser la vis de fixation du capot
et retirer celui-ci.
Retirer le couvercle du réservoir
d'huile.
Verser l'appareil en avant.
Vider l'huile dans la cuvette de ré-
cupération.
Remplir lentement la nouvelle huile
; les bulles d'air doivent s'échapper.
Apporter le couvercle du réservoir
d'huile.
Fixer le capot.
– 10
23FR
Page 24

Assistance en cas de panne
Danger
Risque de blessure et de choc électrique par un démarrage inopiné de
l'appareil.
Avant d'effectuer tout type de travaux
sur l'appareil, le mettre hors service et
débrancher la fiche électrique.
Seul le service après-vente autorisé
est habilité à contrôler et réparer les
composants électriques.
S'il se produit des défauts qui ne sont
pas répertoriés dans ce chapitre, en
cas de doute ou si cela est explicitement indiqué, s'adresser à un service
après-vente autorisé.
L'appareil ne fonctionne pas
Contrôler que le câble de raccorde-
ment n'est pas endommagé.
Contrôler la tension du secteur.
En cas de défaut électrique, consul-
ter le service après-vente.
L'appareil ne monte pas en pres-
sion
Placer l'injecteur sur la position
"Haute pression".
Nettoyer la buse.
Susbstituer la busette.
Purger l'air de l'appareil (voir "Mise
en service").
Contrôler le débit de l'alimentation
en eau (voir la section Caractéristiques techniques).
Nettoyer le tamis de l'arrivée d'eau.
Vérifier toutes les conduites d'ali-
mentation vers la pompe.
Si nécessaire, visiter le service
après-vente.
La pompe fuit
3 gouttes d'eau par minute sont admissibles et peuvent s'écoulent au côté inférieure de l'appareil. En cas de non
étanchéité plus forte, adressez-vous
au Centre de Service Après-vente.
En cas de fuite plus importante,
faire vérifier l'appareil par le service
après-vente.
La pompe frappe
Vérifier les conduites d'aspiration
de l'eau et de détergent par rapport
à une perte d'étanchéité.
Fermer la valve de dosage pour le
détergent lors du fonctionnement
sans détergent.
Purger l'air de l'appareil (voir "Mise
en service").
Si nécessaire, visiter le service
après-vente.
Le détergent n'est pas aspirée
Placer l'injecteur sur la position
"CHEM".
Vérifier/ettoyer le flexible d'aspira-
tion du détergent avec filtre.
Ouvrir ou vérifier/nettoyer le doseur
du détergent.
Si nécessaire, visiter le service
après-vente.
24 FR
– 11
Page 25

Accessoires et pièces de re-
change
– Utiliser uniquement des acces-
soires et des pièces de rechange
autorisés par le fabricant. Des accessoires et des pièces de rechange d’origine garantissent un
fonctionnement sûr et parfait de
l’appareil.
– Une sélection des pièces de re-
change utilisées le plus se trouve à
la fin du mode d'emploi.
– Plus information sur les pièces de
rechange vous les trouverez sous
www.kaercher.com sous le menu
Service.
Garantie
Dans chaque pays, les conditions de
garantie en vigueur sont celles publiées par notre société de distribution
responsable. Les éventuelles pannes
sur l’appareil sont réparées gratuitement dans le délai de validité de la garantie, dans la mesure où celles-ci
relèvent d'un défaut matériel ou d'un
vice de fabrication. En cas de recours
en garantie, adressez-vous à votre revendeur ou au service après-vente
agréé le plus proche munis de votre
preuve d'achat.
– 12
25FR
Page 26

Caractéristiques techniques
Raccordement au secteur
Tension V 220...240
Type de courant Hz 1~ 60
Rotation de moteur t/min 1680
Puissance absorbée hp/kw 4,7/3,5
Puissance de raccordement A 20
Protection (à action retardée, carat. C) A 20
Type de protection IPX5
Rallonge 100 ft/30 m AWG/mm
Arrivée d'eau
Température d'alimentation (max.) °F (°C) 140/60
Débit d'alimentation (min.) GPM / l/min 2.6/10
Hauteur d'aspiration à partir du réservoir ouvert
ft/m 1.6/0.5
(20 °C)
Pression d'alimentation (max.) PSI (MPa) 145/1
Performances
Pression de service PSI (MPa) 435...2000/
Pression de service max. PSI (MPa) 2200/15.2
Taille d'injecteur 047
Débit GPM / l/min 1.3...3/4.9...11.3
Aspiration de détergent GPM / l/min 0...0.18 (0...0.7)
Force de réaction max. de la poignée-pistolet N 30
Valeurs déterminées selon EN 60355-2-79
Valeur de vibrations bras-main
Poignée-pistolet m/s
Lance m/s
Incertitude K m/s
Niveau de pression sonore L
Incertitude K
pA
pA
dB(A) 69
dB(A) 2
Niveau de pression sonore LWA + incertitude KWAdB(A) 84
Carburants
Quantité d'huile l 0.5
Types d'huile -- SAE 15W40
Dimensions et poids
Longueur mm 554
Largeur mm 509
Hauteur mm 1000
Poids kg 43
2
10/2.5
3...13.7
2
2
2
<2.5
<2.5
0.3
26 FR
– 13
Page 27

INSTRUCCIONES IMPOR-
TANTES DE SEGURIDAD
몇 ADVERTENCIA
Al utilizar este producto, tome siempre
las precauciones básicas, incluidas las
siguientes:
1 Lea todas las instrucciones antes
de usar el producto.
2 Los aparatos a alta presión pueden
resultar peligrosos si se usan de
forma incorrecta. No se debe dirigir
el aparato a personas, animales,
dispositivos eléctricos o la equipo
mismo.
3 Para reducir el riesgo de lesiones,
es preciso vigilar atentamente si se
usa el producto cerca de niños.
4 Es necesario saber cómo parar rá-
pidamente el producto y parar hemorragias. Estar familiarizado con
los mandos.
5 Estar atento, prestar atención a lo
que se está haciendo.
6 Utilizar gafas de seguridad.
7 No usar ácidos, alcalinos, disolven-
tes, o cualquier material inflamable
con este producto. Estos productos
pueden causar heridas físicas al
operario y daños irreparables a la
máquina.
8 No ponga en funcionamiento el pro-
ducto si está cansado o está bajo la
influencia de alcohol o drogas.
9 No sobrecargar o colocar sobre un
soporte inestable. Mantener el
equilibrio en todo momento.
10 Para reducir el riesgo de electrocu-
ción, mantenga todas las conexio-
nes secas y alejadas del suelo. No
toque el enchufe con las manos
mojadas.
11 El seguro del gatillo de la pistola
evita que el gatillo salte de forma involuntaria. El dispositivo de seguridad NO bloquea el gatillo en la
posición ON (encendido).
12 Mantenga la zona de trabajo libre
de personas.
13 Seguir las instrucciones de mante-
nimiento especificadas en el manual.
14 Este producto se suministra con un
interruptor de circuito de avería por
puesta a tierra, que está montado
en el enchufe del cable de potencia.
Si es necesario reemplazar el enchufe o el cable, utilice sólo piezas
de repuesto idénticas.
15 Riesgo de inyección o lesiones; no
dirija el chorro directamente a personas.
16 No se debe usar el cable de exten-
sión para esta máquina.
INSTRUCCIONES DE PUES-
TA A TIERRA
Este producto se tiene que poner a tierra. Si funcionase mal o si se rompiese, la puesta a tierra proporcionaría
una circuito menos resistente a la
energía eléctrica para reducir el riesgo
de electrochoque. Este producto está
equipado con un cable que tiene un
conductor a tierra y un enchufe a tierra
para el equipo. El enchufe se tiene que
enchufar a un tomacorriente adecuado, que esté correctamente instalado y
puesto a tierra conforme a todas las
normas y reglamentos locales.
PELIGRO
Si la conexión del conductor a tierra
del equipo es incorrecta puede existir
riesgo de electrochoque. En caso de
duda, compruebe con ayuda de un
– 1
27ES
Page 28

electricista cualificado o del personal
del servicio técnico que el tomacorriente está correctamente puesto a tierra.
No modifique el enchufe proporcionado con el producto; si no encaja en el
tomacorriente, pida a un electricista
cualificado que le instale un tomacorriente adecuado. No utilice ningún
tipo de adaptador con este producto.
PROTECCIÓN MEDIANTE IN-
TERRUPTOR DE CIRCUITO
DE AVERÍA POR PUESTA A
TIERRA
Este producto esta dotado de un interruptor de protección GFCI incorporado en el enchufe de alimentación
eléctrica. Este dispositivo proporciona
protección adicional ante el riesgo de
descargas eléctricas. Si se interrumpiese el flujo de electricidad, el interruptor GFCI volverá a conectar
automáticamente el circuito a la unidad
de consumo después que se restablezca el suministro. Dependiendo del
modelo de GFCI puede ser necesario
accionar manualmente el botón Reset
para restablecer el suministro del circuito de consumo del GFCI. Si fuese
necesario sustituir el enchufe o el cable de alimentación se deberán utilizar
repuestos idénticos.
SUMINISTRO DE AGUA
(Únicamente agua fría)
몇 ATENCIÓN
Al conectar la toma de agua a la red de
suministro del agua, es obligatorio respetar la normativa local establecida
por la compañía del agua. En algunas
zonas, está prohibido conectar la unidad directamente a la red pública de
suministro de agua potable. Esto es
así para garantizar que no penetren
sustancias químicas en la red de suministro del agua. Sí se permite efectuar
la conexión directamente por ejemplo
a través de un depósito receptor o un
dispositivo antirretorno.
Si el agua de alimentación está sucia,
la unidad sufrirá daños. Para evitar
este riesgo, le recomendamos que
monte un filtro de agua.
– La manhuera deberá tener un diá-
metro mínimo de una pulgada.
– El índice de flujo del suministro de
agua no deberá ser menor a 2,6
gpm (galones por minuto).
– El índice de flujo se puede determi-
nar si se deja correr el agua durante
un minuto en un bidón de 5 galones.
– La temperatura de agua no debe
exceder los 140°F/60°C.
– No usar la limpiadora de alta pre-
sión para agua contaminada con disolventes, por ejemplo para diluir
pintura, gasolina, aceite etc.
– Evitar que entren escombros en la
unidad, para ello use una fuente de
agua limpia. Use un filtro adicional
de agua.
CANADÁ
몇 ADVERTENCIA
No pulverice sobre ningún aparato o
cable eléctrico.
No use líquidos inflamables y productos químicos tóxicos.
Peligro de inyección: el equipo puede
causar heridas graves si el pulverizador penetra la piel, no dirija la pistola a
nadie ni ninguna parte del cuerpo. En
caso de penetración, consulte inmediatamente a un médico.
Este sistema está en capacidad de
producir 13700 kPa/2000 PSI. Para
prevenir daños materiales o lesiones,
28 ES
– 2
Page 29

no operar esta bomba con componentes que tengan un rendimiento de presión de trabajo menor a 13700 kPa/
2000 PSI (incluyendo, pero no solamente, rociadores de pistola, mangueras y conexiones de mangueras).
Antes de realizar el mantenimiento,
limpieza o retirada de cualquiera de las
piezas, desconectar el interruptor y aliviar la presión.
CABLES PROLONGADORES
Use sólo cables prolongadores de 3 hilos que dispongan de clavijas de 3
puntas, del tipo puesta a tierra, y conectores de 3 polos que acepten la
toma del producto. Use sólo cables
prolongadores diseñados para uso en
exteriores. Estos cables prolongadores están identificados por la leyenda
"Apto para su uso con aparatos de exterior: guárdelos bajo techo siempre
que no los use". Use sólo cables prolongadores que tengan una clasificación eléctrica igual o superior a la
clasificación del producto. No use cables prolongadores dañados. Examine
el cable prolongador antes de usarlo y,
si está dañado, reemplácelo. No haga
un mal uso del cable prolongador y no
tire del cable para desconectarlo. Mantenga el cable alejado de fuentes de
calor y de bordes cortantes. Desconecte siempre el cable prolongador de
la caja antes de desconectar el producto del cable prolongador.
Si se usa un cable de prolongación,
éste deberá encontrarse siempre completamente desenrollado de su tambor.
Hasta 100 pies = 10/3 AWG.
몇 ADVERTENCIA
Para reducir el riesgo de electrocución,
mantenga todas las conexiones secas
y alejadas del suelo. No toque el enchufe con las manos mojadas.
CONSERVE ESTAS INSTRUCCIONES!
– 3
29ES
Page 30

Antes del primer uso de su
aparato, lea este manual original, actúe de acuerdo a sus indicaciones y guárdelo para un uso
posterior o para otro propietario posterior.
Índice de contenidos
Elementos del aparato . . . . ES . . .4
Indicaciones de seguridad . ES . . .4
Uso previsto . . . . . . . . . . . . ES . . .5
Dispositivos de seguridad . ES . . .5
Protección del medio ambiente ES . . .5
Antes de la puesta en marcha ES . . .6
Puesta en marcha . . . . . . . ES . . .6
Manejo . . . . . . . . . . . . . . . . ES . . .7
Transporte . . . . . . . . . . . . . ES . . .9
Almacenamiento . . . . . . . . ES . .10
Cuidados y mantenimiento. ES . .10
Ayuda en caso de avería . . ES . . 11
Accesorios y piezas de repues-
to . . . . . . . . . . . . . . . . . . . . ES . .12
Garantía . . . . . . . . . . . . . . . ES . .12
Datos técnicos . . . . . . . . . . ES . .13
Elementos del aparato
Desplegar las páginas delanteras
1 Soporte para boquillas
2 asidero
3 Conexión de alta presión
4 Conexión de agua
5 Manómetro
6 Indicador del nivel de aceite
7 Recipiente de aceite
8 Capó del aparato
9 Interruptor del aparato
10 Tornillo de fijación del capó del apa-
rato
11 Soporte para manguera
12 Soporte para los accesorios
13 boquilla
14 Marca de la boquilla
15 Lanza dosificadora
16 Regulación de presión y caudal
30 ES
17 Pistola pulverizadora manual
18 Palanca de seguro
19 Palanca de la pistola pulverizadora
manual
20 Manguera de alta presión
21 Estribo de empuje
22 Portacables
23 Válvula dosificadora de detergente
24 Manguera de detergente con filtro
de detergente y tapa
25 Soporte de la botella de detergente
Identificación por colores
– Los elementos de control para el
proceso de limpieza son amarillos.
– Los elementos de control para el
mantenimiento y el servicio son de
color gris claro.
Indicaciones de seguridad
– ¡Antes de la primera puesta en mar-
cha lea sin falta las instrucciones de
uso y las instrucciones de seguri-
dad n.° 5.951-949!
– Respetar las normativas vigentes
nacionales correspondientes para
eyectores de líquidos.
– Respetar las normativas vigentes
nacionales correspondientes de
prevención de accidentes. Los
eyectores de líquidos deben ser
examinados regularmente y tiene
que guardarse una copia escrita de
la revisión.
Símbolos del manual de instruc-
ciones
Peligro
Para un peligro inminente que acarrea
lesiones de gravedad o la muerte.
몇 Advertencia
Para una situación que puede ser peligrosa, que puede acarrear lesiones de
gravedad o la muerte.
– 4
Page 31

Precaución
Para una situación que puede ser peligrosa, que puede acarrear lesiones leves o daños materiales.
Símbolos en el aparato
Los chorros a alta presión
pueden ser peligrosos si se
usan indebidamente. No dirija el chorro hacia personas, animales o
equipamiento eléctrico activo, ni apunte con él al propio aparato.
De acuerdo con las normativas vigentes, está prohibido
utilizar el aparato sin un separador de sistema en la red de agua potable. Se debe utilizar un separador de
sistema apropiado de la empresa Kärcher o, alternativamente, un separador
de sistema que cumpla la norma EN
12729 tipo BA.
El agua que haya pasado por un separador del sistema será catalogada
como no potable.
Uso previsto
Válvula de derivación con pre-
sostato
Al reducir la cantidad de agua con la regulación de presión y caudal se abre la
válvula de rebose y una parte del agua
refluye al lado de succión de la bomba.
Cuando se suelta la palanca de la pistola pulverizadora manual, un presostato desconecta la bomba y el chorro
de alta presión se para. Cuando se acciona la palanca, se conecta la bomba
nuevamente.
Válvula de Seguridad
La válvula de seguridad se abre si se
sobrepasa la sobrepresión de servicio
admisible; el agua fluye de nuevo hacia el lado de aspiración de la bomba.
La válvula de derivación, el presostato
y la válvula de seguridad vienen ajustados y precintados de fábrica.
Los ajustes los deben realizar solamente el servicio postventa.
Protección del medio ambiente
Utilizar exclusivamente esta limpiadora a presión
– la limpieza con chorros a baja pre-
sión y detergente (p. ej., limpieza
de máquinas, vehículos, edificios,
herramientas),
– para limpiar con el chorro a alta pre-
sión sin detergente (p. ej. limpieza
de fachadas, terrazas, herramientas de jardinería).
Recomendamos que use la fresadora
de suciedad para la suciedad más resistente.
Dispositivos de seguridad
La función de los dispositivos de seguridad es proteger al usuario y está prohibido ponerlos fuera de servicio y
modificar o ignorar su funcionamiento.
– 5
Los materiales empleados
para el embalaje son reciclables y recuperables. No tire el
embalaje a la basura doméstica y entréguelo en los puntos oficiales de recogida para
su reciclaje o recuperación.
Los aparatos viejos contienen materiales valiosos reciclables que deberían ser
entregados para su aprovechamiento posterior. Evite el
contacto de baterías, aceites
y materias semejantes con el
medio ambiente. Por este
motivo, entregue los aparatos usados en los puntos de
recogida previstos para su
reciclaje.
31ES
Page 32

Por favor, no deje que el aceite para
motores, el aceite caliente y la gasolina
dañen el medio ambiente. Evite que
sustancias nocivas penetren en el suelo y elimine el aceite usado de forma
que no dañe el medio ambiente.
Indicaciones sobre ingredientes
(REACH)
Encontrará información actual sobre
los ingredientes en:
www.kaercher.com/REACH
Antes de la puesta en marcha
Desembalar
– Comprobar el contenido del paque-
te al desembalar.
– En caso de daños de transporte in-
forme inmediatamente al fabricante.
Controle el nivel de aceite
Leer el indicador de nivel de aceite
con el aparato parado. El nivel de
aceite tiene que estar por encima
de ambas agujas.
Activar la ventilación del reci-
piente de aceite
Extraer el tornillo de fijación del
capó del aparato, retirar el capó.
Cortar la punta de la tapa del depó-
sito de aceite.
Fijar el capó del aparato.
Montaje de los accesorios
Monte la boquilla en la lanza dosifi-
cadora (la marca del aro de apoyo
tiene que estar arriba).
Monte la lanza dosificadora con re-
gulación de presión y caudal en la
pistola pulverizadora manual.
Atornillar la manguera de alta pre-
sión a la conexión de alta presión.
32 ES
Puesta en marcha
Conexión eléctrica
몇 Peligro
Peligro de lesiones por descarga eléctrica.
El aparato sólo debe estar conectado a
una conexión eléctrica que haya sido
realizada por un electricista de conformidad con la norma CEI 60364.
La tensión de la fuente de corriente tiene que coincidir con la indicada en la
placa de características.
Protección mínima por fusible de la toma
de corriente (vea los datos técnicos).
Es imprescindible que el aparato esté
conectado con un enchufe a la red
eléctrica. Está prohibido establecer
una conexión no separable con la red
eléctrica. El enchufe sirve para poder
desconectarse de la red.
Antes de cada puesta en servicio, compruebe si el cable de conexión y el enchufe de red presentan daños. Si el cable de
conexión estuviera deteriorado, debe encargar sin demora a un electricista especializado del servicio de atención al
cliente autorizado que lo sustituya.
El enchufe y el acoplamiento del cable
de prolongación utilizado tienen que
ser impermeables.
Utilizar un alargador con suficiente corte trasversal (véase "Datos técnicos")
y enrollar desde la parte delantera del
tambor del cable.
El uso de cables de prolongación inadecuados puede resultar peligroso.
Para el exterior, utilice sólo cables de
prolongación autorizados expresamente para ello, adecuadamente marcados y con una sección de cable
suficiente:
Valores de conexión: véase la placa de
características/datos técnicos.
– 6
Page 33

Instrucciones del Interruptor de Circuito de Avería por Puesta a Tierra
– PASO 1: Enchufe el interruptor de
circuito de avería por puesta a tierra
a un tomacorriente de servicio.
– PASO 2: Presione ’’TEST’’ (PRUE-
BA) y, después, presione ’’RESET"
(REINICIO) para asegurarse de
que la conexión a la toma de energía eléctrica es correcta.
Nota: El aspecto actual del interruptor
de circuito de avería por puesta a tierra
puede ser distinto al de la ilustración.
Conexión de agua
Conexión a la toma de agua
몇 Advertencia
Tenga en cuenta las normas de la empresa suministradora de agua.
De acuerdo con las normativas
vigentes, está prohibido utilizar
el aparato sin un separador de
sistema en la red de agua potable. Se
debe utilizar un separador de sistema
apropiado de la empresa KÄRCHER o,
alternativamente, un separador de sistema que cumpla la norma EN 12729
tipo BA. El agua que haya pasado por
un separador del sistema será catalogada como no potable.
Precaución
Conectar el separador del sistema
siempre a la toma de agua, nunca directamente al aparato!
Valores de conexión, ver datos técnicos.
Conectar la tubería de abasteci-
miento (longitud mínima 7,5 m, diámetro mínimo 1") a la conexión de
agua del aparato y a la alimentación de agua (como el grifo).
Nota
La tubería de abastecimiento de agua
no está incluida en el volumen de suministro.
Abrir el suministro de agua.
Aspiración del agua de depósitos
abiertos
Instalar el la manguera de succión
(número de pedido 4.440-270.0) a
la conexión de agua.
Monte el filtro (nº referencia 4.730-
012.0) en la manguera de aspiración.
Purgar el aire del aparato:
Desenroscar la boquilla.
Dejar funcionar el aparato hasta
que salga el agua sin burbujas.
Si es necesario, dejar funcionar el
aparato 10 segundos y apagar. Repetir el proceso varias veces.
Desconecte el aparato y vuelva a
atornillar la boquilla.
Manejo
Peligro
Peligro de explosiones
No pulverizar ningún líquido inflamable.
Para usar el aparato en zonas con peligro de explosión (p. ej., gasolineras)
son de obligado cumplimiento las normas de seguridad correspondientes.
Precaución
Limpiar los motores sólo en las zonas
con el separador de aceite correspondiente (protección del medio ambiente).
– 7
33ES
Page 34

Funcionamiento con alta pre-
sión
Nota
El aparato está equipado con un presostato. El motor sólo se pone en marcha cuando se ha accionado el gatillo
de la pistola.
Colocar el interruptor principal en la
posición "I".
Desbloquear la pistola pulverizado-
ra manual y tirar de la palanca de la
pistola.
Ajuste la presión de servicio y la
cantidad de agua girando (ajuste
continuo) el control de presión y
cantidad (+/-).
Selección del tipo de chorro
Cerrar la pistola de pulverización
manual.
Girar la carcasa de la boquilla hasta
que coincida en símbolo deseado
con la marca:
Elija entre chorro circular o chorro
plano cambiando sin contacto.
Girar hacia la izquierda o derecha
la lanza dosificadora orientada 45º
hacia abajo.
Chorro circular de alta presión (0°) para suciedad
especialmente resistente
Chorro plano de baja presión (CHEM) para el uso
con detergentes o para
limpiar a una tensión baja.
Chorro plano de alta presión (25°) para áreas sucias muy amplias.
Funcionamiento con detergente
몇 Advertencia
Todos aquellos detergentes inadecuados podrán dañar el aparato y el objeto
a limpiar. Utilizar sólo detergentes que
hayan sido autorizados por Kärcher.
Tenga en cuenta la dosis recomendada y las indicaciones que incluyen los
detergentes. Utilice los detergentes
con moderación para no perjudicar el
medio ambiente.
Tener en cuenta las indicaciones de
seguridad de los detergentes.
Los detergentes Kärcher aseguran un
funcionamiento sin averías. Solicite el
asesoramiento oportuno o pida nuestro catálogo o nuestra hoja informativa
sobre detergentes.
Coloque la botella de detergente en
el soporte previsto para la misma
en el aparato o coloque el bidón de
detergente junto al aparato. Es posible depositar dos tipos distintos
de detergente a la vez en el aparato.
Extraer el tubo de absorción de de-
tergente y sumergir en el bote o bidón de detergente.
Desenrosque el tapón roscado de
la botella o del bidón.
Coloque la boquilla en la posición
"CHEM".
Ajuste la válvu-
la dosificadora
de detergente
para el detergente deseado
y la concentración deseada.
34 ES
– 8
Page 35

Método de limpieza recomendado
Rocíe la superficie seca con detergente y déjelo actuar pero sin dejar
que se seque.
Aplique el chorro de agua a alta
presión sobre la suciedad disuelta
para eliminarla.
Tras el funcionamiento, introducir el
filtro en agua limpia. Girar la válvula
dosificadora a la concentración máxima de detergente. Arrancar el aparato y enjuagar durante un minuto.
Interrupción del funcionamiento
Soltar la palanca de la pistola pul-
verizadora manual, el aparato se
apaga.
Tirar de nuevo de la palanca de la
pistola pulverizadora manual, el
aparato se enciende de nuevo.
Apagado del aparato
Colocar el interruptor principal en la
posición "0".
Saque el enchufe de la toma de co-
rriente.
Cerrar el abastecimiento de agua.
Poner en funcionamiento la pistola
pulverizadora manual hasta que no
quede presión en el aparato.
Accionar la palanca de seguridad
de la pistola pulverizadora manual,
para asegurar la pistola para que
no se active involuntariamente.
Almacenamiento del aparato
Introducir la pistola pulverizadora
manual en el soporte.
Enrollar la manguera de alta pre-
sión y colgar sobre el soporte de
manguera.
Enrollar el cable de conexión alre-
dedor del soporte de cable.
Fijar el enchufe con el clip montado.
Protección antiheladas
몇 Advertencia
El hielo deteriora el aparato si éste no
se ha vaciado por completo de agua.
Coloque el aparato en un lugar a salvo
de las heladas.
Si no es posible el almacenamiento
libre de heladas:
Dejar salir agua.
Bombee anticongelante de los ha-
bituales en el mercado en el aparato.
Nota
Utilizar anticongelante habitual para
automóviles con una base de glicol.
Tener en cuenta las instrucciones de
uso del fabricante del anticongelante.
Dejar en marcha el aparato durante
1 minuto como máximo hasta que
la bomba y los conductos estén vacíos.
Transporte
Precaución
¡Peligro de lesiones y daños! Respetar
el peso del aparato para el transporte.
Para transportar el aparato por tra-
yectos largos, tire de él mediante el
asa.
Levante el aparato por el asa y de
sopórtelo.
Antes de proceder al transporte en
posición horizontal, quite las botellas de detergente de sus soportes
y ciérrelas.
Al transportar en vehículos, asegu-
rar el aparato para evitar que resbale y vuelque conforme a las
directrices vigentes.
– 9
35ES
Page 36

Almacenamiento
Precaución
¡Peligro de lesiones y daños! Respetar
el peso del aparato en el almacenamiento.
Este aparato sólo se puede almacenar
en interiores.
Cuidados y mantenimiento
Peligro
Peligro de lesiones causadas por un
aparato que se arranque involuntariamente y descarga eléctrica.
Antes de efectuar cualquier trabajo en
el aparato, hay que desconectarlo de
la red eléctrica.
Nota
El aceite usado sólo se puede eliminar
en los punto de recogida previstos
para ello. Entregue el aceite usado allí.
Ensuciar el medio ambiente con aceite
usado es ilegal.
Inspección de seguridad/contra-
to de mantenimiento
Acuerde una inspección regular de seguridad con su distribuidor o cierre un
contrato de mantenimiento. Solicite el
asesoramiento oportuno.
Antes de cada servicio
Comprobar si el cable de conexión
está dañado (peligro por descarga
eléctrica), encargar al servicio técnico/electricista que cambie inmediatamente el cable de conexión
dañado.
Compruebe que no haya daños en
la manguera de alta presión (riesgo
de estallido).
Si la manguera de alta presión presenta daños, debe sustituirla inmediatamente.
Comprobar si el aparato (bomba)
es estanco.
Está permitido perder 3 gotas de
agua por minuto y pueden salir por
la parte inferior del aparato. En
caso de fuga de mayor envergadura consultar al servicio de atención
al cliente.
Todas las semanas
Comprobar el nivel de aceite. Si el
aceite tiene aspecto lechoso (señal
de presencia de agua en el aceite)
consultar inmediatamente al servicio técnico.
Limpie el tamiz en la conexión del
agua.
Limpie el filtro en la manguera de
aspiración de detergente.
Anualmente o tras 500 lavados
ha de cambiar el aceite.
Cambio de aceite
Nota
Caudal y tipo de aceite, vea "Datos
técnicos".
Extraer el tornillo de fijación del
capó del aparato, retirar el capó.
Retire la tapa del depósito de acei-
te.
Inclinar el aparato hacia delante.
Suelte el aceite en el recipiente co-
lector.
Introducir lentamente aceite nuevo;
dejar que salgan las burbujas de aire.
Colocar la tapa del depósito de
aceite.
Fijar el capó del aparato.
36 ES
– 10
Page 37

Ayuda en caso de avería
Peligro
Peligro de lesiones causadas por un
aparato que se arranque involuntariamente y descarga eléctrica.
Antes de efectuar cualquier trabajo en
el aparato, hay que desconectarlo de
la red eléctrica.
En caso de avería, la reparación de las
piezas eléctricas sólo debe efectuarla
el servicio técnico autorizado.
En caso de averías que no se mencionen en este capítulo, consulte al servicio técnico oficial en caso de duda y si
se indica explícitamente.
El aparato no funciona
Comprobar los daños del cable de
conexión.
Comprobar la tensión de la red.
En caso de un defecto eléctrico
consultar al servicio de atención al
cliente.
El aparato no alcanza la presión
necesaria
Coloque la boquilla en la posición
"presión alta".
Limpiar la boquilla.
Sustituir la boquilla.
Purgar el aparato (véase "Puesta
en marcha").
Verifique la cantidad de abasteci-
miento de agua (ver datos técnicos).
Limpie el tamiz en la conexión del
agua.
Compruebe todos los tubos de
abastecimiento hacia la bomba.
Si es necesario, consultar al servi-
cio de atención al cliente.
La bomba no es estanca
Está permitido perder 3 gotas de agua
por minuto y pueden salir por la parte
inferior del aparato. En caso de fuga
de mayor envergadura consultar al
servicio de atención al cliente.
En caso de fuga de mayor enverga-
dura deje que el servicio técnico revise el aparato.
La bomba da golpes
Comprobar la estanqueidad de las
tuberías de absorción de agua y detergente.
Cerrar la válvula dosificadora para
detergentes cuando se trabaje sin
detergentes.
Purgar el aparato (véase "Puesta
en marcha").
Si es necesario, consultar al servi-
cio de atención al cliente.
El detergente no se aspira
Coloque la boquilla en la posición
"CHEM".
Compruebe o limpie la manguera
de detergente con filtro.
Abra o compruebe o limpie la válvu-
la dosificadora de detergente.
Si es necesario, consultar al servi-
cio de atención al cliente.
– 11
37ES
Page 38

Accesorios y piezas de re-
puesto
– Sólo deben emplearse accesorios y
piezas de repuesto originales o autorizados por el fabricante. Los accesorios y piezas de repuesto
originales garantizan el funcionamiento seguro y sin averías del
aparato.
– Podrá encontrar una selección de
las piezas de repuesto usadas con
más frecuencia al final de las instrucciones de uso.
– En el área de servicios de
www.kaercher.com encontrará más
información sobre piezas de repuesto.
Garantía
En todos los países rigen las condiciones de garantía establecidas por nuestra empresa distribuidora. Las averías
del aparato serán subsanadas gratuitamente dentro del periodo de garantía, siempre que se deban a defectos
de material o de fabricación. En un
caso de garantía, le rogamos que se
dirija con el comprobante de compra al
distribuidor donde adquirió el aparato o
al servicio al cliente autorizado más
próximo a su domicilio.
38 ES
– 12
Page 39

Datos técnicos
Conexión de red
Tensión V 220...240
Tipo de corriente Hz 1~ 60
Velocidad del motor 1/min 1680
Consumo de potencia hp/kw 4,7/3.5
Potencia conectada A 20
Fusible de red (inerte, car. C) A 20
Categoría de protección IPX5
Cable de prolongación AWG/mm
Conexión de agua
Temperatura de entrada (máx.) °F (°C) 140/60
Velocidad de alimentación (mín.) GPM / l/min 2,6/10
Altura de aspiración desde el depósito abierto
ft/m 1,6/0.5
(20 ºC)
Presión de entrada (máx.) PSI (MPa) 145/1
Potencia y rendimiento
Presión de trabajo PSI (MPa) 435...2000/
Sobrepresión de servicio máxima PSI (MPa) 2200/15.2
Tamaño de la boquilla 047
Caudal GPM / l/min 1.3...3/4.9...11.3
Aspiración de detergente GPM / l/min 0...0.18 (0...0.7)
Fuerza de retroceso de la pistola pulverizadora
N30
manual (máx.)
Valores calculados conforme a la norma EN 60355-2-79
Valor de vibración mano-brazo
Pistola pulverizadora manual m/s
Lanza dosificadora m/s
Inseguridad K m/s
Nivel de presión acústica L
Inseguridad K
pA
pA
dB(A) 69
dB(A) 2
Nivel de potencia acústica LWA + inseguridad KWAdB(A) 84
Combustibles
Cantidad de aceite l 0,5
Tipo de aceite -- SAE 15W40
Medidas y pesos
Longitud mm 554
Anchura mm 509
Altura mm 1000
Peso kg 43
2
10/2.5
3...13.7
2
2
2
<2.5
<2.5
0,3
– 13
39ES
Page 40

Page 41

Page 42

Page 43

Page 44

http://www.kaercher.com/dealersearch
 Loading...