

Page 1

Page 2

E110 0 Us er Guide
This manual is based on the product i on version of
the Kyocer a E1100 phon e. S oft war e changes may
have occurred after this printing. Kyocera reserves
the ri ght to make changes in technical and product
specifications without prior notice. The products
and equi pm ent desc ri bed i n this documentation
are manufactured under license from QUALCOMM
Incorporated under one or more of the following
U.S. patents :
4,901,307 5,109,390 5,267,262 5,416,797 5,506,865
5,544,196 5,657,420 5,101,501 5,267,261 5,414,796
5,504,773 5,535,239 5,600,754 5,778,338 5,228,054
5,337,338 5,710,784 5,056,109 5,568,483 5,659,569
5,490,165 5,511,073
The Kyoc era Wireless Corp. (“K WC”) products
described in this manual may include copyrighted
KWC and third party software sto red in
semiconductor memories or other media. Law s in
the United States and other countries preserve for
KWC and third party software prov id ers certai n
exclus ive ri ght s fo r copy ri ghted software, such as
the exclusive rights to distribute or reproduce the
copyrighted software. Accordingly , any copyrighted
software contained in the KWC products may not
be modifie d, reverse engineered, distrib uted or
reproduc ed i n any mann er not perm i tted by law.
Further mo re, the pur chase of the KWC product s
shall not be deem ed to grant—either directly or by
implication, estoppel, or otherwise—any license
under the copy ri ght s, patents, or patent
applic ations of KWC or any third part y so ft ware
provider, except for the normal, non-ex clusive
royalty-free license to use that arises by operation
of law in the sale of a product.
Kyocera is a registered trademark of Kyocera
Corpora tion. Brick Attac k and Race 21 are
trademarks of Kyocera Wireless Corp.
QUALCO MM is a registered trademark of
QUALCO MM In corporated.
2
Openwav e i s a tra dem ark of Openwave Syst em s
Incorporated. eZi Text is a registered trademark of
Zi Corp orat i on. Tra nsFl ash is a trad em ark of
SanD isk Co rporation. Bl uet ooth tra dem arks are
owned by Bluetooth SIG , Inc. and used by Kyocera
Wirel ess Corp. under license.
All other trademarks are the property of their
re spective own e rs.
Copyr i ght © 2008 Kyocera Wireless Corp.
All rights reserved. Ringer Tones Copyright ©
2000-2008 Kyocera Wireless Corp.
82-N0246-1EN, Rev. 001
FCC Noti c e
This device complies with part 15 of the FCC rules.
Operation is subject to the following two conditions:
(1) Thi s dev ice m ay not caus e harm ful
interf erence, and (2) this device must accept any
interference received, including interference that
may cause undesired operation. T o maintain
compliance with FCC RF exposure guidelines, if
you wear a handset on your body, use the Kyocera
Wireless Corp. (KWC) supplied and approved
accessory designed for this product. Using
accessories that are not supplied or approved by
KWC may violate FCC RF exposure guidelines.
Other accessories used with this device for
body-worn operations must not contain any
metal lic components and must prov i de at least
15 mm separation distance including the antenna
and the user’s body.
THIS MO DE L PHON E MEETS THE
GOVERNMENT’S REQUIREMENTS FOR
EXPOSURE TO RADIO WAVES.
Your wireless phone i s a radio transmitter and
receiv er. It is designed and manufactured to not
exce ed the emission limits for exp osure to radio
frequency (RF) energy set by the Federal
Communications Commission of the
U.S . G ove r nmen t.
Page 3

These limits are part of comprehensive guidelines
and establish permitted levels of RF energy for the
general popul ation. The guidel i nes are based on
standa rds that were dev el oped by independent
scient i fic or gani zations through periodic and
thorou gh evaluation of sci ent ifi c s tudies. The
standa rds incl ude a substantial safety margin
designed t o assure the safety of all per sons ,
regardless of age and health.
The exposure standard for wireless mobile phones
employs a unit of measurement known as the
Sp e cific Ab s orp ti o n Rate , or SAR . T h e SAR l imi t
set by the FCC is 1. 6 W/kg.*
T ests for SAR are conducted using standard
operati ng positions specified by the FCC with the
phone transmitting at its highest certified power
level in all tes ted frequency bands.
Although the SAR is determined at the highest
certifi ed power level, the actual SA R level of the
phone whil e operating can be well bel ow the
maximum val ue. This is because the phone is
designed t o operate at multiple power levels so as
to use only the power required to reach the
networ k. In general, the closer y ou are to a
wirele ss base station antenna, the lower the
power out put .
Before a phone m odel i s av ai l able for sale to the
public , it must be tested and certified by the
FCC that it does not exceed the limit established
by the governm ent-adopted requirement fo r saf e
exposure. The tests are performed in positions and
locations (e.g., at the ear and worn on the body) as
required by the FCC for eac h mo del .
Body-worn measurements di ffer am ong phone
models, depending upon availability of accessories
and FCC requirements. While t here may be
differe nces between the SAR level s of various
phones and at vario us pos i tions, they all meet the
government requirement for saf e expo sure.
The FCC has granted an Equi pment Authorization
for thi s model phone with all reported SAR levels
evaluat ed as in compliance with the FCC RF
emis sion gui delines. SAR information on this
mode l pho ne is on file wi th the FCC and can be
found under the Display Gran t section
www.fcc.gov/oet/ea after searching on th e
FCC ID: OVFKWC-K3801 (dual band) or
OVFKWC-K3802 (tri-band).
Additional information on SAR can be found on the
Cellu l ar Telecommuni cations and Inte rnet
Association (CTIA) web-site at www.ctia.org.
* In the United Sta tes and Canada, the SAR
limit for mobile phones used by the public is
1.6 watts /k g (W/ kg) averaged over one gram of
tiss ue. The stan dard i nc orporates a subst ant i al
margi n of sa fet y t o gi ve addit i onal protection for
the public and to account for any variat i ons
in meas urem ents.
Bluetooth® Certification
For inform at i on about Neo E1100 Bluetoo th
Cert ification, visi t th e Bluet ooth Qualificat i on
Program Web site at qualweb.bluetooth.org.
Caution
The user is ca utioned that changes or
modifications not expressly approved by the party
responsible for compliance could void the warranty
and user’s authority to operate the equipment.
Optimi ze yo ur phone’s per for manc e
Use the gui del i nes in this us er guide to learn how
to optimize the performance and life of your phone
and battery.
Air Bag s
If you have an air bag, DO NOT place installed or
portable phone equipment or other objects over
the air bag or in the air bag depl oyment area. If
equipment is not properly installed, you and your
passe ngers risk serious inj ury.
User Guide 3
Page 4

Medical de vices
Pacemakers—Warni ng to pacemaker wearers:
Wireles s pho nes, when in the ‘on’ posit i on, have
been shown to interfere with pacemakers. The
phone should be kept at least six (6) inches away
from the pacem aker to reduce risk.
The Health In dustry Manufact urers Associati on
and the wireless technology research community
recomm end th at y ou foll ow these guidelines to
minimize the potential for inter feren ce.
• Alway s k eep the phone at le ast six inches
(15 centimet ers) away from your pac em aker
when t he phone is turned on.
• Do not carry your phone near you r heart .
• Use the ear opposite the pacem ak er.
• If you hav e any reason to suspect t hat
interference is taking place, turn off your
phone immediately.
Hearing aids—Some digital wireless phones
may interf ere with hearing aids. In t he event of
such inte rf erence, you may want to cons ul t your
servic e prov i der or call the customer service line
to discuss alternatives.
Other med ica l devices—If you use any other
persona l medical device, consul t the manufacturer
of the device t o determine if it is adequately
shield ed fr om ext ernal RF energy. Your physician
may be able to hel p you obt ai n th i s information.
In health care facilities—T urn your phone off in
health car e fac i l iti es when i nst ructed. Hospital s
and heal th care facilities may be using equipment
that is sensitive to externa l RF energy.
Potentially unsafe areas
Posted faci lities—Turn your phone off in any
facilit y when posted notices require you to do so.
Vehicles—RF signals may affect im properly
installed or inadequately shielded electronic
systems in motor vehicles. Check with the
manu fac tu rer of the device to determ i ne if it is
adequately shielded from external RF energy.
Blas ting ar eas—Turn off your phone where
blasting is in progress. Observe restrictions, and
follow any regulations or rules.
Potentially explosive atmospheres—
Turn off your phone when you are in any area
with a pot ent i al l y exp lo sive atmospher e. Obey
all signs and instructi ons. Sparks i n suc h areas
could cause an explosio n or fire, resulting in
bodi ly i njury or deat h. A reas with a potentiall y
explosive atmosph ere are often, but not always,
clearly marked.
They in clude:
• fueling areas such as gas stations
• below deck on boats
• transfer or storage facilities for fuel
or chemicals
• vehi cl e s u si ng l i que fi ed p etro l eum ga s, su ch a s
propane or but ane
• any othe r area wh ere you would normally be
advised to turn off your vehicle engine
Use with care
Use only in normal position (to ear). Avoid
dropping, hitting, bendi ng, or sitting on the phone.
Avoid magnetic environments
Keep the phone away from magnet s which can
cause improper functioning of the phone.
Keep phon e dry
Keep pho ne dry. Dama ge can result if the
phone get s wet . Water damage is not
covered under warranty.
4
Page 5

Resetting the phone
If the screen seems frozen and the k eypad does
not respond to key presses, res et the phone by
comple ting t he following steps :
1. Remove the battery door.
2. Rem ove and replace the batter y.
If the problem persists, return the phone to the
dealer for service.
Accessories
Use only Kyocera-approved accessories with
Kyocera phones. Use of any unaut hori zed
accessories may be dangero us and will invalidate
the phone warranty if said accessories cause
damage or a defect to the phone.
Radio Frequency (RF) energy
Y our telephone is a radio transmitter and receiver.
When it is on, it receives and sends out RF energy.
Y our service provider’s network controls the power
of the RF signa l . This power level can rang e fro m
0.006 to 0.6 wat ts.
In August 1996, the U.S. Federal
Communic ations Commissi on (F CC ) adopted
RF exposur e gui del ines with safety level s for
hand-held wi reless p hones. These guide lines are
consis tent with the safety stan dards previous l y
set by both U.S. and internationa l stand ards
bodies in the fol lo wi ng reports:
• ANSI C95.1 (American National
Standards I nstitute, 199 2)
• NCRP Report 86 (National Council
on Radiation Protect ion and
Measurements, 1986)
• ICNIRP (International Commission on
Non-I onizing Radia tion Protection , 1996)
Your phone complies with the stan dards set by
these reports and the FCC guidel in es.
E9 11 ma n dates
Where se rvice is availab le, t hi s handset complies
with th e Pha se I and Phas e II E911 Mandates
issued by the FCC.
Hearing Aid Compatibility (HAC) with
Mobile Phones
Some mobile phones and hearing devices (hearing
aids and coc hl ear implants), wh en used together,
result in buzz in g, humm i ng, or whining noi ses
detec te d by th e user.
Some hearing devices ar e more imm une than
other s to this interference no is e, and phones also
vary in the amount of interference they generate.
The wir eless telephone indu st ry has developed
ratings for some of their mobil e phones, to assis t
hearing device users in finding phones that may be
compatible with their hearing devices . Not al l
phones have been rated.
Phone s th at ar e rated have the rati ng on their box
or a label on the box . The rat i ngs are not
guarantees and results will vary depending on the
user ’ s hearing device and hear i ng l oss . I f you r
hearing device happens to be vu ln erable to
interference, you may not be able to use a rated
phone suc ces sf ul l y. Trying out the phone wit h your
hearing device is the best way to ev al uat e it for
your per sonal needs.
M-Ratings—Phones rated M3 or M4 meet
FCC requirements and are l i kely to generate
less interference to heari ng devices than
phones that are not la bel ed. M4 is the
better/higher of the tw o rat in gs.
T-Ratings—Phones rated T3 or T4 meet FCC
requirements and are likely to be more usa bl e wi th
a hearing device’s teleco i l (“T Swit ch” or
“Telephone Switc h”) than unrated phones. T4 is
the better/higher of the two ratings. (Note that not
all hear i ng devices have telecoil s in them.)
User Guide 5
Page 6

Hearing devices may also be measured for
immuni ty to this type of interference. Your hearing
device manufacturer or hearing health professional
may help you choose the proper rat i ng for your
mobile phone. The more immune your hearing aid
is, the less likely you are to experience interference
noise from m obi le phones.
For more inf orm at i on about hearing aid
compa tibilit y , visit the FCC's Consumer &
Governmental Affairs Bureau Web site at
www.fcc.gov/cgb/dro.
Kyocer a Wireless Corp.
www.kyocera-wireless.com
To purchase accessories, visit
www.kyocera-wireless.com/store
6
Page 7

Table of Contents
1 Get Started . . . . . . . . . . . . . . . . . . . . . . . . .9
Phone B attery. . . . . . . . . . . . . . . . . . . . . . . . . . . . 9
Attach the Lan yard . . . . . . . . . . . . . . . . . . . . . . . 11
Phone O verview . . . . . . . . . . . . . . . . . . . . . . . . .12
Main Menu. . . . . . . . . . . . . . . . . . . . . . . . . . . . .1 5
Guide Conventions . . . . . . . . . . . . . . . . . . . . . . .16
2 Call Features . . . . . . . . . . . . . . . . . . . . . .17
Power P hone Up . . . . . . . . . . . . . . . . . . . . . . . .17
Make Phone Calls. . . . . . . . . . . . . . . . . . . . . . . .17
Answer Phone Calls . . . . . . . . . . . . . . . . . . . . . .17
End Phone Call s. . . . . . . . . . . . . . . . . . . . . . . . . 18
Activate Voice Diali ng . . . . . . . . . . . . . . . . . . . . .18
Volume Contro l . . . . . . . . . . . . . . . . . . . . . . . . .18
Use Sp eed D ialing . . . . . . . . . . . . . . . . . . . . . . .18
Emerge ncy Se rvices . . . . . . . . . . . . . . . . . . . . . . 19
3 Text Entry. . . . . . . . . . . . . . . . . . . . . . . . .20
Text Entry Modes . . . . . . . . . . . . . . . . . . . . . . . . 20
Text Entry Quick Reference . . . . . . . . . . . . . . . . 22
4 Contacts. . . . . . . . . . . . . . . . . . . . . . . . . .23
View C ontacts Directory . . . . . . . . . . . . . . . . . . . 23
Add Contacts . . . . . . . . . . . . . . . . . . . . . . . . . . .2 3
Customize Contacts . . . . . . . . . . . . . . . . . . . . . .24
Contact Group s . . . . . . . . . . . . . . . . . . . . . . . . . 27
Search Contacts . . . . . . . . . . . . . . . . . . . . . . . . . 28
Erase A ll Contacts. . . . . . . . . . . . . . . . . . . . . . . . 29
Count Contacts . . . . . . . . . . . . . . . . . . . . . . . . . .29
5 Camera . . . . . . . . . . . . . . . . . . . . . . . . . . .30
Take a Picture . . . . . . . . . . . . . . . . . . . . . . . . . .3 0
Change Camera Option s. . . . . . . . . . . . . . . . . . .30
Camera Indicators and Icons . . . . . . . . . . . . . . . 31
6 Tools. . . . . . . . . . . . . . . . . . . . . . . . . . . . . 32
Voice Memo. . . . . . . . . . . . . . . . . . . . . . . . . . . . 32
Sched uler . . . . . . . . . . . . . . . . . . . . . . . . . . . . .3 2
Alarm Clock. . . . . . . . . . . . . . . . . . . . . . . . . . . . 34
Use Tip Calculator . . . . . . . . . . . . . . . . . . . . . . . 35
Use Calculato r . . . . . . . . . . . . . . . . . . . . . . . . . . 35
Use Timer . . . . . . . . . . . . . . . . . . . . . . . . . . . . .3 6
Use Stopwat ch . . . . . . . . . . . . . . . . . . . . . . . . . . 36
Memopad . . . . . . . . . . . . . . . . . . . . . . . . . . . . . 36
World Clock . . . . . . . . . . . . . . . . . . . . . . . . . . . . 37
7 Media Gallery . . . . . . . . . . . . . . . . . . . . . .38
Browse Camera Pictu res . . . . . . . . . . . . . . . . . . 3 8
Modi fy a Pict ure. . . . . . . . . . . . . . . . . . . . . . . . . 38
Browse Saved Images. . . . . . . . . . . . . . . . . . . . . 39
Browse Wallp apers . . . . . . . . . . . . . . . . . . . . . . 39
Edit Wallpap er Shuffle . . . . . . . . . . . . . . . . . . . .39
Browse Scree nsavers . . . . . . . . . . . . . . . . . . . . . 40
Browse Caller IDs . . . . . . . . . . . . . . . . . . . . . . . 40
Browse Saved Sounds . . . . . . . . . . . . . . . . . . . .40
Browse Ringers . . . . . . . . . . . . . . . . . . . . . . . . . 41
Edit Ringer Shuffle . . . . . . . . . . . . . . . . . . . . . . . 41
Browse Voice Memos. . . . . . . . . . . . . . . . . . . . . 41
Delet e All Files. . . . . . . . . . . . . . . . . . . . . . . . . . 4 2
Playback Tools. . . . . . . . . . . . . . . . . . . . . . . . . . 42
8 easyedge. . . . . . . . . . . . . . . . . . . . . . . . . .43
How does B REW Work? . . . . . . . . . . . . . . . . . . . 43
Download an Application . . . . . . . . . . . . . . . . . . 4 3
Open an Application . . . . . . . . . . . . . . . . . . . . . 44
View A pplicatio n Details. . . . . . . . . . . . . . . . . . . 44
Remove an A pplication . . . . . . . . . . . . . . . . . . . 44
Disable an Application . . . . . . . . . . . . . . . . . . . . 44
Check Availa ble Memory . . . . . . . . . . . . . . . . . . 44
User Guide 7
Page 8

9 Messaging . . . . . . . . . . . . . . . . . . . . . . . .45
Text Messages. . . . . . . . . . . . . . . . . . . . . . . . . . 45
Multimedia Messages . . . . . . . . . . . . . . . . . . . . 47
Voicemail . . . . . . . . . . . . . . . . . . . . . . . . . . . . . 5 0
Erase Messages. . . . . . . . . . . . . . . . . . . . . . . . . 5 0
Work wi th Messages . . . . . . . . . . . . . . . . . . . . . 51
Message Settings . . . . . . . . . . . . . . . . . . . . . . . . 52
Message Groups . . . . . . . . . . . . . . . . . . . . . . . . 55
10 Settings. . . . . . . . . . . . . . . . . . . . . . . . . . .56
Settings Menu . . . . . . . . . . . . . . . . . . . . . . . . . . 5 6
Create a Custom Men u . . . . . . . . . . . . . . . . . . . 5 7
Blueto oth . . . . . . . . . . . . . . . . . . . . . . . . . . . . . 5 7
Sounds . . . . . . . . . . . . . . . . . . . . . . . . . . . . . . . 59
Display . . . . . . . . . . . . . . . . . . . . . . . . . . . . . . . 6 1
Convenience . . . . . . . . . . . . . . . . . . . . . . . . . . . 6 3
Voice Features. . . . . . . . . . . . . . . . . . . . . . . . . . 65
Accessories . . . . . . . . . . . . . . . . . . . . . . . . . . . . 67
Network . . . . . . . . . . . . . . . . . . . . . . . . . . . . . . 6 8
Security. . . . . . . . . . . . . . . . . . . . . . . . . . . . . . . 7 0
11 Rec en t Calls . . . . . . . . . . . . . . . . . . . . . . .72
Call Lists . . . . . . . . . . . . . . . . . . . . . . . . . . . . . . 7 2
View C all Timers . . . . . . . . . . . . . . . . . . . . . . . . 73
View Data Cou nter . . . . . . . . . . . . . . . . . . . . . . . 73
12 Phone Info . . . . . . . . . . . . . . . . . . . . . . . .74
13 Voice Commands. . . . . . . . . . . . . . . . . . .75
Add Contacts . . . . . . . . . . . . . . . . . . . . . . . . . . . 7 5
Remove Contacts. . . . . . . . . . . . . . . . . . . . . . . . 75
Start V oice Commands . . . . . . . . . . . . . . . . . . . 75
Call a Contact . . . . . . . . . . . . . . . . . . . . . . . . . . 76
Call a Number. . . . . . . . . . . . . . . . . . . . . . . . . . 76
Use Sh ortcuts . . . . . . . . . . . . . . . . . . . . . . . . . . 7 6
Find Contacts . . . . . . . . . . . . . . . . . . . . . . . . . . 76
Voice Command Settings . . . . . . . . . . . . . . . . . . 77
14 Get Help . . . . . . . . . . . . . . . . . . . . . . . . . .78
User Guide . . . . . . . . . . . . . . . . . . . . . . . . . . . . 7 8
Cust omer Support . . . . . . . . . . . . . . . . . . . . . . . 78
Qualif ied Service. . . . . . . . . . . . . . . . . . . . . . . . 7 8
Phon e Acce ssories . . . . . . . . . . . . . . . . . . . . . . 79
Become a Product Evaluator. . . . . . . . . . . . . . . 7 9
Index . . . . . . . . . . . . . . . . . . . . . . . . . . . . . . . . . 80
8
Page 9
1Get Started
Phone Ba tte ry
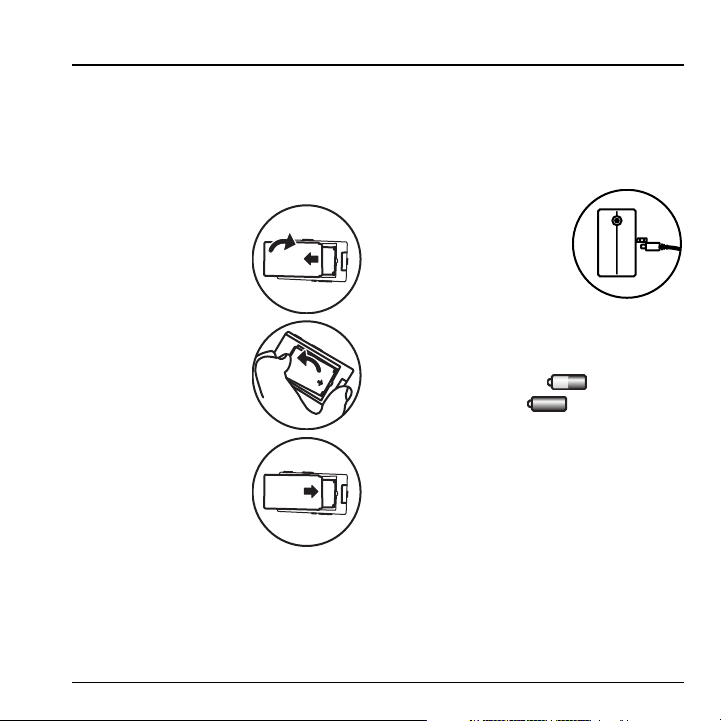
Install the Battery
To install the battery:
1. Hold the phone face down.
2. Find notch directly
above the back cover. It
is square. Use the notch
to slide the cover down.
Lift the cover from the
bottom to remove.
3. Place the battery in the
battery casing with the
metal contacts facing
toward the bottom of
the phone. The metal
contacts of the battery
must make contact with
the metal contacts of the
battery casing.
4. Replace the battery door
by sliding the notches
into the openings on
each side of the battery casing.
5. Snap the cover into place.
Charge the Battery
You must have at least a partial charge in the
battery to make or receive calls.
To charge the battery:
1. Connect the AC adapter
to the microUSB jack on
the side of the phone.
2. Plug the adapter into a
wall outlet.
The battery icon in the
upper-right corner of the screen tells you
whe ther the phone is:
– Charging (the icon is animated)
– Partially charged
– Fully charged
You can safely recharge the battery at any time,
even if it has a partial charge.
Warning: The battery will not charge if you use
the phone while it is connected to an AC adapter.
Note: Before removing the battery, make sure the
phone is powered off.
User Guide 9
Page 10

Battery Safety Guidel ines
• Do not disassemble or open the battery.
• Do not crush, bend, deform, puncture, or
shred the battery.
• Do not attempt to insert foreign objects into
the battery.
• Do not immerse the battery or expose it to
water or other liquids. Even if a battery
appears to dry out and operate normally,
internal parts can slowly corrode and pose a
safety hazard.
• Always keep the battery between 15°C and
25°C (59°F and 77°F). Do not expose the
battery to extremes of temperature (heat or
cold), fire, or other hazards such as a
cooking surface, iron, or radiator.
• Never use any damaged battery.
• Only use the battery for its intended phone.
• Only use the battery with a qualified charger.
Use of an unqualified battery charger may
present a risk of fire, explosion, leakage, or
other hazard. If you are unsure about
whether a charger is qualified, contact
customer support.
• Do not short-circuit the battery or allow
metallic conductive objects—such as
keys, coins, or jewelry—to contact the
battery’s terminals.
• Replace the battery only with another
qualified battery. Use of an unqualified
battery may present a risk of fire, explosion,
leakage, or other hazard. If you are unsure
about whether a replacement battery is
compatible, contact customer support.
• Promptly dispose of used batteries in
accordance with local regulations and
recycle if possible. Do not dispose as
household waste.
• Supervise all battery usage by children.
• Avoid dropping the phone or battery. If the
phone or battery is dropped, especially on
a hard surface, an internal short-circuit
can occur and pose a safety hazard. If you
suspect battery damage, take it to a service
center for inspection.
• Improper battery use may result in a fire,
explosion, or other hazard.
Common Causes of Batte ry Drain
• Playing gam es or using the Web.
• Taking pictures with the flash on.
• Keeping backlighting on.
• Operating in digital mode when far away from
a base station or cell site.
• Using data cables or accessories.
• Operating when no service is available, or
service is available intermittently.
• High earpiece and ringer volume settings.
• Repeating sound, vibration, or lighted alerts.
10 Phone Battery
Page 11
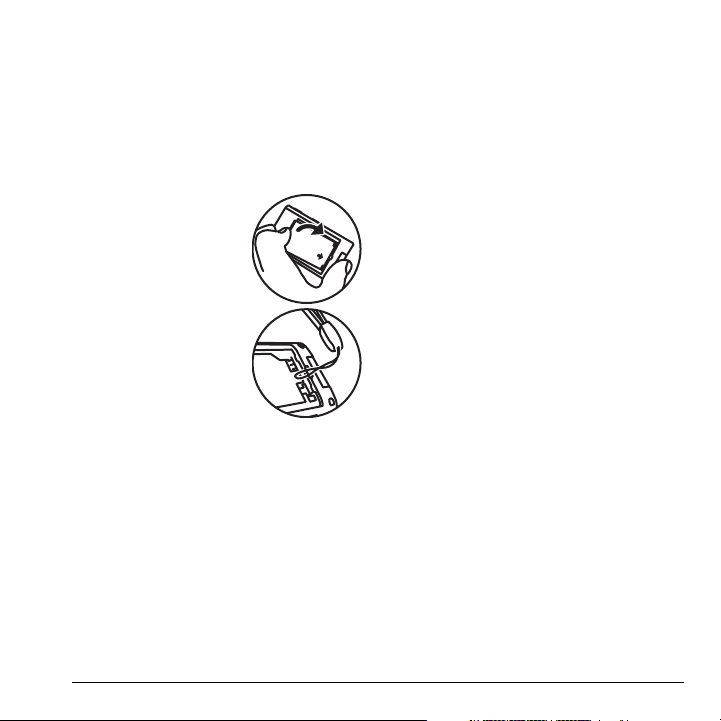
Attach the Lanyard
To attach the lanyard:
1. Hold the phone face down.
2. Find the notch directly above the back
cover. It is square. Use the notch to slide
the cover down. Lift the cover from the
bottom to remove.
3. Remove the battery. Use
the notch directly below
the battery casing. It is a
half circle.
4. Thread the lanyard
through the upper
square notch’s hole.
5. Make sure the lanyard
catches on the hook
inside the hole.
6. Insert the battery.
7. Replace the battery door
cover and snap it into place.
User Guide 11
Page 12
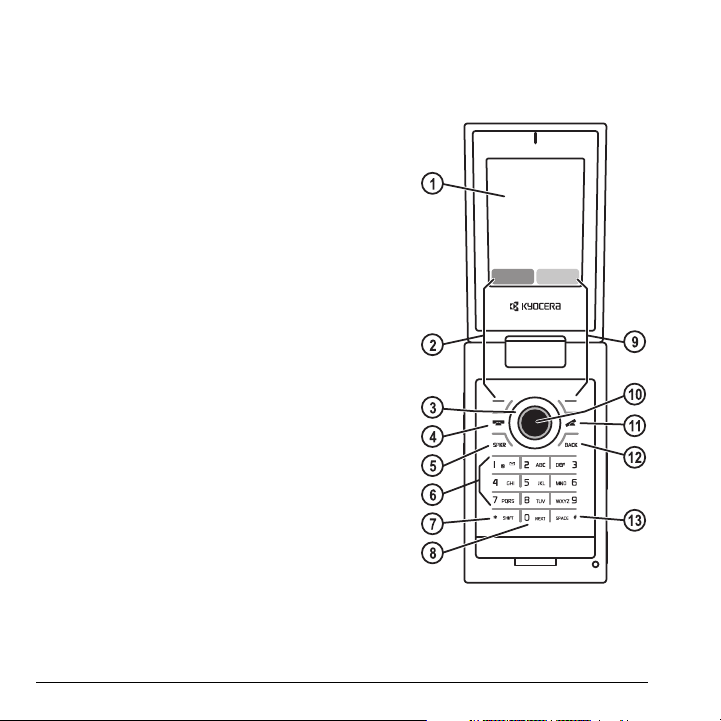
Phon e Ov ervie w
Get to Know Your Phone
The phone is shown here in the open position.
1. Home screen.
2. Left softkey selects items that appear on the lower left of the
display. At the home screen, you can select
3. Navigation key scrolls through lists and text entry fields
and accesses the following shortcuts from the home screen.
– Scroll left to launch easyedge.
– Scroll right to go to Messaging.
– Scroll up to create a custom menu shortcut.
– Scroll down to go to Media Gallery.
4. Send key starts or answers a call. Press once to activate
voice command, twice to display the All Calls list, and three
times to redial the last number dialed. Press and hold to
activate voice commands.
5. Speakerphone key activates the speakerphone and
answers incoming calls.
6. Keypad for entering numbers, letters, or symbols.
7. * Shift key changes the text mode in text entry.
8. 0 Next key cycles through word choices during text entry.
9. Right Softkey selects items that appear on the lower right of
the display. At the home screen, you can select
10. OK key selects a m enu item or option.
11. End key turns the phone on and off, ends a call or browser
session, and returns you to the home screen.
12. Back key erases characters in text entry and returns you to the previous screen when navigating
through menus.
13. # Space key enters a space during text entry. Press and hold to activate or deactivate Silent mode.
12 Phone Overview
Menu.
Contacts.
Page 13
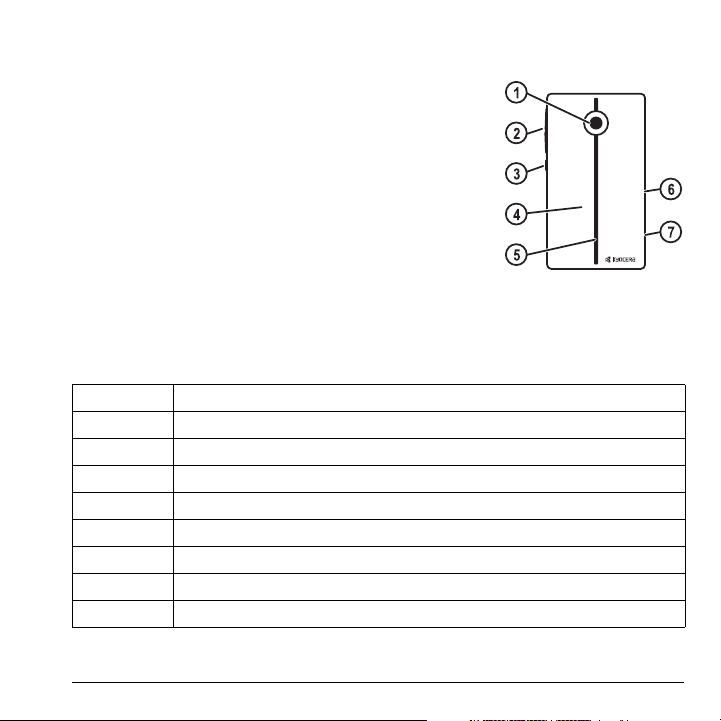
The phone is shown here in the closed position. When the phone is closed, the keys are locked to prevent
accidental key presses.
1. Camera lens.
2. Volume key raises or lowers ringer volume.
3. Camera key activates Camera mode. To activate camera mode, press
and hold the
4. External screen displays time, caller ID, signal, and battery strength.
5. Lightpipe LED.
6. Jack for microUSB cable (sold separately).
7. Jack for a hands-free headset (sold separately).
Camera key.
Warning: Inserting an accessory into the incorrect jack will
damage the phone.
Lightpipe LED Behavior
Your phone’s lightpipe LED displays different patterns depending upon the alert. You can disable the
lightpipe LED, see “Set LightPipe Behavior” on page 62.
New message One flash. If you do not respond, your phone will flash again to remind you.
Incoming call Heartb eat pulse. It will c ontinue until you answer the phone or miss the call.
Missed call One flash. If you do not respond, your phone will flash again to remind you.
In call Wave pu lse. It w ill conti nue u ntil the call ends.
Alarm Three flashes. It w ill continue until you respond to the alert.
Scheduler Three flashes. It w ill continue until you respond to the alert.
Bluetooth One flash. It will c ontinue until you re spond to Blueto oth request.
Low battery One flash. It will continue until you charge the phone.
Charging Wave pu lse. Disp lays when the phon e is being charged.
Note: Incoming emergency calls always activate the LED, even if you have disabled it.
User Guide 13
Page 14

Screen Icons
These icons may appear on your phone’s screen.
The phone is operating in IS95 digital mode.
The phone is operating in IS2000 (1X) digital mode.
The phone is receiving a signal. You can make and
receiv e calls. Fe wer ba rs indicate a we aker signal.
A call is in progress.
The phone has a high speed data connection.
The phone has a standard speed data connection.
The phone is not receiving a signal. You cannot
make or receive calls.
Content is DRM protected.
Data service is available and active on your phone.
Check with your service provider for availability.
(blinking) The phone is sending high-speed data.
(blinking) The phone is receiving high-speed data.
Data service is available , but the phone is dormant.
Bluetooth wireless technology is enabled (On).
Bluetooth wireless technology is disabled (Off).
The phone is roaming outside of its home service
area.
New text message .
New voice message.
New voice and text mess age.
New photo message.
New photo and voic e message.
New photo and text message.
New photo, voice a nd text message.
The phone is set to light up instead of ring.
The phone is set to vibrate or to vibrate and then
ring.
The speaker phone is turned on.
Position location is set to your service provider and
to emergency services.
Position location is set to emergency services only.
The phone is in cam era mode.
The phone is set to auto answer.
The phone is in privacy mode or is access ing a
secure Web site.
The alarm cloc k is set.
The battery is fully charged. The more black bars,
the greater the charge.
The phone is in air plane mode.
14 Phone Overview
Page 15

Main Menu
The contents of the main menu are as follows:
Contacts
View All
Add New
Groups
Speed Dial List
Voice Dial List
Erase Contacts
Contacts Count
Camera
Launches the Camera
Tools
Voice Memo
Scheduler
Alarm Clock
Tip Calculator
Cal cula tor
Time r
Stopwatch
Memopad
World Clock
Media Gallery
Images
Sounds
Delete All
easyedge
easyedge shop
Setti ngs
Help
Messaging
New Text Msg
New Pic Msg
Voicemail
Inbox
Sent Msgs
Outbox
Saved Msgs
Draft s
Msg Settings
Message Groups
Erase Msg
Settings
Bluetooth
Sounds
Display
Convenience
Voice Features
Accessories
Network
Security
Recent Calls
All
Incoming
Outgoing
Missed
Data
Erase Call List
Call Timer
Kilobyte Counter
Phone Info
Build Info
Icon Key
User Guide
User Guide 15
Page 16

Guide Conventions
In this guide, the following conventions are used
when describing phone features.
Select means to press the Left softkey, Right
OK key to select an item seen on the
softkey or
display. For example, “Select
physically press the left softkey to choose
from the display.
Press means to press a phone key. For
example, “Press the
call” tells you to physically press the
on your phone.
Scroll means to use the Navigation key to move
though a list on the display. For example, “Scroll
through your Contacts list to choose a contact”
means to physically press the
or down to scroll through the list on the display.
> (greater than symbol) tells you to select an
option from a menu or list. For example,
Menu > Settings” means to:
“
1. Press the left softkey to select Menu.
2. Scroll to the Settings option.
3. Press the OK key to select Settings.
Menu” tells you to
Menu
Send key to make a phone
Send key
Navigation key up
16 Guide Conventions
Page 17

2 Call Features
This section describes call features such as
volume, holding calls, speed dialing and
other features.
Power Phone Up
• To turn your phone on, press the End key and
wait until the phone display lights up.
• To turn your phone off, press and hold the
End key until the phone plays a musical chime
and turns off.
Make Phone Calls
Make sure you are in an area where a signal can
be received. Look for the signal strength icon on
the home screen. The more bars you see in this
symbol, the stronger the signal. If there are no
bars, move to where the signal strength is better.
When the phone has been idle for a time, it
changes to power save mode. When you see
“Power Save” on your phone’s screen, press any
key to return to normal operating mode.
There are several ways you can make a
phone call.
Call Using a Number
1. Enter a ph one n umber.
2. Press the Send key.
Call Using a Contact
1. Select Menu > Contacts > View All to open
your contacts list.
2. Highlight a contact and press the Send key.
Call Using Voice Commands
You can use voice commands to call a contact
from your voice dial list or to dial a phone
number. For more information, see “Voice
Commands” on page 75.
Redial a Number
1. Press the Send key twice to open your
call history.
2. Highlight a phone number or contact and
Send key.
press the
Note: To redial the last number called, received
or missed, press the
Send key three times.
Answer Phone Ca lls
When a call comes in, the phone rings, vibrates,
or lights up. The phone number of the caller also
appears if it is not restricted. If the number is
stored in your Contacts directory, the contact’s
name appears. There are several ways you can
answer a phone call.
Answer Using Earpiece
Press the Send key.
User Guide 17
Page 18

Answer Using Speakerphone
Press the Speakerphone key.
Answer Using Flip
You can set the phone to answer immediately
when you open the flip. This feature does not
apply to incoming data calls. For more
information, see “Enable Open to Answer” on
page 65.
End Ph one Cal ls
To end a phone call press the End key.
Activate Voice Dialing
1. Press and hold the Send key.
2. Follow the prompts.
For more information, see “Voice Commands” on
page 75.
Volume Control
There are several ways to control the volume of
your phone.
Adjust Volume during a Call
To adjust the earpiece volume during a call, press
Volume key up or down.
the
Use the Speakerphone
Your phone has a built-in speakerphone.
• To turn on the speakerphone, press the
Speakerphone key. The speakerphone icon
appears on the home screen when the
speakerphone is on.
• To turn off the speakerphone, press the
Speakerphone key again.
Note: If you press the
an incoming call, you will answer the call.
Speakerphone key during
Silence an I ncoming Call
• To silence the phone without answering the
call select
press the
• To silence the phone and answer the call,
sel ect
Note: In the absence of voicemail, this feature
drops the call.
Silence, press the Back key, or
Volume key.
Silence and then press the Send key.
Use Speed Dia ling
Speed dialing allows you to assign a one- or
two-digit shortcut to a contact. Before you can use
speed dialing you must save a phone number as a
contact and assign a speed dial location to it. See
“Customize a Number” on page 25.
To call a contact that has a speed dial location.
1. Enter the one- or two-digit speed
dial location.
2. Press the Send key.
18 E nd Phone Calls
Page 19

Eme rgency Servi ce s
Call Emergency Service
You can call an em ergency code, even if your
phone is locked or your account is restricted.
When you call, your phone enters Emergency
mode. This enables the emergency service
exclusive access to your phone to call you back, if
necessary. To make or receive regular calls after
dialing the code, you must exit this mode.
To place dial an emergency code:
1. Enter your 3-digit emergency code.
2. Press the Send key.
Note: Regardless of your 3-digit emergency code
(911, 111, 999, 000, etc.), your pho ne operates
as described.
Exit Emergency Services
When you have completed the emergency call:
1. Select Exit.
2. Select Exit again to confirm your choice.
Note: To determine who has access to
your location, see “Set Location Information” on
page 69.
User Guide 19
Page 20
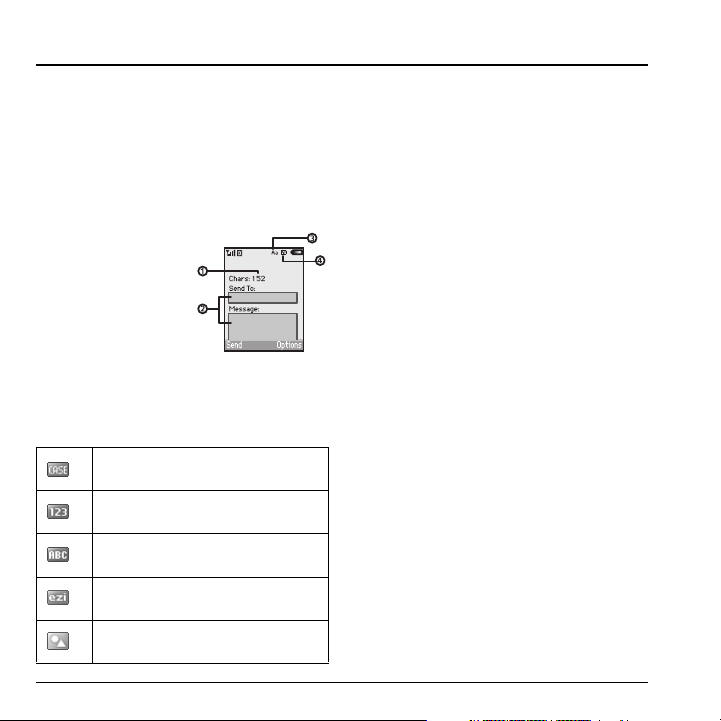
3 Text Entry
You can enter letters, numbers, and symbols in
contacts, text messages, and your banner.
Text En try M odes
The current text entry mode (and capitalization
setting, when applicable) are indicated by icons.
The text entry screen has the following features:
1. Characters remaining
that you can type.
Allowed length of
messages can vary
depending on your
serv ice.
2. Text entry fields.
3. Current capitalization setting.
4. Current text entry mode.
There are five text entry modes:
Case Change
Numbers Only
Normal Alpha
Rapid Entry
Add Symbol
Note: The mode you start in depends on the task
you are doing. For example, when entering a
phone number, you’re in Numbers Only mode.
When entering a name for a contact, you’re in
Normal Alpha mode.
Enter Numbers
• To enter a number while in Numbers Only
mode, press a number key once.
• To enter a number while in Normal Alpha or
Rapid Entry mode, press and hold a number
key until the number appears on the screen.
Enter Words Letter by Letter
1. Press a key once for the first letter, twice for
the second letter, and so on. If your phone is
set to Spanish, French, or Portuguese,
accented letters are available.
2. Wait for the cursor to move right and enter
the next letter.
Note: To enter a space, press
# Space key.
20 Text Entry Modes
Page 21

Enter Words Quickly
When you press a series of keys using Rapid Entry
mode, your phone checks its dictionary of
common words and guesses at the word you are
trying to spell.
1. For each letter of the word you want, press
the key once. For example, to enter the word
“any” press the 2 > 6 > 9 keys.
2. If the word doesn’t match what you
want, press
0 Next key to look at other
word matches.
3. When you see the word you want, press the
# Space key.
Enter Symbols
While entering text in Normal Alpha mode, you
can enter symbols by pressing the 1 key until you
see the symbol you want. Using this method, you
have access to the following symbols:.
. @ ? ! - , & : ‘ ]
To access the full set of symbols:
1. From the text entry screen select Options >
Add Symbol.
2. Scroll up or down to view the list of symbols.
3. Press the number key corresponding to the
symbol to enter it.
Change Modes
Sometimes you need to change modes. For
example, to enter numbers in an email address
while in Normal Alpha mode, you must change to
numbers only mode, enter the numbers, and then
change back to Normal Alpha mode to complete
the address.
To change text entry modes:
• Press and hold * Shift key until the icon
for the mode you want appears at the top
of the screen.
• You can also select Options then select a
different mode.
Note: You can change the default text entry mode
when creating a text message. For more
information, see “Set Default Text” on page 54.
Change Capitalization
You can change capitalization at any time while
entering text.
* Shift key to choose upper or lower
Press the
case while in Normal Alpha mode.
User Guide 21
Page 22
Text En try Q uick Refe rence
This table gives instructions for entering letters, numbers, and symbols. For more information,
see “Text Entry Modes” on page 20.
To.. Do this..
Enter a letter Use Normal Alpha mode and press a key until you see the letter your want.
Enter a number Use Normal Only mode and press a key.
Enter a sym bol Use Normal Alpha mode and press the 1 key until you see the symbol
Enter a space Press the # Space key.
Erase a character Press the Back key.
Erase all characters Press and hold th e Back key.
Move the cursor right or left Scroll left or right.
Move the cursor up or down Scroll up o r down.
Chan ge text entry mod es Press and hold th e * Shift key.
Capital ize any letter In Normal Alpha mode, press the * Shift key. Choose uppercase.
Lowercase any letter In Normal Alpha mode, press the * Shift key. Choose lowercase.
Initial caps In Normal Alpha mode, press the * Shift key. Choose sentence case.
Select soft options on screen Press the appropriate left or ri ght softkey.
your want.
22 Text Entry Quick Reference
Page 23

4 Contacts
Use your phone’s contacts directory to store
information about a person or company. Each
contact entry can have up to six phone numbers,
two email addresses, two Web addresses, two
street addresses, and a space for notes.
View Co ntact s Directory
To view existing contacts in your phone:
1. Select Menu > Contacts > View All. Your
contacts are listed alphabetically.
2. Highlight a contact and do one of
the fo llo wing:
– Press the Send key to call the contact.
– Press the OK key view the
contact’s details.
– Select New to create a new contact.
– Select Options > Call to call the contact.
– Select Options > Se nd Text Msg to send
a text message.
– Select Options > Send Pict Msg to send
a picture message.
– Select Options > View Contact to view
the contact’s details.
– Select Options > Edit Contact to edit
the contact.
– Select Options > Erase Contact to call
the contact.
– Se lect Options > Send a s vCard to send
contact as a vCard.
– Se lect Options > Send All to send all
contacts to a Bluetooth device or a
connected printer.
– Se lect Options > Contacts Menu to
access the Contacts menu.
Add Contacts
Add Contact from Home Screen
To add a contact to your Contacts directory:
1. From the home screen, enter a phone
number to save (include the area code).
2. Select Save > Save New Contact.
3. Enter a name for the contact.
4. Enter additional phone numbers, email
addresses, Web addresses and note, if
needed. Scroll up or down to move through
the contact fields.
5. When you are done entering information,
select
Save.
User Guide 23
Page 24

Add Contact from Contacts Menu
To add a contact to your Contacts directory:
1. Select Menu > Contacts > Add New.
2. Enter a name for the contact. When you are
done scroll down to the next field.
3. Enter a primary number for the contact.
4. Enter additional phone numbers, email
addresses, Web addresses and note, if
needed. Scroll up or down to move through
the contact fields.
5. When you are done entering information,
sel ect
Save.
Add Code or Extension
When you save the phone number of an
automated service, you may include a pause to
stop dialing. For example, a pause where you
would wait to dial an extension.
1. From the home screen, enter a
phon e num ber.
2. Select Options and a type of pause:
– Time Pause causes the phone to stop
dialing for two seconds.
– Hard Pause causes the phone to stop
until you select
the call.
3. Enter the remaining numbers and select
Save > Save New Contact.
4. Complete the contact and select Save.
Release while making
Cus t o mi ze Co ntact s
Edit Contact Details
To edit details of an existing contact.
1. Select Menu > Contacts > View All.
2. At the contacts directory, select a contact.
3. At the contact details screen, select Edit.
4. Edit or add phone numbe rs, email
addresses, Web addresses and notes.
Scroll up or down to move through the
contact fields.
5. When you are done entering information,
Save.
select
Customize a Name
To customize the name of an existing contact.
1. Select Menu > Contacts > View All.
2. At the contacts directory, select a contact.
3. At the contact details screen, scroll to
the name.
4. Select Options and one of the following.
– Ringer assigns a specific ringer to
the contact.
– Msg Tone assigns a specific message
tone to the contact.
–Picture assigns a specific picture to
the contact.
– Erase Contact deletes the contact. This
will erase the entire contact.
– Send as vCard sends the contact as
a vCard.
24 Customize Contacts
Page 25

Customize a Number
To customize the number of an existing contact.
1. Select Menu > Contacts > View All.
2. At the contacts directory, select a contact.
3. At the contact details screen, scroll to
a number.
4. Select Options and one of the following.
–Call calls the contact.
– Send Text Msg sends a text message.
– Send Pict Msg sends a
multimedia message.
– Prepend displays the contact details
screen for you to change the number
(adding an area code) or other data
of the contact.
– Add Speed Dial adds the number to your
speed dial list.
–View Number displays the number.
–Erase Number deletes number from
the contact.
– Secret / Not Secret makes the
number secret. It will not appear on
the screen until the lock code is
entered. Secret numbers can be
called without a lock code.
–Primary Number makes this number the
primary number for the contact.
– Send as vCard sends the contact as
a vCard.
– Add To Group adds the number to the
business, personal or custom group.
Customize an Email Address
To customize the email address of an existing
contact.
1. Select Menu > Contacts > View All.
2. At the contacts directory, select a contact.
3. At the contact details screen, scroll to an
email address.
4. Select Options and one of the following.
– Send Text Msg sends a text message.
– Send Pict Msg sends a
multimedia message.
– View Address displays the
email address.
– Add To Group adds the email address to
the business, personal or custom group.
– Erase Address deletes email address
fro m the contac t.
– Secret / Not Secret makes the email
address secret. It will not appear on the
screen until the lock code is entered.
– Send as vCard sends the contact as
a vCard.
Customize an IM Addres s
To customize the IM address of an
existing contact.
1. Select Menu > Contacts > View All.
2. At the contacts directory, select a contact.
3. At the contact details screen, scroll to an
IM address.
User Guide 25
Page 26

4. Select Options and one of the following.
–View IM displays the IM address.
–Erase IM dele tes IM addr ess from
the contact.
Customize a Web Address
To customize the Web address of an
existing contact.
1. Select Menu > Contacts > View All.
2. At the contacts directory, select a contact.
3. At the contact details screen, scroll to a
Web address.
4. Select Options and one of the following.
– Launch Web launches the Web browser
and goes to Web address.
– Send Pict Msg sends a
multimedia message.
–View Web displays the Web address.
–Erase Web deletes Web address from
the contact.
– Send as vCard sends the contact as
a vCard.
Customize a Street Address
To customize the street address of an
existing contact.
1. Select Menu > Contacts > View All.
2. At the contacts directory, select a contact.
3. At the contact details screen, scroll to a
street address.
26 Customize Contacts
4. Select Options and one of the following.
– View Address displays the
street address.
– Erase Address deletes street address
fro m the contac t.
– Send as vCard sends the contact as
a vCard.
Customize a Note
To customize the note of an existing contact.
1. Select Menu > Contacts > View All.
2. At the contacts directory, select a contact.
3. At the contact details screen, scroll to a note.
4. Select Options and one of the following.
– View Note displays the note.
– Erase Note deletes note from
the contact.
– Secret / Not Secret makes the note
secret. It will not appear on the screen
until the lock code is entered.
– Send as vCard sends the contact as
a vCard.
Assign Ringer to a Contact
To assign a ringer to a contact.
1. Select Menu > Contacts > View All.
2. At the contacts directory, select a contact.
3. At the contact details screen, scroll to
the name.
4. Select Options > Ringer > Assign Ringer
and a ringer from the list. Scroll to play
the ringers.
Page 27

Assign Picture to a Contact
To assign a picture to a contact.
1. Select Menu > Contacts > View All.
2. At the contacts directory, select a contact.
3. At the contact details screen, scroll to the
name and do one of the following:
– Select Options > Picture >
Assign Picture > Camera Pictures.
Scroll to an image and select
– Select Options > Picture >
Take Picture Now to take a new picture.
Select.
Assign Number Type
When you assi gn a number ty pe, an icon is p laced
in front of the contact number to specify the type
of number it is.
1. Select Menu > Contacts > View All.
2. At the contacts directory, select a contact.
3. At the contact details screen, select Edit.
4. Press down twice to scroll to the number
type dropdown and press the
5. Select General, Wor k , Home, Mobile,
Pager or Fax. The appropriate icon
will appear next to the number in your
phone lists.
6. Select Save.
OK key.
Send a vCard
To send contact information as a message:
1. Select Menu > Contacts > View All.
2. At the contacts directory, select a contact.
3. At the contact details screen, scroll to the
contact name.
4. Select Options > Send as vCard >
Via MMS, Via Bluetooth, or To Printer.
5. Complete the appropriate task to send
contact information.
Con t a ct Groups
You can a ssign you r con tacts to grou ps. Your
phone comes with default groups. You can also
create your own groups.
Create a Group
1. Select Menu > Contacts > Groups.
2. Select New.
3. Enter a name for the group, then select Next.
4. Select contacts from the list provided.
A check mark appears next to each
selection you make. You can also
remove checkmarks.
5. When you have chosen your contacts,
Your new group appears the next time you view
you r groups
select
Done.
User Guide 27
Page 28

Use a Group
1. Select Menu > Contacts > Groups.
2. At the groups list, scroll to a group.
3. Select Options and one of the following:
–View displays the group details.
– Edit adds or removes group members.
–Erase deletes the group.
– Send Text Msg sends a text message.
– Send Pict Msg sends a
multimedia message.
– Send as vCard sends the group as
a vCard.
– Create Msg Group creates a
message group.
Customize a Group
1. Select Menu > Contacts > Groups.
2. At the groups list, select a group.
3. Select Options and one of the following:
–Ringer assigns a ringer to the group.
– Msg Tone assigns a message tone to
the group.
–Picture assigns a picture to the group.
–Erase deletes the group.
– Edit adds or removes group members.
Search C ontact s
To find a phone number or contact, you can
search the contacts directory, check the
Frequent List, or use Fast Find.
Contacts Directory
To search your contacts directory:
Menu > Contacts and one of the following:
Select
• View All lists the entire contacts directory.
• Groups lists existing groups.
• Speed Dial List or Voice Dial List shows
contacts on the specified list.
To quickly get down the list, enter the first
letter of the contact. You will skip to that letter
of the alphabet.
Frequent List
With Frequent List enabled, you can see 15 of
your most frequently called contacts. See “Enable
Frequent List” on page 65.
Fast Find
With Fast Find enabled, you can press one or two
keys to view close matches of the number. See
“Enable Fast Find” on page 65.
Voice Search
You can use voice commands to find a contact in
your voice dial list. For more information, see
“Find Contacts” on page 76.
28 Search Contacts
Page 29

Erase All Contacts
You can delete all your contacts.
Menu > Contacts > Erase Contacts and
Sel ect
one of the following:
• Contacts Only deletes all contacts from
the phone.
• Groups Only deletes groups you have
created from the phone. This does not
delete the contacts.
• Erase All deletes both contacts and groups
from the phone.
Note: Deleted information can not be recovered.
Count Contacts
Check how many contacts you have stored.
Menu > Contacts > Contacts Count.
Sel ect
User Guide 29
Page 30

5 Camera
Your phone comes with a camera. Before using
your phone’s camera, here are some tips:
• You cannot activate the camera while on
an active call or while browsing files in the
media gallery.
• Once the camera is active, the home screen
acts as the viewfinder.
• If you get a “Low memory” error, check your
resolution and quality compression settings.
• If there is no activity within 45 seconds after
you turn your camera on, the camera quits
and returns to the previous launch point.
• Menu settings and options can only be
accessed when the camera is active.
Take a Picture
To take a picture:
1. Activate the camera one of the
following ways:
– Press and hold the Camera key.
– Select Me nu > Camera.
2. Focus on the image using the phone’s display
as a viewfinder. Scroll up or down to zoom in
and out.
3. Take a picture one of the following ways:
– Press the OK key.
– Press the Camera key.
– Select Capture.
The picture is saved to your camera
pictures folder.
4. Select Send to create a multimedia
message or
Erase to delete the picture
from your phone.
You can also send the picture to a
Bluetooth device or a printer.
5. Press the End key to exit camera mode.
Change Camera Options
While in camera mode you can select one of
the following:
• Options > Settings displays the
following settings you may set up prior
to taking a picture:
– Resolution adjusts the resolution.
– Self Timer sets a self timer. When set, the
camera beeps from 3 seconds down to the
time the shutter snaps the picture
automatically. Self Timer is not available
when Multishot mode is activated.
– Date/Time places a time stamp on
the picture.
– Multishot allows you to take up to six
multiple pictures while the camera key is
pressed and held. A tone will play each
time a picture is taken.
30 Take a Picture
Page 31

– Shutter Sound sets the sound used when
the camera takes a picture.
– White Balance adjusts for
different lighting.
– Color Tone sets the color tone of
the picture.
– Picture Quality sets the picture
compression. The higher the
compression, the better the detail of the
picture (higher pixel rate). When set
higher, the picture file size is larger,
using more memory.
• Options > Brightness adjusts the brightness
of the image in the home screen LCD.
• Options > Camera Images displays all
pictures taken and stored.
• Options > Last Picture displays the most
re cently ta ken p icture.
• Options > Frames adds a frame or a stamp
to your picture. A frame or stamp cannot
be removed once it has been used in a
picture. The picture resolution may
change while taking pictures with frames.
The resolution returns to the original setting
once Frames is disabled.
Note: The following settings will revert to
the default setting each time you exit the
camera application:
Color Tone.
and
Self Timer, Multishot
Camer a Indica to rs and Icons
The following information indicators and icons
may display on the screen when you are operating
the camera.
Numbers in the top right corner indicate
the number of snapshots remaining.
Numbers in the bottom left corner
indicate the resolution setting for
pictures.
Camera is in camera mode.
Multishot feature is on.
Self timer feature is on.
Date/Time stamp is on.
User Guide 31
Page 32

6 Tools
Your phone comes with tool s and games. S ome of
the games or tools described here may not be
available on your phone. If you receive an
incoming call while you are playing a game, the
game is paused and exited. You can return to play
once the call alert ends. Games do not remain
paused if the phone is turned off or loses power.
Voice Memo
The Voice Memo tool allows you to record and
play back audio memos.
Record Voice Memos
To record new voice memos, do the following:
1. Select Menu > Tools > Voice Memo >
Record New.
2. Say your voice memo. Select Stop when
you are done.
3. Select Save to save your memo.
If an incoming call is received while you are
recording a memo, the memo is saved and the
incoming call screen appears.
View Voice Memos
To play and use voice memos, do the following:
1. Select Menu > Tools > Voice Memo >
Recorded Memos.
2. At the file list, highlight a memo.
3. Select Play to play the memo select Options
and one of the following:
– Send creates a message with the
file attached or sends file to a
Bluetooth device.
– Erase deletes the memo.
– Assign assigns the memo to a function.
– Send to Online uploads a file to an
online server.
– Lock / Unlock prevents accidental
erasing of the memo.
–Rename renames the memo.
– Shuffle adds the file to your ringer
shuffle list.
– Details displays the details of the file.
– Erase All deletes all unlocked memos.
Scheduler
The Scheduler allows you to schedule events
and set reminder alerts.
Create an Event
1. Select Menu > Tools > Scheduler >
Add New Event.
2. Enter a name. Scroll down to move to the
next field when done.
3. Choose an event type. Press the OK key and
select a choice from the list.
32 Voice Memo
Page 33

4. Modify the date, if needed. Press the OK key
to change the date.
– Scroll left or right to move between
month, day and year fields.
– Scroll up or down to change month, day
and year.
OK key to save date and move to
Press the
the next field.
5. Modify the time, if needed. Press the OK key
to change the time.
– Scroll left or right to move between hour,
minute and AM/PM fields.
– Scroll up or down to change hour,
minute and AM/PM.
OK key to save time and move to
Press the
the next field.
6. Modify the duration of event, if needed. Press
the OK key to change the duration.
– Scroll left or right to move between hour
and minute fields.
– Scroll up or down to change hour
and minute.
OK key to save duration and move
Press the
to th e next field.
7. Choose a priority. Press the OK key and
select a choice from the list.
8. Choose a rem inder. Press the OK key and
select a choice from the list.
9. Enable silent mode, if needed. press the
OK key and select No to leave on normal
sounds or
During Event to place phone in
silent mode during the duration of the event.
10. Make the event recurring, if need. Press the
OK key and select a choice from the list.
11. Select Save to save the event.
View Events
You can view the events saved to the scheduler.
View by Date
1. Select Menu > Tools > Scheduler and one
of the following:
– View Month displays the current month.
Days with events are highlighted. Scroll
through the calendar. Press the
to select a date.
–View Day displays the current date.
Scroll right or left to move to
another date.
– Go to Date chooses a specific date.
Scroll left or right to move between
month, day and year fields. Scroll up or
down to change month, day and year.
OK key to select the date.
Press the
2. At the day view, do one of the following.
– Select an existing event to view the
event detail.
– Scroll to a time and select Add New to
create a new event.
OK key
User Guide 33
Page 34

– Select Options > Go to Today to go to
the current date.
– Select Options > Go to Date to go to a
specific date.
– Select Options > Erase Today’s Events
to delete all events for that date.
View by List
1. Select Menu > Tools > Scheduler >
View All Events.
2. At the event list, select one of the following:
– Scroll to an event and select View to
display the event detail.
– Select Options > Sort by Time to sort
events by time.
– Select Options > Sort by Type to so rt
events by type.
– Select Options > Sort by Priority to sort
events by priority.
– Select Options > Erase All Events to
delete all events.
– Select Options > Erase All Past Events
to delete all past events.
Modify an Event
You can modify existing events.
From the event detail screen, you can select
return to the previous screen or
Options and one
the following:
• Edit edits the event.
•Erase deletes the event.
OK to
• Send creates a message with the event
attached or sends event to a Bluetooth
device or printer.
• Copy creates an event with the existing
event information.
Scheduler Settings
You can change the default settings of
your scheduler.
Menu > Tools > Scheduler > Settings
Select
and one of the following:
• Scheduler Hours changes the work day.
• Auto Erase deletes events automatically.
• Priority prioritizes new events.
• Reminder assigns reminders for new events.
• Reminder Sound assigns sound alerts for
new event reminders.
• Silent Mode sets phone to silent mode for
new events.
Ala rm Clock
You can set up to four alerts with your phone’s
three alarm clocks and one quick alarm.
Note: The alert occurs only if the phone is on.
Set an Alarm
1. Select Menu > Tools > Alarm Clock.
2. Scroll to one of the alarms and select Set.
3. Modify the time, if needed. Press the OK key
to change the time.
34 Alarm Cloc k
Page 35

– Scroll left or right to move between hour,
minute and AM/PM fields.
– Scroll up or down to change hour,
minute and AM/PM.
OK key to save time and move to
Press the
the next field.
4. Choose a s ound. Press the OK k ey and select
a choice from the list.
5. Make the alarm recurring, if needed. Press
OK key and select a choice from the list.
the
6. Enter a note. Press the OK key.
7. Select Save to set the alarm.
When the alarm rings, select
the alarm or
Snooze to reset the alarm for
Stop to turn off
next 10 minutes.
Note: Opening the flip turns off the alarm.
Set the Quick Alarm
1. Select Menu > Tools > Alarm Clock.
2. Highlight the quick alarm and select Set.
3. Choose a time. A notification shows the
quick alarm is on.
When the quick alarm rings, select
the alarm or
Reset to set the quick alarm again.
Off to turn off
Use Tip Calculator
The Tip Calculator helps you calculate how much
tip to include with a bill.
1. Select Menu > Tools > Tip Calculator.
2. Enter the amount of your bill.
3. Select percentage you want to tip.
4. Enter the number of guests splitting the bill.
5. Select Next. The bill amount is shown.
6. Select Done to return to menu.
Use Calculator
The Calculator can perform basic
mathematical operations.
1. Select Menu > Tools > Calculator.
2. Enter the first number.
3. Select a mathematical operation:
– Scroll left to multiply.
– Scroll right to divide.
– Scroll up to add.
– Scroll down to subtract.
The chosen operation is highligh ted.
4. Enter the second number. Press the OK
key to perform the operation. The result
is shown.
5. Select Exit to return to menu or Options
and one of the following:
–MS clears value currently stored and
adds the displayed result to value
stored in memory.
User Guide 35
Page 36

–M+ adds displayed result to the value
stored in memory.
–MR displays currently stored value on
the screen.
–MC clears value currently stored
in memory.
Use Ti m er
The Timer counts down for the specified time. It
beeps when that amount of time has elapsed.
1. Select Menu > Tools > Timer > Set.
2. Enter the first number.
3. Enter the time length.
– Scroll left or right to move between
hours, minutes and seconds fields.
– Scroll up or down to change hours,
minutes and seconds.
4. If needed, select Sound and one of the
sounds to change the sound.
5. To work the timer, select the
following options:
–Start begins the countdown.
–Stop pauses the countdown.
– Reset clears the timer.
When the countdown is complete select
silence the alarm.
Off to
Use St opwatch
The Stopwatch counts time for you.
1. Select Menu > Tools > Stopwatch.
2. To work the stopwatch, select the
following options:
–Start begins counting.
–Stop pauses counting.
–Reset clears the stopwatch.
Back key to return to the menu.
Press the
Memopad
Write memos on your phone.
Write a Memo
To write a memo:
1. Select Menu > Tools > Memopad >
New Memo.
2. Enter the memo.
3. Select Save.
Use a Memo
To use memos:
1. Select Menu > Tools > Memopad >
View Memos.
2. From the memo list, select a memo.
3. Select Options and one of the following:
– Edit modifies the memo.
– Send as SMS sends memo with a
text message.
36 Use Timer
Page 37

–Use Number uses a number in
the memo.
– Lock Memo / Unlock Memo prevents
accidental erasing of the memo.
–Erase deletes the memo.
– Erase All deletes all the
unlocked memos.
World Clock
The world clock lets you check times in cities
around the world in relation to local time.
Set World Clock
1. Select Menu > Tools > World Clock.
The world clock menu is displayed. Your
local time and date is on the first line,
followed by your selected world city and that
city’s time and date .
2. When yo u fir st access Wo rld Clo ck, s cro ll le ft
or right to select a time zone.
The world clock menu is displayed again, with the
new time zone.
Search World Clock
1. Select Menu > Tools > World Clock >
Options > Search City or Search Country.
2. In the search field, enter letter(s) to search
by. Results are listed as you type.
3. Select a city or country from the list.
User Guide 37
Page 38

7 Media Gallery
Your phone stores media files and can display
those files on the phone display.
Browse Camera Pictures
To browse the camera pictures on your phone:
1. Select Menu > Media Gallery > Images >
Camera Pictures. You can scroll through
the file list.
2. Select View to open a highlighted file or
Options and one of the following:
sel ect
– Send creates a message with the file
attached or sends file to a Bluetooth
device or printer.
– Take Picture launches the camera.
–Erase deletes the file.
–Assign assigns the file as a Caller ID,
wallpaper, or screensaver.
– Slideshow starts a slideshow beginning
with the selected file.
– Send to Online uploads a file to an
online server.
– Lock / Unlock prevents accidental
erasing of the file.
– Rename renames the file.
– Shuffle adds the file to the
wallpaper shuffle.
– Details displays details of the file.
– Erase All deletes all unlocked files.
Modify a Picture
To modify a picture you have taken, do
the following:
1. Select Menu > Media Gallery > Images >
Camera Pictures and a picture from the list.
2. Select Options > Modify > Options and
one of the following:
– Rotate r otates the p ictu re. Opt ions
include 90° right, 180°, 90° left,
flip horizontal and flip vertical.
–Resize resizes the image. Options
include 90%, 75%, 50% and 35%.
– Brightness adjusts the brightness.
– Sharpness adjusts the sharpness.
– Saturation adjusts the saturation.
–Hue adjusts the hue.
– Auto Adjust automatically adjusts
all levels.
– Color Tone adjusts the color tone.
Options include grayscale, negative,
sepia and emboss.
3. If you modify the picture, select Save to
save your changes. You can save the
modified picture over the existing file or
save it as a new file.
38 Browse Camera Pictures
Page 39

Browse Saved Images
To browse the saved images on your phone:
1. Select Menu > Media Gallery > Images >
Saved Images. You can scroll through the
file list.
2. Select View to open a highlighted file or
Options and one of the following:
sel ect
– Send creates a message with the file
attached or sends file to a Bluetooth
device or printer.
–Erase deletes the file.
–Assign assigns the file as a Caller ID,
wallpaper, or screensaver.
– Send to Online uploads a file to an
online server.
– Lock / Unlock prevents accidental
erasing of the file.
– Rename renames the file.
– Shuffle adds the file to the
wallpaper shuffle.
– Details displays details of the file.
– Erase All deletes all unlocked files.
Browse Wallpapers
To browse the wallpapers on your phone:
1. Select Menu > Media Gallery > Images >
Wallpapers. You can scroll through the
file list.
2. Select View to open a highlighted file or
Options and one of the following:
select
– Send creates a message with the file
attached or sends file to a Bluetooth
device or printer.
– Erase deletes the file.
– Set Default assigns the file as
the wallpaper.
– Send to Online uploads a file to
an online server.
– Lock / Unlock prevents accidental
erasing of the file.
–Rename renames the file.
– Shuffle adds the file to the
wallpaper shuffle.
– Details displays details of the file.
– Erase All deletes all unlocked files.
Edit W allpaper Shuffle
To edit the wallpaper shuffle of your phone,
do the following:
1. Select Menu > Media Gallery > Images >
Wallpaper Shuffle.
2. Select Edit to add or remove images from
your wallpaper list or
Set Shuffle Time t o m odify the time
interval for the shuffle.
To enable this feature, see “Enable Wallpaper
Shuffle” on page 61.
Options >
User Guide 39
Page 40

Browse Screensavers
To browse the screensavers on your phone:
1. Select Menu > Media Gallery > Images >
Screensavers. You can scroll through
the file list.
2. Select View to open a highlighted
screensaver or select
Options and one
of the following:
– Send creates a message with the file
attached or sends file to a Bluetooth
device or printer.
–Erase deletes the file.
– Set Default assigns the file
the screensaver.
– Send to Online uploads a file to an
online server.
– Lock / Unlock prevents accidental
erasing of the file.
– Rename renames the file.
– Details displays details of the file.
– Erase All deletes all unlocked files.
Browse Caller IDs
To browse the caller IDs on your phone:
1. Select Menu > Media Gallery > Images >
Caller IDs. You can scroll through the
file list.
2. Select View to open a highlighted file or
Options and one of the following:
select
– Assign assigns the file to a contact as
a Caller ID.
– Details displays details of the file.
Browse Save d Sounds
To browse the saved sounds on your phone:
1. Select Menu > Media Gallery > Sounds >
Saved Sounds. You can scroll through
the file list.
2. Select Send to create a message with the
sound attached or select
of the following:
– Erase deletes the file.
– Assign assigns the sound.
– Send to Online uploads a file to an
online server.
– Lock / Unlock prevents accidental
erasing of the file.
–Rename renames the file.
– Shuffle adds the image to the
wallpaper shuffle.
– Details displays details of the file.
– Erase All deletes all unlocked files.
Options and one
40 Browse Screensavers
Page 41

Browse Ringers
To browse the ringers on your phone:
1. Select Menu > Media Gallery > Sounds >
Ringers. You can scroll through the file list.
2. Select Assign to assign the ringer or select
Options and one of the following:
– Send creates a message with the
file attached or sends file to a
Bluetooth device.
–Erase deletes the file.
– Send to Online uploads a file to an
online server.
– Lock / Unlock prevents accidental
erasing of the file.
– Rename renames the file.
– Shuffle adds the image to the
wallpaper shuffle.
– Details displays details of the file.
– Erase All deletes all unlocked files.
Edi t Ringer Sh uffle
To edit the ringer shuffle of your phone,
do the following:
1. Select Menu > Media Gallery > Sounds >
Ringer Shuffle.
2. Select Edit to add or remove sounds
from your ringer list.
To enable this feature, see “Enable Ringer
Shuffle” on page 59.
Browse Vo ice Memos
To browse the voice memos on your phone:
1. Select Menu > Media Gallery > Sounds >
Voi ce Memos. You can scroll through the
file list.
2. Select Play to play the voice memo or select
Options and one of the following:
– Send creates a message with the
file attached or sends file to a
Bluetooth device.
– Record New records a new voice memo.
– Erase deletes the file.
– Assign assigns the file.
– Send to Online uploads a file to an
online server.
– Lock / Unlock prevents accidental
erasing of the file.
–Rename renames the file.
– Shuffle adds the file to the ringer shuffle.
– Details displays details of the file.
– Erase All deletes all unlocked files.
User Guide 41
Page 42

Del e te All Files
You can delete your unlocked media files:
Menu > Media Gallery > Delete All and
Sel ect
one of the following:
• Cam Pics Only deletes all unlocked camera
pictures from the phone.
• Images Only deletes all unlocked images
from the phone.
• Sounds Only deletes all unlocked sounds
from the phone.
• Delete All deletes all unlocked media files
from the phone.
Note: Deleted information cannot be recovered.
Playback Tool s
When you playback sound files, use the
Navig ation key to select the playback tools
displayed on the screen.
42 Delete All Files
Page 43

8 easyedge
Your Kyocera phone has the added ability
to download and manage applications
through BREW.
BREW brings you the full range of applications
and services you have come to expect from the
Internet: Email and instant messaging, real-time
navigation services, group chat, games, relevant
news, and much more.
For more information about BREW
capabilities and application pricing, contact
your service provider.
How does BREW Work?
You connect to the server, download applications,
and then man age them as you like. When you
choose an application, you have the option of
choosing a demo, various limited use options, or
the full version—all varying in price. If you
choose a demo, BREW lets you know when it has
expired. If you choose a priced version, the
amount is added to your phone bill. BREW also
lets you know if you’re running out of memory. At
that point, you can either disable an application
or remove it completely.
Once applications are loaded, you can update to
newer versions as they become available.
Dow nload an Applicat ion
1. Select Menu > easyedge >
easyedge shop > Catalog. When a
connection is made, a list of
application types appears.
2. Select an application type. A list of
applications appears. Long titles scroll
left as you highlight them.
3. Select an application. A list of usages
appears. There may be one or more
usages available. Prices are specified for
each usage.
4. Select a usage for the application. You are
pro mpted to confi rm yo ur pu rch ase.
5. Select Yes to confirm. The application
downloads to your phone. Download times
may vary.
To open the application now, select
No, you return to the easyedge menu,
select
where you see a link to your new application.
Note: Your connection to the application server
automatically ends after 30 seconds, unless you
connect again to download more apps. If you
want to end the connection manually, press the
End key on your phone.
Yes . If you
User Guide 43
Page 44

Open an Application
Downloaded applications are stored under the
easyedge menu. Each application comes with its
own unique icon, to help you identify it easily.
Menu > easyedge and the application.
Sel ect
easyedge icon always remains at the top
The
of this menu. Downloaded applications are
listed after.
View Application Details
You can get information about the size of an
application and how many uses it has left
before it runs out.
1. Select Menu > easyedge > Settings >
Manage Apps.
2. Select an application to view its details.
Rem ove an Application
If you remove an application, it is removed
completely from your phone. If you want to use it
again, you must pay for it again. If you want to free
up space on your phone, we recommend you
disable the application.
1. Select Menu > easyedge > Settings >
Manage Apps.
2. Select an application.
3. Select Remove. At the prompt, select
Ye s to confirm.
Disable an Application
If you are running out of memory and would like
to download more applications, but do not want
to completely remove those you have paid for, you
can simply disable them. This means you have to
re-download an application in order to use it
again, but don’t have to pay for it again.
1. Select Menu > easyedge > Settings >
Manage Apps.
2. Select an application.
3. Select Lock App. At the prompt, select
Yes to confirm.
The application is listed in the
The icon looks like an empty box.
easyedge menu.
Check Available Memory
The amount of memory depends on the number
of applications you download.
Menu > easyedge > Settings >
Select
Manage Apps > System Info.
The amount of memory left is shown.
44 Open an Application
Page 45

9 Messaging
This chapter describes how to send, receive, and
erase messages from your phone.
Note: The features and menus described in this
chapter may vary depending on services available
in your area. Check with your service provider for
details and possible usage charges.
Text Messages
You can only send text messages to phon es
that are capable of receiving them or to
email addresses.
Create a Text Message
1. Select Menu > Messaging > New Text Msg.
2. Enter a recipient’s phone number or
email address:
– Select Options > Recent List,
Recent Calls, Contacts, or
Message Groups to access your
stored contacts.
– Enter a new address manually.
You can message up to ten recipients at
once. Use comma or spaces to separate
addresses. If you select stored contacts, this
is done automatically. Scroll down to move
to th e next field when done.
3. Enter the message.
4. Select Send.
Attach QuickText and other Extras
During text entry, you can attach items such as
prewritten text (QuickText) or symbols.
1. From the text entry screen, select Options
and one of the following:
– Insert QuickText inserts prewritten
text from a list.
–Insert Note inserts memo created
with your memopad.
– Add Symbol inserts a symbol. Press
the corresponding number to select
a symbol.
2. Complete your message.
3. Select Send.
Use Text Message Options
When you create a text message, you have several
options to help you.
1. From the message entry screen, select
Options and one of the following:
– Add Address allows you to add
another recipient.
– Save Address saves a recipient’s address
to your phone if it is new.
– Save Message saves the messages in your
Drafts folder.
– Save QuickText saves the message you
comp osed as a prewritten message.
User Guide 45
Page 46

– Msg Settings > Msg Rec eipt alerts
you when a recipient has received
your message.
– Msg Settings > Set Priority labels the
message as urgent.
– Msg Settings > Callback Number
includes a callback number with
the message.
– Msg Settings > Send Later schedules a
time to send the message.
– Msg Settings > Validity Period sets
a defined expiration time limit for
a message.
2. After setting options, select Close
your message .
3. Complete your message.
4. Select Send.
Retrieve a Text Message
When a text message is received, your phone
displays a notification and the message icon
appears at the top of your screen. The message
icon flashes if the message is urgent. Urgent
messages are also marked in the Inbox.
Message Noti fica ti ons
If you see a message notification, select Inbox to
view messages and do one of the following:
• Scroll to a message and select Vie w to open it.
• Se lect Ignore clear the message notification.
Note: If you receive a new message while you are
reading a message, the one you are reading will
be replaced by the new one. The older message is
in the Inbox.
Message I cons
1. If you see the message icon, select Menu >
Messaging > Inbox.
2. Scroll to a message and select View
to open it.
View a Text Message
The options available when viewing a text message
may vary. Check with your service provid er.
1. Select Menu > Messaging > Inbox.
2. Select a message to view. If the message is
long, scroll down to view entire message.
3. Select Reply to create a response message or
Options and one of the following.
– Erase deletes the message.
–Forward forwards the message.
– Reply with Copy replies to the message
with a copy of the original attached.
– Save Message saves the message to the
Saved Messages folder.
46 Text Messages
Page 47

– Save as QuickText saves the message
text as QuickText, which can be
inserted into other messages.
Graphics are not saved.
– Sender displays the sender information.
– Lock Msg / Unlock Msg protects the
message from being accidentally deleted.
Note: If a graphic is too large or incorrectly
formatted and is not received with the message,
an icon appears.
Multimedia Messages
You can only send multimedia messages to
phones that are capable of receiving them or to
email addresses. Multimedia messages have a
predetermined character and file size limit. When
you reach the character and file size limit for a
single multimedia message, you must edit the
message to meet the size limitation.
Note: Multimedia messaging is not available on
all phones. Check with your service provider.
Create a Multimedia Message
1. Select Menu > Messaging > New Pic Msg.
2. Enter a recipient’s phone number or
email address:
– Select Options > Recent List,
Recent Calls, Contacts, or
Message Groups to access your
stored contacts.
– Se lect Options > Send to Online Album
to send a file to a Web location.
– Enter a new address manually. Scroll
down to move to the next field when
done. Repeat the procedure for the CC
and BCC fields. You can message up to
ten recipients at once. Use comma or
spaces to separate addresses. If you
select stored contacts, this is done
automa tica lly.
3. Enter a subject. Scroll down to move to the
next field when done.
4. Enter a message. Scroll down to move to the
next field when done.
5. Attach an image file:
– Se lect Options > Take a Picture to take
a photo and attach it.
– Se lect Options > Media Gallery to
attach an existing file.
Scroll down to move to the next field
when done.
6. Attach a sound file:
– Se lect Options > Record Sound to
record a sound and attach it.
– Se lect Options > Media Gallery to
attach an existing file.
7. Select Send.
User Guide 47
Page 48

Use Multimedia Message Options
When you create a multimedia message, you have
several options to help you.
1. From the message entry screen, select
Options and one of the following:
– Remove Image removes file from
the message.
– Remove Sound removes file from
the message.
– Add New Slide adds a new slide to
the message.
– Previous Slide edits the previous slide.
– Next Slide edits the next slide.
–Erase Slide erases the current slide.
– Insert Contacts adds a contact to
the message.
– Insert QuickText adds prewritten text to
the message.
– Preview Message plays the message.
– Save as QuickText saves the message
text as QuickText, which can be
inserted into other messages. Graphics
are not saved.
– Save Message saves the message to your
Drafts folder.
– Add Address adds additional recipients
to the message.
– Save Address saves a recipient’s address
to your phone if it is new.
– Msg Settings > Msg Receipt alerts
you when a recipient has received
your message .
– Msg Settings > Set Priority labels the
message as urgent.
– Msg Settings > Send Later schedules a
time to send the message.
– Msg Settings > Slide Interval sets
how fast the message moves from slide
to slide.
2. After setting an option, press the Back key to
return to the message window if necessary.
3. Complete your message.
4. Select Send.
Retrieve a Multimedia Message
There are two modes for receiving a multimedia
message on your phone: Auto retrieve (default)
and Prompt. To control this setting, see “Enable
Auto Retrieve” on page 53.
Auto Retrieve Mo d e
When a message is received, it is automatically
downloaded onto your phone. A notification
appears when a new message has been
downloaded to your phone. Select one of
the following:
•View opens the message.
• Later views the message at another time. It is
stored in the Inbox.
48 Multimedia Messages
Page 49

Note: If a message is received during a call, then
the phone downloads the message approximately
one minute after the last key is pressed.
Prompt Mode
When a multimedia message is received, it is
not automatically downloaded onto your phone.
A notification appears when a new message
is available for download. Select one of
the following:
•View downloads and opens the message.
•Erase deletes the message,
wi thout downloading.
•Later downloads the message to the Inbox.
Note: If a multimedia message is received during
a call, the phone displays a notification after the
call ends.
View a Multimedia Message
When a multimedia message is received, the
message icon appears at the top of your screen.
The message icon flashes if the message is urgent.
All notifications or messages are stored in the
Inbox regardless of your auto receive settings.
1. Select Menu > Messaging > Inbox.
2. Select a message to view. If the message is
long, scroll down to view entire message.
3. Select Reply to create a response message or
Options and one of the following.
– Reply All replies to all recipients of
the message.
– Erase deletes the message.
– Recipients displays the recipients of
the message.
– Mute / Unmute silences the message.
–Forward launches the message creation
screen, allowing you to forward the
message. The original address will not be
shown, nor will the graphic, sound, and
text fields.
– Message Info displays message
information (priority, sender,
subject, time sent and received, and
message size).
–Replay plays the message again from
the beginning.
–Call initiates call to sender of message.
– Save Picture saves the currently viewed
picture embedded in the message.
– Save Sound saves the current sound
embedded in the message.
– Save Address extracts email addresses,
phone numbers, and/or URLs from the
sender information and message body.
– Save as QuickText saves the message
text as QuickText, which can be
inserted into other messages. Graphics
are not saved.
– Save Message saves the message to the
Saved Messages folder.
– Lock Msg / Unlock Msg protects the
message from being accidentally deleted.
User Guide 49
Page 50

If a message contains more than one slide,
the following options are also available:
– Next moves to the next slide.
– Done exits the message.
–Pause / Resume pauses or continues the
message slides.
Voicemail
Configure your Voicemail
Before your phone can receive voicemail
messages, you must set up a password and record
a personal greeting with your service provider.
When you have set up your voicemail, all
unanswered calls to your phone are automatically
transferred to voicemail, even if your phone is in
use or turned off.
1. Press and hold the 1 key.
2. Follow the system prompts to create a
password and record a greeting.
Check your Voicemail
When a voice message is received, your screen
displays a notification along with a voicemail
message icon at the top of your screen. The
symbol flashes if the message is urgent.
• If you see a notification:
a. Select Call, which initiates a call to your
voicemail number.
b. Follow the system prompts to retrieve
the message.
To clear the screen without checking
messages, select
• If you only see the voicemail message icon:
a. Select Menu > Messaging > Voicemail.
b. Follow the system prompts to retrieve
the message.
Note: You can set the phone to beep or vibrate
every five minutes to remind you that you have
voicemail. For more information, see “Set Alerts”
on page 52.
Ignore.
Era se Me ssages
It is a good idea to erase old messages to free up
memory in your phone. You can erase messages
and pages as you send or read them, erase them
one at a time, or erase them all at once.
Erase a Single Message
1. Select Menu > Messaging > Inbox,
Sent Msgs, Outbox, Saved Msgs or Drafts.
2. Scroll to the message you wish to erase.
3. Select Options > Erase.
4. You will see a notification. Select Yes to
erase the message.
Note: You can erase a scheduled message, but
you cannot cancel delivery of the message.
50 Voicemail
Page 51

Erase All Messages
1. Select Menu > Messaging > Erase Msg >
Inbox, Outbox, Sent Msgs, Saved Msgs,
Drafts or All.
To erase messages from all folders,
All.
sel ect
2. You will see a notification. Select Yes to
eras e th e mes sages .
Work with Messages
Here are some tips about messaging with
your phone.
Unable to Send Messages
You may not be able to send or receive messages
if your phone’s memory is nearly full, or if digital
service is not available at the time. To free up
memory, erase old messages. See “Erase
Messages” on page 50.
Appended Messages
If you go over the character limit for a single
message, the phone may automatically append an
empty segment to your message to make space.
Warning: Your service provider will charge you
for each message segment.
When you start a message, the maximum
character limit appears once you are in the
message entry field. This number counts down as
you enter characters, until it reaches 0.
If you continue to enter text after this counter
reaches 0, a message segment may be appended.
When you reach the message size limit, you are
prompted to edit the message or alerted that the
message is being appended.
Note: Not available on all phones. Check with
your service provider.
Incoming Ca lls while Creating
Messages
If you receive a call while receiving a message
you will receive a notification. You can do
the following:
• Se lect Ignore to not answer the call. You will
return to the message screen.
• Press the Send key to answer the call. The
message will be saved to the Drafts folder.
Complete Messages in Drafts Folder
To continue composing a message in the
Drafts folder:
• Se lect Menu > Messaging > Drafts.
• Select the message your wish to complete.
• Se lect Edit.
• Complete your message.
• Se lect Send.
User Guide 51
Page 52

View Sent Messages
To view messages in the Sent Messages folder:
Menu > Messaging > Sent Msgs.
Sel ect
Your list of saved messages will appear with the
following symbols.
The scheduled message will be sent at the
scheduled time. You cannot cancel delive ry
of the message.
The message was sent. You cannot cancel
delivery of the message.
The message has been received.
The message has been sent to more than one
recipient.
View Failed or Pending Messages
Failed or pending messages are stored in your
Outbox. To view messages in the Outbox:
Menu > Messaging > Outbox.
Sel ect
Your list of failed or pending messages will
appear with the following symbols.
The message is pending and will be sent
when possible. You can cancel delivery of
the message.
The message cannot be sent because
service is not available. An alert appears
on your phone if the message cannot be
sent.
Message Settings
Messaging settings configure your phone for
voice, text, multimedia messages.
Set A le rts
Choose how you want be alerted of messages,
pages, and voicemail.
1. Select Menu > Messaging >
Msg Settings > Alerts > Msg Alert,
Page Alert, or Voice Alert.
2. Select an alert.
If you select an alert with an & Remind, the phone
notifies you once when a new message is received
and then notify you again every five minutes. To
stop a reminder alert, select
Set Message List View
You can s et how your phone displays your
message list.
Menu > Messaging > Msg Settings >
Select
Msg List View and one of the following:
• Msg Preview displays first part of message.
• Sender displays who sent the message.
• Sender & Preview displays sender and first
part of message.
• Sender & Date/Time displays sender and
when message was sent.
Ignore.
52 Message Settings
Page 53

Set Signature
The signature you create is included at the end of
all outgoing messages and is counted as
characters in your messages; however, it does not
appear in the message creation screen.
1. Select Menu > Messaging >
Msg Settings > Signature.
2. Enter your signature in the text field.
3. Select OK to save the signature.
Note: The characters in the signature
are included in the total character count of
the message.
Edit QuickT ext
Your phone comes with prewritten (QuickText)
messages, such as “Please call me,” which you
can insert into the body of a text message. You
can edit these messages or create new ones. Your
phone stores up to 40 QuickText messages, with
up to 100 characters per message.
1. Select Menu > Messaging >
Msg Settings > Edit QuickText and do
one of the following:
– Scroll to a QuickText message and
Edit.
select
– Select New Msg to create a new
QuickText message.
2. Enter or edit the text.
3. Select Save.
Note: You can also save a message you have
written or received as QuickText.
Enable Auto Retrieve
To set your phone to auto retrieve
multimedia messages.
Menu > Messaging > Msg Settings >
Select
Auto Retrieve and one of the following:
•Disabled turns off auto retrieve. You will be
prompted before any multimedia messages
are download.
• Enabled turns on auto retrieve.
Enable CC/BC C Fields
To show or hide the CC and BCC fields when you
compose a multimedia message.
Menu > Messaging > Msg Settings >
Select
CC and BCC and one of the following.
•Disabled hides the CC and BCC fields.
• Enabled shows the CC and BCC fields.
Set Callback Number
Set a callback number to let recipients know a
number where they can call you back.
1. Select Menu > Messaging >
Msg Settings > Callback Number.
2. Enter number in the text field.
3. Select OK to save the number.
User Guide 53
Page 54

Enable Save to Sent
You can save your outgoing messages.
Menu > Messaging > Msg Settings >
Sel ect
Save to Sent and one of the following:
•Disabled does not save outgoing messages.
•Prompt allows you to choose whether or not
to save your message when you send it.
• Enabled saves all outgoing messages to the
Sent folder.
Enable Auto-Erase
You can set your phone to erase message
automatically when memory is needed for
incoming messages.
Menu > Messaging > Msg Settings >
Sel ect
Auto-Erase and one of the following:
•Disabled erases no messages.
• Inbox Msgs erases old messages in your
Inbox when memory is needed.
•Sent Msgs erases old messages in your Sent
folder when memory is needed.
• Both erases old messages in both your Inbox
and Sent folders when memory is needed.
Set D e fa u lt Tex t
You can change the default text entry mode when
creating a text message. This setting applies only
to the message body screen, not the “To” screen.
Menu > Messaging > Msg Settings >
Select
Defa ult Text and one of the following:
• Normal Alpha enter text in letter by letter.
• Rapid Mode enter text with word recognition.
Request Message Receipts
Request a notification when a recipient has
received a text or multimedia message.
Menu > Messaging > Msg Settings >
Select
Text Msg Receipt or Pic Msg Receipt and one of
the following:
• Don’t Request to not request a notification.
• Request to request a notification.
Note: To receive a message receipt, you must save
outgoing messages to the Sent folder.
Set Voicemail Number
Set the number your phone calls to
retrieve voicemail. Often your voicemail
number is automatically programmed by
your service provider.
1. Select Menu > Messaging >
Msg Settings > Voicemail Number.
2. Select Edit.
54 Message Settings
Page 55

3. Enter number in the text field. Use
Options > Time Pause or Hard Pause
to enter pauses.
4. Select Save.
Erase Recent List
Clears recent list of message recipients from
your phone. Select
Msg Settings > Erase Recent List > Ye s.
Menu > Messaging >
Request Message Read Rece ipts
Request a notification when a recipient has
received and read a text or multimedia message.
Menu > Messaging > Msg Settings >
Sel ect
Text Msg Read Receipt or Pic Msg Read Receipt
and one of the following:
• Don’t Request to not request a notification.
• Request to request a notification.
Note: To receive a message receipt, you must save
outgoing messages to the Sent folder.
Mess ag e Groups
You can create groups for messaging.
Create a Group
1. Select Menu > Messaging >
Message Groups.
2. Select New.
3. Enter a name for the group, then select Next.
4. Select contacts from the list provided. A
check mark appears next to each
User Guide 55
selection you make. You can also
remove checkmarks.
5. When you have chosen your contacts,
Done.
select
Use a Group
1. Select Menu > Messaging >
Message Groups.
2. At the groups list, scroll to a group.
3. Select Options and one of the following:
–View displays the group details.
– Edit adds or removes group members.
– Erase deletes the group.
– Send Text Msg sends a text message.
– Send Pict Msg sends a
multimedia message.
– Send as vCard sends the group as
a vCard.
Customize a Group
1. Select Menu > Messaging >
Message Groups.
2. At the groups list, select a group.
3. Select Options and one of the following:
– Ringer assigns a ringer to the group.
– Msg Tone assigns a message tone to
the group.
–Picture assigns a picture to the group.
– Erase deletes the group.
– Edit adds or removes group members.
Page 56

10 Settings
Settings Menu
The contents of the settings menu are as follows:
Bluetooth
On/Of f
My Devices
Settings
Sounds
Ringers
Ringer Mode
Volume
Flip Sounds
Pwr On /Off Sou nd
Key pad
Display
Set Wallpaper
Wallpaper Shuffle
Set Screensaver
Themes
Main Menu View
My Banner
Backlighting
LightPipe Behavior
Bri ght ness
Language
Time/Date Format
External Display
Convenience
Airplane Mode
Auto-Hyphen
1-Touch Dialing
Hold Call
Fast Find
Frequent List
Minute Alert
Missed Call Alert
Open to Answe r
Any Key Answer
Vibrate on End Call
Voice Features
Automatic Add
Ex pert Mode
Display Results
Digit Lengths
Voice Answer
Voice Wake- up
Voice Training
Accessories
Headset Sounds
Auto-A nswer
TTY De vice
T-coil Hearing Aid
Network
Privacy Alert
Voice Privacy
Roam/Svc Alert
Roam Option
Set Phone Line
Locatio n
Roam Call Alert
Security
Lock Phone
Limit Calls
ICE Numbers
Erase Contacts
New Lock Code
56 Settings Menu
Page 57

Crea t e a Cus tom Menu
1. From the main screen, scroll up and hold.
2. Select Edit.
3. Select features from the list provided.
A check mark appears next to each
selection you make. You can also
remove ch eck marks.
4. When you have chosen your menu options,
Save.
sel ect
Your new selection appears the next time you
select your custom menu.
Bluetooth
The Bluetooth® wireless technology on your
phone enables wireless connectivity with
accessories such as portable or installed
hands-free car kits, headsets, handsets,
computers, PC cards and adapters, PDAs,
and speakers.
Not available on all phones. For details check with
your service provider.
You must use a Bluetooth device (compatible with
Class 2 Bluetooth wireless technology, version
1.2) in order to use this phone wirelessly.
Bluetooth accessories are noted with a symbol.
User Guide 57
Enable Bluetooth
You must turn on your phone’s Bluetooth feature
to use it with Bluetooth devices.
Menu > Settings > Bluetooth > On/Off
Select
and one of the following:
• On Visible allows other devices to find
your phone.
• On I nvisible hides your phone for all devices
except those listed in your My Devices.
•Off prohibits your phone from being used
with any Bluetooth wireless technology device.
To prolong battery life, it is recommended to
turn Bluetooth off when you are not using it.
When you turn Bluetooth on the first time, you
will be prompted to do a device search. You can
immediately pair with a device.
Bluetooth Pairing
You must first “pair” your phone with the
Bluetooth device to allow your phone to
communicate with it. Refer to the instructions
for setting up Bluetooth (below) in conjunction
with the user guide provided with your
Bluetooth device.
1. Select Menu > Settings > Bluetooth >
On/Off > On Visible or On Invisible.
2. Prepare the Bluetooth device or accessory
for pairing as described in the other device’s
user guide.
3. Select Menu > Settings > Bluetooth >
My Devices > Find New.
Page 58

4. Your phone will search and detect visible
Bluetooth devices in the vicinity.
5. At the device list, highlight a device and
Add.
sel ect
When pairing is initiated from another
Bluetooth device, you will be prompted to
accept or reject the pairing.
6. If necessary, enter the password provided
in the Bluetooth device’s user guide and
OK.
sel ect
Your phone waits for the device’s response. If the
password is accepted the device is added to your
device list.
Use Bluetooth
Before you can use the Bluetooth audio
functions of your phone, you must set your
phone to be ready to communicate with a
device. This is called “connecting.”
Connect to a Device
To connect your phone to an audio
Bluetooth device:
1. Select Menu > Settings > Bluetooth >
My Devices.
2. At the device list, highlight a device and
A notification appears confirming the connection.
You can now use the device with your phone.
sel ect
Connect.
Disconnect from a Device
To disconnect your phone from an audio
Bluetooth device:
1. Select Menu > Settings > Bluetooth >
My Devices.
2. At the device list, highlight a connected
device and select
Disconnect.
Bluetooth Device Options
You can change or review the information about
each device you paired with your phone.
1. Select Menu > Settings > Bluetooth >
My Devices.
2. At the device list, highlight a device, select
Options and one of the following:
–Rename renames the device.
– Delete removes the device from
your phone if you are no longer
going to use it.
– Services displays description of the
device (such as Headset, Handsfree,
Object Push, and Serial Port).
Bluetooth Settings
You have settings for how your phone interacts
with Blu etoot h devices. Select
Bluetooth > Settings and one of the following:
•My Name changes the name of your phone to
identify to other devices it is paired with.
• Visible Duration sets the time your phone
remains visible to other devices.
Menu > Settings >
58 Bluetooth
Page 59

• Services shows the list of the Bluetooth
protocol supported by your phone.
• OBEX Authentication enables or disables
OBEX authentication.
Sounds
Your phone has several settings that control the
sound. You can pick from a variety of ringers as
well as control the volume.
Ringers
You can change the ringer for your phone. You
can also assign ringers for different tasks.
Set Ringers
Your phone has multiple ringers you can choose
to use for all incoming calls.
1. Select Menu > Settings > Sounds >
Ringers > Ringer Type.
2. Select a ringer. As you scroll down the list
you will hear the ringers.
Enable Roam Ringer
Your phone can alert you to roaming calls with a
specific ringer. Select
Ringers > Roam Ringer > Enabled.
>
Menu > Settings > Sounds
Enable Ringer Shuffle
You can set your phone use a different ringer
every time you receive a call. Select
Settings > Sounds > Ringers > Ringer Shuffle
Menu >
and one of the following:
• Enable / Disable turns the ringer shuffle
on or off.
• Edit adds or removes ringers from the shuffle.
•View shows the current shuffle list.
Set Ringer Mode
Your phone is set to make sounds when you
receive calls, press keys, navigate through menus,
and receive alerts (such as new messages). You
can silence all sounds and set the phone to vibrate
or light up when you receive calls and alerts.
Menu > Settings > Sounds >
Select
Ringer Mode and one of the following:
• Normal Sounds rings for the incoming
call or alert (in effect, returns phone to
a non-silent mode).
• Vibrate Only vibrates for the duration of the
incoming call or other alerts.
• Vibe then Ring vibrates for the first
10 seconds and then rings for the
remainder of the incoming call alert.
• Lights Only lights up for the duration of the
incoming call or other alerts.
You c an al so p ress and ho ld the
back forth from Vibrate Only mode to Normal
Sounds mode.
# Space key to go
User Guide 59
Page 60

Note: The phone will ring when it is attached to
an external po wer source (such as a charger),
even if all sounds have been silenced.
Volume
Control the volume of your phone’s features.
Set Volume
Control the volume of the phone’s ringer,
speakerphone, earpiece and keypad.
1. Select Menu > Settings > Sounds >
Volum e > Ringer Volume, Spkrphone
Volum e
, Earpiece Volume, or Key Volume.
2. Scroll right to increase the volume or left to
decrease the volume.
3. Press the OK key to save.
Enable Smart Volume
Automatically adjust the volume during a call,
based on surrounding noise levels.
Menu > Settings > Sounds > Volume >
Sel ect
Smart Volume > Enabled.
Set Flip Sounds
Assign specific sounds for when your phone flip
open s or closes.
1. Select Menu > Settings > Sounds >
Flip Sounds > Flip Open or Flip Close.
2. Select a sound. As you scroll down the list
you will hear the soun ds.
Set Power On/Off Sounds
You can set your phone to play a sound when
powering on and off.
1. Select Menu > Settings > Sounds >
Pwr On/Off Sound > Power On Sound
Power Off Sound.
or
2. Select a sound. As you scroll down the list
you will hear the sounds.
Keypad
Control the keypad tones of the phone.
Set Key Press Sounds
Choose the sounds the keys make when pressed.
Menu > Settings > Sounds > Keypad >
Select
Key Sounds > Tone, Click, or Off.
Set Key Tone Length
Control the length of the keypad tones.
Menu > Settings > Sounds > Keypad >
Select
Key Length > Normal or Long.
Enable DTMF Tones
Set your phone to send dual-tone multi-frequency
(DTMF) tones when you press the keypad.
Menu > Settings > Sounds > Keypad >
Select
DTMF Tones > On .
60 Sounds
Page 61

Display
Your phone has several settings that control
the display.
Set Wallpaper
You can select a wallpaper for your phone’s home
screen. Select
Set Wallpaper and one of the following options:
• Camera Pictures selects from taken pictures.
• Saved Images selects from saved images.
• Wallpapers selects from wallpapers.
• None turns off the wallpaper.
Enable Wallpaper Shuffle
You can set your phone to shuffle through your
wallpapers. Select
Wallpaper Shuffle and one of the following:
• Enable / Disable turns the wallpaper
shuffle on or off.
• Edit adds or removes wallpapers from
the shuffle.
•View shows the current shuffle list.
• Set Shuffle Time sets the time interval
for each wallpaper change.
Menu > Settings > Displ ay >
Menu > Settings > Display >
Set Screensaver
Screensavers appear on the home screen during
idle state. A screensaver activates 10 seconds after
the last keypress. Incoming calls and alerts
override the screensavers.
Menu > Settings > Display >
Select
Set Scree nsaver and one of the following options:
• Camera Pictures selects from taken pictures.
• Saved Images selects from saved images.
• Screensavers selects from screensavers.
• None turns off the screensaver.
Set Theme
You can select a color theme for the display
background of your phone.
1. Select Menu > Settings > Displa y >
Themes.
2. Select a color theme. As you scroll down the
list you will preview the themes.
Set Main Me n u V ie w
Display menus in various formats.
Menu > Settings > Display >
Select
Main Menu View and one of the following:
•Grid displays icons of each menu item, with
its name at the top of the screen.
•List displays a list of all menu items.
The next time you select
screen, you see the menu style you selected.
Menu from the home
User Guide 61
Page 62

Set My Banner
The banner is the personal label for your phone.
It appears on the home s creen above the time a nd
date. To change your banner:
1. Select Menu > Settings > Display >
My Banner.
2. Select Edit and press the Back key to clear
the current banner.
3. Enter your new text and select Save.
Set Backlight Durati on
You can set the length of time the backlighting
remains on:
Menu > Settings > Display >
Sel ect
Backlighting and one of the following:
• Always Dim forces the backlight to remain
dim until it turns off.
• 7 Seconds, 10 Seconds, 15 Seconds, or
30 Seconds turns backlighting on for the set
time after your last keypress.
• Always Bright forces the backlight to remain
bright until it turns off.
Set LightPipe Behavior
Controls the behavior of the LED light on the
phone. Select
LightPipe Behavior and one of the following:
• Enable All turns the LED display on.
• Disable All turns the LED display off.
• Disable while Charging turns the LED display
Menu > Settings > Display >
Set Brightness
Change the brightness of the display.
1. Select Menu > Settings > Displa y >
Brightness.
2. Scroll to change the brightness.
3. Press the OK key to save.
Set Language
Your phone can display alternative languages.
Menu > Settings > Display > Language
Select
and a language.
Set Time and Date Format
Your phone can display different time and
date formats.
Menu > Settings > Display >
Select
Time/Date Format and a format.
Set External Display
Controls what information is shown on the
external display.
Menu > Settings > Display >
Select
External Display and one of the following:
• Icons and Time displays information
icons and time.
• Icons Only displays icons only.
•Time Only displays time only.
off while the phone is charging.
62 Display
Page 63

Convenience
Your phone has several settings that may make
your phone more convenient to use.
Enable Airplane Mode
While in an airplane, it is normally required that
you turn off your mobile phone because it emits
RF signals that interfere with air traffic control. In
Airplane mode, however, your phone will not emit
RF signals. You cannot make or receive calls,
send text messages, use the browser, or
Bluetooth, but you can play games, use the
Scheduler, set the clock, and make emergency
calls to designated emergency numbers. Please
check with uniformed personnel before operating
your phone in Airplane mode.
To set your phone to Airplane mode:
Menu > Settings > Convenience >
Sel ect
Airplane Mode > Enabled > OK.
If you turn on Airplane mode, you can also set the
time and date manually.
Set D a te a n d Ti me
While in Airplane Mode, your phone does not
keep time automatically. You can set the time
and date manually.
1. Select Menu > Settings > Convenience >
Set Time/Date.
2. Press the OK key to change the date.
– Scroll left or right to move between
month, day and year fields.
– Scroll up or down to change month, day
and year.
3. Press the OK key to save the date.
4. Press the OK key to change the time.
– Scroll left or right to move between hour,
minute and AM/PM fields.
– Scroll up or down to change hour,
minute and AM/PM.
5. Press the OK key to save the time.
6. Select Done.
Enable Auto-Hyphenation
Auto-hyphenation, when enabled, automatically
inserts hyphens into your phone numbers to be
consistent with the U.S. dialing plan. For example,
1-222-333-4444.
To turn on auto-hyphenation:
Menu > Settings > Convenience >
Select
Auto-Hyphen > Enabled.
Enable 1-Touch Dialing
The 1-Touch Dialing feature is the fastest way
to call a speed dial location. To call a contact
with speed dial, press and hold the speed
dialing location.
If it is a two-digit location, press the first digit
briefly, then press and hold the second digit.
User Guide 63
Page 64

Note: To use 1-Touch dialing, you must enable
1-Touch dialing on your phone and have a speed
dial location assigned to a contact.
To turn on 1-touch dialing:
Menu > Settings > Convenience >
Sel ect
1-Touch Dialing > Enabled.
Hold Call
Enable Hold Call
The Hold Call feature allows you to place
incoming calls on hold until you are ready to
answer them.
Note: The Hold Call feature will not work if the
Open to Answer feature is enabled. See “Enable
Open to Answer” on page 65.
1. Select Menu > Settings > Convenience >
Hold Call > Enabled.
If you have not recorded a hold message, you
will be prompted to record one, such as
“Please hold. I’ll answer in a minute.”
2. Record the message twice, as prompted.
3. Select Save to save the message or Options
and one of the following:
–Play to replay your message.
–Re-Record to record your
message again.
–Exit to exit.
The next time a call comes in, you will have the
option of placing it on hold.
Place a Call on Hold
You can place a call on hold once you have
enabled this feature.
Note: If you are already on a call and you receive
another call, you cannot place the incoming call
on hold. It will go to voicemail.
When a call comes in, do the following:
1. Select Options > Hold Ca ll. The caller will
be placed on hold and will hear your
recorded hold message.
2. Select Answer to speak to the caller on hold
End Call to hang up without speaking.
or
Change Hold Call Message
1. Select Menu > Settings > Convenience >
Hold Call > Re-Record Msg.
2. Record the message twice, as prompted.
3. Select Save to save the message or Options
and one of the following:
–Play to replay your message.
– Re-Record to record your
message again.
–Exit to exit.
64 Convenience
Page 65

Enable Fast Find
With fast find enabled, you can press one or two
keys to view close matches of the number you are
looking for.
1. From the home screen, press the keys
corresponding to the letters of the name you
want to find. A matching contact or speed
dial entry appears.
2. Scroll to the contact you want and press the
Send key to call the number.
To enable fast find:
Menu > Settings > Convenience >
Sel ect
Fast Find > Enabled.
Enable Frequent List
The last 15 of your most frequently called
contacts appear at the beginning of your
contacts directory, when the frequent list is
enabled. Scroll past the double line to view
the entire contacts directory.
To enable frequent list:
Menu > Settings > Convenience >
Sel ect
Frequent List > Enabled.
Enable Minute Alert
Your phone can alert you with a short beep ten
seconds before each minute passes during a call.
Menu > Settings > Convenience >
Sel ect
Minute Alert > Enabled.
Set Missed Call Alert
Choose your alert for missed calls.
1. Select Menu > Settings > Convenience >
Missed Call Alert.
2. Select an alert.
If you select an alert with an & Remind, the phone
notifies you once when a new message is received
and then notify you again every five minutes. To
stop a reminder alert, select
Ignore.
Enable Open to Answer
Open to answer allows you to answer a call by
opening the phone.
Menu > Settings > Convenience >
Select
Open to Answer > Enabled.
Enable Any Key Answer
Set your phone to answer a call when press
any key. Select
Convenience > Any Key Answer > Enabled.
Menu > Settings >
Enable Vibrate on End Call
Set your phone to vibrate when you end a phone
call. Select
Vibrate on End Call > Enabled.
Menu > Settings > Convenience >
Voice Fe atures
Following features allow you to customize the
voice commands.
User Guide 65
Page 66

Enable Automatic Add
You can set the phone to automatically add a
contact to your voice dial list when you create a
new contact. Select
Features > Automatic Add > Enabled.
Menu > Settings > Voi ce
Set Expert Mode
When expert mode is used, instead of speaking a
command following the initial voice prompts, you
can speak the command after you hear a tone.
Menu > Settings > Voice Features >
Sel ect
Expert Mode and one of the following:
• Normal sets phone to default voice prompts.
•Expert sets phone to sound tones instead of
voice prompts.
Set Display Results
You can set the phone to display up to three
recognition contacts when calling or searching
for a contact with voice commands. Select
Menu > Settings > Voice Features >
Display Results > Single Best or Three Best.
Set Digit Lengths
You can set the number of digits used for a phone
number in your voice dial list. Select
Settings > Voice Features > Digit Lengths and
one of the following:
• North American allows 7, 10, and
Menu >
Voice Answer
Enable Voice Answer
You can set your phone to answer a call with your
voice when using a headset.
1. Disable t he Au to-An swer f eature, se e “Ena ble
Auto-Answer” on page 67.
2. Set the phone to normal sounds, see “Set
Ringer Mode” on page 59.
3. Set the phone to play sound from
the headset, see “Set Headset Sounds” on
page 67.
4. Select Menu > Settings > Voice Features >
Voice Answer > With Accessory.
Use Voice Answer
When you receive an incoming call, the phone
prompts you with a voice recording. If the caller
is recognized as a contact entry in your phone,
then the phone prompts “Incoming call from
(Name), answer?” Do one of the following:
• Say “Yes” or press any except the End key to
answer the call.
• Say “No” or press the End key to ignore
the call.
• Remain silent. The voice alert repeats twice
and the phone rings once, then returns to the
home screen.
1 + 10 digits in a phone number.
• Permit All allows 4-14 digits in a
phone number.
66 Voice Featur es
Page 67

Voice Wake-up
Enable Voice W ake-up
You can set your phone to make a call using
a headset.
1. Set the phone to play sound from
the headset, see “Set Headset Sounds” on
page 67.
2. Select Menu > Settings > Voice Features >
Voice Wake-up > With Accessory.
Use Voice Wake-up
To wake up the phone:
1. Say “Wake Up” and listen for a tone.
2. Say “Wake Up” again until you hear
two tones.
If the phone does not recognize your Wake Up
command, see “Use Voice Training” on page 67.
Use Voice Training
If your phone is having trouble recognizing
your voice, you can train by speaking
numb er commands.
1. Select Menu > Settings > Voice Features >
Voice Training.
2. Read the message and select OK.
3. Select Train Numbers.
4. Read the message and select OK.
5. Follow the prompts displayed on the
screen. Speak each number until training
is complete.
To untrain your phone select
Voice Features > Voice Training > OK >
Untrain Numbers.
Menu > Sett ings >
Accessories
This section describes settings that affect
accessories you use with your phone.
Set Headset Sounds
When a headset is attached to your phone, the
ringer can be played through the headset or
phone speaker.
Menu > Settings > Accessories >
Select
Headset Sounds and one of the following:
• Out of phone rings from the phone speaker.
• Out of headset rings from the headset.
Enable Auto-Answer
When a headset is attached to your phone, the
phone can be set to answer automatically.
Menu > Settings > Accessories >
Select
Auto-Answer > After 5 Seconds. The phone will
automatically answer after 5 seconds.
User Guide 67
Page 68

Enable TTY
You can connect the phone to a teletype (TTY)
device for the hearing impaired.
Note: Enab le TTY only when u sing the ph one wi th
a TTY device.
1. Connect the TTY device to your phone.
2. Select Menu > Settings > Accessories >
TTY Device.
3. At the notification, select OK.
4. Select one of the following options:.
– TTY Off to disable TTY.
– TTY On to enable for TTY devices.
– TTY On + Talk to enable for TTY devices
and voice carry over.
– TTY On + Hear to enable for TTY
devices and hearing carry over.
Note: You can also enable TTY when you enter
##889 with your keypad and select TTY.
Enable Hearing Aid
You can use your ph one with a T-coil hearing
aid device.
Note: Enable hearing aid feature only when using
the phone with a T-coil hearing aid device.
1. Connect the T-coil hearing aid device to
your phone.
2. Select Menu > Settings > Accessories >
T-coil Hearing Aid.
3. At the notification, select OK.
4. Select Enabled.
Network
Your phone has several settings for how your
phone connects to a network.
Enable Privacy Alert
Set your phone to alert you when enhanced digital
CDMA privacy is lost or regained. Select
Settings > Network > Privacy Alert > Enabled.
Enable Voice Privacy
Set your phone to use enhanced digital CDMA
privacy. Select
Voice Privacy > Enhanced.
Menu > Settings > Network >
Enable Roaming Service Alert
Use this setting if you want the phone to alert you
when you roam outside of your home service
area. Select
Roam/Svc Alert and one of the following:
•Disabled turns roaming service alert off.
• When no svc alerts you with three tones
• On roam change alerts you with two
Menu > Settings > Network >
decreasing in pitch when service is lost and
three tones increasing in pitch when service is
acq uired agai n.
decreasing tones when roaming service is
acquired and three increasing tones when
home area service is acquired again.
Menu >
68 Network
Page 69

• On any change alerts you with three
increasing tones if there is a change in
roaming service or three decreasing tones if
the phone loses service.
Set Roaming Restrictions
You can restrict your phone from making a call
when roaming.
Menu > Settings > Network >
Sel ect
Roam Option and one of the following:
• Automatic allows roaming.
• No Roaming does not allows roaming.
Set Phone Line
Your phone can have two service accounts, or
phone lines, associated with it. Each phone line
has its o wn phone number.
Note: You must first establish a second phone
line with your service provider. Once established,
a second phone number becomes available in the
menu for selection.
Menu > Settings > Network >
Sel ect
Set Phone Line and a phone line.
When you are using one line, you cannot receive
calls from the other. It would be as if the phone
were “off” for that number. Your voicemail,
however, will still take messages. All contacts and
settings are shared for both lines.
Set Location Information
This setting allows you to share your location
information with network services other than
emergency services (for example, 911, 111, 999
and 000) in markets where service has been
implemented. This feature works only when your
phone is in digital mode. You do have the option
of turning off the locator to emergency services.
Menu > Settings > Network > Location
Select
and one of the following:
• 911 Only (default) shares your position
information only with emergency services
when you call your 3-digit emergency code.
• Location On shares your position
information, in addition to
emergency services.
Ena ble R o a min g C a ll Ale rt
You can set the phone to warn you before you
answer or place a call while roaming.
Note: Call prompt is disabled when the phone is
in Emergency Mode.
Menu > Settings > Network >
Select
Roam Call Alert > Call Prompt.
The phone emits a distinctive ring to indicate
when you are roaming during a call. To accept or
place a call while roaming, you must press
1.
User Guide 69
Page 70

Security
This section describes all the features involved in
securing your phone and preventing access to
personal information. All security features are
shielded by a four-digit lock code.
Lock Phone
Set Lock Phone
When your phone is locked, you can call only
emergency numbers or your service provider’s
customer service number. You can still receive
incoming calls.
1. Select Menu > Settings > Security.
2. Enter your four-digit lock code.
3. Select Lock Phone.
4. Select OK to clear notification.
5. Select one of the following:
– Never leaves the phone always unlocked.
– On power up locks the phone every time
you turn it on.
–Now locks the phone immediately.
Unlock Phone
Do the following to unlock the phone:
• From the home screen, select Yes.
• Enter your four-digit lock code.
Set Limit Calls
You can limit the calls that can be m ade from your
phone to emergency numbers, your contacts, and
your service provider’s numbers.
1. Select Menu > Settings > Security.
2. Enter your four-digit lock code.
3. Select Limit Calls and one of the following:
– No Limit does not limit calls.
– Limit Outgoing limits outgoing calls.
Incoming calls can be answered.
– Limit All limits both incoming and
outgoing calls.
Assign ICE Numbers
The ICE (in case of emergency) numbers
feature allows you to specify three personal
phone numbers that can be called when the
phone is locked.
1. Select Menu > Settings > Security.
2. Enter your four-digit lock code.
3. Select ICE Numbers.
4. Select an Unassigned slot.
5. Enter the number and select Done.
You can view these numbers only when they’re
being entered for the first time.
To make a call to an ICE number from a locked
phone, you must dial the number (including area
code) exactly as it was stored in ICE numbers.
70 Security
Page 71

Erase All Contacts
You can erase all entries from your
Contacts directory.
1. Select Menu > Settings > Security.
2. Enter your four-digit lock code.
3. Select Erase Contacts and one of
the fo llo wing.
–No exits without erasing contacts.
–Yes erases all contacts. A confirmation
prompt appears to verify your decision.
4. Select Yes to confirm.
Change Lock Code
Change your lock code from the default provided
by the service provider. The lock code is typically
0000 or the last 4 digits of your phone number.
1. Select Menu > Settings > Security.
2. Enter your four-digit lock code.
3. Select New Lock Code and one of
the fo llo wing.
4. A confirmation prompt appears. Select Yes.
5. Enter a new four-digit code.
6. Re-enter your new lock code. The lock code
is now changed.
User Guide 71
Page 72

11 Recent Calls
Call Lists
Details on the calls you made, received, or missed
are stored in the recent call lists and are identified
by the following icons:
– Send Picture Msg sends a multimedia
message to the number.
– Erase Record deletes the call from the
call list
Note: If the phone number is classified as
Outgoing call
“secret,” you must enter your four-digit lock code
to view or edit it.
Incoming call
Missed call (flashing)
Deal with a Missed Call
When you have missed a call, “Missed Call”
appears on your screen. You can do one of
the following:
View Call Lists
1. Select Menu > Recent Calls an d one of
the fo llo wing:
–All to view all calls made or received.
– Incoming to view calls received.
– Outgoing to view calls made.
–Missed to view calls received, but
not answered.
–Data to view data calls.
2. Highlight a recent call.
3. Press the Send key to call the number or
Options and one of the following.
sel ect
– Save creates a new contact.
–View displays the contact details.
– Send Text Msg sends a text message to
• To clear the screen, select OK.
• To view the call details, select Calls and press
OK key.
the
• To return the call, select Calls and press the
Send key.
You can set an alert to beep every five minutes
after you have missed a call. See “Set Missed Call
Alert” on page 65.
Erase Call Lists
You can erase your phone’s call lists.
1. Select Menu > Recent Calls >
Erase Call List > All, Incoming, Outgoing,
Missed, or Data Call.
2. Select Yes.
the number.
72 Call Lists
Page 73

View Call Timers
Sel ect Menu > Recent Calls > Call Timer and
one of the following:
• All Calls tracks all calls you have made and
received. This timer cannot be reset.
• Recent tracks all calls you have made and
received since you last reset this timer. To
reset this timer to zero, select
• Home tracks all calls you have made and
received in your home network since you last
reset this timer. To reset this timer to zero,
Reset.
select
• Roam tracks all roaming calls you have made
and received since you last reset this timer. To
reset this timer to zero, select
• Incoming tracks all incoming calls you have
received since you last reset this timer. To
reset this timer to zero, select
• Outgoing tracks all outgoing calls you have
made since you last reset this timer. To reset
this timer to zero, select
Your phone can alert with a short beep ten
seconds before each minute passes during a call.
For more information, see “Enable Minute Alert”
on page 65.
Reset.
Reset.
Reset.
Reset.
Vie w Data Counter
Your phone tracks the kilobytes you have received
and sent during data calls.
Menu > Recent Calls > Kilobyte Counter
Select
to view your data call information. To reset this
counter to zero, select
You cannot redial a data call from this list.
Options > Reset.
User Guide 73
Page 74

12 Phone Info
You can access information regarding your
phone. Select
the following:
• Build Info shows specific software and
hardware information.
• Icon Key shows the icons used by
your phone.
• User Guide accesses the user guide.
Menu > Phone Info and one of
74 View Data Counter
Page 75

13 Voice Commands
Voice commands allow you to call a contact, dial
a phone number, access menus, or find contact
information from your voice dial list.
Note: You cannot use voice recognition to end
a call; you must press the
is open.
End key when the flip
Add Co ntact s
To call or find a contact using voice dial you
must add the contact to your voice dial list. The
contact name must not have more than three
words or components in a contact name for
voice dialing recognition.
To add a contact to your voice dial list:
1. Select Menu > Contacts > Voice Dial List.
2. At the contact list, highlight a contact
and press the
appears next to a name when voice dialing
is active. Check each name you wish use
with voice dialing.
3. Select Save.
OK key. A check mark
Remov e Cont acts
To remove a contact from your voice dial list:
1. Select Menu > Contacts > Voice Dial List.
2. At the contact list, highlight a check marked
contact and press the
mark appears next to a name when voice
dialing is inactive. Uncheck each name you
wish remove from voice dialing.
3. Select Save.
OK key. No check
Start Voice Commands
1. From the home screen, press and hold the
Send key to initiate voice commands. The
phone prompts, “Say a command”.
2. Say one of the following commands and
following the voice prompts.
– “Contact <name>” sends call to a
contact on your voice dial list.
– “Dial Number <number>” sends call by
speaking the digits of the phone number.
– “<shortcut name>” sends you to a
menu i tem.
– “Find Contact” allows you to find a
contact from your voice dial list.
User Guide 75
Page 76

Call a Contact
1. If you haven’t already done so, add the
person you wish to call to the Voice Dial List.
See “Add Contacts” on page 75.
2. From the home screen, press and hold
Send key. The phone prompts, “Say
the
a comm and”.
3. Say “Contact” and then name of the person
you want to call.
The phone prompts, “Please repeat” or “Say
a name” if it does not recognize the name. If
the name y ou sp oke ma tches a conta ct in the
Voice Dial List, the phone prompts: “Name,
correct?” Say “Yes” to make the call, “No” to
select a similar name, or “Cancel” to cancel
the phone call.
If the phone finds multiple voice tags that
sound like the name you said, the phone will
list the names, you will be asked to verify
which name you want to call. Say “Yes” when
you hear the correct name. Say “No” when
you hear an incorrect name.
4. Press the End key to end the call.
Call a Number
1. From the home screen, press and hold
Send key. The phone prompts, “Say
the
a command”.
2. Say “Dial Number” and then speak the digits
of the number you want to call. If you pause,
the phone prompts you, “Did you say
<number>” or “Sa y a nu mber” if it does not
recognize the name. Say “Yes” to make the
call, “No” to cancel the phone call.
3. Press the End key to end the call.
Use Shortcuts
1. From the home screen, press and hold
Send key. The phone prompts, “Say
the
a command”.
2. Say the name of the menu item you want to
access or say “Shortcuts” to view a list of
menu items. The phone prompts, “Say one of
the shortcuts”.
3. Say the name of the menu item you want
to access.
Find Contacts
You can use voice commands to find contacts
listed in your voice dial list.
1. From the home screen, press and hold
Send key. The phone prompts, “Say
the
a command”.
76 Call a Contact
Page 77

2. Say “Find Contacts”. The phone prompts,
“Say a name”.
The phone prompts, “Please repeat” or “Say a
name” if it does not recognize the name. If the
name you spoke matches a contact in the Voice
Dial List, the phone prompts: “Name, correct?”
Say “Yes” to display the contact, “No” to select a
similar name, or “Cancel” to cancel the search.
Voice Command Settings
You can control settings for your phone’s voice
recognition feature. For more information, see:
• “Enable Automatic Add” on page 66
• “Set Expert Mode” on page 66
• “Set Display Results” on page 66
• “Set Digit Lengths” on page 66
• “Use Voice Training” on page 67
User Guide 77
Page 78

14 Get Help
User Guide
You have a user guide located on your phone.
To access this user guide, select
Phone Info > User Guide.
The user guide for your phone is also located on
the web at
www.kyocera-wireless.com/support.
Menu >
Customer Support
Your service provider’s customer support
department may be accessible directly from your
phone when you dial a number, such as *611
(check with your service provider). They can
answer questions about your phone, phone bill,
call coverage area, and specific features available
to you, such as call forwarding or voicemail. For
questions about the phone features, refer to the
materials provided with your phone, or visit
www.kyocera-wireless.com.
For additional questions, you may contact the
Kyocera Wireless Corp. Customer Care Center in
any of the following ways:
• Web site: www.kyocera-wireless.com.
• Email: phone-help@kyocera-wireless.com.
• Phone: 1-800-349-4478 (U.S. and Canada) or
1-858-882-1401.
• Customer support phone numbers are also
available in the following countries:
– India: 1-600-121214 or 0124-284-5000
– Puerto Rico: 1-866-664-6443
Before requesting support, please try to
reproduce and isolate the problem. When you
contact the Customer Care Center, be ready to
provide the following information:
• The name of your service provider.
• The actual error message or problem you
are experiencing.
• The steps you took to reproduce the problem.
• The phone’s mobile equipment
identifier (MEID).
Note: To locate the MEID select
Phone Info > Build Info and scroll down to
MEID for the 18-digit number. If your phone uses
an electronic service number (ESN), then
MEID.
replaces
Menu >
ESN
Qualified Service
If the problem with your phone persists, return
the phone with all accessories and packaging to
the dealer for qualified service.
78 User Guide
Page 79

Phon e Access or i es
To shop for phone accessories, visit
www.kyocera-wireless.com/store. Yo u may
also call us at 800-349-4188 (U.S.A. only)
or 858-882-1410.
Become a Product Evaluator
To participate in the testing and evaluation
of Kyocera Wireless Corp. products,
including cellular or PCS phones, visit
beta.kyocera-wireless.com.
User Guide 79
Page 80

Index
Numerics
1-touch dialing, 63
A
accessories
headsets
, 67
phone, 79
settings, 67
T-coil hearing a id, 68
TTY device, 68
activating Bluetooth, 57
adding
Bluetooth devices
codes, 24
contacts, 23
extensions, 24
voice dial list, 66, 75
airplane mode, 63
set date/time, 63
alarm c lock, 34
alerts
LED
, 13
messages, 52
minute, 65
missed calls, 65
pages, 52
privacy, 68
roaming c alls, 69
roaming s ervice, 68
voicemail, 52
answering calls, 17
any key, 65
any key answer, 65
appended message s, 51
applications
, 57
details
, 44
disabling, 44
downloading, 43
opening, 4 4
remov ing, 4 4
auto retrieve, 53
auto- erase, 54
auto-hyphenation, 63
B
backlight duration, 62
banner, 62
battery
charging
, 9
drain, 10
installing, 9
recharging, 9
safety guidelines, 10
Bluetooth, 57
adding devices, 58
connecting, 58
disconnecting, 58
pairing, 57
phone na me, 58
setting s, 58
turning on, 57
BREW, 43
brightness, 62
C
calculator, 35
calendar, see scheduler
call history, See recent calls
call lists
erasing
, 72
viewing , 72
call logs, see recent calls
call timers
, 73
callback number, 53
caller IDs, 40
assigning, 40
browsing, 40
calls
answering
, 17
call lists, 72
emergency, 19
ending, 18
holding, 64
lim iting, 70
making, 17
silencing, 18
vibrate on end, 65
voice commands, 76
camera, 30
brightness, 3 1
color tone, 31
last picture, 31
mo de, 30
mult ishots, 30
picture compression, 31
picture settings, 30
resolut ion, 30
self timer, 30
shutter sound, 31
taking pictures, 30
tim e stamp, 30
white bala nce, 31
capitalization, 21
CDMA privacy, 68
80
Page 81

changing modes, text entry, 21
color themes, 61
color tone, 31
connecting Bluetooth devices, 58
contacts, 23
adding, 23
adding to a group, 25
assign message tone , 24
assign number type, 27
assign picture, 24, 27
assign ringer, 24, 26
calling numbers, 25
customizing, 24
delete all, 29
directory, 23
editing, 23, 24
email a ddresses, 25
erase, 24
erasing, 23, 25, 26, 71
fast find, 65
frequent list, 65
groups, 27
IM addresses, 25
memory, 29
notes, 26
prepend, 25
primary number, 25
searching, 28
secret, 25, 26
send as vCard, 23, 24, 27
sending mulitmedia message, 25
sending text message, 25
speed di al l ist, 25
street a ddresses, 26
viewing all, 23
voice search, 76
web addresses, 26
conveni ence settin gs, 63
conventions, using this guide, 16
countdown timer, 36
custom menu, 57
customer support, 78
customizing contacts, 24
D
data calls, 73
defau lt text mode, c hanging, 54
dialing
1-touch, 63
speed, 18
voice list, 75
directory, con tacts, 23
disconnecting, devices, 58
display
banner, 62
brightness, 62
color themes, 61
language, 62
main menu, 61
screen savers, 61
setting s, 61
time/date format, 62
wallpapers, 61
do wnloading
applications, 43
games, 43
drafts folder, 51
E
earpiece, 17
volume, 60
ed iting contacts, 24
email addresses, 25
emergency
calls, 1 9
numbers, 70
entering
lett ers, 20
numbers, 20
symbols, 21
text, 22
erasing, 39, 40
all contacts, 29
all media files, 42
contacts, 71
mult imedi a mes sages, 50
text messages, 50
evaluation, product, 79
F
fast find, 65
flip
answering calls, 65
sounds, 60
folders
caller I Ds, 40
camera pictures, 31
draft, 51
images, 39
inb ox, 46, 48
outbox, 52
pictures, 38
ringers, 41
screensavers, 40
sent, 52
sounds, 40
voice memos, 41
wallpapers, 39
frequent list, 65
G
gallery, media, 38
User Guide 81
Page 82

games, 32
downloading, 43
groups, 27
assign message tone , 28, 55
assign picture, 28, 55
assign ringer, 28, 55
creating, 27, 55
erase, 28, 55
sending mulitmedia message, 28
sending text message, 28
using, 28, 55
H
headsets
auto ans wer, 67
sounds, 67
voice answer, 66
voice wake-up, 67
help, getting, 78
hold calls, 64
I
icons, 14, 74
multimedi a messages, 49
text message, 46
images
assigni ng, 39
browsing, 39
erasing, 39
lock ing, 39
sending, 39
inb ox, 46, 48
incoming calls , 72
K
keypad
key tone length, 60
sounds, 60
volume, 60
keys
tone length, 60
tones, 60
L
language, 62
lanyard, 11
LED beh avior, 13
LED display, 62
lights only alerts, 59
limiting calls, 70
location information, 69
lock code, 71
locking, 39, 40
phone, 70
text messages, 47
M
main menu, 15
making calls, 17
media files
delete all, 42
media gallery, 38
memopad, 36
memory, 44
menus
custom, 57
main, 15
main view, 61
setting , 56
messages
alerts , 52
appended, 51
auto-erase incoming, 54
callback number, 53
completing, 51
default text mode, 54
fail ed, 52
incoming calls , 51
list view , 52
mult imedi a mes sages, 47
pending, 52
quicktext, 53
saved, 54
sent, 52
settings, 52
signature, 53
text messages, 45
unable to send, 51
minute alerts, 65
missed calls, 72
alerts, 65
deal wi th, 72
modes
airplane, 63
expe rt, v oice, 66
ringers, 59
text entry, 20
mult imedia messages
aut o retr ieve, 48, 53
CC/BCC fields , 53
creating, 47
erasing, 50
forwarding, 49
ico n, 49
loc king, 49
notifications, 48
options, 48
previewing, 48
prompts, 49
quicktext, 48
read receipt request, 55
receipt request, 54
recording sounds, 47
82
Page 83

replayi ng, 49
replying, 49
request receipt, 48
retrieving, 48
saving , 49
send later, 48
sender information, 49
set priority, 48
slide interval, 48
slides, 50
taking pictures, 47
viewing , 49
mult iple pictures, 30
N
network
loca tion i nform ation , 69
set phone line, 69
network settings, 68
notes, contacts , 26
notifications
multimedi a messages, 48
text messages, 46
O
open to answer, 65
outbox, 52
outgoing calls, 72
P
page al erts , 52
pairing, 57
phone, 70
answering calls, 17
Bluetooth name, 58
codes, 24
extensions, 24
icon s, 14
making calls, 17
User Guide 83
overvi ew, 12
setting line , 69
turning on and off, 17
phone information, 74
icons, 74
software build, 74
user guide, 74
picture messages, see multimedia
messages
pictures, 38
assigning, 38
browsing, 38
compr ession, 31
erasing, 38
frames , 31
last taken, 31
locking, 38
modifying, 38
sending, 38
slideshow, 38
taking, 30
playback tools, 42
power
on and off sounds, 60
primary number, 25
privacy alerts, 68
prompt mode, 49
Q
quick alarm, 35
quicktext, 53
R
rapid en try, 21
read receipt request
multimedia messages, 55
text messages, 55
receipt request
mult imedi a mes sages
54
text messages, 46, 54
rec ent ca lls, 72
erase all, 55
redial ing, 17
replying
mult imedi a mes sages, 49
text messages, 46
res olution, 30
restrict roaming, 69
ringer shuffle
edit, 59
ringers, 59
assigning, 41
browsing, 41
erasing, 41
loc king, 41
mo de, 59
roam, 59
sending, 41
shuffle, 59, 61
silent mode, 59
type, 59
volume , 60
roaming
call alerts, 69
restrict, 69
service a lerts, 68
S
saved folder, 54
scheduler, 32
creating even ts, 32
modifying events, 34
settings, 34
viewing events, 33
screensavers, 40, 61
, 48,
Page 84

browsing, 40
erasing, 40
lock ing, 40
sending, 40
searching
contacts dire ctory, 28
fast find, 65
frequent list, 65
voice commands, 76
security
emergency numbers, 70
erasing contacts , 71
limiting calls, 70
lock code , 71
locking phone, 70
settings, 70
self timer, 30
sending, 39, 40
sent folder, 52
set priority
multimedi a messages, 48
text message, 46
settings
accessories, 67
alarm cl ock, 34
Bluetooth, 58
camera, 30
convenience, 63
date and t ime, 63
display, 61
messages, 52
network, 68
phone information, 7 4
picture, 30
quick alarm, 35
scheduler, 34
security, 70
84
sounds, 59
voice commands, 65, 77
world clock, 37
settings menu, 56
shutter sound, 31
signature, 53
silent m ode, 59
smart sound, 60
software
bui ld in formation, 74
sounds
assigning, 40
browsing, 40
erasing, 40
flip closed, 60
flip open, 60
keypad, 60
locking, 40
playback tools, 42
power on and off, 60
ringe rs, 59
setting s, 59
silence all, 59
volume, 60
speakerphone, 18
volume, 60
speed
dialing, 18
stopwatch, 36
support, customer, 78
symbols, 21
T
T-coil hearing aid, 68
teletype, 68
text entry, 20
capitalization, 21
changing modes, 21
current mode, 20
default mode, 54
lett ers, 20
numbers, 20
quick reference, 22
rapid entry, 21
text messages
callback number, 46
creating, 45
erasing, 50
forwarding, 46
ico n, 46
loc king, 47
not ification, 46
options, 45
quicktext, 45
replying, 46
request read rece ipt, 55
request receipt, 46, 54
retrieving, 46
saving , 46
send later, 46
sender information, 47
set priority, 46
validity period, 46
viewing , 46
tim e call s, 65
time stamp , 30
timer, 36
tip calculator, 35
tools, 32
alarm c lock, 34
calculator, 35
memopad, 36
scheduler, 32
stopwatch, 36
tim er, 36
Page 85

tip calculator , 35
voice memo, 32
wo rld clo ck, 37
TTY device, 68
U
user gu ide, 74
V
validity period
text message, 46
vibrating ca ll alerts , 59
viewing contacts, 23
voice
answer, 6 6
dial list, 75
privacy, 68
training, 67
wa ke-u p, 67
voice commands, 75
calling contacts, 76
calling numbers, 76
display results, 66
expert mode, 66
find contacts, 76
settings, 65
shortcuts, 76
training, 67
voice dialing
activating, 18
adding contacts, 75
auto mated lists, 66
digit lengths, 66
removing contacts, 75
voice memos, 32
assigni ng, 32, 41
browsing, 41
erasing, 32, 41
locking, 32, 41
playing, 32, 41
recording, 32
sending, 32, 41
voicemail, 50
alerts , 52
number, 54
volume, 60
adjusting, 18
earpiece, 60
keypad, 60
ringe rs, 60
smart sound, 6 0
speakerphone, 60
W
wallpapers, 39, 61
browsing, 39
erasing, 39
locking, 39
sending, 39
web addresses, 26
white ba lance, 31
world clock, 37
searching, 37
User Guide 85
Page 86

Kyocera Wireles s Cor p .
www.kyocera-wireless.com
82-N0246-1EN, Rev. 001
 Loading...