


 Loading...
KM-2810/KM-2820
Quick Guide
About this Guide
This Guide is intended to help you operate the machine correctly, perform routine maintenance and take a simple troubleshooting action as necessary, so that you can always use the machine in good condition.
Keep this guide in the pocket on the right side.
The following work can be done by this machine. To make copies
•Basic Copying
•Combine Mode
•Duplex Mode
•EcoPrint
•Print Override Mode To send documents
•Send as E-mail
•Send to Folder (SMB) To send a FAX
•Using One-touch Keys
•Printing Activity Reports
•Memory Forwarding
•Delayed Transmission
•Broadcast Transmission
•Network FAX To print
•Printing Documents Stored in USB Memory Program function
•Registering Program Functions
•Using Program Functions
Contents |
|
|
1 |
Preparation ......................................................... |
3 |
2 |
Operation ............................................................ |
7 |
3 |
Troubleshooting............................................... |
13 |
4 |
Clearing Paper Jams........................................ |
15 |
5 |
Cleaning............................................................ |
21 |
2
1 Preparation |
|
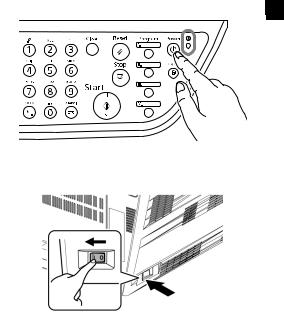
Power On/Off |
|
When the main power indicator is lit... |
|
Press Power. |
1 |
When the main power indicator is off...
Open the main power switch cover and turn the main power switch on.
3

Operation Panel |
|
|||
Left Side |
3 |
|
|
|
1 |
2 |
4 |
5 |
|
6 |
|
|
|
|
|
|
|
|
|
|
|
|
|
|
|
|
|
|
|
|
|
|
|
|
|
|
|
|
|
|
|
|
|
|
|
|
|
|
|
|
|
|
|
7 |
8 |
9 |
10 |
|
|
|
|
||||||||||||||
1.System Menu/Counter Key
2.Document Box Key
3.Copy Key
4.Address Book Key
5.Message Display
6.Send Key
7.FAX Key
8.One-touch Keys
9.Left Select Key
10.Right Select Key
Right Side
11 12
13 |
14 |
15 |
16 |
17 |
18 |
19 |
11.Arrow Key
12.Function Menu Key
13.Numeric Keys
14.Clear Key
15.Stop Key
16.Program Keys
17.Power Key
18.OK Key
19.Start Key
4
Message Display
The following examples explain the messages and icons used on the message display.
Copier Screen
|
|
|
|
|
|
|
|
|
|
|
|
|
|
|
|
|
|
|
1 |
|
|
|
|
|
|
|
|
|
|
|
|
|
|
|
|
|
|
|
|
1 |
|
|
Ready to copy. |
|
|
|
|
|
|
|
|
|
|
|
|||||
|
|
|
|
|
|
|
|
|
|
|
|
|
|
||||||
2 |
|
|
|
|
|
|
|
|
|
|
|
|
|
|
|
|
|
6 |
|
|
|
|
|
|
|
|
|
|
|
|
Copies: |
1 |
|
|
|
||||
3 |
|
|
|
|
|
|
s |
|
|
|
|
|
|
|
|
|
7 |
|
|
|
|
|
|
A4q |
|
VX |
|
A4a |
|
|
|
|
|
||||||
4 |
|
|
|
|
|
|
|
|
|
|
|
|
|
|
|
|
|
|
|
|
|
|
100% |
|
|
|
|
|
|
|
|
|
|
|
|
|
|
||
|
|
|
|
|
|
|
|
|
|
|
|
|
|
|
|
|
|
||
5 |
|
|
|
|
|
|
|
|
|
|
|
|
|
|
|
|
|
|
|
|
[ |
|
Zoom |
|
] |
[ |
|
|
|
|
|
] |
|
|
|
|
|||
|
|
|
|
|
|
|
|
|
|
|
|
|
|||||||
|
|
|
|
|
|
|
|
|
|
|
|
|
|
|
|
|
|
|
|
Send Scrren |
|
|
|
|
|
|
|
|
|
|
|
|
|
||||||
1 |
|
|
|
|
|
|
|
|
|
|
|
|
|
|
|
||||
|
|
|
|
|
|
|
|
|
|
|
|
|
|
|
|||||
|
|
Ready to send. |
|
|
|
|
|
|
|
|
|
|
8 |
|
|||||
|
|
|
|
|
|
|
|
|
|
|
|
|
|||||||
9 |
|
|
|
|
|
|
|
|
|
|
|
Dest.: |
3 |
|
|
|
|||
|
|
|
|
|
|
|
|
|
|
|
|
|
|||||||
|
|
p :qwerty@as01.net |
|
|
|
|
|
|
|
|
|
|
|||||||
4 |
|
|
|
|
|
|
|
|
|
|
|
|
|
|
|
|
|
|
|
|
|
|
|
A4 |
|
|
|
|
|
Off |
|
|
|
|
|
||||
|
|
|
|
|
|
|
|
|
|
|
|
|
|
||||||
5 |
|
|
|
|
|
|
|
|
|
|
|
|
|
|
|
|
|
|
|
|
|
[ SendSize |
] |
[ |
|
Subject |
] |
|
|
|
|
||||||||
|
|
|
|
|
|
|
|||||||||||||
|
|
|
|
|
|
|
|
|
|
|
|
|
|
|
|
|
|
|
|
|
|
|
|
|
|
|
|
|
|
|
|
|
|
|
|
|
|
|
|
Number |
Meaning |
|
|
|
|
|
|
|
|
|
|
|
|
|
|||||
|
|
|
|
|
|
|
|
|
|
|
|
|
|
|
|
|
|||
1 |
|
|
|
Indicates the current status of the machine. |
|
||||||||||||||
|
|
|
|
Also displays the title of the current menu |
|
|
|||||||||||||
|
|
|
|
whenever the operation panel is being used. |
|
||||||||||||||
|
|
|
|
|
|
|
|
|
|
|
|
|
|
|
|
|
|||
2 |
|
|
|
Displays an icon that indicates the currently |
|
||||||||||||||
|
|
|
|
selected source of paper feed. |
|
|
|
|
|
||||||||||
|
|
|
|
|
|
|
|
|
|
|
|
|
|
|
|
|
|
|
|
3 |
|
|
|
Displays the size of the original(s). |
|
|
|
|
|
||||||||||
|
|
|
|
|
|
|
|
|
|
|
|
|
|
|
|
|
|||
4 |
|
|
|
Displays the current setting when there is a |
|
||||||||||||||
|
|
|
|
corresponding menu that can be selected |
|
|
|||||||||||||
|
|
|
|
using the left or right Select keys. |
|
|
|
|
|
||||||||||
|
|
|
|
|
|
|
|
|
|
|
|
|
|
|
|
|
|||
5 |
|
|
|
Displays the title of the corresponding menu |
|
||||||||||||||
|
|
|
|
that can be selected using the [Left Select] |
|
||||||||||||||
|
|
|
|
or [Right Select]. |
|
|
|
|
|
|
|
|
|
||||||
6 |
|
|
|
Displays the number of copies. |
|
|
|
|
|
||||||||||
|
|
|
|
|
|
|
|
|
|
|
|
|
|
|
|
|
|
||
7 |
|
|
|
Displays the paper size to be copied. |
|
|
|||||||||||||
|
|
|
|
|
|
|
|
|
|
|
|
|
|
|
|
|
|
||
8 |
|
|
|
Displays the number of destinations. |
|
|
|||||||||||||
|
|
|
|
|
|
|
|
|
|
|
|
|
|
|
|
|
|
|
|
9 |
|
|
|
Displays the destination. |
|
|
|
|
|
||||||||||
|
|
|
|
|
|
|
|
|
|
|
|
|
|
|
|
|
|
|
|
5

Accessing Menu Items
When you configure the machine, you do so by accessing a menu item and making your setting from there. An example of a route map and its significance is shown below.
1. |
Press [Copy]. The basic screen appears. |
|||||
|
|
|
|
|
||
|
Ready to copy. |
|
Copies: 1 |
|
||
|
|
A4q |
|
|
|
|
|
|
s |
VX |
A4a |
|
|
|
[ |
100% |
] |
[ |
] |
|
|
Zoom |
|
||||
2. |
Press [Function Menu]. The Function Menu |
|||||
|
|
screen appears. |
|
|
|
|
3. |
Press the up (U) or down (V) to select Original |
|||||
|
|
Size. |
|
|
|
|
|
Function Menu: |
|
a b |
|||
4Zoom
5Combine
6Original Size
[ Exit ]
4.Press [OK]. The Original Size screen appears.
5.Press U or V to select the original size.
Original Size: |
|
a b |
|
1 |
*A4q |
|
|
2 |
A5q |
|
|
3 |
A6q |
Exit |
] |
|
[ |
||
6.Press [OK]. The display shows Completed and returns to the basic screen.
6

2 Operation
Copy Functions
Basic Copying
Follow the steps as below for basic copying. 1. Press [Copy].
NOTE: If the panel is turned off, press [Power] and wait for the machine to warm up.
Ready to copy. |
|
Copies: 1 |
|
2 |
||
|
A4q |
|
|
|
|
|
|
s |
VX |
A4a |
|
||
[ |
100% |
] |
[ |
] |
|
|
Zoom |
|
|
||||
2.Place the originals on the platen or in the optional document processor.
3.Use the numeric keys to enter the copy quantity. Specify the desired number up to 999.
4.Press [Start]. Copying begins.
5.Remove the finished copies from the top tray.
Combine Mode
This mode allows you to copy 2 or 4 originals combined onto a single page.
1.Press [Copy].
2.Place the originals.
3.Press [Function Menu].
4.Press U or V to select Combine and press [OK].
5.Press U or V to select 2 in 1 or 4 in 1 and press [Right Select] (Detail).
6.Press U or V to select the direction of the layout and press [OK].
7.Press U or V to select the borderline and [OK].
8.Press U or V to select the original orientation and press [OK].
9.Press [Start]. Copying begins.
Duplex Copying
Using the document processor, you can automatically print on both sides of the paper.
1.Press [Copy].
2.Place the originals.
3.Press [Function Menu].
4.Press U or V to select Duplex and press [OK].
7
5.Press U or V to select duplex printing mode and press [Right Select] (Detail).
6.Press U or V to select the binding and press [OK].
7.Press U or V to select original orientation and press [OK].
8.Press [Start]. Copying begins.
EcoPrint
Use EcoPrint to save toner when printing. Use this function for test copies or any other occasion where high quality print is unnecessary.
1.Press [Copy].
2.Place the originals.
3.Press [Function Menu].
4.Press U or V to select EcoPrint and press [OK].
5.Press U or V to select On and press [OK].
6.Press [Start]. Copying begins.
Print Override Mode
The print override mode allows the current job to be interrupted in order to make copies of a more urgent job. After the print override processing is completed, the interrupted job will be resumed.
1.Press [Copy].
2.Press [Function Menu].
3.Press U or V to select Print Override and press [OK].
4.Press U or V to select On and press [OK].
5.Press [Right Select] (Exit).
6.Program the functions as required and use the numeric keys to enter the number of copies required.
7.Place the original.
8.Press [Start]. Copying begins.
Scan Functions
Send as E-mail
Sends a scanned original image as an E-mail attachment.
1.Press [Send].
2.Press U or V to select E-Mail.
3.Press [OK].
4.Enter the e-mail address with numeric keys.
5.Press [OK].
6.Program the settings as required from [Function Menu].
7.Place the originals.
8
Loading...