

Page 1

FS-2000D
FS-3900DN
FS-4000DN
Operation Guide
Page 2

Page 3

Content s
Legal and Safety Information
1 Machine Parts
Components at the Front of the Printer. . . . . . . . . . . . . . . . . . . . . . . . . . . . . . . . . . . . . . . . . . . . 1-2
Components at the Left of the Printer and Internal Components . . . . . . . . . . . . . . . . . . . . . . . . 1-2
Components at the Rear of the Printer . . . . . . . . . . . . . . . . . . . . . . . . . . . . . . . . . . . . . . . . . . . . 1-3
2 Printing Operation
Loading Printer Driver. . . . . . . . . . . . . . . . . . . . . . . . . . . . . . . . . . . . . . . . . . . . . . . . . . . . . . . . . 2-2
Printing from Application Software . . . . . . . . . . . . . . . . . . . . . . . . . . . . . . . . . . . . . . . . . . . . . . . 2-3
3 Maintenance
General Information . . . . . . . . . . . . . . . . . . . . . . . . . . . . . . . . . . . . . . . . . . . . . . . . . . . . . . . . . . 3-2
Toner Container Replacement . . . . . . . . . . . . . . . . . . . . . . . . . . . . . . . . . . . . . . . . . . . . . . . . . . 3-3
Cleaning the Printer . . . . . . . . . . . . . . . . . . . . . . . . . . . . . . . . . . . . . . . . . . . . . . . . . . . . . . . . . . 3-8
4 Troubleshooting
General Guidelines . . . . . . . . . . . . . . . . . . . . . . . . . . . . . . . . . . . . . . . . . . . . . . . . . . . . . . . . . . . 4-2
Print Quality Problems . . . . . . . . . . . . . . . . . . . . . . . . . . . . . . . . . . . . . . . . . . . . . . . . . . . . . . . . 4-3
Error Messages. . . . . . . . . . . . . . . . . . . . . . . . . . . . . . . . . . . . . . . . . . . . . . . . . . . . . . . . . . . . . . 4-5
Clearing Paper Jams. . . . . . . . . . . . . . . . . . . . . . . . . . . . . . . . . . . . . . . . . . . . . . . . . . . . . . . . . 4-11
5 Specifications
OPERATION GUIDE i
Page 4

Contents
ii OPERATION GUIDE
Page 5

Legal and Safety Information
CAUTION: NO LIABILITY IS ASSUMED FOR ANY DAMAGE CAUSED
BY IMPROPER INSTALLATION.
Notice on Software
SOFTWARE USED WITH THIS PRINTER MUST SUPPORT THE
PRINTER'S EMULATION MODE. The printer is factory-set to emulate the
PCL. The emulation mode can be changed.
Notice
The information in this guide is subject to change without notification.
Additional pages may be inserted in future editions. The user is asked to
excuse any technical inaccuracies or typographical errors in the present
edition.
No responsibility is assumed if accidents occur while the user is following
the instructions in this guide. No responsibility is assumed for defects in the
printer's firmware (contents of its read-only memory).
This guide, any copyrightable subject matter sold or provided with or in
connection with the sale of the page printer, are protected by copyright. All
rights are reserved. Copying or other reproduction of all or part of this
guide, any copyrightable subject matter without the prior written consent of
Kyocera Mita Corporation is prohibited. Any copies made of all or part of
this guide, any copyrightable subject must contain the same copyright
notice as the material from which the copying is done.
Regarding Tradenames
PRESCRIBE is a registered trademark of Kyocera Corporation. KPDL is
trademark of Kyocera Corporation.
Hewlett-Packard, PCL, and PJL are registered trademarks of HewlettPackard Company. Centronics is a trade name of Cent ro nics Data
Computer Inc. PostScript is a registered trademark of Adobe Systems
Incorporated. Macintosh is a registered trademark of Apple Computer, Inc.
Microsoft, Windows, and Windows NT are registered trademarks of
Microsoft Corporation. Microsoft Windows Server is a trademark of
Microsoft Corporation. PowerPC is a trademark of International Business
Machines Corporation. Microdrive is a registered trademark of Hitachi
Global Storage Technologies Netherlands B.V. in the US and other
countries. CompactFlash is a trademark of SanDisk Corporation.
ENERGY STAR is a U.S. registered mark. All other brand and product
names are registered trademarks or trademarks of their respective
companies.
Operation Guide iii
Page 6

This product uses PeerlessPrintXL to provide the HP LaserJet compatible
PCL 6 language emulation. PeerlessPrintXL is a trademark of Peerless
Systems Corporation, 2381 Rosecrans Ave. El Segund o, CA 90245,
U.S.A.
This product was developed using the Tornado™ Real Time Operating
System and Tools from Wind River Systems.
This product contains UFST™ and MicroType® from Monotype Imaging
Inc.
USB
This product has been certified by the USB Implementers Forum, Inc.
iv OPERATION GUIDE
Page 7

License Agreements
IBM Program License Agreement
THE DEVICE YOU HAVE PURCHASED CONTAINS ONE OR MORE
SOFTWARE PROGRAMS (“PROGRAMS”) WHICH BELONG TO
INTERNATIONAL BUSINESS MACHINES CORPORATION (“IBM”). THIS
DOCUMENT DEFINES THE TERMS AND CONDITIONS UNDER WHICH
THE SOFTWARE IS BEING LICENSED TO YOU BY IBM. IF YOU DO
NOT AGREE WITH THE TERMS AND CONDITIONS OF THIS LICENSE,
THEN WITHIN 14 DAYS AFTER YOUR ACQUISITION OF THE DEVICE
YOU MAY RETURN THE DEVICE FOR A FULL REFUND. IF YOU DO
NOT SO RETURN THE DEVICE WITHIN THE 14 DAYS, THEN YOU
WILL BE ASSUMED TO HAVE AGREED TO THESE TERMS AND
CONDITIONS.
The Programs are licensed not sold. IBM, or the applicable IBM country
organization, grants you a license for the Programs only in the country
where you acquired the Programs. You obtain no rights other than those
granted you under this license.
The term “Programs” means the original and all whole or partial copie s of
it, including modified copies or portions merged into other programs. IBM
retains title to the Programs. IBM owns, or has licensed from the owner,
copyrights in the Programs.
1. License
Under this license, you may use the Programs only with the device on
which they are installed and transfer possession of the Programs and the
device to another party.
If you transfer the Programs, you must transfer a copy of this license and
any other documentation to the other part y. You r lice nse is the n
terminated. The other party agrees to these terms and conditions by its first
use of the Program.
You may not:
1 use, copy, modify, merge, or transfer copies of the Program except
as provided in this license;
2 reverse assemble or reverse compile the Program; or
3 sublicense, rent, lease, or assign the Program.
2. Limited Warranty
The Programs are provided “AS IS.”
THERE ARE NO OTHER WARRANTIES COVERING THE PROGRAMS
(OR CONDITIONS), EXPRESS OR IMPLIED, INCLUDING, BUT NOT
LIMITED TO, THE IMPLIED WARRANTIES OF MERCHANTABILITY
AND FITNESS FOR A PARTICULAR PURPOSE.
OPERATION GUIDE v
Page 8

Some jurisdictions do not allow the exclusion of implied warranties, so the
above exclusion may not apply to you.
3. Limitation of Remedies
IBM's entire liability under this license is the following;
For any claim (including fundamental breach), in any form, related in any
way to this license, IBM's liability will be for actual damages only and will
be limited to the greater of:
1 the equivalent of U.S. $25,000 in your local currency; or
2 IBM's then generally available license fee for the Program
This limitation will not apply to claims for bodily injury or damages to real
or tangible personal property for which IBM is legally liable.
IBM will not be liable for any lost profits, lost savings, or any incidental
damages or other economic consequ en tia l dam a ge s, ev en if IBM, or its
authorized supplier, has been advised of the possibility of such damages.
IBM will not be liable for any damages claimed by you based on any third
party claim. This limitation of remedies also applies to any deve lop e r of
Programs supplied to IBM. IBM's and the developer's limitations of
remedies are not cumulative. Such developer is an intended bene ficiary of
this Section. Some jurisdictions do not allow these limitations or
exclusions, so they may not apply to you.
4. General
You may terminate your license at any time. IBM may terminate your
license if you fail to comply with the terms and conditions of this license. In
either event, you must destroy all your copies of th e Pro gra m. You ar e
responsible for payment of any taxes, including personal property taxes,
resulting from this license. Neither party may bring an action, regardless of
form, more than two years after the cause of action arose. If you acquired
the Program in the United States, this license is governed by the laws of
the State of New York. If you acquired the Program in Canada, this license
is governed by the laws of the Province of Ontario. Otherwise, this license
is governed by the laws of the country in which you acquired the Program.
vi OPERATION GUIDE
Page 9

Typeface Trademark Acknowledgement
All resident fonts in this printer are licensed from Monotype Imaging Inc.
Helvetica, Palatino and Times are registered trademarks of Linotype-Hell
AG. ITC Avant Garde Gothic, ITC Bookman, ITC ZapfChancery and ITC
Zapf Dingbats are registered trademarks of International Typeface
Corporation.
Monotype Imaging License Agreement
1 “Software” shall mean the digitally encoded, machine rea dable,
scalable outline data as encoded in a special format as well as the
UFST Software.
2 You agree to accept a non-exclusive license to use the Software to
reproduce and display weights, styles and versions of letters,
numerals, characters and symbols (“Typefaces”) solely for your own
customary business or personal purposes at the address stated on
the registration card you return to Monotype Imaging. Under the
terms of this License Agreement, you have the right to use the Fonts
on up to three printers. If you need to have access to the fonts on
more than three printers, you need to acquire a multi-user license
agreement which can be obtained from Monotype Imaging.
Monotype Imaging retains all rights, title and interest to the Software
and Type faces and no righ t s are grante d to you other th an a License
to use the Software on the terms expressly set forth in this
Agreement.
3 To protect proprietary rights of Monotype Imaging, you agree to
maintain the Software and other proprietary information concerning
the Typefaces in strict confidence and to establish reasonable
procedures regulating access to and use of the Software and
Typefaces.
4 Y ou agr ee not to duplicate or cop y the Software or T ypefa ces, except
that you may make one backup copy. You agree that any such copy
shall contain the same propriet ary notices a s those appea ring on the
original.
5 This License shall continue until the last use of the Software and
Typefaces, unless sooner terminated. This License may be
terminated by Monotype Imaging if you fail to comply with the terms
of this License and such failure is not remedied within thirty (30) days
after notice from Monotype Imaging. When this License expires or is
terminated, you shall either return to Monotype Imaging or destroy all
copies of the Software and Typefaces and documentation as
requested.
6 You agree that you will not modify, alter, disassemble, decrypt,
reverse engineer or decompile the Software.
7 Monotype Imaging warrants that for ninety (90) days after delivery,
the Software will perform in accordance with Monotype Imagingpublished specifications, and the diskette will be free from defects in
material and workmanship. Monotype Imaging does not war rant th at
the Software is free from all bugs, errors and omissions.
OPERATION GUIDE vii
Page 10

8 THE PARTIES AGREE THAT ALL OTHER WARRANTIES,
EXPRESSED OR IMPLIED, INCLUDING WARRANTIES OF
FITNESS FOR A PARTICULAR PURPOSE AND
MERCHANTABILITY, ARE EXCLUDED.
9 Your exclusive remedy and the sole liability of Monotype Imaging in
connection with the Software and Typefaces is r epai r or replacement
of defective parts, upon their return to Monotype Imaging.
10 IN NO EVENT WILL MONOTYPE IMAGING BE LIABLE FOR LOST
PROFITS, LOST DATA, OR ANY OTHER INCIDENTAL OR
CONSEQUENTIAL DAMAGES, OR ANY DAMAGES CAUSED BY
ABUSE OR MISAPPLICATION OF THE SOFTWARE AND
TYPEFACES.
11 Massachusetts U.S.A. law governs this Agreement.
12 You shall not sublicense, sell, lease, or otherwise transfer the
Software and/or Typefaces without the prior written consent of
Monotype Imaging.
13 Use, duplication or disclosure by the Government is subject to
restrictions as set forth in the Rights in Technical Data and Computer
Software clause at FAR 252-227-7013, subdivision (b)(3)(ii) or
subparagraph (c)(1)(ii), as appropriate. Fur ther use, duplication or
disclosure is subject to restrictions applicable to restricted rights
software as set forth in FAR 52.227-19 (c)(2).
14 YOU ACKNOWLEDGE THAT YOU HAVE READ THIS
AGREEMENT, UNDERSTAND IT, AND AGREE TO BE BOUND BY
ITS TERMS AND CONDITIONS. NEITHER PARTY SHALL BE
BOUND BY ANY STATEMENT OR REPRESENTATION NOT
CONTAINED IN THIS AGREEMENT. NO CHANGE IN THIS
AGREEMENT IS EFFECTIVE UNLESS WRITTEN AND SIGNED
BY PROPERLY AUTHORIZED REPRESENTATIV ES OF EACH
PARTY. BY OPENING THIS DISKETTE PACKAGE, YOU AGREE
TO ACCEPT THE TERMS AND CONDITIONS OF THIS
AGREEMENT.
Compliance and Conformity
FCC Statement (for users in the United States)
This device complies with Part 15 of FCC Rules and RSS-Gen of IC Rules.
Operation is subject to the following two conditions; (1) this device may not
cause interference, and (2) this device must accept any interference,
including interference that may cause undesired operation of the device.
This equipment has been tested and found to comply with the limits for a
Class B digital device, pursuant to part 15 of the FCC Rules. These limits
are designed to provide reasonable protection against harmful interf erence
in a residential installation.
This equipment generates, uses and can radiate radio frequency energy
and, if not installed and used in accordance with the instructions, may
cause harmful interference to radio communications. However, there is no
viii OPERATION GUIDE
Page 11

Precautions for Use
guarantee that interference will not occur in a particular installation. If this
equipment does cause harmful interference to radio or television
reception, which can be determined by turning the equipment off and on,
the user is encouraged to try to correct the interference by one or more o f
the following measures:
• Reorient or relocate the receiving antenna.
• Increase the distance between the equipment and the receiver.
• Connect the equipment into an outlet on a circuit different from that
used for the receiver.
• Consult your service technician or an experienced radio/TV technician
for help.
Changes or modifications not expressly approved b y the manufacturer fo r
compliance could void the user's authority to oper at e th e eq uip m en t.
Shielded circular cables should be used for interfacing with the computer.
Any modifications without prior permission of Kyocera may cause harmful
interference.
If any modifications or changes are made to this equipment without prior
permission of Kyocera, Kyocera as the manufacturer does not guarante e
the compliance with the FCC Rules. The use of equipment that does not
comply with the FCC Rules is prohibited.
OPERATION GUIDE ix
Page 12

Safety Information
Laser Safety
Laser Notice
This printer is certified as a Class 1 laser product under the U.S.
Department of Health and Human Services (DHHS) Radiation
Performance Standard according to Radiation Control for Health and
Safety Act of 1968. This means that the printer does not produce
hazardous laser radiation. Since radiation emitted inside the printer is
completely confined within protective housings and external covers, the
laser beam cannot escape from the printer during any phase of user
operation.
This printer is certified in the U.S. to conform to the requirements of DHHS
21 CFR Subchapter for Class I (1) laser products, and elsewhere is
certified as a Class I laser product conforming to the requirements of IEC
825.
DANGER:CLASS 3B LASER RADIATION WHEN OPEN. AVOID
DIRECT EXPOSURE TO BEAM.
CAUTION: Use of controls or adjustments or performance of procedures
other than those specified herein may result in hazardous radiation
exposure.
Radio Frequency T ransmitter
This machine contains the transmitter module. We, the manufacturer
(Kyocera Corporation) hereby decl ar e th at this eq uipm en t (p ag e pr in ter ),
models FS-2000D/FS-3900DN/FS-4000DN are in compliance with the
essential requirements and other relevant provisions of Directive 1999/5/
EC.
Radio Tag Technology
In some countries the radio tag technology used in this equipment to
identify the toner container may be subject to authorization and the use of
this equipment may consequently be restricted.
x OPERATION GUIDE
Page 13
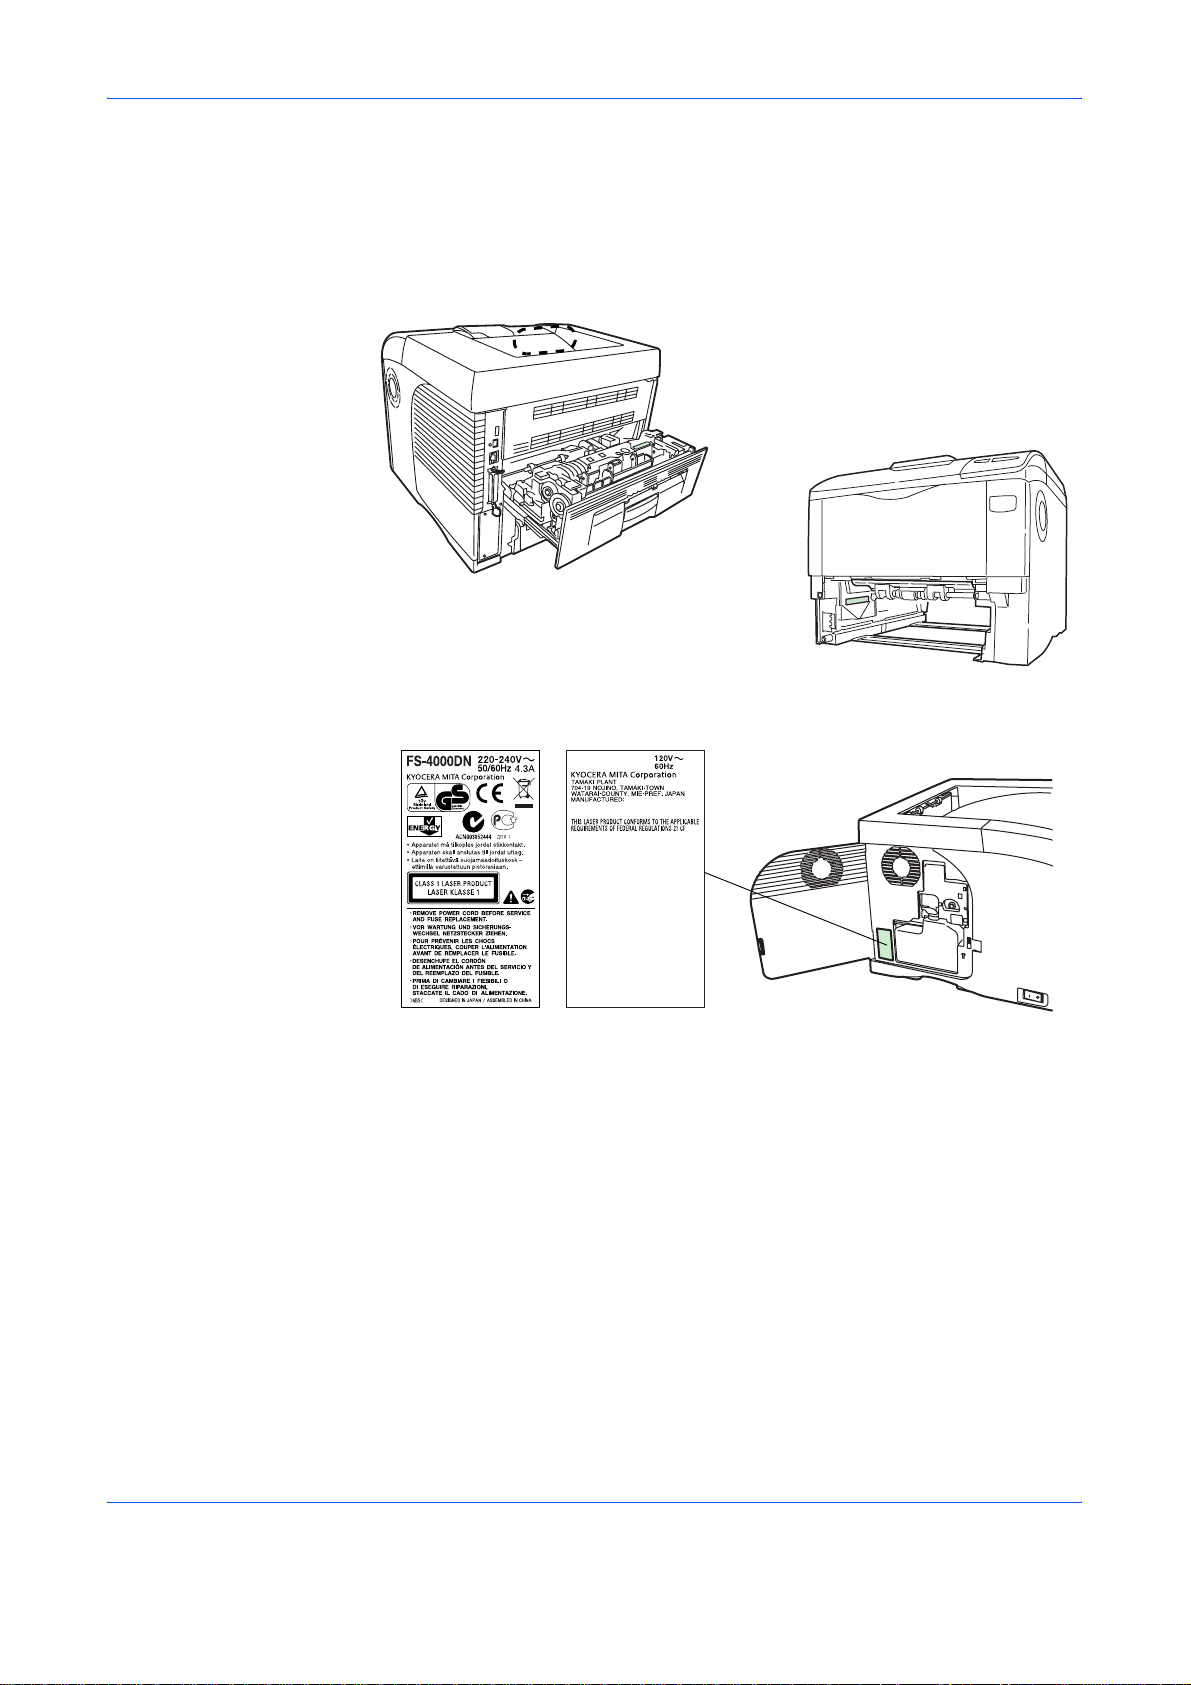
Caution Labels
The printer bears any of the following labels.
Label inside the printer
(Laser radiation warning)
For Europe, Asia,
and other countries
CDRH Regulations
The Center for Devices and Radiological Health (CDRH) of the U.S. Food
and Drug Administration implemented regulations for laser products on
August 2, 1976. These regulations apply to laser products manufactured
after August 1, 1976. Compliance is mandatory for products marketed in
the United States. A label indicating compliance with the CDRH regulations
must be attached to laser products marketed in the United States.
Ozone Concentration
For U.S.A. and
Canada
The printers generate ozone gas (O3) which may concentrate in the place
of installation and cause an unpleasant smell. To minimize the
concentration of ozone gas to less than 0.1ppm, we recommend you not
to install the printer in a confined area where ventilation is blocked.
OPERATION GUIDE xi
Page 14

Declaration of Conformity for U.S.A.
Model name: Page Printer FS-2000D/FS-3900DN/FS-4000DN
Trade name: Kyocera Mita
Responsible party: Kyocera Mita America, Inc.
Address: 225 Sand Road PO Box 40008 Fairfield, New Jersey 070040008, U.S.A.
Telephone: (973) 808-8444
Fax: (973) 882-6000
Manufacturer: Kyocera Mita Corporation Tamaki Plant
Manufacturer’s address: 704-19, Nojino, Tamaki-cho, Watarai-gun, Mieken 519-0497, Japan
This device complies with Part 15 of the FCC Rules. Operation is subject
to the following two conditions: (1) this device may not cause harmful
interference, and (2) this device must accept any interference received,
including interference that may cause undesired operation.
The manufacturer and its merchandising companies retain the following
technical documentation in anticipation of the inspection that may be
conducted by the authorities concerned.
User’s instruction that conforms to the applicable specifications.
Technical drawings.
Descriptions of the procedures that guarantee the conformity.
Other technical information.
Kyocera Mita America Inc.
CE Marking Directive
According to Council Directive 89/336/EEC, 73/23/EEC, and 1999/5/EC
Manufacturer: Kyocera Mita Corporation Tamaki Plant
Manufacturer’s address: 704-19, Nojino, Tamaki-cho, Watarai-gun, Mieken 519-0497, Japan
Declares that the product
Product name: Page Printer
Model number: FS-2000D/FS-3900DN/FS-4000DN (as tested with
enhancement optional unit; Paper Feeder PF-310)
Conforms to the following product specifications:
EN 55 022:1998+A1:2000+A2:2003 Class B
EN 61 000-3-2:2000
EN 61 000-3-3:1995+A1:2001
EN 55 024:1998+A1:2001+A2:2003
EN 60 950:2000
EN 60 825-1:1994+A1+A2
EN 300330-1
xii OPERATION GUIDE
Page 15

EN 300330-2
The manufacturer and its merchandising companies retain the following
technical documentation in anticipation of the inspection that may be
conducted by the authorities concerned.
User’s instruction that conforms to the applicable specifications.
Technical drawings.
Descriptions of procedures that guarantee conformity.
Other technical information.
Declaration of Conformity (Australia)
Manufacturer: Kyocera Mita Corporation Tamaki Plant
Manufacturer’s address: 704-19, Nojino, Tamaki-cho, Watarai-gun, Mieken 519-0497, Japan
declares that the product
Product name: Page Printer
Model name: FS-2000D/FS-3900DN/FS-4000DN
Description of devices: This Page Printer Model FS-4000DN is the 45ppm
(FS-2000D is the 30ppm, FS-3900DN is the 35ppm); A4 size and utilized
plain paper; dry toner; etc. The printer can be equipped with several
enhancement optional units as a paper feeder as PF-310.
conforms to the following product specifications:
AS/NZS 3548: 1995 (EN 55 022: 1998 Class B)
AS/NZS 4268: 2003
IEC60950: 1999 (EN 60 950: 2000)
The manufacturer and its merchandising companies retain the following
technical documentation in anticipation of the inspection that may be
conducted by the authorities concerned.
User’s instruction that conforms to the applicable specifications
Technical drawings
Descriptions of procedures that guarantee conformity
Other technical information
The manufacturer has been employed with ISO9001 scheme. JQA and BS
have attested the manufacturer.
Kyocera Mita Australia Pty., Ltd.
6-10 Talavera Road, North Ryde, NSW 2113, Australia
Telephone: +61 2-9888-9999
Fax: +61 2-9888-9588
Canadian Department of Communications Compliance Statement
This Class B digital apparatus complies with Canadian ICES-003.
OPERATION GUIDE xiii
Page 16
Avis de conformité aux normes du ministere des Communications du Canada
Cet appareil numérique de la classe B est conforme a la norme NMB-00 3
du Canada.
ISO 7779
Maschinenlärminformations-Verordnung 3. GPSGV: Der höchste
Schalldruckpegel beträgt 70 dB (A) oder weniger gemäß EN ISO 7779.
Disclaimer
Kyocera Mita will not be liable to customers or any other person or entity
for any loss or damage caused or alleged to be caused directly or indirectly
by equipment sold or furnished by us, including but not limited to, any
interruption of service, loss of business or anticipatory profits, or
consequential damages resulting from the use or operation of the
equipment or software.
Energy Star Program
Initial Auto Sleep
Setting
Power
Consumption in
Auto Sleep
As an ENERGY STAR Partner, we have determined that this product meets
the ENERGY STAR guidelines for energy efficiency.
The basic objective of the ENERGY STAR Program is to reduce environmental
pollution by encouraging the manufacture and sale of equipment that uses
energy more efficiently.
This printer is equipped with a sleep timer function that conforms with the
standards of the E
reduce the amount of electrical power consumed by the printer. For
maximum power savings, turn off the printer’s power supply when not
using the printer for extended periods of time.
For details on the sleep timer function and printer power consumption,
refer to this manual.
Initial settings of the sleep timer function and power saved using the sleep
timer function:
FS-2000D FS-3900DN FS-4000DN
15 minutes (60 minutes) 15 minutes (60 minutes) 15 minutes (60 minutes)
4.4W (30W) 4.9W (40W) 5.5W (75W)
NERGY STAR Program. This function makes it possible to
( ): ENERGY STAR program guideline
xiv OPERATION GUIDE
Page 17
Group for Energy Efficient Appliances (GEEA)
The goal of GEEA is efficient use of energy. This product has a highefficiency profile and meets the criteria for receiving the GEEA-Label.
FS-2000D FS-3900DN FS-4000DN
Initial Auto Sleep
Setting
Power
Consumption
- Power off
- Auto Sleep
15 minutes (60 minutes) 15 minutes (60 minutes) 15 minutes (60 minutes)
0W (1W)
4.4W (15W)
( ): GEEA criteria
0W (1W)
4.9W (15W)
0W (1W)
5.5W (15W)
Please read this Operation Guide before using the machine. Keep it close to the machine for easy reference.
The sections of this guide and parts of the machine marked with symbols
are safety warnings meant to protect the user, other individuals and
surrounding objects, and ensure correct and safe usage of the machine.
The symbols and their meanings are indicated below.
DANGER: Indicates that serious injury or even death will
very possibly result from insufficient attention to or incorrect
compliance with the related points.
WARNING: Indicates that serious injury or even death may
result from insufficient attention to or incorrect compliance
with the related points.
CAUTION: Indicates that personal injury or mechanical
damage may result from insufficient attention to or incorrect
compliance with the related points.
OPERATION GUIDE xv
Page 18

Symbols
The following symbols indicate that the related section includes safety
warnings. Specific points of attention are indicated inside the symbol.
.... [General warning]
.... [Warning of danger of electrical shock]
.... [Warning of high temperature]
The following symbols indicate that the related section includes
information on prohibited actions. Specifics of the prohibited action are
indicated inside the symbol.
.... [Warning of prohibited action]
.... [Disassembly prohibited]
The following symbols indicate that the related section includes
information on actions which must be performed. Specifics of the required
action are indicated inside the symbol.
.... [Alert of required action]
.... [Remove the power plug from the outlet]
[Always connect the machine to an outlet with a ground
....
connection]
Please contact your service representative to order a replacement if the
safety warnings in this Operation Guide are illegible or if the guide itself is
missing. (fee required)
xvi OPERATION GUIDE
Page 19

Installation Precautions
Environment
Avoid placing the machine on or in locations which are unstable
or not level. Such locations may cause the machine to fall down
or fall over. This type of situation presents a danger of personal
injury or damage to the machine.
Avoid locations with humidity or dust and dirt. If dust or dirt
become attached to the power plug, clean the plug to avoid the
danger of fire or electrical shock.
Avoid locations near radiators, heaters, or other heat sources, or
locations near flammable items, to avoid the danger of fire.
CAUTION:
To keep the machine cool and facilitate changing of parts and
maintenance, allow access space as shown below. Leave
adequate space, shous5(hpecie, yich aro plunding the)ventug t, al5o(ch)4(i)(ug b(the)5( )]TJ030022 Tc -0391169 Tw T*(n prop(ng)5(er yiv(esen)5(f)il-6(a)ache) o pluting to th)5(r(ch)5t)5(er)5(.)]rg/TT1 1 -Tf0.0006 Tc 0.00280 Tw 12 0 0 101 55.879223110.9203 Tm( otion Precaut(on)-(ii)]TJg)Tj/TT2 1 Tf0.0029 TJ0.0027 Tw 9.96001 0 0 9.96001 215.879208 980.0026 Tmdv)5(ers5(h(the (esen(En6(n)5(o)esenm5(o)(esen)(ica)inenche)5(d)iocation)5(f)-3( -6(ma)53( affecting the)s6(maffire)5( op)5(erlocation53( andthe)5( )]TJ030022 Tc -0391169 Tw T*(5(we)fs, or-6(ma4(aing to th)5(e machin)-3(e un)55( )]TJ0.0022 Tc -032023 Tw 6687602 0 Tdr fain5(, )-6(atio)4(n) ad dir-4(n)nenc4e)5(2)iocate an)4rbeloom)5( )]TJ030281 Tc -0.8031 Tw -6687602 -1.2048 Td(( o)5(1((ele)5(c)5( ommenche)5(d)ache)5(d)-r5( oom)temp(ng)5(eratu fire:5(, )-6(at o)5(1(5( ounvoid)5( )2oid35(1(98 oidC4(w)4(su-6(m4(mid:ich aro nche) 8 oid%(rt )]TJ0.00281 Tc -0.00349 Tw T*RH), )-6(at on5(1(void)5( )-6(a)5(c)5( o)4(i(oid tfo, awaching in location)5(set on5(1( s5(ve)ecti)8a)5 a of fire)f5( o)oid trt )]TJ042005 Tc 0 Tw 0 -1.7108 TDm6(eac-6(h)5(i6e)5(.)]TJ0.0016 Tc -0.0023 Tw 0 -2.2048 TD•5(1817(A)18([(Avoid)4(c)4(ca)4(n-5(sar a wacdow)5( )-r2(s 5( )]TJ-0.3006 Tc 0.6023 T8.7.13602 0 Tdh )-6(sx1(s)(e on)-u on)r ite)5(e te)5d te)i6(E)]TJ0.79101 Tc -0.0005 w 4786602 0 Tdn Pis t) sunlight.trt )]ET1Jg)5653.732 55.8790901 7.5601 req)5653.766.70.40009031 7.5601 W* n]TJg)0 G]TJ5 3 T0 M602j602J []0 d /GS1Jgs7 -135.76 -613.1 m75.935400066.70996 77.435400066.113.1 78.236400065.0.0400c78.435400064.90997 94.9.007361109.60y95.73640001 7308.9294.4.00733.513.0 93.4.00733.408.20c93.336400013.408.2059.635400013.408.20y57.7350013.308.4 5w 4754000157308.9258.23507361308.92c58.383400016.743.4 7 -135.76 -613.1 yhBQ)0 G]TJ5 3 T0 M602j602J []0 d /GS1Jgs76.335400063.40997 m60.43500157909.60l92.3364000157909.60l76.335400063.40997 lhBTJg)77.486400045..00.92m78.7850055..00.9278.75.879055.309.2 v78.777400055.424.1 78.7850055.53998 78.7850055.659.60c78.7850057J0.05 77.55.0058.113.1 76.335400058.113.1 c7 -991400058.113.1 73535400057J0.05 73535400055.659.60c73535400055.53998 73594400055.424.1 73.911400055.309.2 c73935400055.309.2 75.087400045.184.20y75.12640004 -146.2 75.61340004 -059.2 76..0087904 -059.2 c76.90740004 -059.2 77.444004 -1-1.4 77.4830045..09.5 cB78.135.739.75..92m78.135.738-616.2 77.587400037.659.6076.435400037.659.60c75.2830037.659.6074.335400038-616.2 74.335400039.75..92c7 -335400040.91140005.2830041.853.1 76.435400041.853.1 c77.587400041.853.1 78.135.740.91140008.135.739.75..92chB1Jg)/GS0Jgs218.110400649110..2 41.04.40006601 reTJg)1.5 i /GS1Jgs2361396400683.030.1 m238-166.2 685.23642 239.741400684-616.2 24..581400683.451.5 c24..791420683.346400258.117 653.41998 y258.957 651.52997 257J592400650.374.20256542420650.269.4 c256.437400650.269.4 221.051400650.269.4 y219.056420650.164 218.426400655 -7996 219.581400653.692c219.736400653.7-1.6 2361396400683.030.1 y req)218.110400685.10..2 41.04.400-06601 W* n]T..0 3 2361396400683.030.1 m238-166.2 685.23642 239.741400684-616.2 24..581400683.451.5 c24..791420683.346400258.117 653.41998 y258.957 651.52997 257J592400650.374.20256542420650.269.4 c256.437400650.269.4 221.051400650.269.4 y219.056420650.164 218.426400655 -7996 219.581400653.692c219.736400653.7-1.6 2361396400683.030.1 y hSQ)1Jg)0.99.400G]T..0 3 239.794400662.713400m241.153.1 673213400241.132420673265400v241.140879673786.5 241.153.1 673508.6 241.153.1 673633.60c241.153.1 675.044400239.998420676..0542 238.587400676..0542 c237.175420676..0542 236.0.4.1 675.044400236.0.4.1 673633.60c236.0.4.1 673508.6 236.023.1 673335400236.041420673265400c236.066.1 673265400237.275400662.634.92y237.3174206610 94.5 237.823.1 6610452.92238.507 6610452.92c239.1874006610452.92239.7506610 91492239.791420662.65997 cB24..896400656.937400m24..896400655.728492239.3.1420654.733.92238.692420654.733.92c237.482400654.733.92236.486400655.728492236.486400656.937400c236.486400658.147492237.482400659.142.92238.692420659.142.92c239.3.1420659.142.9224..896400658.14749224..896400656.937400chB/GS0Jgs50 -660596.41998 35.04.4000 -98601 reTJg)/GS1Jgs539.476400613.45.0m539.47640060 -12644 531.7-9.5 596.429.2 522.42643 596.429.2 c513.073 596.429.2 505.37543060 -12644 505.375430613.45.0c505.375430622.832.92513.073 630.52997 522.42643 630.52997 c531.7-9.5 630.52997 539.476400622.832.92539.476400613.45.0c req)50 -660631.10..2 35.04.400-0 -98601 W* n]TJG]TJ5 3 539.476400613.45.0m539.47640060 -12644 531.7-9.5 596.429.2 522.42643 596.429.2 c513.073 596.429.2 505.37543060 -12644 505.375430613.45.0c505.375430622.832.92513.073 630.52997 522.42643 630.52997 c531.7-9.5 630.52997 539.476400622.832.92539.476400613.45.0chSQ)1Jg
OPERATION GUIDE xvii
Page 20
• Avoid locations with vibrations.
• Avoid locations with drastic temperature fluctuations.
• Avoid locations with direct exposure to hot or cold air.
• Avoid poorly ventilated locations.
During printing, some ozone is released, but the amount does not cause
any ill effect to one's health. If, however, the printer is used over a long
period of time in a poorly ventilated room or when printing an extremely
large number of copies, the smell may become unple a san t. To ma in tain
the appropriate environment for print work, it is suggested that the room be
properly ventilated.
Power Supply/Grounding the Machine
WARNING:
Do not use a power supply with a voltage other than that
specified. Avoid multiple connections in the same outlet. These
types of situations present a danger of fire or electrical shock.
Other Precautions
Handling of Plastic Bags
Plug the power cord securely into the outlet. If metallic objects
come in contact with the prongs on the plug, it may cause a fire
or electric shock.
Always connect the machine to an outlet with a ground
connection to avoid the danger of fire or electrical shock in case
of an electric short. If an earth connection is not possible, contact
your service representative.
Connect the power plug to the closest outlet possible to the machine.
The power supply cord is used as the main disconnect device. Ensu re that
the socket/outlet is located/installed near the equipment and is easily
accessible.
WARNING:
Keep the plastic bags that are used with the machine away from
children. The plastic may cling to their nose and mouth causing
suffocation.
xviii OPERATION GUIDE
Page 21

Precautions for Use
Cautions when Using the Machine
Do not place metallic objects or containers with water (flower
vases, flower pots, cups, etc.) on or near the machine. This
situation presents a danger of fire or electrical shock should they
fall inside.
Do not remove any of the covers from the machine as there is a
danger of electrical shock from high voltage parts inside the
machine.
Do not damage, break or attempt to repair the power cord. Do not
place heavy objects on the cord, pull it, bend it unnecessarily or
cause any other type of damage.
These types of situations present a dange r of fire or elec t rica l
shock.
WARNING:
Never attempt to repair or disassemble the machine or its parts
as there is a danger of fire, electrical shock or damage to the
laser. If the laser beam escapes, there is a danger of it causing
blindness.
If the machine becomes excessively hot, sm ok e ap pe a rs fr om
the machine, there is an odd smell, or any other abnormal
situation occurs, there is a danger of fire or electrical shock. Turn
the power switch off (O) immediately, be absolutely certain to
remove the power plug from the outlet and then contact your
service representative.
If anything harmful (paper clips, water, other fluids, etc.) falls into
the machine, turn the power switch off (O) immediately. Next, be
absolutely certain to remove the power plug from the outlet to
avoid the danger of fire or electrical shock. Then contact your
service representative.
Do not remove or connect the power plug with wet hands, as
there is a danger of electrical shock.
Always contact your service representative for maintenance or
repair of internal parts.
OPERATION GUIDE xix
Page 22

CAUTION
Do not pull the power cord when removing it from the outlet. If the power
cord is pulled, the wires may become broken and there is a danger of fire
or electrical shock. (Always grasp the power plug when remo vin g the
power cord from the outlet.)
Always remove the power plug from the outlet when moving the
machine. If the power cord is d ama ge d, the re is a d ang er of fire
or electrical shock.
If the machine will not be used for a short period of time
(overnight, etc.), turn the power switch off (O). If it will not be
used for an extended period of time (vacations, etc.), remove the
power plug from the outlet for safety purpose s during the time the
machine is not in use.
Always hold the designated parts when lifting or moving the
machine.
For safety purposes, always remove the power plug from the
outlet when performing cleaning operations.
If dust accumulates within the machine, there is a danger of fire
or other trouble. It is therefore recommended that you consult
with your service representative in regard to cleaning of internal
parts. This is particularly effective if accomplished prior to
seasons of high humidity. Consult with your servic e
representative in regard to the cost of cleaning the internal parts of the
machine.
Other Precautions
Do not place heavy objects on the machine or cause other damage to the
machine.
Do not open the upper front cover, turn off the power switch, or pull out the
power plug during copying.
When lifting or moving the machine, contact your service representative.
Do not touch electrical parts, such as connectors or printed circuit boards.
They could be damaged by static electricity.
Do not attempt to perform any operations not explained in this handbook.
Use shielded interface cables.
xx OPERATION GUIDE
Page 23

CAUTION
Use of controls or adjustments or performance of procedures other than
those specified herein may result in hazardous radiation exposure.
Cautions when Handling Consumables
CAUTION
Do not attempt to incinerate the Toner Container. Dangerous
sparks may cause burns.
Keep the Toner Container out of the reach of children.
If toner happens to spill from the Toner Container, avoid
inhalation and ingestion, as well as contact with your eyes and
skin.
• If you do happen to inhale toner, move to a place with fresh
air and gargle thoroughly with a large amount of water. If coughing
develops, contact a physician.
• If you do happen to ingest toner, rinse your mouth out with water and
drink 1 or 2 cups of water to dilute the contents of your stomach. If
necessary, contact a physician.
• If you do happen to get toner in your eyes, flush them thoroughly with
water. If there is any remaining tenderness, contact a physician.
• If toner does happen to get on your skin, wash with soap and water.
Do not attempt to force open or destroy the Toner Container.
Other Precautions
After use, always dispose of the Toner Container in accordance with
Federal, State and Local rules and regulations.
Store all consumables in a cool, dark location.
If the machine will not be used for an extended period of time, remove the
paper f ecavda c Tw[(sse4.8, retu)4.2(pn ite)4.7(.8(d)1.itu)4.8(ps )8(e)(a)igs nal aLok Tw[(gd)4.(Le.7(.8(d)1. Tw[(nd)-44Ton)4.ioneal iton)4.5(.)]TJEFigu(If/Span <<6MCID 1103 22•)T8 734.32 40 06 26 ref7603 /GS2 gs4.5 i 238 0.6 765.854 m240 416 767.50 043 045.831 765.774 c2432 T1 765.67 26•3 c218. rg732.5(3 225.8TD732.5(3 y224.7m-732.496 210.67-735.103 221.831 735.953 c221.98-736.095 238 0.6 765.854 yf7q 22•)T8 767.32 40 06 -26 reW* n760G760J11.j0 c-w<</ M []0 d238 0.6 765.854 m240 416 767.50 04)4.91 76-6(3 045.831 765.774 c2432 T1 765.67 26•)T67 735.744 y26.4577 73 co53 059.842 732.696 218.792 732.5(3 c218. rg732.5(3 225.8TD732.5(3 y224.7m-732.496 210.67-735.103 221.831 735.953 c221.98-736.095 238 0.6 765.854 ysQ1103 0 090G760J11.j0 c-w<</ M []0 d245.044 745y)]T m244.5D-715.537 244.382-715.589 v244.5-715.7D-244.5D-715.8TD244.5D-715.957 c24325D-717)T68 045.28 -718.52-24e)-37 718.52-c234.6c-718.52-238 264-717
OPERATION GUIDE xxi
Page 24

About the Operation Guide
This Operation Guide has the following chapters:
Chapter 1 - Machine Parts
This chapter explains the names of parts.
Chapter 2 - Printing Operation
This chapter explains how to print from your workstation.
Chapter 3 - Maintenance
This chapter explains how to replace the toner container and how to care
for your printer.
Chapter 4 - Troubleshooting
This chapter explains how to handle printer problems that may occur, such
as paper jams.
Chapter 5 - Specifications
This chapter lists the printer’s specifications.
xxii OPERATION GUIDE
Page 25

Conventions
Convention Description Example
This manual uses the following conventions.
Italic Typeface Used to emphasize a key word,
phrase or references to
additional information.
Courier Typeface Used to denote messages or
names displayed on the
operation panel.
Bold Typeface Used to denote operation panel
keys.
Notes Used to provide additional or
useful information about a
function or feature.
Important Use to provide important
information.
Caution Cautions are statements that
suggest mechanical damage as
a result of an action.
Warning Used to alert users to the
possibility of personal injury.
Close the top cover.
Refer to Toner Container Replacement
on page 3-3.
Replace the waste toner box when the
Check waste toner box message is
displayed.
Press [Menu].
NOTE: For information about storing the
pin, refer to step 10.
IMPORTANT: Ensure paper is not
folded, curled, or damaged.
CAUTION: Do not pull the cassette out
when holding the front of the machine.
WARNING: High voltage is present
in the charger section.
OPERATION GUIDE xxiii
Page 26

xxiv OPERATION GUIDE
Page 27

1 Machine Parts
This section provides explanations and illustrations for you to
determine the parts and their functions. Try to be familiar with
the names and functions of these parts for correct use and
optimal performance.
This chapter contains explanations on the following topics:
• Components at the Front of the Printer........................ 1-2
• Components at the Left of the Printer and Internal
Components................................................................. 1-2
• Components at the Rear of the Printer.........................1-3
OPERATION GUIDE 1-1
Page 28

Machine Parts
Components at the Front of the Printer
2
1
7
3
4
6
FS-2000D FS-3900DN/FS-4000DN
5
2
1
7
6
3
4
5
1 Top Cover
2 Paper Stopper
3 Top Tray
4 Right Cover
5 Operation Panel
6 Paper Cassette
7 MP (Multi-Purpose) T ray
Components at the Left of the Printer and Internal Components
1
4
1 Left Cover
2 Toner Container
3 Power Switch
4 Waste Toner Box
2
3
1-2 OPERATION GUIDE
Page 29

Components at the Rear of the Printer
1
2
3
4
5
Machine Parts
6
7
8
1 USB Memory Slot
2 USB Interface Connector
3 Network indicators (FS-3900DN/FS-4000DN only)
4 Network Interface Connector (FS-3900DN/FS-4000DN only)
5 Parallel Interface Connector
6 Power Cord Connector
7 Rear Unit
8 Option Interface Slot (Network/Serial/CF card/Microdrive)
OPERATION GUIDE 1-3
Page 30

Machine Parts
1-4 OPERATION GUIDE
Page 31

2 Printing Operation
This chapter contains explanations on the following topics:
• Loading Printer Driver .................................................. 2-2
• Printing from Application Software...............................2-3
OPERATION GUIDE 2-1
Page 32

Printing Operation
Loading Printer Driver
1
2
3
4
Ensure the printer is plugged in and connected to the PC before installing
the printer driver from the CD-ROM.
Switch on the PC and activate Windows.
NOTE: If the Welcome to the Found New Hardware Wizard dialog box
displays, select Cancel.
Insert the CD-ROM supplied with the printer into the optical drive of the PC.
The installation program launches.
NOTE: If the installation program fails to launch, use Windows Explorer
to access the CD-ROM and select Setup.exe.
Perform the procedures displayed on the installation prog ram to install the
KX DRIVER.
2-2 OPERATION GUIDE
Page 33

Printing from Application Software
The steps required to print a document created with an application are
explained below. You can select the printing Paper Size and Output
Destination.
Load the paper required into the paper cassette.
1
From the application File menu, select Print. The Print dialog box displays.
2
Click the drop down list of printer names. All the printers installed in
3
Windows are listed. Click the name of the machine.
Use Number of copies to enter the number of prints required. Up to 999
4
copies can be entered.
For Microsoft Word, we recommend that you click Options and specify
Use printer settings for the Default tray.
Printing Operation
3
To start printing, click OK.
5
4
OPERATION GUIDE 2-3
Page 34

Printing Operation
2-4 OPERATION GUIDE
Page 35

3 Maintenance
This chapter contains explanations on the following topics:
• General Information......................................................3-2
• Toner Container Replacement...................................... 3-3
• Cleaning the Printer......................................................3-8
OPERATION GUIDE 3-1
Page 36

Maintenance
General Information
This chapter describes basic maintenance tasks you can perform on the
printer. You can replace the following component according to the printer ’s
display:
• Toner Kits
• Waste Toner Box
Also, the internal parts need periodic cleaning.
3-2 OPERATION GUIDE
Page 37

Toner Container Replacement
Frequency of toner container replacement
The life of the toner containers depend s on the amount of toner r equired to
accomplish your printing jobs. Assuming paper of A4 size, an average
toner coverage of apporoximatetly 5% and Eco Prin t mo d e tur n ed off, the
toner container will need replacing apporoximately once every 20,000
pages (FS-4000DN); 15,000 pages (FS-3900DN); 12,000 pages (FS2000D).
You can print a status page to check how much toner remains in the toner
container. The Toner Gauge in the consumables status section on the
status page shows a progress bar, which roughly represen ts how much
toner is left in the toner container.
Starter Toner Container
The toner container packed with the new printer is a starter toner contain er.
The starter toner container lasts an average of 10,000 pages (FS4000DN); 7,500 pages (FS-3900DN); 6,000 pages (FS-2000D).
Maintenance
Toner Kits
For best results, we recommend that you only use genuine Kyocera Parts
and Supplies.
A new toner kit contains the following items:
• Toner Container
• Cleaning cloth
• Plastic waste bags for old toner container and old waste toner box
• Waste toner box
• Installation Guide
NOTE: Do not remove the toner container from the carton until you are
ready to install it in the printer.
Understanding Messages Requesting Toner Container Replacement
The printer displays messages at two stages of toner usage. Th is message
is automatically alternated with the other printer message (such as
Ready):
• When the printer becomes low on toner, the printer displays the
message Toner low as the first caution. Note the replacement is not
always necessary at this stage.
• If you ignore the above message and continue printing, the printer
displays the message Replace toner — just before the toner is
used up. The toner container must be replaced immediately. After the
cleaning is finished, however, the message does not automatically
OPERATION GUIDE 3-3
Page 38

Maintenance
change to Ready. To restart printing, you must press [GO] and make
the printer ready.
In either case, replace the toner container, refer to Toner Container
Replacement on page 3-3.
Replacing the Toner Container
NOTE: During toner container replacement, temporarily put storag e
media and computer supplies (such as floppy disks) away from around
the toner container . Th is is to avoid damaging media by the ma gnetism of
toner.
This section explains how to replace the toner container. When replacing
the toner container, always replace the waste toner box at the same time.
If this box is full, the printer may be damaged or contaminated by the waste
toner that may spill over the box.
NOTE: You do not have to turn printer power off before starting the
replacement. Any data that may be under printing process in the printer
will be deleted if you turn printer power off.
Open the top cover.
1
3-4 OPERATION GUIDE
Page 39

Push lock lever to the right and pull out the toner container.
2
Put the old toner container in the plastic bag (contained in the toner kit) and
3
discard it later according to the local code or regulations for waste disposal.
Maintenance
Lock Lever
Plastic Bag
Take the new toner container out of the toner kit.
4
Shake the new toner container at least 10 times as shown in the figure in
5
order to distribute the toner evenly inside the container.
Remove the label from the toner container.
6
OPERATION GUIDE 3-5
Page 40

Maintenance
Set the new toner container in the printer and push down on the to p of the
7
toner container to install it firmly in place as shown in the figure below.
Close the top cover.
8
Proceed to the next section.
Replacing the Waste Toner Box
When replacing the toner container, the used waste toner box in the printer
should also be replaced with the new one from the new toner kit. A new
waste toner box is included with the toner kit. The printer will not operate
without replacing the waste toner box.
Open the left cover. While holding the waste toner box, press the lock lever
1
and then gently remove the waste toner box.
Lock Lever
NOTE: Remove the waste toner box as gently as possible so as not to
scatter the toner inside. Do not let the opening of the waste toner box face
downward.
3-6 OPERATION GUIDE
Page 41

Close the cap to the old waste toner box after removing the box from the
2
printer.
Cap
Old Waste Toner Box
To prevent toner from spilling, put the old waste toner box in the plastic bag
3
(contained in the toner kit) and discard it later according to the local code
or regulations for waste disposal.
Maintenance
Plastic Bag
Open the cap of the new waste toner box.
4
Cap
New Waste Toner Box
OPERATION GUIDE 3-7
Page 42

Maintenance
Insert the new waste toner box as shown in the figure below. When the box
5
is set correctly, it will snap into place.
Make sure that the waste toner box is correctly in serted an d clo se the left
6
cover.
After replacing the toner containers and the waste toner box, clean the
internal parts. For instructions, refer to
Cleaning the Printer on page 3-8.
Cleaning the Printer
To avoid print quality problems, the inte rior of the printer must be cleaned.
Open the top cover and MP tray.
1
3-8 OPERATION GUIDE
Page 43

Lift the developer unit together with the toner container out of the printer.
2
Maintenance
Use a lint free cloth to clean dust and dirt away from the registration roller
3
(metal)
.
OPERATION GUIDE 3-9
Page 44

Maintenance
Insert the developer unit together with the toner container, back into the
4
machine.
Close the top cover and MP tray.
5
3-10 OPERATION GUIDE
Page 45

4 Troubleshooting
This chapter contains explanations on the following topics:
• General Guidelines.......................................................4-2
• Print Quality Problems..................................................4-3
• Error Messages............................................................4-5
• Clearing Paper Jams...................................................4-11
If a problem cannot be corrected, contact your service
technician.
OPERATION GUIDE 4-1
Page 46

Troubleshooting
General Guidelines
The table below provides basic solutions for problems you may encou nter
with the printer. We suggest you consult this table to troubleshoot the
problems before calling for service.
Symptom Check Items Corrective Action
Print quality is not good. Refer to Print Quality Problems on page 4-3.
Paper is jammed. Refer to Clearing Paper Jams on page 4-11.
Nothing lights on the operation
panel even when power is turned
on and the fan makes no noise.
The printer prints a status page,
but does not print jobs from the
computer.
Tips
Check that the power cord is
properly plugged into the power
outlet.
Check that the power switch is
in the On (|) position.
Check the printer cable or the
interface cable.
Check program files and
application software.
Printer problems may be solved easily by following the tips below. When
you have encountered a problem that following the above guidelines will
not solve, try the following:
• Turn the printer power off and wait for several seconds. Then, turn on
the printer.
• Reboot the computer which sends the print jobs to the printer.
• Obtain and use the late st vers ion of the prin te r dr ive r. The latest
versions of printer drivers and utilities are available at:
http://www.kyoceramita.com/download/.
• Make sure that the procedures for printing are correctly followed in the
application software. Consult the documentation supplied with the
application software.
• If the printer prints garbage characters or stalls when the computer is
turned on, particularly when the printer is connected to the computer
under Windows 98 via the parallel port, rename device driver file
drvwppqt.vxd. This file may be located in Windows\System\Iosubsys
or Arcada\System folder. For technical details, visit Microsoft web site
for the device driver.
Turn off the printer’s power, plug in
the power cord securely, and try
turning on the printer’s power
again.
Set the power switch to the On
position.
Connect both ends of the printer
cable securely. Try replacing the
printer cable or the interface cable.
Try printing another file or using
another print command. If the
problem occurs only with a specific
file or application, check the printer
driver settings for that application.
4-2 OPERATION GUIDE
Page 47

Print Quality Problems
The tables and diagrams in the following sections define print quality
problems and the corrective action you can con duct to solve the problems.
Some solutions may require cleaning or replacing parts of the printer.
If the suggested corrective action will not solve the problem, call for
service.
Printed Results Corrective Action
Completely blank printout Check the toner container.
Open the top cover and check that the toner container is correctly
installed in the printer. For more information on installing the toner
container, refer to
Check that the application software is correctly operated.
Toner Container Repla ce m en t on page 3-3.
Troubleshooting
Black or white vertical streaks Check the operation panel for toner.
If the Toner low message is displayed, inst all a new toner kit. To
replace the toner container, refer to
Replacement on page 3-3.
Faint or blurred printing Check the EcoPrint setting.
When this setting is On, switch it to off on the operation panel.
Make sure the paper type setting is correct the paper being used.
Check the operation panel. If the Toner low message is
displayed, install a new toner kit. To replace toner , refer to
Container Replacement on page 3-3.
Toner Container
Toner
OPERATION GUIDE 4-3
Page 48

Troubleshooting
Printed Results Corrective Action
Grey background Check the operation panel.
If the Toner low message is displayed and the Attention indicator is
flashing, install a new toner kit. Refer to
Replacement on page 3-3.
Check the print density.
Display the print density menu from the operation p anel and select
a lighter density setting.
Toner Containe r
Dirt on the top edge or back of the
paper
Printing incomplete or out of
position
Clean the parts in the paper paths—such as the paper cassette,
etc.
Check that the application software is correctly operated.
Refer to Tips on page 4-2.
4-4 OPERATION GUIDE
Page 49

Error Messages
Message Corrective Action
Troubleshooting
The following table lists errors and maintenance messages that you can be
dealt with by yourself. If Call service appears, turn off the printer,
disconnect the power cord, and contact your service technician.
Some errors cause the alarm to sound. To stop th e alarm, press [Cancel].
Add paper MPTray
Call service
F## #
Call service
####:0123456
Cassette #
not loaded
Check waste
toner box
Clean printer
Press GO
The paper has run out in the paper source displayed. Supply paper according to
the paper source displayed (paper cassettes, MP tray, optional paper feeders, or
optional envelope feeder [FS-3900DN/FS-4000DN only]).
This message is displayed alternately with messages indicating th e printer status,
such as, Ready, Please wait, Processing, Waiting, and FormFeed Time
Out.
F### represents a controller error (#= 0, 1, 2, ...). Call for service. The printer does
not operate when this message is displayed.
#### represents a mechanical error (#=0, 1, 2, ...). Call for service. The printer
does not operate when this message is displayed. The total number of pages
printed is also indicated, e.g. 0123456.
The corresponding paper cassette is not installed. Install the cassette. The
cassette number can be 1 (topmost) to 4 (bottom) [FS-2000D: 1 and 2].
This message warns following two cases. Install the new waste to ner box.
The waste toner box is not installed.
The waste toner box is full.
Please clean the inside of the printer. Refer to Cleaning the Printer on page 3-8.
This message will be displayed when replacing the toner container after the
message Replace toner is displayed. After cleaning the inside of the printer,
press [GO] and the printer will be ready for printing.
Close
left cover
Close
rear unit
Close
top cover
Duplex disabled
Press GO
The left cover of the printer is open. Close the left cover.
The rear unit of the printer is open. Close the printer rea r unit.
The top cover of the printer is open. Close the printer top cover.
You attempted to print with a paper size and paper type that cannot be used for
duplex printing. Press [GO] to print onto one-side of the paper only.
OPERATION GUIDE 4-5
Page 50

Troubleshooting
Message Corrective Action
e-MPS not stored
Press GO
Error.Power off
F## #
File not found
Press GO
Format error
Hard disk
Format error
Memory card
Hard disk err ##
Press GO
I/F occupied
The e-MPS job cannot be stored because RAM disk is disabled, RAM disk size is
insufficient, Microdrive is not installed, or Microdrive is full. Press [GO] to print error
report.
Turn the power switch off and then back on again. If this message still remains, turn
the power switch off, and contact your service repr esent ative or author ized service
center.
You have attempted to print a job that is not contained in the specified virtual
mailbox, or the specified virtual mailbox is not found.
If Auto Error Clear is set to On, printing will be automatically resumed after a preset
period of time.
The Microdrive installed in the printer is not formatted , an d th er ef or e ca nn ot be
read or written.
The CompactFlash card inserted in the printer is not formatted, and ther efore
cannot be read or written.
A Microdrive error has occurred. Look at the er ro r code gi ve n in pla ce of ## and
refer to
Storage Error Codes on page 4-9. To ignore the Microdrive error, press
[GO].
This message is displayed when you attempt to use the printer’s operation p anel to
change the environmental settings on the interface from which data are presently
being received.
ID error
Install MK
KPDL error ##
Press GO
Load Cassette #
(A4)/(
PLAIN
†
)
The user ID entered for a private job, or a sto red job is not correct. Check th e user
ID that you specified on the printer driver.
Replace Maintenance Kit which is displayed on the message display. Replacement
of the maintenance kit is necessary at every 300,000 pages of printing and requires
professional servicing. Contact your service technician.
Current print processing cannot continue because of occurrence of KPDL error
which is categorized by ##. To print out an error report, display > Print KPDL
err(s) from the menu system, and select On. Press [GO] to resume printing. You
can abandon printing by pressing
[Cancel].
If Auto Error Clear is set to On, printing will be automatically resumed after a preset
period of time.
The paper cassette matching the pap er size and paper type of the print job is
empty . Load paper into the paper cassette as displayed in place of #. Press [GO] to
resume printing.
If you want to print from a different paper source, press ? or @ to display Use
alternative and you can change the source for paper feeding. After selecting a
paper source and pressing [Menu], Paper Handling > appears. By pressing
the
?, the paper type settings menu appears. After setting the correct paper type,
press [OK] and printing starts.
4-6 OPERATION GUIDE
Page 51

Troubleshooting
Page 52

Troubleshooting
Message Corrective Action
Replace toner
Clean printer
Set paper
Press GO
Toner low
Top tray
paper full
Unknown Toner
Installed
USB memory err##
Press GO
USB mem. removed
Press GO
Toner has run out in the toner container. Replace the toner container using a new
toner kit. The printer does not operate when this message is displayed.
The MP tray is out of paper. Load paper and press [GO]. (Note that feeding the
paper having a paper size which does not match the curr ent paper size from the
MP tray can cause paper jam.)
Toner is running low. Replace the toner container using a new toner kit.
The top tray has become full. You must remove all printed pages from the top tray.
When the printer detects that the top tray is empty again, the printer will continues
printing into the top tray.
The toner container is not original. Use of original Kyocera Mita toner kits is highly
recommended to prevent printer trouble and ensure the long life of the printer.
An USB flash memory error has occurred. Look at the error code given in place of
## and refer to
Storage Error Codes on page 4-9. T o ignore the USB memory error,
press [GO].
The USB flash memory is accidentally removed from the printer. T o ignore the USB
memory error, press [GO]. The message display returns to Ready.
Virtual mailbox
full
Warning
image adapt
Warning
low memory
The storage area in the Microdrive for the virtual mailboxes is full. Print out
accumulated jobs in the virtual mailboxes.
Printing job cannot be done in current resolution because there is not enough
internal memory. Try adding more memory or changing resolution.
The printer’s internal memory is running low due to too many numbers o f font s and
macros downloaded. Try deleting unnecessary fonts and macros.
† Messages separated by ‘( )/( )’ are displayed alternately.
†† After this error has happened, page protect mode will be automatically turned on. To maintain
optimum use of memory during printing, we recommend you manually turn off page protect mode .
4-8 OPERATION GUIDE
Page 53

Storage Error Codes
Microdrive Errors
Code Meaning
01 Microdrive format error. If this error recurs even if the power has been
02 The disk system is not installed. Recheck the requirements for using the
04 There is no available Microdrive space. Delete unnecessary files, etc.,
05 The specified file does not exist in the Microdrive.
06 There is no memory available to the Microdrive system. Increase the
10 Formatting is not possible because host data is being spooled on the
Troubleshooting
turned off and then on, reformat the Microdrive.
system and the devices.
in order to free up space.
available memory.
Microdrive. Wait until the Microdrive is ready, and then format.
85 VMB: Alias error. The alias setting was lost, or the virtual tray
corresponding to the alias does not exist. Set the alias again.
97 The number of permanent code job s that can be stored reach ed the limit
value, and no more can be saved. Either delete some unnecessary
jobs, etc., or increase the limit.
98 An unreadable page was found in a job (The job is damaged.).
99 A print job for the specified ID does not exist in the Microdrive.
CompactFlash Card/USB memory Errors
Code Meaning
01 The printer does not support the CompactFlash card inserted.
02 The CompactFlash card is not installed.
04 The CompactFlash card is full and cannot hold further data. Purge
unnecessary files or use a new CompactFlash card.
05 Specified file is not on the CompactFlash card/USB flash memory.
06 Insufficient printer memory to support the CompactFlash card system.
Expand printer memory.
OPERATION GUIDE 4-9
Page 54

Troubleshooting
RAM Disk Errors
Code Meaning
01 Format error. Try turning the power off and on again.
02 RAM disk mode is Off. Turn RAM disk mode On from the operation
panel.
04 No disk space. Purge unnecessary files.
05 Specified file is not on disk.
06 Insufficient printer memory to support the RAM disk system. Expand
printer memory.
4-10 OPERATION GUIDE
Page 55

Clearing Paper Jams
Possible Paper Jam Locations
Troubleshooting
If the paper jammed in the paper transport system, or no paper sheets
were fed at all, the Paper jam message appears and the location of the
paper jam (the component where the paper jam has occurred) is also
indicated. The printer automatically goes off-line when this message is
displayed. Remove jammed paper. After removing jammed paper, the
printer will re-start printing.
The figure below explains the printer’s paper paths including the options.
The locations where paper jams might occur are also shown here, with
each location explained in the table below. Paper jams can occur in mo re
than one component on the paper paths.
Face-up Tray
PT-310
Paper jam message Paper jam
location
Paper jam
MP Tray
Paper jam
EF
Paper jam
Bulk Feeder
A Paper is jammed at the MP tray or
Paper Feeder
PF-310
Description Reference page
page 4-13
optional envelope feeder or bulk
paper feeder (if installed [FS3900DN and FS-4000DN only]).
page 4-16
page 4-16
OPERATION GUIDE 4-11
Page 56

Troubleshooting
Paper jam
Cassette 1 (to 4)
General considerations for clearing jams
B Paper is jammed at the paper
cassette. The cassette number can
Bear in mind the following considerations when attempting jam removal:
CAUTION: When pulling the paper, pull it gently so as not to tear it. Torn
pieces of paper are difficult to remove and may be easily overlooked,
deterring the jam recovery.
• If paper jams occur frequently, try using a different type of paper,
replace the paper with paper from another ream, flip the paper stack
over, or rotate the paper stack 180 degrees. The printer may have
problems if paper jams recur after the paper was replaced.
• Whether or not the jammed pages are reproduced normally after
printing is resumed depends on the location of the paper jam.
Utilizing Online Help Messages
Online help messages are available in the printer’s message display to
provide simple instructions for clearing jams. Press (
jam message has appeared. Then a help message will appear to facilitate
jam clearing in the location.
) when the paper
4-12 OPERATION GUIDE
Page 57

MP Tray
Paper Cassette
Paper is jammed at the MP tray. Remove the jammed paper using the
procedure given below.
Remove the paper jammed at the
1
MP tray.
Open and close the top cover to clear the error.
2
Pull out the paper cassette.
1
Troubleshooting
Remove any partially fed paper.
2
Check to see if paper is loaded
correctly. If not, reload the paper.
Push the paper cassette back in firmly. The printer warms up an d resumes
3
printing.
OPERATION GUIDE 4-13
Page 58

Troubleshooting
Duplexer
Paper is jammed in the duplex section. Remove the jammed paper using
the procedure given below.
CAUTION: Do not touch parts in this area, because it may result in burn
injury.
Pull the paper cassette all the way out of the printer.
1
Open the duplexer’s cover and
2
remove any jammed paper.
Insert the paper cassette into the slot in the printer. The printer warms up
3
and resumes printing.
4-14 OPERATION GUIDE
Page 59

The Inside of Printer
Open the top cover and MP tray.
1
Lift the developer unit together
2
with the toner container out of the
printer.
Open the feed cover.
3
Troubleshooting
Remove the paper from the
4
printer.
If the jammed paper appears to be
pinched by rollers, pull it along the
normal running direction of the
paper.
NOTE: If you cannot find a paper jam, try checking inside the rear of the
printer. Refer to Rear Unit on page 4-16.
Insert the developer unit together
5
with the toner container, back into
the machine.
Close the top cover and MP tray. The printer warms up and resumes
6
printing.
OPERATION GUIDE 4-15
Page 60

Troubleshooting
Rear Unit
If paper is not completely ejected
1
into the output tray, open the rear
unit.
Open the fuser cover and remove
2
the jammed paper by pulling it out.
NOTE: If you cannot find a
paper jam, try checking inside
the rear of the printer.
CAUTION: The fuser unit inside the printer is hot. Do not touch it with your
hands as it may result in burn injury.
3
Paper Feeder
Envelope Feeder
Close the rear unit. The printer
warms up and resumes
printing.out.
Paper is jammed at optional paper cassette 2 (to 4). Refer to the
Installation Guide for the optional paper feeder and remove the jammed
paper.
Paper is jammed at the optional envelope feeder. Remove the jammed
paper using the same procedure as for a jam at the MP Tr ay. The n, open
and close the paper transfer unit. For details, refer to the User’s Manual for
the envelope feeder.
Bulk Paper Feeder
Paper is jammed at the optional bulk paper feeder. Detach the bulk paper
feeder from the printer by sliding with the rail away from the printer, holding
the bulk paper feeder by both hands. If paper is partially fed out from the
feeder's output slot, pull the paper out by hand.
4-16 OPERATION GUIDE
Page 61

5 Specifications
NOTE: Specifications are subject to change without notice.
Item
FS-2000D FS-3900DN FS-4000DN
Printing Method Semiconductor laser and electrophotography
Printing Speeds
- Simplex
- Duplex
Paper Sizes
- Cassette
- MP Tray
Paper Types
- Cassette
A5: 19ppm
A4: 30ppm
Letter: 31ppm
Legal: 26ppm
A4: 15.5ppm
Letter: 15.5ppm
A4, A5, B5, Letter, Legal,
Folio, Oficio2, Custom
(148 x 210 to 216 x 356
mm [5
x 14"])
A4, A5, B5, A6, Letter,
Legal, Folio, Oficio2,
Custom (70 x 148 to 216
x 356 mm [2
to 8
Plain, Preprinted, Bond, Recycled, Rough, Letterhead, Color, Prepunched, High
quality, and Custom
13/16 x 8 1/4 to 8 1/2
3/4 x 5 13/16
1/2 x 14"])
Description
A6: 21ppm
A5: 21ppm
A4: 35ppm
Letter: 37ppm
Legal: 28ppm
A4: 25ppm
Letter: 26ppm
A4, A5, B5, A6 , Letter, Legal, Folio, Oficio2, Custom
(105 x 148 to 216 x 356 mm [4
14"])
A4, A5, B5, A6, Letter, Legal, Folio, Oficio2, Custom
(70 x 148 to 216 x 356 mm [2
14"])
A6: 23ppm
A5: 23ppm
A4: 45ppm
Letter: 47ppm
Legal: 38ppm
A4: 33.5ppm
Letter: 34.5ppm
1/8 x 5 13/16 to 8 1/2 x
3/4 x 5 13/16 to 8 1/2 x
- MP Tray
Paper Feed Source
Capacity
- Cassette
- MP Tray
Output Tray Capacity
- Top Tray
- Face-up Tray (Option)
OPERATION GUIDE 5-1
Plain, Transparency, Preprinted, Labels, Bond, Recycled, Vellum, Rough,
Letterhead, Color, Prepunched, Envelope, Cardstock, Thick, High quality, and
Custom
500 sheets (80g/m2)
100 sheets (80g/m2)
250 sheets (80g/m2)
-
500 sheets (80g/m2)
PT-310: 250 sheets (80g/m2)
Page 62

Specifications
Item
FS-2000D FS-3900DN FS-4000DN
Warm-up Time (23°C,
50%RH)
- Power on
- Sleep
First Print Out (A4, 23°C,
60%RH)
Resolution Fine1200, Fast1200, 600dpi, 300dpi
Monthly Duty
- Average
- Maximum
Operating Systems Microsoft Windows 95/98/Me/2000/XP
Controller PowerPC 440 400MHz PowerPC 750CXr
Memory
- Standard
13 seconds or less
10 seconds or less
19 seconds or less 25.5 seconds or less 24 seconds or less
4,000 pages
150,000 pages
Microsoft Windows NT4.0
Microsoft Windows Server 2003
Apple Macintosh OS 9
Apple Macintosh OS X
64MB
Description
15 seconds or less
15 seconds or less
8,000 pages
200,000 pages
400MHz
17 seconds or less
15 seconds or less
12,000 pages
250,000 pages
PowerPC 750CXr
500MHz
128MB
- Maximum
Interface
- Standard
- Option
Operation Environment
- Temperature
- Relative Humidity
- Altitude
- Illumination
Dimensions (W x D x H) 382 x 394 x 285m m
Weight (without toner
container)
576MB
USB: Hi-Speed USB
Full-Speed USB (USB
memory slot)
Parallel: IEEE1284
KUIO-LV slot
IB-11: Serial
IB-21E/IB-30: 10BASE-T/
100BASE-TX
10 to 32.5 °C
15 to 80 %
2,500m maximum
1,500lux maximum
(15 3/8 x 15 1/2 x 11 1/4")
15.8kg (33lb) 16.7kg (33 5/16lb) 16.8kg (33 5/16lb)
640MB
USB: Hi-Speed USB
Full-Speed USB (USB memory slot)
Parallel: IEEE1284
Network: 10BASE-T/100BASE-TX
KUIO-LV slot
IB-11: Serial
IB-21E: 10BASE-T/100BASE-TX
382 x 394 x 320mm (15 3/8 x 15 1/2 x 12 5/8")
5-2 OPERATION GUIDE
Page 63

Specifications
Item
Operating noise (in
accordance with ISO7779
[Bystander Position,
sound pressure level at
the front])
FS-2000D FS-3900DN FS-4000DN
During printing: LpA =
50dB (A)
During standby: LpA =
40dB (A)
During sleep mode:
immeasurably low
Description
During printing: LpA =
52dB (A)
During standby: LpA =
40dB (A)
During sleep mode:
immeasurably low
During printing: LpA =
56dB (A)
During standby: LpA =
40dB (A)
During sleep mode:
immeasurably low
OPERATION GUIDE 5-3
Page 64

Specifications
5-4 OPERATION GUIDE
Page 65

A1
Page 66

Page 67

Page 68

Rev. 1.1 2006.3
Printed in China 302F956021
 Loading...