

Page 1
Duplexer
Duplexeinheit
Module recto-verso
Unità duplex
Duplexor
Instructions
Anleitung
Instructions
Istruzioni
Instrucciones
For the Kyocera Laser Printers
Für Kyocera Laserdrucker
Pour imprimantes laser Kyocera
Per le stampanti laser Kyocera
Para las impresoras láser Kyocera
Page 2

We shall have no liability or responsibility to customers or any other person or
entity with respect to any liability, loss or damage caused or alleged to be caused
directly or indirectly by equipment sold or furnished by us, including but not
limited to, any interruption of service, loss of business or anticipatory profits, or
consequential damages resulting from the use or operation of the equipment or
software.
Caution
English
NO LIABILITY IS ASSUMED FOR ANY DAMAGE CAUSED BY IMPROPER
INSTALLATION.
Notice
The information in this manual is subject to change without notification.
Additional pages may be inserted in future editions. The user is asked to excuse
any technical inaccuracies or typographical errors in the present edition.
No responsibility is assumed if accidents occur while the user is following the
instructions in this manual.
The contents of this manual are protected by copyright. No part of this manual may
be reproduced or copied by any means without the permission of the copyright
holder.
Regarding Tradenames:
PRESCRIBE is a registered trademark of Kyocera Corporation.
Deutsch
FrançaisItalianoEspañol
1
Page 3
According to Council Directive 89/336/EEC and 73/23/EEC
Manufacturer’s name: Kyocera Corporation, Printer Division
Manufacturer’s address: 2-14-9 Tamagawadai, Setagaya Ward, Tokyo 158-8610, Japan
declares that the product
Product name: Dupex Unit
Model number: DU-31 (as tested with Page Printer FS-7000+ and other enhancement
Conforms to the following product specifications.
EN 55 022:1994 Class B
EN 60 950:1992+A1+A2+A3+A4
The manufacturer and its merchandising companies retain the following technical documentation in
anticipation of the inspection that may be conducted by the authorities concerned.
optional units: PF-30, DF-31, UF-1, BC-1 and HD-2)
User’s instruction that conforms to the applicable specifications
Technical drawings
Descriptions of the procedures that guarantee the conformity
Other technical information
KYOCERA ELECTRONICS EUROPE GmbH
Tetsuo Okada, President
Revised Date:
Contact in Europe:
KYOCERA ELECTRONICS EUROPE GmbH
Mollsfeld 12
40670 Meerbusch, Germany
Phone: +49 21 59 918 0
Fax: +49 21 59 918 100
Declaration of Conformity
Manufacturer’s name: Kyocera Corporation, Printer Division
Manufacturer’s address: 2-14-9 Tamagawadai, Setagaya Ward, Tokyo 158-8610, Japan
declares that the product
Product name: Duplex Unit
Model number: DU-31 (as tested with FS-7000+ and enhancement option units: as PF-30,
Description of device: This Page Printer Model FS-7000+ is the 28ppm; A3 size and utilized plain
2
DF-31, UF-1, BC-1 and HD-2)
paper; laser; dry toner etc.. The printer can be equipped with several
enhancement optional units as a paper feeder as PF-30, a document finisher
DF-31, etc..
Page 4
Conforms to the following product specifications.
AS/NZS 3548:1995
(EN 55 022: 1994 Class B)
IEC60 950
(EN 60 950:1992+A1+A2+A3+A4)
The manufacturer and its merchandising companies retain the following technical documentation in
anticipation of the inspection that may be conducted by the authorities concerned.
User’s instruction that conforms to the applicable specifications
Technical drawings
Descriptions of the procedures that guarantee the conformity
Other technical information
David Finn
Managing Director
Date:
Unit 8, 43-45 Herbert Street,
Artarmon NSW 2064, Australia
Phone: +61 2-9-906-8075
Fax: +61 2-9-906-8153
English
Deutsch
FrançaisItalianoEspañol
3
Page 5
Warning
FCC Regulations state that any unauthorized changes or modifications to
this equipment not expressly approved by the manufacturer could void the
user’s authority to operate the equipment.
Note: The equipment has been tested and found to comply with the limits
for a Class B digital device, pursuant to Part 15 of the FCC Rules. These
limits are designed to provide reasonable protection against harmful
interference when the equipment is operated in a commercial environment.
The equipment generates, uses, and can radiate radio frequency energy
and, if not installed and used in accordance with the instruction manual,
may cause harmful interference to radio communications.
Operation of the equipment in a residential area is likely to cause harmful
interference, in which case the user will be required to correct the interference at his own expense.
Radio interference requirement in European countries
The optional universal feeder DU-31 is intended for use with the printer
models FS-7000, FS-7000+ and FS-9000 which are type tested and categorized as a Class B computing device in accordance with the EN55022 rules.
A device in the Class B category may cause interference to radio or television
reception, particularly in a residential installation.
4
Page 6

Information to users:
This equipment has been tested and found to comply with the limits for a Class B
digital device, pursuant to Part 15 of FCC Rules. These limits are designed to
provide reasonable protection against harmful interference in a residential installation. This equipment generates, uses, and can radiate radio frequency energy and, if
not installed and used in accordance with the instructions, may cause harmful
interference to radio communications. However, there is no guaranteee that
interference will not occur in a particular installation. If this equipment does cause
harmful interference to radio or television reception, which can be determined by
turning the equipment off and on, the user is encouraged to try to correct the
interference by one or more of the following measures:
❒ Reorient or relocate the receiving antenna.
❒ Increase the separation between the equipment and receiver.
❒ Connect the equipment into an outlet on a circuit different from that to which
the receiver is connected.
❒ Consult the dealer or an experienced radio/TV technician for help.
Changes or modifications not expressly approved by the manufacturer for compliance could void the user’s authority to operate the equipment.
Contents
Introduction .............................................................................................................6
Names of Parts.........................................................................................................6
Installing the Duplexer ............................................................................................7
Duplex Printing .......................................................................................................9
Clearing Paper Jams ..............................................................................................14
Paper Selection ......................................................................................................20
Specification ..........................................................................................................26
English
Deutsch
FrançaisItalianoEspañol
5
Page 7
Introduction
The DU-31 duplexer is an optional duplex printing unit for the Kyocera Page
Printers.
Before using the DU-31 duplexer, please read this manual, then carefully follow all
instructions given for installing and using the duplexer. Adhere to any cautions and
warnings indicated on the unit itself.
Retain this manual in an easily accessible place. You may need it for future
consultation if you later have questions about the operation or what to do in case of
troubles.
Packing List
DU-31 1
Instruction manual (this booklet) 1
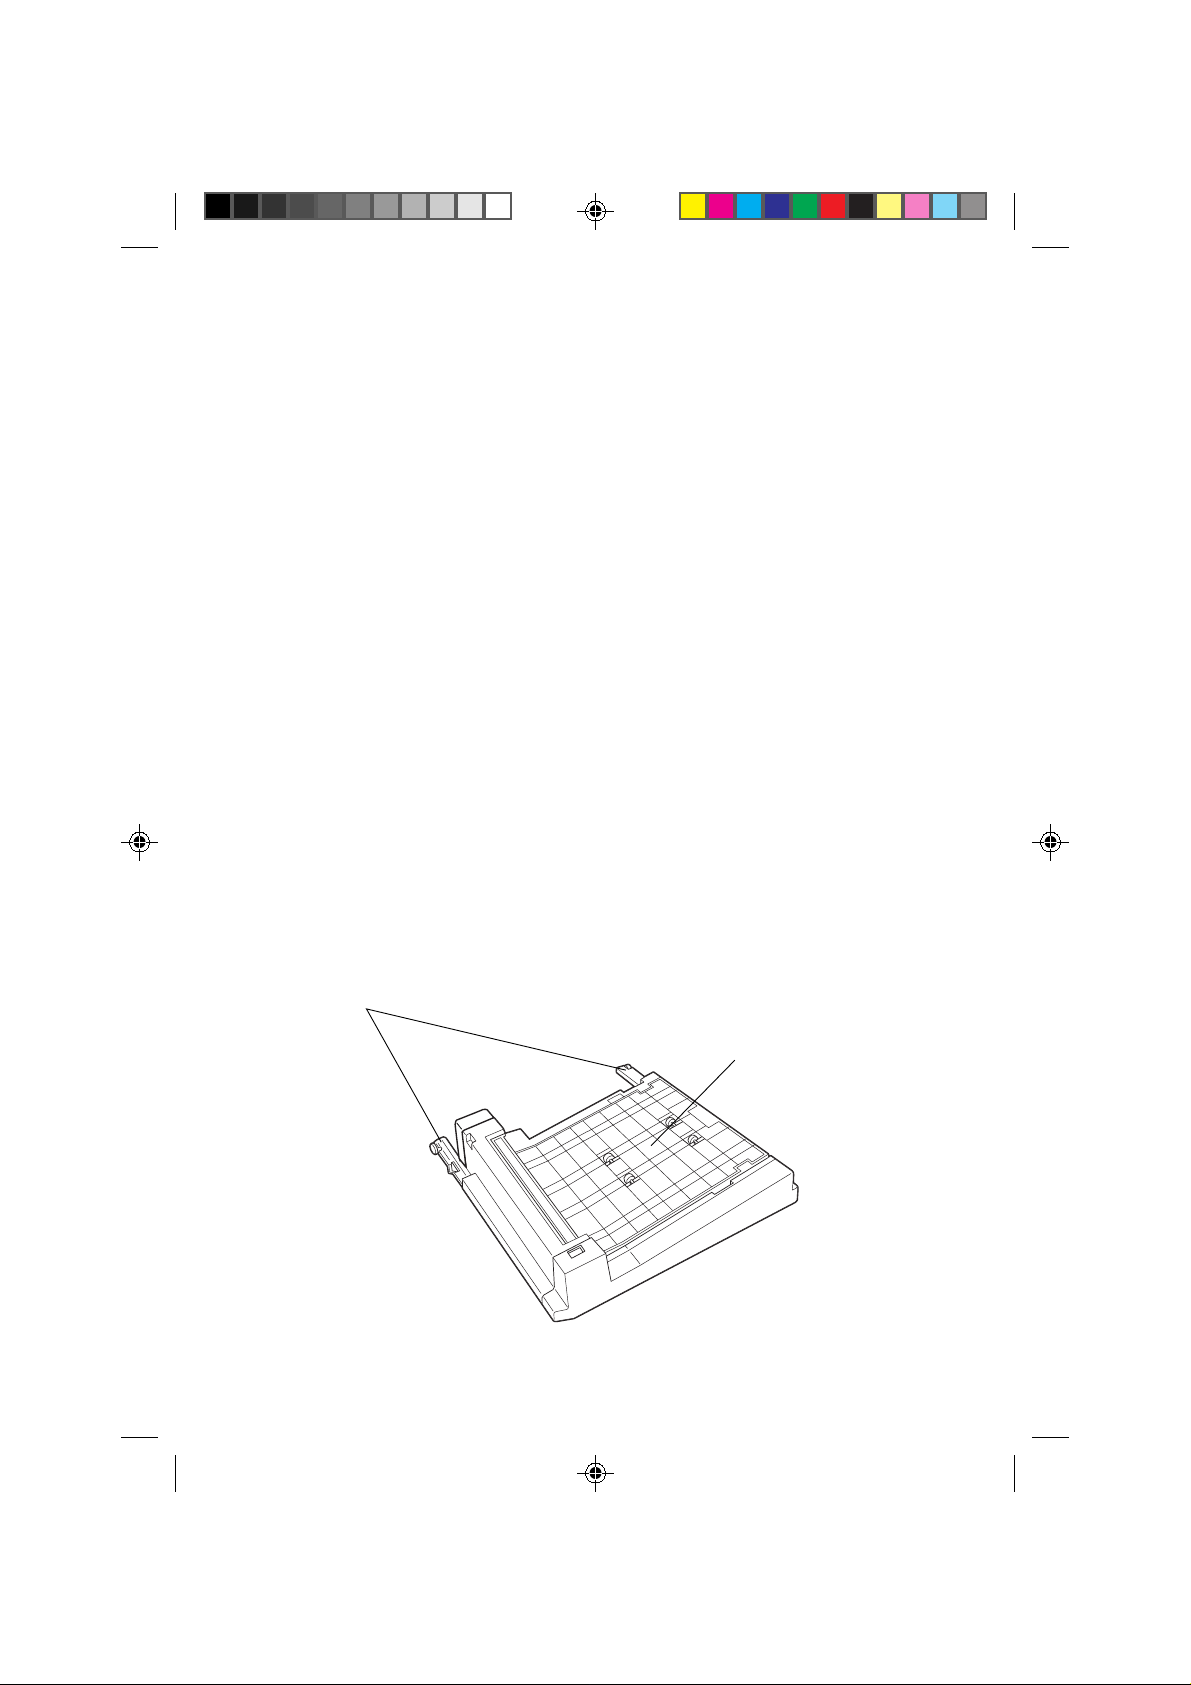
Names of Parts
Before installing the duplexer, please study the following part names. These names
are used in describing procedures for installing and using the duplexer.
Installation rails
6
Transparent plastic cover
(two covers)
Duplexer (DU-31)
Page 8
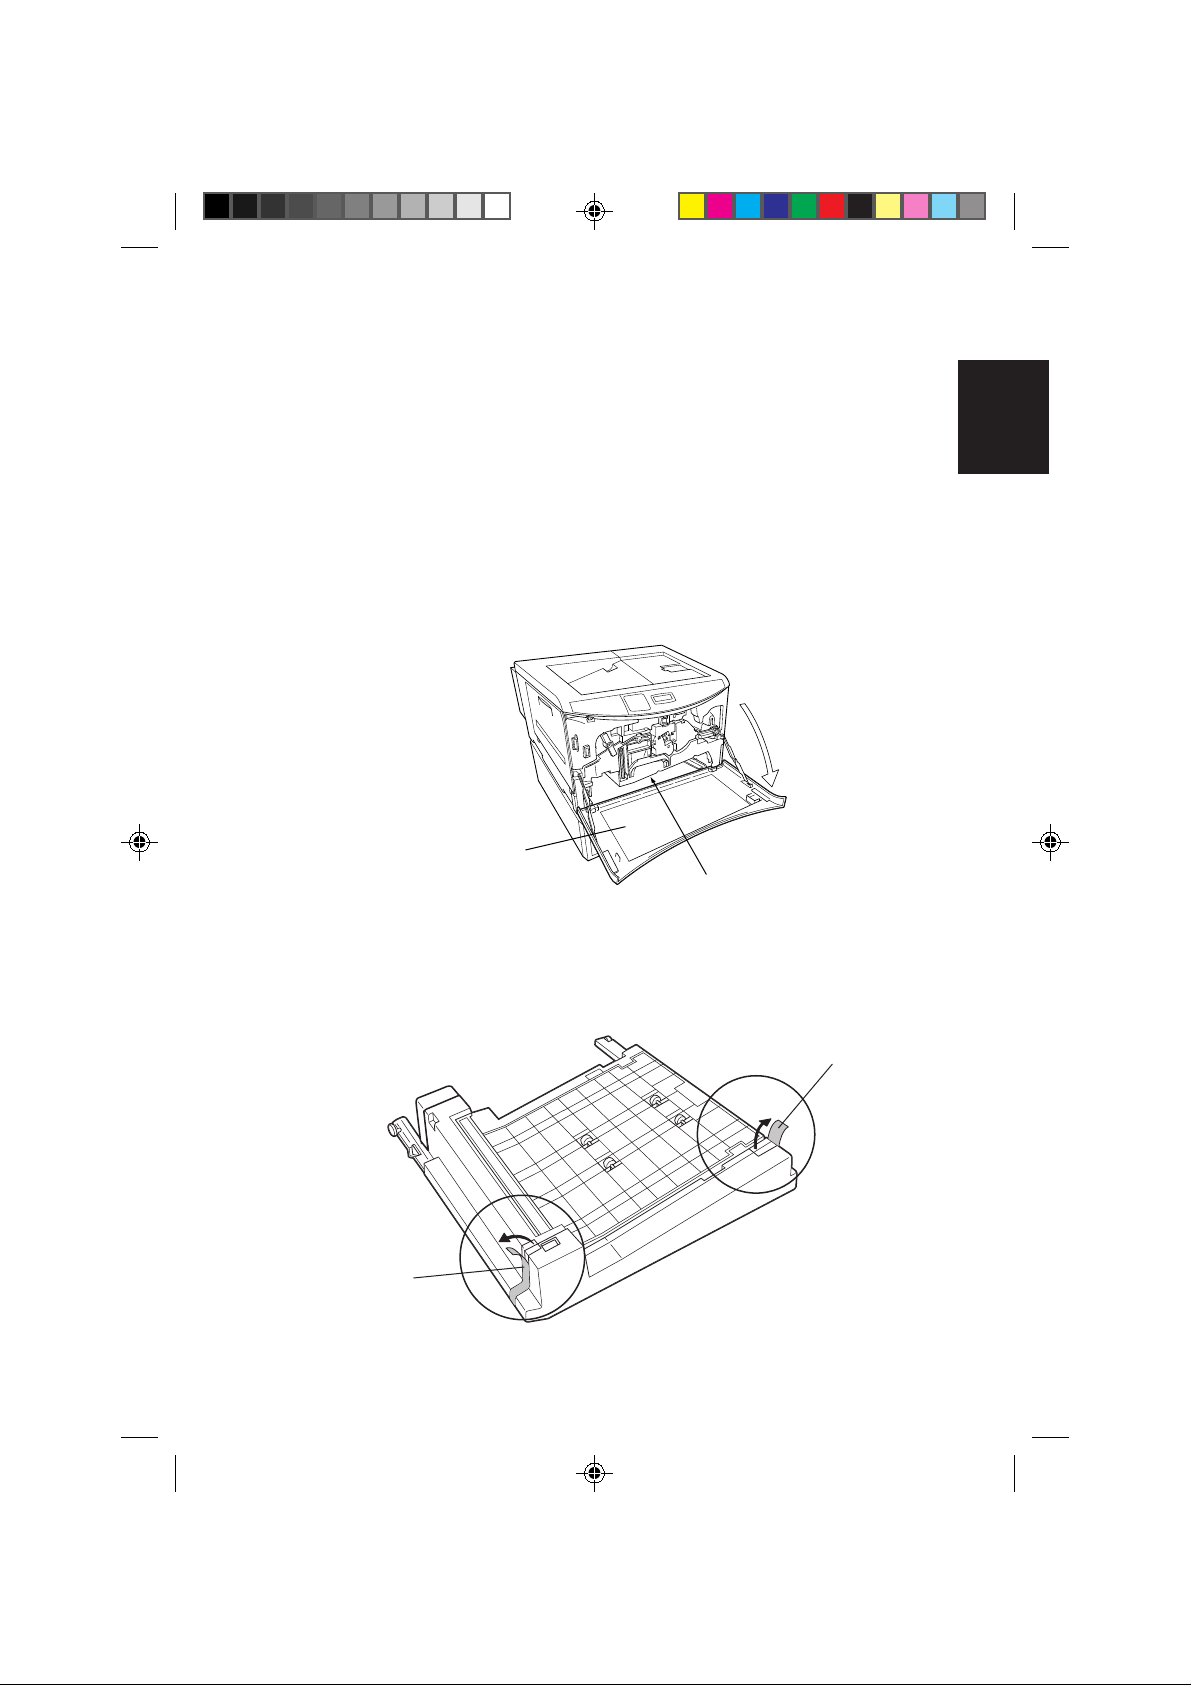
Installing the Duplexer
Open the front cover of the printer, and install the DU-31 in the vacant space below
the transfer unit.
CAUTION Before installing (or removing) the optional duplexer, be sure
to turn off the printer’s power and disconnect the power cord
plug from the AC outlet.
1. Open the printer’s front cover.
Front cover
Installation space for the
DU-31
2. After removing the duplexer from the packing materials, remove the
adhesive tape holding the cover in place.
English
Deutsch
FrançaisItalianoEspañol
Tape
Tape
7
Page 9
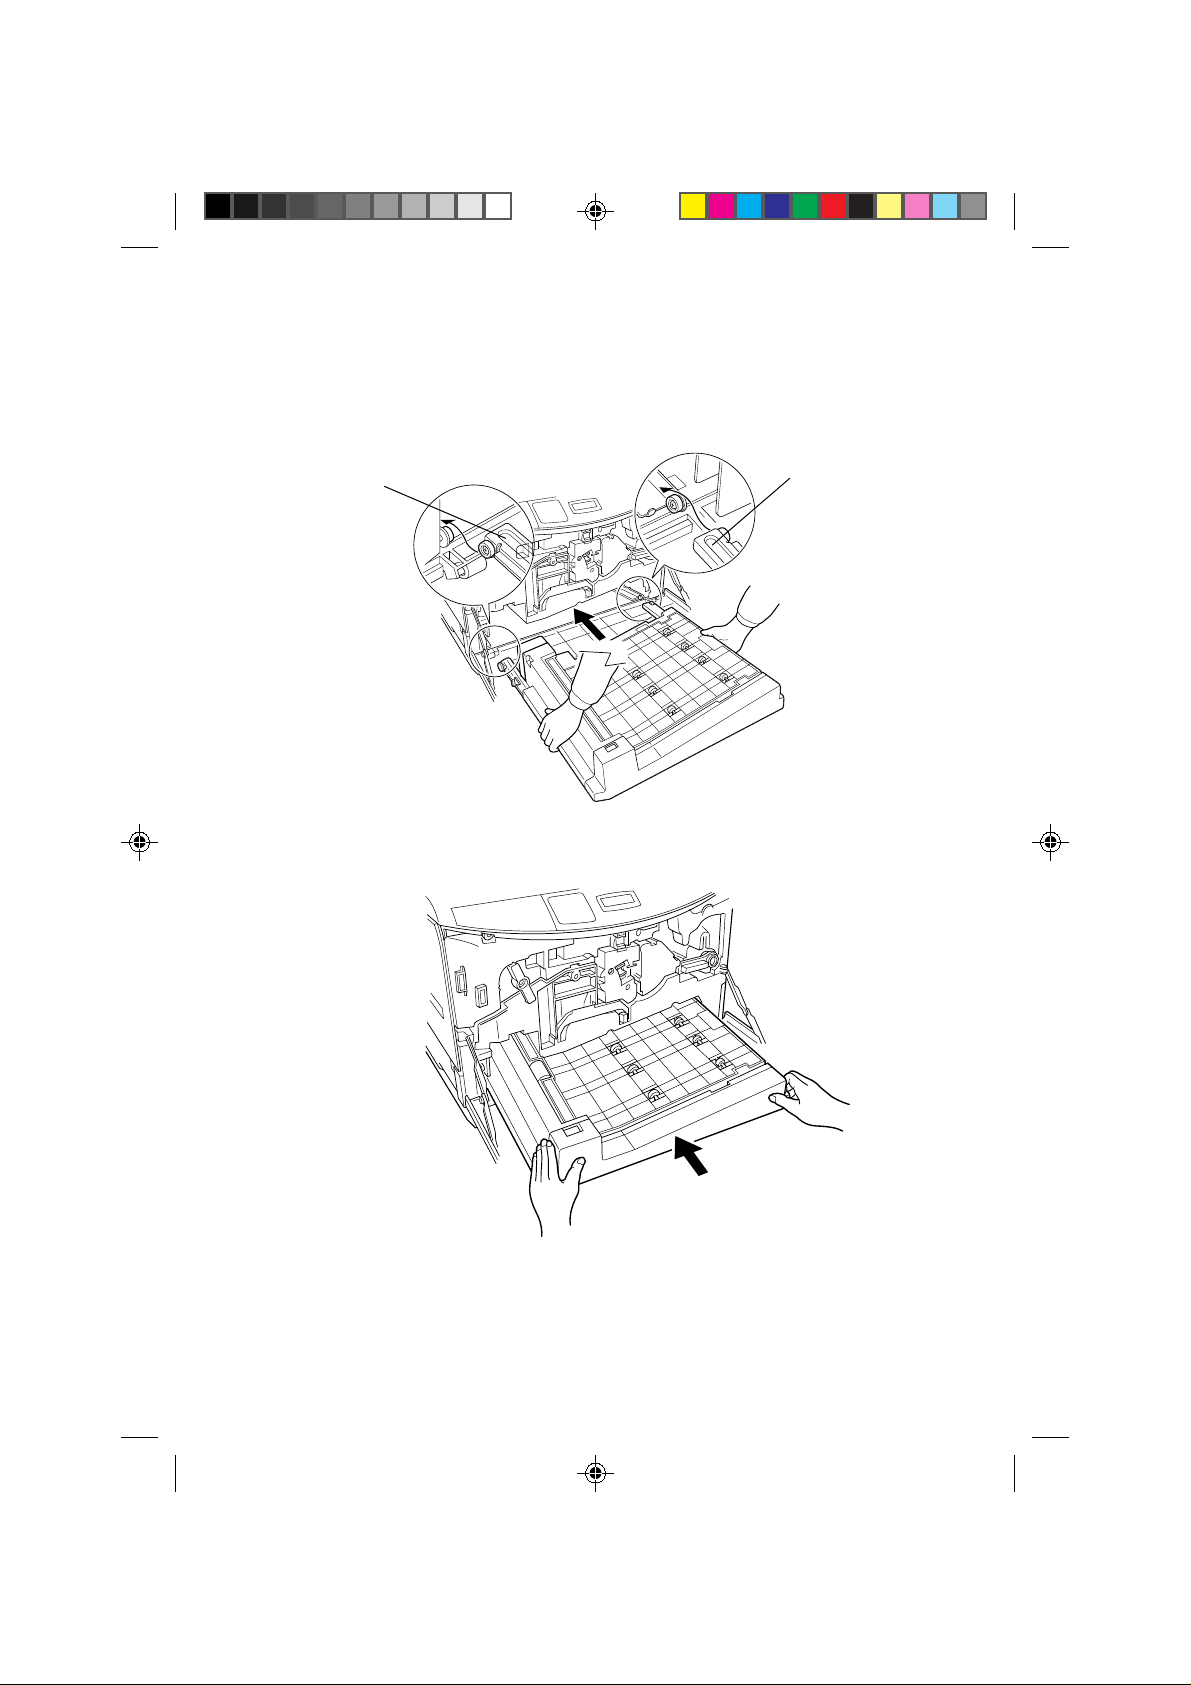
3. Remove the duplexer from the packing materials and install in the printer
as shown in the figure. Install so that the left and right rails are correctly
resting on the rails of the printer.
Rail
4. Push the DU-31 all the way into the printer.
Rail
5. Close the printer’s front cover. This completes installation of the duplexer.
8
Page 10
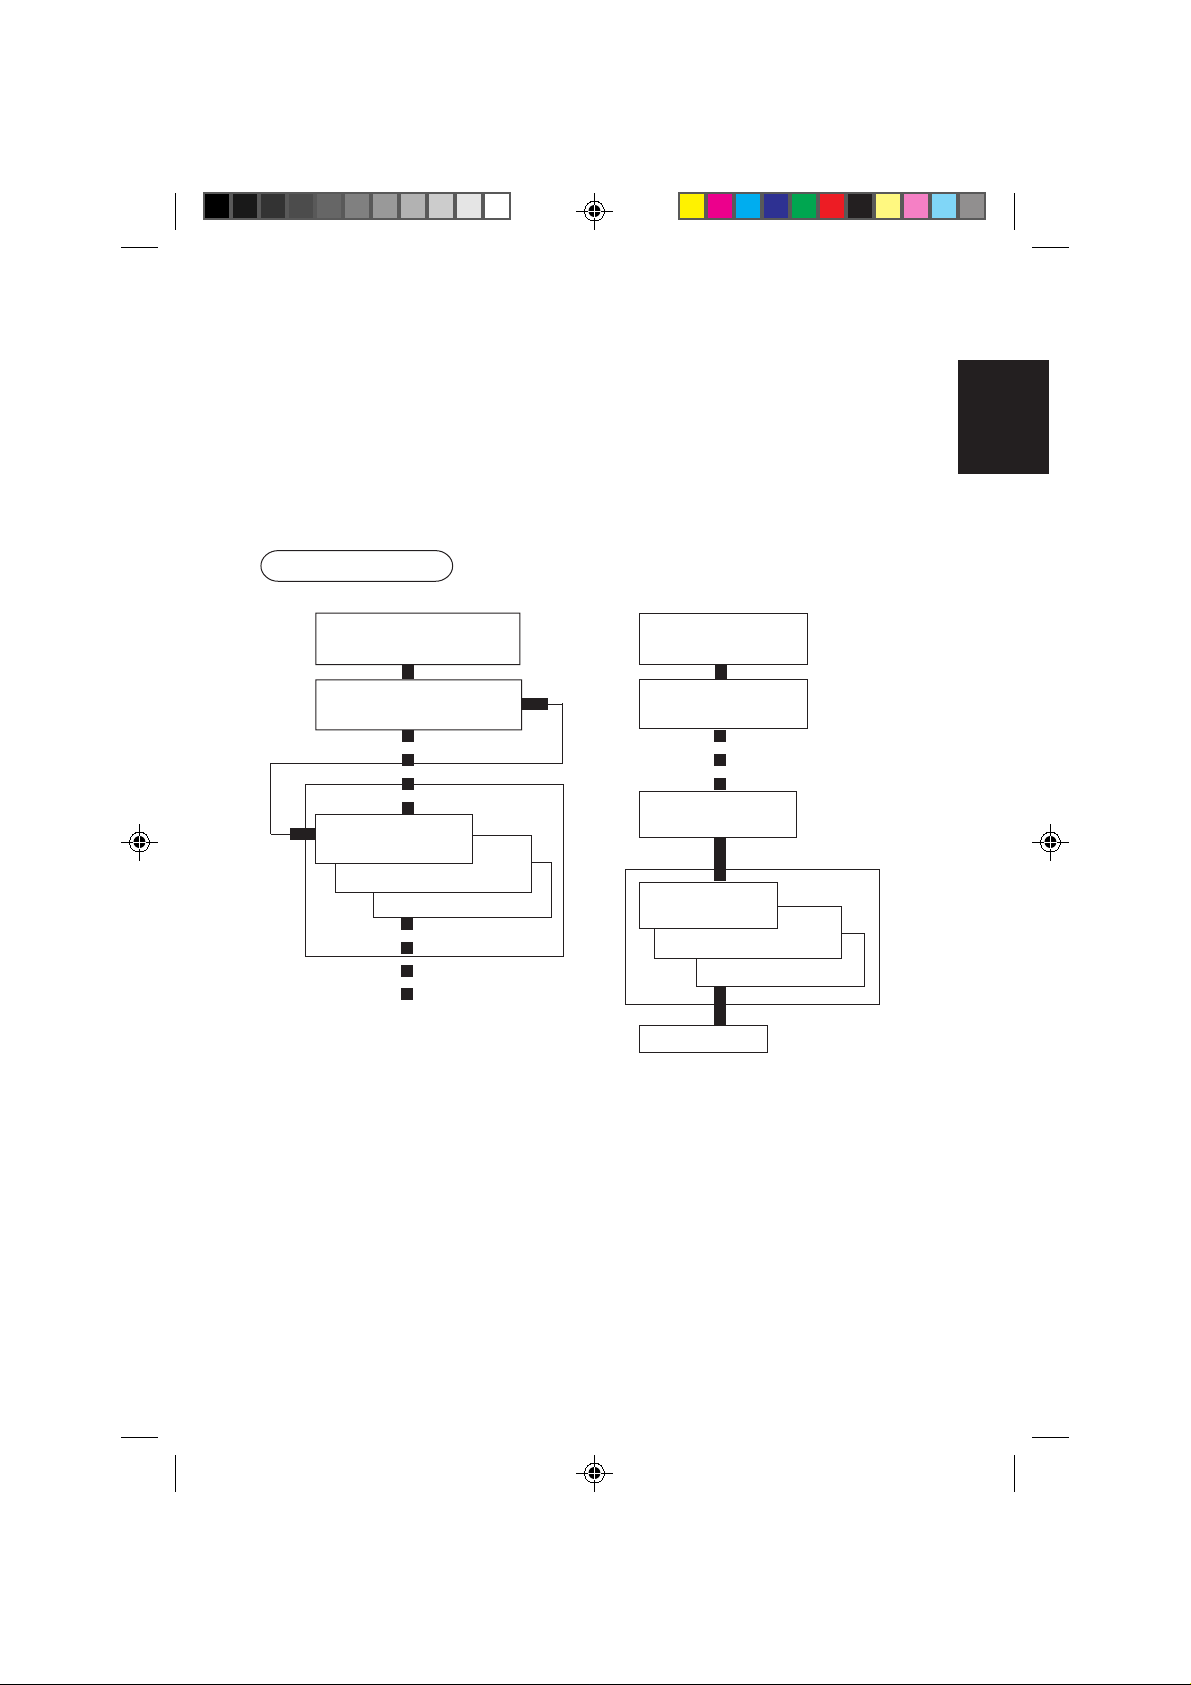
Duplex Printing
After the duplexer is installed, the duplex printing menu is added to the printer’s
mode selection menu as shown below (added menu enclosed in frame), and it is
used to switch the duplex printing mode on/off and to set the orientation for duplex
printing.
Mode selection menu
(FS-7000 only)
Ready
PAR 600 A4 001
Paper handling >
Duplex mode
None
Short edge bind
Long edge bind
Ready
PAR 600 A4 001
Interface >
Parallel
Paper type
Normal
Duplex mode
None
Short edge bind
Long edge bind
English
Deutsch
FrançaisItalianoEspañol
Others >
The duplex printing mode is explained on the following pages.
9
Page 11
Duplex Printing Mode
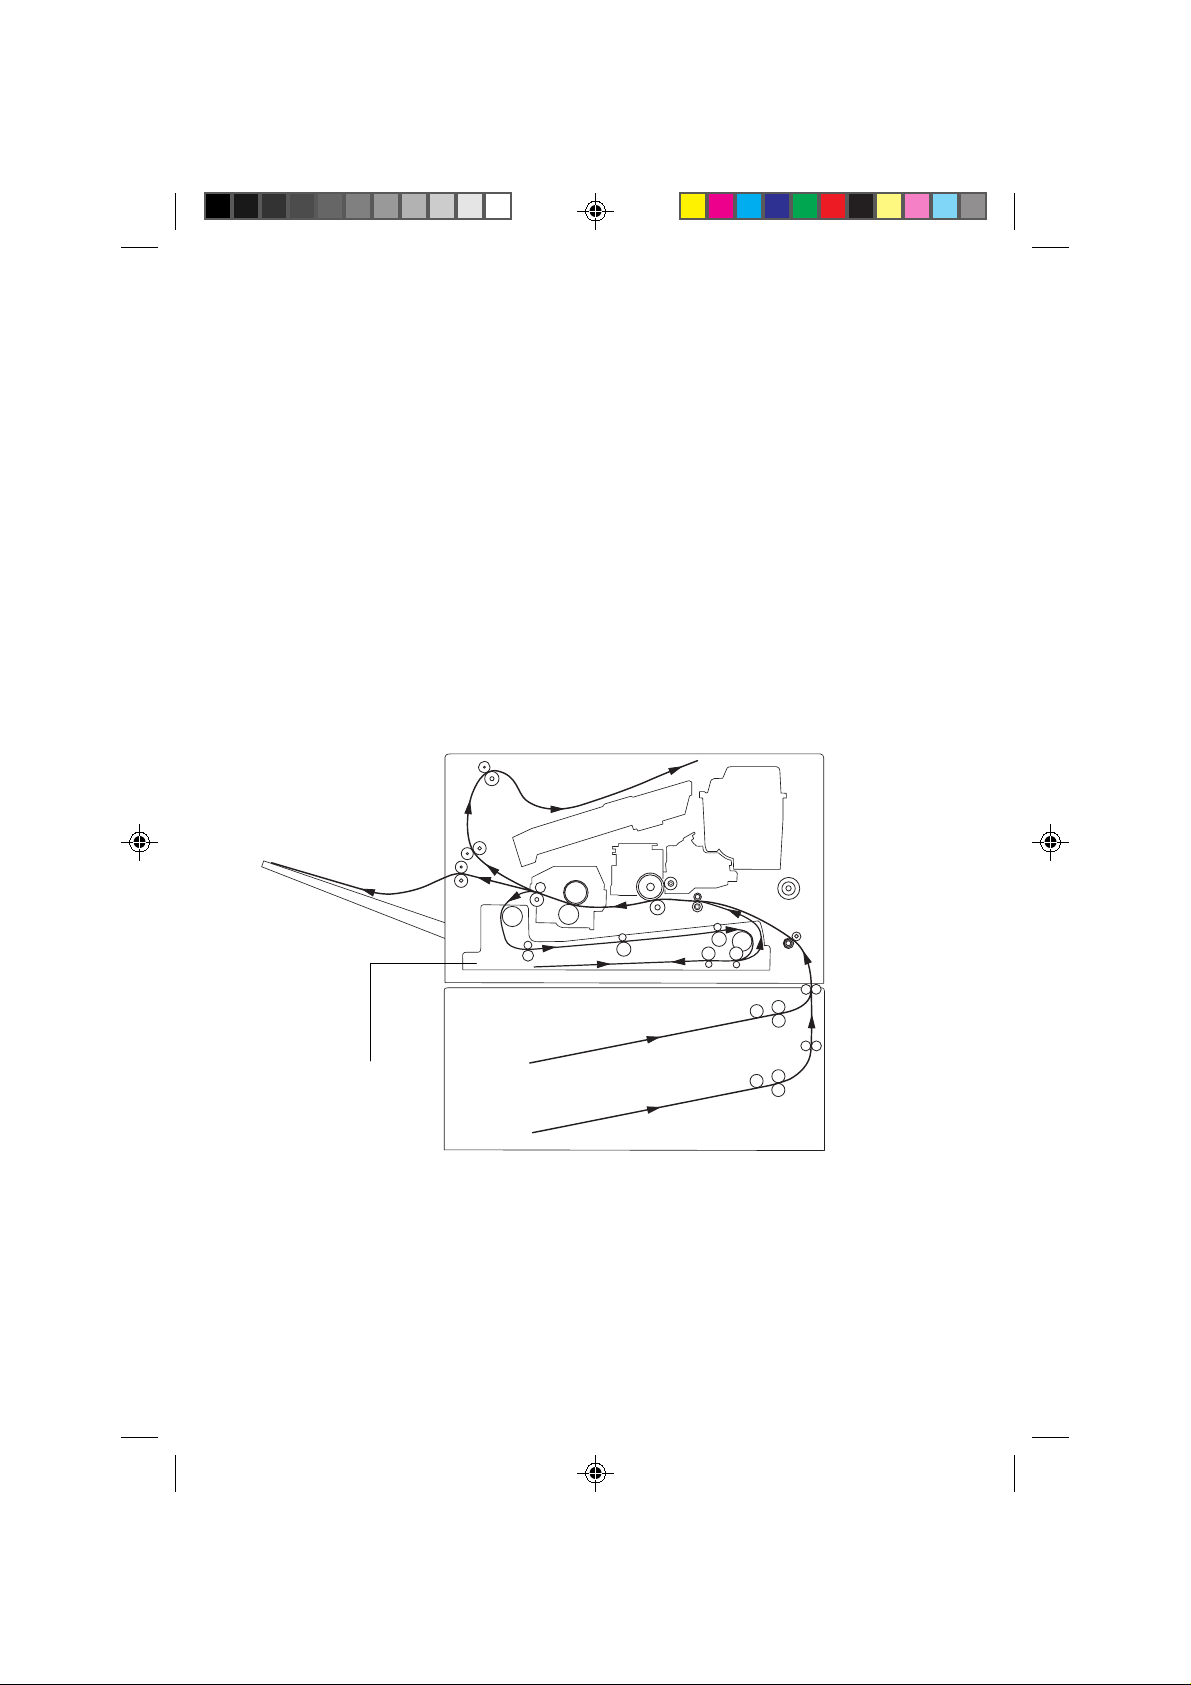
The printing operation flow in duplex printing mode is as follows. Initially, the first
sheet is fed and page 2 of the document is printed on one side of the sheet. The first
printed sheet is temporarily transferred to the duplexer. Then the printer feeds the
second sheet on which page 4 is printed on one side. After page 4 has printed, the
first sheet held in the duplexer is again sent to the printer’s transfer unit for printing
of page 1. This completes printing of the first sheet and this is output. Following
this and while the second sheet, on which page 4 has been printed on one side, is
retained on standby in the duplexer, the printer feeds the third sheet and prints page
6 on this sheet. The operation is now repeated as described above to perform the
duplex printing.
Duplex Printing Flow
Printer
Duplexer (DU-31)
10
Paper feeder
(PF-30)
Page 12
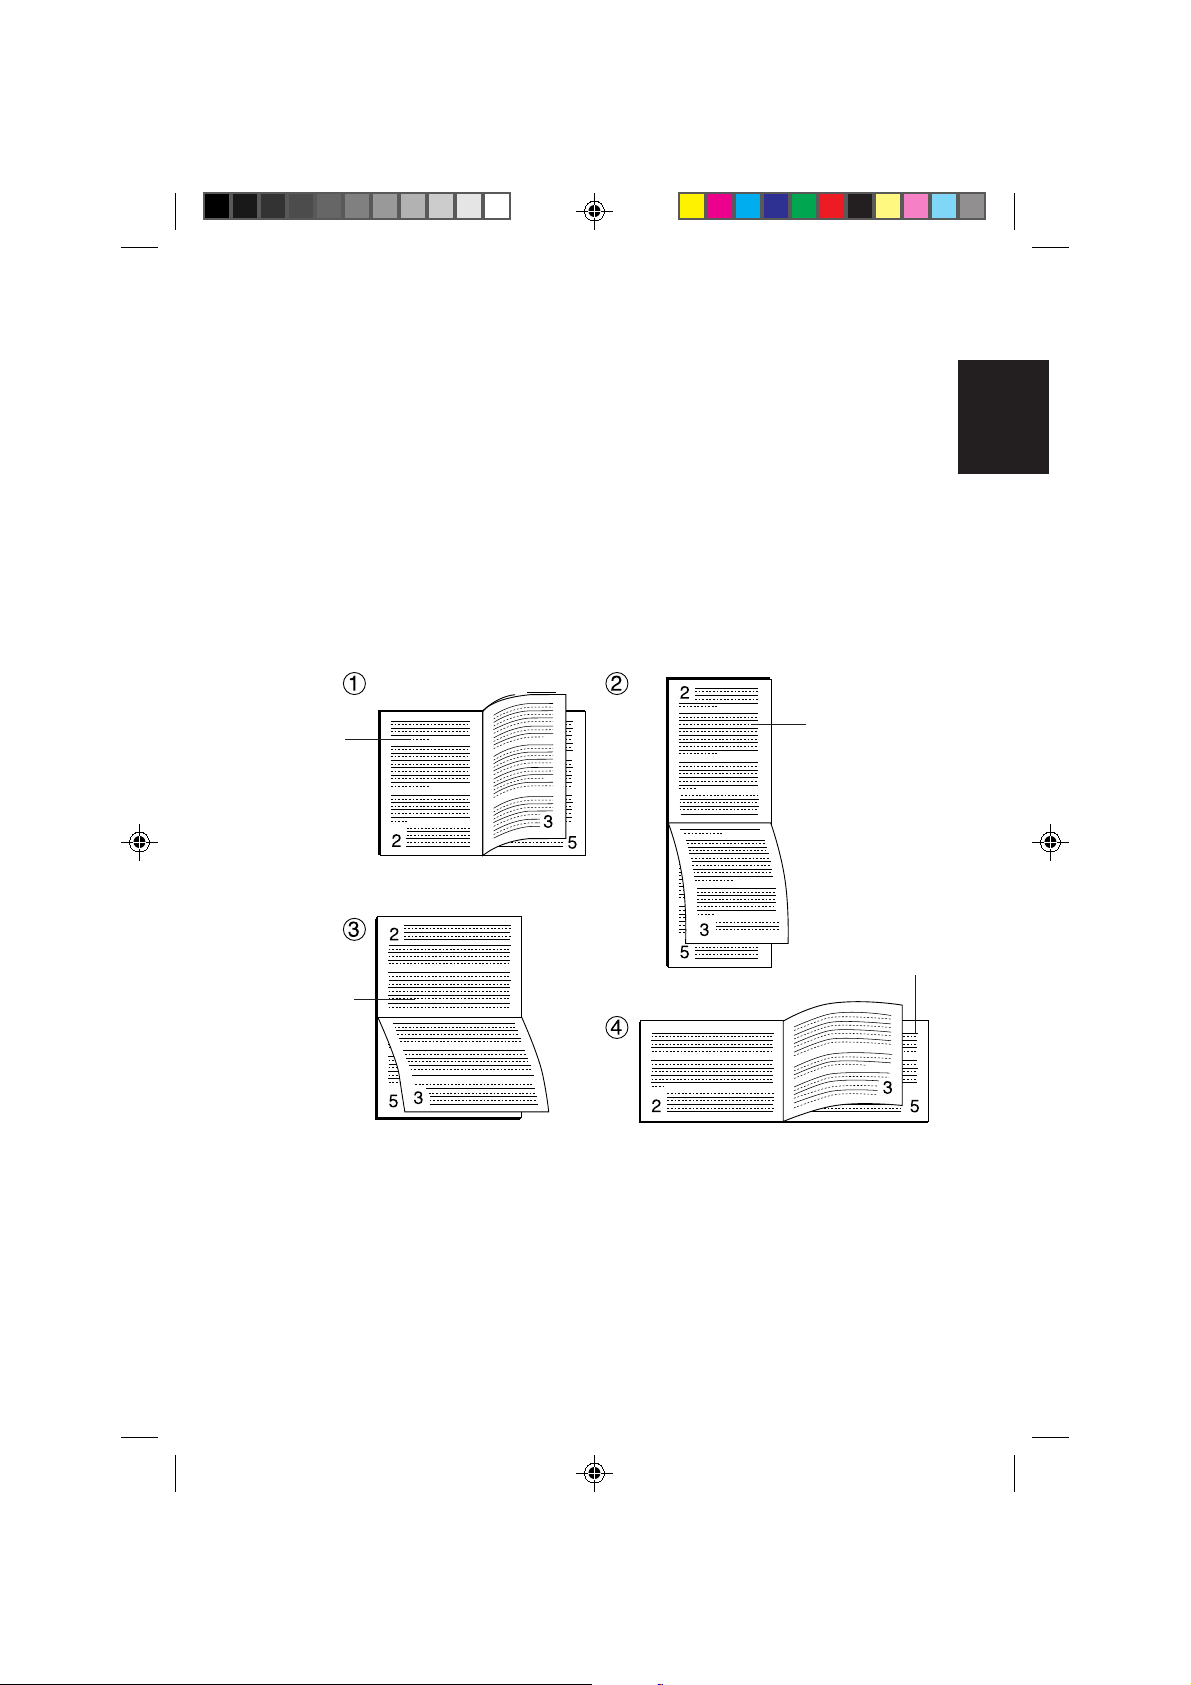
Setting the Binding Mode
To bind printed sheets like a book is called “binding.” There are two forms of
binding; “long edge” which is binding on the long side of the page, and “short
edge” which is binding on the short side of the page. You can select both portrait
and landscape printing for both long edge and short edge binding.
Binding type and printing direction can be set using the following four binding
modes. These are 1 Portrait / Long edge, 2 Portrait / Short edge, 3 Landscape /
Long edge, 4 Landscape / Short edge. (See the figures below.)
Binding mode
English
Deutsch
Portrait /
Long edge
Landscape /
Long edge
Portrait /
Short edge
Landscape /
Short edge
In the portrait/long edge and landscape/short edge modes (1, 4), both sides of the
page are printed in the up to down direction.
In the portrait/short edge mode and landscape/long edge mode (2, 3), the front
side of the page and the rear side of the page are printed in reverse up/down
directions.
FrançaisItalianoEspañol
11
Page 13
Duplex Printing Mode Settings
Settings for the duplex printing mode are made on the printer’s control panel.
Settings on the Printer’s Control Panel
Make the settings for duplex printing and binding on the printer’s control panel
using the following procedure.
1. Confirm that Ready is indicated on the printer’s message display and
that the on-line indicator is lit.
2. Press the printer’s MODE key.
3. Display “paper handling >”, press the key, and press the + or –
key to display “ > Duplex mode”. The second line indicates the
current mode. (In the initial state, None is shown.) In the case of an FS7000, using the + or – key, display Duplex mode on the message
display.
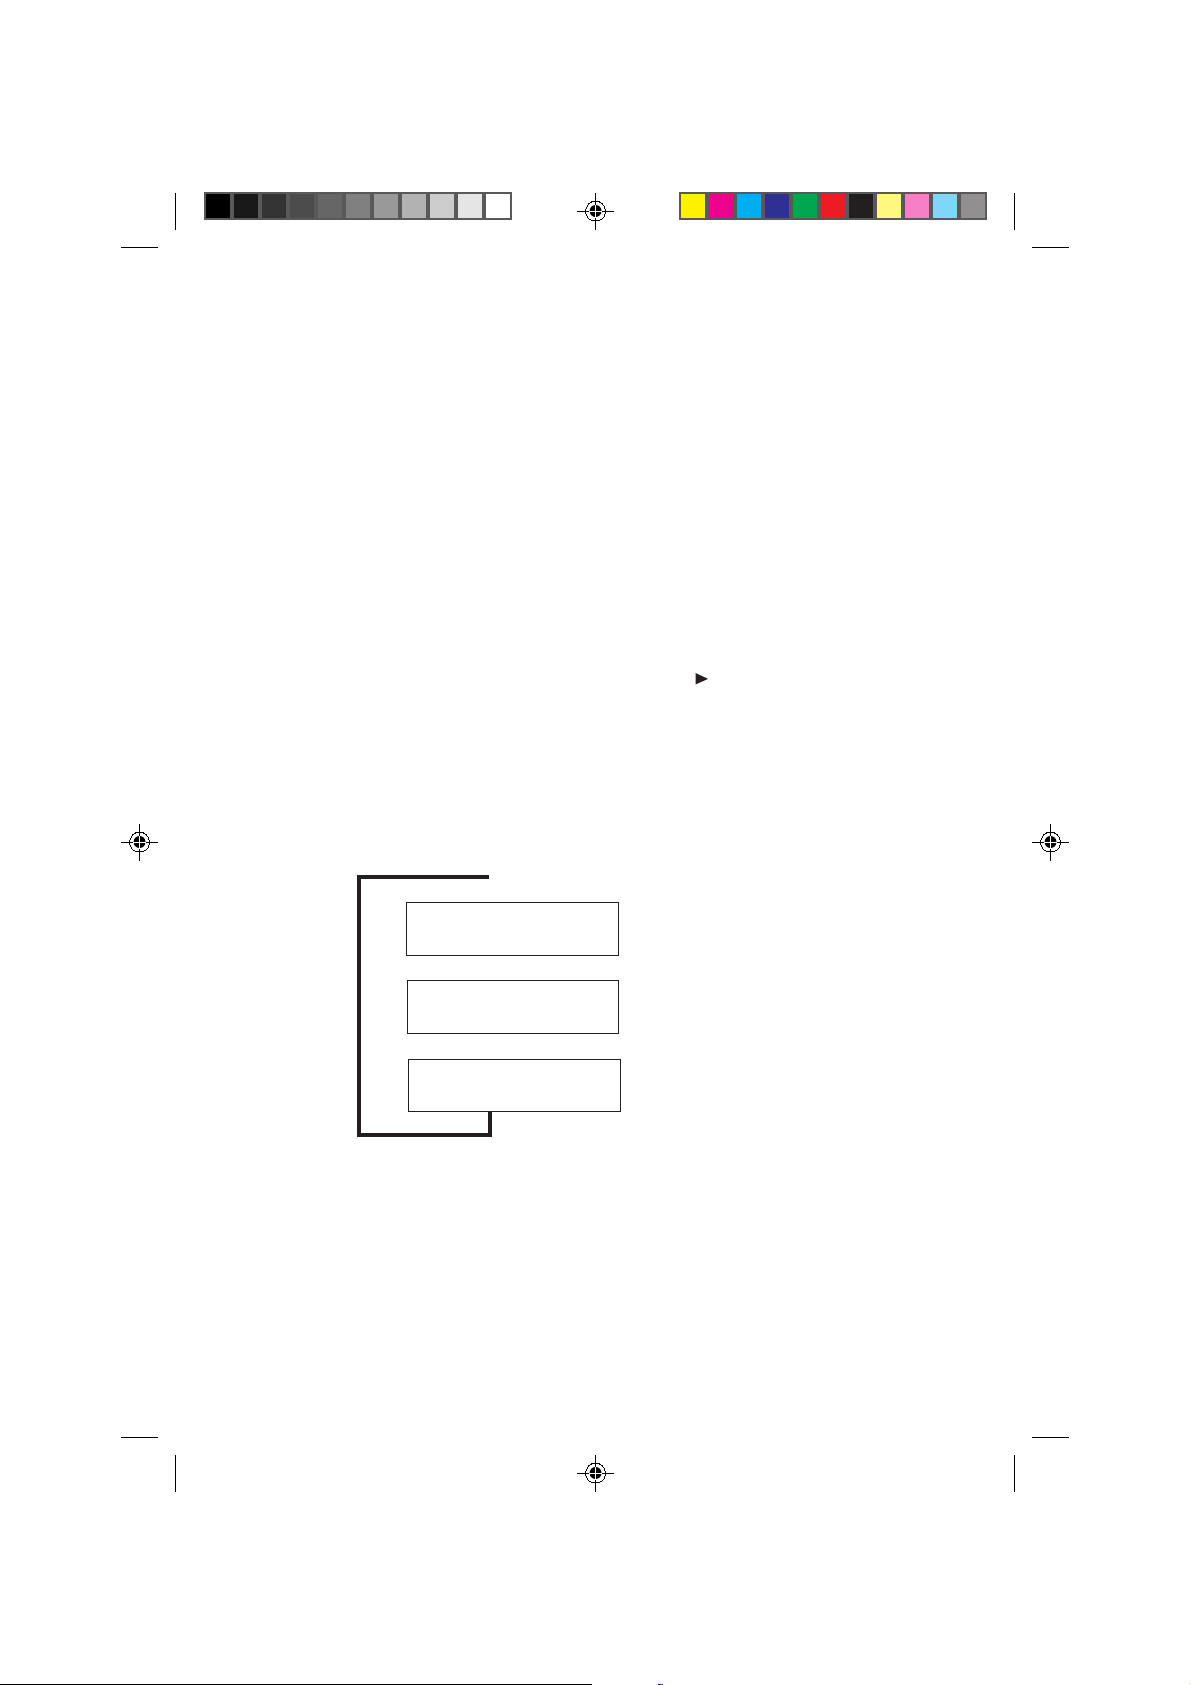
4. When the ENTER key is pressed, the ? mark flashes and the display can
be changed by pressing the + or – key as shown in the following diagram.
➔
Duplex mode
?None
Duplex mode
?Short edge bind
➔➔
Duplex mode
?Long edge bind
To abandon the setting, press the CANCEL key.
5. Select the desired binding mode and press the ENTER key.
6. When the MODE key is pressed, the message display indication returns to
Ready.
The same setting can also be performed by accessing the printer driver from the
printer setting menu of your appplication software.
12
Duplex printing is not performed.
(Initial setting)
Short edge binding
Long edge binding
Page 14

Duplex printing from the Multi-Purpose Tray
In first mode, be sure to set the MP tray to the same paper size, paper type and feed
direction as set for the current cassette. If the paper size, type or feed direction
differs, a paper jam may result. Also note that it is not possible to select the multipurpose tray as the current cassette and perform duplex printing. We therefore
recommended that duplex printing be performed from the paper cassette.
Note In the case of an FS-7000, duplex printing is not possible from the
printer’s MP (multi-purpose) tray, the optional envelope feeder (EF-
1), or optional universal feeder (UF-1). If duplex printing is attempted from these paper sources, the mode is automatically
canceled and the printed paper is output from the face-up tray.
When the duplex printing mode is set to off, paper can also be
output from the face-down tray. However, when feeding paper from
the envelope feeder, output is through the face-up tray.
English
Deutsch
FrançaisItalianoEspañol
13
Page 15
Clearing Paper Jams
Error messages and remedial actions when paper jamming has occurred during
duplex printing are explained in the following section.
WARNING Take care not to leave any small pieces of paper in the printer
when removing paper jams. This could result in fire.
This section describes how to remove paper when it jams in the printer. The printer
will stop whenever paper jams in the printer or paper is not fed from a cassette. The
printer will go offline and the message Paper jam Open front cover
will appear on the message display.
Paper jam
Open front cover
Opening the printer’s front cover will cause the message display to change. It will
now indicate the coded location (A through I and 1 through 6) of the paper jam.
Example
Paper jam
C, H, I, 3
In this example, paper is jammed in the paper feeder (C), paper feed unit (H),
duplexer (I), and in the upper cassette of the optional paper feeder (3). The
corrective action to take in cases like this is explained using actual examples
beginning from page 17.
The meanings of symbols appearing on the message display and the corresponding
locations of paper jams are given in the table on the next page. Be sure to correct
paper jams according to the procedure given on the following pages.
14
Page 16
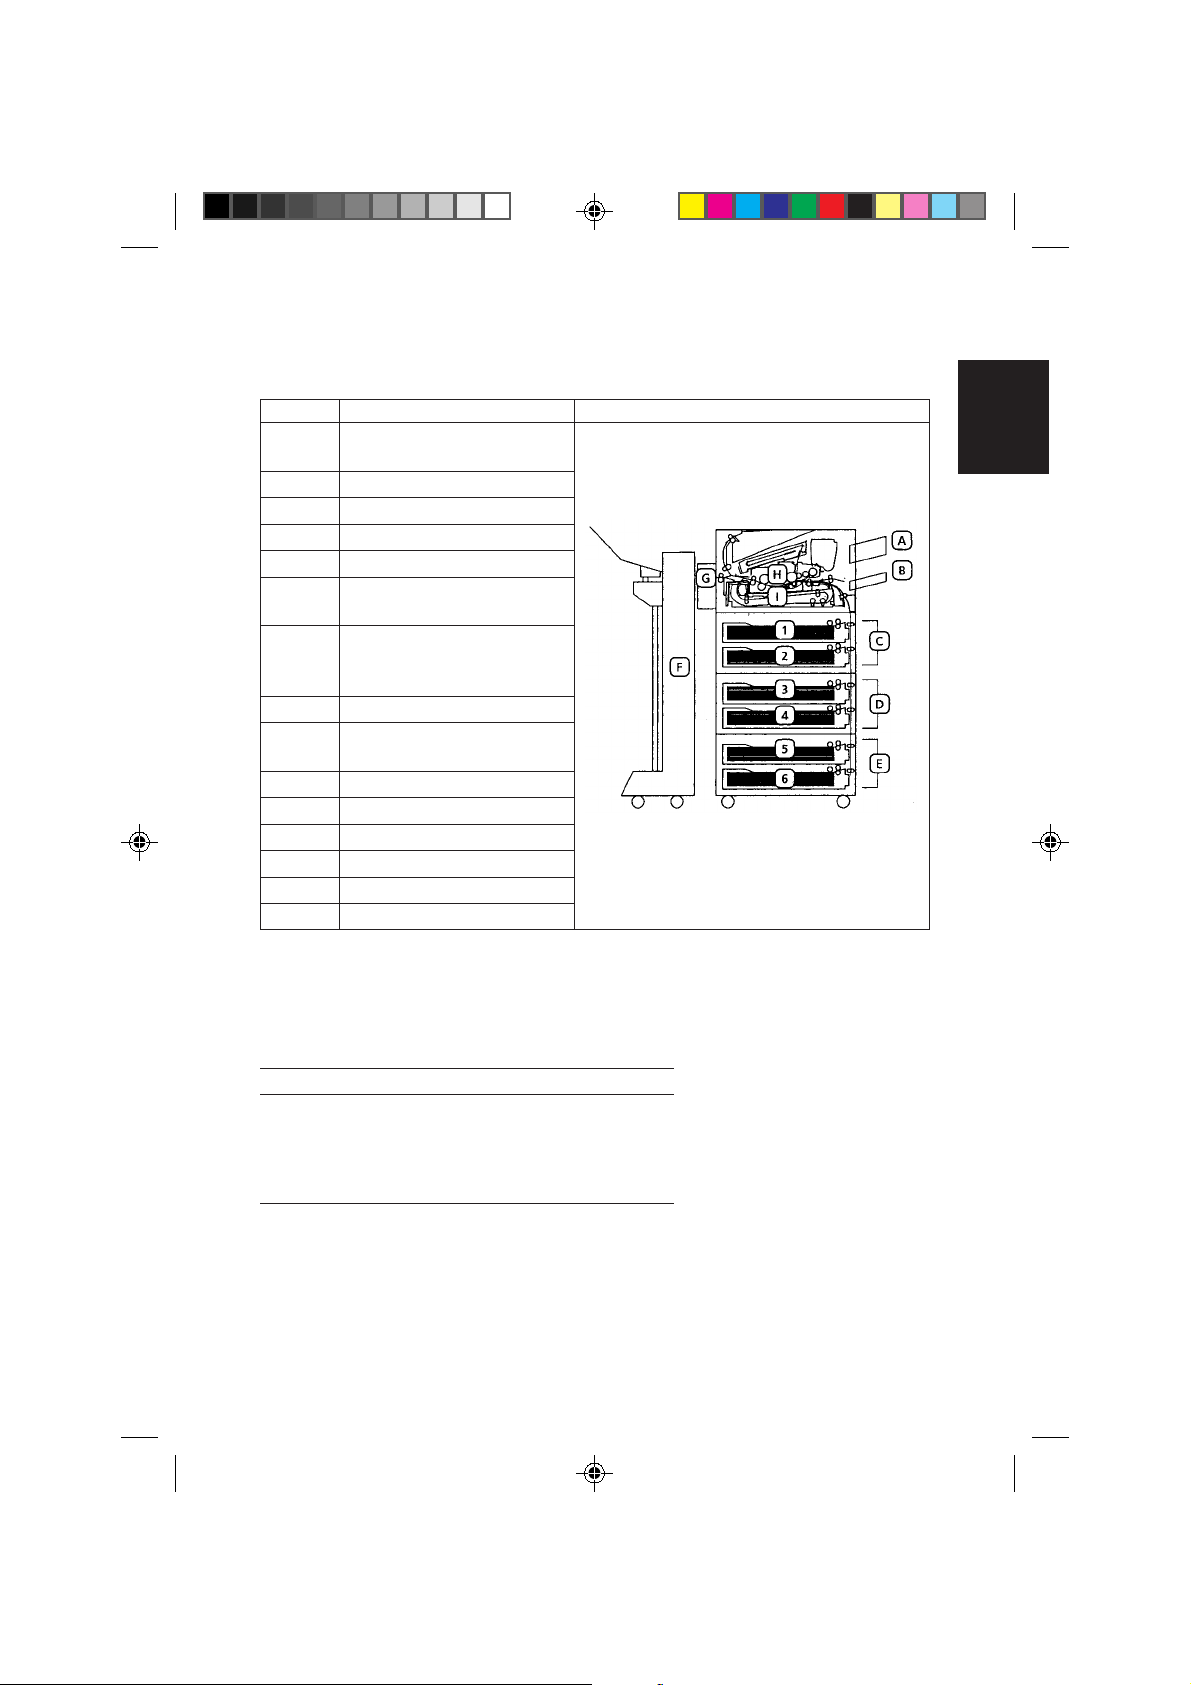
Message Display Indicator and Paper Jam Location
Indicator Meaning of Indicator Corresponding Printer Location
Optional paper feeder
A
(EF-1 or UF-1)
MP (multi-purpose) tray
B
Paper feeder included with printer
C
Optional paper feeder (PF-30)
D
Optional paper feeder (PF-30)
E
Optional unit
F
(DF-30/DF-31, SO-30 or ST-30)
Face-up output tray
/face-down output tray
G
(connection with optional unit)
Paper feed unit
H
Optional duplexer
I
(DU-31 [this unit])
Cassette 1
1
Cassette 2
2
Cassette 3
3
Cassette 4
4
Cassette 5
5
Cassette 6
6
A label titled “Paper Jam Location Indicators” is also
attached to the back of the front cover.
English
Deutsch
FrançaisItalianoEspañol
When a paper jams, the indicator on the printer’s control panel also flashes to
indicate the location of the jam. When a paper jam occurs in a paper feeder, the
LED at the front of this paper feed cassette also flashes. The meanings of the
flashing modes can be seen in following table.
LED status Meaning
Fast flashing Paper is jammed in this cassette.
Slow flashing No paper in this cassette.
Lit Currently selected cassette
Off • Cassette improperly inserted.
• Cassette is not currently selected.
In case of a paper jam, after checking the location of the paper jam using the above
table, take corrective action according to the table on the next page. After removing
all jammed paper, the printer will automatically resume printing.
15
Page 17
Corrective Action for Paper Jam
Indicator
A
B
C
D
E
F
G
H
I
1 to 6
Meaning of Indicator
Check the optional paper
feeder (EF-1 or UF-1). (Only
when installed)
Check the printer’s MP
(multi-purpose) tray.
Check the paper feeder
(main unit).
(D and E are only displayed
when an optional PF-30 is
installed.)
Check the optional unit
(DF-30/DF-31/SO-30/ST-
30). (Only when installed)
Check the printer’s face-up
output tray.
(connection with optional
unit)
Check the printer’s facedown output tray.
Check the printer’s paper
feed unit.
Check the printer’s fuser
unit.
Check the optional duplexer
(DU-31 [this unit]).
Check the paper feed
cassette indicated.
Corrective Action
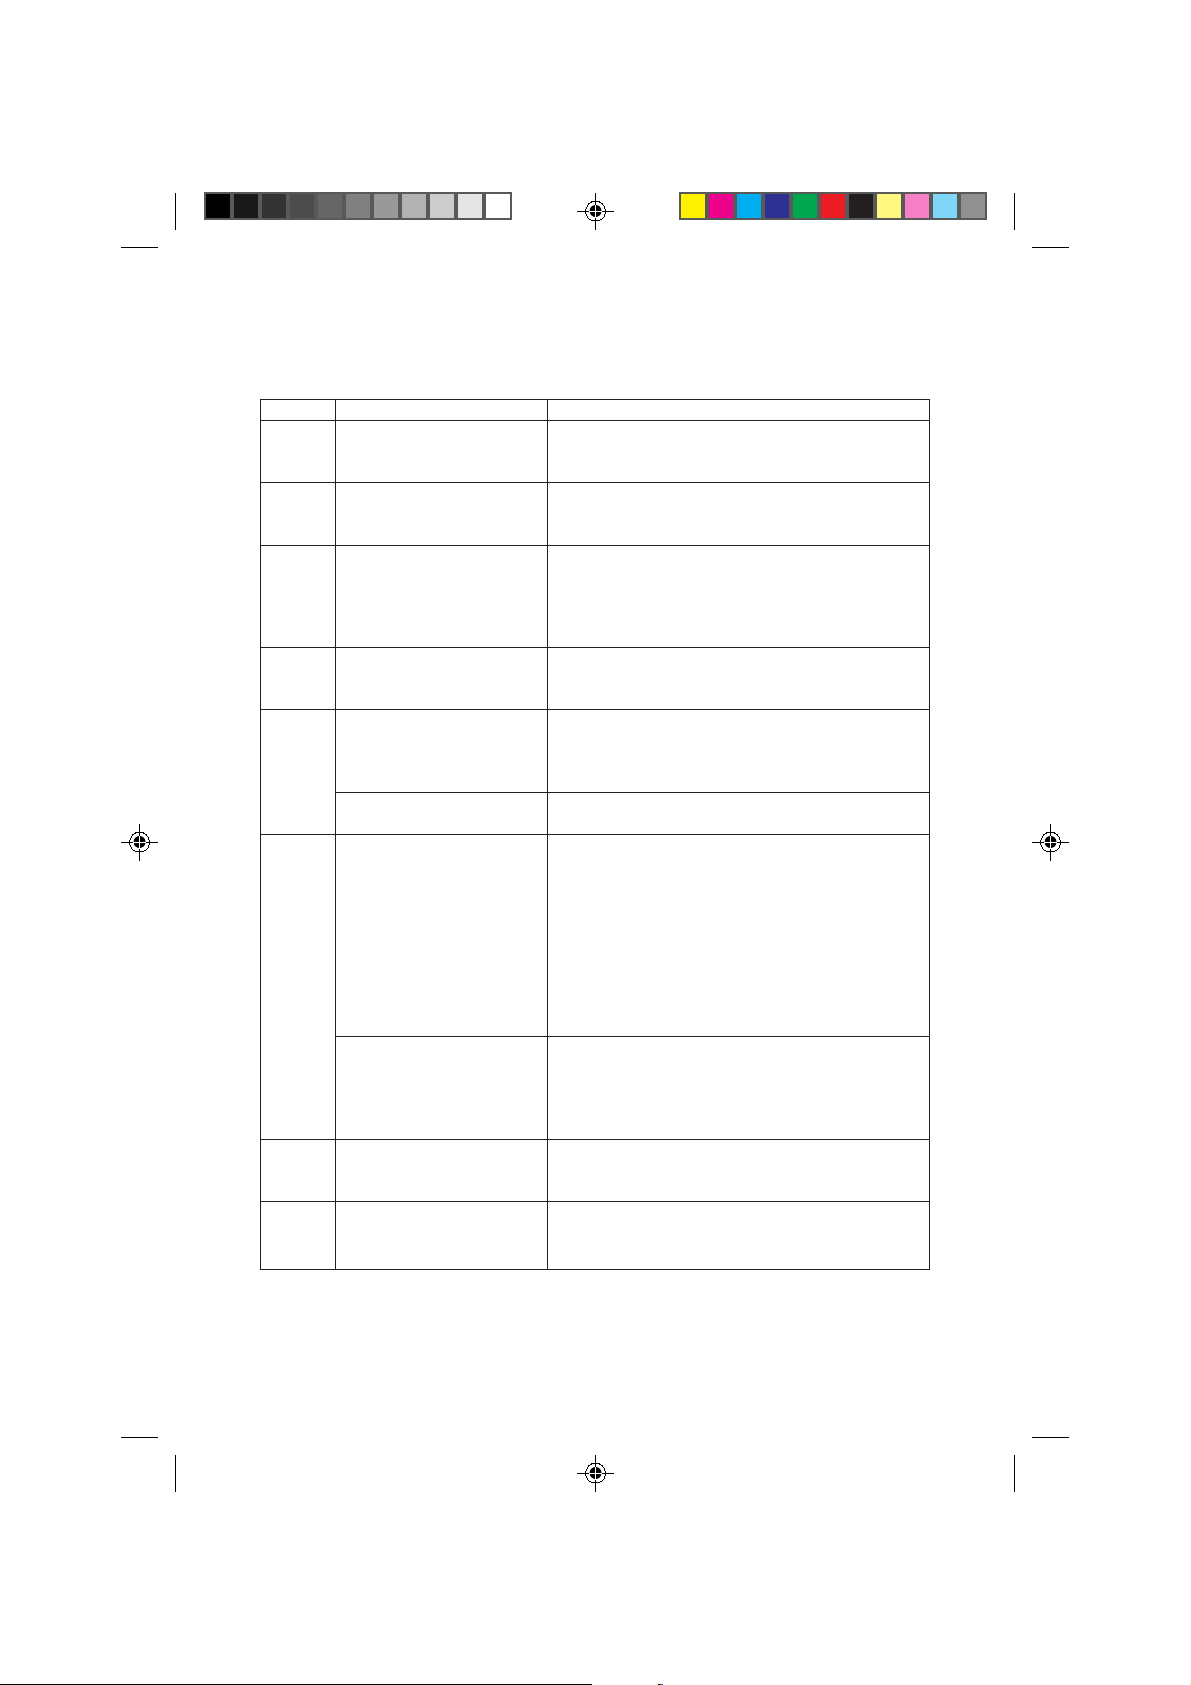
A paper jam has occurred in the optional feeder.
Carefully pull out the jammed paper. (For details, read
the EF-1/UF-1 instruction manual.)
A paper jam has occurred in the MP (multi-purpose)
tray. Carefully pull out the jammed paper. Then open
and close the front cover of the printer once.
Open the side cover of the paper feeder indicated and
remove the jammed paper. (Refer to the example on the
next page.)
Remove the paper jammed in the paper stacker. (For
details, read the DF-30/DF-31/SO-30/ST-30 instruction
manual.)
Paper is jammed before being completely output. Open
the side cover of the printer and carefully remove the
jammed sheet. (For details, read the printer’s instruction
manual.)
If printing stops before a sheet is completely output,
carefully remove that sheet.
Open the front cover and carefully pull out the paper
feed unit as far as it will go. If paper is jammed in the
registration rollers, remove it by pulling out in the
direction where this is most easily accomplished. (For
details, read the printer’s instruction manual.)
If paper is jammed in the fuser unit, remove the paper in
the same manner. (For details, read the printer’s
instruction manual.)
After all paper has been completely removed, return the
paper feed unit to its original folded down position.
Open the front cover and carefully pull out the paper
feed unit as far as it will go. Open the fuser unit cover
(hold the [green] knob), and check the interior of the
fuser unit. Paper may remain trapped inside the fuser
unit.
Open the front cover, pull out the duplexer and remove
the jammed paper. (For details, read the following
pages.)
Pull out the paper feed cassette indicated and remove the
jammed paper. After all paper has been completely
removed, open and close the front cover once.
16
Page 18
Example
In the example given on page 14, paper is jammed in the paper feeder (C), the
paper feed unit (H), the duplexer (I), and upper cassette of the optional paper
feeder (3).
Paper jam
C, H, I, 3
English
1. When paper jams in multiple locations such as in this example, begin
taking corrective action from the location displayed at the left.
Side cover of the paper feeder
After the paper jam in the paper feeder (C) has been corrected, the display
will change as follows:
Paper jam
H, I, 3
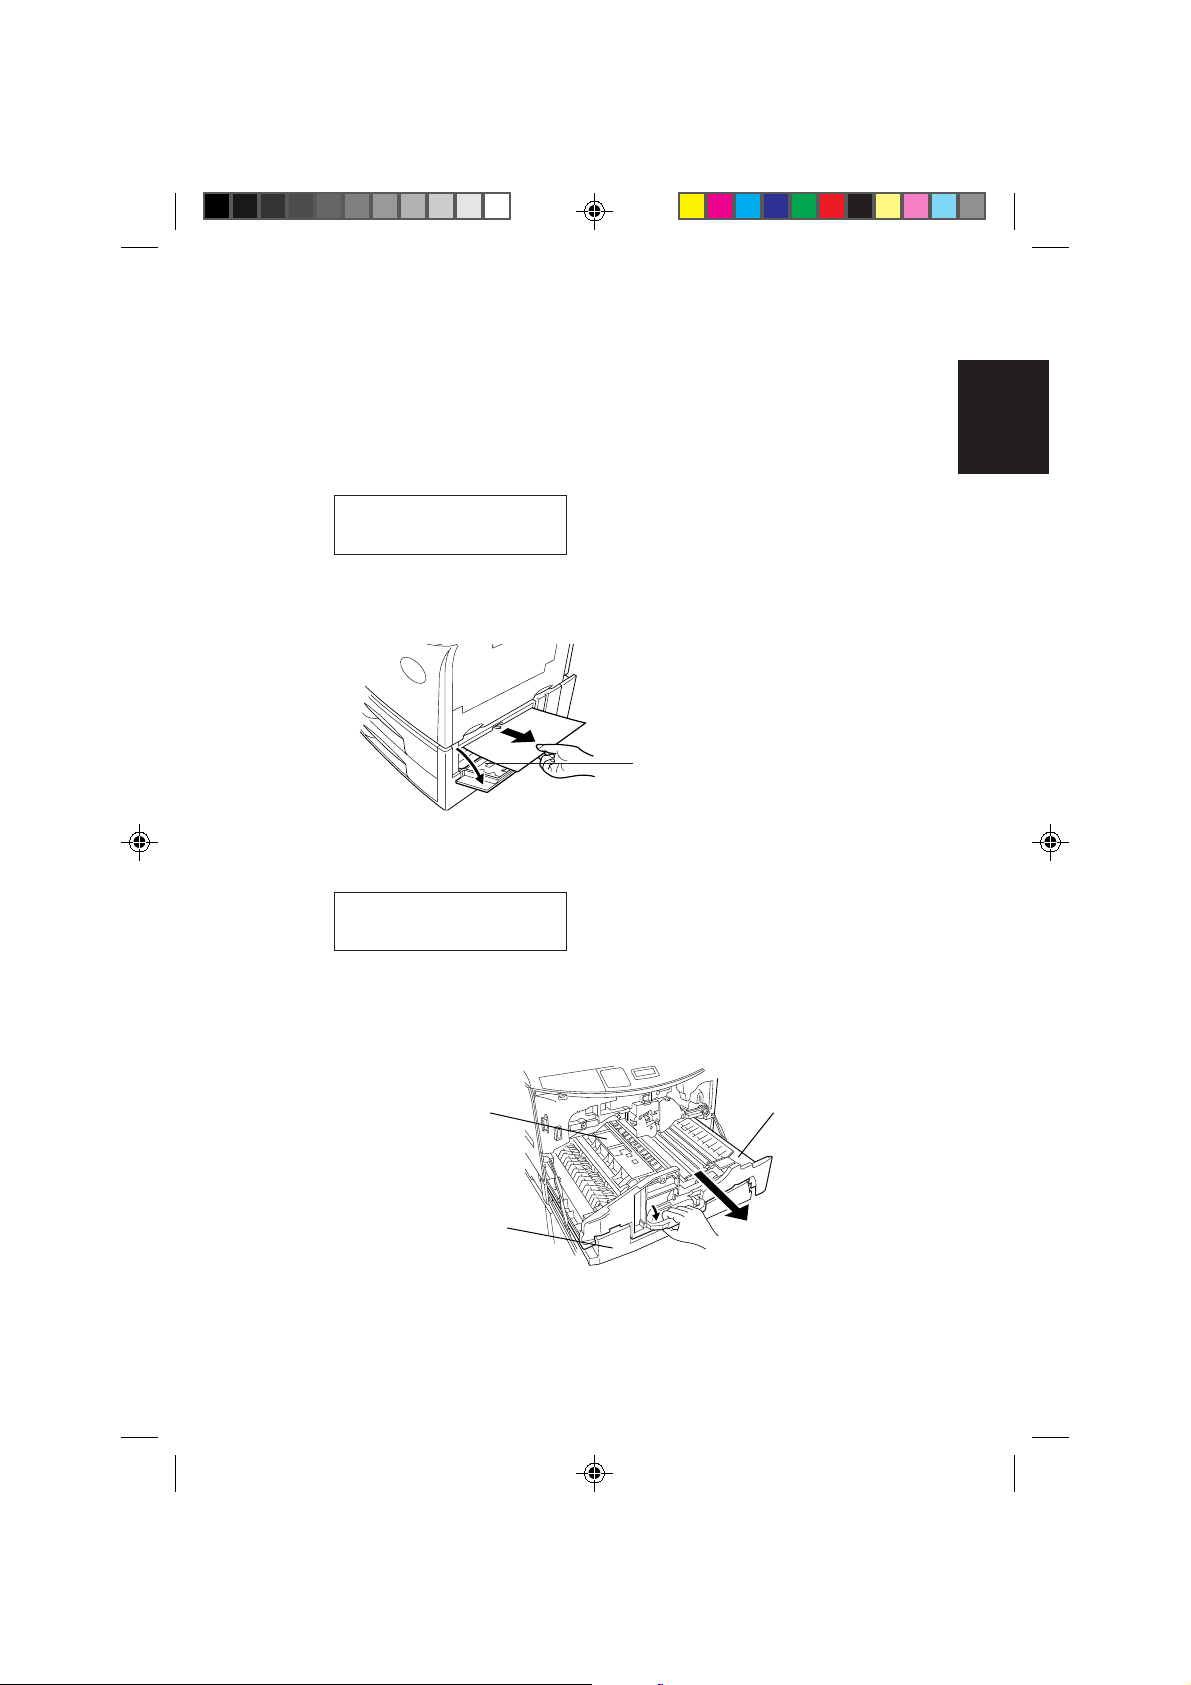
2. Next, open the printer’s front cover and turn the lock lever counter
clockwise (except for the FS-7000). And then carefully pull the transfer
unit out as far as it will go. (At this point, the duplexer is simultaneously
pulled out.)
Fuser unit
Transfer unit
Deutsch
FrançaisItalianoEspañol
Duplexer
CAUTION For a while after the transfer unit is pulled out, the fuser unit
inside will be hot. Do not touch with bare hands as burns
could result.
17
Page 19
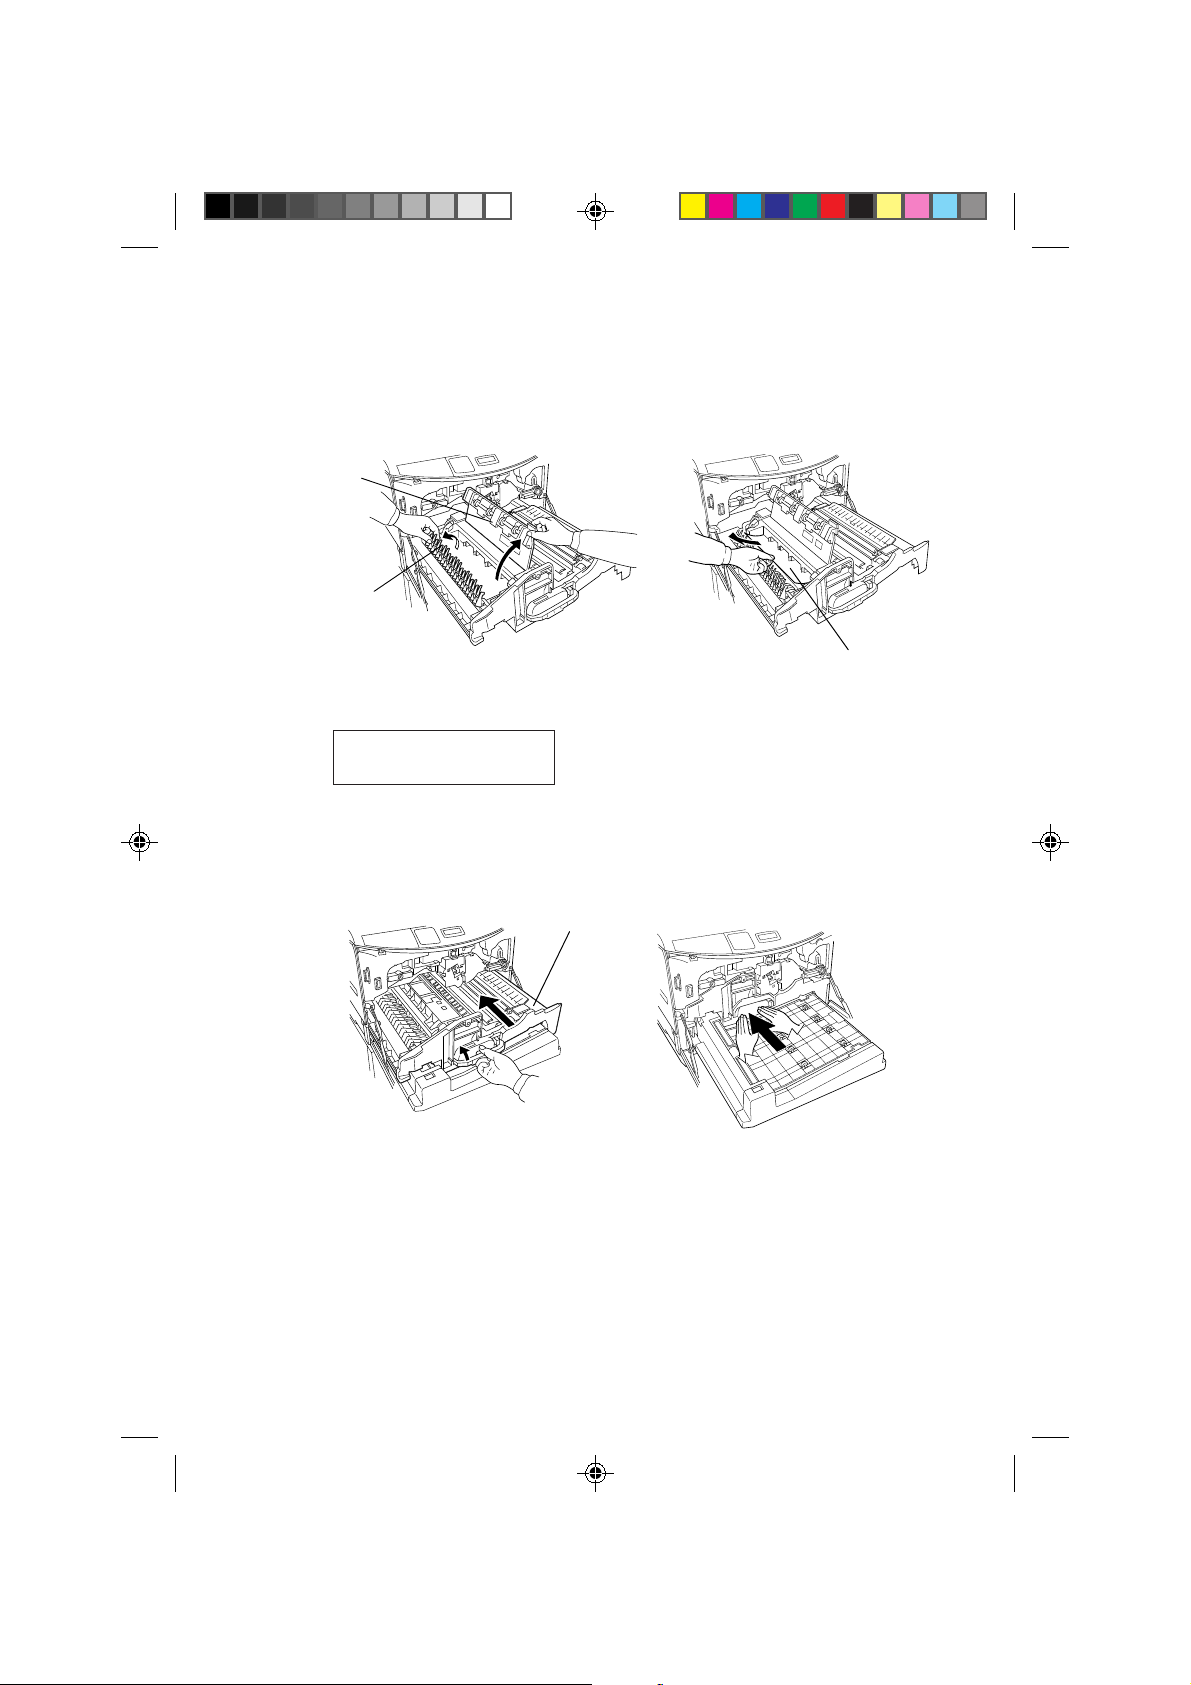
3. Check the guide changer on the left side of the fuser unit. Should paper be
jammed underneath, raise the guide changer and the fuser unit cover
(hold the [green] knob). Remove paper as shown in the following figure.
Fuser unit
cover
Guide changer
➞
Jammed paper
After remedying, the message display indication changes to the following:
Paper jam
I, 3
4. After confirming that paper is not jammed in the transfer unit, return the
transfer unit alone into the printer.
Transfer unit
➞
5. Turn the lock lever clockwise to securely lock the transfer unit.
18
Page 20

6. Open the two transparent plastic covers at the top of the duplexer.
Remove any jammed paper from the inside as shown in the following
figure.
Open the first cover and
remove paper.
Transparent
plastic cover
Open the second cover
and remove paper.
English
Deutsch
Transparent
plastic cover
7. Following removal of the paper, return the transparent plastic covers to
their original positions and reinsert the duplexer into the printer. The
message display indication changes to Front cover Open.
8. Close the printer’s front cover. This completes the actions for clearing
paper jamming.
Notes • Sometimes the page on which the paper jam occurred will not be
re-printed depending on the location of the paper jam.
• Note that your hands may become dirty from unfused toner when
removing paper jams.
Frequent occurrence of paper jams may indicate you are using a paper specification
which does not suit the printer. If this appears to be the case, please change to a
different type of paper.
If you have tried changing paper types and paper jams still occur frequently, there
may be a problem with the printer. In this case, please contact your Kyocera
dealer.
FrançaisItalianoEspañol
19
Page 21
Paper Selection
Although the page printer is designed for printing on standard dry PPC photocopier
copy paper (standard paper), it can print on various types of paper that conform to
the specifications given in this chapter. For details on paper which can be used,
also refer to the printer’s User’s Manual.
Select paper carefully as using paper inappropriate for the printer may result in
paper jams or wrinkling of output paper. Low-quality paper may reduce printing
quality, not only wasting paper but possibly leading to damage to the printer. It is
possible to achieve efficient printing with few problems and minimize the risk of
printer damage or wear by following the precautions listed below.
Usable Paper
Be sure to use copy paper (standard paper) used in standard dry PPC photocopiers.
Note Some recylced paper does not meet the necessary specifications
(Table 1) for use in this printer due to conditions such as stored
water and pulp content. Before purchasing recycled paper, test a
sample on the printer and check that printing quality is satisfactory.
Be sure to select a brand of recycled paper which offers good
printing quality and does not contain excessive paper dust.
There are differences in grade between each paper manufacturer, and these
differences can affect printer operations. Satisfactory printing results cannot be
obtained through the use of poor-quality paper. Even inexpensive paper may turn
out to be uneconomical from a results standpoint if its quality is inappropriate for
the printer.
20
Page 22
Basic Paper Specifications
The following table summarizes the basic paper specifications.
Table 1. Basic Paper Specifications
English
Item Specification
Weight 60 to 90 g/m
Thickness 0.086 to 0.110 mm
Dimensional accuracy ±0.7 mm
Squareness of corners 90° ±0.2°
Moisture content 4% to 6%
Pulp content 80% or more
2
Note When performing duplex printing on paper larger than A4, espe-
cially with thin paper weighing less than 65 g/m2, the edges may
become slightly dirty. Use standard paper weighing more than
70 g/m2.
Kyocera bears absolutely no responsibility for accidents resulting
from the use of inappropriate paper which does not meet the
specifications listed above. Consult with your Kyocera dealer before
purchasing any specially treated paper or special application paper.
Selecting the Right Paper
High quality printing is possible when using paper that conforms to the conditions
in Table 1. Points that must be taken into consideration when selecting paper for
duplex printing are discussed below.
Deutsch
FrançaisItalianoEspañol
Condition of the Paper
Avoid using paper that is folded at the corners, curled, dirty, torn, has rough edges,
fuzzy fibers, a rough surface or is easily torn.
Use of paper in these conditions can lead to illegible printing, misfeeding, and
paper jams, and can shorten the life of the printer. Select paper which has as
smooth and even a surface as possible. Note that the use of paper with a surface
coating or other surface treatement may damage the drum or fuser unit.
21
Page 23
Composition
Do not use paper that has been coated or surface-treated and contains plastic or
carbon. The heat of fusing can cause such paper to give off harmful fumes, and
may damage the drum.
Bond paper should contain at least 80% pulp. Not more than 20% of the total paper
content should consist of cotton or other fibers.
Paper Size
Cassettes and the MP (multi-purpose) tray can handle the paper sizes listed in Table
2. The printer automatically detects the paper size loaded in a cassette.
Table 2. Paper Sizes for Paper Feeding
Paper Size
ISO A3 297 × 420 mm
ISO A4 210 × 297 mm
ISO A5 148 × 210 mm
JIS B4 257 × 364 mm
JIS B5 182 × 257 mm
Ledger 11 × 17 inches
Letter 8.5 × 11 inches
Legal 8.5 × 14 inches
Smoothness
Although it is important to use paper with a smooth and even surface, do not use
paper which has been coated. Paper that is too smooth can cause multiple feeding
and paper jams.
Basis Weight
Basis weight is the weight of a one square meter sheet of paper. Paper that is too
light or too heavy can cause misfeeding, jams, and premature wear of the printer.
Uneven paper weight can cause multiple feeds, print defects, poor toner fusing,
blurring, and other print quality problems. The appropriate paper weight range for
normal paper is 60 to 90 g/m2 (16 to 24 lbs/ream) and 90 to 200 g/m2 (24 to 53 lbs/
ream) for thick paper.
22
Page 24
Thickness
The paper used with the printer should be neither extremely thick nor extremely
thin. If you are having problems with multiple feeds and paper jams, the paper may
be too thin. The paper may also be too thick if you are having problems with paper
jams. The proper thickness is 0.086 to 0.110 mm (3.4 to 4.3 mils).
Moisture Content
English
Moisture content is defined as the percentage ratio of moisture to the dry mass of
the paper. Moisture can affect the paper’s appearance, feedability, curl, electrostatic
properties, and toner fusing characteristics.
The moisture content of paper varies with the relative humidity in the room. When
the relative humidity is high and the paper absorbs moisture, the paper edges
expand, becoming wavy in appearance. When the relative humidity is low and the
paper loses moisture, the edges shrink and tighten, and print contrast may suffer.
Wavy or tight edges can cause misfeeding and alignment anomalies. The moisture
content of the paper should be 4% to 6%.
To ensure the proper moisture content, it is important to store the paper in a
controlled environment. Some tips on moisture control are:
• Store paper in a dry, well-ventilated location.
• Keep the paper flat and in its wrapping as long as possible. Rewrap paper that is
not in use.
• Store paper in its original carton. Place a pallet etc. under the carton to separate
it from the floor. Keep paper away from boarded or concrete floors during rainy
weather.
• Avoid leaving paper where it is exposed to heat, sunlight, or damp.
Deutsch
FrançaisItalianoEspañol
23
Page 25

Other Paper Properties
Stiffness: Paper that is too limp or too stiff may fold or bend inside the printer,
resulting in a paper jam.
Curl: Most paper has a natural tendency to curl in one direction or the other if it is
stored unwrapped. Paper will curl slightly upward when it passes through the fuser
unit. Load the paper with its natural curl downward so that it will come out flat.
Some paper also has a front and back surface. If this is indicated on the paper’s
packaging, be sure to load the paper into the cassette face down.
Note If curl is large, load the paper into the cassette in such a manner
that the paper’s back surface is facing down.
Electrostatic properties: During the printing process, the paper is electrostatically charged to attract the toner. The paper must be able to release this charge so
that printed sheets do not cling together in the output tray.
Quality control: Uneven sheet size, corners that are not square, ragged edges,
welded (uncut) sheets, and crushed edges and corners can cause the printer to
malfunction in various ways. Pay particular attention to these considerations if you
are choosing paper yourself.
Packaging: Select paper that is wrapped by the ream and then placed in a box.
The best wrapping is one whose inner surface is coated to protect against humidity.
Specially treated paper: We recommend that you avoid using paper listed
below which has been specially treated, even if it meets basic specifications. If you
wish to use such paper, test a sample on the printer and check that the printing
quality is satisfactory before purchasing.
• Paper with a glossy finish
• Paper with sections cut out
• Paper which is embossed
• Paper with feed holes in it
• Paper with punch holes in it
24
Page 26

Special paper
The page printer can use the following types of special paper:
• Colored paper
• Preprinted paper (letter head, etc.)
When using the above types of paper, be sure to use products that are specified for
use with photocopiers and/or page printers.
Since the composition and quality of special paper vary considerably, special paper
is more likely than white bond paper to give trouble during printing. Some special
paper will emit harmful gases during printing. When using a new type of special
paper for the first time, make sure to perform a test first.
English
Deutsch
Note Before purchasing any type of special paper, test a sample on the
printer and check that the printing quality is satisfactory.
Following are the specifications for special paper.
Colored paper
Colored paper should meet the same specifications as those listed for white bond
paper in Table 1. In addition, the pigments used in the paper must be able to
withstand the heat of fusing during the printing process.
Preprinted paper (letter head, etc.)
When printing on preprinted paper, the preprinted ink must be able to withstand the
heat of fusing during the printing process, and must not be affected by silicone oil.
Do not use paper with any kind of surface treatment.
Note In the duplex printing mode, page 2 is printed first. When using
letter head paper, etc. for duplex printing, it is recommended to
place the paper with the sides reversed in the cassette.
FrançaisItalianoEspañol
25
Page 27
Specifications
Model name DU-31 Duplexer
Compatible printer Kyocera Page Printers
Loadable paper sizes ISO A3 (297 mm × 420 mm)
ISO A4 (210 mm × 297 mm)
ISO A5 (148 mm × 210 mm)
JIS B4 (257 mm × 364 mm)
JIS B5 (182 mm × 257 mm)
Letter size (8.5 × 11 inches)
Legal (8.5 × 14 inches)
Ledger (11 × 17 inches)
Installation Environment Conforms to the printer’s installation environment
Dimensions (H × W × D) 96 mm (3.8") × 455 mm (17.9") × 451 mm (17.8")
Weight 5 kg (11 lbs.)
Power supply From printer
26
Page 28
Kyocera übernimmt keinerlei Haftung für direkte oder indirekte Verluste oder Schäden,
die einem Kunden oder irgendeiner anderen Person oder Rechtspersondurch von
Kyocera verkaufte oder ausgerüstete Geräte direkt oder indirekt entstehen oder geltend
gemacht werden, und lehnt jedwede Haftung für eine eventuelle Unterbrechung einer
Dienstleistung, für Geschäftsverluste oder für den Verlust erwarteter Profite sowie
für Folgeschäden ab, die aus der Benutzung des Gerätes oder der Software entstehen
können.
Achtung
FÜR SCHÄDEN, DIE AUF UNSACHGEMÄSSE INSTALLIERUNG
ZURÜCKZUFÜHREN SIND, WIRD KEINERLEI HAFTUNG ÜBERNOMMEN.
Hinweis
English
Deutsch
Änderungen des Inhalts dieser Anleitung bleiben jederzeit vorbehalten.
In zukünftigen Ausgaben können zusätzliche Seiten eingefügt werden. Der Benutzer
wird gebeten, eventuelle technische Ungenauigkeiten oder drucktechnische Fehler
in der vorliegenden Ausgabe zu entschuldigen.
Für Unfälle, die sich trotz Befolgung aller in dieser Anleitung gegebenen Anweisungen
ereignen, wird keinerlei Haftung übernommen.
Der Inhalt dieser Anleitung ist urheberrechtlich geschützt. Kein Teil dieser Anleitung
darf in irgendeiner Form ohne schriftliche Genehmigung des Urheberrechtinhabers
reproduziert oder kopiert werden.
Warenzeichen
PRESCRIBE ist ein eingetragenes Warenzeichen von Kyocera Corporation.
FrançaisItalianoEspañol
27
Page 29

Europäische Funkstörschutzauflagen
Die Universal-Papierzuführung DU-31 ist für den Einsatz mit den
Druckermodellen FS-7000, FS-7000+ und FS-9000 bestimmt, die
typengeprüft und gemäß den Bestimmungen von EN55022 als Digitalgerät
der Klasse B eingestuft sind.
Digitalgeräte der Klasse B können Störungen des Rundfunk- oder
Fernsehempfangs verursachen, vor allem bei Betrieb in einer Wohngegend.
Inhaltsverzeichnis
Einleitung ..............................................................................................................29
Bezeichnung der Teile ...........................................................................................29
Installieren der Duplexeinheit ............................................................................... 30
Duplexdruck .......................................................................................................... 32
Beseitigen von Papierstaus ....................................................................................37
Wahl des Papiers.................................................................................................... 43
Technische Daten................................................................................................... 49
28
Page 30

Einleitung
Die Duplexeinheit DU-31 ist ein zur Verwendung mit Kyocera Laserdruckern
konzipiertes Zusatzgerät.
Bitte lesen Sie diese Anleitung vor Verwendung der Duplexeinheit DU-31
sorgfältig durch und folgen Sie anschließend genau den Anweisungen zum
Installieren und Einsatz dieses Zusatzgerätes. Beachten Sie auch alle Vorsichtsund Warnaufkleber, die an der Duplexeinheit selbst angebracht sind.
Bewahren Sie diese Anleitung griffbereit auf. Dann können Sie sofort darauf
Bezug nehmen, falls Sie Fragen zum Betrieb der Duplexeinheit haben oder eine
Störung vorliegt.
Verpackungsinhalt
Duplexeinheit DU-31 1
Anleitung (diese Broschüre) 1
Bezeichnung der Teile
Bitte überprüfen Sie vor dem Installieren der Duplexeinheit die folgende Liste der
Bezeichnungen der verschiedenen Teile der Duplexeinheit, da diese
Bezeichnungen in den Erklärungen zum Installieren und Gebrauch der
Duplexeinheit verwendet werden.
English
Deutsch
FrançaisItalianoEspañol
Montageschienen
Transparente
Kunststoffabdeckung
(zwei Abdeckungen)
Duplexeinheit (DU-31)
29
Page 31

Installieren der Duplexeinheit
Öffnen Sie die vordere Abdeckung des Druckers und setzen Sie die Duplexeinheit
DU-31 in den Freiraum unterhalb der Transfereinheit ein.
VORSICHT Achten Sie vor dem Installieren (bzw. Entfernen) der
optionalen Duplexeinheit unbedingt darauf, den Drucker
auszuschalten und das Netzkabel von der Netzsteckdose zu
trennen.
1. Öffnen Sie die vordere Abdeckung des Druckers.
Vordere
Abdeckung
Einbauplatz für DU-31
2. Nachdem Sie die Duplexeinheit aus der Verpackung genommen haben,
entfernen Sie das Klebeband, das die Abdeckung in ihrer
Ausgangsstellung hält.
30
Klebeband
Klebeband
Page 32

3. Entfernen Sie die Duplexeinheit aus der Verpackung und installieren Sie
sie wie in der Abbildung gezeigt im Drucker. Achten Sie dabei darauf, daß
die linke und die rechte Montageschiene richtig auf den Schienen des
Druckers zu liegen kommen.
English
Schiene
Schiene
4. Schieben Sie die DU-31 bis zum Anschlag in den Drucker.
Deutsch
FrançaisItalianoEspañol
5. Schließen Sie die vordere Abdeckung des Druckers. Damit ist die
Installierung der Duplexeinheit beendet.
31
Page 33

Duplexdruck
Nach der Installierung der Duplexeinheit wird das Duplexdruck-Menü dem
Moduswahl-Menü des Druckers wie unten gezeigt hinzugefügt (das zusätzliche
Menü wird im Diagramm eingerahmt dargestellt) und wird verwendet, um den
Duplexdruck-Modus ein- und auszuschalten und die Orientierung für den
Duplexdruck zu wählen.
Moduswahl-Menü
(nur FS-7000)
Bereit
PAR 600 A4 001
Bereit
PAR 600 A4 001
Papierhandling >
Duplex Aus
kurze Seite
lange Seite
Schnittstelle >
Parallel
Papierstärke
Normal
Duplex Aus
kurze Seite
lange Seite
Andere >
Die Betriebsarten der Duplexeinheit werden auf den folgenden Seiten erläutert.
32
Page 34

Betriebsart Duplexdruck
Die Duplexeinheit ermöglicht ein doppelseitiges Bedrucken von Blättern, wobei
der Druckvorgang wie folgt abläuft. Zunächst wird das erste Blatt eingezogen und
Seite 2 des Dokuments auf der einen Seite des Blattes ausgedruckt. Danach wird
das erste bedruckte Blatt vorübergehend an die Duplexeinheit übergeben, wonach
das zweite Blatt in den Drucker eingezogen und Seite 4 des Dokuments auf der
einen Seite des Blattes ausgedruckt wird. Nach Drucken von Seite 4 wird das erste,
inzwischen in der Duplexeinheit gehaltene Blatt an die Transfereinheit des
Druckers zurückgeführt, um Seite 1 des Dokuments auf der anderen Seite dieses
Blattes auszudrucken. Damit ist der Druck des ersten Blattes beendet, und dieses
Blatt wird ausgegeben. Danach wird das dritte Blatt in den Drucker eingezogen,
während das zweite Blatt, das bisher nur mit Seite 4 des Dokuments bedruckt ist,
weiter in der Duplexeinheit bereitgehalten wird, und der Drucker bedruckt das
dritte Blatt mit Seite 6 des Dokuments. Anschließend wird der oben beschriebene
Vorgang wiederholt, um den doppelseitigen Druck des Dokuments bis zum Ende
fortzusetzen.
Ablauf beim Duplexdruck
English
Deutsch
FrançaisItalianoEspañol
Duplexeinheit
(DU-31)
Drucker
Papierzuführung
(PF-30)
33
Page 35

Binden einstellen
Der Ausdruck “binden” bezieht sich auf die Art, in der die einzelnen Blätter in
Buchform miteinander verbunden (z.B. durch Kleben, Heften usw.) werden. Die
beiden möglichen Arten sind das längsseitige Binden (“long-edge binding”), wobei
die Blätter an den langen Kanten verbunden werden, sowie das kurzseitige Binden
(“short-edge binding”), wobei die Blätter an den kurzen Kanten verbunden werden.
Beim Wählen der Art des Bindens müssen Sie auch die Orientierung der bedruckten
Seite berücksichtigen. Sowohl beim Drucken im Hochformat als auch beim Drucken
im Querformat ist ein längsseitiges oder kurzseitiges Binden möglich.
Abhängig von der Art des Bindens und der Orientierung kann das Binden auf vier
verschiedene Weisen geschehen. Diese vier möglichen Einstellungen sind: 1
Hochformat längsseitig, 2 Hochformat kurzseitig, 3 Querformat längsseitig und 4
Querformat kurzseitig (siehe die nachfolgenden Abbildungen).
Betriebsart Binden
Hochformat
längsseitig
Querformat
längsseitig
Hochformat
kurzseitig
Querformat
kurzseitig
Bei Hochformat und längsseitigem Binden sowie bei Querformat und kurzseitigem
Binden (Einstellung 1 und 4 in der Abbildung) ist der Text auf beiden Seiten des
Blattes gleich ausgerichtet.
Bei Hochformat und kurzseitigem Binden sowie bei Querformat und längsseitigem
Binden (Einstellung 2 und 3 in der Abbildung) wird der Text auf der Rückseite des
Blattes, verglichen mit dem Text auf der Vorderseite, verkehrt gedruckt.
34
Page 36

Einstellungen der Betriebsart Duplexdruck
Die Einstellungen für den Duplexdruck werden im Bedienfeld des Druckers
vorgenommen.
Einstellungen im Bedienfeld des Druckers
Nehmen Sie die Einstellung für die Betriebsart Duplexdruck und das Binden
anhand des folgenden Verfahrens im Bedienfeld des Druckers vor.
1. Vergewissern Sie sich, daß das Display des Druckers Bereit anzeigt
und daß die Online-Anzeige leuchtet.
2. Drücken Sie im Bedienfeld des Druckers die Taste MENÜ.
3. Bringen Sie zunächst “Papierhandling >” zur Anzeige, drücken Sie
die Taste und betätigen Sie dann die Taste + oder –, wonach das
Display “> Duplex” zeigt. Auf der zweiten Zeile wird der aktuelle
Duplexmodus angezeigt. (Im ursprünglichen Zustand wird Aus
angezeigt.) Beim Modell FS-7000 betätigen Sie die Taste + oder –,
wonach das Display Duplex zeigt.
4. Nach Drücken der Taste ENTER zeigt das Display ein blinkendes
Fragezeichen (?) an. Danach betätigen Sie die Taste + oder –, bis das
Display die gewünschte Art des Bindens anzeigt (siehe das nachfolgende
Diagramm).
➔
English
Deutsch
FrançaisItalianoEspañol
Duplex ? Aus
Duplex ? Binden
kurze Seite
➔➔
Duplex ? Binden
lange Seite
Um den Einstellvorgang abzubrechen, drücken Sie die Taste ABBRUCH.
5. Nachdem Sie die gewünschte Art des Bindens gewählt haben, drücken Sie
die Taste ENTER.
6. Drücken Sie die Taste MENÜ, wonach das Display wieder Bereit anzeigt.
Die gleiche Einstellung kann auch vorgenommen werden, indem Sie im DruckerEinstellmenü Ihres Anwendungsprogramms auf den Druckertreiber zugreifen.
Kein Duplexdruck
(Standardeinstellung)
Kurzseitiges Binden
Längssseitiges Binden
35
Page 37

Duplexdruck von der Multifunktionszufuhr
Achten Sie im ersten Modus darauf, die Multifunktionszufuhr auf die gleichen
Einstellungen von Papierformat, Papiersorte und Vorschubrichtung zu bringen, die
für die aktuelle Kassette eingestellt sind. Bei einer unterschiedlichen Einstellung
von Papierformat, Papiersorte oder Vorschubrichtung kann es zu einem Papierstau
kommen. Beachten Sie außerdem, daß es nicht möglich ist, die
Multifunktionszufuhr als aktuelle Kassette zur Ausführung des Duplexdrucks
anzuwählen. Es wird daher empfohlen, den Duplexdruck von der Papierkassette
auszuführen.
Hinweis Beim Modell FS-7000 ist Duplexdruck von der
Multifunktionszufuhr des Druckers, der optionalen
Umschlagzuführung (EF-1) oder der optionalen
Universalzuführung (UF-1) nicht möglich. Falls versucht wird,
einen Duplexdruck von diesen Papierquellen auszuführen, wird die
Betriebsart Duplexdruck automatisch aufgehoben und das
bedruckte Papier über die linke Papierausgabe ausgegeben. Wenn
die Betriebsart Duplexdruck ausgeschaltet ist, kann das Papier auch
über die Standard-Papierausgabe ausgegeben werden. Wenn die
Papierzufuhr jedoch vom Kuverteinzug erfolgt, muß die linke
Papierausgabe verwendet werden.
36
Page 38

Beseitigen von Papierstaus
In diesem Abschnitt werden die Fehlermeldungen und Abhilfemaßnahmen beim
Auftreten eines Papierstaus erläutert.
WARNUNG Achten Sie beim Beseitigen von Papierstaus unbedingt
darauf, daß keine Papierfetzen im Drucker zurückbleiben.
Anderenfalls kann ein Brand verursacht werden.
In diesem Abschnitt wird das Verfahren zum Entfernen von gestautem Papier aus
dem Drucker erläutert. Der Drucker unterbricht den Betrieb, wenn ein Papierstau
aufgetreten ist oder kein Papier aus einer Kassette zugeführt wird. In einem
solchen Fall geht der Drucker offline, und das Display zeigt Papierstau
vorne öffnen an.
Papierstau
vorne öffnen
Nach Öffnen der vorderen Abdeckung wechselt das Display auf die Anzeige eines
Codes (Buchstaben A bis I und Ziffern 1 bis 6), der die Lage des Papierstaus
kennzeichnet.
Beispiel
Papierstau
C, H, I, 3
English
Deutsch
FrançaisItalianoEspañol
In obigem Beispiel befindet sich der Papierstau in der Papierzuführung (C), im
Papiereinzug (H), in der Duplexeinheit (I) und in der oberen Kassette der
optionalen Papierzuführung (3). Die in einem solchen Fall zu ergreifenden
Abhilfemaßnahmen werden anhand von Beispielen ab Seite 40 erläutert.
Die Tabelle auf der nächsten Seite zeigt den Zusammenhang zwischen den
verschiedenen Codes, die im Display erscheinen, und der jeweiligen Lage des
Papierstaus. Achten Sie stets darauf, Papierstaus anhand des auf den folgenden
Seiten beschriebenen Verfahrens zu beseitigen.
37
Page 39

Angezeigter Code und Lage des Papierstaus
Code Bedeutung Entsprechende Lage
Optionale Papierzuführung
A
(EF-1 oder UF-1)
Multifunktionszufuhr
B
Standardmäßige Papierzuführung
C
des Druckers
Optionale Papierzuführung (PF-30)
D
Optionale Papierzuführung (PF-30)
E
Optionale Einheit
F
(DF-30/DF-31, SO-30 oder ST-30)
Linke Papierausgabe/StandardPapierausgabe
G
(Auschluß an optionale Einheit)
Papiereinzug
H
Optionale Duplexeinheit
I
(DU-31, dieses Gerät)
Kassette 1
1
Kassette 2
2
Kassette 3
3
Kassette 4
4
Kassette 5
5
Kassette 6
6
An der Innenseite der vorderen Abdeckung des Druckers
befindet sich ein Aufkleber “Paper Jam Location Indicators” (Papierstau-Lagecodes).
Bei Auftreten eines Papierstaus blinkt außerdem eine Anzeige im Bedienfeld des
Druckers, um die Lage des Papierstaus zu kennzeichnen. Tritt der Papierstau in
einer Papierzuführung auf, so blinkt die LED an der Vorderseite der betreffenden
Papierkassette ebenfalls. Die folgende Tabelle erläutert die Bedeutungen der
verschiedenen Zustände dieser LED.
LED-Zustand Bedeutung
Schnelles Blinken Papierstau in dieser Kassette
Langsames Blinken Kein Papier in dieser Kassette
Stetiges Leuchten Momentan gewählte Kassette
Ausgeschaltet • Kassette falsch eingesetzt
• Kassette momentan nicht gewählt
Ermitteln Sie die Lage des Papierstaus anhand der obigen Tabelle und ergreifen Sie
dann die in der Tabelle auf der nächsten Seite aufgeführten Abhilfemaßnahmen.
Nachdem das gestaute Papier vollständig entfernt worden ist, setzt der Drucker den
Ausdruck automatisch fort.
38
Page 40

Abhilfemaßnahmen bei Papierstau
Code
A
B
C
D
E
F
G
H
I
1 bis 6
Bedeutung
Überprüfen Sie die optionale
Papierzuführung (EF-1 oder
UF-1), falls diese installiert ist.
Überprüfen Sie die
Multifunktionszufuhr des
Druckers.
Überprüfen Sie die (mitgelieferte) Papierzuführung.
(D und E werden nur
angezeigt, wenn eine optionale
PF-30 installiert ist.)
Überprüfen Sie die optionale
Einheit (DF-30/DF-31/SO-30/
ST-30), falls diese installiert ist.
Überprüfen Sie die linke
Papierausgabe des Druckers.
(Auschluß an optionale
Binheit)
Überprüfen Sie die StandardPapierablage des Druckers.
Überprüfen Sie den
Papiereinzug des Druckers.
Überprüfen Sie die
Fixiereinheit des Druckers.
Überprüfen Sie die optionale
Duplexeinheit (DU-31, dieses
Gerät).
Überprüfen Sie die
angegebene Papierkassette.
Fehlerbehebung
In der optionalen Papierzuführung ist ein Papierstau
aufgetreten. Ziehen Sie das gestaute Papier vorsichtig
heraus. Öffnen und schließen Sie dann die vordere
Abdeckung des Druckers einmal. (Einzelheiten finden Sie in
der Anleitung der EF-1/UF-1.)
In der Multifunktionszufuhr ist ein Papierstau aufgetreten.
Ziehen Sie das gestaute Papier vorsichtig heraus. Öffnen
und schließen Sie dann die vordere Abdeckung des
Druckers einmal.
Öffnen Sie die Seitenabdeckung der angegebenen
Papierzuführung und entfernen Sie das gestaute Papier.
(Siehe das Beispiel auf der nächsten Seite.)
Entfernen Sie das gestaute Papier aus dem Stapler.
(Einzelheiten finden Sie in der Anleitung des DF-30/DF31/SO-30/ST-30.)
Das Papier staut sich, bevor das Blatt vollständig
ausgegeben werden kann. Öffnen Sie die Seitenabdeckung
des Druckers und entfernen Sie das gestaute Blatt
vorsichtig. (Einzelheiten finden Sie in der Anleitung des
Druckers.)
Falls der Druckvorgang stoppt, bevor ein Blatt vollständig
ausgegeben wurde, entfernen Sie dieses vorsichtig.
Öffnen Sie die vordere Abdeckung und ziehen Sie den
Papiereinzug vorsichtig bis zum Anschlag heraus. Falls das
Papier zwischen den Registrierwalzen gestaut ist, ziehen Sie
das Blatt in derjenigen Richtung heraus, in der sich dies mit
dem geringsten Widerstand bewerkstelligen läßt.
(Einzelheiten finden Sie in der Anleitung des Druckers.)
Falls das Papier in der Fixiereinheit gestaut ist, entfernen
Sie es auf gleiche Weise. (Einzelheiten finden Sie in der
Anleitung des Druckers.)
Nachdem Sie das gestaute Papier vollständig entfernt haben,
schieben Sie den Papiereinzug wieder in seine
Ausgangsstellung.
Öffnen Sie die vordere Abdeckung und ziehen Sie den
Papiereinzug vorsichtig bis zum Anschlag heraus. Öffnen
Sie die Abdeckung der Fixiereinheit
(wobei Sie den
grünen Knopf anfassen) und überprüfen Sie das Innere der
Fixiereinheit. Gestautes Papier ist möglicherweise in der
Fixiereinheit zurückgeblieben.
Öffnen Sie die vordere Abdeckung, ziehen Sie die
Duplexeinheit heraus und entfernen Sie das gestaute Papier.
(Einzelheiten finden Sie auf den nächsten Seiten.)
Ziehen Sie die angegebene Papierkassette heraus und
entfernen Sie das gestaute Papier. Öffnen und schließen
Sie
dann die vordere Abdeckung des Druckers einmal.
English
Deutsch
FrançaisItalianoEspañol
39
Page 41

Beispiel
In dem auf Seite 37 gezeigten Beispiel befindet sich der Papierstau in der Papierzuführung (C), im Papiereinzug (H), in der Duplexeinheit (I) und in der oberen
Kassette der Papierzuführung (3).
Papierstau
C, H, I, 3
1. Wenn sich Papier wie in diesem Beispiel an mehreren Stellen staut,
beginnen Sie die Abhilfemaßnahmen an der ganz links angezeigten
Stelle.
Seitenabdeckung der
Papierzuführung
Nachdem Sie den Papierstau in der Papierzuführung (C) beseitigt haben,
ändert sich die Anzeige im Display wie folgt:
Papierstau
H, I, 3
2. Als nächstes öffnen Sie die vordere Abdeckung des Druckers und drehen
den Arretierhebel entgegen den Uhrzeigersinn (außer beim Modell FS-
7000). Ziehen Sie dann die Transfereinheit vorsichtig bis zum Anschlag
heraus. (Dadurch wird die Duplexeinheit gleichzeitig herausgezogen.)
Fixiereinheit
Duplexeinheit
Transfereinheit
VORSICHT Nach dem Herausziehen der Transfereinheit ist das Innere
der Fixiereinheit extrem heiß. Vermeiden Sie sorgfältig
jegliche Berührung der Fixiereinheit, da die Gefahr von
Verbrennungen besteht.
40
Page 42

3. Überprüfen Sie die Führungswechsler an der linken Seite der
Fixiereinheit. Falls Papier darunter gestaut, heben Sie die Führung und die
Abdeckung der Fixiereinheit an (wobei Sie den grünen Knopf
anfassen). Entfernen Sie das gestaute Papier wie in der Abbildung unten
gezeigt.
Abdeckung der
Fixiereinheit
Führungswechsler
➞
Gestautes Papier
Nach Beseitigen des Papierstaus an dieser Stelle ändert sich die Anzeige
im Display wie folgt:
Papierstau
I, 3
4. Nachdem Sie sich überzeugt haben, daß kein Papier in der Transfereinheit
gestaut ist, setzen Sie nur die Transfereinheit wieder in den Drucker ein.
English
Deutsch
FrançaisItalianoEspañol
Transfereinheit
➞
5. Drehen Sie den Arretierhebel im Uhrzeigersinn, um die Transfereinheit zu
arretieren.
41
Page 43

6. Öffnen Sie die beiden transparenten Kunststoffabdeckungen an der
Oberseite der Duplexeinheit. Entfernen Sie das gestaute Papier wie in der
Abbildung unten gezeigt.
Die erste Abdeckung öffnen und
das gestaute Papier entfernen.
Transparente
Kunststoffabdeckung
Die zweite Abdeckung öffnen und
das gestaute Papier entfernen.
Transparente
Kunststoffabdeckung
7. Nachdem Sie das gestaute Papier entfernt haben, bringen Sie jede
transparente Kunststoffabdeckung wieder in ihre Ausgangsstellung und
setzen die Duplexeinheit in den Drucker ein. Danach ändert sich die
Anzeige im Display wie folgt: Drucker vorne offen.
8. Schließen Sie die vordere Abdeckung des Druckers. Damit ist die
Beseitigung dieses Papierstaus abgeschlossen.
Hinweise • Ob der Drucker die gestaute Seite abermals druckt, hängt
davon ab, wo der Papierstau aufgetreten ist.
• Bitte beachten Sie, daß Sie sich beim Beseitigen von Papierstaus
die Hände mit lose auf dem Papier liegendem Toner
beschmutzen können.
Ein häufiges Auftreten von Papierstaus kann ein Anzeichen dafür sein, daß eine für
diesen Drucker ungeeignete Papiersorte verwendet wird. Verwenden Sie in einem
solchen Fall ein anderes Papier.
Wenn es trotz Wechseln der Papiersorte häufig zu Papierstaus kommt, liegt
möglicherweise ein Defekt des Druckers vor. Bitte wenden Sie sich in einem
solchen Fall an Ihren Kyocera-Händler.
42
Page 44

Wahl des Papiers
Obwohl der Drucker primär auf das Bedrucken von Trockenkopierer-Normalpapier
(Standardpapier) ausgelegt ist, können auch verschiedene andere Papiersorten
verwendet werden, sofern diese den Papierspezifikationen in diesem Kapitel
entsprechen. Einzelheiten zu den geeigneten Papiersorten finden Sie in der
Bedienungsanleitung des Druckers.
Der Wahl des richtigen Papiers kommt große Bedeutung zu. Der Gebrauch einer
für diesen Drucker ungeeigneten Papiersorte kann zu Papierstaus, Fehleinzügen,
schlechter Druckqualität und im Extremfall zu einer Beschädigung der
Papierzuführung und des Druckers führen. Die nachfolgenden Richtlinien sollen
Ihnen helfen, wirtschaftlich und problemfrei zu drucken und die Abnutzung von
Papierzuführung und Drucker möglichst niedrig zu halten.
Geeignetes Papier
Verwenden Sie ausschließlich Kopierer-Normalpapier (Standardpapier), das für
den Gebrauch mit herkömmlichen Trockenkopierern vorgesehen ist.
Hinweis Bestimmte Arten von Recycling-Papier sind aufgrund ihres Wasser-
und Zellstoffgehalts nicht für den Gebrauch mit diesem Drucker
geeignet (Tabelle 1). Vor dem Ankauf von Recycling-Papier sollten
Sie damit mehrere Probeausdrucke machen, um sicherzustellen, daß
eine einwandfreie Druckqualität erzielt wird. Achten Sie bei der
Wahl von Recycling-Papier nicht nur auf eine gute Druckqualität,
sondern auch darauf, daß möglichst wenig Papierstaub beim
Drucken abfällt.
English
Deutsch
FrançaisItalianoEspañol
Auch Unterschiede in der Papierqualität verschiedener Hersteller haben Einfluß
auf die Leistung der Papierzuführung. Ein Drucker kann keine guten
Druckergebnisse liefern, wenn ungeeignetes Papier benutzt wird. Billiges Papier ist
langfristig gesehen nicht wirtschaftlich, wenn es ständig Druckprobleme
verursacht.
43
Page 45

Grundlegende Papierspezifikationen
Die folgende Tabelle faßt die grundlegenden Papierspezifikationen zusammen.
Tabelle 1. Grundlegende Papierspezifikationen
Eigenschaft Spezifikation
Gewicht 60 bis 90 g/m
Stärke 0,086 bis 0,110 mm
Abmessungstoleranz ±0,7 mm
Rechteckigkeit der Kanten 90° ±0,2°
Feuchtigkeitsgehalt 4 % bis 6 %
Zellstoffgehalt 80 % oder mehr
2
Hinweis Beim Duplexdrucken auf Papier eines größeren Formats als A4,
insbesondere bei Verwendung eines leichten Papiers mit einem
Gewicht von weniger als 65 g/m2, kann es vorkommen, daß die
Randzonen der Blätter geringfügig verschmutzt werden. Ersetzen Sie
das Papier in einem solchen Fall durch Normalpapier mit einem
Gewicht von mehr als 70 g/m2.
Kyocera übernimmt keinerlei Haftung für Probleme, die auf die
Verwendung der Papierzuführung mit Papier zurückzuführen sind,
das nicht den Anforderungen der obigen Tabelle entspricht. Bitte
konsultieren Sie Ihren Kyocera-Händler vor dem Ankauf von Papier
mit Spezialbeschichtung oder Papier für besondere Anwendungen.
Wahl des richtigen Papiers
Eine hochwertige Druckqualität kann nur bei Verwendung von Papier erzielt
werden, das die in Tabelle 1 gestellten Anforderungen erfüllt. Die folgenden
Abschnitte erläutern die wichtigsten Faktoren, die bei der Papierwahl für den
Duplexdruck zu berücksichtigen sind.
Zustand des Papiers
Vermeiden Sie den Gebrauch von Papier, dessen Kanten eingebogen oder rauh
sind oder das gekrümmt, schmutzig, eingerissen oder durch Fusseln, Staub oder
Papierschnitzel verunreinigt ist oder eine rauhe Oberfläche aufweist.
Papier in solchem Zustand kann zu unleserlichen Ausdrucken, Fehleinzügen und
Papierstaus führen und die Lebensdauer der Papierzuführung und des Druckers
verkürzen. Die Oberfläche des Papiers sollte so glatt und eben wie möglich sein.
Vermeiden Sie insbesondere oberflächenbeschichtetes Papier oder solches, dessen
Oberfläche anderweitig behandelt wurde, da derartiges Papier eine Beschädigung
von Trommel und Fixiereinheit verursachen kann.
44
Page 46

Zusammensetzung
Verwenden Sie kein Papier, das beschichtet oder dessen Oberfläche sonstwie
behandelt wurde und Kunststoff oder Karbon enthält. Die beim Fixieren entstehende
Hitze könnte dazu führen, daß solches Papier schädliche Gase abgibt und die
Trommel beschädigt.
Der Zellstoffgehalt von Feinpostpapier sollte mindestens 80 % betragen. Das Papier
darf insgesamt nicht mehr als 20 % Baumwollfasern oder andere Fasern enthalten.
English
Papierformat
Die Papierkassetten und die Multifunktionszufuhr können Papier der in der Tabelle 2
aufgelisteten Formate aufnehmen. Der Drucker erkennt das Format des in eine
Kassette eingelegten Papiers automatisch.
Tabelle 2. Papierformate für Einzug
Papierformat Abmessungen
ISO A3 297 × 420 mm
ISO A4 210 × 297 mm
ISO A5 148 × 210 mm
JIS B4 257 × 364 mm
JIS B5 182 × 257 mm
Ledger 11 × 17 Zoll
Letter 8,5 × 11 Zoll
Legal 8,5 × 14 Zoll
Glätte
Das Papier sollte eine möglichst glatte und ebene Oberfläche besitzen, aber nicht
beschichtet sein. Zu glattes Papier allerdings kann zu Mehrfacheinzügen und
Papierstaus führen.
Papiergewicht
Deutsch
FrançaisItalianoEspañol
Unter Papiergewicht versteht man das Gewicht einer Standardmenge von 1
Quadratmeter. Zu leichtes oder zu schweres Papier kann zu Fehleinzügen,
Papierstaus oder vorzeitiger Abnutzung von Papierzuführung und Drucker führen.
Unebenes Papier kann zu Mehrfacheinzügen, Druckfehlern, schlechter Fixierung des
Toners, Verschmieren und anderen Druckproblemen führen. Das richtige
Papiergewicht beträgt 60 bis 90 g/m
2
für Normalpapier und 90 bis 200 g/m2 für
dickes Papier .
45
Page 47

Dicke
Das mit dem Drucker verwendete Papier sollte weder extrem dick noch extrem dünn
sein. Wenn Sie Probleme mit Mehrfacheinzügen und Papierstaus haben, liegt das
vielleicht an zu dünnem Papier. Papierstaus können jedoch auch auf ein zu dickes
Papier zurückzuführen sein. Die richtige Papierdicke beträgt 0,086 bis 0,110 mm.
Feuchtigkeitsgehalt
Der Feuchtigkeitsgehalt wird als prozentuales Verhältnis zwischen Trockenmasse
und Feuchtigkeit angegeben. Der Feuchtigkeitsgehalt beeinflußt das
Erscheinungsbild des Papiers sowie dessen Einzugsfähigkeit und Krümmung, die
elektrostatischen Eigenschaften und die Tonerfixierung.
Der Feuchtigkeitsgehalt des Papiers richtet sich nach der relativen Luftfeuchtigkeit
im Raum. Wenn die relative Luftfeuchtigkeit hoch ist und das Papier Feuchtigkeit
aufnimmt, dehnen sich die Papierkanten aus und erscheinen wellig. Wenn die
relative Luftfeuchtigkeit niedrig ist und das Papier Feuchtigkeit abgibt, ziehen sich
die Papierkanten zusammen, und das Papier wird straffer, was den Druckkontrast
herabsetzen kann.
Wellige oder straffe Kanten können zu Fehleinzügen und unregelmäßiger
Ausrichtung führen. Der Feuchtigkeitsgehalt des Papiers sollte 4 % bis 6 % betragen.
Damit das Papier den richtigen Feuchtigkeitsgehalt aufweist, ist es wichtig, den
Feuchtigkeitsgehalt des Lagerraums zu regulieren. Einige Tips zur
Feuchtigkeitsregelung sind:
• Bewahren Sie Papier stets an einem trockenen, gut belüfteten Ort auf.
• Bewahren Sie Papier so lange wie möglich flach in seiner Verpackung liegend
auf. Packen Sie nicht benutztes Papier wieder ein.
• Bewahren Sie Papier in dessen Originalkarton auf. Legen Sie eine Palette o.ä.
unter den Karton, um direkten Kontakt mit dem Fußboden zu vermeiden. Bei
Regenwetter sollte Papier nicht auf Brettern oder Betonböden liegen.
• Lassen Sie das Papier nicht an Orten zurück, wo es hohen Temperaturen, direkter
Sonneneinstrahlung oder Nässe ausgesetzt ist.
46
Page 48

Sonstige Papiereigenschaften
Steife: Zu schlaffes oder zu steifes Papier kann in der Papierzuführung oder im
Drucker einknicken oder sich verklemmen. Beides führt zu einem Papierstau.
Krümmung: Bei Aufbewahrung außerhalb seiner Verpackung besitzt Papier meist
eine natürliche Tendenz, sich in eine bestimmte Richtung zu krümmen. Legen Sie
das Papier so ein, daß die natürliche Krümmung nach unten weist, um der beim
Durchlaufen der Fixiereinheit verursachten geringfügigen Aufwärtskrümmung
entgegenzuwirken. Meistens besitzt Papier eine unterschiedlich strukturierte
Vorder- und Rückseite. Wenn dies auf der Papierverpackung z. B. mit einem Pfeil
angegeben ist, achten Sie darauf, das Papier mit der Vorderseite in die Kassette
einzulegen.
Hinweis Wenn die Krümmung stark ausgeprägt ist, legen Sie das Papier mit
der Rückseite nach unten in die Kassette ein.
Elektrostatische Eigenschaften: Beim Bedrucken wird das Papier
elektrostatisch aufgeladen, um Toner anzuziehen. Das Papier muß diese Ladung
freigeben können, damit die Blätter im Ausgabebehälter nicht zusammenhaften.
Qualitätskontrolle: Ungleiche Abmessungen der Blätter, nicht rechteckige oder
ausgefranste Kanten, verschweißte (nicht beschnittene) Blätter und eingebogene
Kanten und Ecken können zu verschiedenen Störungen der Papierzuführung und
des Druckers führen. Ein guter Papierlieferant sollte stets darauf achten, daß es
nicht zu solchen Problemen kommt.
English
Deutsch
FrançaisItalianoEspañol
Verpackung: Das Papier sollte in einem festen Karton verpackt sein, um
Transportschäden vorzubeugen. Bei der besten Art von Verpackung ist die
Innenseite des Verpackungspapiers mit einer Beschichtung zum Schutz gegen
Feuchtigkeit versehen.
Spezialpapier: Vom Gebrauch der nachfolgend aufgeführten Spezialpapierarten
wird abgeraten, selbst wenn diese ansonsten den grundlegenden Anforderungen
entsprechen. Falls Sie unbedingt ein derartiges Papier mit dem Drucker verwenden
möchten, sollten Sie vor dem Kauf damit mehrere Probeausdrucke machen, um
sicherzustellen, daß eine einwandfreie Druckqualität erzielt wird.
• Hochglanzpapier
• Blätter, aus denen Teile herausgeschnitten sind
• Geprägtes Papier
• Papier mit Perforationen für Traktorvorschub
• Gelochtes Papier
47
Page 49

Spezialpapier
Die folgenden Spezialpapierarten können mit dem Seitendrucker benutzt werden:
• Farbpapier
• Vorbedruckte Formulare (Briefkopfpapier usw.)
Benutzen Sie nur solche Arten von Spezialpapier, die ausdrücklich für den
Gebrauch mit Kopierern und/oder Seitendruckern angeboten werden.
Da die Zusammensetzung und Qualität von Spezialpapier sehr unterschiedlich ist,
kommt es beim Bedrucken von Spezialpapier häufiger zu Problemen als mit
weißem Feinpostpapier. Bestimmte Sorten von Spezialpapier können außerdem
schädliche Gase abgeben. Führen Sie daher einen Drucktest aus, bevor Sie erstmals
mit einem neuen Spezialpapier drucken.
Hinweis Vor dem Ankauf von Spezialpapier sollten Sie damit mehrere
Probeausdrucke machen, um sicherzustellen, daß eine
einwandfreie Druckqualität erzielt wird.
In diesem Abschnitt wird die Verwendung von Spezialpapier erläutert.
Farbpapier
Farbpapier muß den gleichen Anforderungen entsprechen, die in Tabelle 1 an
weißes Feinpostpapier gestellt werden. Außerdem müssen die im Papier
enthaltenen Pigmentstoffe der beim Fixieren entstehenden Hitze widerstehen
können.
Vorbedrucktes Papier (Briefkopfpapier usw.)
Die auf dem vorbedruckten Papier aufgebrachte Tinte muß der beim Fixieren
entstehenden Hitze widerstehen können und gegen Silikonöl beständig sein.
Benutzen Sie kein Papier, dessen Oberfläche auf irgendeine Weise behandelt
wurde.
Hinweis Beim doppelseitigen Bedrucken wird Seite 2 des Dokuments zuerst
ausgedruckt. Wird daher Papier mit Briefkopf o.ä. zum
Duplexdruck verwendet, sollten Sie die Blätter umgekehrt (mit der
Rückseite nach unten weisend) in die Kassette einlegen, damit die
richtige Seite unter dem Briefkopf ausgedruckt wird.
48
Page 50

Technische Daten
Modellbezeichnung Duplexeinheit DU-31
Geeigneter Drucker Kyocera Laserdrucker
Verfügbare Papierformate ISO A3 (297 × 420 mm)
ISO A4 (210 × 297 mm)
ISO A5 (148 × 210 mm
JIS B4 (257 × 364 mm)
JIS B5 (182 × 257 mm)
Ledger (11 × 17 Zoll)
Letter (8,5 × 11 Zoll)
Legal (8,5 × 14 Zoll)
Umgebungsbedingungen Wie beim Drucker
Abmessungen 96 (H) × 455 (B) × 451 (T) mm
Gewicht 5 kg
Stromversorgung Über Drucker
English
Deutsch
FrançaisItalianoEspañol
49
Page 51

Diese Seite wurde absichtlich freigelassen.
50
Page 52

Nous ne pourrons être tenus responsables envers un client ou toute autre personne,
physique ou morale, pour des pertes ou dommages quelconques causés, directement
ou indirectement, par un matériel vendu ou fourni par nous, y compris sans limitation, toute interruption de service, manque à gagner ou dommage indirect résultant
de l’utilisation du matériel ou du logiciel.
Attention
NOUS DÉCLINONS TOUTE RESPONSABILITÉ POUR DES DOMMAGES
DUS À UNE INSTALLATION INCORRECTE.
Avertissement
Les informations de ce manuel sont susceptibles d’être modifiées sans avertissement.
Il se peut que des pages supplémentaires soient ajoutées dans les futures éditions.
L’utilisateur est prié de bien vouloir excuser toute inexactitude technique ou erreur
typographique de la présente édition.
Notre responsabilité ne saurait être engagée en cas d’accident alors que l’utilisateur
suit les instructions de ce manuel.
Le contenu de ce manuel est protégé par la loi sur le droit d’auteur. Aucune partie
de ce manuel ne peut être reproduite ou copiée, par quelque moyen que ce soit,
sans l’autorisation du titulaire du droit d’auteur.
English
Deutsch
FrançaisItalianoEspañol
Marque
PRESCRIBE est une marque déposée de Kyocera Corporation.
51
Page 53

Brouillage radioélectrique dans les pays européens
Le chargeur de papier universel DU-31 en option est destiné aux
imprimantes de modèles FS-7000, FS-7000+ et FS-9000 qui ont été
homologuées et classées comme périphériques de la classe B
conformément aux règles EN55022.
Les périphériques de la classe B peuvent brouiller la réception de radio ou
de télévision, tout particulièrement en zone résidentielle.
Sommaire
Introduction ........................................................................................................... 53
Nomenclature des pièces .......................................................................................53
Installation du module recto-verso ........................................................................54
Impression recto-verso .......................................................................................... 56
En cas de bourrage papier......................................................................................61
Choix du papier ..................................................................................................... 67
Caractéristiques ..................................................................................................... 73
52
Page 54

Introduction
Le module recto-verso DU-31 est un dispositif d’impression sur les deux faces
disponible en option pour les imprimantes feuille à feuille Kyocera.
Avant d’utiliser le module recto-verso DU-31, veuillez lire attentivement ce
manuel. Suivez toujours toutes les instructions données lorsque vous installez et
utilisez le module recto-verso. Observez les avertissements et consignes indiqués
sur le module lui-même.
Conservez ce manuel dans un endroit facilement accessible. Vous pourrez avoir
besoin de le consulter ultérieurement en cas de question sur son fonctionnement ou
de problème.
Contenu de l’emballage
DU-31 1
Mode d’emploi (ce manuel) 1
Nomenclature des pièces
Avant d’installer le module recto-verso, veuillez vous familiariser avec le nom des
pièces. Ces noms sont utilisés pour décrire les opérations d’installation et d’utilisation
du module recto-verso.
English
Deutsch
FrançaisItalianoEspañol
Rails d’installation
Couvercle en plastique transparent
(deux couvercles)
Module-recto verso (DU-31)
53
Page 55

Installation du module recto-verso
Ouvrez le capot avant de l’imprimante et installez le DU-31 dans l’espace vide
sous l’ensemble de transfert.
ATTENTION Avant d’installer (ou de retirer) le module recto-verso en
option, mettez l’imprimante hors tension et débranchez la
fiche secteur de la prise de courant.
1. Ouvrez le capot avant de l’imprimante.
Capot avant
Espace pour l’installation
du DU-31
2. Après avoir retiré le module recto-verso des cales de transport, retirez le
ruban adhésif maintenant le capot en place.
54
Ruban
Ruban
Page 56

3. Retirez le module recto-verso des cales de transport et installez-le dans
l’imprimante comme sur la figure. Lors de l’installation, veillez à ce que les
rails droit et gauche reposent correctement sur les rails de l’imprimante.
Rail
Rail
4. Enfoncez complètement le DU-31 dans l’imprimante.
English
Deutsch
FrançaisItalianoEspañol
5. Refermez le capot avant de l’imprimante. Ceci termine l’installation du
module recto-verso.
55
Page 57

Impression recto-verso
Lors de l’installation du module recto-verso, le menu d’impression recto-verso
s’ajoute au menu de sélection de mode de l’imprimante comme sur l’illustration cidessous (la partie ajoutée est entourée d’un cadre). Ce menu permet d’activer/
désactiver le mode Impression recto-verso et de choisir l’orientation de
l’impression recto-verso.
Menu de sélection de mode
(FS-7000 seulement)
Prêt
PAR 600 A4 001
Prêt
PAR 600 A4 001
Gestion papier >
Mode duplex
Inactif
Bord relié court
Bord relié long
Interface >
Parallèle
Type papier
Normal
Mode duplex
Inactif
Bord relié court
Bord relié long
Autres >
Le mode Impression recto-verso est expliqué aux pages suivantes.
56
Page 58

Mode Impression recto-verso
En mode Impression recto-verso, l’ordre des opérations d’impression est le suivant.
La première feuille est d’abord introduite et la page 2 du document est imprimée sur
une face. Après l’impression, la première feuille est transférée provisoirement au
module recto-verso. La seconde feuille est ensuite introduite dans l’imprimante et la
page 4 du document y est imprimée. Après l’impression de la page 4, la première
feuille, qui se trouve en attente dans le module recto-verso, est renvoyée à l’ensemble
de transfert de l’imprimante pour l’impression de la page 1. Ceci termine l’impression
de la première feuille qui sort alors de l’imprimante. Après cela, et alors que la seconde
feuille sur laquelle se trouve imprimée la page 4 est en attente dans le module rectoverso, la troisième feuille est introduite dans l’imprimante et la page 6 y est imprimée.
Cette suite d’opérations se répète pour réaliser l’impression recto-verso.
English
Deutsch
Déroulement de l’impression recto-verso
Module recto-verso
(DU-31)
FrançaisItalianoEspañol
Imprimante
Chargeur
de papier
(PF-30)
57
Page 59

Sélection du mode Reliure
L’opération consistant à assembler les feuilles imprimées comme dans un livre est
dite “reliure”. Il existe deux types de reliures : la reliure des “bords longs” qui
consiste à assembler les pages par leur côté le plus long et la reliure des “bords
courts” qui consiste à les assembler par leur côté le plus court. Pour les deux types
de reliure, vous pouvez choisir une impression Portrait ou une impression Paysage.
Pour spécifier le type de reliure et l’orientation de l’impression, choisissez l’un des
quatre modes suivants : 1 Portrait/bords longs, 2 Portait/bords courts, 3
Paysage/bords longs et 4 Paysage/bords courts (voyez les figures ci-dessous).
Modes de reliure
Portrait/
bords longs
Paysage/
bords longs
Portait/bords
courts
Paysage/bords
courts
Dans les modes Portrait/bords longs et Paysage/bords courts (1, 4) les deux faces
de la page sont imprimés du haut vers le bas.
Dans les modes Portrait/bords courts et Paysage/bords longs (2, 3), le recto et le
verso de la page sont imprimés dans des directions haut-bas inverses.
58
Page 60

Sélection du mode Impression recto-verso
La sélection du mode Impression recto-verso s’effectue depuis le panneau de
commande de l’imprimante.
Sélection depuis le panneau de commande de l’imprimante
Pour choisir le mode Impression recto-verso et de reliure depuis le panneau de
commande de l’imprimante, procédez comme suit :
English
1. Assurez-vous que Prêt est indiqué sur l’afficheur de l’imprimante et que
le témoin Imprimante en ligne est allumé.
2. Appuyez sur la touche MODE de l’imprimante.
3. Affichez “Gestion papier >”, appuyez sur la touche , puis sur la
touche + ou – pour afficher le “> Mode duplex”. La seconde ligne
indique le mode actuel (le mode par défaut est : Inactif.) Pour la FS7000, à l’aide de la touche + ou –, afficher Mode duplex.
4. Lorsque vous appuyez sur la touche ENTREE, le caractère ? clignote.
Vous pouvez alors changer le mode affiché de la manière indiquée
ci-dessous en appuyant sur la touche + ou –.
➔
Mode duplex ?
Inactif
Mode duplex ?
Bord relié long
Mode duplex ?
Bord relié court
Pour abandonner la sélection, appuyez sur ANNULA TION.
➔
➔
Pas d’impression recto-verso
(Réglage par défaut)
Reliure bords longs
Reliure bords courts
Deutsch
FrançaisItalianoEspañol
5. Après avoir choisi le mode de reliure désiré, validez en appuyant sur
ENTREE.
6. Lorsque vous appuyez sur la touche MODE, l’afficheur indique à
nouveau Prêt.
Vous pouvez aussi effectuer cette sélection en accédant au pilote d’imprimante
depuis le menu de paramétrage de l’imprimante de votre application.
59
Page 61

Impression recto-verso à partir du plateau d’alimentation
Dans le premier mode, spécifiez pour le plateau d’alimentation le même format de
papier, le même type de papier et la même orientation du papier que pour la
cassette actuelle. Si le type, le format ou l’orientation du papier sont différents, il
peut en résulter un bourrage papier. Il n’est pas possible de sélectionner le plateau
d’alimentation comme cassette actuelle pour une impression recto-verso. Pour une
impression recto-verso, nous vous recommandons donc d’utiliser la cassette papier.
Remarque Pour la FS-7000, il n’est pas possible d’effectuer une impression
recto-verso depuis le plateau MP (usages multiples) de
l’imprimante, le chargeur d’enveloppes (EF-1) en option ou le
chargeur universel (UF-1) en option. Si vous tentez une impression recto-verso depuis ces sources de papier, le mode est
automatiquement annulé et les feuilles imprimées sortent par le
plateau face en haut. Lorsque le mode Impression recto-verso est
désactivé, le papier peut également sortir par le plateau face en
bas. Toutefois, si vous utilisez le chargeur d’enveloppes, le papier
ne sortira que par le plateau face en haut.
60
Page 62

En cas de bourrage papier
Les messages d’erreur et mesures à prendre en cas de bourrage papier pendant une
impression recto-verso sont expliqués ci-dessous.
AVERTISSEMENT Veillez à ce qu’il ne reste pas des fragments de papier
dans l’imprimante lorsque vous enlevez les feuilles
bloquées. Ils pourraient prendre feu.
Cette section explique comment enlever les feuilles bloquées en cas de bourrage
papier. L’imprimante s’arrête si des feuilles se bloquent à l’intérieur ou si
l’alimentation en papier ne s’effectue pas depuis une cassette. Elle est alors placée
hors-ligne et le message Bourrage papier Ouvrir capot s’affiche sur
l’imprimante.
Bourrage papier
Ouvrir capot
Lorsque vous ouvrez le capot avant de l’imprimante, l’indication de l’afficheur
change. L’afficheur indique alors le code d’emplacement (A à I et 1 à 6) du
bourrage papier.
Exemple
Bourrage papier
C, H, 3
English
Deutsch
FrançaisItalianoEspañol
Dans cet exemple, des feuilles sont bloquées dans le chargeur de papier (C),
l’ensemble d’alimentation papier (H), le module recto verso (I) et la cassette
supérieure du chargeur de papier (3) en option. Les mesures à prendre dans un tel
cas sont expliquées avec des exemples à partir de la page 64.
La signification des indicateurs apparaissant sur l’afficheur et les emplacements
correspondants des bourrages sont donnés dans le tableau de la page suivante.
Procédez de la manière indiquée aux pages suivantes pour enlever les feuilles
bloquées.
61
Page 63

Indicateur affiché et emplacement du bourrage papier
Indicateur Signification de l’indicateur Emplacement correspondant sur l’imprimante
Chargeur de papier (EF-1 ou UF-1)
A
en option
B Plateau d’alimentation
Chargeur de papier livré avec
C
l’imprimante
D Chargeur de papier (PF-30) en option
E Chargeur de papier (PF-30) en option
Dispositif en option
F
(DF-30/DF-31, SO-30 ou ST-30)
Plateau de sortie face en haut/plateau
G
de sortie face en bas (accouplement au
dispositif en option)
H Ensemble d’alimentation papier
Module recto-verso en option
I
(DU-31 [cet ensemble])
Cassette 1
1
Cassette 2
2
Cassette 3
3
Cassette 4
4
Cassette 5
5
6 Cassette 6
Vous trouverez une étiquette indiquant
l’emplacement des bourrages papier au dos
du capot avant.
En cas de bourrage papier, l’indicateur du panneau de commande de l’imprimante
clignote également pour indiquer l’emplacement des feuilles bloquées. Lorsque le
bourrage se produit dans un chargeur de papier, la DEL à l’avant de la cassette où
les feuilles sont bloquées clignote également. La signification des clignotements
est expliquée dans le tableau suivant.
État de la DEL Signification
Clignotement rapide Bourrage papier dans la cassette
Clignotement lent Pas de papier dans la cassette
Allumée Cassette actuellement sélectionnée
Éteinte • Cassette incorrectement introduite
• Cassette non sélectionnée actuellement
En cas de bourrage papier, localiser son emplacement en s’aidant du tableau ci-dessus,
puis procédez comme il est indiqué dans le tableau de la page suivante. Lorsque les
feuilles bloquées ont été enlevées, l’imprimante reprend automatiquement
l’impression.
62
Page 64

Que faire en cas de bourrage papier
Indicateur
A
B
C
D
E
F
G
H
I
1 à 6
Signification de l’indicateur
Vérifiez le chargeur de
papier (EF-1 ou UF-1) en
option (si installé).
Vérifiez le plateau
d’alimentation de
l’imprimante.
Vérifiez le chargeur de
papier (standard).
(D et E ne s’affichent que si
un PF-30 en option est
installé.)
Vérifiez le dispositif en
option (DF-30/DF-31/SO30/ST-30) (si installé).
Vérifiez le plateau de sortie
face en haut de l’imprimante.
(Accouplement au dispositif
en option)
Vérifiez le plateau de sortie
face en bas de l’imprimante.
Vérifiez l’ensemble
d’alimentation papier de
l’imprimante.
Vérifiez l’ensemble de
fixation de l’imprimante.
Vérifiez le module rectoverso (DU-31) en option (cet
ensemble).
Vérifiez la cassette papier
indiquée.
Remède
Un bourrage papier s’est produit dans le chargeur en
option. Enlevez avec précaution les feuilles bloquées
(pour plus d’informations, consultez le mode d’emploi
de l’EF-1/UF-1).
Un bourrage papier s’est produit dans le plateau
d’alimentation. Enlevez avec précaution les feuilles
bloquées. Ouvrez et refermez ensuite une fois le capot
avant de l’imprimante.
Ouvrez le capot latéral du chargeur de papier indiqué et
enlevez les feuilles bloquées (voyez l’exemple page
suivante).
Enlevez les feuilles bloquées sur le plateau auxiliaire
multifeuille (pour plus d’informations, consultez le
mode d’emploi du DF-30/DF-31/SO-30/ST-30).
La feuille se bloque avant d’être complètement sortie.
Ouvrez le capot latéral de l’imprimante et enlevez avec
précaution la feuille bloquée (pour plus d’informations,
consultez le mode d’emploi de l’imprimante).
Si l’impression s’arrête avant la sortie complète d’une
feuille, enlevez cette feuille avec précaution.
Ouvrez le capot avant et tirez l’ensemble d’alimentation
papier avec précaution jusqu’à ce qu’il vienne en butée.
Si une feuille est bloquée dans les galets d’alignement,
enlevez-la en la tirant dans le sens où le retrait est le plus
facile (pour plus d’informations, consultez le mode
d’emploi de l’imprimante).
Si une feuille est bloquée dans l’ensemble de fixation,
enlevez-la de la même manière (pour plus
d’informations, consultez le mode d’emploi de
l’imprimante).
Après avoir enlevé complètement le papier, remettez
l’ensemble d’alimentation papier comme il se trouvait
initialement.
Ouvrez le capot avant et tirez l’ensemble d’alimentation
papier avec précaution jusqu’à ce qu’il vienne en butée.
Ouvrez le couvercle de l’ensemble de fixation
bouton [vert])
fixation. Il se peut que du papier soit bloqué à
l’intérieur.
Ouvrez le capot avant, retirez le module recto-verso et
enlevez les feuilles bloquées (pour plus d’informations,
voyez les pages suivantes).
Retirez la cassette papier indiquée et enlevez les feuilles
bloquées. Après avoir enlevé complètement le papier,
ouvrez et refermez une fois le capot avant.
et vérifiez l’intérieur de l’ensemble de
(tenez le
English
Deutsch
FrançaisItalianoEspañol
63
Page 65

Exemple
Dans l’exemple donné à la page 61, des feuilles sont bloquées dans le chargeur de
papier (C), le chargeur de papier (H), le module recto-verso (I) et la cassette
supérieure du chargeur de papier en option (3).
Bourrage papier
C, H, I, 3
1. Lorsque les feuilles sont bloquées en plusieurs endroits à la fois comme
dans cet exemple, commencez par les enlever au premier emplacement
indiqué (C dans cet exemple).
Capot latéral du chargeur de papier
Lorsque les feuilles bloquées dans le chargeur de papier (C) ont été
enlevées, l’indication change comme suit :
Bourrage papier
H, I, 3
2. Ouvrez le capot avant de l’imprimante et tournez le levier de verrouillage
dans le sens inverse dans aiguilles d’une montre (sauf pour la FS-7000).
Sortez ensuite l’ensemble de transfert avec précaution jusqu’à ce qu’il
vienne en butée (en ce point, le module recto-verso est également tiré).
Ensemble de fixation
Module recto-verso
Ensemble de transfert
ATTENTION L’ensemble de fixation à l’intérieur de l’imprimante reste chaud
pendant un certain temps après le retrait de l’ensemble de
transfert. Pour ne pas risquer des brûlures, ne pas le toucher
avec les mains nues.
64
Page 66

3. Vérifiez le changeur de guide sur le côté gauche de l’ensemble de
fixation. Si une feuille est bloquée dessous, soulevez le changeur de guide
et le couvercle de l’ensemble de fixation (tenez le bouton [vert]).
Enlevez les feuilles bloquées comme sur la figure ci-dessous.
Couvercle de
l’ensemble
de fixation
English
Changeur
de guide
➞
Feuille bloquée
Lorsque les feuilles bloquées ont été enlevées, l’indication change comme suit :
Bourrage papier
I, 3
4. Après vous être assuré qu’il n’y a pas de feuilles bloquées dans l’ensemble
de transfert, remettez l’ensemble de transfert seul en place dans l’imprimante.
Ensemble de transfert
➞
Deutsch
FrançaisItalianoEspañol
5. Tournez le levier de verrouillage à fond dans le sens des aiguilles d’une
montre pour bloquer l’ensemble de transfert.
65
Page 67

6. Ouvrez les deux couvercles en plastique transparent au-dessus du module
recto-verso. Enlevez toute feuille bloquée en procédant depuis l’intérieur
comme sur la figure ci-dessous.
Ouvrez le premier couvercle
et enlevez la feuille bloquée.
Couvercle en
plastique
transparent
Ouvrez le second couvercle et
enlevez la feuille bloquée.
Couvercle en
plastique transparent
7. Après avoir enlevé les feuilles bloquées, remettez les couvercles en
plastique transparent en place, puis introduisez le module recto-verso dans
l’imprimante. L’afficheur indique Capot avant ouvert.
8. Refermez le capot avant de l’imprimante. Ceci termine le retrait des feuilles
bloquées.
Remarques • Selon l’emplacement du bourrage, il se peut parfois que la
page bloquée ne soit pas réimprimée.
• Notez que le toner non fondu peut vous salir les mains
lorsque vous enlevez les feuilles bloquées.
Si les bourrages sont fréquents, vous utilisez peut-être un papier dont les
caractéristiques ne conviennent pas à l’imprimante. Dans un tel cas changez de type
de papier.
Si les bourrages restent fréquents après le changement de type de papier, il se peut
que l’imprimante présente un problème. Adressez-vous alors à votre revendeur
Kyocera.
66
Page 68

Choix du papier
Cette imprimante est conçue pour imprimer sur du papier de photocopie destiné
aux copieurs PPC à sec standard (papier standard), mais elle peut aussi imprimer
sur divers types de papier se conformant aux caractéristiques indiquées dans cette
section. Pour plus d’informations sur le papier à utiliser, consultez le mode
d’emploi de l’imprimante.
Choisissez le papier avec soin. Un papier inadéquat peut entraîner des bourrages
papier ou un froissement des feuilles. Du papier de mauvaise qualité peut affecter la
qualité d’impression et non seulement gâcher du papier mais aussi endommager
l’imprimante. En observant les précautions ci-dessous, vous imprimerez plus
efficacement, avec moins de problèmes et risquerez moins de causer des dommages
à l’imprimante ou d’accélérer son usure.
Papier pouvant être utilisé
Utilisez du papier de photocopie (papier standard) destiné aux copieurs PPC à sec
standard.
Remarque Certains papiers recyclés n’ont pas les caractéristiques
nécessaires (Tableau 1) pour pouvoir être utilisés sur cette
imprimante car leur teneur en eau et en pulpe, en particulier,
est excessive. Avant d’acheter du papier recyclé, faites un essai
sur l’imprimante avec un échantillon pour vous assurer de la
qualité d’impression. Choisissez un papier recyclé de marque
offrant une bonne qualité d’impression et ne contenant pas des
niveaux excessifs de poussière de papier.
English
Deutsch
FrançaisItalianoEspañol
La qualité du papier diffère selon les fabricants. Si elle est médiocre, vous n’obtiendrez
pas de bons résultats d’impression. Vous ne réaliserez pas des économies en utilisant
des papiers bon marché si leur qualité n’est pas adéquate pour l’imprimante.
67
Page 69

Caractéristiques de base du papier
Les caractéristiques de base du papier sont résumées dans le tableau suivant :
Tableau 1. Caractéristiques de base du papier
Description Caractéristique
Grammage 60 à 90 g/m
Epaisseur 0,086 à 0,110 mm
Précision dimensionnelle ± 0.7 mm
Perpendicularité des coins 90° ± 0.2°
Teneur en eau 4% à 6%
Teneur en pulpe 80 % ou plus
2
Remarque Lors d’une impression recto-verso sur du papier de format
supérieur à A4, tout particulièrement si le papier est léger
(grammage inférieur à 65 g/m2), il se peut que les bords soient
légèrement sales. Utilisez du papier normal ayant un grammage
de plus de 70 g/m2.
Kyocera ne saurait être tenu responsable d’accidents résultant
de l’utilisation de papiers ne répondant pas aux caractéristiques
ci-dessus. Consultez votre revendeur Kyocera avant d’acheter
un papier traité spécialement ou un papier pour des applications spéciales.
Comment choisir le bon papier
Une impression de haute qualité est possible avec du papier conforme aux conditions du Tableau 1. Les critères de sélection du papier pour l’impression rectoverso sont indiqués ci-dessous.
Condition du papier
N’utilisez pas du papier écorné, incurvé, sale, déchiré, à bords irréguliers,
pelucheux, à gros grains ou se déchirant facilement.
L’utilisation d’un tel papier peut entraîner une impression illisible, des défauts
d’alimentation en papier et des bourrages papier, et raccourcir la durée de service
de l’imprimante. Choisissez un papier ayant une surface aussi lisse et régulière que
possible. Notez que l’utilisation de papiers couchés ou à traitement superficiel peut
endommager le tambour ou l’ensemble de fixation.
68
Page 70

Composition
N’utilisez pas des papiers couchés ou à traitement superficiel contenant du plastique
ou du carbone. Sous la chaleur de fixation, de tels papiers pourraient dégager des
fumées toxiques et endommager le tambour.
Le papier bond doit contenir au moins 80 % de pulpe. La teneur en coton et autres
fibres ne doit pas dépasser 20 %.
Format du papier
Les cassettes et le plateau d’alimentation peuvent recevoir les formats de papier
indiqués au Tableau 2. L’imprimante détecte automatiquement le format de papier
dans une cassette.
Tableau 2. Formats de papier utilisables
Papier Format
ISO A3 297 × 420 mm
ISO A4 210 × 297 mm
ISO A5 148 × 210 mm
JIS B4 257 × 364 mm
JIS B5 182 × 257 mm
Ledger (grand-livre) 11 × 17 pouces
Letter 8,5 × 11 pouces
Legal 8,5 × 14 pouces
English
Deutsch
FrançaisItalianoEspañol
Lissé du papier
Il est important que le papier ait une surface lisse et régulière, mais n’utilisez pas
du papier couché. Un papier trop lisse peut entraîner le passage de plusieurs
feuilles ensemble et des bourrages papier.
Grammage
Le grammage est le poids d’un mètre carré de papier. Un papier trop léger ou trop
lourd peut entraîner des défauts d’alimentation, des bourrages et une usure prématurée
de l’imprimante. Un grammage irrégulier du papier peut entraîner le passage de
plusieurs feuilles ensemble, des défauts d’impression, une mauvaise fusion du toner,
une impression floue et d’autres problèmes de qualité d’impression. Pour le papier
normal, le grammage doit être de 60 à 90 g/m2. Pour le papier épais, il doit être de 90
à 200 g/m2.
69
Page 71

Épaisseur
Le papier utilisé ne doit être ni trop épais ni trop fin. Si plusieurs feuilles passent
ensemble et s’il y a des bourrages, il se peut que le papier soit trop fin. Un papier trop
épais peut aussi provoquer des bourrages. L’épaisseur du papier doit être comprise
entre 0,086 et 0,110 mm.
Teneur en eau
La teneur en eau est définie comme le pourcentage de l’humidité à la masse sèche du
papier. L’humidité peut affecter l’aspect du papier, l’alimentation, le cintrage, les
propriétés électrostatiques et les caractéristiques de fusion du toner.
La teneur en eau du papier varie avec l’humidité relative ambiante. Lorsque l’humidité
relative est élevée, le papier absorbe de l’eau et ses bords se dilatent et se gondolent.
Lorsque l’humidité relative est faible, le papier perd de son humidité, ses bords se
contractent et le contraste d’impression peut être médiocre.
Des bords ondulés ou trop tendus peuvent entraîner des défauts d’alimentation et des
anomalies d’alignement. La teneur en eau du papier doit être de 4 à 6 %.
Pour que la teneur en eau soit correcte, il est important de stocker le papier en le
protégeant contre l’humidité. Voici quelques conseils pour protéger le papier contre
l’humidité :
• Rangez le papier dans un endroit sec et bien aéré.
• Laissez le papier aussi longtemps que possible dans son emballage et à plat.
Remettez toujours les feuilles inutilisées dans l’emballage.
• Stockez le papier dans son carton d’origine. Placez le carton sur une palette ou un
autre support pour le séparer du plancher . Veillez à ce que le papier ne soit pas en
contact avec un plancher en bois ou en béton pendant la saison humide.
• Ne laissez pas le papier dans un endroit exposé à la chaleur, au soleil ou à l’humidité.
70
Page 72

Autres propriétés du papier
Raideur : Un papier trop mou ou trop raide peut se plier ou se déformer à l’intérieur
de l’imprimante et causer un bourrage.
Cintrage : La plupart des papiers ont tendance à s’incurver naturellement dans un
sens ou dans l’autre lorsqu’on les laisse hors de leur emballage. Le papier s’incurve
légèrement vers le haut lorsqu’il traverse l’ensemble de fixation. Chargez le papier
avec son cintrage naturel vers le bas de sorte qu’il sorte plat. Certains papiers ont
un verso et un recto. Si ceci est indiqué sur leur emballage, placez les feuilles dans
la cassette avec leur verso tourné vers le bas.
Remarque Si le cintrage est important, placez le papier dans la cassette
avec le dos du papier tourné vers le bas.
English
Deutsch
Propriétés électrostatiques : Pendant l’impression, le papier est chargé
électrostatiquement pour attirer le toner. Le papier doit pouvoir libérer cette charge
afin que les feuilles n’adhèrent pas les unes aux autres dans le réceptacle de sortie.
Contrôle de qualité : Des feuilles de taille inégale, des coins non
perpendiculaines, des bords irréguliers, des feuilles soudées (non coupées) et des
bords ou des coins rabattus peuvent entraîner diverses anomalies de l’imprimante.
Prêtez une attention particulière à ces points lorsque vous choisissez vous-même le
papier.
Emballage : Choisissez un papier emballé par rame et placé dans un carton. Le
meilleur emballage comporte un revêtement superficiel sur sa face intérieure qui
protège le papier contre l’humidité.
Papier à traitement spécial : Il est déconseillé d’utiliser les papiers à traitement
spécial ci-dessous, même s’ils satisfont aux caractéristiques de base. Si vous désirez
utiliser de tels papiers, faites un essai sur l’imprimante avec un échantillon avant de
les acheter pour vous assurer que la qualité d’impression est satisfaisante.
• Papiers brillants
• Papiers comportant des parties ajourées
• Papiers gaufrés
• Papiers comportant des perforations d’entraînement
• Papiers poinçonnés
FrançaisItalianoEspañol
71
Page 73

Papiers spéciaux
Vous pouvez utiliser les types de papier spécial suivants :
• Papiers de couleur
• Papiers préimprimés (papier à en-tête, etc.)
Avant d’utiliser les types de papier ci-dessus, assurez-vous qu’ils sont spécialement
conçus pour les copieurs et/ou les imprimantes feuille à feuille.
La composition et la qualité des papiers spéciaux sont très variables. Ces papiers
ont donc plus tendance à causer des problèmes à l’impression que le papier bond
blanc. Certains papiers spéciaux dégagent des gaz toxiques lors de l’impression.
Faites toujours un test d’impression avant d’utiliser un nouveau type de papier
spécial.
Remarque Avant d’acheter un type quelconque de papier spécial, faites
un test sur l’imprimante avec un échantillon pour vous
assurer que la qualité d’impression est satisfaisante.
Les caractéristiques pour les papiers spéciaux sont indiquées ci-dessous.
Papiers de couleur
Les papiers de couleur doivent satisfaire aux mêmes caractéristiques que le papier
bond blanc, qui sont indiquées au Tableau 1. Les pigments utilisés dans le papier
doivent en outre pouvoir supporter la chaleur de fixation pendant l’impression.
Papiers préimprimés (papier à en-tête, etc.)
Lorsque vous imprimez sur du papier préimprimé, l’encre préimprimée doit
pouvoir supporter la chaleur de la fixation durant l’impression et ne doit pas être
affectée par l’huile de silicone.
N’utilisez pas du papier traité en surface.
Remarque En mode Impression recto-verso, la page 2 est imprimée en
premier. Lorsque vous utilisez du papier à en-tête, etc., pour
l’impression recto-verso, il est recommandé de placer le
papier dans la cassette en inversant ses faces.
72
Page 74

Caractéristiques
Désignation de modèle Module recto-verso DU-31
Imprimante compatible Imprimantes feuille à feuille Kyocera
Formats de papier utilisables ISO A3 (297 × 420 mm)
ISO A4 (210 × 297 mm)
ISO A5 (148 × 210 mm)
JIS B4 (257 × 364 mm)
JIS B5 (182 × 257 mm)
Letter (8,5 × 11 pouces)
Legal (8,5 × 14 pouces)
Ledger (grand-livre) (11 × 17 pouces)
Conditions ambiantes Les mêmes que celles de l’imprimante
d’utilisation
Dimensions (h × l × p) 96 mm (3,8") × 455 mm (17,9") × 451 mm (17,8")
Poids 5 kg (11 lbs.)
Alimentation électrique Depuis l’imprimante
English
Deutsch
FrançaisItalianoEspañol
73
Page 75

Cette page est délibérément laissée blanche.
74
Page 76

Si declina ogni responsabilità nei riguardi degli utenti o di altre persone per
qualsiasi perdita o danno causato direttamente o indirettamente da questo prodotto,
compreso il malfunzionamento, la perdita di affari o di profitti previsti derivanti
dall’uso o dal funzionamento di questo prodotto o del suo software.
Attenzione
NON CI ASSUMIAMO ALCUNA RESPONSABILITÀ PER QUALSIASI
DANNO CAUSATO DALLA INSTALLAZIONE SBAGLIATA.
Avviso
Le informazioni di questo manuale sono soggette a modifiche senza avviso.
In future edizioni potranno essere inserite pagine supplementari. L’utente è pregato
di scusare ogni imprecisione tecnica o errore tipografico di questa pubblicazione.
Non ci assumiamo alcuna responsabilità nel caso che si verifichi un qualsiasi
problema osservando le istruzioni di questo manuale.
Il contenuto di questo manuale è protetto da copyright. Nessuna parte di esso può
essere riprodotta o copiata in qualsiasi maniera senza l’autorizzazione del
proprietario del copyright.
Riguardo al marchio di fabbrica
English
Deutsch
FrançaisItalianoEspañol
PRESCRIBE è un marchio di fabbrica depositato della Kyocera Corporation.
75
Page 77

Requisiti contro le interferenze radio nei paesi europei
L’alimentatore universale DU-31 opzionale è progettato per l’uso con le
stampanti modello FS-7000, FS-7000+ e FS-9000 che sono state testate e
categorizzate come dispositivi di Classe B in base alle norme EN55022.
I dispositivi di Classe B possono causare interferenze con la ricezione radio o
TV, soprattutto nelle aree residenziali.
Indice
Introduzione...........................................................................................................77
Nome delle parti ....................................................................................................77
Installazione dell’unità duplex ..............................................................................78
Stampa duplex ....................................................................................................... 80
Correzione degli inceppamenti della carta ............................................................ 85
Selezione della carta ..............................................................................................91
Dati tecnici.............................................................................................................97
76
Page 78

Introduzione
La DU-31 è una unità di stampa duplex opzionale delle stampanti Kyocera.
Prima di usare l’unità duplex DU-31, leggere questo manuale e seguire con cura
tutte le istruzioni per la sua installazione ed uso. Osservare gli avvisi cautelativi
indicati sull’unità stessa.
Conservare questo manuale in un posto facilmente accessibile, in modo da poterlo
consultare in futuro in caso di dubbio sul suo funzionamento o se si verifica un
qualche problema.
Lista dell’imballaggio
DU-31 1
Manuale di istruzioni (questo libretto) 1
Nome delle parti
Prima di installare l’unità duplex, studiare i nomi delle parti seguenti. Essi servono
a descrivere i procedimenti di installazione e d’uso dell’unità duplex.
Rotaie di installazione
Coperchio di plastica
trasparente (due coperchi)
English
Deutsch
FrançaisItalianoEspañol
Unità duplex (DU-31)
77
Page 79

Installazione dell’unità duplex
Aprire il coperchio anteriore della stampante e installare la DU-31 nello spazio
vuoto sotto l’unità di trasferimento.
ATTENZIONE Prima di installare (o di rimuovere) l’unità duplex opzionale,
accertarsi di aver spento la stampante e di aver staccato il
cavo di alimentazione dalla presa di corrente.
1. Aprire il coperchio anteriore della stampante.
Coperchio anteriore
Spazio di installazione
della DU-31
2. Dopo aver rimosso l’unità duplex dal materiale di imballaggio, togliere il
nastro adesivo che mantiene il coperchio in posizione.
78
Nastro
Nastro
Page 80

3. Togliere l’unità duplex dal materiale di imballaggio e installarla sulla
stampante come mostrato nell’illustrazione. Installarla in modo che le
rotaie destra e sinistra si trovino appoggiate correttamente sulle rotaie
della stampante.
English
Rotaia
4. Spingere la DU-31 completamente nella stampante.
Rotaia
Deutsch
FrançaisItalianoEspañol
5. Chiudere il coperchio anteriore della stampante. Ciò completa
l’installazione dell’unità duplex.
79
Page 81

Stampa duplex
Dopo l’installazione dell’unità duplex, al menu di selezione del modo della
stampante viene aggiunto il menu di stampa duplex, come mostrato sotto (menu
aggiunto incorniciato), ed esso viene usato per attivare e disattivare il modo di
stampa duplex e per regolare l’orientamento della stampa duplex.
Menu di selezione modo
(FS-7000 soltanto)
Stampante pronta
PAR 600 A4 001
Stampante pronta
PAR 600 A4 001
Inseriment >
carta
Modo fronte/retr
Nessuno
Lato corto
Lato lungo
Interfaccia >
Parallela
Tipo Carta
Normale
Modo fronte/retr
Nessuno
Lato corto
Lato lungo
Altri >
Il modo di stampa duplex viene spiegato nelle pagine seguenti.
80
Page 82

Modo di stampa duplex
Il flusso dell’operazione di stampa nel modo di stampa duplex è come segue.
Inizialmente, il primo foglio viene alimentato e la pagina 2 del documento viene
stampata su un lato del foglio. Il primo foglio stampato viene temporaneamente
trasferito all’unità duplex. La stampante alimenta poi il secondo foglio su cui la
pagina 4 è stampata su un lato. Dopo la stampa della pagina 4, il primo foglio
nell’unità duplex viene inviato di nuovo all’unità di trasferimento della stampante
per la stampa della pagina 1. Ciò completa la stampa del primo foglio, che viene
fatto uscire. Dopo di ciò e mentre il secondo foglio su cui è stata stampata la
pagina 4 su un lato viene mantenuto in condizione di attesa nell’unità duplex, la
stampante alimenta il terzo foglio e vi stampa sopra la pagina 6. L’operazione poi
si ripete come descritto sopra per l’esecuzione della stampa duplex.
English
Deutsch
Flusso della stampa duplex
Unità duplex (DU-31)
FrançaisItalianoEspañol
Stampante
Alimentatore
carta (PF-30)
81
Page 83

Regolazione del modo di cucitura
L’unione dei fogli come un libro viene detta “cucitura”. Ci sono due modi di
cucitura: “lato lungo”, che unisce i fogli sul lato lungo della pagina, e “lato corto”,
che li unisce sul lato corto. Per la cucitura sul lato lungo e sul lato corto si può
selezionare sia l’orientamento ritratto che quello paesaggio.
Il tipo di cucitura e la direzione di stampa possono essere regolati usando i quattro
modi di cucitura seguenti. Essi sono 1 Ritratto/Lato lungo, 2 Ritratto/Lato corto,
3 Paesaggio/Lato lungo e 4 Paesaggio/Lato corto. (Vedere le illustrazioni sotto.)
Modo di cucitura
Ritratto/
Lato lungo
Paesaggio/
Lato lungo
Ritratto/
Lato corto
Paesaggio/
Lato corto
Nei modi ritratto/lato lungo e paesaggio/lato corto (1 e 4), entrambi i lati della
pagina vengono stampati nella direzione dall’alto al basso.
Nei modi ritratto/lato corto e paesaggio/lato lungo (2 e 3), il lato anteriore della
pagina e il lato posteriore della pagina vengono stampati nelle direzioni opposte su/
giù.
82
Page 84

Regolazioni del modo di stampa duplex
Le regolazioni del modo di stampa duplex vanno fatte sul pannello dei comandi
della stampante.
Regolazioni sul pannello dei comandi della stampante
Fare le regolazioni per la stampa duplex e per la cucitura sul pannello dei comandi
della stampante usando il procedimento seguente.
1. Accertarsi che sul display dei messaggi della stampante sia indicato
Stampante pronta e che l’indicatore in-linea sia acceso.
2. Premere il tasto FUNZIONI della stampante.
3. Visualizzare “Inserimento carta >”, premere il tasto e premere
il tasto + o – per visualizzare “> Modo fronte/retr”. La seconda
riga mostra il modo attuale. (Nello stato iniziale, viene mostrato
Nessuno.) Nel caso di una FS-7000, usare il tasto + o – per visualizzare
Modo fronte/retr sul display dei messaggi.
4. Quando si preme il tasto INVIO, il segno ? lampeggia e si può cambiare il
display premendo il tasto + o –, come mostrato nel diagramma seguente.
➔
English
Deutsch
FrançaisItalianoEspañol
Modo fronte/retr
?Nessuno
Modo fronte/retr
?Lato corto
Modo fronte/retr
?Lato lungo
Per abbandonare la regolazione, premere il tasto CANCELLA.
5. Selezionare il modo di cucitura desiderato e premere il tasto INVIO.
6. Quando si preme il tasto FUNZIONI, l’indicazione del display dei
messaggi torna a Stampante pronta.
La stessa regolazione può essere operata accedendo al driver della stampante dal
menu di regolazione della stampante del software applicativo.
➔➔
La stampa duplex non viene eseguita
(regolazione iniziale).
Cucitura sul lato corto
Cucitura sul lato lungo
83
Page 85

Stampa duplex dal vassoio universale
Nello stato iniziale, ricordarsi di regolare per il vassoio universale lo stesso
formato carta, tipo di carta e direzione di alimentazione del cassetto attuale. Se il
formato carta, tipo di carta o direzione di alimentazione differiscono, si potrebbe
verificare un inceppamento della carta. Tenere inoltre presente che non è possibile
selezionare il vassoio universale come cassetto attuale ed eseguire la stampa
duplex. Si raccomanda perciò di eseguire la stampa duplex dal cassetto della carta.
Nota Nel caso di una FS-7000, la stampa duplex non è possibile dal
vassoio universale, dall’alimentatore buste (EF-1) opzionale o
dall’alimentatore universale (UF-1) della stampante. Se si cerca di
eseguire la stampa duplex da queste sorgenti della carta, il modo si
cancella automaticamente e la carta stampata viene fatta uscire dal
vassoio a faccia in su. Quando il modo di stampa duplex è
disattivato, la carta può anche essere fatta uscire dal vassoio a faccia
in giù. Quando però si alimenta la carta dall’alimentatore delle
buste, la carta esce dal vassoio a faccia in su.
84
Page 86

Correzione degli inceppamenti della carta
I messaggi di errore e i rimedi quando si verifica l’inceppamento della carta
durante la stampa duplex sono spiegati di seguito.
ATTENZIONE Correggendo gli inceppamenti della carta, fare attenzione a
non lasciare pezzetti di carta nella stampante, perché
altrimenti c’è pericolo di incendio.
Questa sezione descrive il modo di rimuovere la carta quando si inceppa nella
stampante. La stampante si arresta ogni volta che la carta si inceppa all’interno o se
la carta non viene alimentata da un cassetto. La stampante si dispone fuori linea e
sul display dei messaggi appare il messaggio Carta inceppata Aprire
coperchio.
Carta inceppata
Aprire coperchio
L’apertura del coperchio anteriore della stampante fa cambiare il display dei
messaggi. Esso indica ora il posto di codice (da A a I e da 1 a 6)
dell’inceppamento della carta.
Esempio
Carta inceppata
C, H, I, 3
English
Deutsch
FrançaisItalianoEspañol
In questo esempio, la carta è inceppata nell’alimentatore della carta (C), unità di
alimentazione carta (H), unità duplex (I) e sul cassetto superiore dell’alimentatore
carta (3) opzionale. I rimedi da prendere in questi casi sono spiegati usando esempi
reali a partire de pagina 88.
I significati dei simboli che appaiono sul display dei messaggi e i posti dove la
carta è inceppata sono dati nella tabella della pagina seguente. Correggere gli
inceppamenti della carta con il procedimento spiegato nelle pagine seguenti.
85
Page 87

Indicatore del display dei messaggi e posto dove la carta è inceppata
Indicatore Significato dell’indicatore Posto corrispondente della stampante
Alimentatore carta opzionale
A
(EF-1 o UF-1)
Vassoio universale
B
Alimentatore carta in dotazione
C
alla stampante
Alimentatore carta opzionale (PF-30)
D
Alimentatore carta opzionale (PF-30)
E
Unità opzionale
F
o ST-30)
Vassoio di uscita a faccia in su/ giù
G
(collegamento all’unità opzionale)
Unità di alimentazione carta
H
Unità duplex opzionale
I
(DU-31 [questa unità])
Cassetto 1
1
Cassetto 2
2
Cassetto 3
3
Cassetto 4
4
Cassetto 5
5
Cassetto 6
6
(DF-30/DF-31, SO-30
Sulla parte posteriore del coperchio anteriore è
attaccata una etichetta intitolata “Paper Jam
Location Indicators’’ (Indicatori dei posti di
inceppamento della carta).
Quando la carta si inceppa, l’indicatore sul pannello dei comandi della stampante
lampeggia per indicare il posto dell’inceppamento. Se la carta si inceppa
nell’alimentatore della carta, lampeggia anche il LED sulla parte anteriore di
questo cassetto di alimentazione della carta. I significati dei modi di
lampeggiamento sono indicati nella tabella seguente.
Stato del LED Significato
Lampeggia velocemente La carta è inceppata nel cassetto.
Lampeggia lentamente In questo cassetto non c’è la carta.
Acceso Cassetto correntemente selezionato.
Spento • Il cassetto è inserito male.
• Non è stato selezionato un cassetto.
Nel caso di un inceppamento della carta, dopo aver controllato il posto
dell’inceppamento con la tabella sopra, rimediare come suggerito nella tabella
della pagina seguente. Dopo la rimozione di tutta la carta inceppata, la stampante
riprende automaticamente a stampare.
86
Page 88

Modo di rimediare gli inceppamenti della carta
Indicatore
A
B
C
D
E
F
G
H
I
Da 1 a 6
Significato dell’indicatore
Controllare l’alimentatore carta
opzionale (EF-1 o UF-1).
(Soltanto se è stato installato)
Controllare il vassoio
universale della stampante.
Controllare l’alimentatore carta
opzionale (unità principale).
(D e E vengono visualizzati
soltanto se si è installato il PF30 opzionale.)
Controllare l’unità opzionale
(DF-30/DF-31/SO-30/ST-30).
(Soltanto se installata)
Controllare il vassoio di uscita
a faccia in su della stampante
(collegamento all’unità
opzionale)
Controllare il vassoio di uscita
a faccia in giù della stampante.
Controllare l’unità di
alimentazione carta della
stampante.
Controllare l’unità di fusione
della stampante.
Controllare l’unità duplex
(DU-31 opzionale [questa
unità]).
Controllare il cassetto di
alimentazione carta indicato.
Punto corrispondente della stampante
Si è verificato un inceppamento della carta
nell’alimentatore opzionale. Tirare via con cura la carta
inceppata. (Per i dettagli, leggere il manuale di istruzioni
dell’EF-1/UF-1.)
Si è verificato un inceppamento della carta nel vassoio
universale. Tirare via con cura la carta inceppata. Aprire
poi e chiudere una volta il coperchio anteriore della
stampante.
Aprire il coperchio laterale dell’alimentatore della carta
indicato e togliere la carta inceppata. (Riferirsi
all’esempio alla pagina seguente.)
Togliere la carta inceppata nell’impilatore della carta.
(Per i dettagli, leggere il manuale di istruzioni della DF30/DF-31/SO-30/ST-30.)
La carta si è inceppata prima di essere uscita
completamente. Aprire il coperchio laterale della
stampante e togliere con cura la carta inceppata. (Per i
dettagli, leggere il manuale di istruzioni della
stampante.)
Se la stampa si interrompe prima dell’uscita della carta,
toglierla con cura.
Aprire il coperchio anteriore ed estrarre l’unità di
alimentazione carta fin dove possible. Se la carta è
inceppata nei rulli di registro, toglierla tirandola nella
direzione che ne permette più facilmente la rimozione.
(Per i dettagli, leggere il manuale di istruzioni della
stampante.)
Se la carta è inceppata nell’unità di fusione, toglierla
allo stesso modo. (Per i dettagli, leggere il manuale di
istruzioni della stampante.)
Dopo aver tolto tutta la carta inceppata, rimettere l’unità
di alimentazione carta nella sua posizione originale.
Aprire il coperchio anteriore ed estrarre l’unità di
alimentazione carta fin dove possible. Aprire il
coperchio dell’unità di fusione [tenere la manopola
(verde)] e controllare il suo interno. La carta potrebbe
essere inceppata dentro l’unità di fusione.
Aprire il coperchio anteriore, estrarre l’unità duplex e
togliere la carta inceppata. (Per i dellagli, riferirsi alle
pagine seguenti.)
Estrarre il cassetto di alimentazione carta indicato e
togliere la carta inceppata. Dopo aver tolto tutta la carta,
aprire e chiudere una volta il coperchio anteriore.
English
Deutsch
FrançaisItalianoEspañol
87
Page 89

Esempio
Nell’esempio a pagina 85 la carta è inceppata nell’alimentatore carta (C), nell’unità
di alimentazione carta (H), nell’unità duplex (I) e nel cassetto superiore (3)
dell’alimentatore della carta.
Carta inceppata
C, H, I, 3
1. Se la carta si inceppa in diversi posti, come in questo esempio, rimediare
cominciando dal posto mostrato a sinistra.
Coperchio laterale alimentatore carta
Dopo che si è tolta la carta inceppata nell’alimentatore carta (C), il display
cambia come segue:
Carta inceppata
H, I, 3
2. Aprire poi il coperchio anteriore della stampante e girare la leva di
bloccaggio in senso antiorario (FS-7000 esclusa). Estrarre poi con cura
l’unità di trasferimento finché non può andare più oltre. (A questo punto,
viene contemporaneamente estratta l’unità duplex.)
Unità di fusione
Unità duplex
Unità di trasferimento
ATTENZIONE Dopo che si è tirata fuori l’unità di trasferimento, l’unità di
fusione all’interno potrebbe restare calda per un certo tempo.
Non toccarla con le mani nude, perché c’è pericolo di
bruciature.
88
Page 90

3. Controllare il cambio guida sul lato sinistro dell’unità di fusione. Se la
carta è inceppata sotto, sollevare il cambio guida e il coperchio dell’unità
di fusione [tenere la manopola (verde)]. Togliere la carta come mostrato
nell’illustrazione seguente.
Coperchio
unità di
fusione
English
Cambio guida
➞
Carta inceppata
Dopo che si è rimediato, l’indicazione sul display dei messaggi cambia
come segue:
Carta inceppata
I, 3
4. Dopo la conferma che non c’è carta inceppata nell’unità di trasferimento,
rimettere solo l’unità di trasferimento nella stampante.
Unità di trasferimento
➞
Deutsch
FrançaisItalianoEspañol
5. Girare la leva di bloccaggio in senso orario per bloccare saldamente
l’unità di trasferimento.
89
Page 91

6. Aprire i due coperchi di plastica trasparente sulla parte superiore dell’unità
duplex. Togliere la carta inceppata dall’interno come mostrato
nell’illustrazione seguente.
Aprire il primo coperchio e
rimuovere la carta.
Coperchio
di plastica
trasparente
Aprire il secondo coperchio e
rimuovere la carta.
Coperchio
di plastica
trasparente
7. Dopo la rimozione della carta, rimettere i coperchi di plastica trasparente
nelle loro posizioni originali e reinserire l’unità duplex nella stampante.
L’indicazione sul display dei messaggi diventa Coperchio front.
aperto.
8. Chiudere il coperchio anteriore della stampante. Ciò completa i rimedi per
la correzione degli inceppamenti della carta.
Note • A seconda del posto dell’inceppamento della carta, a volte la
pagina dove si è verificato l’inceppamento non viene ristampata.
• Fare attenzione che le mani potrebbero sporcarsi di toner quando
si toglie la carta inceppata.
Se la carta si inceppa frequentemente, potrebbe essere perché si usa una carta non
adatta alla stampante. In tal caso, cambiare la carta.
Se anche dopo aver cambiato la carta essa si inceppa frequentemente, il problema
potrebbe essere causato dalla stampante. In tal caso, rivolgersi al rivenditore
Kyocera.
90
Page 92

Selezione della carta
Anche se questa stampante è progettata per stampare su carta da fotocopie PPC a
secco (carta standard), essa può anche stampare su vari tipi di carta conformi a
quanto specificato in questo capitolo. Per i dettagli sul tipo di carta che può essere
usato, riferirsi anche al manuale dell’utente della stampante.
Selezionare con cura la carta, perché quella non adatta può causare inceppamenti o
l’arricciamento della carta che esce. La carta di cattiva qualità può ridurre la qualità
della stampa con dispendio di carta e potrebbe anche danneggiare la stampante.
Usando le precauzioni seguenti si può ottenere una stampa efficiente con pochi
problemi e minimizzare il pericolo di danneggiare la stampante.
Carta utilizzabile
Usare soltanto la carta per fotocopie PPC a secco (carta standard).
Nota Alcuni tipi di carta riciclata non rispondono alle specifiche (Tabella
1) per l’uso con questa stampante, per il loro contenuto di acqua e
polpa. Prima di acquistare carta riciclata, fare una prova di stampa
e controllare che la qualità della stampa sia soddisfacente.
Selezionare un tipo di carta riciclata che consente una stampa di
buona qualità e che non contenga livelli eccessivi di polvere di carta.
Ci sono differenze di qualità tra i diversi produttori di carta, che possono avere
effetti sul funzionamento della stampante. Se si usa carta di scarsa qualità non si
possono ottenere dei risultati soddisfacenti. Anche la carta a buon mercato potrebbe
non essere economica dal punto di vista dei risultati se non è adatta a questa
stampante.
English
Deutsch
FrançaisItalianoEspañol
91
Page 93

Dati tecnici fondamentali della carta
La tabella seguente riassume le specifiche fondamentali della carta.
Tabella 1. Dati tecnici fondamentali della carta
Voce Specifiche
Peso Dai 60 ai 90 g/m
Spessore Dai 0,086 ai 0,110 mm
Precisione dimensioni ±0,7 mm
Quadraticità angoli 90° ±0,2°
Contenuto di umidità Dal 4% al 6%
Contenuto di polpa 80% o più
2
Nota Quando si esegue la stampa duplex su carta più grande di A4,
soprattutto con carta leggera che pesa meno di 65 g/m2, i bordi
potrebbero diventare leggermente sporchi. Usare carta normale con
un peso di oltre 70 g/m2.
Kyocera declina ogni responsabilità per gli incidenti causati dall’uso
di carta inadatta che non risponde alle specifiche elencate sopra.
Prima di acquistare carta speciale, rivolgersi al rivenditore Kyocera.
Selezione della carta adatta
La stampa di alta qualità è possibile quando si usa carta conforme alle condizioni
della Tabella 1. Sotto sono discussi i punti da prendere in considerazione per la
selezione della carta per la stampa duplex.
Condizioni della carta
Evitare la carta che è piegata agli angoli, arricciata, sporca, strappata, con bordi
ruvidi, fibre irregolari, superficie ruvida o che si strappa facilmente.
L’uso di carta in queste condizioni può causare una stampa illeggibile, errori di
alimentazione, inceppamenti e potrebbe ridurre la vita della stampante. Selezionare
una carta con una superficie più liscia e piana possibile. Tenere presente che l’uso
di una carta patinata o trattata in modo speciale potrebbe danneggiare il tamburo o
l’unità di fusione.
92
Page 94

Composizione
Non usare carta patinata o trattata in modo speciale contenente plastica o carbone.
Il calore dell’unità di fusione potrebbe sprigionare un fumo dannoso da tale carta e
danneggiare il tamburo.
La carta dovrebbe contenere almeno l’80% di polpa. Il contenuto di cotone od altre
fibre non dovrebbe superare il 20%.
Formato della carta
Nel cassetto e nel vassoio universale si possono mettere i formati carta elencati
nella Tabella 2. La stampante identifica automaticamente il formato della carta
caricata in un cassetto.
Tabella 2. Formati carta utilizzabili
Carta Formato
ISO A3 297 × 420 mm
ISO A4 210 × 297 mm
ISO A5 148 × 210 mm
JIS B4 257 × 364 mm
JIS B5 182 × 257 mm
Ledger 11 × 17 pollici
Lettera 8,5 × 11 pollici
Legale 8,5 × 14 pollici
English
Deutsch
FrançaisItalianoEspañol
Levigatezza
Anche se è importante usare una carta con una superficie levigata e piana, non
usare carta patinata. La carta troppo lucida potrebbe causare alimentazioni multiple
e inceppamenti.
Peso fondamentale
Il peso fondamentale è quello di un foglio di un metro quadrato. La carta troppo
leggera o troppo pesante può causare difetti di alimentazione, inceppamenti e
l’usura prematura della stampante. Il peso disuguale della carta può causare
alimentazioni multiple, difetti di stampa o la fusione insufficiente del toner, aloni
ed altri problemi di qualità della stampa. Il peso corretto della carta è da 60 a
90 g/m2, e da 90 a 200 g/m2 per la carta spessa.
93
Page 95

Spessore
La carta usata con questa stampante non deve essere né estremamente spessa né
estremamente sottile. Se si verificano problemi di alimentazione multipla e
inceppamenti, potrebbe essere che la carta è troppo sottile. La carta troppo spessa
potrebbe anche causare inceppamenti. Lo spessore corretto della carta è di 0,086
mm fino a 0,110 mm.
Contenuto di umidità
Il contenuto di umidità viene definito come il rapporto percentuale di umidità rispetto
alla massa a secco della carta. L’umidità condiziona l’aspetto, l’alimentazione e
l’arricciamento della carta, le proprietà elettrostatiche e le caratteristiche di fusione
del toner.
Il contenuto di umidità della carta varia in base all’umidità relativa della stampa.
Se l’umidità relativa della stanza è alta e viene assorbita dalla carta, i bordi della
carta si espandono diventando ondulati. Se l’umidità relativa della stanza è bassa e
la carta perde umidità, i bordi si restringono e il contrasto della stampa potrebbe
soffrirne.
I bordi ondulati o tirati possono causare difetti di alimentazione e di allineamento
della carta. Il contenuto di umidità della carta deve essere del 4% fino ad un massimo
del 6%.
Per assicurare il contenuto corretto di umidità, è importante conservare la carta in un
ambiente controllato. Alcuni suggerimenti al riguardo sono i seguenti:
• Conservare la carta in un luogo asciutto e ben ventilato.
• Mantenere la carta piatta nel suo imballaggio quanto più a lungo possibile.
Rimettere la carta non usata nel suo imballaggio.
• Conservare la carta nella sua scatola originale. Mettere qualcosa sotto la scatola
per separarla dal pavimento. Non tenere la carta su pavimenti di legno o di cemento
durante la stagione piovosa.
• Non lasciare la carta esposta al calore, alla luce del sole o all’umidità.
94
Page 96

Altre caratteristiche della carta
Rigidezza: La carta troppo floscia o rigida potrebbe piegarsi all’interno della
stampante causando inceppamenti.
Arricciamento: La maggior parte della carta tende ad arricciarsi in qualche
direzione se la si conserva fuori del suo imballaggio. La carta si arriccia
leggermente in su quando passa attraverso l’unità di fusione. Caricare la carta con
il suo arricciamento naturale rivolto in giù, in modo che esca piatta. Alcuni tipi di
carta hanno una superficie anteriore e posteriore. Se ciò è indicato
nell’imballaggio, caricare la carta nel cassetto rivolta in giù.
Nota Se la carta è molto arricciata, caricarla nel cassetto con la superficie
posteriore rivolta in basso.
English
Deutsch
Proprietà elettrostatiche: Durante la stampa la carta subisce una carica statica
per attrarre il toner. La carta deve poter scaricare questa carica in modo che i fogli
stampati non si attacchino nel vassoio di uscita.
Controllo della qualità: I fogli di formato diverso, gli angoli che non sono
quadrati, i bordi sbrindellati, i fogli cuciti (non tagliati) e i bordi e gli angoli
schiacciati possono causare diversi malfunzionamenti della stampante. Tenere ciò a
mente quando si seleziona la carta.
Imballaggio: Selezionare carta imballata e metterla in una scatola. L’imballaggio
migliore è quello con la superficie interna patinata come protezione contro
l’umidità.
Carta trattata specialmente: Si sconsiglia l’uso dei tipi di carta elencati sotto
che sono stati trattati in modo speciale, anche se rispondono ai dati tecnici
fondamentali.Se si desidera usare questi tipi di carta, fare una prova di stampa ed
accertarsi che la qualità della stampa sia soddisfacente prima di acquistarli.
• Carta lucida
• Carta con sezioni tagliate
• Carta lavorata a sbalzo
• Carta con fori di alimentazione
• Carta con fori
FrançaisItalianoEspañol
95
Page 97

Carta speciale
Questa stampante può usare i tipi seguenti di carta speciale.
• Carta colorata
• Carta stampata
Usando i tipi di carta sopra, usare soltanto i prodotti specificati per le fotocopiatrici
e/o stampanti.
Poiché la composizione e la qualità della carta speciale varia considerevolmente, la
carta speciale potrebbe creare dei problemi più facilmente della carta normale
durante la stampa. Alcuni tipi di carta speciale emettono dei gas dannosi durante la
stampa. Prima di usare un tipo di carta speciale, fare una prova.
Nota Prima di acquistare un qualsiasi tipo di carta speciale, fare una
prova di stampa e controllare che la qualità della stampa sia
soddisfacente.
Seguono le specifiche per la carta speciale.
Carta colorata
La carta colorata deve rispondere alle stesse specifiche della carta bianca elencate
nella Tabella 1. Inoltre, i pigmenti usati nella carta devono essere in grado di
sopportare il calore della fusione durante la stampa.
Carta stampata (intestazioni di lettere, ecc.)
Quando si stampa su carta stampata, l’inchiostro stampato deve essere in grado di
sopportare il calore dell’unità di fusione durante il procedimento di stampa, e non
deve contenere olio ai siliconi.
Non usare carta con qualsiasi tipo di trattamento della superficie.
Nota Nel modo di stampa duplex, la pagina 2 viene stampata per prima.
Se si usa carta intestata, ecc., per la stampa duplex, si raccomanda
di metterla nel cassetto con i lati rovesciati.
96
Page 98

Dati tecnici
Nome del modello Unità duplex DU-31
Stampante compatibile Stampanti Kyocera
Formati carta compatibili ISO A3 (297 × 420 mm)
ISO A4 (210 × 297 mm)
ISO A5 (148 × 210 mm)
JIS B4 (257 × 364 mm)
JIS B5 (182 × 257 mm)
Lettera (8,5 × 11 pollici)
Legale (8,5 × 14 pollici)
Ledger (11 × 17 pollici)
Ambiente operativo Conforme all’ambiente di installazione della stampante
Dimensioni (L × A × P) 96 × 455 × 451 mm
Peso 5 kg
Alimentazione Dalla stampante
English
Deutsch
FrançaisItalianoEspañol
97
Page 99

Questa pagina è stata lasciata bianca intenzionalmente.
98
Page 100

No tendremos ninguna obligación ni responsabilidad ante los clientes o cualquier
otra persona o entidad con respecto a cualquier obligación, pérdida o daño causado,
o que se diga que es causado, directa o indirectamente por el equipo vendido o
suministrado por nosotros, incluyendo, pero sin limitar, cualquier interrupción en el
servicio, pérdida de negocios o de beneficios anticipados, o daños indirectos
resultantes de la utilización u operación del equipo o del software.
Precaución
English
NO ASUMIMOS RESPONSABILIDADES POR NINGÚN DAÑO CAUSADO
DEBIDO A UNA INSTALACIÓN MAL HECHA.
Aviso
La información de este manual está sujeta a cambios sin previo aviso.
En futuras ediciones podrán insertarse otras páginas adicionales. Pedimos al
usuario que nos disculpe por cualquier imprecisión técnica o errores tipográficos
que puedan aparecer en la presente edición.
No asumimos ninguna responsabilidad por los accidentes que puedan ocurrir
mientras el usuario sigue las instrucciones de este manual.
El contenido de este manual está protegido por las leyes sobre derechos de autor.
Ninguna parte de este manual podrá reproducirse o copiarse sin permiso del
propietario de los derechos de autor.
Acerca de las marcas comerciales
PRESCRIBE es una marca registrada de Kyocera Corporation.
Deutsch
FrançaisItalianoEspañol
99
 Loading...