

Page 1

Do not remove this Owner’s Manual from the vehicle. Read this manual carefully
before operating the vehicle, as it contains important safety information.
Page 2

Read this manual carefull y.
WARNING
CAUTION
WARNING
This Owner’s Manual contains important information on the safety, operation and maintenance of your KYMCO scooter.
Anyone who operates your scooter should carefully read and understand the contents of this manual before riding the scooter.
For your safety, understand and follow all of the warnings contained in this Owner’s Manual and the labels applied to your scooter.
This Owner’s Manual should be considered a permanent part of the vehicle. Keep it with your scooter at all times.
ON-ROAD USE ONLY This scooter has been designed to be used on the road.
Particularly important information is called out in this manual by the following icons and notations:
The SAFETY ALERT symbol with the exclamation point in the triangle means ATTENTION!
BE ALERT! YOUR SAFETY CAN BE AFFECTED.
Failure to follow instructions associated with a WARNING symbol could result in severe injury or
death to the rider, a passenger, a bystander, or a person inspecting or repairing the scooter.
A CAUTION symbol indicates that special precautions must be taken to avoid damaging
the scooter.
NO NO
NO
NO NO
TETE
TE
TETE
The NOTE symbol indicates key information about a procedure or clarifies an operation.
California Proposition 65
This product contains or emits chemicals known to the State of California to cause
cancer and birth defects or other reproductive harm.
Page 3

TABLE OF CONTENTS
Manual Icon Legend ................................................... (inside of front-cover)
CA Prop 65 Warning................................................... (inside of front-cover)
Table of Contents.......................................................................................... 1
SECTION 1 - SAFETY................................................................ 2 - 6
Foreword ....................................................................................................... 2
Scooter Safety ........................................................................................ 3 - 4
Load Limits & Guidelines ............................................................................. 5
Accessories & Modifications ........................................................................ 6
SECTION 2 - CONTROLS & FEATURES ............................... 7 - 15
Locations of Parts & Controls ................................................................ 7 - 9
Vehicle Identification Numbers .................................................................. 10
Keys............................................................................................................. 11
Ignition Switch & Steering Lock ..........................................................11 - 12
Right-hand Handlebar Switch .................................................................... 13
Engine-stop Switch..................................................................................... 13
Electric Start Button.................................................................................... 13
Left-hand Handlebar Switch ............................................................... 13 - 14
Headlight Dimmer Switch........................................................................... 13
Turn Signal Switch......................................................................................13
Turn Signals................................................................................................ 14
Horn Button ................................................................................................. 14
Under-seat Storage Compartment ............................................................14
Helmet Hooks .............................................................................................15
Power Socket.............................................................................................. 15
Main Stand .................................................................................................. 16
Front Luggage Box ..................................................................................... 16
Instruments ......................................................................................... 17 - 18
Clock & Trip-meter............................................................................. 18 – 19
Rear Shock Absorbers ............................................................................... 20
Passenger Foot Rests................................................................................ 20
SECTION 3 - OPERATION ..................................................... 21 - 41
Break-in Recommendations ....................................................................... 21
Tire Break-in ................................................................................................ 22
Pre-ride Inspection ............................................................................. 23 - 33
Engine Oil Inspection ................................................................................. 24
Tire Inspection .................................................................................... 24 - 25
Fuel Level / Filler Cap ................................................................................26
Brake Inspection ................................................................................. 27 - 30
Steering & Handlebar Inspection............................................................... 30
Instrument Inspection .................................................................................31
Horn & Lights Inspection .................................................................... 31 - 32
Chassis Inspection ............................................................................. 32 - 33
Starting the Engine (electric start) ..................................................... 33 - 35
Starting the Engine (kick start) ................................................................... 35
Riding Your Scooter............................................................................ 36 - 40
Parking Your Scooter .......................................................................... 40 - 41
SECTION 4 - MAINTENANCE............................................... 42 - 61
Importance of Maintenance ....................................................................... 42
Maintenance Schedule....................................................................... 43 - 44
Tires............................................................................................................. 45
Tire Pressure ...............................................................................................45
Engine Oil....................................................................................................46
Engine Oil Level Inspection & Change.............................................. 46 - 47
Transmission Fluid Change ....................................................................... 48
Air Filter Maintenance ................................................................................ 49
Spark Plug ................................................................................................... 50
Fuel System ................................................................................................ 51
Battery ................................................................................................. 51 - 52
Fuses ...........................................................................................................53
Brake Fluid Level Inspection.............................................................. 54 - 55
Brake Lever & Shoe Adjustment................................................................ 55
Cleaning Your Scooter........................................................................ 56 - 57
Storage................................................................................................ 58 - 59
Maintenance Record .......................................................................... 60 - 61
Specifications (People S 50)...................................................................... 62
Specifications (People S 125)....................................................................63
Specifications (People S 200)....................................................................64
Emission - KYMCO Clean Air System....................................................... 65
Emission Information & EPA Warranty ......................................................66
KYMCO Limited Scooter Warranty ............................................................ 67
Index............................................................................................................ 68
Identification Numbers Record .................................. (inside of back-cover)
1
Page 4

SECTION 1 FOREWORD & SAFETY INTRODUCTION
Thank you for purchasing this KYMCO People S scooter, and welcome to the KYMCO riding family.
Please read this Owner's Manual carefully before riding so that you will be thoroughly familiar with the proper
operation of your scooter’s controls, its features, its capabilities, and its limitations.
To ensure a long, trouble-free life for your scooter, be sure to provide it with proper care and maintenance as
set forth in this manual.
For replacement parts and accessories, you should always use genuine KYMCO products, as they have
been specially designed for your vehicle and manufactured to meet KYMCO's demanding standards.
Keep this Owner's Manual aboard your scooter at all times, so that you can refer to it whenever you need
information. This manual should be considered a permanent part of the scooter, and should remain with the
scooter when it is sold.
All information, illustrations, photographs and specifications contained in this manual are based on the latest
product information available at the time of publication. Due to improvements or other changes, there may be
information in this manual that differs slightly from your vehicle. KYMCO reserves the right to make product
and publication changes at any time, without notice, and without incurring any liability.
2
Page 5

SCOOTER SAFETY
IMPORTANT SAFETY INFORMATION
Your scooter can provide you with many years of service and
pleasure if you take responsibility for your own safety and understand the challenges that you can meet on the road. There
is much that you can do to protect yourself when you ride. You
will find many helpful recommendations throughout this
manual. Here are some very important safety tips:
Wear a helmet
Scooter safety equipment starts with a quality helmet. One of
the most serious injuries you can suffer in a crash is a head
injury. Always wear a properly approved helmet. You should
also wear suitable eye protection.
Make yourself easy to see
To make yourself more visible, wear bright, reflective clothing;
position yourself so other drivers can see you; signal before
turning or changing lanes; and use your horn when it will help
others notice you.
Know your limits
Ride within the boundaries of your own skill at all times. Knowing these limits and staying within them will help you avoid
accidents.
Keep your scooter in safe condition
For safe riding, it is important to inspect your scooter before
every ride and perform all recommended maintenance. Never
exceed load limits, and only use accessories that have been
approved by KYMCO for this scooter.
Inspect your scooter before riding
Do not forget to perform an entire safety inspection to ensure
your, and your passenger's safety, before each ride.
Be extra safety conscious on bad weather days
Riding on bad weather days, especially wet ones, requires extra caution. Braking distance can double on a rainy day. Stay
off of painted surfaces, manhole covers and greasy appearing
areas on the pavement, as they can be especially slippery. Use
extreme caution at railway crossings and on metal gratings and
bridges. Whenever your are in doubt about the road conditions,
slow down.
Modification
Modification of your scooter, or removal of original equipment
may render the vehicle unsafe or illegal. Obey all applicable
equipment regulations in your area.
3
Page 6

SCOOTER SAFETY
PROTECTIVE APPAREL
For your safety, always wear an approved motorcycle or scooter
helmet, eye protection, boots, gloves, long pants, and a longsleeved shirt or jacket whenever you ride your scooter.
Helmets and protection
Your helmet is your most important piece of riding gear because it offers the best protection against head injuries. Your
helmet should fit your head comfortably and securely. Always
wear a face shield or goggles to protect your eyes and aid
your vision.
Additional riding gear
In addition to a helmet and eye protection, you should also use:
• Sturdy boots with nonslip soles to help protect your
feet and ankles
• Leather gloves to keep your hands warm and help prevent blisters, cuts, burns and bruises
• A motorcycle or scooter riding suit or jacket that has
been designed for comfort, as well as protection. Bright
colored and reflective clothing can help make you more
noticeable in traffic. Be sure to avoid loose clothing
that can get caught on any part of your scooter.
22
2
11
1
11
1 Wear gloves and use both hands to grasp the handle-
bar when riding
2 Wear bright or reflective clothing. Clothes should fit
properly (not too tight or loose)
3 Always wear a helmet and eye protection
4 Footwear should be the proper size, have low heels,
and offer ankle protection
22
44
4
44
33
3
33
Not wearing a helmet increases your chance of serious
injury or death in a crash.
4
Be sure you and your passenger always wear an approved
motorcycle helmet that fits properly. You should also wear
eye protection and other protective apparel when you ride.
Page 7

LOAD LIMITS & LOADING GUIDELINES
These general guidelines may help you decide how to add
accessories to your scooter and how to load it properly.
Load limits
These specifications are the load limits for your People S scooter.
Overloading the scooter will affect its stability and handling.
Be sure to stay within the limits given below:
Maximum weight capacity (Includes the weight of the rider,
passenger, cargo and accessories): ........ 330 lb (150 kg)
Maximum cargo weight:........................... 25.3 lb (11.5 kg)
Rear carrier (rack)
Under-seat compartment
Front luggage box
Overloading or improper loading will affect vehicle handling, stability and braking, and can lead to an accident.
Never exceed the stated load capacity of your scooter.
Cargo should be properly distributed and securely at-
tached. Reduce speed when carrying cargo. Allow greater
distances for braking.
5 5
5 weight limit:...................11 lbs (5 kg)
5 5
66
6 weight limit: ......11 lbs (5 kg)
66
7 7
7 weight limit: ............. 3.3 lbs (1.5 kg)
7 7
66
6
55
5
55
Loading guidelines
Improperly loading your scooter will affect its stability and handling. You should ride at reduced speeds when you are carrying a
passenger or cargo. Follow these guidelines whenever you carry
a passenger or cargo:
• Check that both tires are properly inflated
• To prevent loose items from creating a hazard, make
sure all cargo is securely tied down before you ride
• Place cargo weight as close to the center of the scooter
as possible
• Balance cargo weight evenly on both sides of the scooter
66
77
7
77
5
Page 8

ACCESSORIES & MODIFICATION
There is a large variety of accessories available to KYMCO
scooter owners. KYMCO cannot control the quality or suitability of accessories you may wish to purchase. But the addition
of unsuitable accessories to your scooter can lead to unsafe
operating conditions. It is not possible for KYMCO to test each
accessory on the market, or all of the combinations of the available accessories. Your KYMCO dealer will be happy to assist
you in selecting quality accessories and see that they are installed correctly.
Use extreme caution when selecting and installing the accessories for your scooter.
No modifications
KYMCO strongly advises you against removing any original
equipment or modifying your scooter in any way that would
change its design or operation.
Improper accessories or modifications can make your
scooter unsafe and can lead to an accident.
Never modify your scooter through the improper installation or use of accessories. All parts and accessories
added to this vehicle should be genuine KYMCO or
equivalent components designed for use on this
scooter.
All accessories should be installed and used according to the product’s instructions. If you have any questions, consult an authorized KYMCO dealer.
6
Page 9

SECTION 2 CONTROLS & FEATURES
Location of par ts & contr ols
1 Battery & Fuse
2 Helmet Holder
3 Ignition Switch
4 Speedometer
5 Engine Stop Switch & Starter Button
6 Exhaust Muffler
7 Main Stand
8 Front Luggage Box
11
1
11
22
2
22
33
3
33
44
4
44
55
5
55
66
6
66
NOTE: Your scooter may differ slightly in appearance from the images in this manual.
77
7
77
88
8
88
7
Page 10

CONTROLS & FEATURES
Location of par ts & controls
1 Headlight HI/LO-beam Switch,
Passing Light Button, Turn Signal
Switch & Horn Button
2 Helmet Holder
3 Under-seat Storage Compartment
4 Fuel Filler Cap
5 Seat Lock
6 Center Hook (for helmet or bag)
7 Side Stand
8 Kick Start Lever
9 Air Cleaner Assembly
11
1
11
66
6
66
22
2
22
77
7
77
33
3
33
44
4
44
88
8
88
99
9
99
55
5
55
8
NOTE: Your scooter may differ slightly in appearance from the images in this manual.
Page 11

CONTROLS & FEATURES
Location of par ts & controls
1 Right Front Fork
2 Right Front Turn Signal
3 Front Brake Lever
44
4
44
55
5
55
66
6
66
4 Right Mirror
5 Headlight
6 Left Mirror
7 Rear Brake Lever
8 Left Front Turn Signal
9 Left Front Fork & Front Brake
NOTE: Your scooter may differ slightly in appearance from the images in this manual.
33
3
33
22
2
22
11
1
11
FRONT
77
7
77
88
8
88
99
9
99
9
Page 12

CONTROLS & FEATURES
11
1
11
VEHICLE IDENTIFICATION NUMBERS
You scooter had identification numbers stamped into the frame and
engine cases during manufacture.
VIN (Vehicle Identification Number) or Frame Number
To view the VIN 1, remove the cover on the frame cover by releasing
its tab with a flat-head screw driver.
ESN (Engine Serial Number)
The ESN 2, is stamped on the left engine case.
22
2
22
10
NOTE:
Write your scooter’s VIN and ESN in the boxes provided in the
inside, rear cover of this Owner's Manual.
Page 13

CONTROLS & FEATURES
Keys
Your People S scooter is supplied with two identical ignition
switch keys. The ignition key operates the ignition switch, the
steering lock, and is used to open the seat to gain access to
the front luggage box and the under-seat storage compartment (and fuel filler cap).
Key code tab
The keys have a unique code which is stamped on the tab
supplied with the keys. This code is not stamped on the scooter
and is not recorded in the vehicle's basic documentation for
security reasons. Since this code is required if you need replacement keys, record this important code in the box provided
on the inside, rear cover of this Owner's Manual.
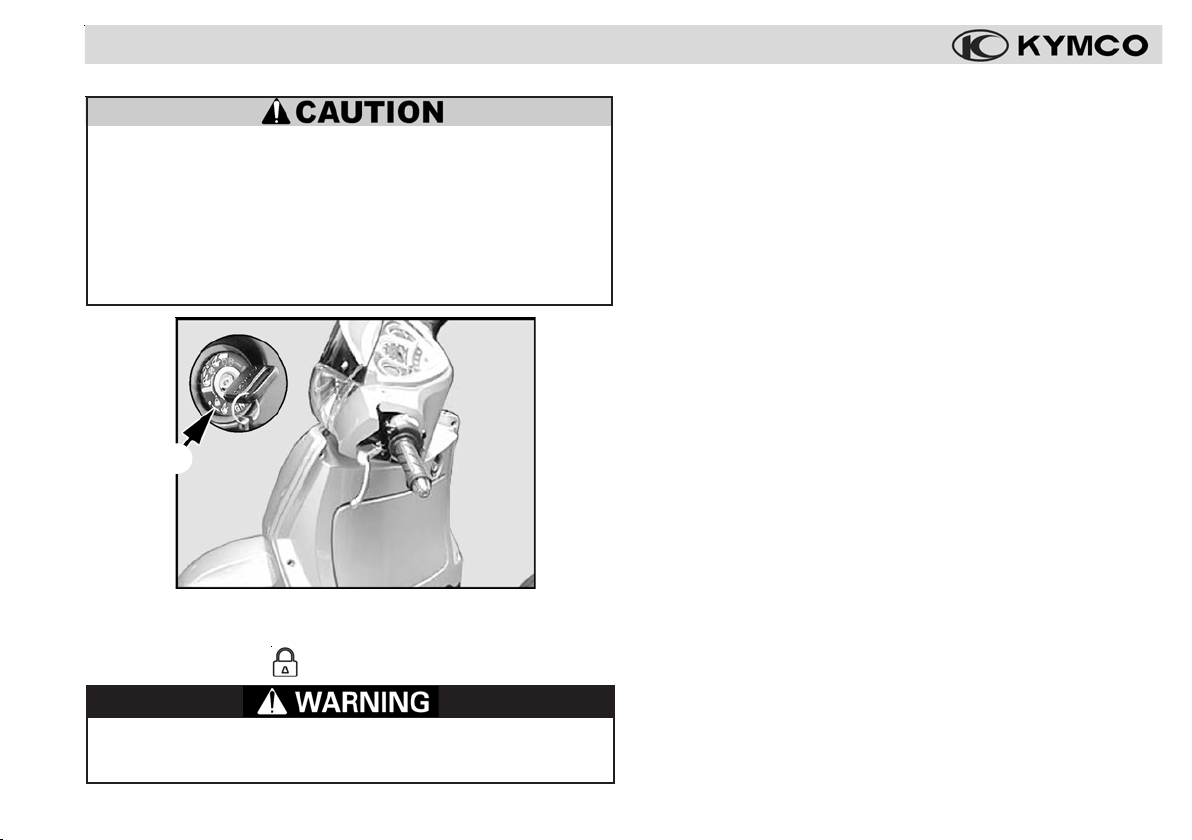
Ignition switch & Steering lock
11
1
11
1 1
1 ON : In this position, electrical power is connected to
1 1
start and operate the engine (the key cannot be removed).
22
2
22
NOTE: Your scooter’s keys may differ slightly in appearance from
the images in this manual.
2 2
2 OFF
2 2
nected and the engine cannot start or operate (the key
can be removed).
: In this position, electrical power is discon-
11
Page 14

CONTROLS & FEATURES
33
3
33
3 3
3 LOCK
3 3
cal power is disconnected and the engine cannot start or
operate (the key can be removed).
Locking the steering
Turn the handlebar fully to the left. Press in and rotate the
ignition switch key counterclockwise to the “LOCK
sition. The steering will now be locked. Remove the ignition
switch key.
: In this position, the steering is locked, electri-
” po-
Do not turn the ignition switch to the lock position when
riding, as this could cause the steering to lock, and you
could lose control of your scooter.
Unlocking the steering
Insert and rotate the ignition switch key clockwise from the
“LOCK
The steering is now unlocked, and you may start and operate the scooter.
” position to the “OFF ” or “ON ” position.
After locking the ignition switch, turn the handlebar gently to confirm that the steering is locked. Do not park
your scooter in a position that will interfere with vehicle
or pedestrian traffic.
12
Page 15

CONTROLS & FEATURES
Right handlebar switch
11
1
11
22
2
22
Left handlebar switch
33
3
33
44
4
44
55
5
55
Engine stop switch
The engine stop switch turns off the ignition, stopping the engine. The scooter’s lights and horn still function.
Electric starter button
Press the electric starter button to activate the starter motor.
NOTE: The starter motor will not engage unless a brake lever is squeezed at the same time the starter button is pressed.
To prevent damage to the starter motor, do not operate
the starter motor for more than five seconds at a time. If
the scooter fails to start immediately, check the fuel level
and the battery condition, and allow the starter motor to
cool before attempting to start the engine again.
11
1:
11
22
2:
22
Headlamp switch -- UP
The upper switch position turns the headlight high beam on.
The high beam indicator light on the dash is activated as well.
Headlamp switch -- DOWN
The lower switch position turns the headlight low beam on.
Passing light button - PRESS DOWN
When downward pressure is applied to the headlight rocker
switch, the high beam is activated. When pressure is released,
the low beam setting is restored. This enables you to rapidly flick
the headlight high beam on and off to signal other vehicles that
you wish to pass.
33
3:
33
44
4:
44
55
5:
55
13
Page 16

CONTROLS & FEATURES
88
8
88
ATAT
AT
ATAT
66
6
66
99
9
99
Turn signal switch:
Use the turn signal indicator to signal to other traffic that you
intend to turn or change lanes. The turn signal light on the
dash will flash to indicate that the switch is engaged.
66
6 Slide the turn switch to the left to activate the left turn signal.
66
77
7 Slide the switch to the right to activate the right turn signal.
77
To cancel the turn signal, press down on the signal switch 8.
Horn button
Press the horn button to sound the horn.
NOTE: The horn will only sound when the ignition is “ON”.
Under-seat storage compartment
Your scooter is equipped with an under-seat storage compartment that permits you to secure your helmet or other items.
14
99
9:
99
77
7
77
To open the seat, stop the engine and rotate the ignition
switch key counterclockwise in the ignition switch AT from
the “ ” position to the “ ”position . When the latch releases, lift up the seat.
Under-seat compartment weight Iimit: ......... 11 lbs (5 kg)
To close the seat, lower the seat and press down until it is
secured by the latch. Gently lift up on the seat to make sure
it is locked before riding.
Never exceed the maximum weight limit of the storage
compartment, as vehicle handling and stability may be
severely affected. Do not leave the ignition switch key
under the seat.
Page 17

CONTROLS & FEATURES
Helmet hooks
Your scooter has two helmet hooks AK so you can hang your
helmet(s) outside of the under-seat storage compartment.
AKAK
AK
AKAK
AKAK
AK
AKAK
With the seat up, put the helmet’s retaining ring onto the helmet
hook. Lower and press down on the seat to lock it and secure the
helmet in place. To remove the helmet, open the seat.
Do not ride your scooter with a helmet hanging from a
helmet hook, as this can interfere with your ability to control your scooter and may cause an accident.
The under-seat storage compartment may become warm
from engine heat. Therefore, do not store any items in
this compartment that are susceptible to heat damage,
such as food or flammable materials.
Power socket
Your scooter is equipped with a SAE 12-VDC power socket
AL in the under-seat storage compartment.
ALAL
AL
ALAL
The power socket can be used to connect and power accessories such as a cell-phone charger.
Close the socket’s protective cover when it is not in use.
When connecting accessories and chargers to the power
socket, read and follow the accessory’s instructions to
prevent damage to the device or your scooter.
15
Page 18

CONTROLS & FEATURES
Front luggage box
Your scooter is equipped with a front luggage box that permits you to secure your gloves or other items.
11
1
11
Main stand (center stand)
Your People S scooter is equipped with a main (center) stand.
To open the luggage box, insert the ignition switch key into the
ignition switch 1 and turn it from the “ ” position to the
“
” position, and the cover will automatically open.
Front luggage box weight Iimit: ................ 3.3 lbs (1.5 kg)
To close the luggage box cover, lift it up and press it in
place until it is secured by the latch. Gently pull down on
the cover to make sure it is locked before riding.
Never exceed the maximum weight limit of the front
luggage box. Do not leave the ignition switch key
under the seat.
16
To park your scooter on the main stand, stand on the left
side of the scooter and grasp the handlebar with your left
hand, while grasping the side of the rear rack with your
right hand. Step down on the foot pad of the main stand
with your foot while pulling up and back on the rear rack.
This lifting motion will allow the scooter to rock backwards
and up onto the main stand.
Always park your the scooter on firm, level ground to
help prevent it from falling over. If you must park on an
incline, aim the front of your scooter uphill.
Page 19

CONTROLS & FEATURES
Instruments & Indicator s
Your People S scooter is equipped with a multifunction meter
and indicator set. This set includes an analog speedometer
and fuel level display, and a digital clock and odometer. The
set also includes indicator lamps to alert you to headlight and
turn signal functions.
1 1
1 Mode & Adjustment Buttons: Used to adjust the clock’s
1 1
time setting and to reset the trip odometer.
22
2 Clock: Indicates the time (24-hour format).
22
33
3 Odometer: Indicates the total riding mileage of the scooter.
33
4 4
4 Speedometer (outer dial): Indicates the road speed in
4 4
MPH (miles per our).
55
5 Fuel Gauge: Indicates the amount of gasoline in the fuel
55
tank. Refill the tank with unleaded gasoline before the
needle reaches the “E” (empty) mark. (Best practice is to
maintain the fuel level no lower than the one-quarter mark
above empty whenever possible).
22
2
22
11
1
11
33
3
33
44
4
44
66
6
66
55
5
55
66
6 Speedometer (inner dial): Indicates the road speed in
66
K/PH (kilometers per hour).
17
Page 20

CONTROLS & FEATURES
77
7
77
7 7
7 Left Turn Signal Indicator Light: Flashes when the left
7 7
turn signals are being used.
88
8 Low Beam Indicator Light: This light is illuminated when
88
the headlight low beam is on.
99
9 High Beam Indicator Light: This light is illuminated when
99
the headlight high beam is on.
AT AT
AT Right T urn Signal Indicator Light: Flashes when the right
AT AT
turn signals are being used.
88
8
88
99
9
99
ATAT
AT
ATAT
Digital Clock & Trip-meter
Use the following instructions to set the digital clock and
odometer display on your People S scooter. The odometer
can be toggled between “miles” or “kilometers”, has a
resettable trip meter, and a mileage-based service reminder
feature.
1 1
1 Mode Button
1 1
2 2
2 Adjustment Button
2 2
These buttons enable you to adjust and change the digital
display’s functions.
11
1
11
33
3
33
22
2
22
Changing the odometer/tripmeter from “Miles” to “Kilometers”:
Press and hold the Mode But-
33
ton
3 for two seconds to switch
33
between “miles” or “kilometers”
display on the odometer/tripmeter.
18
Page 21

CONTROLS & FEATURES
66
6
66
44
4
44
55
5
55
77
7
77
Changing from odometer display
to trip-meter display:
Press and hold the Adjustment
Button
switch between “odometer” and
“trip-meter” display.
Resetting the Service Reminder:
[The Service Reminder will flash to remind
you to change the engine oil - DO NOT
reset until the oil change is complete]
Press and hold the Adjustment
Button
cess the service reminder mode.
While in service reminder mode,
press and hold the Mode Button
66
6 and the Adjustment Button
66
77
7 at the same time for two sec-
77
onds to reset the reminder.
To return to the odometer display,
press and hold the Adjustment
Button
44
4 for two seconds to
44
55
5 for five seconds to ac-
55
77
7 for two seconds.
77
88
8
88
ATAT
AT
ATAT
99
9
99
AKAK
AK
AKAK
Trip-meter reset:
While in the trip meter display,
press and hold the Mode Button
88
8 and the Adjustment Button
88
99
9 at the same time for two sec-
99
onds to reset the trip-meter.
Adjusting the clock time:
While in the odometer mode, press
and hold the Mode Button
the Adjustment Button
same time for two seconds in the
Odometer Mode until the clock’s
hour display begins to flash.
Then press the Adjutment Button
to change the hour setting.
Press the Mode Button until the
clock’s minute display begins to
flash and use the Adjustment But-
ton to change the minute setting.
Press the Mode Button and the
Adjustment Button again simultaneously to exit the clock adjustment mode.
ATAT
AT and
ATAT
AKAK
AK at the
AKAK
19
Page 22

CONTROLS & FEATURES
Rear shock absorbers
You can adjust the spring preload of your scooter’s shock
absorbers to match the load it will be carrying.
11
1
11
1. Insert the rod tool from the tool kit into the preload collar 1
on each shock absorber and rotate the collar to increase or
decrease the spring preload.
2. There are three steps on the spring preload collar. The center step “medium” is the standard setting. The longer step
“hard”, and the shorter step “soft”, are optional settings based
upon your load and riding preference.
When adjusting the spring preload, rotate each shock
absorber’s collar to the same setting.
Passenger foot rest
Your People S scooter is equipped with fold-down foot rests
2 for use when you are carrying a passenger.
22
2
22
Riding with a passenger will change the handling characteristics of your scooter. Allow for extra braking distance and use extra care when riding in traffic.
Be sure you and your passenger should always wear
approved and properly fitting motorcycle helmets. You
and your passenger should also wear eye protection
and other protective apparel when you ride.
20
Page 23

SECTION 3 OPERATION
Break-in recommendations
The first 600 miles (1,000 km) of riding are the most important
in the life of your scooter. Following proper break-in procedures during this time will help ensure maximum life and performance from your new scooter. Proper break-in operation
allows the machined surfaces to polish each other and mate
smoothly.
Your scooter’s reliability and performance depend on your
exercise of special care and restraint during the break-in period. It is especially important that you avoid operating the
engine in a manner which could expose the engine parts to
excessive heat.
The following guidelines should be followed during the breakin period:
Maximum throttle operation:
Initial 300 miles (600 km): ........Less than 1/2 throttle
Up to 600 miles (1,000 km): ..... Less than 3/4 throttle
Vary the engine speed:
The engine speed should be varied and not held at a constant
rate for long periods of time. This allows the parts to be "loaded"
with pressure, and then unloaded, allowing the parts to cool.
This aids in the mating process of the engine and transmission components. It is essential that some stress be placed
on these components during break-in to ensure that this mating process occurs. Do not, however, apply excessive load on
the scooter's drive line.
Avoid constant low speed:
Operating the engine at constant low speed (light load) can
cause parts to glaze and not seat in properly. Allow the engine
to accelerate freely through the gears, without exceeding the
recommended throttle openings.
Avoid using full throttle for the first 300 miles (600 km).
The initial service:
The 200 mile (300 km) initial service is the most important
service your scooter will receive. Take extra care to observe
your scooter’s initial service in a timely fashion. During
the break-in period, all of the engine components will have
worn in, and all of the other parts will have seated in, so adjustments will be required. All fasteners will be tightened, and
the contaminated engine oil will be replaced.
NOTE: Completion of the 200 mile (300 km) initial service
will ensure optimum service life and performance from
your scooter. Do not delay in having this service performed
once your scooter reaches this mileage.
21
Page 24

OPERATION
The 200 mile (300 km) service should be performed as
outlined in the maintenance schedule section of this
owner's manual. Pay particular attention to the cautions
and warnings in the Maintenance Schedule section.
Unless you have formal training as a service technician and have access to KYMCO technical reference
materials, it is strongly suggested that you have the
initial service performed by a KYMCO dealer.
Breaking in the new tires
New tires need proper break-in to assure maximum performance, just as your scooter's engine does. Wear in the tread
surface by gradually increasing your cornering lean angles
over the first 100 miles (160 km) before attempting maximum
lean angles. Avoid hard acceleration, hard cornering, and hard
braking for the first 100 miles (160 km).
Failure to break in your tires could cause the tires to
slip and could result in your losing control of the scooter.
Use extra care when riding on new tires. Perform proper
break-in of the tires as described in this Owner’s Manual,
and avoid hard acceleration, hard cornering, and hard
braking for the first 100 miles (160 km).
22
Troubleshooting
It can be fustrating if your scooter fails to start ,or stops running
while you are riding. In the rare instance this occurs, take a few
moments to check the following items. This checklist covers
some of the most common, simple problems which may arise,
and which can be quickly resolved.
√√
√ Do you have enough gasoline in the fuel tank?
√√
√√
√ Did you follow the correct procedure for starting the
√√
engine?
√√
√ Is the battery voltage low (you may need to kick start
√√
your scooter)?
√√
√ Is the main fuse in good condition?
√√
NOTE: Use this Owner’s Manual to check components and
adjustments that are within your technical ability. If you
cannot resolve the problem, do not hesitate to contact your
KYMCO dealer for assistance.
Page 25

OPERATION
Pre-ride inspection (PRI)
For your safety, it is very important to take a few moments
before each ride to walk around your scooter and check its
condition. If you detect any problem, be sure to address it immediately, or have it corrected by your KYMCO dealer.
Improperly maintaining your scooter or failing to correct a problem before riding can cause a crash in which
you can be seriously hurt or killed.
Always perform a pre-ride inspection before every ride
and correct any problems.
1. Engine oil level: Add engine oil if required (page 24). Check
for leaks.
2. Tires: Check condition and inflation pressure (pages 24 & 25).
3. Fuel level: Fill fuel tank when necessary (page 26). Check
for leaks.
4. Front and rear brakes: Check operation, making sure there
is proper free-play at the left lever
fluid in the front brake fluid reservoir (pages 27 through
30).
, and that there is brake
5. Steering: Check for smooth operation in all steering positions (page 30).
6. Instruments: Make sure the speedometer, fuel level gauge
and indicator lights function (page 31).
7. Lights and horn: Check that headlight, tail/brake light, turn
signals, indicators and horn function properly (pages 31 & 32).
8. Chassis: Check for overall proper function (pages 32 & 33).
Performing pre-ride inspections does not take the place
of regular maintenance. Follow the maintenance schedule recommendations on pages 42 - 44 of this manual.
After one month of use or 200 miles (300 km) of riding,
which ever occurs first, contact your KYMCO dealer to
perform an initial service on your scooter
This initial service is the most important service in the
life of your scooter, and includes checks and adjustments that will help ensure that your scooter operates
efficiently and safely.
.
23
Page 26
OPERATION
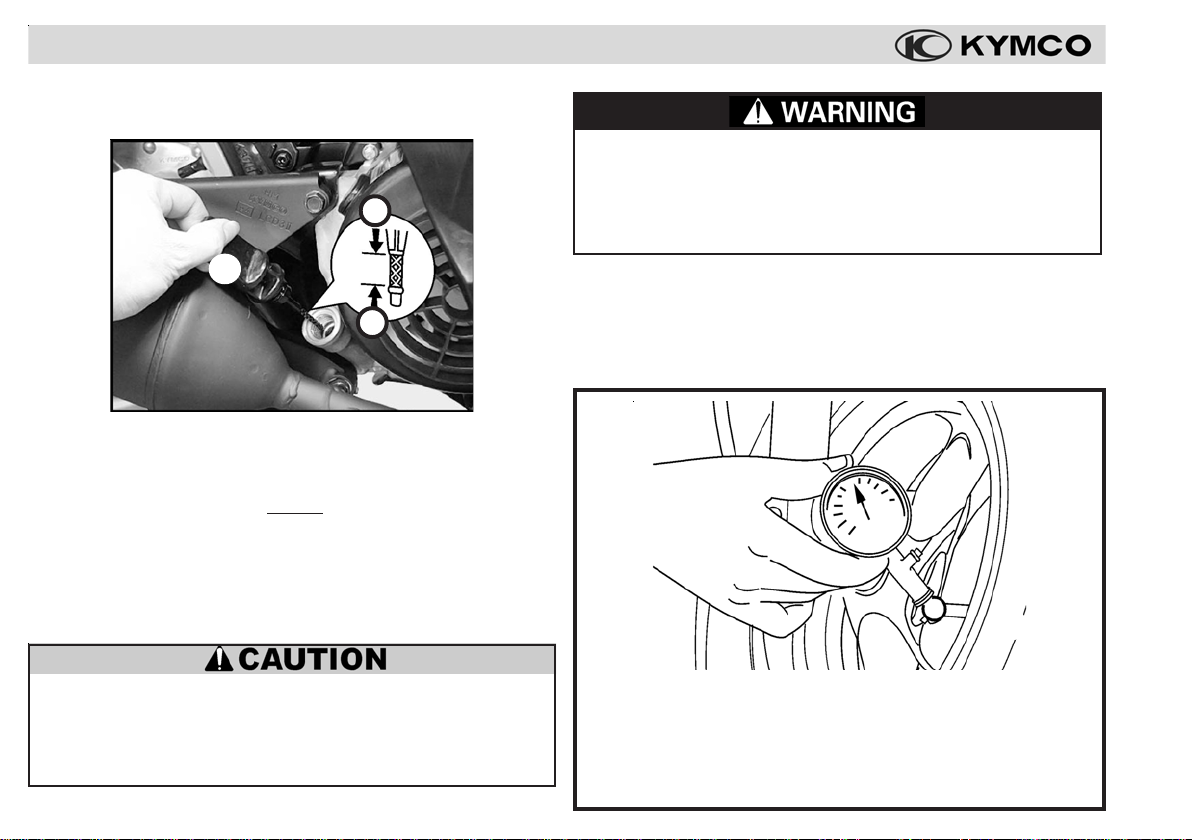
PRI - Engine oil level inspection
NOTE: Park your scooter on the main stand, on level ground.
F
11
1
11
L
1. Unscrew the dip stick 1, remove it and wipe it with a clean cloth
2. Reinsert the dip stick until the threaded part of the dip stick
touches the engine case.
engine case.
3. Remove the dip stick again and inspect the oil level on the
stick. The engine oil level should be above the "L" mark but
not higher than the "F" mark. Add or remove oil as required.
Do not thread the dipstick into the
Use extreme caution when performing the oil level inspection or any other checks if the scooter’s engine
has been recently operated. The engine oil, engine case
and muffler can become very hot creating a burn hazard.
PRI - Tire inspection
The condition of your scooter’s tires is vital for operational efficiency and your safety. Check the tires’ inflation pressure 2,
the tread depth, and for damage before each ride.
22
2
22
Do not overfill the engine with oil. Overfilling the engine can cause oil leaks and/or oil contamination of
the air filter element. Always make sure the oil level is
above the "L" mark but not higher than the "F" mark.
24
Front tire (rider only): 22.0 PSI (1.50kg/cm2)
Rear tire (rider only): 29.0 PSI (2.0 kg/cm2)
Front tire (rider & passenger): 25.0 PSI (1.75 kg/cm
Rear tire (rider & passenger): 32.0 PSI ( 2.25 kg/cm
2
)
2
)
Page 27
OPERATION
1. Measure and adjust the tire pressure when the tires are
touching the ground (while no one is seated on the scooter).
NOTE: Measure the pressure before riding, as the heat
generated during operation may cause improper readings.
33
3
33
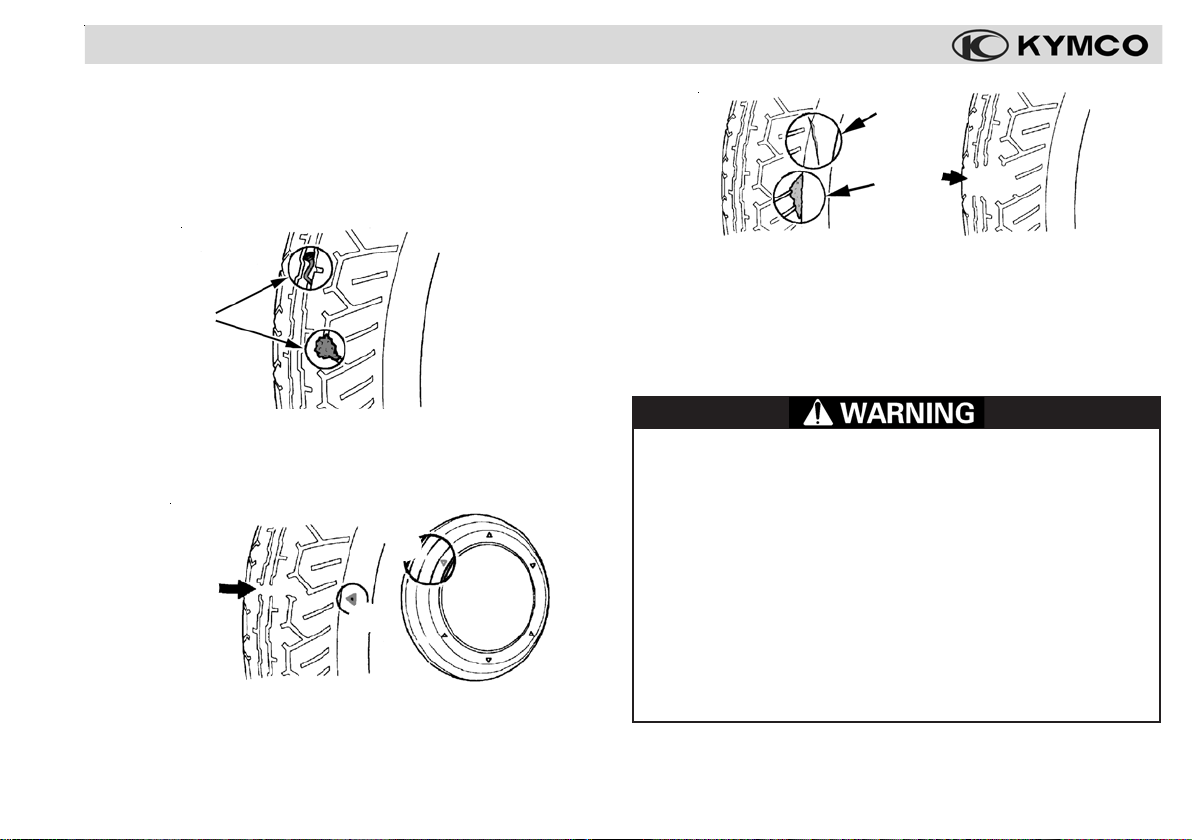
2. Inspect the tires for nails, screws and other objects 3 that
may be imbedded into the rubber.
55
5
55
44
4
44
55
5
55
66
6
66
77
7
77
66
6
66
4. Check for damage 6 (blisters or cuts) in the side wall, or
for significant flat spots 7 on the tires’ tread. Replace the
tire immediately if any damage of this type is present.
The tires on your scooter must be replaced if they:
Leak air (even at a slow rate)
Have any damage on the tread or side wall areas
Have been damaged by intrusion of objects, such as a nail
Are worn as evidenced by the wear indicators
Failure to replace a tire in poor condition will cause an
unsafe riding condition. Replace worn or damaged tires
immediately for your, and your passenger’s, safety.
Consult your KYMCO dealer for tire repair or replacement service.
3. Check the tread depth 4 at the wear indicator points 5. If
the tread is worn smooth at these points, the tire must
be replaced.
25
Page 28

OPERATION
PRI - Fuel level inspection / Refilling
When the fuel level gauge needle approaches “E” (indicating
the tank is nearly empty), refill the tank with unleaded gasoline.
To open the fuel filler cap:
1. With the engine “OFF”, place the scooter on its main stand
and open the seat (see page 14 of this manual).
11
1
11
33
3
33
22
2
22
2. Rotate the cap 1 counterclockwise to access the fuel filler 2.
3. Add fuel (per the recommendations listed here).
Fuel recommendation
Use unleaded gasoline with a research octane number of
91 or higher. Unleaded gasoline will extend spark plug life.
26
4. Replace the fuel filler cap 3 and secure it to the fuel filler
by rotating clockwise. Close the seat.
Do not overfill the tank. There should be no fuel in the
fuel filler neck. Excess fuel can contaminate the evaporative emission canister, resulting in poor drivability.
Gasoline is highly flammable and explosive. You can be
burned or seriously injured while handling fuel.
* Stop the engine and keep heat, sparks, and flame away.
* Refuel only outdoors.
* Clean up fuel spills immediately.
Page 29
OPERATION
PRI - Brake fluid inspection
The right brake lever on your People S scooter controls the
front hydraulic brake.
NOTE:
On the People S scooter the left brake lever controls the
rear mechanical drum brake.
Check the fluid level through the inspection window on the
brake fluid master cylinder reservoir(s).
1. Verify that the fluid level is between the “L” mark 1 and the
“F” mark 2 in the brake fluid reservoir window. See the
MAINTENANCE section of this Owner’s Manual for additional information about the front brake fluid.
11
1
11
As the brake pads wear, the brake fluid level drops as the
hydraulic system automatically compensates for the wear.
There are no adjustments to perform, but fluid level and
pad wear must be inspected periodically to make sure the
brakes will function properly.
The system must also be inspected for fluid leaks. Leaks
can cause the system to lose pressure and not function.
To prevent damage to the brake system, only use DOT 4
brake fluid from a sealed container. Never allow contaminants (dirt, water, etc.) to enter the brake fluid reservoir.
See your KYMCO dealer for this service.
Brake fluid can damage paint and plastic, so handle the
brake fluid with care. When adding brake fluid, be sure
that the reservoir is horizontal before removing the cover
so you will not spill fluid onto the scooter.
22
2
22
27
Page 30
OPERATION
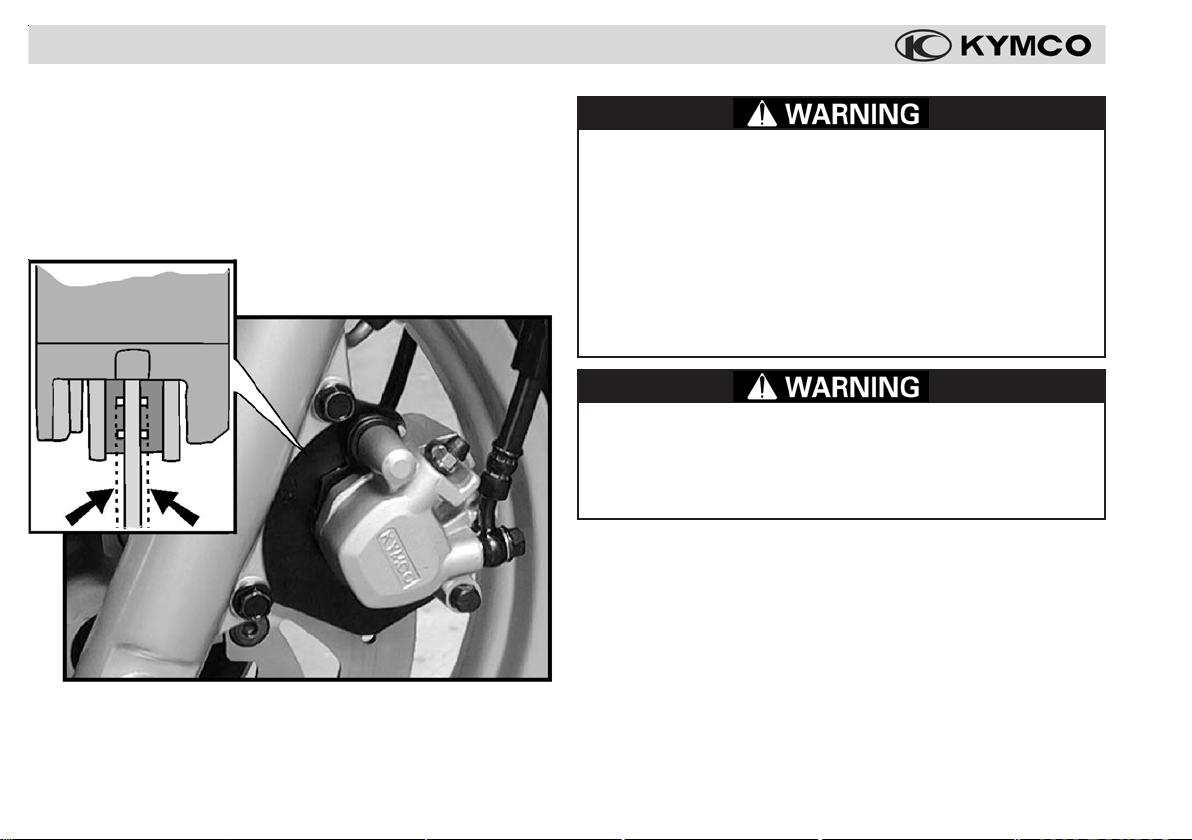
PRI - Front brake pad wear inspection
Visually inspect the front brake pads on your scooter for wear.
The pads’ surface has grooves that will indicate the amount of
life left in each pad. If the grooves are visible, there is adequate brake pad material. If the grooves are no longer visible,
or their depth is severely reduced, the pads require replacement.
As the brake pads wear, the brake fluid level drops as
the hydraulic system automatically compensates for the
wear. The brake fluid level must be inspected at the
same time you inspect the brake pads for wear.
If the wear indicator grooves in the front brake pads
are no longer visible, it is an indication that the brake
pads are worn and require replacement. Consult your
KYMCO dealer for any brake-related service.
Prolonged and repetitive use of the vehicle’s hydraulic
brakes for high speed stops will cause overheating of
the brake fluid and premature brake pad wear, which
can cause unexpected loss of braking ability.
PRI - Rear brake inspection
The left brake lever on your People S scooter controls the rear
mechanical, drum-style brake. Before riding, you should inspect the rear brake shoe wear and the brake lever play.
NOTE: Your scooter’s brake system components may differ slightly
in appearance from the images in this manual.
28
Brake shoe wear inspection:
1. The rear drum brake is equipped with a brake show wear
indicator. When the brake is applied, an arrow on the brake
arm 1 moves towards reference marks 2 on the brake hub.
NOTE: See illustration on next page:
Page 31
OPERATION
0.4 - 0.8 in
(10 - 20 mm)
11
1
11
2. If the arrow points to the reference marks when the rear
brake is fully applied, the shoes are worn and require replacement.
If the brake arm pointer is outside of the adjustment range
markings the brake shoes must be inspected and may
require replacement. If your scooter requires brake shoe
replacement, see your KYMCO dealer for this service.
Brake lever inspection & adjustment:
Your People S scooter requires the proper brake lever freeplay so the brakes will be responsive and will not drag, causing premature wear to the brake pads. The free-play is the
measured distance between the brake lever at rest and the
point at which the brake first begins to engage.
22
2
22
1. Measure the free-play at the left brake lever end:
0.4 - 0.8 in (10 - 20 mm).
2. Use the cable adjuster on left brake lever perch for minor
free play adjustment.
33
3
33
NOTE: See next page for the remainder of the rear brake lever
inspection & adjustment process.
29
Page 32

OPERATION
3. Park the scooter on the main stand and rotate the adjusting
nut on the brake arm clockwise to decrease the lever free
play. Rotate the adjusting nut counterclockwise to increase
the lever free play.
55
5
44
4
44
55
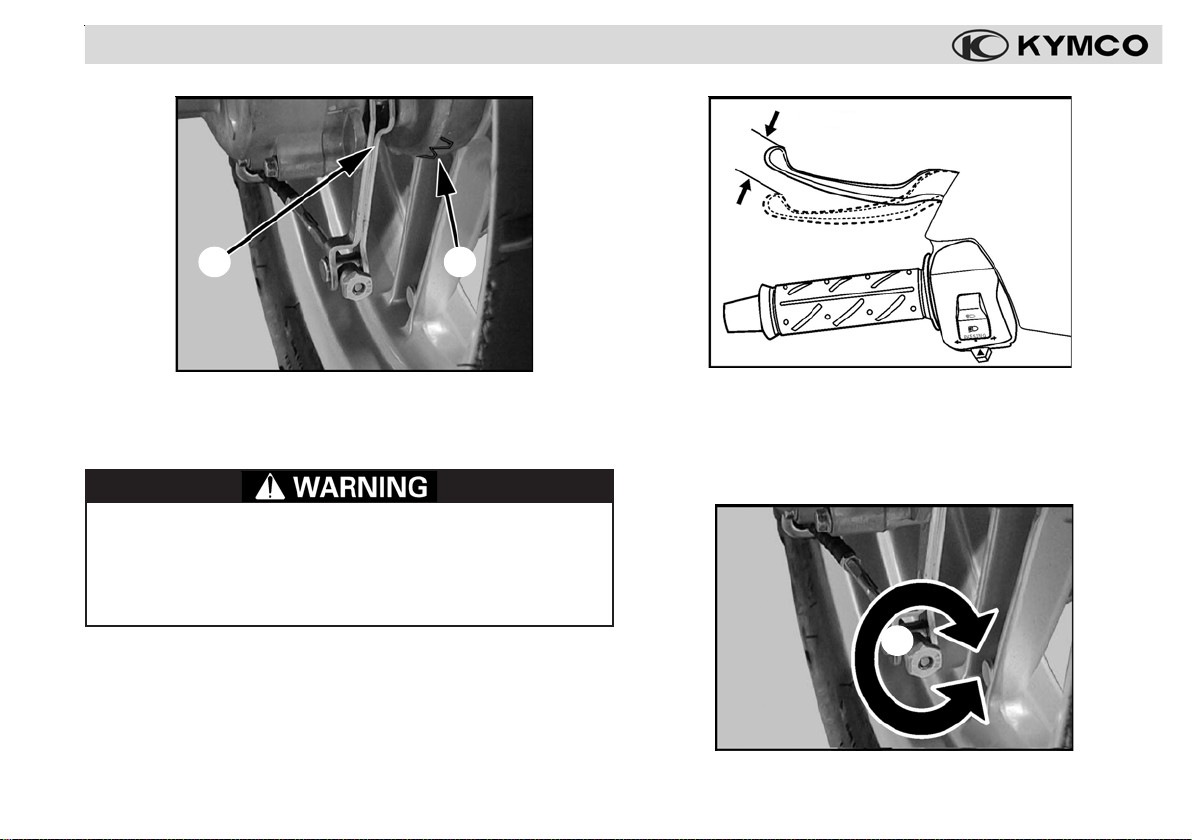
PRI - Steering & handlebar inspection
Before riding, inspect your scooter’s handlebars for damage,
and make sure the steering’s side-to-side and up-and-down
movement is smooth.
1. Apply the front brake (right lever) and press down and release
pressure on the handlebar, listening for any abnormal noise.
2. As you press down and release, also feel for any looseness from the chassis transmitted to the handlebar.
3. Turn the handlebar from the center fully to the left and then
fully to the right, feeling for any loose components and listening for any abnormal sounds.
Make sure the cutout on the adjusting nut
on the brake arm pin
Make sure the rear wheel turns freely after free play
adjustment, so the brake will function properly and not
wear prematurely.
30
4 4
4 after making adjustments.
4 4
5 5
5 is seated
5 5
If the steering does not move smoothly or feels obstructed, do not ride your scooter. See your KYMCO
dealer immediately for repairs or adjustment.
Page 33

OPERATION
PRI - Instrument inspection
Before you begin your ride, make sure the scooter’s instruments are functioning.
11
1
11
1. Does the speedometer 1 needle move as the scooter
moves?
2. Does the fuel level gauge needle 2 indicate the fuel
level?
3. Do the indicator lights 3 (turn signal and high-beam, for
example) function?
NOTE: Contact your KYMCO dealer for repair of your
scooter’s instruments if they are not functioning properly.
33
3
33
22
2
22
PRI - Hor n & lights inspection
44
4
44
55
5
55
66
6
66
66
6
66
1. Turn on the ignition switch to see if the headlight 4 and
the tail light 5 are illuminated. Check the lenses for dirt
or damage.
2. Squeeze each brake lever to make sure the brake lamp in
the tail light 5 illuminates.
3. Operate the turn signal switch to make sure the turn signals
6 flash. Make sure each of the four signals flash, and the
lenses are free of dirt and are not broken.
31
Page 34

OPERATION
4. Turn the ignition switch to “ON - “ and press the horn
button 7 to make sure the horm sounds.
77
7
77
The horn is an essential safety item, as it alerts other
traffic to your presence.
The headlight must be in good working order to illuminate your riding path at night.
The tail/brake light is required so other traffic can see
your scooter and be alerted to your intention to stop or
slow down.
The turn signals indicate your turning intentions.
Because all of these systems are vital safety items, con-
tact your KYMCO dealer for replacement bulbs or electrical system repair should there be any malfunctions.
32
PRI - Chassis inspection
Complete the pre-ride inspection of your scooter by checking
items on its chassis.
Front suspension & rear shock absorber: Check the
operation of the suspension by pressing down on the
handlebars and seat. Make sure the suspension returns in
a smooth fashion.
Brake lever operation: Check that the rear brake (left lever) and the front brake (right lever) have pressure and
lock the wheels when you squeeze them.
Mirrors: Adjust the mirrors while seated on the scooter
BEFORE you begin riding.
Page 35

OPERATION
License plate: Make sure your license plate is securely
mounted and your registration is current.
Reflectors: Look to make sure all of the safety reflectors are
still mounted to your scooter. Replace any missing or damaged reflectors.
Star ting the engine (electric start)
To start your scooter using the electric starter motor, follow
this procedure:
NOTE: Before starting, check the engine oil and fuel levels. Take the scooter off of the main or side stand.
1. Unlock the steering with the ignition switch key and turn the
ignition switch to the “ON -
” position.
Lubrication points: Occasionally check and lubricate certain controls and points on the scooter as indicated in the
periodic maintenance schedule (see pages 42 - 44).
2. Apply the rear brake (left lever) .
33
Page 36

OPERATION
The brake must be adjusted and functioning properly
to lock the rear wheel during starting, or the scooter
could accelerate away when the engine starts.
NOTE: The rear brake must be held for the starter motor
to engage the engine. It is normal for the stop light to be
illuminated during starting.
22
2
22
11
1
11
3. Press the starter button 1 without rotating the throttle grip.
To prevent damage to the starter motor, do not operate
the starter motor for more than five seconds at a time. If
the scooter fails to start immediately, check the fuel level
and the battery condition, and allow the starter motor to
cool before attempting to start the engine again.
34
NOTE: If the scooter’s engine is warm and does not start
immediately, rotate the throttle grip
to help the engine start.
NOTE: If the scooter has not been ridden for a long period of time it may be hard to start. Add fresh fuel and
press the starter button several times in succession to
try to start the engine. If the scooter does not start, contact your KYMCO dealer, as your scooter may need to have
its fuel system cleaned and adjusted.
Once the scooter starts, the rear wheel may spin. To
avoid injury, keep your body and clothing away from
the rear wheel.
4. Allow a cold engine to warm up for 2 - 3 minutes before
riding.
2 2
2 to 1/8 to 1/4 open
2 2
Page 37

OPERATION
Do not press the starter button once the engine is running or the starter motor and engine may be damaged.
Star ting the engine (kick star t)
To start your scooter using the kick start lever 3, follow the
electric starting procedure, but use the kick lever in place of
the electric start button.
33
3
33
3. While squeezing the rear brake lever, kick down on the
kick start lever without rotating the throttle grip.
NOTE: If the scooter’s engine is warm and does not start
immediately, rotate the throttle grip
to help the engine start.
4 4
4 to 1/8 to 1/4 open
4 4
44
4
44
Once the scooter is started, fold the kick start lever
back to its original position.
Your scooter's exhaust emits poisonous carbon monoxide gas. High levels of carbon monoxide can collect
rapidly in enclosed areas such as a garage. Do not run
the scooter's engine with the garage door closed. Even
with the door open, run the engine only long enough
to move your scooter out of the garage.
35
Page 38

OPERATION
Riding your scooter
NOTE: After starting, allow the engine oil to circulate before riding your scooter. Allow sufficient idling time after
warm or cold engine start-up before applying load or revving the engine. This allows time for the lubricating oil to
reach all the critical engine components.
NOTE: Review the scooter safety recommendations on
pages 2 through 6 before you ride.
You and your passenger should always wear appropriate
safety apparel such as a helmet, eye protection, gloves
and other protective clothing each time you ride the scooter.
Never wear any items that will adversely affect your safety.
Make sure flammable materials such as dry grass or
leaves do not come into contact with the exhaust system when riding, idling, or parking your scooter
.
11
1
11
Keep your finger away from the starter button
the engine is running. You can damage the engine or
the starter mechanism if you engage the starter motor
when the engine is running.
36
1 1
1 while
1 1
1. Make sure the throttle is closed and the rear brake is engaged before moving the scooter off the main stand.
Page 39

OPERATION
In hot weather the engine could overheat if it idles for a
long period of time. Very slow speed traffic could also
cause the scooter to overhead. To promote engine longevity, permit the engine to cool in these situations.
Avoid sudden acceleration and prolonged high speed
use that can accelerate engine wear.
Moderate use will prolong the engine life of the scooter.
2. Mount the scooter from the left side and sit in an upright
position on the seat. Place both hands on the handlebars
and touch the ground with your left foot for stability.
22
2
22
3. Release the rear brake and slowly rotate the throttle grip
2 so that the engine power will be transmitted smoothly
to the rear wheel.
4. You will control the scooter’s speed with the throttle grip.
33
3
33
44
4
44
Rotating the grip towards you
scooter’s speed.
Rotating the grip away from you
scooter’s speed.
3 3
3 will increase the
3 3
4 4
4 will decrease the
4 4
37
Page 40

OPERATION
5. Limit the maximum speed of your scooter during the first
600 miles (1,000 km) of operation. Keep the road speed
below 25 MPH (40 KPH) during this break-in period.
Use the scooter’s turn signals to signal your intention
to merge into traffic. Always scan around you and check
the rear view mirrors so you are aware of other traffic.
Use caution as you merge into traffic, keeping to the
right until you match the pace of the traffic.
6. Use both brake levers when slowing and stopping the
scooter. Release the throttle when braking.
Avoid using just one brake to stop the scooter, as
this will affect the tires’ grip.
Avoid sudden braking, as this will also affect the tires’
grip and can cause an accident.
38
NOTE: Decreasing the scooter’s speed with a balanced
application of both brake levers and a reduction of throttle
will reduce the distance required to stop. Squeeze the levers lightly at first, and then increase the pressure when
stopping.
Prolonged and repetitive use of the vehicle’s hydraulic
brakes for high speed stops will cause overheating of
the brake fluid and premature brake pad wear which can
cause unexpected loss of braking ability.
7. When riding and turning the scooter, use smooth movements.
Page 41

OPERATION
NOTE: At certain speeds your scooter will turn more effectively by leaning your body, than by applying pressure
on the handlebars. Practice steering in an open, trafficfree area until you are familiar with the handling characteristics of your scooter.
Reduce your speed when riding your scooter in the rain.
Wet road surfaces reduce tire grip and greatly increases
the distance required for safe braking. A wet surface
also reduces tires grip during cornering. Reduced tire
grip will make it more difficult to control your scooter
and may cause an accident.
Reduce your speed when riding on uneven or loose road
surfaces. When riding downhill, use less throttle and
brake intermittently to control the vehicle’s speed. These
conditions reduce tire grip and can cause an accident.
8. As you approach a turn, or plan to stop, use the turn signals well in advance to alert other traffic of your intentions.
Scan for other vehicles around you, turn your head and
use the scooter’s mirrors. Slowly move to the right side of
the road. Close the throttle, apply the brake smoothly, as
the brake light will warn vehicles behind you that you are
braking.
39
Page 42

OPERATION
66
6
66
55
5
55
9. When you stop the scooter, press the center of the turn
signal indicator switch 5 to cancel the signal flashing. Turn
the ignition switch to the “OFF “ position 6 to stop the
engine and turn off the scooter’s electrical system.
Never operate the ignition switch while riding your scooter.
If the ignition switch is turned during riding it could turn
off the engine and lights, possibly causing you to lose control of the scooter.
With the lights off, your scooter may not be visible to other
traffic, and this could cause a traffic accident.
Only operate the ignition switch when the scooter is not
moving.
Parking your scooter
Use the following procedure and suggestions when parking
your scooter.
1. Place the scooter on level ground.
2. Stand on the left side of the scooter and grasp the handlebar with your left hand, while grasping the side of the rear
rack with your right hand. Step down on the foot pad of the
main stand with your foot, while pulling up and back on the
rear rack. This lifting motion will allow the scooter to rock
backwards and up onto the main stand.
40
Page 43
OPERATION
The scooter may fall over if it is not parked on level ground.
Make sure flammable materials such as dry grass or
leaves do not come into contact with the exhaust system when parking your scooter.
Lock the steering of your scooter (see pages 11 & 12) to
reduce the risk of theft.
77
7
77
3. Stop the engine using the engine stop switch. Turn the
handlebars to the left and rotate the ignition key in the ignition switch to the “
” position 7 to lock the steering.
Do not park your scooter in a place that hinders traffic,
or that is unsafe to you or to others.
41
Page 44

SECTION 4 MAINTENANCE
The impor tance of maintenance
Maintaining your scooter properly is essential for safe, economical and trouble-free riding. It will also help reduce air pollution and maximize fuel economy.
If your scooter tips over or becomes involved in a crash,
be sure your KYMCO dealer inspects all major parts,
even if you are able to make some repairs.
To help you properly care for your scooter, the following pages
in this Owner's Manual include a maintenance schedule to
help you make sure your scooter is serviced at the appropriate intervals.
These instructions are based on the assumption that your
scooter will be used exclusively for its designed purpose. Sustained, high-speed operation, or operation in unusually wet or
dusty conditions, will require more frequent service than specified in the maintenance schedule. Consult your KYMCO dealer
for recommendations applicable to your individual needs and
use.
NOTE: Always follow the inspection and maintenance recommendations and schedules in this Owner's Manual.
42
Improperly maintaining this scooter, or failing to correct a problem before you ride, could result in a crash
in which you could be seriously hurt or killed.
When performing maintenance on your scooter, you
may need to start the engine. Running your scooter's
engine indoors or in a garage can be hazardous. Exhaust gas contains carbon monoxide, a gas that is colorless and odorless, and can cause death or severe injury. Operate the engine only where there is adequate
ventilation, preferably outdoors.
Page 45

MAINTENANCE
Maintenance Schedule
Perform the pre-ride inspection (see pages 23 - 33) at each scheduled maintenance period. This interval should be judged by
odometer reading or months, whichever comes first.
Maintenance Schedule Legend (see page 44):
I: INSPECT
C: CLEAN R: REPLACE A: ADJUST L: LUBRICATE T: TIGHTEN
The maintenance schedule chart on page 44 specifies the maintenance required to keep your People S scooter in peak
operating condition. Maintenance work should be performed in accordance with KYMCO standards and specifications by
properly trained and equipped technicians. Your KYMCO dealer meets all of these requirements.
* Should be serviced by your KYMCO dealer, unless you have the proper tools, service data and are technically qualified.
* * In the interest of safety, we recommend these items be serviced only by your KYMCO dealer. KYMCO USA recommends
# Does not apply to People S 50, 125 or 200 models
Maintenance Schedule Notes (see page 44):
1. At higher odometer readings, repeat at the frequency interval listed here.
2. Service more frequently if the scooter is ridden in unusually wet or dusty areas.
3. Service more frequently when riding in rain or at full throttle.
4. “PRI” indicates that the item should be checked as part of the Pre-Ride Inspection (see page 23 through 33)
5. “See page” indicates on which page of the Owner’s Manual you will find information about the required maintenance.
6. “Dealer” indicates maintenance or service procedure that should be performed by your KYMCO dealer.
AND CLEAN, ADJUST, LUBRICATE OR REPLACE IF NECESSARY
that your KYMCO dealer road test your scooter after each periodic maintenance service is completed.
43
Page 46

MAINTENANCE
Maintenance Schedule - People S 50, 125 & 200
ITEM
MILEAGE
200 mi 600 mi 1850 mi 3100 mi 4300 mi 5500 mi 7000 mi Pre-ride See
300 km 1000 km 3000 km 5000 km 7000 km 9000 km 11000 km inspection page
Engine oil * R R R R R R R PRI 24, 46
Engine oil strainer
* C - C - C - C - 47
Gear oil * R - R - R - R - 48
Coolant
#
- - - - - - R - Dealer
Spark plug * C I C R C I R - 50
Valve clearance ** A - A
- A - A - Dealer
Carburetor ** I - I - I - I - Dealer
Drive belt ** - - - - I - - - Dealer
Air cleaner * C I R I R I R - 49
Battery * I I I I I I I P RI 51, 52
Fuel filter ** - - -
- R - - - Dealer
Brake system ** I I I I I I I PR I 27, 54
Tires ** I I I I I I I PR I 24, 45
Bolts & nuts * T I I T I I T PR I 33
44
I: INSPECT AND CLEAN, ADJUST, LUBRICATE OR REPLACE IF NECESSARY
C: CLEAN R: REPLACE A: ADJUST L: LUBRICATE T: TIGHTEN
Page 47

MAINTENANCE
Tires
Failure to follow these warnings may result in an accident due to tire failure. The tires on your scooter are a
crucial link between your scooter and the road. Y ou and
your passenger's personal safety are dependant upon
the condition of your scooter's tires.
Follow these instructions:
Check tire condition and pressure, and adjust the
inflation pressure before each ride.
Avoid overloading your scooter.
Replace a tire when worn to the specified limit, or
if you find any damage such as cuts or cracks.
Always use the proper size and type of tires as
specified in this Owner's Manual.
Balance the wheel after tire installation.
Read this section of Owner's Manual carefully.
Failure to perform a reasonable break-in of the tires
could cause tire slippage and loss of control.
NOTE: Check the tire inflation pressure and tire tread condition at the periods listed in the Periodic Maintenance
Schedule. For maximum safety and good tire life, the tire
pressures should be inspected more often.
Tire pressure
Insufficient air pressure in the tires not only accelerates tire
wear, but it also affects the stability of your scooter. Underinflated tires make smooth cornering difficult, and overinflated
tires decrease the amount of tire in contact with the ground,
which can lead to skids and loss of control. Make sure that the
tire pressures on your scooter are within the specified limits at
all times.
NOTE: Tire pressure should only be adjusted when the
tires are cold.
Use extra care when riding on new tires, as the grip
will be limited. Perform proper break-in of the tires, as
set forth in the break-in recommendation section of this
manual. Avoid hard acceleration, hard cornering, and
hard braking for the first 100 miles (160 km).
Front tire (rider only): 22.0 PSI (1.50kg/cm
Rear tire (rider only): 29.0 PSI (2.0 kg/cm2)
Front tire (rider & passenger): 25.0 PSI (1.75 kg/cm
Rear tire (rider & passenger): 32.0 PSI ( 2.25 kg/cm
2
)
2
)
2
)
45
Page 48

MAINTENANCE
Engine oil
Engine oil recommendation
Use a premium quality, 4-stroke engine oil to ensure longer
service life of your scooter. Only use oils that have a SJ rating
per the API service classification.
Engine oil capacity (50): 0.90 qt (0.85 L)
Engine oil capacity (125 & 200): 1.20 qt (1.10 L)
Engine oil viscosity: SAE 10W-40
If this viscosity is not available, select an alternative engine
oil according to the chart shown below.
ENGINE OIL VISCOSITIES
Engine oil level inspection
Check the engine oil level each day before riding your scooter
(see page 24).
46
The engine and related components can become very hot.
Use care when inspecting or adjusting the oil level to avoid
injury. If needed, let the engine and exhaust system cool
before working in those areas.
Prolonged contact with used engine oil can cause skin
cancer. Although rare, this possibility exists if you
handle oil on a frequent basis. Thoroughly wash your
hands with soap and water as soon as possible after
handling used oil.
Engine oil replacement
Engine oil quality is the primary factor affecting engine longevity. Change your scooter's engine oil as specified in the maintenance schedule (see page 42 - 44).
NOTE: When riding your scooter in very dusty conditions,
oil changes should be performed more frequently than
specified in the maintenance schedule.
NOTE: Always dispose of used engine oil in a environmentally responsible manner. You should take the drained
oil in a sealed container to your local recycling center or
service station for reclamation. Do not throw the oil in the
trash, pour it on the ground, or pour it down a drain.
NOTE: Change the engine oil with the engine at normal
operating temperature and with the scooter positioned on
its main stand, to assure complete and rapid draining.
Page 49

MAINTENANCE
11
1
11
3. Replace the drain bolt 1. Tighten it to the specified torque.
Oil drain plug torque: 18 lb-ft (25 N-m)
4. Add engine oil through the oil filler/dipstick hole.
Engine oil capacity (50): 0.90 qt (0.85 L)
Engine oil capacity (125 & 200): 1.20 qt (1.10 L)
Engine oil viscosity: SAE 10W-40
1. Place a suitable container (drain pan) under the left crankcase. Remove the drain bolt 1 to drain the oil.
22
2
22
2. Remove the oil filler/dipstick 2 from the right crankcase
cover.
Do not overfill the engine with oil. Overfilling the engine can cause oil leaks and/or oil contamination of
the air filter element. Always make sure the oil level is
above the "L" mark but not higher than the "F" mark
on the dipstick.
5. Refer to page 24: Wipe the dipstick off with a clean cloth and
einstall it in its hole, but
r
case. Push the dip stick in until it touches the case.
6. Remove the dip stick and visually inspect the oil level on the
stick. The engine oil level should be above the "L" mark but
not higher than the "F" mark. Add or remove oil as required.
7. Replace the oil filler/dipstick and tighten it securely.
do not thread it into the engine
47
Page 50

MAINTENANCE
Transmission fluid change
1. Place the scooter on its main stand.
33
3
33
22
2
22
11
1
11
2. Place a suitable container (drain pan) under the transmission case on its left side. Remove the drain bolt 1 to
drain the fluid.
3. After the fluid has drained out, reinstall the drain bolt with a
new sealing washer and tighten it to the specified torque.
Transmission fluid drain bolt torque: 15 lb-ft (20 N-m)
4. Remove the transmission fluid filler bolt from the filler
hole 2.
Transmission fluid type: SAE 90
Transmission fluid capacity (50): 0.13 qt (0.12 L)
Transmission fluid capacity (125 & 200): 0.25 qt (0.21 L)
NOTE: The fill amount specified is the amount to use after
completely draining the used transmission fluid.
Do not exceed the specified amount when adding transmission fluid. If too much fluid is added to the transmission case, it could be forced into the air cleaner assembly during operation, causing air filter contamination and poor engine performance.
Using the wrong transmission fluid type or viscosity
may cause premature transmission component wear.
5. Add the
hole.Only fill the transmission so the fluid level stays
below the filler hole 3.
48
exact specified fluid through the fluid filler
Page 51

MAINTENANCE
Air cleaner filter element
The air cleaner filter element should be serviced at regular
intervals. Service the element more often when riding in unusually wet or dusty areas.
1. Remove the six air cleaner cover screws 1.
11
1
11
2. Remove the air cleaner case cover 2.
22
2
22
4. Remove the air cleaner element (air filter) 3.
44
4
44
5. If lightly soiled, clean the filter 4 with compressed air. If very
dirty (or if the filter is at the replacement interval per the maintenance schedule) discard the air cleaner element.
6. Install the cleaned or new air cleaner element. Use a KYMCO
genuine air cleaner element or an equivalent air cleaner element specified for your scooter.
7. Complete the installation by reinstalling the air cleaner parts in
the reverse order of removal.
33
3
33
Improper installation of the filter can cause water or dirt
to enter the engine, causing premature wear.
Using the wrong air cleaner element or a non-KYMCO air
cleaner element which is not of equivalent quality may
cause premature engine wear or performance problems.
49
Page 52

MAINTENANCE
Spark plug
Remove the carbon deposits from the spark plug with a small
wire brush, a pick 1 or a spark plug cleaning machine. After
cleaning (or when installing a new spark plug) readjust the
spark plug gap 2 to the specified limit by using a spark plug
gap thickness gauge. The spark plug should also be replaced
if the sealing washer 3 has been compressed flat from multiple installations. The spark plug should be replaced periodically. Under normal usage, a spark plug's porcelain tip 4
should appear light brown or tan in color. If the spark plug porcelain tip is very white or glazed appearing, then the spark
plug has been operating too hot. In such a situation, you should
replace the standard spark plug with a spark plug that has a
colder heat range (usually a higher number; consult with your
KYMCO dealer when selecting an alternate spark plug).
11
1
11
Recommended spark plug
Spark plug type: CR7HSA
Spark plug gap
An improper spark plug may have an incorrect fit or
heat range for your engine. This may cause severe engine damage which will not be covered under warranty.
Never use a spark plug with an improper heat range, as
severe engine damage may result.
50
22
2: 0.024 - 0.028 in
22
(0.6 - 0.7 mm)
44
4
44
33
3
33
22
2
22
Page 53

MAINTENANCE
Fuel system & hoses
Check the fuel hoses and fittings for any signs of leakage.
11
1
11
33
3
33
22
2
22
1. Check for leakage at the carburetor 1.
2. Check for leakage from the fuel hoses, clamps and joints 2.
3. Check for leakage at the fuel filter.
4. Check for leakage at the fuel tank.
Engine idle speed: 1700 RPM
1. Adjust the engine idle speed using the adjustment screw on
the carburetor throttle cable linkage 3.
Replace any fuel system components that are leaking fuel.
Contact your KYMCO dealer for fuel system service, re-
pairs or engine idle speed adjustment.
Battery
Your KYMCO scooter is equipped with a maintenance-free
(sealed) battery. Therefore, it is not necessary to check the
battery's electrolyte level or add distilled water.
NOTE: If your battery seems weak and/or is leaking electrolyte (causing hard starting or other electrical troubles),
contact your KYMCO dealer immediately .
Your battery is a maintenance-free type and can be permanently damaged if the cap strip is removed.
Charge the battery with a charger specifically designed
for use with a maintenance-free type battery. Using another type of charger can damage the battery.
Y our scooter's battery gives off explosive hydrogen gas
during normal operation. A spark or flame can cause
the battery to explode with enough force to kill or seriously injure you.
Wear protective clothing and a face shield, or have a
qualified technician perform the battery maintenance.
51
Page 54

MAINTENANCE
Battery r emoval & installation
The battery is in a compartment below the scooter’s floorboard
mat. To remove the battery for service, follow this procedure:
11
1
11
22
2
22
1. Make sure the ignition switch is “OFF - ”. Remove the
two cover screws 1 and remove the battery cover.
33
3
33
44
4
44
11
1
11
2. When removing the battery for charging or replacement, disconnect the negative (-) terminal lead 3 from the battery
first, then disconnect the positive (+) terminal lead 4.
3. Remove the battery.
4. Use a charger specically designed for a maintence-free
type battery. Unsing another type of battery charger may
damage the battery and prevent it from becoming fully
charged.
5. When installing the battery, connect the positive(+) terminal lead 4 first, then the negative (-) terminal lead 3.
52
6. Replace the battery cover 2 and screws.
NOTE: Always keep the ignition switch OFF when servicing the battery. See your KYMCO dealer for electrical
system diagnosis and repair.
Page 55

MAINTENANCE
Fuses
When frequent fuse failures occur, it usually indicates a short
circuit or an overload in the electrical system.
Charging system fuse (50): 7A
Charging system fuse (125 & 200): 15A
Ignition system fuse (50): 7A
Ignition system fuse (125 & 200): 10A
11
1
11
44
4
44
55
5
55
22
2
22
33
3
33
1. The chraging system and ingition system fuses (and a spare
fuse) are located in the battery compartment. Remove the
battery compartment cover - see page 52.
2. The charge fuse 1, the ignition fuse 2, and the spare fuse
3 are adjacent to the battery.
3. To replace a fuse, pull the fuse holder out of the battery compartment.
4. Slide the fuse 4 out of the holder clips 5.
5. Install a new fuse of the proper specification into the holder
clips.
6. Press the fuse and the holder clips back into the holder.
7. Close the fuse holder and set it back in place.
Never use a fuse with a different rating from that specified. Serious damage to the electrical system or a fire
hazard may result, causing a dangerous loss of lights
or engine power.
53
Page 56

MAINTENANCE
Wire & ca ble cover inspection
The control cables and connection points of the scooter’s wire
harness have rubber covers that protect them from dirt and
moisture.
1. The covers 1 should be checked periodically to make sure
they are in good condition .
2. The covers should also be pulled back 2 to make sure
the electrical terminals, are not contaminated by moisture,
dirt or corrosion that could affect their electrical integrity.
3. When the cover is pulled back, make sure the connectors
tabs 3 are secured so the connectors will not seperate
during operation.
11
1
11
22
2
22
33
3
33
Corrosion on electrical connectors can alter or disrupt the electrical function of your scooter. Use a
quality, dielectric grease to lubricate and protect electrical connectors.
Always keep ignition switch OFF when servicing the
electrical connectors. See your KYMCO dealer for
any electrical system diagnosis and repair.
Brake fluid (front br ake)
Your scooter is equipped with a hydraulic front brake. Check
the brake fluid level window on the master cylinder reservoir
on the handlebars per the maintenance schedule.
Use a moist rag to clean debris off of the covers.
54
44
4
44
Page 57
MAINTENANCE
Adding brake fluid:
1. Remove the two Phillips screws retaining the master cylinder cap. Remove the cap.
2. Add the specified type of brake fluid to bring the level above
the “MIN” level in the window 4 (see image on prior page).
3. Wipe the master cylinder cap and gasket with a clean cloth
and reinstall the cap, tightening the screws securely.
Brake fluid type: DOT 4
Do not mix brake fluid types. Doing so may cause brake
failure and could result in an accident.
Do not allow brake fluid to touch the scooter’s body
work, as it will damage the painted surface.
Brake lever & shoe adjustment (rear brake)
Your scooter requires the proper lever free-play and brake
shoe adjustment so the rear brake will be responsive and will
not drag, causing premature wear to the brake shoes.
Note: The free-play is the measured distance between the
brake lever at rest and the point at which the brake first
begins to engage (see page 29).
1. Measure the free-play at the left brake lever end 5:
0.4 - 0.6 in (10 - 20 mm).
0.4 - 0.8 in
55
5
55
2. Adjust the rear brake free-play so the pointer on the brake
arm is within the adjustment range markings on the transmission case (see page 29 & 30).
4. Use the cable end adjuster to set the free-play (see page 30).
Make sure the rear wheel turns freely after free-play
adjustment so the brake will function properly and
not wear prematurely.
If the brake arm pointer is outside of the adjustment
range markings, the brake shoes must be inspected
and may need to be replaced. If your scooter requires
brake shoe replacement, see your KYMCO dealer for
this service.
(10 - 20 mm)
55
Page 58

MAINTENANCE
Cleaning
Clean your scooter regularly to protect the surface finishes
and inspect for damage, wear, and oil, coolant or brake fluid
leakage.
Avoid cleaning products that are not specifically designed for
scooter, motorcycle, or automobile surfaces. Nonspecific cleaners may contain harsh detergents or chemical solvents that
could damage the metal, paint, and plastic on your scooter.
NOTE: If your scooter is still warm from recent operation,
give the engine and exhaust system time to cool off before washing. Avoid the use of high pressure water spray
(typical in coin-operated car washes), as this powerful
spray can damage components on your scooter.
Washing your scooter
1. Rinse the scooter thoroughly with cool water to remove any
loose dirt.
2. Clean the scooter with a sponge or soft cloth using cool water.
Avoid directing water at muffler outlets and electrical parts.
3. Clean the plastic parts using a cloth or sponge dampened with
a solution of mild detergent and water. Rub the soiled area
gently, rinsing it frequently with fresh water. Take care to keep
brake fluid or other chemical solvents away from the scooter,
as they will damage the plastic and painted surfaces.
56
4. After cleaning, rinse the scooter thoroughly with plenty of
clean water. This rinsing is required to remove detergent
residue which can corrode alloy parts.
5. Dry the scooter and then start the engine, allowing it to run
for several minutes.
NOTE: The inside of the headlight lens may become clouded
immediately after washing the scooter. Moisture condensation inside the headlight lens will disappear gradually as it is
heated by the headlight. After washing, run the engine while
keeping the headlight on to dissipate any condensation.
Page 59
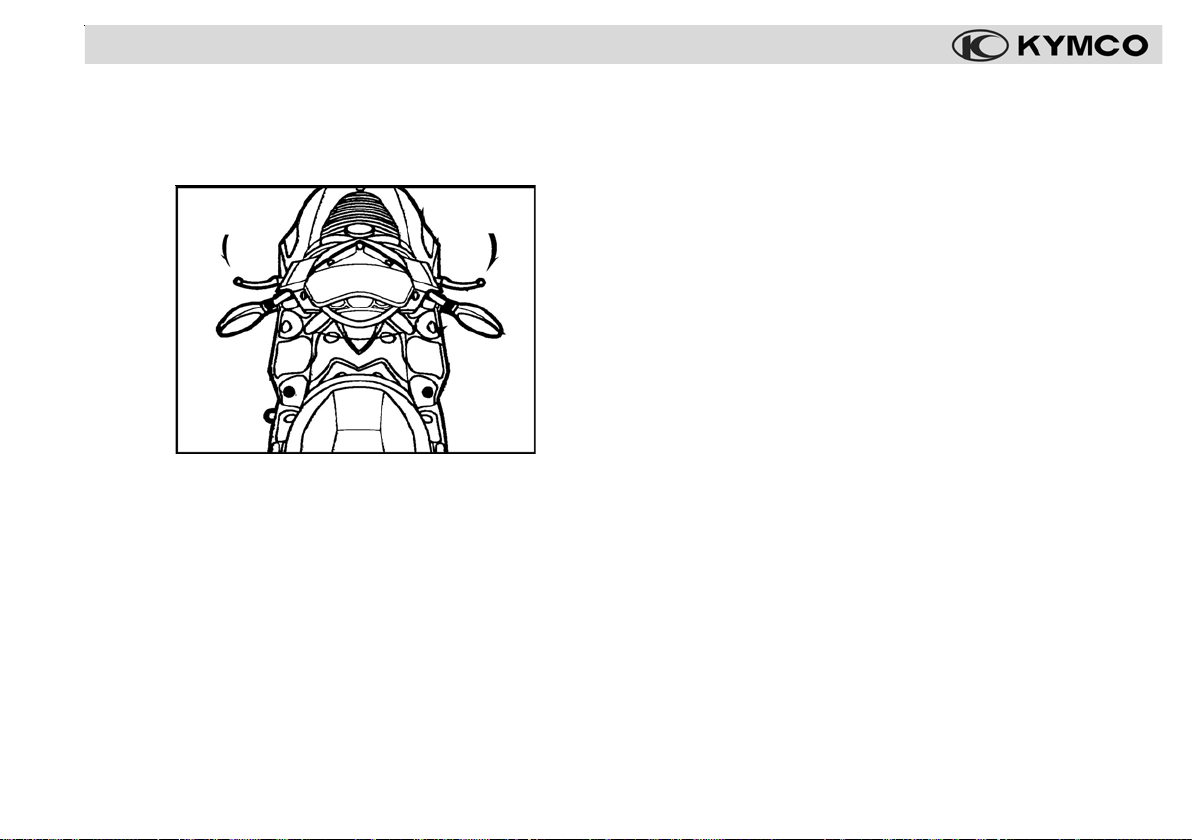
MAINTENANCE
6. Test the brakes before riding the scooter. Several applications of the brakes may be necessary to restore normal braking performance.
NOTE: Due to water on the brake components, braking
efficiency may be temporarily impaired immediately after
washing the scooter. Anticipate longer stopping distances
to avoid a possible accident.
Finishing touches:
After washing your scooter, consider using a commerciallyavailable spray cleaner/polish or a quality liquid or paste wax
to enhance and protect the paint's finish. Use only a nonabrasive polish or wax made specifically for scooters, motorcycles,
or automobiles. Apply the polish or wax according to the instructions on the container.
Removing road salt
The salt used in some communities to prevent road icing can
become very corrosive to your scooter. Wash your scooter as
soon as possible if it comes in contact with road salt (or sea
water).
1. Clean the scooter using cool water (see page 56). Do not
use warm water; as this will increase the corrosive effect of
the salt.
2. Dry the scooter and protect painted and metal surfaces
with wax or polish.
Painted aluminum wheel maintenance
Even if protected by paint, aluminum may corrode from contact with dirt, mud, or road salt. Clean the scooter's wheels
with a wet sponge and mild detergent. Avoid stiff brushes, steel
wool, or cleaners containing abrasives or chemical compounds.
After washing, rinse with plenty of water and dry with a clean
cloth. Apply touch-up paint to the wheels where damage has
occurred.
Exhaust pipe maintenance
The exhaust system is stainless steel, but it can become stained
by oil or mud. If necessary, remove heat stains with a liquid
kitchen-counter abrasive.
57
Page 60

MAINTENANCE
STORAGE GUIDE
Extended storage, such as for the winter months, requires that
you take certain steps to reduce the effects of deterioration
from the non-use of your scooter. Whenever possible, perform
any necessary periodic maintenance or repairs before storage
so the scooter will be in good condition for riding when it is
removed from storage.
Storage
1. Change the engine oil and filter.
2. Drain the carburetor (if equipped) and empty the fuel tank
into an approved gasoline container using a commercially
available hand siphon or an equivalent method. Spray the
inside of the tank with an aerosol rust-inhibiting oil. Close
the fuel filler cap on the fuel tank
Gasoline is highly flammable and explosive. You can
be burned or seriously injured when handling fuel. Stop
the engine and keep heat, sparks, and flame away. Refuel the scooter outdoors and wipe up any spills immediately.
58
3. To prevent rusting in the cylinder, perform the following:
Remove the spark plug cap from the spark plug, and use tape
or string to secure the cap to any convenient plastic body part
so that it is positioned away from the spark plugs.
Remove the spark plug from the engine and store it in a
safe, dry place. Do not connect the spark plug to the spark
plug cap.
Pour a tablespoon (15 - 20 cc) of clean engine oil into the
cylinder and cover the spark plug hole with a piece of cloth.
Crank the engine several times to distribute the oil.
Reinstall the spark plug and spark plug cap.
4. Remove the battery. Store it in an area protected from freezing temperatures and direct sunlight. Slow charge the battery once a month (use a quality charger designed for use
on a maintenance-free type battery).
5. Wash and dry the scooter. Wax all painted surfaces. Coat
the chrome or bare aluminum parts with rust inhibiting oil.
6. Inflate the tires to their recommended pressures. Place the
scooter on blocks to raise both tires off the ground.
7. Cover the scooter (do not use plastic or other coated materials) and store in an unheated area, free of excessive moisture, with a minimum of daily temperature variation. Do not
store the scooter in direct sunlight, as the sun's UV rays
can damage the body work and other components.
Page 61

Removal from storage
1. Uncover and clean the scooter.
2. Change the engine oil if more than 1 month has passed
since the start of storage.
3. Charge the battery as required (use a quality charger designed for use on a maintenance-free type battery). Install
the battery.
4. Drain any excess aerosol rust-inhibiting oil from the fuel
tank. Fill the fuel tank with fresh gasoline.
5. Perform all the pre-ride inspection checks (see pages 23 -
33). T
est ride the scooter at low speeds in a safe riding
area, away from traffic.
59
Page 62

MAINTENANCE RECORD
DATE MILEAGE SERVICE PERFORMED & NOTES
60
Page 63

MAINTENANCE RECORD
DATE MILEAGE SERVICE PERFORMED & NOTES
61
Page 64

SPECIFICATIONS - PEOPLE S 50
Dimensions
Overall length ..........................................79.1 in (2010 mm)
Overall width .............................................. 28.3 in (720 mm)
Overall height ..........................................51.2 in (1300 mm)
Wheel base ...............................................53.5 in (1360mm)
Seat height ................................................ 31.5 in (800 mm)
Dry weight ................................................. 240.3lbs (109 kg)
Capacities
Engine oil..................................................0.9 US qt. (0.85L)
Transmission oil ............................................ 0.13 qt (0.12 L)
Fuel tank...................................................1.8 US gal (6.8 L)
Maximum weight capacity ............................ 330 lb (150 kg)
Engine
Type......................................Four-stroke, air-cooled SOHC
Displacement....................................... 49.5 cm3 (3.0 cu. in)
Bore and stroke...............1.53in X 1.61 in (39 X 41.4 mm)
Compression ratio .......................................................... 11:1
Spark plug ..............................................................CR7HSA
Idle speed ............................................................ 1700 RPM
Cooling system............................................ Forced Air (fan)
Starting system... Electric starter motor (kick-start back-up)
Transmission ................................................ Automatic CVT
62
Chassis
Tire size, front..................................................... 100/80 - 16
Tire size, rear ...................................................... 110/70 - 16
Chassis material ............................................................ Steel
Front suspension ......................................... Telescopic forks
Rear suspension ................................. Twin shock absorber
Brake (front) ...........................................................Disc type
Brake (rear) .................................................Drum/shoe type
Electrical
Ignition type ..............................................................DC-CDI
Battery ..................................................................... 12v-6Ah
Headlight ........................................................... 12v 35/35W
Tail/brake light ..................................................... 12v 5/21W
Turn signal light................................................12v 10W X 4
Position light ........................................ 12v5W (front & rear)
Main Fuse......................................................................... 7A
Page 65

SPECIFICATIONS - PEOPLE S 125
Dimensions
Overall length ..........................................80.7 in (2050 mm)
Overall width .............................................. 28.3 in (720 mm)
Overall height ..........................................51.2 in (1300 mm)
Wheel base ................................................ 53.2in (1350mm)
Seat height ................................................ 31.5 in (800 mm)
Dry weight .................................................255.7 lbs (116 kg)
Capacities
Engine oil...................................................1.2 US qt. (1.1 L)
Transmission oil ............................................ 0.25 qt (0.21 L)
Fuel tank...................................................1.8 US gal (6.8 L)
Maximum weight capacity ............................ 330 lb (150 kg)
Engine
Type......................................Four-stroke, air-cooled SOHC
Displacement....................................... 1.25 cm3 (7.6 cu. in)
Bore and stroke ........... 2.06in X 2.27 in (52.4 X 57.8 mm)
Compression ratio .........................................................9.3:1
Spark plug ..............................................................CR7HSA
Idle speed ............................................................ 1700 RPM
Cooling system............................................ Forced Air (fan)
Starting system... Electric starter motor (kick-start back-up)
Transmission ................................................ Automatic CVT
Chassis
Tire size, front..................................................... 100/80 - 16
Tire size, rear ...................................................... 120/80 - 16
Chassis material ............................................................ Steel
Front suspension ......................................... Telescopic forks
Rear suspension ................................. Twin shock absorber
Brake (front) ...........................................................Disc type
Brake (rear) .................................................Drum/shoe type
Electrical
Ignition type ..............................................................DC-CDI
Battery ..................................................................... 12v-6Ah
Headlight ........................................................... 12v 35/35W
Tail/brake light ..................................................... 12v 5/21W
Turn signal light................................................12v 10W X 4
Position light ........................................ 12v5W (front & rear)
Fuses.....................................................................10A / 15A
63
Page 66

SPECIFICATIONS - PEOPLE S 200
Dimensions
Overall length ..........................................80.7 in (2050 mm)
Overall width .............................................. 28.3 in (720 mm)
Overall height ..........................................51.2 in (1300 mm)
Wheel base ................................................
Seat height ................................................ 31.5 in (800 mm)
Dry weight ................................................ 326.9 lbs (122 kg)
Capacities
Engine oil...................................................
Transmission oil ............................................ 0.25 qt (0.21 L)
Fuel tank...................................................1.8 US gal (6.8 L)
Maximum weight capacity ............................ 330 lb (150 kg)
Engine
Type......................................Four-stroke, air-cooled SOHC
Displacement..................................... 1.63 cm3 (9.94 cu. in)
Bore and stroke............... 2.36in X 2.27 in (60 X 57.8 mm)
Compression ratio .........................................................9.5:1
Spark plug ..............................................................CR7HSA
Idle speed ............................................................ 1700 RPM
Cooling system............................................ Forced Air (fan)
Starting system... Electric starter motor (kick-start back-up)
Transmission ................................................ Automatic CVT
64
53.2in (1350mm)
1.2 US qt. (1.1 L)
Chassis
Tire size, front..................................................... 100/80 - 16
Tire size, rear ...................................................... 120/80 - 16
Chassis material ............................................................ Steel
Front suspension ......................................... Telescopic forks
Rear suspension ................................. Twin shock absorber
Brake (front) ...........................................................Disc type
Brake (rear) .................................................Drum/shoe type
Electrical
Ignition type ..............................................................DC-CDI
Battery ..................................................................... 12v-6Ah
Headlight ........................................................... 12v 35/35W
Tail/brake light ..................................................... 12v 5/21W
Turn signal light................................................12v 10W X 4
Position light ........................................ 12v5W (front & rear)
Fuses.....................................................................10A / 15A
Page 67

EXHAUST EMISSION CONTROL SYSTEM
KYMCO Clean-Air System
The KYMCO Clean-Air System is a secondary air suction system that helps the exhaust gases to burn more completely.
When the engine's exhaust is sent into the exhaust system, it contains some unused fuel. This exhaust is still hot
enough to burn the unused fuel. The Clean-Air system introduces more air so the oxygen will then permit the unused fuel
to burn in the exhaust system. This continued burning action uses up a great deal of the normally unused fuel and other
gases, as well as changing a significant portion of the poisonous carbon monoxide into harmless carbon dioxide. The
Clean-Air system does not use any energy from the engine and does not affect the scooter's performance.
1 Fresh Air
22
2
11
1
11
ANAN
AN
ANAN
22
33
3
33
44
4
44
88
8
88
55
5
55
2 Carburetor
3 Intake manifold
4 Vacuum hose
5 Air injection control valve
6 Air injection air cleaner
AMAM
AM
AMAM
ALAL
AL
ALAL
AKAK
AK
AKAK
ATAT
AT
ATAT
99
9
99
77
7
77
66
6
66
11
1
11
7 Reed valve
8 Air pipe
9 Fresh air
AT Exhaust valve
AK Piston & cylinder
AL Engine oil
AM Catalytic converter
AN Crankshaft
65
Page 68

EMISSION CONTROL & WARRANTY INFORMATION
Crankcase Emission Control System
Your People S scooter’s engine is equipped with a closed crankcase system. Blow-by gases are routed back into the
combustion chamber via the intake system. This system does not allow the blow-by gases to enter the atmosphere.
Exhaust Emission Control System
The exhaust emissions from your scooter are controlled by engine design, factory-set fuel delivery, ignition settings, and
exhaust system design. This system also includes a catalyzer in the exhaust system.
Noise Exhaust Emission Control System
The engine, intake and exhaust systems of your scooter were designed to comply with federal, state and local noise level
requirements. Do not modify the engine, intake or exhaust components, as doing so will affect compliance with these noise
level requirements.
Please do not modify or change any KYMCO-designed components that may alter the sound or emission level from
your People S scooter.
KYMCO LIMITED WARRANTY
NOISE EMISSIONS
KYMCO USA Inc, 5 Stan Perkins Road, Spartanburg, SC 29307, USA warrants that this vehicle was designed, manufactured and equipped so that when new, it would conform with the applicable Motorcycle Noise Regulations of the U.S. EPA
Environmental Protection Agency.
This warranty is not limited to any particular part, component or system of the vehicle. Defects in design, assembly, or in any
part, component or system of the vehicle which, at the time of sale to the first purchaser, caused noise emission levels to
exceed applicable Federal standards in effect at the time of manufacture, are covered by this warranty.
66
Page 69

KYMCO LIMITED WARRANTY
67
Page 70

INDEX
Accessories & Modifications ................................ 6
Air Filter Maintenance ........................................ 49
Battery ..........................................................51 - 52
Brake Fluid Level Inspection.......................54 - 55
Brake Inspection ..........................................27 - 30
Brake Lever & Shoe Adjustment........................ 55
Break-in Recommendations ............................... 21
CA Prop 65 Warning............(inside of front-cover)
Chassis Inspection ......................................32 - 33
Cleaning Your Scooter .................................56 - 57
Clock & Trip-meter......................................18 – 19
Electric Start Button............................................ 13
Emission - KYMCO Clean Air System............... 65
Emission Information & EPA Warranty .............. 66
Engine Oil Inspection ......................................... 24
Engine Oil Level Inspection & Change.......46 - 47
Engine Oil............................................................ 46
Engine-stop Switch............................................. 13
Foreword ............................................................... 2
Front Luggage Box ............................................. 16
Fuel Level / Filler Cap ........................................ 26
Fuel System ........................................................ 51
Fuses ................................................................... 53
Headlight Dimmer Switch................................... 13
Helmet Hooks ..................................................... 15
Horn & Lights Inspection .............................31 - 32
Horn Button ......................................................... 14
Identification Numbers Record (inside of back-cover)
Ignition Switch & Steering Lock ..................11 - 12
Importance of Maintenance ............................... 42
Index.................................................................... 68
Instrument Inspection ......................................... 31
Instruments ..................................................17 - 18
Keys..................................................................... 11
KYMCO Limited Scooter Warranty .................... 67
Left-hand Handlebar Switch ........................13 - 14
Load Limits & Guidelines ..................................... 5
Locations of Parts & Controls .........................7 - 9
Main Stand .......................................................... 16
Maintenance Record ...................................60 - 61
Maintenance Schedule................................43 - 44
Manual Icon Legend ............ (inside of front-cover)
Parking Your Scooter ...................................40 - 41
Passenger Foot Rests........................................ 20
Power Socket...................................................... 15
Pre-ride Inspection ......................................23 - 33
Rear Shock Absorbers ....................................... 20
Riding Your Scooter.....................................36 - 40
Right-hand Handlebar Switch ............................ 13
Scooter Safety ................................................. 3 - 4
SECTION 1 - SAFETY ...................................... 2 - 6
SECTION 2 SECTION 3 -
CONTROLS & FEATURES .....7 - 15
OPERATION..................... 21 - 41
SECTION 4 - MAINTENANCE .................... 42 - 61
Spark Plug ........................................................... 50
Specifications (People S 125)............................ 63
Specifications (People S 200)............................ 64
Specifications (People S 50).............................. 62
Starting the Engine (electric start) ..............33 - 35
Starting the Engine (kick start) ........................... 35
Steering & Handlebar Inspection....................... 30
Storage.........................................................58 - 59
Table of Contents.................................................. 1
Tire Break-in ........................................................ 22
Tire Inspection .............................................24 - 25
Tire Pressure ....................................................... 45
Tires..................................................................... 45
Transmission Fluid Change ............................... 48
Turn Signal Switch.............................................. 13
Turn Signals........................................................ 14
Under-seat Storage Compartment .................... 14
Vehicle Identification Numbers .......................... 10
68
Page 71

Identification Numbers Record
33
3
22
2
22
11
1
11
1. IGNITION SWITCH KEY IDENTIFICATION NUMBER
The ignition switch key identification code is stamped on tab 1 supplied with the key. If you require a replacement key , you will
need this code to obtain a new key from your authorized KYMCO dealer. Record the key number in the box above.
2. VEHICLE IDENTIFICATION NUMBER (VIN)
33
3. ENGINE SERIAL NUMBER (ESN)
Record the Vehicle Identification Number 2 and Engine Serial Number 3 in the boxes above for future reference (to assist
you in ordering parts from your authorized KYMCO dealer or for reference in case the vehicle is stolen).
NOTE: Your scooter’s keys may differ in appearance from those shown in this manual.
Page 72

5 Stan Perkins Road
Spartanburg, SC 29307
Telephone: (888) 235-3417
FAX: (864) 327-4745
Prepared: March 2009
T300-BA40BB-US-A5
 Loading...