

KYMCO PeopleS 250, PeopleS 250i, PeopleS 300 i Owner's Manual

OWNER'S MANUAL
KWANG YANG MOTOR CO.,LTD.
Issued: 2008.Feb

INTRODUCTION
CAUTION
Congratulations on your purchase of the KYMCO PEOPLES 250/250i/300i.
It represents the result of many years of KYMCO experience in the
production of fine scooter vehicles. To ensure your riding enjoyment, you
should become thoroughly familiar with this Owner's Manual before riding
the scooter. This manual will provide you with a good basic understanding of
the features and operation of this vehicle. It also includes basic
maintenance and procedures. If you have any questions regarding the
operation, please consult a KYMCO dealer.
NOTE:
The information and specifications stated in this manual are for reference
only and subject to change without notice.
For injection engine vehicle, please avoid having a short-circuit and don’t
remove or install the battery wire while the ignition key turned on, otherwise
certain injection parts could be breakdown.
This Owner’s Manual covers the following models:
PEOPLES 250 ─ Carburetor type & Liquid-cooled engine
PEOPLES 250i/300i ─ Fuel injection engine & Liquid-cooled engine

TABLE OF CONTENTS
1.SCOOTER SAFETY
2.PARTS LOCATION
FRAME SERIAL NUMBERS
ENGINE SERIAL NUMBERS、KEY SERIAL NUMBERS
3.OPERATION INSTRUCTIONS
IGNITION SWITCH、STEERING LOCK
STARTER BUTTON、HEADLIGHT SWITCH
HEADLIGHT DIMMER SWITCH、PASSING SIGNAL SWITCH
HORN BUTTON、TURN SIGNAL SWITCH、ENGINE STOP SWITCH
SIDE STAND SWITCH
SEAT LOCK、MET-IN BOX、HELMET HOLDER
SPEEDOMETER
CELL PHONE SOCKET、REAR SUSPENSION
4.PRE-RIDE INSPECTION
ADVANCE INSPECTION、ENGINE OIL LEVEL INSPECTION/REFILLING
ENGINE COOLANT
TIRE INSPECTION
1
3
6
7
8
10
11
12
13
14
15
20
21
8
21
22
23

TABLE OF CONTENTS
25
27
28
29
37
38
39
40
5.STARTING THE ENGINE
6.RIDING
7.PARKING
8.MAINTENANCE
MAINTENANCE SCHEDULE
AIR CLEANER
SPARK PLUG
BATTERY
FUSE REPLACEMENT
ENGINE OIL REPLACEMENT
CLEANING
SPECIFICATIONS
FUEL
STEERING HANDLEBAR、INSTRUMENT LIGHTS INSPECTION
BRAKE FLUID LEVEL INSPECTION
BRAKE PAD WEAR
LIGHTS INSPECTION
33
30
31
42
43
44
45
46
47
SCOOTER SAFETY
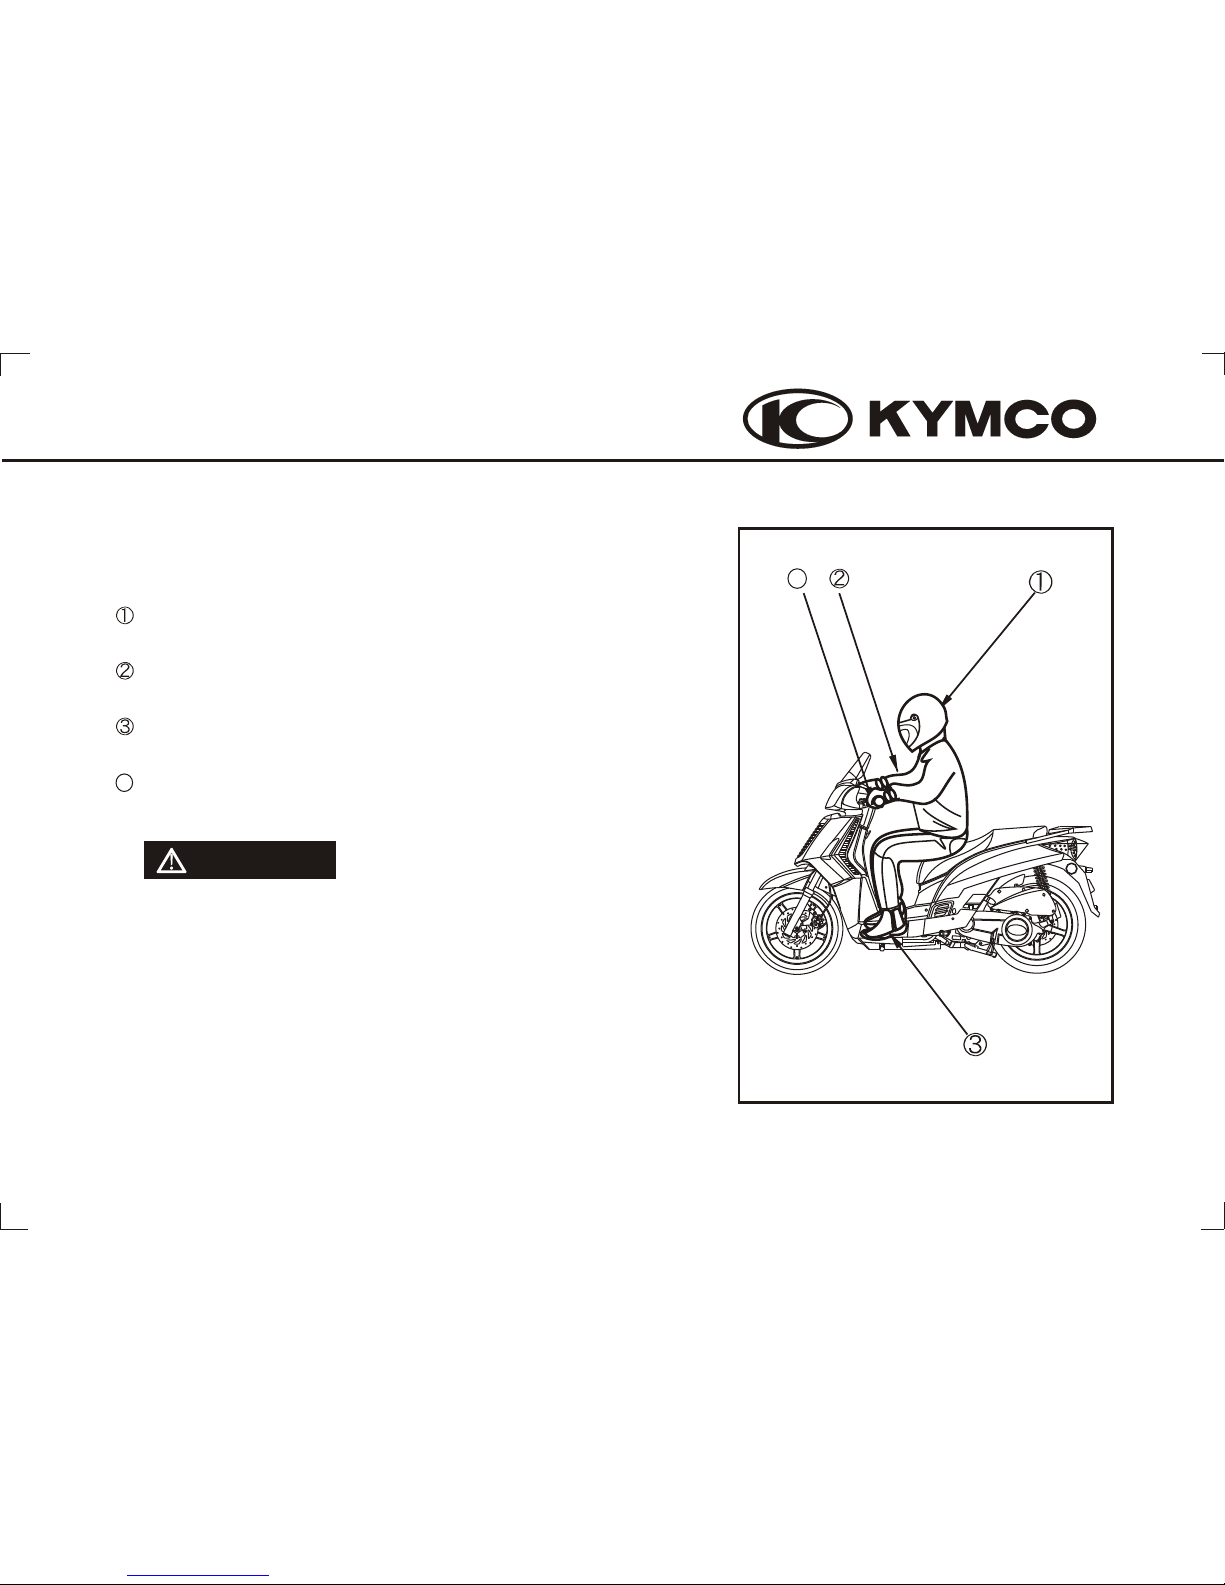
PROTECTIVE APPAREL
1
CAUTION
Always wear a helmet. You should also wear a face
Clothes should be close-fitting. Fasten shirt cuffs and
1.
shield or goggles.
keep them from hooking the brake lever.
Shoes should be close-fitting, have low heels and offer
ankle protection.
Wear gloves.
Keep both hands on the handlebars and both feet on
the floor boards while riding. During riding or 10
minutes after the scooter is parking, do not touch the
muffler to avoid scalding.
4
4
To wear comfortable clothes is necessary for a safe riding.
2
RIDING METHOD
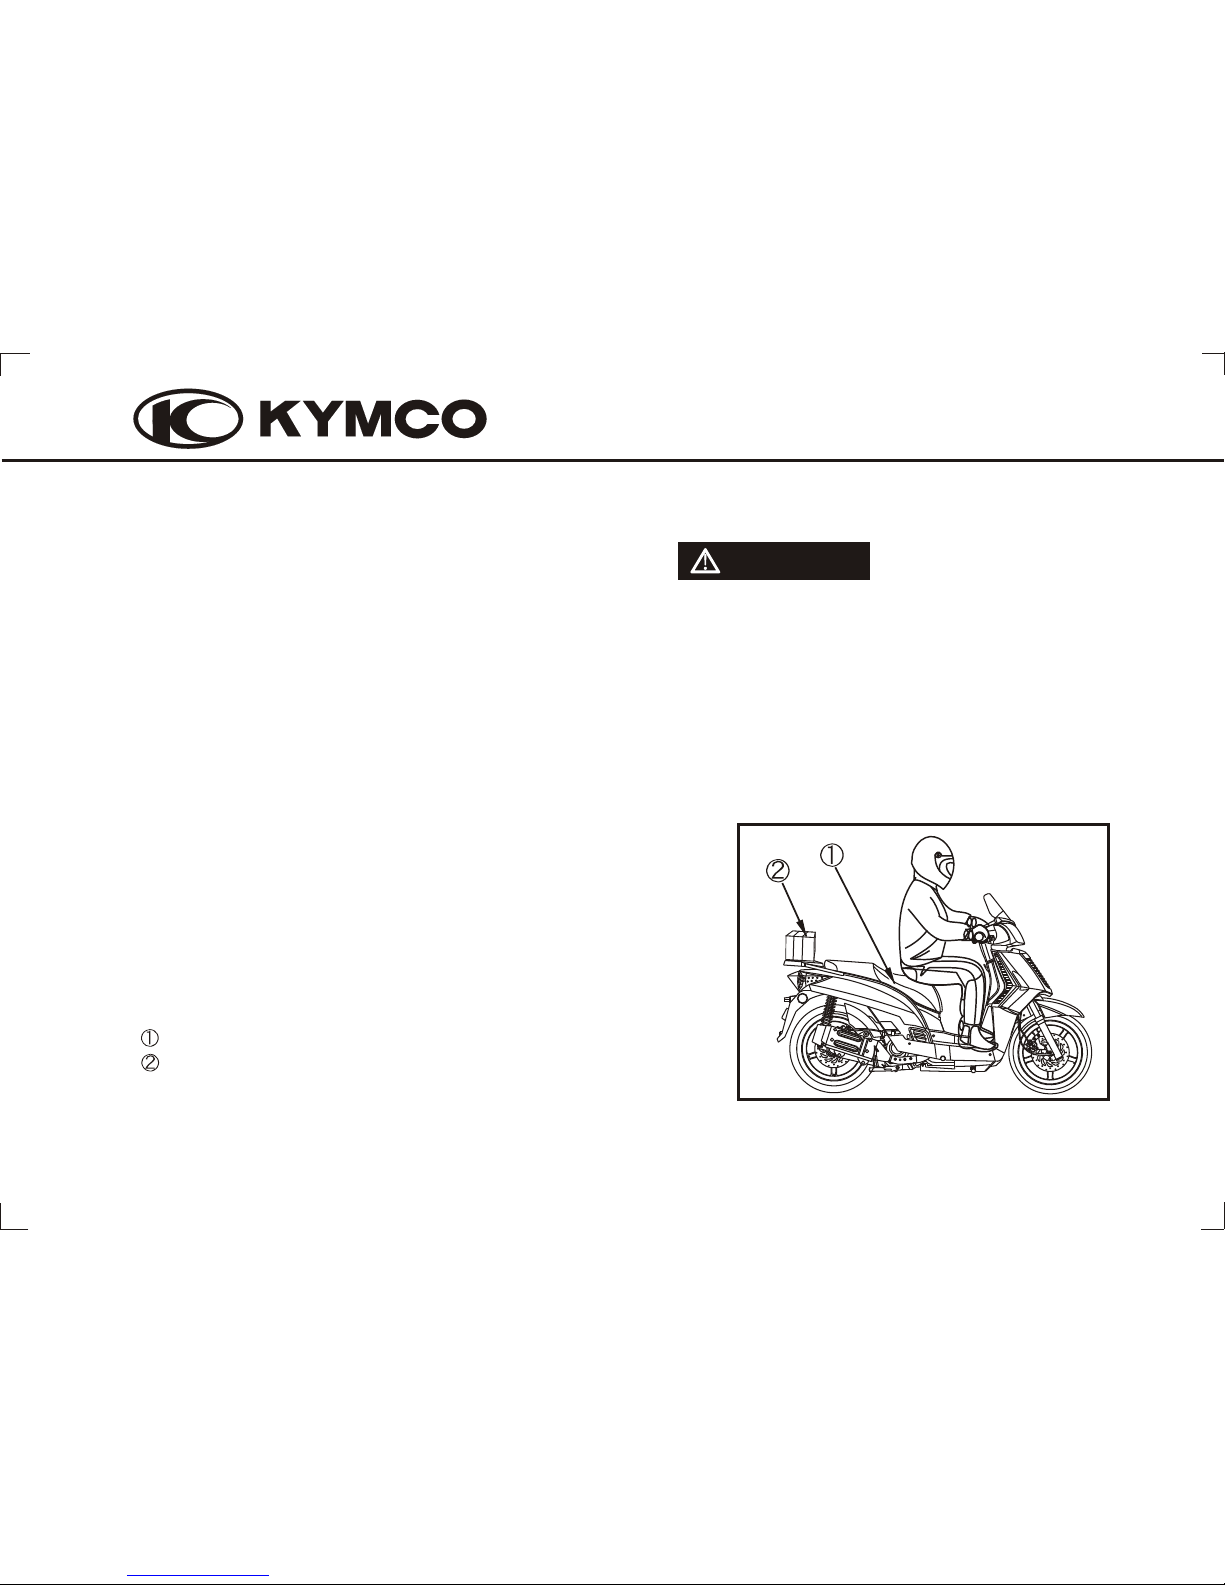
CARRYING GOODS
When carrying a load on the scooter, mount it as low as
possible and as close as possible to the machine. An
improperly mounted load can create difficult to handle.
The size of the “ load” can affect the handling of the
scooter. Balance the load between the left and right side
of the scooter and fasten it securely.
Your riding skill and your mechanical knowledge from the
foundation for safe riding practices. We suggest that you
practice riding your scooter in a non-traffic situation
without obstacles until you are thoroughly familiar with
your machine and its controls. Remember practice
makes perfect.
CAUTION
Modification of the scooter, or removal of
orginal equipment, may render the vehicle
unsafe or illegal. Obey all application
equipement regulations in your area.
Max. Loading capacity of the met-in box is 10kg.
Max. Loading capacity of the rear carrier is 5kg.
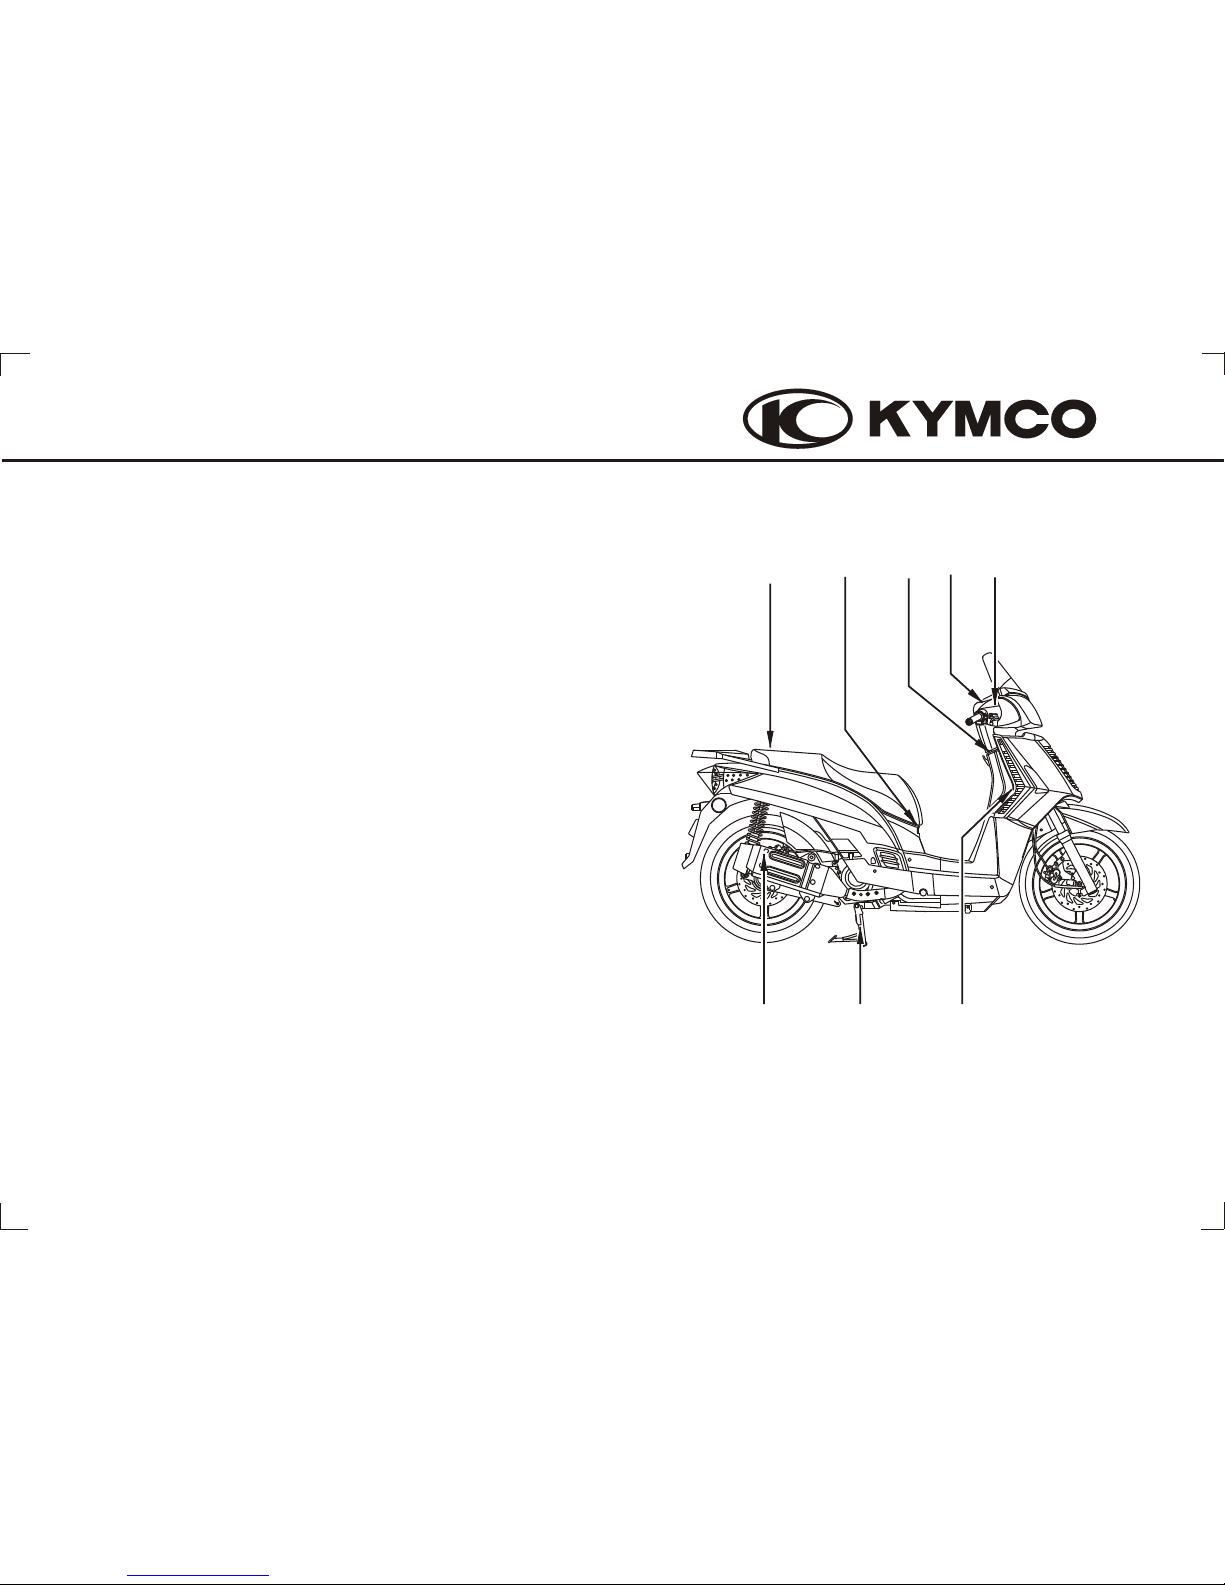
(1) Headlight s witch (P.10)/
Starter button (P.10)
(2) Speedomet er (P.15)
(3) Center stan d
(4) Ignition sw itch (P.8)
(5) Helmet hold er (P.14)
(6) Battery/F use (P.4 3/P.44)
(7) Muffler
(8) Engine cool ant overflow tank (P.22)
3
3
7
8
2
4
5
1
6
PARTS LOCATION
2.
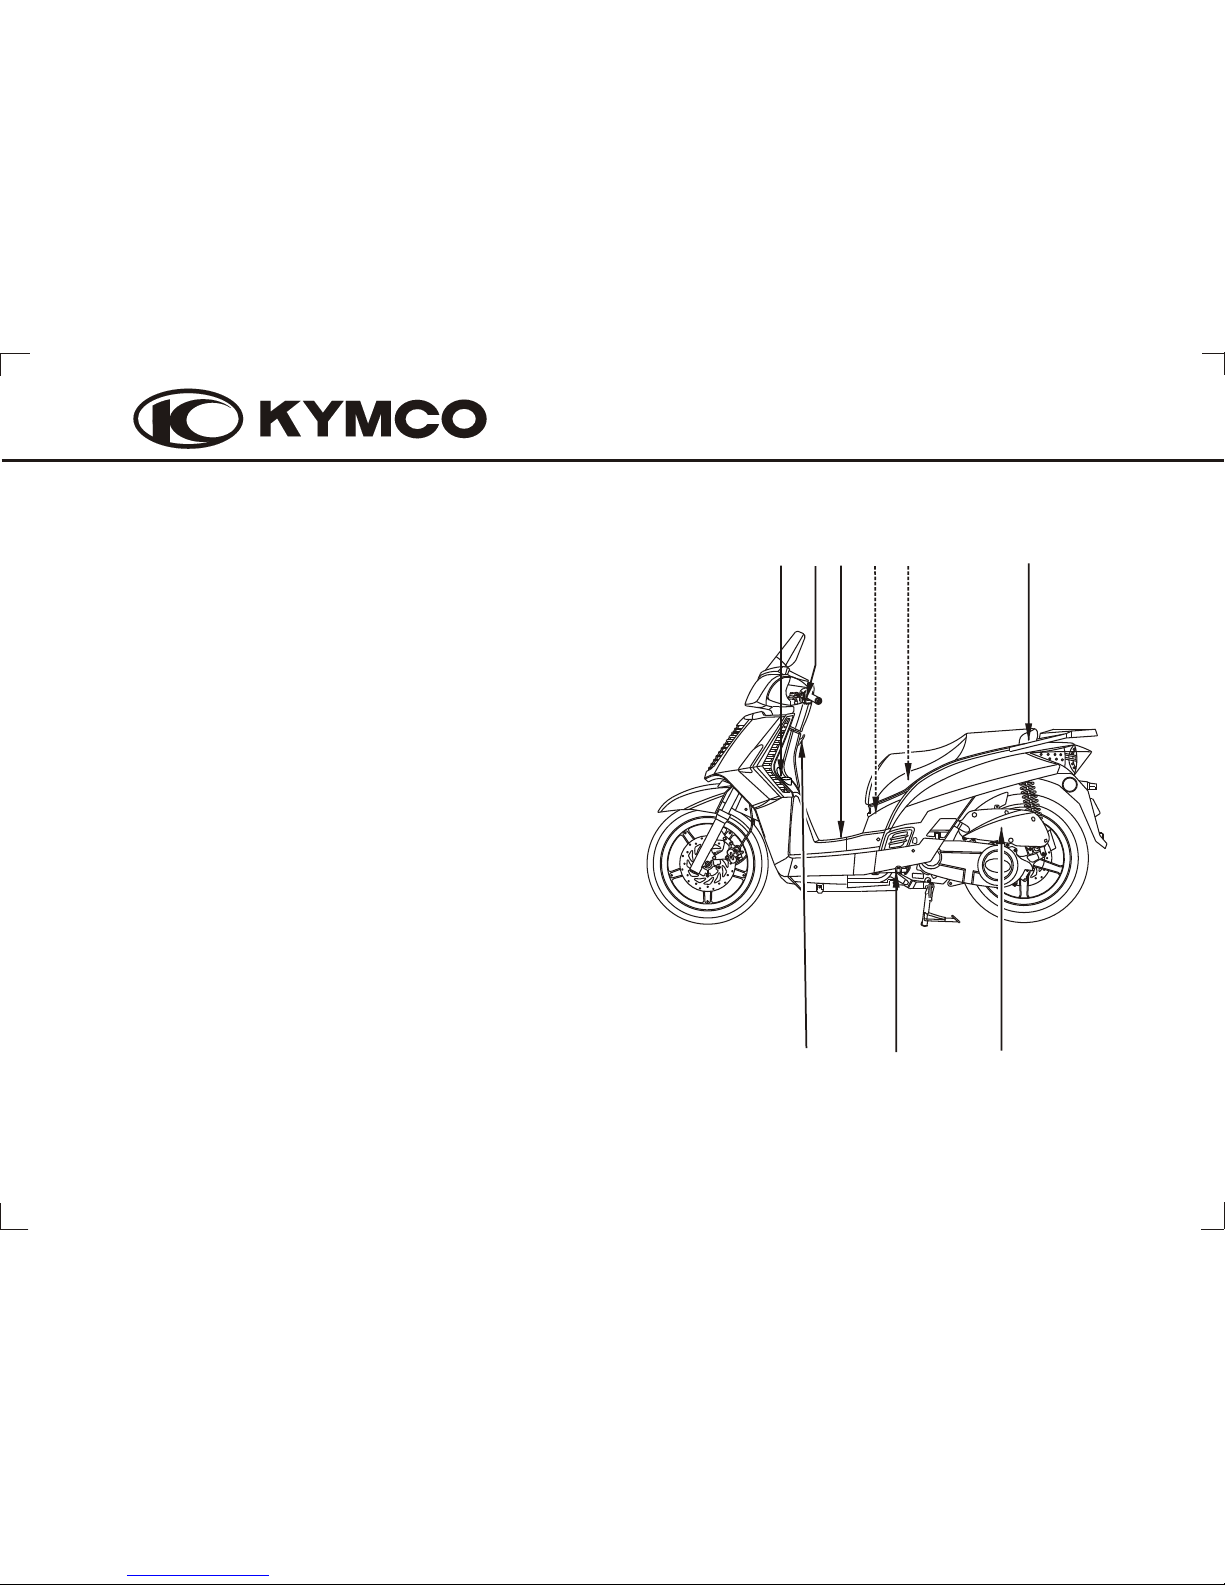
(9) Seat lock (P.14)
(10) Fuel tank ca p (Peoples 250)(P.25)
9
15
14 17
10
12
13
16
4
11
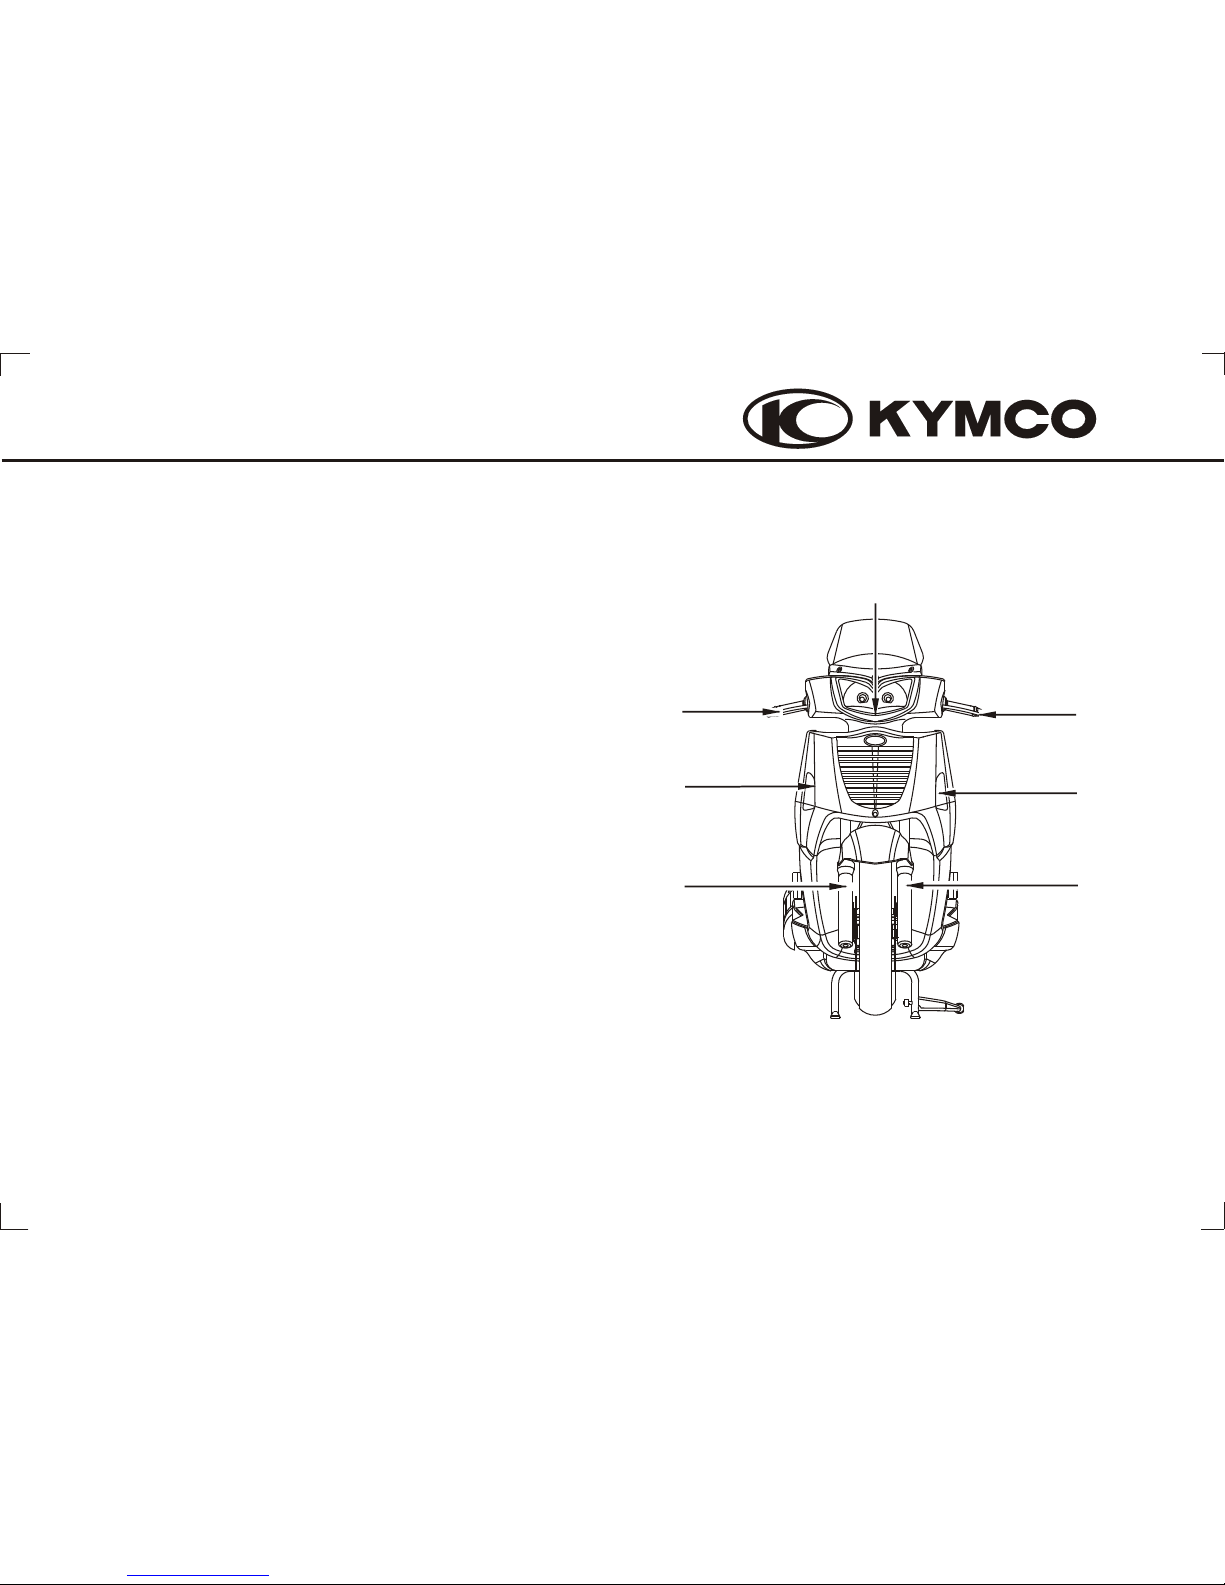
(11) Fue l tank cap (Peoples 250i/30 0i) (P. 26)
Headlight dim mer switch (P.11)/
Passing signa l switch (P.11)/
Turn signal swit ch (P.12)/
Horn button(P.12)
(12) Met-in box ( P.14)
(13) Helmet hol der (P.14)
(14) Center hoo k
(15) Side stand
(16)
(17) Air cleaner ( P.44)
19
18
24
23
22
21
20
(18) Headligh t
(19) Rear brake l ever
(20) Left front t urn signal light
(21) Left front s uspension
(22) Right fron t suspension
(23) Right fron t turn signal light
(24) Front brak e lever
5
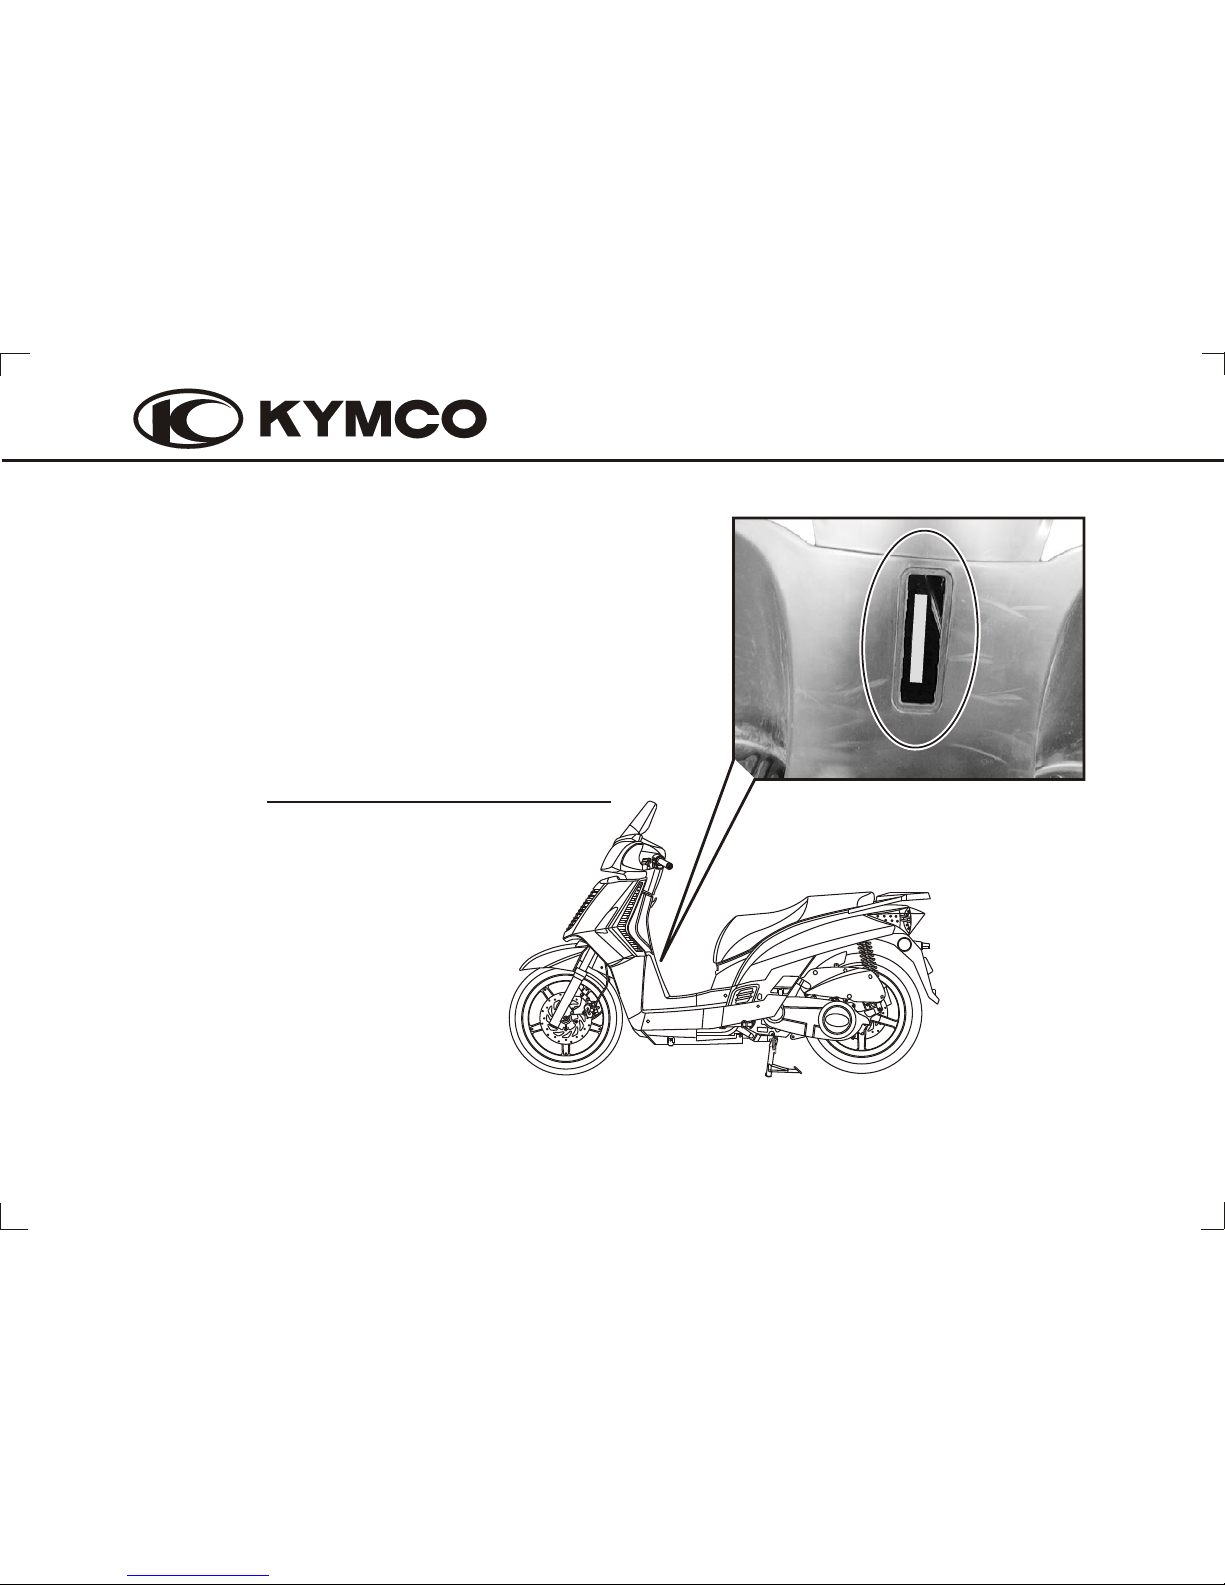
FRAME SERIAL NUMBERS
FRAME NO.
6
Frame number
The frame number is stamped on the center side of the
frame body. Remove the cover with a screwdriver. The
frame and engine serial numbers are required when
registering your scooter. They may also be required by
KYMCO dealer when ordering replacement parts.
Record the numbers here for your reference.
Key No.
7
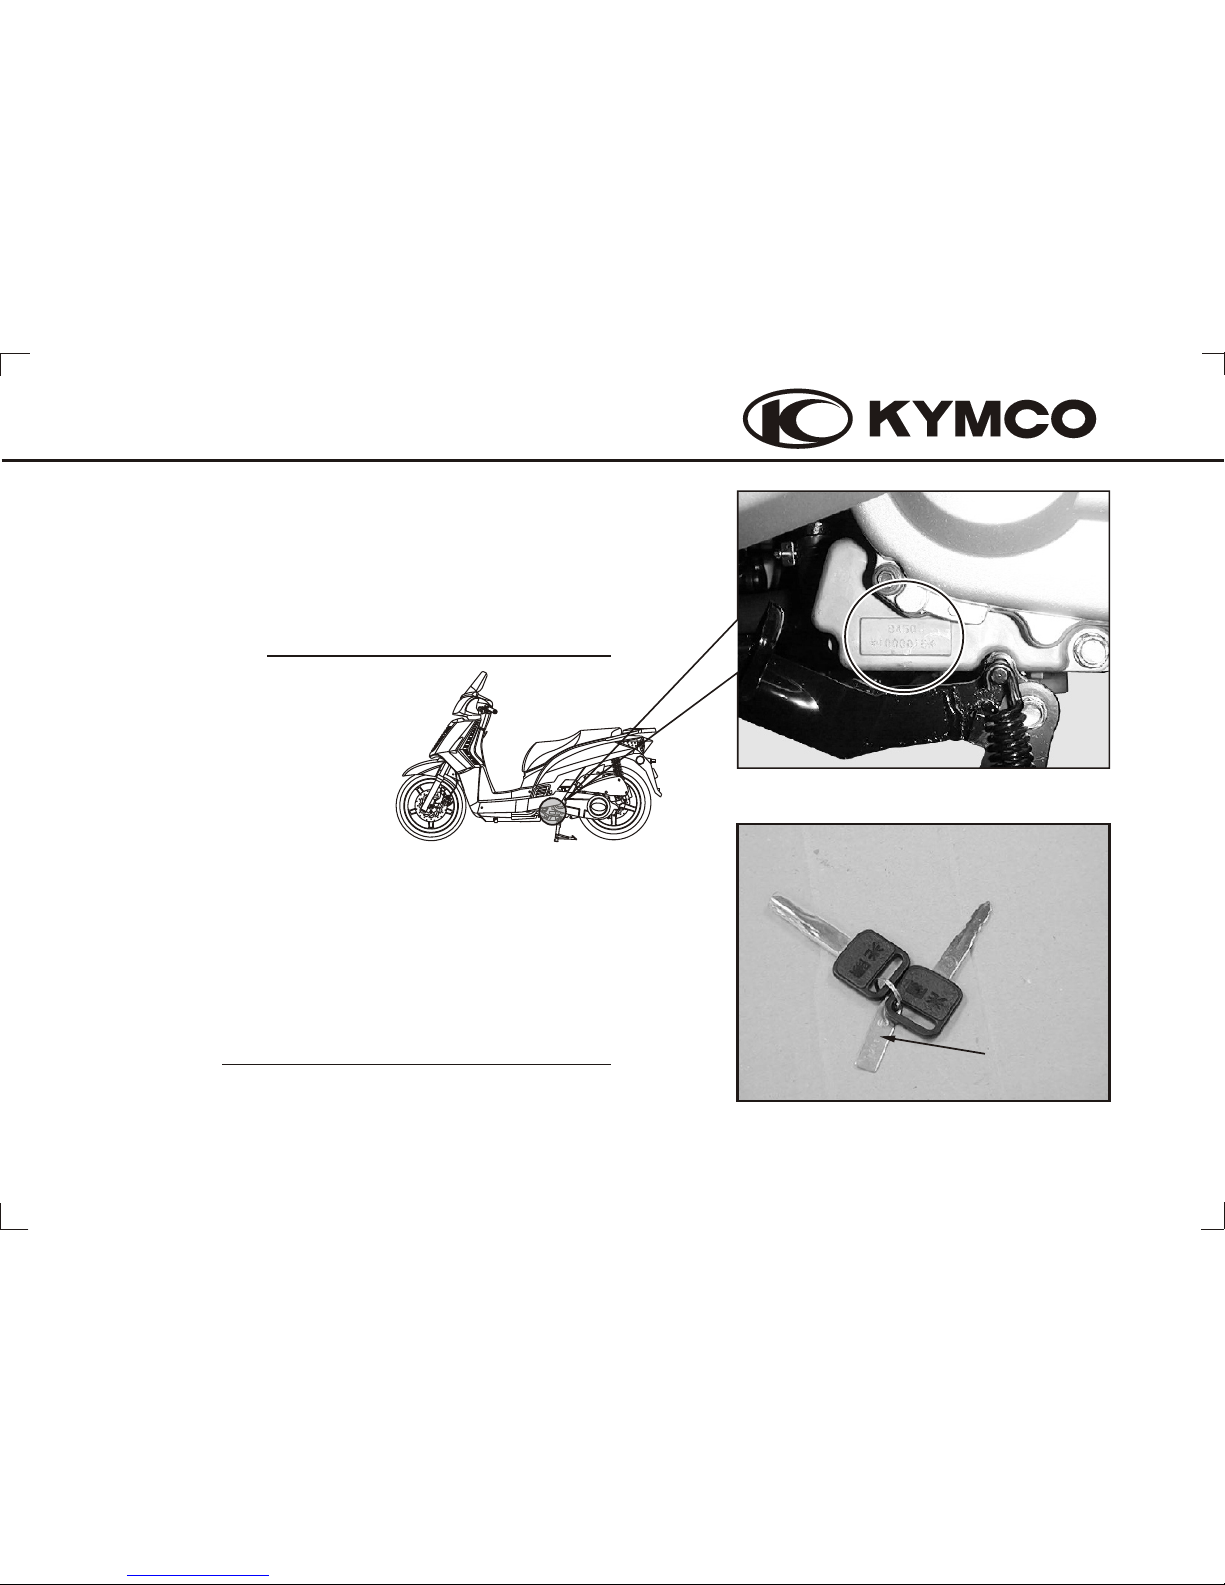
ENGINE NO.
The engine number is stamped on the left side of the
crankcase near the center stand. Record the numbers here
for your reference.
KEY NO.
ENGINE SERIAL NUMBERS
KEY SERIAL NUMBERS
You should received a key number plate with your key. You
will need this key number if you ever have to replace a lost
key. Store this plate in a safe place. Record the numbers
here for your reference.
ON
OFF
LOCK
8
3. OPERATION INSTRUCTIONS(Peoples 250)
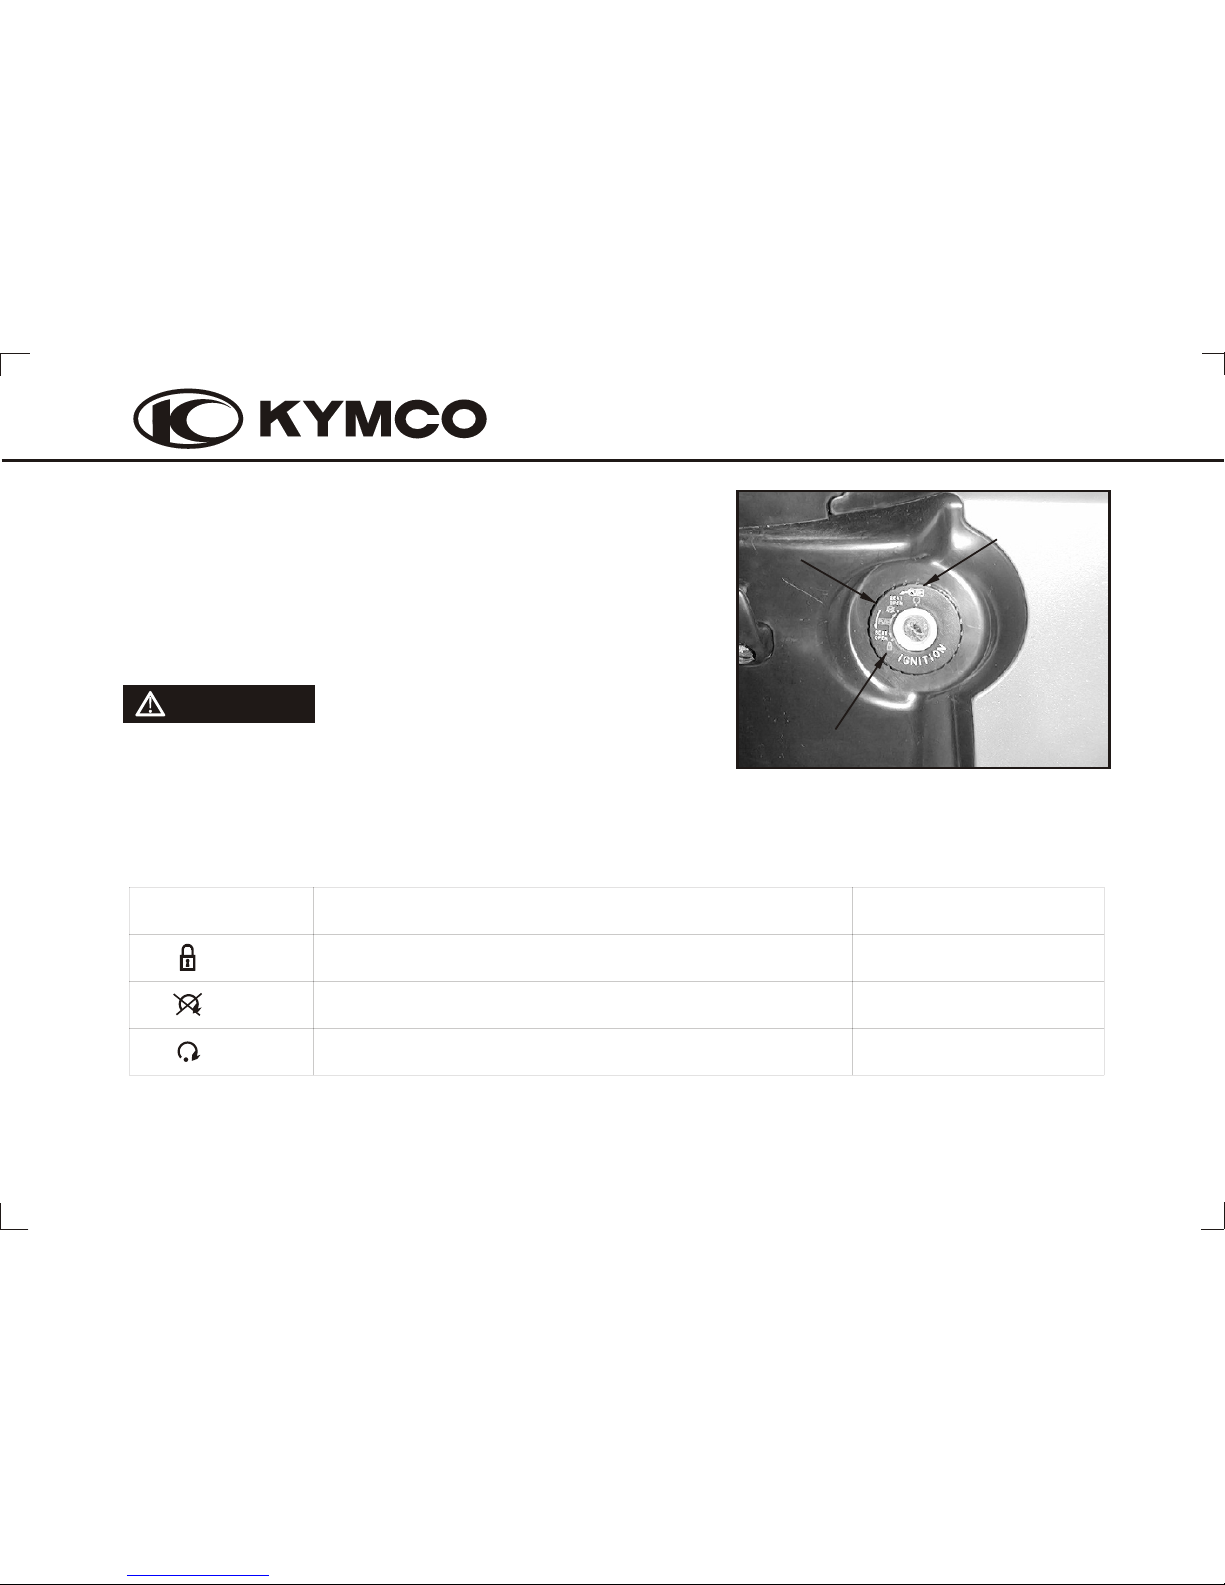
(1) IGNITION SWITCH/STEERING LOCK
The ignition switch is on the right side below the steering
stem.
CAUTION
Key Position
Function
Key Removal
ON
OFF
LOCK
Steering is locked. Engine and lights cannot be operated.
Key can be removed
Engine and lights cannot be operated.
Key can be removed
Engine and lights can be operated.
Key cannot be removed
After locking, turn the handlebar gently to make sure
that it is locked.
Do not turn the key to LOCK while riding the scooter,
otherwise out of control will result.
To lock the steering, turn the handlebars all the way to the
left, turn the key to LOCK while pushing in. Remove the key.

3. OPERATION INSTRUCTIONS(Peoples 250i/300i)
9
Key Position
Function
Key Removal
ON
OFF
LOCK
Steering is locked. Engine and lights cannot be operated.
Key can be removed
Engine and lights cannot be operated.
Key can be removed
Engine and lights can be operated.
Key cannot be removed
Fuel tank cap can be opened.
Key cannot be removed
ON
Engine and lights can be operated.
4
4
The ignition switch is on the right side below the steering
stem.
CAUTION
After locking, turn the handlebar gently to make sure
that it is locked.
Do not turn the key to LOCK while riding the scooter,
otherwise out of control will result.
To lock the steering, turn the handlebars all the way to the
left, turn the key to LOCK while pushing in. Remove the key.
(1) IGNITION SWITCH/STEERING LOCK
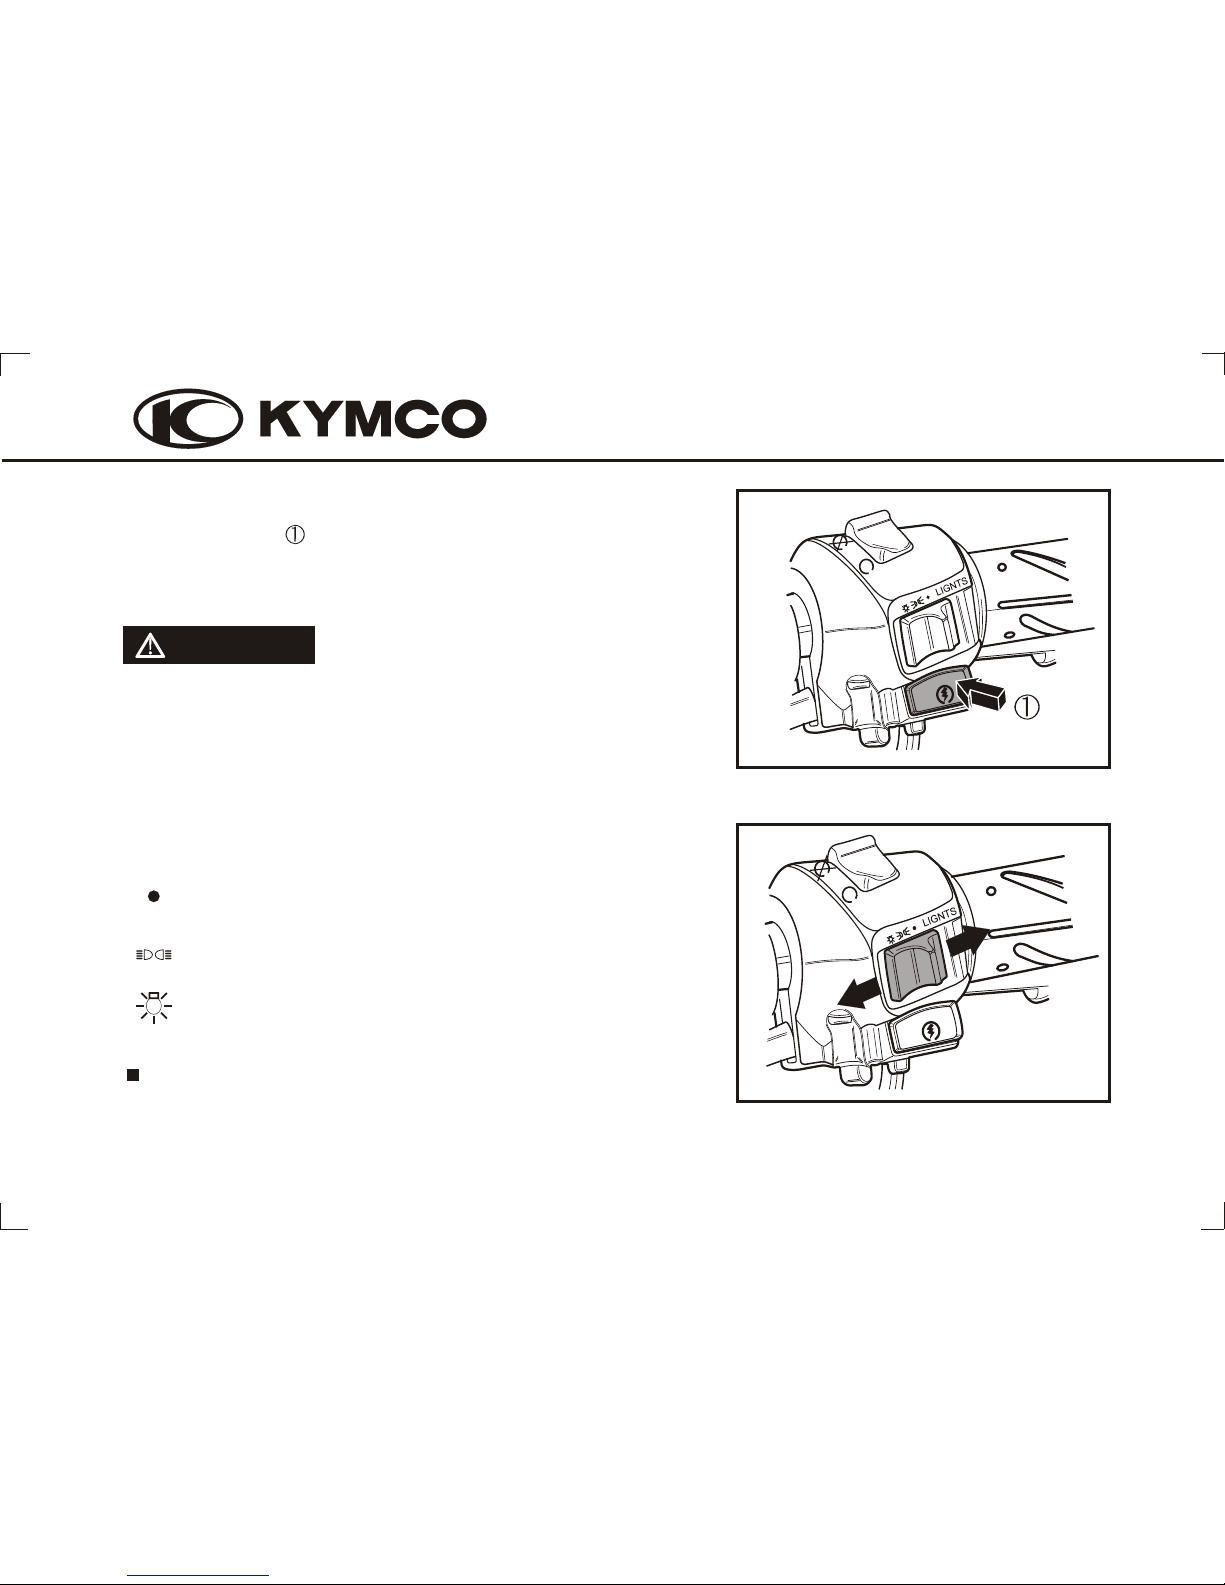
(2) STARTER BUTTON
(3) HEADLIGHT SWITCH
10
EN
GIN
E
STO
P
EN
GIN
E
STO
P
E
NGIN
E
S
T
O
P
E
NGIN
E
S
T
O
P
The starter button is below the headlight switch.
When the starter button is pressed, the starter motor cranks
the engine. See page 31 for starting procedure.
CAUTION
Do not push the electric starter button to avoid engine
damage during engine running.
Release the electric starter button immediately after the
engine is started.
Headlight, taillight, position light and meter lights
off.
Taillight, position light and meter lights on.
Headlight, taillight, position light and meter lights
on.
NOTE:
Not used for always lighting type.
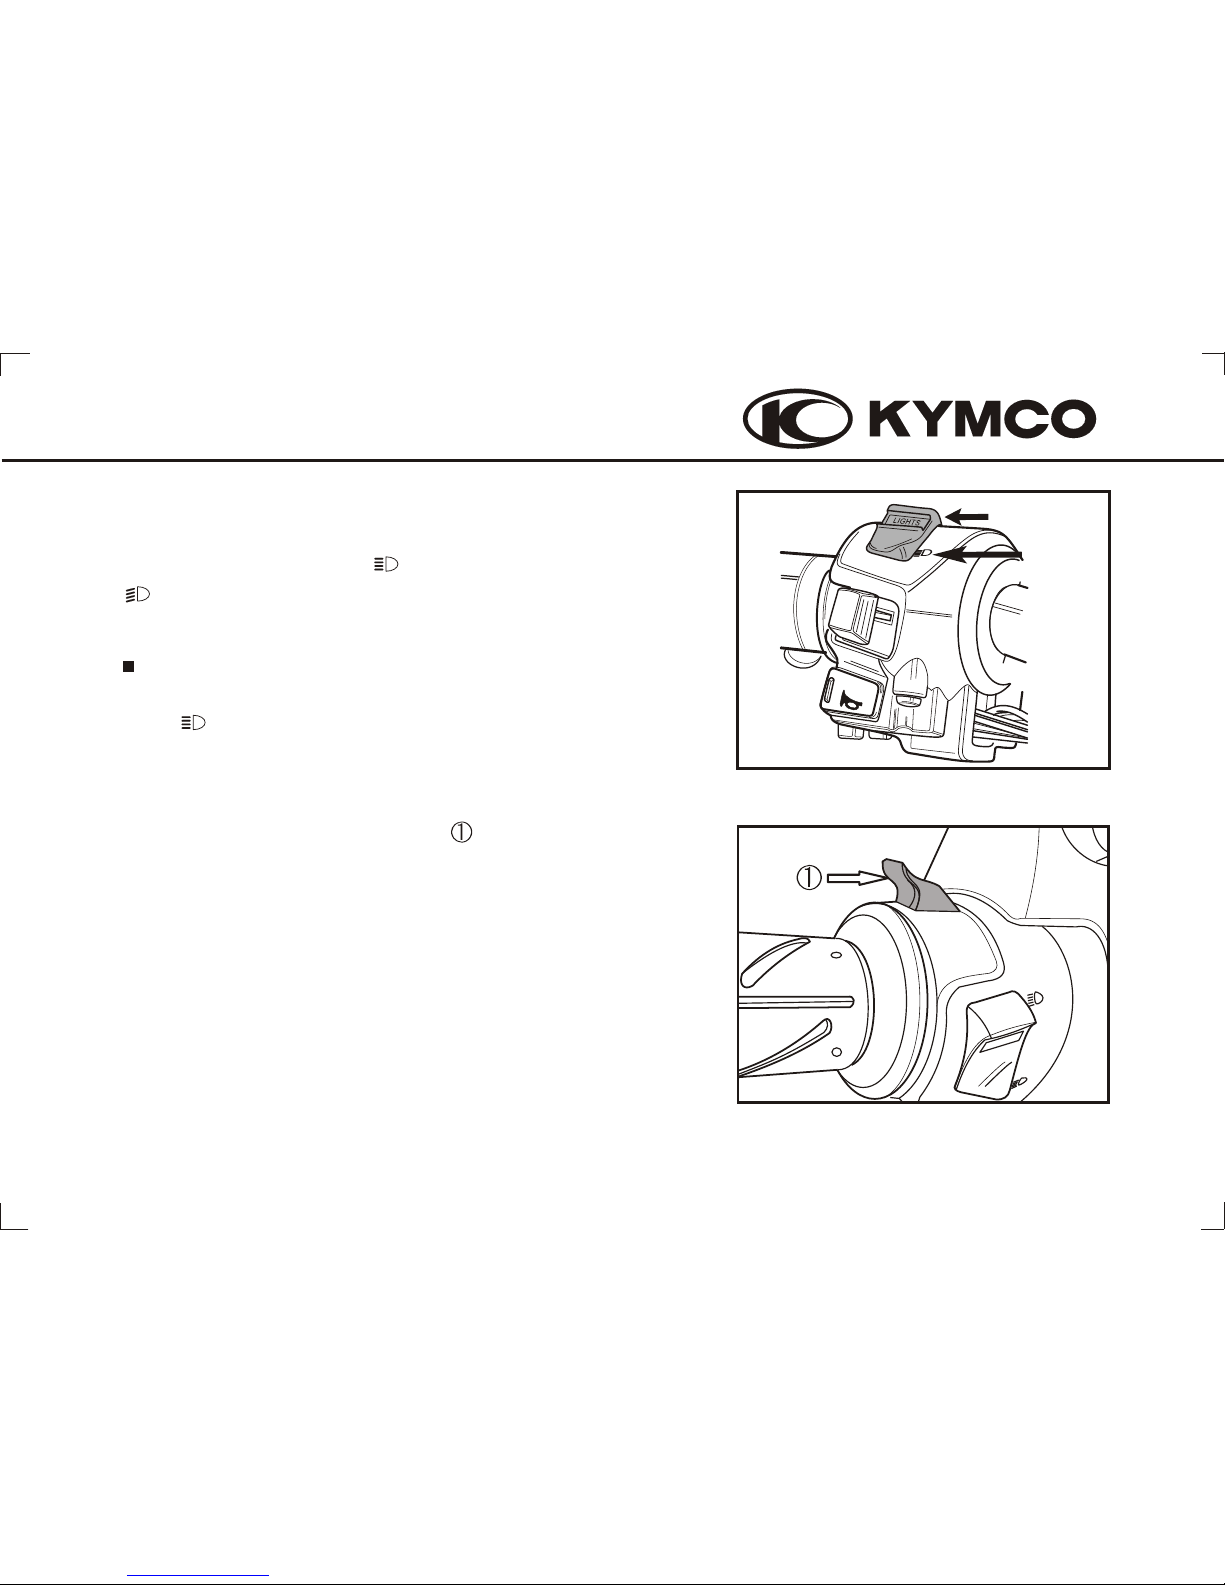
(4) HEADLIGHT DIMMER SWITCH
(5) PASSING SIGNAL SWITCH
HI
LO
11
A
S
S
I GP
NA
S
S
I GP
N
L
IG
H
TSL
IG
H
TS
Push the dimmer switch to (HI) to select high beam or
(LO) to select low beam.
NOTE:
This indicator light of speedometer unit can come on
while (HI) be selected.
When passing, if there are cars coming from the opposite
direction, press and release the PASSING switch and the
headlight will be winking to warn the coming cars.
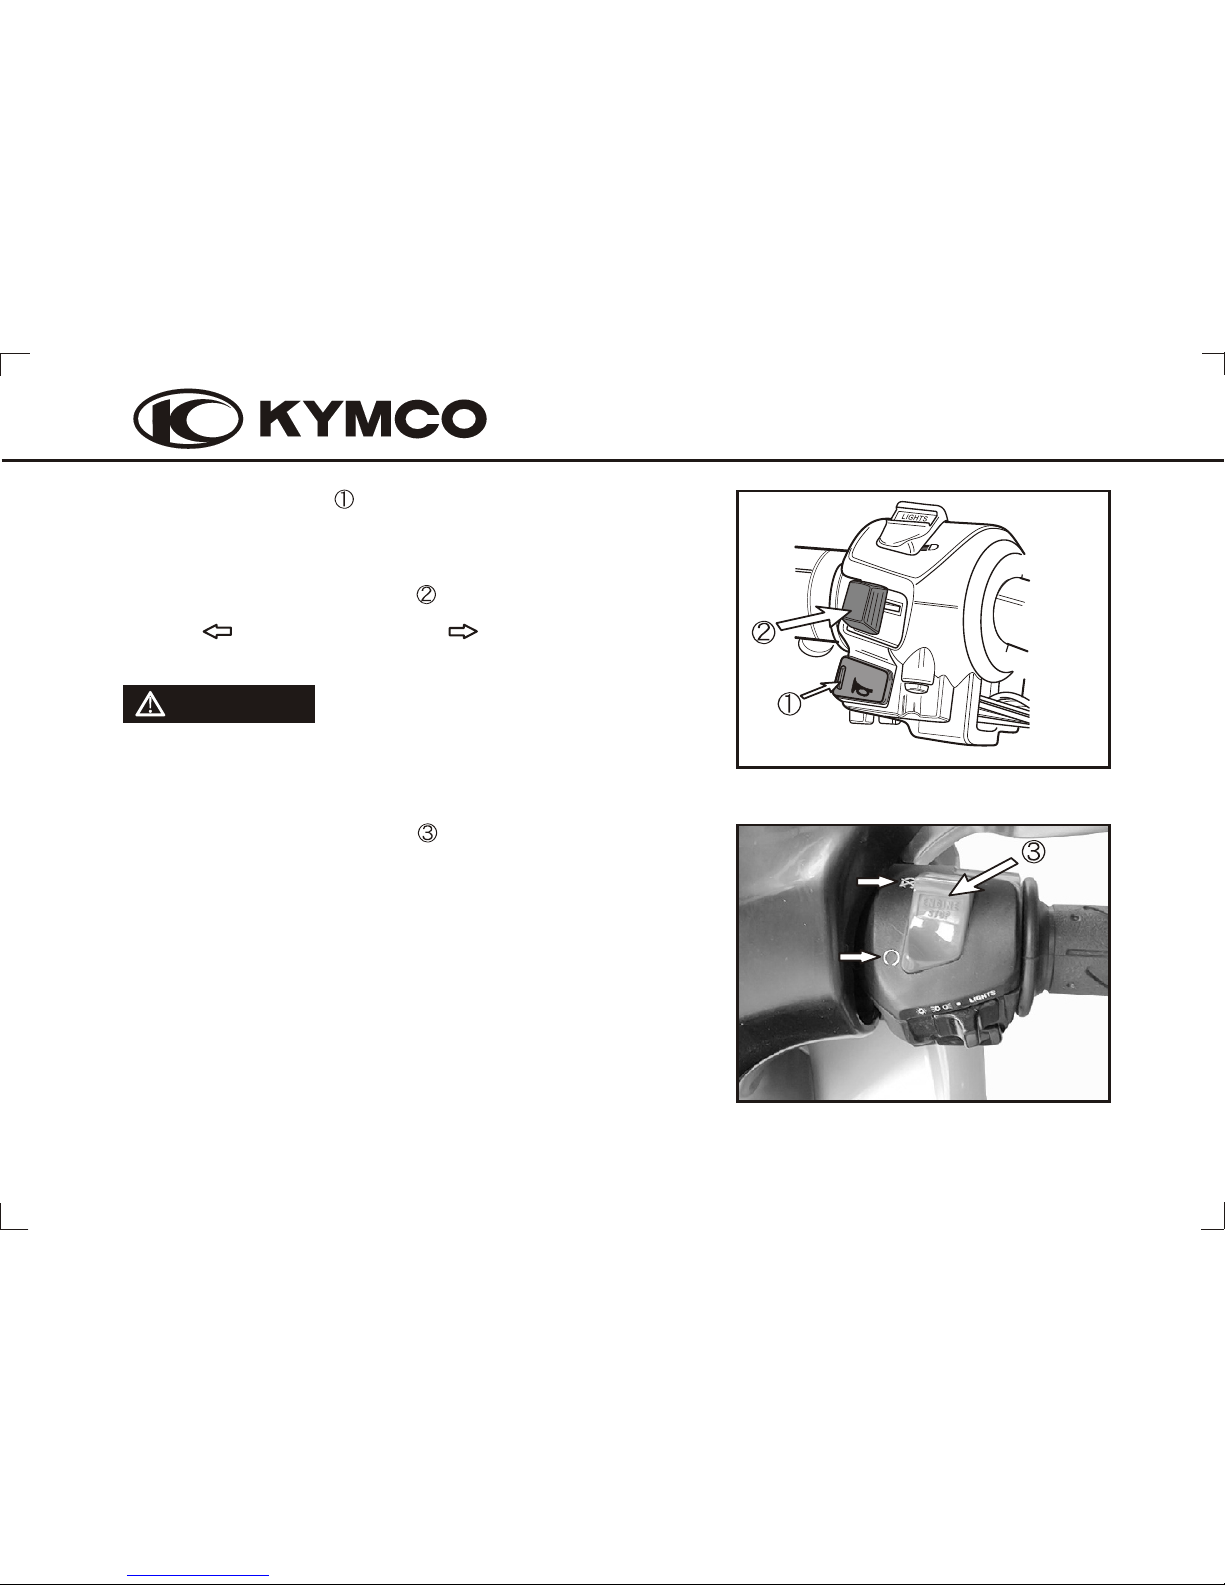
(6) HORN BUTTON
12
Press the button to sound horn.
(7) TURN SIGNAL SWITCH
Move to (L) to signal a left turn, (R) to signal a right
turn. Press to turn signal off.
CAUTION
The turn signal light will not be released automatically.
Be sure to reset it after using, otherwise it may affect
the traffic safety.
(8) ENGINE STOP SWITCH
The engine stop switch is used to stop the engine in an
emergency. To operate, move the switch to either OFF
position. The switch mush be in the RUN position to start the
engine, and it should normally remain in the RUN position
even when the engine stopped.
If your scooter is stopped with the ignition key ON and the
engine stop switch OFF, the battery will discharge. Turn the
ignition key OFF to prevent battery discharge.
OFF
RUN
13
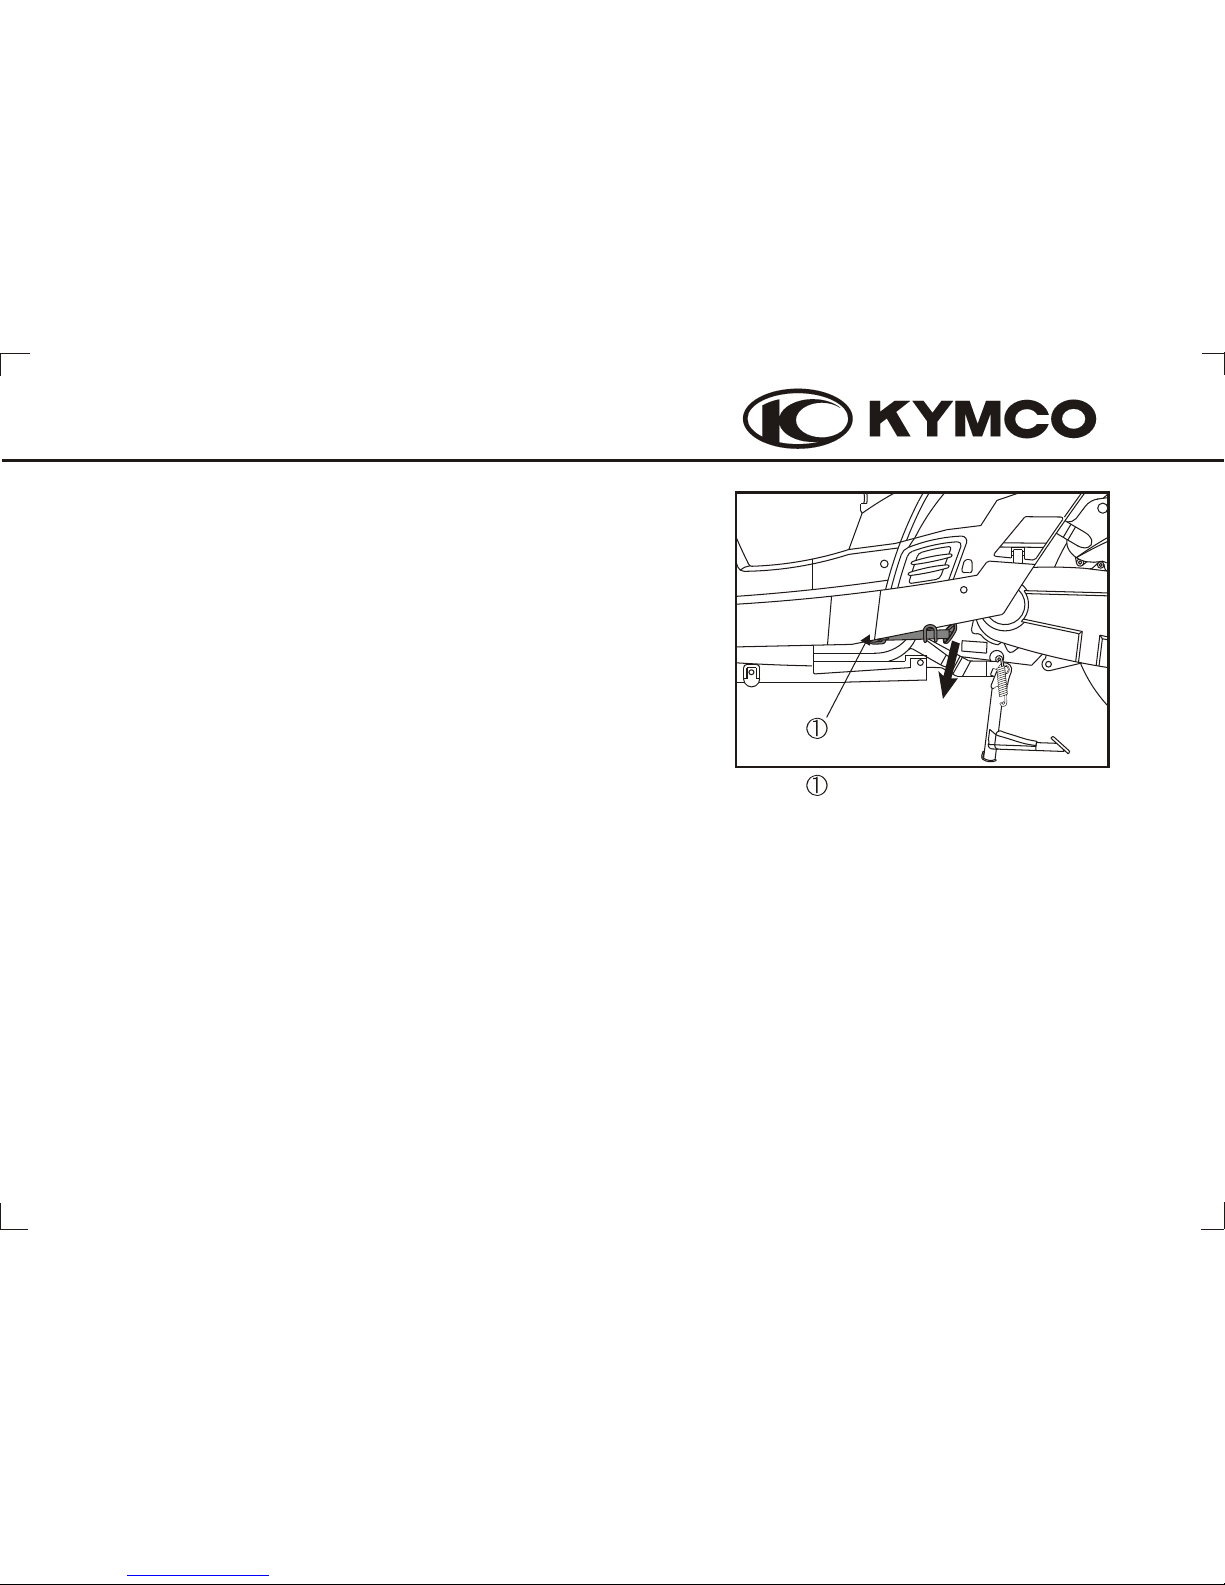
Down
Use the side stand to support the scooter while parked
temporary. The side stand switch is located beside the
side stand.
If the side stand is at the lower position, the engine
stopped even the engine was starting before.
Side stand switch
(9) SIDE STAND SWITCH
 Loading...