

Page 1

FR
HOTLINE : BE: 32 70 23 31 59 - FR: 09 74 50 10 61 - CH: 0800 37 77 37
FR
A
EN HOTLINE: UK: 0345 330 6460 - ROI: (01) 677 4003
DE
HOTLINE : DE: 0800 98 000 00 - AT: 0800 225 225 - CH: 0800 37 77 37
NL
HOTLINE : NL: 0318 58 24 24
ESPRESSERIA AUTOMATIC
SERIE EA80 EA81
EN
DENLIT
B
ES
PTELRUUKPLCS
C
D
E
F
G
1
L
2
W
X
0A21059
www.krups.com
1
H
J
K
0A21059 - 11.2014
SK
M
I
N
O
P
Q
2
R
S
T
U
V
www.krups.com
HU
Page 2

01234
S3000
X
h
1 sec.
1 sec.
1
2 3 4
h
h
h
5 6 7 8
9 10 11 12
o
25 26 27
o
13 14 15 16
17 18 19 20
21
23 2422
This product may differ from the photos
Page 3

01234
S3000
X
h
1 sec.
1 sec.
1
2 3 4
h
h
h
5 6 7 8
9 10 11 12
o
25 26 27
o
13 14 15 16
17 18 19 20
21
23 2422
This product may differ from the photos
Page 4
EN
Empty the
°
l
coffee grounds
collector
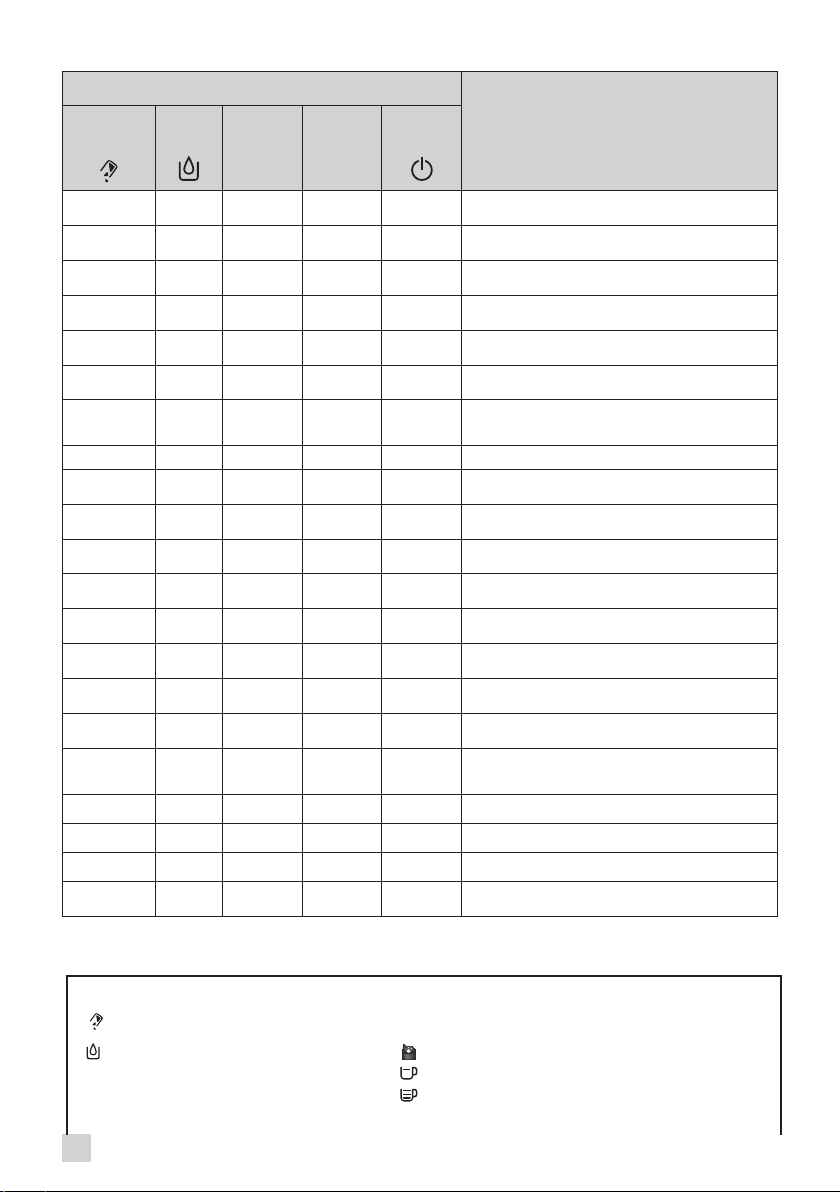
Lights
Fill tank Clean Calc On / Off
Meaning
° ° ° °
° ° ° °
° ° ° °
l
°/l
°/l
l
°
°
°
° °
° °
° °
° ° °
° ° °
° ° °
°
° °
° °
°/
l
° ° ° °
° ° °
° ° °
° ° °
l
°/l
°/l
° ° °
° °
° °
l
l
°/l
°
°
°
l
l
°/l l
°/l
°
°/l l
°/l °/l l
l l
°/
l
°/
l
°/
l
°/l °/l °/l °/l
: Light off
: Light on
The appliance is ready for a coffee or steam cycle.
l
°/l
°/ll
°/ll
°/l
Slow flashing: the device is in the preheating phase or
an initialisation cycle.
Double flash: a 2 coffee cycle is in process.
Product support information in operating parameters
setting mode.
Empty the coffee grounds collector (a 2 coffee cycle is
underway).
Empty the coffee grounds collector + clean the drawer
l
+ empty the drip tray.
Check coffee grounds collector is not missing or
incorrectly positioned. Check cleaning tray is not missing
l
or incorrectly positioned.
Set water hardness.
Fill tank with water. Check water tank is not missing or
l
incorrectly positioned.
Coffee cycle has stopped due to lack of water.
Fill tank with water.
Setting auto off automatic cut-off.
°
Cleaning program requested or in process.
l
Cleaning program: preparing cleaning or rinsing cycle.
l
Setting coffee temperature.
°
Scale removal program requested or in process.
l
Scale removal program: preparing scale removal or
rinsing cycle.
Rinsing cycle or scale removal cycle: request to empty
water tank, rinse it and fill with fresh water.
Long rinse request.
Long rinse in progress.
l
Constant flashing: operating fault.
°
Alternate flashing: Switching off of the appliance under
°
progress.
°/l : Light flashing
°/ll: Light double flashing
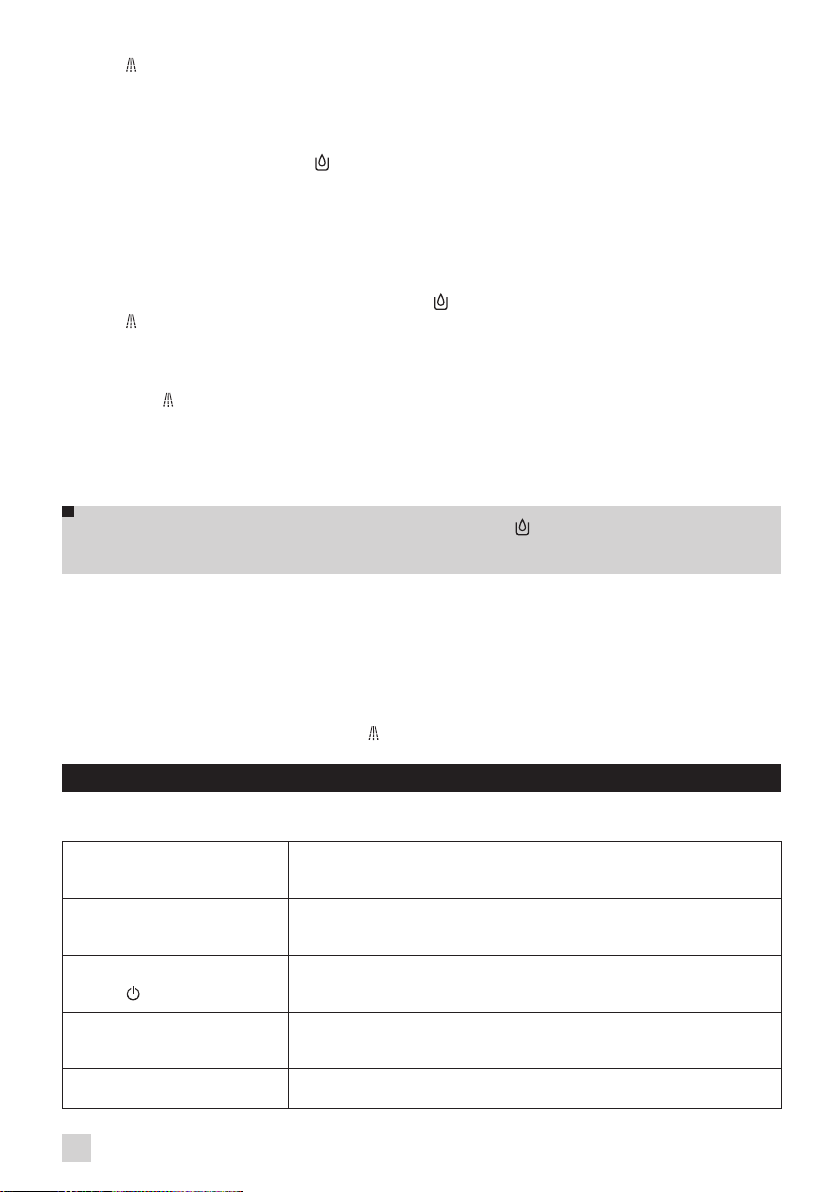
Warning signals
Empty the coffee grounds collector, the drip tray, and the coffee drawer; the light will remain on if the coffee
grounds collector is not properly inserted or if it has been put back in place 4 seconds earlier.
Fill water tank Setting the coffee bean grinding fineness
CLEAN Proceed with cleaning Standard
CALC Proceed with scale removal Strong coffee
CLEAN+ CALC Carry out a long rinse
10
Page 5

Dear Customer,
Thank you for having purchased this Krups Espresseria Automatic. We are sure you will enjoy both the quality of the coffee
it makes and how easy it is to use.
Whether you want a short, strong shot of a ristretto, a good espresso, a larger and milder lungo, or a creamy cappuccino,
your automatic coffee / espresso machine has been designed so you can enjoy the same quality at home as at the bistro,
whatever the time of day and right through the week.
Thanks to its Thermoblock System, its 15 bar pump and because it uses real coffee beans that are ground just before the
coffee is made, your Espresseria Automatic will give you a drink containing maximum aroma, with a ne creamy golden
brown top produced by the natural oils contained in coffee beans.
To obtain an espresso at just the right temperature and a nice compact creamy top, we advise you to pre-heat your cup.
After a few trial runs you will nd the type of mix and roast of the coffee beans that suits your taste. The quality of the water
used is obviously another essential factor in the coffee you get.
Make sure the water is fresh from the tap (contact with the air tends to make it stale), that it is free from
chlorine odours and relatively cold.
Espresso coffee is richer in aroma than a conventional lter coffee. Despite its stronger, longer-lasting taste, espresso in
fact contains less caffeine than lter coffee.
DESCRIPTION
EN
A Water tank handle/lid
B Water tank
C Cleaning tray
D Coffee grounds collector
E Coffee outlets with height adjusting handle
F Removable drip grid and tray
G Coffee bean container lid
Coffee bean container
1
H Grinding neness setting knob
I Metal grinding wheel
J Cleaning inlet
K Digital display for parameter setting
L
Cup tray
Control panel
2
M Steam button
N “On/Off” key and light
O Coffee volume rotating button
P "empty the coffee grounds" and "empty the
drip tray" warning light
Q “Fill water tank” light
R Strong coffee key
S Standard coffee key
T “Scale removal” light
U “Clean” light
V “Rinsing/servicing” key
W Steam nozzle
X Water level oats
BEFORE FIRST USE
Measuring water hardness
Before using the appliance for the rst time or if you have noted a change in water hardness, it is advisable to adapt
the appliance to the water hardness. Please contact your water supplier to nd out the water hardness in your area.
Degreeof
hardness
°f
°dH
°e
Settings
Fill a glass with water and immerse a stick into it.
After 1 minute the hardness measurement will appear (moderately hard water) - Fig. 1 et 2.
To get the best taste from your coffee and extend your appliance’s service life, we advise you to use only the Claris - Aqua
Filter System cartridge sold as an accessory.
Fig. 3 : Mechanism to indicate the month the cartridge was tted and when to replace it (after 2 months at most).
Installing the cartridge in the machine. On rst use, screw the lter cartridge into the bottom of the water tank - Fig. 4.
0
Verysoft
< 5,4° > 7,2° > 12,6° > 25,2° > 37,8°
< 3° > 4° > 7° > 14° > 21°
< 3,75° > 5° > 8,75° > 17,5° > 26,25°
0 1 2 3 4
soft
1
2
moderatelyhard
3
hard
4
extremelyhard
11
Page 6

Place a receptacle under the steam nozzle. Run 300 ml of water by pressing the rinse button once for more than 3
seconds. You can repeat this operation if you wish.
The Claris cartridge needs to be replaced after about every 50 litres of water or every two months at least.
Settings
Connect the appliance to the mains power supply but do not turn it on.
Lift the cup grid by pressing on the back to make it tilt.
Press the and
The digital display for parameter setting is under the servicing ap
Look down vertically to the bottom of the window
- Fig. 5
.
- Fig. 7
- Fig. 6
.
.
Setting water hardness
Appliances are pre-set in the factory for hardness level 4.
The “water tank” light will come on.
Press the key
soft, 2 = moderately hard, 3 = hard, 4 = very hard.
- Fig. 8
as many times as are needed to select the hardness level for the water used : 0 = very soft, 1 =
Setting the coffee temperature
Appliances are pre-set in the factory to 2, average temperature.
Press the steam key to switch to coffee temperature setting : The ‘
Press the key
- Fig. 8
as many times as are needed to select the desired coffee temperature : 1, 2 or 3.
CALC
’ light will come on.
Setting the automatic electrical power supply cut-off (auto-off)
Appliances are pre-set in the factory to 1 hour.
It is possible to turn your machine off automatically after a number of pre-programmed hours.
Press the steam key
Press the key
At each of these stages, you can memorise your settings by pressing the button when you have reached the setting
you want (the 4 lights ash 2 times) or carry on with the procedure. These settings will remain memorised even if the
electrical power is cut off. You can modify these settings at any time by repeating these operations.
to switch to automatic cut-off setting :The ‘
- Fig. 8
as many times as are needed to select the desired duration: 1 = 1 H, 2 = 2 H, 3 = 3 H, 4 = 4 H.
CLEAN
’ light will come on.
Preparing the appliance
Pull out and ll the water tank
Put it back in place by pressing rmly and close the lid again
Open the coffee bean container lid. Add the coffee beans
Close the coffee bean container lid again.
Do not fill the water tank with hot water, milk or any other liquid.
tank is not in place or not correctly lled (under the “min.” level,), the “ll water tank” light will come on and making
an espresso or a cup of coffee will be made impossible.
NEVER PUT GROUND COFFEE IN THE COFFEE CONTAINER.
It is recommended that you do not use oily, caramelised or avoured coffee beans for this machine. These kinds of beans
may damage the machine.
Check that the coffee beans do not contain any foreign particles such as grit, as any damage caused by the presence of
foreign particles will negate the warranty.
- Fig. 9
.
- Fig. 10
- Fig. 11
.
.
If you turn on the appliance when the water
12
Page 7

Do not put water into the coffee bean container.
Remember to t the drip tray to avoid waste water owing onto the work surface and staining it or scalding you.
Check that your water tank is clean.
Rinsing of circuits
Turn the appliance on by pressing the button
cycle.
Rinsing out the coffee circuit:
Place a recipient under the coffee nozzles. Press the button
which will automatically stop after around 40 mL.
Rinsing out the steam circuit:
Place a container under the steam nozzle and press the button for 3 seconds to start a steam circuit rinsing cycle,
which will automatically stop after around 300 mL.
It is preferable to rinse the 2 circuits out at least once after the machine has not been used for several days.
Each time you plug your machine in, it will carry out an initialisation cycle.
- Fig. 12
. The light will ash during the pre-heating and initialisation
- Fig. 13
quickly to start a coffee circuit rinsing cycle,
Preparing the grinder
You can choose the strength of your coffee by setting the coffee bean grinding neness. The ner the grinding setting, the
stronger and creamier the coffee should be. Set the desired neness for grinding by turning the ‘Grinding neness setting’
knob.Turn to the left for ner grind. Turn to the right for coarser grind.
CHANGE THE SETTING DURING GRINDING.
Never force the grinding fineness setting button.
PREPARING ESPRESSO AND LONG COFFEES
YOUR APPLIANCE IS DESIGNED TO MAKE COFFEE FROM COFFEE BEANS ONLY.
When you first make coffee with the machine or after a long period of absence or a cleaning or scale removal
procedure, a little steam and hot water will come out of the steam nozzle (priming).
Splashing or scalding may occur if the coffee outlets are set too high in relation to the size of the cups.
Preparing an espresso
Each time you plug your machine in, it will carry out an initialisation cycle.
Press the button . The light will ash during the pre-heating and initialisation cycle.
The light will stay on.
Put a cup under the coffee outlets
Select the key to get a strong espresso or the key to get a standard espresso
You can change the volume of water at any time
To stop coffee owing into the cup, you can either again press one of the or , keys or turn the knob to the min.
position.
- Fig. 14
. You can lower or raise the coffee outlets to suit the size of your cups.
- Fig. 16
.
- Fig. 15
.
EN
Preparing a cup of coffee
The ground coffee is moistened with a little hot water after the grinding stage. A few moments later, percolation as
such starts. Beyond a certain amount of coffee in the cup, we recommend - in order to obtain a stronger coffee - to
divide your preparation into two separate cycles. Example 2 x 70ml cycles for a cup of 140 ml.
DO NOT REMOVE THE WATER COMPARTMENT BEFORE THE END OF THE CYCLE (that is around 15
seconds after the coffee has finished dripping through).
2-cup function
You can use your appliance to make 2 cups of coffee or espresso. Remember not to remove the cups after the rst cycle.
You have now prepared your appliance. The light will stay on.
Put two cups under the coffee outlets
Select the key or key according to your choice, pressing twice rapidly in succession. The light will come on with
a double ash to conrm that you have ordered 2 cups of coffee.
- Fig. 17
. You can lower or raise the coffee outlets to suit the size of your cups.
13
Page 8

The appliance will automatically sequence 2 complete coffee-making cycles.
If you rst press the ‘ ’ key and then the ‘ ’ (or vice versa), the second action will not be taken into account.
PREPARING STEAM
Steam froths up the milk to make a cappuccino or a caffe latte, for example, and also heats up liquids. As you need a
higher temperature to produce steam than to make an espresso, the appliance runs an additional pre-heating phase for
steam.
Press the
The
Once pre-heating has been completed, the light will remain on continuously and you can start producing steam by
again pressing the
Press the
BE CAREFUL, BECAUSE THE CYCLE DOES NOT STOP IMMEDIATELY.
Frothing milk
We recommend that you use pasteurised or UHT milk that has been recently opened. Untreated milk does not give
the best results. After the steam function has been used, the nozzle can be hot, and we recommend that you wait for
a few moments before handling it.
Pour the milk into your milk jug. Immerse the nozzle in the milk
Initiate the steam function as explained in the paragraph above.
Once your milk is frothy enough
To remove any remaining milk from the steam nozzle, place a receptacle under the nozzle and press the
steam escape for at least 10 seconds and then again press the
The steam nozzle can be removed for more intense cleaning. Wash it out with water and a little washing up liquid and a
small non-abrasive brush. Rinse and dry it
by any milk residues. If necessary, unblock them using the needle supplied
the dishwasher.
key
- Fig. 18.
light will flash while the appliance heats up.
key.
button again to stop the cycle.
- Fig. 20 -
- Fig. 19
.
again press the key to stop the cycle.
key to stop the process.
- Fig. 21
. Before putting it back, ensure that the air inlet holes are not blocked
- Fig. 22
. Do not wash the steam nozzle in
.key. Let the
To interrupt the steam function, just press any key. Be careful as the nozzle may be hot. If the nozzle is blocked,
unblock it using the needle supplied. The maximum duration for production of steam per cycle is limited to 2 minutes.
MAINTAINING YOUR APPLIANCE
Emptying the coffee grounds collector, the coffee tray and the drip tray
If the light comes on, remove, empty and clean the drip tray.
Remove, empty and clean the coffee grounds collector.
Remove the coffee cleaning tray.
The drip tray is equipped with oats to tell you when to empty it.
As soon as you remove the coffee grounds collector, you will have to empty it completely to avoid any overow.
The
light will remain on if the coffee grounds collector is not slotted in fully or not fitted correctly or if
it has been put back in less than 6 seconds.
You cannot make espresso or coffee while the light is on or is ashing. The coffee grounds collector has a capacity
of 9 coffees.Le collecteur de marc de café a une capacité de 9 cafés.
Rinsing out the circuits: see page 13
Machine cleaning program – total duration: about 13 minutes
When a cleaning operation is necessary, the appliance warns you of this by ashing the ‘
This program is only accessible when the machine requests it (i.e. approximately every 300 coffees or espressos).
14
CLEAN
’ light.
Page 9

Caution! To benefit from the guarantee conditions, it is essential to perform the appliance cleaning cycle when
informed to do so. Be sure to follow the procedure closely, step by step.
You can continue to use the appliance when the light is on, but you are advised to perform the program as soon as
possible.
Press the
Remove and clean the cleaning tray then t it again
Empty and clean the coffee grounds collector then t it again
Remove and empty the drip tray
Remove, ll and re-t the water tank.
Place a receptacle with a minimum capacity of 0.6 l under the coffee outlets
Open the servicing ap and insert a KRUPS cleaning tablet (XS3000) in the cleaning inlet
Press the button to start up the cleaning program.
1 - Cleaning cycle ± 10 mn
Empty your waste water receptacle and put it back under the coffee outlets.
Again press the button to start the rst rinsing cycle.
Remove and empty your waste water receptacle.
Empty the drip tray and t it again.
Fill your water tank.
Your appliance will be ready for use again.
If there is not enough water in the water tank when you start the program, the ‘ ’light will come on to warn you.
Add the appropriate amount of water to the container and cleaning will continue automatically.
If your machine is unplugged during cleaning or in the event of power failure, you will have to restart the cleaning
program right from the start. This is essential due to water circuit rinsing reasons. In this case, you will need to use
another cleaning tablet. Be sure to complete the entire cleaning cycle to avoid any risk of irritation (seek medical
advice if cleaning solutions are accidently swallowed.
The cleaning cycle is a continuous cycle. Do not put your hands under the coffee outlets during the cycle.
Only use KRUPS (XS3000) cleaning tablets. We cannot be held responsible for any damage that may result from the use
of tablets from other brands.
You can obtain cleaning tablets from KRUPS Service Centres.
button to start up the cleaning program. The ‘
- Fig. 25
.
The ‘
CLEAN
intermittently. This operation lasts about 10 minutes and the ‘
2 - Rinsing ± 3 mn
The ‘
It allows the appliance to be rinsed and remaining detergent to be eliminated. This rst rinsing cycle lasts about
3 minutes and once nished the ‘
’ light becomes steady. The cleaning cycle will be run automatically. The pump sucks up water
CLEAN
’ light will become steady again. The program continues. A rst rinsing cycle will be run automatically.
CLEAN
’ light will ash again.
- Fig. 23
CLEAN
’ and ‘ ’ lights will ash.
.
- Fig. 24
. The ‘ ’ light will go off.
CLEAN
’ light will ash again.
- Fig. 26
.
- Fig. 27
.
EN
Scale removal program – total duration: about 20 minutes.
The quantity of scale deposited depends on the hardness of the water used. The appliance will automatically warn you by
the ‘
CALC
This program is only accessible when the machine requests it.
Caution! To benefit from the guarantee conditions, it is essential to perform the appliance scale removal
cycle when informed to do so. Be sure to follow the procedure closely step by step.
appliance when the light is on, but you are advised to perform the program as soon as possible.
If your appliances fitted with our Claris - Aqua Filter System F088 cartridge, please remove the cartridge
during the descaling operation.
Make certain to protect your work surface during cleaning and scale removal cycles, especially if it is made
of marble, stone or wood.
Press the key to start up the scale removal program. The ‘
Remove and clean the drip tray.
Place a receptacle with a minimum water capacity of 0.6 l under the coffee outlets and under the steam nozzle.
Empty the tank and ll it with lukewarm water up to the ‘
Dissolve a sachet of
Only use KRUPS scale removal products. You can obtain scale removal products from KRUPS Service Centres.
The manufacturer may not be held responsible for damage to the appliance through use of other products.
Put the water tank back in place. The ‘ ’ light turns off and the ‘
’ light coming on when you need to proceed with scale removal.
CALC
’ and ‘ ’ lights will ash.
CALC
Krups
scale remover
F054
(40 g).
’ marking.
CALC
’ light stops blinking.
You can continue to use the
15
Page 10
Press the button after having carried out all of these operations.
1 - Descaling cycle ± 8 mn
The ‘
CALC
occasionally sucks up water which comes out of the coffee nozzles and then the steam nozzle. This operation
lasts approximately 8 minutes.
When the cycle has completed, the ‘
2 - First rinsing ± 6 mn
A rst rinsing is needed to eliminate the remaining scale remover. This cycle is run automatically. It lasts about
6 minutes.
Empty your receptacle full of waste water.
Empty the drip tray and then put it back again together with the receptacle as previously.
Empty, clean and rinse the water tank and then ll it again up to the “Max. level.
Replace your water tank. The ‘
Press the
3 - Second rinsing
At the end of the rst rinsing, the ‘
Remove your waste water recipient and the drip tray then t them again.
Again press the key. The ‘
A second automatic cycle will last 6 minutes.
Once the second rinsing is nished, the ‘
Empty the drip tray and then t it again.
Empty and then ll your water tank.
Your appliance is now ready for use again.
If there is not enough water in the water tank, you will be warned by the ‘ ’ light.
Add the appropriate amount of water to the tank and scale removal will continue automatically.
If a power failure occurs during the cycle, you will have to start it up again from the start.
Be sure to complete the entire scale removal cycle to avoid any risk of intoxication. The scale removal cycle
is a continuous cycle. Do not put your hands under the coffee outlets during the cycle.
’ light stops blinking. The descaling cycle starts and is carried out automatically. The pump
’ and ‘
CALC
’ lights blink.
CALC
key. The ‘
CALC
’ light will ash and the ‘ ’ light will go off.
’ light will become steady. The automatic cycle will last 6 minutes.
CALC
’ light will ash. A second automatic cycle will last 6 minutes.
CALC
’ light will become steady.
CALC
’ light will go off.
Long rinsing program
When it is necessary to make a long rinsing program, the appliance warns you of this by ashing the ‘
lights.
Remove, ll and replace the water tank.
Under the coffee outlets and steam nozzle place a recipient that can contain at least 0.15 L.
Launch the long rinse program by pressing on the button.
When the long rinsing program is complete, the ‘
CLEAN
’ and ‘
CALC
’ lights turn off.
CLEAN
’ and ‘
CALC
TROUBLESHOOTING, CORRECTIVE ACTIONS
’
If one of the problems described in the table persists, contact KRUPS customer service.
PROBLEM MALFUNCTION CORRECTIVE ACTION
Your machine detects a fault.
The appliance does not turn on
when the
The coffee grinder makes a strange
noise.
The steam nozzle makes a noise. Check that the steam nozzle is correctly attached to its corresponding end piece.
button is pressed.
Switch off and disconnect the machine, remove the lter cartridge, wait for a
minute and restart the machine.
Check your fuses and plug sockets.
Check that the two power plugs are correctly pushed in the socket.
There is a foreign body in the grinder. Disconnect the machine before investigating.
See if you can extract the foreign body using your vacuum cleaner.
16
Page 11

The steam nozzle on your
machine seems partially or
completely clogged.
The steam nozzle makes little or no
milk froth.
No steam comes out of the nozzle.
The auto-cappuccino set makes
little or no froth.
The auto-cappuccino set does not
take in milk.
There is water underneath the
appliance.
After emptying the coffee grounds
collector and cleaning the coffee
drawer, the warning message is still
displayed.
The coffee dispenses too slowly.
Ensure that the opening in the end piece is not obstructed by milk residue or
limescale. Unclog the holes with the needle supplied with your appliance.
For milk-based drinks, you use very fresh, very cold pasteurised or UHT milk. It is
also advisable to use a cold container. If the results do not improve, try changing
the brand of milk.
Empty the tank and temporarily remove the lter cartridge. Fill the water tank with
mineral water which is high in calcium (> 100 mg/l) and run successive steam
cycles.
Check that the accessory is correctly attached to the appliance, remove it then
replace it.
Check that the exible tube is not obstructed or pierced and that it is correctly
attached to the accessory so as to make it airtight. Rinse and clean the accessory
(refer to the “Auto-cappuccino accessory” chapter).
Before removing the water tank, wait for 15 seconds after the coffee has nished
owing so that the machine nishes its cycle properly.
Check that the drip tray is correctly positioned on the machine; it should always
be in place, even when the appliance is not in use.
Check that the drip tray is not full.
The drip tray should not be removed during a cycle.
Correctly replace the coffee drawer and the coffee grounds collector, follow the
instructions on the screen.
Wait at least for 6 seconds before replacing them.
Turn the coffee neness knob to the right to make the grounds courser (this could
also depend on the type of coffee used).
Run one or several rinsing cycles.
Change the Claris Aqua Filter System cartridge (see “Installing the lter”).
EN
The water/steam is not dispensed
normally from the steam nozzle.
The coffee neness knob is difcult
to turn.
The espresso or coffee is not hot
enough.
The coffee is too lightly coloured or
too weak.
The appliance is not producing
coffee.
Why can I not start the descaling or
cleaning program ? Why does my
machine not request to be descaled
or cleaned ?
A power failure occurs during a
cycle.
At the beginning or end of making a drink, the steam nozzle may drip slightly.
Only change the grinder setting when it is running.
Change the coffee temperature setting. Warm the cup by rinsing it with hot water
before making the drink.
Avoid using oily, caramelised or avoured coffee. Check that the coffee bean
container has coffee in it and that is it dispensing correctly.
Decrease the drink volume, increase the drink strength.
Turn the coffee neness knob to the left to make the grounds ner.
Make the drink in two cycles by using the 2 cups function.
A problem has been detected during preparation of the drink.
The appliance has restarted automatically and is ready for a new cycle.
The machine only requests to be cleaned once it has made several types of coffee.
The machine only requests a descaling cycle once it has made a certain number
of drinks using steam.
The appliance is automatically restarted when power is switched back on.
SWITCHING OFF
You can stop your appliance at all times: the appliance will emit two beeps and then it will stop soon afterwards.
17
Page 12

Here are some recipes you can make using your Espresseria Automatic:
Cappuccino
For a cappuccino in the rules of the art, the ideal proportions are as follows: 1/3 hot milk, 1/3 coffee, 1/3 milk froth.
Caffe Latte
To make coffee with milk, also often called Latte Macchiato, the proportions are as follows: 3/5 hot milk, 1/5 coffee, 1/5
milk froth.
For these milk-based preparations, it is best to use cold skimmed milk straight from the refrigerator (ideally between 6
and 8° C).
To nish off, you can sprinkle with cocoa.
Café Crème
Prepare a conventional espresso in a large cup.
Add a little cream to get a café crème.
Café corretto*
Prepare a cup of espresso as usual.
Then add 1/4 or 1/2 of a liqueur glass of Cognac to taste.
You can also use anisette, brandy, Sambuca, Kirsch or Cointreau.
There are many other ways to give some punch to your espresso.
Just use your imagination.
Coffee liqueur*
Mix 3 cups of espresso, 250 g of brown sugar candy and 1/2 litre of Cognac or Kirsch in an empty 0.75 litre bottle.
Leave the mixture to macerate for at least 2 weeks.
You will obtain a delicious liqueur. A real treat for coffee lovers
Italian style iced coffee
4 scoops of vanilla ice-cream, 2 cups of espresso with sugar to taste, 1/8 l milk, fresh cream, grated chocolate.
Mix the cold espresso with the milk.
Serve the scoops of ice-cream into the glasses, pour the coffee onto them and decorate with fresh cream and grated
chocolate.
Café à la frisonne*
Add a small glass of rum to a cup of sweetened espresso.
Decorate with a good layer of fresh cream and serve.
Flambéed espresso*
2 cups of espresso, 2 small glasses of Cognac, 2 teaspoons of brown sugar, fresh cream.
Pour the Cognac into heat-resistant glasses, heat and light.
Add the sugar, mix, pour in the coffee and decorate with fresh cream.
Espresso Parfait*
2 cups of espresso, 6 egg yolks, 200g sugar, 1/8 litre of sweetened fresh cream, 1 small glass of orange liqueur.
Beat the egg yolks with the sugar until it forms a thick, frothy mass.
Add the cold espresso and the orange liqueur.
Then mix in the whipped fresh cream.
Pour the mix into saucer champagne glasses or ordinary.
Put the champagne glasses in the freezer.
18
(*: Remember, over-indulgence in alcohol is bad for the health.)
Page 13

SUOMI
FINLAND
09 622 94 20
Groupe SEB Finland
Kutojantie 7 02630 Espoo
France
continentale
+ Guadeloupe, Martinique,
Réunion, Saint-Martin
09 74 50 10 61
GROUPE SEB France
Service Consommateur KRUPS
112 Ch. Moulin Carron, TSA 92002
69134 ECULLY Cedex
DEUTSCHLAND
GERMANY
0212 387 400
GROUPE SEB DEUTSCHLAND GmbH /
KRUPS GmbH
Herrnrainweg 5 63067 Offenbach
GREECE
2106371251
SEB GROUPE . .
7
. . 145 64 K.
HONG KONG
8130 8998
SEB ASIA Ltd.
Room 903, 9/F, South Block, Skyway House
3 Sham Mong Road, Tai Kok Tsui, Kowloon
Hong-Kong
MAGYARORSZÁG
HUNGARY
06 1 801 8434
GROUPE SEB CENTRAL-EUROPE Kft.
Távíró köz 4 2040 Budaörs
INDONESIA
+62 21 5793 6881
Groupe SEB Indonesia (Representative office)
Sudirman Plaza, Pl aza Marein 8th Floor
JL Jendral Sudirm an Kav 76-78,
Jakarta 12910, Indonesia
ITALIA
ITALY
199207701
GROUPE SEB ITALIA S.p.A.
Via Montefeltro, 4 20156 Milano
JAPAN
0570 077 772
144-0042 11-1
5F
JORDAN
4629700
www.krups.com
KAZAKHSTAN
727 378 39 39
«
-
KOREA
1588-1588
KUWAIT
24831000
www.krups.com
LATVJA
LATVIA
6 616 3403
GROUPE SEB POLSKA Sp.zo.o.
ul.
22b 02-703 Warszawa
LEBANON
1364392
www.krups.com
LIETUVA
LITHUANIA
5 214 0057
GROUPE SEB POLSKA Sp.zo.o.
ul.
22b 02-703 Warszawa
LUXEMBOURG
0032 70 23 31 59
GROUPE SEB BELGIUM SA NV
25 avenue de l'Espérance -ZI
6220 Fleurus
MACEDONIA
(02) 20 50 319
Groupe SEB Bulgaria EOOD
Office 1, floor 1, 52G Borovo St.,
1680 Sofia -Bulgaria
MALAYSIA
603 7802 3000
GROUPE SEB MALAYSIA SDN. BHD
Unit No. 402-403, Level 4, Uptown 2,
No. 2, Jalan SS21/37, Damansara Uptown, 47400, Petaling
Jaya, Selangor D.E Malaysia
MEXICO
(01800) 112 8325
Groupe.S.E.B. México, S.A. DE C.V.
Goldsmith 38 Desp. 401, Col. Polanco
Delegación Miguel Hildalgo
11 560 México D.F.
MOLDOVA
(22) 929249
-
Page 14

NEDERLAND
THE NETHERLANDS
NEW ZEALAND
NORGE
NORWAY
OMAN
PERU
POLSKA
POLAND
PORTUGAL
0318 58 24 24
0800 700 711
815 09 567
80075000
441 4455
801 300 420
lokalne
808 284 735
GROUPE SEB NEDERLAND B.V.
De Schutterij 27
3905 PK Veenendaal Nederland
GROUPE SEB NEW ZEALAND
Unit E, Building 3, 195 Main Highway, Ellerslie,
Av. Camino Real N° 111 of. 805 B
GROUPE SEB POLSKA Sp.zo.o.
ul.
Bloco1 -3° B/D 1950 - 327 Lisboa
Auckland
GROUPE SEB NORDIC AS
Tempovej 27 2750 Ballerup
www.krups.com
Groupe SEB Perú
San Isidro -Lima –Perú
22b 02-703 Warszawa
GROUPE SEB IBÉRICA SA
Urb. da Matinha
Rua Projectada à Rua 3
QATAR
REPUBLIC OF
IRELAND
ROMÂNIA
ROMANIA
RUSSIA
SAUDI ARABIA
SRBIJA
SERBIA
SINGAPORE
SLOVENSKO
SLOVAKIA
SLOVENIJA
SLOVENIA
SOUTH AFRICA
ESPAÑA
SPAIN
SRI LANKA
SVERIGE
SWEDEN
SUISSE SCHWEIZ
SWITZERLAND
44485555
01 677 4003
0 21 316 87 84
495 213 32 28
920023701
060 0 732 000
6550 8900
233 595 224
02 234 94 90
0100202222
902 31 23 00
115400400
08 594 213 30
044 837 18 40
www.krups.com
Unit B3 Aerodrome Business Park, College Road,
TEFAL SVERIGE SUBSIDIARY OF GROUPE SEB NORDIC
GROUPE SEB IRELAND
Rathcoole, Co. Dublin
GROUPE SEB ROMÂNIA
Str. Daniel Constantin nr. 8
010632 Bucure
www.krups.com
SEB Developpement
11070 Novi Beograd
GROUPE SEB SINGAPORE Pte Ltd.
59 Jalan Peminpin, #04-01/02 L&Y Building
20 Woodlands Drive, Woodmead 2080
Almogàvers, 119-123, Complejo Ecourban
Truckvägen 14 A, 194 52 Upplands Väsby
Singapore 577218
GROUPE SEB Slovensko, spol. s r.o.
Cesta na Senec 2/A
821 04 Bratislav a
SEB d.o.o.
GS South Africa
Building 17,PO BOX 107
The Woodlands Office Park
GROUPE SEB IBÉRICA S.A.
08018 Barcelona
www.krups.com
GROUPE SEB SCHWEIZ GmbH
Thurgauerstrasse 105
8152 Glattbrugg
ti
-
2000 MARIBOR
Page 15

THAILAND
TÜRKIYE
TURKEY
UAE
UKRAINE
UNITED KINGDOM
U.S.A.
VENEZUELA
VIETNAM
02 769 7477
216 444 40 50
8002272
044 300 13 04
0345 330 6460
800-526-5377
0800-7268724
08 38645830
GROUPE SEB THAILAND
2034/66 Italthai Tower, 14th Fl oor, n° 14-02,
New Phetchburi Road,
Bangkapi, Huaykwang, Bangkok, 10320
GROUPE SEB ISTANBUL AS
Beybi Giz Plaza Dereboyu Cad.
Meydan Sok. No: 28 K.12 Maslak
www.krups.com
GROUPE SEB UK LTD
Riverside House, Riverside Walk
Windsor, Berkshire,SL4 1NA
2121 Eden Road Millville, NJ 08332
Av Eugenio Mendoza, Centro Letonia, Torre ING Bank, Piso
25 Nguyen Thi Nho Str, Ward 9, Tan Binh Dist, HCM city
GROUPE SEB VENEZUELA
Urb. La Castellana, Caracas
Vietnam Fan Joint Stock Company
-
GROUPE SEB USA
15, Ofc 155
YEMEN
01454980
www.krups.com
Page 16

KRUPS INTERNATIONAL GUARANTEE
Date of purchase: . . . . . . . . . . . . . . . . . . .. . . . . . . .. . . . .. / Date d'achat / Fecha de
compra / Data da compra / Data d'acquisto / Kaufdatum / Aankoopdatum / Købsdato / Inköpsdatum /
Sorozatszám / Dátum nákupu / Pirkuma datums / Datum Kupovine / Datum kupnje / Data
tarihi / / / / /
/
/ / /
/
Tanggal pembelian / Ngày mua hàng
/
Product reference: . . . . . . . . . . . . . . . . . . . . . . . . . . . . .. . . . .
Referencia del producto / Nome do produto / Tipo de prodotto / Typnummer des Gerätes /
Artikelnummer van het apparaat / Referencenummer / Produktreferens / Artikkelnummer /
Tuotenumero / referencja produktu / Model / Gaminio numeris / Toote viitenumber / Tip aparata /
Vásárlás kelte / Typ výrobku / Produkta atsauces numurs / Model proizvoda / Oznaka proizvoda /
/ i / / / / /
/ /
/ Référence du produit /
/ /
Retailer name & address: . . . . . . . . . . . . . . . . . . . . . . . . . . . . . . . . . . . . . . . . . . . . . . . .
/Nom et adresse du vendeur / Nombre y dirección del minorista / Nome e endereço do revendedor /
Nome e indirizzo delnegozzio / Name und Anschrift des Händlers / Naam en adres van de dealer /
Forhandler navn & adresse / Återförsäljarens namn och adress / Forhandler navn og adresse /
Jälleenmyyjän nimi ja osoite / N
Tipusszám / Názov a adresa predajcu / Veikala nosaukums un adrese / Naziv i adresa maloprodaje /
Naziv i adresa prodavca/ Naziv i adresa prodajnog mj
hàng bán/
/ / - /
/ / /
/ /
a ch c a
/ / / / /
/
Distributor stamp . . . . . . . . . . . . . . . . . . . . . . . .. . . . . . . . . . .
del distribuidor / Carimbo do revendedor / Timbro del negozzio / Händlerstempel / Stempel van de
dealer / Forhandler stempel / Återförsäljarens stämpel / Forhandler stempel / Jälleenmyyjän leima /
d / / / /
/ / / /
/
/ / / /
/Cachet distributeur /Sello
 Loading...