

Page 1
F
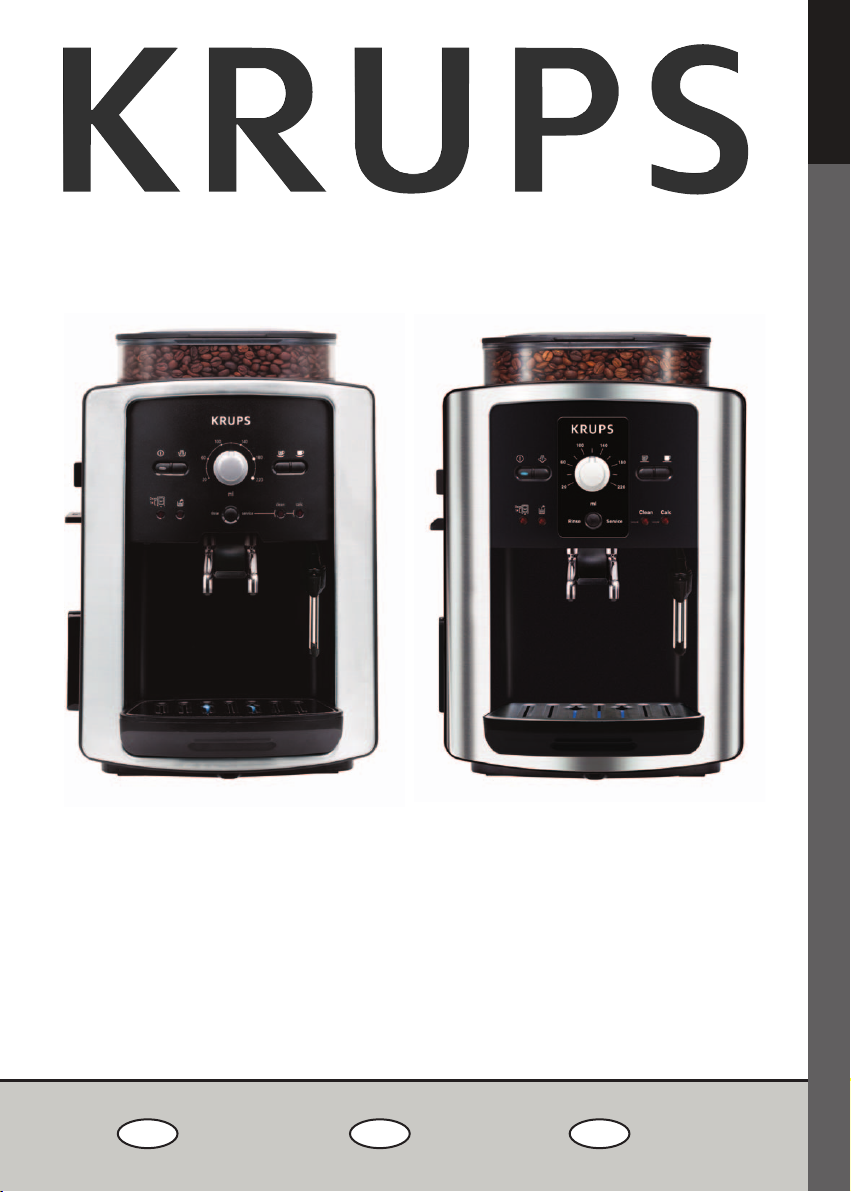
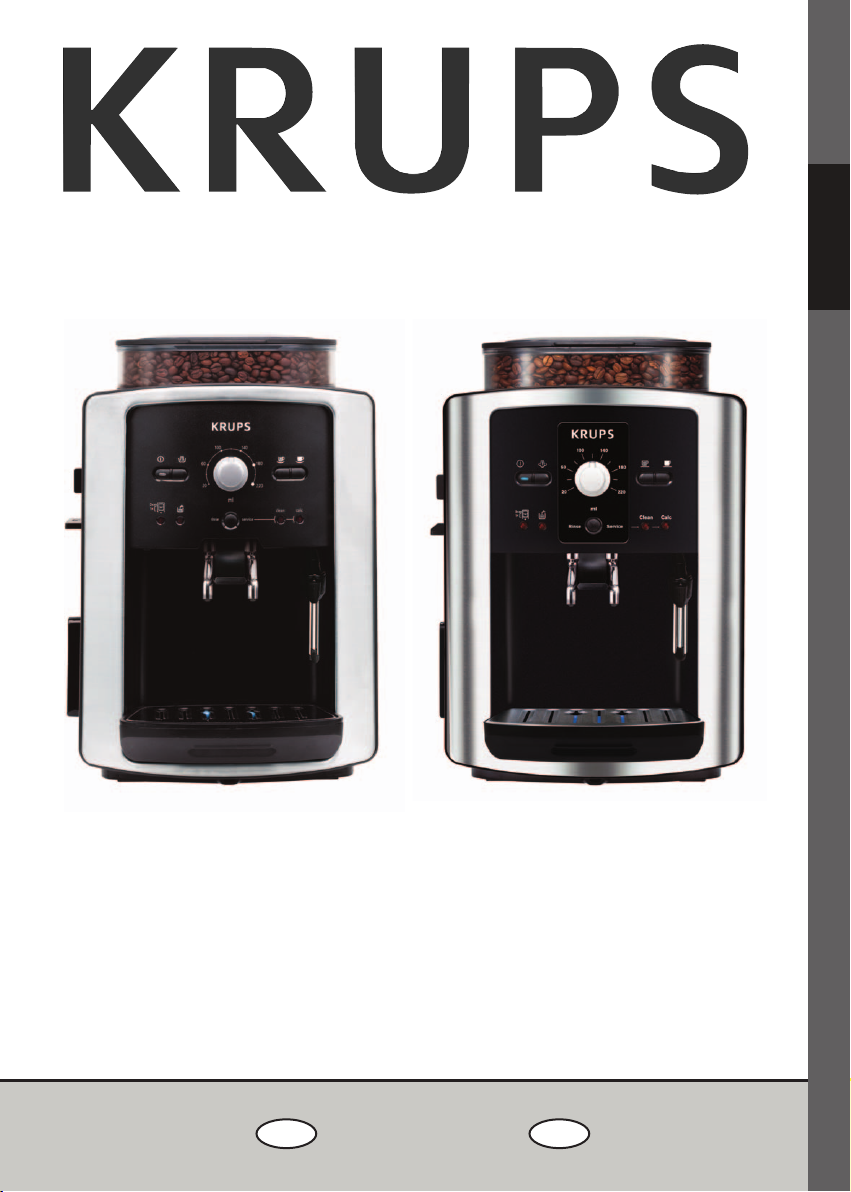
ESPRESSERIA AUTOMATIC
09 74 50 10 61
070 / 233 159
B
0800 37 77 37
CH
HOTLINE
Photos non contractuelles
FRANCAISENGLISHDEUTSCHNEDERLANDSITALIANO
ESPAÑOL
PORTUGUÊS
E
λληνικά
Pour utilisation domestique seulement
La durée de la garantie dépend de la législation de votre pays avec un maximum de 3000 cycles par an.
Cet appareil est destiné à une utilisation domestique uniquement et ne convient pas à une utilisation
commerciale ou professionnelle. Toute utilisation de cette machine da ns un contexte autre que domestique
n'est pas couvert par la garantie du fabricant.
La garantie ne couvre pas les dommages et détériorations provenant d’une mauvaise utilisation, de
réparations effectuées par des personnes non habilitées ou encore au non respect du mode d’emploi. La
garantie ne sera pas assurée si toutes opérations ou instructions d’entretien ne sont pas respectées ; si
des produits de nettoyage ou de détartrage non conformes aux spécifications d’origine KRUPS sont
utilisés. La garantie ne s’applique pas dans le cas où la cartouche filtrante Claris Aqua Filter System n’est
pas utilisée selon les instructions KRUPS. L’usure anormale des pièces (meules de broyage, valves, joints)
est exempte de la garantie ainsi que les dommages causés par des objets extérieurs dans le broyeur à café
(par exemple : bois, cailloux, plastiques, pièces...).
Page 2
Signification
L’appareil est prêt pour un cycle de café ou de vapeur.
Clignotement simple : l’appareil est en phase de
préchauffage ou en cycle d'initialisation.
Double clignotement : un cycle de 2 cafés est en
cours.
Information Service Après-Vente dans le mode réglage
des paramètres de fonctionnement.
Vider le collecteur de marc (un cycle de 2 cafés est en
cours).
Vider le collecteur de marc + nettoyer le tiroir + vider
le bac récolte-gouttes.
Vérifier le collecteur de marc absent ou mal positionné.
Vérifier le tiroir de nettoyage absent ou mal positionné.
Réglage de la dureté de l’eau.
Remplir le réservoir d’eau.
Vérifier le réservoir d’eau absent ou mal positionné.
Le cycle café a été interrompu par manque d’eau.
Remplir le réservoir d’eau.
Réglage de la coupure automatique auto-off.
Programme de nettoyage demandé ou en cours.
Programme de nettoyage : préparation du cycle de
nettoyage ou de rinçage.
Réglage de la température du café.
Programme de détartrage demandé ou en cours.
Programme de détartrage : préparation du cycle de
détartrage ou de rinçage.
Cycle de rinçage du programme de détartrage :
demande de vider le réservoir d’eau, de le rincer et de
le remplir d’eau fraîche.
Demande rinçage long (environ 150 ml) voir page 5.
Rinçage long en cours.
Clignotement permanent : anomalie de
fonctionnement.
Témoins lumineux
Vider le
collecteur
de marc
/
/
/
Remplir
le
réservoir
/
/
/
/
Clean
/
/
/
Calc
/
/
/
/
Marche /
Arrêt
/
/
/
/
: Témoin éteint / : Témoin clignotant
: Témoin allumé / : Témoin en double clignotement
Page 3

PAG E
DESCRIPTIF . . . . . . . . . . . . . . . . . . . . . . . . . . . . . . . . . . . . . . . . . . . . . . . . . . . . . . . . . . . . . . . . .1
Signaux d’avertissement
Éléments d’information sur le café espresso
Consignes de sécurité
AVANT LA PREMIÈRE UTILISATION . . . . . . . . . . . . . . . . . . . . . . . . . . . . . . . . . . . . . . . . . . . .3
MESURE DE LA DURETÉ DE L’EAU
CARTOUCHE CLARIS - AQUA FILTER SYSTEM
RÉGLAGES . . . . . . . . . . . . . . . . . . . . . . . . . . . . . . . . . . . . . . . . . . . . . . . . . . . . . . . . . . . . . . . . . . .4
RÉGLAGE DE DURETÉ DE L’EAU
RÉGLAGE DE TEMPÉRATURE DU CAFÉ
RÉGLAGE DU MÉCANISME DE COUPURE AUTOMATIQUE DE L'ALIMENTATION
ÉLECTRIQUE
PRÉPARATION DE L’APPAREIL . . . . . . . . . . . . . . . . . . . . . . . . . . . . . . . . . . . . . . . . . . . . . . . . . .5
RINÇAGE DES CIRCUITS
PRÉPARATION DU BROYEUR
PRÉPARATION D’UN ESPRESSO ET D’UN CAFÉ . . . . . . . . . . . . . . . . . . . . . . . . . . . . . . .6
PRÉPARATION D’UN ESPRESSO (DE 20 À 70 ML)
PRÉPARATION D’UN CAFÉ (DE 80 À 220 ML)
FONCTION 2 TASSES
PRÉPARATIONS AVEC DE LA VAPEUR . . . . . . . . . . . . . . . . . . . . . . . . . . . . . . . . . . . . . . . . .7
MOUSSE DE LAIT
SET AUTO-CAPPUCCINO XS6000
ENTRETIEN DE VOTRE APPAREIL . . . . . . . . . . . . . . . . . . . . . . . . . . . . . . . . . . . . . . . . . . . . .8
VIDANGE DU COLLECTEUR DE MARC DE CAFÉ, DU TIROIR À CAFÉ
ET DU BAC RÉCOLTE-GOUTTES
RINÇAGE DU CIRCUIT CAFÉ
PROGRAMME DE NETTOYAGE
PROGRAMME DE DÉTARTRAGE . . . . . . . . . . . . . . . . . . . . . . . . . . . . . . . . . . . . . . . . . . . . . . .10
PROGRAMME DE RINÇAGE LONG
ENTRETIEN GENERAL . . . . . . . . . . . . . . . . . . . . . . . . . . . . . . . . . . . . . . . . . . . . . . . . . . . . . . . .12
TRANSPORT DE L’APPAREIL
PRODUIT ÉLECTRIQUE OU ÉLECTRONIQUE EN FIN DE VIE
PROBLEMES ET ACTIONS CORRECTIVES . . . . . . . . . . . . . . . . . . . . . . . . . . . . . . . . . . . .12
RECETTES . . . . . . . . . . . . . . . . . . . . . . . . . . . . . . . . . . . . . . . . . . . . . . . . . . . . . . . . . . . . . . . . . .14
SOMMAIRE
Photos non contractuelles
F 088
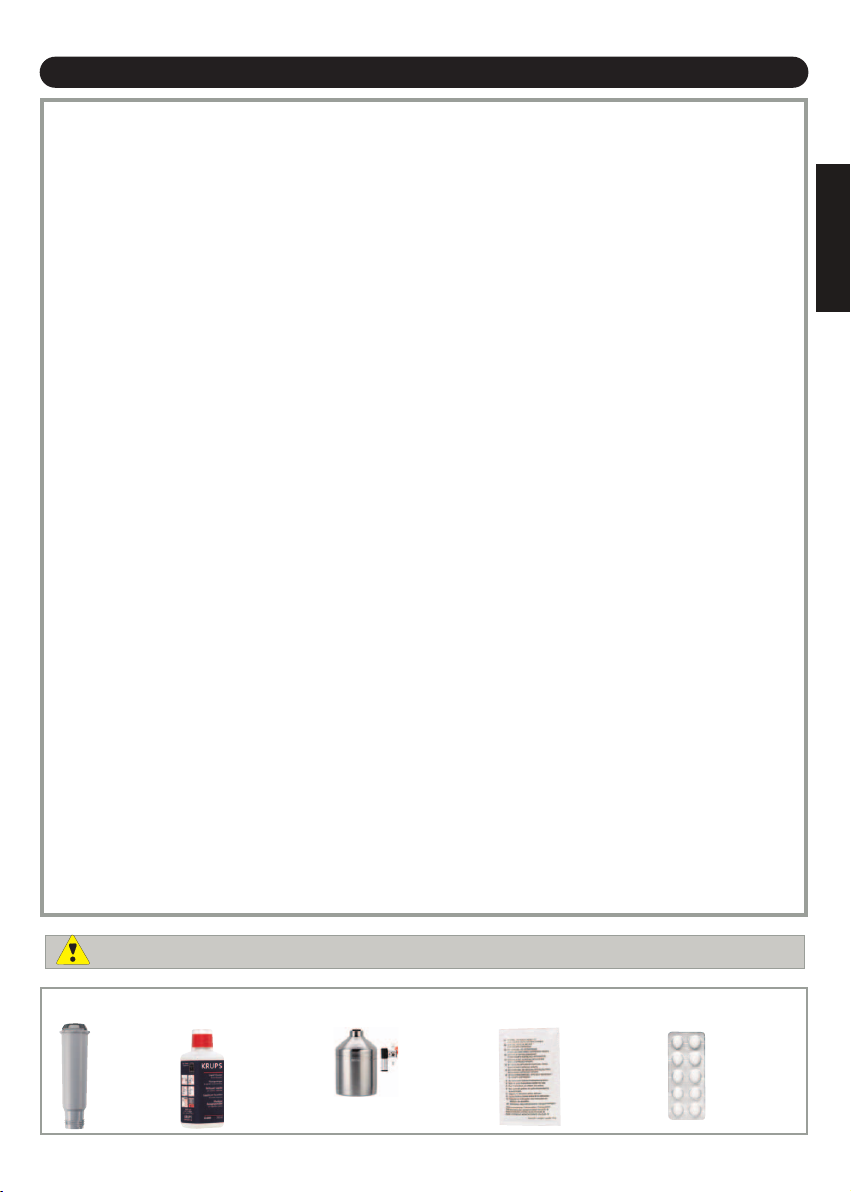
Cartouche
Claris Aqua Filter
System
(non fournie)
XS 3000
Tablette de
10 pastilles
de nettoyage
(2 pastilles
fournies)
F 054
Poudre
de détartrage
(1 sachet
fourni)
XS6000
Set Auto
Cappuccino
(non fourni)
XS 4000
KRUPS
nettoyant liquide
pour système
Cappuccino
(non fourni)
accessoires (vendus séparément)
FRANCAIS
N'utilisez pour cette machine que des accessoires Krups pour conserver la garantie.
Page 4

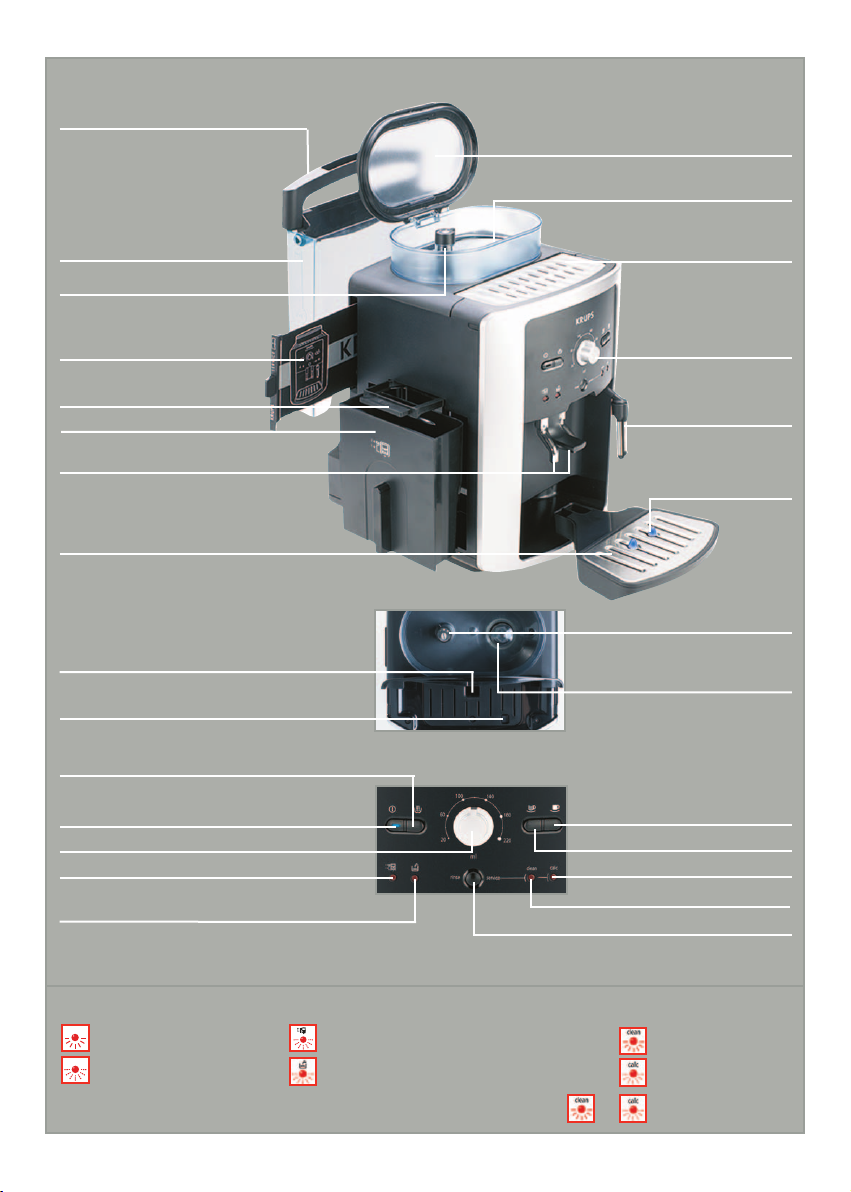
1
Bouton rotatif volume café
Touche vapeur
Touche et témoin lumineux “marche/arrêt”
Touche café standard
Touche café fort
Témoin lumineux “nettoyer”
Témoin lumineux “détartrer”
Témoin lumineux “remplir le réservoir d’eau”
Témoin lumineux “vider le marc à café”et
“vider le bac récolte-gouttes”
Touche “rinçage/entretiens”
Grille et bac récolte-gouttes amovible
Sorties café, poignée réglables en hauteur
Collecteur de marc de café
Bouton rotatif volume café
Réservoir café en grains
Buse vapeur
Couvercle de réservoir café en grains
Poignée / couvercle réservoir d’eau
Réservoir d’eau
Grille repose-tasses
Flotteurs de niveau d’eau
Vue de dessus
Bouton de réglage de la finesse
de broyage
Goulotte pastille de nettoyage
DESCRIPTIF
Bouton de réglage de la finesse
de broyage
Tiroir à café
Vider le collecteur de marc de café,
le bac récolte-gouttes et le tiroir à café
Remplir le réservoir d’eau
Signaux d’avertissements
Procéder au nettoyage
Procéder au détartrage
Voyant allumé
Voyant clignotant
Broyeur à meules en métal
Afficheur digital réglage des paramètres
Notice spéciale entretiens
Photos non contractuelles
+
Procéder au rinçage
long
Page 5

2
FRANCAIS
Chère Cliente, cher Client,
Nous vous félicitons pour l’achat de cette Espresseria Automatic Krups. Vous en apprécierez aussi bien la qualité du
résultat en tasse que la grande facilité d’utilisation.
Espresso ou lungo, ristretto ou cappuccino, votre machine à café / espresso automatique a été conçue pour vous
permettre de savourer à la maison la même qualité qu’au bistrot, quelque soit le moment dans la journée ou dans la semaine où
vous le préparerez.
Grâce à son Compact Thermoblock System, sa pompe 15 bars et parce qu’elle travaille exclusivement à partir de café en grains
fraîchement moulus juste avant extraction, votre Espresseria Automatic vous permettra d’obtenir une boisson
contenant un maximum d’arômes, recouverte d’une magnifique crème épaisse et dorée couleur chamois, un produit
provenant de l’huile naturelle des grains de café.
L’espresso n’est pas servi dans une tasse à café traditionnelle, mais plutôt dans de petites tasses en porcelaine.
Pour obtenir un espresso à une température optimale et une crème bien compacte, nous vous conseillons de bien faire préchauffer
vos tasses.
Après certainement plusieurs essais, vous trouverez le type de mélange et de torrefaction du café en grains correspondant à vos
goûts. La qualité de l’eau utilisée est aussi bien sûr un autre facteur déterminant dans la qualité du résultat en tasse que vous
obtiendrez.
Vous devez vous assurer que l’eau est fraîchement sortie du robinet (afin qu’elle n’ait pas eu le temps de devenir stagnante au
contact de l’air), qu’elle est exempte d’odeur de chlore et qu’elle est froide.
Le café espresso est plus riche en arôme qu’un café filtre classique. Malgré son goût plus prononcé, très présent en
bouche et plus persistant, l’espresso contient en fait moins de caféine que le café filtre (environ 60 à 80 mg par tasse en comparaison avec 80 à 100 mg par tasse). Cela est dû à une durée de percolation plus courte.
Grâce à sa grande simplicité de manipulation, la visibilté de tous ses réservoirs ainsi que ses programmes automatiques de nettoyage et de détartrage, votre Espresseria Automatic vous apportera un grand confort d’utilisation.
Important: Consignes de Sécurité
Lisez attentivement le mode d’emploi avant la première utilisation de l’appareil et conservez-le : une utilisation non conforme
dégagerait Krups de toute responsabilité.
Cet appareil est destiné à être utilisé dans des applications domestiques et analogues (dans la limite de 3000 cycles par an)
telles que :
- des coins cuisines réservés au personnel dans des magasins, bureaux et autres environnements professionnels ;
- des fermes ;
- l’utilisation par les clients des hôtels, motels et autres environnements à caractère résidentiels ;
- des environnements du type chambres d’hôtes.
Néanmoins, si le produit venait à être utilisé dans ce type d’environnement, il ne serait pas couvert par la garantie du fabricant.
Branchez l’appareil uniquement sur une prise secteur reliée à la terre. Vérifiez que la tension d'alimentation indiquée sur la plaque
signalétique de l'appareil correspond bien à celle de votre installation électrique.
Veillez à ne pas poser l'appareil sur une surface chaude telle qu’une plaque chauffante ni à l'utiliser à proximité d'une flamme nue.
Retirez immédiatement la prise secteur si vous constatez une anomalie quelconque pendant le fonctionnement.
Ne tirez pas sur le câble d'alimentation pour retirer la prise secteur.
Ne laissez pas le câble d'alimentation pendre du bord d'une table ou d'un plan de travail.
Ne laissez pas votre main ou le câble d’alimentation sur les parties chaudes de l’appareil.
Ne laissez jamais tremper l'appareil, le fil ou la prise électrique dans l'eau ou dans un autre liquide.
Cet appareil n'est pas prévu pour être utilisé par des personnes ( y compris les enfants ) dont les capacités physiques, senso-
rielles ou mentales sont réduites, ou des personnes dénuées d'expérience ou de connaissance, sauf si elles ont pu bénéficier, par
l'intermédiaire d'une personne responsable de leur sécurité, d'une surveillance ou d'instructions préalables concernant l'utilisation
de l'appareil.
Il convient de surveiller les enfants pour s'assurer qu'ils ne jouent pas avec l'appareil.
N'utilisez pas l'appareil si le câble d'alimentation ou l'appareil lui-même est endommagé.
Si le câble d’alimentation ou la fiche sont endommagés, n’utilisez pas l’appareil afin d’éviter tout danger, faites obligatoirement
remplacer le câble d’alimentation par un centre agréé KRUPS.
Reportez-vous toujours aux instructions pour le détartrage de l’appareil.
Protégez l’appareil de l’humidité et du gel.
N’utilisez pas l’appareil s’il ne fonctionne pas correctement ou s’il a subi un dommage. Dans un tel cas, il est conseillé de faire
examiner l’appareil par un centre agréé KRUPS (consultez la liste dans le livret Service KRUPS).
Excepté pour le nettoyage et le détartrage selon les procédures du mode d’emploi de l’appareil, toute intervention sur l’appareil
doit être effectuée par un centre agréé KRUPS.
Pour votre sécurité, n’utilisez que des accessoires et consommables agréés KRUPS pour votre appareil.
Toute erreur de branchement annule la garantie.
Débranchez l’appareil dès que vous cessez de l’utiliser pendant une longue période et lorsque vous le nettoyez.
Tous les appareils sont soumis à un contrôle qualité sévère. Des essais d’utilisation pratiques sont faits avec des appareils pris
au hasard, ce qui explique d’éventuelles traces d’utilisation.
L’emploi de prises multiples et/ou rallonges est déconseillé.
Ne mettez pas d’eau dans le réservoir à café en grains et/ou sous trappe d’entretien.
Faites attention à l’orientation de la buse Vapeur pour éviter tout risque de brûlure.
En cas d’absence de détartrage, de nettoyage ou d’entretien régulier ou suite à la présence de corps étranger dans le broyeur, la
garantie de votre appareil (voir document séparé) ne pourra être prise en compte.
Limites d’utilisation
Cette machine Espresso ne doit être utilisée que pour la préparation d’espressos ou de cafés, pour faire mousser le lait et chauffer
des liquides. Aucune responsabilité ne saurait être engagée pour les endommagements éventuels découlant de l’utilisation de
l’appareil à des fins non autorisées, de mauvais branchements, manipulations, opérations et réparations hasardeuses. Les garanties
de maintenance deviendront nulles dans de telles circonstances.
Cet appareil est uniquement destiné à un usage domestique à l’intérieur de la maison. Il n’est pas conçu pour une utilisation commerciale ou
professionnelle.
Page 6
Nous vous conseillons pour optimiser le goût de vos préparations et la durée de vie de votre appareil d’utiliser uniquement la
cartouche Claris - Aqua Filter System vendue en accessoire.
Elle est composée d’une substance anti-calcaire et de charbon actif qui réduit chlore, impuretés, plomb, cuivre, pesticides...
présents dans l’eau. Les minéraux et oligo-éléments sont alors préservés.
3
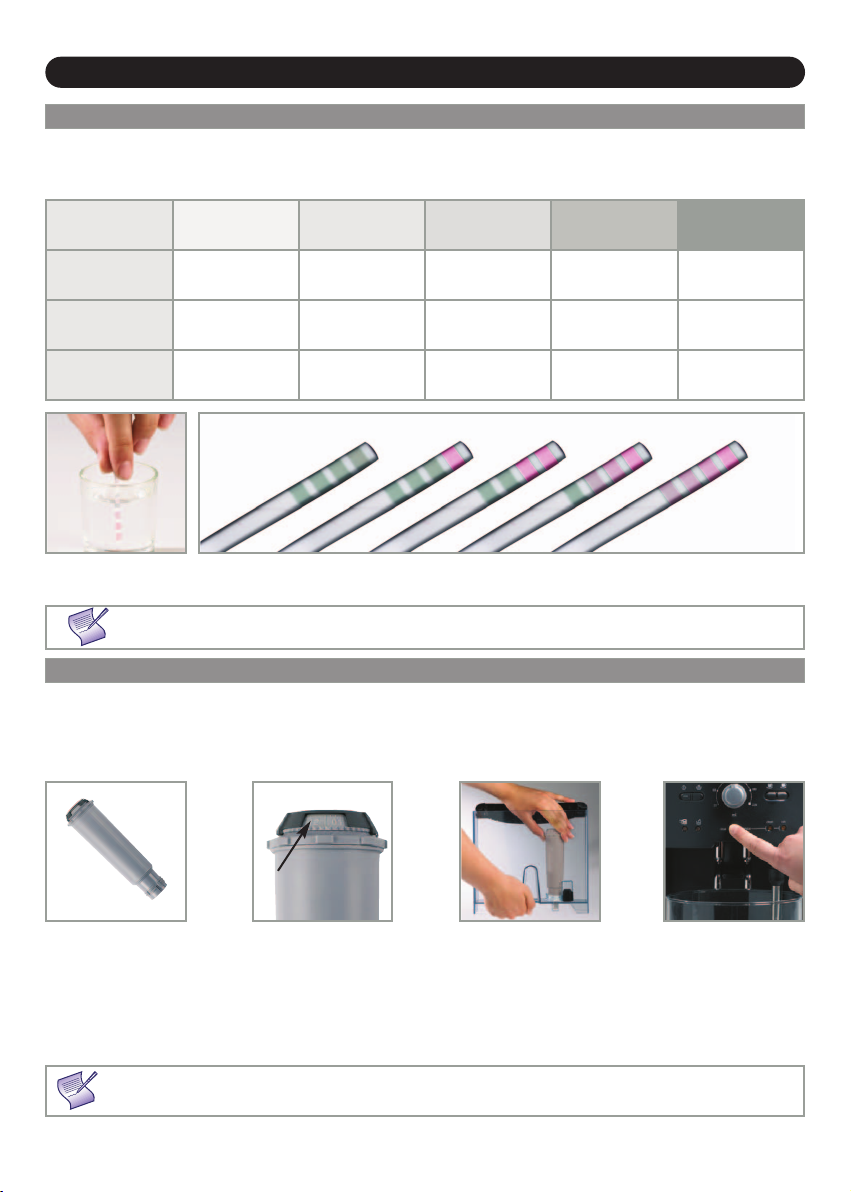
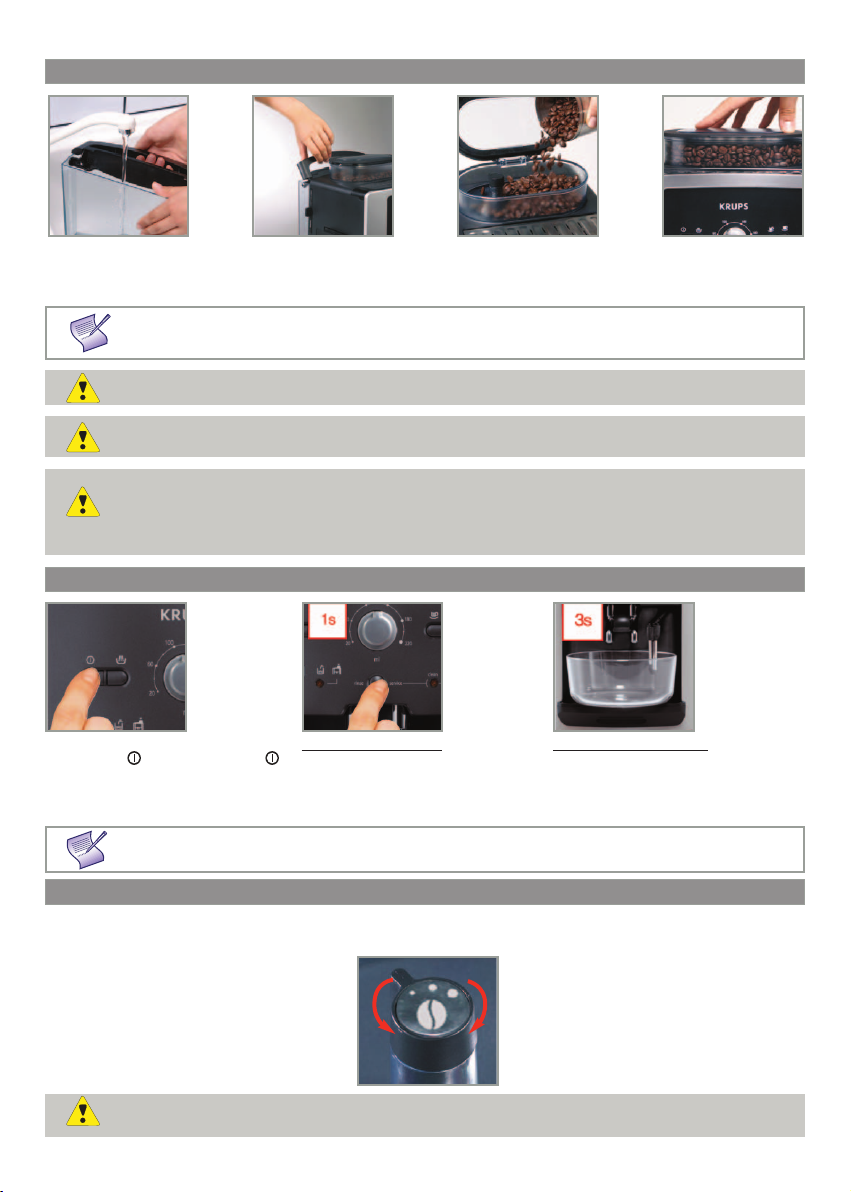
Avant d'utiliser l'appareil pour la première fois ou après avoir constaté un changement dans la dureté de l’eau, il convient
d’adapter l’appareil à la dureté de l’eau constatée. Pour connaître la dureté de l’eau, déterminez-la à l’aide du bâtonnet livré
avec l’appareil ou adressez-vous à votre compagnie des eaux.
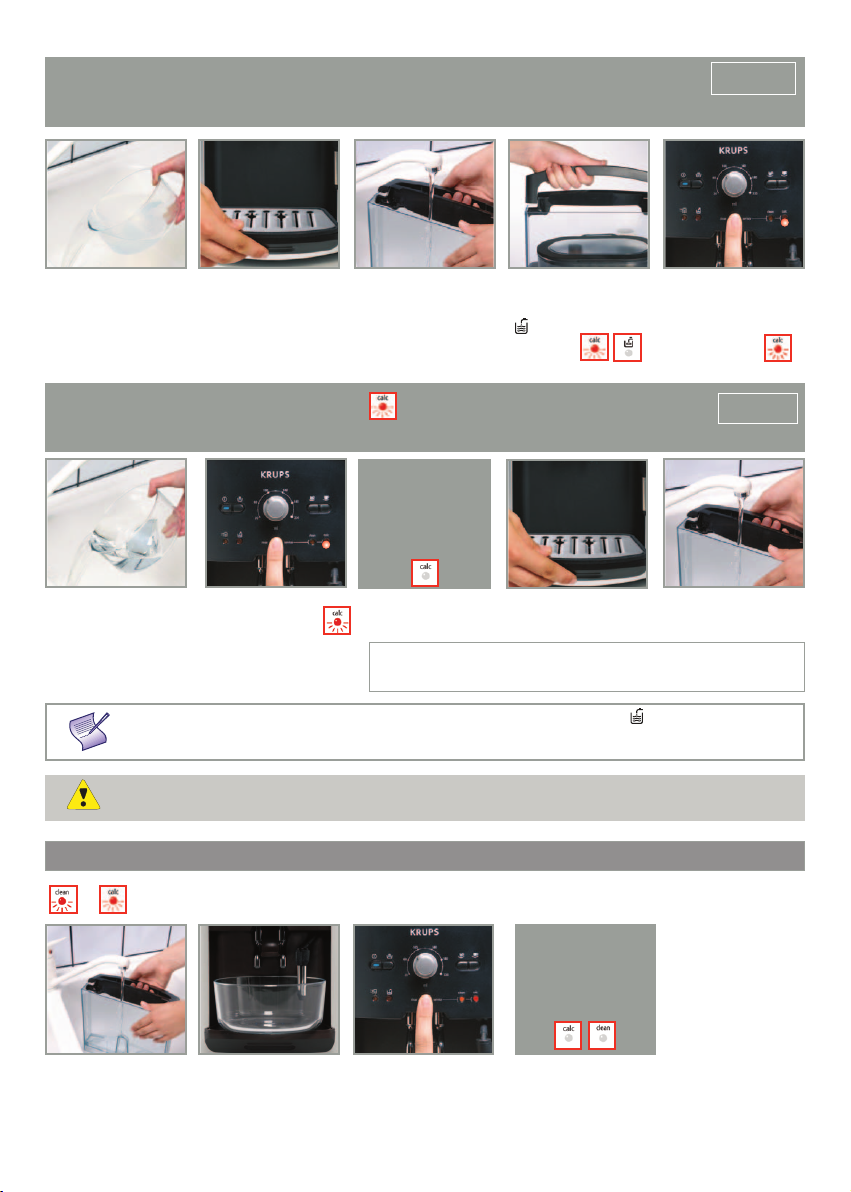
AVANT LA PREMIÈRE UTILISATION
Lire après 1 minute le niveau de dureté de l’eau
Filtrer l’eau avec la cartouche
Claris - Aqua Filter System
vous permet de réduire :
La dureté en carbonate jusqu’à 75 %*
Le chlore - jusqu’à 85 %*
Le plomb - jusqu’à 90 %*
Le cuivre - jusqu’à 95 %*
L’aluminium - jusqu’à 67 %*
* indications fournies par le fabricant
Installation de la
cartouche dans la machine :
visser la cartouche filtrante
dans le fond du réservoir.
La cartouche Claris nécessite d’être remplacée tous les 50 litres d’eau environ ou tous les deux mois au minimum.
Remplir un verre d’eau
et plonger un batonnet
Utiliser de l’eau de source ou issue d’une cartouche filtrante pour optimiser le résultat en tasse.
Mécanisme permettant de
mémoriser le mois de mise
en place et de changement
de la cartouche (après
maximum 2 mois).
Degré de dureté
0
Très douce
1
douce
2
moyennement dure
3
dure
4
très dure
° f
<5,4° >7,2° >12,6° >25,2° > 37,8°
° dH
<3° >4° >7° >14° > 21°
° e
<3,75° >5° >8,75° >17,5° > 26,25°
Placez un récipient sous
la buse vapeur. Faire
passer 300 ml d’eau en
appuyant 1 fois sur la
touche rinçage pendant
plus de 3 secondes.
Si vous le souhaitez
vous pouvez renouveler
l’opération.
1 sec.
012
3
4
F088
MESURE DE LA DURETÉ DE L’EAU
CARTOUCHE CLARIS - AQUA FILTER SYSTEM F 088 (VENDUE SÉPARÉMENT)
Page 7
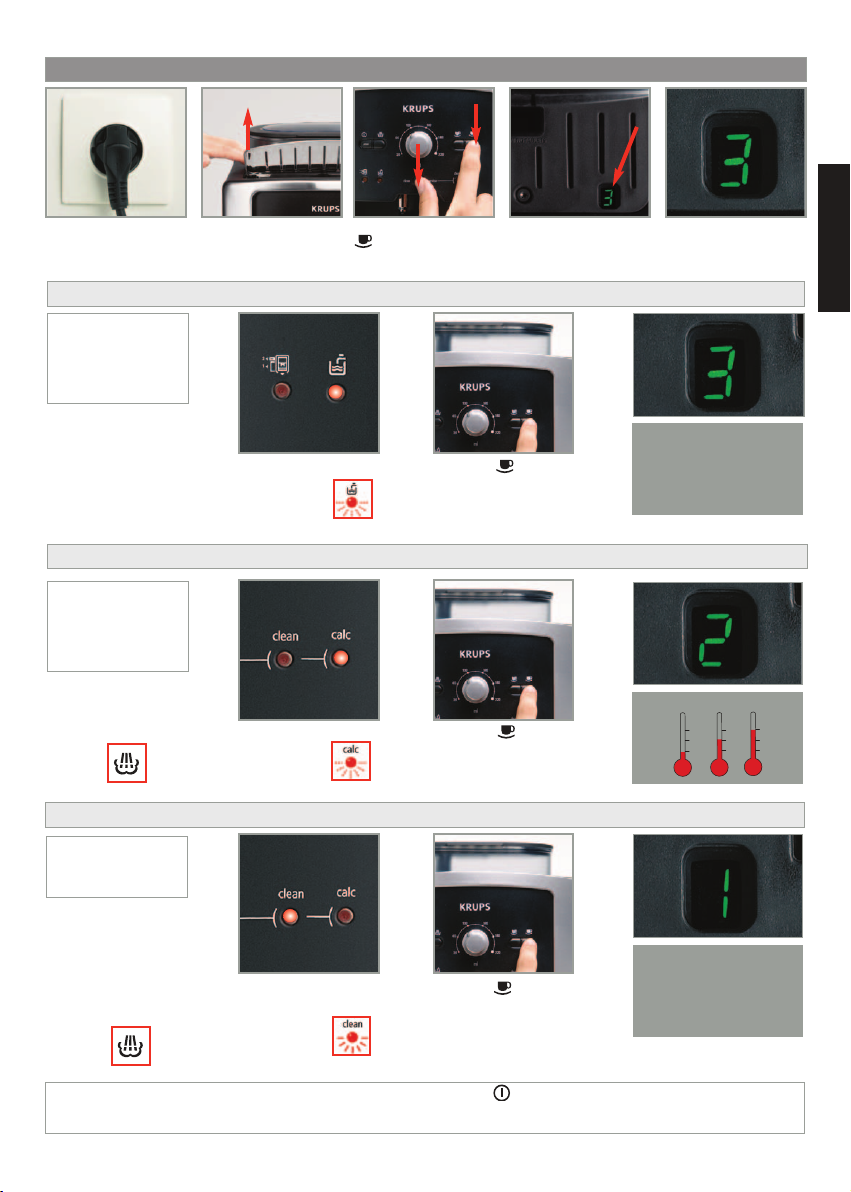
RÉGLAGES
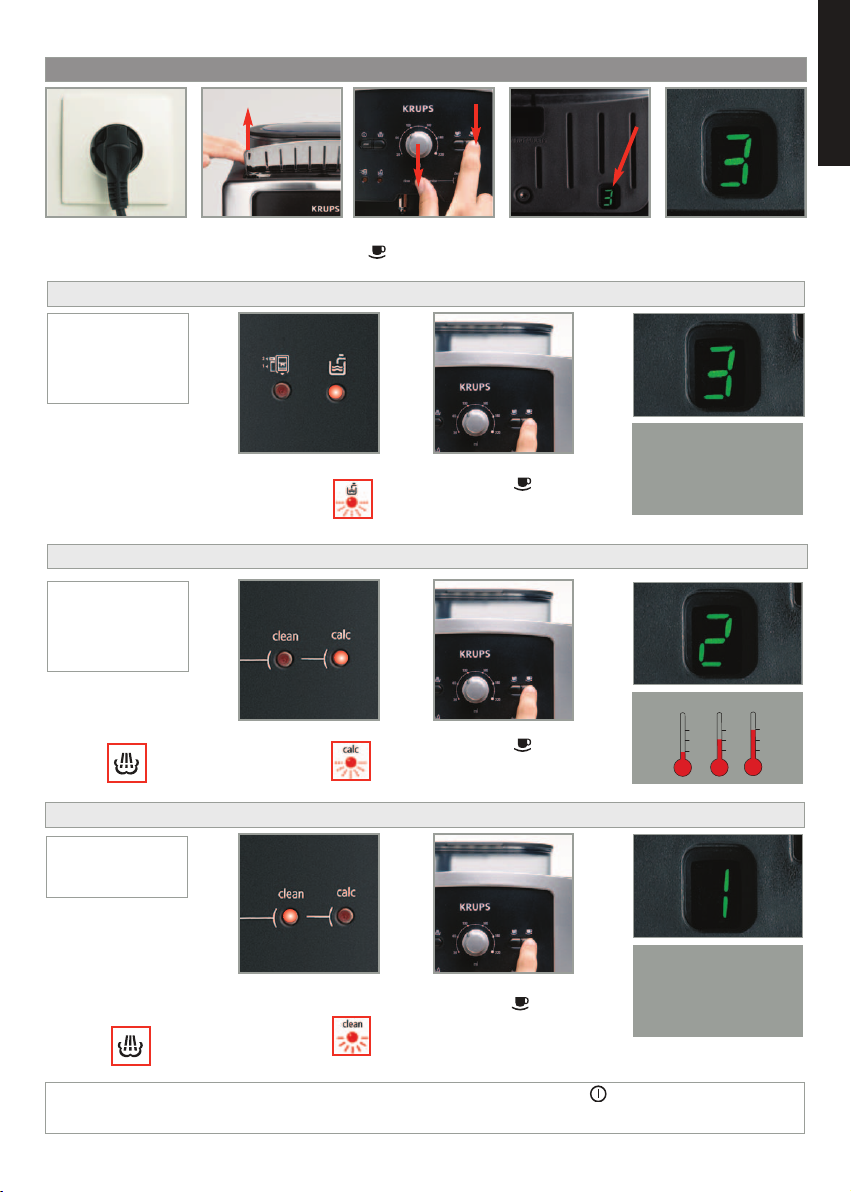
4
Les appareils sont
préréglés en usine sur
le niveau 2
Branchez l’appareil sur
la prise secteur mais
ne l’allumez pas.
Soulevez la grille
repose-tasses en
appuyant à l'arrière
pour la faire basculer.
Appuyez simultanément
sur les touches ‘Service’
et .
Le témoin lumineux ‘calc’
s’allume.
Appuyez par impulsion
sur la touche
le nombre de fois nécessaire
pour régler la température
du café souhaitée.
A chacune de ces étapes vous pouvez mémoriser les réglages en appuyant sur la touche si vous avez fini vos réglages
(les 4 témoins clignotent 2 fois) ou poursuivre la procédure. La mémorisation de ces réglages reste en vigueur même en cas
de panne d’alimentation électrique. A tout moment vous pouvez modifier ces réglages en répétant ces opérations.
Réglage du mécanisme de coupure automatique de l’alimentation électrique
Le témoin lumineux
‘clean’ s’allume.
Appuyez par impulsion
sur la touche
le nombre de fois
nécessaire pour obtenir
la durée souhaitée.
Appuyez par impulsion
sur la touche
le nombre de fois nécessaire
pour sélectionner le niveau
de la dureté de l’eau utilisée.
Réglage de la température du café
Réglage de la dureté de l’eau
Les appareils sont
préréglés en usine
pour le niveau de
dureté 3.
Les appareils sont
préréglés en usine
sur 1 heure
1
2
3
1 = 1 H
2 = 2 H
3 = 3 H
4 = 4 H
0 = très douce
1 = douce
2 = moyennement dure
3 = dure
4 = très dure
L’afficheur digital de
réglage des paramètres
se trouve sous la
trappe d’entretien.
Vous avez la possibilité
d'éteindre votre machine
après un nombre d'heures
pré-programmé.
Appuyez sur la touche
vapeur pour passer en
réglage de coupure
automatique pour que : =>
Le témoin réservoir
d’eau s’allume.
Appuyez sur la touche
vapeur pour passer en
réglage de température
du café pour que : =>
Regardez bien
verticalement au
fond du hublot.
FRANCAIS
Page 8
5
Il est préférable de faire un ou plusieurs rinçages des 2 circuits après plusieurs jours sans utilisation.
A chaque fois que vous branchez votre appareil, la machine effectue un cycle d'initialisation.
Retirez et remplissez
le réservoir d’eau.
Remettez-le en place en
appuyant fermement et
refermez le couvercle
.
Ouvrez le couvercle du
réservoir à café en
grains. Mettez le café
(250 gr maxi).
Refermez le couvercle
du réservoir à café en
grains.
Assurez-vous qu’aucun corps étranger tel que des petits cailloux contenus dans le café en grains ne pénètre dans le
réservoir à café en grains. Tout endommagement dû à des corps étrangers ayant pénétré dans le réservoir à café est
exclu de la garantie. Ne pas mettre d’eau dans le réservoir à café en grains.
Pour éviter que les écoulements d’eau usagée ne salissent votre plan de travail ou ne risquent de vous brûler, n’oubliez pas de mettre le bac récolte-gouttes.
Vérifiez la propreté de votre réservoir à eau.
Mettez l'appareil en marche en appuyant
sur la touche . Le témoin lumineux
clignote pendant le préchauffage et le
cycle d'initialisation.
Rinçage du circuit café :
Mettez un récipient sous les buses café.
Appuyez brièvement sur la touche 'Service'
pour lancer un cycle de rinçage du circuit
café, qui s'arrêtera automatiquement après
environ 40 ml.
Vous pouvez ajuster la force de votre café en réglant la finesse de broyage des grains de café.
Plus le réglage du broyeur à café est fin, plus le café a priori est fort et crémeux.
Réglez le degré de finesse de broyage désiré en tournant le bouton ‘Réglage de la finesse de broyage’.
LE RÉGLAGE NE DOIT ÊTRE VARIÉ QUE PENDANT LE BROYAGE.
NE JAMAIS FORCER SUR LE BOUTON DE RÉGLAGE DE LA FINESSE DE BROYAGE
L'utilisation de grains de café huileux, caramélisés ou aromatisés est déconseillée pour cette machine. Ce type de grains
peut endommager la machine.
NE JAMAIS METTRE DU CAFÉ MOULU DANS LE RÉSERVOIR À CAFÉ.
Vers la gauche
la mouture est
plus fine.
Vers la droite la
mouture est
plus grosse.
Ne pas remplir le réservoir d’eau chaude, de lait ou de tout autre liquide. Si, lors de la mise sous tension de
l’appareil, le réservoir d’eau est absent ou incomplètement rempli, le témoin ‘remplir réservoir’ s’allume et la préparation
de l’espresso ou du café est momentanément impossible.
PRÉPARATION DE L’APPAREIL
Rinçage du circuit vapeur :
Mettez un récipient sous la buse vapeur.
Appuyez ensuite pendant 3 secondes sur
la touche 'Service' pour lancer un cycle de
rinçage du circuit vapeur, qui s'arrêtera
automatiquement après environ 300 ml.
PRÉPARATION DU BROYEUR
RINÇAGE DES CIRCUITS
Page 9
6
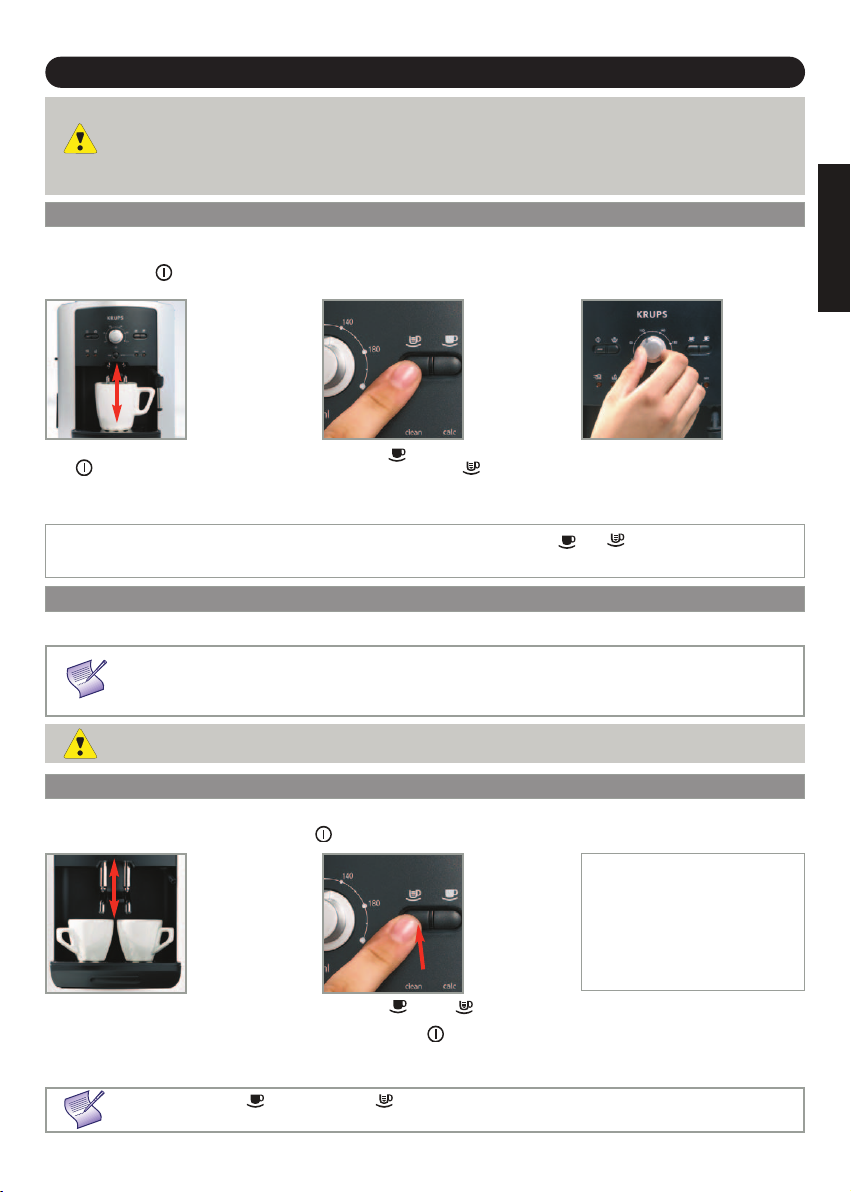
La quantité d’eau pour un espresso doit être comprise entre 20 et 70 ml.
A chaque fois que vous branchez votre appareil, la machine effectue un cycle d'initialisation.
Appuyez sur le bouton le témoin lumineux clignote pendant le préchauffage de la machine.
Sélectionnez la touche
pour obtenir un espresso corsé,
ou la touche pour obtenir un
espresso standard.
Vous avez préparé votre appareil,
le témoin est fixe.
Mettez une tasse sous les sorties café.
Vous pouvez abaisser ou remonter les
sorties café selon la taille de votre tasse.
PRÉPARATION D’UN ESPRESSO ET D’UN CAFÉ
VOTRE APPAREIL EST EXCLUSIVEMENT CONÇU POUR UTILISER DU CAFÉ EN GRAINS.
Lors de la préparation de votre premier café, après une longue période d’absence ou après une
procédure de nettoyage ou de détartrage, un peu de vapeur et d’eau chaude sortent de la buse
vapeur (auto-amorçage).
Si les sorties café sont réglées trop hautes par rapport à la taille de vos tasses, il y a un risque
d’éclaboussures ou de brûlures.
Vous pouvez à tout moment régler le
volume de l’eau.
La mouture est humidifiée avec un peu d’eau chaude après la phase de broyage.
Quelques instants après, la percolation proprement dite se poursuit.
A partir d'une certaine quantité en tasse, nous vous conseillons pour obtenir un café plus fort - de diviser
votre préparation en deux cycles. Par exemple 2 fois 70 ml pour une tasse de 140 ml.
Votre appareil vous permet de préparer 2 tasses de café ou d’espresso. Veillez à ne pas enlever les tasses après le premier
cycle. Vous avez préparé votre appareil. Le témoin est fixe.
Mettez deux tasses
sous les sorties café.
Vous pouvez abaisser ou
remonter les sorties café
selon la taille de vos tasses.
Sélectionnez la touche ou selon
votre choix, avec un double appui rapide.
Le témoin s’allume avec un double
clignotement pour vous informer que vous
avez demandé deux tasses de café.
Si vous appuyez une première fois sur la touche ‘ ’ et une deuxième fois sur la touche ‘ ’
(ou inversement), le dernier appui n’est pas pris en compte.
L’appareil enchaînera
automatiquement
2 cycles complets
de préparation de café.
Pour arrêter l’écoulement dans votre tasse, vous pouvez soit réappuyer sur une des touches ou ,
soit tourner le bouton rotatif vers la position mini.
x 2
PRÉPARATION D’UN ESPRESSO
FONCTION 2 TASSES
NE PAS RETIRER LE RESERVOIR AVANT LA FIN DU CYCLE
(c'est-a-dire environ 15 secondes après la fin de l'écoulement du café).
La quantité d’eau pour un café doit être comprise entre 80 et 220 ml.
PRÉPARATION D’UN CAFÉ
FRANCAIS
Page 10

7
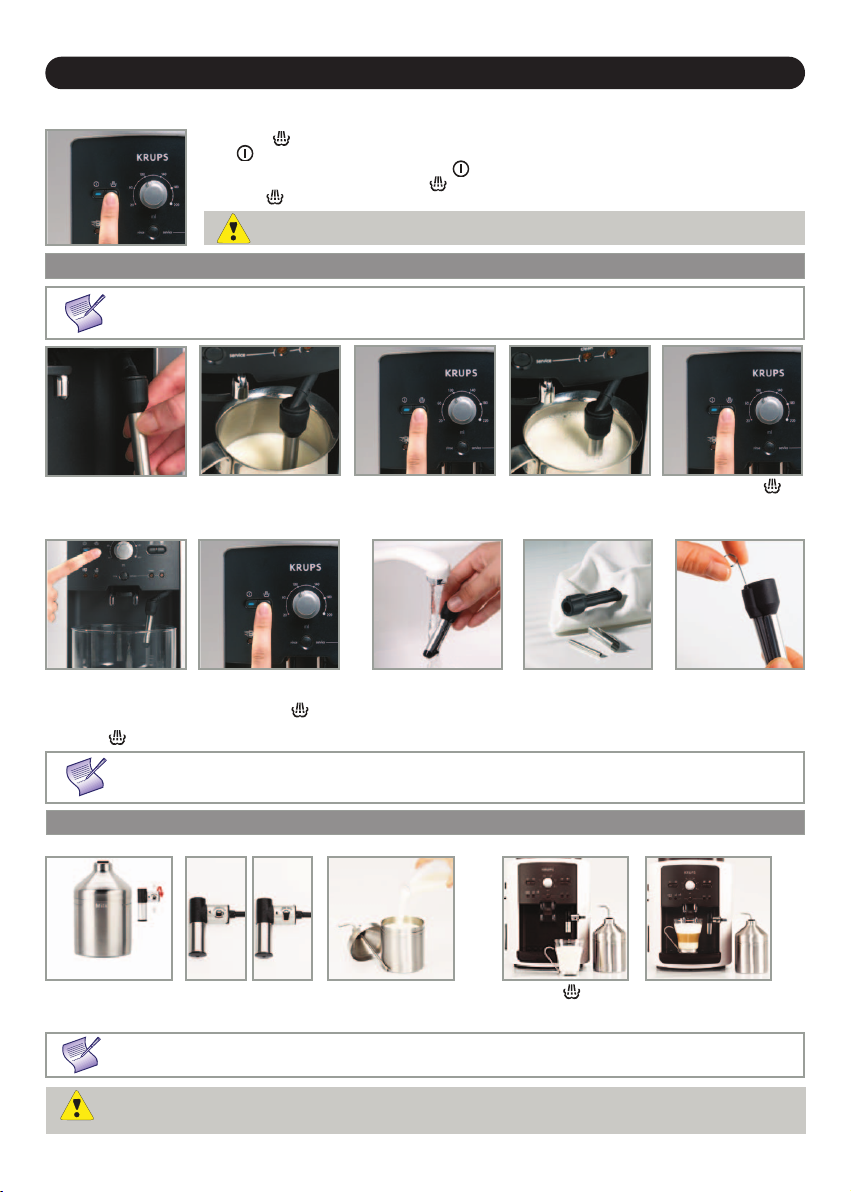
PRÉPARATIONS AVEC DE LA VAPEUR
La vapeur sert à faire mousser le lait pour confectionner par exemple un cappuccino ou un caffe latte et aussi à chauffer les
liquides. Comme la production de vapeur nécessite une température plus élevée que pour préparer un espresso, l’appareil
assure une phase de préchauffage supplémentaire pour la vapeur.
Appuyez sur la touche .
Le témoin clignote pendant le préchauffage.
Une fois la phase de préchauffage achevée, le témoin reste fixe et
vous pouvez commencer la production de vapeur en appuyant à nouveau sur la touche .
Appuyer de nouveau sur la touche pour arrêter le cycle.
MOUSSE DE LAIT
Nous vous conseillons d'utiliser du lait pasteurisé ou UHT, récemment ouvert. Le lait cru ne permet pas d'obtenir
des résultats optimums. Après avoir utilisé les fonctions vapeur, la buse peut être chaude, nous vous conseillons
d'attendre quelques instants avant de la manipuler.
Vérifiez que la buse
vapeur est bien en
place.
Versez le lait dans
votre pot à lait.
Faites plonger la buse
vapeur dans le lait.
Lancez la fonction
vapeur comme
expliqué dans le
paragraphe ci-dessus.
...réappuyez sur la touche
pour arrêter le cycle.
Attention, l'arrêt du cycle
n'est pas immédiat.
Pour enlever toute trace
éventuelle de lait dans la
buse vapeur, placez un
récipient sous la buse et
appuyez sur la
touche .
Laissez la vapeur
s’échapper au moins 10
secondes et réappuyez
sur la touche
pour stopper le processus.
La buse vapeur est démontable pour permettre un nettoyage en profondeur. Lavez-la avec de l’eau et un peu de savon à vaisselle non abrasif au
moyen d’une brosse. Rincez-la et séchez-la. Avant de la remettre en
place, assurez-vous que les trous d’entrée d’air ne sont pas bouchés par
des résidus de lait. Débouchez-les à l'aide de l'aiguille fournie si nécessaire. Ne pas laver la buse vapeur dans un lave-vaisselle.
Pour interrompre la fonction vapeur, il suffit d’appuyer sur n’importe quelle touche. Si la buse est obstruée, débouchez-la avec l'aiguille fournie. La durée maximum de production de vapeur par cycle est limitée à 2 minutes.
SET AUTO-CAPPUCCINO XS 6000 (VENDU SÉPARÉMENT)
Pour éviter que le lait ne sèche sur l’accessoire auto-cappuccino, il faut veiller à bien le nettoyer. Il est recommandé
de le laver immédiatement en faisant un cycle avec de la vapeur avec le pot de l'accessoire rempli d'eau afin de
nettoyer la buse de l'intérieur. Pour cela, vous pouvez utiliser le nettoyant liquide XS4000 disponible en accessoire.
XS 6000
Quand votre mousse de
lait est suffisante...
Attention, l'arrêt du cycle n'est pas immédiat.
Branchez les différents
éléments entre eux.
Sélectionner la position cappuccino ou
caffe latte sur la buse
spéciale.
Remplissez le pot à lait
et placez une tasse ou
un verre sous la buse
auto-cappuccino.
Appuyez sur la
touche pour lancer
puis arrêter le cycle.
Placez votre tasse
sous les sorties café
et lancez un cycle
café / espresso.
Cet accessoire auto-cappuccino facilite la préparation d'un cappuccino ou d'un caffe latte.
Le tuyau ne doit pas être vrillé pour le bon maintien de la position du bouton.
Page 11
8
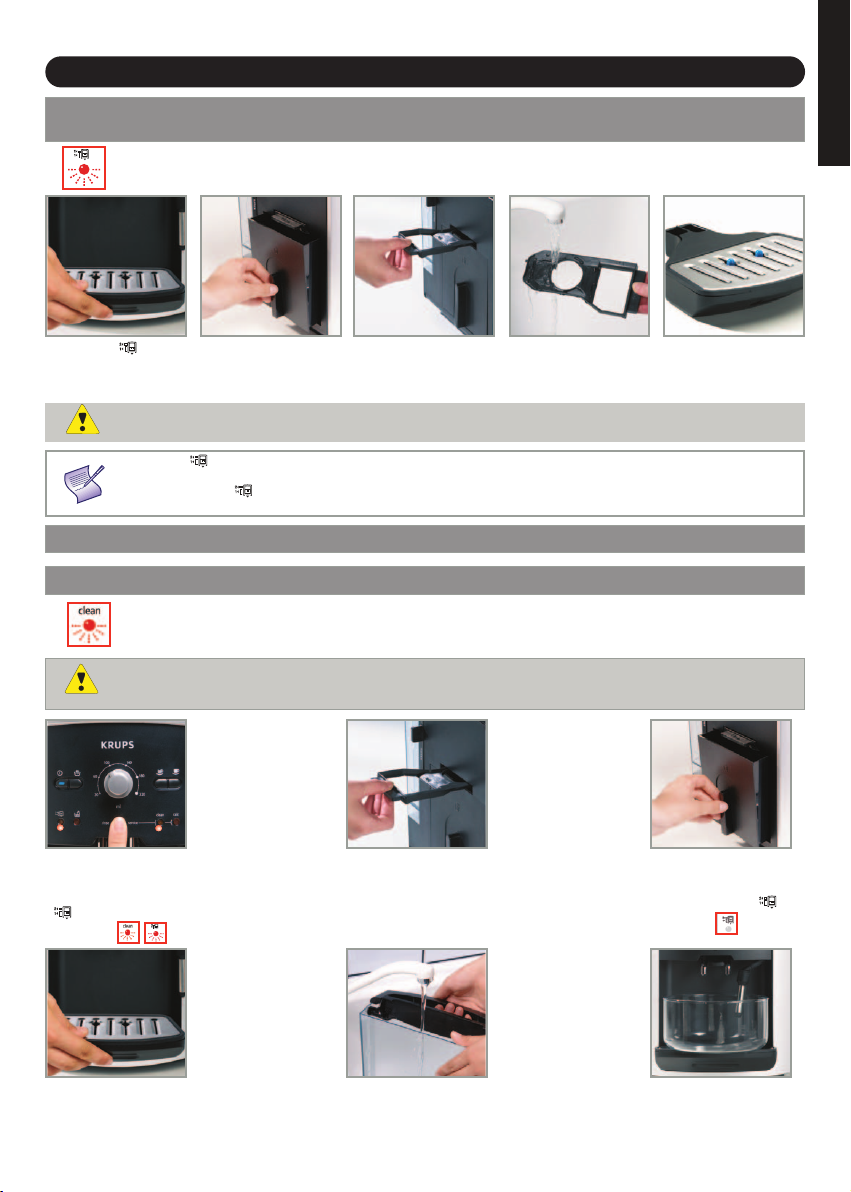
Si le témoin s’allume,
retirez, videz et nettoyez
le bac récolte-gouttes.
Le bac récolte-gouttes reçoit l’eau usagée et le collecteur de marc de café reçoit la mouture usagée.
Le tiroir à café permet d’éliminer d’éventuels dépôts de marc de café.
Retirez, videz
et nettoyez
le collecteur de marc
de café.
Le bac récolte-gouttes
est équipé de flotteurs
qui vous indiquent à tout
moment quand le vider.
Le témoin reste allumé si le collecteur de marc de café n’est pas enfoncé ou installé correctement
ou s’il a été remis en place en moins de 4 secondes.
Lorsque le témoin est allumé ou clignote la préparation d’un espresso ou d’un café est impossible.
Le collecteur de marc de café a une capacité de 9 cafés.
ENTRETIEN DE VOTRE APPAREIL
Dès que vous retirez le collecteur de marc de café, vous devez le vider complètement
pour éviter tout débordement par la suite.
PROGRAMME DE NETTOYAGE - DURÉE TOTALE : 20 MINUTES ENVIRON
Lorsqu’il est nécessaire de procéder à un nettoyage l’appareil vous en avertit par l’allumage du témoin lumineux ‘clean’.
Ce programme n'est accessible que lorsque l'appareil le demande (soit environ toutes les 300 préparations de café
ou d'espresso).
Lancez le programme de
nettoyage en appuyant
sur la touche ‘Service’.
Les témoins ‘clean’ et
‘ ’ clignotent.
Videz et nettoyez le
collecteur de marc de
café puis remettez-le en
place. Le témoin ‘ ’
s’éteint.
Enlevez et nettoyez
le tiroir de nettoyage.
Remettez-le en place.
Enlevez, remplissez et
remettez le réservoir en
place.
RINÇAGE DES CIRCUITS : VOIR PAGE 5
Placez sous les sorties
café un récipient pouvant
contenir au minimum 0.6 l.
Retirez le tiroir à café.
Nettoyez-le sous l’eau
et séchez-le bien
avant de le remettre
en place.
Attention ! Pour respecter les conditions de garantie, il est indispensable d’effectuer le cycle de nettoyage
de l’appareil quand il vous le signale. Bien suivre l’ordre des opérations.
Quand le voyant est allumé, vous pouvez continuer à utiliser l’appareil mais il est conseillé d’exécuter le programme le plus vite possible.
Retirez et videz le bac
récolte-gouttes.
VIDANGE DU COLLECTEUR DE MARC DE CAFÉ, DU TIROIR À CAFÉ
ET DU BAC RÉCOLTE-GOUTTES
FRANCAIS
Page 12

9
Appuyez sur la touche
‘Service’ pour lancer
le cycle de nettoyage.
1 - Cycle de nettoyage
Le témoin ‘clean’ devient fixe.
Le cycle de nettoyage va se dérouler de façon automatique.
La pompe aspire l’eau par intermittence. La durée de cette
opération est d’environ 10 minutes et le témoin ‘clean’ clignote
à nouveau.
Videz votre récipient
d’eau usagée et
remettez-le sous les
sorties café.
Appuyez à nouveau sur
la touche ‘Service’ pour
lancer un premier cycle
de rinçage.
2 - Premier rinçage
Le témoin ‘clean’ redevient fixe.
Le programme se poursuit.
Un premier cycle de rinçage va se dérouler de façon
automatique. Il permet de rincer l’appareil et d’éliminer les
restes de nettoyant. Ce premier cycle de rinçage dure environ
5 minutes quand il est achevé, le témoin ‘clean’ clignote
à nouveau.
Videz votre récipient
d’eau usagée et
remettez-le sous les
sorties café.
Appuyez à nouveau sur
la touche ‘Service’ pour
lancer un deuxième
cyle de rinçage.
3 - Deuxième rinçage
Le témoin ‘clean’ redevient fixe.
Un deuxième cycle de rinçage va se
dérouler de façon automatique. Ce deuxième cycle de rinçage
dure environ 5 minutes.
Lorsque le deuxième cycle de rinçage est terminé, le témoin
‘clean’ s’éteint.
Enlevez et videz votre
récipient d’eau usagée.
Videz le bac récolte-gouttes
et remettez-le en place.
Remplissez votre
réservoir d’eau.
Votre appareil est prêt pour
une nouvelle utilisation.
Si au démarrage du programme il n’y a pas assez d’eau dans le réservoir, vous en serez averti par l’allumage du
témoin ‘ ’. Ajoutez la quantité convenable d’eau dans le réservoir et le nettoyage se poursuit automatiquement.
Si vous débranchez votre appareil pendant le nettoyage ou en cas de panne d’alimentation électrique,
le programme de nettoyage doit être relancé depuis le début. Ceci est obligatoire pour des raisons de rinçage
de circuit d’eau. Dans ce cas, une autre pastille de nettoyage est nécessaire. Bien réaliser le cycle total de nettoyage
pour éviter tout risque d’intoxication.
Le cycle de nettoyage est un cycle discontinu, ne pas mettre les mains sous les sorties café pendant le cycle.
N’utilisez que des pastilles de nettoyage KRUPS (XS3000). Aucune responsabilité ne saurait être engagée pour
des dommages découlant de l’utilisation de pastilles d’autres marques.
Vous pouvez obtenir des pastilles de nettoyage auprès du Service Après-Vente KRUPS.
Ouvrez la trappe
d’entretien et insérez
une pastille de
nettoyage KRUPS
(XS3000) dans la
goulotte de nettoyage.
± 10 mn
± 5 mn
± 5 mn
XS3000
Veillez à bien protéger votre plan de travail pendant les cycles de nettoyage , notamment lorsqu’il est
en marbre, en pierre ou en bois.
Page 13
Replacez le réservoir
à eau. Le témoin ‘ ’
s’éteint et le témoin
'calc' devien fixe.
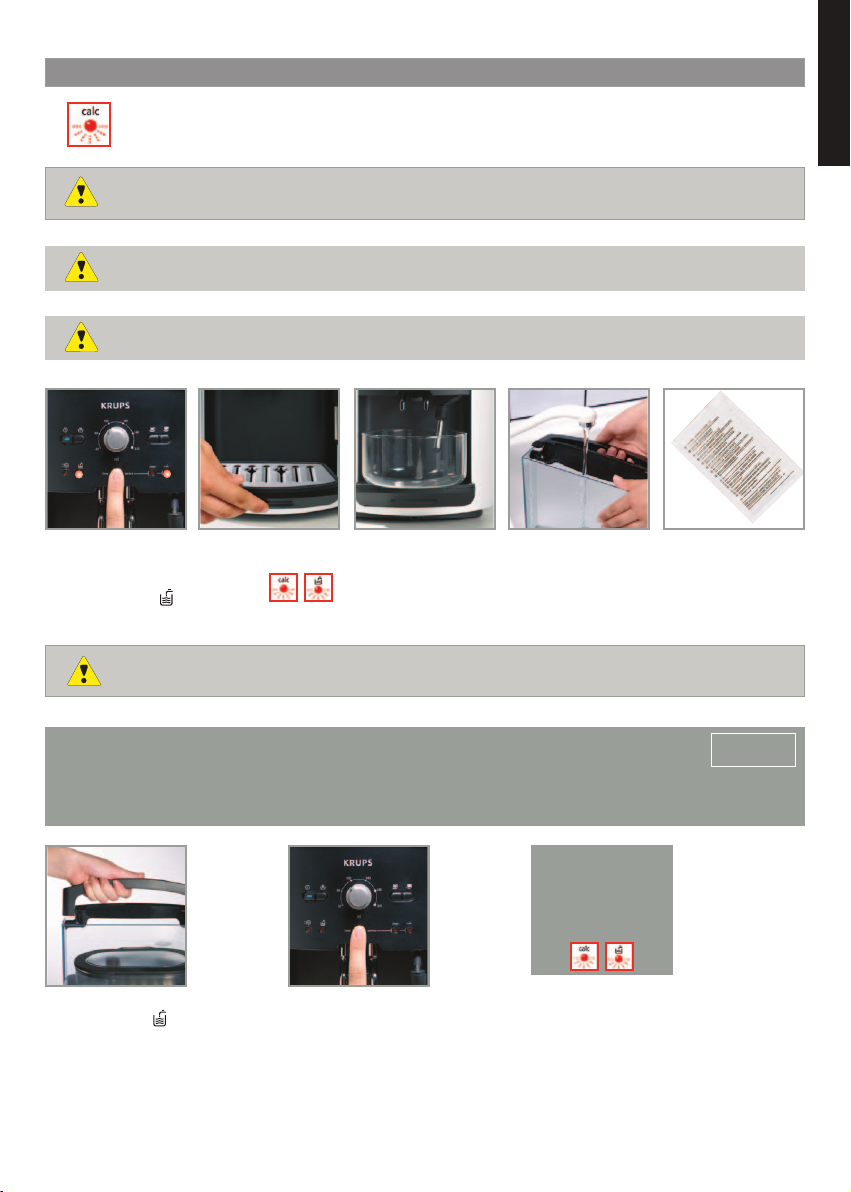
1 - Cycle de détartrage
Le témoin ‘calc’ devient fixe.
Le cycle de détartrage est démarré et va se dérouler de façon
automatique. La pompe aspire l’eau par intermittence et sort par les buses sorties café puis par la buse vapeur. La durée de
cette opération est d’environ 10 minutes.
10
PROGRAMME DE DÉTARTRAGE - DURÉE TOTALE : 22 MINUTES ENVIRON
La quantité du dépôt de tartre dépend de la dureté de l’eau utilisée. Lorsqu’il est nécessaire de procéder à un
détartrage, l’appareil vous en avertit automatiquement par l’allumage du témoin ‘calc’.
Ce programme n'est accessible que lorsque l'appareil le demande.
Attention ! Pour conserver les conditions de garantie, il est indispensable d’effectuer le cycle de détartrage de
l’appareil quand il vous le signale. Bien suivre l’ordre des opérations.
Quand le voyant est allumé, vous pouvez continuer à utiliser l’appareil mais il est conseillé d’exécuter le programme le plus vite possible.
Lancez le programme
de détartrage en
appuyant sur la
touche ‘Service’. Les
témoins ‘calc’ et ‘ ’
clignotent
Placez un récipient
pouvant contenir au
moins 0,6 l d’eau sous
les sorties café ainsi
que sous la buse
vapeur
Enlevez et nettoyez le
bac récolte-gouttes.
Videz le réservoir et
remplissez-le avec de
l’eau tiède jusqu’au
trait ‘calc’
Faites dissoudre un
sachet de détartrant
Krups (40 g) F054
Appuyez sur la touche
‘Service’ après avoir
effectué toutes ces
opérations.
± 10 mn
F054
Veillez à bien protéger votre plan de travail pendant les cycles de détartrage, notamment lorsqu’il est
en marbre, en pierre ou en bois.
Si votre produit est équipé de notre cartouche Claris - Aqua Filter System F088, merci de veillez à la
retirer avant l’opération de détartrage.
Lorsque le cycle est
achevé, les témoins
‘réservoir d’eau’ et
‘calc’ clignotent.
FRANCAIS
Utilisez uniquement des produits de détartrage KRUPS. Les produits de détartrage sont disponibles dans les centres de Service Après-Vente KRUPS.
Aucune responsabilité ne saurait être engagée dans le cas d’un dommage de l’appareil par l’utilisation d’autres produits.
Page 14
11
2 - Premier rinçage
Un premier rinçage est nécessaire pour éliminer les restes de détartrant.
Ce cycle se déroule de façon automatique. Sa durée est d’environ 6 minutes.
± 6 mn
Videz votre récipient
plein d’eau usagée.
Videz le bac récolte
gouttes et remettez-le
en place ainsi que
votre récipient comme
précédemment.
Videz, nettoyez et rincez le réservoir d’eau
puis remplissez-le à
nouveau jusqu’au
niveau “Maxi”.
Replacez votre réservoir
d’eau. Le témoin ‘calc’
clignote et le témoin
‘ ’ s’éteint.
Appuyez sur la touche
‘Service’, le témoin
‘calc’ redevient fixe. Le
cycle automatique va
durer 6 minutes.
Lorsque le deuxième
rinçage est terminé,
le témoin ‘calc’
s’éteint.
Appuyez à nouveau sur
la touche ‘Service’,
le témoin ‘calc’
redevient fixe.
Un deuxième cycle
automatique va durer
6 minutes.
Videz le bac
récolte-gouttes et
remettez-le en place.
Videz et remplissez
votre réservoir d’eau.
3 - Deuxième rinçage
A la fin du premier rinçage le témoin ‘calc’ clignote.
Un deuxième cycle automatique va durer 6 minutes.
Votre appareil est prêt
pour une nouvelle utilisation.
Enlevez votre récipient
d’eau usagée et le bac
récolte-gouttes et
remettez-les en place.
S’il n’y a pas assez d’eau dans le réservoir, vous en serez averti par l’allumage du témoin ‘ ’. Ajoutez la quantité
convenable dans le réservoir et le détartrage se poursuit automatiquement.
Si une coupure de courant se produit durant le cycle, il faudra le relancer entièrement.
± 6 mn
PROGRAMME DE RINÇAGE LONG
Enlevez, remplissez et
remettez le réservoir en
place.
Lorsqu'il est nécessaire de procéder à un rinçage long, l'appareil vous en avertit par le clignotement des
témoins lumineux 'clean' et 'calc'
Placer un récipient
pouvant contenir au
minimum 0,15 l sous
les sorties café et la
buse vapeur.
Lancez le programme de
rinçage long en appuyant
sur la touche 'Service'.
Les témoins 'clean' et
'calc' deviennent fixes.
+
Lorsque le rinçage
long est terminé, les
témoins 'clean' et
'calc' s'éteignent.
Bien réaliser le cycle total de nettoyage pour cause de risque d’intoxication. Le cycle de détartrage
est un cycle discontinu, ne pas mettre les mains sous les sorties café pendant le cycle.
Page 15
12
ENTRETIEN GÉNÉRAL
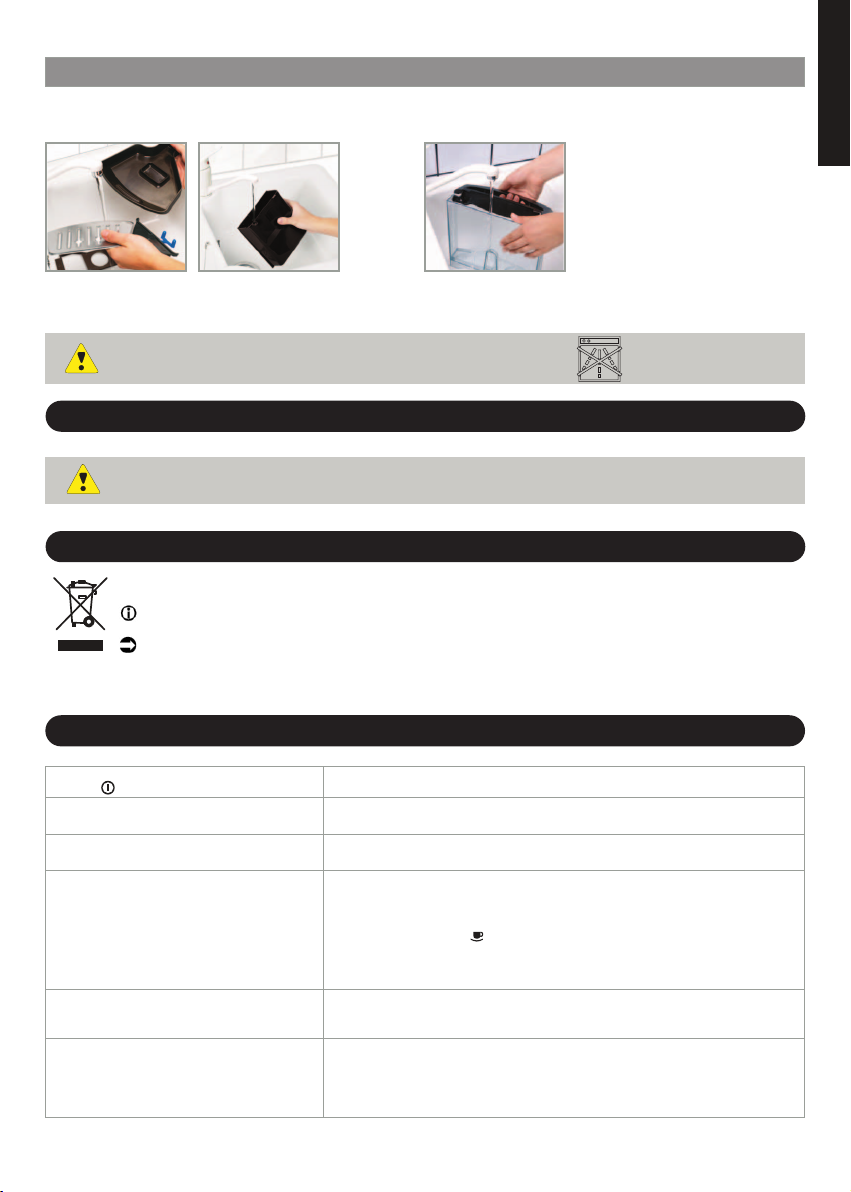
Retirez toujours le cordon d’alimentation de la prise et laissez refroidir votre appareil avant de le nettoyer.
N’utilisez pas d’ustensiles ou de produits de nettoyage susceptibles de rayer ou de corroder l’appareil.
Essuyez le corps de l’appareil extérieurement à l’aide d’un chiffon humide.
Nettoyez le tiroir de nettoyage, le bac récolte-gouttes
et sa grille, le collecteur de marc de café à l’eau
chaude avec un détergent liquide.
Rincez le réservoir
d’eau à l’eau claire.
Conservez et utilisez l'emballage original pour transporter l'appareil.
TRANSPORT DE L’APPAREIL
En cas de chute de l’appareil hors emballage, il est souhaitable de le ramener dans un centre agréé pour éviter
tout risque d’incendie ou de problèmes électriques.
PRODUIT ÉLECTRIQUE OU ÉLECTRONIQUE EN FIN DE VIE
Ces pièces ne sont pas conçues pour être lavées au lave-vaisselle.
Participons à la protection de l’environnement !
Votre appareil contient de nombreux matériaux valorisables ou recyclables.
Confiez celui-ci dans un point de collecte pour que son traitement soit effectué.
FRANCAIS
PROBLÈMES ET ACTIONS CORRECTIVES
L’appareil ne s’allume pas après appui sur la
touche .
De l'eau ou de la vapeur sort anormalement
de la buse vapeur.
L’espresso ou le café n’est pas assez chaud.
Le café est trop clair ou pas assez corsé.
Le café s’écoule trop lentement.
Le café est peu crémeux.
Vérifiez que la fiche du cordon est bien enfoncée dans la prise de courant.
Dans le cas de fonctionnements répétés, quelques gouttes peuvent s'écouler
par la buse vapeur.
Changez le réglage de la température café.
Chauffez les tasses en les rinçant à l’eau chaude.
Vérifiez que le réservoir à café en grains contient du café et que celui-ci
s'écoule correctement.
Evitez d'utiliser du café huileux, caramélisé ou aromatisé.
Diminuez le volume de café sélectionné au moyen du bouton rotatif.
Sélectionnez la touche .
Tournez le bouton de la finesse de broyage vers la gauche pour obtenir une
mouture plus fine.
Réalisez votre préparation en deux cycles en utilisant la fonction 2 tasses.
Tournez le bouton de la finesse de broyage vers la droite pour obtenir une
mouture plus grossière (peut dépendre du type de café utilisé).
Effectuez un ou plusieurs cycles de rinçage.
Tournez le bouton de la finesse de broyage vers la gauche pour obtenir une
mouture plus fine (peut dépendre du type de café utilisé).
Changer la cartouche Claris Aqua Filter System (respectez la procédure d'installation page 3).
Effectuez un ou plusieurs cycles de rinçage.
Page 16

13
PROBLÈMES ET ACTIONS CORRECTIVES
L'appareil n'a pas délivré de café.
Vous avez utilisé du café moulu à la place du
café en grains.
Le broyeur émet un bruit anormal.
Le bouton de réglage de la finesse de
broyage du broyeur est difficile à tourner.
La vapeur ne sort pas par la buse.
La quantité de mousse du lait est
insuffisante.
La mousse de lait est trop grossière.
L’accessoire Auto-Cappuccino
n’aspire pas le lait
(accessoire vendu séparément).
Le programme de nettoyage ou de
détartrage refuse de démarrer.
Après avoir rempli le réservoir d’eau, le
voyant « » reste allumé.
Après avoir vidé le collecteur de marc de
café, le voyant « » reste allumé.
Une coupure de courant s’est produite lors
d’un cycle.
Il y a de l’eau ou du café sous l’appareil.
Les 4 témoins rouges clignotent en
permanence.
Un incident a été détecté pendant la préparation.
L'appareil s'est réinitialisé automatiquement et est prêt pour un nouveau cycle.
Aspirez à l’aide de votre aspirateur le café pré-moulu contenu dans le réservoir
à grains.
Il y a présence de corps étrangers dans le broyeur.
Contactez le Service Consommateurs Krups.
Modifiez le réglage du broyeur uniquement lorsqu’il est en fonctionnement.
Après avoir éteint et laissé refroidir votre appareil :
Vérifiez que la buse vapeur est bien connectée sur son embout. Vérifiez que la
buse vapeur n'est pas bouchée (si besoin nettoyer la buse vapeur et débouchez la avec l'aiguille fournie). Vider le réservoir et enlever la cartouche Claris.
Remplir le réservoir avec de l'eau minérale forte en calcium (> 100 mg/l) et
faire successivement des cycles de vapeur (5 à 10) dans un récipient jusqu'à
l'obtention d'un jet de vapeur continu. Une fois le jet de vapeur continu obtenu,
vous pouvez utiliser à nouveau le type d’eau que vous souhaitez.
Débouchez avec l'aiguille fournie le petit orifice d'entrée d'air en partie
supérieure de la buse si nécessaire.
Utilisez un récipient froid et du lait récemment ouvert.
Changez éventuellement de type de lait (UHT ou pasteurisé).
Vérifiez le bon emboîtement des 2 extrémités du petit tube inox dans la partie
souple de la buse vapeur.
Vérifiez que le tuyau plongeant dans le lait n’est pas bouché
Vérifiez que le tube souple soit non vrillé et bien emboîté dans l’accessoire
pour éviter toute prise d’air.
Après avoir éteint et laissé refroidir votre appareil, débouchez l’orifice de sortie
de l’accessoire Auto-Cappuccino.
Ces programmes ne sont possibles que lorsque l'appareil le demande (témoin
'clean' ou 'calc' allumé).
Vérifiez le bon positionnement du réservoir sur l’appareil.
Vérifiez que le flotteur dans le fond du réservoir se déplace librement.
Rincez le réservoir et si nécessaire détartrez-le.
Enlevez le collecteur, assurez-vous qu’il est bien vide, attendez 8 secondes et
remettez-le en place.
Vérifiez que le tiroir de nettoyage est correctement enfoncé.
L’appareil se réinitialise automatiquement lors de la remise sous tension et est
prêt pour un nouveau cycle.
Le bac récolte-gouttes a débordé : videz-le et nettoyez le tiroir de nettoyage.
Vérifiez le bon positionnement du bac récolte-gouttes.
Ne pas enlever le réservoir avant la fin du cycle.
Débranchez l’appareil, retirez la cartouche Claris, attendez 20 secondes, puis
remettez-le en service.
Si le défaut persiste, relevez le chiffre qui apparaît dans l’afficheur, sous la
grille repose-tasses et contactez le Service Consommateurs Krups.
Page 17

14
Voici quelques recettes à réaliser avec votre Espresseria Automatic :
• Cappuccino
Pour un cappuccino dans les règles de l’art, les proportions idéales sont les suivantes: 1/3 de lait chaud, 1/3 de café,
1/3 de mousse de lait.
• Caffe Latte
Pour cette préparation, appelée aussi souvent Latte Macchiato, les proportions sont les suivantes: 3/5 de lait chaud,
1/5 de café, 1/5 de mousse de lait.
• Pour ces préparations à base de lait, utilisez de préférence du lait demi-écrémé bien frais.
• Pour finir, vous pouvez saupoudrer de chocolat en poudre.
• Café Crème
• Préparez un espresso classique dans une grande tasse.
• Ajoutez un nuage de crème pour obtenir un café crème.
• Café corretto*
• Préparez un tasse d’espresso comme d’habitude.
• Corrigez ensuite légèrement le goût en ajoutant 1/4 ou 1/2 verre à liqueur de cognac.
L’anisette, l’eau de vie de raisins, le Sambuco, le Kirsch et le Cointreau conviennent aussi à cet effet.
Il existe encore de nombreuses autres possibilités pour «anoblir» l’espresso.
L’imagination est illimitée.
• Liqueur au café*
• Mélangez dans 1 bouteille vide de 0,75 litre
3 tasses d’espresso, 250 g de sucre candi brun, 1/2 litre de Cognac ou de Kirsch.
• Laissez macérer le mélange pendant au moins 2 semaines.
Vous aurez ainsi une liqueur délicieuse, surtout pour les amateurs de café.
• Café glacé à l’italienne
4 boules de glace à la vanille, 2 tasses d’espresso froid sucré, 1/8 l de lait, crème fraîche, chocolat râpé.
• Mélangez l’espresso froid avec du lait.
• Répartissez les boules de glace dans des verres, versez le café dessus et décorez avec la crème fraîche et le chocolat râpé.
• Café à la frisonne*
• Ajoutez un petit verre de rhum à une tasse d’espresso sucré.
• Décorez avec une bonne couche de crème fraîche et servez.
• Espresso parfait*
2 tasses d’espresso, 6 jaunes d’oeuf, 200g de sucre, 1/8 litre de crème fraîche sucrée, 1 petit
verre de liqueur d’orange.
• Battez les jaunes d’oeuf avec le sucre jusqu’à formation d’une masse épaisse et mousseuse.
• Ajoutez l’espresso froid et la liqueur d’orange.
• Mélangez ensuite la crème fraîche fouettée.
• Versez le tout dans des coupes ou des verres.
• Mettez les coupes dans le congélateur.
(* : L’abus d’alcool est dangereux pour la santé.)
FRANCAIS
Page 18

15
. . . . . . . . . . . . . . . . . . . . . . . . . . . . . . . . . . . . . . . . . . . . . . . . . . . . . . . . . . . . . . . . . . . . . . . . . . . . . . . . . . .
. . . . . . . . . . . . . . . . . . . . . . . . . . . . . . . . . . . . . . . . . . . . . . . . . . . . . . . . . . . . . . . . . . . . . . . . . . . . . . . . . . .
. . . . . . . . . . . . . . . . . . . . . . . . . . . . . . . . . . . . . . . . . . . . . . . . . . . . . . . . . . . . . . . . . . . . . . . . . . . . . . . . . . .
. . . . . . . . . . . . . . . . . . . . . . . . . . . . . . . . . . . . . . . . . . . . . . . . . . . . . . . . . . . . . . . . . . . . . . . . . . . . . . . . . . .
. . . . . . . . . . . . . . . . . . . . . . . . . . . . . . . . . . . . . . . . . . . . . . . . . . . . . . . . . . . . . . . . . . . . . . . . . . . . . . . . . . .
. . . . . . . . . . . . . . . . . . . . . . . . . . . . . . . . . . . . . . . . . . . . . . . . . . . . . . . . . . . . . . . . . . . . . . . . . . . . . . . . . . .
. . . . . . . . . . . . . . . . . . . . . . . . . . . . . . . . . . . . . . . . . . . . . . . . . . . . . . . . . . . . . . . . . . . . . . . . . . . . . . . . . . .
. . . . . . . . . . . . . . . . . . . . . . . . . . . . . . . . . . . . . . . . . . . . . . . . . . . . . . . . . . . . . . . . . . . . . . . . . . . . . . . . . . .
. . . . . . . . . . . . . . . . . . . . . . . . . . . . . . . . . . . . . . . . . . . . . . . . . . . . . . . . . . . . . . . . . . . . . . . . . . . . . . . . . . .
. . . . . . . . . . . . . . . . . . . . . . . . . . . . . . . . . . . . . . . . . . . . . . . . . . . . . . . . . . . . . . . . . . . . . . . . . . . . . . . . . . .
. . . . . . . . . . . . . . . . . . . . . . . . . . . . . . . . . . . . . . . . . . . . . . . . . . . . . . . . . . . . . . . . . . . . . . . . . . . . . . . . . . .
. . . . . . . . . . . . . . . . . . . . . . . . . . . . . . . . . . . . . . . . . . . . . . . . . . . . . . . . . . . . . . . . . . . . . . . . . . . . . . . . . . .
. . . . . . . . . . . . . . . . . . . . . . . . . . . . . . . . . . . . . . . . . . . . . . . . . . . . . . . . . . . . . . . . . . . . . . . . . . . . . . . . . . .
. . . . . . . . . . . . . . . . . . . . . . . . . . . . . . . . . . . . . . . . . . . . . . . . . . . . . . . . . . . . . . . . . . . . . . . . . . . . . . . . . . .
. . . . . . . . . . . . . . . . . . . . . . . . . . . . . . . . . . . . . . . . . . . . . . . . . . . . . . . . . . . . . . . . . . . . . . . . . . . . . . . . . . .
. . . . . . . . . . . . . . . . . . . . . . . . . . . . . . . . . . . . . . . . . . . . . . . . . . . . . . . . . . . . . . . . . . . . . . . . . . . . . . . . . . .
. . . . . . . . . . . . . . . . . . . . . . . . . . . . . . . . . . . . . . . . . . . . . . . . . . . . . . . . . . . . . . . . . . . . . . . . . . . . . . . . . . .
. . . . . . . . . . . . . . . . . . . . . . . . . . . . . . . . . . . . . . . . . . . . . . . . . . . . . . . . . . . . . . . . . . . . . . . . . . . . . . . . . . .
. . . . . . . . . . . . . . . . . . . . . . . . . . . . . . . . . . . . . . . . . . . . . . . . . . . . . . . . . . . . . . . . . . . . . . . . . . . . . . . . . . .
. . . . . . . . . . . . . . . . . . . . . . . . . . . . . . . . . . . . . . . . . . . . . . . . . . . . . . . . . . . . . . . . . . . . . . . . . . . . . . . . . . .
. . . . . . . . . . . . . . . . . . . . . . . . . . . . . . . . . . . . . . . . . . . . . . . . . . . . . . . . . . . . . . . . . . . . . . . . . . . . . . . . . . .
. . . . . . . . . . . . . . . . . . . . . . . . . . . . . . . . . . . . . . . . . . . . . . . . . . . . . . . . . . . . . . . . . . . . . . . . . . . . . . . . . . .
. . . . . . . . . . . . . . . . . . . . . . . . . . . . . . . . . . . . . . . . . . . . . . . . . . . . . . . . . . . . . . . . . . . . . . . . . . . . . . . . . . .
. . . . . . . . . . . . . . . . . . . . . . . . . . . . . . . . . . . . . . . . . . . . . . . . . . . . . . . . . . . . . . . . . . . . . . . . . . . . . . . . . . .
. . . . . . . . . . . . . . . . . . . . . . . . . . . . . . . . . . . . . . . . . . . . . . . . . . . . . . . . . . . . . . . . . . . . . . . . . . . . . . . . . . .
. . . . . . . . . . . . . . . . . . . . . . . . . . . . . . . . . . . . . . . . . . . . . . . . . . . . . . . . . . . . . . . . . . . . . . . . . . . . . . . . . . .
. . . . . . . . . . . . . . . . . . . . . . . . . . . . . . . . . . . . . . . . . . . . . . . . . . . . . . . . . . . . . . . . . . . . . . . . . . . . . . . . . . .
. . . . . . . . . . . . . . . . . . . . . . . . . . . . . . . . . . . . . . . . . . . . . . . . . . . . . . . . . . . . . . . . . . . . . . . . . . . . . . . . . . .
. . . . . . . . . . . . . . . . . . . . . . . . . . . . . . . . . . . . . . . . . . . . . . . . . . . . . . . . . . . . . . . . . . . . . . . . . . . . . . . . . . .
. . . . . . . . . . . . . . . . . . . . . . . . . . . . . . . . . . . . . . . . . . . . . . . . . . . . . . . . . . . . . . . . . . . . . . . . . . . . . . . . . . .
. . . . . . . . . . . . . . . . . . . . . . . . . . . . . . . . . . . . . . . . . . . . . . . . . . . . . . . . . . . . . . . . . . . . . . . . . . . . . . . . . . .
. . . . . . . . . . . . . . . . . . . . . . . . . . . . . . . . . . . . . . . . . . . . . . . . . . . . . . . . . . . . . . . . . . . . . . . . . . . . . . . . . . .
. . . . . . . . . . . . . . . . . . . . . . . . . . . . . . . . . . . . . . . . . . . . . . . . . . . . . . . . . . . . . . . . . . . . . . . . . . . . . . . . . . .
. . . . . . . . . . . . . . . . . . . . . . . . . . . . . . . . . . . . . . . . . . . . . . . . . . . . . . . . . . . . . . . . . . . . . . . . . . . . . . . . . . .
. . . . . . . . . . . . . . . . . . . . . . . . . . . . . . . . . . . . . . . . . . . . . . . . . . . . . . . . . . . . . . . . . . . . . . . . . . . . . . . . . . .
. . . . . . . . . . . . . . . . . . . . . . . . . . . . . . . . . . . . . . . . . . . . . . . . . . . . . . . . . . . . . . . . . . . . . . . . . . . . . . . . . . .
. . . . . . . . . . . . . . . . . . . . . . . . . . . . . . . . . . . . . . . . . . . . . . . . . . . . . . . . . . . . . . . . . . . . . . . . . . . . . . . . . . .
. . . . . . . . . . . . . . . . . . . . . . . . . . . . . . . . . . . . . . . . . . . . . . . . . . . . . . . . . . . . . . . . . . . . . . . . . . . . . . . . . . .
. . . . . . . . . . . . . . . . . . . . . . . . . . . . . . . . . . . . . . . . . . . . . . . . . . . . . . . . . . . . . . . . . . . . . . . . . . . . . . . . . . .
. . . . . . . . . . . . . . . . . . . . . . . . . . . . . . . . . . . . . . . . . . . . . . . . . . . . . . . . . . . . . . . . . . . . . . . . . . . . . . . . . . .
. . . . . . . . . . . . . . . . . . . . . . . . . . . . . . . . . . . . . . . . . . . . . . . . . . . . . . . . . . . . . . . . . . . . . . . . . . . . . . . . . . .
Page 19
16
UK
ESPRESSERIA AUTOMATIC
0845 330 6460 (01) 677 4003
ROI
HOTLINE
Photos are non-contractual.
FRANCAISENGLISHDEUTSCHNEDERLANDSITALIANO
ESPAÑOL
PORTUGUÊS
E
λληνικά
For domestic use only
The length of the guarantee depends on the legislation in your country with a maximum of 3000 cycles a year. This
appliance is intended for domestic use only and is not suitable for commercial or professional use. This product has
been designed for domestic use only. Any commercial use, inappropriate use or failure to comply with the
instructions, the manufacturer accepts no responsibility and the guarantee will not apply.
The warranty does not apply to damage and faults resulting from careless use, repair by unauthorised persons as
well as non-observance of the instructions for use. Warranty will not be rendered if any operation and maintenance
instructions of Krups have not been observed or if cleaning or de-scaling agents are used which do not comply with
the original Krups specifications or failure to use the Claris Aqua Filter System water filter in accordance with Krups
instructions. Abnormal wear and tear of parts (grinding disks, valves, seals) is exempted from the warranty, as well
as damages caused by foreign objects in the grinding mill (e.g. wood, stones, plastic parts etc.).
Page 20

: Light off / : Light flashing
: Light on / : Light double flashing
Lights
Meaning
Empty the
coffee
grounds
collector
Fill tank Clean Calc On / Off
The appliance is ready for a coffee or steam cycle.
/
Slow flashing: the device is in the preheating phase
or an initialisation cycle.
/
Double flash: a 2 coffee cycle is in process.
Product support information in operating parameters
setting mode.
/
/
Empty the coffee grounds collector (a 2 coffee cycle
is underway).
/
Empty the coffee grounds collector + clean the drawer + empty the drip tray.
Check coffee grounds collector is not missing or
incorrectly positioned. Check cleaning tray is not
missing or incorrectly positioned.
Set water hardness.
/
Fill tank with water. Check water tank is not missing
or incorrectly positioned.
/
/
Coffee cycle has stopped due to lack of water.
Fill tank with water.
Setting auto off automatic cut-off.
Cleaning program requested or in process.
/
Cleaning program: preparing cleaning or rinsing
cycle
Setting coffee temperature.
Scale removal program requested or in process.
/
Scale removal program: preparing scale removal or
rinsing cycle.
/
/
Rinsing cycle or scale removal cycle: request to
empty water tank, rinse it and fill with fresh water.
/ /
Long rinse request (around 150 ml) see page 5.
Long rinse in progress.
/ / / /
Constant flashing: operating fault.
Page 21
PAG E
DESCRIPTION . . . . . . . . . . . . . . . . . . . . . . . . . . . . . . . . . . . . . . . . . . . . . . . . . . . . . . . . . . . . . . . .1
Warning signals
Information on espresso coffee
Safety instructions
BEFORE FIRST USE . . . . . . . . . . . . . . . . . . . . . . . . . . . . . . . . . . . . . . . . . . . . . . . . . . . . . . . . . .3
MEASURING WATER HARDNESS
CLARIS - AQUA FILTER SYSTEM CARTRIDGE
SETTINGS . . . . . . . . . . . . . . . . . . . . . . . . . . . . . . . . . . . . . . . . . . . . . . . . . . . . . . . . . . . . . . . . . . . .4
SETTING WATER HARDNESS
SETTING COFFEE TEMPERATURE
SETTING THE AUTOMATIC ELECTRICAL POWER SUPPLY CUT-OFF MECHANISM
PREPARING THE APPLIANCE . . . . . . . . . . . . . . . . . . . . . . . . . . . . . . . . . . . . . . . . . . . . . . . . . .5
RINSING OF CIRCUITS
PREPARING THE GRINDER
PREPARING ESPRESSO AND LONG COFFEES . . . . . . . . . . . . . . . . . . . . . . . . . . . . . . . .6
PREPARING AN ESPRESSO (FROM 20 TO 70 ML)
PREPARING A CUP OF COFFEE (FROM 80 TO 220 ML)
2-CUP FUNCTION
PREPARING STEAM . . . . . . . . . . . . . . . . . . . . . . . . . . . . . . . . . . . . . . . . . . . . . . . . . . . . . . . . . .7
FROTHING MILK
AUTO-CAPPUCCINO SET XS6000
MAINTAINING YOUR APPLIANCE . . . . . . . . . . . . . . . . . . . . . . . . . . . . . . . . . . . . . . . . . . . . . .8
EMPTYING THE COFFEE GROUNDS COLLECTOR, THE CLEANING TRAY
AND THE DRIP TRAY
RINSING THE COFFEE CIRCUIT
CLEANING PROGRAM
SCALE REMOVAL PROGRAM . . . . . . . . . . . . . . . . . . . . . . . . . . . . . . . . . . . . . . . . . . . . . . . . .10
LONG RINSING PROGRAMME
GENERAL MAINTENANCE . . . . . . . . . . . . . . . . . . . . . . . . . . . . . . . . . . . . . . . . . . . . . . . . . . . .12
MOVING THE APPLIANCE
ELECTRICAL OR ELECTRONIC PRODUCT AT END OF SERVICE LIFE
TROUBLESHOOTING AND CORRECTIVE ACTIONS . . . . . . . . . . . . . . . . . . . . . . . . . . . .12
RECIPES . . . . . . . . . . . . . . . . . . . . . . . . . . . . . . . . . . . . . . . . . . . . . . . . . . . . . . . . . . . . . . . . . . .14
CONTENTS
Photos are non-contractual.
F 088 Claris
–Aqua Filter
System
Cartridge
(not
supplied)
XS 3000
Packet of 10
cleaning
tablets (two
tablets supplied)
F 054
Descaling
powder (one
sachet supplied)
XS6000
AutoCappuccino Set
(not supplied)
XS 4000
KRUPS
Cleaning fluid for
Cappuccino system (not supplied)
accessories (sold separately)
ENGLISH
This machine must only be used with Krups' accessories for the guarantee to be valid.
Page 22
1
Coffee volume rotating button
Steam button
“On/Off” key and light
Standard coffee key
Strong coffee key
“Clean” light
“Scale removal” light
“Fill water tank” light
"empty the coffee grounds" and "empty the drip
tray" warning light
“Rinsing/servicing” key
Removable drip grid and tray
Coffee outlets with height adjusting handle
Coffee grounds collector
Coffee volume rotating knob
Coffee bean container
Steam nozzle
Coffee bean container lid
Water tank handle/lid
Water tank
Cup tray
Water level floats
Topview
Grinding fineness setting knob
Cleaning inlet
DESCRIPTION
Ground coffee setting
Cleaning tray
Empty the coffee grounds collector, the
drip tray and the coffee drawer.
Fill water tank
Warning signals
Proceed with cleaning
Proceed with scale removal
Light on
Light flashing
Metal grinding wheel
Digital display for parameter setting
Special maintenance instructions
Photos are non-contractual.
+
Carry out a long rinse
Page 23

2
ENGLISH
Dear Customer,
Thank you for having purchased this Krups Espresseria Automatic. We are sure you will enjoy both the quality of the coffee it makes
and how easy it is to use.
Whether you want a short, strong shot of a ristretto, a good espresso, a larger and milder lungo, or a creamy cappuccino, your auto-
matic coffee / espresso machine has been designed so you can enjoy the same quality at home as at the bistro, whatever the time
of day and right through the week.
Thanks to its Thermoblock System, its 15 bar pump and because it uses real coffee beans that are ground just before the coffee is
made, your Espresseria Automatic will give you a drink containing maximum aroma, with a fine creamy golden brown top produced
by the natural oils contained in coffee beans.
Drink your espresso from small porcelain cups rather than the usual coffee cup or mug.
To obtain an espresso at just the right temperature and a nice compact creamy top, we advise you to pre-heat your cup.
After a few trial runs you will find the type of mix and roast of the coffee beans that suits your taste. The quality of the water used is
obviously another essential factor in the coffee you get.
Make sure the water is fresh from the tap (contact with the air tends to make it stale), that it is free from
chlorine odours and relatively cold.
Espresso coffee is richer in aroma than a conventional filter coffee. Despite its stronger, longer-lasting taste, espresso in fact
contains less caffeine than filter coffee (about 60 to 80 mg a cup as compared with 80 to 100 mg a cup). This is due to the shorter
percolation time.
Due to the visibility of the containers and its automatic cleaning and scale removal programs, your Espresseria Automatic is extremely easy to use.
Important: Safety instructions
Read the instructions for use carefully before first using your appliance and keep them for reference: Incorrect use of the
appliance will release KRUPS from any responsibility.
This appliance is intended to be used in household and similar applications: (maximum of 3000 cycles a year) such as:
- staff kitchen areas in shops, offices and other working environments;
- farm houses
- by clients in hotels, motels and other residential type environnements;
- bed and breakfast type environments.
However, if used in the above types of environments the product will not be covered by the manufacturer's guarantee.
Place on a flat, stable, heat-resistant surface away from sources of heat and water splashes.
Connect the appliance only to an earthed mains socket. Check that the power supply voltage shown on the appliance’s rating
plate corresponds to that of your electrical installation.
Make certain not to place the appliance on a hot surface such as a hot-plate or use it close to a bare flame.
Immediately take the plug out of the socket if you notice any problem while coffee is being made.
Do not pull the power supply cord to remove the plug.
Do not let the power supply cord hang down from a table or work surface.
Do not put your hand or the power supply cord on the hot parts of the appliance.
This appliance is not intended for use by persons (including children) with reduced physical, sensory or mental capabilities, or
lack of experience and knowledge, unless they have been given supervision or instruction concerning use of the appliance by a
person responsible for their safety.
Children should be supervised to ensure that they do not play with the appliance.
For safety reasons, do not use the appliance if the power supply cord or plug are damaged. Only have the power supply cord
replaced by an authorised KRUPS service centre.
Always refer to the instructions when removing scale from the appliance.
Protect the appliance against humidity and freezing.
Do not use the appliance if it does not run correctly or if it has been damaged. In this case, have the appliance examined by a
KRUPS authorized service centre (see list in KRUPS Service handbook).
Apart from cleaning and scale removal in accordance with the appliance’s user instructions, any intervention on the appliance
must be performed by an authorised Krups service centre.
In the interests of safety, only use accessories and consumables certified by KRUPS for your appliance.
Any error in connection negates the guarantee.
Disconnect the appliance as soon as you stop using it over a prolonged period and when you clean it.
All appliances are subject to stringent quality control. Practical tests using appliances taken at random are conducted and this
may explain any marks showing prior use.
You are advised against using multiple plugs and/or extension leads.
Do not put water into the coffee bean container and/or under the servicing flap.
Be careful of the direction of the steam nozzle as steam can cause scalding.
Failure to ensure scale removal, cleaning and regular maintenance or the presence of foreign bodies in the grinder will mean that
the guarantee will not be valid.
Limits to use
This Espresso machine must only be used to prepare espressos or coffee, to froth up milk and heat liquids. This product has been
designed for domestic use only. Any commercial use inappropriate use or failure to comply with the instructions, the manufacturer
accepts no responsability and the guarantee will not apply.
Page 24

To get the best taste from your coffee and extend your appliance’s service life, we advise you to use only the Claris - Aqua
Filter System cartridge sold as an accessory.
It comprises a scale-removing substance and activated carbon that reduces chlorine, impurities, lead, copper, pesticides, etc.
that are present in the water. Minerals and trace elements will then be preserved.
3
Before using the appliance for the first time or if you have noted a change in water hardness, it is advisable to adapt the
appliance to the water hardness. To determine the water hardness, use the measuring stick delivered with your appliance or
get in contact with your water authority.
BEFORE FIRST USE
After 1 minute the hardness measurement will
appear (moderately hard water).
Filter the water using the ClarisAqua Filter System cartridge to
reduce carbonate hardness by
as much as 75 %*
Chlorine – up to 85 %*
Lead – up to 90 %*
Copper – up to 95 %*
Aluminium – up to 67 %*
Installing the cartridge in
the machine.
On first use, screw the
filter cartridge into the
bottom of the water tank.
The Claris cartridge needs to be replaced after about every 50 litres of water or every two months at least.
Fill a glass with water
and immerse a stick
into it.
Use filtered water, but not bottled mineral water.
Mechanism to indicate the
month the cartridge was fitted and when to replace it
(after 2 months at most).
Degree of
hardness
0
Very soft
1
soft
2
moderately hard
3
hard
4
extremely hard
° f
<5,4° >7,2° >12,6° >25,2° > 37,8°
° dH
<3° >4° >7° >14° > 21°
° e
<3,75° >5° >8,75° >17,5° > 26,25°
Place a receptacle
under the steam nozzle.
Run 300 ml of water by
pressing the rinse button once for more than
3 seconds. You can
repeat this operation if
you wish.
1 sec.
012
3
4
F088
MEASURING WATER HARDNESS
CLARIS - AQUA FILTER SYSTEM F 088 CARTRIDGE (SOLD SEPARATELY)
* indications provided by the manufacturer
Page 25
SETTINGS
4
Appliances are
pre-set in the factory
to 2, average
temperature.
Connect the appliance
to the mains power
supply but do not turn
it on.
Lift the cup grid by
pressing on the back to
make it tilt.
Press the ‘Service’ and
keys at the same
time.
The ‘calc’ light will
come on.
Press the key as
many times as are
needed to select the
desired coffee temperature.
At each of these stages, you can memorise your settings by pressing the button when you have reached the setting you
want (the 4 lights flash 2 times) or carry on with the procedure. These settings will remain memorised even if the electrical
power is cut off. You can modify these settings at any time by repeating these operations.
Setting the automatic electrical power supply cut-off (auto-off)
The ‘clean’ light will
come on.
Press the key as
many times as are
needed to select the
desired duration.
Press the key as many
times as are needed to select
the hardness level for the
water used.
Setting the coffee temperature
Setting water hardness
Appliances are
pre-set in the factory
for hardness level 3.
Appliances are
pre-set in the factory
to 1 hour.
1
2
3
1 = 1 H
2 = 2 H
3 = 3 H
4 = 4 H
0 = very soft
1 = soft
2 = moderately hard
3 = hard
4 = very hard
The digital display for
parameter setting is
under the servicing
flap.
It is possible to turn your
machine off automatically after
a number of pre-programmed
hours.
Press the steam key to switch
to automatic
cut-off setting =>
The “water tank” light
will come on.
Press the steam key to
switch to coffee
temperature setting =>
Look down vertically to
the bottom of the window
ENGLISH
Page 26
5
It is preferable to rinse the 2 circuits out at least once after the machine has not been used for several days.
Each time you plug your machine in, it will carry out an initialisation cycle.
Pull out and fill the
water tank.
Put it back in place by
pressing firmly and
close the lid again.
Open the coffee bean
container lid. Add the
coffee beans (250 g
maximum).
Close the coffee bean
container lid again.
Check that the coffee beans do not contain any foreign particles such as grit, as any damage caused by the presence of
foreign particles will negate the warranty.
Do not put water into the coffee bean container.
Remember to fit the drip tray to avoid waste water flowing onto the work surface and staining it or scalding you.
Check that your water tank is clean.
Turn the appliance on by pressing the
button. The light will flash during the
pre-heating and initialisation cycle.
Rinsing out the coffee circuit:
Place a recipient under the coffee nozzles.
Press the 'Service' button quickly to start a
coffee circuit rinsing cycle, which will automatically stop after around 40 mL.
You can choose the strength of your coffee by setting the coffee bean grinding fineness.
The finer the grinding setting, the stronger and creamier the coffee should be. Set the desired fineness for grinding by turning the ‘Grinding fineness setting’ knob.
CHANGE THE SETTING DURING GRINDING.
NEVER FORCE THE GRINDING FINENESS SETTING BUTTON
It is recommended that you do not use oily, caramelised or flavoured coffee beans for this machine. These kinds of beans
may damage the machine.
NEVER PUT GROUND COFFEE IN THE COFFEE CONTAINER.
Turn to the left
for finer grind.
Turn to the right
for coarser
grind.
Do not fill the water tank with hot water, milk or any other liquid. If you turn on the appliance when the water tank is
not in place or not correctly filled (under the “min.” level,), the “fill water tank” light will come on and making an espresso
or a cup of coffee will be made impossible.
PREPARING THE APPLIANCE
Rinsing out the steam circuit:
Place a container under the steam
nozzle and
press the ’Service’ button
for 3 seconds to start a steam circuit
rinsing cycle, which will automatically
stop after around 300 mL.
PREPARING THE GRINDER
RINSING OF CIRCUITS
Page 27
6
The quantity of water for an espresso must be between 20 and 70 ml.
Each time you plug your machine in, it will carry out an initialisation cycle.
Press the button . The light will flash during the pre-heating and initialisation cycle.
Select the key to get a
strong espresso or the
key to get a standard
espresso.
You have now prepared your appliance.
The light will stay on.
Put a cup under the coffee outlets.
You can lower or raise the coffee
outlets to suit the size of your cups.
PREPARING ESPRESSO AND LONG COFFEES
YOUR APPLIANCE IS DESIGNED TO MAKE COFFEE FROM COFFEE BEANS ONLY.
When you first make coffee with the machine or after a long period of absence or a cleaning or scale
removal procedure, a little steam and hot water will come out of the steam nozzle (priming).
Splashing or scalding may occur if the coffee outlets are set too high in relation to the size
of the cups.
You can change the volume of water
at any time.
The ground coffee is moistened with a little hot water after the grinding stage.
A few moments later, percolation as such starts.
Beyond a certain amount of coffee in the cup, we recommend - in order to obtain a stronger coffee - to
divide your preparation into two separate cycles. Example 2 x 70ml cycles for a cup of 140 ml.
You can use your appliance to make 2 cups of coffee or espresso. Remember not to remove the cups after the first cycle.
You have now prepared your appliance. The light will stay on.
Put two cups under the
coffee outlets.
You can lower or raise the
coffee outlets to suit the
size of your cups.
Select the key or key according
to your choice, pressing twice rapidly in
succession. The light will come on
with a double flash to confirm that you
have ordered 2 cups of coffee.
If you first press the key and then the (or vice versa), the second action will not
be taken into account.
The appliance will
automatically sequence
2 complete
coffee-making cycles.
To stop coffee flowing into the cup, you can either again press one of the or keys or turn the
knob to the min. position.
x 2
PREPARING AN ESPRESSO
2-CUP FUNCTION
DO NOT REMOVE THE WATER COMPARTMENT BEFORE THE END OF THE CYCLE
(that is around 15 seconds after the coffee has finished dripping through).
The quantity of water for a cup of coffee must be between 80 and 220 ml.
PREPARING A CUP OF COFFEE
ENGLISH
Page 28
7
PREPARING STEAM
Steam froths up the milk to make a cappuccino or a caffe latte, for example, and also heats up liquids. As you need a higher
temperature to produce steam than to make an espresso, the appliance runs an additional pre-heating phase for steam.
Press the key .
The light will flash while the appliance heats up.
Once pre-heating has been completed, the light will remain on continuously and you can start
producing steam by again pressing the key.
Press the button again to stop the cycle
FROTHING MILK
We recommend that you use pasteurised or UHT milk that has been recently opened. Untreated milk does not
give the best results. After the steam function has been used, the nozzle can be hot, and we recommend that
you wait for a few moments before handling it.
Check that the steam
nozzle is correctly
fitted.
Pour the milk into your
milk jug. Immerse the
nozzle in the milk.
Initiate the steam function as explained in the
paragraph above.
...again press the key
to stop the cycle. Be careful, because the cycle
does not stop immediately.
To remove any remaining
milk from the steam
nozzle, place a receptacle under the nozzle and
press the key.
Let the steam escape for at
least 10 seconds and then
again press the key to
stop the process.
The steam nozzle can be removed for more intense cleaning. Wash it out
with water and a little washing up liquid and a small non-abrasive brush.
Rinse and dry it. Before putting it back, ensure that the air inlet holes are
not blocked by any milk residues. If necessary, unblock them using the
needle supplied. Do not wash the steam nozzle in the dishwasher.
To interrupt the steam function, just press any key. Be careful as the nozzle may be hot.
If the nozzle is blocked, unblock it using the needle supplied.
The maximum duration for production of steam per cycle is limited to 2 minutes.
SETTING UP THE AUTO-CAPPUCCINO XS 6000 (SOLD SEPARATELY)
To prevent milk from drying on the auto-cappuccino accessory, it must be cleaned thoroughly. It is recommend that you
wash it immediately by carrying out a cycle with steam and the accessory pot filled with water in order to clean the
inside of the nozzle. To do so, you can use liquid cleaner XS4000, available as an accessory.
XS 6000
Once your milk is frothy
enough...
Be careful, because the cycle does not stop immediately.
Attach the various
parts together.
Select the cappuccino
or caffe latte position
on the special nozzle.
Fill up the milk pot and place
a cup or a glass underneath
the auto-cappuccino nozzle.
Press the button
to start and then to
stop the cycle
Place your cup under the
coffee outlets and start a
coffee / espresso cycle.
This auto-cappuccino accessory makes it easier to make a cappuccino or a caffe latte.
The tube must not be twisted to ensure that the button is held in the correct position.
Page 29
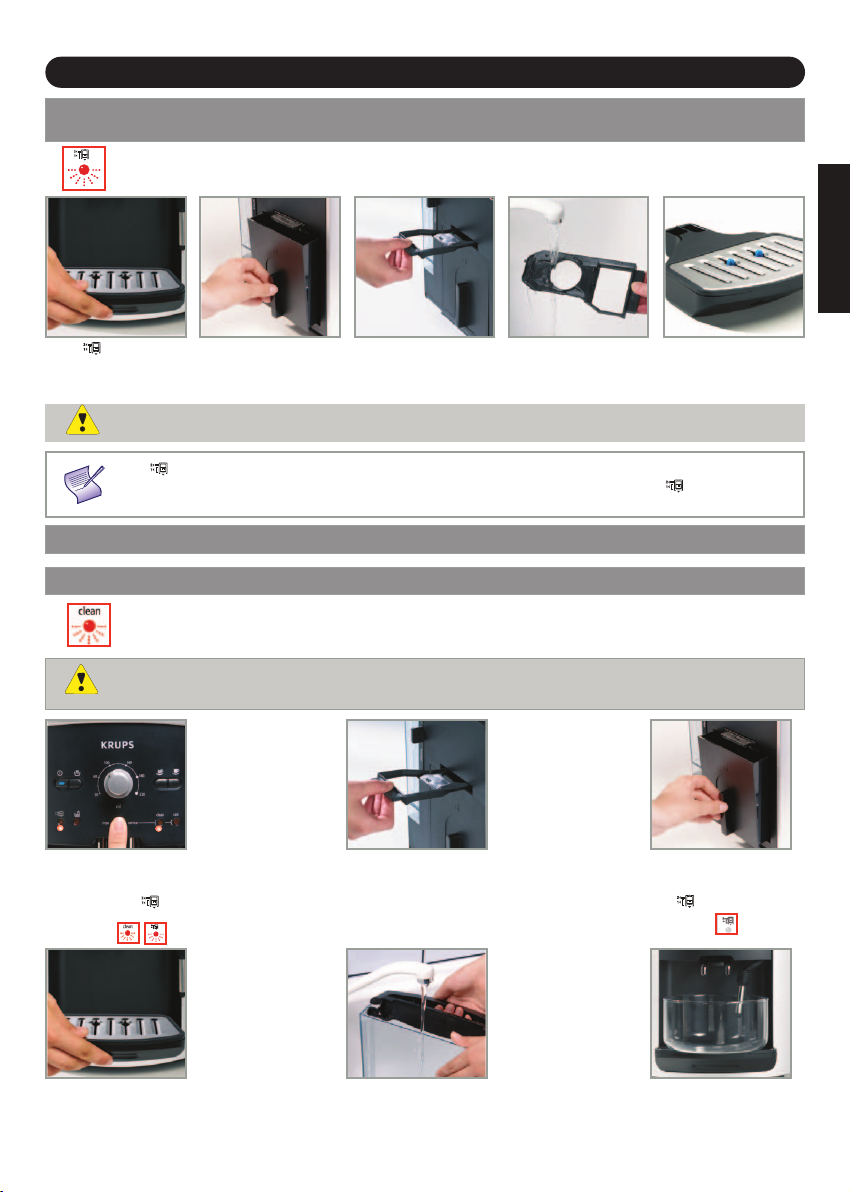
8
If the light comes
on, remove, empty and
clean the drip tray.
The drip tray receives waste water and the coffee grounds collector receives used coffee grounds.
The coffee cleaning tray allows you to eliminate any deposits of coffee grounds.
Remove, empty and
clean the coffee
grounds collector.
The drip tray is equipped
with floats to tell you
when to empty it.
The light will remain on if the coffee grounds collector is not slotted in fully or not fitted correctly or if
it has been put back in less than 4 seconds. You cannot make espresso or coffee while the light is on or is
flashing. The coffee grounds collector has a capacity of 9 coffees.
MAINTAINING YOUR APPLIANCE
As soon as you remove the coffee grounds collector, you will have to empty it completely to avoid any overflow.
MACHINE CLEANING PROGRAM – TOTAL DURATION: ABOUT 20 MINUTES
When a cleaning operation is necessary, the appliance warns you of this by flashing the "clean" light.
This program is only accessible when the machine requests it (i.e. approximately every 300 coffees or espressos).
Press the ‘Service’
button to start up the
cleaning program.
The ‘clean’ and
lights will flash.
Empty and clean the
coffee grounds collector
then fit it again.
The light will go off.
Remove and clean
the cleaning tray then
fit it again.
Remove, fill and re-fit
the water tank.
RINSING OUT THE CIRCUITS: SEE PAGE 5
Place a receptacle with a
minimum capacity of 0.6 l
under the coffee outlets.
Remove the coffee
cleaning tray.
Clean it under water
and dry thoroughly.
Caution! To benefit from the guarantee conditions, it is essential to perform the appliance cleaning cycle
when informed to do so. Be sure to follow the procedure closely, step by step.
You can continue to use the appliance when the light is on, but you are advised to perform the program as soon as possible.
Remove and empty the
drip tray.
EMPTYING THE COFFEE GROUNDS COLLECTOR, THE COFFEE TRAY
AND THE DRIP TRAY
ENGLISH
Page 30
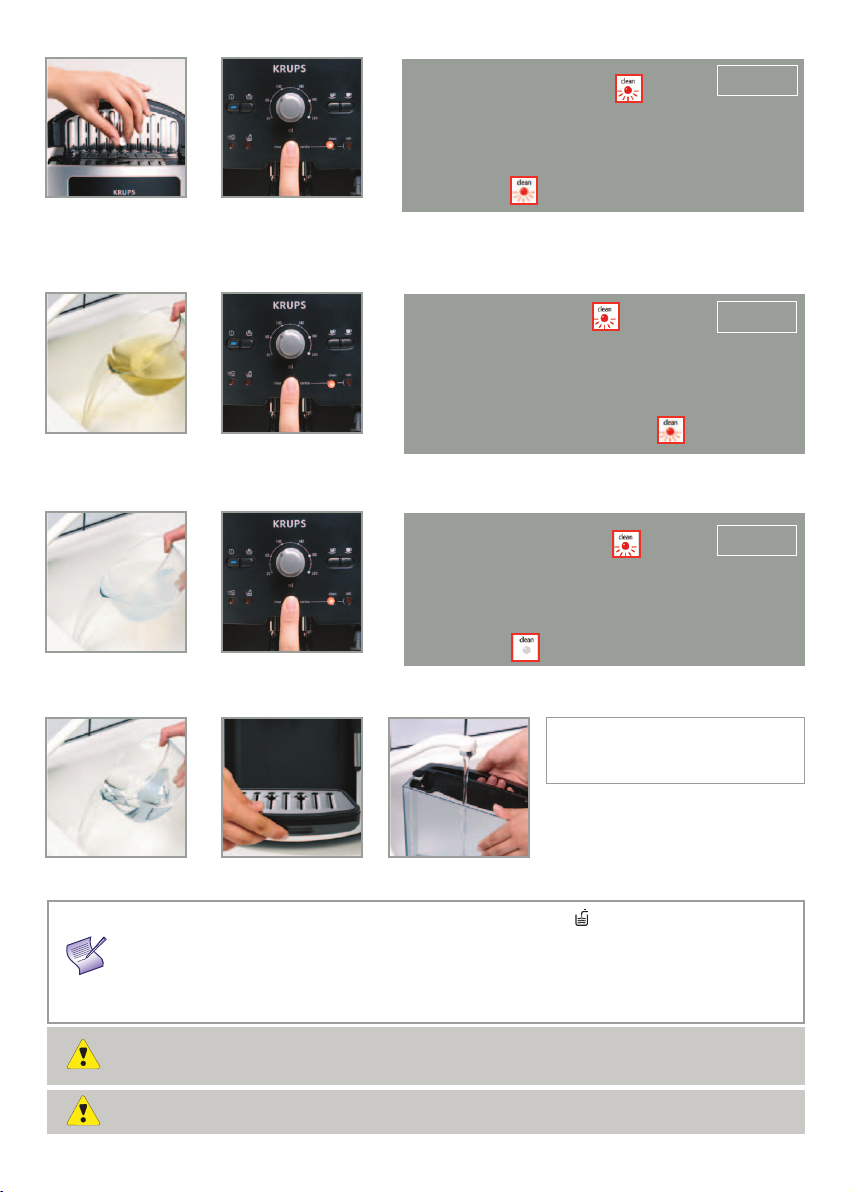
9
Press the ‘Service’
button to start up the
cleaning program.
1 – Cleaning cycle
The ‘clean’ light becomes steady.
The cleaning cycle will be run automatically.
The pump sucks up water intermittently. This operation lasts
about 10 minutes and the ‘clean’ light will flash again.
Empty your waste water
receptacle and put it
back under the coffee
outlets.
Again press the ‘Service’
button to start the first
rinsing cycle.
2 - First rinsing
The ‘clean’ light will become steady again.
The program continues.
A first rinsing cycle will be run automatically. It allows the
appliance to be rinsed and remaining detergent to be eliminated. This first rinsing cycle lasts about 5 minutes and once finished the ‘clean’ light will flash again.
Empty your waste
water receptacle and
put it back under the
coffee outlets.
Again press the
‘Service’ button to start
the second rinsing
cycle.
3 – Second rinsing
The ‘clean’ light again becomes steady.
A second cleaning cycle will be run automatically. This second
rinsing cycle lasts about 5 minutes.
Once the second rinsing cycle has finished, the ‘clean’ light will
go off.
Remove and empty your
waste water receptacle.
Empty the drip tray and fit
it again.
Fill your water tank.
Your appliance will be ready
for use again.
If there is not enough water in the water tank when you start the program, the light will come on to
warn you. Add the appropriate amount of water to the container and cleaning will continue automatically.
If your machine is unplugged during cleaning or in the event of power failure, you will have to restart the cleaning
program right from the start. This is essential due to water circuit rinsing reasons. In this case, you will need to use
another cleaning tablet. Be sure to complete the entire cleaning cycle to avoid any risk of irritation (seek medical
advice if cleaning solutions are accidently swallowed.
The cleaning cycle is a continuous cycle. Do not put your hands under the coffee outlets during the cycle.
Only use KRUPS (XS3000) cleaning tablets. We cannot be held responsible for any damage that may result from
the use of tablets from other brands.
You can obtain cleaning tablets from KRUPS Service Centres.
Ensure work surfaces are protected during cleaning cycles, especially if they are made from marble, stone or wood.
Open the servicing
flap and insert a
KRUPS cleaning
tablet (XS3000) in
the cleaning inlet.
± 10 mn
± 5 mn
± 5 mn
XS3000
Make certain to protect your work surface during cleaning and scale removal cycles, especially if it is
made of marble, stone or wood.
Page 31
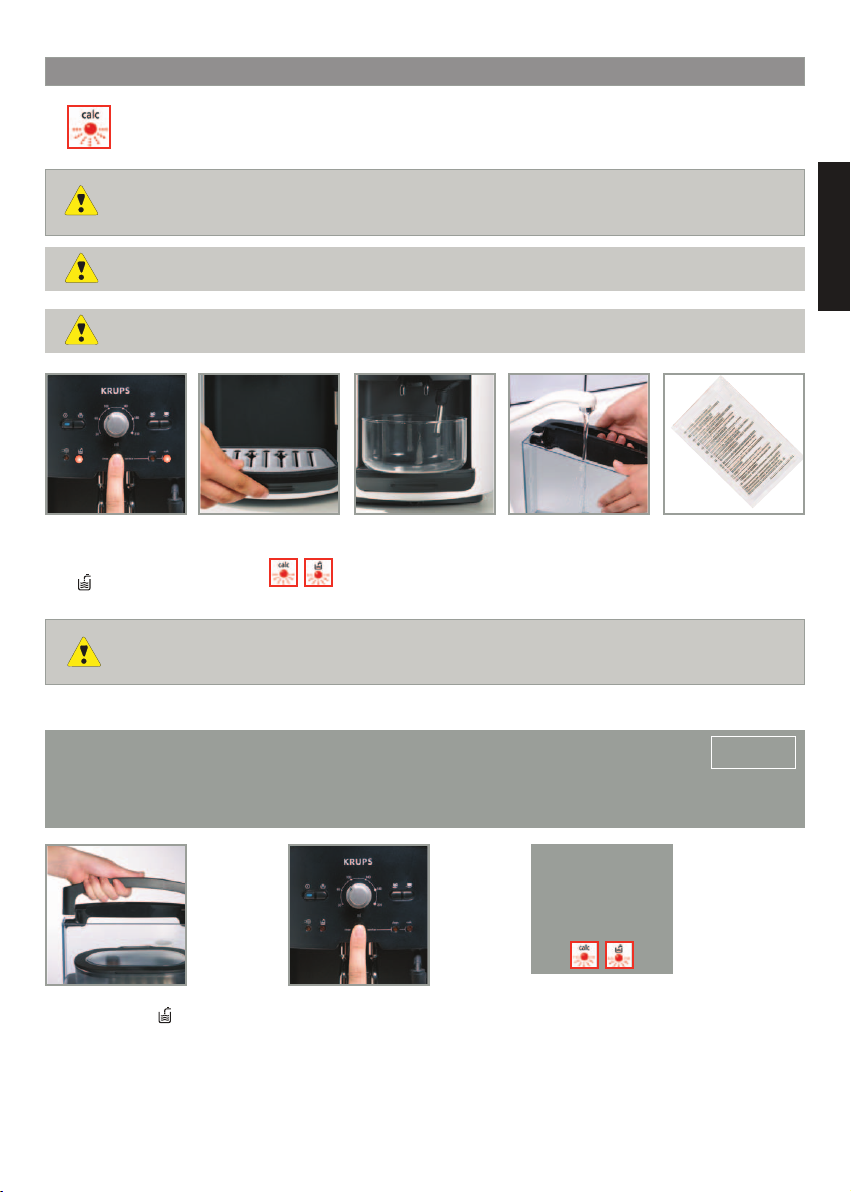
Put the water tank
back in place. The
light turns off and the
'calc' light stops blinking.
1 - Descaling cycle
The 'calc' light stops blinking.
The descaling cycle starts and is carried out automatically. The pump occasionally sucks up water which comes out of the
coffee nozzles and then the steam nozzle. This operation lasts approximately 10 minutes.
10
SCALE REMOVAL PROGRAM – TOTAL DURATION: ABOUT 22 MINUTES.
The quantity of scale deposited depends on the hardness of the water used. The appliance will automatically
warn you by the ‘calc’ light coming on when you need to proceed with scale removal.
This program is only accessible when the machine requests it.
Caution! To benefit from the guarantee conditions, it is essential to perform the appliance scale removal
cycle when informed to do so. Be sure to follow the procedure closely step by step.
You can continue to use the appliance when the light is on, but you are advised to perform the program as soon
as possible.
Press the ‘Service’
key to start up the
scale removal
program. The ‘calc’
and lights will
flash.
Place a receptacle with
a minimum water
capacity of 0.6 l under
the coffee outlets and
under the steam nozzle.
Remove and clean the
drip tray.
Empty the tank and fill
it with lukewarm water
up to the ‘calc’ marking.
Dissolve a sachet of
Krups scale remover
F054 (40 g).
Press the 'Service' button after having carried
out all of these operations.
± 10 mn
F054
Make certain to protect your work surface during cleaning and scale removal cycles, especially if it is
made of marble, stone or wood.
If your appliances fitted with our Claris - Aqua Filter System F088 cartridge, please remove the cartridge
during the descaling operation.
When the cycle has
completed, the ‘water
tank’ and ‘calc’ lights
blink.
ENGLISH
Only use KRUPS scale removal products. You can obtain scale removal products from KRUPS Service Centres.
The manufacturer may not be held responsible for damage to the appliance through use of other products.
Page 32

11
2 - First rinsing
A first rinsing is needed to eliminate the remaining scale remover.
This cycle is run automatically. It lasts about 6 minutes.
± 6 mn
Empty your receptacle
full of waste water.
Empty the drip tray and
then put it back again
together with the
receptacle as
previously.
Empty, clean and rinse
the water tank and then
fill it again up to the
“Max. level.
Replace your water
tank. The ‘calc’ light will
flash and the light
will go off.
Press the ‘Service’ key.
The ‘calc’ light will
become steady. The
automatic cycle will last
6 minutes.
Once the second
rinsing is finished,
the ‘calc’ light will
go off.
Again press the
‘Service’ key. The
‘calc’ light will
become steady.
A second automatic
cycle will last 6
minutes.
Empty the drip tray and
then fit it again.
Empty and then fill
your water tank.
3 - Second rinsing
At the end of the first rinsing, the ‘calc’ light will flash.
A second automatic cycle will last 6 minutes.
Your appliance is now ready for use again.
Remove your waste
water recipient and the
drip tray then fit them
again.
If there is not enough water in the water tank, you will be warned by the light.
Add the appropriate amount of water to the tank and scale removal will continue automatically.
If a power failure occurs during the cycle, you will have to start it up again from the start.
± 6 mn
LONG RINSING PROGRAM
Remove, fill and replace
the water tank.
When the cycle has completed, the ‘water tank’ and ‘calc’ lights blink.
Under the coffee outlets and steam nozzle
place a recipient that
can contain at least
0.15 L.
Launch the long rinse program by pressing on the
"Service" button.
The "clean" and "calc"
lights stop blinking.
+
When the long rinsing
program is complete,
the "clean" and "calc"
lights turn off
Be sure to complete the entire scale removal cycle to avoid any risk of intoxication.
The scale removal cycle is a continuous cycle. Do not put your hands under the coffee outlets
during the cycle.
Page 33

12
GENERAL MAINTENANCE
Always remove the power supply cord from the socket and let your appliance cool down before cleaning it.
Do not use utensils or cleaning products likely to scratch or corrode the appliance.
Wipe the body of the appliance on the outside using a moist cloth.
Clean the cleaning drawer, the drip tray, the coffee
grounds collector and the drip tray grid using warm
water and washing up liquid detergent.
Rinse the water tank
with fresh water.
Keep the packing and use it again to move the appliance.
MOVING THE APPLIANCE
If the unpacked appliance is dropped, it is advisable to have it inspected by an authorised Service Dealer.
ELECTRICAL OR ELECTRONIC PRODUCT AT END OF SERVICE LIFE
These parts are not designed to go into the dishwasher.
Let’s all help protect the environment!
Your appliance contains many recyclable materials that can be re-used.
Take it to a civic waste collection point.
ENGLISH
TROUBLESHOOTING, CORRECTIVE ACTIONS
The appliance does not turn on after I press
the button.
Water or steam are coming out of the steam
nozzle unexpectedly.
The espresso or coffee is not hot enough.
The coffee is too weak or not strong
enough.
The coffee flows too slowly.
The coffee is not creamy enough.
Check that the power supply cord plug is correctly inserted in the socket.
If used often, some drops of water may run out of the steam nozzle.
Change the coffee temperature setting.
Heat the cups by rinsing them under hot water.
Check that the coffee bean compartment contains coffee and that it is running
through properly.
Avoid using oily, caramelised or flavoured coffee beans.
Reduce the volume you have selected using the knob.
Select the button.
Turn the fineness of grind button to the left to obtain a finer grind.
Make your coffee in two separate cycles by using the 2 cup function.
Turn the fineness of grind button to the right to obtain a coarser grind (may
depend on the kind of coffee being used).
Carry out one or more rinsing cycles.
Turn the grinding fineness knob towards the left for a finer grind (may depend
on the type of coffee used).
Change the Claris Aqua Filter System cartridge (follow the installation procedure on page 3).
Carry out one or two rinsing cycles.
Page 34
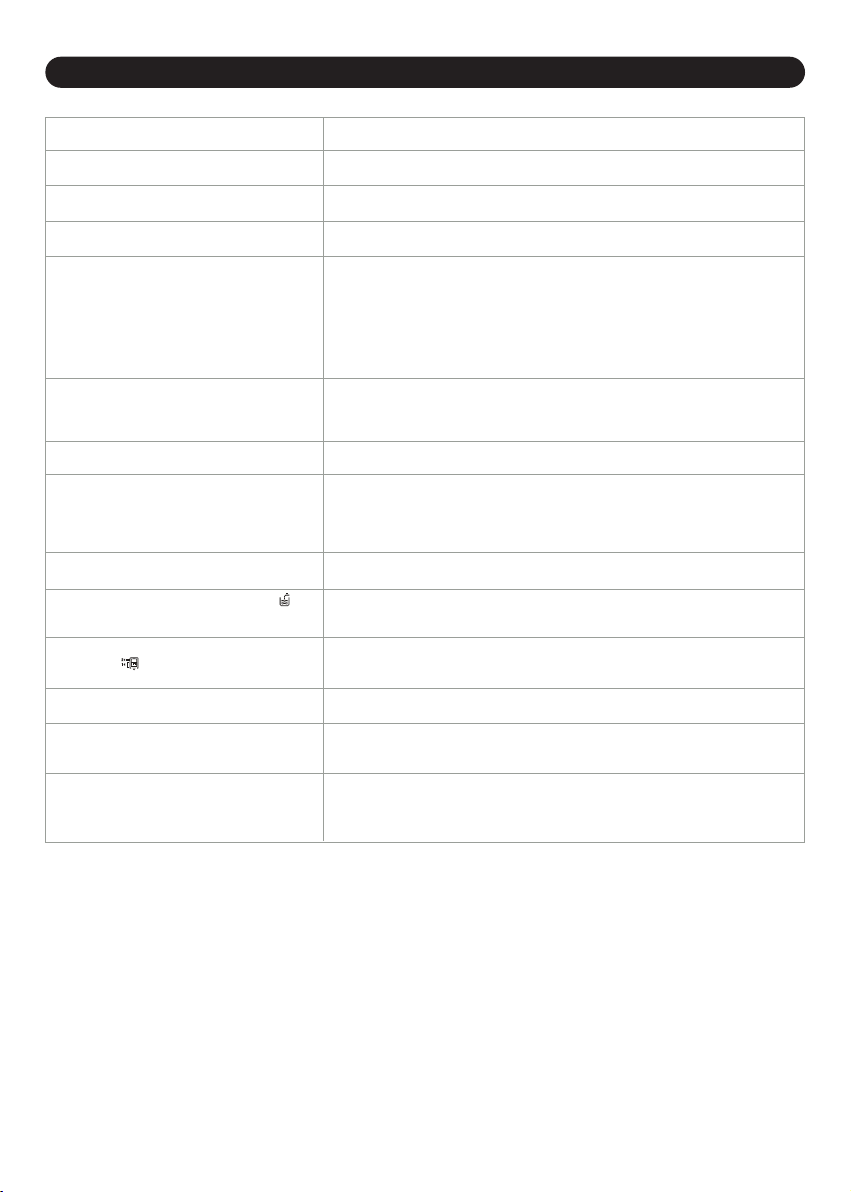
13
The machine has not produced any coffee
You used ground coffee instead of coffee
beans.
The grinder is making an unusual noise.
The grinding fineness button is difficult to
turn.
Steam does not come out of the nozzle.
Not enough froth on the milk.
The milk froth is too bubbly.
The Auto-Cappuccino accessory does not
suck up the milk (accessory sold separately)
The cleaning or descaling program will not
start.
After having filled the water tank, the
light remains on.
After having emptied the coffee grounds collector, the light remains on.
A power failure occurred during a cycle.
There is water or coffee under the appliance.
The 4 red lights flash permanently.
An incident has been detected during the coffee making process.
The machine automatically re-initialises and is ready for a new cycle.
Use your vacuum cleaner to remove the ground coffee in the coffee bean
container.
There is a foreign body in the grinder.
Contact the Krups Consumer Service.
Only adjust the grinder when it is operating.
After switching off your appliance and leaving it to cool:
Make sure the tip of the steam nozzle is properly affixed. Make sure the steam
nozzle is not clogged at the aerator (if necessary clean the steam nozzle aerator with the needle supplied). Empty the tank and remove the Claris filter. Fill
the tank with mineral water high in calcium (> 100 mg/litre or .015oz/gallon), it
may take as many as 5 to 10 cycles of steam at 60 seconds each cycle to
achieve a continuous jet of steam. Once you have a continuous jet of steam
you should not have to use this particular type of water again.
Using the needle supplied unblock the small air inlet at the top of the nozzle if
required.
Use a cold container and milk that has been opened recently.
Try changing the type of milk if this does not work (UHT or pasteurised).
Check that the 2 ends of the small stainless steel tube in the flexible part of
the steam nozzle are fitted together properly.
Check that the tube that goes into the milk is not blocked.
Check that the flexible tube is not twisted and that it is correctly fitted into the
accessory to avoid any air being sucked in.
After having turned the machine off and left it to cool, unblock the outlet of the
Auto-Cappuccino accessory.
These programs are only possible when the machine requests them ('clean' or
'calc' light on).
Check for correct positioning of the tank in the coffee maker.
Check that the float at the bottom of the tank moves freely.
Rinse the accessory and if necessary remove scale.
Remove the collector, make certain that it is empty, wait for 8 seconds and
then fit it again.
Check that the cleaning tray is correctly pushed in.
The appliance will re-initialise automatically when power is turned on and be
ready for a new cycle.
The drip tray has overflowed: empty it and clean the cleaning drawer.
Check that the drip tray is fitted correctly.
Do not remove the water tank before the end of the cycle.
Unplug the machine, remove the Claris cartridge, wait for 20 seconds and
then turn it all back on.
If the fault persists, note the number which appears on the display under the
cup tray and contact the Krups Consumer Service.
TROUBLESHOOTING, CORRECTIVE ACTIONS
Page 35

14
Here are some recipes you can make using your Espresseria Automatic:
• Cappuccino
For a cappuccino, the ideal proportions are as follows: 1/3 hot milk, 1/3 coffee, 1/3 milk froth.
• Caffe Latte
To make coffee with milk, also often called Latte Macchiato, the proportions are as follows: 3/5 hot milk, 1/5 coffee,
1/5 milk froth.
• For these milk-based preparations, it is best to use cold skimmed milk straight from the refrigerator (ideally between
6 and 8° C).
• To finish off, you can sprinkle with cocoa.
• Café Crème
• Prepare a conventional espresso in a large cup.
• Add a little cream to get a café crème.
• Café corretto*
• Prepare a cup of espresso as usual.
• Then add 1/4 or 1/2 of a liqueur glass of Cognac to taste.
You can also use anisette, brandy, Sambuca, Kirsch or Cointreau.
There are many other ways to give some punch to your espresso.
Just use your imagination.
• Coffee liqueur*
• Mix 3 cups of espresso, 250 g of brown sugar candy and 1/2 litre of Cognac or Kirsch in an empty 0.75 litre bottle.
• Leave the mixture to marinate for at least 2 weeks.
You will obtain a delicious liqueur. A real treat for coffee lovers.
• Italian style iced coffee
4 scoops of vanilla ice-cream, 2 cups of espresso with sugar to taste, 1/8 l milk, fresh cream, grated chocolate.
• Mix the cold espresso with the milk.
• Serve the scoops of ice-cream into the glasses, pour the coffee onto them and decorate with fresh cream and grated
chocolate.
• Coffee à la frisonne
• Add a small glass of rum to a cup of sweetened espresso.
• Decorate with a good layer of fresh cream and serve.
• Flambéed espresso*
2 cups of espresso, 2 small glasses of Cognac, 2 teaspoons of brown sugar, fresh cream.
• Pour the Cognac into heat-resistant glasses, heat and light.
• Add the sugar, mix, pour in the coffee and decorate with fresh cream.
• Espresso parfait*
2 cups of espresso, 6 egg yolks, 200g sugar, 1/8 litre of sweetened fresh cream, 1 small glass of orange liqueur.
• Beat the egg yolks with the sugar until it forms a thick, frothy mass.
• Add the cold espresso and the orange liqueur.
• Then mix in the whipped fresh cream.
• Pour the mix into saucer champagne glasses or ordinary.
• Put the champagne glasses in the freezer.
(*: Remember, over-indulgence in alcohol is bad for the health.)
ENGLISH
Page 36

15
. . . . . . . . . . . . . . . . . . . . . . . . . . . . . . . . . . . . . . . . . . . . . . . . . . . . . . . . . . . . . . . . . . . . . . . . . . . . . . . . . . .
. . . . . . . . . . . . . . . . . . . . . . . . . . . . . . . . . . . . . . . . . . . . . . . . . . . . . . . . . . . . . . . . . . . . . . . . . . . . . . . . . . .
. . . . . . . . . . . . . . . . . . . . . . . . . . . . . . . . . . . . . . . . . . . . . . . . . . . . . . . . . . . . . . . . . . . . . . . . . . . . . . . . . . .
. . . . . . . . . . . . . . . . . . . . . . . . . . . . . . . . . . . . . . . . . . . . . . . . . . . . . . . . . . . . . . . . . . . . . . . . . . . . . . . . . . .
. . . . . . . . . . . . . . . . . . . . . . . . . . . . . . . . . . . . . . . . . . . . . . . . . . . . . . . . . . . . . . . . . . . . . . . . . . . . . . . . . . .
. . . . . . . . . . . . . . . . . . . . . . . . . . . . . . . . . . . . . . . . . . . . . . . . . . . . . . . . . . . . . . . . . . . . . . . . . . . . . . . . . . .
. . . . . . . . . . . . . . . . . . . . . . . . . . . . . . . . . . . . . . . . . . . . . . . . . . . . . . . . . . . . . . . . . . . . . . . . . . . . . . . . . . .
. . . . . . . . . . . . . . . . . . . . . . . . . . . . . . . . . . . . . . . . . . . . . . . . . . . . . . . . . . . . . . . . . . . . . . . . . . . . . . . . . . .
. . . . . . . . . . . . . . . . . . . . . . . . . . . . . . . . . . . . . . . . . . . . . . . . . . . . . . . . . . . . . . . . . . . . . . . . . . . . . . . . . . .
. . . . . . . . . . . . . . . . . . . . . . . . . . . . . . . . . . . . . . . . . . . . . . . . . . . . . . . . . . . . . . . . . . . . . . . . . . . . . . . . . . .
. . . . . . . . . . . . . . . . . . . . . . . . . . . . . . . . . . . . . . . . . . . . . . . . . . . . . . . . . . . . . . . . . . . . . . . . . . . . . . . . . . .
. . . . . . . . . . . . . . . . . . . . . . . . . . . . . . . . . . . . . . . . . . . . . . . . . . . . . . . . . . . . . . . . . . . . . . . . . . . . . . . . . . .
. . . . . . . . . . . . . . . . . . . . . . . . . . . . . . . . . . . . . . . . . . . . . . . . . . . . . . . . . . . . . . . . . . . . . . . . . . . . . . . . . . .
. . . . . . . . . . . . . . . . . . . . . . . . . . . . . . . . . . . . . . . . . . . . . . . . . . . . . . . . . . . . . . . . . . . . . . . . . . . . . . . . . . .
. . . . . . . . . . . . . . . . . . . . . . . . . . . . . . . . . . . . . . . . . . . . . . . . . . . . . . . . . . . . . . . . . . . . . . . . . . . . . . . . . . .
. . . . . . . . . . . . . . . . . . . . . . . . . . . . . . . . . . . . . . . . . . . . . . . . . . . . . . . . . . . . . . . . . . . . . . . . . . . . . . . . . . .
. . . . . . . . . . . . . . . . . . . . . . . . . . . . . . . . . . . . . . . . . . . . . . . . . . . . . . . . . . . . . . . . . . . . . . . . . . . . . . . . . . .
. . . . . . . . . . . . . . . . . . . . . . . . . . . . . . . . . . . . . . . . . . . . . . . . . . . . . . . . . . . . . . . . . . . . . . . . . . . . . . . . . . .
. . . . . . . . . . . . . . . . . . . . . . . . . . . . . . . . . . . . . . . . . . . . . . . . . . . . . . . . . . . . . . . . . . . . . . . . . . . . . . . . . . .
. . . . . . . . . . . . . . . . . . . . . . . . . . . . . . . . . . . . . . . . . . . . . . . . . . . . . . . . . . . . . . . . . . . . . . . . . . . . . . . . . . .
. . . . . . . . . . . . . . . . . . . . . . . . . . . . . . . . . . . . . . . . . . . . . . . . . . . . . . . . . . . . . . . . . . . . . . . . . . . . . . . . . . .
. . . . . . . . . . . . . . . . . . . . . . . . . . . . . . . . . . . . . . . . . . . . . . . . . . . . . . . . . . . . . . . . . . . . . . . . . . . . . . . . . . .
. . . . . . . . . . . . . . . . . . . . . . . . . . . . . . . . . . . . . . . . . . . . . . . . . . . . . . . . . . . . . . . . . . . . . . . . . . . . . . . . . . .
. . . . . . . . . . . . . . . . . . . . . . . . . . . . . . . . . . . . . . . . . . . . . . . . . . . . . . . . . . . . . . . . . . . . . . . . . . . . . . . . . . .
. . . . . . . . . . . . . . . . . . . . . . . . . . . . . . . . . . . . . . . . . . . . . . . . . . . . . . . . . . . . . . . . . . . . . . . . . . . . . . . . . . .
. . . . . . . . . . . . . . . . . . . . . . . . . . . . . . . . . . . . . . . . . . . . . . . . . . . . . . . . . . . . . . . . . . . . . . . . . . . . . . . . . . .
. . . . . . . . . . . . . . . . . . . . . . . . . . . . . . . . . . . . . . . . . . . . . . . . . . . . . . . . . . . . . . . . . . . . . . . . . . . . . . . . . . .
. . . . . . . . . . . . . . . . . . . . . . . . . . . . . . . . . . . . . . . . . . . . . . . . . . . . . . . . . . . . . . . . . . . . . . . . . . . . . . . . . . .
. . . . . . . . . . . . . . . . . . . . . . . . . . . . . . . . . . . . . . . . . . . . . . . . . . . . . . . . . . . . . . . . . . . . . . . . . . . . . . . . . . .
. . . . . . . . . . . . . . . . . . . . . . . . . . . . . . . . . . . . . . . . . . . . . . . . . . . . . . . . . . . . . . . . . . . . . . . . . . . . . . . . . . .
. . . . . . . . . . . . . . . . . . . . . . . . . . . . . . . . . . . . . . . . . . . . . . . . . . . . . . . . . . . . . . . . . . . . . . . . . . . . . . . . . . .
. . . . . . . . . . . . . . . . . . . . . . . . . . . . . . . . . . . . . . . . . . . . . . . . . . . . . . . . . . . . . . . . . . . . . . . . . . . . . . . . . . .
. . . . . . . . . . . . . . . . . . . . . . . . . . . . . . . . . . . . . . . . . . . . . . . . . . . . . . . . . . . . . . . . . . . . . . . . . . . . . . . . . . .
. . . . . . . . . . . . . . . . . . . . . . . . . . . . . . . . . . . . . . . . . . . . . . . . . . . . . . . . . . . . . . . . . . . . . . . . . . . . . . . . . . .
. . . . . . . . . . . . . . . . . . . . . . . . . . . . . . . . . . . . . . . . . . . . . . . . . . . . . . . . . . . . . . . . . . . . . . . . . . . . . . . . . . .
. . . . . . . . . . . . . . . . . . . . . . . . . . . . . . . . . . . . . . . . . . . . . . . . . . . . . . . . . . . . . . . . . . . . . . . . . . . . . . . . . . .
. . . . . . . . . . . . . . . . . . . . . . . . . . . . . . . . . . . . . . . . . . . . . . . . . . . . . . . . . . . . . . . . . . . . . . . . . . . . . . . . . . .
. . . . . . . . . . . . . . . . . . . . . . . . . . . . . . . . . . . . . . . . . . . . . . . . . . . . . . . . . . . . . . . . . . . . . . . . . . . . . . . . . . .
. . . . . . . . . . . . . . . . . . . . . . . . . . . . . . . . . . . . . . . . . . . . . . . . . . . . . . . . . . . . . . . . . . . . . . . . . . . . . . . . . . .
. . . . . . . . . . . . . . . . . . . . . . . . . . . . . . . . . . . . . . . . . . . . . . . . . . . . . . . . . . . . . . . . . . . . . . . . . . . . . . . . . . .
. . . . . . . . . . . . . . . . . . . . . . . . . . . . . . . . . . . . . . . . . . . . . . . . . . . . . . . . . . . . . . . . . . . . . . . . . . . . . . . . . . .
Page 37

ESPRESSERIA AUTOMATIC
0800 980 00 00
D
HOTLINE
Abbildungen unverbindlich
0800 37 77 37
CH
0800 225 225
A
FRANCAIS
ENGLISHDEUTSCH
NEDERLANDSITALIANOESPAÑOLPORTUGUÊS
E
λληνικά
Nur für den privaten Gebrauch
Die Garantiedauer hängt von der jeweiligen Gesetzgebung in Ihrem Land ab und ist auf höchstens 3000
Durchlaufzyklen pro Jahr begrenzt. Dieses Gerät ist ausschließlich für den Hausgebrauch bestimmt und darf
nicht für gewerbliche oder professionelle Zwecke eingesetzt werden. Bei Einsatz dieses Geräts für Zwecke,
die über den Hausgebrauch hinausgehen, erlischt die Herstellergarantie.
Die Garantie gilt nicht für Schäden und Mängel, die auf unsachgemäßen Gebrauch, eine Reparatur durch
unbefugte Personen als auch die Nichtbeachtung der Gebrauchsanweisungen zurückzuführen sind. Es wird
keine Garantie übernommen, wenn die Betriebs- und Wartungsanweisungen von Krups nicht befolgt
wurden oder wenn Reinigungs- oder Entkalkungsmittel benutzt wurden, die den Angaben von Krups nicht
entsprechen, oder der Claris Aqua Filter System Wasserfilter nicht gemäß den Anweisungen von Krups
benutzt wurde. Der anormale Verschleiß der Teile (Mahlscheiben, Ventile, Dichtungen) ist ausgenommen von
der Garantie ebenso wie die Schäden welche durch Fremdkörper im Kaffeemahlwerk hervorgerufen wurden
(zum Beispiel: Holz, Steine, Plastikteile etc.).
Page 38

: Kontrollleuchte leuchtet nicht auf / : Kontrollleuchte blinkt
: Kontrollleuchte leuchtet auf / : Doppeltes Blinken der Kontrollleuchte
Kontrollleuchten
Bedeutung
Leeren des
Kaffeesatz
-Behälters
Wasser
tank
füllen
Clean Calc Ein/Aus
Das Gerät ist bereit für einen Kaffee- oder
Dampfzyklus.
/
Einfaches Blinkzeichen: das Gerät befindet sich in
der Aufheiz-oder in Initialisierungphase.
/
Doppeltes Blinkzeichen: ein 2-Kaffee-Zuklus läuft.
Kundendienst-Information im Modus Einstellung der
Betriebsparameter
/
/
Kaffeesatzbehälter leeren (ein Zyklus für 2 Tassen
Kaffee ist im Gange.).
/
Den Kaffeesatz-Behälter leeren+ die Lade reinigen +
die Tropfenauffangschale leeren.
Kontrollieren, ob der Kaffeesatzbehälter nicht oder
falsch eingesetzt ist. Kontrollieren, ob der
Reinigungsschieber nicht oder falsch eingesetzt ist
Einstellung der Wasserhärte.
/
Wassertank füllen
Kontrollieren, ob der Wassertank nicht oder falsch.
/
/
Der Kaffeezyklus wurde wegen Wassermangel unterbrochen. Füllen Sie den Wassertank.
Einstellung der automatischen Abschaltung Auto-Off.
Reinigungsprogramm wird angefordert oder läuft.
/
Reinigungsprogramm: Vorbereitung des
Reinigungs- oder Spülzyklus
Einstellung der Kaffeetemperatur.
Entkalkungsprogramm wird angefordert oder läuft.
/
Entkalkungsprogramm: Vorbereitung des
Entkalkungs- oder Spülzyklus.
/
/
Spülzyklus des Entkalkungsprogramms: Wassertank
ausleeren, spülen und mit frischem Wasser füllen.
/ /
Befehl Langes Spülen (ungefähr 150 ml) siehe Seite 5.
Vorgang Langes Spülen läuft.
/ / / /
Ständiges Blinken: Betriebsstörung.
Page 39

SEITE
BESCHREIBUNG ..................................................................1
Warnanzeigen
Informationen zum Thema Espresso
Sicherheitshinweise
VOR DER ERSTEN VERWENDUNG . . . . . . . . . . . . . . . . . . . . . . . . . . . . . . . . . . . . . . . . . . . .3
MESSUNG DER HÄRTE DES WASSER
PATRONE CLARIS
AQUA FILTER SYSTEM
EINSTELLUNGEN . . . . . . . . . . . . . . . . . . . . . . . . . . . . . . . . . . . . . . . . . . . . . . . . . . . . . . . . . . . . .4
EINSTELLUNG DER WASSERHÄRTE
EINSTELLUNG DER KAFFEETEMPERATUR
EINSTELLEN DES MECHANISMUS ZUM AUTOMATISCHEN ABSCHALTEN DER
STROMVERSORGUNG
VORBEREITUNG DES GERÄTS . . . . . . . . . . . . . . . . . . . . . . . . . . . . . . . . . . . . . . . . . . . . . . . . .5
SPÜLEN DER KREISLÄUFE
VORBEREITUNG DES MAHLWERKS
ZUBEREITUNG EINES ESPRESSOS UND EINES KAFFEES . . . . . . . . . . . . . . . . . . . .6
ZUBEREITUNG EINES ESPRESSOS (20 BIS 70 ML)
ZUBEREITUNG EINES KAFFEES (80 BIS 220 ML)
FUNKTION 2 TASSEN
ZUBEREITUNGEN MIT DAMPF . . . . . . . . . . . . . . . . . . . . . . . . . . . . . . . . . . . . . . . . . . . . . . . .7
MILCHSCHAUM
AUTO-CAPPUCCINO XS6000 SET
WARTUNG IHRES GERÄTS . . . . . . . . . . . . . . . . . . . . . . . . . . . . . . . . . . . . . . . . . . . . . . . . . . .8
AUSLEEREN DES KAFFEESATZBEHÄLTERS, DES KAFFEESCHIEBERS UND DER
TROPFSCHALE
SPÜLEN DES KAFFEEKREISLAUFS
REINIGUNGSPROGRAMM
ENTKALKUNGSPROGRAMM . . . . . . . . . . . . . . . . . . . . . . . . . . . . . . . . . . . . . . . . . . . . . . . . . .10
PROGRAMM LANGES SPÜLEN
ALLGEMEINE WARTUNG . . . . . . . . . . . . . . . . . . . . . . . . . . . . . . . . . . . . . . . . . . . . . . . . . . . . .12
TRANSPORT DES GERÄTS
ENTSORGUNG DES GERÄTS
PROBLEME UND LÖSUNGEN . . . . . . . . . . . . . . . . . . . . . . . . . . . . . . . . . . . . . . . . . . . . . . . .12
REZEPTE . . . . . . . . . . . . . . . . . . . . . . . . . . . . . . . . . . . . . . . . . . . . . . . . . . . . . . . . . . . . . . . . . . .14
INHALTSVERZEICHNIS
Abbildungen unverbindlich
F 088
Patrone
Claris Aqua Filter
System
(nicht im
Lieferumfang)
XS 3000
10 Stk.
Reinigungstab
letten(2
Tabletten im
Lieferumfang)
F 054
Entkalkungspu
lver (1
Säckchen im
Lieferumfang)
XS 3000
XS6000
Auto
Cappuccino Set
(nicht mitgeliefert)
XS 4000
KRUPS
Flüssigreiniger für
Cappuccino-Set
(nicht im
Lieferumfang)
Zubehörteile (separat verkauft)
DEUTSCH
Die Garantie gilt nur, wenn mit diesem Gerät ausschließlich Zubehörteile von Krups verwendet werden.
Page 40

1
Kaffeemengen-Drehknopf
Dampftaste
Netzstromtaste mit Betriebs-LED
Taste „normaler Kaffee“
Taste „starker Kaffee“
LED "clean"
LED "calc"
Leuchtanzeige „Wassertank füllen“
Anzeigeleuchte „Kaffeesatzbehälter leeren„ und
„Abtropfbehälter leeren”
Service-Taste
Abtropfbehälter mit Rost
Kaffeeauslauf mit Griff
Kaffeesatzbehälter
Kaffeemengen-Drehknopf
Kaffeebohnenbehälter
Dampfdüse
Deckel des Kaffeebohnenbehälters
Griff/Wassertankdeckel
Wassertank
Wartungsklappe mit
Tassenablage
Wasserstandsanzeige
Ansicht von oben
Verstellknopf für die Mahlstärke
Reinigungsschacht
BESCHREIBUNG
Verstellknopf für die Mahlstärke
Reinigungsschieber
Den Kaffeesatzbehälter und den
Auffangbehälter leeren
Wassertank füllen
Warnanzeigen
Reinigen
Entkalken
Leuchtanzeige brennt
Leuchtanzeige blinkt
Metall-Mahlwerkl
Digitalanzeige zur Einstellung der Parameter
Wartungsanleitung "Service
Guide"
Abbildungen unverbindlich
+
Einen langen Spülgang
ausführen
Ansicht Bedienfeld
Page 41

2
DEUTSCH
Sehr geehrter Kunde, sehr geehrte Kundin, wir freuen uns, dass Sie diese Espresseria Automatic von Krups gewählt haben. Sie werden sich sowohl an der Qualität ihres Kaffees als auch an ihrer großen Anwenderfreundlichkeit erfreuen.
Mit Ihrer Kaffee-/Espressomaschine können Sie zu Hause einen Espresso oder Lungo, Ristretto oder Cappuccino wie im Café
genießen, ganz gleich an welchem Tag und zu welcher Uhrzeit.
Das Thermoblock System, die 15 Bar-Pumpe und die Verwendung ausschließlich frisch gemahlener Kaffeebohnen schenken Ihnen
bestes Aroma und eine herrlich dicke, goldfarbene Crema, die durch das natürliche Öl der Kaffeebohnen erzeugt wird.
Der Espresso wird nicht in einer herkömmlichen Kaffeetasse serviert, sondern in kleinen Porzellantässchen.
Damit Ihr Espresso die richtige Temperatur und eine schön kompakte Crema erhält, empfehlen wir Ihnen, Ihre Tassen gut vorzuwärmen.
Nach mehreren Versuchen werden Sie bestimmt die richtige Mischung und Röstung der Kaffeebohnen finden, die Ihrem Geschmack
entspricht. Die Qualität des verwendeten Wassers ist natürlich auch ein ausschlaggebender Faktor für die Qualität des Ergebnisses
in der Tasse.
Sie müssen sicherstellen, dass das Wasser frisch aus dem Wasserhahn kommt (damit es im Kontakt mit der Luft nicht abgestanden
ist), dass es nicht nach Chlor riecht und kalt ist.
Der Espresso hat mehr Aroma als ein herkömmlicher Filterkaffee. Trotz seines ausgeprägteren, intensiven und länger anhaltenden
Geschmacks enthält der Espresso weniger Koffein als Filterkaffee (ca. 60 bis 80 mg pro Tasse im Vergleich zu 80 bis 100 mg pro
Tasse). Dies liegt an der kürzeren Brühdauer.
Dank der großen Bedienungsfreundlichkeit, der Sichtbarkeit aller Behälter sowie der automatischen Reinigungs- und
Entkalkungsprogramme bietet Ihnen die Espresseria Automatic einen hohen Verwendungskomfort.
Wichtig: Sicherheitshinweise
Lesen Sie die Bedienungsanleitung vor dem ersten Gebrauch Ihres Geräts sorgfältig durch und bewahren Sie sie gut auf: Bei
unsachgemäßer Verwendung übernimmt Krups keine Haftung.
Dieses Gerät ist bestimmt für den Gebrauch in häuslichen und häuslichen Umständen gleichenden Umgebungen (begrenzt auf
3000 Zyklen pro Jahr) wie:
- Kochecken für das Personal in Geschäften, Büros und sonstige Arbeitsumfelder;
- Bauernhöfe
- den Gebrauch durch Gäste von Hotels, Motels und sonstigen Umfeldern mit Beherbergungscharakter;
- Umfelder wie Gästezimmer.
Schließen Sie das Gerät ausschließlich an einer geerdeten Steckdose an. Vergewissern Sie sich, dass die Spannung Ihrer
Elektroinstallation mit der auf dem Typenschild des Geräts angegebenen Versorgungsspannung übereinstimmt.
Stellen Sie das Gerät nicht auf heiße Flächen (z.B. Herdplatten) oder in die Nähe von offenem Feuer.
Ziehen Sie sofort den Netzstecker, wenn Sie während des Betriebs eine Anomalie feststellen.
Ziehen Sie den Stecker nicht am Kabel aus der Steckdose.
Lassen Sie das Netzkabel nicht vom Rand eines Tisches oder einer Arbeitsplatte herunterhängen.
Lassen Sie das Netzkabel niemals in die Nähe von oder in Berührung mit den heißen Teilen des Gerätes kommen oder herunter-
hängen.
Tauchen Sie das Gerät, das Kabel oder den Stecker nie in Wasser oder eine andere Flüssigkeit.
Bei Verwendung einer Claris - Aqua Filter System Kartusche muss die Wasserhärte auf 0 eingestellt werden.
Überlassen Sie niemals unbeaufsichtigten Kindern oder Personen das Gerät, wenn deren physische oder sensorische Fähigkeiten
oder Mangel an Erfahrung und Wissen sie am sicheren Gebrauch hindern. Sie müssen stets überwacht werden und zuvor unterwiesen sein.
Kinder müssen beaufsichtigt werden, um sicher zu gehen, dass sie nicht mit dem Gerät spielen.
Verwenden Sie das Gerät nicht, wenn das Netzkabel oder das Gerät selbst beschädigt ist.
Wenn das Netzkabel oder der Stecker beschädigt ist, darf das Gerät zur Vermeidung von Gefahren nicht verwendet werden.
Lassen Sie das Netzkabel unbedingt vom KRUPS-Kundendienst austauschen.
Befolgen Sie für das Entkalken des Geräts stets die Anweisungen.
Schützen Sie das Gerät vor Feuchtigkeit und Frost.
Benutzen Sie Ihr Gerät nicht, wenn es nicht fehlerfrei funktioniert, gefallen ist, sichtbare Schäden aufweist oder undicht ist. In
diesem Fall wird empfohlen, das Gerät vom KRUPS-Kundendienst kontrollieren zu lassen (siehe Adressenliste im
KRUPS-Serviceheft ).
Mit Ausnahme der Reinigung und der Entkalkung gemäß den Anweisungen in der Gebrauchsanleitung des Geräts, dürfen alle
Eingriffe am Gerät nur vom KRUPS-Kundendienst vorgenommen werden.
Zu Ihrer eigenen Sicherheit sollten Sie nur Zubehör und Ersatzteile von KRU PS verwenden, da diese für Ihr Gerät geeignet sind.
Bei fehlerhaftem Anschluss erlischt die Garantie.
Ziehen Sie den Netzstecker, wenn Sie das Gerät längere Zeit nicht benutzen und wenn Sie es reinigen.
Alle Geräte werden einer strengen Kontrolle unterzogen. Mit einer beliebigen Auswahl an Geräten werden praktische
Benutzungstests durchgeführt, was eventuell vorhandene Spuren der Benutzung erklärt.
Es wird davon abgeraten, Mehrfachsteckdosen oder Verlängerungskabel zu verwenden.
Füllen Sie kein Wasser in den Kaffeebohnenbehälter und/oder unter die Wartungsklappe.
Achten Sie auf die Ausrichtung der Dampfdüse, um jegliche Verbrennungsgefahr zu vermeiden.
Wenn das Gerät nicht entkalkt, gereinigt oder regelmäßig gewartet wird oder Fremdkörper im Mahlwerk vorhanden sind, kann die
2 Jahres-Garantie (6000 Zyklen, mit maximal 3000 Zyklen pro Jahr) nicht zum Tragen kommen.
Verwendungsgrenzen
Diese Espressomaschine darf nur für die Zubereitung von Espressos oder Kaffee, zum Aufschäumen von Milch und Erhitzen von
Flüssigkeiten verwendet werden. Für Schäden aufgrund unsachgemäßer Verwendung des Geräts, fehlerhafter Anschlüsse und
Handhabungen, riskanter Vorgänge und Reparaturen wird keinerlei Haftung übernommen. Unter derartigen Bedingungen erlöschen
die Wartungsgarantien.
Dieses Gerät ist ausschließlich für privaten Gebrauch in geschlossenen Räumen bestimmt. Es ist nicht für einen kommerziellen oder
professionellen Gebrauch bestimmt.
Page 42

Damit Ihre Zubereitungen besonders gut schmecken und für eine längere Lebensdauer Ihres Geräts empfehlen wir Ihnen
ausschließlich, die als Zubehör erhältliche Filterkartusche Claris – Aqua Filter System zu verwenden.
Sie enthält eine kalkentfernende Substanz und Aktivkohle, die Chlor, Verunreinigungen, Blei, Kupfer, Pestizide, usw. im
Wasser reduziert. Mineralstoffe und Spurenelemente bleiben erhalten.
3
Vor der ersten Verwendung des Geräts oder wenn Sie eine Änderung der Wasserhärte festgestellt haben, muss das Gerät auf
die festgestellte Wasserhärte abgestimmt werden. Die Wasserhärte können Sie mit Hilfe des mit dem Gerät gelieferten
Teststäbchens ermitteln oder bei Ihrem Wasserversorgungsunternehmen in Erfahrung bringen.
VOR DER ERSTEN VERWENDUNG
Nach 1 Minute, Härtemessung (mittelhartes Wasser)
Durch die Filterung des Wassers
mit der Filterpatrone Claris –
Aqua Filter System können Sie
folgendes reduzieren:
Karbonathärte – bis zu 75%*
Chlor – bis zu 85%*
Blei – bis zu 90 %*
Kupfer – bis zu 95 %*
Aluminium – bis zu 67 %*
* Herstellerangaben
Einsetzen der Filterpatrone
in das Gerät: Schrauben
Sie die Filterpatrone in den
Boden des Wassertanks.
Die Filterpatrone Claris muss nach ca. 50 Litern Wasser oder mindestens alle 2 Monate ausgewechselt werden.
Füllen Sie ein Glas und
tauchen Sie das
Teststäbchen in das Wasser
Verwenden Sie Quellwasser oder gefiltertes Wasser.
Mechanismus zur
Speicherung des Monats,
an dem die Patrone eingesetzt wurde und Erinnerung
wann sie
auszuwechseln ist
(spätestens nach 2
Monaten).
Härtegrad
0
Sehr weich
1
Wei ch
2
Mittelhart
3
Hart
4
Sehr hart
° f
<5,4° >7,2° >12,6° >25,2° > 37,8°
° dH
<3° >4° >7° >14° > 21°
° e
<3,75° >5° >8,75° >17,5° > 26,25°
Stellen Sie einen
Behälter unter die
Dampfdüse. Lassen Sie
300 ml Wasser durchlaufen, indem Sie 1 mal länger als 3 Sekunden auf
die Spültaste drücken.
Wenn Sie wünschen,
können Sie den Vorgang
wiederholen.
1 sec.
012
3
4
F088
MESSUNG DER WASSERHÄRTE
FILTERPATRONE CLARIS – AQUA FILTER SYSTEM F 088 (SEPARAT ERHÄLTLICH)
Page 43
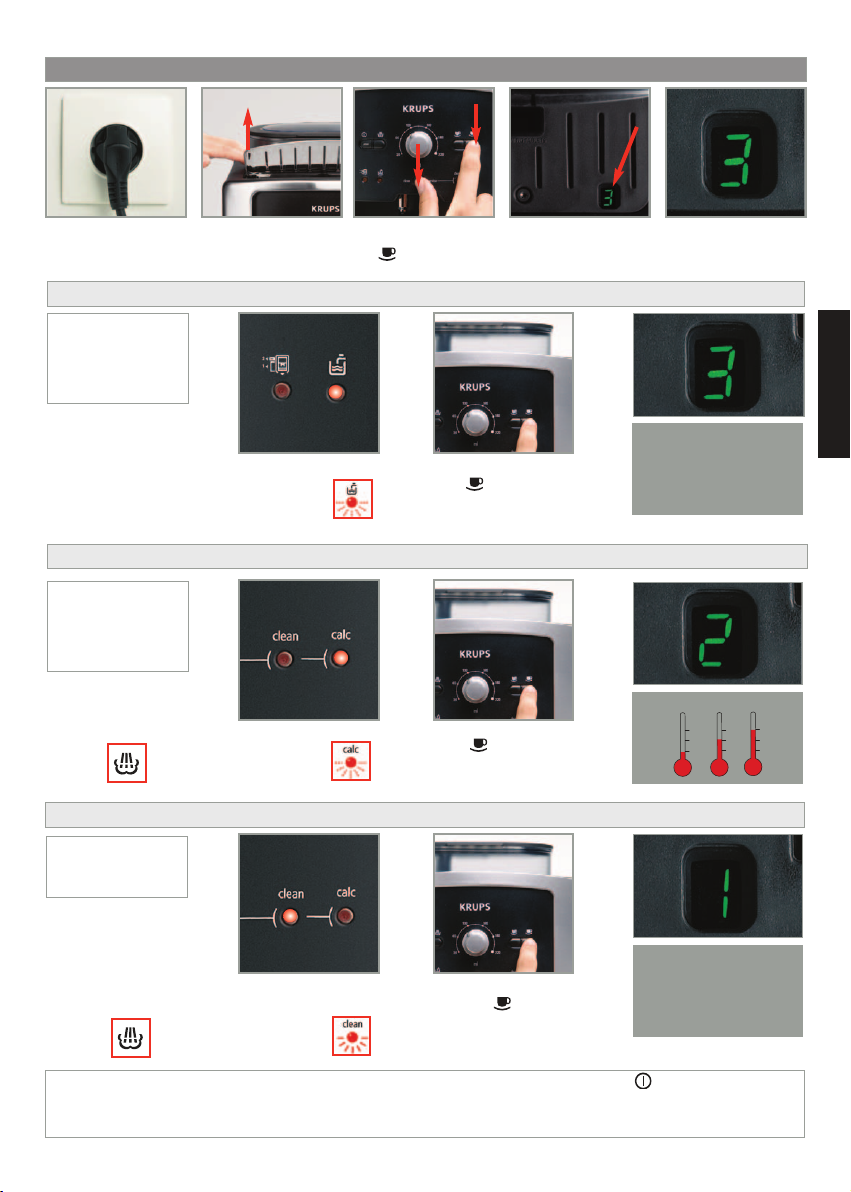
EINSTELLUNGEN
4
Die Geräte werden im
Werk auf 2 = mittlere
Temperatur
voreingestellt.
Schließen Sie das Gerät
an die Steckdose an,
aber schalten Sie es
nicht ein.
Heben Sie die
Tassenablage ab,
indem Sie von hinten
drücken, um ihn zu kippen.
Drücken Sie gleichzeitig
auf die Tasten „Service“
und .
Die Kontrollleuchte „calc“
leuchtet auf.
Drücken Sie so oft auf die
Taste ,bis die
gewünschte
Kaffeetemperatur eingestellt
ist.
Sie können die Einstellungen bei jedem dieser Schritte speichern, indem Sie den Knopf drücken,
sobald Sie Ihre Einstellungen vorgenommen haben (die 4 Lichter blinken 2 Mal) oder den Vorgang fortführen. Diese
Einstellungen bleiben auch im Falle eines Stromausfalls gespeichert. Die Einstellungen können jederzeit abgeändert werden,
indem man diese Vorgänge wiederholt.
Einstellung der automatischen Abschaltung der Stromversorgung (auto-off)
Die Kontrollleuchte
„clean“ leuchtet auf.
Drücken Sie so oft auf
die Taste , bis die
gewünschte Dauer
eingestellt ist.
Drücken Sie so oft auf die
Taste ,bis der Härtegrad
des verwendeten Wassers
gewählt ist.
Einstellung der Kaffeetemperatur
Einstellung der Wasserhärte
Die Geräte werden im
Werk auf den
Härtegrad
3 voreingestellt.
Die Geräte werden im
Werk auf 1 Stunde
voreingestellt.
1
2
3
1 = 1 H
2 = 2 H
3 = 3 H
4 = 4 H
0 = Sehr weich
1 = Weich
2 = Mittelhart
3 = Hart
4 = Sehr hart
Die Digitalanzeige für die
Einstellung der
Parameter befindet sich
unter der
Wartungsklappe.
Sie können Ihr Gerät nach
einer vorprogrammierten
Anzahl von Stunden ausschalten.
Drücken Sie die Dampftaste,
um auf die Einstellung der
automatischen Abschaltung
umzuschalten:
Die Kontrollleuchte des
Wassertanks
leuchtet auf.
Drücken Sie die
Dampftaste, um auf die
Einstellung der
Kaffeetemperatur
umzuschalten:
Schauen Sie senkrecht
auf den Boden des
Fensters.
DEUTSCH
Page 44

5
Wenn das Gerät einige Tage lang nicht benutzt wurde, sollten die beiden Kreisläufe ein Mal oder mehrmals
gespült werden. Bei jedem Anschluss des Geräts läuft ein Initialisations-Zyklus ab.
Nehmen Sie den
Wassertank ab und füllen
Sie ihn mit Wasser.
Setzen Sie ihn mit einem
kräftigen Druck wieder ein
und schließen Sie den
Deckel.
Öffnen Sie den Deckel des
Kaffeebohnenbehälters.
Füllen Sie den Kaffee ein
(max. 250 gr.)
Schließen Sie den
Deckel des
Kaffeebohnenbehälters.
Stellen Sie sicher, dass kein Fremdkörper, wie z.B. kleine Steine im Bohnenkaffee, in den Kaffeebohnenbehälter gelangen.
Schäden aufgrund von Fremdkörpern im Kaffeebehälter sind von der Garantie ausgeschlossen. Füllen Sie kein Wasser in
den Kaffeebohnenbehälter. Vergessen Sie nicht, die Tropfschale anzubringen, um eine Verschmutzung Ihrer Arbeitsplatte
oder Verbrühungen durch den Ausfluss von Wasser zu vermeiden.
Versichern Sie sich, dass der Wasserbehälter sauber ist.
Setzen Sie das Gerät mit einem
Druck auf die Taste in Betrieb.
Die Anzeigeleuchte blinkt
während dem Vorheizen und der
Initialisierungsphase.
Spülen des Kaffee-Kreislaufs:
Stellen Sie ein Gefäß unter die Kaffeeausläufe.
Drücken Sie kurz die „Service” Taste, um den Zyklus
zum Spülen des Kaffee-Kreislaufs in Betrieb zu nehmen. Dieser Zyklus schaltet sich nach ungefähr 40
ml automatisch ab.
Sie können die Stärke Ihres Kaffees ändern, indem Sie die Mahlstärke der Kaffeebohnen verstellen.
Je feiner die Mahlstärke, desto stärker und cremiger wird der Kaffee.
Zum Verstellen der Mahlstärke am Drehknopf „Einstellung der Mahlstärke" drehen.
DIE EINSTELLUNG DARF NUR WÄHREND DES MAHLVORGANGS VERÄNDERT WERDEN.
DEN KNOPF FÜR DIE EINSTELLUNG DER MAHLSTÄRKE NIE GEWALTSAM DREHEN
In diesem Gerät sollten keine öligen, karamellisierten oder aromatisierten Kaffeebohnen verwendet werden. Diese Art von
Bohnen könnte das Gerät beschädigen
FÜLLEN SIE NIEMALS GEMAHLENEN KAFFEE IN DEN KAFFEEBOHNENBEHÄLTER.
Nach links wird
das Kaffeemehl
feiner.
Nach rechts
wird das
Kaffeemehl
gröber.
Füllen Sie kein heißes Wasser, Milch oder andere Flüssigkeiten in den Wassertank. Wenn der Wassertank beim
Einschalten des Geräts nicht eingesetzt oder nicht ausreichend gefüllt ist, leuchtet die Leuchtanzeige „Wassertank
füllen“ auf und die Zubereitung eines Espressos oder eines Kaffees ist zu diesem Zeitpunkt nicht möglich.
VORBEREITUNG DES GERÄTS
Spülen des Dampf-Kreislaufs:
Stellen Sie einen Behälter unter die
Dampfdüse und
drücken Sie danach 3
Sekunden lang die „Service” Taste, um den
Zyklus zum Spülen des Dampf-Kreislaufs in
Betrieb zu nehmen. Dieser Zyklus schaltet
sich nach ungefähr 300 ml automatisch ab.
VORBEREITUNG DES MAHLWERKS
SPÜLEN DER KREISLÄUFE
Page 45

6
Die Wassermenge für einen Espresso muss zwischen 20 und 70 ml betragen.
Bei jedem Anschluss des Geräts läuft ein Initialisations-Zyklus ab. Drücken Sie den Schalter
und die Anzeigeleuchte blinkt während der Aufheizphase des Geräts.
Mit der Taste erhalten Sie
einen starken Espresso, mit der
Taste einen normalen
Espresso.
Sie haben Ihr Gerät vorbereitet. Die
Kontrollleuchte leuchtet permanent auf.
Stellen Sie eine Tasse unter die Ausläufe.
Je nach Größe Ihrer Tasse können Sie die
Kaffeeausläufe weiter nach oben oder
nach unten stellen.
ZUBEREITUNG EINES ESPRESSOS UND EINES KAFFEES
IHR GERÄT IST AUSSCHLIESSLICH FÜR DIE VERWENDUNG VON KAFFEEBOHNEN BESTIMMT.
Beim Zubereiten Ihres ersten Kaffees, nach einer längeren Abwesenheit oder nach einer Reinigung
oder Entkalkung entweichen etwas Dampf und heißes Wasser aus der Dampfdüse (Selbststart).
Wenn die Wasserausläufe für Ihre Tassen zu hoch eingestellt sind, besteht Spritz- oder
Verbrennungsgefahr.
Sie können die Wassermenge
jederzeit verstellen.
Das Kaffeemehl wird nach dem Mahlen mit etwas heißem Wasser befeuchtet.
Einige Augenblicke später wird der eigentliche Brühvorgang fortgesetzt.
Ab einer bestimmten Tassengröße sollten Sie den Inhalt Ihrer Tasse in zwei aufeinander folgenden Zyklen
zubereiten, damit der Kaffee stärker wird. Zum Beispiel 2 Mal 70 ml für eine Tasse mit 140 ml Inhalt.
Mit Ihrem Gerät können Sie 2 Tassen Kaffee oder Espresso zubereiten. Nehmen Sie die Tassen nach dem ersten Zyklus nicht
weg. Sie haben Ihr Gerät vorbereitet. Die Kontrollleuchte leuchtet permanent auf.
Stellen Sie zwei Tassen
unter die Ausläufe. Je nach
Größe Ihrer Tassen können
Sie die Kaffeeausläufe
weiter nach oben oder nach
unten stellen.
Drücken Sie zweimal schnell
hintereinander auf die Taste oder .
Die Kontrollleuchte blinkt zweimal auf
und bestätigt, dass Sie zwei Tassen
Kaffee gewählt haben.
Wenn Sie zuerst die Taste und dann die Taste
(oder in umgekehrter Reihenfolge) drücken, wird der letzte Druck nicht registriert.
Das Gerät führt
automatisch 2 komplette
Kaffeezyklen
hintereinander durch.
Um den Ausfluss in Ihre Tasse zu stoppen, können Sie entweder erneut auf eine der Tasten oder
drücken oder den Drehknopf auf Mindestposition stellen.
x 2
ZUBEREITUNG EINES ESPRESSOS
FUNKTION 2 TASSEN
DER WASSERBEHÄLTER DARF NICHT VOR BEENDIGUNG DES ZYKLUS HERAUSGENOMMEN WERDEN
(also ungefähr 15 Sekunden nachdem kein Kaffee mehr austritt).
Die Wassermenge für einen Kaffee muss zwischen 80 und 220 ml betragen.
ZUBEREITUNG EINES KAFFEES
DEUTSCH
Page 46

7
ZUBEREITUNGEN MIT DAMPF
Der Dampf dient zum Aufschäumen von Milch, mit der Sie z.B. einen Cappuccino oder einen Caffe Latte zubereiten können,
oder zum Erhitzen der Flüssigkeiten. Da für die Erzeugung von Dampf eine höhere Temperatur erforderlich ist, als für die
Zubereitung eines Espressos, besitzt das Gerät eine zusätzliche Heizphase für den Dampf.
Drücken Sie die Taste .
Die Kontrollleuchte blinkt während des Vorheizens.
Sobald das Vorheizen beendet ist, leuchtet die Kontrollleuchte permanent auf und Sie
können die Dampferzeugung starten, indem Sie erneut die Taste drücken.
Drücken Sie zum Anhalten des Zyklus erneut den Schalter.
MILCHSCHAUM
Wir raten zum Gebrauch von pasteurisierter oder ultrahocherhitzter Milch, die erst kurz vorher geöffnet wurde.
Mit roher Milch erzielt man keine optimalen Ergebnisse. Nach Gebrauch der Dampf-Funktionen kann die Düse
eventuell heiß sein, Sie sollten eine Weile warten, bevor Sie sie anfassen.
Überprüfen Sie, dass
die Dampfdüse gut
sitzt.
Gießen Sie die Milch in
Ihre Milchkanne.
Tauchen Sie die
Dampfdüse in die
Milch.
Nehmen Sie die
Dampf-Funktion wie
nachstehend beschrieben in Betrieb.
...drücken Sie erneut die
Taste ,um den Zyklus
zu stoppen. Vorsicht, der
Zyklus wird nicht sofort
beendet.
Zum Entfernen eventueller Milchreste in der
Dampfdüse, stellen Sie
einen Behälter unter die
Düse und drücken Sie
die Taste .
Lassen Sie den Dampf
mindestens 10
Sekunden entweichen
und stoppen Sie durch ein
erneutes Drücken der
Taste .
Die Dampfdüse kann zur gründlichen Reinigung abgenommen werden.
Reinigen Sie sie mit Wasser und nicht scheuerndem Spülmittel mit einer
Bürste. Anschließend abspülen und trocknen. Versichern Sie sich vor
dem erneuten Einsetzen der Düse, dass die Lufteintrittsöffnungen nicht
durch Milchreste verstopft sind. Entfernen Sie diese gegebenenfalls mit
der mitgelieferten Nadel. Die Dampfdüse ist nicht spülmaschinenfest.
Zum Unterbrechen der Dampffunktion brauchen Sie einfach nur auf eine beliebige Taste zu drücken.
Sollte die Düse verstopft sein, reinigen Sie sie bitte mit der mitgelieferten Nadel.
Die Dampferzeugung ist auf eine maximale Dauer pro Zyklus von 2 Minuten beschränkt.
AUTO-CAPPUCCINO-SET XS 6000 (SEPARAT ERHÄLTLICH)
Um zu verhindern, dass die Milch nicht in dem Auto-Cappuccino Zubehörteil antrocknet, muss dieses stets besonders gründlich gereinigt
werden. Es sollte sofort nach Gebrauch gereinigt werden. Lassen Sie dazu einen Dampf-Zyklus durchlaufen und füllen Sie den Topf des
Zubehörteils mit Wasser, um die Düse von innen zu reinigen. Dazu kann das gesondert erhältliche XS4000 Reinigungsmittel verwendet werden.
XS 6000
Wenn Sie ausreichend
Milchschaum haben...
Vorsicht, der Zyklus wird nicht sofort beendet.
Stecken Sie die einzelnen Elemente zusammen
Stellen Sie die
Spezialdüse auf
Position Cappuccino
oder Caffe Latte.
Füllen Sie den Milchtopf
und stellen Sie eine
Tasse oder ein Glas
unter die AutoCappuccino Düse.
Drücken Sie den
Schalter um den
Zyklus in Betrieb zu nehmen und dann anschließend wieder zu stoppen
Stellen Sie Ihre Tasse
unter die Kaffeeaustritte
und nehmen Sie einen
Kaffee / Espresso
Zyklus in Betrieb.
Dieses Auto-Cappuccino Zubehörteil dient zur Zubereitung von Cappuccino und Caffe Latte.
Um zu verhindern, dass der Knopf die Position wechselt, darf der Schlauch nicht verdreht werden.
Page 47

8
Wenn die Kontrollleuchte
aufleuchtet, die
Tropfschale abnehmen,
ausleeren und reinigen.
Die Tropfschale fängt das verbrauchte Wasser auf, der Kaffeesatzbehälter das verbrauchte Kaffeemehl.
Mit dem Kaffeeschieber können Sie eventuelle Ablagerungen von Kaffeesatz entfernen.
Kaffeesatzbehälter
herausnehmen,
ausleeren und reinigen.
Die Tropfschale besitzt
eine Wasserstandsanzeige, damit Sie
wissen, wann sie geleert
werden muss.
Die Kontrollleuchte leuchtet weiterhin auf, wenn der Kaffeesatzbehälter nicht korrekt eingedrückt oder installiert ist oder wenn er in weniger als 4 Sekunden wieder eingesetzt wurde.
Wenn die Kontrollleuchte aufleuchtet oder blinkt, kann kein Espresso oder Kaffee zubereitet werden. Der
Kaffeesatzbehälter hat ein Fassungsvermögen für höchstens 9 Portionen Kaffee.
WARTUNG IHRES GERÄTS
Sobald Sie den Kaffeesatzbehälter herausnehmen, müssen Sie ihn vollständig leeren, um ein anschließendes
Überlaufen zu vermeiden.
REINIGUNGSPROGRAMM DER MASCHINE – GESAMTDAUER: CA. 20 MINUTEN
Wenn das Gerät gereinigt werden muss, wird dies durch ein Aufleuchten der „Clean” Anzeigeleuchte angezeigt.
Dieses Programm ist nur auf Anfrage des Geräts hin verfügbar (ungefähr alle 300 Zubereitungen von Kaffee oder
Espresso).
Starten Sie das
Reinigungsprogramm
mit der Taste „Service“.
Die Anzeigen „clean“
und blinken.
Den Kaffeesatzbehälter
ausleeren und reinigen
und wieder einsetzen.
Die Anzeige erlischt.
Den
Reinigungsschieber
herausnehmen und
reinigen. Setzen Sie
den
Reinigungsschieber
wieder ein.
Den Wassertank abnehmen, mit Wasser füllen
und wieder einsetzen.
SPÜLEN DES KREISLAUFS: SIEHE SEITE 5
Stellen Sie einen Behälter mit
einem Fassungsvermögen
von mindestens 0,6 l unter
die Kaffeeausläufe.
Nehmen Sie die
Kaffeeschublade
heraus.
Unter fließendem
Wasser reinigen und
gut trocknen.
Achtung! Damit die Garantie wirksam werden kann, müssen Sie den Reinigungszyklus unbedingt
ausführen, wenn die entsprechende Anzeige am Gerät erscheint. Beachten Sie die Reihenfolge der Vorgänge.
Wenn die Anzeige aufleuchtet, können Sie das Gerät weiterhin verwenden, aber wir empfehlen, das Programm möglichst bald
auszuführen.
Die Tropfschale herausnehmen und ausleeren.
AUSLEEREN DES KAFFEESATZBEHÄLTERS, DER KAFFEESCHUBLADE UND DER TROPFSCHALE
DEUTSCH
Page 48
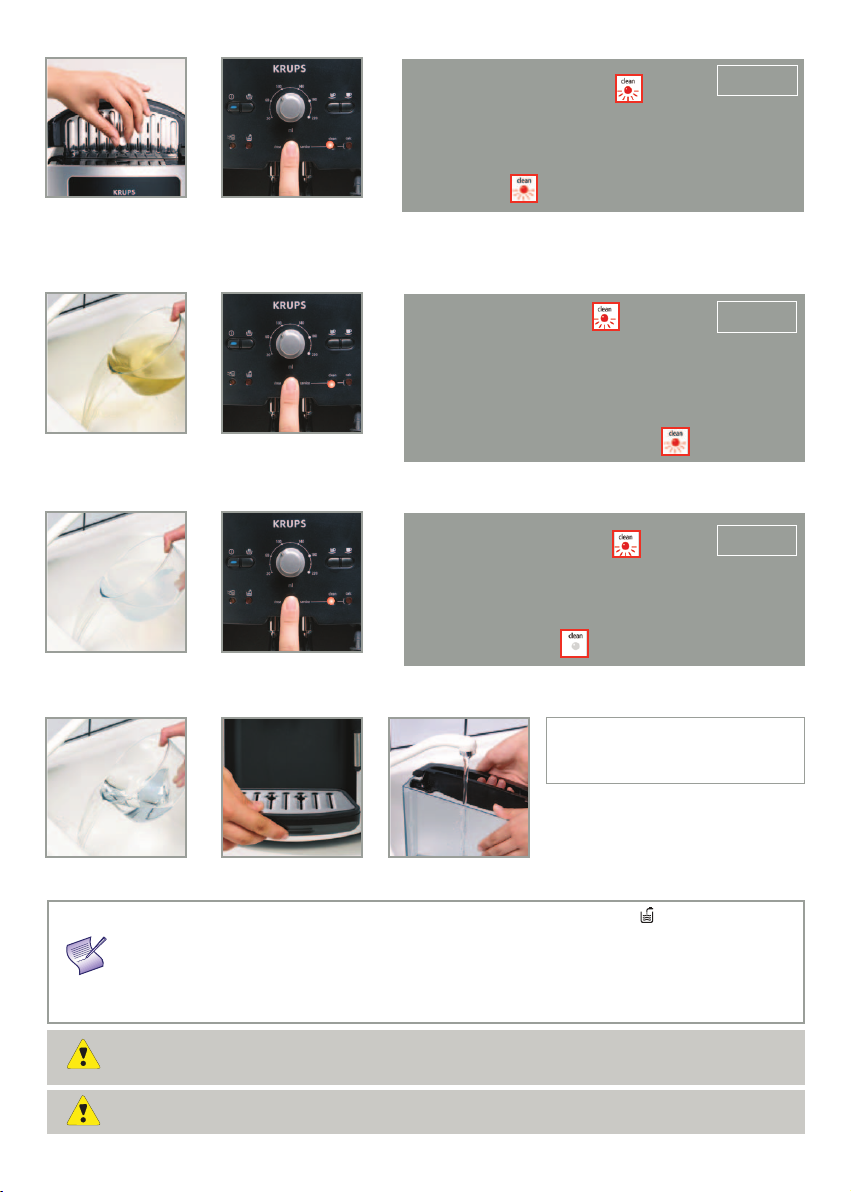
9
Starten Sie den
Reinigungszyklus mit
der Taste „Service“.
1 - Reinigungszyklus
Die Anzeige „clean“ leuchtet permanent auf. Der
Reinigungszyklus läuft automatisch ab. Die Pumpe saugt das
Wasser mit Unterbrechungen an. Dieser Vorgang dauert etwa
10 Minuten. Anschließend blinkt die Leuchtanzeige „clean“
erneut.
Leeren Sie den Behälter
mit dem durchgelaufenen
Wasser aus und stellen
Sie ihn wieder unter die
Kaffeeausläufe.
Starten Sie einen ersten
Spülzyklus durch
erneutes Drücken der
Taste „Service“.
2 - Erstes Spülen
Die Anzeige „clean“ leuchtet wieder permanent auf. Das
Programm wird fortgesetzt.
Ein erster Spülzyklus läuft automatisch ab. Er dient dazu, das
Gerät zu spülen und Reste des Reinigungsmittels zu entfernen.
Dieser erste Spülzyklus dauert etwa 5 Minuten. Anschließend
blinkt die Leuchtanzeige „clean“ erneut.
Leeren Sie den Behälter
mit dem durchgelaufenen Wasser aus und
stellen Sie ihn wieder
unter die Kaffeeausläufe.
Starten Sie einen
zweiten Spülzyklus
durch erneutes Drücken
der Taste „Service“.
3 - Zweites Spülen
Die Anzeige „clean“ leuchtet wieder permanent auf. Ein zweiter
Spülzyklus läuft automatisch ab. Dieser zweite Spülzyklus
dauert etwa 5 Minuten.
Nach Beendigung des zweiten Spülzyklus erlischt die
Leuchtanzeige „clean“.
Den Behälter mit dem
durchgelaufenen Wasser
entfernen und ausleeren.
Die Tropfschale ausleeren
und wieder einsetzen.
Den Wassertank erneut
mit Wasser füllen.
Ihr Gerät ist wieder
einsatzbereit.
Wenn beim Starten des Programms nicht genug Wasser im Tank ist, leuchtet die Anzeige auf. Füllen
Sie die notwendige Menge Wasser in den Tank und die Reinigung wird automatisch fortgesetzt.
Wenn das Gerät während der Reinigung ausgesteckt wird oder bei einem Stromausfall muss das
Reinigungsprogramm wieder von Anfang an gestartet werden. Das ist erforderlich, um den Wasserkreislauf zu spülen.
In diesem Fall ist eine weitere Reinigungspastille notwendig. Zur Vermeidung einer Vergiftungsgefahr muss der
Reinigungszyklus komplett durchgeführt werden.
Der Reinigungszyklus ist ein Zyklus mit Unterbrechungen. Halten Sie die Hände während des Zyklus nicht unter die
Ausläufe.
Verwenden Sie nur KRUPS Reinigungspastillen (XS3000). Krups übernimmt keine Haftung für Schäden aufgrund
einer Verwendung von Pastillen anderer Marken.
Die Reinigungspastillen sind beim KRUPS-Kundendienst erhältlich.
Öffnen Sie die
Wartungsklappe und
legen Sie eine
Reinigungspastille
KRUPS (XS3000) in
den Reinigungsschacht
± 10 mn
± 5 mn
± 5 mn
XS3000
Achten Sie darauf, Ihre Arbeitsplatte bei den Entkalkungszyklen gut zu schützen, insbesondere
wenn diese aus Marmor, Stein oder Holz sind.
Page 49

Setzen Sie den
Wasserbehälter wieder
ein. Die Anzeige ’
geht aus und die
Anzeige „Calc” leuchtet auf.
1 – Entkalkungs-Zyklus
Die Anzeige „Calc” leuchtet auf.
Der Entkalkungs-Zyklus ist angelaufen und läuft automatisch ab. Die Pumpe saugt das Wasser intervallweise an und dieses
läuft dann durch die Kaffee-Düsen und die Dampfdüse nach außen. Der Vorgang nimmt ungefähr 10 Minuten in Anspruch.
10
ENTKALKUNGSPROGRAMM – GESAMTDAUER: CA. 22 MINUTEN.
Die Menge der Kalkablagerungen hängt von der Härte des verwendeten Wassers ab. Wenn das Entkalken
erforderlich ist, werden Sie durch das Aufleuchten der Leuchtanzeige „calc“ automatisch darauf hingewiesen.
Dieses Programm ist nur auf Anfrage des Geräts hin verfügbar.
Achtung! Damit die Garantie wirksam werden kann, müssen Sie den Entkalkungszyklus unbedingt ausführen,
wenn die entsprechende Anzeige am Gerät erscheint. Beachten Sie die Reihenfolge der Vorgänge.
Wenn die Anzeige aufleuchtet, können Sie das Gerät weiterhin verwenden, aber wir empfehlen, das Programm möglichst bald auszuführen.
Starten Sie das
Entkalkungsprogramm
mit der Taste
„Service“. Die
Anzeigen „calc“
und blinken.
Stellen Sie einen
Behälter mit mindestens 0,6 l
Fassungsvermögen
unter die
Kaffeeausläufe und
unter die Dampfdüse.
Die Tropfschale herausnehmen und reinigen.
Den Tank ausleeren
und bis zum Strich
„calc“ mit lauwarmem
Wasser füllen.
Einen Beutel KrupsEntkalker (40g) F054
auflösen.
Drücken Sie nach
Ausführung all dieser
Vorgänge den
„Service” Schalter.
± 10 mn
F054
Achten Sie darauf, Ihre Arbeitsplatte bei den Entkalkungszyklen gut zu schützen, insbesondere
wenn diese aus Marmor, Stein oder Holz sind.
Wenn Ihr Gerät mit einer Claris - Aqua Filter System F088 Kartusche ausgestattet ist, muss diese vor
dem Entkalken herausgenommen werden.
Nach Ende des
Durchlaufs beginnen
die Anzeigelämpchen
„Wassertank füllen”
und „calc” zu blinken.
DEUTSCH
Verwenden Sie nur Entkalkungsmittel von KRUPS. Der Entkalker ist bei den KRUPS-Kundendienstcentern erhältlich.
Krups übernimmt keine Haftung für Schäden des Geräts infolge der Verwendung anderer Produkte.
Page 50

11
2 - Erstes Spülen
Ein erstes Spülen ist erforderlich, um Reste des Entkalkers zu entfernen.
Dieser Zyklus läuft automatisch ab. Er dauert etwa 6 Minuten.
± 6 mn
Leeren Sie den
Behälter mit dem
durchgelaufenen
Wasser aus.
Die Tropfschale
ausleeren und wieder
einsetzen, sowie den
Behälter wie oben.
Den Wassertank
ausleeren, reinigen,
spülen und wieder bis
zum maximalen
Füllstand mit Wasser
füllen.
Setzen Sie Ihren
Wassertank wieder ein.
Die Anzeige „calc“
blinkt und die Anzeige
erlischt.
Drücken Sie die Taste
„Service“ und die
Anzeige „calc“ leuchtet permanent auf.
Der automatische
Zyklus dauert 6
Minuten.
Nach Beendigung
des zweiten
Spülzyklus erlischt
die Leuchtanzeige
„calc“.
Drücken Sie erneut
die Taste „Service“
und die Anzeige
„calc“ leuchtet
wieder permanent
auf.
Der zweite automatische Zyklus dauert 6
Minuten.
Die Tropfschale
ausleeren und wieder
einsetzen.
Den Wassertank
ausleeren und neu
füllen.
3 - Zweites Spülen
Nach Beendigung des ersten Spülens blinkt die Anzeige „calc“.
Der zweite automatische Zyklus dauert 6 Minuten.
Ihr Gerät ist wieder einsatzbereit.
Den Behälter mit dem
durchgelaufenen
Wasser und die
Tropfschale ausleeren
und wieder anbringen.
Wenn nicht genug Wasser im Tank ist, leuchtet die Anzeige auf. Füllen Sie die notwendige Menge
Wasser in den Tank und die Entkalkung wird automatisch fortgesetzt.
Wenn es während des Zyklus zu einem Stromausfall kommt, muss er vollkommen neu gestartet werden.
± 6 mn
LANGES SPÜLPROGRAMM
Nehmen Sie den
Wasserbehälter heraus,
füllen Sie ihn auf und
setzen Sie ihn wieder
ein.
Sobald ein Durchlauf Langes Spülen erforderlich ist, beginnen die Anzeigelämpchen „clean” und „calc” des
Geräts zu blinken.
Stellen Sie unter die
Kaffeeausläufe einen
Behälter mit einem
Mindestfassungsvermögen von 0,15 l.
Starten Sie das Programm
Langes Spülen mit einem
Druck auf die Taste
„Service”.
Die Anzeigelämpchen
„clean” und „calc” hören auf
zu blinken.
+
Nach Beendigung
des Durchlaufs
Langes Spülen gehen
die Anzeigelämpchen
„clean” und „calc”
aus.
Zur Vermeidung einer Vergiftungsgefahr muss der Zyklus komplett durchgeführt werden.
Der Entkalkungszyklus ist ein Zyklus mit Unterbrechungen. Halten Sie die Hände während des Zyklus
nicht unter die Ausläufe.
Page 51

12
ALLGEMEINE WARTUNG
Vor der Reinigung immer den Netzstecker ziehen und das Gerät abkühlen lassen. Verwenden Sie keine Reinigungsutensilien
oder -mittel, die das Gerät verkratzen oder verätzen könnten.
Reinigen Sie das Gehäuse des Geräts außen mit einem feuchten Tuch.
Reinigen Sie den Reinigungsbehälter, die
Tropfenauffangschale und ihren Rost und den
Kaffeesatz-Behälter mit flüssigem Reinigungsmittel
Den Tank mit klarem
Wasser ausspülen.
Bewahren Sie die Originalverpackung auf, um das Gerät zu transportieren.
TRANSPORT DES GERÄTS
Wenn das Gerät ohne seine Verpackung zu Boden fällt, sollte es zu einer autorisierten Servicestelle gebracht
werden, um jegliche Brandgefahr oder elektrische Probleme zu vermeiden.
ENTSORGUNG DES GERÄTS
Diese Teile sind nicht spülmaschinenfest.
Denken Sie an den Schutz der Umwelt !
Ihr Gerät enthält wertvolle Rohstoffe, die wieder verwertet werden können.
Geben Sie Ihr Gerät deshalb bitte bei einer Sammelstelle Ihrer Stadt oder Gemeinde ab.
DEUTSCH
PROBLEME, LÖSUNGEN
Das Gerät geht nicht in Betrieb, wenn man
den Schalter drückt.
Es treten anormal viel Wasser oder Dampf
aus der Dampfdüse aus.
Der Espresso oder der Kaffe ist nicht heiß
genug.
Der Kaffee ist zu dünn oder hat nicht genug
Aroma.
Der Kaffee läuft zu langsam durch
Prüfen, ob der Netzstecker korrekt in der Steckdose eingesteckt ist.
Wird das Gerät mehrmals hintereinander in Betrieb genommen, können einigen Tropfen aus der Dampfdüse austreten.
Stellen Sie die Kaffeetemperatur neu ein.
Wärmen Sie die Tassen durch Spülen mit heißem Wasser an.
Überprüfen Sie, dass sich im Kaffeebohnenbehälter auch tatsächlich
Kaffeebohnen befinden und dass sie korrekt aus dem Behälter austreten können.
Verwenden Sie keine öligen, karamellisierten oder aromatisierten Kaffeesorten.
Stellen Sie mit Hilfe des Drehknopfs ein geringeres Kaffeevolumen ein.
Drücken Sie den Schalter .
Drehen Sie den Einstellknopf nach links, um den Kaffee feiner zu mahlen.
Bereiten Sie mit der 2-Tassen-Funktion Ihren Kaffee in zwei hintereinander folgenden Zyklen zu.
Drehen Sie den Einstellknopf nach rechts, um den Kaffee gröber zu mahlen.
(das kann von der Art des verwendeten Kaffees abhängen).
Führen Sie einen oder mehrere Spül-Zyklen durch.
Page 52

13
PROBLEME, LÖSUNGEN
Der Kaffee hat nicht viel Crema.
Das Gerät bereitet keinen Kaffee zu.
Sie haben gemahlenen Kaffee anstelle von
Kaffeebohnen verwendet
Das Mahlwerk gibt ungewöhnliche
Geräusche von sich.
Der Einstellknopf des Mahlwerks lässt sich
nur schwer drehen.
Der Dampf tritt nicht aus der Düse aus
Sie erhalten nicht genügend Milchschaum
Der Milchschaum ist nicht fein genug.
Das Auto-Cappuccino Zubehörteil saugt
keine Milch an (Zubehörteil separat verkauft).
Das Reinigungsprogramm oder das
Entkalkungsprogramm laufen nicht an.
Die Leuchtanzeige geht nach dem
Auffüllen des Wasserbehälters nicht aus.
Die Leuchtanzeige geht nach dem
Leeren des Kaffeesatz-Behälters nicht aus.
Während eines Zyklus wurde der Strom
unterbrochen.
Unter dem Gerät ist Wasser oder Kaffee
vorhanden.
Die 4 roten Kontrollleuchten blinken ständig.
Drehen Sie den Knopf zum Einstellen der Mahlqualität nach links, um den
Kaffee feiner zu mahlen (das kann vom verwendeten Kaffee abhängen).
Wechseln Sie die Claris Aqua Filter System Kartusche aus (halten Sie sich
dabei bitte an die auf Seite 3 beschriebene Installationsanleitung). Machen Sie
einen oder mehrere Spüldurchläufe.
Während der Zubereitung wurde ein Störfall gemeldet.
Das Gerät reinitialisiert sich automatisch und ist betriebsbereit für einen neuen
Zyklus.
Mit dem Staubsauger den gemahlenen Kaffee aus dem Kaffeebohnenbehälter
absaugen.
Es befinden sich Fremdkörper im Mahlwerk.
Treten Sie mit dem Verbraucherservice von Krups in Verbindung.
Stellen Sie das Mahlwerk nur ein, wenn sich dieses in Betrieb befindet.
Schalten Sie das Gerät aus und lassen Sie es abkühlen.
Die Duse des Luftrohres ordnungsgemäß montiert ist. die Duse des Luftrohres
nicht verstopft ist (wenn nötig verwenden Sie bitte die beiliegende Nadel).
Leeren Sie den Wassertank und entfernen Sie den Clarisfilter. Befullen Sie
den Wassertank mit einem Mineralwasser mit hohem Kalciumanteil
(>100mg/l). Es kann 5 bis 10 Zyklen von je 60 Sek. benötigen, bis Sie ein
gleichmäßiges Dampfergebnis erzielen. Tritt der Dampf wieder kontinuierlich
aus, können Sie wieder Leitungswasser verwenden.
Reinigen Sie gegebenenfalls die kleine Lufteintrittsöffnung im oberen Teil der
Düse mit der mitgelieferten Nadel.
Verwenden Sie einen kalten Behälter und frisch aufgemachte Milch.
Verwenden Sie eventuell eine andere Art Milch (UHT oder pasteurisierte
Milch).
Versichern Sie sich, dass die beiden Enden des kleinen Edelstahlröhrchens im
weichen Teil der Dampfdüse richtig ineinander gesteckt sind.
Versichern Sie sich, dass das Röhrchen, das in die Milch getaucht wird, nicht
verstopft ist.
Überprüfen Sie, dass der Schlauch richtig an der Spezialdüse befestigt ist und
auch nicht verdreht ist. So vermeiden Sie, dass Luft eingesaugt wird.
Schalten Sie das Gerät aus und lassen Sie es abkühlen. Reinigen Sie
anschließend die Austrittsöffnung des Auto-Cappuccino Zubehörteils.
Diese Programme sind nur auf Anfrage des Geräts hin betriebsbereit (die
Anzeigelämpchen „clean” oder „calc” leuchten auf).
Prüfen, ob der Tank korrekt in der Espressomaschine eingesetzt ist.
Prüfen, ob sich der Schwimmer am Boden des Tanks frei bewegt.
Den Wassertank ausspülen und falls erforderlich entkalken.
Den Behälter abnehmen, sicherstellen, dass er leer ist , 8 Sekunden warten
und wieder einsetzen.
Prüfen, ob der Reinigungsschieber korrekt eingeschoben ist.
Wenn das Gerät wieder unter Spannung steht, wird es automatisch
reinitialisiert und ist wieder bereit für einen neuen Zyklus.
Der Abtropfbehälter ist übergelaufen: Reinigen Sie ihn und säubern Sie den
Reinigungsschieber. Überprüfen Sie, ob der Abtropfbehälter richtig in der
Kaffeemaschine sitzt.
Der Wasserbehälter darf nicht vor der Beendigung des Zyklus herausgenommen werden.
Stecken Sie das Gerät aus und nehmen Sie die Claris Kartusche heraus.
Nehmen Sie das Gerät nach 20 Sekunden wieder in Betrieb.
Wenn das Problem weiterhin besteht, notieren Sie bitte die Zahl, die auf der
Anzeige unter dem Tassen-Rost erscheint und treten Sie mit dem
Verbraucherservice von Krups in Verbindung.
Page 53

14
Einige Rezeptvorschläge für Ihre Espresseria Automatic:
• Cappuccino
Die idealen Proportionen für einen Cappuccino nach allen Regeln der Kunst: 1/3 heiße Milch, 1/3 Kaffee, 1/3 geschäumte
Milch.
• Caffe Latte
• Für diese Zubereitung, die auch häufig Latte Macchiato genannt wird, gelten die folgenden Proportionen: 3/5 heiße Milch,
1/5 Kaffee, 1/5 geschäumte Milch.
• Für diese Rezepte auf Basis von Milch sollten Sie vorzugsweise gut gekühlte, teilentrahmte Milch verwenden (direkt aus dem
Kühlschrank, am besten zwischen 6 und 8°C). Abschließend können Sie das Getränk mit Schokoladenpulver bestreuen.
• Café Crème
• Bereiten Sie einen herkömmlichen Espresso in einer großen Tasse zu.
Fügen Sie einen Hauch Sahne hinzu, und Sie erhalten einen Café Crème.
• Café corretto*
• Bereiten Sie eine Tasse Espresso zu.
• Korrigieren Sie anschließend leicht den Geschmack, indem Sie _ oder _ Likörglas Cognac hinzufügen.
Sie können auch Grappa, Sambuco, Kirschwasser oder Cointreau verwenden.
Es gibt noch viele andere Möglichkeiten, den Espresso zu "veredeln". Hier sind der Phantasie keine Grenzen gesetzt.
• Kaffeelikör*
• Mischen Sie in einer leeren 0,75 l-Flasche
3 Tassen Espresso, 250 g braunen Kandiszucker, _ Liter Cognac oder Kirschwasser.
• Lassen Sie diese Mischung mindestens 2 Wochen stehen. Sie erhalten so einen köstlichen Likör, der besonders
Kaffeeliebhabern schmeckt.
• Italienischer Eiskaffee
4 Kugeln Vanilleeis, 2 Tassen kalten, gesüßten Espresso, 1/8 l Milch, Schlagsahne, geriebene Schokolade.
• Vermischen Sie den kalten Espresso mit der Milch.
• Verteilen Sie das Eis in Gläsern, gießen Sie den Kaffee darüber und verzieren Sie mit Schlagsahne und geriebener
Schokolade.
• Friesenkaffee*
• Gießen Sie ein kleines Glas Rum in eine Tasse gesüßten Espresso.
• Mit einer dicken Schicht Sahne verzieren und servieren.
• Flambierter Espresso*
2 Tassen Espresso, 2 kleine Gläser Cognac, 2 Teelöffel braunen Zucker, Sahne.
• Den Cognac in feuerfeste Gläser gießen, erhitzen und flambieren.
• Den Zucker hinzufügen, umrühren, Kaffee eingießen und mit Sahne verzieren.
• Espresso Parfait*
2 Tassen Espresso, 6 Eigelb, 200 g Zucker, 1/8 l gesüßte Sahne, 1 kleines Glas Orangenlikör.
• Eigelb und Zucker schaumig rühren.
• Kalten Espresso und Orangenlikör hinzufügen.
• Anschließend mit der Schlagsahne verrühren
und in Schalen oder Gläser füllen.
• Stellen Sie die Schalen in den Gefrierschrank.
(* : Der Mißbrauch von Alkohol gefährdet Ihre Gesundheit).
DEUTSCH
Page 54

1515
. . . . . . . . . . . . . . . . . . . . . . . . . . . . . . . . . . . . . . . . . . . . . . . . . . . . . . . . . . . . . . . . . . . . . . . . . . . . . . . . . . .
. . . . . . . . . . . . . . . . . . . . . . . . . . . . . . . . . . . . . . . . . . . . . . . . . . . . . . . . . . . . . . . . . . . . . . . . . . . . . . . . . . .
. . . . . . . . . . . . . . . . . . . . . . . . . . . . . . . . . . . . . . . . . . . . . . . . . . . . . . . . . . . . . . . . . . . . . . . . . . . . . . . . . . .
. . . . . . . . . . . . . . . . . . . . . . . . . . . . . . . . . . . . . . . . . . . . . . . . . . . . . . . . . . . . . . . . . . . . . . . . . . . . . . . . . . .
. . . . . . . . . . . . . . . . . . . . . . . . . . . . . . . . . . . . . . . . . . . . . . . . . . . . . . . . . . . . . . . . . . . . . . . . . . . . . . . . . . .
. . . . . . . . . . . . . . . . . . . . . . . . . . . . . . . . . . . . . . . . . . . . . . . . . . . . . . . . . . . . . . . . . . . . . . . . . . . . . . . . . . .
. . . . . . . . . . . . . . . . . . . . . . . . . . . . . . . . . . . . . . . . . . . . . . . . . . . . . . . . . . . . . . . . . . . . . . . . . . . . . . . . . . .
. . . . . . . . . . . . . . . . . . . . . . . . . . . . . . . . . . . . . . . . . . . . . . . . . . . . . . . . . . . . . . . . . . . . . . . . . . . . . . . . . . .
. . . . . . . . . . . . . . . . . . . . . . . . . . . . . . . . . . . . . . . . . . . . . . . . . . . . . . . . . . . . . . . . . . . . . . . . . . . . . . . . . . .
. . . . . . . . . . . . . . . . . . . . . . . . . . . . . . . . . . . . . . . . . . . . . . . . . . . . . . . . . . . . . . . . . . . . . . . . . . . . . . . . . . .
. . . . . . . . . . . . . . . . . . . . . . . . . . . . . . . . . . . . . . . . . . . . . . . . . . . . . . . . . . . . . . . . . . . . . . . . . . . . . . . . . . .
. . . . . . . . . . . . . . . . . . . . . . . . . . . . . . . . . . . . . . . . . . . . . . . . . . . . . . . . . . . . . . . . . . . . . . . . . . . . . . . . . . .
. . . . . . . . . . . . . . . . . . . . . . . . . . . . . . . . . . . . . . . . . . . . . . . . . . . . . . . . . . . . . . . . . . . . . . . . . . . . . . . . . . .
. . . . . . . . . . . . . . . . . . . . . . . . . . . . . . . . . . . . . . . . . . . . . . . . . . . . . . . . . . . . . . . . . . . . . . . . . . . . . . . . . . .
. . . . . . . . . . . . . . . . . . . . . . . . . . . . . . . . . . . . . . . . . . . . . . . . . . . . . . . . . . . . . . . . . . . . . . . . . . . . . . . . . . .
. . . . . . . . . . . . . . . . . . . . . . . . . . . . . . . . . . . . . . . . . . . . . . . . . . . . . . . . . . . . . . . . . . . . . . . . . . . . . . . . . . .
. . . . . . . . . . . . . . . . . . . . . . . . . . . . . . . . . . . . . . . . . . . . . . . . . . . . . . . . . . . . . . . . . . . . . . . . . . . . . . . . . . .
. . . . . . . . . . . . . . . . . . . . . . . . . . . . . . . . . . . . . . . . . . . . . . . . . . . . . . . . . . . . . . . . . . . . . . . . . . . . . . . . . . .
. . . . . . . . . . . . . . . . . . . . . . . . . . . . . . . . . . . . . . . . . . . . . . . . . . . . . . . . . . . . . . . . . . . . . . . . . . . . . . . . . . .
. . . . . . . . . . . . . . . . . . . . . . . . . . . . . . . . . . . . . . . . . . . . . . . . . . . . . . . . . . . . . . . . . . . . . . . . . . . . . . . . . . .
. . . . . . . . . . . . . . . . . . . . . . . . . . . . . . . . . . . . . . . . . . . . . . . . . . . . . . . . . . . . . . . . . . . . . . . . . . . . . . . . . . .
. . . . . . . . . . . . . . . . . . . . . . . . . . . . . . . . . . . . . . . . . . . . . . . . . . . . . . . . . . . . . . . . . . . . . . . . . . . . . . . . . . .
. . . . . . . . . . . . . . . . . . . . . . . . . . . . . . . . . . . . . . . . . . . . . . . . . . . . . . . . . . . . . . . . . . . . . . . . . . . . . . . . . . .
. . . . . . . . . . . . . . . . . . . . . . . . . . . . . . . . . . . . . . . . . . . . . . . . . . . . . . . . . . . . . . . . . . . . . . . . . . . . . . . . . . .
. . . . . . . . . . . . . . . . . . . . . . . . . . . . . . . . . . . . . . . . . . . . . . . . . . . . . . . . . . . . . . . . . . . . . . . . . . . . . . . . . . .
. . . . . . . . . . . . . . . . . . . . . . . . . . . . . . . . . . . . . . . . . . . . . . . . . . . . . . . . . . . . . . . . . . . . . . . . . . . . . . . . . . .
. . . . . . . . . . . . . . . . . . . . . . . . . . . . . . . . . . . . . . . . . . . . . . . . . . . . . . . . . . . . . . . . . . . . . . . . . . . . . . . . . . .
. . . . . . . . . . . . . . . . . . . . . . . . . . . . . . . . . . . . . . . . . . . . . . . . . . . . . . . . . . . . . . . . . . . . . . . . . . . . . . . . . . .
. . . . . . . . . . . . . . . . . . . . . . . . . . . . . . . . . . . . . . . . . . . . . . . . . . . . . . . . . . . . . . . . . . . . . . . . . . . . . . . . . . .
. . . . . . . . . . . . . . . . . . . . . . . . . . . . . . . . . . . . . . . . . . . . . . . . . . . . . . . . . . . . . . . . . . . . . . . . . . . . . . . . . . .
. . . . . . . . . . . . . . . . . . . . . . . . . . . . . . . . . . . . . . . . . . . . . . . . . . . . . . . . . . . . . . . . . . . . . . . . . . . . . . . . . . .
. . . . . . . . . . . . . . . . . . . . . . . . . . . . . . . . . . . . . . . . . . . . . . . . . . . . . . . . . . . . . . . . . . . . . . . . . . . . . . . . . . .
. . . . . . . . . . . . . . . . . . . . . . . . . . . . . . . . . . . . . . . . . . . . . . . . . . . . . . . . . . . . . . . . . . . . . . . . . . . . . . . . . . .
. . . . . . . . . . . . . . . . . . . . . . . . . . . . . . . . . . . . . . . . . . . . . . . . . . . . . . . . . . . . . . . . . . . . . . . . . . . . . . . . . . .
. . . . . . . . . . . . . . . . . . . . . . . . . . . . . . . . . . . . . . . . . . . . . . . . . . . . . . . . . . . . . . . . . . . . . . . . . . . . . . . . . . .
. . . . . . . . . . . . . . . . . . . . . . . . . . . . . . . . . . . . . . . . . . . . . . . . . . . . . . . . . . . . . . . . . . . . . . . . . . . . . . . . . . .
. . . . . . . . . . . . . . . . . . . . . . . . . . . . . . . . . . . . . . . . . . . . . . . . . . . . . . . . . . . . . . . . . . . . . . . . . . . . . . . . . . .
. . . . . . . . . . . . . . . . . . . . . . . . . . . . . . . . . . . . . . . . . . . . . . . . . . . . . . . . . . . . . . . . . . . . . . . . . . . . . . . . . . .
. . . . . . . . . . . . . . . . . . . . . . . . . . . . . . . . . . . . . . . . . . . . . . . . . . . . . . . . . . . . . . . . . . . . . . . . . . . . . . . . . . .
. . . . . . . . . . . . . . . . . . . . . . . . . . . . . . . . . . . . . . . . . . . . . . . . . . . . . . . . . . . . . . . . . . . . . . . . . . . . . . . . . . .
. . . . . . . . . . . . . . . . . . . . . . . . . . . . . . . . . . . . . . . . . . . . . . . . . . . . . . . . . . . . . . . . . . . . . . . . . . . . . . . . . . .
Page 55
ESPRESSERIA AUTOMATIC
0318 58 24 24
NL
HOTLINE
Foto’s niet bindend
FRANCAISENGLISHDEUTSCH
NEDERLANDS
ITALIANOESPAÑOLPORTUGUÊS
E
λληνικά
Alleen voor huishoudelijk gebruik
De garantieperiode hangt af van de wetgeving in uw land, met een maximum van 3000 cycli per jaar. Dit
apparaat is uitsluitend bedoeld voor huishoudelijk gebruik en is niet geschikt voor een commercieel of
beroepsmatig gebruik. Indien dit apparaat voor andere doeleinden dan een huishoudelijke toepassing
gebruikt wordt, is de fabrieksgarantie niet geldig.
De garantie geldt niet voor de schade en de verslechtering voortvloeiend uit een slecht gebruik,
herstellingen uitgevoerd door niet bevoegde personen of de niet-naleving van de gebruiksaanwijzing. De
garantie zal niet worden verzekerd als eender welke onderhoudsverrichtingen en – voorschriften niet
worden gerespecteerd of als reinigings - of ontkalkingsproducten worden gebruikt die niet met de
oorspronkelijke specificaties van KRUPS overeenstemmen. De garantie geldt niet ingeval het filterpatroon
Claris Aqua Filter System niet in overeenstemming met de door KRUPS verstrekte aanwijzingen wordt
gebruikt. De garantie geldt evenmin voor abnormale slijtage van de onderdelen (maalstenen, kleppen,
dichtingen) en schade veroorzaakt door externe voorwerpen in de koffiemolen (bijvoorbeeld: hout, kiezels,
plastic, scherven...).
Page 56

: Controlelampje is uit / : Controlelampje knippert
: Controlelampje brandt / : Controlelampje knippert tweemaal
Controlelampje
Betekenis
De koffie-
dik-
opvangbak
leegmaken
Reservoir
vullen
Clean Calc Aan / Uit
Het apparaat is gereed voor een koffie- of stoomcyclus.
/
Bij gewoon knipperend controlelampje : het apparaat is
bezig met de voorverwarming of met de intialiseringscyclus.
/
Knippert tweemaal: er is een koffiecyclus voor
2 kopjes in gang gezet.
Productinformatie in de stand parameterinstelling.
/
/
De koffiedik-opvangbak leegmaken (er is een cyclus
van 2 koffies bezig).
/
De koffiedik-opvangbak leegmaken + de lade schoonmaken
+ de lekbak legen en schoonmaken.
Controleer of de opvangbak afwezig of slecht
geplaatst is.
Controleer of de koffielade ontbreekt of slecht
geplaatst is.
Instelling waterhardheid.
/
Vul reservoir met water. Controleer of waterreservoir
ontbreekt of slecht geplaatst is.
/
/
De koffiecyclus is onderbroken bij gebrek aan water.
Vul het reservoir met water.
Automatische instelling stopzetten auto off.
Schoonmaakprogramma aangevraagd of in uitvoering.
/
Schoonmaakprogramma: voorbereiding
schoonmaak- of spoelcyclus.
Instelling koffietemperatuur.
Ontkalkingsprogramma aangevraagd of in uitvoering.
/
Ontkalkingsprogramma: voorbereiding ontkalkings- of
spoelcyclus.
/
/
Spoelcyclus of ontkalkingscyclus: er wordt gevraagd
het waterreservoir te legen, spoel het af en vul met
vers water.
/ /
Vraag voor lange spoeling (ongeveer 150 ml) zie
pagina 5.
Lange spoelbeurt bezig.
/ / / /
Knippert constant: abnormale werking.
Page 57

PAGINA
BESCHRIJVING . . . . . . . . . . . . . . . . . . . . . . . . . . . . . . . . . . . . . . . . . . . . . . . . . . . . . . . . . . . . . .1
Waarschuwingssignalen
Informatie over espresso koffie
Veiligheidsvoorschriften
VOOR HET EERSTE GEBRUIK . . . . . . . . . . . . . . . . . . . . . . . . . . . . . . . . . . . . . . . . . . . . . . . .3
METEN VAN DE WATERHARDHEID
CLARIS AQUA FILTER SYSTEM
INSTELLINGEN . . . . . . . . . . . . . . . . . . . . . . . . . . . . . . . . . . . . . . . . . . . . . . . . . . . . . . . . . . . . . . .4
INSTELLING WATERHARDHEID
INSTELLING KOFFIETEMPERATUUR
INSTELLING VAN DE AUTOMATISCHE UITSCHAKELING VAN HET APPARAAT
VOORBEREIDING VAN HET APPARAAT . . . . . . . . . . . . . . . . . . . . . . . . . . . . . . . . . . . . . . . . .5
SPOELING VAN DE CIRCUITS
VOORBEREIDING VAN DE KOFFIEMOLEN
BEREIDING VAN ESPRESSO EN GEWONE KOFFIE . . . . . . . . . . . . . . . . . . . . . . . . . . . .6
BEREIDING VAN EEN ESPRESSO (20 TOT 70 ML)
BEREIDING VAN GEWONE KOFFIE (80 TOT 220 ML)
2-KOPJES FUNCTIE
BEREIDING MET STOOM . . . . . . . . . . . . . . . . . . . . . . . . . . . . . . . . . . . . . . . . . . . . . . . . . . . . .7
OPSCHUIMEN VAN MELK
AUTO-CAPPUCINO-SET XS6000
ONDERHOUD VAN UW APPARAAT . . . . . . . . . . . . . . . . . . . . . . . . . . . . . . . . . . . . . . . . . . . .8
LEGEN VAN DE KOFFIEDIK-OPVANGBAK, DE KOFFIELADE EN
HET LEKBAKJE
SCHOONSPOELEN VAN HET KOFFIE CIRCUIT
REINIGINGSPROGRAMMA
ONTKALKINGSPROGRAMMA . . . . . . . . . . . . . . . . . . . . . . . . . . . . . . . . . . . . . . . . . . . . . . . . .10
LANG SPOELPROGRAMMA
ALGEMEEN ONDERHOUD . . . . . . . . . . . . . . . . . . . . . . . . . . . . . . . . . . . . . . . . . . . . . . . . . . . .12
TRANSPORT VAN HET APPARAAT
EINDE LEVENSDUUR VAN HET ELEKTR(ON)ISCH APPARAAT
PROBLEMEN EN OPLOSSINGEN . . . . . . . . . . . . . . . . . . . . . . . . . . . . . . . . . . . . . . . . . . . .12
RECEPTEN . . . . . . . . . . . . . . . . . . . . . . . . . . . . . . . . . . . . . . . . . . . . . . . . . . . . . . . . . . . . . . . . . .14
INHOUDSOPGAVE
Foto’s niet bindend
F 088
Patroon
Claris —
Aqua Filter
Systeem
(niet meegeleverd)
XS 3000
Pakje van 10
reinigingstabletten (2
tabletten meegeleverd)
F 054
Ontkalkingspoeder (1
zakje meegeleverd)
XS6000
Set Auto
Cappuccino
(niet meegeleverd)
XS 4000 KRUPS
vloeibare reiniger
voor Cappuccino
systemen (niet
meegeleverd)
Accessoires (afzonderlijk verkocht)
NEDERLANDS
Gebruik uitsluitend Krups accessoires met deze machine om de garantie te laten gelden.
Page 58

1
Draaiknop hoeveelheid koffie
Stoomknop
Aan/uit-knop met controlelampje
Standaard koffie knop
Sterke koffie knop
Controlelampje “Clean” (reinigen/schoonmaken)
Controlelampje “Calc” (ontkalking)
Controlelampje “vul waterreservoir”
Controlelampje “de koffiedik-opvang leegmaken” en
“de lekbak legen en schoonmaken”.
Knop “spoelen/onderhoud”
Afneembaar rooster en lekbak
In hoogte verstelbare koffie-uitgangen
Koffiedik-opvangbak
Draaiknop hoeveelheid koffie
Koffieboonreservoir
Stoompijpje
Deksel koffieboonreservoir
Waterreservoir handgreep / deksel
Waterreservoir
Onderhoudsrooster met pla-
teau om kopjes op te warmen
Waterpeilvlotters
Gezien van bovenaf
Regelknop maalgraad
Opening voor schoonmaaktablet
BESCHRIJVING
Regelknop maalgraad
Schoonmaaklade
De koffiedik-opvangbak legen en de lekbak
legen en schoonmaken
Vul waterreservoir
Waarschuwingssignalen
Schoonmaken uitvoeren
Ontkalken uitvoeren
Controlelampje brandt
Controlelampje knippert
Metalen maalwieltje
Display variabele(parameter)instelling
Speciale onderhoudsinstructies
Foto’s niet bindend
+
Overgaan tot de lange
spoeling
Page 59

2
NEDERLANDS
Beste Klanten,
Wij danken u voor de aanschaf van deze Krups Espresseria Automatic. Wij zijn er zeker van dat u zult genieten van de
kwaliteit van de espresso en hoe makkelijk het apparaat ingebruik is.
Of u nu een gewone espresso, een ‘lungo’, een sterke ‘ristretto’ of een zachte cappuccino wilt, uw automatisch koffie / espressoapparaat is zo ontworpen dat u dezelfde kwaliteit thuis heeft als in de horeca, op elk gewenst moment van de dag of de week.
Dankzij het Thermoblock System, het 15 bar pompdruksysteem en omdat er echte koffiebonen vers gemalen worden voordat de koffie gemaakt wordt, zorgt uw Espresseria Automatic voor een maximaal aroma, met een goudbruine crèmezachte schuimlaag die
ontstaat door de natuurlijke oliën die in koffiebonen zitten.
Drink uw espresso uit kleine porseleinen kopjes in plaats van de gebruikelijke koffiekopjes.
Voor het verkrijgen van een espresso op de juiste temperatuur en een compacte crèmelaag adviseren wij u uw kopje voor te verwar-
men.
Na een paar keer proberen zult u het type mengsel en branding van de koffiebonen vinden dat het meest aansluit bij uw smaak. NB :
gebruik nooit bonen met een suikerlaagje (de machine zal in dat geval namelijk vastlopen). De kwaliteit van het water dat u gebruikt
is eveneens een essentiële factor in het resultaat van de koffie die u in uw kopje krijgt.
Verzeker u ervan dat het water uit de kraan vers is, dat het geen chloorgeur heeft en redelijk koud is.
Espresso-koffie heeft een rijker aroma dan conventionele filterkoffie. Ondanks het feit dat het sterker en aanhoudender van smaak is,
bevat het minder cafeïne dan filterkoffie (ongeveer 60 tot 80 mg per kop in vergelijking met 80 tot 100 mg per kop). Dit is te danken
aan de kortere doorlooptijd.
Dankzij de goede afleesbaarheid van de reservoirs en de automatische schoonmaak- en ontkalkingsprogramma’s, is uw Espresseria
Automatic uiterst gemakkelijk in het gebruik.
Belangrijk : veiligheidsvoorschriften
Lees de voorschriften zorgvuldig vóór het eerste gebruik van uw apparaat, en bewaar ze: bij onjuist gebruik van het apparaat komt
de aansprakelijkheid van KRUPS te vervallen.
Uw apparaat is uitsluitend bedoeld voor huishoudelijk gebruik (maximaal 3000 cycli per jaar). De garantie is niet van toepassing in
geval van gebruik van uw apparaat:
- in kleinschalige personeelskeukens in winkels, kantoren en andere arbeidsomgevingen,
- op boerderijen,
- door gasten van hotels, motels of andere verblijfsvormen,
- in bed & breakfast locaties.
Sluit het apparaat alleen aan op een geaard stopcontact. Controleer voordat u het apparaat in gebruik neemt of de netspanning,
aangegeven op uw apparaat, overeenkomt met de netspanning bij u thuis
Verzeker u ervan dat het apparaat niet op een hete ondergrond staat zoals een kookplaat, en gebruik het niet in de buurt van een
open vlam.
Trek onmiddellijk de stekker uit het stopcontact als u iets onregelmatigs opmerkt terwijl het apparaat in werking is.
Trek nooit aan het snoer om de stekker uit het stopcontact te halen.
Laat het snoer niet langs een tafel of werkblad hangen.
Laat uw handen of het elektriciteitssnoer niet in contact komen met de hete onderdelen van het apparaat.
Stop het apparaat, het snoer of de stekker nooit in water of enige andere vloeistof.
Dit apparaat is niet bedoeld om zonder hulp of toezicht gebruikt te worden door kinderen of andere personen, indien hun fysieke,
zintuiglijke of mentale vermogen hen niet in staat stelt dit apparaat op een veilige wijze te gebruiken. Indien zij geen ervaring hebben met het gebruik van of kennis hebben van het apparaat, dienen zij onder toezicht te staan van een verantwoordelijk persoon
die bekend is het met gebruik van het apparaat.
Er moet toezicht op jonge kinderen zijn, zodat zij niet met het apparaat kunnen spelen.
Gebruik het apparaat niet als het snoer of het apparaat zelf beschadigd is.
Als het snoer of de stekker beschadigd is/zijn moet deze vervangen worden door een erkend KRUPS reparateur of servicedienst,
om elk gevaar te voorkomen.
Kijk altijd in de voorschriften voor het verwijderen van kalk uit het apparaat.
Bescherm het apparaat tegen vochtigheid en bevriezen.
Gebruik uw apparaat niet als het niet goed functioneert, of als het beschadigd is. In dit geval dient u zich te wenden tot een
erkend servicepunt van KRUPS (zie servicelijst of kijk op www.krups.nl).
Alle werkzaamheden anders dan het schoonmaken en het gebruikelijke onderhoud dienen door een erkende KRUPS reparateur
verricht te worden.
Gebruik voor uw veiligheid alleen accessoires en reserveonderdelen van de fabrikant die specifiek geschikt zijn voor uw apparaat.
Een verkeerde aansluiting maakt de garantie ongeldig.
Trek de stekker uit het stopcontact zodra u het apparaat voor langere tijd niet meer gebruikt en/of wanneer u het schoonmaakt.
Alle apparaten worden onderworpen aan een strenge kwaliteitscontrole. Er worden praktische gebruikstests toegepast op wille-
keurige apparaten waardoor eventuele sporen van gebruik verklaard kunnen worden.
Het gebruik van meervoudige contactdozen en/of verlengsnoeren wordt afgeraden.
Schenk geen water in het koffieboonreservoir en/of onder het onderhoudsrooster.
Let op de richting van het stoompijpje om verbrandingsrisico’s te vermijden.
Als ontkalken, schoonmaken en regelmatig onderhoud wordt nagelaten of indien er vreemde voorwerpen in de molen worden
gestopt, houdt dit in dat de 2-jaarlijkse of 6.000-cyclus garantie (met een maximum van 3.000 cycli per jaar) komt te vervallen.
Gebruikslimiet
Dit espresso-apparaat mag alleen maar gebruikt worden voor het bereidden van espresso’s of koffie, om melk op te schuimen en
vloeistoffen op te warmen. KRUPS is niet aansprakelijk voor schade die voortkomt uit gebruik van het apparaat voor niet toegestane
doeleinden, te wijten is aan verkeerde aansluitingen en hanteringen, of riskante verrichtingen en reparaties. De onderhoudsgarantie
komt in dergelijke gevallen te vervallen.
Dit apparaat is uitsluitend bestemd voor huishoudelijk gebruik en dient alleen binnenshuis gebruikt te worden. Het is niet ontworpen
om voor handels- of beroepsdoeleinden te gebruiken.
Page 60

Om de beste smaak te krijgen voor uw bereidingen en de levensduur van uw apparaat te verlengen uitsluitend, adviseren wij
u het Claris Aquafilter te gebruiken (deze wordt apart als accessoire verkocht). Het is samengesteld uit een antikalk-substantie en actieve koolstof waardoor de in het water aanwezige chloor, onzuiverheden, lood, koper, pesticiden, enz. verminderd
worden. Mineralen en oligo-elementen blijven wel bewaard.
3
Voordat u het apparaat voor de eerste keer gebruikt of als u een verandering hebt geconstateerd in de hardheid van het water
is het raadzaam het apparaat aan te passen aan de waargenomen waterhardheid. Om deze waterhardheid te bepalen kunt u
het bijgeleverde kartonnen strookje gebruiken of neem contact op met uw waterleidingmaatschappij.
VOOR HET EERSTE GEBRUIK
Na 1 minuut zal de hardheidsmeting verschijnen (bij middelmatig hard water).
Door het filteren van het water
met de Claris - Aqua Filter
kunt u hardheid aan carbonaten
terugbrengen tot 75 %*
Chloor –tot 85 %*
Lood – tot 90 %*
Koper – tot 95 %*
Aluminium – tot 67 %
* indicaties worden geleverd door de fabrikant
Installeren van het filter in
het apparaat.
Schroef het filter voor de
eerste keer in de bodem
van het waterreservoir.
Het Claris Filter moet minimaal om de 50 liter water of om de 2 maanden vervangen worden.
Vul een glas met water
en dompel het strookje
erin.
Gebruik leidingwater of water dat net door een filter is gegaan.
Mechanisme om de maand
aan te geven waarin het
filter geplaatst is en
wanneer het weer
vervangen moet worden
(na maximaal 2 maanden).
Hardheidsgraad
0
erg zacht
1
zacht
2
middelmatig hard
3
hard
4
erg hard
° f
<5,4° >7,2° >12,6° >25,2° > 37,8°
° dH
<3° >4° >7° >14° > 21°
° e
<3,75° >5° >8,75° >17,5° > 26,25°
Plaats een bak onder
het stoompijpje. Laat
300 ml water lopen
door één keer langer
dan 3 seconden op de
spoelknop te drukken.
U kunt dit als u wilt
herhalen.
1 sec.
012
3
4
F088
METEN VAN DE WATERHARDHEID
CLARIS - AQUA FILTER F 088 CARTRIDGE (APART VERKRIJGBAAR)
Page 61

INSTELLINGEN
4
De apparaten worden
in de fabriek ingesteld
op 2, gemiddelde
temperatuur.
Doe de stekker van het
apparaat in het stopcontact maar zet het
niet aan.
Til het rooster op waar
de kopjes worden op
geplaatst, terwijl u het
naar achter duwt om
het te doen kantelen.
Druk tegelijkertijd op de
‘Service’ en
knoppen.
Het controlelampje ‘calc’
gaat branden.
Druk een aantal malen op de
knop (met tussenpozen),
zo vaak als nodig is om de
gewenste koffietemperatuur
in te stellen.
Bij elk van deze stappen kunt u, wanneer u klaar bent met uw instellingen, de afstellingen opslaan door te drukken op de toets (de
4 controlelampjes knipperen 2 keer), of u kunt verder gaan met de procedure. De opslag in het geheugen van deze afstellingen blijft
van kracht, zelfs bij een stroomonderbreking. U kunt op elk moment deze afstellingen wijzigen door deze handelingen over te doen.
Instellen van de automatische uitschakeling
Het ‘clean’
controlelampje gaat
branden.
Druk een aantal malen
op de knop (met
tussenpozen), zo vaak
als nodig is om de
gewenste tijdsduur in te
stellen.
Druk een aantal malen op de
knop (met tussenpozen),
zo vaak als nodig is om het
hardheidsniveau voor het
gebruikte water te selecteren.
Instelling van de koffietemperatuur
Instelling van de waterhardheid
De apparaten worden
in de fabriek ingesteld
op hardheidsniveau 3.
De apparaten worden
in de fabriek ingesteld
op 1 uur.
1
2
3
1 = 1 uur
2 = 2 uur
3 = 3 uur
4 = 4 uur
0 = erg zacht
1 = zacht
2 = middelmatig hard
3 = hard
4 = erg hard
Het digitale display voor
de (parameter) instellingen bevindt zich onder
het onderhoudsrooster.
U hebt de mogelijkheid om uw
apparaat uit te zetten na een
aantal voorgeprogrammeerde
uren.
Druk op de stoomknop om
over te gaan op de instelling
‘automatische uitschakeling’:
=>
Het controlelampje
van het waterreservoir
gaat branden.
Druk op de stoomknop om
over te gaan op
koffietemperatuur
instelling : =>
Kijk goed naar het
onderste gedeelte van
het schermpje
NEDERLANDS
Page 62
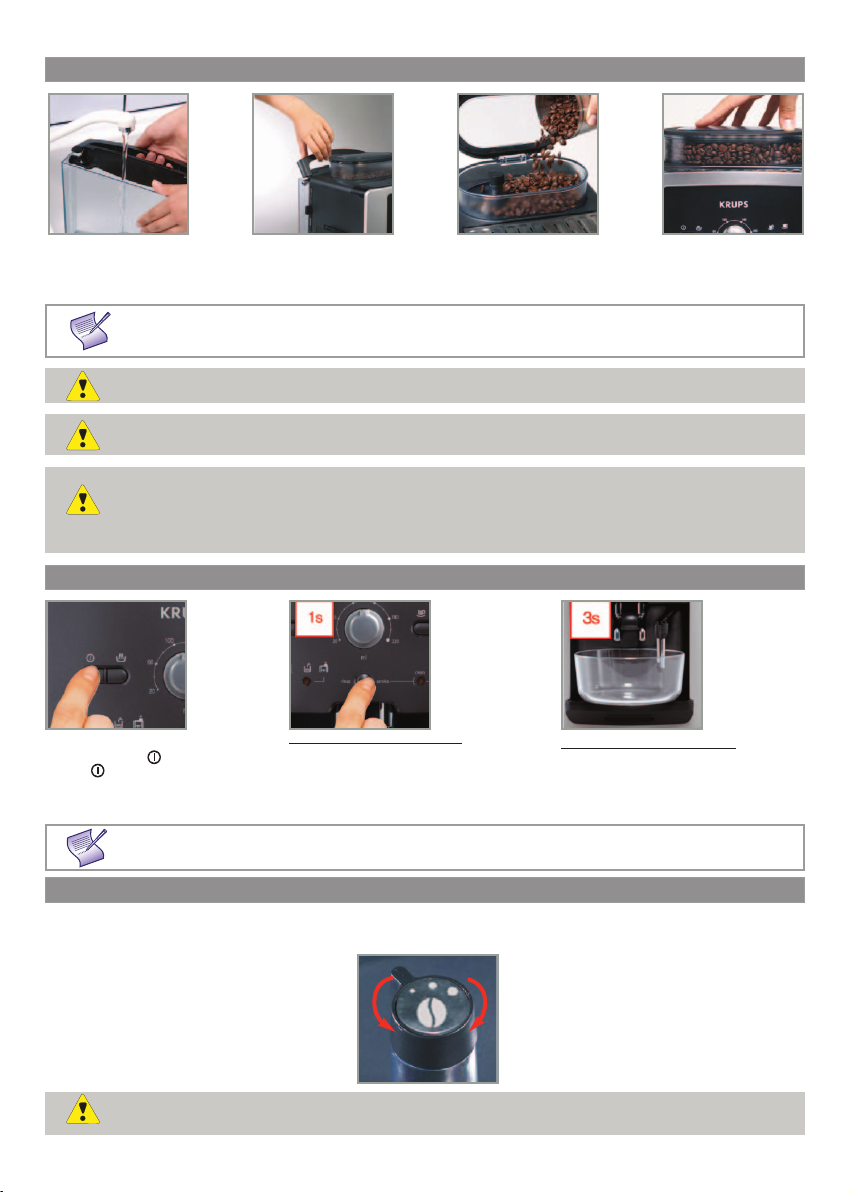
5
Het is aan te raden één of verschillende spoelingen van de 2 circuits uit te voeren als u het apparaat verschillende dagen niet hebt gebruikt. Telkens wanneer u het apparaat inschakelt, voert zij een initialiseringscyclus uit.
Vul het waterreservoir.
Plaats het terug door er
stevig op te drukken en
sluit het deksel weer.
Open het deksel van
het koffieboonreservoir.
Voeg de koffiebonen
toe (maximaal 250 g).
Sluit het deksel van het
koffieboonreservoir
weer.
Zorg ervoor dat er geen vreemde voorwerpen in het koffieboonreservoir terechtkomen die zich tussen de koffiebonen
bevinden, zoals kleine steentjes. Schade veroorzaakt door vreemde voorwerpen in het koffiereservoir valt buiten de garantie. Doe geen water in het koffieboonreservoir. Denk eraan het lekbakje te plaatsen om te vermijden dat er afvalwater op
het werkblad komt en u risico loopt zich te verbranden.
Kijk na of uw waterreservoir schoon is
Zet het apparaat in gang door te drukken op de toets . Het controlelampje knippert tijdens de voorverwarming en tijdens de initaliseringscyclus.
Spoeling van het koffiecircuit :
Plaats een bakje met onder de koffie-uitgangen. Druk kort op de toets ‘Service’ om een
automatische spoelcyclus van het
koffiecircuit te starten. Dit zal automatisch
stoppen na ongeveer 40 ml.
U kunt de sterkte van uw koffie kiezen door de koffieboon maalgraad in te stellen.
Hoe fijner de maalinstelling des te sterker en crème-achtiger de koffie zou moeten zijn.
Regel de gewenste maalgraad door aan de knop ‘Maalgraad instelling’ te draaien.
WIJZIG DE INSTELLING ALLEEN TIJDENS HET MALEN.
FORCEER DE INSTELLING VOOR DE MAALGRAAD NOOIT.
Het gebruik van olieachtige, gekaramelliseerde, of gearomatiseerde koffiebonen wordt afgeraden voor
dit apparaat. Dit type van bonen kan het apparaat beschadigen.
NOOIT GEMALEN KOFFIE IN HET KOFFIEBOONRESERVOIR DOEN.
Draai naar links
voor een fijnere
maalgraad.
Draai naar
rechts voor een
grovere maalgraad.
Vul het waterreservoir niet met heet water, melk of enige andere vloeistof. Als u het apparaat aan zet terwijl het
waterreservoir niet op z’n plaats zit of niet voldoende gevuld is, gaat het lampje“vul waterreservoir” branden en het maken
van een espresso of een kop koffie zal dan onmogelijk zijn.
VOORBEREIDING VAN HET APPARAAT
Spoeling van het stoomcircuit:
Plaats een kannetje onder de stoombuis.
Druk vervolgens 3 seconden lang op de
toets ‘Service’ om een spoelcyclus van
het stoomcircuit te starten. Dit zal automatisch stoppen na ongeveer 300 ml.
VOORBEREIDING VAN DE MOLEN
HET SPOELEN VAN DE CIRCUITS
Page 63
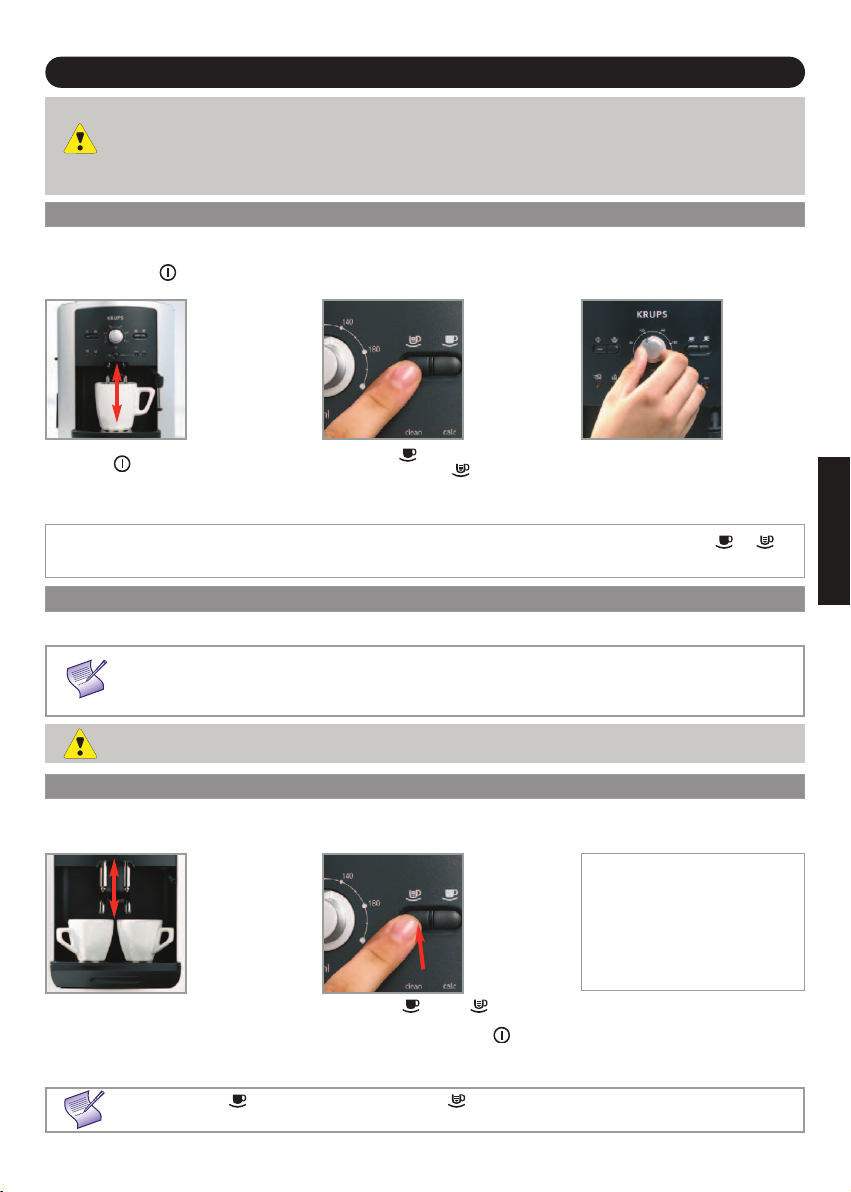
6
De hoeveelheid water voor een espresso moet tussen 20 en 70 ml liggen.
Telkens wanneer u uw apparaat inschakelt, voert het een initialiseringscyclus uit.
Druk op de knop : het controlelampje knippert tijdens de voorverwarming van het apparaat.
Selecteer de knop voor een
sterke espresso of de knop
voor een standaard espresso.
Uw apparaat is nu klaar voor gebruik.
Het lampje zal blijven branden.
Plaats een kopje onder de koffieuitgangen. U kunt de koffie-uitgangen
naar boven of naar beneden halen om af
te stemmen op de maat van uw kopjes.
BEREIDING VAN ESPRESSO EN GEWONE KOFFIE
UW APPARAAT IS ONTWORPEN OM ALLEEN KOFFIE TE MAKEN MET KOFFIEBONEN.
Als u voor het eerst koffie zet met het apparaat of na een lange periode van afwezigheid of
ontbreken van een schoonmaak- of ontkalkingsprocedure zal er een beetje stoom en heet water
uit het stoompijpje komen (automatische ontsteking).
Als de koffie-uitgangen te hoog zijn ingesteld ten opzichte van de maat van de kopjes kan dit leiden
tot opspatten of verbranding.
U kunt altijd de hoeveelheid water
wijzigen.
Het koffiemaalsel wordt bevochtigd met een beetje heet water na de maalfase.
Na verloop van tijd start het koffiezetproces zelf.
Van zodra er een zekere hoeveelheid in het kopje is, raden we u aan om, als u een sterkere koffie wil verkrijgen,
uw bereiding in twee cycli te laten verlopen. Bijvoorbeeld 2 keer 70 ml voor een kop van 140 ml.
U kunt uw apparaat gebruiken om 2 kopjes koffie of espresso te maken. Haal de kopjes na de eerste cyclus nog niet weg.
Uw apparaat is nu klaar voor gebruik. Het lampje blijft branden.
Plaats twee kopjes onder de
koffie-uitgangen.
U kunt de koffie-uitgangen
naar boven of naar benden
halen om af te stemmen op
de maat van uw kopjes.
Selecteer de knop of knop naar
keuze door achtereenvolgens twee keer
snel te drukken. Het lampje gaat
tweemaal knipperen om te bevestigen
dat u gevraagd heeft om 2 kopjes koffie.
Als u eerst op de knop hebt gedrukt en dan op de (of omgekeerd), dan zal de tweede handeling niet in
aanmerking worden genomen.
Het apparaat zal
automatisch 2 complete
koffiezet-cycli in gang
zetten.
Om het doorlopen van de koffie in uw kopje stop te zetten, kunt u of weer drukken op één van de of
knoppen ofwel de draaiknop naar de laagste stand draaien.
x 2
BEREIDING VAN EEN ESPRESSO
2-KOPJES FUNCTIE
TREK HET RESERVOIR NIET UIT VOOR HET EINDE VAN DE CYCLUS
(meer bepaald ongeveer 15 seconden na het doorlopen van de koffie).
De hoeveelheid water voor een kop koffie moet tussen 80 en 220 ml liggen.
BEREIDING VAN EEN KOP KOFFIE
NEDERLANDS
Page 64

7
BEREIDINGEN MET STOOM
Met stoom kan melk worden opgeschuimd om cappuccino te maken of ‘caffe latte’ bijvoorbeeld, en ook kunnen allerlei
vloeistoffen opgewarmd worden. Aangezien het produceren van stoom een hogere temperatuur nodig heeft dan voor
het bereiden van een espresso, zorgt het apparaat voor een extra voorverwarmfase voor stoom.
Druk op de knop.
Het lampje zal gaan knipperen terwijl het apparaat opwarmt.
Als het voorverwarmen eenmaal klaar is zal het lampje continu blijven branden en u kunt
beginnen met het opstarten van de stoom door weer op de knop te drukken.
Druk opnieuw op de toets om de cyclus te beëindigen.
OPSCHUIMEN VAN MELK
We raden u aan halfvolle of volle (houdbare) melk te gebruiken die recent werd geopend. Onbehandelde melk
maakt geen optimale resultaten mogelijk. Nadat u de stoomfuncties hebt gebruikt, kan het mondstuk heet zijn.
Controleer of het
stoompijpje correct
vastzit.
Giet de melk in uw
melkkan. Dompel het
stoompijpje in de melk
onder.
Start de stoomfunctie
zoals uitgelegd in de
bovenstaande paragraaf;
... drukt u weer op de
knop om de cyclus te stoppen.
Opgelet, de cyclus
eindigt niet meteen.
Om enige melkresten
van het stoompijpje te
verwijderen, plaatst u
een kan onder het
stoompijpje en drukt u
op de knop.
Laat de stoom minstens
10 seconden lang
ontsnappen en druk dan
weer op de knop om
het proces stop te zetten.
Het stoommondstuk is afneembaar. Zo kunt u het grondig schoonmaken. Was het met water en een weinig, niet schurend afwasmiddel met
behulp van een borstel. Spoel het en droog het. Voordat u het stoommondstuk terugplaatst, moet u ervoor zorgen dat de luchtopeningen niet
verstopt zitten met melkresten. Maak ze zo nodig open met behulp van
de meegeleverde naald. Was het stoommondstuk niet mee in de vaatwasser.
Om de stoomfunctie te onderbreken kunt u op ongeacht welke knop drukken.
Als het mondstuk verstopt zit, maak het dan open met behulp van de meegeleverde naald.
De maximale tijdsduur voor stoomproductie per cyclus is beperkt tot 2 minuten.
SET AUTO-CAPPUCCINO XS 6000 (APART VERKRIJGBAAR)
Om te vermijden dat de melk droogt op het auto-cappuccino accessoire, moet u ervoor zorgen dat het goed is schoongemaakt. Het verdient aanbeveling dit accessoire onmiddellijk schoon te maken terwijl u een cyclus met stoom uitvoert met de kom van het accessoire vol water om het mondstuk
van binnenuit schoon te maken. Daarvoor kunt u gebruik maken van het vloeibare schoonmaakmiddel XS4000 dat beschikbaar is als accessoire.
XS 6000
Als de melk genoeg is
opgeschuimd...
Opgelet, de cyclus eindigt niet onmiddellijk.
Verbind de verschillende elementen
onderling.
Selecteer de positie
cappuccino of caffe
latte op het speciale
mondstuk.
Vul de melkpot en zet
een kopje of een glas
onder het auto-cappuccino mondstuk.
Druk op de toets
om de cyclus te starten en vervolgens
weer te stoppen;
Zet uw kop onder de
koffie-uitgangen en
start een koffie /
espressocyclus.
Dit auto-cappucino-accessoire vergemakkelijkt de bereiding van een cappucino of van een caffe latte.
De slang mag niet gedraaid zijn, om de knop in de juiste stand te houden.
Page 65

8
Als het lampje gaat
branden, verwijder, leeg
en reinig het lekbakje
dan.
Het lekbakje vangt afvalwater op en de koffiedik-opvangbak vangt gebruikt koffieresidu op.
De koffielade stelt u in staat eventuele afzetting van koffiedik te verwijderen.
Verwijder, leeg en
reinig de koffiedikopvangbak.
Het lekbakje is voorzien
van vlotters om u te
informeren dat het
geleegd moet worden.
Het lampje zal blijven branden als de koffiedik-opvangbak niet goed is aangedrukt/geplaatst of als het
geïnstalleerd is in minder dan 4 seconden. U kunt geen espresso of koffie maken terwijl het lampje aan is of knip-
pert. De koffiedik-opvangbak heeft een capaciteit van 9 kopjes koffie.
ONDERHOUD VAN UW APPARAAT
Zodra u de koffiedik-opvangbak verwijdert moet u het helemaal legen om overstromen te voorkomen.
Leeg tevens het lekbakje.
SCHOONMAAKPROGRAMMA – TOTALE TIJDSDUUR: ONGEVEER 20 MINUTEN
Wanneer het nodig is om over te gaan tot een schoonmaak, waarschuwt uw apparaat hiervoor door dat er een controlelampje “clean” begint te branden. Dit programma is enkel toegankelijk wanneer het apparaat het vraagt (meer bepaald
elke 300 koffie- of espressobereidingen).
Druk op de ‘Service’
knop om het schoonmaakprogramma op te
starten. De ‘clean’ en
lampjes zullen gaan
knipperen.
Leeg en reinig de koffiedik-opvangbak. Plaats het
weer terug. Het lampje
zal uitgaan.
Verwijderen reinig
koffielade. Plaats het
dan weer terug.
Vul en plaats het waterreservoir opnieuw.
SPOELING VAN HET CIRCUITS: ZIE PAGINA 5
Plaats een kan met een
minimuminhoud van 0,6 l
onder de koffie-uitgangen.
Verwijder de koffielade.
Reinig het onder water
en droog het goed
af.
Opgelet! Om van de garantievoorwaarden gebruik te maken is het van belang de schoonmaakcyclus uit te
voeren wanneer dit gevraagd wordt. Zorg ervoor de handelingen in de goede volgorde te verrichten.
U kunt het apparaat nog gebruiken als het lampje brandt. Voer het programma echter wel snel uit, want dit
lampje blokkeert eventuele andere waarschuwingen.
Verwijder en leeg het
lekbakje.
LEGEN VAN DE KOFFIEDIK-OPVANGBAK,
DE KOFFIELADE EN HET LEKBAKJE
NEDERLANDS
Page 66

9
Druk op de ‘Service’
knop om het
schoonmaakprogramma op te starten.
1 - Schoonmaakcyclus
Het ‘clean’ lampje gaat continu branden.
De schoonmaakcyclus zal automatisch gaan werken.
De pomp zuigt bij tussenpozen water op. Deze handeling duurt
ongeveer 10 minuten en het ‘clean’ lampje gaat weer
knipperen.
Leeg de bak met
afvalwater en zet het
terug onder de koffieuitgangen.
Druk weer op de
‘Service’ knop om een
eerste spoelcyclus op te
starten.
2 - Eerste spoeling
Het ‘clean’ lampje gaat continu branden.
Het programma gaat door.
De eerste spoelcyclus zal automatisch gaan werken. Het staat
het apparaat toe gespoeld te worden en dat resterend
schoonmaakmiddel wordt verwijderd. Deze eerste spoelcyclus
duurt ongeveer 5 minuten en eenmaal beëindigd zal het ‘clean’
lampje weer gaan knipperen.
Leeg de bak met
afvalwater en zet het
terug onder de koffieuitgangen.
Druk weer op de
‘Service’ knop om een
tweede spoelcyclus
op te starten.
3 - Tweede spoeling
Het ‘clean’ lampje gaat weer continu branden.
Een tweede schoonmaakcyclus zal automatisch gaan werken.
Deze tweede spoelcyclus duurt ongeveer 5 minuten.
Als de tweede spoelcyclus beëindigd is, gaat het ‘clean’ lampje
uit.
Leeg de bak met afvalwater.
Leeg het lekbakje en plaats
het weer terug.
Vul uw waterreservoir.
Uw apparaat is weer gereed
voor gebruik.
Als er niet genoeg water in het waterreservoir is als u het programma opstart, dan gaat het lampje
branden om u te waarschuwen. Voeg de vereiste hoeveelheid water aan het reservoir toe en de schoonmaak zal
automatisch doorgaan.
Als u tijdens het reinigen of in geval van een stroomstoring, dient u het schoonmaakprogramma opnieuw vanaf het
begin op te starten. Dit is nodig voor het spoelen van het watercircuit. In dit geval is een ander ‘schoonmaaktablet’
nodig. Zorg ervoor dat de volledige schoonmaakcyclus wordt beëindigd, om gezondheidsrisico's te vermijden. De
schoonmaakcyclus is een cyclus met tussenpozen. Houd uw handen niet onder de koffie-uit gangen tijdens de
cyclus.
Gebruik alleen KRUPS (XS3000) ‘schoonmaaktabletten’. KRUPS is niet aansprakelijk voor enige
schade veroorzaakt door middelen van andere merken. Schoonmaakmiddelen zijn verkrijgbaar bij KRUPS of bij
uw winkelier.
Open het
onderhoudsrooster en
breng een KRUPS
‘schoonmaaktablet’
(XS3000) in de
schoonmaakopening.
± 10 min.
± 5 min.
± 5 min.
XS3000
Belangrijk : ter bescherming van het aanrechtblad, dient u tijdens het schoonmaakprogramma altijd
een doek of dienblad onder het apparaat te leggen.
Page 67
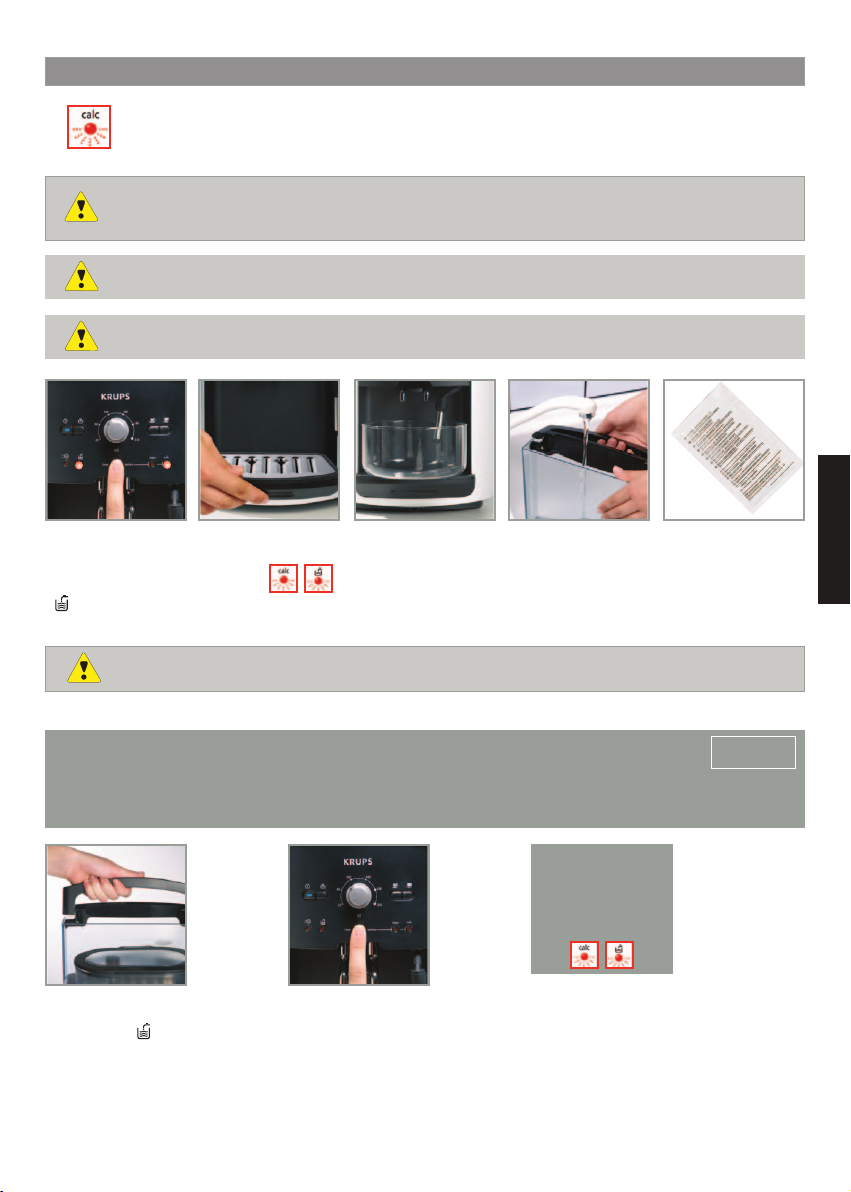
Breng het waterreservoir opnieuw aan. Het
controlelampje
gaat uit en het lampje
“calc” blijft branden.
1 - Ontkalkingscyclus
De ontkalkingscyclus is gestart en zal automatisch verlopen. De pomp zuigt bij tussenpozen water aan en laat dit water uit
de koffiemondstukken en vervolgens via het stoommondstuk uitlopen. Dit duurt ongeveer 10 minuten.
10
ONTKALKINGSPROGRAMMA – TOTALE TIJDSDUUR : ONGEVEER 22 MINUTEN.
De hoeveelheid afgezette kalk is afhankelijk van de hardheid van het gebruikte water. Het apparaat
waarschuwt u automatisch waarbij het ‘calc’ lampje gaat branden : het is dan noodzakelijk over
te gaan op ontkalking.
Dit programma is enkel toegankelijk wanneer het apparaat het vraagt
Opgelet! Om van de garantievoorwaarden gebruik te maken is het van belang dat zowel de schoonmaakcyclus
als de ontkalkingscyclus is uitgevoerd wanneer dit gevraagd wordt. Zorg ervoor de handelingen in de goede
volgorde te verrichten. U kunt het apparaat gebruiken als het lampje brandt. U wordt echter geadviseerd
het programma zo snel mogelijk uit te voeren aangezien het lampje andere waarschuwingen blokkeert.
Druk op de ‘Service’
knop om het
ontkalkingsprogramma op te starten.
De lampjes ‘calc’ en
gaan knipperen.
Plaats een bak met een
minimale watercapaciteit van 0,6 l onder de
koffie-uitgangen en
onder het stoompijpje.
Verwijder en reinig het
lekbakje.
Leeg het reservoir en
vul het met lauwwarm
water tot de ‘calc’
aanduiding.
Los een zakje
ontkalkingsmiddel van
Krups F054 (40 g) op.
Druk op de toets
“Service” nadat u al
deze bewerkingen hebt
uitgevoerd.
± 10 min
F054
Belangrijk : ter bescherming van het aanrechtblad, dient u tijdens het schoonmaakprogramma altijd
een doek of dienblad onder het apparaat te leggen.
Als uw product is uitgerust met het Claris – Aqua Filter System F088, zorg er dan voor het filter te verwijderen voor elke ontkalkingsbeurt.
Wanneer de cyclus
voltooid is, knipperen
de controlelampjes '
waterreservoir ' en
'kalk'.
NEDERLANDS
Gebruik alleen KRUPS ontkalkingsmiddelen. Ontkalkingsmiddelen zijn verkrijgbaar bij KRUPS of bij uw winkelier.
KRUPS is niet aansprakelijk voor schade aan het apparaat door het gebruik van andere producten.
Page 68

11
2 - Eerste spoeling
Een eerste spoeling is noodzakelijk om de kalkresten te verwijderen.
Deze cyclus wordt automatisch opgestart. Dit duurt ongeveer 6 minuten.
± 6 min
Leeg uw bak met
afvalwater.
Leeg het lekbakje en
zet het daarna weer
terug evenals de bak
zoals daarvoor.
Leeg, reinig en spoel
het waterreservoir en
vul het dan weer tot het
“Max.” niveau.
Plaats het waterreservoir weer terug. Het
‘calc’ lampje gaat knipperen en het
lampje gaat uit.
Druk op de ‘Service’
knop. Het ‘calc’ lampje
gaat continu branden.
Als de tweede
spoeling klaar is
gaat het ‘calc’
lampje uit.
Druk weer op de
‘Service’ knop. Het
‘calc’ lampje
gaat continu branden.
Leeg het lekbakje en
plaats het weer terug.
Leeg en vul uw
waterreservoir.
3 - Tweede spoeling
Aan het eind van de eerste spoeling gaat het ‘calc’ lampje branden.
Een tweede automatische cyclus duurt 6 minuten.
Uw apparaat is weer klaar voor gebruik.
Verwijder de
afvalwaterbak en het
lekbakje en plaats ze
weer terug.
Als er niet genoeg water in het waterreservoir zit, dan wordt u gewaarschuwd door het lampje . Voeg de juiste hoeveelheid water aan het reservoir toe en de kalkverwijdering zal automatisch doorgaan.
Als er een stroomstoring optreedt tijdens de cyclus, dan zult u weer helemaal van voren af aan moeten beginnen.
± 6 min
LANG SPOELPROGRAMMA
Verwijder het reservoir,
vul het en zet het terug.
Wanneer een lange spoelbeurt nodig is, waarschuwt het apparaat u door het knipperen van de controlelampjes
'clean' en 'kalk'.
Plaats een bak die
minstens 0,15 l kan
bevatten onder de koffie-uitgangen en het
stoommondstuk.
Start het lange spoelprogramma door op de toets
'Service' te drukken.
De controlelampjes 'clean'
en 'kalk' gaan permanent
branden.
+
Wanneer de lange
spoelbeurt voltooid is,
gaan de controlelampjes 'clean' en
'kalk' uit.
Zorg ervoor de hele ontkalkingscyclus af te maken om gezondheidsrisico’s te vermijden. De ont-
kalkingscyclus is een cyclus met tussenpozen. Houd uw handen niet onder de koffie-uitgangen
tijdens de cyclus.
Page 69

12
ALGEMEEN ONDERHOUD
Haal altijd de stekker uit het stopcontact en laat uw apparaat afkoelen voordat u het schoonmaakt.
Gebruik geen schoonmaakproducten die krassen kunnen achterlaten op het apparaat, of die het kunnen aantasten.
Veeg de romp van het apparaat aan de buitenkant af met een vochtige doek.
Maak de schoonmaaklade schoon met warm water
met daarin een vloeibaar afwasmiddel, alsmede de
lekbak en de koffiedik-opvangbak.
Spoel het waterreservoir om met vers
water.
Bewaar en gebruik de originele verpakking voor het vervoeren van het apparaat.
TRANSPORT VAN HET APPARAAT
Als het apparaat onverpakt is gevallen, dan is het raadzaam het terug te brengen naar een erkend servicepunt
om brandgevaar of elektrische problemen te voorkomen.
EINDE LEVENSDUUR VAN UW ELEKTR(ON)ISCH APPARAAT
Deze onderdelen zijn niet geschikt om te worden gewassen in een vaatwasser.
Bescherm het milieu
Uw apparaat bevat veel materiaal dat voor recycling/hergebruik geschikt is.
Niet in de vuilnisbak deponeren of naar een stortplaats brengen, maar naar een door uw gemeente opgezet centraal
afvalinzamelpunt brengen.
NEDERLANDS
PROBLEMEN EN OPLOSSINGEN
Het apparaat gaat niet aan nadat u op de
toets hebt gedrukt.
Er komt abnormaal water of stoom uit het
stoommondstuk
De espresso of koffie is niet heet genoeg.
De koffie is te slap of niet sterk genoeg.
De koffie loopt te langzaam door.
Controleer of de stekker van het snoer goed in het stopcontact zit.
Wanneer het apparaat herhaaldelijk wordt gebruikt, kunnen er enkele druppels
uit het stoommondstuk komen.
Wijzig de afregeling van de temperatuur van de koffie.
Verwarm de koppen door ze te spoelen met warm water.
Kijk na er er koffie is in het reservoir voor koffiebonen en of de koffie correct
doorvloeit.
Vermijd olieachtige, gekaramelliseerde of gearomatiseerde koffie te gebruiken.
Verminder het volume van de geselecteerde koffie door middel van de draaiknop.
Selecteer de toets .
Draai de knop voor het fijner maken van de maling naar links om een fijner
maalsel te verkrijgen.
Doe uw bereiding in twee cycli door gebruik te maken van de functie 2 kopjes.
Draai de knop voor het fijn maken van de vermaling naar rechts om een grover
maalsel te verkrijgen (kan afhangen van het gebruikte koffietype).
Voer één of meer spoelcycli uit.
Page 70

13
PROBLEMEN EN OPLOSSINGEN
De crema-laag is te dun.
Het apparaat heeft geen koffie geleverd.
U heeft gemalen koffie gebruikt in plaats van
koffiebonen.
De maalvoorziening maakt een abnormaal
geluid.
De regelknop van de fijnheid van het maalsel
van de maalinrichting kan maar moeilijk
draaien.
Er komt geen stoom uit het stoompijpje.
Niet genoeg schuim op de melk.
De opgeschuimde melk is te grof.
Het accessoire Auto-Cappucino zuigt geen
melk aan .
(Afzonderlijk verkocht accessoire)
Het reinigings- of ontkalkingsprogramma
weigert te starten.
Nadat u het waterreservoir hebt gevuld, blijft
het controlelampje branden.
Nadat u de koffiedik-opvangbak hebt leeggemaakt, blijft het controlelampje
branden.
Er heeft zich een stroomstoring voorgedaan
tijdens een cyclus.
Er ligt water of koffie onder het apparaat.
De 4 rode lampjes knipperen continu.
Draai de knop voor de maalgrootte naar links voor een fijner koffiemaalsel (kan
afhangen van de gebruikte koffiesoort).
Vervang het Claris Aqua Filter System Aquafilter (volg de installatieprocedure
van pagina 3).
Spoel het apparaat enkele keren door.
Er werd een storing opgemerkt tijdens de voorbereiding. Het apparaat heeft
zich automatisch geherinitialiseerd en is klaar voor een nieuwe cyclus.
Gebruik uw stofzuiger om het koffiemaalsel in het koffieboonreservoir
te verwijderen.
Er zitten vreemde voorwerpen in de maalvoorziening.
Neem contact op met de klantenservice van Krups.
Wijzig uitsluitend de afregeling van de maalinrichting wanneer die aan het werken is.
Na het apparaat uitgeschakeld en afgekoeld te hebben:
Controleer of de stoombuis is aangesloten op het mondstuk. Controleer of de
stoombuis niet verstopt is (indien nodig de stoombuis reinigen en ontstoppen
met de meegeleverde naald). Leeg het reservoir en verwijder het Clarisfilter.
Vul het reservoir met mineraalwater met een hoog calciumgehalte(> 100 mg/l )
en voer achter elkaar verschillende stoomcycli (5 tot 10) in een kom, totdat u
een continue stoomstoot krijgt. Zodra u een goede straal heeft, moet u dit
water niet meer gebruiken.
Ontstop, indien nodig, met de meegeleverde naald de kleine opening van de
luchtinlaat aan de bovenzijde van de het stoompijpje.
Gebruik een koud kannetje en melk die pas geopend is.
Neem eventueel een ander soort melk (halfvolle of volle (houdbare) melk).
Kijk na of de twee uiteinden van het roestvrijstalen pijpje goed
aaneensluit in het soepele bovendeel van de stoombuis.
Kijk na of de buis die in de melk terecht komt, niet is verstopt.
Controleer of het flexibele slangetje niet gedraaid is en dat het goed aansluit
op het accessoire om te voorkomen dat er lucht bijkomt.
Nadat u uw apparaat het uitgezet en hebt laten afkoelen, moet u de uitgangsopening van het accessoire Auto-Cappucino ontstoppen.
Deze programma’s zijn alleen mogelijk wanneer het apparaat hier om vraagt
(controlelampje 'clean' of 'kalk' brandt).
Controleer of het reservoir goed geplaatst is in het apparaat
Controleer of de vlotter op de bodem van het reservoir vrij beweegt
Spoel het accessoire af.
Verwijder de opvangbak, verzeker u ervan dat deze leeg is, wacht 8 seconden
en zet het weer in elkaar
Controleer of de schoonmaaklade goed is aangedrukt.
Het apparaat start automatisch opnieuw op wanneer de spanning weer terug
is en is dan klaar voor een nieuwe cyclus.
De lekbak is overgelopen: leeg hem en reinig de reinigingsbak.
Controleer of de lekbak goed op zijn plaats zit.
Verwijder nooit het waterreservoir voordat de cyclus is beëindigd
Schakel het apparaat uit. Trek het Claris Aqua filter uit, wacht 20 seconden en
zet het dan opnieuw aan.
Als de storing blijft duren, noteer dan het cijfer dat verschijnt op het display,
onder het rooster om er de kopjes op te plaatsen en neem contact op met de
klantendienst van Krups.
Page 71

14
Hier volgen een aantal recepten die u kunt maken bij het gebruik van de Espresseria Automatic:
• Cappuccino
Voor een cappuccino volgens het boekje zijn de ideale verhoudingen als volgt: 1/3 hete melk, 1/3 koffie, 1/3 opgeschuimde
melk.
• Caffe Latte / koffie verkeerd
Om koffie met veel melk te maken, ook wel Latte Macchiato genoemd zijn de verhoudingen als volgt: 3/5 hete melk, 1/5 koffie,
1/5 opgeschuimde melk.
• Voor deze op melk gebaseerde bereidingen is het het beste om koude halfvolle melk te gebruiken die direct uit de koelkast
komt (ideaal tussen 6 en 8° C).
• Voor de ‘finishing touch’ kunt u er een beetje cacaopoeder over strooien.
• Café Crème
• Bereid een gewone espresso in een groot kopje.
• Voeg er een wolkje room aan toe om een ‘café crème’ te krijgen.
• Café corretto*
• Bereid een kop espresso als gewoonlijk.
• Voeg er dan 1/4 of 1/2 likeurglas Cognac toe om te proeven.
U kunt ook anisette, brandy, Sambuca, Kirsch of Cointreau gebruiken.
Er zijn vele manieren om uw espresso kracht bij te zetten.
Gebruik gewoon uw verbeelding.
• Koffielikeur*
• Mix 3 kopjes espresso, 250 g bruine kandijsuiker en 1/2 liter Cognac of Kirsch in een lege fles van 0,75 liter.
• Laat het mengsel minstens 2 weken in de fles trekken.
U krijgt een overheerlijke likeur. Een echte must voor koffieliefhebbers.
• IJskoffie op z’n Italiaans
4 bolletjes vanille-ijs, 2 kopjes espresso met suiker om te proeven, 1/8 l melk, slagroom, geraspte chocola.
• Mix de koude espresso met de melk.
• Serveer de bolletjes ijs in de glazen, schenk de koffie er overheen en decoreer met verse opgeklopte slagroom
en geraspte chocola.
• Koffie op z’n Fries*
• Voeg een klein glas rum toe aan een kopje gezoete espresso.
• Decoreer met een flinke laag opgeklopte slagroom en serveer.
• Geflambeerde espresso*
2 kopjes espresso, 2 kleine glaasjes Cognac, 2 theelepels bruine suiker, crème fraiche.
• Giet de Cognac in hittebestendige glazen, verhit en flambeer het.
• Voeg suiker toe, mix, giet de koffie erbij en decoreer het met opgeklopte slagroom.
• Espresso parfait*
2 kopjes espresso, 6 eierdooiers, 200g suiker, 1/8 liter gezoete slagroom, 1 klein glaasje sinaasappellikeur.
• Klop de eierdooiers met de suiker totdat het een dikke luchtige massa wordt.
• Voeg de koude espresso en de sinaasappellikeur er aan toe.
• Mix dit met de opgeklopte slagroom.
• Giet de mix in champagne- of gewone glazen.
• Zet de champagneglazen in de vriezer.
(*:Overmatig gebruik van alcohol is slecht voor de gezondheid.)
NEDERLANDS
Page 72

15
. . . . . . . . . . . . . . . . . . . . . . . . . . . . . . . . . . . . . . . . . . . . . . . . . . . . . . . . . . . . . . . . . . . . . . . . . . . . . . . . . . .
. . . . . . . . . . . . . . . . . . . . . . . . . . . . . . . . . . . . . . . . . . . . . . . . . . . . . . . . . . . . . . . . . . . . . . . . . . . . . . . . . . .
. . . . . . . . . . . . . . . . . . . . . . . . . . . . . . . . . . . . . . . . . . . . . . . . . . . . . . . . . . . . . . . . . . . . . . . . . . . . . . . . . . .
. . . . . . . . . . . . . . . . . . . . . . . . . . . . . . . . . . . . . . . . . . . . . . . . . . . . . . . . . . . . . . . . . . . . . . . . . . . . . . . . . . .
. . . . . . . . . . . . . . . . . . . . . . . . . . . . . . . . . . . . . . . . . . . . . . . . . . . . . . . . . . . . . . . . . . . . . . . . . . . . . . . . . . .
. . . . . . . . . . . . . . . . . . . . . . . . . . . . . . . . . . . . . . . . . . . . . . . . . . . . . . . . . . . . . . . . . . . . . . . . . . . . . . . . . . .
. . . . . . . . . . . . . . . . . . . . . . . . . . . . . . . . . . . . . . . . . . . . . . . . . . . . . . . . . . . . . . . . . . . . . . . . . . . . . . . . . . .
. . . . . . . . . . . . . . . . . . . . . . . . . . . . . . . . . . . . . . . . . . . . . . . . . . . . . . . . . . . . . . . . . . . . . . . . . . . . . . . . . . .
. . . . . . . . . . . . . . . . . . . . . . . . . . . . . . . . . . . . . . . . . . . . . . . . . . . . . . . . . . . . . . . . . . . . . . . . . . . . . . . . . . .
. . . . . . . . . . . . . . . . . . . . . . . . . . . . . . . . . . . . . . . . . . . . . . . . . . . . . . . . . . . . . . . . . . . . . . . . . . . . . . . . . . .
. . . . . . . . . . . . . . . . . . . . . . . . . . . . . . . . . . . . . . . . . . . . . . . . . . . . . . . . . . . . . . . . . . . . . . . . . . . . . . . . . . .
. . . . . . . . . . . . . . . . . . . . . . . . . . . . . . . . . . . . . . . . . . . . . . . . . . . . . . . . . . . . . . . . . . . . . . . . . . . . . . . . . . .
. . . . . . . . . . . . . . . . . . . . . . . . . . . . . . . . . . . . . . . . . . . . . . . . . . . . . . . . . . . . . . . . . . . . . . . . . . . . . . . . . . .
. . . . . . . . . . . . . . . . . . . . . . . . . . . . . . . . . . . . . . . . . . . . . . . . . . . . . . . . . . . . . . . . . . . . . . . . . . . . . . . . . . .
. . . . . . . . . . . . . . . . . . . . . . . . . . . . . . . . . . . . . . . . . . . . . . . . . . . . . . . . . . . . . . . . . . . . . . . . . . . . . . . . . . .
. . . . . . . . . . . . . . . . . . . . . . . . . . . . . . . . . . . . . . . . . . . . . . . . . . . . . . . . . . . . . . . . . . . . . . . . . . . . . . . . . . .
. . . . . . . . . . . . . . . . . . . . . . . . . . . . . . . . . . . . . . . . . . . . . . . . . . . . . . . . . . . . . . . . . . . . . . . . . . . . . . . . . . .
. . . . . . . . . . . . . . . . . . . . . . . . . . . . . . . . . . . . . . . . . . . . . . . . . . . . . . . . . . . . . . . . . . . . . . . . . . . . . . . . . . .
. . . . . . . . . . . . . . . . . . . . . . . . . . . . . . . . . . . . . . . . . . . . . . . . . . . . . . . . . . . . . . . . . . . . . . . . . . . . . . . . . . .
. . . . . . . . . . . . . . . . . . . . . . . . . . . . . . . . . . . . . . . . . . . . . . . . . . . . . . . . . . . . . . . . . . . . . . . . . . . . . . . . . . .
. . . . . . . . . . . . . . . . . . . . . . . . . . . . . . . . . . . . . . . . . . . . . . . . . . . . . . . . . . . . . . . . . . . . . . . . . . . . . . . . . . .
. . . . . . . . . . . . . . . . . . . . . . . . . . . . . . . . . . . . . . . . . . . . . . . . . . . . . . . . . . . . . . . . . . . . . . . . . . . . . . . . . . .
. . . . . . . . . . . . . . . . . . . . . . . . . . . . . . . . . . . . . . . . . . . . . . . . . . . . . . . . . . . . . . . . . . . . . . . . . . . . . . . . . . .
. . . . . . . . . . . . . . . . . . . . . . . . . . . . . . . . . . . . . . . . . . . . . . . . . . . . . . . . . . . . . . . . . . . . . . . . . . . . . . . . . . .
. . . . . . . . . . . . . . . . . . . . . . . . . . . . . . . . . . . . . . . . . . . . . . . . . . . . . . . . . . . . . . . . . . . . . . . . . . . . . . . . . . .
. . . . . . . . . . . . . . . . . . . . . . . . . . . . . . . . . . . . . . . . . . . . . . . . . . . . . . . . . . . . . . . . . . . . . . . . . . . . . . . . . . .
. . . . . . . . . . . . . . . . . . . . . . . . . . . . . . . . . . . . . . . . . . . . . . . . . . . . . . . . . . . . . . . . . . . . . . . . . . . . . . . . . . .
. . . . . . . . . . . . . . . . . . . . . . . . . . . . . . . . . . . . . . . . . . . . . . . . . . . . . . . . . . . . . . . . . . . . . . . . . . . . . . . . . . .
. . . . . . . . . . . . . . . . . . . . . . . . . . . . . . . . . . . . . . . . . . . . . . . . . . . . . . . . . . . . . . . . . . . . . . . . . . . . . . . . . . .
. . . . . . . . . . . . . . . . . . . . . . . . . . . . . . . . . . . . . . . . . . . . . . . . . . . . . . . . . . . . . . . . . . . . . . . . . . . . . . . . . . .
. . . . . . . . . . . . . . . . . . . . . . . . . . . . . . . . . . . . . . . . . . . . . . . . . . . . . . . . . . . . . . . . . . . . . . . . . . . . . . . . . . .
. . . . . . . . . . . . . . . . . . . . . . . . . . . . . . . . . . . . . . . . . . . . . . . . . . . . . . . . . . . . . . . . . . . . . . . . . . . . . . . . . . .
. . . . . . . . . . . . . . . . . . . . . . . . . . . . . . . . . . . . . . . . . . . . . . . . . . . . . . . . . . . . . . . . . . . . . . . . . . . . . . . . . . .
. . . . . . . . . . . . . . . . . . . . . . . . . . . . . . . . . . . . . . . . . . . . . . . . . . . . . . . . . . . . . . . . . . . . . . . . . . . . . . . . . . .
. . . . . . . . . . . . . . . . . . . . . . . . . . . . . . . . . . . . . . . . . . . . . . . . . . . . . . . . . . . . . . . . . . . . . . . . . . . . . . . . . . .
. . . . . . . . . . . . . . . . . . . . . . . . . . . . . . . . . . . . . . . . . . . . . . . . . . . . . . . . . . . . . . . . . . . . . . . . . . . . . . . . . . .
. . . . . . . . . . . . . . . . . . . . . . . . . . . . . . . . . . . . . . . . . . . . . . . . . . . . . . . . . . . . . . . . . . . . . . . . . . . . . . . . . . .
. . . . . . . . . . . . . . . . . . . . . . . . . . . . . . . . . . . . . . . . . . . . . . . . . . . . . . . . . . . . . . . . . . . . . . . . . . . . . . . . . . .
. . . . . . . . . . . . . . . . . . . . . . . . . . . . . . . . . . . . . . . . . . . . . . . . . . . . . . . . . . . . . . . . . . . . . . . . . . . . . . . . . . .
. . . . . . . . . . . . . . . . . . . . . . . . . . . . . . . . . . . . . . . . . . . . . . . . . . . . . . . . . . . . . . . . . . . . . . . . . . . . . . . . . . .
. . . . . . . . . . . . . . . . . . . . . . . . . . . . . . . . . . . . . . . . . . . . . . . . . . . . . . . . . . . . . . . . . . . . . . . . . . . . . . . . . . .
Page 73

ESPRESSERIA AUTOMATIC
Foto non contrattuali
FRANCAIS
ENGLISHDEUTSCH
NEDERLANDSITALIANOESPAÑOLPORTUGUÊS
E
λληνικά
199 207 701
I CH
SERVIZIO CONSUMATORI
0800 37 77 37
Questo apparecchio è destinato esclusivamente ad un uso domestico.
La durata della garanzia dipende dalla legislazione in vigore nel Paese di residenza, con un massimo di
3.000 cicli per anno. Questo apparecchio è destinato soltanto ad un uso domestico e non è adatto ad un
uso commerciale o professionale. Qualsiasi utilizzo di questa macchina in un contesto che non sia
domestico non è coperto dalla garanzia del fabbricante.
La garanzia non è valida in caso di danno o difetti risultanti da un uso improprio, riparazione da parte di
persone non autorizzate o dall’inosservanza delle istruzioni per il funzionamento. La garanzia non sarà resa
nel caso in cui qualche operazione o istruzione di manutenzione di Krups non sia stata osservata o nel caso
in cui gli agenti di pulizia o di decalcificazione utilizzati non rispettano le istruzioni originali Krups. Evitate di
utilizzare il filtro dell’acqua Claris Aqua Filter System in accordo con le istruzioni Krups. L’usura anormala dei
pezzi (dischi molati, valvole, chiusure) è esenta della garanzia, come i danni causati da corpi estranei nel
tornio (legno, pietre, parti in plastica, etc.).
Page 74
: Spia spenta / : Spia lampeggiante
: Spia accesa / : Spia in lampeggiamento doppio
Spie luminose
Significato
Svuotare
il serbatoio filtri
Riempire
il
serbatoio
Clean Calc Acceso /
Spento
L’apparecchio è pronto per un ciclo di caffè o di vapore.
/
Intermittenza semplice : l’apparecchio è in fase di
preriscaldamento o in ciclo di inizializzazione.
/
Lampeggiamento doppio: è in corso un ciclo di
2 caffè.
Informazione Assistenza Tecnica nella modalità di
regolazione dei parametri di funzionamento.
/
/
Svuotare il serbatoio filtri (un ciclo di due caffè è in
corso)
/
Svuotare il serbatoio filtri + pulire il cassettino +
svuotare il vano raccogli-gocce.
Verificare che il recipiente di raccolta dei fondi sia
correttamente posizionato.
Verificare che lo scomparto per la pulizia sia
correttamente posizionato.
Regolazione della durezza dell’acqua.
/
Riempire il serbatoio d’acqua. Verificare che il
serbatoio dell’acqua sia correttamente posizionato.
/
/
Il ciclo di preparazione del caffè è stato interrotto
perché manca acqua. Riempire il serbatoio.
Regolazione dell’interruzione automatica Auto Off.
Programma di pulizia richiesto o in corso.
/
Programma di pulizia: preparazione del ciclo di pulizia
o di risciacquo.
Regolazione della temperatura del caffè.
Programma di eliminazione del calcare richiesto
o in corso.
/
Programma di eliminazione del calcare: preparazione
del ciclo di eliminazione del calcare o di risciacquo.
/
/
Cycle de rinçage du programme de détartrage :
demande de vider le réservoir d’eau, de le rincer et
de le remplir d’eau fraîche.
/ /
Richiede risciacquo lungo (circa 150 ml) vedere
pagina 5.
Risciacquo lungo in corso.
/ / / /
Lampeggiamento permanente: anomalia di
funzionamento.
Page 75
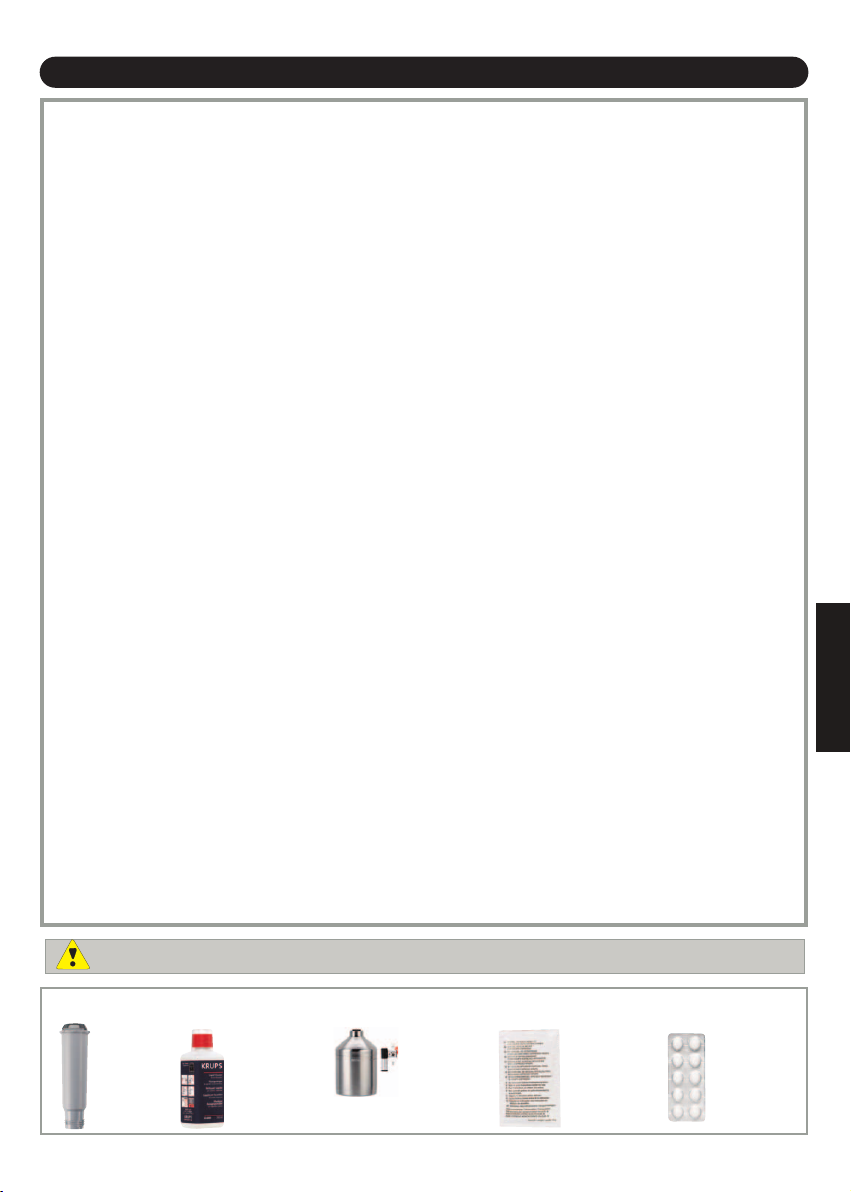
PAGINA
DESCRIZIONE . . . . . . . . . . . . . . . . . . . . . . . . . . . . . . . . . . . . . . . . . . . . . . . . . . . . . . . . . . . . . . .1
Segnali di avvertenza
Elementi informativi sul caffè espresso
Istruzioni di sicurezza
AL PRIMO UTILIZZO . . . . . . . . . . . . . . . . . . . . . . . . . . . . . . . . . . . . . . . . . . . . . . . . . . . . . . . . . .3
MISURAZIONE DELLA DUREZZA DELL’ACQUA
CARTUCCIA CLARIS – AQUA FILTER SYSTEM
REGOLAZIONI . . . . . . . . . . . . . . . . . . . . . . . . . . . . . . . . . . . . . . . . . . . . . . . . . . . . . . . . . . . . . . .4
REGOLAZIONE DELLA DUREZZA DELL’ACQUA
REGOLAZIONE DELLA TEMPERATURA DEL CAFFÈ
REGOLAZIONE DEL MECCANISMO DI BLOCCO AUTOMATICO DELL’ALIMENTAZIONE
ELETTRICA
PREPARAZIONE DELL’APPARECCHIO . . . . . . . . . . . . . . . . . . . . . . . . . . . . . . . . . . . . . . . . . . .5
PULIZIA DEI CIRCUITI
PREPARAZIONE DEL MACINACAFFÈ
PREPARAZIONE DI UN CAFFÈ ESPRESSO E DI UN CAFFÈ LUNGO . . . . . . . . . . . . .6
PREPARAZIONE DI UN CAFFÈ ESPRESSO (DA 20 A 70 ML)
PREPARAZIONE DI UN CAFFÈ LUNGO (DA 80 A 220 ML)
FUNZIONE 2 TAZZE
PREPARAZIONE CON VAPORE . . . . . . . . . . . . . . . . . . . . . . . . . . . . . . . . . . . . . . . . . . . . . . .7
SCHIUMA DI LATTE
SET CAPPUCCINO AUTOMATICO XS6000
MANUTENZIONE DELL’APPARECCHIO . . . . . . . . . . . . . . . . . . . . . . . . . . . . . . . . . . . . . . . .8
SVUOTAMENTO DEL RECIPIENTE DI RACCOLTA DEI FONDI DI CAFFÈ, DELLO SCOMPARTO DELCAFFÈ E DELLA VASCHETTA RACCOGLIGOCCE
PULIZIA DEL CIRCUITO DEL CAFFÈ
PROGRAMMA DI PULIZIA
PROGRAMMA DI DECALCIFICAZIONE . . . . . . . . . . . . . . . . . . . . . . . . . . . . . . . . . . . . . . . . .10
PROGRAMMA DI RISCIACQUO LUNGO
MANUTENZIONE GENERALE . . . . . . . . . . . . . . . . . . . . . . . . . . . . . . . . . . . . . . . . . . . . . . . . . .12
TRASPORTO DELL’APPARECCHIO
PRODOTTO ELETTRICO O ELETTRONICO A FINE VITA
PROBLEMI ED AZIONI CORRETTIVE . . . . . . . . . . . . . . . . . . . . . . . . . . . . . . . . . . . . . . . . .12
RICETTE . . . . . . . . . . . . . . . . . . . . . . . . . . . . . . . . . . . . . . . . . . . . . . . . . . . . . . . . . . . . . . . . . . . .14
INDICE
Foto non contrattuali
F 088
CartucciaCl
aris —
AquaFilter
System (non
fornita)
XS 3000
Blister di 10
pastiglie di
pulizia (2 pastiglie fornite)
F 054
Polvere di
decalcificazione (1 bustina fornita)
XS6000
Set Auto
Cappuccino
(non fornito)
XS 4000
KRUPS
Detergente Liquido
per sistema
Cappuccino (non
fornito)
Accessori (venduti separatamente)
ITALIANO
Per questa macchina, utilizzare esclusivamente accessori Krups affinché la garanzia conservi validità.
Page 76

1
Manopola per la regolazione del volume di caffè
Tasto vapore
Tasto e spia luminosa “on-off””
Tasto caffè normale
Tasto caffè forte
Spia luminosa “pulizia”
Spia luminosa “eliminazione calcare”
Spia luminosa “riempimento serbatoio dell’acqua”
Spia lunimosa “svuotare il filtro caffè” e “svuotare
il vano raccogli-gocce”
Tasto “risciacquo/manutenzione”
Griglia e vaschetta raccogligocce removibili
Ugelli caffè, impugnature regolabili in altezza
Recipiente di raccolta dei
fondi di caffè
Manopola per la regolazione
del volume di caffè
Serbatoio caffè in grani
Ugello del vapore
Coperchio del serbatoio del caffè in grani
Impugnatura/coperchio del serbatoio
dell’acqua
Serbatoio dell’acqua
Griglia posatazze
Indicatori galleggianti
del livello dell’acqua
Vista dall’alto
Manopola di regolazione della
finezza di macinazione
Scomparto per la pastiglia di pulizia
DESCRIZIONE
Manopola di regolazione della
finezza di macinazione
Scomparto per la pulizia
Svuotare il serbatoio filtri di caffè, il
vano raccogli-gocce e il cassettino
Riempire il serbatoio dell’acqua
Segnali di avvertenza
Procedere alla pulizia
Procedere all’eliminazione del calcare
Spia accesa
Spia intermittente
Macinacaffè in metallo
Display digitale per la regolazione dei parametri
Avvertenza speciale per la manutenzione
Foto non contrattuali
+
Procedere al risciacquo
lungo
Page 77

2
ITALIANO
Egregio/Gentile Cliente
La ringraziamo per aver acquistato questa macchina da caffè Espresseria Automatic Krups. Siamo certi che potrà
apprezzarne sia la qualità del risultato in tazza che la grande facilità di utilizzo.
Espresso o lungo, ristretto o cappuccino, la macchina da caffè espresso automatica è stata ideata per consentirLe di
assaporare a casa la stessa qualità del caffè del bar, in ogni momento della giornata.
Grazie al Thermobox System, alla pompa da 15 bar ed al funzionamento esclusivo con caffè in grani macinato al momento appena
prima dell’estrazione, la macchina Espresseria Automatic permette di ottenere una bevanda contenente i migliori aromi del caffè,
ricoperta da una magnifica crema densa e dorata color camoscio, prodotto derivante dall’olio naturale dei grani di caffè.
L’espresso deve essere servito in piccole tazzine di porcellana. Per ottenere un espresso ad una temperatura ottimale ed
una schiuma cremosa, si consiglia di preriscaldare adeguatamente la tazzina.
Certamente, dopo varie prove, ciascun utilizzatore troverà il tipo di miscela e di torrefazione del caffè in grani corrispondente al proprio gusto. La qualità dell’acqua utilizzata rappresenta, indubbiamente, un altro fattore determinante della qualità del risultato ottenuto in tazza.
È necessario accertarsi che l’acqua sia appena uscita fresca dal rubinetto (affinché non abbia avuto il tempo di ristagnare a contatto
con l’aria), che sia priva di odore di cloro e che sia relativamente fredda.
Il caffè espresso è più ricco d’aroma rispetto ad un caffè classico. Nonostante il suo gusto più pronunciato, molto presente in bocca
e più persistente, l’espresso contiene in realtà meno caffeina rispetto al caffè filtro (circa 60-80 mg per tazza
rispetto agli 80-100 mg per tazza). Ciò è dovuto ad una durata di percolazione più breve.
Grazie alla evidente semplicità di manipolazione, alla visibilità di tutti i serbatoi, nonché ai programmi automatici di pulizia e
di eliminazione del calcare, la macchina Espresseria Automatic sarà in grado di offrire un gran comfort di utilizzo.
Importante: Istruzioni di sicurezza
Leggere attentamente le istruzioni per l’uso al momento del primo utilizzo dell’apparecchio e conservarle con cura:
Krups declina ogni responsabilità in caso di utilizzo non conforme alle stesse.
Questo apparecchio è destinato ad essere utilizzato in applicazioni domestiche e analoghe (con il limite di 3000 cicli all'anno)
come:
- angoli cucina riservati al personale in negozi, uffici e altri ambienti professionali;
- aziende agricole
- utilizzo da parte dei clienti degli hotel, motel e altri ambienti a carattere residenziale;
- ambienti di tipo “bed and breakfast”.
Tuttavia, se usato negli ambienti elencati sopra, il prodotto non sarà coperto dalla garanzia del fabbricante.
Collegare l’apparecchio esclusivamente ad una presa di corrente dotata di messa a terra. Verificare che la tensione di alimenta-
zione indicata sulla targhetta segnaletica dell’apparecchio corrisponda esattamente a quella dell’impianto elettrico utilizzato.
Non appoggiare l’apparecchio su una superficie calda, come ad esempio una piastra termica; non utilizzarlo nei pressi di una
fiamma libera.
Disinserire immediatamente la spina dalla presa di corrente nel caso in cui si constati una qualunque anomalia durante
il funzionamento.
Non tirare il cavo di alimentazione per disinserire la spina dalla presa.
Non lasciare pendere il cavo di alimentazione sullo spigolo di un tavolo o di un piano da lavoro.
Non appoggiare la mano o il cavo di alimentazione sui componenti caldi dell’apparecchio.
Non immergere per alcun motivo l’apparecchio, il cavo o la spina nell’acqua o in un altro liquido.
Questo apparecchio non deve essere utilizzato da persone (compresi bambini) le cui capacità fisiche, sensoriali o mentali sono
ridotte, o da persone prive di esperienza o di conoscenza, salvo se hanno potuto beneficiare, attraverso una persona responsabile della loro sicurezza, di una sorveglianza o di istruzioni preliminari relative all’uso dell’apparecchio.
Invitiamo a sorvegliare i bambini per assicurarsi che non giochino con l’apparecchio.
Non utilizzare l’apparecchio qualora il cavo di alimentazione o l’apparecchio stesso siano danneggiati.
Nel caso in cui il cavo di alimentazione o la spina risultino danneggiati, non utilizzare l’apparecchio, al fine di evitare qualsiasi
pericolo, nonché far sostituire necessariamente il cavo di alimentazione da un centro assistenza autorizzato KRUPS.
Fare sempre riferimento alle istruzioni per attuare la procedura di eliminazione del calcare dall’apparecchio.
Proteggere l’apparecchio dall’umidità e dal gelo.
Non utilizzare l’apparecchio nel caso in cui non funzioni correttamente o qualora abbia subito un danno. In tal caso, si consiglia di
far esaminare l’apparecchio da un centro assistenza autorizzato KRUPS (consultare l’elenco sull’opuscolo Service KRUPS).
Tranne che per la pulizia e l’eliminazione del calcare da attuare secondo le procedure riportate nelle presenti istruzioni, è necessa-
rio che qualsiasi intervento sull’apparecchio sia eseguito da un centro assistenza autorizzato KRUPS.
Al fine di garantire la sicurezza degli utilizzatori, avvalersi unicamente di accessori e di materiali di consumo omologati KRU PS
per l’apparecchio.
Qualsiasi errore di collegamento elettrico annulla la garanzia.
Disinserire la spina dell’apparecchio subito dopo l’uso e durante la pulizia.
Tutti gli apparecchi sono sottoposti ad un rigoroso controllo della qualità. A tal fine, vengono effettuati alcuni test di utilizzo pratici
su apparecchi scelti a caso, ragione per cui è possibile trovare eventuali tracce di utilizzo sull’apparecchio.
È sconsigliato l’uso di prese multiple e/o di prolunghe.
Non mettere acqua nel serbatoio del caffè in grani e/o sotto lo sportellino di manutenzione.
Fare attenzione all’orientamento dell’ugello Vapore, per evitare qualsiasi rischio di ustioni.
In caso di mancata esecuzione della procedura di eliminazione del calcare, di pulizia o di manutenzione regolare, nonché di corpo
estraneo nel macinacaffè, la garanzia di 2 anni o di 6000 cicli (con un massimo di 3000 cicli l’anno) sarà ritenuta caduca.
Limiti di utilizzo
È necessario che questa macchina da caffè sia utilizzata esclusivamente per la preparazione di caffè espresso o caffè lungo, nonché
per far schiumare il latte e per riscaldare liquidi. Il costruttore declina ogni responsabilità per eventuali danni derivanti dall’utilizzo
dell’apparecchio per scopi non autorizzati, collegamenti elettrici errati, manipolazioni, operazioni e riparazioni rischiose.
In tali circostanze, le garanzie di manutenzione diverranno nulle.
Questo apparecchio è destinato esclusivamente ad un uso domestico. Non è, pertanto, ideato per un utilizzo commerciale o
professionale.
Page 78

Per ottimizzare il gusto delle preparazioni e la durata dell’apparecchio, si consiglia di utilizzare unicamente la cartuccia Claris
– Aqua Filter System, venduta come accessorio.
È composta di una sostanza anticalcare e di carbone attivo in grado di ridurre il cloro, le impurità, il piombo, il rame ed i
pesticidi generalmente presenti nell’acqua, pur preservando, nel contempo, i minerali e gli oligoelementi.
3
Prima di utilizzare l’apparecchio per la prima volta o dopo aver constatato un cambiamento di durezza dell’acqua, è opportuno
adattare l’apparecchio alla durezza dell’acqua constatata. Per conoscere il grado di durezza dell’acqua, occorre determinarla
con l’ausilio del bastoncino fornito in dotazione all’apparecchio o rivolgersi all’ente di distribuzione idrica della propria zona.
AL PRIMO UTILIZZO
Dopo 1 minuto, misurazione della durezza (acqua mediamente dura).
Il filtraggio dell’acqua con la cartuccia Claris- Aqua Filter System
consente di ridurre:
La durezza di
carbonato- fino al 75%*
Il cloro - fino al 85%*
Il piombo - fino al 90%*
Il rame - fino al 95%*
L’alluminio - fino al 67%*
*indicazioni fornite dal fabbricante
Installazione della
cartuccia all’interno della
macchina : avvitare la cartuccia filtrante sul fondo del
serbatoio.
La cartuccia Claris deve essere sostituita all’incirca ogni 50 litri d’acqua oppure ogni due mesi come minimo.
Riempire un bicchiere
d’acqua ed immergere
un bastoncino.
Utilizzare acqua di sorgente o acqua proveniente da un sistema dotato di cartuccia filtrante.
Meccanismo che consente
di memorizzare il mese di
installazione e di sostituzione della
cartuccia (dopo 2 mesi al
massimo).
Grado di durezza
0
Molto dolce
1
Dolce
2
Mediamente dura
3
Dura
4
Molto dura
° f
<5,4° >7,2° >12,6° >25,2° > 37,8°
° dH
<3° >4° >7° >14° > 21°
° e
<3,75° >5° >8,75° >17,5° > 26,25°
Collocare un recipiente
sotto l’ugello del vapore.
Far defluire 300 ml
d’acqua, premendo
1 volta sul tasto di
risciacquo per più di 3
secondi. Se necessario,
è possibile ripetere
l’operazione.
1 sec.
012
3
4
F088
MISURAZIONE DELLA DUREZZA DELL’ACQUA
CARTUCCIA CLARIS – AQUA FILTER SYSTEM F 088 (VENDUTA SEPARATAMENTE)
Page 79
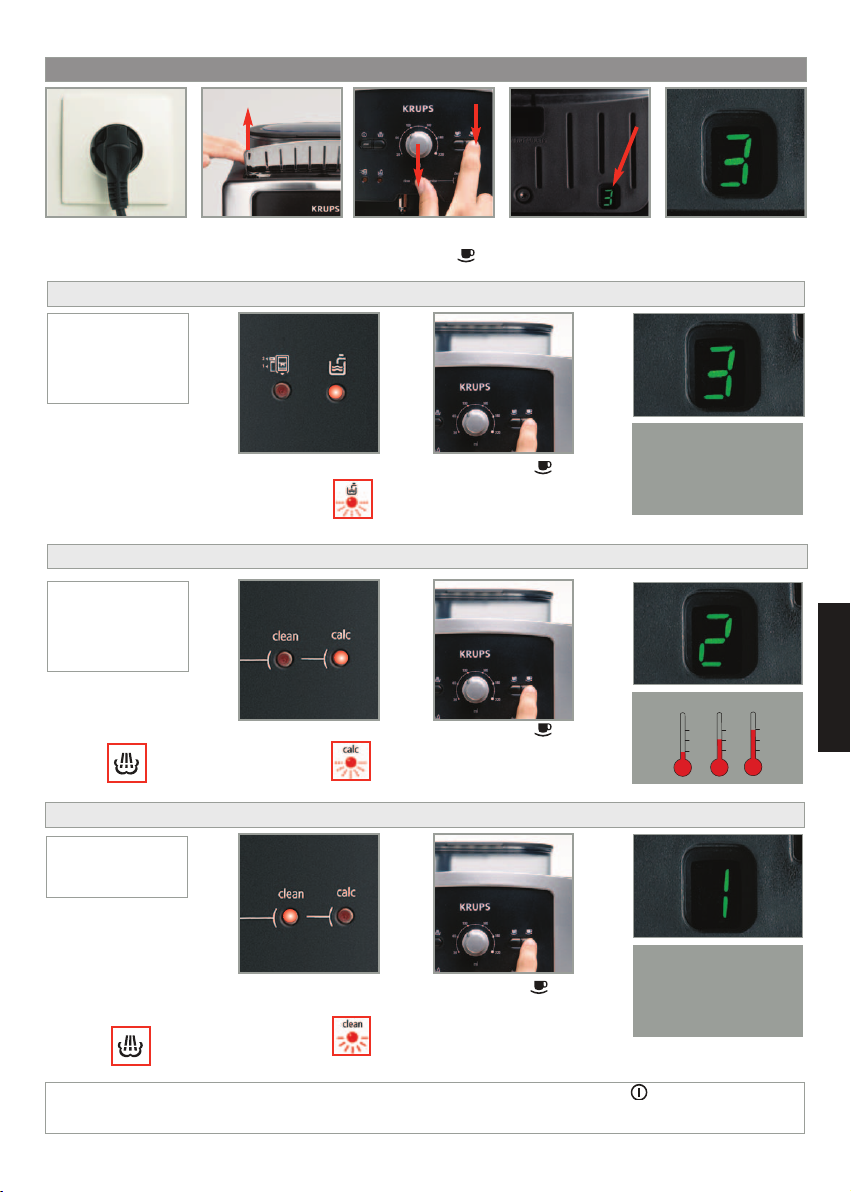
REGOLAZIONI
4
Gli apparecchi sono
preregolati in origine
su 2, temperatura
media.
Collegare la spina dell’
apparecchio alla presa
di corrente senza accenderlo.
Sollevate la griglia
posatazze premendo la
parte posteriore per
farla oscillare.
Premere
contemporaneamente i
tasti “Service” e .
La spia luminosa “calc”
si accende.
Premere il tasto a più
riprese, secondo il numero di
volte necessario per regolare
la temperatura del caffè desiderata.
Durante ciascuna di queste fasi potete memorizzare le varie regolazioni premendo il relativo tasto , se avete terminato (le 4
spie lampeggiano 2 volte), oppure proseguire nelle operazioni. La memorizzazione rimane valida fino a eventuale black-out
elettrico. In qualsiasi momento potete modificare queste impostazioni ripetendo le operazioni.
Regolazione del meccanismo di interruzione automatica dell’alimentazione elettrica (auto-off)
La spia luminosa
“clean” si accende.
Premere il tasto
a più riprese, secondo
il numero di volte
necessario per ottenere
la durata desiderata.
Premere il tasto a più
riprese, secondo il numero di
volte necessario per selezionare il livello della durezza
dell’acqua utilizzata.
Regolazione della temperatura del caffè
Regolazione della durezza dell’acqua
Gli apparecchi sono
preregolati in origine
per un livello di
durezza 3.
Gli apparecchi sono
preregolati in origine
su 1 ora.
1
2
3
1 = 1 H
2 = 2 H
3 = 3 H
4 = 4 H
0 = molto dolce
1 = dolce
2 = mediamente dura
3 = dura
4 = molto dura
Il display digitale di
regolazione dei parametri si trova sotto lo sportellino di manutenzione.
È possibile spegnere il vostro
apparecchio dopo un numero
di ore pre-programmate.
Premere il tasto del vapore
per passare in modalità di
regolazione dell’interruzione
automatica :
La spia luminosa
del serbatoio
dell’acqua si
accende.
Premere il tasto del vapore
per passare in modalità di
regolazione della temperatura del caffè :
Guardate bene in verticale al fondo dell’oblò
ITALIANO
Page 80

5
È preferibile effettuare 1 o più cicli di pulizia dei 2 circuiti dopo vari giorni senza utilizzo.
Dopo ogni accensione dell’apparecchio, viene effettuato un ciclo di inizializzazione.
Rimuovere e riempire
il serbatoio dell’acqua.
Ricollocarlo premendo
saldamente e richiudere
il coperchio.
Aprire il coperchio del
serbatoio del caffè in
grani. Mettere il caffè
(250 gr. max.).
Richiudere il coperchio
del serbatoio del caffè
in grani.
Accertarsi che nessun corpo estraneo, come ad esempio i piccoli sassolini contenuti nel caffè in grani, penetri nel
serbatoio caffè in grani. Qualsiasi danno dovuto a corpi estranei che siano penetrati nel serbatoio del caffè non è
coperto dalla garanzia. Non mettere acqua nel serbatoio del caffè in grani.
Per evitare che l’acqua utilizzata fuoriesca e sporchi il piano da lavoro o rischi di scottare l’utilizzatore,
non dimenticarsi di collocare la vaschetta raccogligocce.
Verificare la pulizia del serbatoio di acqua.
Mettete l’apparecchio in funzione
premendo il tasto relativo. La spia
luminosa lampeggia durante il
pre-riscaldamento e il ciclo di
inizializzazione.
Pulizia del circuito caffè :
Mettete un recipiente sulle bocchette caffè.
Premere leggermente sul tasto “Service” per
iniziare un ciclo di risciacquo del circuito di
caffè che si fermerà automaticamente dopo
circa 40 ml.
È possibile regolare la forza del caffè regolando la finitura dei grani.
Più il taglio del grano è piccolo, tanto più il caffè sarà forte e cremoso.
Regolate il grado di finitura del taglio desiderato girando il tasto “Regola la finitura dei grani”.
LA REGOLAZIONE NON DEVE VARIARE SE NON DURANTE L’OPERAZIONE.
MAI FORZARE IL TASTO DI REGOLAZIONE DELLA FINITURA DEI GRANI.
L’utilizzo di grani di caffè oleosi, caramellati o aromatizzati è sconsigliato su questo apparecchio. Questo tipo di grano può
danneggiare l’apparecchio.
Non mettere mai caffè macinato nel serbatoio del caffè.
Verso sinistra la
miscela è più
fine.
Verso destra la
miscela è più
grossa.
Non riempire il serbatoio con acqua calda, latte o qualsiasi altro liquido. Nel caso in cui, in occasione della messa
sotto tensione dell’apparecchio, il serbatoio dell’acqua sia assente o non completamente riempito, la spia luminosa “riempimento serbatoio” si accende e la preparazione del caffè espresso o del caffè lungo è momentaneamente impossibile.
PREPARAZIONE DELL’APPARECCHIO
Pulizia del circuito vapore :
Posizionare un recipiente sotto il condotto
vapore.
Premere inoltre per 3 secondi sul
tasto « Service » per iniziare un ciclo di
pulizia del circuito vapore, che si fermerà
automaticamente dopo circa 300 ml.
PREPARAZIONE DEL MACINACAFFÈ
PULIZIA DEI CIRCUITI
Page 81
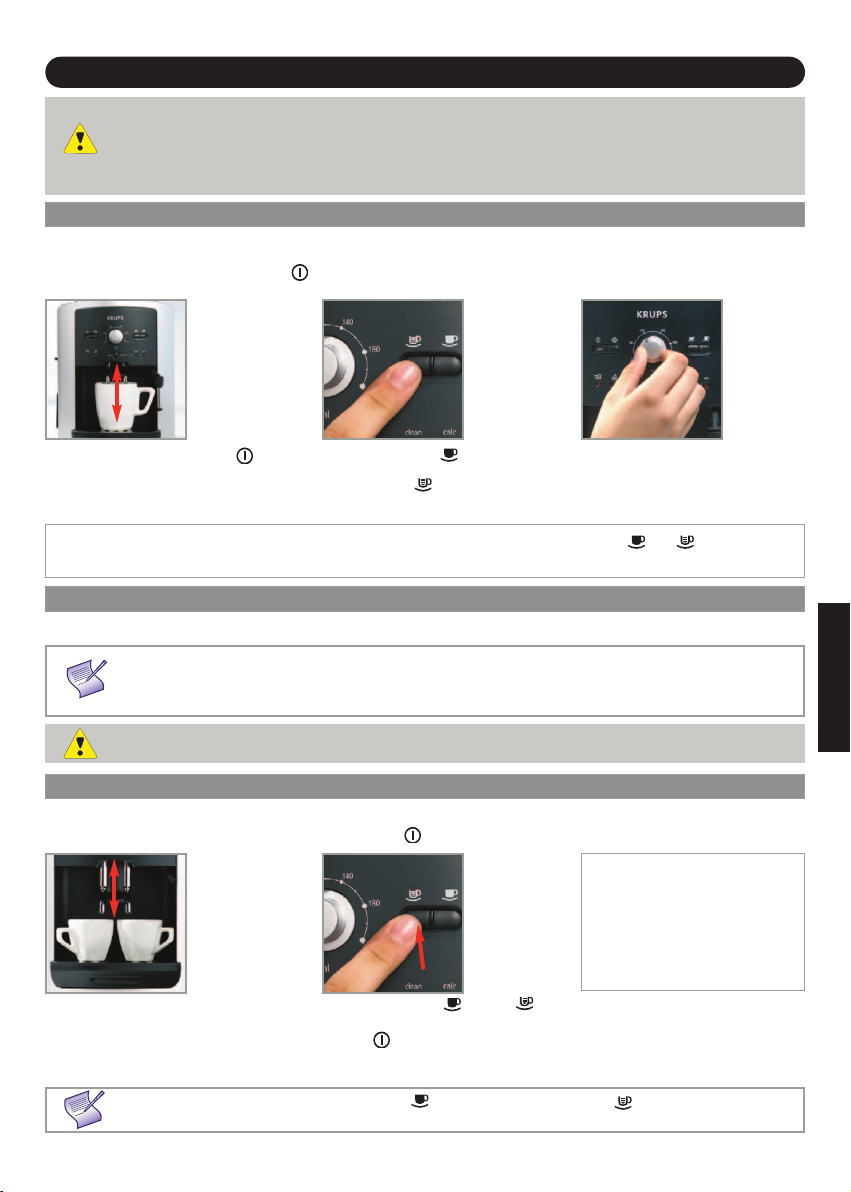
6
È necessario che la quantità d’acqua per un caffè espresso sia compresa tra 20 e 70 ml.
Dopo ogni accensione dell’apparecchio, viene effettuato un ciclo di inizializzazione.
Alla pressione del tasto la spia luminosa lampeggia durante il pre-riscaldamento dell’apparecchio.
Selezionare il tasto per ottenere un caffè espresso forte,
oppure il tasto per ottenere
un caffè espresso normale.
L’apparecchio è pronto, la spia
è fissa. Collocare una tazza sotto gli ugelli
del caffè. È possibile abbassare o alzare
gli ugelli del caffè secondo la dimensione
della tazza utilizzata.
PREPARAZIONE DI UN CAFFÈ ESPRESSO E DI UN CAFFÈ LUNGO
QUESTO APPARECCHIO È IDEATO ESCLUSIVAMENTE PER L’UTILIZZO DI CAFFÈ IN GRANI.
In occasione della preparazione del primo caffè, nonché dopo un lungo periodo di assenza o in
seguito ad una procedura di pulizia o di eliminazione del calcare, è possibile che un po’ di vapore e
di acqua calda fuoriescano dall’ugello del vapore (auto-innesco).
Nel caso in cui gli ugelli del caffè siano regolati troppo alti rispetto alla dimensione delle tazze,
sussiste il rischio di spruzzi o di ustioni.
In qualsiasi momento, è possibile
regolare il volume dell’acqua.
La miscela viene umidificata con un po’ d’acqua calda in seguito alla fase di macinazione.
Dopo alcuni istanti, prosegue la percolazione propriamente detta.
A partire da una certa quantità in tazza, vi consigliamo di dividere la preparazione in due cicli- per ottenere un caffè
più forte. Per esempio due volte 70 ml per una tazza da 140 ml.
L’apparecchio consente all’utilizzatore di preparare 2 tazze di caffè lungo o di caffè espresso. Fare attenzione a non rimuovere
le tazze dopo il primo ciclo. L’apparecchio è pronto. La spia è fissa.
Collocare due tazze sotto gli
ugelli del caffè.
È possibile abbassare o
alzare gli ugelli del caffè
secondo la dimensione delle
tazze utilizzate.
Selezionare il tasto oppure a piacimento, premendo rapidamente due
volte.
La spia si accende con un
lampeggiamento doppio, al fine di informare l’utilizzatore che sono state richieste
due tazze di caffè.
Nel caso in cui si prema una prima volta il tasto ed una seconda volta il tasto (o viceversa), l’ultima pres
sione sul tasto non viene tenuta in considerazione.
L’apparecchio eseguirà
automaticamente
2 cicli completi di
preparazione del caffè.
Per arrestare il ciclo di preparazione, è possibile premere nuovamente uno dei tasti o , oppure
ruotare la manopola verso la posizione min.
x 2
PREPARAZIONE DI UN CAFFÈ ESPRESSO
FUNZIONE 2 TAZZE
MAI TOGLIERE IL SERBATOIO PRIMA DELLA FINE DEL CICLO
(cioè 15 secondi circa dopo che il caffè ha smesso di essere erogato).
È necessario che la quantità d’acqua per un caffè lungo sia compresa tra 80 e 220 ml.
PREPARAZIONE DI UN CAFFÈ LUNGO
ITALIANO
Page 82

7
PREPARAZIONI CON IL VAPORE
Il vapore serve per far schiumare il latte occorrente, ad esempio, per la preparazione di un cappuccino o di un caffelatte, nonché
per riscaldare altri liquidi. Dato che la produzione di vapore richiede una temperatura più elevata rispetto a quella necessaria
per la preparazione di un espresso, l’apparecchio garantisce una fase di preriscaldamento supplementare per il vapore.
Premere il tasto .
La spia lampeggia durante la fase di preriscaldamento.
Una volta terminata la fase di preriscaldamento, la spia rimane fissa ed è possibile dare
inizio alla produzione di vapore premendo nuovamente il tasto .
Premere di nuovo sul tasto per fermare il ciclo.
SCHIUMA DI LATTE
Vi consigliamo di utilizzare latte pastorizzato o UHT, recentemente aperto. Il latte crudo non permette di ottenere
risultati ottimali. Dopo aver utilizzato le funzioni vapore, la bocchetta potrebbe essere calda, vi consigliamo di
aspettare prima di toccarla.
Verificare che l’ugello
del vapore sia correttamente posizionato
Versare il latte nella
lattiera. Immergere
l’ugello del vapore
nel latte.
Fate iniziare la funzione vapore come
spiegato nel paragrafo
qui sotto.
... premere nuovamente il
tasto per arrestare il
ciclo.
Attenzione, lo stop del
ciclo non è immediato.
Per rimuovere qualsiasi
eventuale traccia di latte
dall’ugello del vapore,
collocare un recipiente
sotto l’ugello e premere
il tasto .
Lasciare che il vapore
fuoriesca per almeno
10 secondi e premere
nuovamente il tasto
per arrestare il ciclo.
La bocchetta vapore si può smontare per permettere una pulizia in profondità. Lavatela con acqua e un po’ di detersivo per piatti non abrasivo
e con una spugna. Risciacquatela e asciugatela. Prima di ricollocarla
assicuratevi che i fori di entrata dell’aria non siano otturati da residui di
latte. Sbloccarli con l’ago fornito in dotazione se necessario. Non lavare
la bocchetta in lavastoviglie.
Per interrompere la funzione vapore, è sufficiente premere un tasto qualunque.
Se la bocchetta è otturata, sbloccarla con l’ago fornito in dotazione.
La durata massima di produzione di vapore per ogni ciclo è limitata a 2 minuti.
SET AUTO-CAPPUCCINO XS 6000 (VENDUTO SEPARATAMENTE)
Per evitare che il latte non si secchi sull’accessorio del cappuccino-automatico bisogna pulirlo molto bene. Si raccomanda di lavarlo immediatamente effettuando un ciclo con vapore con il recipiente riempito di acqua per poter pulire la
bocchetta all’interno. Per questo, potete utilizzare il liquido pulente XS4000 disponibile fra gli accessori.
XS 6000
Nel momento in cui la
schiuma di latte è sufficiente...
Attenzione, lo stop del ciclo non è immediato
Collegate i diversi elementi fra loro.
Selezionate la posizione cappuccino o
caffè latte sulla bocchetta speciale.
Riempite il recipiente
per il latte e mettete una
tazza o bicchiere sotto
la bocchetta del cappuccino automatico.
Premete per iniziare il
ciclo.
Posizionate la vostra
tazza sotto le uscite
e fate iniziare un
ciclo caffè/espresso.
Questo accessorio per cappuccino automatico facilita la preparazione di un cappuccino o caffè latte.
Affinché il pulsante mantenga la posizione corretta, il tubicino non deve essere attorcigliato.
Page 83

8
Nel caso in cui la spia
si accenda, rimuovere,
svuotare e pulire la
vaschetta raccogligocce.
La vaschetta raccogligocce riceve l’acqua di scolo, mentre il recipiente di raccolta dei fondi di caffè riceve
la miscela di scarto. Lo scomparto del caffè consente di eliminare eventuali depositi di fondi di caffè.
Rimuovere, svuotare e
pulire il recipiente di
raccolta dei fondi di
caffè.
La vaschetta raccogligocce
è dotata di galleggianti che,
in qualsiasi momento, indicano all’utilizzatore quando
è opportuno svuotarla.
La spia rimane accesa nel caso in cui il recipiente di raccolta dei fondi di caffè non sia inserito o installato
in modo corretto, oppure nel caso in cui sia stato ricollocato in meno di 4 secondi. Nel momento in cui la spia
è accesa oppure lampeggia, la preparazione di un caffè espresso o di un caffè lungo è impossibile.
Il recipiente di raccolta dei fondi di caffè ha una capienza di 9 caffè.
MANUTENZIONE DELL’APPARECCHIO
Non appena si rimuove il recipiente di raccolta dei fondi di caffè, è necessario svuotarlo completamente
per evitare qualsiasi traboccamento successivo.
PROGRAMMA DI PULIZIA – DURATA TOTALE: 20 MINUTI CIRCA
È necessario eseguire il programma di pulizia all’incirca ogni 350 preparazioni di caffè espresso o di caffè lungo.
Nel momento in cui è necessario procedere ad un ciclo di pulizia, l’apparecchio avverte l’utilizzatore tramite
l’accensione della spia luminosa “clean”.
Lanciare il programma di
pulizia premendo il tasto
“Service”. Le spie “clean”
e lampeggiano.
Svuotare e pulire il recipiente di raccolta dei
fondi di caffè, poi riposizionarlo correttamente.
La spia si spegne.
Rimuovere e pulire lo
scomparto per la pulizia .Riposizionarlo
correttamente.
Rimuovere, riempire e
riposizionare correttamente
il serbatoio.
PULIZIA DEI CIRCUITI : VEDERE PAGINA 5
Collocare un recipiente in
grado di contenere almeno
0,6 l sotto gli ugelli del
caffè.
Rimuovere lo
scomparto del caffè.
Pulirlo sotto l’acqua
corrente ed
asciugarlo
accuratamente.
Attenzione! Affinché la garanzia sia valida, è indispensabile compiere il ciclo di pulizia dell’apparecchio
non appena quest’ultimo lo segnala all’utilizzatore. Seguire attentamente l’ordine delle operazioni.
Nel momento in cui la spia è accesa, è possibile continuare ad utilizzare l’apparecchio, ma si consiglia di procedere
all’esecuzione del programma il più velocemente possibile.
Rimuovere e svuotare
la vaschetta raccogligocce.
SVUOTAMENTO DEL RECIPIENTE DI RACCOLTA DEI FONDI DI CAFFÈ,
DELLO SCOMPARTO DEL CAFFÈ E DELLA VASCHETTA RACCOGLIGOCCE.
ITALIANO
Page 84

9
Premere il tasto
“Service” per lanciare
il ciclo di pulizia.
1- Ciclo di pulizia
La spia “clean” è fissa.
Il ciclo di pulizia si svolge automaticamente.
La pompa aspira l’acqua ad intermittenza. La durata di
quest’operazione corrisponde a circa 10 minuti e la spia
“clean” lampeggia nuovamente.
Svuotare il recipiente
dell’acqua di scolo e
riposizionarlo sotto gli
ugelli del caffè.
Premere nuovamente il
tasto “Service” per
lanciare un primo ciclo di
risciacquo.
2- Primo risciacquo
La spia “clean” è nuovamente fissa.
Il programma prosegue.
Un primo ciclo di risciacquo si svolge in maniera automatica.
Esso consente di risciacquare l’apparecchio e di eliminare i
residui di prodotto detergente. Questo primo ciclo di
risciacquo dura circa 5 minuti. Non appena è giunto al termine,
la spia “clean” lampeggia nuovamente.
Svuotare il recipiente
dell’acqua di scolo e
riposizionarlo sotto gli
ugelli del caffè.
Premere nuovamente il
tasto “Service” per
lanciare un secondo
ciclo di risciacquo.
3- Secondo risciacquo
La spia “clean” è nuovamente fissa.
Un secondo ciclo di risciacquo si svolge in maniera
automatica. Questo secondo ciclo di risciacquo dura circa
5 minuti.
Nel momento in cui il secondo ciclo di risciacquo è terminato,
la spia “clean” si spegne.
Rimuovere e svuotare il
recipiente dell’acqua di
scolo.
Svuotare la vaschetta
raccogligocce e
riposizionarla correttamente.
Riempire il serbatoio
dell’acqua.
Ora, l’apparecchio è pronto
per un nuovo utilizzo.
Nel caso in cui, all’avviamento del programma, non sia presente una quantità sufficiente d’acqua nel serbatoio, l’utilizzatore ne sarà avvertito tramite l’accensione della spia . Aggiungere la quantità necessaria di acqua nel serbatoio
un’altra pastiglia di pulizia. Se si scollega la periferica durante la pulizia o, in caso di mancanza di alimentazione, il programma di pulizia deve essere riavviato dall'inizio. Questo è obbligatorio per motivi di acqua di lavaggio circuito. In
questo caso, un altro di pellet di pulizia è necessaria.
Portare correttamente a termine il ciclo di pulizia completo per evitare qualsiasi rischio di intossicazione. Il ciclo di
pulizia è un ciclo discontinuo. Pertanto, non mettere le mani sotto gli ugelli del caffè durante l’esecuzione del ciclo.
Utilizzare soltanto pastiglie di pulizia KRUPS (XS3000). Il costruttore declina ogni responsabilità in caso di danni
derivanti dall’utilizzo di pastiglie di altre marche.
È possibile acquistare le pastiglie per la pulizia presso i centri assistenza autorizzati KRUPS.
Aprire lo sportellino di
manutenzione ed
inserire una pastiglia
di pulizia KRUPS
(XS3000) nell’
apposito scomparto.
± 10 mn
± 5 mn
± 5 mn
XS3000
Fare attenzione a proteggere accuratamente il piano da lavoro durante i cicli di eliminazione
del calcare, in particolare qualora quest’ultimo sia di marmo, di pietra o di legno.
Page 85

Ricollocare il serbatoio
ad acqua. La spia si
spegne e la spia “calc”
diventa fissa.
Ciclo di decalcificazione
La spia « calcare » diventa fissa.
Si instaura il ciclo di decalcificazione e continua in modo automatico. La pompa aspira l’acqua a intermittenza ed esce dalle
bocchette di uscita del caffè e poi dalla bocchetta vapore. La durata di questa operazione è di circa 10 minuti.
10
PROGRAMMA DI ELIMINAZIONE DEL CALCARE – DURATA TOTALE: 22 MINUTI CIRCA.
La quantità del deposito di calcare dipende dalla durezza dell’acqua utilizzata. Nel momento in cui è
necessario procedere ad un ciclo di eliminazione del calcare, l’apparecchio avverte automaticamente
l’utilizzatore tramite l’accensione della spia “calc”. Non si può accedere a questo programma se non quando
l’apparecchio lo richiede.
Attenzione! Affinché la garanzia sia valida, è indispensabile eseguire il ciclo di eliminazione del calcare dall’
apparecchio non appena quest’ultimo lo segnala all’utilizzatore. Seguire attentamente l’ordine delle operazioni.
Nel momento in cui la spia si accende, è possibile continuare ad utilizzare l’apparecchio, ma si consiglia di procedere all’esecuzione
del programma il più velocemente possibile.
Lanciare il programma
di eliminazione del
calcare premendo il
tasto “Service”.
Le spie “calc” e
lampeggiano.
Collocare un recipiente
in grado di contenere
almeno 0,6 l d’acqua
sotto gli ugelli del
caffè, nonché sotto
l’ugello del vapore.
Rimuovere e pulire la
vaschetta
raccogligocce.
Svuotare il serbatoio e
riempirlo con acqua
tiepida fino alla riga
“calc”.
Far sciogliere un
sacchetto di polvere
anticalcare Krups
(40 gr.) F054.
Premere il tasto
“Service” dopo aver
effettuato tutte queste
operazioni.
± 10 mn
F054
Fare attenzione a proteggere accuratamente il piano da lavoro durante i cicli di eliminazione
del calcare, in particolare qualora quest’ultimo sia di marmo, di pietra o di legno.
Se il vostro prodotto è provvisto della nostra cartuccia Claris- Aqua Filter System F088, preghiamo di
ritirarla prima dell’operazione di decalcificazione.
Quando il ciclo è terminato, le spie "serbatoio d’acqua" e "calc"
lampeggiano.
ITALIANO
Utilizzare esclusivamente prodotti per l’eliminazione del calcare di marca KRUPS.I prodotti anticalcare sono disponibili presso i centri di assistenza KRUPS. Il costruttore declina ogni responsabilità in caso di danni dell’apparecchio
provocati dall’utilizzo di altri prodotti.
Page 86

11
2. Primo risciacquo
È necessario eseguire un primo risciacquo per eliminare i residui di prodotto anticalcare.
Questo ciclo si svolge in maniera automatica. La sua durata è di circa 6 minuti.
± 6 mn
Svuotare il recipiente
pieno d’acqua di scolo.
Svuotare la vaschetta
raccogligocce e
riposizionarla, insieme
al recipiente, come in
precedenza.
Svuotare, pulire e
risciacquare il serbatoio dell’acqua, poi
riempirlo di nuovo fino
al livello “Max.”
Riposizionare il serbatoio
dell’acqua. La spia “calc”
lampeggia e la spia
si spegne.
Premere il tasto
“Service”, la spia “calc”
diventa nuovamente
fissa. Il ciclo automatico
durerà 6 minuti.
Nel momento in cui il
secondo risciacquo
è giunto al termine,
la spia “calc” si
spegne.
Premere nuovamente il
tasto “Service”,
la spia “calc” è
di nuovo fissa.
Il secondo ciclo
automatico dura 6 minuti.
Svuotare la vaschetta
raccogligocce e
riposizionarla correttamente.
Svuotare e riempire il
serbatoio dell’acqua.
3- Secondo risciacquo
Alla fine del primo risciacquo, la spia “calc” lampeggia.
Il secondo ciclo automatico dura 6 minuti.
Ora, l’apparecchio è pronto per un nuovo uti-
lizzo.
Rimuovere il recipiente
dell’acqua di scolo e la
vaschetta
raccogligocce;
riposizionarli
correttamente.
Nel caso in cui non sia presente una quantità sufficiente d’acqua nel serbatoio, l’utilizzatore ne sarà avvertito tramite l’accensione della spia . Aggiungere la quantità opportuna di acqua nel serbatoio affinché la procedura di elimina
zione del calcare prosegua automaticamente. Qualora intervenga un’interruzione di corrente elettrica durante il ciclo,
sarà necessario rilanciare il programma dall’inizio.
± 6 mn
PROGRAMMA DI RISCIACQUO LUNGO
Togliere, riempire e
rimettere a posto il serbatoio.
L'apparecchio avverte con il lampeggiamento delle spie luminose "clean" e "calc" quando è necessario procedere ad un risciacquo lungo.
Collocate un recipiente che possa
contenere minimo
0,15 ml sotto le uscite
del caffè e sotto la
bocchetta vapore.
Lanciare il programma di
risciacquo lungo premendo il tasto "Service".
Le spie "clean" e "calc"
diventano fisse.
+
Quando il risciacquo
lungo è terminato, le
spie "clean" e "calc"
si spengono.
Portare correttamente a termine il ciclo di pulizia completo per evitare qualsiasi rischio di
intossicazione. Il ciclo di eliminazione del calcare è un ciclo discontinuo; pertanto, non mettere
le mani sotto gli ugelli del caffè durante il ciclo.
Page 87

12
MANUTENZIONE GENERALE
Disinserire sempre il cavo di alimentazione dalla presa di corrente e lasciare raffreddare l’apparecchio prima di procedere alla
pulizia. Non utilizzare utensili o prodotti detergenti che potrebbero eventualmente rigare o corrodere l’apparecchio.
Asciugare il corpo esterno dell’apparecchio con un panno umido.
Pulite il cassettino di pulizia, il vano raccogli-gocce e
la sua griglia, il serbatoio filtri con acqua calda e
detergente liquido.
Risciacquare il serbatoio dell’acqua con
acqua corrente pulita.
Conservare ed utilizzare l’imballaggio originale per trasportare l’apparecchio.
TRASPORTO DELL’APPARECCHIO
In caso di caduta dell’apparecchio al di fuori dell’imballaggio, è opportuno portarlo presso un centro
assistenza autorizzato per evitare qualsiasi rischio di incendio o problemi elettrici.
PRODOTTO ELETTRICO O ELETTRONICO A FINE VITA
Questi pezzi non sono adatti per lavastoviglie
Contribuiamo alla salvaguardia dell’ambiente!
Questo apparecchio contiene numerosi materiali valorizzabili o riciclabili.
Smaltirlo presso il centro di raccolta rifiuti comunale o in un’apposita discarica, conformemente alle norme in
vigore.
ITALIANO
PROBLEMI, AZIONI CORRETTIVE
L’apparecchio non si accende dopo aver
premuto il tasto relativo.
Acqua o vapore escono in modo anomalo
dalla bocchetta vapore.
L’espresso o il caffè lungo non sono
abbastanza caldi.
Il caffè è troppo chiaro o non abbastanza
forte.
Il ciclo di preparazione del caffè è troppo
lungo.
Verificare che la spina del cavo di alimentazione sia correttamente inserita
nella presa di corrente.
In caso di ripetuti funzionamenti, poche gocce possono fuoriuscire dalla bocchetta vapore.
Cambiate la regolazione della temperatura del caffè.
Riscaldate le tazze sciacquandole con acqua calda.
Verificate che il serbatoio del caffè in grani contenga caffè e che questo venga
correttamente erogato.
Evitate di utilizzare caffè oleoso, caramellato o aromatizzato.
Diminuite il volume di caffè selezionato mediante il tasto a rotella.
Selezionate il tasto .
Girate il bottone della finitura di taglio dei grani verso sinistra per ottenere una
macinatura piú sottile.
Realizzate la vostra preparazione in due cicli utilizzando la funzione 2 tazze
Girate il tasto della finitura di taglio dei grani verso destra per ottenere una
macinatura piú grossa (dipende dal tipo di caffè utilizzato).
Effettuate uno o più cicli di pulizia.
Page 88

13
PROBLEMI, AZIONI CORRETTIVE
Il caffè è poco cremoso.
L’apparecchio non ha prodotto caffè.
Si è utilizzato caffè macinato al posto del
caffè in grani.
Il trituratore emette un rumore anomalo.
È difficile girare il tasto di regolazione di finitura dei grani.
Il vapore non esce dall’ugello.
La quantità di schiuma di latte è
insufficiente.
La schiuma di latte è troppo grossolana.
L’accessorio Cappuccino-Automatico non
aspira latte (accessorio venduto separatamente).
Il programma di pulizia o di
decalcificazione non parte.
Dopo aver riempito il serbatoio di acqua, la
spia rimane accesa.
Dopo aver svuotato il serbatoio filtri del
caffè, la spia rimane accesa.
Si è verificata un’interruzione di corrente in
occasione di un ciclo.
Sono presenti acqua o caffè sotto
l’apparecchio.
Le 4 spie rosse lampeggiano in modo
permanente.
Girare verso sinistra la manopola di selezione macinatura per ottenere una
macinatura più fine (può dipendere dal tipo di caffé utilizzato).
Caricare la cartuccia Claris Aqua Filter System (rispettare la procedura d'installazione indicata a pagina 3). Effettuare uno o più cicli di risciacquo.
Si è verificato un incidente durante la preparazione.
L'apparecchio si è riavviato automaticamente ed è pronto per un nuevo ciclo.
Aspirare, per mezzo di un aspiratore, il caffè premacinato contenuto nel
serbatoio per caffè in grani.
Sono presenti residui esterni nel trituratore.
Contattare il Servizio Consumatori Krups.
Modificate la regolazione del trituratore solo durante il funzionamento.
Spegnere l'apparecchio e lasciarlo raffreddare;
Verificare che il foro per il vapore sia ben collegato all'apposito attacco.
Verificare che il foro per il vapore non sia ostruito (se necessario, pulire il foro
per il vapore e stapparlo con l'ago in dotazione). Vuotare il serbatoio e rimuovere il filtro Claris. Riempire il serbatoio con acqua minerale ricca di calcio (>
100 mg/l ) e fare successivamente dei cicli di vapore (da 5 a 10) in un recipiente, fino ad ottenere un getto di vapore continuo. Una volta ottenuto un
getto di vapore continuo si dovrebbe smettere di utilizzare nuovamente questo
particolare tipo di acqua.
Se necessario stappare, con l'aiuto dell'ago in dotazione, il piccolo foro di
entrata dell'aria nella parte superiore dell'erogatore di vapore. Utilizzare un recipiente freddo e latte di una confezione aperta recentemente. Eventualmente,
provare con un tipo diverso di latte (UHT o pastorizzato).
Verificate il corretto inserimento delle 2 estremità del piccolo tubo inox nella
parte flessibile della bocchetta vapore.
Verificate che la guarnizione che viene immersa nel latte non sia otturata.
Controlla che il tubo flessibile non sia ritorto e che posizionato correttamente
nell'accessorio al fine di evitare che venga risucchiata dell'aria.
Dopo aver spento e lasciato raffreddare il vostro apparecchio, liberate il foro di
uscita dell’accessorio “Cappuccino-Automatico”.
Questi programmi sono possibili solo quando l'apparecchio lo richiede (spia
"clean" o "calc" acceso).
Verificare il corretto posizionamento del serbatoio nella caffettiera.
Verificare che il galleggiante sul fondo del serbatoio si sposti liberamente.
Risciacquare il serbatoio e, se necessario, procedere all’eliminazione del calcare.
Rimuovere il recipiente, accertarsi che sia completamente vuoto, attendere
8 secondi e riposizionarlo correttamente.
Verificare che lo scomparto di pulizia sia correttamente inserito.
L’apparecchio si reinizializza automaticamente in occasione della rimessa sotto
tensione ed è pronto per un nuovo ciclo.
La vaschetta raccogligocce è piena; vuotarla e pulire il cassetto.
Verificare che la vaschetta raccogligocce sia posizionata correttamente.
Non rimuovere il recipiente dell'acqua prima della fine del ciclo.
Smontate l’apparecchio, togliete la cartuccia Claris, aspettate 20 secondi
dopodiché rimettetela in serivzio.
Se il problema persiste, annotate il numero che appare sulla targhetta, sotto la
griglia posatazze e contattate il Servizio Consumatori Krups.
Page 89

14
Ecco qualche ricetta da realizzare con la macchina Espresseria Automatic:
• Cappuccino
Per un cappuccino preparato a regola d’arte, le proporzioni ideali sono le seguenti: 1/3 di latte caldo, 1/3 di caffè, 1/3 di
schiuma di latte.
• Caffelatte
Per questa preparazione, le proporzioni sono le seguenti: 3/5 di latte caldo, 1/5 di caffè, 1/5 di schiuma di latte.
• Per questa preparazione a base di latte, utilizzare preferibilmente latte parzialmente scremato molto fresco
(a temperatura da frigorifero, idealmente tra 6 e 8°C).
• Per finire, è possibile cospargere con cioccolato in polvere.
• Caffè con panna
• Preparare un caffè espresso classico in una tazza grande.
• Aggiungere una nuvola di panna per ottenere un caffè con panna.
• Caffè corretto*
• Preparare una tazza di caffè espresso come al solito.
• Poi, correggere leggermente il gusto aggiungendo 1/4 o 1/2 bicchierino da liquore di Cognac.
L’anisetta, l’acquavite, la Sambuca, il Kirsch ed il Cointreau sono anch’essi idonei a questa preparazione.
Esistono moltissime altre possibilità per “nobilitare” l’espresso.
L’immaginazione non ha confini.
• Liquore al caffè*
• Miscelare in una bottiglia vuota da 0,75 litri 3 tazze di caffè espresso, 250 gr. di zucchero di canna non raffinato,
1/2 litro di Cognac o di Kirsch.
• Lasciare macerare la miscela per almeno 2 settimane.
Si otterrà così un liquore delizioso, soprattutto per gli appassionati di caffè.
• Affogato al caffè
4 palline di gelato alla vaniglia, 2 tazze di caffè espresso freddo zuccherato, 1/8 l di latte, panna montata, cioccolato a scaglie.
• Miscelare l’espresso freddo con il latte.
• Suddividere le palline di gelato in bicchieri grandi, versare sopra il caffè e decorare con la panna montata ed il cioccolato
a scaglie.
• Irish Coffee*
• Aggiungere un bicchierino di rhum ad una tazza di caffè espresso zuccherato.
• Decorare con uno strato abbondante di panna montata e servire.
• Espresso flambé*
2 tazze di caffè espresso, 2 bicchierini di Cognac, 2 cucchiaini da caffè di zucchero di canna non raffinato, panna montata.
• Versare il Cognac in bicchieri resistenti al calore, riscaldare e fiammeggiare.
• Aggiungere lo zucchero, mescolare, versare il caffè e decorare con panna montata.
• Espresso perfetto*
2 tazze di caffè espresso, 6 tuorli d’uovo, 200 gr. di zucchero, 1/8 litro di panna zuccherata, 1 bicchierino di liquore all’arancia.
• Sbattere i tuorli d’uovo con lo zucchero fino a formare un composto denso e schiumoso.
• Aggiungere l’espresso freddo ed il liquore all’arancia.
• Poi miscelare la panna montata.
• Versare il tutto in coppette o bicchieri.
• Riporre le coppette nel congelatore.
(*: L’abuso di alcool è pericoloso per la salute.)
ITALIANO
Page 90

15
. . . . . . . . . . . . . . . . . . . . . . . . . . . . . . . . . . . . . . . . . . . . . . . . . . . . . . . . . . . . . . . . . . . . . . . . . . . . . . . . . . .
. . . . . . . . . . . . . . . . . . . . . . . . . . . . . . . . . . . . . . . . . . . . . . . . . . . . . . . . . . . . . . . . . . . . . . . . . . . . . . . . . . .
. . . . . . . . . . . . . . . . . . . . . . . . . . . . . . . . . . . . . . . . . . . . . . . . . . . . . . . . . . . . . . . . . . . . . . . . . . . . . . . . . . .
. . . . . . . . . . . . . . . . . . . . . . . . . . . . . . . . . . . . . . . . . . . . . . . . . . . . . . . . . . . . . . . . . . . . . . . . . . . . . . . . . . .
. . . . . . . . . . . . . . . . . . . . . . . . . . . . . . . . . . . . . . . . . . . . . . . . . . . . . . . . . . . . . . . . . . . . . . . . . . . . . . . . . . .
. . . . . . . . . . . . . . . . . . . . . . . . . . . . . . . . . . . . . . . . . . . . . . . . . . . . . . . . . . . . . . . . . . . . . . . . . . . . . . . . . . .
. . . . . . . . . . . . . . . . . . . . . . . . . . . . . . . . . . . . . . . . . . . . . . . . . . . . . . . . . . . . . . . . . . . . . . . . . . . . . . . . . . .
. . . . . . . . . . . . . . . . . . . . . . . . . . . . . . . . . . . . . . . . . . . . . . . . . . . . . . . . . . . . . . . . . . . . . . . . . . . . . . . . . . .
. . . . . . . . . . . . . . . . . . . . . . . . . . . . . . . . . . . . . . . . . . . . . . . . . . . . . . . . . . . . . . . . . . . . . . . . . . . . . . . . . . .
. . . . . . . . . . . . . . . . . . . . . . . . . . . . . . . . . . . . . . . . . . . . . . . . . . . . . . . . . . . . . . . . . . . . . . . . . . . . . . . . . . .
. . . . . . . . . . . . . . . . . . . . . . . . . . . . . . . . . . . . . . . . . . . . . . . . . . . . . . . . . . . . . . . . . . . . . . . . . . . . . . . . . . .
. . . . . . . . . . . . . . . . . . . . . . . . . . . . . . . . . . . . . . . . . . . . . . . . . . . . . . . . . . . . . . . . . . . . . . . . . . . . . . . . . . .
. . . . . . . . . . . . . . . . . . . . . . . . . . . . . . . . . . . . . . . . . . . . . . . . . . . . . . . . . . . . . . . . . . . . . . . . . . . . . . . . . . .
. . . . . . . . . . . . . . . . . . . . . . . . . . . . . . . . . . . . . . . . . . . . . . . . . . . . . . . . . . . . . . . . . . . . . . . . . . . . . . . . . . .
. . . . . . . . . . . . . . . . . . . . . . . . . . . . . . . . . . . . . . . . . . . . . . . . . . . . . . . . . . . . . . . . . . . . . . . . . . . . . . . . . . .
. . . . . . . . . . . . . . . . . . . . . . . . . . . . . . . . . . . . . . . . . . . . . . . . . . . . . . . . . . . . . . . . . . . . . . . . . . . . . . . . . . .
. . . . . . . . . . . . . . . . . . . . . . . . . . . . . . . . . . . . . . . . . . . . . . . . . . . . . . . . . . . . . . . . . . . . . . . . . . . . . . . . . . .
. . . . . . . . . . . . . . . . . . . . . . . . . . . . . . . . . . . . . . . . . . . . . . . . . . . . . . . . . . . . . . . . . . . . . . . . . . . . . . . . . . .
. . . . . . . . . . . . . . . . . . . . . . . . . . . . . . . . . . . . . . . . . . . . . . . . . . . . . . . . . . . . . . . . . . . . . . . . . . . . . . . . . . .
. . . . . . . . . . . . . . . . . . . . . . . . . . . . . . . . . . . . . . . . . . . . . . . . . . . . . . . . . . . . . . . . . . . . . . . . . . . . . . . . . . .
. . . . . . . . . . . . . . . . . . . . . . . . . . . . . . . . . . . . . . . . . . . . . . . . . . . . . . . . . . . . . . . . . . . . . . . . . . . . . . . . . . .
. . . . . . . . . . . . . . . . . . . . . . . . . . . . . . . . . . . . . . . . . . . . . . . . . . . . . . . . . . . . . . . . . . . . . . . . . . . . . . . . . . .
. . . . . . . . . . . . . . . . . . . . . . . . . . . . . . . . . . . . . . . . . . . . . . . . . . . . . . . . . . . . . . . . . . . . . . . . . . . . . . . . . . .
. . . . . . . . . . . . . . . . . . . . . . . . . . . . . . . . . . . . . . . . . . . . . . . . . . . . . . . . . . . . . . . . . . . . . . . . . . . . . . . . . . .
. . . . . . . . . . . . . . . . . . . . . . . . . . . . . . . . . . . . . . . . . . . . . . . . . . . . . . . . . . . . . . . . . . . . . . . . . . . . . . . . . . .
. . . . . . . . . . . . . . . . . . . . . . . . . . . . . . . . . . . . . . . . . . . . . . . . . . . . . . . . . . . . . . . . . . . . . . . . . . . . . . . . . . .
. . . . . . . . . . . . . . . . . . . . . . . . . . . . . . . . . . . . . . . . . . . . . . . . . . . . . . . . . . . . . . . . . . . . . . . . . . . . . . . . . . .
. . . . . . . . . . . . . . . . . . . . . . . . . . . . . . . . . . . . . . . . . . . . . . . . . . . . . . . . . . . . . . . . . . . . . . . . . . . . . . . . . . .
. . . . . . . . . . . . . . . . . . . . . . . . . . . . . . . . . . . . . . . . . . . . . . . . . . . . . . . . . . . . . . . . . . . . . . . . . . . . . . . . . . .
. . . . . . . . . . . . . . . . . . . . . . . . . . . . . . . . . . . . . . . . . . . . . . . . . . . . . . . . . . . . . . . . . . . . . . . . . . . . . . . . . . .
. . . . . . . . . . . . . . . . . . . . . . . . . . . . . . . . . . . . . . . . . . . . . . . . . . . . . . . . . . . . . . . . . . . . . . . . . . . . . . . . . . .
. . . . . . . . . . . . . . . . . . . . . . . . . . . . . . . . . . . . . . . . . . . . . . . . . . . . . . . . . . . . . . . . . . . . . . . . . . . . . . . . . . .
. . . . . . . . . . . . . . . . . . . . . . . . . . . . . . . . . . . . . . . . . . . . . . . . . . . . . . . . . . . . . . . . . . . . . . . . . . . . . . . . . . .
. . . . . . . . . . . . . . . . . . . . . . . . . . . . . . . . . . . . . . . . . . . . . . . . . . . . . . . . . . . . . . . . . . . . . . . . . . . . . . . . . . .
. . . . . . . . . . . . . . . . . . . . . . . . . . . . . . . . . . . . . . . . . . . . . . . . . . . . . . . . . . . . . . . . . . . . . . . . . . . . . . . . . . .
. . . . . . . . . . . . . . . . . . . . . . . . . . . . . . . . . . . . . . . . . . . . . . . . . . . . . . . . . . . . . . . . . . . . . . . . . . . . . . . . . . .
. . . . . . . . . . . . . . . . . . . . . . . . . . . . . . . . . . . . . . . . . . . . . . . . . . . . . . . . . . . . . . . . . . . . . . . . . . . . . . . . . . .
. . . . . . . . . . . . . . . . . . . . . . . . . . . . . . . . . . . . . . . . . . . . . . . . . . . . . . . . . . . . . . . . . . . . . . . . . . . . . . . . . . .
. . . . . . . . . . . . . . . . . . . . . . . . . . . . . . . . . . . . . . . . . . . . . . . . . . . . . . . . . . . . . . . . . . . . . . . . . . . . . . . . . . .
. . . . . . . . . . . . . . . . . . . . . . . . . . . . . . . . . . . . . . . . . . . . . . . . . . . . . . . . . . . . . . . . . . . . . . . . . . . . . . . . . . .
. . . . . . . . . . . . . . . . . . . . . . . . . . . . . . . . . . . . . . . . . . . . . . . . . . . . . . . . . . . . . . . . . . . . . . . . . . . . . . . . . . .
Page 91
ESPRESSERIA AUTOMATIC
902 31 23 00
E
HOTLINE
Fotos no contractuales
FRANCAISENGLISHDEUTSCHNEDERLANDS
ITALIANOESPAÑOL
PORTUGUÊS
E
λληνικά
Sólo para utilización doméstica
La duración de la garantía depende de la legislación de su país, con un máximo de 3.000 ciclos al año.
Este aparato está destinado a un uso doméstico únicamente y no es conveniente usarlo de forma comercial
o profesional. Cualquier utilización de esta máquina en un contexto diferente al doméstico no está cubierto
por la garantía del fabricante.
La garantía no se aplica para daños o defectos como resultado de un mal uso, reparo por una persona no
autorizada así como también el no tomar en cuenta las instrucciones de uso. La garantía no se dará si
cualquier instrucción de Krups de operación o mantenimiento no ha sido observada o la limpieza y los
agentes descalcificantes son usados de una manera que no obedezca a las especificaciones originales de
Krups. Incumplimiento de uso del filtro de agua Claris Aqua Filter System de acuerdo con las instrucciones
de Krups. El desgaste anormal de las partes (grinding discos y válvulas, precintos) está exento de la
garantía, así como también daños causados por objetos de procedencia extranjera, en el grinding mill
(ejem. Madera, piedras, partes plásticas, etc...).
Page 92

: Indicador apagado / : Indicador parpadeante
: Indicador encendido / : Indicador con doble parpadeo
Pilotos luminosos
Significado
Vacíe el
colector
de posos
Llenar
el
depósito
Clean Calc Func/
parada
El aparato está listo para un ciclo de café o de vapor.
/
Parpadeo simple: El aparato está en fase de precalentamiento.
/
Doble parpado: está en curso un ciclo de 2 cafés.
Información Servicio Postventa en el modo ajuste de
parámetros de funcionamiento.
/
/
Vacíe el recolector de posos (un ciclo de 2 cafés
está en curso).
/
Vacíe el recolector de posos + limpie la bandeja +
vacíe la bandeja recoje-gotas
Verificar que el depósito de poso de café esté bien
colocado.
Verificar que la bandeja de limpieza esté bien colocada.
Reglaje de la dureza del agua.
/
Llenar el depósito de agua.
Verificar que el depósito de agua esté bien colocado.
/
/
El ciclo de café ha sido interrumpido por falta de agua.
Llenar el depósito de agua.
Reglaje del parada automática auto-off.
Programa de limpieza solicitado o en curso.
/
Programa de limpieza: preparación del ciclo de
limpieza o de aclarado.
Reglaje de la temperatura del café.
Programa de descalcificación solicitado o en curso.
/
Programa de descalcificación : preparación del ciclo
de descalcificación o de aclarado.
/
/
Ciclo de aclarado del programa de descalcificación :
solicitud de vaciar el depósito de agua, de aclararlo
y de llenarlo con agua fresca.
/ /
Pide un aclarado largo (alrededor de 150 ml) ver
página 5
Aclarado largo en curso.
/ / / /
Parpadeo permanente: anomalía de funcionamiento.
Page 93
PÁGINA
DESCRIPTIVO . . . . . . . . . . . . . . . . . . . . . . . . . . . . . . . . . . . . . . . . . . . . . . . . . . . . . . . . . . . . . . . .1
Señales de advertencia
Elementos de información sobre el café espresso
Consignas de seguridad
ANTES DE LA PRIMERA UTILIZACIÓN . . . . . . . . . . . . . . . . . . . . . . . . . . . . . . . . . . . . . . . . .3
MEDIDA DE LA DUREZA DEL AGUA
CARTUCHO CLARIS - AQUA FILTER SYSTEM
REGLAJES . . . . . . . . . . . . . . . . . . . . . . . . . . . . . . . . . . . . . . . . . . . . . . . . . . . . . . . . . . . . . . . . . . .4
REGLAJE DE DUREZA DEL AGUA
REGLAJE DE TEMPERATURA DEL CAFÉ
AJUSTE DEL MECANISMO DE CORTE AUTOMÁTICO DE LA ALIMENTACIÓN
ELÉCTRICA
PREPARACIÓN DEL APARATO . . . . . . . . . . . . . . . . . . . . . . . . . . . . . . . . . . . . . . . . . . . . . . . . . .5
ACLARADO DE CIRCUITOS
PREPARACIÓN DEL MOLINILLO
PREPARACIÓN DE UN ESPRESSO Y DE UN CAFÉ . . . . . . . . . . . . . . . . . . . . . . . . . . . . .6
PREPARACIÓN DE UN ESPRESSO (DE 20 A 70 ML)
PREPARACIÓN DE UN CAFÉ (DE 80 A 220 ML)
FUNCIÓN 2 TAZAS
PREPARACIÓN EL VAPOR . . . . . . . . . . . . . . . . . . . . . . . . . . . . . . . . . . . . . . . . . . . . . . . . . . . .7
ESPUMA DE LECHE
SET AUTO-CAPPUCCINO XS6000
MANTENIMIENTO DEL APARATO . . . . . . . . . . . . . . . . . . . . . . . . . . . . . . . . . . . . . . . . . . . . . .8
VACIADO DEL DEPÓSITO DE POSO DE CAFÉ, DE LA BANDEJA DE LIMPIEZA Y DE LA
BANDEJA RECOGEGOTAS
ACLARADO DEL CIRCUITO DE CAFÉ
PROGRAMA DE LIMPIEZA
PROGRAMA DE DESCALCIFICACIÓN . . . . . . . . . . . . . . . . . . . . . . . . . . . . . . . . . . . . . . . . . .10
PROGRAMA DE ACLARADO LARGO
MANTENIMIENTO GENERAL . . . . . . . . . . . . . . . . . . . . . . . . . . . . . . . . . . . . . . . . . . . . . . . . . .12
TRANSPORTE DEL APARATO
FINAL DE VIDA DE UN PRODUCTO ELÉCTRICO O ELECTRÓNICO
PROBLEMAS Y ACCIONES CORRECTIVAS . . . . . . . . . . . . . . . . . . . . . . . . . . . . . . . . . . .12
RECETAS . . . . . . . . . . . . . . . . . . . . . . . . . . . . . . . . . . . . . . . . . . . . . . . . . . . . . . . . . . . . . . . . . . .14
ÍNDICE
Fotos no contractuales
F 088
Cartucho
Claris —
Aqua Filter
System (no
incluido)
XS 3000
Tabletas de
10 pastillas
de limpieza (2
pastillas incluidas)
F 054
Polvo de descalcificación
(1 saquito
incluido)
XS6000
Set Auto
Capuchino
(No incluido)
XS 4000
KRUPS
Líquido limpiador
para el sistema
Cappuccino (no
incluido)
Accesorios (vendidos por separado)
ESPAÑOL
Con el fin de conservar la garantía, utilice únicamente accesorios Krups para esta máquina.
Page 94

1
Botón rotativo volumen de café
Tecla vapor
Tecla e indicador luminoso “funcionamiento/parada”
Tecla café estándar
Tecla café fuerte
Indicador luminoso “limpiar”
Indicador luminoso “descalcificar”
Indicador luminoso “llenar el depósito de
agua”
Piloto luminoso "vacíe los posos de café y vacíe la
bandeja recogegotas"
Tecla “aclrado/mantenimientos”
Rejilla y bandeja recogegotas extraíble
Salidas de café, con regulador de altura
Depósito de poso de café
Botón rotativo volumen
de café
Depósito de cafe en grano
Boquilla de vapor
Tapa de depósito café en granos
Asa /depósito de agua
Depósito de agua
Rejilla reposa-tazas
Boyas de nivel del agua
Vista superior
Botón de reglaje de la finura de
trituración
Canal pastilla de limpieza
DESCRIPTIVO
Reglage de la moltura
Bandeja de limpieza
Vacíe el recolector de posos de café, la
bandeja recogegotas y la gaveta del café
Llenar el depósito de agua
Señales de advertencias
Proceder a la limpieza
Proceder a la descalcificación
Piloto iluminado
Piloto parpadeando
Molinillo con muela de metal
Pantalla digital reglaje de los parámetros
Instrucción especial de mantenimientos
Fotos no contractuales
+
Proceda a un aclarado
largo
Page 95
2
ESPAÑOL
Estimado/a Cliente,
Le felicitamos por la compra de esta Espresseria Automatic Krups. Apreciará a la vez la calidad del resultado en taza como su gran
facilidad de utilización.
Espresso o lungo, ristretto o cappuccino, su máquina de café / espresso automática ha sido diseñada para permitirle
saborear en casa la misma calidad que en la cafetería, en cualquier momento de la jornada o durante la semana donde quiera que
lo prepare.
Gracias a su Thermoblock System, su bomba de 15 bars y porque trabaja exclusivamente a partir de café en granos
recientemente molidos justo antes de la preparación del café, su Espresseria Automatic le permitirá obtener una bebida que
contiene un máximo de aromas, recubierta de una magnífica crema espesa y dorada color caramelo, un producto procedente del
aceite natural de los granos de café.
El espresso no se sirve en una taza de café tradicional, sino más bien en pequeñas tazas de porcelana. Para obtener un espresso a
una temperatura óptima y una crema bien compacta, le aconsejamos precalentar bien sus tazas.
Después de algunas pruebas, encontrará el tipo de mezcla y de torrefacción del café en granos que corresponda a sus
gustos. Evidentemente, la calidad del agua utilizada también es otro factor determinante en la calidad del resultado que obtendrá en
la taza.
Debe asegurarse de que el agua ha salido recientemente del grifo (para que no haya tenido el tiempo de estancarse al contacto del
aire), que no tenga olor a cloro y que esté fría.
El café espresso es más rico en aroma que un café de filtro clásico. A pesar de su gusto más pronunciado, muy presente en boca y
más persistente, el espresso contiene de hecho menos cafeína que el café de filtro (aproximadamente de 60 a 80 mg por taza en
comparación con 80 a 100 mg por taza). Esto se debe a una duración de salida de café más corta.
Gracias a su gran sencillez de manipulación, la visibilidad de todos sus depósitos, así como sus programas automáticos de limpieza
y de descalcificación, su Espresseria Automatic le aportará un gran confort de utilización.
Importante: Consignas de Seguridad
Lea atentamente el modo de empleo antes de la primera utilización del aparato y consérvelo: una utilización no conforme liberaría
Krups de toda responsabilidad.
Este aparato está destinado a ser utilizado en aplicaciones domésticas y análogas (para un máximo de 3.000 ciclos al año)
como:
- espacios de cocina reservados al personal en tiendas, oficinas y demás entornos profesionales;
- granjas
- el uso por parte de clientes de hoteles, moteles y demás entornos de carácter residencial;
- entornos de tipo habitaciones rurales.
Sin embargo, si se utiliza en estos entornos, el producto no será cubierto por la garantía del fabricante.
Conecte el aparato únicamente en una toma sector conectada a tierra. Verifique que la tensión de alimentación indicada en la
placa del fabricante del aparato corresponde debidamente a la de su instalación eléctrica.
No ponga el aparato sobre una superficie caliente como una placa eléctrica y tampoco lo utilice cerca de una llama
sin protección.
Retire inmediatamente la toma sector si observa cualquier anomalía durante el funcionamiento.
No tire del cable de alimentación para retirar el enchufe.
No deje el cable de alimentación colgar del borde de una mesa ni de una superficie de trabajo.
No deje su mano o el cable de alimentación sobre las partes calientes del aparato.
Nunca sumerja el aparato, el cable ni la toma eléctrica en agua ni en cualquier otro líquido.
Este aparato no está previsto para ser utilizado por personas (incluso los niños) cuyas capacidades físicas, sensoriales o men-
tales estén reducidas, o personas sin experiencia o sin conocimiento, excepto si han podido beneficiarse, a través de una persona responsable de su seguridad, de una vigilancia o de instrucciones previas referentes a la utilización del aparato.
Conviene vigilar a los niños para asegurarse de que no juegan con el aparato.
No utilice el aparato si el cable de alimentación o el propio aparato está dañado.
Si el cable de alimentación o el enchufe están dañados, no utilizar el aparato para evitar todo peligro, hacer reemplazar
obligatoriamente el cable de alimentación por un centro aprobado KRUPS.
Remítase siempre a las instrucciones para descalcificar el aparato.
Proteja el aparato de la humedad y del frío.
No utilice el aparato si no funciona correctamente o si ha sufrido un daño. En tal caso, se aconseja hacer examinar
el aparato por un centro aprobado KRUPS (consulte la lista en el cuaderno de Servicio KRUPS).
A excepción de la limpieza y la descalcificación según los procedimientos del modo de empleo del aparato, toda
intervención en el aparato debe efectuarse por un centro aprobado KRUPS.
Para su seguridad, utilice para su aparato sólo accesorios y recambios aprobados KRUPS.
Todo error de conexión anula la garantía.
Desconecte el aparato tan pronto deja de utilizarlo durante un periodo largo o cuando lo limpia.
Todos los aparatos se someten a un severo control de calidad. Se realizan pruebas de utilización con aparatos tomados
al azar, lo que explica eventuales restos de utilización.
Se desaconseja utilizar tomas múltiples y/o prolongadores.
No ponga agua en el depósito para café en granos y/o bajo la trampilla de mantenimiento con bandeja reposatazas.
Preste atención a la orientación de la boquilla de vapor para evitar todo riesgo de quemadura.
La garantía de 2 años pierde su validez en caso de falta de descalcificación, de limpieza o de mantenimiento regular
o por la presencia cuerpos extraños en el molinillo.
Límites de utilización
Esta máquina Espresso debe utilizarse solamente para preparar espressos o cafés, para hacer espumar la leche y calentar líquidos.
No podrá comprometerse ninguna responsabilidad por los daños eventuales que emanen de la utilización del
aparato con fines no autorizados, por mala conexión, manipulaciones, operaciones ni reparaciones peligrosas.
Las garantías de mantenimiento se anulan en tales circunstancias. Este aparato sólo está destinado a un uso doméstico en el interior de la casa. No ha sido diseñado para una utilización comercial ni profesional.
Page 96

Para optimizar el gusto de sus preparaciones y la duración de vida de su aparato, le aconsejamos utilizar únicamente el
cartucho Claris - Aqua Filter System vendido como accesorio.
Se compone de una sustancia anticalcárea y carbón que reduce el cloro, las impurezas, el plomo, el cobre, los pesticidas...
presentes en el agua. De esta forma se preservan los minerales y los oligoelementos.
3
Antes de utilizar el aparato por primera vez o después de haber observado un cambio en la dureza del agua, conviene adaptar
el aparato a la dureza del agua observada. Para conocer la dureza del agua, determínela con la tira de papel suministrada con
el aparato o diríjase a su compañía de agua.
ANTES DE LA PRIMERA UTILIZACIÓN
Después de 1 min, medida de dureza (agua medianamente dura).
Filtrar el agua con el
cartucho Claris - Aqua Filter
System le permite reducir:
La dureza en
carbonato - hasta 75 %*
El cloro - hasta 85 %*
El plomo - hasta 90 %*
El cobre - hasta 95 %*
El aluminio - hasta 67 %*
Instalación del cartucho en
la máquina.
En la primera utilización:
enroscar el cartucho
filtrante en el fondo del
depósito.
El cartucho Claris necesita reemplazarse cada 50 litros de agua aproximadamente o cada dos meses como mínimo.
Llenar un vaso de
agua e introducir en el
mismo una tira.
Utilizar agua mineral embotellada de una dureza de 25 a 35 mg/litro de calcio o procedente de un cartucho filtrante.
Mecanismo que permite
memorizar el mes de instalación y de cambio del cartucho
(después de 2 meses como
máximo).
Grado de dureza
0
Muy blanda
1
Blanda
2
Medianamente dura
3
Dura
4
Muy dura
° f
<5,4° >7,2° >12,6° >25,2° > 37,8°
° dH
<3° >4° >7° >14° > 21°
° e
<3,75° >5° >8,75° >17,5° > 26,25°
Ponga un recipiente
bajo la boquilla de
vapor. Pase 300 ml de
agua pulsando 1 vez la
tecla aclarado durante
más de 3 segundos.
Si lo desea, puede renovar la operación.
1 sec.
012
3
4
F088
MEDIDA DE LA DUREZA DEL AGUA
CARTUCHO CLARIS - AQUA FILTER SYSTEM F 088 (VENDIDO POR SEPARADO)
* indicaciones suministradas por el fabricante
Page 97

REGLAJES
4
Los aparatos son
prerregulados en
fábrica en
2 temperaturas medias
Conecte el aparato a la
corriente pero no lo
ponga en marcha.
Levante la rejilla
reposa-tazas presionando desde atrás
para hacerla bascular
Pulse simultáneamente
las teclas ‘Service’ y
.
El indicador luminoso
‘calc se enciende.
Pulse la tecla
la cantidad de veces
necesaria para regular la
temperatura deseada del
café.
En cada una de estas etapas usted puede memorizar los ajustes presionando sobre la tecla si los ha terminado. (Los 4
pilotos parpadean 2 veces) o seguir el procedimiento. La memorización de estos ajustes permanece incluso en caso de
corte de alimentación eléctrica. Puede modificar estos ajustes en cualquier momento repitiendo estas operaciones.
Reglaje del mecanismo de parada automática de la alimentación eléctrica (auto-off)
El indicador luminoso
‘clean’ se enciende.
Pulse la tecla la
cantidad de veces
necesaria para obtener
la duración deseada.
Pulse la tecla
la cantidad de veces
necesaria para
seleccionar el nivel de la
dureza del agua utilizada.
Reglaje de la temperatura del café
Reglaje de la dureza del agua
Los aparatos son
prerregulados en
fábrica para el nivel
de dureza 3.
Los aparatos son
prerregulados en
fábrica en 1 hora
1
2
3
1 = 1 H
2 = 2 H
3 = 3 H
4 = 4 H
0 = muy blanda
1 = blanda
2 = medianamente dura
3 = dura
4 = muy dura
La pantalla digital de
reglaje de los parámetros se encuentra bajo
la trampilla de mantenimiento.
Tiene la posibilidad de apagar
su máquina después de un
número de horas pre-programado.
Pulse la tecla vapor
para pasar a regulación
de corte automático
para que : =>
El indicador luminoso
de agua se enciende.
Pulse la tecla vapor
para pasar a reglaje de
temperatura del café
para que : =>
Mire bien verticalmente
al fondo de la ventanita
ESPAÑOL
Page 98

5
Es preferible hacer uno o varios aclarados de 2 los dos circuitos después de varios días sin utilización. Cada
vez que enchufe su aparato, la máquina efectúa un ciclo de inicialización.
Retire y llene el
depósito de agua.
Reinstálelo en su lugar
apoyando firmemente y
cierre la tapa.
Abra la tapa del
depósito para café en
grano. Ponga el café
(250 g máximo).
Cierre la tapa del
depósito para café en
grano.
Asegúrese que no penetre ningún cuerpo extraño en el depósito para café en grano, como las pequeñas
piedrecitas contenidas en el café en granos. Se excluye de la garantía todo daño debido a cuerpos extraños que
hayan penetrado en el depósito para café. No poner agua en el depósito para café en grano. Para evitar que el
agua usada ensucie su superficie de trabajo o le queme, no olvide poner la bandeja recogegotas.
Verifique la limpieza del depósito de agua.
Ponga el aparato en marcha
presionando la tecla . El
piloto luminoso parpadea
durante el precalentamiento
y el ciclo de inicialización.
Aclarado del circuito de café:
ponga un recipiente bajo la boquilla del
café. Presionar brevemente la tecla 'Service'
para lanzar un ciclo de aclarado del circuito
café, que se parará automáticamente después de aproximadamente 40 ml.
Puede ajustar la intensidad de su café regulando la finura de trituración de los granos de café.
Mientras más fino sea el reglaje del molinillo de café, más fuerte y cremoso es el café.
Regule el grado de finura de trituración deseado girando el botón ‘Reglaje de la finura de trituración.
CAMBIE EL REGLAJE DURANTE LA TRITURACIÓN.
NUNCA FORZAR EL BOTÓN DE REGLAJE DE FINURA DE TRITURACIÓN.
Se desaconseja la utilización de granos de café torrefacto, grasos, caramelizados o aromatizados para esta maquina.
Este tipo de grano puede dañar la máquina.
NUNCA PONER CAFÉ MOLIDO EN EL DEPÓSITO PARA CAFÉ.
Hacia la
izquierda el
molido es más
fino.
Hacia la
derecha el
molido es más
grueso.
PREPARACIÓN DEL APARATO
Aclarado del circuito de vapor:
Ponga un recipiente bajo el tubo de vapor.
Presionar después durante 3 segundos la
tecla 'Service' para lanzar un ciclo de aclarado
del circuito vapor, que se parará automáticamente después de aproximadamente 300 ml.
PREPARACIÓN DEL MOLINILLO
ACLARADO DEL CIRCUITO DE CAFÉ
No llenar el depósito con agua caliente, de leche ni de cualquier otro líquido. Si al poner en tensión el aparato,
el depósito de agua no está colocado o incompletamente lleno (bajo el nivel “mín”), se enciende el indicador
‘llenar depósito’ y es momentáneamente imposible preparar espresso o café.
Page 99

6
La cantidad de agua para un espresso debe estar comprendida entre 20 y 70 ml.
Cada vez que enchufe su aparato, la máquina efectúa un ciclo de inicialización.
Presione el botón , el piloto parpadea durante el precalentamiento de la máquina.
Seleccione la tecla para
obtener un espresso fuerte o la
tecla para obtener un
espresso estándar.
Usted ha preparado su aparato, el
indicador está fijo.
Ponga una taza bajo las salidas de café.
Puede bajar o subir las salidas de café
según el tamaño de su taza.
PREPARACIÓN DE UN ESPRESSO Y DE UN CAFÉ
SU APARATO HA SIDO EXCLUSIVAMENTE DISEÑADO PARA UTILIZAR CAFÉ EN GRANOS.
Al preparar su primer café, después de un largo periodo de ausencia o después de un procedimiento
de limpieza o de descalcificación, de la boquilla de vapor salen un poco de vapor y agua caliente
(autocebado).
Si las salidas de café están reguladas demasiado altas respecto al tamaño de sus tazas, hay riesgo
de salpicaduras o de quemaduras.
En todo momento usted puede regular el volumen de agua.
El café molido se prehumidifica con un poco de agua caliente después de la fase de trituración.
Algunos segundos después, continúa la salida del café.
A partir de una cierta cantidad en taza, para obtener un café más fuerte le aconsejamos que divida su preparación
en dos ciclos. Por ejemplo 2 veces 70 ml para una taza de 140 ml.
Su aparato le permite preparar 2 tazas de café o de espresso. No retire las tazas después del primer ciclo.
Usted ha preparado su aparato. El indicador está fijo.
Ponga dos tazas bajo las
salidas de café.
Puede bajar o subir las salidas de café según el
tamaño de sus tazas.
Seleccione la tecla o según su
selección, con una doble
pulsación rápida.
El indicador se enciende con un
doble parpadeo para informarle que
usted ha solicitado dos tazas de café.
Si usted presiona una primera vez la tecla y una segunda vez la tecla (o lo contrario),
la última pulsación no es tomada en consideración.
El aparato encadenará
automáticamente 2 ciclos
completos de
preparación de café.
Para detener la salida de café, puede volver a pulsar una de las teclas o , girar el botón rotativo hacia
la posición mínima.
x 2
PREPARACIÓN DE UN ESPRESSO
FUNCIÓN 2 TAZAS
NO RETIRE EL DEPÓSITO ANTES DEL FINAL DEL CICLO.
(es decir, aproximadamente 15 segundos después del final del goteo del café)
La cantidad de agua para un café debe estar comprendida entre 80 y 220 ml.
PREPARACIÓN DE UN CAFÉ
ESPAÑOL
Page 100
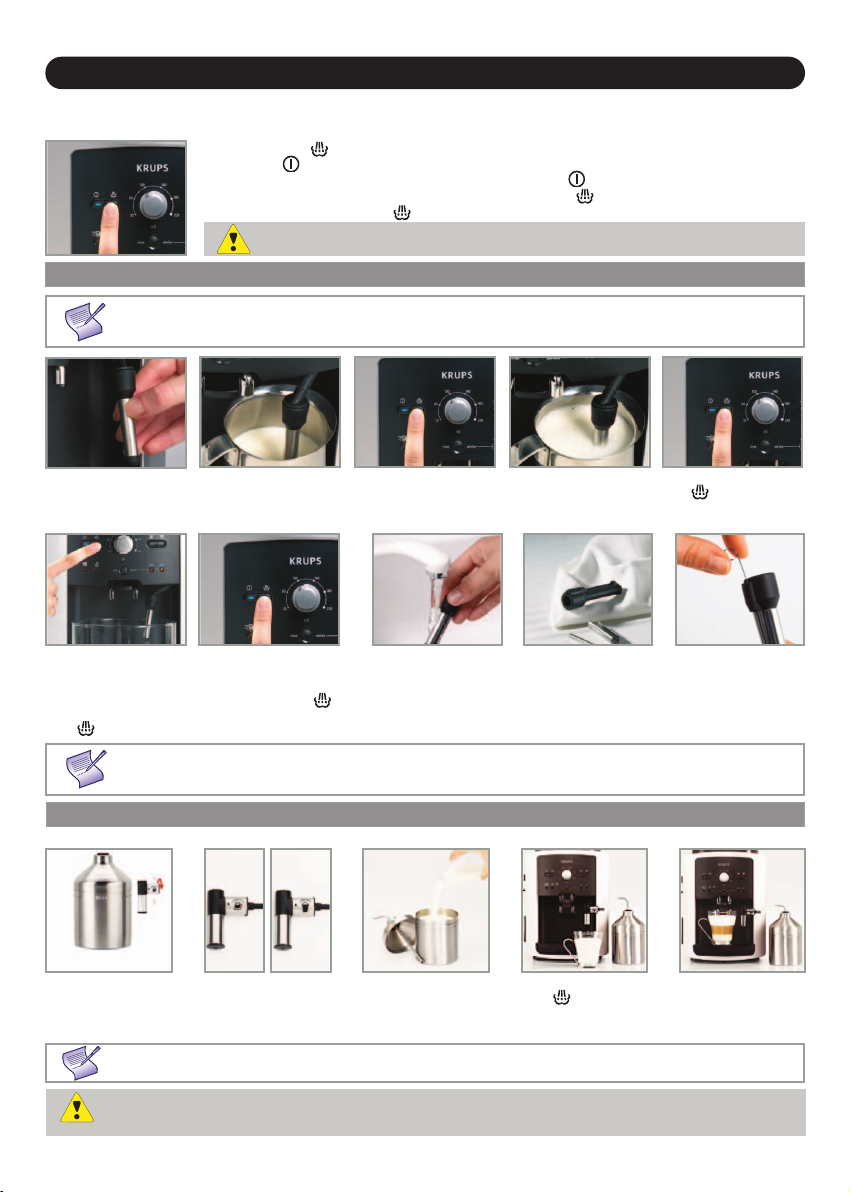
7
PREPARACIÓN CON EL VAPOR
El vapor sirve para hacer espumar la leche y preparar, por ejemplo, un cappuccino o un caffe latte y también calentar los líquidos. Como la producción de vapor necesita una temperatura más elevada que para preparar un espresso, el aparato
asegura una fase de precalentamiento suplementaria para el vapor.
Presione la tecla .
El indicador parpadea durante el precalentamiento.
Una vez terminada la fase de precalentamiento, el indicador se mantiene fijo y puede
comenzar la producción de vapor pulsando de nuevo la tecla .
Presione de nuevo sobre la tecla para parar el ciclo.
ESPUMA DE LECHE
Le aconsejamos que use leche pasteurizada o UHT, recién abierta. La leche cruda no permite obtener resulta
dos óptimos. Después de haber utilizado las funciones vapor, la boquilla puede estar caliente, le recomendamos
que espere unos instantes antes de manipularla.
Verifique que la
boquilla de vapor está
bien instalada.
Vierta la leche en su
jarra de leche.
Sumerja la boquilla de
vapor en la leche.
Lance la función vapor
como se explica en el
párrafo a continuación.
Presione nuevamente la
tecla para detener el
ciclo. Cuidado, la parada
del ciclo no es inmediata.
Para eliminar los restos
de leche en la boquilla
de vapor, ponga un
recipiente bajo la
boquilla y presione la
tecla .
Deje que el vapor se
escape al menos 10
segundos y presione
nuevamente la tecla
para detener el proceso.
La boquilla del vapor es desmontable para permitir una limpieza en profundidad. Lávela con agua y poco de jabón no abrasivo con un cepillo.
Aclárela y séquela. Antes de volver a ponerla en su sitio, asegúrese de
que los agujeros de entrada del aire no estén bloqueados con residuos
de leche. Desbloquéelo con la aguja suministrada si es necesario. No
lave la boquilla vapor en el lavavajillas.
Para interrumpir la función vapor, basta con pulsar cualquier tecla.
Si la boquilla está obstruida, desbloquéela con la aguja suministrada.
La duración máxima de producción de vapor por ciclo está limitada 2 minutos.
SET AUTO-CAPPUCCINO XS 6000 (VENDIDO POR SEPARADO)
Para evitar que la leche se seque sobre el accesorio auto-capuccino, hay que cuidar que esté bien limpio. Se reco
mienda lavarlo inmediatamente haciendo un ciclo con vapor con el recipiente del accesorio lleno de agua con el fin de
limpiar la boquilla del interior. Para esto, usted puede utilizar el limpiador líquido XS4000 disponible en accesorio.
XS 6000
Cuando la espuma de
leche es suficiente,
Cuidado, la parada del ciclo no es inmediata.
Enchufe los diferentes
elementos entre ellos
Seleccione la posición
capuchino o café latte
sobre la boquilla especial.
Rellene el recipiente
de leche y coloque
una taza o un vaso
bajo la boquilla autocapuccino.
Presione sobre la
tecla para lanzar y
después parar el ciclo.
Coloque una taza
bajo las salidas del
café y lance un ciclo
café / espresso.
Este accesorio auto-capuccino facilita la preparación de un capuchino o de un café latte.
El tubo no debe estar retorcido para mantener correctamente la posición del botón.
 Loading...