01/99
ALTOSONIC
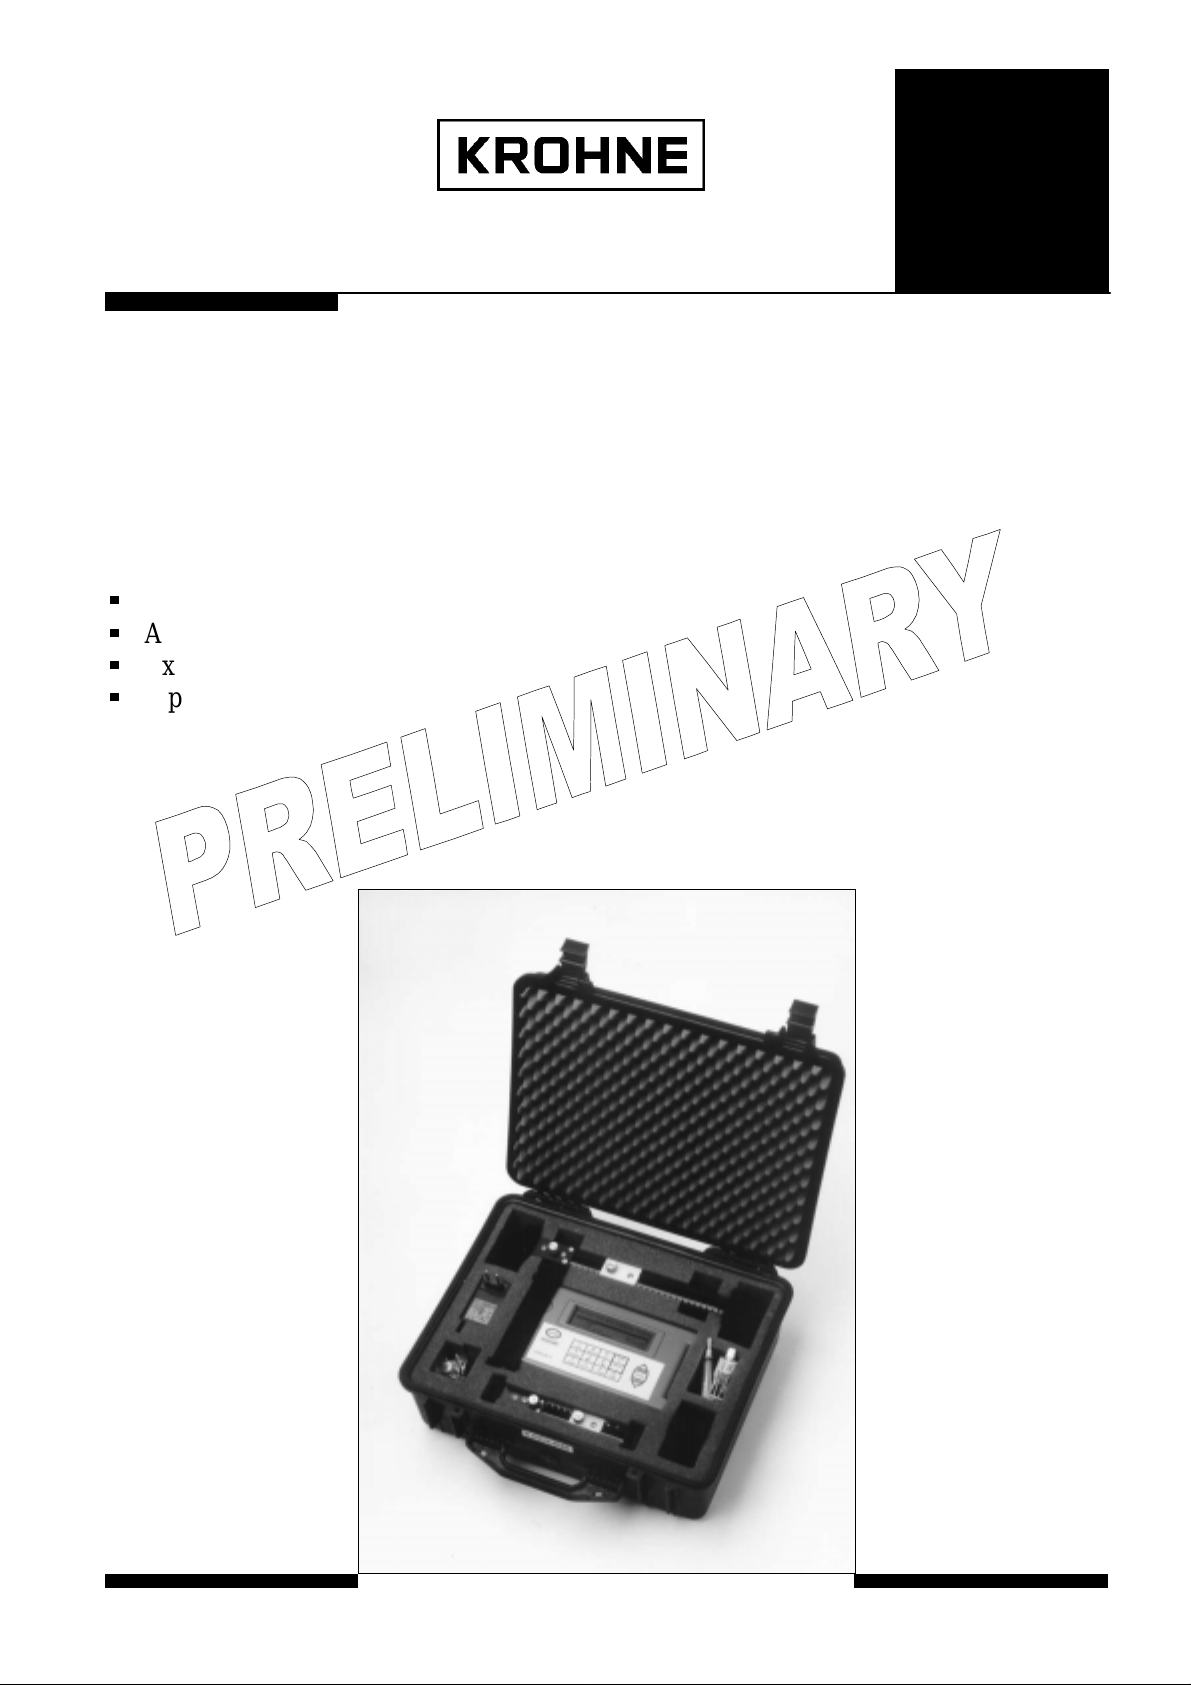
UFM 610 P Portable system
The solution for Clamp-on Ultrasonic Flow Measurements
Compact light weight
All components in one carrying case
Extended diameter range
Pipe wall temperature measurement as a standard
Installation and
operating
instructions
ALTOSONIC
UFM 610 P
7.30854.32.00

All rights reserved. No part of this publication may be copied or published by means of printing, photocopying, microfilm or
otherwise without prior written consent of KROHNE Altometer. This restriction also applies to the corresponding drawings and
diagrams.
KROHNE Altometer has the right to change the parts or specifications at any time without prior or direct notice to the client.
The contents of this publication are subject to change without notice.
This publication is to be used for the standard version only. Thus KROHNE Altometer cannot held responsible for any damage
resulting from the incorrect application of this publication to the version actually delivered to you.
For additional information regarding configuration, maintenance and repair, please contact the technical department of your
supplier.
This publication has been written with great care. However, KROHNE Altometer cannot be held responsible, either for any
errors occur in g in th is publi cation or their cons eq u ences.
LIST OF CONTENTS
1. INTRODUCTION ..........................................................................................................................................................5
1.1 Fast Track Set Up Procedure .....................................................................................................................................5
2. HARDWARE..................................................................................................................................................................9
2.1 Connectors ................................................................................................................................................................ 9
2.2 UFM 610 P parts & accessories...............................................................................................................................10
2.3 Charger (only use the charger supplied) ................................................................................................................... 10
2.4 Battery....................................................................................................................................................................10
2.5 Keypad...................................................................................................................................................................10
2.6 Temperature indication/range.................................................................................................................................. 11
2.7 Transducers.............................................................................................................................................................11
2.8 Separ ation dis tance ..................................................................................................................................................13
2.9 Attac hi n g the tra ns d u cer..........................................................................................................................................13
2.10 Ultrasonic couplant.................................................................................................................................................15
2.11 Fluid types..............................................................................................................................................................15
3. PROGRAMMING/MAIN MENU................................................................................................................................16
3.1 Main men u .............................................................................................................................................................. 16
3.2 Quick start.............................................................................................................................................................. 16
3.3 View/edit site data...................................................................................................................................................19
3.4 Select sensorset....................................................................................................................................................... 21
3.5 Da ta logger (see also KEYPAD OPTIONS-data logger) ..........................................................................................23
3.6 Download data to Windows '95...............................................................................................................................27
3.7 Download data to Windows 3.1............................................................................................................................... 29
3.8 Main men u set up RS232.........................................................................................................................................31
3.9 Set up UFM 610 P...................................................................................................................................................32
3.10 Main men u read flow..............................................................................................................................................34
4. KEY PAD OPTIONS....................................................................................................................................................36
4.1 Logger....................................................................................................................................................................36
4.2 4-20 mA Key ..........................................................................................................................................................37
4.3 RS232 output key....................................................................................................................................................38
4.4 Delete key...............................................................................................................................................................38
4.5 Pulse output key......................................................................................................................................................38
4.6 Options key.............................................................................................................................................................39
5. STATUS/ERROR/WARNING MESSAGES ...............................................................................................................43
5.1 Status messages.......................................................................................................................................................43
5.2 Error messages........................................................................................................................................................43
5.3 Warning messages...................................................................................................................................................43
5.4 Other messages....................................................................................................................................................... 44
6. APPLICATION INFORMATION...............................................................................................................................47
6.1 Transducer.............................................................................................................................................................. 48
6.2 Mou nti n g the tra ns d u cers........................................................................................................................................49
6.3 Liquid conditions....................................................................................................................................................51
6.4 Reynolds number ....................................................................................................................................................51
6.5 Propagation velocity................................................................................................................................................52
6.6 Maximum flow........................................................................................................................................................52
6.7 Application temperature.......................................................................................................................................... 52
6.8 Flow range..............................................................................................................................................................52
6.9 Liquid sound speed .................................................................................................................................................54
6.10 Solid sound speeds..................................................................................................................................................58
7. TECHNICAL DATA....................................................................................................................................................59
8. CE MARKING.............................................................................................................................................................59
9. WARRANTY................................................................................................................................................................60
WARNING!!
Users should ensure or note that:
1. The UFM 610 P is not certified for use in hazardous area
2. The local site safety regulations are complied with
3. Work is carried out in accordance with the health & Safety at Work Act 1974
1. INTRODUCTION
The UFM 610 P is a portable flowmeter designed for use on liquid flows in full pipes, which utilise “Clamp-On” Transducers.
Easy to use with rugged packaging, the UFM 610 P features a large easy to read Graphics Display with backlighting. A simple
FAST TRACK set up procedure; Simpl e to follow keypad; I P65 In strument case with IP65 rated sockets; Guide rail a ssem bly
including magnets (if required) for steel pipes above 89mm (3½”) diameter.
Other features incorporated into the UFM 610 P are:
1) 112k memory logger
2) RS232 output
3) Pulse output
4) 4-20mA or 0-20mA output
5) 24hr Battery (rechargeable)
6) Self checking facilities
7) Battery management
8) Continuous signal monitoring
3
The in strument displays vol umetr ic flow rat e in M
/hr, M3/min, M3/sec, g/min, kg/hr, USg/hr, USkg/hr, l/min, l/sec and linear
velocity in metres and feet per second. When in flow mode the total volume both positive and negative will be displayed, up to a
maximum 12-digit number.
1.1 Fast Track Set Up Procedure
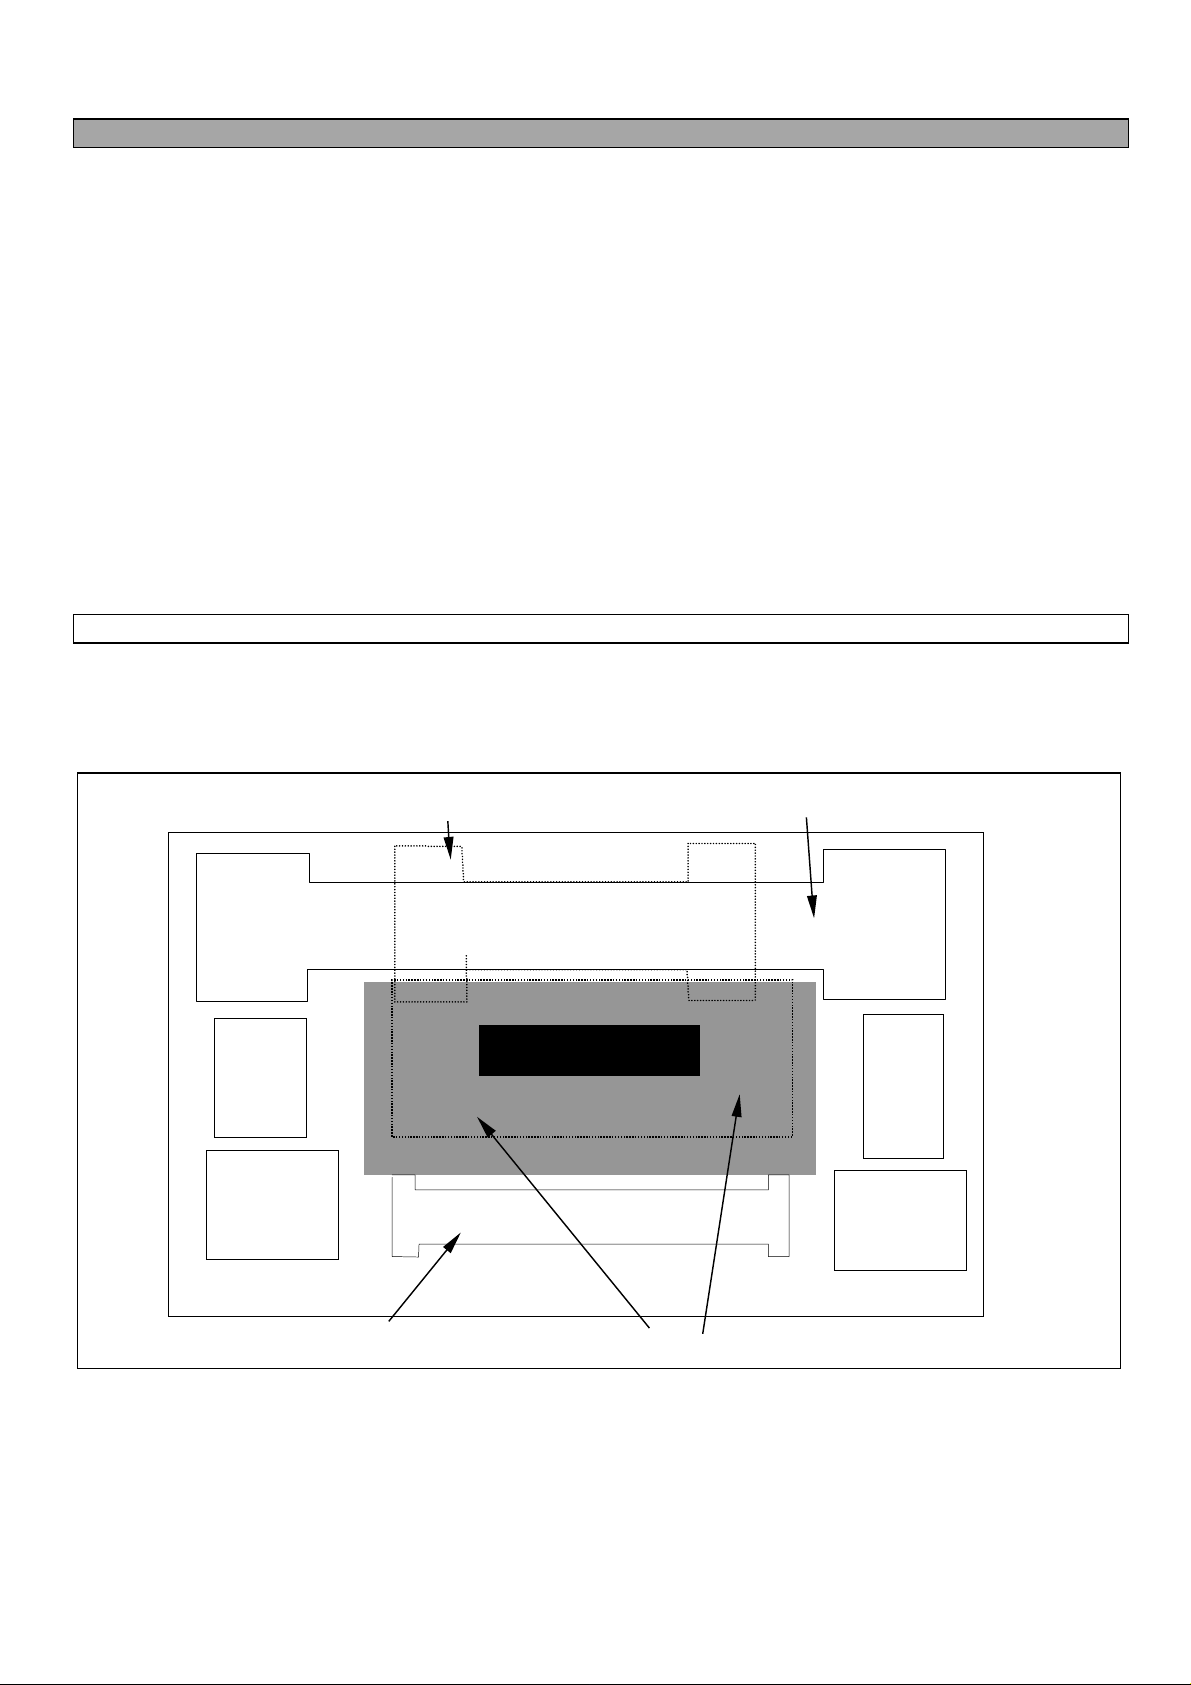
The Standard UFM 6 1 0 P is su pplied in a carrying case and lai d out as shown in F igure 1. Tr ansducer s ets “A” and “B” ar e
standard. Transducer set “C” is an optional extra. A further transducer set “D” is also available but will be supplied in a separate
carrying case. The following simple guide will enable the user to quickly set up the meter to measure flow. Additional data on
the facilities available and many useful hints are contained in the latter sections of this manual.
Figure 1
DIAGONAL BEAM GUIDE RAIL
CHARGER
“C”
TRANSDUCER
SET
TRANSDUCER SET “A”
TRANSDUCER SET “B”
COUPLANT
WEBBING
STRAPS
CABLES
5
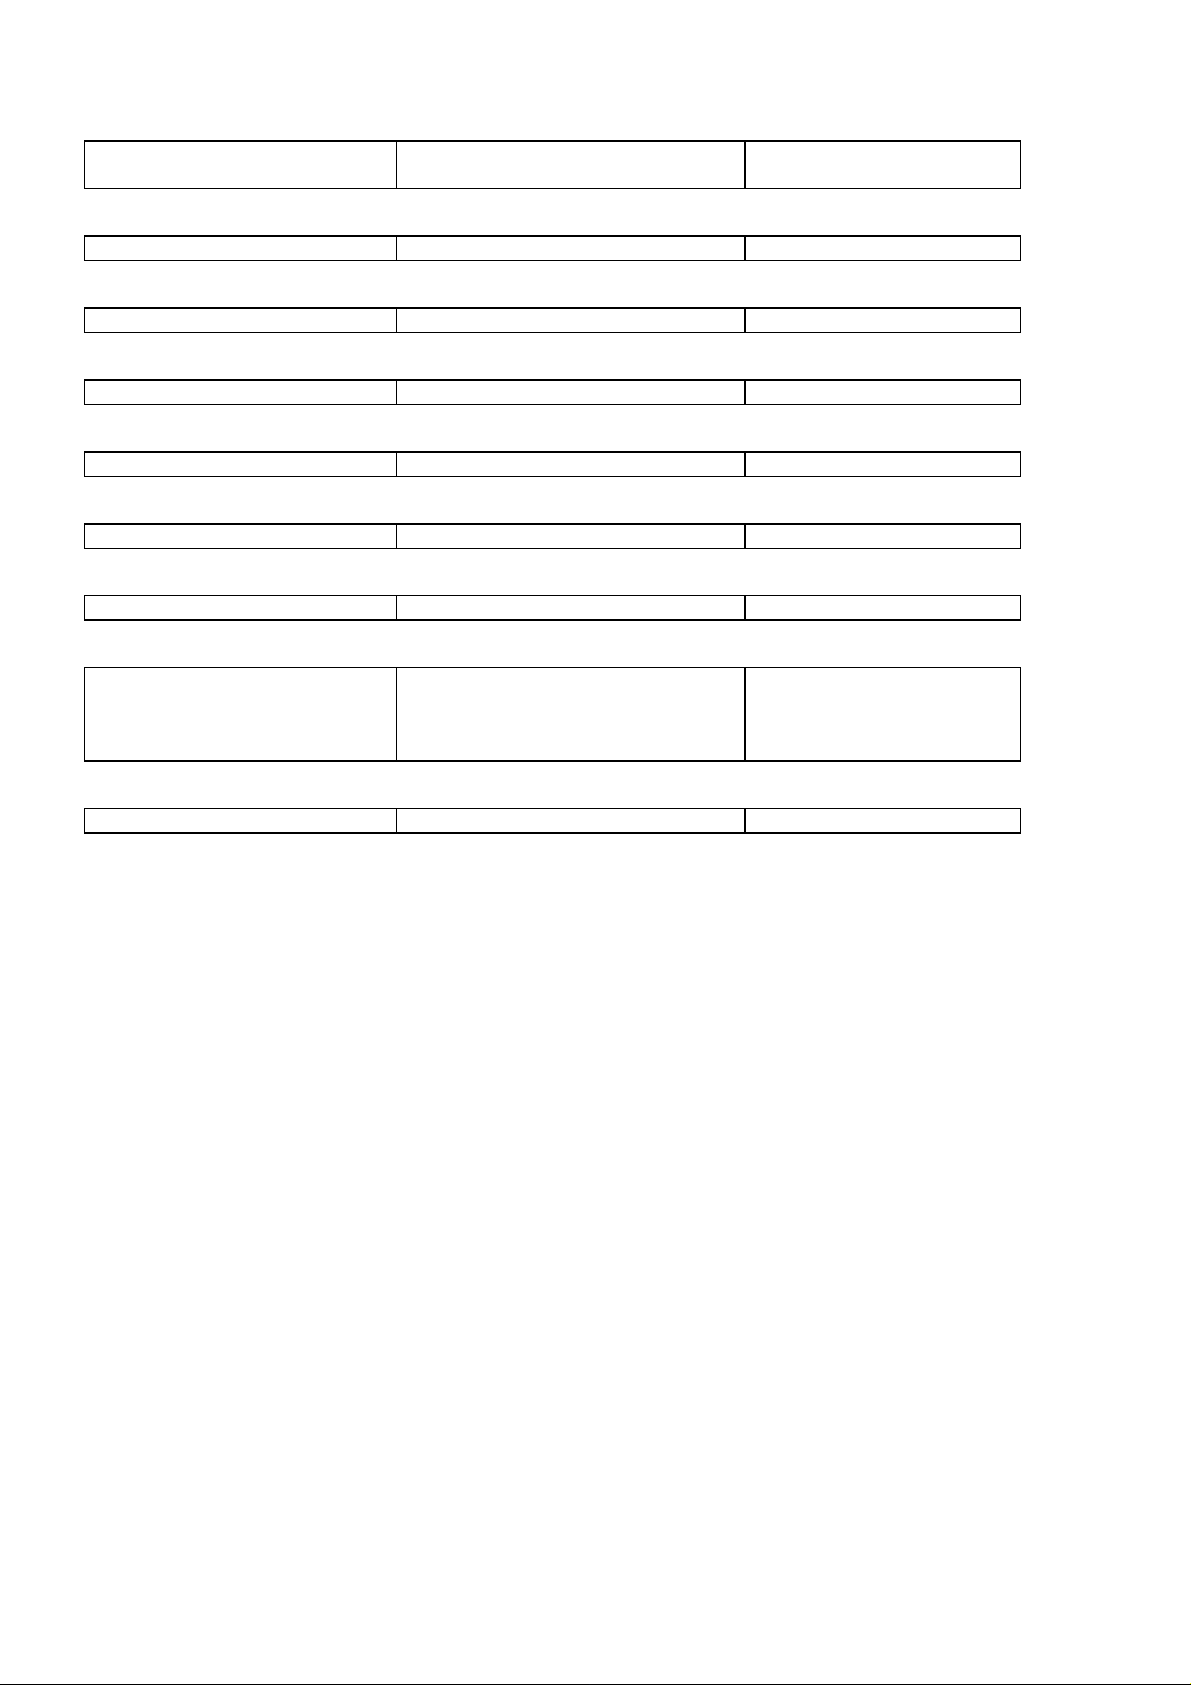
SWITCH ON…
CHECK BATTERY LEVEL
(See 2.4)
QUICK START
(See 3.2)
DIMENSION UNITS
(See 3.2)
OUTSIDE DIAMETER
(See 3.2)
PIPE WALL THICKNESS
(See 3.2)
PIPE LINING THICKNESS
(See 3.2)
PIPE WALL MATERIAL
(See 3.2)
PIPE LINING MATERIAL
(See 3.2)
IF THE BATTERY SYMBOL IS
FULL, THE UNIT IS CHARGED
SELECT UNITS REQUIRED PRESS ENTER
ENTER DATA PRESS ENTER
ENTER DATA PRESS ENTER
ENTER DATA NO LINING PRESS ENTER
SELECT USING SCROLL KEYS PRESS ENTER
THIS WILL ONLY BE DISPLAYED
IF A THICKNESS HAS BEEN
ENTERE D . SELECT USI N G
SCROLL KE YS
PRESS ENTER
PRESS ENTER
PRESS ENTER
FLUID TYPE
SELECT USING SCROLL KEY PRESS ENTER
(See 3.2)
6
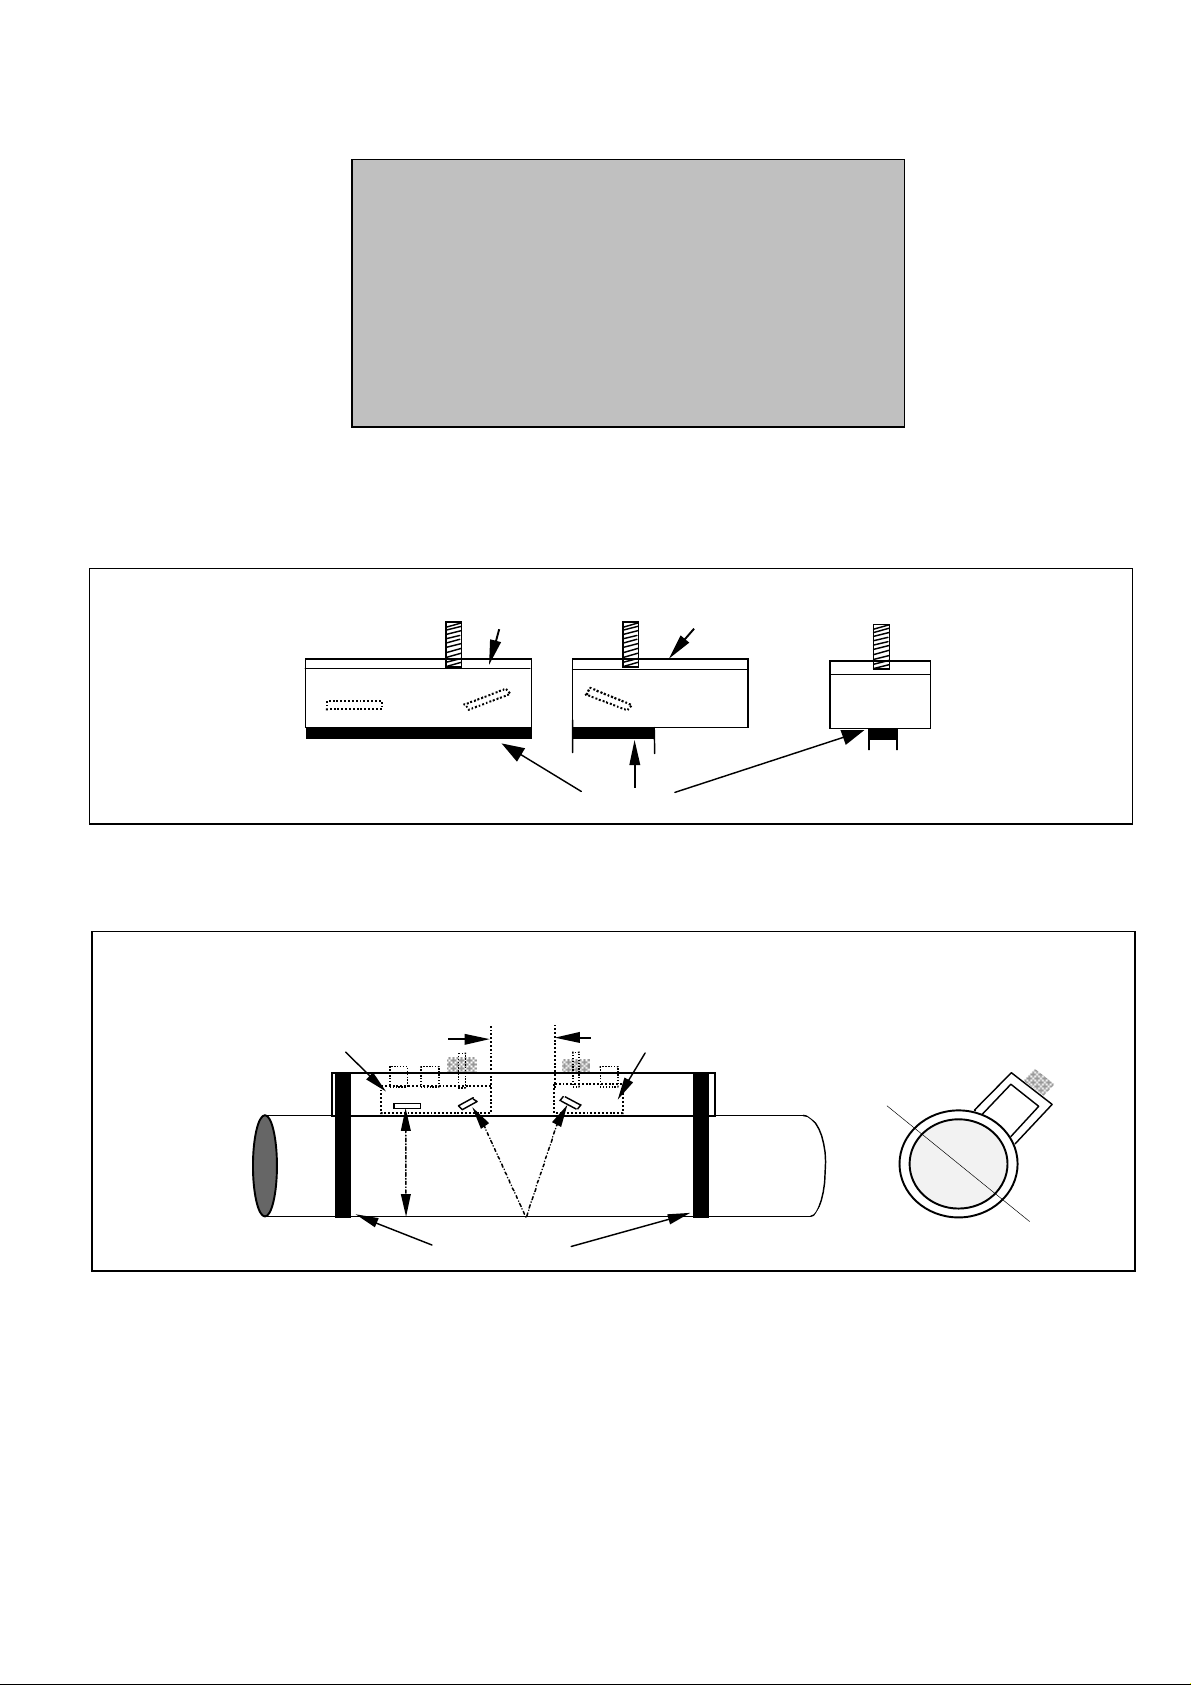
• The instrument selects the appropriate guiderail using the data entered and now displays the following. The sensor set can
be “A”, ” B” , ”C” or “D” and the mode Reflex or Dia g on al.
ATTACH SENSORS yy-mm-dd hh:mm:ss
Attach sensor set X in XXXXXX mode
(RED connector UPSTREAM)
Approx. max. flow: X.XX m/s
Press ENTER to continue
or SCROLL to select another sensor
• Take the guiderail selected by the instrument out of the case, retract the sensor blocks back into the guiderail by turning the
knurled knobs cl ockwise. I f t ransd u cer “C” is select ed and these blocks are availa bl e, remove “B” trans d u cer set and
repla ce wi th “C” transducer set.
• Apply couplant to both sensor blocks as shown, then attach to the pipe using the appropriate mounting hardware.
fixed sensor block
floating sensor block
COUPLANT
•
Figure 2
• In most cases the guide rail selected will suit the application. The user can choose another rail and/or sensors to increase
sensitivity, signal strength or change flow range (see 3.4.1 – Select Sensor Set).
Example: REFLEX MODE OP ER ATI ON
separation
distance
floating transducerfixed transducer
straps
Figure 3
NOTE:
If the instrument has select e d a guiderail assembly to work in DIAGONAL MODE the floating transducer has to be
removed and placed on the opposite side of the pipe, using the diagonal beam rail and the appropriate mounting
hardware (See 2.9 - ATTACHING THE TRANSDUCERS).
• Connect the red/blue and black sensor cables to both the electronics and the guiderail assembly. The red cable indicates +ve
flow if upstream.
• Attach to the pipe as shown in figure 3 and turning the knurled knob anti-clockwise, screw the fixed transducer to the pipe,
making finger tight contact.
• Press ENTER and the display will show the separation distance in mm.
• Set the separation distance (see figure 3) by sliding the floating transducer along the scale until the front edge of the block is
at the recommended distance. Now turn the knurled knob anti-clockwise, until in finger tight contact with the pipe surface.
7
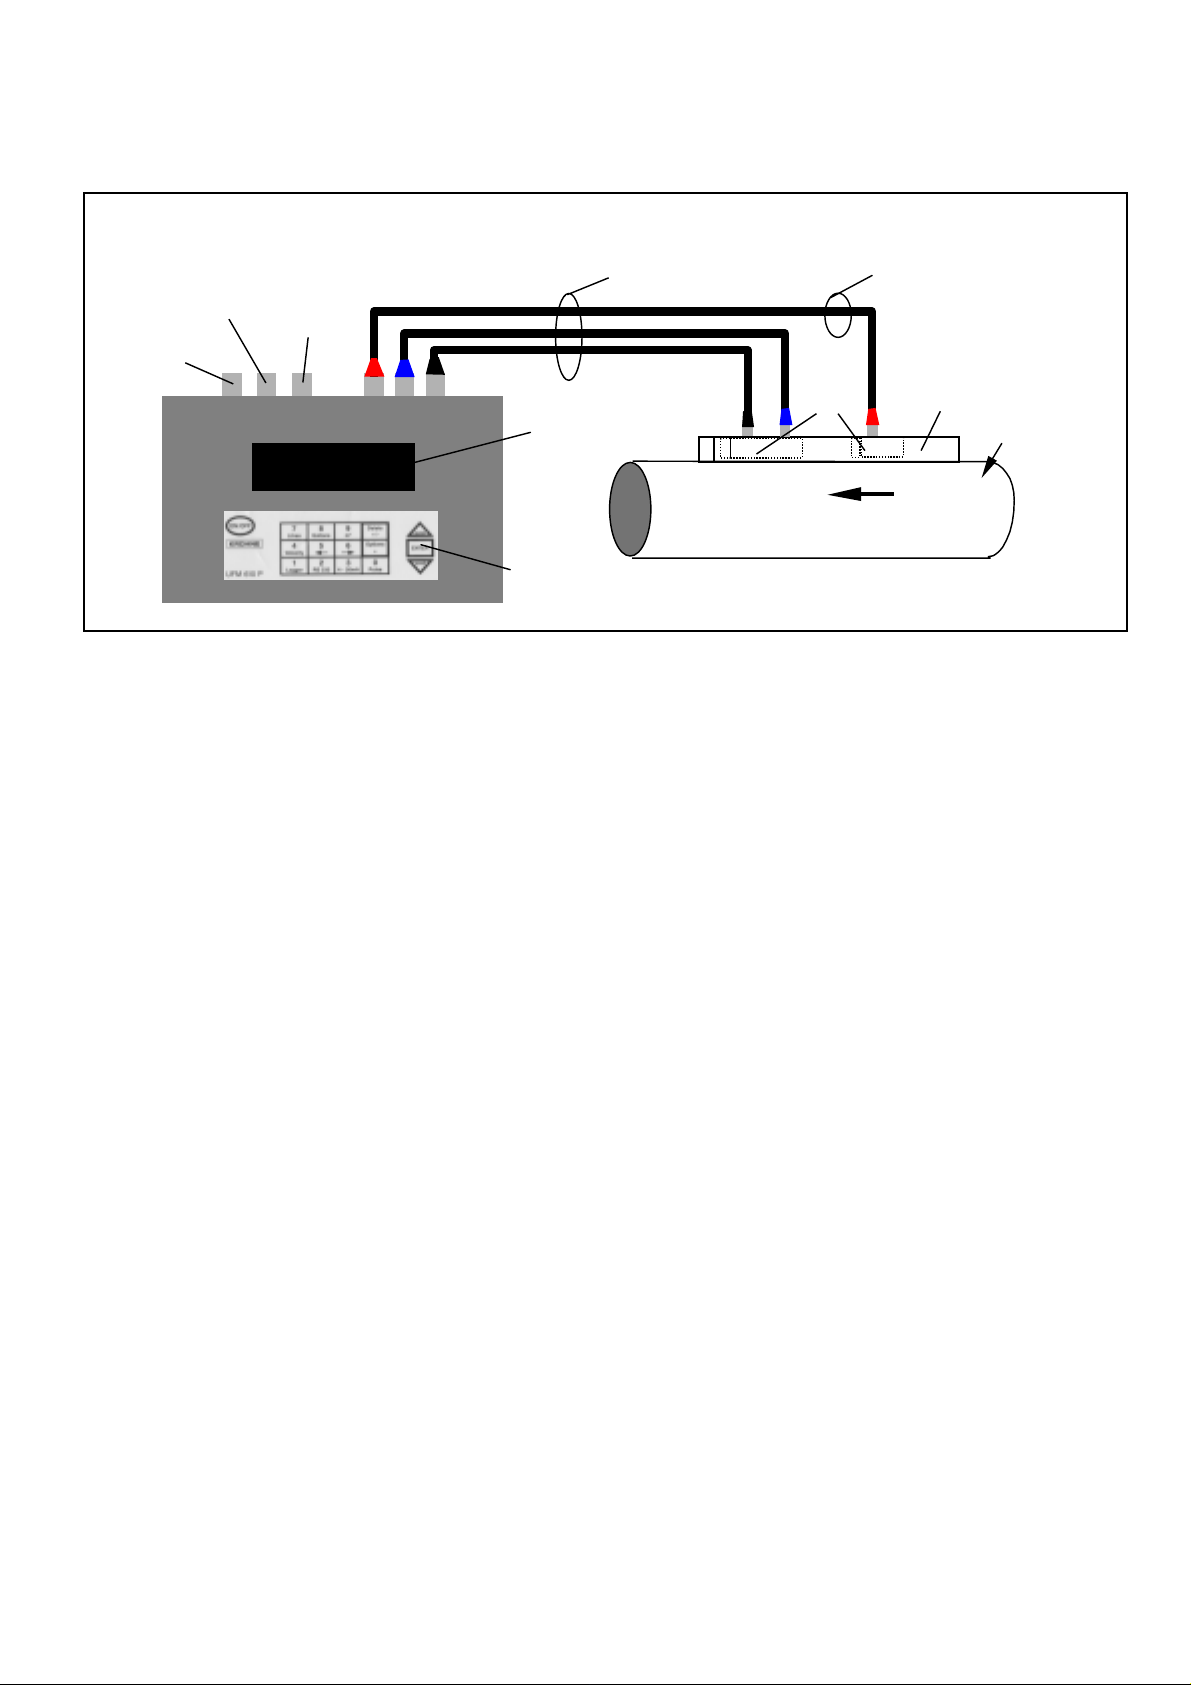
• Press ENTER to read flow.
• Flow units can be changed by pressing the appropriate key. An additional key press will change the timescale of the reading
- hr/min/sec.
Mains
supply
Figure 4
RS232
4-20mA
&
pulse
Display
Keypad
Sensor
cables
Sensor
blocks
Red cable indi cates
+ve flow if upstream
Guide rail
Pipe
flow
8
2. HARDWARE
2.1 Connectors
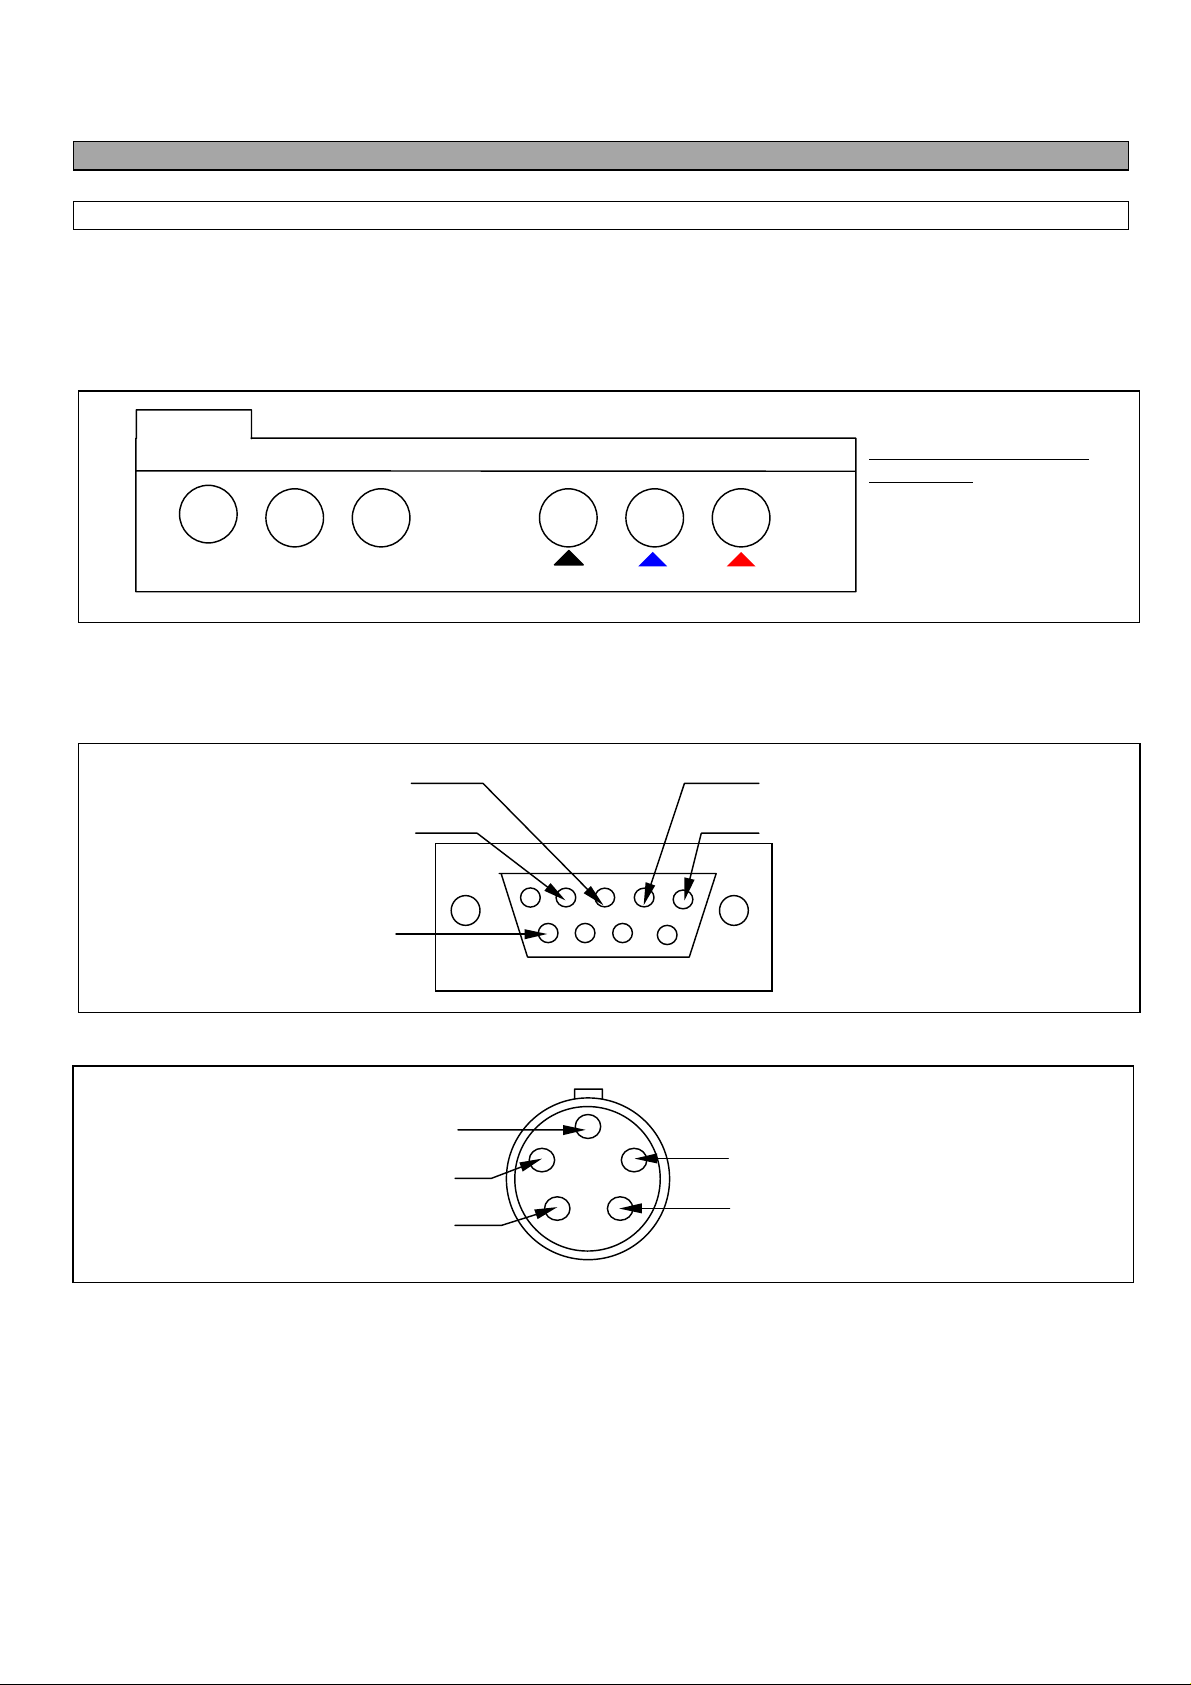
Ther e are six conn ectors on th e electronic hous ing, thr ee of wh i ch are directly con nected to the tran s d u cer as s em blies and three
are for the output facilities.
NOTE: To remove the cable connectors from the sensor blocks, fully retract each block into the guide rail by turning the
knurled knob clockwise. DO NOT pull on the cables.
4 - 20mA and Pulse Cable
Connections
4 - 20mA - Red positive,
Black negative.
Pulse - White positive,
Green negative.
Figure 5
+
9v DC in
1A M ax
RS232
Pulse
4-20 mA
blueblack
red
RS 232 CONNECTORS
9 way “D” plug viewed from reverse
Pin 3 RS232 RXD white
Pin 2 RS232 TXD green
Pin 6 RS232 DSR red
5-pin plug viewed from reverse
Pin 1 (marked) RS232 DSR red
Pin 2 RS232 DTR black
Pin 3 GND screen
Pin 4 RS232 DTR black
Pin 5 GND screen
Pin 5 RS232 RXD white
Pin 4 RS232 TXD green
9
2.2 UFM 610 P parts & accessories
The UFM 610 P is supplied in a rugged IP65 carrying case. The equipment is housed in a foam insert to give
added protection for transportation.
STANDARD PARTS
Electroni c in s trument with backlit graph i c display Logger included as stan dard.
Guide Rail Assembly “A” Includes sensor s for pip e ID 13mm to 89mm.
Temp. range -20°C to +100°C.
Guide Rail Assembly “B” Includes sensors for pip e ID 90mm to 1000mm.
Temp. range -20°C to +100°C.
Guide Rail for use in Diagonal Mode
Ultrasonic couplant
Power supply - with UK, US, European adapters 110/240 VAC.
Manual
Large pipe straps 4 Supplied as standard.
Sensor cables 3 metr es .
Other cables 4-20mA, Pulse Output, RS232-C.
OPTIONS
Guide Rail Assembly “A” Includes sensor s for pip e ID 13mm to 89mm.
Temp. range -20°C to +200°C.
Guide Rail Assembly “B” Includes sensors for pip e ID 90mm to 1000mm.
Temp. range -20°C to +200°C.
Magnetic assembly For the Diagonal and “B” guide rail Assembly.
Transducer set “C” High Velocity Transducers for pipes 300mm-2000mm, in guide rail
“B”. Temp. range -20°C to +100°C or -20°C to +200°C.
Transducer kit “D” Sensors include ratchet straps for pipes 1000mm to 5000mm. Temp.
range -20°C to +80°C.
Straps Extra webbing straps are available on request.
Calibrati on certificate NAMAS accreditati on.
2.3 Charger (only use the charger supplied)
The battery takes 15 hours to fully charge. When the instrument is charging but switched off the display will read CHARGING
and display a battery and plug symbol. When the instrument is in flow mode, the fact that the batter y is charging will be
displayed under Battery. The instru ment also displays a “p lug” symbol when connected to the mains in flow mode.
2.4 Battery
When you first receive your unit put th e batter y on ch arge for a min imum of 15hrs. When fully charged the battery will last up
to 24hrs, depending on the outputs used and how often the back light is operated. If the backlight is enabled, every time a key is
press ed the backlight comes on for 15 seconds. Th is dramat ically reduces th e ba ttery li fe. I f the backlight wa s on continu ous ly
the battery life would reduce down to 8hrs, and if the 4-20mA was used constantly at 20mA, this would reduce the battery life
by 20%. The display in flow mode continually shows the battery level as a percentage. When this indication reads
approximately 20%, it will display a warning message, at which point there is only 30 minutes of use left. The battery can be
charged whil e the instr u ment is in u se or overnight whil e the instrument i s s witched off. The in s trument can be partially charged
and then used.
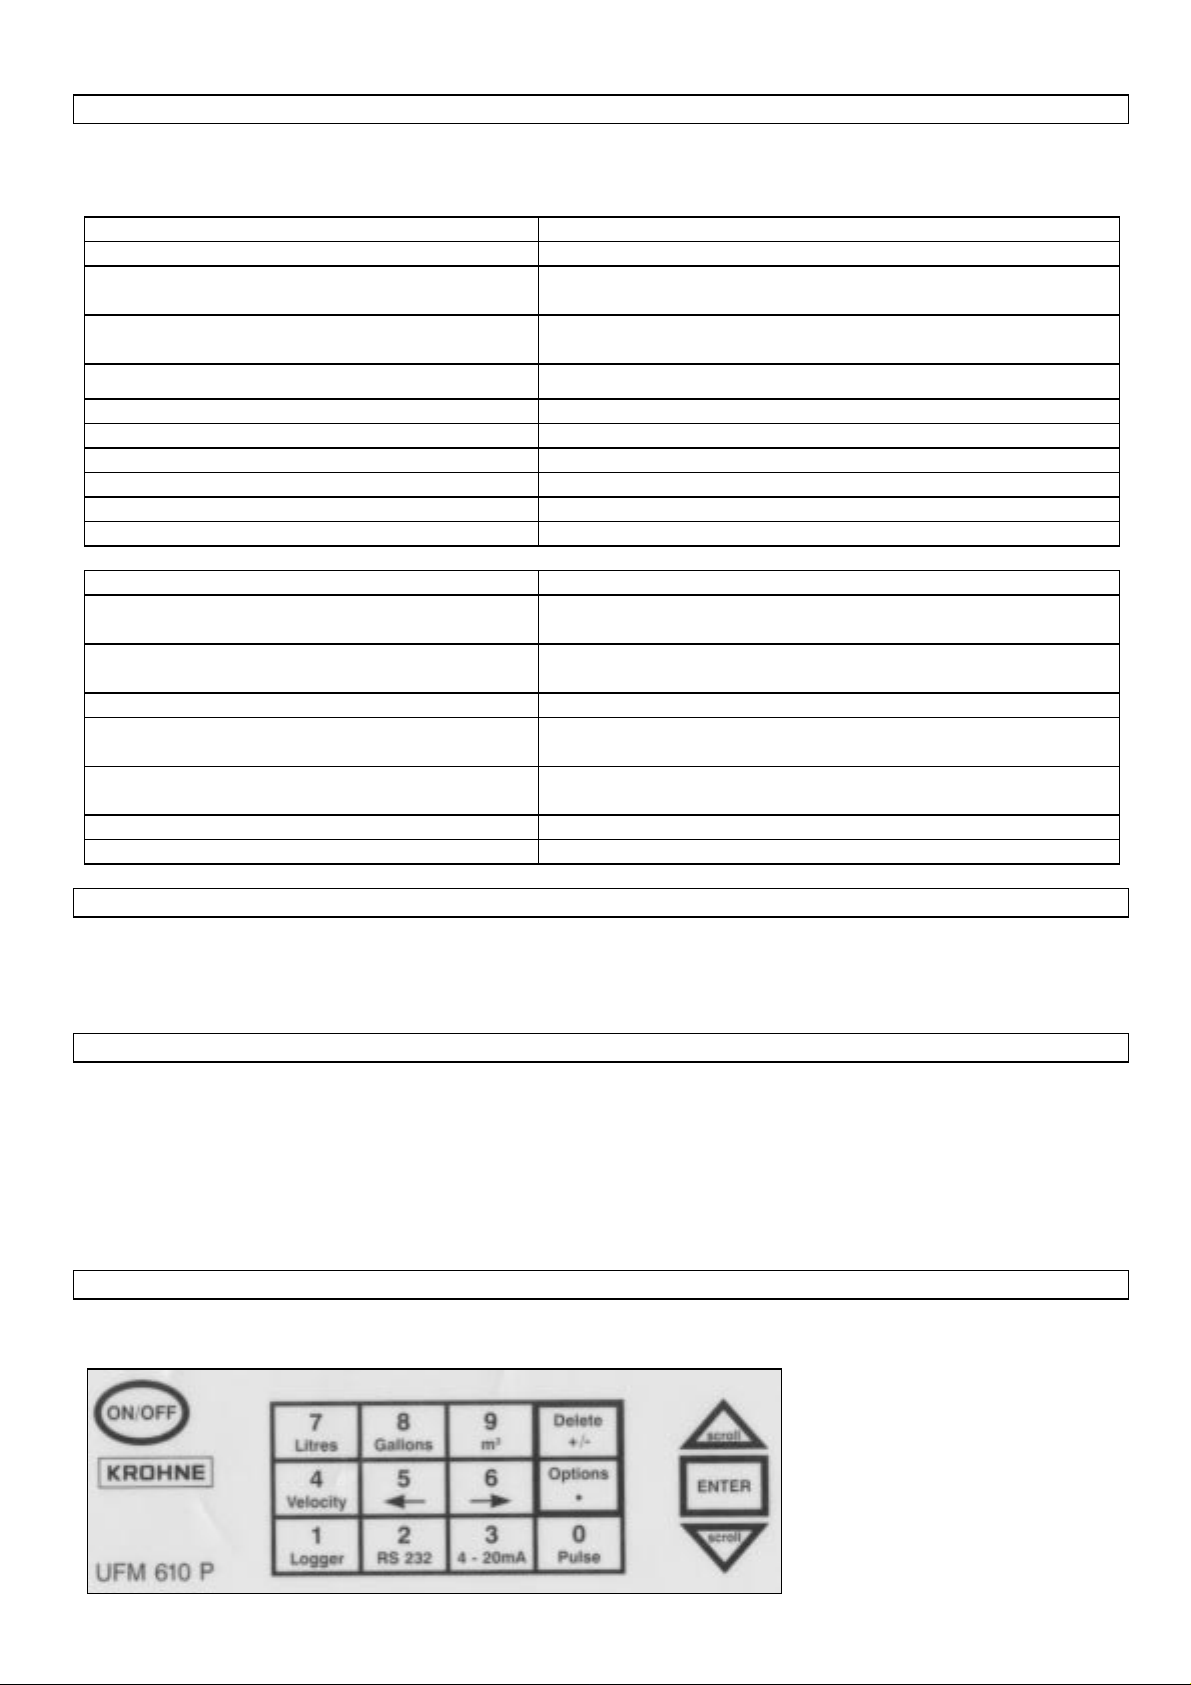
2.5 Keypad
Programming is via the tactile membrane keypad with rim embossed keys. The keypad is rated at IP65.
Figure 6
10

By selecting keys 4, 7, 8 and 9 it i s possible to chang e th e vel oci ty an d volu metri c fl ow r eadin g. Press th e ke y more than on ce to
chang e the display.
Press 4 > m/s, Press 4 > f/s
Press 7 > l/s, Pres s 7 > l/min
Press 8 > g/min, pr e s s 8 > kg/hr,
press 8 > usg/min, press 8 > uskg/min
Press 9 > m
press 9 > m
3
/hr, press 9 > m3/min,
3
/sec
There are some facilities that require you to move the cursor on the display left and right as well as up and down. This is done
with keys 5 (left) and 6 (righ t ).
The 4-20mA, Pulse, RS232 and logger keys can only be activated from flow mode (see page 33 - Keypad Options) but the
RS232 and data logger are also on the MAIN MENU.
2.6 Temperature indication/range
The transducers work over two temperatur e ranges. Th e s tandard t emperature rang e is from -20 °C to +100 °C and high
temperature is from –20 °C to +200 °C. The application temperature is displayed when in flow mode only if the prop/temp
sensor cable i s connected. If the in s tr u ment is di s pl aying th e tempera ture produ ced from th e sensor in the transdu cer, then th is
figure will vary if the temperature of the application varies, which could serve as an indication of change in the process. The
instrument can only compensate for a temperature change of ±10°C when reading flow .
2.7 Transducers
The UFM 610 P uses three different transducer types to measure flow which we call “A”, “B” and “C”. These are selected by
the instrument depending on the data entered, the pipe size and flow velocity. There are default settings that are programmed
into the instru ment and most of the tim e these wil l n ot n eed to be chan g ed , al though it is possible t o u se d ifferent transducer sets
on different pi p es outside their nor mal operat ing rang e. ( s ee 3 .4 Select s ensor set ) .
11
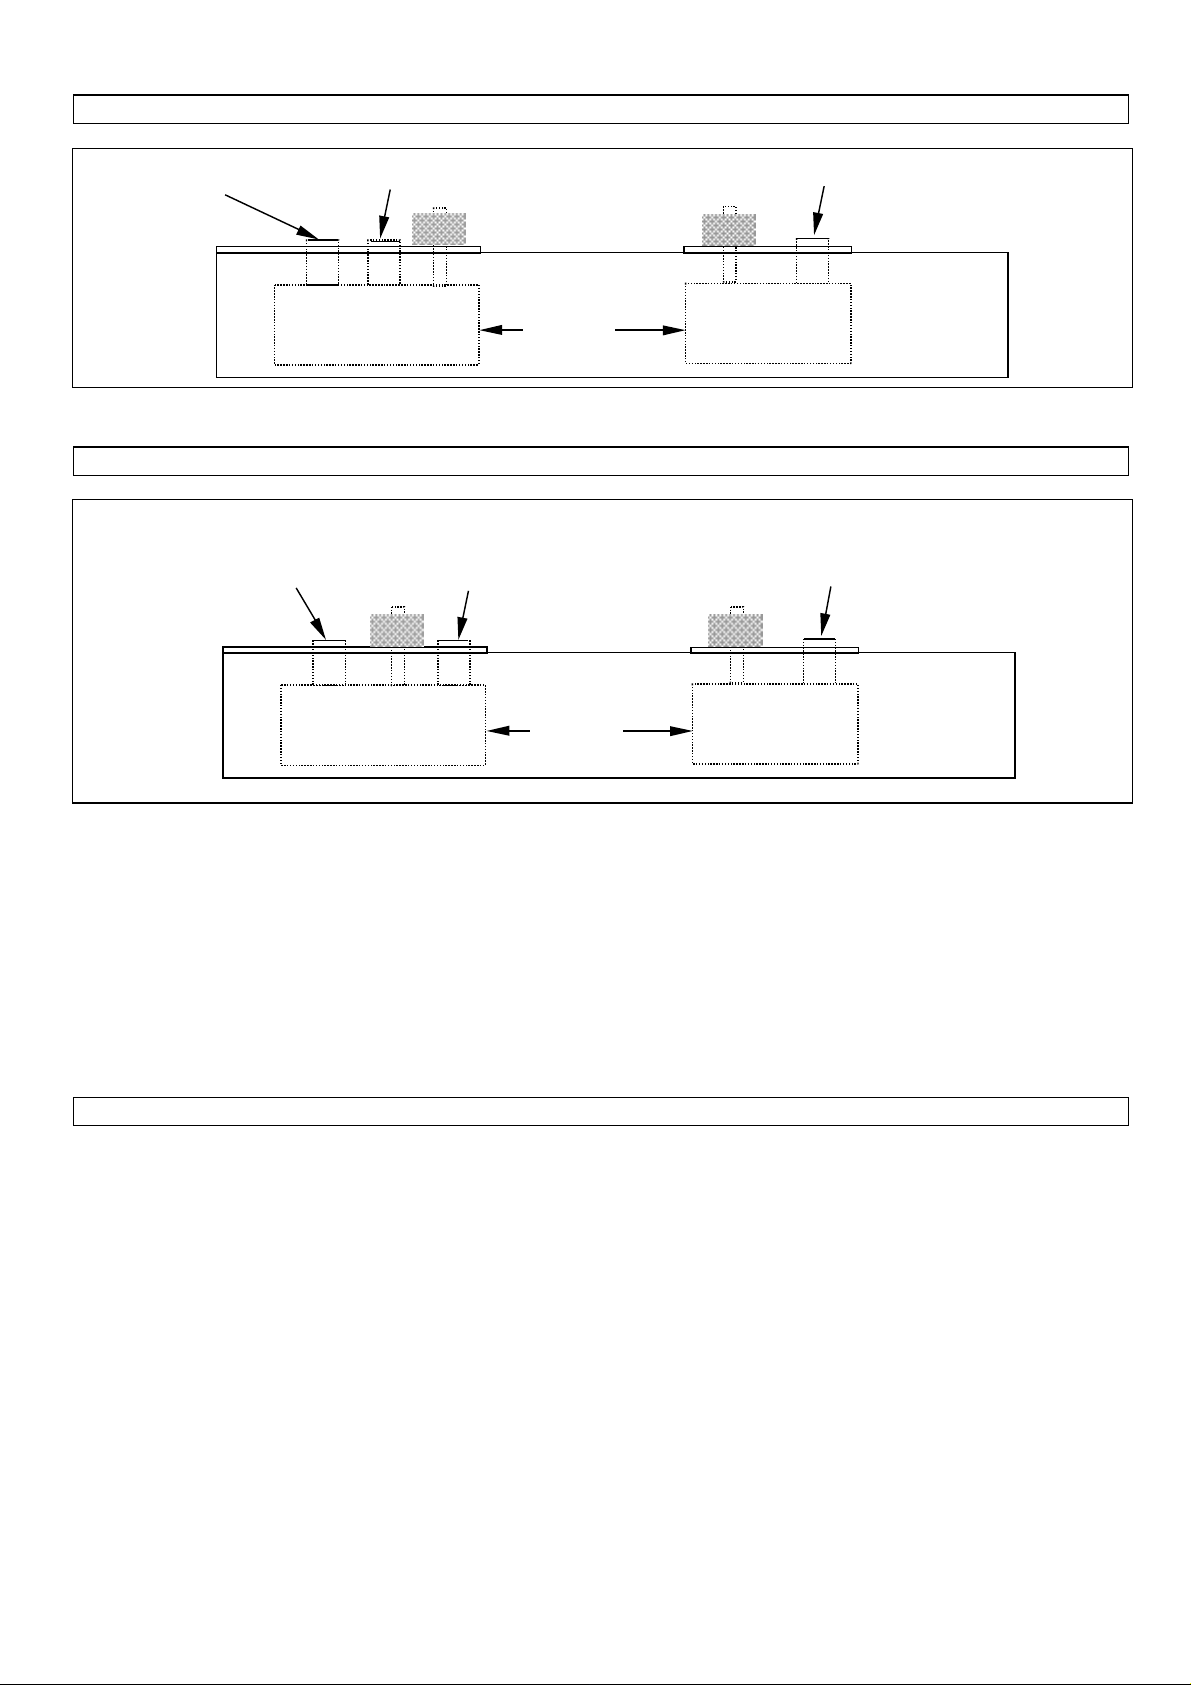
2.7.1 Transducer set "A"
single core coax s ocket
four pin socket
fixed bl ock
Figure 7
2.7.2 Transducer set "B" and "C"
four pin socket
fixed bl ock
separation
distance
single core coax s ocket
separation
distance
single core coax s ocket
floati ng block
single core coax s ocket
floati ng block
NOTE:
The sensor blocks must always be placed in the guiderail as shown above. If for any reason they get taken out, it is
Figure 8
possible to put them back in the opposite way. This will result in the instrument not working correctly.
Transducer set “A” and transducer set “B” are positioned in the guiderail, to help align the transducer blocks along the pipe axis
correctly. Both the “A” and “B” guiderails have two sensor blocks. One of these is fixed, the other is moveable and can slide up
& down the scale to enable you to set the separation distance required.
The separation distance is calculated by the instrument when the application information has been entered. The fixed sensor can
be identified because it is slightly longer and has two connections as opposed to the floating block only having one connection.
Each guiderail can be mounted to the surface of the pipe using the mounting hardware provided, which includes both velcro and
webbing straps. Magnetic attachments are available as an option with guiderail “B” and the diagonal guider ail, “D” sensors are
supplied with ratchet straps.
2.7.3 Transducer set "A"
These are supplied for pipes 13mm to 89mm inside diameter. They are only supplied with velcro straps, unless the high
temperature version has been supplied. Magnets are not available for this transducer set.
12
2.7.4 Transducer set "B" and "C"
There are two types of transducer block available that both fit into guiderail “B”. One pair for standard velocity on pipes 90mm
to 1000mm, the second pair “C” are for higher velocity flow in pipes 300mm to 2000mm inside diameter. Magnetic attachments
are available to fit onto these guiderails as a standard they are supplied with chains.
2.7.5 Transducer ki t " D "
The “D” transducers are for use on pipes 1000 mm to 5000 mm inside diameter. The sensors are supplied with their own guide
rails, ratchets and webbing straps. They may also be supplied with chains if required, if webbing straps have been supplied with
the standard instrument they also can be used to attach to the “D” guide rail. The “D” sensors are aligned in the same way as
other tr ansducers i.e. in Reflex or D iagonal mode and the s ep ar ation di stance is taken from th e front edge of the block a s shown
in fig ure 12. the transducers are ma d e fr om a p erspex mat er ial with an operatin g range up to +8 0°C. Please state when ordering
“D” sensors whether you were supplied with webbing straps or chains with your original UFM 610 P.
2.8 Separation distanc e
The separation distance is calculated by the instrument when all the parameters have been entered in and the fixed transducer
has been tur ned down onto the pip e s urface. Th e next stag e is to slid e the moveable sensor to the separation di stance r eq ui red
and screw down onto the pipe surface making sure not to overtighten as it may force the fixed sensor off the pipe wall - finger
tight is sufficient! The s ep ar ation distance is the distance betwe en the fr ont face of each sensor bl ock. See Fig u res 9, 10, 1 1, 12
pages 12 & 13, for examples in both reflex and diagonal mode. Connections are made via the LEMO IP65 connectors between
the sensor block and the el ectronics.
2.9 Attaching the transducer
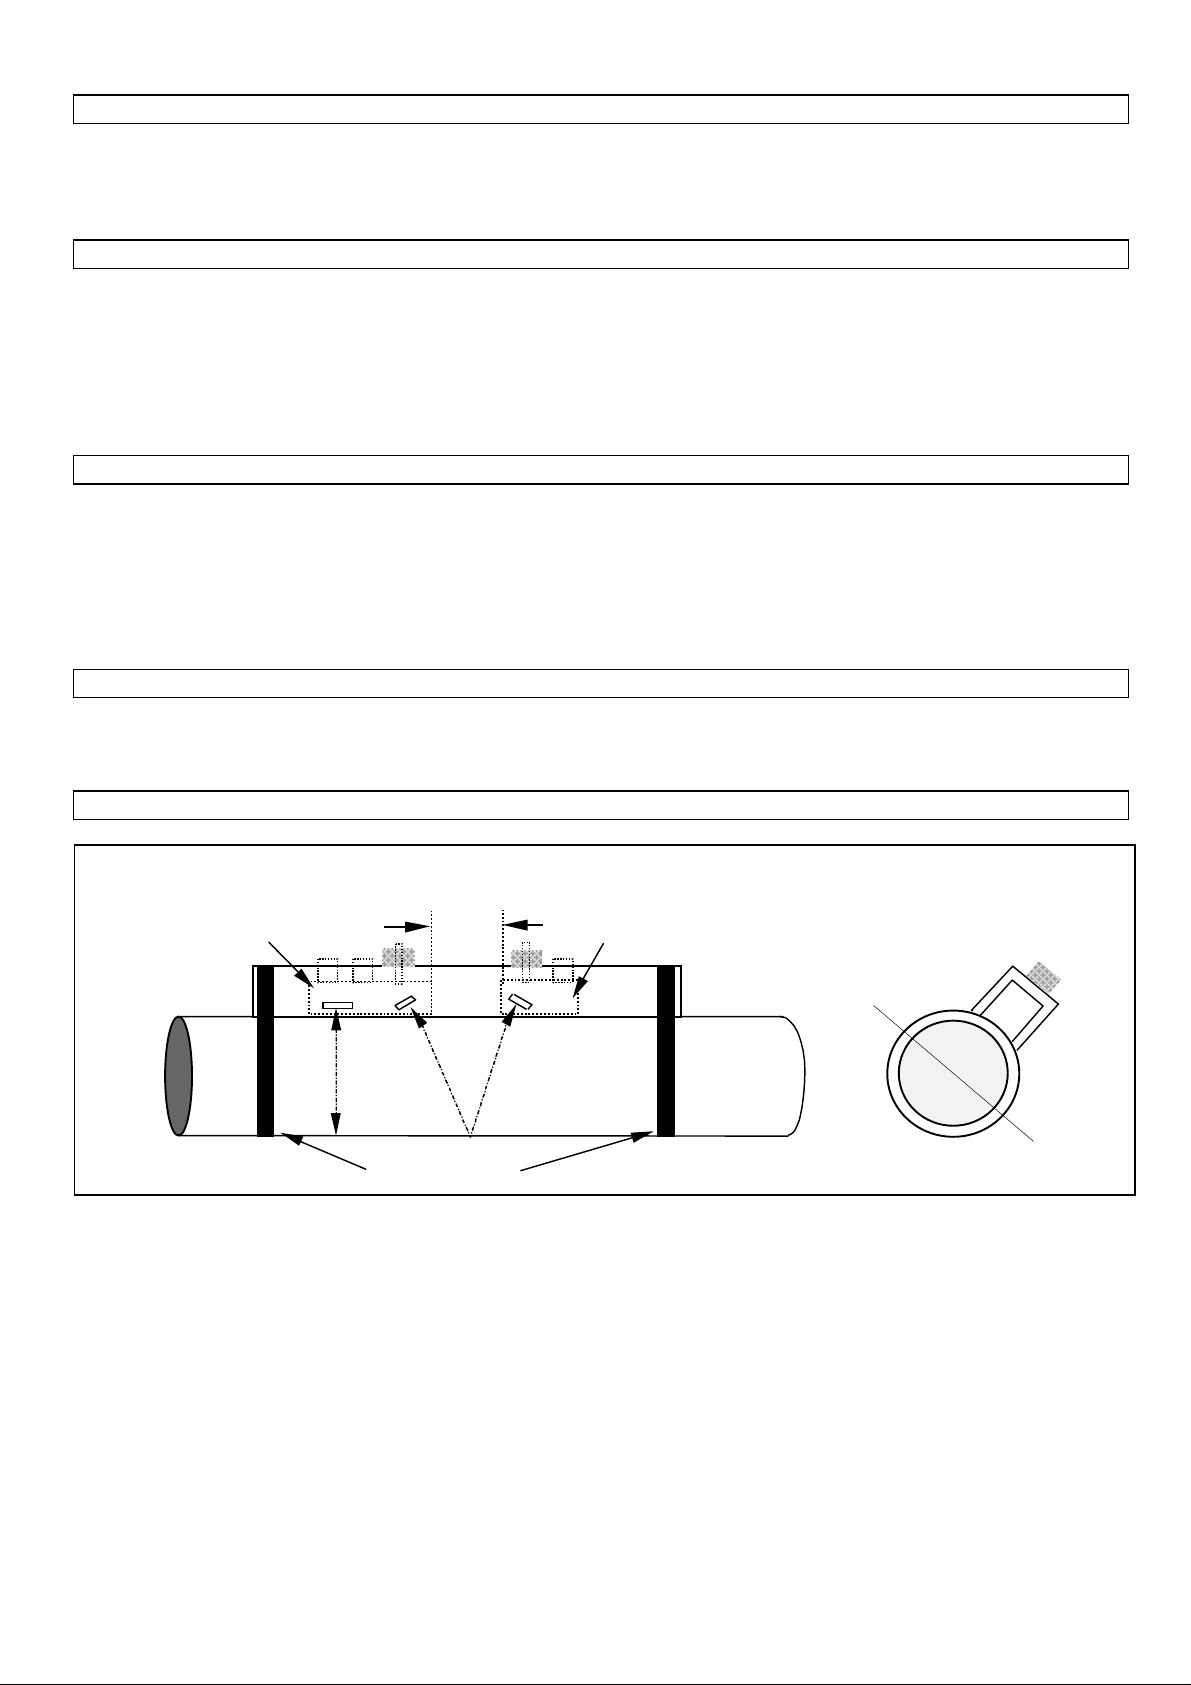
The guiderails are attached to the pipe surface as shown in Figures 9, 10, 11 and 12 using velcro, webbing straps, chains or
magnets.
2.9.1 Reflex mounting hardware - Transducer set "A"
separation distanc e
fixed transducer
floating transducer
velcro strap
Figure 9
13
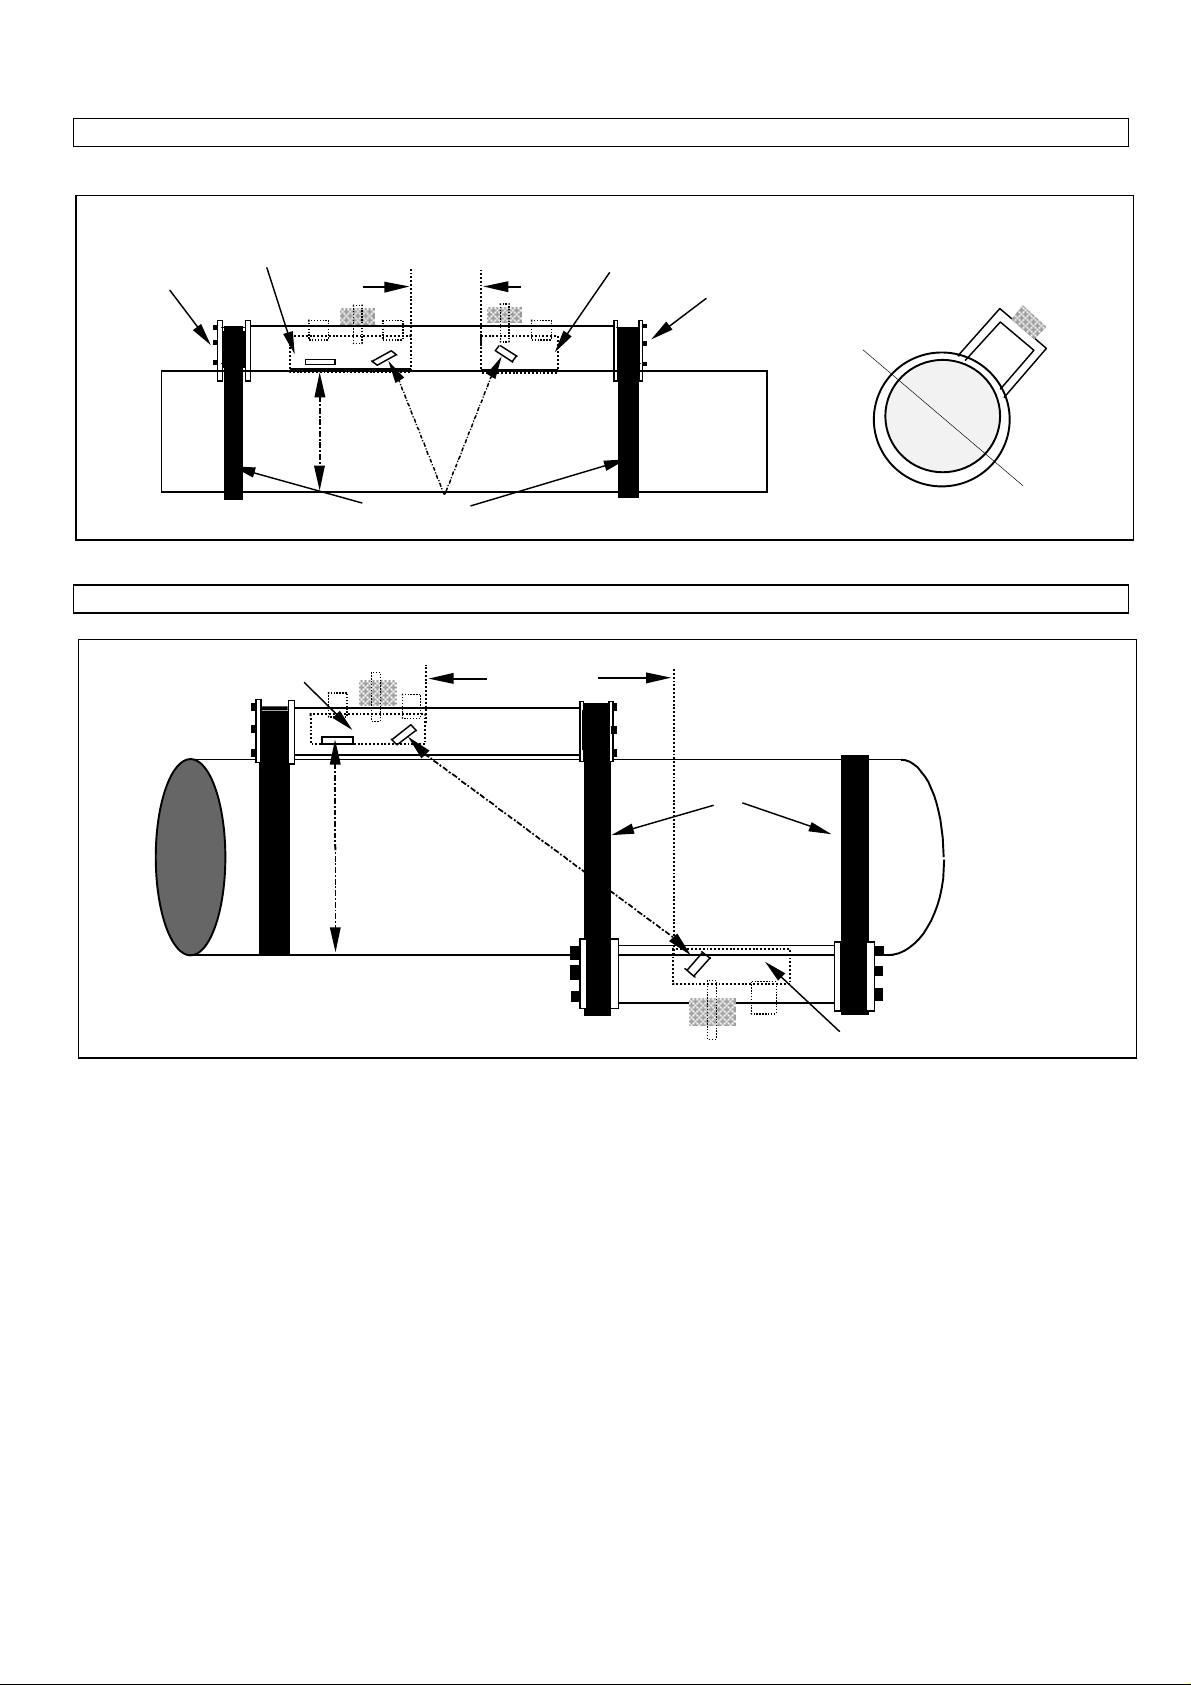
2.9.2 Reflex mounting assembly - Transducer sets "B" and "C"
fixed transducer
separation distanc e
floating transducer
magnets
webbing straps
Figure 10
2.9.3 Diagonal beam mounting hardware for transducer sets "B" & "C"
fixed transducer
separation
distance
WEBBING STRAPS
magnets
Figure 11
floating transducer
14
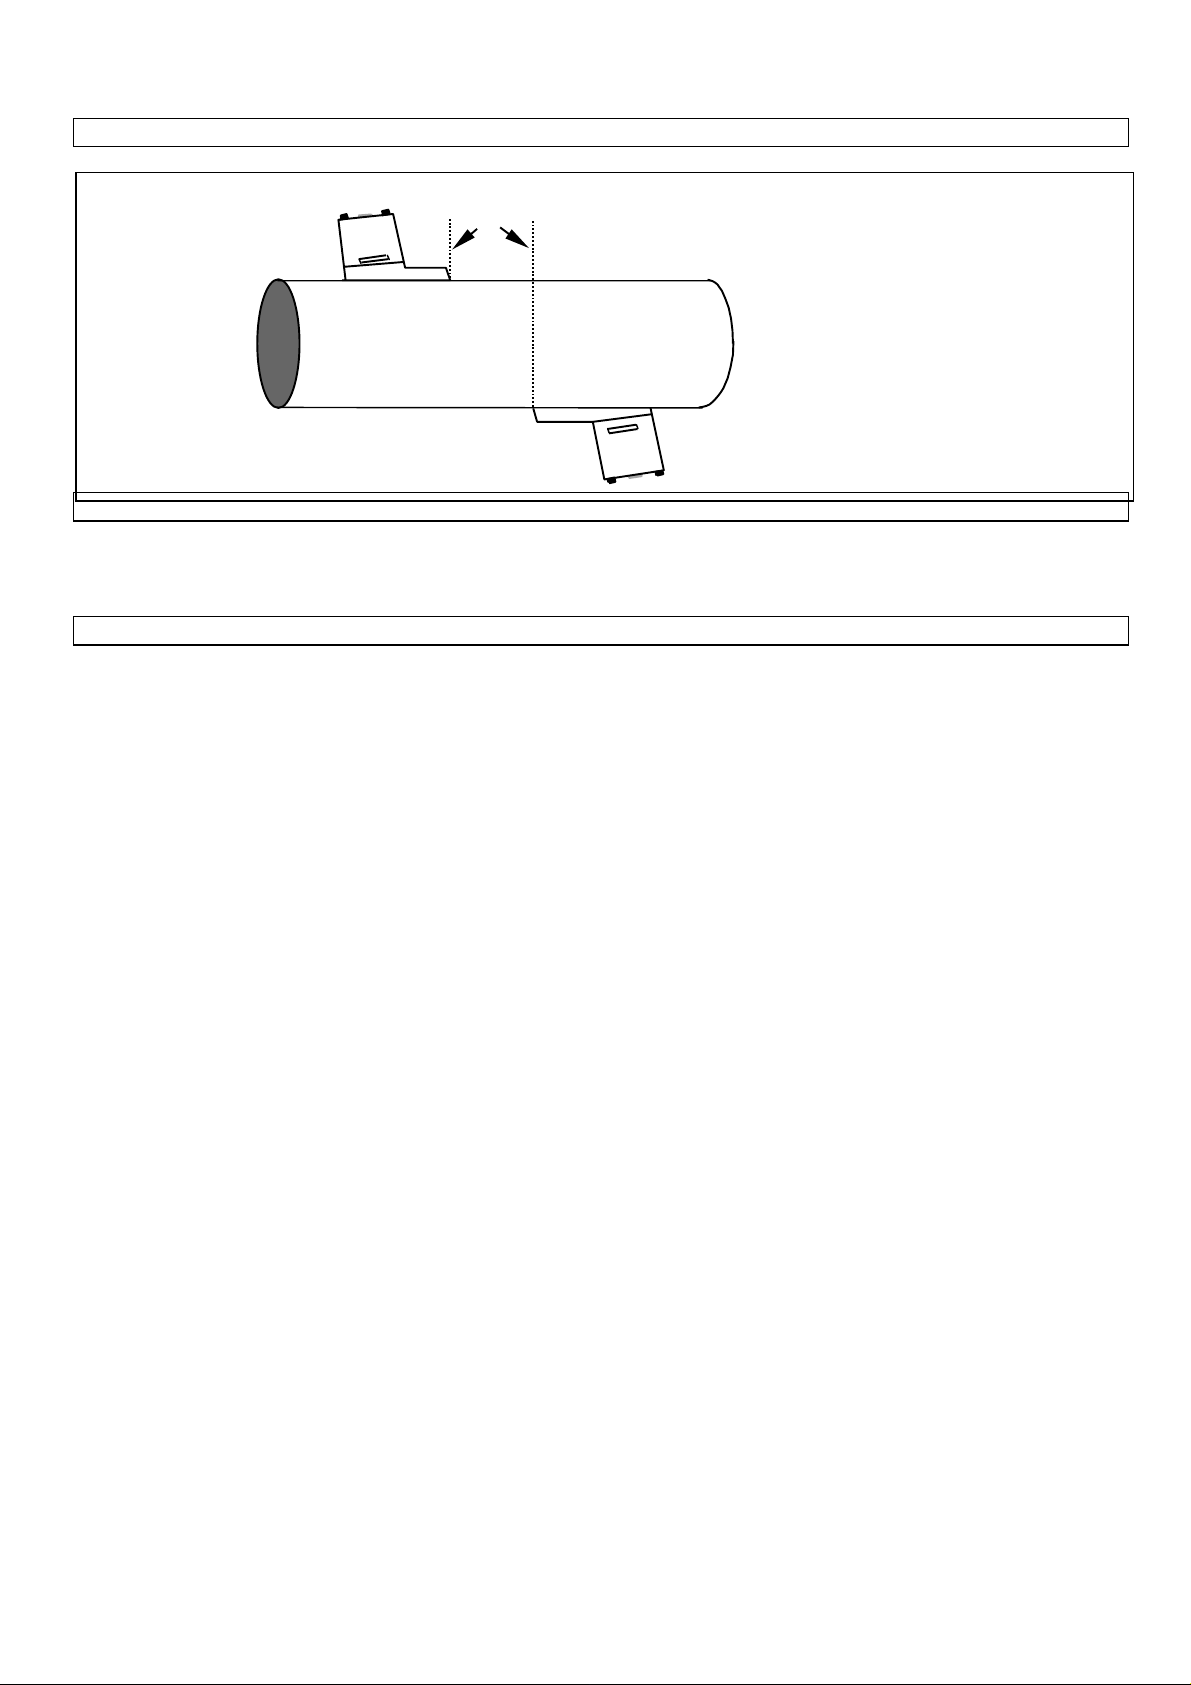
2.9.4 Diagonal beam mounting for transducer set "D"
separation distanc e
2.10 Ultraso n ic coup la n t
Figure 12
Ultrasonic couplant must be used on the sensor face to interface with the pipe wall. (See Figures 20, 21 & 22). On applica tions
above 100°C high temperature couplant will be required, and is supplied as standard with high temperature sensors.
2.11 Fluid types
The type of fluids that can be measur ed with the UFM 61 0 P are clean li q u ids or oils etc. that h ave less than 3 % b y volu me of
parti culate content. Liquids that ar e cloudy, li k e ri ver water , effl u ent et c. can be mea sured and al so liquid s tha t are clean , like
demineralised water. During the set up procedure the user is asked to select from a list of liquids (See fluid type 3.2) w hich
includes water and oils. If the liquid to be measured is not listed it is possible for the instrument to measure the propagation rate
automatically, but only when pipes sizes are greater then 40 mm internal diameter (See 6.5). Applications include :- River water,
Seawater, Potable water, Demineralised water, Treated effluent, Water/Glycol systems, Hydraulic systems and Diesel oil.
15
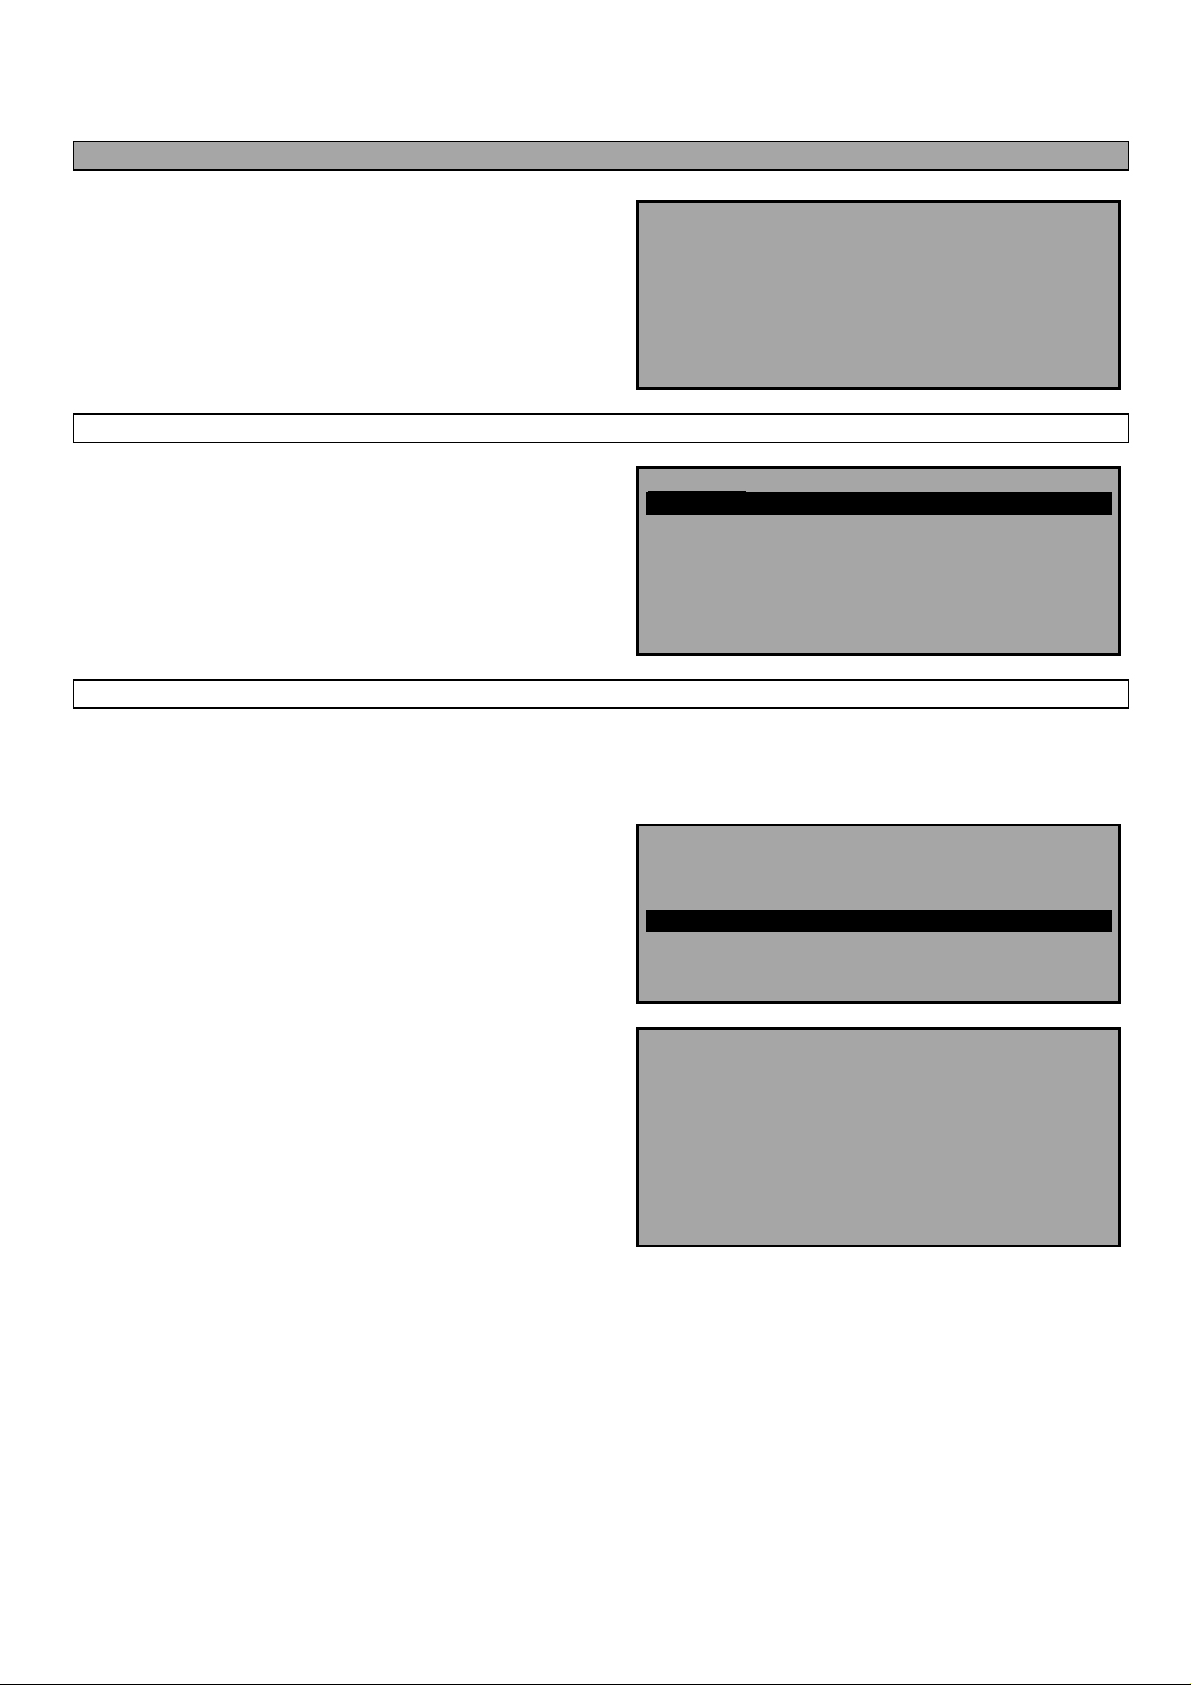
3. PROGRAMMING/MAIN MENU
Switch on...
3.1 Main menu
Pre s s SCRO LL up or down to move c urs or t o required opti on, then
press ENTER to select.
3.2 Quick start
Selecti ng qui ck start offers th e user the easiest opti on to achieve fl o w m easur emen t. If th e in strument h as been used previousl y,
it stores the last QUICK START application data, w hich can acce ssed via the MAIN MENU option Read flow. This allows
the user to measure the same application without spending time entering new data.
MAIN MENU yy-mm-dd hh:mm:ss
Quick start
View/Edit Site Data
Select sensor set
Data Logger
Set up RS232
Set up UFM 610 P
Read flow
KROHNE
Press 0 for English
Press 1 for French
Press 2 for German
Press 3 for Spanish
Serial 0000 v 2.00
If QUICK START is select ed , proceed wi th the foll o wi ng routine.
Use th e s cr ol l k eys to select, then press ENTER.
The instrument now asks for the Pipe outside diameter?
After entering the outside diameter press ENTER.
QUICK START yy-mm-dd hh:mm:ss
Select the dimension units:
Millimetres
Inches
QUICK START yy-mm-dd hh:mm:ss
Dimension units MILLIMETRES
Pipe outside diameter? 58.0
16
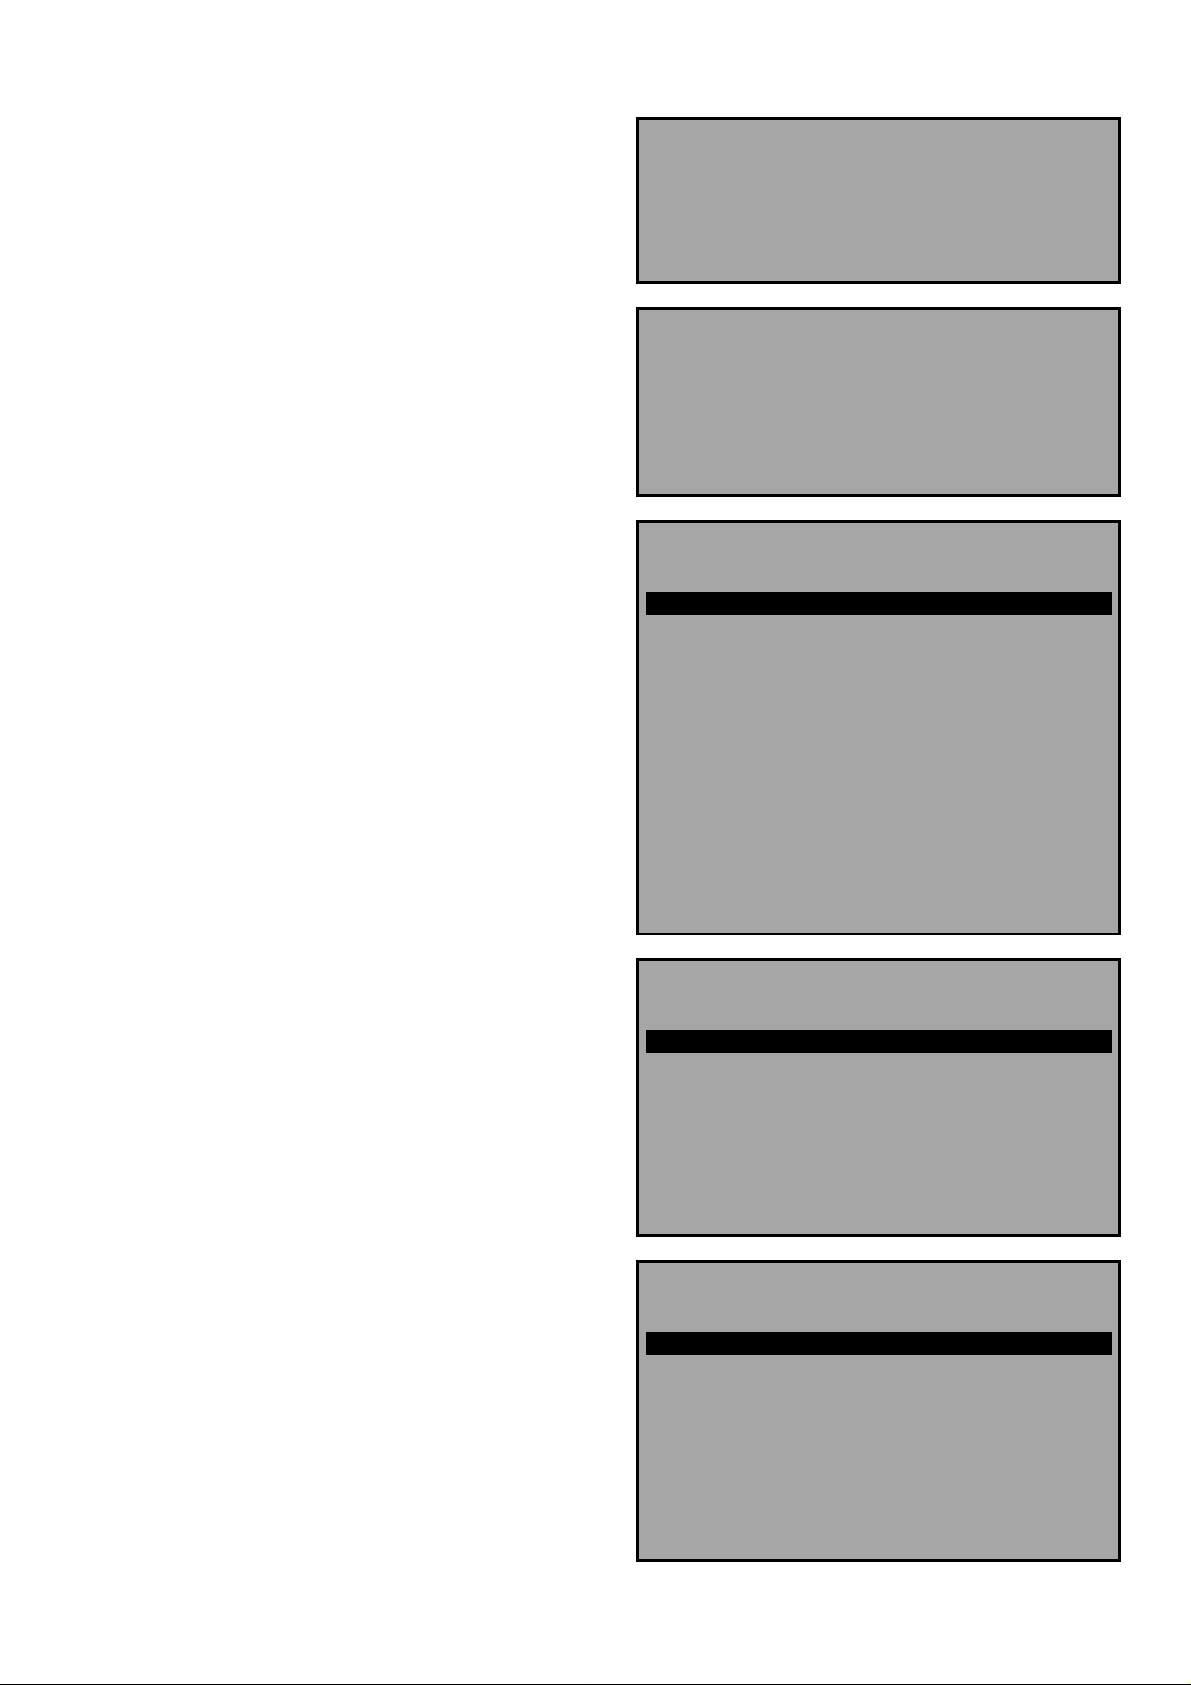
Pipe wall thick ne ss now appears on the display.
After entering the pipe wall thickness, press ENTER.
QUICK START yy-mm-dd hh:mm:ss
Dimension units MILLIMETRES
Pipe outside diameter? 58.0
Pipe w all thickness? 4.0
Pipe lining thick ness now appears on the display. If the pipe you
are measurin g h as a lining , you now ent er the Pipe lining
thickness. If nothing is entered the instrument automatically
assumes there is no lining, press ENTER to move on. If the
application has a pipe lining, enter the required thickness in the
units selected. Press ENTER to continue.
The instrument no w displays Select pipe wall material. By using
the scroll keys it is possible to scroll up or down the options
available. Select the required material and press ENTER.
QUICK START yy-mm-dd hh:mm:ss
Dimension units MILLIMETRES
Pipe outside diameter? 58.0
Pipe w all thickness? 4.0
Pipe lining thickness? 0.0
QUICK START yy-mm-dd hh:mm:ss
Select pipe wall material:
Mild Steel
S’ less Steel 316
S’ less Steel 303
Plastic
Cast Iron
Ductile Iron
Copper
Brass
Concrete
Glass
Other (m/s)
The following will only be displayed at this stage if a lining
thickn e s s ha d bee n en tered pr evious ly.
Use th e s cr ol l k eys to select the r eq uired mater ial then press
ENTER. If Other is selected, enter the propagation rate of the
lining in metres/sec. Contact KROHNE if this is not known.
Select fluid type now appears on the display.
Use the scroll keys to select the application liquid and press
ENTER. If Measure is selected, the instrument automatically
measures the propagation rate of the liquid, but only when the pipe
size is greater then 40 mm internal diameter. If the liquid is not
listed select Other and enter a propagation rate in metres/second.
This may be found in the back of the manual under Liquid Sound
Speeds.
QUICK START yy-mm-dd hh:mm:ss
Select pipe lining material:
Steel
Rubber
Glass
Epoxy
Concrete
Other (m/s)
QUICK START
yy-mm-dd hh:mm:ss
Select fluid type:
Water
Glycol/water 50/50
Lubricating oil
Diesel oi l
Freon
Measure
Other (m/sec)
17
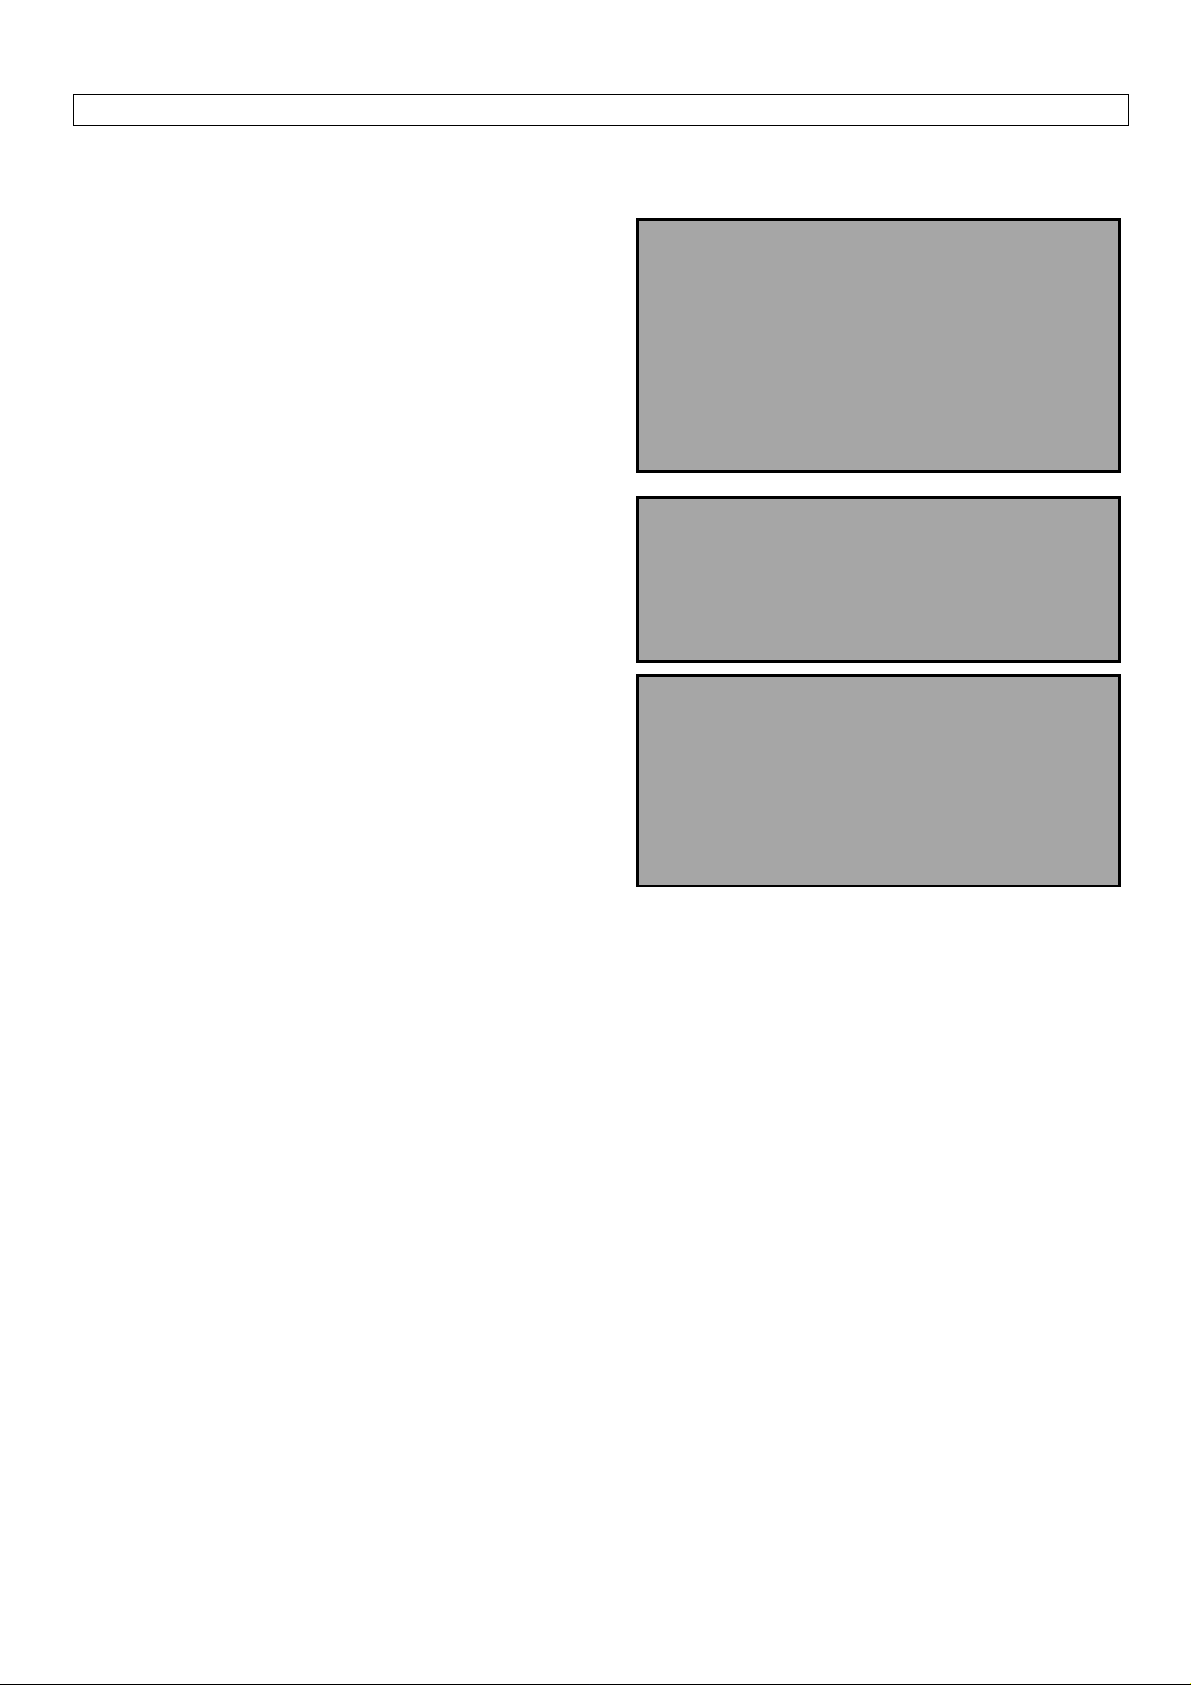
3.2.1 Attach sensors
The instrument will now provide the user with details on the type of sensor to be attached to the pipe and the mode of operation.
It wil l al s o give the approxima te maximu m fl o w that can be achieved wit h the sensors tha t ha ve be en selected.
It is possible to change the flow units at this stage to display the
maximum volumetric flow. Use the keypad to select a flow unit.
Now conn ec t the RED, BLUE and BLA CK sensor cables, be tween
the gu id e r ail and the electr on ics.
If the instrument cannot find a temperature signal because the black
sensor cable is not connected, it asks the user to try again. Pressing
ENTER will make the instrument try again or scroll will prompt the
user to enter a value. When a value is entered press ENTER.
Pressing ENTER at this point will give the user the separation
distance or ask for a temperature to be entered.
ATTACH SENSORS yy-mm-dd hh:mm:ss
Attach sensor set A in REFLEX mode
(RED connector upstr eam)
Approx . max. flow: 7. 20 m/s
press ENTER to continue
or SCROLL to sel e ct another s ensor
ATTACH SENSORS yy-mm-dd hh:mm:ss
No signal from temp sen sor
Press ENTER to try again or
SCROLL to enter a value
ATTACH SENSORS yy-mm-dd hh:mm:ss
FLUID TEMPERATURE (°C) 20.0
Set sensor separation to 34
Press ENTER to continue
NOTE:
The fluid temperature will only be displayed when entered manually.
The separation distance is displayed in mm.
18
READ FLOW now appears on the display.
The display will now read flow and will default to m/s, unless other units were selected when the instrument displayed the
sen s or mod e a nd t ype. To selec t other units pres s th e a ppropriate k e y a nd pressing m ore tha n onc e scr olls through other options.
When reading volumetric flow the instrument will display a positive and negative total flow. These totals can be reset by
selecting OPTIONS from the keypad. (See 4.6).
When in flow mode the instrument will continually display the battery and signal levels. Signal levels should be above 30%. If
there is an err or in the site data or the application the instrument will display an Error or warning message (See 5.3.2) which
will appear above the flow reading.
READ FLOW yy-mm-dd hh:mm:ss
(ERROR MESSAGES APPEAR HERE)
Battery
100%
Signal
83%
Temp + Total 1564 l
20°C - Total 0 l
100.0
l/m
To stop reading flow press ENTER ONCE in flow mode and the
display will read the following.
Pressing ENTER a second time will stop all logging/outputs and
return the instrument to MAIN MENU. Pressing the scroll key
retur ns the in s tr u ment to READ FLOW.
3.3 View/edit site dat a
The VIEW/EDIT SIT E DATA mode can be accessed from the main menu and allows the user to enter application details of up
to 20 different sites. A useful facility if a number of sites are being monitored on a regular basis and data needs to be stored at a
later date and it may not be possible to get to a PC.
When scrolling up/down the menu press ENTER to select at each
command.
EXIT FLOW yy-mm-dd hh:mm:ss
This will stop all logging and outputs
Press ENTER to EXIT or
SCROLL to return to READ FLOW
VIEW/EDIT SITE DATA yy-mm-dd hh:mm:ss
List sites
Site number 0
Site name QUICK START
Dimension units MILLIMETRES
Pipe outside diameter 58.0
Pipe w all thickne s s 4.0
Pipe lining thickness 0.0
Pipe w all materia l MILD STEE L
Lining material --------Fluid type WATER
Read flow
Exit
19
