

Page 1

OPTISYS TUR 1050
Handbook
Compact measuring system for turbidity
© KROHNE 11/2012 - 4002444301 MA OPTISYS TUR 1050 R02 en
Page 2

: IMPRINT :::::::::::::::::::::::::::::::::::::::
All rights reserved. It is prohibited to reproduce this documentation, or any part thereof, without
the prior written authorisation of KROHNE Messtechnik GmbH.
Subject to change without notice.
Copyright 2012 by
KROHNE Messtechnik GmbH - Ludwig-Krohne-Str. 5 - 47058 Duisburg (Germany)
2
www.krohne.com 11/2012 - 4002444301 MA OPTISYS TUR 1050 R02 en
Page 3

OPTISYS TUR 1050
CONTENTS
1 Safety instructions 5
1.1 Intended use ..................................................................................................................... 5
1.2 Certification ...................................................................................................................... 5
1.2.1 CE ............................................................................................................................................ 5
1.2.2 ETL .......................................................................................................................................... 5
1.2.3 US EPA 180.1........................................................................................................................... 5
1.2.4 ISO 7027 and DIN 27027.......................................................................................................... 5
1.3 Safety instructions from the manufacturer ..................................................................... 6
1.3.1 Copyright and data protection ................................................................................................ 6
1.3.2 Disclaimer ............................................................................................................................... 6
1.3.3 Product liability and warranty ................................................................................................ 7
1.3.4 Information concerning the documentation........................................................................... 7
1.3.5 Warnings and symbols used................................................................................................... 8
1.4 Safety instructions for the operator................................................................................. 8
2 Device description 9
2.1 Scope of delivery............................................................................................................... 9
2.2 Device description .......................................................................................................... 10
2.3 Nameplates .................................................................................................................... 12
3 Installation 14
3.1 Notes on installation ......................................................................................................14
3.2 Storage and transport .................................................................................................... 14
3.3 Requirements of the device............................................................................................ 14
3.4 Installation order............................................................................................................ 15
3.4.1 Placing the desiccant pouch and the humidity indicator ..................................................... 15
3.4.2 Selecting site and mounting ................................................................................................. 16
3.4.3 Mounting ............................................................................................................................... 18
3.4.4 Connecting the hoses............................................................................................................ 19
3.4.5 Drain vent .............................................................................................................................. 20
3.4.6 Inserting and fixing the ultrasonic cuvette with flow-through holder ................................. 21
4 Electrical connections 22
4.1 Safety instructions.......................................................................................................... 22
4.2 Description of board and bulkheads .............................................................................. 22
4.3 Circuit breaker and specifications of power supply ...................................................... 23
4.4 Cable specifications........................................................................................................ 23
4.5 Installation order of the electrical connections............................................................. 23
4.5.1 Connecting the cables in the junction box power assembly ................................................ 24
4.5.2 Alarms terminal (signal output) ........................................................................................... 25
4.5.3 RS 485 or 4...20 mA signal output.........................................................................................25
4.5.4 Connecting the sensor interconnect cable........................................................................... 26
www.krohne.com11/2012 - 4002444301 MA OPTISYS TUR 1050 R02 en
3
Page 4

CONTENTS
OPTISYS TUR 1050
5 Operation 27
5.1 Start-up........................................................................................................................... 27
5.2 Display and operating keys ............................................................................................ 28
5.3 Normal operation ...........................................................................................................28
5.4 Getting access with activated security access function ................................................ 29
5.5 Menu topology ................................................................................................................ 30
5.6 Calibration mode (main menu) ...................................................................................... 30
5.6.1 Calibration liquids................................................................................................................. 31
5.6.2 Calibration procedure (physical), inclusive indexing ........................................................... 31
5.6.3 Calibration procedure (offset calibration)............................................................................ 33
5.6.4 Calibration error ................................................................................................................... 35
5.7 Configuration mode (main menu) .................................................................................. 35
5.7.1 Selecting the output.............................................................................................................. 36
5.7.2 Setting the 4...20 mA output inclusive error level................................................................ 37
5.7.3 Configuring the RS 485 port.................................................................................................. 38
5.7.4 Configuring the alarm relays................................................................................................ 39
5.7.5 Offset calibration................................................................................................................... 41
5.7.6 Enabling or disabling the security access............................................................................ 41
5.7.7 Extended settings.................................................................................................................. 41
5.8 Restoring the factory settings........................................................................................ 47
5.9 Faults: reasons and remedies ....................................................................................... 47
6 Service 50
6.1 Service admonitions ....................................................................................................... 50
6.2 Maintenance ................................................................................................................... 50
6.2.1 Replacing or cleaning cuvette .............................................................................................. 50
6.2.2 Replacing desiccant pouch and humidity indicator.............................................................. 51
6.2.3 Replacing the source lamp................................................................................................... 51
6.3 Availability of services .................................................................................................... 52
6.4 Spare parts availability...................................................................................................52
6.5 Spare or accessory parts ............................................................................................... 52
6.6 Returning the device to the manufacturer..................................................................... 53
6.6.1 General information.............................................................................................................. 53
6.6.2 Form (for copying) to accompany a returned device............................................................ 54
6.7 Disposal .......................................................................................................................... 54
7 Technical data 55
7.1 Measuring principle........................................................................................................55
7.2 Technical data table .......................................................................................................56
7.3 Dimensions and weight .................................................................................................. 58
8 Notes 59
4
www.krohne.com 11/2012 - 4002444301 MA OPTISYS TUR 1050 R02 en
Page 5

OPTISYS TUR 1050
1.1 Intended use
The OPTISYS TUR 1050 series consists of a white light (WL) version and an infrared (IR) version.
Both versions are designed to measure online the turbidity of water. Furthermore the two
following different measuring ranges are available: 0.02...100 NTU/FNU or 0.02...1000 NTU/FNU
1.2 Certification
1.2.1 CE
CE marking
The device fulfils the statutory requirements of the following EC directives:
• Electromagnetic compatibility (EMC) in accordance with:
EN 61326-1:2006: Emission standard and immunity for industrial environments.
• Low Voltage Directive:
Safety requirements for electrical equipment for measurement, control and laboratory use in
accordance with EN 61010-1:2001, Edition 2.0.
SAFETY INSTRUCTIONS 1
The manufacturer certifies successful testing of the product by applying the CE marking.
1.2.2 ETL
The manufacturer tested the device and it fulfils the following ETL requirements:
• ETL: tested to UL 61010B-1, 1st Edition, January 24th, 2003.
• ETLc: tested to CS C22.2#1010.1-92.
1.2.3 US EPA 180.1
The white light version meets the design criteria specified by the US EPA 180.1 on turbidity
measurement.
1.2.4 ISO 7027 and DIN 27027
The infrared version meets the design criteria specified in ISO 7027 and DIN 27027 for the
measurement of the turbidity of a sample.
www.krohne.com11/2012 - 4002444301 MA OPTISYS TUR 1050 R02 en
5
Page 6

1 SAFETY INSTRUCTIONS
1.3 Safety instructions from the manufacturer
1.3.1 Copyright and data protection
The contents of this document have been created with great care. Nevertheless, we provide no
guarantee that the contents are correct, complete or up-to-date.
The contents and works in this document are subject to copyright. Contributions from third
parties are identified as such. Reproduction, processing, dissemination and any type of use
beyond what is permitted under copyright requires written authorisation from the respective
author and/or the manufacturer.
The manufacturer tries always to observe the copyrights of others, and to draw on works created
in-house or works in the public domain.
The collection of personal data (such as names, street addresses or e-mail addresses) in the
manufacturer's documents is always on a voluntary basis whenever possible. Whenever
feasible, it is always possible to make use of the offerings and services without providing any
personal data.
OPTISYS TUR 1050
We draw your attention to the fact that data transmission over the Internet (e.g. when
communicating by e-mail) may involve gaps in security. It is not possible to protect such data
completely against access by third parties.
We hereby expressly prohibit the use of the contact data published as part of our duty to publish
an imprint for the purpose of sending us any advertising or informational materials that we have
not expressly requested.
1.3.2 Disclaimer
The manufacturer will not be liable for any damage of any kind by using its product, including,
but not limited to direct, indirect or incidental and consequential damages.
This disclaimer does not apply in case the manufacturer has acted on purpose or with gross
negligence. In the event any applicable law does not allow such limitations on implied warranties
or the exclusion of limitation of certain damages, you may, if such law applies to you, not be
subject to some or all of the above disclaimer, exclusions or limitations.
Any product purchased from the manufacturer is warranted in accordance with the relevant
product documentation and our Terms and Conditions of Sale.
The manufacturer reserves the right to alter the content of its documents, including this
disclaimer in any way, at any time, for any reason, without prior notification, and will not be liable
in any way for possible consequences of such changes.
6
www.krohne.com 11/2012 - 4002444301 MA OPTISYS TUR 1050 R02 en
Page 7

OPTISYS TUR 1050
1.3.3 Product liability and warranty
The operator shall bear responsibility for the suitability of the device for the specific purpose.
The manufacturer accepts no liability for the consequences of misuse by the operator. Improper
installation and operation of the devices (systems) will cause the warranty to be void. The
respective "Standard Terms and Conditions" which form the basis for the sales contract shall
also apply.
1.3.4 Information concerning the documentation
To prevent any injury to the user or damage to the device it is essential that you read the
information in this document and observe applicable national standards, safety requirements
and accident prevention regulations.
If this document is not in your native language and if you have any problems understanding the
text, we advise you to contact your local office for assistance. The manufacturer can not accept
responsibility for any damage or injury caused by misunderstanding of the information in this
document.
This document is provided to help you establish operating conditions, which will permit safe and
efficient use of this device. Special considerations and precautions are also described in the
document, which appear in the form of underneath icons.
SAFETY INSTRUCTIONS 1
www.krohne.com11/2012 - 4002444301 MA OPTISYS TUR 1050 R02 en
7
Page 8
1 SAFETY INSTRUCTIONS
1.3.5 Warnings and symbols used
Safety warnings are indicated by the following symbols.
DANGER!
This information refers to the immediate danger when working with electricity.
DANGER!
This warning refers to the immediate danger of burns caused by heat or hot surfaces.
DANGER!
This warning refers to the immediate danger when using this device in a hazardous atmosphere.
DANGER!
These warnings must be observed without fail. Even partial disregard of this warning can lead to
serious health problems and even death. There is also the risk of seriously damaging the device
or parts of the operator's plant.
OPTISYS TUR 1050
WARNING!
Disregarding this safety warning, even if only in part, poses the risk of serious health problems.
There is also the risk of damaging the device or parts of the operator's plant.
CAUTION!
Disregarding these instructions can result in damage to the device or to parts of the operator's
plant.
INFORMATION!
These instructions contain important information for the handling of the device.
LEGAL NOTICE!
This note contains information on statutory directives and standards.
• HANDLING
This symbol designates all instructions for actions to be carried out by the operator in the
specified sequence.
i RESULT
This symbol refers to all important consequences of the previous actions.
1.4 Safety instructions for the operator
WARNING!
In general, devices from the manufacturer may only be installed, commissioned, operated and
maintained by properly trained and authorized personnel.
This document is provided to help you establish operating conditions, which will permit safe and
efficient use of this device.
8
www.krohne.com 11/2012 - 4002444301 MA OPTISYS TUR 1050 R02 en
Page 9
OPTISYS TUR 1050
2.1 Scope of delivery
INFORMATION!
Inspect the cartons carefully for damages or signs of rough handling. Report damage to the
carrier and to the local office of the manufacturer.
INFORMATION!
Do a check of the packing list to make sure that you have all the elements given in the order.
INFORMATION!
Look at the device nameplate to ensure that the device is delivered according to your order.
Check for the correct supply voltage printed on the nameplate.
INFORMATION!
Assembly materials and tools are not part of the delivery. Use the assembly materials and tools
in compliance with the applicable occupational health and safety directives.
DEVICE DESCRIPTION 2
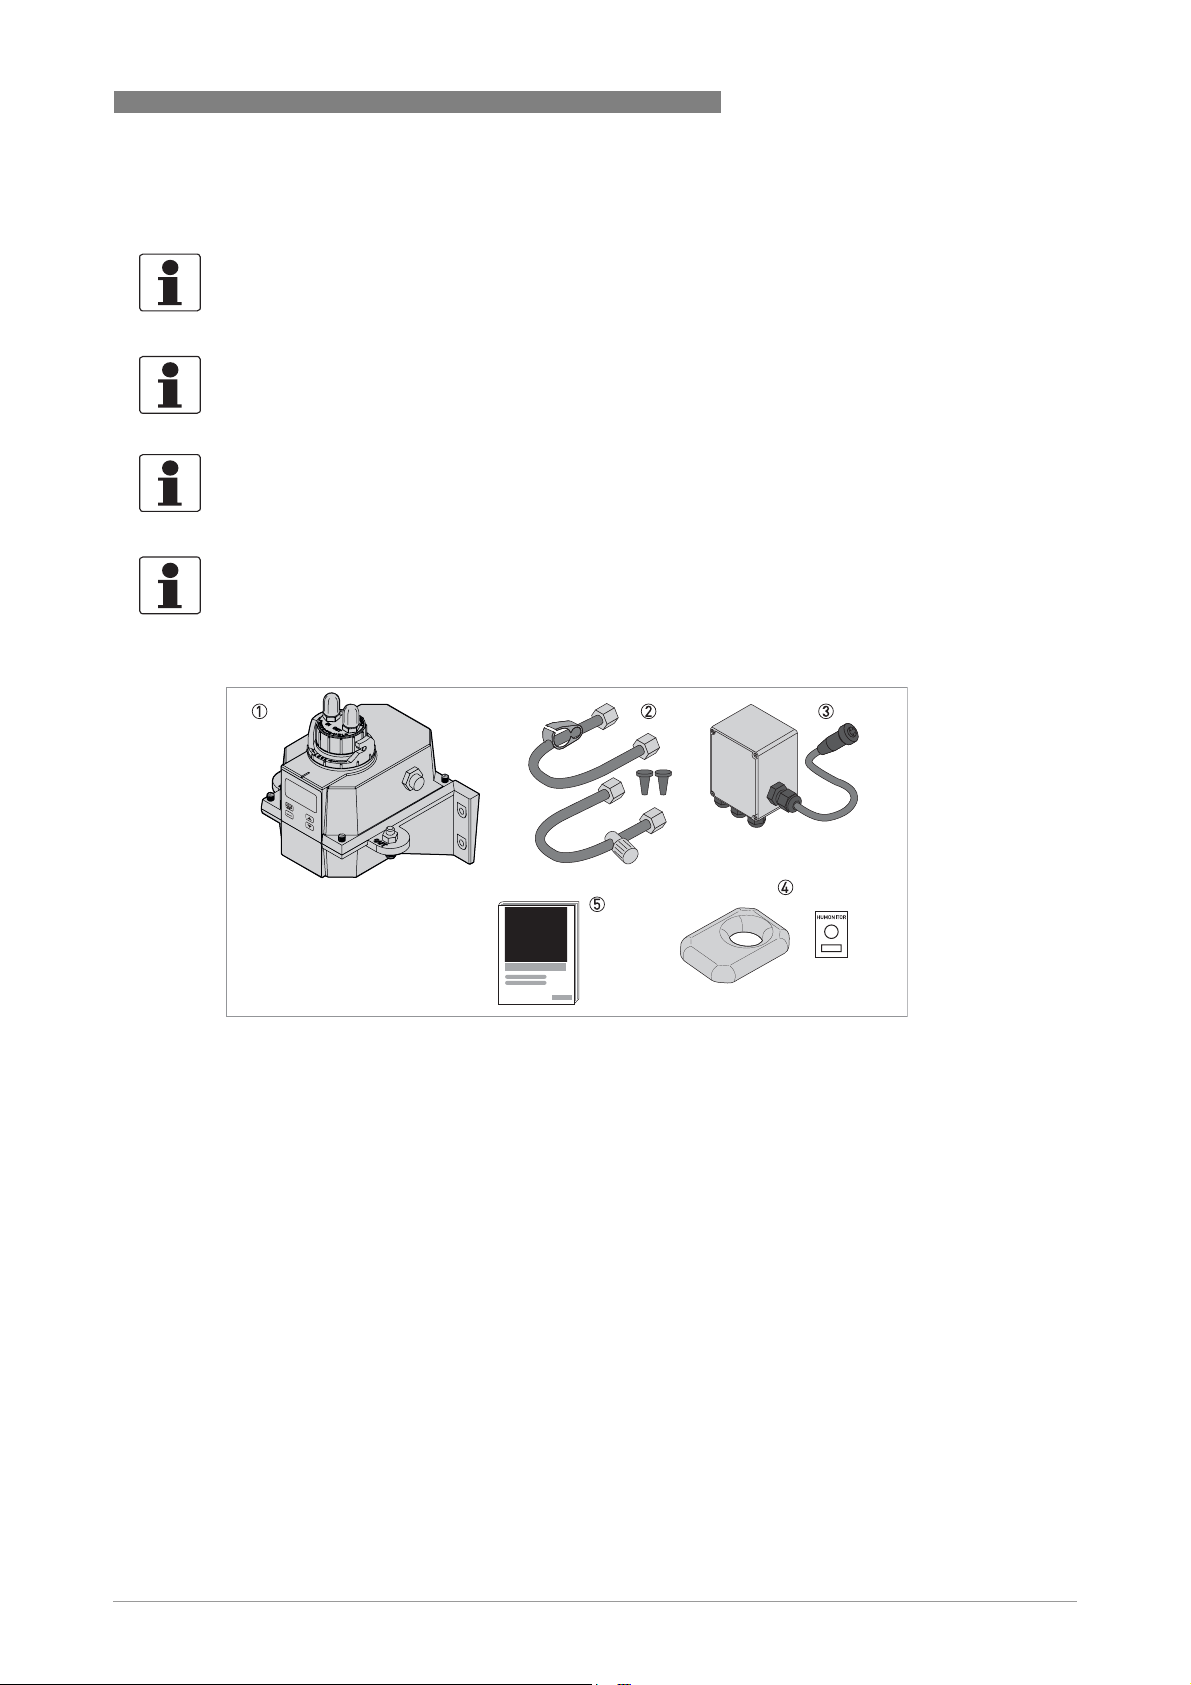
Figure 2-1: Scope of delivery
1 Electronic device with flow-through assembly and ultrasonic cuvette
2 Tubing kit (drain vent, shut-off clamp, backpressure valve, connection tubes with fittings for
ultrasonic cuvette assembly)
3 Junction box power assembly
4 Desiccant pack (desiccant pouch with humidity indicator)
5 Documentation
www.krohne.com11/2012 - 4002444301 MA OPTISYS TUR 1050 R02 en
9
Page 10
2 DEVICE DESCRIPTION
2.2 Device description
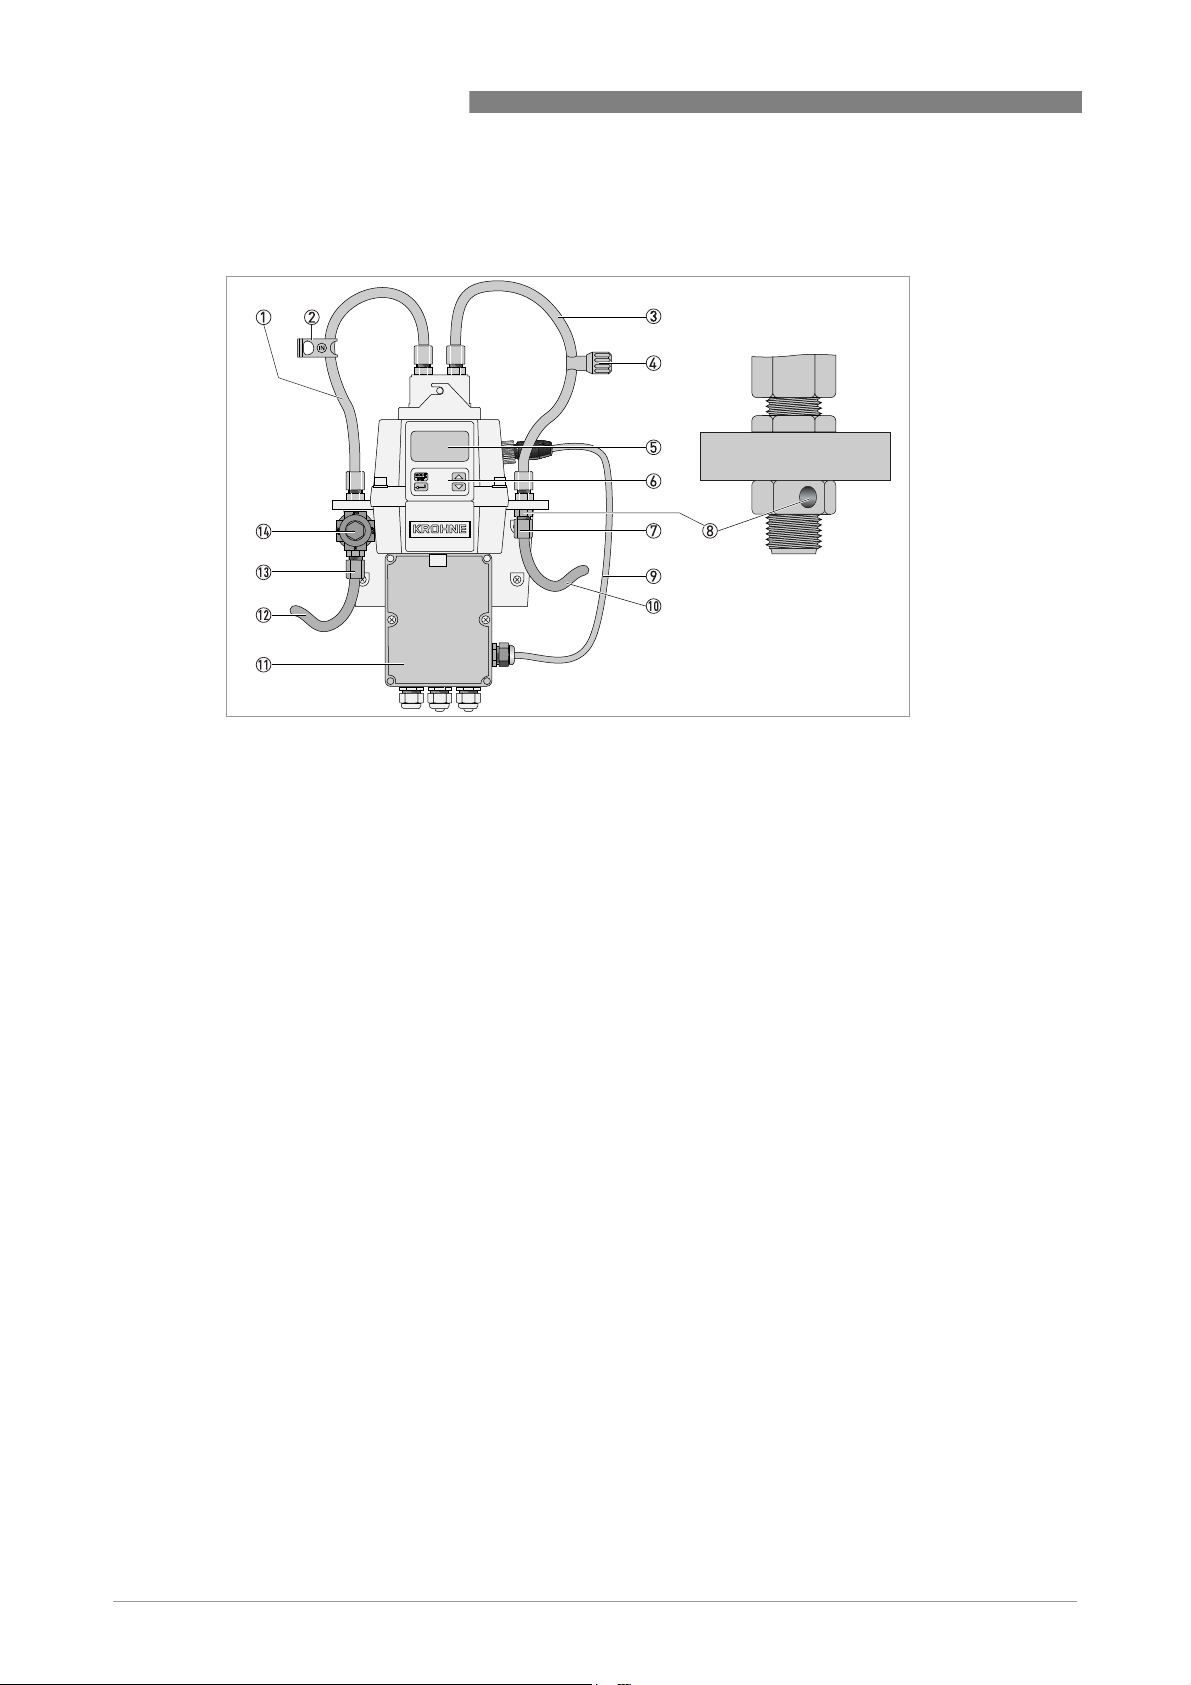
Front view of the complete device
OPTISYS TUR 1050
Figure 2-2: Description of the complete device
1 Intake tubing
2 Shut-off clamp (stops the intake flow during cuvette cleanings and replacements)
3 Drain tubing
4 Backpressure valve (allows adjustment of the amount of back pressure, which helps to control the flow rate and elim-
inate small bubbles)
5 Display (LCD)
6 Operation keys
7 Drain hose connection (inner Ø: 4.75 mm / 0.19", outer Ø: 8 mm / 0.31"), the hose has to lead to a suitable drain site
8 Drain vent hole
9 Sensor interconnect cable
10 Drain hose
11 Junction box power assembly
12 Intake hose
13 Intake hose connection (inner Ø: 4.75 mm / 0.19",outer Ø: 8 mm / 0.31"), has to supply the sensor with a dependable
sample flow
14 Pressure regulator
10
www.krohne.com 11/2012 - 4002444301 MA OPTISYS TUR 1050 R02 en
Page 11
OPTISYS TUR 1050
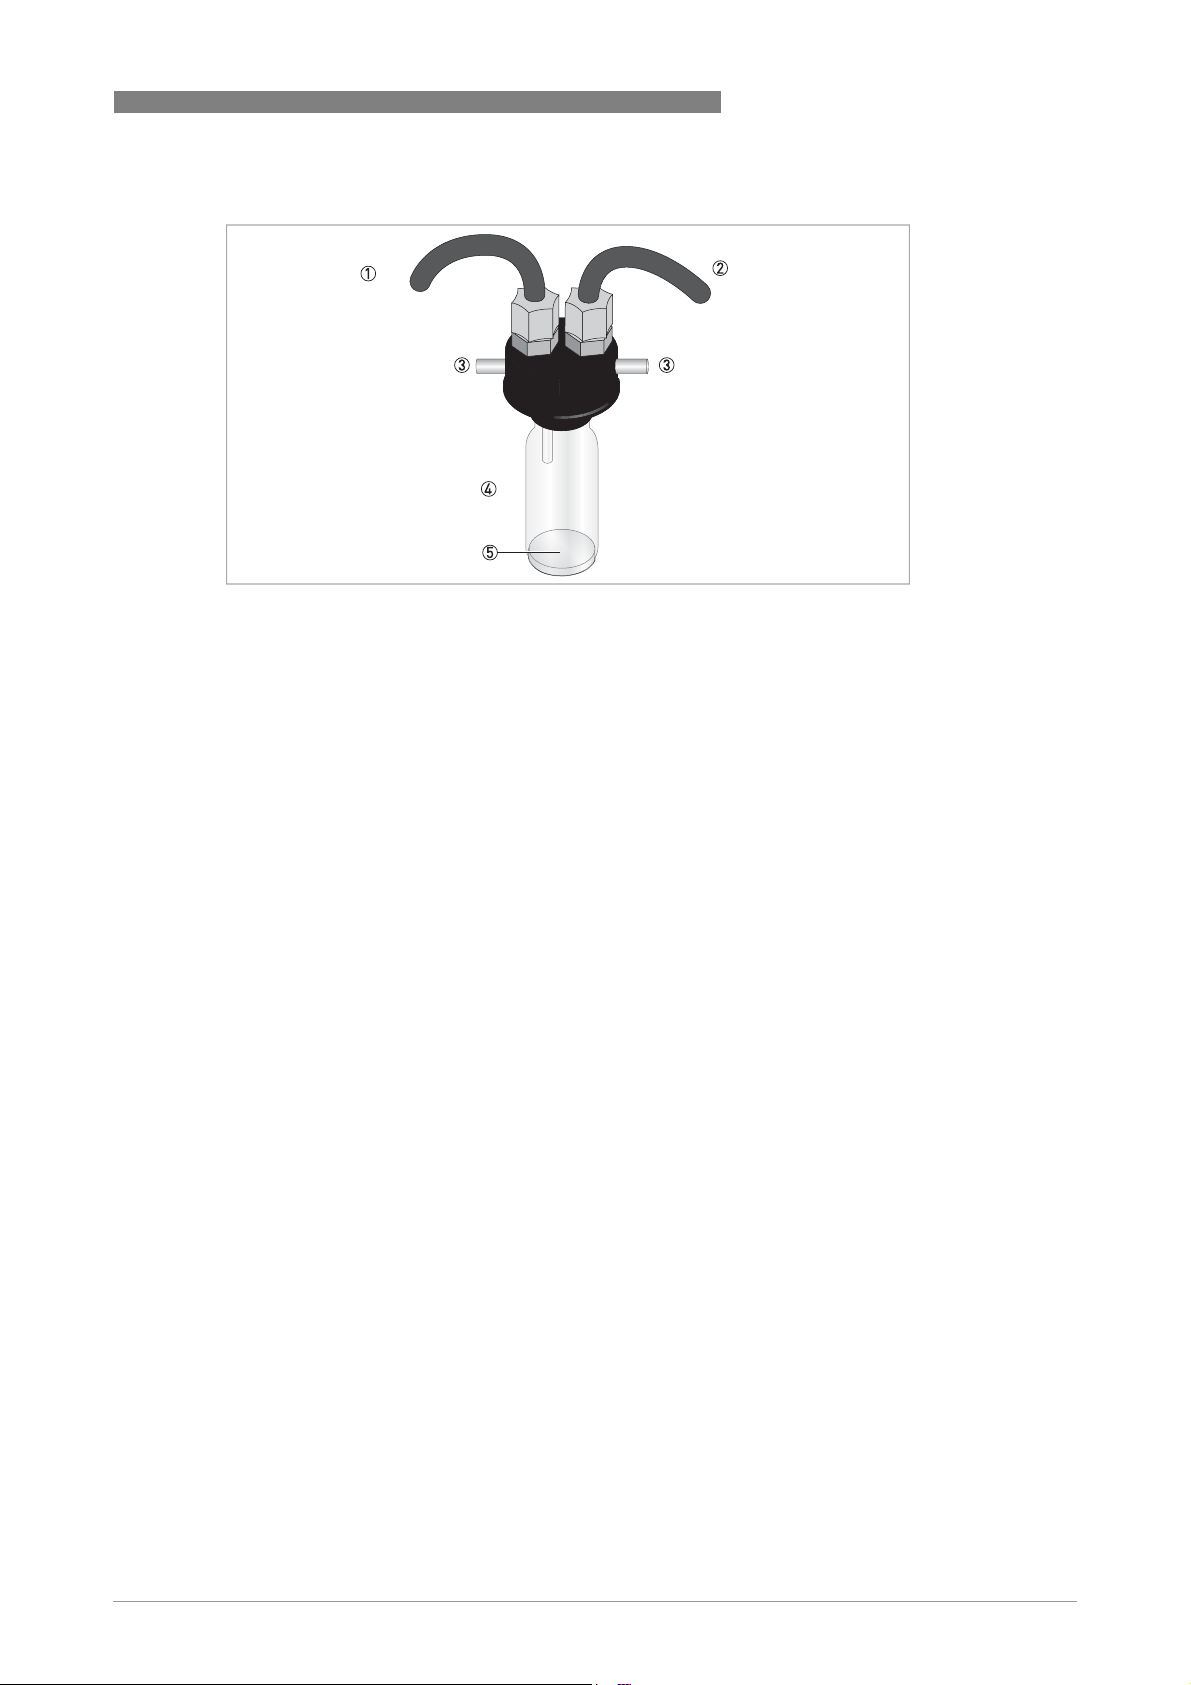
Ultrasonic cuvette with flow-through holder
Figure 2-3: Description of ultrasonic cuvette with flow-through holder
1 Intake tubing
2 Drain tubing
3 Bolt
4 Ultrasonic cuvette
5 Bottom plate with ultrasonic transducer (at the bottom side)
DEVICE DESCRIPTION 2
The device is available with a white light source or an infrared light source. There are no visible
differences between these versions. Both versions provide the possibility of ultrasonic cleaning.
Every device has a pressure regulator for the incoming flow which reduces pressures up to
14 bar / 203 psi down to 1 bar / 15 psi.
Dehumidification system
The device is equipped with a continuous dehumidification system that works with the help of a
replaceable desiccant pouch in the electronic device. While the system heat is used to warm the
air, a fan inside the device continuously circulates this heated and by the desiccant pouch
dehumidified air around the optical well and the electronic device. This features eliminates the
need for a dry purge line.
The device monitors the replaceable desiccant pouch condition continuously. The lower line of
the display shows the message "DESC" in the event that you have to replace a saturated
desiccant pouch that may cause problems.
Liquid crystal display (LCD)
For a better readability in low light or no light conditions the LCD is backlight. The backlight
always stays on, but the brightness is adjustable.
www.krohne.com11/2012 - 4002444301 MA OPTISYS TUR 1050 R02 en
11
Page 12
2 DEVICE DESCRIPTION
RS 485 interface
In addition to the Modbus communication the device can operate in two other RS 485 modes:
• Online: the device operates as a small SCADA system (Supervisory Control and Data
Acquisition) with an optional software package (to get this package contact the manufacturer
or your local sales office). This system allows the connection of up to 255 devices for data
logging which all have to be an OPTISYS TUR 1050. Furthermore this system offers a direct
interface with common database and spreadsheet software.
• Simple: the device can provide basic communications with the help of simple programs.
Examples for such programs are Hilgraeve hyperterminal (included in most Microsoft
Windows packages) or Visual Basic.
Ultrasonic cleaning
This feature helps to clean the ultrasonic cuvette continuously. The system works by sending an
ultrasonic frequency through spring connections in the upper part of the device to a piezo
transducer at the bottom of the ultrasonic cuvette.
The ultrasonic cleaning can increase the time between cleanings significantly. However it cannot
substitute the manual cleaning entirely.
OPTISYS TUR 1050
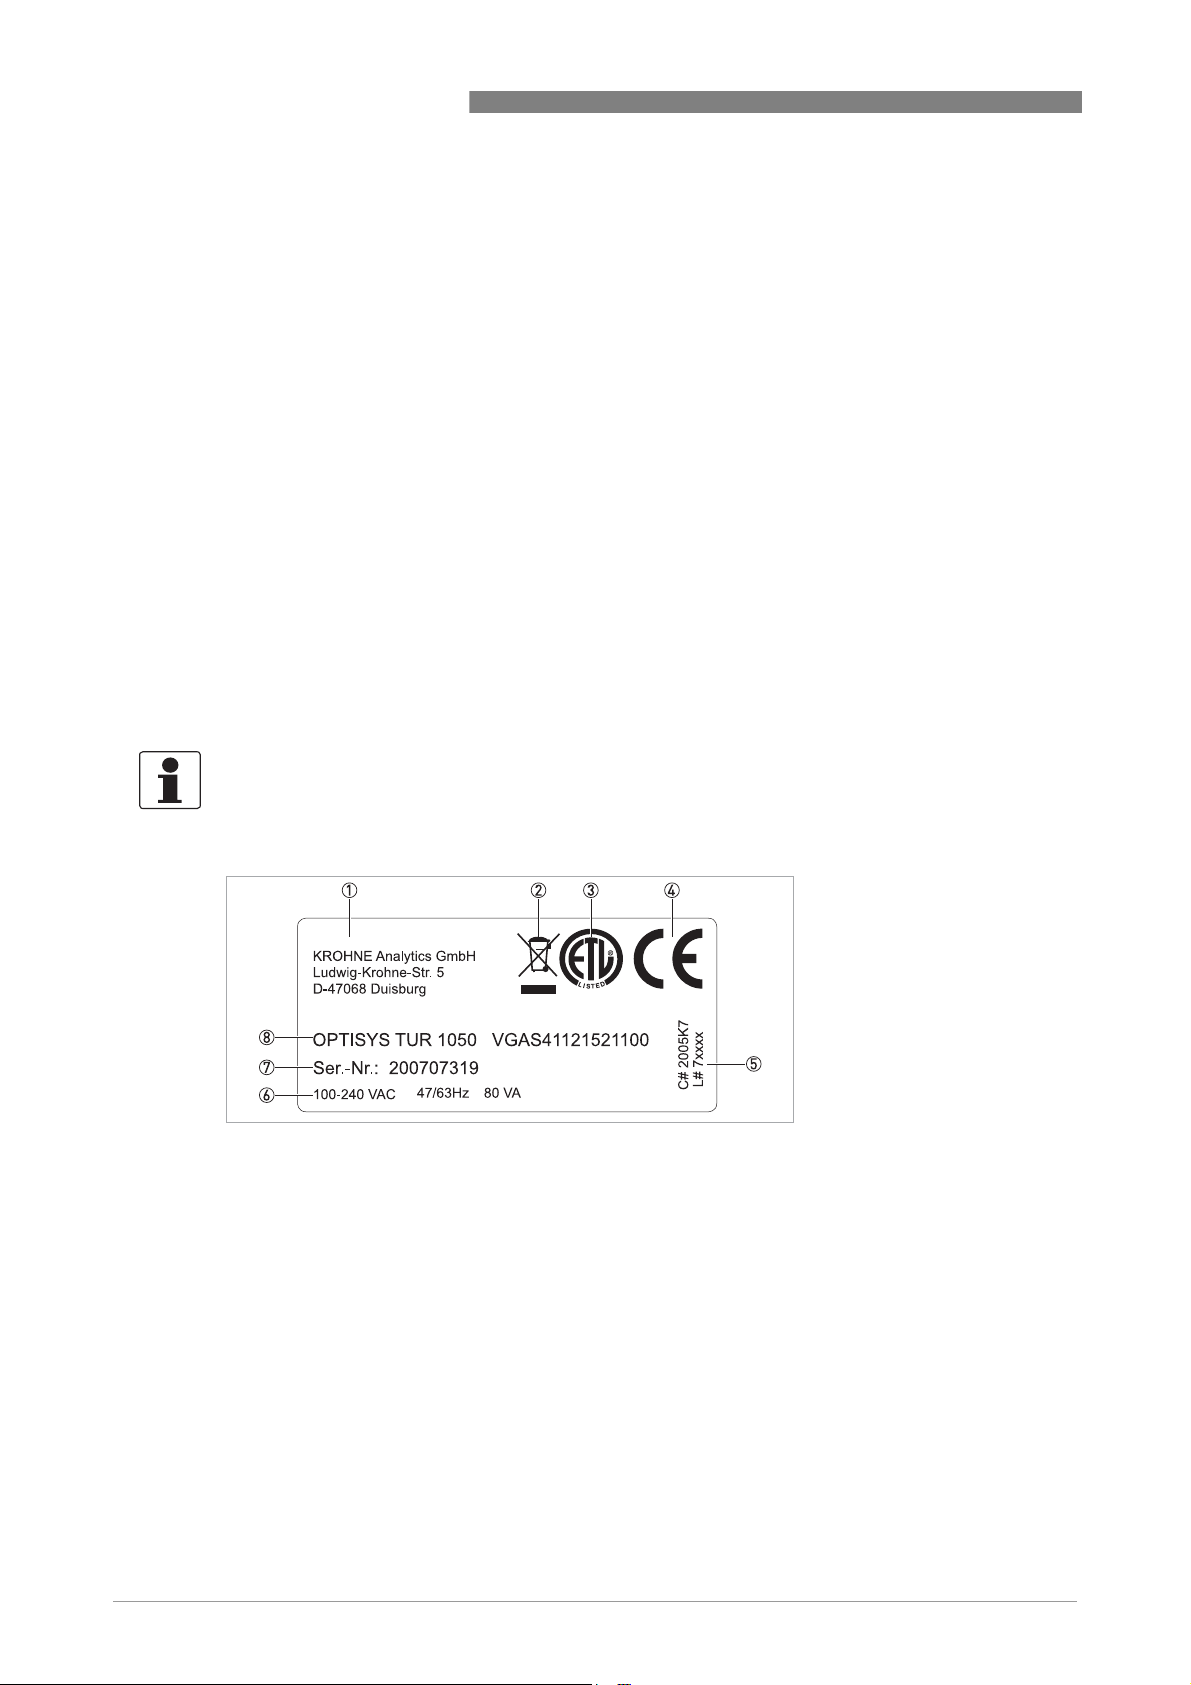
2.3 Nameplates
INFORMATION!
Look at the device nameplate to ensure that the device is delivered according to your order.
Check for the correct supply voltage printed on the nameplate.
Infrared version
Figure 2-4: Example for nameplate for infrared version
1 Manufacturer and address
2 WEEE waste bin symbol
3 ETL symbol
4 CE symbol
5 Logistics numbers
6 Electrical data
7 Serial number
8 Device designation and order code
12
www.krohne.com 11/2012 - 4002444301 MA OPTISYS TUR 1050 R02 en
Page 13

OPTISYS TUR 1050
White light version
Figure 2-5: Example for nameplate for white light version
1 Manufacturer and address
2 WEEE waste bin symbol
3 ETL symbol
4 CE symbol
5 Logistics numbers
6 Electrical data
7 Serial number
8 Device designation and order code
DEVICE DESCRIPTION 2
www.krohne.com11/2012 - 4002444301 MA OPTISYS TUR 1050 R02 en
13
Page 14

3 INSTALLATION
3.1 Notes on installation
INFORMATION!
Inspect the cartons carefully for damages or signs of rough handling. Report damage to the
carrier and to the local office of the manufacturer.
INFORMATION!
Do a check of the packing list to make sure that you have all the elements given in the order.
INFORMATION!
Look at the device nameplate to ensure that the device is delivered according to your order.
Check for the correct supply voltage printed on the nameplate.
3.2 Storage and transport
• Store and transport the device in a dry, dust-free environment.
• Store and transport the device in an environment with a temperature between -20...+60°C/
-4...+176°F.
• The original packing is designed to protect the equipment. It has to be used if the device is
transported or sent back to the manufacturer.
OPTISYS TUR 1050
3.3 Requirements of the device
The device was designed to require very low input pressure. Though the device offers a wide
pressure range, as it has an integrated pressure regulator:
• Input pressure range: 0.07...14 bar / 1...200 psi (built in regulator set at 1 bar / 15 psi)
• Maximum allowable flow rate of the cuvette: 0.1...1 l/min / 0.026...0.26 gal/min
• Maximum fluid temperature: +50°C / +122°F
14
www.krohne.com 11/2012 - 4002444301 MA OPTISYS TUR 1050 R02 en
Page 15
OPTISYS TUR 1050
3.4 Installation order
CAUTION!
Installation, assembly, start-up and maintenance may only be performed by appropriately
trained personnel. The regional occupational health and safety directives must always be
observed.
To install the device in the correct way, follow the order of the following sections and their
instructions.
3.4.1 Placing the desiccant pouch and the humidity indicator
CAUTION!
A missing or saturated desiccant pouch affects not only the performance of the whole device, but
can also destroy the internal electronics!
If the seal at the device base does not fit properly or is defective, the lifetime of the desiccant
decreases. Therefore assure the following items:
•
Do not start-up the device with a desiccant pouch missing, replace a saturated pouch!
•
Replace the desiccant pouch when the display shows the message "DESC".
•
Inspect the enclosure seal each time you replace the desiccant.
•
If the seal is not properly seated or damaged, reseat or replace it!
INSTALLATION 3
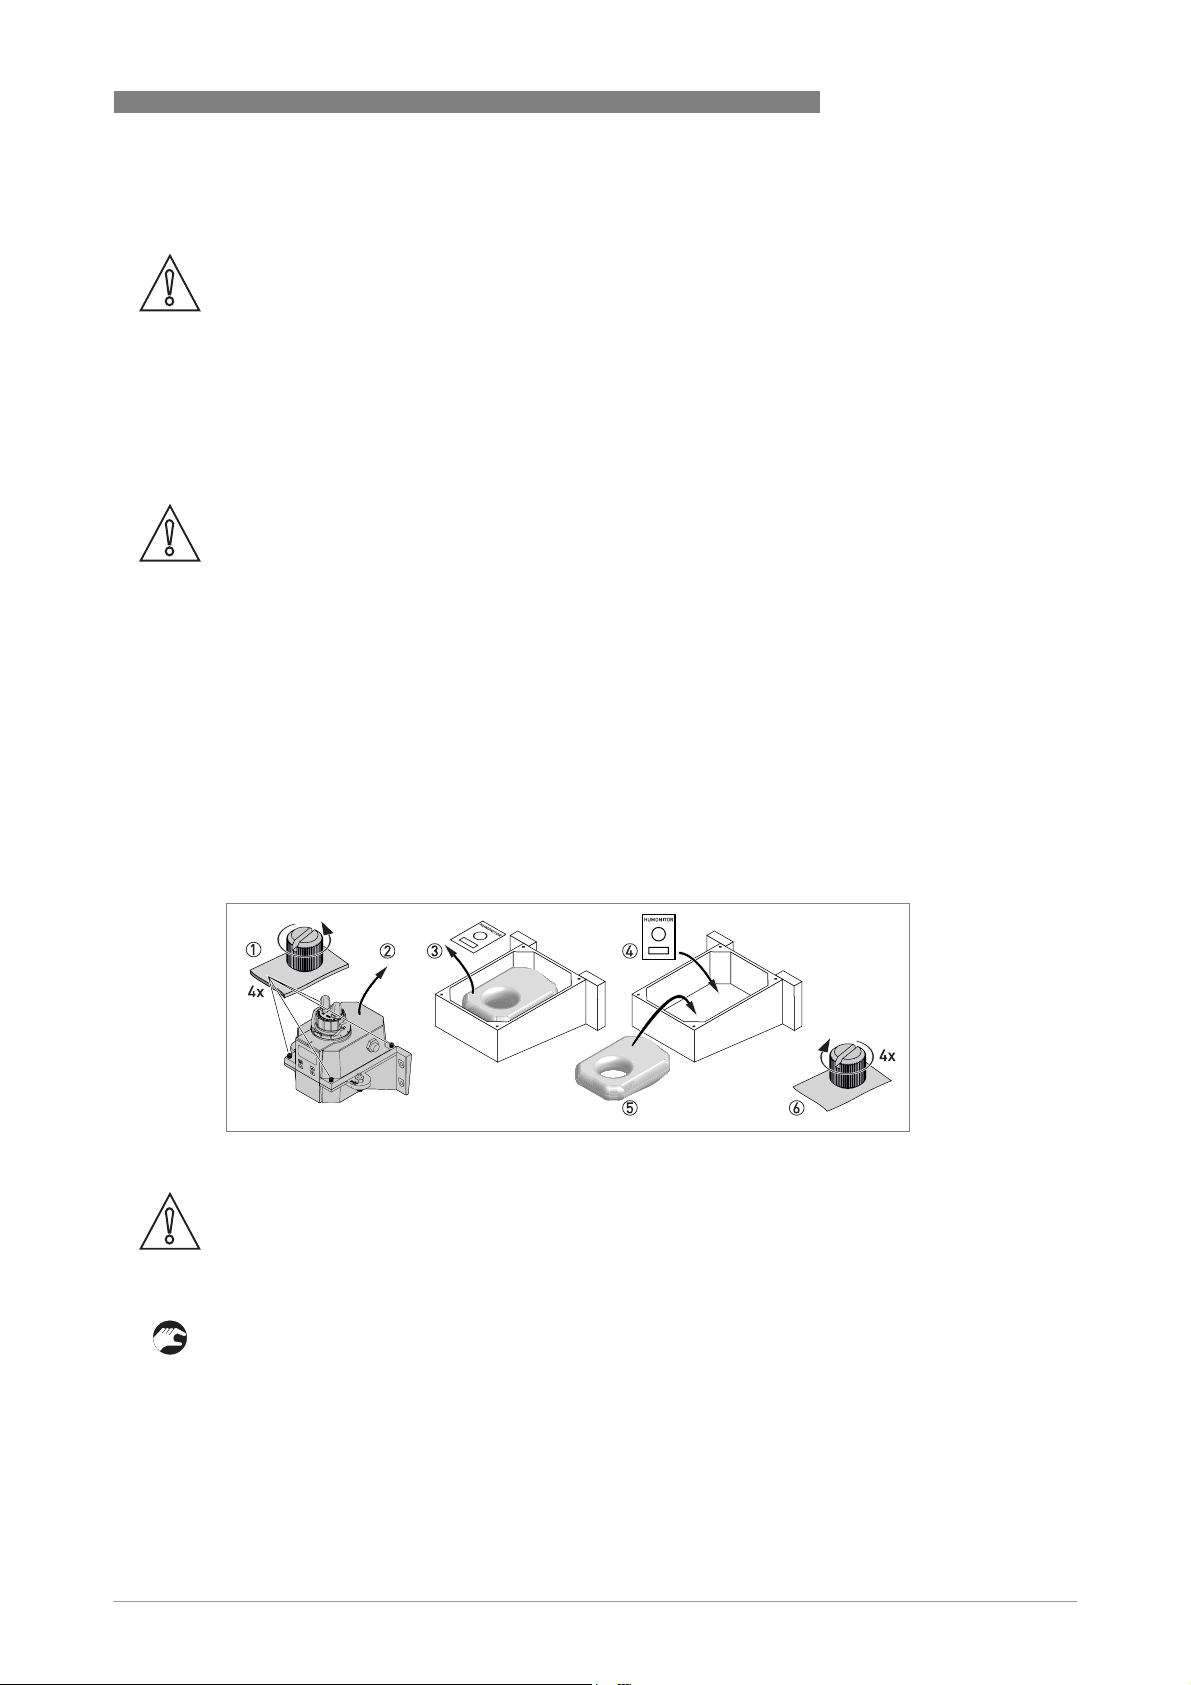
Execute the following steps to insert or replace the desiccant pouch and the humidity indicator
®
(Humonitor
Figure 3-1: Desiccant pack (desiccant pouch with humidity indicator)
card) or to inspect the seal:
CAUTION!
The desiccant degrades prematurely after removing the protective packaging. Therefore do not
open the packaging before usage, install the desiccant pouch quickly and close the device as
soon as possible.
• Move the lock ring counterclockwise and pull out the ultrasonic cuvette with flow-through
holder (detailed information on page 21).
• Unscrew the four corner thumbscrews of the electronic device manually according to 1 in the
following drawing (if the screws are too tight, use a screwdriver for slotted grub screws).
• Remove the upper half of the electronic device 2.
• Prior to installing the desiccant pouch for the first time, remove the shipping support (plastic
tube with a red flag reaching outside) within the upper part of the device; after removing you
can discard the tube.
www.krohne.com11/2012 - 4002444301 MA OPTISYS TUR 1050 R02 en
15
Page 16
3 INSTALLATION
• If you want to replace the desiccant pouch and the humidity indicator, take them out at first 3.
• Take the shrink packed desiccant pouch and the humidity indicator out of the protective
packaging.
• Put the humidity indicator on the bottom of the lower part of the electronic device and lay the
desiccant pouch on it 4 and 5.
• Inspect the seal and reseat or replace it if necessary.
• Reassemble everything in reverse order 6.
• To expedite the recognition of the new desiccant, reset the powered device by disconnecting
the sensor interconnect cable for two seconds and reconnecting it.
3.4.2 Selecting site and mounting
The preferred way of mounting of the device is wall mounting. If this is not possible, you can
mount the device on any suitable level surface. Irrespective of this possibilities always note the
following guidelines:
• Choose a location that is easily accessible for operation and service and that is as close as
possible to the sampling point to ensure a quick response time (maximum distance:
3m/10ft)
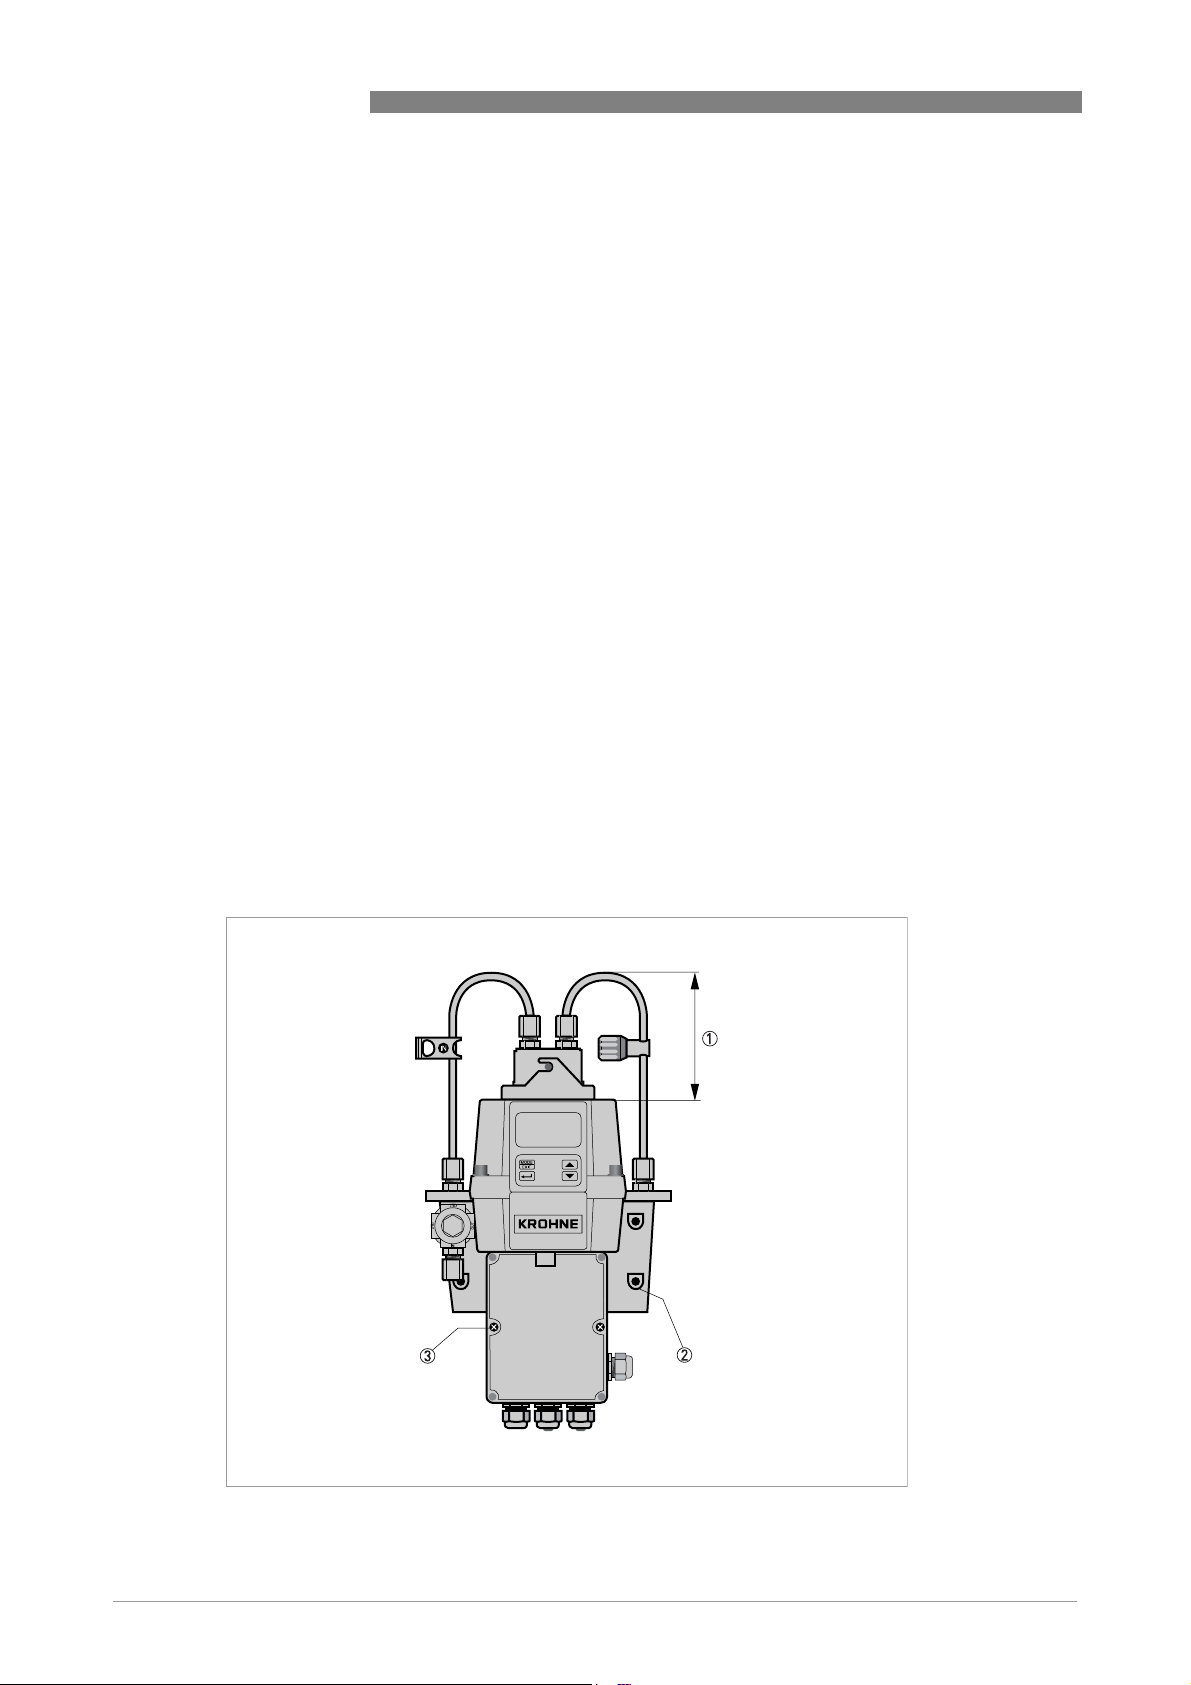
• Leave at least 20 cm / 8" of free space above the device for easy service (e.g. removal of the
flow head and insertion of calibration cuvettes), see position number 1 in the following
drawing.
• Ensure that the front display rests at eye level.
• Refer to chapter "Dimensions" for the device dimensions.
• Use screws M6 / 1/4" to fix the electronic device 2 and M4 / 3/16" to fix the junction box
power assembly 3.
OPTISYS TUR 1050
16
www.krohne.com 11/2012 - 4002444301 MA OPTISYS TUR 1050 R02 en
Page 17
OPTISYS TUR 1050
INFORMATION!
The design of the device recommends that the junction box power assembly cradles in a hutch
below the electronic device. Therefore the correct procedure is to fix the junction box power
assembly first and then mount the electronic device on top of it.
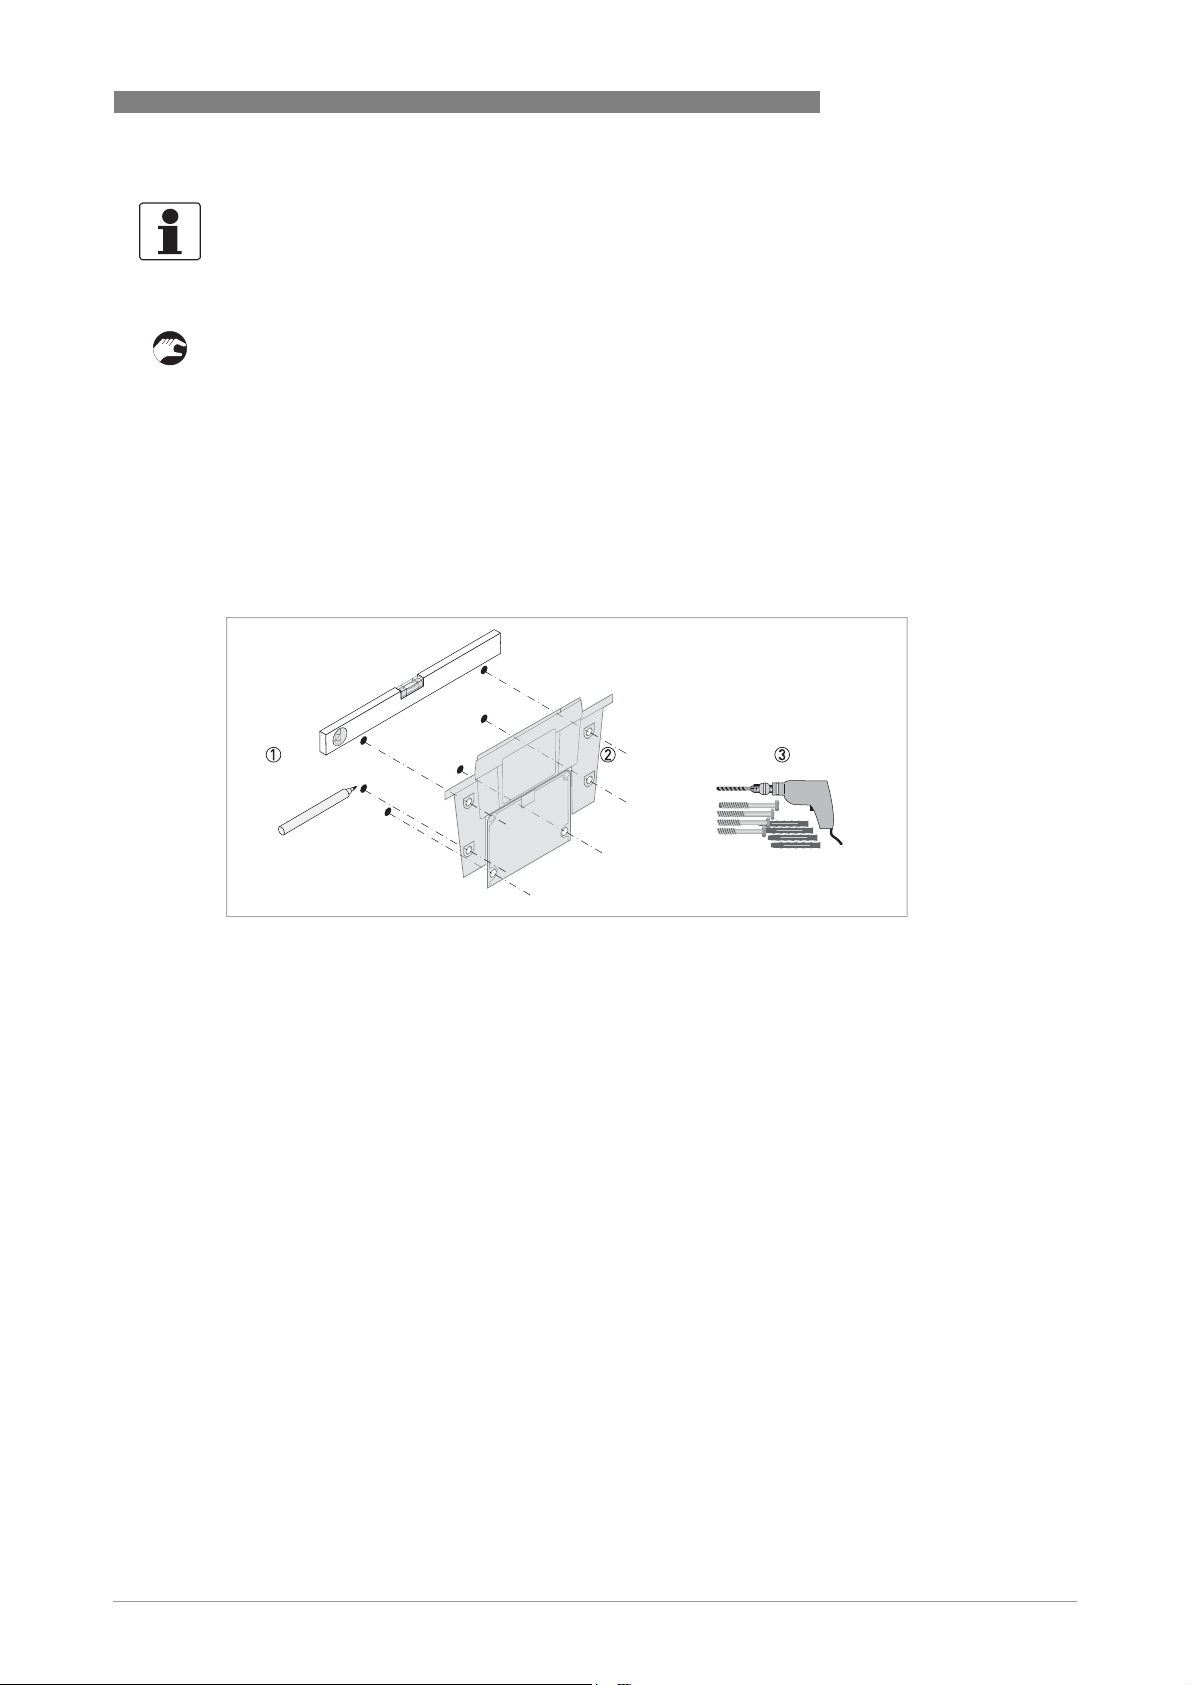
Mounting procedure
• Take a water-level, a pencil and ruler and use the dimensions in the following drawing to mark
the six mounting hole locations on the mounting surface.
Note: Do not use the drawing on the following page directly as mounting template as the
printed dimensions there differ from reality!
• Drill six holes into the mounting surface and insert six screw anchors into them.
• Use screws M4 / 3/16" to fix the junction box power assembly at first.
• Put the electronic device on top of the junction box power assembly and use screws M6 / 1/4"
to fix it.
INSTALLATION 3
Figure 3-2: Mounting filed terminal box
www.krohne.com11/2012 - 4002444301 MA OPTISYS TUR 1050 R02 en
17
Page 18
3 INSTALLATION
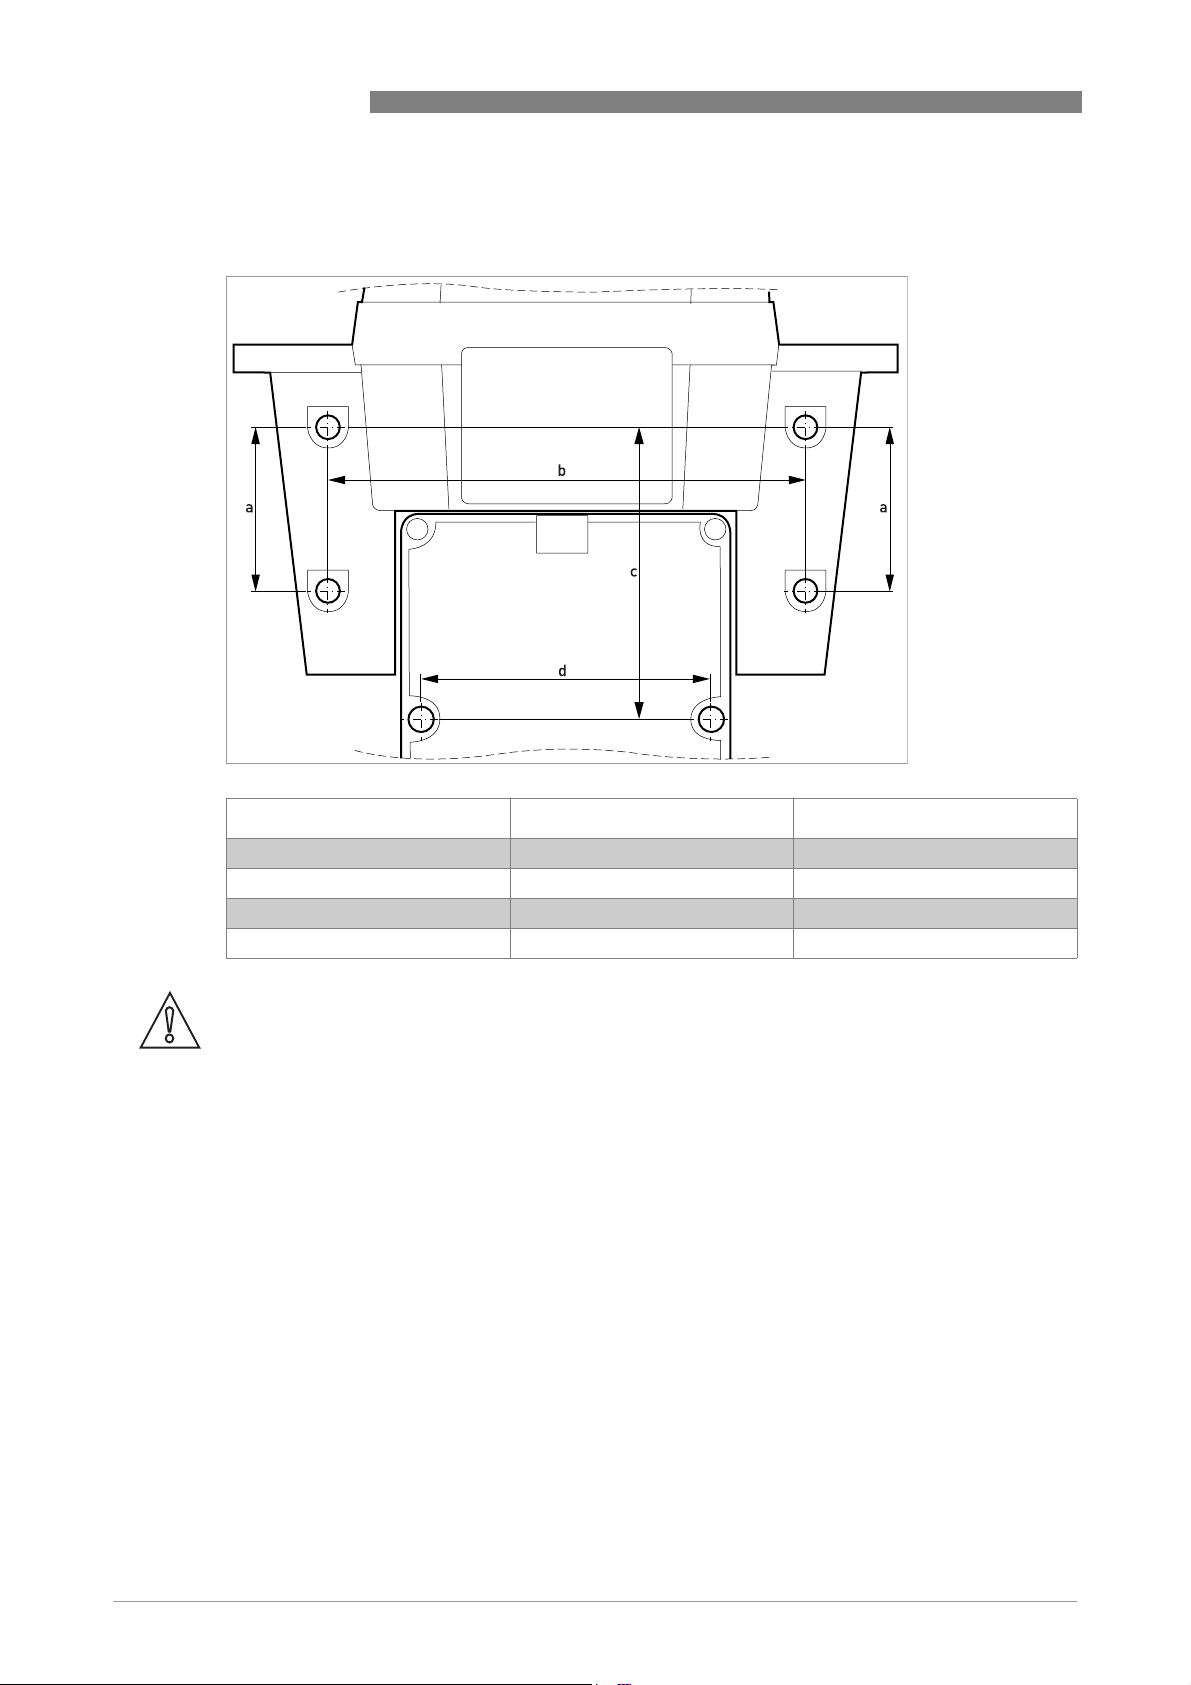
3.4.3 Mounting
OPTISYS TUR 1050
[mm] ["]
a 51 2.0
b 147 5.79
c 90 3.54
d 87 3.43
CAUTION!
Please do not use this directly as mounting template as the printed dimensions here differ from
reality!
18
www.krohne.com 11/2012 - 4002444301 MA OPTISYS TUR 1050 R02 en
Page 19

OPTISYS TUR 1050
3.4.4 Connecting the hoses
The scope of delivery contains two tubings with fittings (intake tubing, drain tubing) for the
connection between the flow-through holder and the flow intake and flow drain. The intake
tubing has a shut-off clamp and the drain tubing has a backpressure valve. Connect the hoses
according to the following drawing:
CAUTION!
Do not connect the sensor interconnect cable with the upper part of the device now and regard
the installation order in the chapter "Electrical connections"! The reason is that you will have to
do the internal wiring at first and the connection of the sensor interconnect cable afterwards, the
reverse order could damage the device!
INSTALLATION 3
Figure 3-3: Connecting the hoses
1 Intake tubing with shut-off clamp
2 Drain hose with backpressure valve
3 Sensor interconnect cable
The hose for the connection between the sampling point and the device as well as the hose for
the flow drain do not belong to the scope of delivery. For this purpose use hoses with the
following specifications:
• Inner diameter: 4.75 mm / 3/16".
• Outer diameter: 8 mm / 5/16".
• Flexible and opaque hose material to prevent algae growth if direct sunlight can reach the
hose.
www.krohne.com11/2012 - 4002444301 MA OPTISYS TUR 1050 R02 en
19
Page 20

3 INSTALLATION
Assemble the plumbing and connect the hoses according to the following drawing:
Figure 3-4: Procedure to assemble the plumbing and connect the hoses
• Slip the coupling nut over the hose 1
• Insert spreading ring into the hose 2
• Fix the nut on the thread of the pressure regulator 3
• Intake hose connection 4
• Drain hose connection 5
OPTISYS TUR 1050
INFORMATION!
To prevent that the drain water causes any damages, assure that the drain hose leads to a
suitable drain site.
3.4.5 Drain vent
CAUTION!
The manufacturer accepts no responsibility for damage caused by the introduction of vapours,
fluids or other materials into the device process stream which are not compatible with the
device
introducing any media into the device process stream!
The device has a drain vent in the "Out" bulkhead fitting. The drain vent allows atmospheric
equalization, thus helping to alleviate bubble formation in the cuvette.
INFORMATION!
During initial flow minor leakage may occur at the drain vent. This will subside once the normal
flow is established.
In some pressurised systems there may occur a continuous leakage at the drain vent hole.
Therefore the scope of delivery contains a seal screw that you can insert into the vent hole and
tighten.
’
s wetted materials. Always note the list of wetted parts in the technical data table before
20
www.krohne.com 11/2012 - 4002444301 MA OPTISYS TUR 1050 R02 en
Page 21

OPTISYS TUR 1050
INSTALLATION 3
3.4.6 Inserting and fixing the ultrasonic cuvette with flow-through holder
CAUTION!
Never insert a cuvette with visible moisture or water on the glass or the transducer into the
upper part of the device, because this could destroy or damage the electronics or the
transducer! Always clean and dry the cuvette with a soft cloth just before inserting it. The
dehumidification system cannot remove large droplets of water, only residual moisture!
Figure 3-5: Procedure for inserting and fixing the ultrasonic cuvette with flow-through holder
INFORMATION!
The device can only detect a new cuvette if it works in the normal operation mode ("AUTO"). If the
device operates correctly after inserting a new cuvette, "AUTO" will flash on the display.
www.krohne.com11/2012 - 4002444301 MA OPTISYS TUR 1050 R02 en
21
Page 22

4 ELECTRICAL CONNECTIONS
4.1 Safety instructions
DANGER!
All work on the electrical connections may only be carried out with the power disconnected. Take
note of the voltage data on the nameplate!
DANGER!
Observe the national regulations for electrical installations!
WARNING!
Observe without fail the local occupational health and safety regulations. Any work done on the
electrical components of the measuring device may only be carried out by properly trained
specialists.
INFORMATION!
Look at the device nameplate to ensure that the device is delivered according to your order.
Check for the correct supply voltage printed on the nameplate.
OPTISYS TUR 1050
4.2 Description of board and bulkheads
Figure 4-1: Description of board and bulkheads
1 Power supply terminal block
2 Alarms relay
3 4...20 mA/RS 485 terminal block
4 Power cable strain relief
5 4...20 mA/RS 485 cable bulkhead
6 Alarm cable bulkhead
7 Power cable bulkhead
8 Holes for strain relief strap
9 Sensor interconnect cable
22
All of the electrical connections to the device run via the junction box power assembly. For
shipment the manufacturer inserts plugs into the alarm and the 4...20 mA/RS 485 cable
bulkhead to waterproof the device.
www.krohne.com 11/2012 - 4002444301 MA OPTISYS TUR 1050 R02 en
Page 23

OPTISYS TUR 1050
ELECTRICAL CONNECTIONS 4
4.3 Circuit breaker and specifications of power supply
DANGER!
The manufacturer strongly recommends to place a circuit breaker prior to the power
connection. Use this circuit breaker to de-energise all cables before starting any installation or
service work, otherwise a perilous electric shock can happen.
CAUTION!
The device has a switching power supply which demands 100...240 VAC and 47...63 Hz. To avoid
damage or destruction of the device always assure that the power supply meets this
specifications!
INFORMATION!
The power cord does not belong to the scope of delivery.
4.4 Cable specifications
• The power cable bulkheads accept the following cable diameter range: 5.8...10 mm /
0.23...0.39".
• All terminals accept wires in the range of 14...28 AWG.
• Stripping of insulation to a length of 6 mm / ¼".
4.5 Installation order of the electrical connections
CAUTION!
Installation, assembly, start-up and maintenance may only be performed by appropriately
trained personnel. The regional occupational health and safety directives must always be
observed.
CAUTION!
To prevent damage or destruction of all devices, always regard the following items:
•
Ensure that the meter itself and all devices that should be connected to the outputs are
de-energised before establishing a cable connection!
•
Before fixing a cable, look on the labels on the board and especially regard polarities!
To establish the electrical connections in the correct way, follow the order of the following
sections and their instructions.
www.krohne.com11/2012 - 4002444301 MA OPTISYS TUR 1050 R02 en
23
Page 24

4 ELECTRICAL CONNECTIONS
4.5.1 Connecting the cables in the junction box power assembly
DANGER!
The device involves a line voltage that could endanger life! Only qualified electricians are allowed
to perform the electrical installation of the device. Always note all local and government
recommendations and methods for installation of electrical connections to and between the
device and other peripheral devices.
DANGER!
The manufacturer accepts no responsibility that the device is watertight again after the electrical
installation. Assure the water tightness after the terminal box was wired for operation. If any of
the bulkheads does not tighten a cable or plug properly this jeopardises the ratings of the device
and may cause a perilous electric shock.
Connection procedure
• Open the terminal box with a screwdriver.
• Remove the plugs in the cable bulkheads if you want to conduct a cable through them.
• Strip all needed wires to a length of 6 mm / ¼".
• Fix the cable on the terminal like in the following drawing 1 to 5.
• Use the strain relief strap to reduce the tension on the power terminals 6.
• Close the terminal box and assure that it is properly sealed.
OPTISYS TUR 1050
24
Figure 4-2: Connecting the cables in the junction box power assembly
www.krohne.com 11/2012 - 4002444301 MA OPTISYS TUR 1050 R02 en
Page 25

OPTISYS TUR 1050
4.5.2 Alarms terminal (signal output)
The terminals "ALARM 1" and "ALARM 2" are mechanical relays rated at 240 VAC and 2 A. The
abbreviations on the board and below the terminal have the following meanings:
• NO: Normally open
• NC: Normally closed
• C: Common
As the configuration of the alarms is fail-safe, the normal state is a power supplied device and
non-active alarms. For detailed information concerning the configuration of the alarms refer to
Configuring the alarm relays
on page 39.
4.5.3 RS 485 or 4...20 mA signal output
INFORMATION!
The installation of the 4...20 mA isolator will render the RS 485 non-operational. Shifting
between the 4...20 mA (analog) and the RS 485 (digital) output mode works with the help of the
software, for further information refer to Selecting the output on page 36
ELECTRICAL CONNECTIONS 4
.
INFORMATION!
Transformer isolated outputs are available as a factory installed option.
The 4...20 mA output is energised by a 15 VDC power source and can drive recorder loads up to
600 Ω. It is isolated from line power and earth ground.
The RS 485 half-duplex digital interface (2-wire) operates with differential levels that are
unsusceptible to electrical interferences. This is why the usage of cable lengths up to
900 m / 2950 ft is possible. Independent of the output mode (analog or digital) always note the
following items:
• For ease of connecting, remove the plug in terminal block (the labels of the connections are
beneath this block).
• Do not run 4...20 mA or RS 485 cables in the same conduit as power as this could lead to
signal interferences.
• When using the RS 485 interface, equip the last device on each bus with a 120 Ω terminating
resistor to eliminate signal reflection on the line.
www.krohne.com11/2012 - 4002444301 MA OPTISYS TUR 1050 R02 en
25
Page 26

4 ELECTRICAL CONNECTIONS
The electrical connection is independent of the output mode (analog or digital) and works as
follows:
Figure 4-3: Signal output connection
OPTISYS TUR 1050
RS485/4...20 mA
4.5.4 Connecting the sensor interconnect cable
CAUTION!
Always connect the sensor interconnect cable with the upper part of the device last of all! The
reason is that if you connect the sensor interconnect cable before the internal wiring, energising
the device with power could destroy or damage the device!
Figure 4-4: Connecting cable
26
www.krohne.com 11/2012 - 4002444301 MA OPTISYS TUR 1050 R02 en
Page 27

OPTISYS TUR 1050
5.1 Start-up
CAUTION!
Installation, assembly, start-up and maintenance may only be performed by appropriately
trained personnel. The regional occupational health and safety directives must always be
observed.
Before start-up assure the following adjustments:
• The drain vent is open for gravity-feed and open-drain systems. In pressurised systems it has
• The back pressure valve is completely open.
• The hose connected with drain connection of the device leads to a suitable drain site.
• For continuous measurement the intake hose has to supply the sensor with a dependable
Start-up procedure
• Check that the circuit breaker is not in a position where it de-energises the device.
• Switch on the power supply.
• Wait until the device has completed its warm-up (1 hour during the initial start-up and
typically 45 minutes during all following start-ups), at the same time the fully automatic
drying process takes place.
i After the warm-up the display shows the measured turbidity, if a continuous process
OPERATION 5
to be plugged with a seal screw (the manufacturer ships the device with the seal screw in the
drain vent).
sample flow.
stream is flowing through the cuvette; refer to
the equivalent signal is provided on the analog 4...20 mA output or the digital RS 485 output,
depending on the options selected.
Normal operation
on page 28. In addition,
www.krohne.com11/2012 - 4002444301 MA OPTISYS TUR 1050 R02 en
27
Page 28

5 OPERATION
5.2 Display and operating keys
Figure 5-1: Description of the display and operating keys
1 Indication of the turbidity levels and user guidance in the customer setting routine
2 Indication of an active access code and operation in offset mode
3 Indication of error messages and user guidance
4 Button to move up or increase
5 Button to move down or decrease
6 Button to enter the option or mode that is chosen
7 Button to cycle between the three operation modes
8 Mode arrows that indicate the current of the three operation modes: AUTO (normal operation), CAL (calibration) or
CONFIG (configuration)
OPTISYS TUR 1050
5.3 Normal operation
The device can report the turbidity of the process water in Nephelometric Turbidity Units (NTU)
or Formazin Nephelometric Units (FNU). Readings above 100 NTU/FNU or 1000 NTU/FNU
(depending on the specific device measuring range) are outside the range of this device.
During normal operation, the display shows an arrow beside "AUTO" in the upper left corner.
Simultaneously the lower row displays the current scale and the upper row the measured
reading. The following drawing is an example for a display during normal operation:
28
www.krohne.com 11/2012 - 4002444301 MA OPTISYS TUR 1050 R02 en
Page 29

OPTISYS TUR 1050
5.4 Getting access with activated security access function
The device has a security access function that you can enable and disable in the configuration
mode (for more information refer to
the enabled function the following screen appears any time you press the button MODE/EXIT:
INFORMATION!
The only valid security code is 333, it cannot be changed.
Execute the following steps to get access to the menus CAL or CONFIG with an activated security
access:
Enabling or disabling the security access
OPERATION 5
on page 41). With
• If you have not already pressed the button MODE/EXIT, press it now (in the normal measuring
mode: 1x=CAL, 2x=CONFIG).
i You see the display like in the drawing above with the first number of the access code in the
upper row flashing.
• Use the buttons ↑ or ↓ to select the first number of the code (i.e. "3").
• Press the button ^ to accept the first number of the code.
i Now the second number of the code is flashing.
• Repeat the previous steps with the second and third number (always enter "3"), always
confirm the chosen number with the ^ button.
i If you have entered the valid code, the device directly goes to calibration or configuration
main menu. If you have entered a wrong code, it returns to the normal measuring mode
("AUTO").
www.krohne.com11/2012 - 4002444301 MA OPTISYS TUR 1050 R02 en
29
Page 30

5 OPERATION
5.5 Menu topology
The device has three operation modes:
• Auto (AUTO): normal measuring mode
• Calibration (CAL): mode for physical calibration
• Configuration (CONFIG) mode for customer-specific adjustments and offset calibration
You can enter the calibration mode and the configuration mode with the help of the
correspondent main menus. Each main menu has a set of submenus.
Entering, navigating within and leaving a main menu:
• Press the button MODE/EXIT until the arrow on the left side of the display appears in front of
the abbreviation of the desired main menu (in the normal measuring mode: 1 x = CAL,
2x=CONFIG).
i You are now in one of the two main menus.
• You can move through the submenu items by pressing ^, in the submenu you can choose the
different options.
• You can always leave the submenu level and go back to the normal operation mode by
pressing the button MODE/EXIT.
OPTISYS TUR 1050
INFORMATION!
Note that you can change settings, i.e. values and options, with the help of ↑ or ↓ upwards and
downward. But you can only move through the menus in one direction. If you want to go back, you
have to leave the main menu by pressing MODE/EXIT and enter it again as described above.
5.6 Calibration mode (main menu)
The manufacturer calibrates and tests every device before it leaves the factory. Therefore you
can use the device directly out of the box. Under normal conditions the manufacturer
recommends a recalibration every three months. Also be aware of the following device
properties:
INFORMATION!
•
During calibration the fan inside the device does not run to extend the life of the desiccant;
the fan turns on again during each calibration countdown, after returning to the normal
operation mode ("AUTO") or after 5 minutes, whichever comes first.
•
While in calibration or configuration mode, the device has a time-out function; it
automatically returns the device to the normal operation mode ("AUTO") after a 15 minute
period of inactivity.
•
While in the calibration or configuration mode, the relay contacts hold at the last valid
condition and will not change state.
30
CAUTION!
The desiccant pouch may become prematurely saturated if the measurement chamber is
permanently uncovered; therefore keep the chamber covered during calibration and replace the
ultrasonic cuvette immediately thereafter.
www.krohne.com 11/2012 - 4002444301 MA OPTISYS TUR 1050 R02 en
Page 31

OPTISYS TUR 1050
5.6.1 Calibration liquids
If you want to use the device over the entire measuring range (0.02...100 NTU/FNU or
0.02...1000 NTU/FNU), a complete calibration with three different calibration liquids is
necessary. If you require a device accuracy below 10 NTU/FNU (i.e. with potable water), you can
do the calibration with only two liquids (for this purpose the first calibration step can be
bypassed).
INFORMATION!
Always note the following items to achieve the best calibration results:
•
Use three calibration liquids with turbidities of 0.02, 10.0 and 100 or 1000 NTU/FNU if you
want to achieve the full-scale accuracy stated in this document.
•
You can use formazin as a primary calibration liquid. Though the manufacturer recommends
the own calibration kit as a primary option because this liquids are more stable than formazin
and have a minimum shelf life of twelve months (the manufacturer's calibration kit is
purchasable as accessory part).
•
Check the expiration dates of the liquids prior to calibration to ensure that they have not
expired.
OPERATION 5
If you want to calibrate the device with formazin, always use a fresh stock suspension. The
reason is that diluted formazin is unstable and this can distort the calibration.
For EPA compliant calibration results the agency recommends that a calibration of online
devices takes place with primary calibration liquids at least every three months.
5.6.2 Calibration procedure (physical), inclusive indexing
To achieve the highest possible accuracy, the manufacturer recommends to index all calibration
cuvettes. Furthermore indexing a calibration cuvette accounts for normal scratches and
aberrations in the cuvette glass when performing a calibration. The manufacturer supplies all
his optionally available calibration cuvettes with indexing rings (see below).
Execute the following steps to make a physical calibration inclusive indexing the calibration
cuvettes:
• Press the button MODE/EXIT once to switch into the calibration mode.
i The arrow in the display appears beside "CAL", the lower display line shows alternating
"100" (turbidity value of the first calibration liquid in NTU/FNU) and ^, the upper line shows
the real-time reading.
www.krohne.com11/2012 - 4002444301 MA OPTISYS TUR 1050 R02 en
31
Page 32

5 OPERATION
• Remove the ultrasonic cuvette and insert the 100 NTU/FNU or 1000 NTU/FNU calibration
cuvette according to the following drawing (if you do not need the full-scale accuracy, press ↓
alternatively to bypass this calibration step and go directly to the 10 NTU/FNU calibration
step).
• If you need the 100 NTU/FNU or 1000 NTU/FNU calibration step, slowly rotate the calibration
cuvette one complete revolution (i.e. 360°), observe the measured turbidity on the display
during rotation and locate the position with the lowest measured turbidity.
• After one complete rotation return the cuvette to the position with the lowest measured
turbidity.
• Pull the indexing ring over the cap of the calibration cuvette according to the following
drawing, the ring should face directly forward.
i The cuvette is indexed now. When using it in future, insert it so that the pointer of the
indexing ring faces directly forward. For fine adjustment slowly rotate the calibration
cuvette about 5° clockwise and counterclockwise to find the lowest measured turbidity.
OPTISYS TUR 1050
32
• After finding out the lowest measured value of the 100 NTU/FNU or 1000 NTU/FNU calibration
cuvette and indexing it, press ^ to accept the 100 NTU/FNU or 1000 FNU/NTU calibration.
i The lower line of the display counts down the progress of the calibration step, afterwards
the device requests the next calibration step by showing 10 and ^ alternating.
• If the display does not show 10 and ^ alternating, press ↑ or ↓ until the display does so.
• Insert the 10 NTU/FNU calibration cuvette (contrary to the 100 NTU/FNU or 1000 NTU/FNU
calibration step you cannot leave out this step and the 0.02 NTU/FNU step).
• Repeat the procedure above and finally press ^ to accept the 10 NTU/FNU calibration.
i The lower line of the display counts down the progress of the calibration step, afterwards
the device requests the next calibration step by showing 0.02 and ^ alternating.
• Repeat the procedure above and finally press ^ to accept the 0.02 NTU/FNU calibration.
i The lower line of the display counts down the progress of the calibration step, afterwards
the device returns to the normal operation mode ("AUTO").
www.krohne.com 11/2012 - 4002444301 MA OPTISYS TUR 1050 R02 en
Page 33

OPTISYS TUR 1050
5.6.3 Calibration procedure (offset calibration)
Under certain circumstances an offset calibration is more suitable than a physical calibration as
described in the previous chapter. This might be the case if the process application contains a
number of devices so that a regular physical calibration is not possible.
INFORMATION!
Be aware that an offset calibration does not offer the accuracy of a physical calibration. An offset
calibration makes the device accurate only at turbidity levels in the immediate vicinity of the grab
sample's value and not in the full measuring range!
The maximum offset value is ±1 NTU/FNU. If the deviation goes beyond this value, a physical
calibration is necessary. An offset calibration always starts with a comparison of samples:
• Collect a grab sample of the process water with the optional grab sample cuvette.
• Measure the turbidity with the help of the device.
• Take a second grab sample and measure its turbidity using a turbiditymeter for laboratory use
(the manufacturer's service department can give you examples of suitable devices).
• Compare the turbidity values of both samples. If they are very close, then an offset calibration
is not required and you can stop the procedure at this step.
OPERATION 5
If both samples differ substantially (but less than 1 NTU/FNU), continue with the actual offset
calibration. The following steps make the turbidity reading of the device agree with the value of
turbidity meter for laboratory use:
• In the normal measuring mode (AUTO), press the button MODE/EXIT twice.
i The device switches in the configuration mode and the arrow in the display appears in front
of "CONFIG".
• Press ^ several times until "OFST" appears in the lower row of the display.
i While the lower row shows"OFST", the upper row indicates the status of the offset function
("ON" or "OFF", default setting is "OFF")
• Change the status of the offset function by pressing ↓ or ↑, see following drawing.
www.krohne.com11/2012 - 4002444301 MA OPTISYS TUR 1050 R02 en
33
Page 34

5 OPERATION
• Press ^ to accept the new operational status.
i The display now shows the set offset value (default setting is 0.00).
• Select the desired offset value by pressing ↑ or ↓ (regard the example below).
• Press ^ to accept the chosen offset value.
i The offset calibration is complete and the device goes to the next submenu in the
configuration main menu.
• If you want to return to the normal measuring mode, press MODE/EXIT.
INFORMATION!
Whenever the measurement rests upon an offset value, the information "OFFSET" appears in the
lower right corner of the display (even in the normal operation mode).
OPTISYS TUR 1050
Example of finding out the offset value
The correct offset value is the difference between the value measured with the turbidity meter
for laboratory use and the value measured with the actual meter. After you have entered an
offset value, the meter adds or subtracts this value from its own measured value (depending on
the algebraic sign of the difference).
If the actual meter measures 0.28 NTU/FNU in the grab sample and the meter for laboratory use
measures 0.04 NTU in the same sample, than the correct offset value is -0.24. After entering the
offset value the device subtracts 0.24 from its own measured value of 0.28 NTU/FNU and
displays a measuring result of 0.04 NTU/FNU.
34
www.krohne.com 11/2012 - 4002444301 MA OPTISYS TUR 1050 R02 en
Page 35

OPTISYS TUR 1050
5.6.4 Calibration error
If the following information is shown on the display, the internal diagnostic function has
determined an error during the calibration procedure:
The reason for this error message is that either the calibration liquids were bad or they were
inserted in the wrong order. You may find a remedy with the following options:
• Check of the calibration liquids (e.g. the expiration date), afterwards restoring the factory
calibration or performing a recalibration.
• To recalibrate execute a calibration as described in the previous sections.
• To restore the factory calibration refer to
Restoring the factory settings
OPERATION 5
on page 47.
INFORMATION!
If the device reports a calibration error, you cannot use it for measuring purposes without
performing a recalibration or restoring the factory settings.
5.7 Configuration mode (main menu)
The device has the ability to customise it according to your specific needs any time during normal
operation with the help of the configuration mode. Be aware of the following device properties:
INFORMATION!
•
While in calibration or configuration mode, the device has a time-out function; it
automatically returns the device to the normal operation mode ("AUTO") after a 15 minute
period of inactivity.
•
While in the calibration or configuration mode, the relay contacts hold at the last valid
condition and will not change state.
•
You can leave the configuration mode at any time and menu by pressing the button
MODE/EXIT. The device automatically saves all changes.
•
The order of the following sections and subsections represents the menu topology.
As described in the section "Menu topology", you have to press the button MODE/EXIT twice to
switch to the configuration mode. Thereafter you are always in the first submenu, i.e. "Selecting
the output".
www.krohne.com11/2012 - 4002444301 MA OPTISYS TUR 1050 R02 en
35
Page 36

5 OPERATION
5.7.1 Selecting the output
After switching to the configuration mode, the first submenu is always the selection of the
output. At first you see the following display:
AUTO
CAL
CONFIG
• Select the desired output by using ↓ or ↑ (options: 4-20 for the 4...20 mA output, 485 for the
RS 485 output, OFF if you do not need outputs) or leave the setting.
The displays for the two possible outputs look like the following drawings:
OPTISYS TUR 1050
AUTO
CAL
CONFIG
• Accept your selection by pressing ^.
i If you chose or leave the setting "OFF", the device switches to the submenu "Error level"; if
you chose or leave one of the outputs, the device switches to a submenu for the settings of
the chosen output (see one of the next two sections).
36
www.krohne.com 11/2012 - 4002444301 MA OPTISYS TUR 1050 R02 en
Page 37

OPTISYS TUR 1050
5.7.2 Setting the 4...20 mA output inclusive error level
If you selected or left the 4...20 mA output in the previous step (for detailed information refer to
Selecting the output
see the following display:
AUTO
CAL
CONFIG
Your task is now to set the lower and the upper turbidity limits:
• Use the buttons ↑ and ↓ to define the lower turbidity limit which is assigned to the 4 mA output
level or leave the setting.
• Accept your selection by pressing ^.
i The device switches to the next menu item, i.e. the setting of the upper limit.
on page 36), the device automatically switches to this submenu. At first you
OPERATION 5
AUTO
CAL
CONFIG
• Use the buttons ↑ and ↓ to define the upper turbidity limit which is assigned to the
20 mA output level or leave the setting.
• Accept your selection by pressing ^.
i The device switches to the last menu item of this submenu, i.e. "Error level".
AUTO
CAL
CONFIG
In case of an error the 4...20 mA output can be used to indicate the problem. That means the
device can set the current either to 4.00 mA, 2.00 mA, 0 mA or to "OFF" ("OFF" is the default
setting and effects that the 4...20 mA output is unaffected by any error condition):
• Use the buttons ↑ or ↓ to choose the desired setting for the error level or leave the setting.
• Accept your selection by pressing ^.
i The device switches to the submenu "Configuring the alarm relays".
www.krohne.com11/2012 - 4002444301 MA OPTISYS TUR 1050 R02 en
37
Page 38

5 OPERATION
5.7.3 Configuring the RS 485 port
INFORMATION!
The default communication parameters of the RS 485 port are: 8 bits, no parity and 1 stop bit.
OPTISYS TUR 1050
If you selected the RS 485 output (for detailed information refer to
Selecting the output
on page
36), the device automatically switches to this submenu. It allows to configure the RS 485 output
and starts with the baud rate:
• Use the buttons ↑ and ↓ to select one of the predefined baud rates or leave the setting
(options: 1200, 2400, 4800, 9600 or 19200 baud).
• Accept your selection by pressing ^.
i The device switches to the next menu item, i.e. the setting of the device address.
• Use the buttons ↑ and ↓ to select the desired device address or leave the setting (options:
1...255).
• Accept your selection by pressing ^.
i The device switches to the last menu item of this submenu, i.e. "Modbus mode".
AUTO
CAL
CONFIG
• Use the buttons ↑ and ↓ to select the options "RTU" or "ASCII" or leave the setting.
• Accept your selection by pressing ^.
i The device switches to the submenu "Configuring the alarm relays".
INFORMATION!
For further information concerning the Modbus mode contact the manufacturer.
38
www.krohne.com 11/2012 - 4002444301 MA OPTISYS TUR 1050 R02 en
Page 39

OPTISYS TUR 1050
5.7.4 Configuring the alarm relays
The device has two alarm relays that operate as two independent programmable alarms. To fully
program each alarm, you have to input the work mode of the alarm function, the alarm set point
and the delay time for the alarm.
Work mode of the alarm function
• HI: the relay changes state when the measured turbidity level is higher than the programmed
alarm level for the chosen alarm delay time.
• LO: the relay changes state when the measured turbidity level is lower than the programmed
alarm level for the chosen alarm delay time.
• OFF: this option completely deactivates the alarm functions.
• ERROR: the relay changes state when an internal error occurs.
Alarm set point
This is the level at which an alarm activates. You can adjust the alarm set point to any valid
turbidity level over the range of the device in steps of 0.01 NTU/FNU.
OPERATION 5
Alarm delay times
The alarm delay time prevents activating the alarm when the measured turbidity level exceeds
or falls below the alarm set point just for a short time. There are two options:
• Delay on: with this option you can define a time period; the turbidity level must exceed the
alarm set point for this time period before the alarm starts. Example: if you selected an alarm
set point of 50 NTU/FNU and an alarm delay time of 5 seconds, then the measured turbidity
must exceed 50 NTU/FNU for at least 5 seconds to start the alarm.
• Delay off: similar to the option "Delay on" you can define a time period; the turbidity level
must not fall below the alarm set point for this time period before the alarm stops. Example:
if you selected an alarm set point of 50 NTU/FNU and an alarm delay time of 5 seconds, then
the measured turbidity must fall below 50 NTU/FNU for at least 5 seconds to stop the alarm.
If you have completed all settings for the output as described in the previous sections, the device
moves to the submenu for the alarm configuration. At first you see the following display:
AUTO
CAL
CONFIG
• Use the buttons ↑ and ↓ to select the desired work mode (HI, LO, OFF, ERROR) or leave the
setting.
• Accept your selection by pressing ^.
i If you chose "OFF" or "ERROR", a prompt appears to set up the alarm for the second relay
(see below in this section). If you chose one of the other options, a prompt appears to set up
the alarm set point.
www.krohne.com11/2012 - 4002444301 MA OPTISYS TUR 1050 R02 en
39
Page 40

5 OPERATION
AUTO
CAL
CONFIG
• Use the buttons ↑ and ↓ to select the desired alarm set point in the upper row or leave the
setting.
• Accept your selection by pressing ^.
i A prompt appears to set up the alarm delay times starting with "Delay on". Thus an arrow
pointing upward appears to the right of "DLY" in the lower row while the upper row shows
the preset number of seconds.
OPTISYS TUR 1050
• Use the buttons ↑ and ↓ to select the desired number of seconds for the time after which the
alarm has to be "on" (options: 1...30) or leave the setting.
• Accept your selection by pressing ^.
i The desired number of seconds for the time after which the alarm has to be "on" is set. The
display switches to the input of the value for "Delay off". Thus an arrow pointing downward
appears to the right of "DLY" in the lower row while the upper row again shows the preset
number of seconds.
• Use the buttons ↑ and ↓ to select the desired number of seconds for the time after which the
alarm has to be "OFF" or leave the setting.
• Accept your selection by pressing ^.
i The desired number of seconds for the time after which the alarm has to be "on" is set. The
display switches back to the selection of the desired work mode, but this time for the
second alarm relay.
• Repeat the procedure described in this section for the second alarm relay, starting again with
the work mode.
40
If you choose another work mode than "OFF" for the second alarm relay, you have to go through
the described procedure of defining the set point and the delay times for this relay. After defining
"Delay off" for the second alarm relay and pressing ^, the device switches to the next submenu
(i. e. enabling or disabling the security access). The same happens if you choose the work mode
"OFF" for the second alarm relay and press ^.
www.krohne.com 11/2012 - 4002444301 MA OPTISYS TUR 1050 R02 en
Page 41

OPTISYS TUR 1050
5.7.5 Offset calibration
The offset calibration is a submenu item in the configuration mode. That means despite of its
function, it is not accessible via the calibration mode. For detailed information concerning the
offset calibration procedure refer to
Calibration procedure (offset calibration)
5.7.6 Enabling or disabling the security access
With an enabled security access the user has to enter a valid code to get to any mode other than
normal operation (AUTO).
INFORMATION!
The only valid security code is 333, it cannot be changed.
Execute the following steps to change the setting of the function:
• Use the buttons ↑ or ↓ to enable (upper row: ON) or disable (upper row: OFF) the security
access or leave the setting
i If you enabled the security access, the security key icon will be visible and flashing on the
display in all working modes of the device (AUTO, CAL, CONFIG) and their submenus.
OPERATION 5
on page 33.
• Accept your selection by pressing ^.
i The device switches to the last submenu of the configuration mode ("Extended settings").
For further information refer to
29.
5.7.7 Extended settings
"Extended settings" is the last submenu of the configuration mode. A couple of settings are
grouped together in this submenu to prevent them form being adjusted by mistake. The default
setting is "OFF", as shown in the following drawing:
AUTO
CAL
CONFIG
Getting access with activated security access function
on page
www.krohne.com11/2012 - 4002444301 MA OPTISYS TUR 1050 R02 en
41
Page 42

5 OPERATION
You can leave the default setting or, if the setting is "ON", disable the extended settings again by
pressing ↑ or ↓.
INFORMATION!
If you disable the extended settings, i.e. choose the setting "OFF", the device stores all
adjustments for every menu item of the extended settings submenu. The manufacturer
recommends to disable the extended settings again after all adjustments to prevent adjustments
by mistake.
Any time you press ^ while the extended settings are disabled, the device switches back to the
normal measuring mode and saves all settings. If you enabled the extended settings with the
buttons ↑ or ↓ (i.e. "ON" appears in the upper row of the display) and press ^, the device
switches to the first menu item of the extended settings submenu (speed of response). The
procedure of changing a setting and switching to the next item is the same for every item of the
extended settings:
Changing a setting and switching to the next item
• Use the buttons ↑ or ↓ to change the setting.
• Accept your selection by pressing ^.
i The device switches to the next item of the extended settings. Pressing ^ after reaching the
last item (i.e. the 20 mA adjustment) will switch the device back to the normal measuring
mode (AUTO), all settings are saved.
OPTISYS TUR 1050
Speed of response
With the help of this function you can adjust the speed of response for both the displayed
NTU/FNU value and the output values (i.e. of the RS 485 or the 4...20 mA output). The default
setting is 10, the adjustable range is 1...100.
Note that the displayed speed of response in the upper row of the display is a relative number
and not the real speed of response in seconds. You can calculate the approximate response time
in seconds by multiplying the number in the upper row by 5.
Select the slowest speed of response (i.e. the highest number) if you want to avoid disturbances
of the reading by air and other anomalies. Select the fastest speed (i.e. the lowest number) if you
need to monitor rapid changes.
42
www.krohne.com 11/2012 - 4002444301 MA OPTISYS TUR 1050 R02 en
Page 43

OPTISYS TUR 1050
Resolution of the measured value
The device can display from one up to four digits to the right of the decimal place. The default
setting are two decimal places. Four digits right to the decimal point are only possible for
measuring results below 10 NTU/FNU. Each decade upwards decreases the digits right to the
decimal place by one.
If the last or the last two digits right of the decimal place are not stable, you can reduce the
resolution (i.e. the amount of digits right to the decimal place) to hide these digits and get a
stable reading.
Display backlight brightness
OPERATION 5
The display backlight brightness is of particular interest if multiple devices are located in the
same area. If all of them should have the same clearness of display, then you might have to
adjust the backlight brightness of particular devices. The default setting is 8, ten levels are
available.
Setting the units
The most common unit of the measured value and the default setting is NTU (Nephelometric
Turbidity Units), but FNU (Formazin Nephelometric Units) is also available.
www.krohne.com11/2012 - 4002444301 MA OPTISYS TUR 1050 R02 en
43
Page 44

5 OPERATION
Ultrasonic cleaning
With the help of this function you turn the ultrasonic cleaning on or off (default is "On").
RS 485 parameters
The RS 485 parameters are only adjustable and so appear if the RS 485 interface is enabled (for
detailed information refer to
parameters "BITS", "PRTY" (parity) and "STOP" (stop bit). After choosing a setting for the
ultrasonic cleaning in the previous step you see the following display at first:
Selecting the output
OPTISYS TUR 1050
on page 36). In this case you can change the
• Use ↑ or ↓ to select the desired number of bits or leave the setting, accept your selection by
pressing ^.
• Use ↑ or ↓ to select the desired parity or leave the setting, accept your selection by
pressing ^.
• Use ↑ or ↓ to select the desired number of bits or leave the setting, accept your selection by
pressing ^.
i The device switches to the next item of the extended settings (desiccant alarm).
44
www.krohne.com 11/2012 - 4002444301 MA OPTISYS TUR 1050 R02 en
Page 45

OPTISYS TUR 1050
In the communication mode "Simple" the following information is exchanged between the
master computer and the device:
Enquiries of master computer Answer of device
Byte 1: attention character ":" in ASCII or 3A Hex The same attention character ":" in ASCII or 3A Hex
Byte 2: address of the device being enquired Address of the device
Byte 3/4: CR/LF or 0D 0A in Hex 3: Measured value
Example (master requesting a report from address
No. 1): 1 CRLF
Desiccant alarm
The device can output a humidity alarm if the detected humidity could cause condensation. The
default setting of the humidity alarm is "OFF", like in the following drawing:
OPERATION 5
4: Unit (NTU or FNU)
Example (response of the device set to address
No. 1): 001 0.0249 NTU
If you enabled the desiccant alarm and the humidity detector determines a problematic value,
the device activates the alarms and sets the 4...20 mA output to the selected error level. In the
normal measuring mode you see the measured value in the upper row and "DESC" in the lower
row:
AUTO
CAL
CONFIG
www.krohne.com11/2012 - 4002444301 MA OPTISYS TUR 1050 R02 en
45
Page 46

5 OPERATION
4 mA and 20 mA adjustment
If you enabled the 4...20 mA output (for detailed information refer to
36) you can adjust the 4 mA and the 20 mA output separately (if the 4...20 mA output is disabled
this item does not appear in the extended settings). This means that you can increase or
decrease the current output slightly until you see exactly 4 mA or 20 mA at your multimeter or
control system. This settings will be slightly different on each device as the manufacturer sets
them to 4.00 mA and 20 mA before shipping. The limits are:
• 4mA: ± 0.2 mA or ± 200 counts
• 20 mA: ± 1mA or ± 1000 counts
After accepting your selection for the desiccant alarm by pressing ^ and while the 4...20 mA
output is enabled, you see the following display:
AUTO
CAL
CONFIG
OPTISYS TUR 1050
Selecting the output
on page
• Use ↑ or ↓ to make your adjustment.
• Press ^ to switch to the adjustment of the 20 mA output:
AUTO
CAL
CONFIG
After accepting the adjustment for the 20 mA output by pressing ^ the device switches back to
the normal measuring mode (AUTO). All settings are saved.
46
www.krohne.com 11/2012 - 4002444301 MA OPTISYS TUR 1050 R02 en
Page 47

OPTISYS TUR 1050
5.8 Restoring the factory settings
INFORMATION!
The restore function affects not only the configuration settings, but also the calibration settings.
Executing this functions means that both return to the default which was defined by the
manufacturer. Furthermore the device works with reduced accuracy!
INFORMATION!
Be aware that if the reason for restoring the factory settings was a hardware defect (e.g. a
sensor lamp with a low output), the original problem still exists thereafter. Before an accurate
operation you have to determine and correct the original problem.
Irrespective of the reason for restoring you always have to execute the following steps if you
want the configuration and calibration settings to return to the default:
• Press and hold the button ↑.
• Press the button ^ and release it.
• Release the button ↑
i Factory configuration and calibration settings have been restored.
OPERATION 5
5.9 Faults: reasons and remedies
The device continuously performs an internal fault detection. If a fault occurs, a description in
form of a queue appears in the bottom row of the display. Altogether there are three types of
fault messages:
Warnings
A warning is simply an indication of a problem, i.e. the device does not activate any alarms. If for
example the desiccant becomes saturated and the desiccant alarm is disabled, the warning
"DESC" appears on the display.
Errors
The cause of an error message can usually be corrected by the operator. If the device detects an
error, it activates both alarm relays and sets the 4...20 mA output to the selected error level. In
this case the device may still display measuring results, but with an uncertain accuracy:
AUTO
CAL
CONFIG
www.krohne.com11/2012 - 4002444301 MA OPTISYS TUR 1050 R02 en
47
Page 48

5 OPERATION
A message of a calibration error, i.e. the calibration is deficient, differs from the other error
messages and looks like the following:
Failures
A failure is a complete malfunction, i.e. the device does not function properly. Failures cannot be
corrected by the operator, but the device has to be returned to the manufacturer. They concern
internal systems such as the CPU, the A/D converter or the EEPROM chip. In the case of a failure
detection, the display shows the message "FAIL". Furthermore the device activates both alarm
relays and helds the 4...20 mA output at the selected error level.
AUTO
OPTISYS TUR 1050
CAL
CONFIG
48
www.krohne.com 11/2012 - 4002444301 MA OPTISYS TUR 1050 R02 en
Page 49

OPTISYS TUR 1050
Apart from the faults shown before there are problems that do not have a specific message in
the display (e.g. extremely alternating measuring results). The following table contains both
kinds of problems:
Fault chart
OPERATION 5
Fault message /
problem
CAL (bottom row of
display)
CLN (bottom row of
display)
DESC (bottom row of
display, only if
desiccant alarm
disabled)
FAIL (bottom row of
display)
FLOW (bottom row of
display, only if flow
switch is installed)
LAMP (bottom row of
display)
MA (bottom row of
display)
Measuring result
blinks (i.e. value in the
upper row of the
display)
Measuring result
alternates extremely
Measuring result is
higher than expected
Measuring result is
lower than expected
Category Cause Measurement
Error Deficient calibration or
calibration impossible.
Error Ultrasonic transducer
has no contact to the
spring connections or
transducer itself is
damaged.
Ultrasonic cuvette has
been removed or
wrong cuvette is used.
Warning Desiccant in the pouch
is saturated or bad.
Failure Complete malfunction
of an internal system.
Error Sample flow stopped. Restore sample flow, contact manufacturer for
Error Light source fails. A service employee of the manufacturer has to
Error 4...20 mA loop open. Check wiring of the current output (details on page
- Exceeding of
measuring range, i.e.
turbidity is too high.
- Bubbles in the
measured medium.
Debris in the ultrasonic
cuvette.
- Bubbles in the
measured medium.
Condensate or dirt in
the ultrasonic cuvette
Leaky ultrasonic
cuvette.
Improper calibration. Recalibrate the device (details on page 30).
- Improper calibration. Recalibrate the device (details on page 30).
Ensure that you use a proper calibration liquid (the
best way is to use the calibration cuvettes of the
manufacturer); if the calibration fails nonetheless,
check the output of the sensor lamp and clean it or
replace. After you remedied the problem, you have
to recalibrate the device.
Rotate ultrasonic cuvette slightly to improve the
spring connection; if message persists, the
transducer itself is damaged and you have to
replace the whole cuvette.
Insert correct ultrasonic cuvette and pay attention
to the correct procedure (details on page 21).
Change desiccant pouch (details on page 51).
Return the device to the manufacturer.
further information.
replace the lamp, do not do it on your own!
25).
Take a sample and check the turbidity in a
laboratory.
Ensure that the drain vent hole is open and not
blocked.
Apply backpressure with the help of the
backpressure valve.
In case of severe bubble formation use a stilling
chamber (available as accessory part).
Remove cuvette (details on page 50) and clean it
with a soft cloth.
See above in this table.
Remove cuvette (details on page 50) and clean it
with a soft cloth.
Check for leakages and replace devices if
necessary.
www.krohne.com11/2012 - 4002444301 MA OPTISYS TUR 1050 R02 en
49
Page 50

6 SERVICE
6.1 Service admonitions
CAUTION!
Installation, assembly, start-up and maintenance may only be performed by appropriately
trained personnel. The regional occupational health and safety directives must always be
observed.
INFORMATION!
Each time a housing cover is opened, the thread should be cleaned and greased. Use only resinfree and acid-free grease.
Ensure that the housing gasket is properly fitted, clean and undamaged.
INFORMATION!
Assembly materials and tools are not part of the delivery. Use the assembly materials and tools
in compliance with the applicable occupational health and safety directives.
6.2 Maintenance
6.2.1 Replacing or cleaning cuvette
OPTISYS TUR 1050
CAUTION!
Never insert a cuvette with visible moisture or water on the glass or the transducer into the
upper part of the device! Otherwise this cuvette could destroy or damage the electronics or the
transducer! Always clean and dry the cuvette with a soft cloth just before inserting it. The
dehumidification system cannot remove large droplets of water, only residual moisture!
INFORMATION!
Measurement cuvettes used for both grabbing a sample and continuous flow measurement have
to be clean and free of marks or scratches. Otherwise the device cannot detect a proper
measuring result.
To remove the glass cuvette from the ultrasonic cuvette with flow-through holder execute the
following steps:
• Shut-off the intake flow with the help of the shutoff clamp.
• Move the lock ring counterclockwise and remove the ultrasonic cuvette with flow-through
holder (details on page 21).
• Turn the cuvette counterclockwise to remove it from the ultrasonic cuvette with flow-through
holder.
• Take a new cuvette or clean the old one (clean the interior and exterior of the cuvette by
washing up with a detergent solution usual in trade at first, afterwards rinse the interior and
exterior with distilled or de-ionised water usual in trade).
• Reassemble everything in reverse order.
50
www.krohne.com 11/2012 - 4002444301 MA OPTISYS TUR 1050 R02 en
Page 51

OPTISYS TUR 1050
After installing an new cuvette the dehumidification system becomes active to remove all
moisture from the ultrasonic transducer. The drying process may last up to 30 minutes, during
this time "DRY" appears in the lower row of the screen and the ultrasonic cleaning cannot run.
Also be aware of the following items:
• The drying process is not an alarm condition and therefore no alarm is active.
• The duration of the process depends on the amount of moisture detected by the
dehumidification system and thus it may vary.
• If you remove the ultrasonic cuvette assembly during the drying process, the message "CLN"
does not appear in the lower row of the display; in the normal case the message indicates
that the spring connection has no contact, but the drying process deactivates this function.
• All seals and the desiccant pack have to be in a good condition (i.e. that the message "DESC"
does not appear in the display); otherwise the dehumidification system cannot function
properly.
• If the drying process is unsuccessful (e.g. because of to much moisture or water on the
cuvette), the message "DESC" appears on the display.
6.2.2 Replacing desiccant pouch and humidity indicator
SERVICE 6
INFORMATION!
Contact the manufacturer or your local sales office if you need a new, shrinkpacked desiccant
pouch, a new humidity indicator or a new seal.
The device monitors the replaceable desiccant pouch condition continuously. The lower line of
the display shows the message "DESC" in the event that you have to replace a saturated
desiccant pouch that may cause problems. The desiccant has a long lifetime, however its
replacement is necessary from time to time. In this case refer to
humidity indicator
on page 51 and use a new desiccant pouch and humidity indicator.
6.2.3 Replacing the source lamp
The source lamps in the device have a long lifetime. The manufacturer has rated the infrared
lamp for ten years and the white light lamp for seven years.
CAUTION!
To prevent the device from damages, do not try to replace the lamp on your own! If you need to
replace a lamp, contact the manufacturer or your local sales office.
Replacing desiccant pouch and
www.krohne.com11/2012 - 4002444301 MA OPTISYS TUR 1050 R02 en
51
Page 52

6 SERVICE
6.3 Availability of services
The manufacturer offers a range of services to support the customer after expiration of the
warranty. These include repair, maintenance, technical support and training.
INFORMATION!
For more precise information, please contact your local sales office.
6.4 Spare parts availability
The manufacturer adheres to the basic principle that functionally adequate spare parts for each
device or each important accessory part will be kept available for a period of 3 years after
delivery of the last production run for the device.
This regulation only applies to spare parts which are subject to wear and tear under normal
operating conditions.
6.5 Spare or accessory parts
OPTISYS TUR 1050
Spare or accessory part Order code
Desiccant pack (desiccant pouch with humidity indicator) XGA M 010000
Flow regulator XGA M 010010
Flow-through assembly XGA M 010015
Pressure regulator XGA M 010020
Junction box power assembly XGA M 010025
Ultrasonic cuvette XGA M 010030
Lamp assembly WL XGA M 010040
Lamp assembly IR XGA M 010050
Tubing kit: (1 drain vent, 1 shut-off clamp, 1 backpressure valve, 2
connection tubes with fittings for flow-through assembly
Stilling chamber XGA M 010070
Grab sample cuvette, 10 pack XGA M 010080
Software for data collection and reporting XGA M 010090
Solid validation standard (cuvette) XGA M 010100
Calibration kit (0.02, 10, 100 NTU/FNU) XGA M 010150
Calibration kit (0.02, 10, 1000 NTU/FNU) XGA M 010160
Electronic service device IR XGA M 010200
Electronic service device WL XGA M 010210
XGA M 010060
52
CAUTION!
The spare part "Electronic service device IR (XGAM010200)" or "Electronic service device WL
(XGAM010210) is labelled with a spare part number. In case you change the electronic device,
please keep the original device label with the complete order code of the device. Only with the
original label the manufacturer can draw conclusions from the exact device type and specific
configuration. This is also important in case the device has still warranty.
www.krohne.com 11/2012 - 4002444301 MA OPTISYS TUR 1050 R02 en
Page 53

OPTISYS TUR 1050
6.6 Returning the device to the manufacturer
6.6.1 General information
This device has been carefully manufactured and tested. If installed and operated in accordance
with these operating instructions, it will rarely present any problems.
CAUTION!
Should you nevertheless need to return a device for inspection or repair, please pay strict
attention to the following points:
•
Due to statutory regulations on environmental protection and safeguarding the health and
safety of our personnel, manufacturer may only handle, test and repair returned devices that
have been in contact with products without risk to personnel and environment.
•
This means that the manufacturer can only service this device if it is accompanied by the
following certificate (see next section) confirming that the device is safe to handle.
CAUTION!
If the device has been operated with toxic, caustic, flammable or water-endangering products,
you are kindly requested:
•
to check and ensure, if necessary by rinsing or neutralising, that all cavities are free from
such dangerous substances,
•
to enclose a certificate with the device confirming that is safe to handle and stating the
product used.
SERVICE 6
www.krohne.com11/2012 - 4002444301 MA OPTISYS TUR 1050 R02 en
53
Page 54

6 SERVICE
6.6.2 Form (for copying) to accompany a returned device
Company: Address:
Department: Name:
Tel. no.: Fax no.:
Manufacturer's order no. or serial no.:
The device has been operated with the following medium:
OPTISYS TUR 1050
This medium is: water-hazardous
toxic
caustic
flammable
We checked that all cavities in the device are free from such
substances.
We have flushed out and neutralized all cavities in the
device.
We hereby confirm that there is no risk to persons or the environment through any residual media
contained in the device when it is returned.
Date: Signature:
Stamp:
6.7 Disposal
CAUTION!
Disposal must be carried out in accordance with legislation applicable in your country.
54
www.krohne.com 11/2012 - 4002444301 MA OPTISYS TUR 1050 R02 en
Page 55

OPTISYS TUR 1050
7.1 Measuring principle
According to the US EPA definition, turbidity is the cloudy appearance of water caused by the
presence of suspended and colloidal matter. In the waterworks field, a turbidity measurement is
used to indicate the clarity of water. Technically, turbidity is an optical property of the water
based on the amount of light reflected by suspended particles and colloidal matter.
According to ISO 7027 turbidity values below < 40 NTU are measured with the 90° scattered light
method. Light source and receiver are positioned in a 90° angle to each other. The light
transmitted from the source is directed in equal strength to the reference receiver and into the
medium. The light is reflected from the particles and fractions of the scattered light are received
by the detector, which is positioned in a 90° angle. The meter compares the light from reference
and scattered light receiver and calculates the turbidity value.
The measuring units for the turbidity are:
• NTU (Nephelometric Turbidity Unit)
• FNU (Formazin Nephelometric Unit)
TECHNICAL DATA 7
1
4
Figure 7-1: Measuring principle for turbidity measurement
1 Light source
2 Reference sensor
3 Sensor
4 Reflected light beam
5 Particles
6 Emitted light beam
2
3
www.krohne.com11/2012 - 4002444301 MA OPTISYS TUR 1050 R02 en
55
Page 56

7 TECHNICAL DATA
OPTISYS TUR 1050
7.2 Technical data table
INFORMATION!
•
The following data is provided for general applications. If you require data that is more
relevant to your specific application, please contact us or your local sales office.
•
Additional information (certificates, special tools, software,...) and complete product
documentation can be downloaded free of charge from the website (Download Center).
Measuring system
Measuring principle 90° scattered light method
Application range Turbidity measurement of liquids according to ISO 7027 and US EPA 180
Measuring range 0.02...100 NTU/FNU or 0.02...1000 NTU/FNU
Design
The measurement system consists of a sensor and a signal converter and is only available as compact version.
Display and user interface
Display Multi-line liquid crystal backlight display
Operating and display language English
Other properties
Response time Min. 5 seconds, adjustable
Alarms Two programmable, 120...240 VAC, 2A form C relay
Measuring accuracy
Reference conditions +1...+50°C / +33.8...+122°F
95% relative humidity
Altitude up to 2000 m / 6600 ft
Accuracy <40NTU/FNU: ±2% of reading or ±0.02 NTU/FNU whichever is greater
>40NTU/FNU: ±5% of reading
Resolution 0.0001 NTU/FNU (below 10 NTU/FNU) selectable
56
www.krohne.com 11/2012 - 4002444301 MA OPTISYS TUR 1050 R02 en
Page 57

OPTISYS TUR 1050
TECHNICAL DATA 7
Operating conditions
Note: the device is not appropriate for outdoor use!
Temperature
Process and ambient
temperature
Storage temperature -20...+60°C / -4...+140°F
Pressure
Process pressure 0.07...14 bar / 1...200 psi (built in regulator set at 1 bar / 15 psi)
Ambient pressure Atmospheric, altitude up to 2000 m / 6600 ft
Flow velocity
Minimum 0.1 l/min / 0.026 gal/min
Maximum 1 l/min / 0.26 gal/min
Other conditions
Humidity Display and operating unit: up to 95% relative humidity (non-condensing)
Protection category Enclosure is designed to meet IP 66 / NEMA 4X
+1...+50°C / +34...+122°F
Installation conditions
Dimensions For detailed information refer to
Weights Shipping weight: 2.5 kg / 5.5 lbs
Dimensions and weight
on page 58.
Materials
Sensor housing ABS
Wetted parts Nylon, borosilicate glass, silicon, polypropylene, stainless steel AISI 304
Electrical connections
Galvanic insulation Double insulated, pollution degree 2, over voltage category II (all in- and outputs
Power supply
Voltage 100...240 VAC, 47...63 Hz
Power consumption 80 VA
Outputs
Current output 1 x 4...20 mA, active, 15 VDC power source, max. load 600 Ω
Modbus Bi-directional, RS-485 Modbus RTU/ASCII
Relays 2 x relay 120...240 VAC, freely programmable
are electrically isolated from each other and from power and earth ground)
Option: transformer isolated current output
Approvals and certifications
CE This device fulfils the statutory requirements of the EC directives. The
manufacturer certifies successful testing of the product by applying the CE mark.
ETL Listed to UL 61010B-1 and certified to CSA 22.2 No. 1010.1-92
www.krohne.com11/2012 - 4002444301 MA OPTISYS TUR 1050 R02 en
57
Page 58

7 TECHNICAL DATA
7.3 Dimensions and weight
OPTISYS TUR 1050
Dimensions
[mm] ["]
a 208 8.19
b 51 2.0
c 90 3.54
d 30 1.18
e 87 3.43
f 148 5.83
g 131 5.16
h 347 13.66
i 197 7.76
k 62 2.44
Shipping weight: 2.5 kg / 5.5lbs
58
www.krohne.com 11/2012 - 4002444301 MA OPTISYS TUR 1050 R02 en
Page 59

OPTISYS TUR 1050
NOTES 8
www.krohne.com11/2012 - 4002444301 MA OPTISYS TUR 1050 R02 en
59
Page 60

KROHNE product overview
• Electromagnetic flowmeters
• Variable area flowmeters
• Ultrasonic flowmeters
• Mass flowmeters
• Vortex flowmeters
• Flow controllers
• Level meters
• Temperature meters
• Pressure meters
• Analysis products
• Products and systems for the oil & gas industry
• Measuring systems for the marine industry
Head Office KROHNE Messtechnik GmbH
Ludwig-Krohne-Str. 5
47058 Duisburg (Germany)
Tel.:+49 (0)203 301 0
Fax:+49 (0)203 301 10389
info@krohne.de
The current list of all KROHNE contacts and addresses can be found at:
© KROHNE 11/2012 - 4002444301 MA OPTISYS TUR 1050 R02 en - Subject to change without notice.
www.krohne.com
 Loading...