

Page 1
Handbook
BM 100 A
Reflex-Radar
©
KROHNE 01/2004 7.02261.22.00
GR
Variable area flowmeters
Vor tex flowmeters
Flow controllers
Electromagnetic flowmeters
Ultrasonic flowmeters
Mass flowmeters
Level measuring instruments
Communications engineering
Engineering systems & solutions
Switches, counters, displays and recorders
Heat metering
Pressure and temperature
Page 2

Table of contents
General advice on safety.................................................................................................................4
Range of application........................................................................................................................4
Items supplied..................................................................................................................................4
Documentation supplied................................................................................................................. 4
Principal gauge components.......................................................................................................... 5
Product liability and warranty.........................................................................................................6
1
1.1 Handling and storage........................................................................................................... 7
1.1.1 Avoiding blows..................................................................................................................... 7
1.1.2 Avoiding bending ................................................................................................................. 7
1.1.3 Avoiding cable kinks or fraying ............................................................................................7
1.2 Installation restrictions .........................................................................................................8
1.3 Mounting on a tank ..............................................................................................................8
1.3.1 Installation instructions: General notes ................................................................................ 8
1.3.2 Installation instructions: Nozzle............................................................................................ 8
1.3.3 Installation instructions: Gauge - all applications ............................................................... 12
1.3.4 Specific installation instructions: gauge - liquid applications.............................................. 14
1.3.5 Specific installation instructions: gauge - solid applications............................................... 15
2
2.1 Insulation rating .................................................................................................................17
2.2 Electrical installation instructions ....................................................................................... 18
2.2.1 Wiring general notes.......................................................................................................... 18
2.2.2 Wiring connections ............................................................................................................19
3
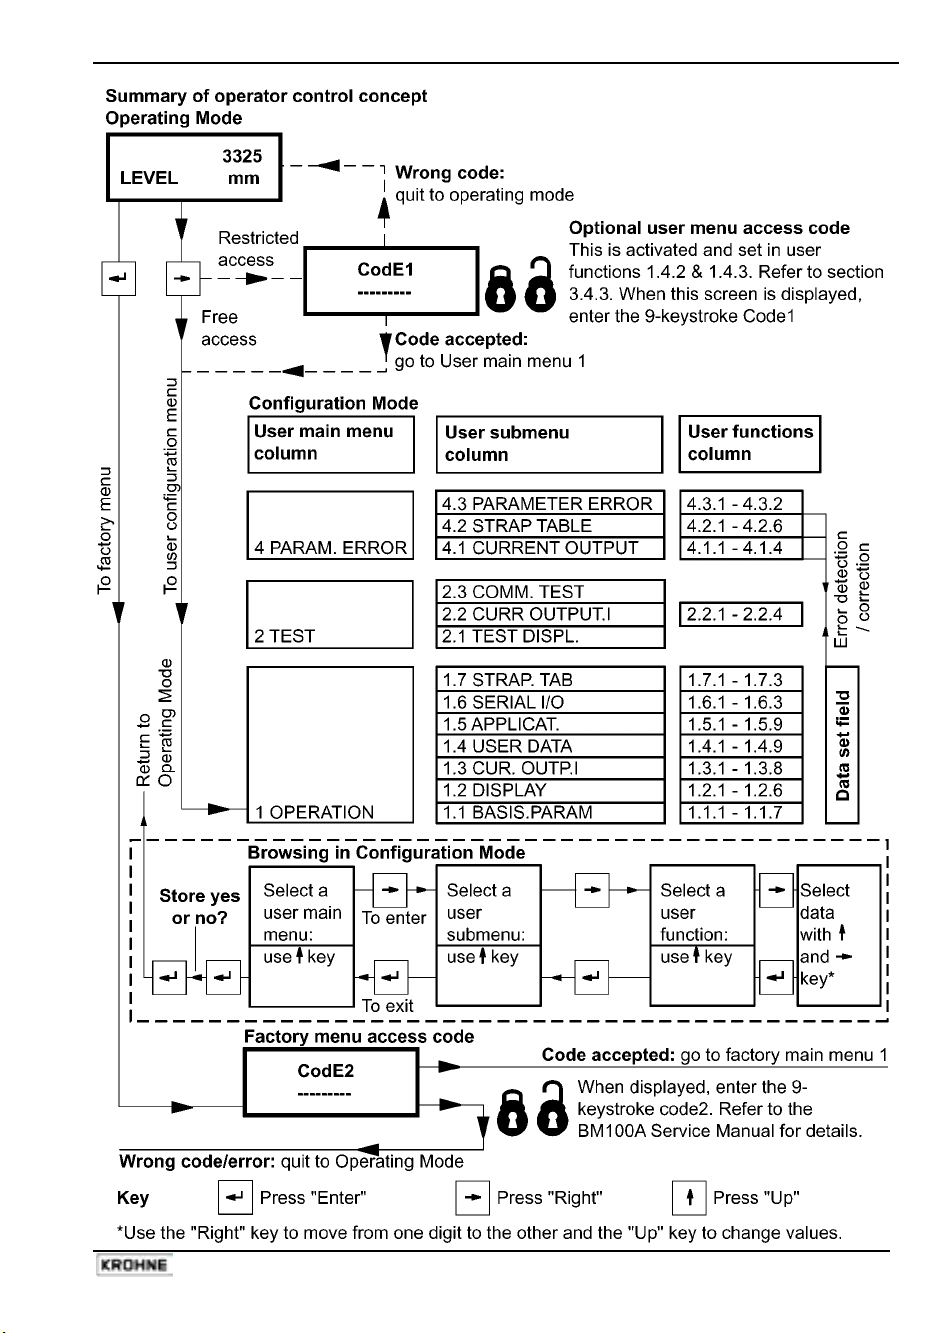
3.1 Power On and self-test mode ............................................................................................23
3.2 Local user interface ...........................................................................................................23
3.3 Status Markers...................................................................................................................24
3.4 Parameter Settings ............................................................................................................ 24
3.4.1 General Information ........................................................................................................... 24
3.4.2 Configuration Procedure.................................................................................................... 24
3.4.3 Quick Configuration: configuration examples .................................................................... 26
3.4.4 Network Configuration – digital outputs and gauge identification : RS 485, multi-drop...... 32
3.4.5 Summary of User Functions .............................................................................................. 33
3.4.6 BM100A TDR level meter characteristics ..........................................................................39
Mechanical installation .....................................................................................................7
Electrical Connections .................................................................................................... 17
User Interface................................................................................................................... 23
4
4.1 Test Functions in the user menu........................................................................................ 45
4.2 Troubleshooting .................................................................................................................45
4.2.1 Parameter errors................................................................................................................45
4.2.2 Basic Servicing – Replacing fuses and the electronics chassis ......................................... 46
4.3 Fault clearing .....................................................................................................................49
5
2 Handbook BM 100 A
Service and maintenance................................................................................................ 45
Ordering spare parts ....................................................................................................... 50
Page 3

6
6.1 Technical Data................................................................................................................... 52
6.2 BM 100 A Equipment Architecture..................................................................................... 54
Technical data..................................................................................................................52
6.2.1 BM 100 A mechanical options...................................................................................... 54
6.2.2 Definition of terms.............................................................................................................. 56
6.2.3 Probe measurement limits................................................................................................. 57
6.3 Gauge dimensions............................................................................................................. 58
7
7.1 Direct mode ....................................................................................................................... 60
8
9
9.1 Software Installation .......................................................................................................... 62
9.2 PC-STAR Software history ................................................................................................ 62
9.3 Setting up the gauge before connecting with the software ................................................ 63
9.4 PCSTAR Functions ........................................................................................................... 63
9.4.1 F1 Help:............................................................................................................................. 63
9.4.2 F2 Connection: ..................................................................................................................64
9.4.3 F3 Exit: .............................................................................................................................. 73
9.4.4 F4 Serial (parameters):...................................................................................................... 73
9.4.5 F5 Record Reading ........................................................................................................... 74
9.4.6 F7 Configuration ................................................................................................................76
9.4.7 F9 Colors........................................................................................................................... 77
9.4.8 Other important PCSTAR functions................................................................................... 77
Appendix A: Returning a device for testing or repair to KROHNE............................................ 78
Appendix B: BM 100 A Level Gauge Configuration Record ...................................................... 79
Appendix C: BM 100 A – CE Declaration of Conformity............................................................. 80
Measuring Principle ........................................................................................................ 59
Certificates and Approvals ............................................................................................. 61
PC STAR software installation and operation instructions ......................................... 62
Handbook BM 100 A 3
Page 4

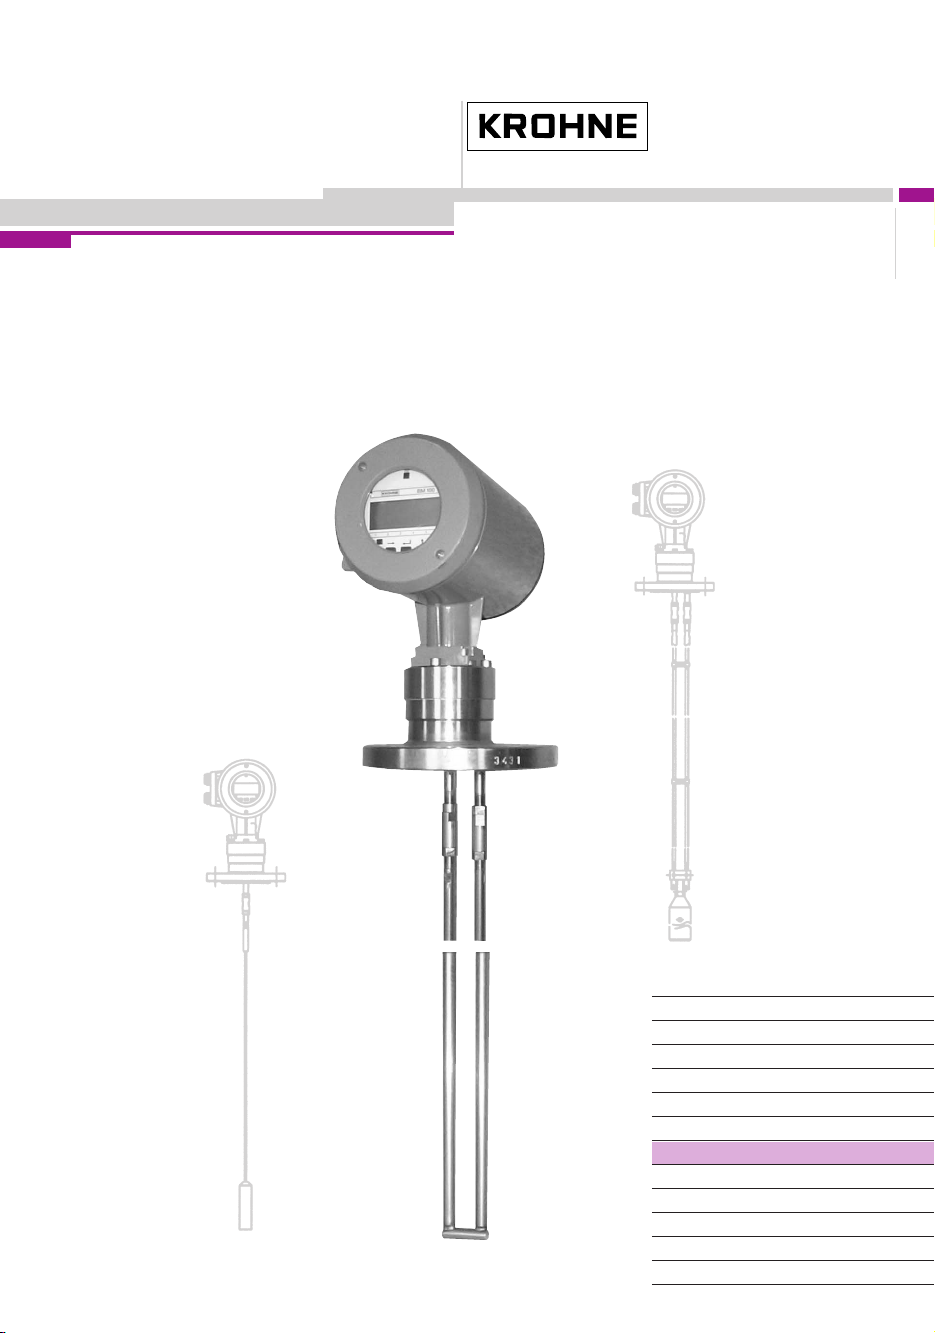
General advice on safety
The device will normally weigh between approx. 11 kg / 25 lb and 35kg / 77 lb. Carry the
device using two people, lifting it by the flange holes and supporting the probe. Lifting
gear may also be used but no attempt should be made to lift the device by the probe.
Range of application
The BM 100 A TDR Level gauge measures the level and volume of liquids and liquid gases. It can
also measure the level and volume of pastes, powders, slurries and granular products.
The BM 100 A also permits continuous and simultaneous measurement of liquid level and interface
of two liquids.
For the storage of volatile products, such as water and carbon disulphide
also be equipped with a probe (type G) to measure the interface with a top mounted probe: this
avoids the resultant safety issues of installing a gauge under the tank.
tanks, the BM 100 A can
Items supplied
• signal converter connected to a cable, coaxial or rod signal guidance probe, as per order.
Optional: remote extension with wall support, sunshade (with fastening material in each case)
• bar magnet for operator control / parameter assignment (only for version with local display)
• wrench for the covers
Documentation supplied
The following documentation will be included with the instrument:
• installation and operating instructions (this manual), and handbook.
• approval documents, unless reproduced in the installation and operating instructions.
4 Handbook BM 100 A
Page 5
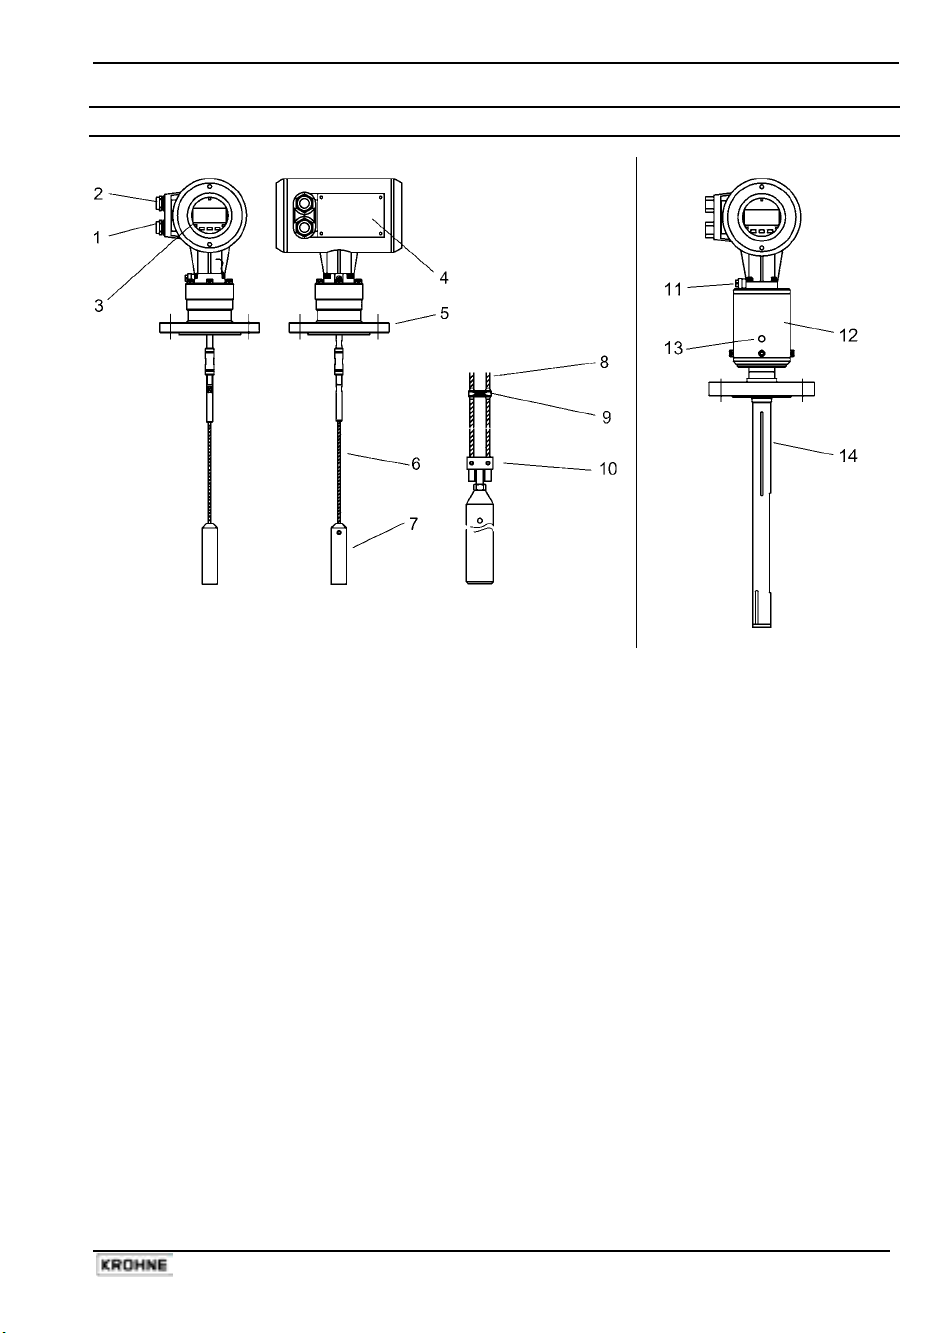
Principal gauge components
Non-Ex version Ex Version
1 Cable entry (output)
2 Cable entry (power supply)
3 Local user interface (display screen, buttons and magnetically-actuated hall sensors)
4 Nameplate (see diagram on the following page)
5 Flange
6 Single cable probe
7 Counterweight
8 Twin cable probe
9 Spacer
10 Short-circuit
11 Equipotential bonding system connection (Ex)
12 Isolating chamber – separates electronics housing from hazardous products
13 Pressure release plug (1 bar or 14.5 psi limit) and vent
14 Coaxial probe
Handbook BM 100 A 5
Page 6
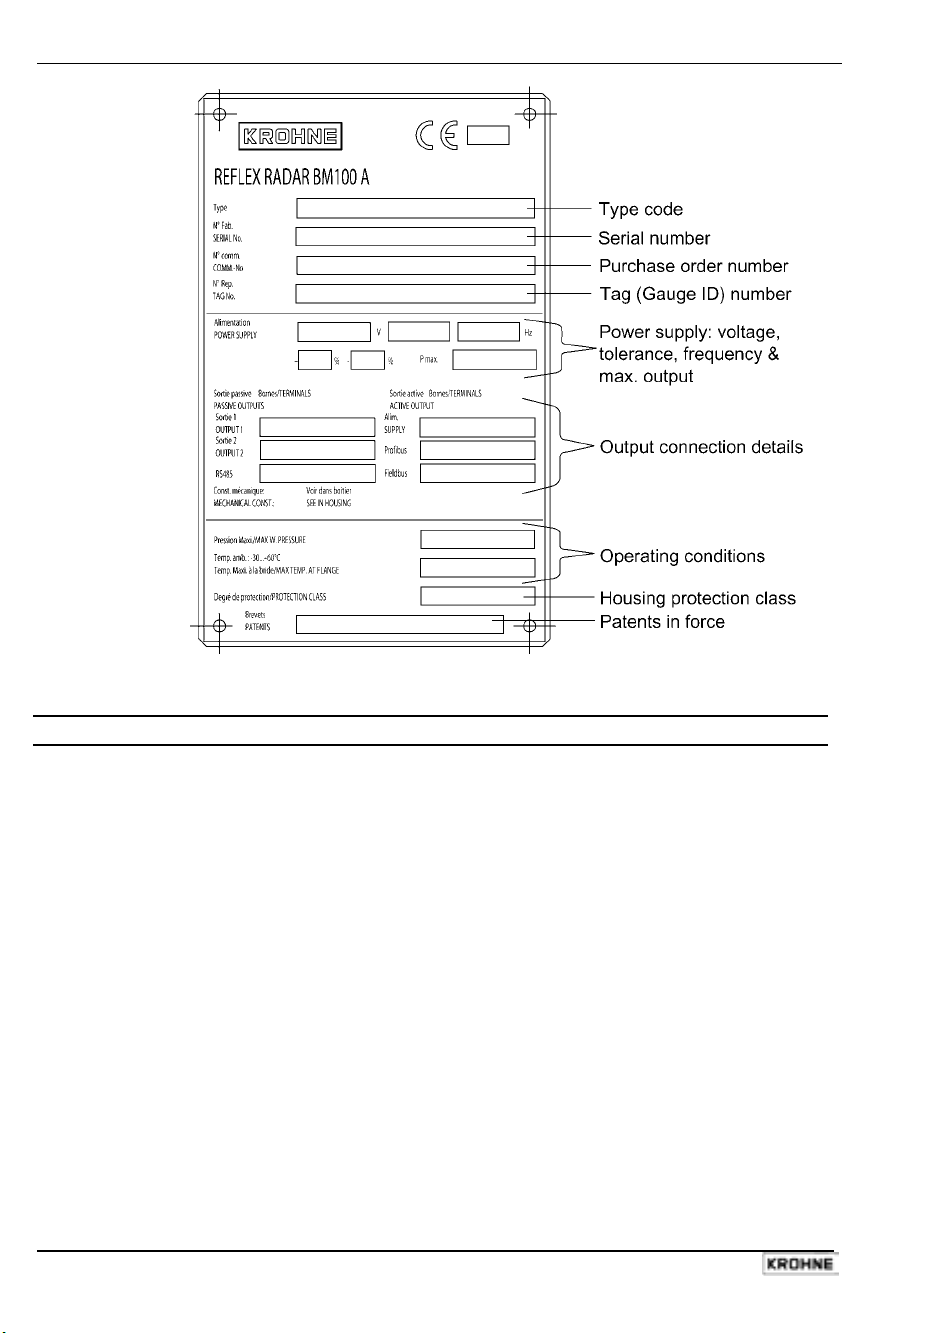
Standard nameplate
Product liability and warranty
The BM 100 A TDR level gauge is designed solely for measuring the distance, level, interface and
volume of liquids, pastes, slurries, solids and particulate materials.
The BM 100 A TDR level gauge does not form part of an overfill protection system as defined in
WHG nor is it concerned by the Pressure Equipment Directive (PED) 97/23/EC.
Special codes and regulations apply to its use in hazardous areas.
Responsibility as to suitability and intended use of these level gauges rests solely with the user.
Improper installation and operation of our level gauges may lead to loss of warranty.
In addition, the "General conditions of sale", found on the back of the invoice and forming the basis
of the purchasing contract, are applicable.
If you need to return the level gauge to the manufacturer or supplier, please refer to the information
given in appendix A.
6 Handbook BM 100 A
Page 7
1 Mechanical installation
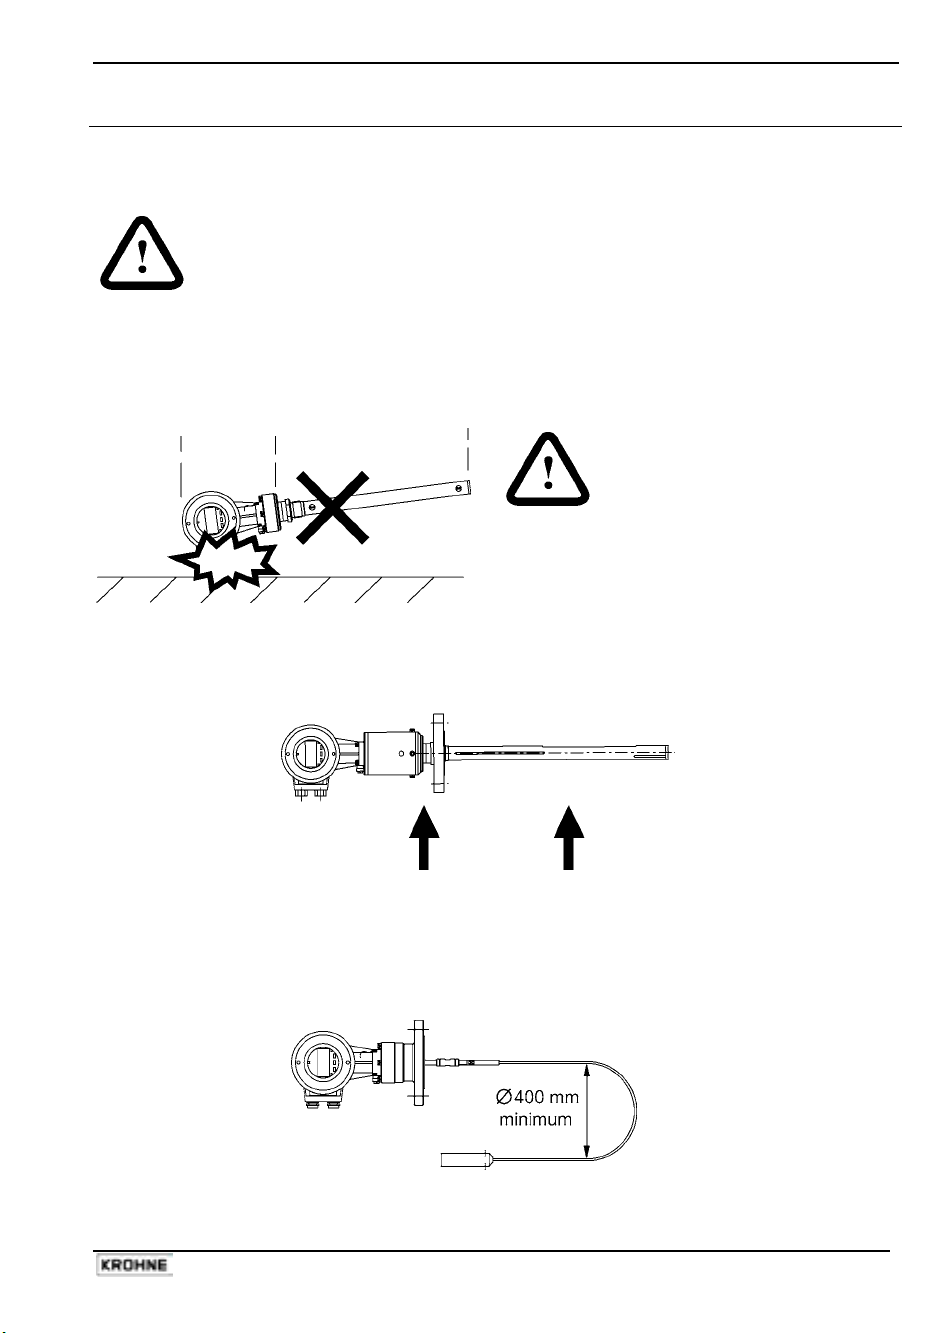
1.1 Handling and storage
1.1.1 Avoiding blows
Avoid hard blows, impacts and jolts when handling the BM100A.
Caution :
The probe is a critical gauge component.
Do not damage– Handle with care!!!
Caution : fragile electronics
1.1.2 Avoiding bending
Rod/ Coaxial probes: support the probe to avoid bending.
Support probe here
1.1.3 Avoiding cable kinks or fraying
Do not coil the cable less than 400 mm / 16’’ in diameter. Cable kinks or fraying will cause
measurement errors.
Handbook BM 100 A 7
Page 8
1.2 Installation restrictions
Hazardous-duty systems (Ex, FM…)
• refer to the supplementary instructions for gauges approved for use in hazardous locations
before installation.
• check that the flange, gasket and probe materials are compatible with the product. Read the
information given on the converter nameplate, the flange markings and specifications in the
approval certificates.
1.3 Mounting on a tank
1.3.1 Installation instructions: General notes
The fitter should give some thought to tank fittings and tank shape:
• nozzle position in relation to the tank walls and other objects inside the tanks
(Warning : this free area will depend on the probe type selected: refer to later on in this section)
• type of tank roof , i.e. floating, concrete, integral, etc; and base, i.e. conical,etc.
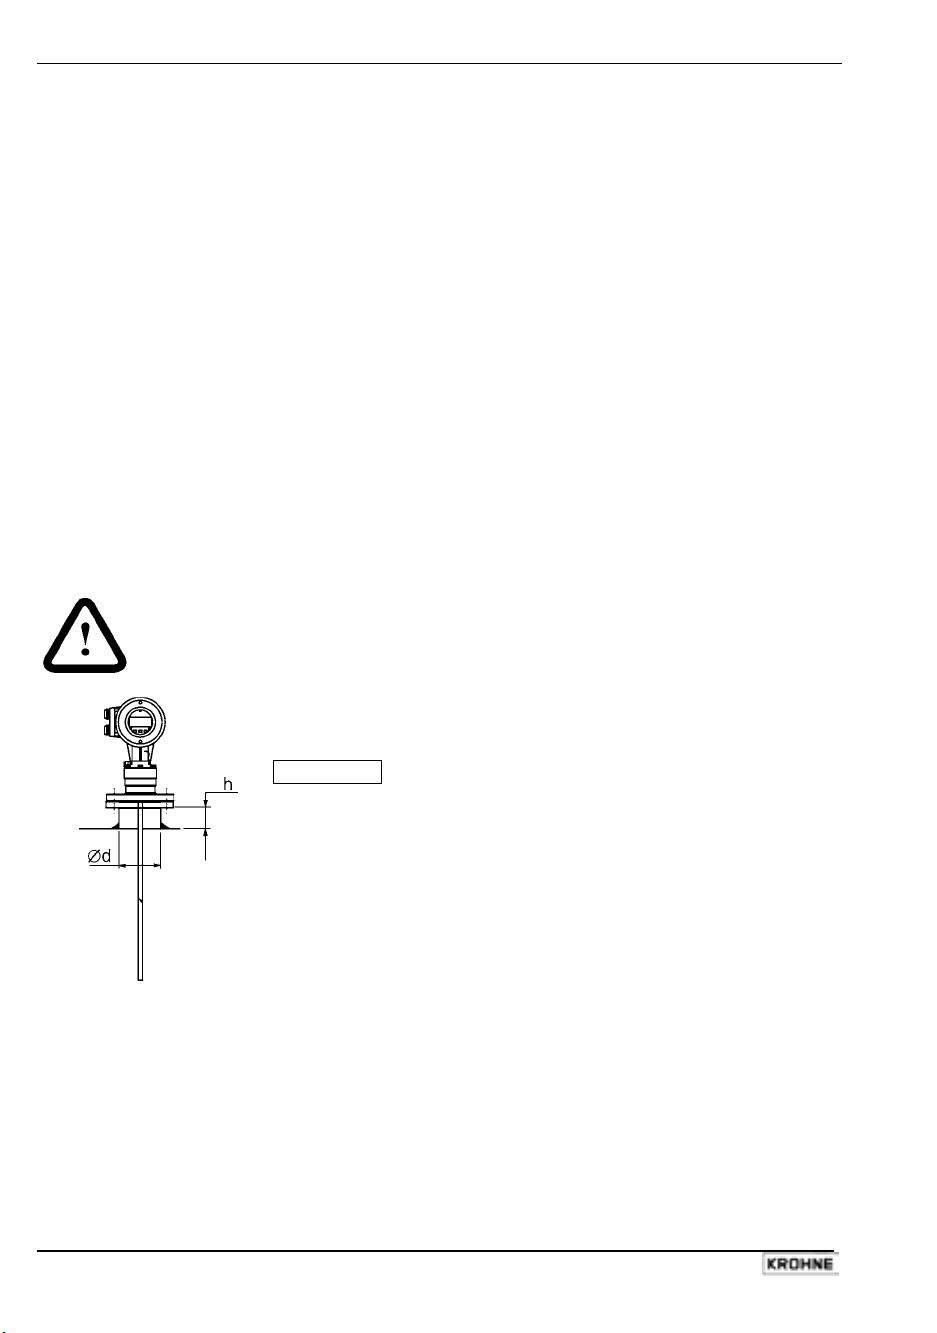
1.3.2 Installation instructions: Nozzle
Nozzle height
Recommendation (especially for single probes and powder applications):
Do not fit a nozzle longer than its diameter.
h ≤ Ød
Contact KROHNE if this relationship cannot be respected.
, where h = nozzle height and d = nozzle diameter.
8 Handbook BM 100 A
Page 9
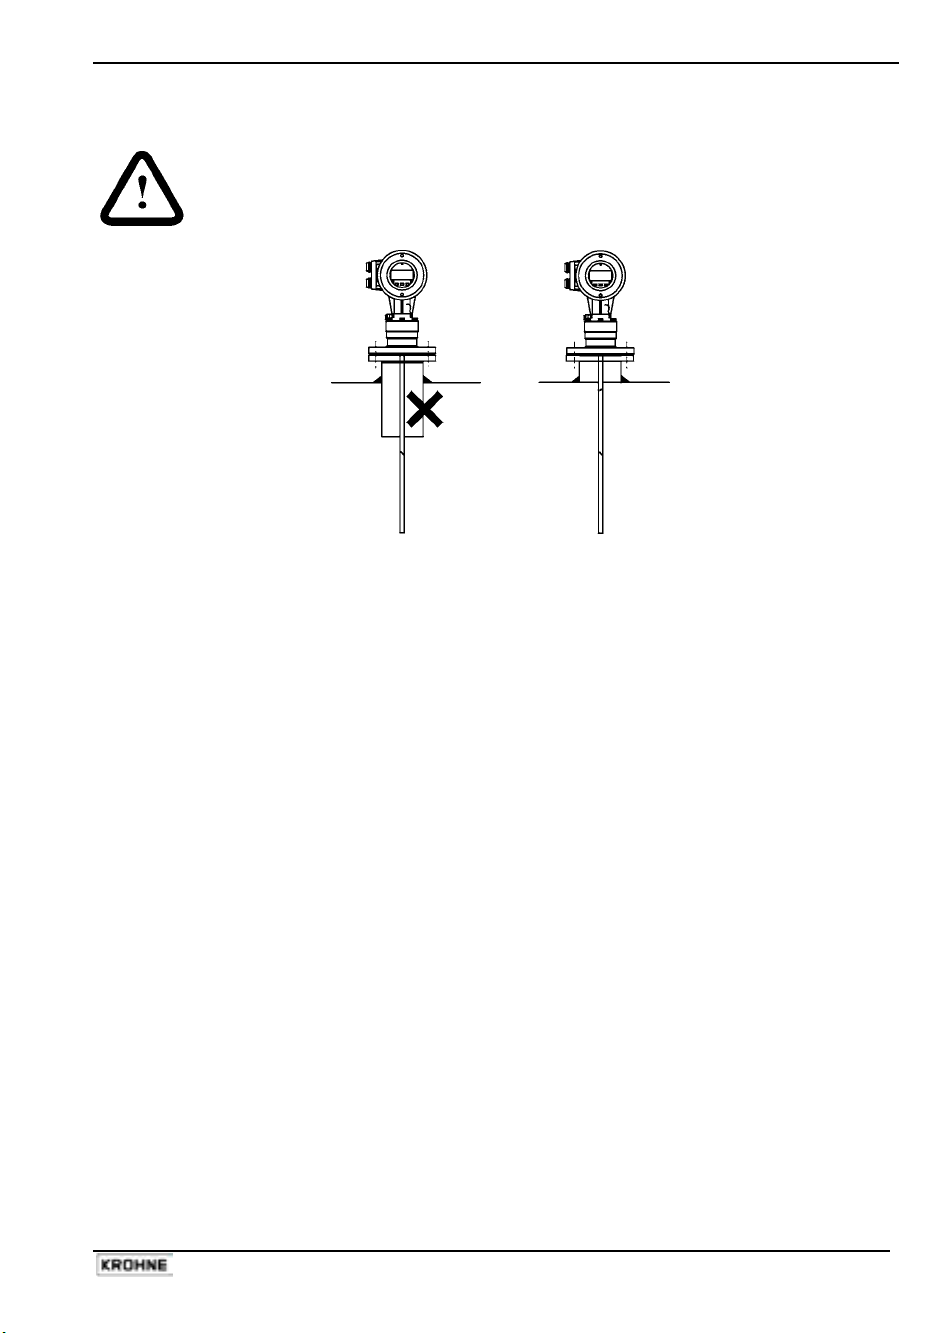
Nozzles extending into tank
Caution:
Do not use nozzles that extend into the tank. This will block the emitted pulse.
Process connection
For the gauge to make accurate measurements:
• the tank process connection must be level.
• ensure a good fit with the gauge process connection
• the tank roof should not deform under the weight of the gauge
Objects (discontinuities) inside the tank that influence the probe EM (electromagnetic) field
Install the process connection far from protruding objects such as:
• heating tubes
• sudden changes in tank cross-section
• tank wall reinforcements and beams,
• weld lines and dip-stick pipes, etc...
Refer to the figure at the top of the following page.
TDR gauges generate electromagnetic fields when a measurement pulse is emitted. This field is
affected by any nearby discontinuities and these will weaken and potentially block the emitted pulse.
A minimum distance is recommended depending on the probe type to be installed. See the table on
the next page for recommended free space dimensions.
Alternatively, the fitter may use a reference chamber or stilling well. However, the chamber walls
must be smooth (i.e. no visible weld lines), straight and vertical to maintain the pulse strength and
gauge accuracy.
For clean applications only :
Coaxial (type D) probes may be used close to or touching objects or walls as the EM field generated
by the probe is contained within the probe’s outer sheath (refer also to the EM field sizes given in
the figures on the next page).
Handbook BM 100 A 9
Page 10

1 Agitator
2 Support beam perpendicular to the pulse
direction
3 Abrupt changes in tank cross section
4 Heating tubes
5 Alternative solution: reference chamber -
electromagnetic field is contained within
chamber.
6 Gauge electromagnetic field :
Any intruding metallic object will be
detected in this zone if perpendicular to
the emitted pulse direction.
= Do not fit the process connection near to these objects.
Probe Type Recommended minimum distance of probe from
objects inside the tank in millimetres (inches)
Single (types F, H and K) 300 (12)
Twin (types A, B, G and L) 100 (4)
Coaxial (type D) 0 (0)
Electromagnetic field shape around probe, by type (not to scale)
Single (types F, H and K) Twin (types A, B, G and L) Coaxial (type D)
No beam angle for any probe type.
10 Handbook BM 100 A
Page 11
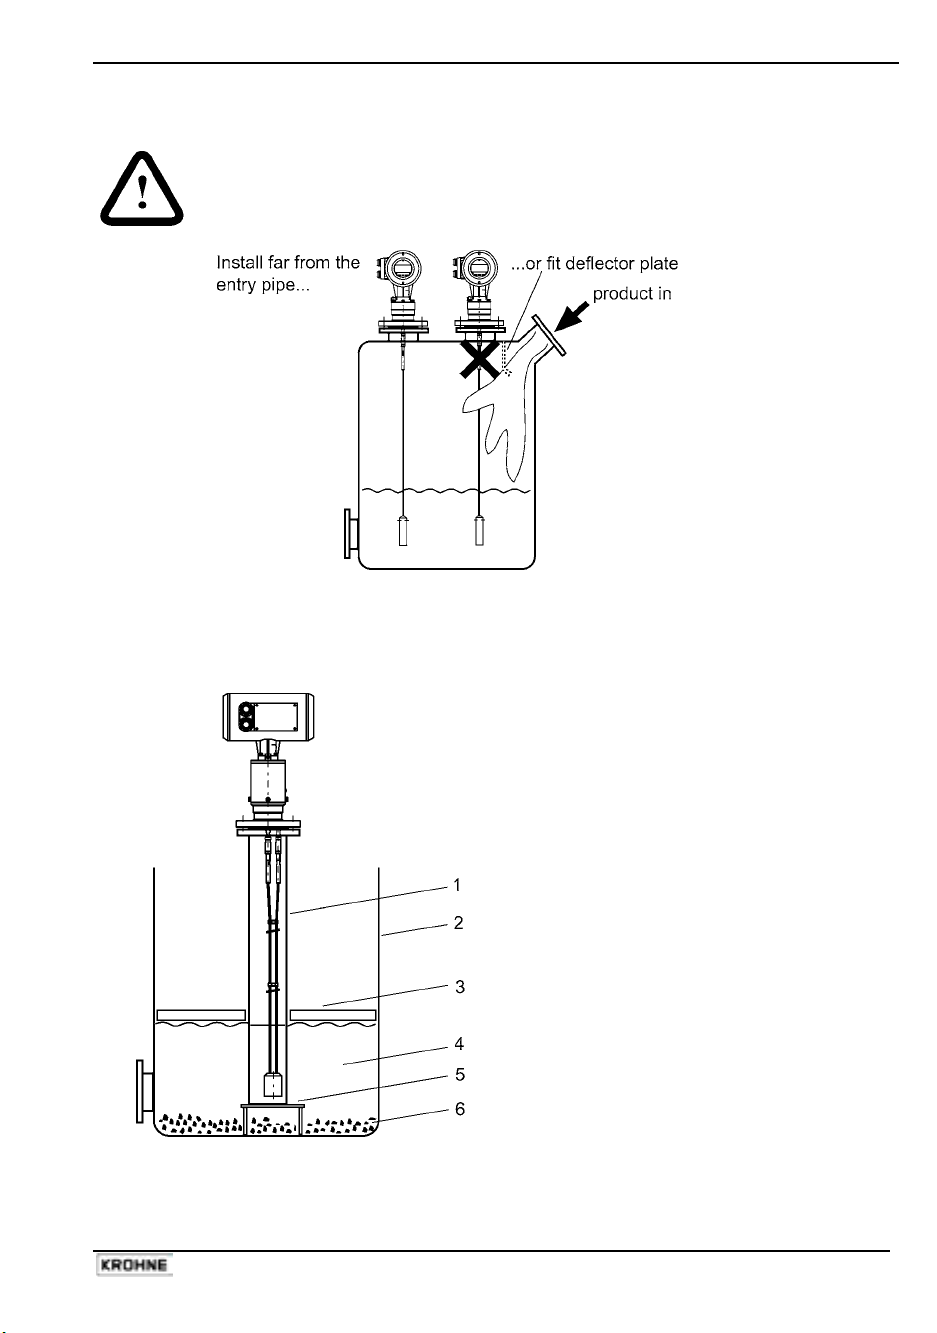
Process connection and entry pipe
Caution:
Do not put the nozzle close to the entry pipe. Pouring the product directly onto the
probe will give false readings. Install deflector plate if impossible to distance gauge
from entry pipe.
Stilling wells
Tanks with floating roofs for petro-chemical applications: Use a stilling well.
1
Stilling well
2
Tank
3 Floating roof
4 Product (petroleum applications)
5 Well fixed to tank base (no roof
deformation)
6 Sediment
Handbook BM 100 A 11
Page 12
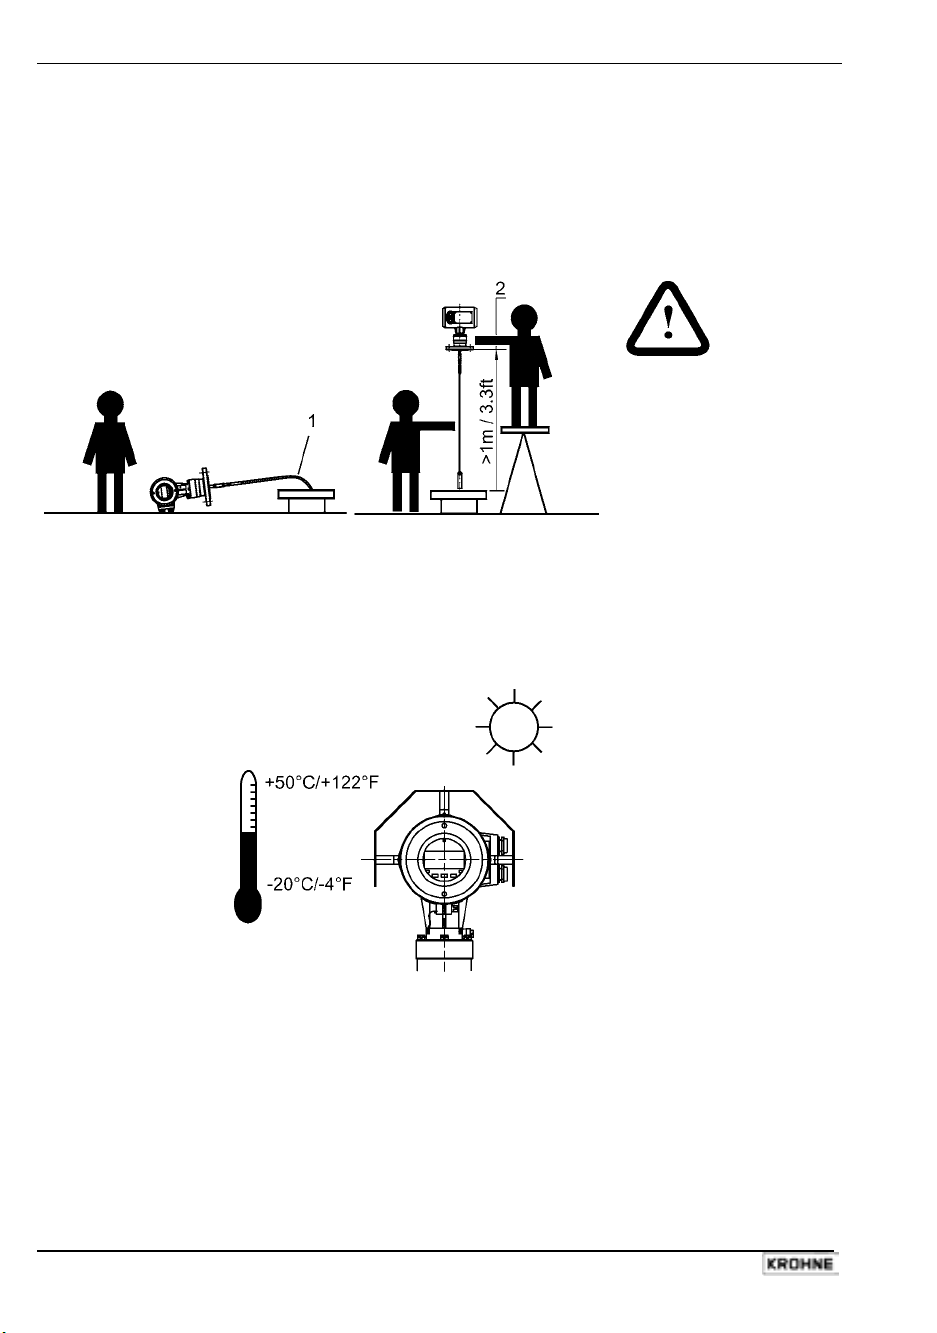
1.3.3 Installation instructions: Gauge - all applications
BM100 A gauges are designed to be mounted on a suitable process connection on a tank or sump.
Install the gauge using two people to avoid damaging the probe. Support the housing and the probe.
Installation of single and twin cable probe level meters
Caution :
1
Do not over-bend
probe!
Inserting the probe:
2
hold more than one
metre above the
opening to avoid cable
bending.
Outdoor sites
Fit a sunshade on the gauge for open-air installations: this is supplied on demand. The ambient
temperature limits of the gauge are given below.
12 Handbook BM 100 A
Page 13
Cable probes: entanglement and straightness
The cable must be straight once inserted into the tank. The cable counterweight should not touch
the bottom of the tank. The cable must be far from other objects (e.g. mixers) to avoid entanglement.
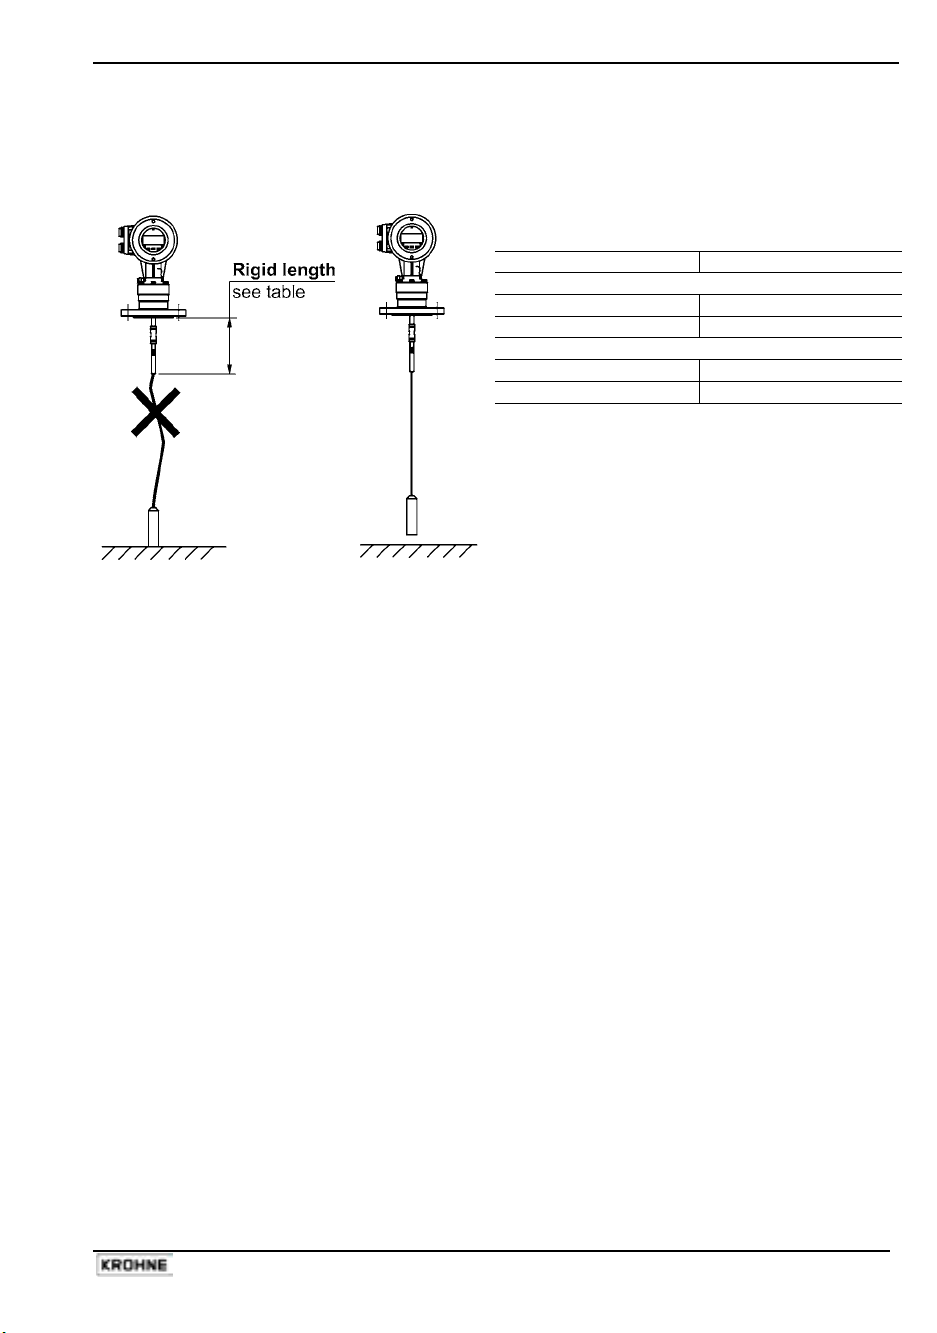
Rigid length of single and twin cable probes
Cable diameter Rigid length
Single cable
Ø4mm or 0.15” 145mm or 5¾”
Ø8mm or 0.3” 200mm or 8”
Twin cable
Ø4mm or 0.15” 145mm or 5¾”
Ø6mm or 0.24” 145mm or 5¾”
Handbook BM 100 A 13
Page 14
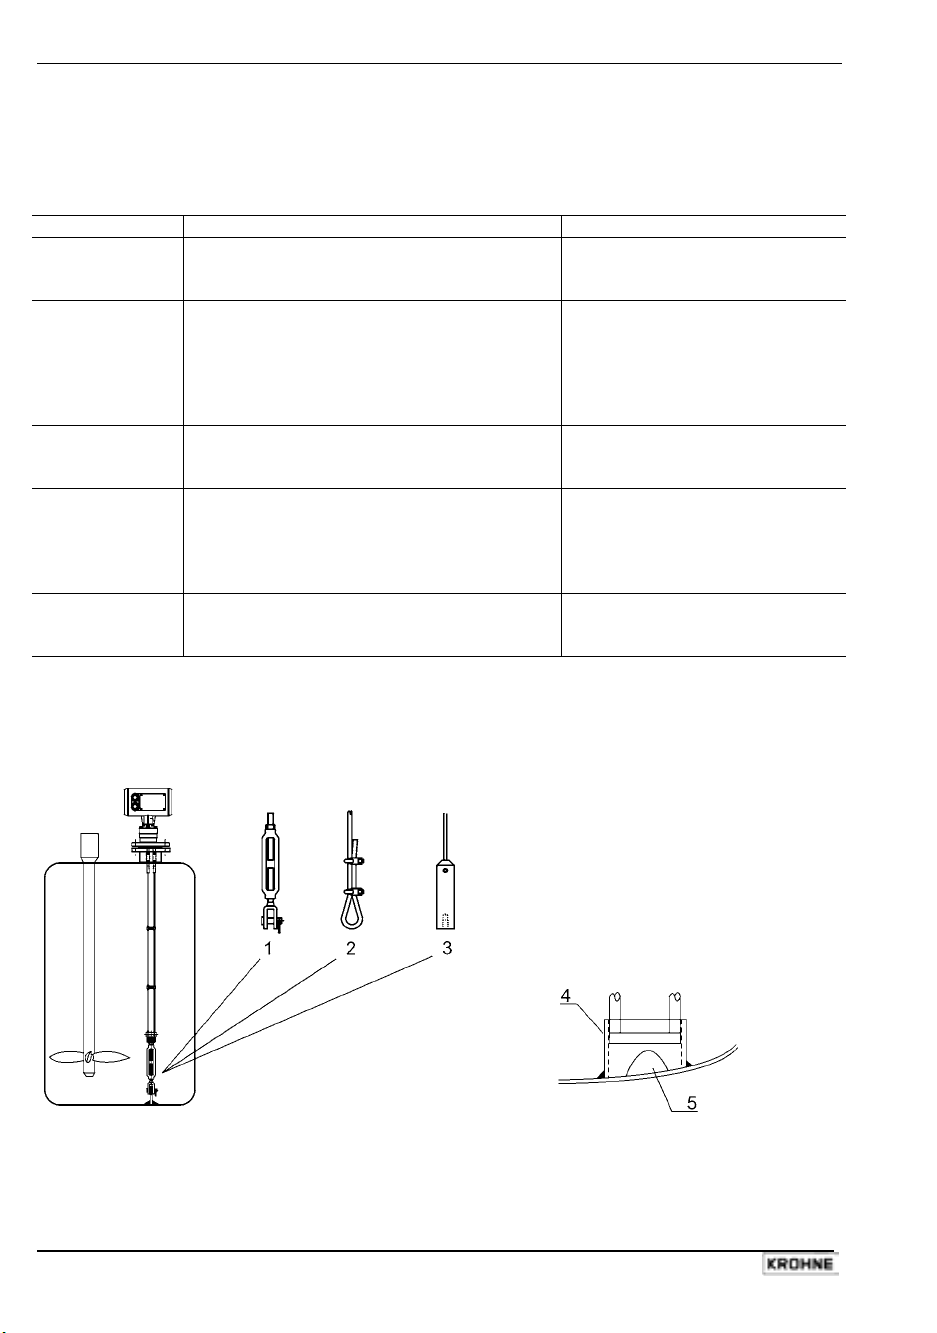
1.3.4 Specific installation instructions: gauge - liquid applications
Probe bending in agitated products: recommended solutions
Probe (Type) Supports and fastenings Stilling well installation*
Twin rod (A)
Twin cable (L) Fit an anchor with an M10 x 1 (Ø4mm/0.16”
Weld a 45mm / 1.8” internal diameter tube on
the bottom of the vessel then insert the
probe.
cable) thread (i.e. spring ring or hook) to the
counterweight*** CAUTION: 6 Nm / 4.4 lbf.ft
maximum torque. This cable may also be
ordered with a turnbuckle.
Possible. On-site calibration may
be required to maintain accuracy.
Repeatability is unaffected.
Possible. On-site calibration may
be required to maintain accuracy.
Repeatability is unaffected.
Centring the probe is
recommended. Contact KROHNE
for more information.
Single rod (F) Weld a 12mm / 0.5” internal diameter tube on
the bottom of the vessel, insert the rod****.
Possible. 50 mm / 2” minimum
diameter chamber. Contact
KROHNE for assistance.
Single cable (H) Fit an anchor with M10x1 (Ø4mm cable)
thread underneath the counterweight : spring
ring or hook. CAUTION: 4 Nm / 2.9 lbf.ft
Possible. 50 mm / 2” diameter
minimum. Contact KROHNE for
assistance**.
maximum torque. This cable may also be
ordered with either a chuck or turnbuckle.
Coaxial (D) Weld a 30-32mm / 1.2” internal diameter tube
on the bottom of the vessel, insert the tube. A
Unnecessary: probe unaffected
by nearby objects.
probe may be fixed with braces.
* Reference (bypass) chamber or stilling well.
Spacers supplied by KROHNE.
**
*** Threaded hole provided in base of counterweight.
**** Contact KROHNE. A factory menu function may need to be changed.
1 Turnbuckle
2 Chuck for type H Ø4mm
single cable probe
3 Counterweight with threaded base
4 Avoid play between tube and probe
5 Hole in welded tube for drainage
Anchoring twin rod and coaxial probes
14 Handbook BM 100 A
Page 15
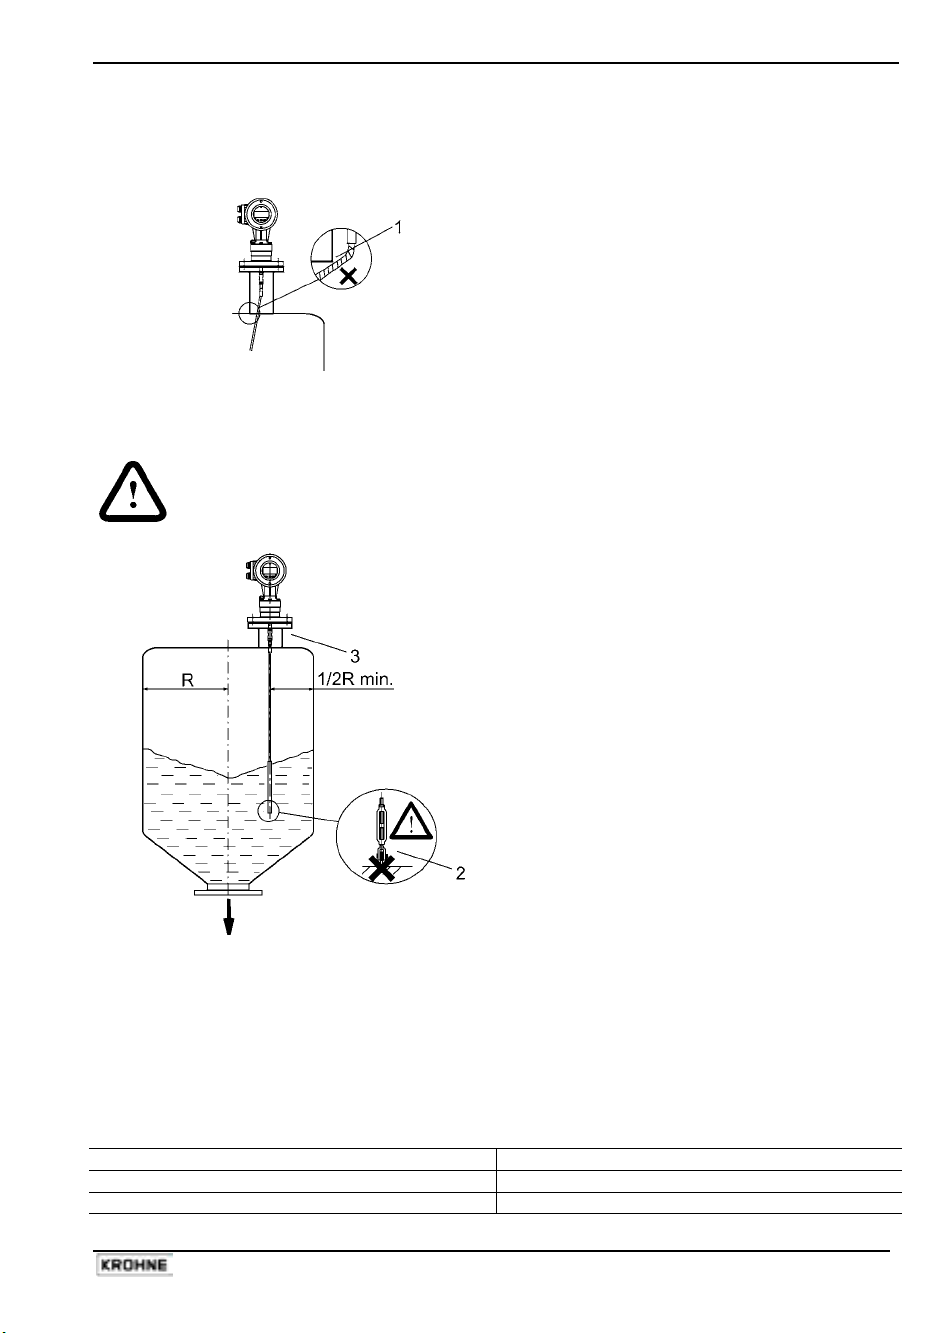
1.3.5 Specific installation instructions: gauge - solid applications
False readings:
1
Do not let probe touch the side of the nozzle
Conical silo nozzles, False readings and traction on the cable probes
Caution
High traction forces :
2
We recommend that the probe should not be
anchored to avoid excessive traction loads on
the cable.
Bending and traction:
3
Position the connection on the roof at ½
radius of the tank and with minimum nozzle
height. This will avoid damage due to
bending and traction during emptying.
Traction forces during emptying cycles for powder applications
Traction load is dependent upon the height and shape of the tank, product particle size & density,
and the rate at which the tank is emptied. The table below gives the load at which cable probes will
break.
Cable maximum design loads, traction
Probe Maximum Load
Type K : Single cable Ø8 mm / Ø 0.3” 3.5 T / 7700 lb
Type B : Twin cable Ø6 mm / Ø 0.2” 3.6 T / 7900 lb (1.8 T / 3950 lb per cable)
Handbook BM 100 A 15
Page 16
Traction on cable according to product (approximate value in metric tons)
Material Probe used
Probe Length / m (ft)
10 (32.8) 20 (65.6) 30 (98.4)
Cement Single cable Ø8 / Ø0.3’’ 1.0 T / 2200 lb 2.0 T / 4410 lb 3.0 T / 6620 lb
Flyash Single cable Ø8 / Ø0.3’’ 0.5 T / 1100 lb 1.0 T / 2200 lb 1.5 T / 3300 lb
Wheat Single cable Ø8 / Ø0.3’’ 0.3 T / 660 lb 0.6 T / 1320 lb 1.2 T / 2650 lb
PE granules Twin cable Ø6 / Ø0.2’’ 0.2 T / 440lb 0.6 T / 1320 lb 1.0 T / 2200lb
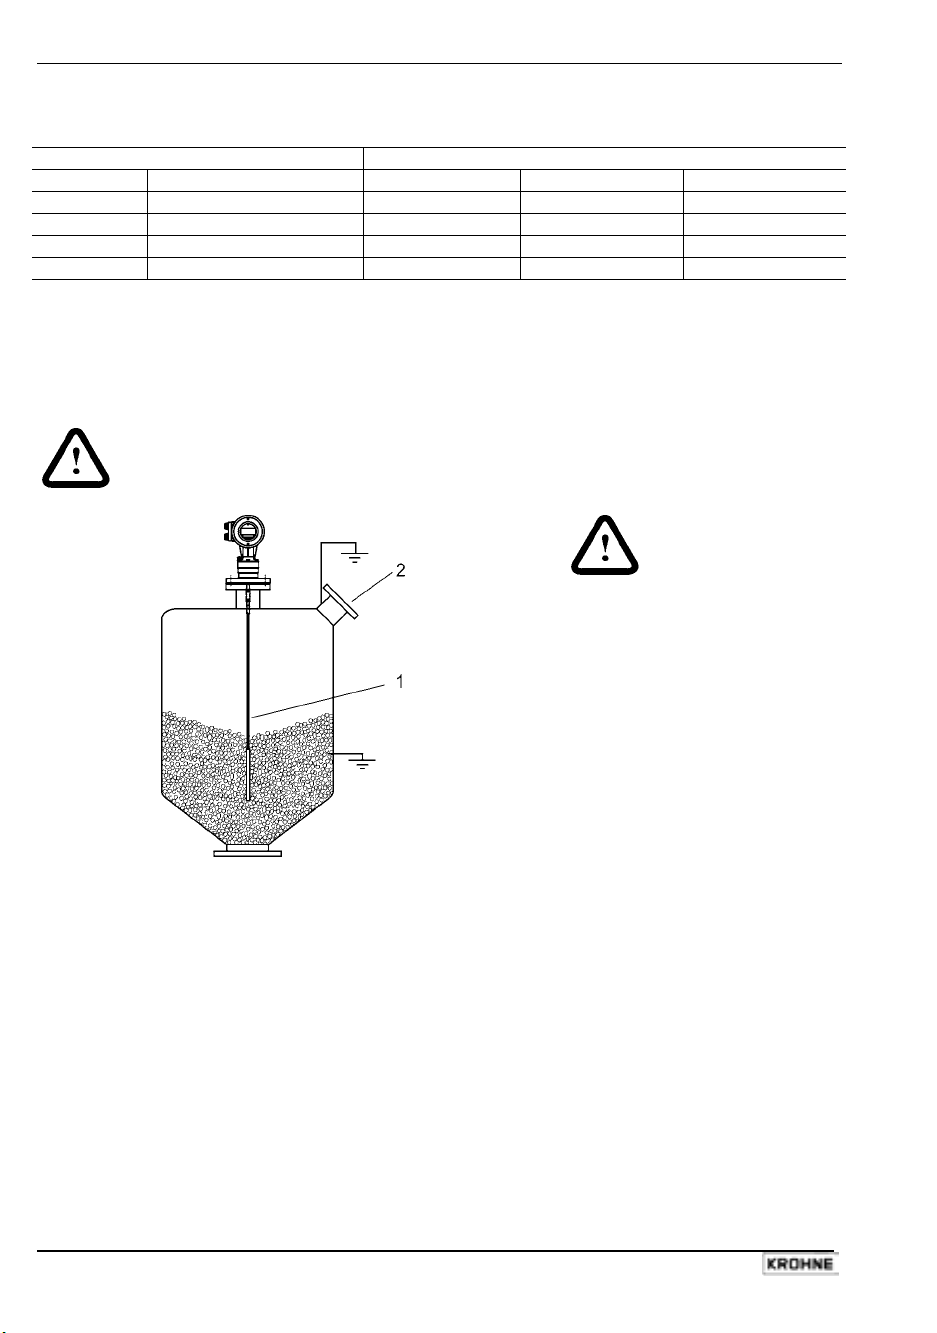
Electro static discharge (E.S.D.)
BM100 Standard and Ex gauge electronics are normally shielded up to 16KV against E.S.D.*.
*For non-Ex powder applications, BM100A probes are protected up to 32 kV.
Note:
E.S.D. cannot be solved by BM100A E.S.D. protection. It is the customer’s responsibility
to avoid E.S.D. by grounding the tank, product and probe installation.
1
Danger of injury
The probe may become electro
statically-charged during
operation; earth the probe by
pushing it against tank wall with a
suitably isolated tool just before
touching it to avoid receiving a
shock.
2 Earth the entry pipe and product.
Product deposits on the nozzle and probe
Product build-up can occur under the nozzle: this may weaken the pulse. Avoid cavities that permit
the build-up of deposits.
Tank roof deformation
Tank roofs should support loads of at least 3.5 tonnes / 7700lb for gauge installations using type K
single cable probes and 3.6 tonnes / 7900 lb for gauge installations using type B twin cable probes
without deformation.
16 Handbook BM 100 A
Page 17
2 Electrical Connections
2.1 Insulation rating
The gauge transmitter electrical insulation conforms to IEC 1010-1. Please note the information
below concerning each rating category.
Category
Power supply overvoltage category
Output circuit overvoltage category II Fuses are unnecessary.
Insulation
Protection class 1
Galvanic isolation of terminals
The gauge conforms to the following standard and E.U. Directive:
Standard/Directive Description
EN (IEC) 61010-1 Safety requirements for electrical equipment for measurement, control and
73/23/EEC Council Directive of 19 February 1973 on the harmonisation of the laws of
The BM 100 A gauge outputs are galvanically isolated from the power supply and ground in
accordance with the regulations given above. An external barrier is unnecessary.
Rating Comments
The gauge does not have an integrated switch or circuit-
III
contamination level 2 The contamination level refers to the protection of internal
laboratory use (low tension)
Member States relating to electrical equipment designed for use within
certain voltage limits (low voltage) modified by Directive 93/68/EEC (art.13).
breakers. These elements must be installed in
conformance to local regulations and EU Low Voltage
Guidelines and to properly isolate the equipment when
necessary. Note that this is not obligatory for instruments
with 24 V power supply boards.
4 to 6.3 A time lag fuses are recommended for external
installation.
Fuses must be installed on every electrical conductor for
the system to conform to current regulations.
Note that the active phase conductor, L, is protected by an
internal fuse: the neutral conductor, N, is not.
elements of the signal converter.
Rated IP 67 (equivalent to NEMA 6-6P) against ingress of
water and other foreign bodies.
Note that the gauge can operate in contamination level 4
conditions if installed correctly.
Handbook BM 100 A 17
Page 18
2.2 Electrical installation instructions
2.2.1 Wiring general notes
Read these instructions carefully!
Wiring must comply with any existing local regulations. Use appropriate wiring methods, conduits
and fittings to maintain a NEMA 6-6P / IP 67 rating.
1. Always disconnect the mains power supply before opening the housing,
2. unscrew the terminal compartment using the special wrench provided,
3. use the top cable entry port for the power supply (see “Principal gauge components”),
4. use a metal cable gland for input power leads to minimise RFI (radio frequency interference) /
5. use a reinforced cable for the outputs,
6. do not cross or loop wires in the signal converter wiring box,
7. do not kink cables close to the glands. Cover with a metallic sheath at this point if necessary,
8. make U-bends in the cable to provide water with run-off points,
9. earthing the device shall be done according to the local applicable installation standards (EN
10. and make sure that the cover thread in the housing is well greased and the O-ring is in good
EMI (electromagnetic interference) effects,
60079.14 in Europe),
condition before replacing the cover.
Shutting off the power supply : non-hazardous zones
Remember to disconnect the power supply before opening the housing.
Shutting off the power supply : hazardous zones
Wait before opening the housing cover. Refer to Supplementary Installation
and Operating Instructions for the BM100 A/Ai KEMA 01 ATEX 1078X
Gauge for the time required.
18 Handbook BM 100 A
Page 19
2.2.2 Wiring connections
Open the signal converter housing rear cover, using the plastic wrench supplied. The terminal
connections are labelled. The standard connections are shown below.
Before starting to wire:
• check that the power supply corresponds to the power board installed.
• check which output option you have selected: this will be indicated on the underside of the rear
housing cover and on the gauge nameplate.
Terminal layout : non – Ex version
X = Terminal not used (X) = Terminal not used except for RS485 outputs
Ensuring a good contact and protection of wire strands
Local regulations concerning electrical wiring must be followed and obeyed. If no details are
given, we recommend :
• crimped metal sheaths over the wire strands
• power supply cables should be rated for at least 500 V, with a cable diameter of 0.5 to 1.5
mm / 0.02” to 0.06” (non-Ex applications only).
• the output current cable diameter should be from 0.5 to 0.75 mm / 0.02” to 0.03”
PE Ground Terminal notes
The internal earth connection shall be used according local applicable installation standards, in
Europe the Low voltage Standard prescribes the connection of the yellow/green cable in case of
230VAC.
Handbook BM 100 A 19
Page 20
Terminal layout : Ex version
(X) = Terminal not used except for RS485 outputs
Wiring the gauge for use in hazardous areas (Ex & FM)
Use the correct wires and spade tags for terminal connections as specified in the Supplementary
Installation and Operating Instructions for the BM100 A/Ai KEMA 01 ATEX 1078X Gauge.
PE Ground Terminal notes
The internal earth connection shall be used according local applicable installation standards, in
Europe the Low voltage Standard prescribes the connection of the yellow/green cable in case of
230VAC.
Options, power supply
The type of power supply to be used will be indicated on the gauge nameplate.
1. 100 – 240V AC -15%/+10% ; Power output : 9VA
2. 24 V AC/DC -15%/+10% ; Power output : 9VA
20 Handbook BM 100 A
Page 21
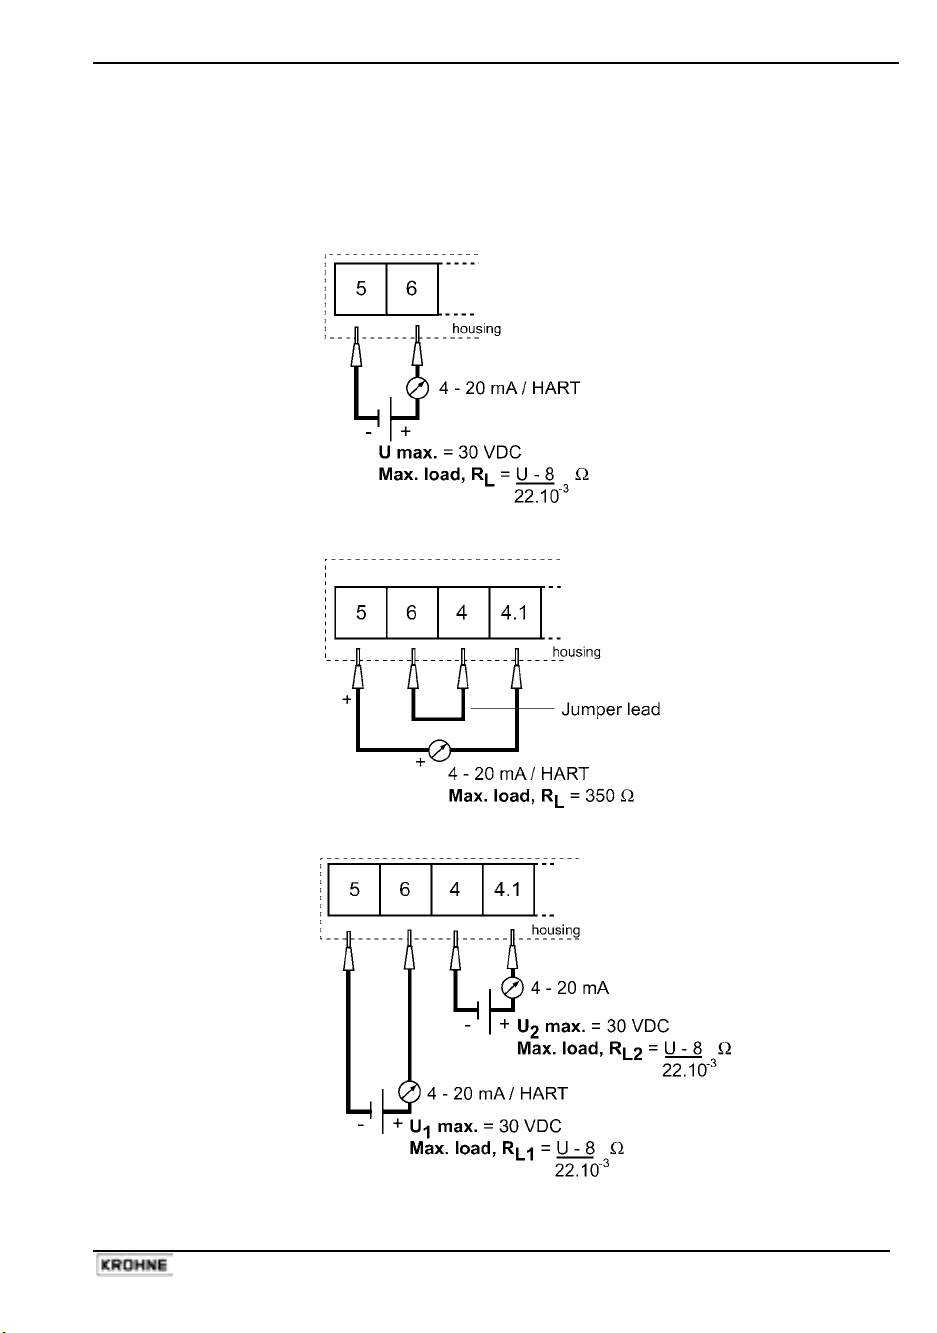
Options, output
The output wires should be wired to the gauge terminals according to the type of output selected
when the order was placed. The type of output supplied will be indicated on the gauge nameplate
and a sticker on the inside of the housing rear cover. The principle output options are shown below:
• 1 passive output: passive = external power source used for measurement output
• 1 active output: active = internal power source used for measurement output
• 2 passive outputs
Handbook BM 100 A 21
Page 22
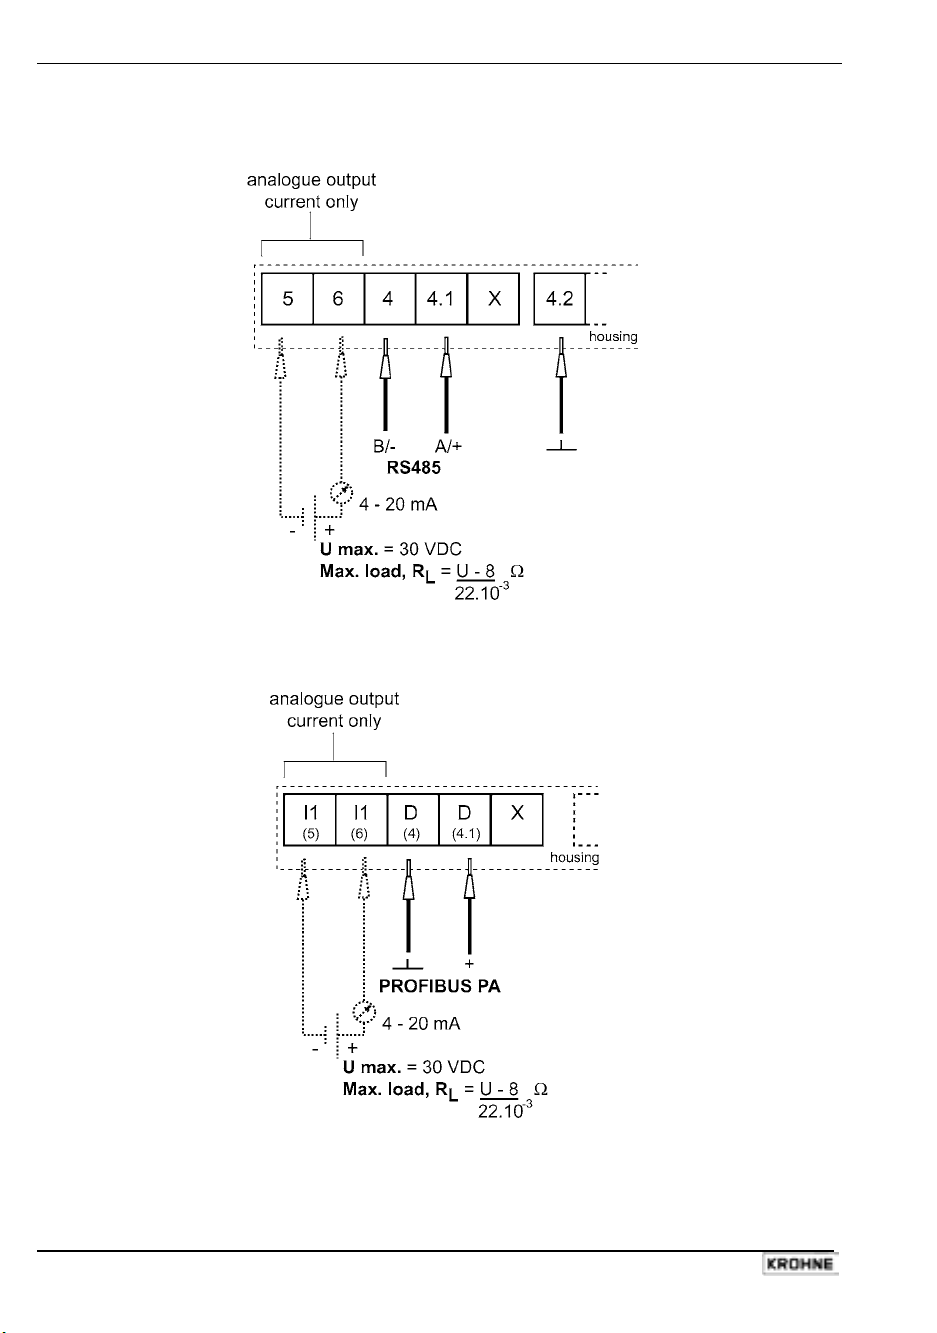
• 1 RS 485 output
with / without optional passive analogue current output for direct readings**
• 1 PROFIBUS PA output *
with / without optional passive analogue current output for direct readings**
* BM 100 A device management: a GSD file providing a device communication features list is
delivered with PROFIBUS PA-output devices.
** must be specified in customer order.
22 Handbook BM 100 A
Page 23
3 User Interface
The BM100A may be configured and operated using a user interface set into the signal converter
housing or a remote link. Remote links using PC STAR, KROHNE’s in-house developed software
and Fieldbus remote links are given at the end of section 3.4.3.
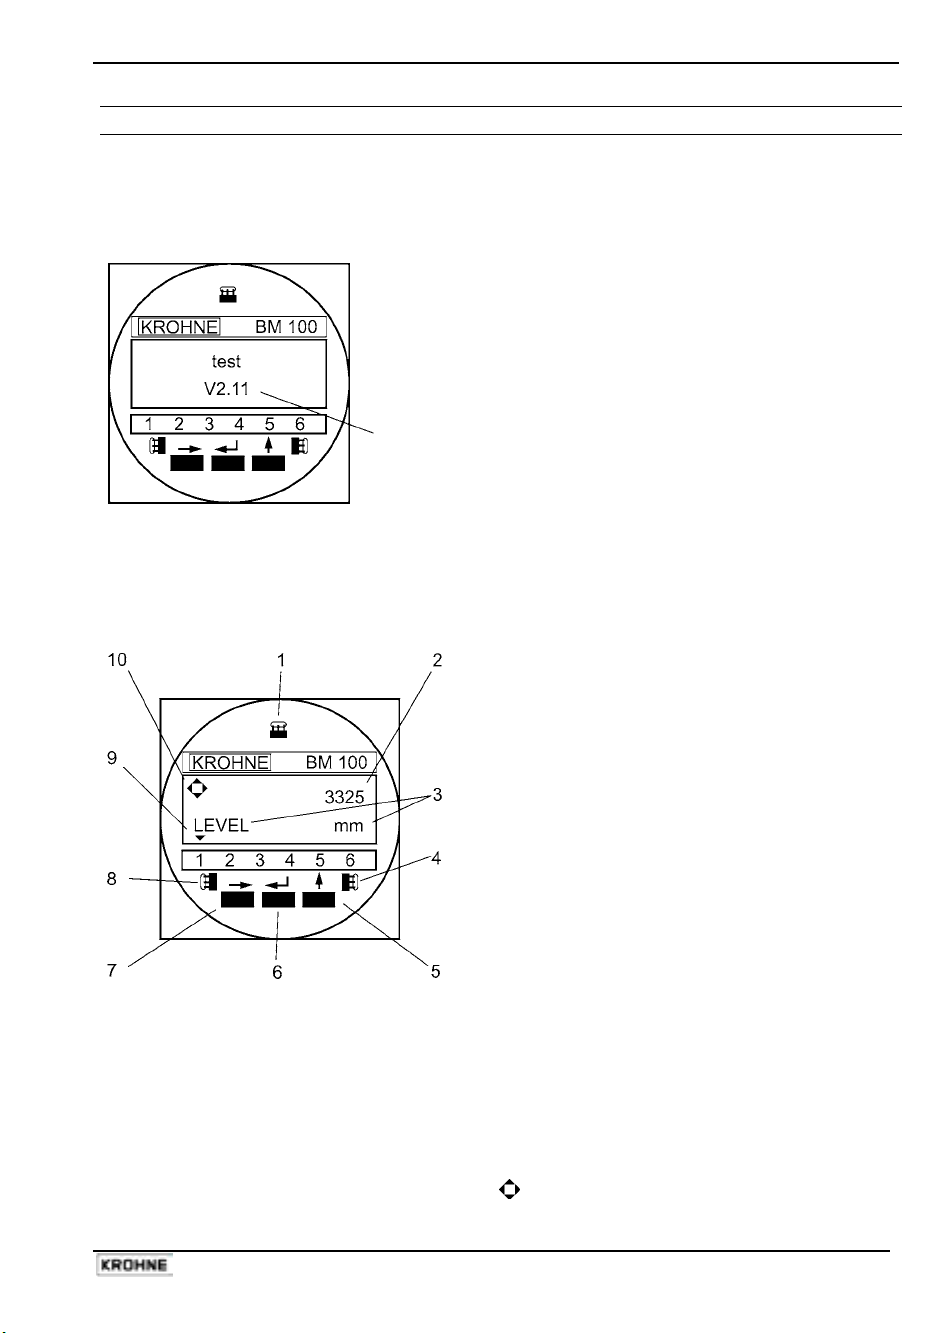
3.1 Power On and self-test mode
The BM100A automatically self-tests once connected to a
power source. The screen readout shown on the left will be
displayed. This test takes from 20 seconds to 1½ minutes to
complete.
The local display will then switch over to the operation mode
display shown on the following page.
Firmware release currently programmed into the EPROM
(Electrically Programmable Read Only Memory)
3.2 Local user interface
The BM100A Local user interface is simple to use. It has three push-buttons, three magneticallykeyed sensors for configuring the gauge without removing the front cover in hazardous zones and a
three-line LCD (Liquid Crystal Display) screen at the front of the signal converter housing.
ENTER Hall Sensor:
The display screen will go blank below
–20°C / -4°F but data can still be
displayed if the instrument is
connected to a computer with PC
STAR or other remote link.
Handbook BM 100 A 23
1
Keyed using a bar magnet. As item 6.
First Display Line:
2
Operating mode- measurement value
Configuration mode- function number
Second Display Line:
3
Operating mode- item measured and units
Configuration mode- function definition
UP Hall Sensor:
4
Keyed using a bar magnet. As item 5.
Press the UP push-button:
5
• To increase the value of a selected digit
• For password definition : code U or
Press the ENTER push-button:
6
• To go back a step in the menu
• To validate data entered
• For password definition : code E or
Press the RIGHT push-button:
7
• To enter configuration mode
8
Keyed using a bar magnet. As item 7.
9
See the next page for details.
10
• To move cursor right in configuration mode
• For password definition : code R or
RIGHT Hall Sensor:
Status Markers:
Key register symbol:
↑
→
Enter pressed
Up pressed
Right pressed
↑
↵
→
Page 24
3.3 Status Markers
This line of numbers identifies six types of errors by means of a triangular indictor over the number
concerned.
Status marker
number
▼1 No initial pulse detected See section 4.3: Fault clearing.
▼2 No level reflection detected See section 4.3: Fault clearing.
▼3 Level measurement frozen Output and indication frozen; search initiated to
▼4 No interface reflection found See section 4.3: Fault clearing.
▼5 Interface measurement
▼6 Output communication failure Contact your local KROHNE Service Department.
If the parameter 1.2.6 Error Display is configured to “YES” as explained in section 3.4.5,
the complete display screen will flash when an error occurs.
Error / Status message Result and action
redetect level : if no reflection is registered :
Status marker 2 is activated.
Output and indication frozen; search initiated to
frozen
redetect interface. If no reflection is found, Status
marker 4 is activated.
3.4 Parameter Settings
3.4.1 General Information
Your BM100 A has now been installed on the tank and the necessary electrical connections have
been made. Once the power has been switched on, it may be necessary to configure the gauge to:
• display the readings using the correct units and reference point (level / distance ),
• change the measurement range,
• give the instrument an address so that it may be integrated into a network,
• display volume readings by programming and using a volume calibration table (strap table).
We recommend that any changes to settings be noted on the configuration record supplied in
appendix B, or recorded using PC-STAR, to enable KROHNE service personnel to provide a rapid
response to any enquiries.
3.4.2 Configuration Procedure
The BM100 A starts up in operating mode displaying either information according to customer
specifications or factory default values.
The configuration mode (user menu) can be accessed and parameters modified by following the
operator control concept summary below. Configuration procedure is described in more detail in
section 3.4.3.
Instruments may equally be configured individually using a remote display available in PC-STAR
software for remote connections. Please refer to the PC-STAR on-line Help file for more details.
A restricted-access factory menu is available for advanced configuration. Refer to the BM100 A
Service Manual for further information.
24 Handbook BM 100 A
Page 25
Handbook BM 100 A 25
Page 26
3.4.3 Quick Configuration: configuration examples
The minimum functions (fct.) to be configured for a simple measurement are listed below:
• 1.1.1
• 1.2.1-6
• 1.4.2-3
• 1.3.1-4
• 1.7.1-2
Tank Height
Display Functions
Entry Code 1 / Code 1
Current Output 1 (& 2)
Volume calibration*
*For volume measurements
Example procedures for each set of functions are given on the following pages. Each procedure is
given in a series of steps in table form and begins from the Operating Mode.
Useful definitions for quick configuration
Typical gauge used for quick configuration examples
Probe type: twin Ø4mm/0.16” cable probe, type L
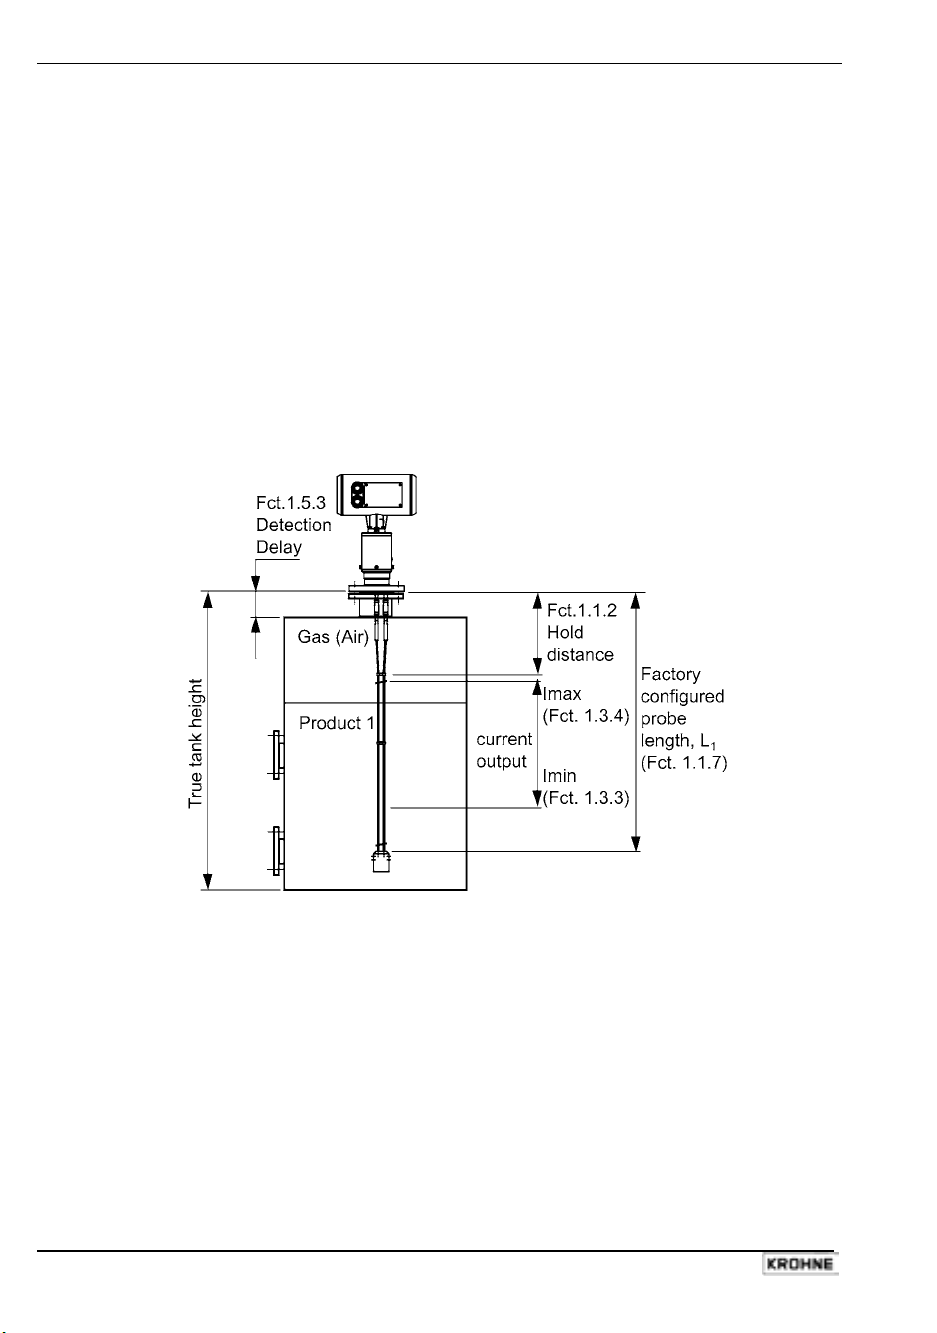
Tank height (Fct. 1.1.1): 10000.00mm/33ft
Hold distance (Fct. 1.1.2) 0.25m/10ft (see “probe measurement limits” in section 6.2.3 for
the Ø4mm twin cable probe, type L)
Probe length, L
(Fct. 1.1.7): 9.00m/29.5ft (Do not modify unless advised to)
1
26 Handbook BM 100 A
Page 27

Tank height
Configuration Mode user function 1.1.1
This function is usually either defined as true tank height or as factory configured probe length,
L1 if the former is not supplied by the customer in the order.
Why change the tank height?
• setting the parameter in Function 1.1.1 to L
avoids having a non-measurable zone
1
underneath the probe where the measurement on the display freezes.
• when setting up a measurement scale as explained on the following pages, this means that
the level at the end of the probe will be taken as zero instead of the tank bottom.
How tank height affects measurement when either Level or Distance is measured
1 True tank height
2 Measurable
height (factory
configured probe
length, L
)
1
3 Non-measurable
zone
4 With true tank
height (1) set in
Function 1.1.1 of
the User’s menu.
5 With factory-
configured probe
length, L
, set in
1
Function 1.1.1. of
the User’s menu.
Example procedure 1:
• to change true tank height (10000mm) to factory configured probe length, L
(9000mm) , and
1
then save the new parameter. Refer to item 5 in the diagram above.
Step Action Press buttons to
finish step
1 Start from Operating
n/a 6750
Mode screen
2 Go to function (fct.) 1.1.1
→,→,→
from Operating Mode
3 Enter function (current
→
Information displayed at the end of
each step
LEVEL mm
Fct. 1.1.1
TANK HEIGHT
10000.00
value: 10000mm)
4 Modify value to 09000.00
(millimetres)
↑,↑,↑,↑,↑,↑,↑,↑,↑,
→,↑,↑,↑,↑,↑,↑,↑,↑,
09000.00
↑
5 Exit to Save function
6 Save & exit to Operating
Mode
↵,↵,↵,↵
↵
STORE Yes
5750
LEVEL mm
Handbook BM 100 A 27
Page 28

How to configure displayed value and units
User Sub-menu 1.2 - Display Functions
These functions are used to choose the information to be displayed in operating mode:
• the measurement function (distance, level, volume, etc.) and units (mm, ft., m3, etc.)
• Display mode (1 (single) or 2 or more items in a repeating loop (cyclic mode))
Example procedure 2:
• to modify display mode from “single” to “cyclic” to configure a repeating loop displaying more
than one piece of data,
• to select Level and Distance and display each item for 5 seconds.
Step Action Press buttons to
finish step
1 Start from Operating Mode
n/a 6750
screen
2 Go to fct. 1.2.1 from the
→,→,↑,→
operating mode
3 Enter function 1.2.1
→
Information displayed at the end of
each step
LEVEL mm
Fct. 1.2.1
DISP.MODE
SINGL.MODE
Display Mode (default
value: SINGL.MODE)
4 Modify value to
↑
CYCL.MODE
CYCL.MODE
5 Exit fct. 1.2.1data set field
and go to fct. 1.2.2
6 Enter function 1.2.2
(Display Item) data set field
↵,↑
→
Fct. 1.2.2
DISPL.ITEM
LEVEL
Default value: LEVEL
7 Select “DISTANCE”.
8 Press “RIGHT” to confirm
↑↑
→
DISTANCE
No
or cancel data item to be
added to display loop
9 Press “UP” to confirm
↑
Yes
parameter
10 Exit data set field to
confirm. Go to to fct. 1.2.3
11 Enter function 1.2.3 data
set field (default value: 01).
↵,↵,↑
→,→,↑,↑,↑,↑
Fct. 1.2.3
CYCLIC TIME
05
Sec
Change to 05 seconds.
12 Exit data set field, function,
submenu and menu. Save
↵,↵,↵,↵,↵
6750
LEVEL mm
new configuration and
return to Operating Mode
The operator may display volume once the gauge is calibrated to measure volume in submenu
1.7. Interface parameters may only be used if the gauge is factory-set for interface measurement.
28 Handbook BM 100 A
Page 29

How to protect gauge configuration
User menu functions 1.4.2 Entry Code 1 & 1.4.3 Code 1
These functions are used to activate the restricted-access code and lock the settings: these will be
impossible to modify without entering the correct code. Do not lose this code!
Example procedure 3A:
• to activate access code function,
• to enter new code and exit configuration mode.
Step Action Press buttons to
finish step
1 Start from Operating Mode
n/a 6750
screen
2 Go to function (fct.) 1.4.2
→,→,↑,↑,↑,→,→
Information displayed at the end
of each step
LEVEL mm
Fct. 1.4.2
ENTRY.CODE1
3 Enter function data set field
(default value: No)
4 Select Yes to confirm activation
of access
→
↑
No
Yes
code.
4 Exit function and go to fct.
1.4.3.
5
Enter function 1.4.3 data set
field.
6 Enter new 9-keystroke code
↵,↑
→
↑,↑,↑,↑,↑,↑,↑,↑,↑
Fct. 1.4.3
CODE 1
CodE1
---------
Default: (
↑↑↑↵↵↵→→→
)
CodE1
---------
7 Re-enter new 9-keystroke code
to confirm. Automatic exit from
↑,↑,↑,↑,↑,↑,↑,↑,↑
Fct. 1.4.3
CODE 1
data set field to function.
8 Exit function, submenu and
menu. Save new
↵,↵,↵,↵
6750
LEVEL mm
configuration and return to
Operating Mode.
Example procedure 3B:
• to re-enter the configuration mode from the Operating mode with the restricted-access
function activated.
9 Start from Operating Mode
screen
10 Press RIGHT button to enter
Configuration Mode. Screen
n/a 6750
LEVEL mm
→
CodE 1
---------
displays access code entry.
11 Type 9-keystroke access code.
User menus are now
↑,↑,↑,↑,↑,↑,↑,↑,↑
Fct. 1.0.0
OPERATION
accessible. A typing error
(impossible to delete incorrect
keystroke) will quit the user
back to the operating mode.
Handbook BM 100 A 29
Page 30

How to set an analogue current output scale
User menu functions 1.3.1 to 1.3.4 (& 1.3.5 to 1.3.8 for a second analogue output)
This set of functions allows users to set up a scale. The minimum (4mA) and maximum (20mA)
values of an analogue current output should ideally lie within the device’s active measuring zone, as
the display will freeze when the signal is lost.
Refer to the measurement limits table for each probe type in the introduction. Refer also to the stqrt
of section 3.4.3 for the advantages of changing tank height.
Example procedure 4:
• personalise a measurement scale
• select “Level” as the current output parameter for the scale to be set up from the tank bottom
• choose suitable minimum and maximum values for the scale.
Step Action Press buttons to
finish step
Information displayed at
the end of each step
1 Start from Operating Mode screen n/a 6750
LEVEL mm
2 Go to Fct. 1.3.1
3 Enter data set field (current value:
→,→,↑,↑,→
→
Fct. 1.3.1
FUNCTION.I.1
DISTANCE
Distance)
4 Set to Level.
5 Exit data set level and go to fct. 1.3.2
↑,↑,↑
↵,↑
LEVEL
Fct. 1.3.2
RANGE I 1
6 Enter function (current value: 4 – 20
mA) – to set the error output to 3.7 mA
→
4 - 20
or 22 mA or having no error output.
7 Modify value to 4 – 20 mA with error
output at 22 mA.
5 Exit data set field and go to fct. 1.3.3.
Enter (current value: 00000.0 mm) – to
set level that corresponds to the
↑,↑
↵,↑,→
4 – 20 /22=E
00000.0
mm
minimum current output 4 mA.
6 Modify value to 01000.0 mm (this sets
the minimum point 1 metre above the
→,↑
01000.0
mm
tank bottom). The tank is considered
to be empty below this point.
7 Exit data set level and go to fct. 1.3.4.
Enter function (current value: 14000.0
↵,↑,→
14000.0
mm
mm) – to set level that corresponds to
the max. current output 20 mA
9 Change to 9600.0 (this sets the
maximum below the top dead zone).
The tank is considered to be full above
↑,↑,↑,↑,↑,↑,↑,↑,↑,
→,↑,↑,↑,↑,↑, →,↑,
↑,↑,↑,↑
9750.0
mm
this point
10 Exit data set level, function, sub menu
and menu. Save configuration and
↵,↵,↵,↵
6750
LEVEL mm
return to operating mode.
Gauges with two current outputs
Two outputs are required for displaying readings simultaneously for two separated products stored
in the tank. Set up a scale using user functions 1.3.1 to 1.3.4 as shown above to measure level, then
repeat the procedure for interface measurement using user functions 1.3.5 to 1.3.8. Give some
thought to where the minimum and maximum points for each scale should be.
Setting up a volume scale
Calibrate for volume measurement in submenu 1.7 then select “volume” as the scale parameter.
30 Handbook BM 100 A
Page 31

How to configure the gauge to give volume readings
User menu functions 1.71, 1.7.2 & 1.7.3
The BM100 A may be calibrated to measure volume by using a 50-line “strapping (calibration)
table”. The shape of the tank decides the number of points to be entered for accurate measurement.
Do not set User menu function 1.3.1 or 1.3.5 to “Volume” until steps 1 to 4 have been completed.
Example procedure 5
• set volume or weight units for calibration
• program up to 50 points (2 in this example) giving the level and filled volume for each point.
Step Action Press buttons to
finish step
Information displayed
at the end of each step
1 Start from Operating Mode screen n/a 6750
LEVEL mm
2 From operating mode go to fct. 1.7.1 to
choose volume units for calibration.
3 Enter function ( default value: m3). A
→,→,↑,↑,↑,↑,↑,↑,↑
,→
→
Fct. 1.7.1
VOL.UNITS
m3
selection of metric, imperial and federal
weight and volume units are available.
4 Set to “Liter”.
5 Exit data set level and go to fct. 1.7.2 to
input calibration points.
6 Enter function to program the table. The
point is displayed (current value: 15).
7 Change to point 01.
↑
↵,↑
→
↑,↑,↑,↑,↑,↑,↑,↑,↑,
Liter
Fct. 1.7.2
INPUT.TAB
15
01
→,↑,↑,↑,↑↑,↑
8 Press ENTER to set level (height from the
bottom of the tank)at point 01 in mm.
↵
00100.0
mm
Current value: 00100.0 mm
9 Change level to 00200.0 mm
→→↑
00200.0
mm
9 To confirm and set filled volume at this
level. Default volume: 0003000.0 Liter.
10 Change to 0000020.0 Liter. Press enter to
confirm and exit data set field.
11 To confirm and exit data set field.
↵
→,→,→,↑,↑,↑↑,↑,
↑,↑,→,→,↑,↑
↵
0003000.0
Liter
0000020.0
Liter
Fct. 1.7.2
INPUT.TAB
12 Enter function to add second point on
→
15
table. The point number will be displayed
(default value: 15)
13 Change to point 02.
↑,↑,↑,↑,↑,↑,↑,↑,↑,
02
→,↑,↑,↑,↑,↑,↑,↑
14 To set level at point 02 in mm. Current
value: 00600.0 mm
15 Change level to 00400.0 mm
16 To confirm and set filled volume at this
point. Current volume: 0799999.9.0 Liter.
17 Change to 0000040.0 Liter.
↵
→,→,↑,↑,↑,↑,↑,↑,↑
,↑
↵
→,↑,↑,↑,→,↑,→,↑,
→,↑,→,↑↑,↑,↑,↑,
00600.0
mm
00400.0
mm
0799999.9
Liter
0000040.0
Liter
→,↑,→,↑
18 Exit data set field, function, sub menu and
menu. Save configuration and return to
↵,↵,↵,↵
6750
LEVEL mm
operating mode.
Handbook BM 100 A 31
Page 32
Clearing the current gauge volume calibration table data
1. Go to fct. 1.7.3 DELETE TAB.
2. Press “right” to enter the data set field. This will read “SURE No”.
3. Press “up” to select “SURE Yes”.
4. Press “enter” to confirm clearing the “strapping table”.
5. Go to fct. 1.7.2 INPUT TAB. to enter new values into an empty table.
3.4.4 Network Configuration – digital outputs and gauge identification : RS 485, multi-drop...
Example procedure 6:
• turn off analog current output to read a digital signal *, **
• give each gauge an address and device number
Step Action Press buttons to
finish step
Information displayed
at the end of each step
1 Start from Operating Mode screen n/a 6750
LEVEL mm
2 From operating mode go to fct. 1.3.1
to turn off analog output.*
3 Enter function ( current value: level)*
4 Set to analog output to “off”*
5 Exit data set level and go to fct. 1.6.2
to give the gauge an address.
6 Enter function. A number will be
displayed (default value: 000- no
→,→,↑,↑,→
→
↑,↑,↑,↑
↵,↵,↑,↑,↑,→,↑
→
Fct. 1.3.1
FUNCTION.I.1
LEVEL
OFF
Fct. 1.6.2
ADDRESS
000
network)
7 Change address to 001.
8 Enter to confirm and exit to function.
Go to fct 1.4.4 to give the gauge a
→,→,↑
↵,↵,↑,↑,↑,↑,→,↑,↑
001
Fct. 1.4.4
DEVICE No
device number (displayed on a remote
user interface such as a PC (Personal
Computer) or a HHC (HART Handheld
Controller).
9 Enter data set field. (default value:
→
00000.001
00000.001). A 9-keystroke
alphanumerical code may be entered
using “up” to scroll through the choices
and “right” to change digit
10 New name: 10000.001
↑
10000.001
11 Exit data set field, function, sub menu
and menu. Save configuration and
↵,↵,↵,↵
6750
LEVEL mm
return to operating mode.
*Ignore steps 2, 3 and 4 for HART® outputs. Leave the analogue output “on”.
**Use local display interface only to configure each BM 100 A meter for network integration.
Communication Rate
Use fct. 1.6.1 BAUD RATE to optimise communication with the remote work station when using
RS485 interface. HART/ SMART networks are set at 1200 baud.
32 Handbook BM 100 A
Page 33

3.4.5 Summary of User Functions
The table below provides an overview of all parameters that can be set in the configuration menu.
Reset default values are in bold type in the “Input Range” column.
Function (Fct.) Input Range Description
1.0.0 OPERATION
1.1.0 BASIS.PARAM These functions concern the
display only
1.1.1 TANKHEIGHT
Enter 0.1 to 60 m
(3.3 to 197 ft.)
As per order
This is the distance from the flange to
the bottom of the tank. Can be set to
the probe length to ignore the bottom
non-linear & non-measurable zones.
1.1.2 HOLD DIST.
(Hold Distance)
Warning : Critical Parameter
Enter a value from 0 mm /
0 in to probe length.
The Minimum value = 0 m
• Twin probes
Probe length<2m/6.5’
0.25 m / 9.8 in
Probe length>2m/6.5’
0.45 m / 17.7 in
This prevents the gauge from
displaying a zone near the flange
where measurements may not be
possible. Function 1.5.3 “Detection
Delay” should be used to suppress
any non-product reflections as
reflections within this zone are still
registered.
• Single probes
Probe length<2 m/6.5’
0.25 m / 9.8 in
Probe length>2 m/6.5’
0.60 m / 23.6 in
• Coaxial probe
0.05 m / 2 in
1 to 100 seconds 1.1.3 TIME CONST.
(Time Constant)
1.1.4 WIN.FROZEN
5 seconds
Select YES or NO
(Window Frozen)
Warning : Critical Parameter NO (window open)
This function filters possible signal
fluctuations when the tank is turbulent.
This causes the instrument to freeze
or open its search window if product
reflection is lost. See function 1.1.5 /
1.1.6 for more details. “YES” means
the gauge will only search in the zone
specified in Fct. 1.1.5.
1.1.5 LEVEL WIN.
(Level Window)
Enter 0.2 m / 7.9” to
probe length, L
• Powders
4.0 m / 13.12 ft
• Others
0.5 m / 19.7 in
Sets the operating window for level
measurement.
The window is centred around the
level and moves as the level changes.
If product reflection is lost, the
instrument reacts according to the
configuration set in Function 1.1.4.
The value refers to the total window: a
value of 500 mm / 20 “ denotes a
window +/-250 mm / +/-9.84” around
the measurement.
1.1.6 INTERF. WIN.
(Interface Window)
1.1.7 PROBE LGTH.
(Probe Length)
Warning : Critical Parameter Per sales order
Enter 0.2 m / 7.9” to
probe length, L
1.0 m / 3.28 ft.
Enter 0.1 m / 7.9” to
probe length 60 m / 197ft.
Sets the operating window for
interface measurement. Refer to Fct.
1.1.5 for details.
Length of probe, L1, measured from
the flange. Do not include the
counterweight length. Modify this only
if the probe length has been changed.
Handbook BM 100 A 33
Page 34

Function (Fct.) Input Range Description
1.2.0 DISPLAY To display readings in the form and
units required.
1.2.1 DISP. MODE
(Display Mode)
1.2.2 DISPL. ITEM
(Display Item)
Select SINGLE or
CYCLIC display mode.
SINGLE
Select parameter(s) to be
displayed. Parameters:
Level, Distance, volume
interface level, layer,
interface distance,
interface volume, ullage
volume and percentage
of output 1 (if in single
mode).
Cyclic mode permits more than one
item to be displayed in a cycle when
used with Functions 1.2.2 and 1.2.3.
Single Display Mode: One parameter
is displayed in the operating mode.
Cyclic Display Mode: One or more
parameters are displayed in the
Operating Mode. Simply select this
function, select a parameter and press
“Right” to confirm.
Repeat this procedure to add
parameters to be displayed.
Level
1.2.4 LGTH UNIT
(Length Unit)
Enter 1 to 10 seconds 1.2.3 CYCLIC TIME
1 second
Select (0.01) m, (1) cm,
(1) mm, 0.1 mm, (0.1)
Sets the amount of time a reading is
displayed in cyclic operating mode.
Sets the length units for displayed
readings.
inch and (0.01) feet
mm
1.2.5 VOL.UNIT
(Volume Unit)
Select (0.01) cubic
metres, (0.1) liter, (0.1)
US gallon, (0.1) GB
Sets the volume units for displayed
readings.
gallon, (0.1) cubic feet,
(0.1) barrel, (1) kg, (0.01)
metric ton, (0.01) GB ton
or (0.01) US ton.
m3
(Error Message)
Select YES or NO 1.2.6 ERROR MSG
NO
Turns an error indicator on or off. If
configured “YES”, the display flashes
when a reading error occurs.
34 Handbook BM 100 A
Page 35

Function (Fct.) Input Range Description
1.3.0 CUR. OUTP. I This configures the current output.
These functions are independent
from what is displayed.
1.3.1 FUNCTION.I.1
Select Off, Level,
Distance, Volume,
Interface Level*, Layer*,
Interface Distance*,
Interface Volume* or
Ullage Volume.
Level
Assigns a measurement parameter to
analogue output number 1.
* These parameters are not displayed
in this sub-menu unless the
instrument is configured for interface
measurement.
Calibrate the gauge using Function
1.7.2 Strapping Table before selecting
“Volume” here.
1.3.2 RANGE.I 1
Select 4-20 mA, 4-20 mA
with a 3.7 mA failsafe
output or 4-20mA with a
22mA failsafe output.
Sets the analogue output range.
Settings with fail-safes will send an
error message if an error occurs i.e.
the level is lost.
4-20 mA, E=22mA
1.3.3 SCAL.I.1 MIN
(Scale I1 Minimum)
Enter value with regards
to measure method
selected in Fct.1.3.1 and
the units set in Fct. 1.2.5.
Assigns a length or volume value to 4
mA.
Refer to section 3.4.3, Example
Procedure 4.
As per order or 0.0
(Scale I1 Maximum)
Enter value as in 1.3.3 1.3.4 SCAL.I.1 MAX
Tank height or probe
length as given in order
Select as in 1.3.1 1.3.5 FUNCTION.I.2*
Level
Select as in 1.3.2 1.3.6 RANGE.I 2*
4-20 mA
Enter value as in 1.3.3 1.3.7 SCAL.I.2 MIN*
As per order or 0.0
Enter value as in 1.3.4 1.3.8 SCAL.I.2 MAX*
As order or Tank Height
Assigns a length or volume value to
20 mA.
Refer to section 3.4.3, Example
Procedure 4.
Same as Fct. 1.3.1, except this is for
the second current output, if ordered.
Same as Fct. 1.3.2, except this is for
the second current output, if ordered.
Same as Fct. 1.3.3, except this is for
the second current output, if ordered.
As per order or Tank Height Same
as Fct. 1.3.4, except this is for the
second current output, if ordered.
*Displayed when interface measurement is selected in the factory menu
Handbook BM 100 A 35
Page 36

Function (Fct.) Input Range Description
1.4.0 USER DATA
1.4.1 LANGUAGE
Select GB/US (English),
F (French) or D (German)
Sets the language for readings &
configuration.
As per order
Select YES or NO 1.4.2 ENTRY.CODE 1
NO
Activates access code for protection
of user configuration. Code is then set
in Fct. 1.4.3.
(accessible only if
Fct.1.4.2 set at “YES”)
Enter code 1.4.3 CODE 1
If no code entered:
UUUEEERRR
Enables user to enter a 9-letter code.
This code is any sequence of the
Right ( R ) , Enter ( E ), and Up (U)
keys. Once entered the display
prompts the user to verify it by
entering it again.
1.4.4 DEVICE No
(Device Number)
Enter tag name (10
characters or less).
0000000.001
Enables user to identify a device
when used in a digital network.
Characters available:Upper(A-Z) and
lower(a-z) case alphabets, plus(+),
minus(-), space(_) and numerals (0-9)
1.4.5 SERIAL No
(Serial Number)
……… (factory-set) KROHNE serial number. Unmodifiable
and to be noted for warranty and
service requirements.
1.4.6 F. NBR(French
Comm Number)
1.4.7 G. NBR. (German
Comm Number)
1.4.8 OPTION
1.4.9 PROBE TYPE
……… (factory-set) French order no. - to be noted for
warranty and service requirements.
……… (factory-set) German order no. - to be noted for
warranty and service requirements.
Enter information (10
characters or less).
Optional
Select TYPE A (Twin
Rod), TYPE B (Bi-cable),
TYPE C (Coaxial), TYPE
D, TYPE E (Mono-cable),
For noting information concerning the
device or its application. Characters
available as in 1.4.4.
For information only: this shows probe
type being used and does not affect
the performance of the instrument if
changed.
TYPE F (Single Rod),
TYPE G (Reversed) or
TYPE H.
As per order
36 Handbook BM 100 A
Page 37

Function (Fct.) Input Range Description
1.5.0 APPLICAT.
(Application)
1.5.1 LEVEL
(Level Threshold)
Warning : Critical Parameter 2.71 GAIN 1
For difficult applications. See also
BM100 A Service Manual.
Press ENTER to access
and modify the threshold
value using the display.
This function acts as a filter. Real-time
gain and reflection amplitude are
displayed along with threshold value.
Refer to Section 3.4.7 to correctly set
the device.
1.5.2 DIST. INPUT
(Distance Input)
Enter value. 0 to probe
length.
No value
This forces the device to look for the
product in a particular zone measured
from the flange facing : enter an
estimated value if there is no level
signal. Do not enter the dead zone.
1.5.3 DETE. DELAY
(Detection Delay)
Enter value. Maximum
value = Fct. 1.1.2 – 150
mm (6 in) unless Fct.
1.1.2 is higher than 150
0.0
1.5.4 INTERF. LEV **
(Interface Level
Threshold)
Press ENTER to access
and modify the threshold
value using the display.
Warning : Critical Parameter 2.86 GAIN 1
This forces the instrument not to
analyse reflections in a defined zone
immediately below the flange.
Modification of the maximum value:
increase Fct. 1.1.2 Hold Distance.
This function acts as a filter and may
be lowered if interface reflection is
difficult to detect.
Real-time gain and reflection
amplitude are displayed along with
threshold value.
Refer to Section 3.4.7.
1.5.5 EPSILON R **
(Dielectric Constant)
1.5.6 INT. INPUT **
(Interface Distance
Input)
Enter value from 1.05 to
99
2.5 or as in order
Enter value from 0 to
probe length
No value
Select YES or NO 1.5.7 SETTLING **
This configures the dielectric constant
value for use in interface applications
and TBF mode.
As for Fct. 1.5.2 but for interface
measurement.
For decanting processes & mixed
products that separate over time.
YES : For decanting processes
NO
NO : For when 2 products are
immiscible (remain separated)
(Cleaning In Place)
Select YES or NO 1.5.8 C.I.P.
NO
If YES is selected and the signal is
lost, the gauge will search for a
reflection along the whole length of
the probe rather than the designated
measurement zone. This allows a
reset to be made following a cleaning
cycle. If the gauge doesn’t find a
reflection or the reading is frozen at
the end of the probe then the tank
hasn’t been filled or drained.
1.5.9 MODE
(Application Mode)
Warning : Critical Parameter DIRECT MODE
Select DIRECT.MODE,
MANU. MODE or TBF.
Never use MANU.
MODE.
This is used for setting the
measurement mode automatically
(direct or TBF). Note that TBF mode is
not available if the gauge is
configured for interface. Contact
KROHNE for more information on
TBF measurement.
** Interface only
Handbook BM 100 A 37
Page 38

1.6.0 SERIAL I/O
(Serial Input/Output)
1.6.1 BAUDRATE*
For integrating into a digital
network
Select 1200, 2400, 4800,
9600 or 19600 baud
1200 bd
Defines transmission rate of
information between BM100 and
remote terminal. HART/SMART
outputs are fixed at 1200 baud
1.6.2 ADDRESS
Enter a number from 0 to
255**
000
Address of a device in a digital
network. If HART protocol is used,
entering >0 will configure the gauge
for multi-drop networks & output
current 1 to 4 mA.
*RS485 interface only
**0 to 15 if HART.
1.7.0 STRAP. TAB
(Strapping Table)
1.7.1 VOL. UNIT
(Volume / Mass Unit)
For calibrating the gauge for
volume measurement.
Select m³, litre, US gal.,
GB, gal., Ft.³, bbl, kg,
Selects the volume or mass unit for a
volume strap table.
metric ton, ton GB or ton
US.
m³
1.7.2 INPUT.TAB.
(Strapping Table Input)
Select point 01 to 50,
enter level and then
volume values
Table or calibrating the gauge point
by point in terms of product level and
volume values.
respectively.
00
1.7.3 DELETE TAB.
(Strap Table Delete)
Select SURE YES or
SURE NO.
Clears the data from the existing
strapping table.
SURE NO
38 Handbook BM 100 A
Page 39

3.4.6 BM100A TDR level meter characteristics
This subsection explains :
• the four principle configurations for setting up a measurement scale and what the user should
be aware of in each case
• what happens when the tank is full or empty.
• what are level and interface thresholds and how to modify them,
• what happens when one product is measured in interface mode
The measurement scale: four possible configurations for analogue current output - with
“Level” selected in function 1.3.1 (Function I.1)
1 True tank height
2 Measurable height
(probe length), L
1
3 Non-measurable
zone
4 Hold distance (user
function 1.1.2)
5 Minimum dead zone
value:
(Fct 1.5.3 – Fct
1.1.2)
6 Detection delay
(user function 1.5.3)
7 Active measurement
zone
Note that 4mA is set in user menu function 1.3.3 and 20mA is set in user menu function 1.3.4.
As can be seen above, there are 4 principal scale configurations for measuring level:
Configuration A
Parameters : Function 1.1.1 = Probe length, L
(excluding counterweight*)
1
Function 1.3.3 (4mA) = 0.0 m/mm/in./ft. units defined in 1.2.4 (for 4 mA)
Function 1.3.4 (20mA) = Probe length, L1 – Hold distance (maximum value)
The configuration used in Quick Configuration Example Procedure 4 in section 3.4.3. When the
gauge reaches the minimum and maximum outputs then the measurement will freeze as the tank is
now considered to be empty or full respectively.
Configuration B
Parameters: Function 1.1.1 = Probe length, L1 (excluding counterweight*)
Function 1.3.3 (4mA) = 0.0
Function 1.3.4 = Probe length, L
(excluding counterweight*)
1
The top of the scale is set to gauge flange facing. The measurement will freeze in the top dead zone.
Warning: danger of overflow!
It is impossible to detect product reflections in the top dead zone!
Configuration C
Parameters: Function 1.1.1 = True tank height
Function 1.3.3 (4mA) = 0.0
Function 1.3.4 (20mA) = True tank height (1.1.1) – Hold distance (1.1.2)
Has the top of its scale below the top dead zone but the bottom of the scale is below the end of the
probe (on the tank bottom). As TDR is a contact technology, the display will freeze at a level above
the 4 mA limit when product level drops below the probe end.
Handbook BM 100 A 39
Page 40

Configuration D
Parameters: Function 1.1.1 = True tank height
Function 1.3.3 (4mA) = 0.0
Function 1.3.4 (20mA) = True tank height (1.1.1)
This combines examples B and C. Care must be taken when the product rises into the top dead zone
or drops into the bottom non-measurable zone as TDR gauges cannot monitor in these zones.
The configurations given above also apply when “distance” is selected in function 1.3.1 (after
adaptation of parameters entered).
*Factory configured probe length, L1, does include the Ø12mm x lg100mm(Ø0.5”xlg4”) weight for the
Ø8mm/0.3” single cable probe (type K).
Gauge operating logic when the reflection is lost
The product reflection pulse is usually lost when the level is in the top dead zone or near the bottom
of the tank. The diagram below shows the action taken by the gauge depending on where the last
reflection was lost.
Zone 1 : Dead zone
• Status marker 3 is displayed when the product enters the
dead zone.
• Gauge assumes the tank is full and displays the maximum
level value
Zone 2 : Full zone
• If the gauge loses the signal in this zone, it reacts as in zone
1 : the tank is assumed to be full.
• The gauge searches for a reflection in this zone.
• On reaching the full zone the level will continue to rise to a
current output of 20.5 mA (i.e. +3⅛%), if signal is not lost.
Note: the search zone increases to :
Fct. 1.1.2 “Hold Distance” + (Fct. 1.1.5 “Level Window”/2), if this
value is greater than 300mm / 12”.
Zone 3 : Central measurement zone
• The gauge uses Fct. 1.1.5 “Level Window” to search in this
zone for the largest pulse reflection.
• If the pulse is lost the reading freezes at the last value.
Status marker 3 will be displayed.
• Status marker 2 will then be displayed if no reflection is
found in the Level Window search zone, and the reflection
search will be enlarged to the probe length.
• The reading will remain frozen during this time.
Zone 4 : Empty zone
• If the reflection is lost in this zone, the gauge assumes the
tank / vessel to be empty.
• The short circuit reflection will become larger than product
reflection at this time.
• If level is not at zero, the gauge will descend further to a
level equivalent to a minimum output of 3.8 mA.
• The gauge searches for a reflection in this zone. The search
zone increases to:
Fct. 1.1.7 (Probe Length) – fct. 1.1.5 (Level Window)/2, if this
value is greater than 300 mm / 12”.
40 Handbook BM 100 A
Page 41

Gain and voltage amplitude
As explained in the measuring principle in section 7, the level of a product is converted from a return
signal (the product reflection) received by the gauge: this signal has taken a certain amount of time
to return to the gauge and it has a certain strength / size measured in milli-volts (dependant on the
dielectric constant of the product).
All pulse signals returning to the gauge electronics block (including flange, obstruction and the
product surface reflections) are converted to voltage amplitudes. The gauge’s microprocessor looks
for part of the largest signal that is over a set voltage amplitude, called the “threshold”, and identifies
this as the product being measured. For this signal to be usable by the gauge, the microprocessor
will amplify the signal by increasing the gain. Once the signal is within a set “working” range, the
gauge follows this signal. The gauge registers any changes in time for this part of the signal to return
to the converter and translate this into a displayed level or volume.
Gain is a function of voltage amplitude. This defines the default threshold value when the gauge is
searching for the product level. A strong return signal will be given a low gain (i.e. Gain 0 or a small
amplification). However, if the signal is very weak, then a Gain of 3 (i.e. high signal amplification) is
given.
Handbook BM 100 A 41
Page 42

Level measurement: Level pulse amplitude and threshold
After connection to a power supply, the BM100 A will:
1. Measure reflection pulses in terms of voltage amplitude by cycling through a set of gains.
2. Identify the highest amplitude as being the product level.
The diagram below shows a level threshold of 2.71 Volts for a Gain of 1.
1 Initial pulse
2 Flange reflection (except
coaxial probe)
3 Non-product reflection
(e.g. parasite : agitator)
4 Product level reflection
5 Level threshold (with 2
metre steps). Set in user
function 1.5.1.
6 Offset (see below for
definition)
7 Distance measured as a
function of time
Offset is the distance measured as time for the signal to travel from the signal converter to the
flange (the gauge’s reference point).
If difficulties are experienced finding the correct level, try the following solutions.
• User function 1.1.4 Window Frozen set to “Yes”:
Critical Parameter: Ask KROHNE for more advice before reconfiguring gauge.
This concentrates search for product level in a small defined zone and ignores interference
signals.The gauge will set up the “level window” on either side of the last reading with a plus/minus
range equal to half of the value given in Function 1.1.5. The gauge will then ignore all other pulse
reflections outside the “level window” as long as there is a reflection above the pre-set threshold. If
no pulse is detected, the instrument will change the Gain automatically as the pulse changes
amplitude.
• User function 1.1.4 Window Frozen set to “No”:
The instrument will search along the entire length of the probe. Warning : This may lead the
instrument to incorrectly identify a non-product reflection (e.g. a nearby beam or the nozzle) to be
the current level.
• Modification of User Function 1.5.1 Level Threshold:
Critical Parameter: Ask KROHNE for more advice before reconfiguring gauge.
The default threshold values do not normally need to be changed. However, the level threshold may
need to be modified if level is hard to detect due to parasite signals from obstructions in the tank
(nozzle, beams and mixers) or the measurement of products with very low dielectric constants.
42 Handbook BM 100 A
Page 43

If the level pulse is too high 2 solutions are possible:
• Modify user function 1.5.3 Detection Delay ignore all signals near the flange
Increase the configured value. This will force the gauge to ignore reflections in the distance set from
the flange. Note that this will reduce the measurement range.
• Modify user function 1.5.1 Level Threshold: to reduce interference along the probe length
Increase the voltage amplitude manually in Fct. 1.5.1. The threshold descends in 2 metre steps to
take into account loss of pulse strength over distance so the correct level behind the obstruction
may be detected. See the procedure below:
If measured level is too low compared its real level:
The gauge may have found that the short circuit gives off the strongest pulse and assigns this as
being the current level. Lowering the gain and /or the voltage amplitude manually in Fct. 1.5.1. may
help but too low a threshold value may result in conflicting non-product reflections and unstable
readings. In the case of very low dielectric products, contact KROHNE service personnel or refer to
the BM100 A service manual for advice on converting to TBF measurement.
Procedure (example where the level measured is too low)
• read off displayed peak amplitude
• modify level threshold value
Step Action Press buttons to finish
step
Information
displayed at the
end of each step
1 Start from Operating Mode screen n/a 6750
LEVEL mm
2 From operating mode go to fct. 1.5.1 Level
Threshold
3 Enter function ( current value: level) to first
read off peak amplitude. The top value
→,→,↑,↑,↑,↑,→
→
Fct. 1.5.1
LEVEL
3.80
GAIN2
gives the peak amplitude in volts.
4 Press enter to see (& modify) configured
level threshold in volts and the minimum
↵
3.80
MIN G 2
gain used
5 Modify the threshold value so that value is
no less than 0.5V below the peak amplitude
6 Exit data set field, function, sub menu and
menu. Store configuration and return to
→, ↑,↑,↑,↑,↑,↑,→,↑,↑,↑,↑
↵,↵,↵,↵
3.44
MIN G 2
6750
LEVEL mm
operating mode. Check that the gauge can
measure in the required measuring range.
Note that the threshold drops every 2 metres / 6.5 ft. Refer to the BM100 A
Service Manual for the threshold value for each 2 metre / 6.5 ft step.
Handbook BM 100 A 43
Page 44

Solid application notes
Most dry solid applications except powder or flakes with high dielectric constants, such as charcoal
and coal powder, are measured with a Gain of 3. If it is difficult to measure level at a certain point
with the gauge using a Gain from 0 to 2, then an internal tank structure (exposed girder, etc.) is most
likely to be within the electromagnetic pulse field area : the gauge will detect the largest signal and
assume this is the product level.
Interface measurement*
After being switched on, the BM100 A will :
• Identify the closest reflection to the flange above the level threshold (minimum voltage
amplitude set in fct. 1.5.1) as being the level
• Identify the next largest reflection which is above the interface threshold (set in fct. 1.5.4 ) as
being the interface.
Follow instructions given above for Level Threshold modification.
* measurement only possible if the gauge is factory-configured for interface.
1 Initial pulse
2 Flange reflection
3 First largest reflection (level)
4 Second largest reflection
(interface)
5 Level threshold. Set in user
fct. 1.5.1.
6 Measurement not dielectric
constant dependant
7 Measurement dielectric
constant dependant
8 Interface threshold. Set in
user fct. 1.5.4.
Interface measurement when only one product is present in the tank
The gauge assumes that at least 100 mm / 4” of top product is in the tank as soon as
a top product reflection has been detected and/or the short circuit at the end of the
probe is no longer detected. This means that level freezes at a constant 100 mm / 4”
above the indicated interface. Also note however, that the interface level displayed
will be slightly higher than the real value. The gauge will measure the correct interface
and level values once there is at least 100 mm / 4” of top product in the tank.
Default voltage amplitude thresholds for a given Gain : for level and interface
Gain
Minimum threshold/ Volts
Level Interface
0 2.59 2.66
1 2.71 2.87
2 2.99 3.34
3 3.62 4.44
44 Handbook BM 100 A
Page 45

4 Service and maintenance
4.1 Test Functions in the user menu
A series of tests are available in this part of the configuration menu. This permits the local display
and the instrument calibration to be checked.
Test Function Input range Description
2.0.0 TEST
2.1.0 TEST DISPL.
(TEST DISPLAY)
2.2.0 CUR OUTP.I
(CURRENT OUTPUT I)
2.2.1 VALUE I 1 N/a Gives a reading of current from
2.2.2 TEST I 1 Select 3.6, 4, 12, 20 or 22 mA. Forces the output 1 to a
2.2.3 VALUE I 2 N/a Gives a reading of current from
2.2.4 TEST I 2 Select 3.6, 4, 12, 20 or 22 mA. Forces the output 2 to a
2.3.0 COMM. TEST For factory use only.
Gives full display of all
segments of the LCD display.
analogue output 1.
selection of 4 output currents.
analogue output 2.
selection of 4 output currents.
4.2 Troubleshooting
4.2.1 Parameter errors
Function Action to be taken
4 PARAMETER ERROR
4.1 CURRENT OUPUT
4.1.1 SCALE I 1 MIN
4.1.2 SCALE I 1 MAX
4.1.3 SCALE I 2 MIN
4.1.4 SCALE I 2 MAX
4.2 STRAP TABLE
4.2.1 STRAP TABLE INPUT
4.2.2 STRAP TABLE SUPRESS
4.2.3 DISPLAY MODE
4.2.4 DISPLAY ITEM
4.2.5 FUNCTION I 1
4.2.6 FUNCTION I 2
4.3 PARAMETERS ERRORS
4.3.1 DEAD ZONE
4.3.2 DETECTION DELAY
When a parameter error occurs, the digit 4 is displayed
with the description “PARAMETER ERROR”.
• The RIGHT key should be pressed until the function
concerned is given.
• Press the RIGHT key again to make the value appear
for modification.
• Follow the instructions for resetting the value in
Section 3 and then press ENTER to exit.
• If more than one error is reported, the procedure
should be repeated.
Handbook BM 100 A 45
Page 46

4.2.2 Basic Servicing – Replacing fuses and the electronics chassis
BM100 servicing by the customer is limited by warranty to the removal and
replacement of :
• the power supply fuse
• the electronics chassis.
Other repairs must be done by KROHNE-authorised service staff.
Removing the electronics chassis
Before changing the electronics chassis remember to save the current configuration
of the instrument :
• Note the settings on the configuration record supplied in appendix B or
• Save the settings in a *.dat file on PC-STAR. Press the F4 key to open a
directory.
Please follow these instructions carefully:
Step 1
Disconnect instrument from the power supply. If instrument is equipment category 1 /
2 GD (ATEX classification) or located in a Division 1 (US) area, please refer to
Supplementary Installation and Operating Instructions BM100 A / Ai KEMA 01 ATEX
1078X for more information.
Step 2
Remove back cover with supplied wrench.
Step 3
Unplug terminal blocks from electronics chassis.
Step 4
Remove the front cover with wrench.
Step 5
Undo the 2 screws holding display on chassis.
46 Handbook BM 100 A
Page 47
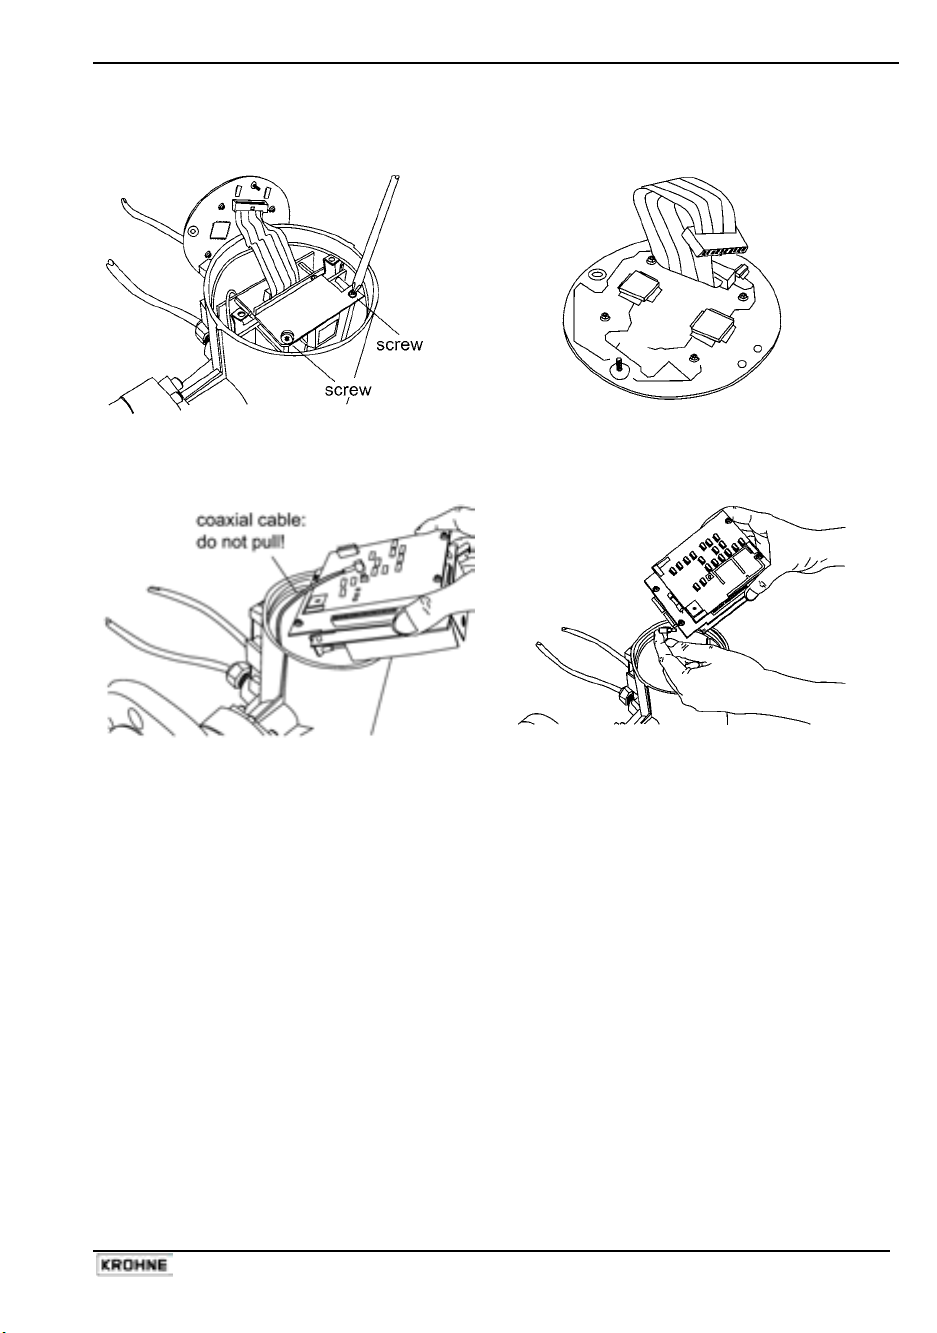
Step 6
Undo the two screws holding block in the
housing.
Step 7
Disconnect interface socket. Remove display
screen circuit board.
Step 8
Remove the electronics chassis carefully.
Step 9
Disconnect the coaxial cable.
Step 10
Use these instructions to mount the new chassis. Care should be taken when putting the electronics
package back into the housing to avoid trapping the coaxial cable between the housing and the rear
cover. Load the old settings saved on a *.dat file using PC-STAR or re-enter information noted on
the configuration record in appendix B.
Handbook BM 100 A 47
Page 48

Replacing the fuses
As indicated in the diagram below, the power supply is protected by a fuse, F1. This will be visible
when the electronics chassis is removed from the housing. The fuse rating is dependant on the type
of power supply used and is given below :
Power Supply Board 100 / 240 V AC
Power supply fuse F1
T 400 mA / 1500 A (250V)
IEC127-2/V Time Lag Fuse
Power Supply Board 24 V DC / AC
Power supply fuse F1
T 1.25 A / 1500 A (250V)
IEC127-2/V Time Lag Fuse
48 Handbook BM 100 A
Page 49

4.3 Fault clearing
Event Fault Action
General Operation
Local Display:
Status Marker
1 displayed
Local Display:
Status Markers
2 or 4 displayed
Local Display:
Status Markers
3 and/ or 5
displayed
Instrument is not
accurate when
working in DIRECT
mode with a
product that has a
high dielectric.
Electrical Connections and Communication Output
The display does
not work.
On connecting the
instrument to a
DCS unit, the
gauge output
current drops to
3.7 mA or lower.
Output remains at
the same value,
about 16 mA.
* A list of KROHNE offices is supplied on the last page of this handbook
The High Frequency board is not sending a
pulse.
Reason: it may have been damaged by
electrostatic discharge.
The instrument has lost the level (marker 2)
or interface (marker 4) signal, has searched
in a pre-defined zone and has not yet found
the return pulse.
Reason: The product may have risen into
the dead zone and has dropped below the
threshold due to readings from the flange.
Reason: The product level may be at zero
(tank empty).
The display is frozen.
Reason: The pulse has dropped below the
threshold, whereupon the gauge opens a
search window / zone. If no reflection is
found, Status Marker 2 (or 4 for interface)
will be displayed.
Marker 3 is also displayed if PC-STAR is
connected and the F7 graphics function has
been selected.
Tank height is not correct.
Deposit on the probe or operation in a
heavy dust environment.
Instrument is wired to the wrong voltage :
fuses have blown.
If the ambient temperature is below
–20°C / –4°F, the LCD does not work
The load resistance in the active loop is
limited to 350Ω. If the DCS load is higher,
then the output current will drop
A power supply has been connected to the
output terminal.
Contact a KROHNE-authorised
service centre*.
The electronics package may
need to be replaced.
Empty tank below dead zone
and check the measurement.
Refill tank above minimum level
and check the measurement.
Empty tank below dead zone
and check the measurement.
If the signal is not detected then
modify the threshold as shown in
section 3.4.6 using user menu
function 1.5.1 for level and 1.5.4
for interface.
Check and re-enter tank height
in user function 1.1.1 if required.
If the electronics pack has been
replaced, verify that factory
calibration parameters are still
the same. Ask KROHNE* for the
factory calibration sheet and
password for access to the
factory menu.
Replace the power supply fuse,
F1, as show in section 4.2.2.
Consider using a PC equipped
with KROHNE PC-STAR
software if in a general purpose
area.
Measure the output load with an
ohmmeter. Modify the load if this
does not conform with the output
option limits. See section 2.2.2.
The electronics package should
be sent to a KROHNE
authorised service center*.
Handbook BM 100 A 49
Page 50

5 Ordering spare parts
50 Handbook BM 100 A
Page 51

Handbook BM 100 A 51
Page 52

6 Technical data
6.1 Technical Data
Input
Measured variable Distance, level, liquid interface and volume
Measurement range Variable according to probe type, see Equipment architecture,
section 6.2
Blocking Distance Variable according to probe type, see Probe measurement limits
Output
Analogue 4 – 20 mA (3.8 – 20.5 mA according to NAMUR 043),
1 passive output (as standard)
Active outputs 350 ohms maximum
Passive outputs (U-8)/22.10-3 ohms
Digital HART
Error signal Status markers. NAMUR 043-compliant (output current values at
Performance Characteristics
Accuracy
Level measurement
Interface measurement Liquids (with minimum layer of 100 mm / 4”)***
Repeatability ± 1 mm / ± 0.04”
Resolution ± 0.3 mm / ± 0.012”
Warm-up time 20 seconds to 1½ minutes (self-test before first reading)
* test medium: water (εr=80) ** test medium: cement (εr=3) *** test medium: oil (εr=2.4)
Test conditions
Ambient temperature +20°C ±5°C / +70°F ±10°F
Ambient air pressure 1013 mbar abs. ±20 mbar / 14.69 psig ±0.29 psi
Relative air humidity 60% ±15%
Reference target coaxial probe: water surface
Distance from wall > 300 mm / 11.81” (not for coaxial probe)
Distance to obstruction > 1 m / > 3.28 ft.
Environment
Ambient temperature -20 °C to + 50 °C / -4°F to 120°F
Storage temperature -40 °C to + 85°C / -40°F to 185°F
Protection IP 67 / NEMA 6 – 6P
52 Handbook BM 100 A
Load
Temperature drift
Resolution
®
& KROHNE SMART protocols (as standard).
<100 ppm / K
± 3 µA
PROFIBUS-PA output also available on demand.
3.6 mA or 22mA according to value configured in fct. 1.3.2).
Liquids when probe length, L < 6 m / 20 ft.*
± 5 mm / ± 0.2”
Optimised with appropriate on-site calibration
± 3 mm / ± 0.12”
Liquids when probe length, L >6 m / 20 ft.*
Additional error above 6m: ±0.02% of distance measured
Solids (powders / granulates)**
± 20 mm / 0.79”
± 10 mm / 0.39” with configured and stable ε
value
r
single probe: Ø0.8m (Ø31.5”) metal plate
twin probe: metal block “short circuit”
Page 53

Power supply
Option 1 24 V DC / AC, +10%/-15%, Power used: 9W
Option 2 100 – 240 V AC, +10%/-15%, Power used: 9W
Process
Process temperature, flange -30 to +150°C / -22°F to 298°F, option 200°C / 392°F
See BM100 A / Ai Supplementary Instructions for Ex values.
Process pressure, standard -1 to +40 bar / -14.5 to +580 psig*
*Process pressure subject to the process temperature and the
mechanical properties of process connection
Dielectric constant εr: Measurement mode and probe type limits
Direct mode
Level measurement
Level & interface measurement Twin rod, coaxial & twin cable
** The minimum layer is 100 mm / 4” and is dependant on the dielectric constant, ε
determined under test conditions using water (ε
coaxial (D)
twin probes (A,B,G&L)
single probes (F,H&K)
=80) and oil (εr=2.4). Note that a layer less than
r
≥ 1.4
ε
r
≥ 1.8
ε
r
≥ 2.1
ε
r
(interface) >> εr (level)2 **
ε
r
. This has been
r
100 mm / 4” will result in a level reading at a constant 100 mm / 4” above the displayed interface
level, also the interface level reading will be slightly higher than the true value.
TBF mode
Level measurement All except D & G
εr ≥ 1.05
Human interface
Communication, standard
KROHNE SMART and HART® protocols installed on first output.
Automatic recognition and configuration by gauge. Information
displayed via local display (integral or remote), PC or HART®
handheld communicator (HHC).
Point-to-point: 1 gauge connected to PC or HHC
Multi-drop: up to 15 gauges connected to PC or HHC
RS 485 (SMART): up to 255 per junction box with PC link Fieldbus
PROFIBUS-PA: GSD file supplied with gauge.
Weight
Non-Ex/FM Housing 8 kg / 18 lb with DN50 PN10/16 flange
Ex/FM Housing 9 kg / 20.25 lb with DN50 PN10/16 flange
Single rod Ø10mm 0.62 kg/m / 0.83 lb/ft (twin rod or reverse: 1.24 kg/m / 0.83 lb/ft)
Single cable Ø4mm 0.12 kg/m / 0.08 lb/ft (twin cable Ø4mm : 0.24 kg/m /0.16 lb/ft)
Twin cable Ø6mm 0.28 kg/m / 0.19 lb/ft
Single cable Ø8mm 0.41 kg/m / 0.28 lb/ft
Coaxial Ø28mm 1.61 kg/m / 1.08 lb/ft
Standards
Electromagnetic Compatibility
and other protection directives
followed for EU countries
Electromagnetic Compatibility
Directive 89/336/EEC in conjunction with EN 61326-1(A1&A2).
EMC emissions shielding (with the exception of BM 100 As with
coaxial probes) is only guaranteed in metal tanks. Class Ashielded as standard, class B shielding is available on demand.
Electrical equipment (low voltage)
Directive 73/23/CEE in conjunction with EN 61010-1.
ATEX
Refer to BM 100A/BM 100 Ai KEMA 01ATEX1078X
Supplementary Installation and Operating Instructions.
Handbook BM 100 A 53
Page 54

6.2 BM 100 A Equipment Architecture
6.2.1 BM 100 A mechanical options
8mm (K)
Powder applications
ingle cable
10mm (F)
ingle rod
Single 316
stainless steel
flexible cable
with long
counterweight.
Single rigid rod
30 m 98.5ft*
3 m / 10ft*
2.1
2.1
DN40PN25/40
DN40 PN25/40
1½”ANSI150lb
1½” G
1½” ANSI 150lbs
1½”G / 1½”NPT
/ 1½” NPT
SS316/316L
S316L
HC276
HB2/ HB3**
PVDF-coated
PVC-coated
Liquid / Liquid Gas applications
10mm (G)
Reverse
One inner
4mm (H)
ingle cable
Single 316
4mm (L)
win cable
Two flexible
28 (D)
Coaxial
Single
10mm (A)
win rod
Two rigid rods
conductor in
protective
tube and one
reference rod
connected by
stainless steel
flexible cable
with
counterweight.
316 SS cables
with spacers
interspersed
along its
length, with
inner
conductor
with
protective
tube.
with spacers
interspersed
along its
length, with
short-circuit. ***
a short circuit.
counterweight.
***
***
”ANSI
½ ”G /
6m / 20ft*
(Liquid only)
45 m / 148ft*
60 m / 197ft
6 m / 20ft
3 m / 10ft*
-
2.1
1.8
1.4
1.8
DN50
PN10/16
DN40
PN25/40
DN50 PN10/16
2”ANSI 150lbs
DN40
PN25/40
DN50 PN10/16
2”ANSI 150lbs
1½” ANSI
2½ ”G /
1”½ANSI
2½ ”G /
150lbs
150lbs
1½ ”G /
2½ ” NPT**
150lbs
1”G /
2 ½ ”NPT**
½ ”NPT**
1½ ” NPT
1”NPT
SS316L
S316/316L
SS316/316L
SS316L
S316L
HC276
S316 + FEP
HC22
HC276
HC276
HB2/HB3**
oating
antalum**
Granulate / solid applications
win cable
Probe
Type Code)
Two flexible
Description
316 SS cables
with spacers
interspersed
along its length,
with short-
circuit and
counterweight.
Level
Interface
54 Handbook BM 100 A
Level and
Interface
30 m / 98.5ft*
Range, max.
1.8
Min εr
direct mode
DN50 PN10/16
Minimum
process
2”ANSI 150lbs
2½ ”G /
connection
2½ ” NPT**
SS316/316L
Probe
material
6mm (B)
= dielectric constant of measured product Liquid / Liquid Gas only * Higher on request ** On request *** No air gap
r
Page 55

8mm (K)
ingle cable
No spacer
D45x245
(316L)
D12x1500
(316L)
Turnbuckle
(316L)
Without** 600 mm / 24”
10mm (F)
ingle rod
Powder applications
No spacer
None
600 mm / 24”
10mm (G)
Reverse
ETFE (Tefzel)
if L > 0.7m
None
200 mm / 8”
4mm (H)
ingle cable
4mm (L)
win cable
28 (D)
Coaxial
No spacer
D25x100
(316L)
nto cable
D45x60(316L)
L > 1.5m
None
Turnbuckle
FEP molded
PTFE if
D25x100
(HC22)
(316L)
D25x10
(HC276)
Chuck(316L)
urnbuckle
(316L)
600 mm / 24”
200 mm / 8”
0 mm / 0”
10mm (A)
win rod
ETFE (Tefzel) if
L > 1.5m
Liquid / Liquid Gas applications
None
200 mm / 8”
6mm (B)
win cable
pplications
Granulate / Solid
Probe
(Type code)
n cable
D45x245
FEP molded
Spacer material
Counter
-weight
(316L)
D90x100
(316L)
Turnbuckle
(316L)
Without** 200 mm / 8”
Free area
(diameter)
Gauge
illustration
Handbook BM 100 A 55
Page 56

6.2.2 Definition of terms
• Distance:
• Interface:
• Interface Distance:
• Interface Level:
• Interface Volume:
• Layer:
• Level:
• Probe Length:
• Tank Height:
• Ullage:
• Volume:
Distance from the face of flange to the level (for 1 product) or the surface
of the top product (in the case of 2 products).
Interface where the two products come into contact.
Distance from the face of the flange to the liquid / liquid interface.
Height from the bottom of the tank to the liquid / liquid interface.
(Tank Height – Interface distance)
Volume of bottom product.
Thickness of the top product (Distance Interface – Distance) :
minimum 100mm / 4”.
Height from the bottom of the of the tank to the surface of the top product
(Tank height – distance).
Ordered length of probe, L, from face of flange to end of probe (including
short circuit and counterweight).
Distance from the face of the flange to the bottom of the tank.
Unfilled volume.
Total volume filled.
56 Handbook BM 100 A
Page 57

6.2.3 Probe measurement limits
A1, the top dead zone,
The minimum distance from the flange to the
top limit of the measuring range. The
measurement displayed on the gauge will
freeze below this distance and status markers
will indicate that the reflection has been lost.
A2, the bottom dead zone,
A length at the end of the probe where
measurement is not possible. For products with
very low dielectric constants (ε
< 5), accuracy
r
may be affected in a non-linear zone up to 150
mm / 6” above the bottom dead zone, A2
D, the non-measurement zone,
A zone where measurements cannot be taken
(i.e. the counterweight, turnbuckle, etc. –
except the Ø12 mm x 100 mm counterweight
for the type K single cable Ø8 mm probe). The
measurement displayed on the gauge will
freeze to L
L1, factory configured probe length
.
1
Length to the end of the probe (excluding short
circuit or counterweight). This parameter is
given in User Function 1.1.7 in the
Configuration Mode.
L, Probe length
The length specified by the customer in the
order.
Warning:
Set User Function 1.1.2 “Hold Distance” in the gauge’s configuration mode to at least
top dead zone size as specified per probe type in the table below, so that the gauge
never displays product level within this zone. Refer to user function 1.1.2 in section 3.4.5
for more information.
Probe measurement limits
Probe type
Top dead
zone, A1
= 80*
ε
r
Bottom dead
zone, A2
= 80*
ε
r
Top dead
zone, A1
= 2.4*
ε
r
Bottom dead
zone, A2
= 2.4*
ε
r
Twin rod (A) 250 mm / 9.8” 20 mm / 0.8” 330 mm / 13” 100 mm / 3.9”
Twin cable
250 mm / 9.8” 20 mm / 0.8” 330 mm / 13” 100 mm / 3.9”
Ø6 mm (B)
Twin cable
250 mm / 9.8” 20 mm / 0.8” 330 mm / 13” 100 mm / 3.9”
Ø4 mm (L)
Coaxial (D) 0 mm / 0” (**) 10 mm / 0.4” 0 mm / 0” (***) 100 mm / 3.9”
Single rod (F) 400 mm / 15¾” 20 mm / 0.8” 500 mm / 19.7” 100 mm / 3.9”
Reverse(G) 50 mm / 2” 250 mm / 9.8” N/a N/a
Single cable Ø4 mm (H) 400 mm / 15¾” 20mm / 0.8” 500 mm / 19.7” 100 mm / 3.9”
Single cable Ø8 mm (K) 400 mm / 15¾” 20 mm / 0.8” 500 mm / 19.7” 100 mm / 3.9”
*The dielectric constant, εr, of water is 80. The dielectric constant, εr, of oil is 2.4.
** 20 mm / 0.8” for Ex version. *** 50mm / 2” for Ex version.
Handbook BM 100 A 57
Page 58
6.3 Gauge dimensions
The drawing below illustrates the complete set of standard gauge configurations and overall
dimensions.
Housing
Non-Ex version Ex version
Probe
A B L D H K F G
Twin
Rod
Ø10(0.4)
Twin
Cable
Ø6(0.24)
Twin
Cable
Ø4(0.16)
Coaxial
Ø28(1.1)
Single
Cable
Ø4(0.16)
Single
Cable
Ø8(0.3)
Single
Rod
Ø10(0.4)
Reverse
Ø10(0.4)
Standard counterweight
N/a Ø45x245
(Ø1¾x9½)
Ø45x60
(Ø 1¾x2½)
N/a Ø25x100
(Ø1x4)
Ø12x100
(ؽx4)
N/a N/a
Dimensions in mm (inches) L is ordered probe length
58 Handbook BM 100 A
Page 59
7 Measuring Principle
The BM100 A has been developed from a tried and tested technology called “Time Domain
Reflectrometry” (T.D.R.). Other modern applications include checking for and locating damage along
telecommunication cable lines.
The BM100 A sends low-power electromagnetic pulses of one nanosecond width along a rod or
cable conductor. This pulse travels at a known speed : the speed of light. Upon reaching the surface
of the product to be measured, the pulses are reflected back with an intensity that is dependent on
the dielectric constant, ε
A product’s dielectric constant, ε
surface of the product being measured is registered by the instrument as a signal amplitude in volts.
The higher the dielectric constant, ε
is reflected from the surface of water.
The instrument measures the time between the emission and the reception of the signal : half of this
time corresponds to the distance from the instrument reference point (the flange facing) to the
product surface. This value of time is converted into an analogue output current between 3.8 and
20.5 mA or a digital signal corresponding to a calibrated distance which can then be displayed
digitally in a variety of forms from a list of choices available in the gauge’s user menu.
Readings taken using this technology have the advantage of being uninfluenced by dust, foam,
vapour and agitated and boiling surfaces. Pressure, temperature and density variations also have no
affect.
, of the product.
r
, is an electrical property. The strength of pulse reflection from the
r
, the stronger the reflection: e.g. up to 80% of the pulse strength
r
When I < 3.6 mA : the current loop is open
I = 3.6 mA : error status (displayed when fct. 1.3.2 is set to “4-20 mA, E=3.6mA”)
3.8 ≤ I ≤ 20.5 mA : measuring range
I = 22 mA : error status (displayed when fct. 1.3.2 is set to “4-20 mA, E=22mA”)
Handbook BM 100 A 59
Page 60

The BM100 A can determine level in two ways, depending on the dielectric constant of the product:
Direct mode: Level and / or interface measurement, for products where the
dielectric constant is above1.4*.
Direct mode: Inverted interface measurement is dealt with in the Service Manual.
Tank bottom following (TBF) mode: Level measurement, for products with low
dielectric constants (below 2.1) TBF level measurement is explained in the Service
Manual.
* This is the minimum value for a BM100A with a coaxial probe. This value will vary slightly
depending on the probe type used.
7.1 Direct mode
Level and Interface Measurement
1. Flange reflection
2. Level measurement
3. Interface measurement
Level measurement of one product
The pulse is emitted by the instrument and guided along the probe. It reflects off the first product
surface it meets and returns to the instrument.
The distance from the gauge flange to the product is proportional to the time taken:
Distance = c
2 where c
. time taken
0
is the speed of light in air.
0
Level is determined by subtracting the distance to the product from the tank height. Note that the
instrument is normally delivered with level being measured from the end of the probe, where the
tank is taken to be empty once the product falls below this point.
60 Handbook BM 100 A
Page 61
Simultaneous interface & level measurement of two products
Interface can be measured when the top liquid has a lower dielectric constant than the second one.
The residual pulse left over from the reflection from the top liquid surface is used for measuring
interface distance. This residual pulse continues along the probe until it is reflected by the liquid /
liquid interface. The speed of the electromagnetic pulse through the top liquid is determined by the
top liquid’s dielectric constant. This relationship is expressed by this formula :
c
1
= c
, where εr1 is the dielectric constant of the top liquid
0
√εr1 and c1 is the pulse’s speed in the top liquid
The distance to the interface may be determined if the distance to the top product surface and εr1 is
known, as the layer thickness is proportional to time and εr1 (see diagram above). The layer must be
a minimum of 100mm / 4” thick for an accurate measurement to be taken.
8 Certificates and Approvals
ATEX*
KEMA 01 ATEX 1078X
Factory Mutual*
Project ID 3009217
Germanischer Lloyd Certificate*
No. 17 461 - 01 HH
Gosstandard Pattern Approval Certificate
No. 17045-98 (Russia)*
Symbols used for the identification of approved equipment
Conformity
to E.U.
Ex-
approved*
directives
and norms
*The above symbols, with the exception of the “CE” symbol, will not appear on gauge nameplates or
supplied paperwork if the approvals are not specified in the order by the customer.
EEx de [ia] IIC / IIB (T6-T3) : (ATEX II 1 / 2 G)*
or
EEx d [ia] IIC/IIB (T6-T3) Zone 0 (ATEX II 1 / 2 D
T75 – 150°C)*
Intrinsically safe apparatus for use in Class I, II,
III, Div. 1, Groups A – G & connections to Class
I, Zone 0 AEx ia IIC;
for Nonincendive Class I, Div.2, Groups A – D ;
suitable for class II, III, Div.2, Groups F & G; with
Type 4X, 6 indoor / outdoor protection.
Gauge tested in accordance with the relevant
requirements of the GL Type Approval System.
Gauge tested in accordance with the approval
requirements of the Gosstandard System.
FMapproved*
GLapproved*
Handbook BM 100 A 61
Page 62

9 PC STAR software installation and operation instructions
This section gives a short installation and operation guide for the PC STAR Version 2.00, a software
program developed in-house by KROHNE to facilitate remote configuration and data display on a
PC (Personal Computer) work station. It is supplied on customer demand only.
9.1 Software Installation
Minimum hardware requirements :
IBM PC – AT-compatible computer, 386 microprocessor or better, 4MB RAM, 2MB free hard-disk
drive space and VGA / SVGA display.
PC communication :
1 x RS 232 serial port
Operating system :
Windows 95, 98, 2000, Me and XP.
Additional hardware :
For HART® protocol RS232 – HART TM converter, e.g. VIATOR from MACTek
For RS485 (SMART Protocol) RS232 – RS485 converter, e.g. K485 – ISOL from KK
Systems Ltd.
The software is supplied zipped or unzipped either on a CD-ROM or on 3”½ diskettes. The software
is supplied with a unique serial number that must be entered to install the software.
1 Load the CD-ROM or diskette into the relevant drive and wait for the installation Wizard to
auto-run. If nothing happens, check that the correct software (for 95, 98, NT, 2000, Me and
XP) has been supplied and the software is unzipped.
Unzip the software, at which point the WinZip Wizard should run the set-up file or
Find the installation file “Setup” or “ Install” on the CD-ROM / diskette and open it to run the
Installation Wizard.
2 Follow the instructions given in the Wizard, entering the serial number when instructed to do
so. The software will then be installed.
9.2 PC-STAR Software history
KROHNE “PC STAR” software history (for remote programming of BM 100 A by PC)
Date of
Introduction
Month / Year Hardware Operating
11 / 1996 PC Windows 3.xx,
10 / 2001 PC Windows 3.xx,
12 / 2001 PC Windows 95 /
PC User software (PC STAR) details
Software
system
95, 98
95, 98
98, NT, Me,
2000 and XP.
release
1.10 Initial release
1.20 /
1.21
2.00
(current)
Instructions Comments
On-line help*
Improvements to
operating system
support
62 Handbook BM 100 A
Page 63

9.3 Setting up the gauge before connecting with the software
Type of communication network
• Point-to-point networks
Communication with one device. No gauge configuration required. All configuration work may be
done on the computer.
• RS485 networks
Communication with more than one device. To enable the software to identify each
gauge, configure the gauge using the local display screen (refer to the Quick
Configuration section for giving the gauge an “address” and “name” to each
gauge). The gauge will measure from the short circuit to the top dead zone, so no
scale configuration is necessary. For the option where a 1 passive analogue output
is available with the RS485 output, the scale should be set as before.
9.4 PCSTAR Functions
Check that the correct hardware has been installed to allow communication between the gauge and
the work station. Once the software is running, the basic functions (and the associated function keys)
will be shown at the foot of the first page.
Open the PC-STAR software. The operator will see the PC STAR main title window:
To enter the functions displayed in the diagram above, move the cursor to the bar concerned and
left-click to open or use the keyboard function key indicated. The functions available are discussed in
sections 9.4.1 to 9.4.7 below.
9.4.1 F1 Help:
PCSTAR Help for a summary on PCSTAR functions
Handbook BM 100 A 63
Page 64

9.4.2 F2 Connection:
Opens a connection between PCSTAR and the gauge.
This will establish a connection with the gauge (s). A small window will open either confirming the
connection or advising the user otherwise. This will open a window which displays graphics of the
current status of outputs and a representation of the tank.
If the PC-STAR doesn’t succeed in making a connection, the RTS shutdown parameter (see Section
9.4.4: F4 – Serial Parameters below) will be automatically incremented until a connection is made.
This shows the real-time tank status. This screen is divided into three parts. In default layout for a
single output, this will show a bar with Current output 1and level graduations on the left hand side, a
representation of the tank with its contents in the middle (the top dead zone will be indicated as a
grey dotted line) and a bar with distance and level graduations on the right.
64 Handbook BM 100 A
Page 65

The following functions are available on the main measurement window page:
F1 – Help Menu
On-line help file
F2 – Configuration Menu:
For creating and modifying gauge settings while PCSTAR is connected to the gauge. The
configuration may also be created, modified or saved without sending the new settings to the gauge
in this window. The User configuration menu will be listed as shown in Section 3.4.5 of this manual.
The values displayed will be either default or customer-order specified values. Follow the instructions
in this section to configure the gauge.
Functions available on this page (use scroll slider on the right hand side to show all):User functions 1.1.1 to 1.1.7 : Basic Parameters
User functions 1.2.1 to 1.2.6 : Display Parameters
User functions 1.3.1 to 1.3.8 : Current Output Parameters
User functions 1.4.1 to 1.4.9 : User Data Parameters
User functions 1.5.1 to 1.5.9 : Application Parameters
User functions 1.6.1 to 1.6.2 : Serial Input/Output Parameters
User functions 1.7.1 to 1.7.3 : Strapping Table Parameters and…
F1 – Help :
F2 – Load from disk :
F3 – Exit:
F4 – Load from BM100:
F5 – Save to disk:
F6 – Send to BM100:
Handbook BM 100 A 65
On-line help file
This loads old settings from the hard disk onto PCSTAR (not to gauge).
Exit configuration page to real-time measurement main window.
This loads the configuration currently used by the gauge into PCSTAR
Press to save a configuration onto disk in *.KRF format. This allows the
user to load old configurations later and also facilitates analysis of the
gauge by KROHNE personnel if a problem is encountered.
Press this once all configuration parameters have been entered. This will
load the new configuration into the gauge.
Page 66

F3 – Exit
Quit to main title window
F4 – Record Menu
The software will temporarily record the last 5000 readings (the last two hours of operation) without
using the record menu. This information will be displayed on the “Trend” and “Markers” windows.
However, if the user wishes to make a permanent record of measurement data then it is necessary to
set and confirm a measurement record period in this menu. It is also recommended to activate the
“Oscilloscope” option in order to have information on pulse reflection times.
This is set in the window below:
Functions available on this page:F1 – Help: On-line help file
F2 – Start : Start Record
F3 – Exit: Exit to real-time measurement main window
Browse: Find directory and create file
Recording Options: Start of Recording- Either now or a delayed start (date and time)
End of Recording- Either in a given number of hours or a given
date and time.
Signal/ Oscilloscope- Activate these zones to record these types of
data.
Time slice- Time spacing between each recorded reading.
Range: 1 to 30 minutes.
Comments- Complementary information concerning the
record (50 characters maximum)
66 Handbook BM 100 A
Page 67
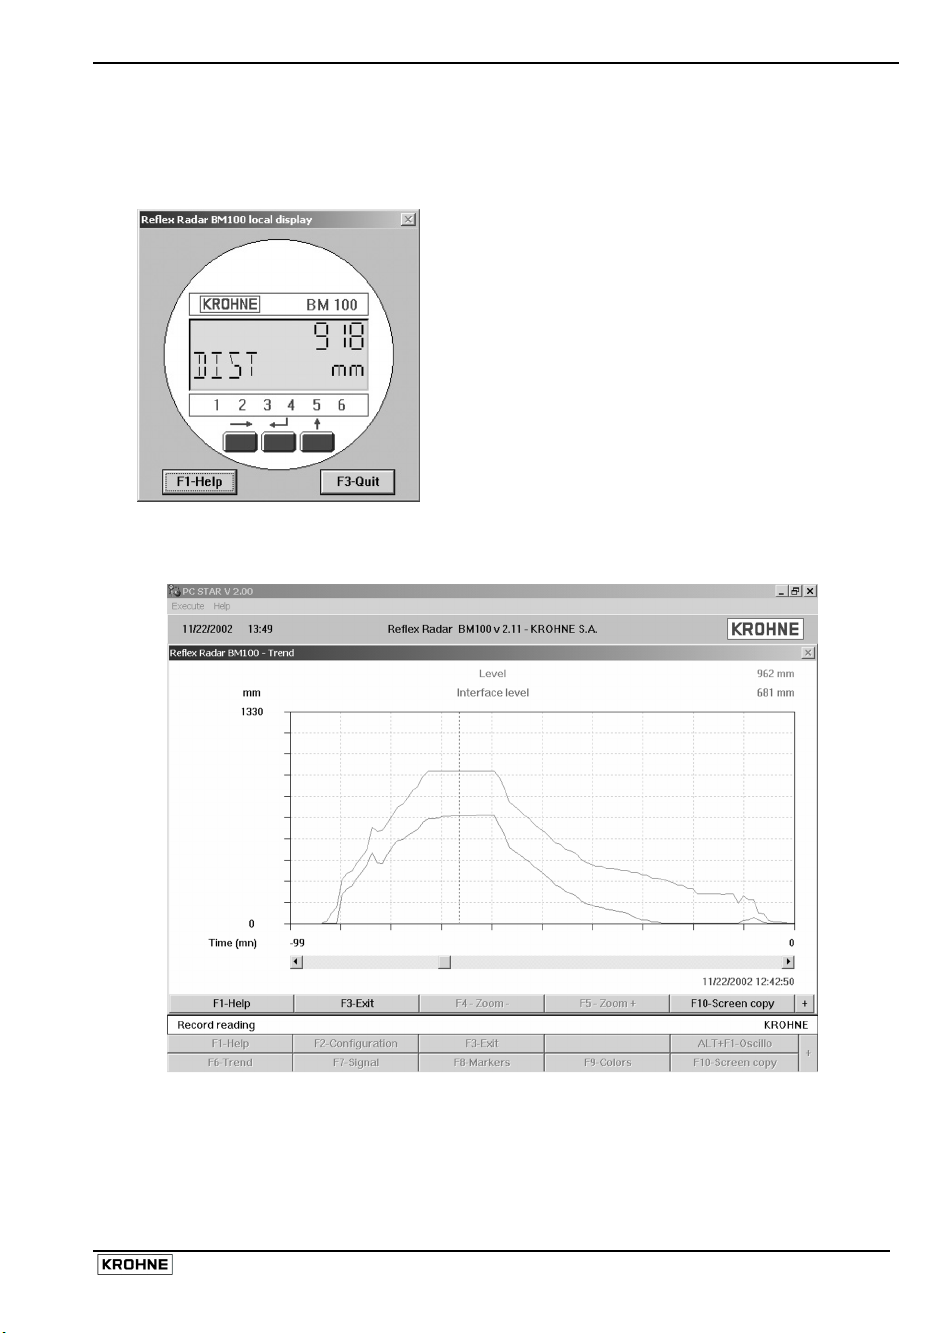
F5 – Display Menu
This shows the gauge local display as it would be on the tank. The operating and configuration mode
functions are all available on this window and functions are made available by left-clicking on the
relevant keys below the LCD display.
Functions available:
→
“Right” key
↵
“Enter” key
↑
“Up” key
F1 – Help On-line help files
F3 – Quit Exit to real-time measurement
main window
F6 – Trend Menu
Displays a real-time graph of distance from flange against time since the gauge started recording.
Functions:F1 – Help On-line help file
F3 – Exit Exit to real-time measurement main window
F4 – Zoom - Reduces the time scale
F5 – Zoom + Increases the time scale
F10 – Screen copy To select a directory and save the current screen as a bitmap file.
Handbook BM 100 A 67
Page 68

F7 – Signal Menu
Displays a real-time graph of signal amplitude over distance from flange.
Item
Item Description
1 Interface Threshold: voltage value to the left of the window
2 Level pulse indicator arrow
3 Level threshold: voltage value to the left of the window
4 Interface pulse indicator arrow
5 Gain and amplitude of selected pulse (with distance indicated by an arrow)
6 Hatched area: gauge dead zone representation
7 Flange reflection: this is not a measured form and will be displayed continuously.
8 Emitted signal level: voltage value to the left of the window
9 Selected interface pulse
10 Distance of level pulse from flange
11 Selected level pulse
12 Factory configured probe length, L2
Functions:F1 – Help On-line help file
F3 – Exit Exit to real-time measurement main window
F4 – Legend Displays information for identifying the gain, level threshold and dead zone.
F10 – Screen copy To select a directory and save the current screen as a bitmap file.
68 Handbook BM 100 A
Page 69

F8 – Markers Menu
Displays a real-time evolving graph of error markers which are either displayed as active (value 1) or
inactive (value 0).
Item Item Description
(grey – error marker)
Notes
1 No reference as marker 1 on gauge display
2
3
4
No level as marker 2 on gauge display
Level frozen as marker 3 on gauge display
No interface as marker 4 on gauge display
5 Interface frozen as marker 5 on gauge display
6
7
Communication as marker 6 on gauge display
No reference error
8 No level error
9
10
No interface error
No EOS error EOS=End Of Scan signal
11 Dead zone error
12
Microwave error
13 Slider control to move from to the next time slice Window function
14 Date and time of time slice. Window data
15 Time slice indicator on graph Window data
16 Error marker “off” Window data
17 Error marker “on” Window data
18 Slider to scroll display to other error markers Window function, see below
19 Error marker status Window data “0” = off ,“1” = on
Handbook BM 100 A 69
Page 70

Other error markers not shown on the oscilloscope window (scroll screen to view):
Other Markers
Notes
ADC reference error ADC=Analog to Digital Converter
RAM error RAM=Random Access Memory
ROM error ROM=Read-Only Memory
EEPROM user error EEPROM=Electrically Erasable Programmable Read-Only Memory
EEPROM factory error
Strap table error Strap table=volume calibration input table
DAC error DAC=Digital to Analog Converter
Error markers detailed in items 1 to 5 above are the result of errors directly related to measurement
and may be solved by modifying the gauge settings. Other error markers relate to hardware errors
and should be solved with KROHNE service centre assistance.
Other functions available on the Oscilloscope window:
F1 – Help On-line help file
F3 – Exit Exit to real-time measurement main window
F4 – Zoom - Reduces the time slice scale
F5 – Zoom + Increases the time slice scale
F10 – Screen copy To select a directory and save the current screen as a bitmap file.
F9 – Colors Menu
Refer to section 9.4.7 for all information concerning this set of functions.
F10 – Screen copy Menu
To save a bitmap image of the active window.
70 Handbook BM 100 A
Page 71
Alt F1 – Oscilloscope Menu
Item
Item Description
1 Zoom - - increase time scale
2 Zoom + - reduce time scale
3 F6: Numerize : PC-STAR will record oscilloscope data when the F6 button is pressed
in this window. Once this button is pressed, some time is required to process the data
before being displayed. This function will not be available when in play back mode
(Record Reading).
4 Maximum limit on scale
5 Factory configured probe length, L2
6 Status Markers (as given on gauge)
7 Time and date of time slice
8 Asked for gain: forces PC STAR to look for the level pulse using a requested gain.
9A Indicator for identifying the level pulse
9B Indicator for identifying the interface pulse
10 Hatched area: dead zone
11 Current gain: gain used by the gauge now to find the level pulse
Handbook BM 100 A 71
Page 72

Alt F2 – Dyn. Config. (Client Dynamic Configuration) menu
1 Level and Interface Thresholds
and Gains may be modified.
2 The current outputs may be
tested at 3.7, 4, 12, 20 or 22mA.
3 The user may force the gauge
to search at a certain distance
from the flange for a lost
reflection by using the Level or
Interface Distance Input
function.
The table displays peak amplitude of the pulse in volts and the measurement mode (direct, TBF…).
Other functions:F1 – Help On-line help file
F3 – Exit Exit to real-time measurement main window
F10 – Screen copy To select a directory and save the current screen as a
bitmap file.
72 Handbook BM 100 A
Page 73

9.4.3 F3 Exit:
To quit PCSTAR.
9.4.4 F4 Serial (parameters):
For configuring the gauge for networks
This will allow the user to select a particular
device in the network. A window will open with
the parameters available explained below:
Serial Port The serial port allows the user to select a free serial port (COM 1 to 4)
on the computer.
BM100 Address Type the “Address” that you have given a gauge (a value between 0
and 255) and press ENTER or OK. This will select the required device.
If you are in a point to point network leave the box at its default value (-
1).
Device Identifier Device Identifier refers to the “Device number” given in User Function
No. 1.4.4.
Protocol Protocol refers to the signal received from the gauge. Use :
RS485 (using SMART as the base signal) for RS485 networks. SMART
or HART for point to point networks.
Initial baud rate This may be changed depending on the protocol:
SMART communication is restricted to 1200 Baud. RS485
communication may be used between 1200 and 19600 Baud. Trials
should be run to find the optimum operating conditions.
RTS shutdown A parameter for communication between the PC and gauge using the
RTS signal. This defines the time frame in which data is transmitted.
This value is dependant on the Operating System used by the PC.
Default value 0
RTS state The RTS state depends on the type of RS232 converter used. For:
RS232<>HART
TM
(i.e. VIATOR from MACTEK) and
RS232<>RS485 (i.e. K485-ISOL from KK Systems Ltd.) use inversed
RTS state.
Handbook BM 100 A 73
Page 74

9.4.5 F5 Record Reading
Play back functions.
1. The function will display a window: Record file – Open…. Browse for the DAT file
required. Press OK to open file or Cancel to quit.
2.
When OK is pressed, the DAT file details are displayed.
Functions:
F1 – Help On-line help file
F2 – Start Start reading the file data. Goes to record reading main window – see
below.
F3 – Exit Exit to main title window
74 Handbook BM 100 A
Page 75

Record reading main screen
Item Item Description
1A & 1B (A) Current output 1/ level in mA/mm; (B) Current output 2/ interface level in mA/mm
2A & 2B Tank diagram showing current position of (A) level and (B) interface.
3 Dead zone limit
4A, B & C (A) Distance/ level of top product in mm, (B) Interface distance/ interface level of
bottom product 2 in mm, (C) Ullage volume/ volume in liters* (*configurable display).
5 Date of time slice
6 Time of time slice
7 F6: Trend function – shows level and interface over time recorded
8 F1: Help – on-line help function
9 F7 : Signal – shows return signal received by gauge at a given time and date
10 F2 : Configuration – access to user menu. The settings here are read-only. This list will
also show modifications to the gauge settings over the time measurement data is
recorded
11 F8 : Markers – Error indicators activated at a given time and date
12 F3 : Exit Record Reading window
13 F9 : Colors – change screen component colours as shown in Section 9.4.7
14 F10 : Screen copy – function for saving bitmaps of the current screen.
15 AltF1: Oscilloscope – to display signal amplitude/return signal time at a given day and
time.
16 +: playback functions
Handbook BM 100 A 75
Page 76
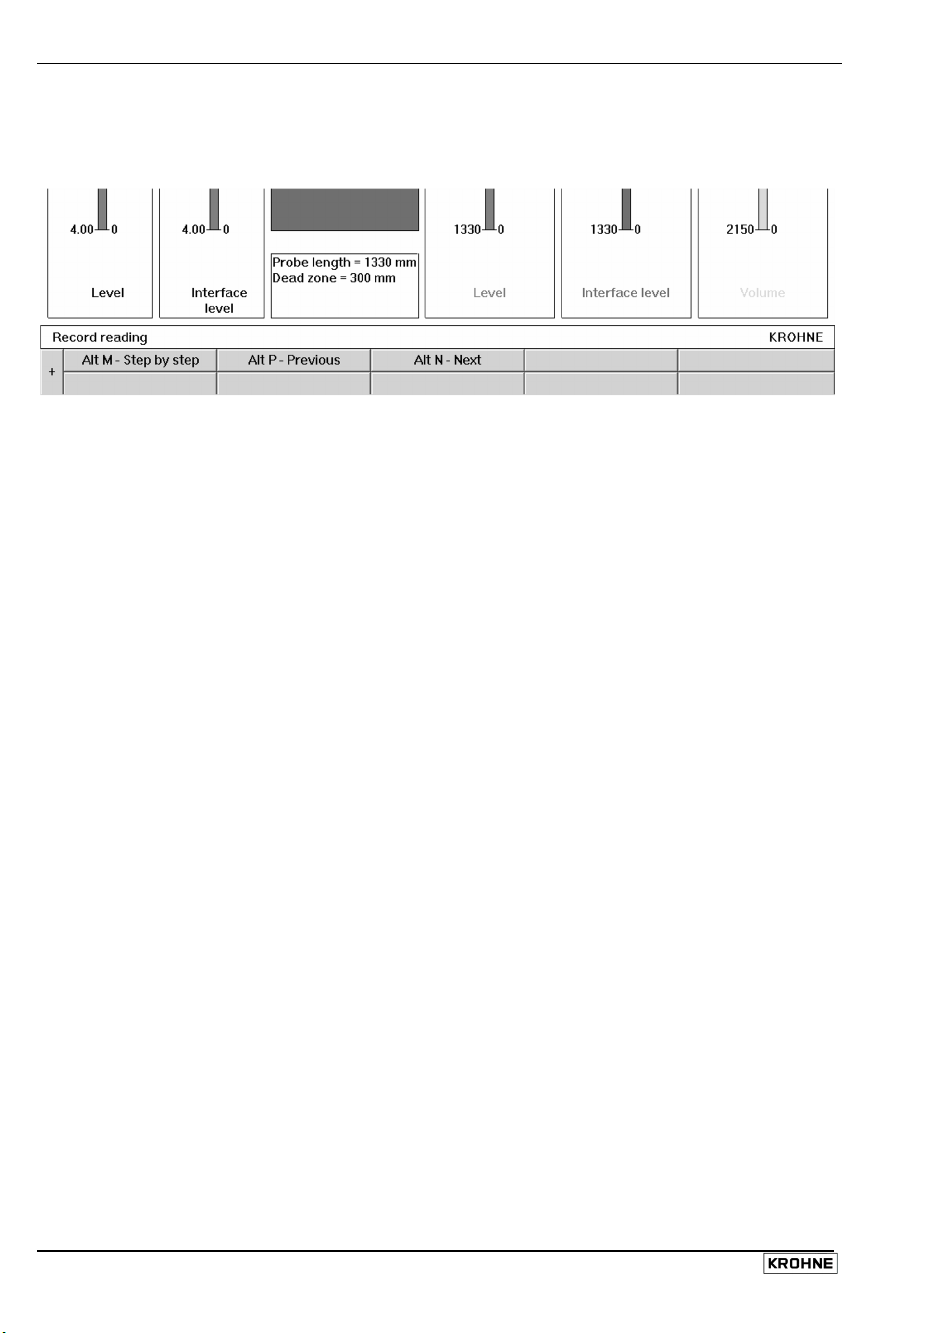
The Signal, Trend, Markers, Configuration function windows given in the list on the preceding page
correspond to those found in the real-time display windows with the exception that the real-time
functions are suppressed, i.e. F6 Numerize in the Alt F1 Oscilloscope window.
Bottom of Record Reading main screen when the “+” sign is pressed
“+” sign …at the bottom right hand side of the window. This will access the viewing features in
the Record Display Window (item 16 on diagram 70 above).
Alt M to view either the data in Continuous mode or in Step by step mode.
Alt N to view “Forward” (Continuous mode) or “Next (step)” (Step by step mode).
Alt P to view “Backwards” (Continuous mode) or “Previous (step)” (Step by step mode).
Alt B Reading Position - A slider control appears to permit the user to browse quickly through
the time slices recorded.
9.4.6 F7 Configuration
Remote gauge configuration. This permits the user to create, load (open file on PC STAR), modify
and save new configurations without changing the current settings. The software will ask the user
which Embedded Software version is in the EPROM chip of the BM100A gauge. Select the version
that corresponds to the gauge in question & press OK to go to Record reading main screen. Please
refer to page 67 for more details.
Functions available: User functions 1.1.1 to 1.1.7 : Basic Parameters
User functions 1.2.1 to 1.2.6 : Display Parameters
User functions 1.3.1 to 1.3.8 : Current Output Parameters
User functions 1.4.1 to 1.4.9 : User Data Parameters
User functions 1.5.1 to 1.5.9 : Application Parameters
User functions 1.6.1 to 1.6.2 : Serial Input/Output Parameters
User functions 1.7.1 to 1.7.3 : Strapping Table Parameters
F1 – Help On-line PCSTAR Help
F2 – Load from disk This permits the user to browse for and open a gauge settings file
(format KRF) on PCSTAR without connecting and loading the settings
onto the gauge.
F3 – Exit To main title window
F5 – Save to disk This permits the user to browse for and save a new or modified gauge
settings file (*.KRF) without connecting and loading the settings onto
the gauge.
76 Handbook BM 100 A
Page 77

9.4.7 F9 Colors
Change colours used on PCSTAR display board. 16 are available.
F1 – Help On-line PCSTAR Help
F2 – Exit and save Saves new settings for the screen elements concerned
F3 – Exit Exit to main title window without saving modified elements.
F4 – Default colors Reset to original colour scheme
Modifiable color parameters
Screen elements Chosen component
Select display
window from the
drop-down menu
Selected by scrolling through a drop-down menu or by clicking on the element
concerned. Click on colour palette to select colour and press F2 to save
modified settings and exit.
Tank Background, tank, text, level, interface level, shadow, information background,
information text and light
Current outputs Background, current outputs text, current output 2, current output 1,shadow
and light
Measurement bar
graphs
Background, level, text, distance, interface level, volume, ullage volume,
shadow and light.
Signal Background, dead zone ,frame, grid, signal, position arrow, actual gain, other
gains, shadow and light
Trend/Markers Background, markers, frame, grid and position cursor
9.4.8 Other important PCSTAR functions
Ctrl Alt R: Reflex Radar BM100 A – Reset
This resets the gauge. This should be done before operating with a new configuration. It empties the
old data temporarily stored in the gauge memory and permits the gauge to go through a series of
checks to accept and operate with a new configuration.
Alt E: Connection – Epsilon R Warning: critical parameter!
Only available when PCSTAR is communicating with the gauge and the real-time main
measurement display is selected. This permits dynamic configuration of the product’s dielectric
constant for interface and Tank Bottom Following (TBF) measurement applications only. This
corresponds to User Function 1.5.5 (Epsilon R) in the User’s configuration menu.
Alt L: Connection – Linearization Table Warning: critical parameter!
A four-point linear calibration table. The BM100A normally requires no optimisation of accuracy by
the user following calibration at the factory of origin. For further information, please contact the local
KROHNE service centre or refer to the relevant section in the BM100A Service Manual.
Ctrl Alt C: Connection – Calculator
A calculator with basic mathematical functions appears.
Handbook BM 100 A 77
Page 78
Appendix A: Returning a device for testing or repair to KROHNE
Your instrument has been carefully manufactured and tested. If installed and operated in
accordance with these operating instructions, it will rarely present any problems. Should you
nevertheless need to return an instrument for servicing or repair, please pay strict attention to the
following points:
Due to statutory regulations on environmental protection and safeguarding the health and safety of our
•
personnel, KROHNE may only handle, test and repair returned instruments that have been in contact with
liquids without risk to personnel and environment.
This means that KROHNE can only service your instrument if accompanied by the following certificate
•
confirming that the instrument is safe to handle. If the instrument has been operated with toxic, caustic,
flammable or water-endangering liquids, you are kindly requested :
to check and ensure, if necessary by rinsing or neutralising, that all cavities in the instrument are free from
•
such dangerous substances. (Directions on how you can find out whether the primary head has to be
opened and flushed out or neutralised are obtainable from KROHNE on request.)
to attach a certificate to the instrument confirming that the instrument is safe to handle and stating the liquid
•
used.
We cannot service your instrument unless accompanied by such a certificate.
Specimen certificate
Company: Address:
Department: Name:
Tel. No.: Fax No.:
The enclosed instrument
Type:
KROHNE Order No. or Series No
has been operated with the following process
liquid
Because this process liquid is
water-hazardous
toxic
caustic
flammable
we have
checked that all cavities in the instrument are free from such substances
flushed out and neutralised all cavities in the instrument
We confirm that there is no risk to humans or environment through any residual liquid contained in
the instrument.
Date: Signature:
Company stamp:
78 Handbook BM 100 A
Page 79

Appendix B: BM 100 A Level Gauge Configuration Record
For all service calls when a PC STAR record file or factory supplier data sheet is not available.
Fct.Nbr. Function Configuration Fct.Nbr. Function Configuration
1.1.0 Basic parameters
1.1.1 Tank Height
1.1.2 Hold Distance 1.5.7 Settling
1.1.3 Time Constant 1.5.8 Cleaning In Place
1.1.4 Window Frozen 1.5.9 Application Mode
1.1.5 Level Window
1.1.6 Interface Window 1.6.1 Transmission Rate
1.1.7 Probe Length 1.6.2 Address (networks)
1.2.0 Display Functions 1.7.0 Volume Strap Table
1.2.1 Display Mode 1.7.1 Volume Unit
1.2.2 Display item 1.7.2 Strap Table Input
1.2.3 Cycle Time
1.2.4 Length Unit
1.2.5 Volume Unit
1.2.6 Error Message
1.3.0 Current Functions
1.3.1 Function I 1
1.3.2 Range I 1
1.3.3 Scale I 1 Min
1.3.4 Scale I 1 Max
1.3.5 * Function I 2 * if second output ordered
1.3.6 * Range I 2 ** for interface applications
1.3.7 * Scale I 2 Min
1.3.8 * Scale I 2 Max Pt Level Volume Pt Level Volume
1.4.0 User Data Functions
1.4.1 Language 2 27
1.4.2 Entry Code 1 3 28
1.4.3 Code 1 4 29
1.4.4 Device Number 5 30
1.4.5 Serial Number 6 31
1.4.6 French Comm No. 7 32
No.
1.4.8 Option 10 35
1.4.9 Sensor Type 11 36
1.5.0 Application Functions
reflection amplitude
Gain Amplitude 15 40
threshold
Gain Amplitude 18 43
1.5.3 Detection Delay 19 44
reflection amplitude
Gain Amplitude 22 47
threshold
Gain Amplitude 25 50
Handbook BM 100 A 79
1.5.5 Epsilon R**
1.6.0 Serial Input /Output
Comments
Strapping Table values (specify units) :
1 26
8 33 1.4.7 German Comm
9 34
12 37
13 38 1.5.1 Level - first reading from display =
14 39
16 41 - second reading from display =
17 42
20 45 1.5.4 ** Interface - first view from display =
21 46
23 48 - second reading from display =
24 49
Page 80

Appendix C: BM 100 A – CE Declaration of Conformity
80 Handbook BM 100 A
Page 81

Notes
Handbook BM 100 A 81
Page 82

Notes
82 Handbook BM 100 A
Page 83

Notes
Handbook BM 100 A 83
Page 84

Australia
KROHNE Australia Pty Ltd
Quantum Corporate Park
10/287 Victoria Rd
Rydalmere NSW 2116
TEL.: +61 2 8846 1710
FAX: +61 2 8846 1755
e-mail: krohne@krohne.com.au
Austria
KROHNE Austria Ges.m.b.H.
Modecenterstraße 14
A-1030 Wien
TEL.: +43(0)1/203 45 32
FAX: +43(0)1/203 47 78
e-mail: info@krohne.at
Belgium
KROHNE Belgium N.V.
Brusselstraat 320
B-1702 Groot Bijgaarden
TEL.: +32(0)2-4 66 00 10
FAX: +32(0)2-4 66 08 00
e-mail: krohne@krohne.be
Brazil
KROHNE Conaut
Controles Automaticos Ltda.
Estrada Das Águas Espraiadas, 230 C.P. 56
06835 - 080 EMBU - SP
TEL.: +55(0)11-4785-2700
FAX: +55(0)11-4785-2768
e-mail: conaut@conaut.com.br
China
KROHNE Measurement Instruments Co. Ltd.
Room 7E, Yi Dian Mansion
746 Zhao Jia Bang Road
Shanghai 200030
TEL.: +86(0)21-64677163
FAX: +86(0)21-64677166
Cellphone: +86(0)139 1885890
e-mail: info@krohne-asia.com
CIS
Kanex KROHNE Engineering AG
Business-Centre Planeta, Office 403
ul. Marxistskaja 3
109147 Moscow/Russia
TEL.: +7(0)095-9117165
FAX: +7(0)095-9117231
e-mail: krohne@dol.ru
Czech Republic
KROHNE CZ, spol. s r.o.
Sobe˘s˘ická 156
CZ-63800 Brno
TEL.: +420 545 532 111
FAX: +420 545 220 093
e-mail: brno@krohne.cz
Algeria
Argentina
Belarus
Bulgaria
Camaroon
Canada
Chile
Colombia
Croatia
Denmark
Ecuador
Egypt
Estonia
Finland
French Antilles
Greece
Guinea
Hong Kong
Hungary
Indonesia
Ivory Coast
Iran
Ireland
Israel
Japan
Jordan
Kuwait
Latvia
Lithuania
Marocco
Mauritius
Mexico
New Zealand
Pakistan
Poland
Portugal
Saudi Arabia
Senegal
Singapore
Slovakia
Slovenia
Sweden
Tai wan
Thailand
Turkey
Tunesia
Venezuela
Yugoslavia
France
KROHNE S.A.S.
Quartier des Ors - PO98
F-26103 Romans Cedex (France)
TEL.: +33(0)4-75 05 44 00
FAX: +33(0)4-75 05 00 48
e-mail: info@krohne.fr
Germany
KROHNE Messtechnik
GmbH & Co. KG
Ludwig-Krohne-Straße
D-47058 Duisburg
TEL.: +49(0)203-301-0
FAX: +49(0)203-301 389
e-mail: krohne@krohne.de
India
KROHNE Marshall Ltd.
A-34/35, M.I.D.C.
Industrial Area, H-Block,
Pimpri Poona 411018
TEL.: +91(0)20-744 20 20
FAX: +91(0)20 -744 20 40
e-mail: pcu@vsnl.net
Iran
KROHNE Liaison Office
North Sohrevardi Ave.
26, Sarmad St., Apt.#9
Tehran 15539
TEL.: ++98-21-874-5973
FAX: ++98-21-850-1268
e-mail: krohne@krohneiran.com
Italy
KROHNE Italia Srl.
Via V. Monti 75
I-20145 Milano
TEL.: +39(0)2-4 30 06 61
FAX: +39(0)2-43 00 66 66
e-mail: krohne@krohne.it
Korea
KROHNE Korea
Room 508 Miwon Bldg
43 Yoido-Dong
Youngdeungpo-Ku
Seoul, Korea
TEL.: 00-82-2-780-1743
FAX: 00-82-2-780-1749
e-mail: yooks@krohnekorea.com
Netherlands
KROHNE Altometer
Kerkeplaat 12
NL-3313 LC Dordrecht
TEL.: +31(0)78-6306300
FAX: +31(0)78-6306390
e-mail: postmaster@krohne-altometer.nl
Netherlands
KROHNE Nederland B.V.
Kerkeplaat 12
NL-3313 LC Dordrecht
TEL.: +31(0)78-6306200
FAX: +31(0)78-6306405
Service Direkt: +31(0)78-6306222
e-mail: info@krohne.nl
Norway
Krohne Instrumentation A.S.
Ekholtveien 114
NO-1526 Moss
P. O. Box 2178, NO-1521 Moss
TEL.: +47(0)69-264860
FAX: +47(0)69-267333
e-mail: postmaster@krohne.no
Internet: www.krohne.no
South Africa
KROHNE Pty.Ltd.
163 New Road
Halfway House Ext. 13
Midrand
TEL.: +27(0)11-315-2685
FAX: +27(0)11-805-0531
e-mail: midrand@krohne.co.za
Spain
I.I. KROHNE Iberia, S.r.L.
Poligono Industrial Nilo
Calle Brasil, n°. 5
E-28806 Alcalá de Henares-Madrid
TEL.: +34(0)91-8 83 21 52
FAX: +34(0)91-8 83 48 54
e-mail: krohne@krohne.es
Switzerland
KROHNE AG
Uferstr. 90
CH-4019 Basel
TEL.: +41(0)61-638 30 30
FAX: +41(0)61-638 30 40
e-mail: info@krohne.ch
United Kingdom
KROHNE Ltd.
Rutherford Drive
Park Farm Industrial Estate
Wellingborough,
Northants NN8 6AE, UK
TEL.: +44(0)19 33-408 500
FAX: +44(0)19 33-408 501
e-mail: info@krohne.co.uk
USA
KROHNE Inc.
7 Dearborn Road
Peabody, MA 01960
TEL.: +1-978 535-6060
FAX: +1-978 535 -1720
e-mail: info@krohne.com
Other Representatives
Other Countries
KROHNE Messtechnik
GmbH & Co. KG
Ludwig-Krohne-Str.
D-47058 Duisburg
TEL.: +49(0)203-301 309
FAX: +49(0)203-301 389
e-mail: export@krohne.de
Subject to change without notice
 Loading...