


 Loading...
USER MANUAL
MODEL:
PA-240Z
240W Power Amplifier
PA-120Z
120W Power Amplifier
P/N: 2900-300802 Rev 4 |
www.kramerAV.com |
|
Kramer Electronics Ltd. |
Contents |
|
Introduction |
1 |
Getting Started |
1 |
Overview |
2 |
Typical Applications |
3 |
Defining the PA-240Z 240W Power Amplifier |
4 |
Connecting the PA-240Z |
6 |
Connecting the Output to a Balanced/Unbalanced Stereo Audio Acceptor |
7 |
Connecting a Balanced/Unbalanced Stereo Audio Source to the Balanced Input |
8 |
Connecting to PA-240Z via RS-232 |
8 |
RJ-45 Pinout |
8 |
Connecting PA-240Z via the Ethernet Port |
9 |
Operating the PA-240Z |
12 |
Setting the DIP-Switches |
12 |
Adjusting the Master Volume |
12 |
Using the Embedded Web Pages |
13 |
Setting the Speaker Output Parameters |
15 |
Setting the Line Level Output Parameters |
17 |
Selecting Hi-Z Mono Settings |
18 |
Changing Standby Settings |
19 |
Setting Device Parameters |
19 |
Managing Web Page Security |
23 |
Viewing the About Page |
26 |
Technical Specifications |
27 |
Default Communication Parameters |
28 |
Protocol 3000 |
29 |
Understanding Protocol 3000 |
30 |
Kramer Protocol 3000 Syntax |
31 |
Protocol 3000 Commands |
32 |
PA-120Z, PA-240Z – Contents |
i |
|
|

Kramer Electronics Ltd.
Introduction
Welcome to Kramer Electronics! Since 1981, Kramer Electronics has been providing a world of unique, creative, and affordable solutions to the vast range of problems that confront the video, audio, presentation, and broadcasting professional on a daily basis. In recent years, we have redesigned and upgraded most of our line, making the best even better!
Getting Started
We recommend that you:
•Unpack the equipment carefully and save the original box and packaging materials for possible future shipment.
•Review the contents of this user manual.
Go to www.kramerav.com/downloads/PA-240Z to check for up-to-date user manuals, application programs, and to check if firmware upgrades are available (where appropriate).
Achieving the Best Performance
•Use only good quality connection cables (we recommend Kramer high-performance, high-resolution cables) to avoid interference, deterioration in signal quality due to poor matching, and elevated noise levels (often associated with low quality cables).
•Do not secure the cables in tight bundles or roll the slack into tight coils.
•Avoid interference from neighboring electrical appliances that may adversely influence signal quality.
•Position your Kramer PA-240Z away from moisture, excessive sunlight and dust.
This equipment is to be used only inside a building. It may only be connected to other equipment that is installed inside a building.
Safety Instructions
Caution: There are no operator serviceable parts inside the unit.
Warning: Use only the power cord that is supplied with the unit.
Warning: Do not open the unit. High voltages can cause electrical shock! Servicing by qualified personnel only.
Warning: Disconnect the power and unplug the unit from the wall before installing.
Recycling Kramer Products
The Waste Electrical and Electronic Equipment (WEEE) Directive 2002/96/EC aims to reduce the amount of WEEE sent for disposal to landfill or incineration by requiring it to be collected and recycled. To comply with the WEEE Directive, Kramer Electronics has made arrangements with the European Advanced Recycling Network (EARN) and will cover any
PA-120Z, PA-240Z – Introduction |
1 |

Kramer Electronics Ltd.
costs of treatment, recycling and recovery of waste Kramer Electronics branded equipment on arrival at the EARN facility. For details of Kramer’s recycling arrangements in your particular country go to our recycling pages at www.kramerav.com/support/recycling.
Overview
Congratulations on purchasing your Kramer PA-240Z 240W Power Amplifier and/or
PA-120Z 120W Power Amplifier.
Although this user manual describes the PA-240Z it refers to both PA-240Z and PA-120Z, unless specified otherwise.
PA-240Z is a high-performance Hi-Z (70V/100V) and Lo-Z (4/8Ω), network controllable power amplifier featuring balanced and unbalanced inputs and also a line-level balanced output. This powerful amplifier is suitable for large-scale applications.
PA-240Z is housed in a desktop sized enclosure and two units can be mounted in a 1U rack space using the optional RK-1 adapter.
PA-240Z provides exceptional quality and user-friendly operation.
Exceptional Quality
•For PA-240Z:
▪A single channel of 240W into a 70V/100V line.
▪2 channels of 120W into 4/8Ω.
•For PA-120Z:
▪A single channel of 120W into a 70V/100V line.
▪2 channels of 60W into 4/8Ω.
•Individual input mix, EQ and HPF (High-Pass Filter) per output.
•Built-in 3-band parametric EQ.
User-friendly Operation
•Status LED indicators for the selected input, output muted and clipped signal on the output.
•Over-current, short circuit or over-heat protection – The PROTECT LED lights and the device shuts down until correct operational conditions are regained.
•Auto-standby with adjustable threshold.
•Controllable via RS-232 and IP.
PA-120Z, PA-240Z – Introduction |
2 |

Kramer Electronics Ltd.
Typical Applications
The PA-240Z is ideal for the following typical applications:
•Medium to large meeting rooms.
•Auditoriums and lecture halls.
•Court rooms.
•Retail stores and shopping centers.
•Hotel lobbies.
•Transportation hubs.
PA-120Z, PA-240Z – Introduction |
3 |
Kramer Electronics Ltd.
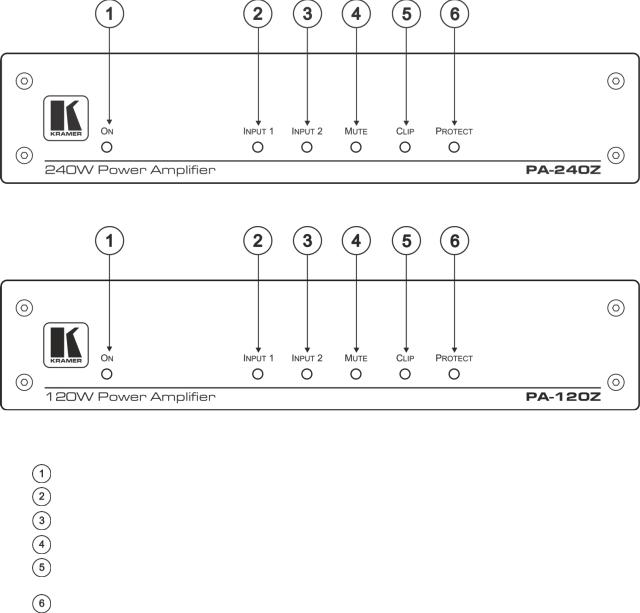
Defining the PA-240Z 240W
Power Amplifier
This section defines the PA-240Z.
Figure 1: PA-240Z 240W Power Amplifier Front Panel
|
|
|
Figure 2: PA-120Z 120W Power Amplifier Front Panel |
|
|
|
|
# |
Feature |
|
Function |
|
|
|
|
|
ON LED |
|
Lights green when powered on and orange when in standby. |
|
|
|
|
|
INPUT 1 LED |
|
Lights green when a signal is present on input 1. |
|
|
|
|
|
INPUT 2 LED |
|
Lights green when a signal is present on input 2. |
|
|
|
|
|
MUTE |
|
Lights red when the output is muted, off when unmuted. |
|
|
|
|
|
CLIP LED |
|
Lights red when the signal is clipped on the output and creating distortion. |
|
|
|
(When clipping is detected, lower the volume until the LED turns off.) |
|
PROTECT LED |
|
Lights red in case of over-current / short circuit / over-heat. |
|
|
|
The device shuts down until correct operational conditions are regained. |
|
|
|
|
PA-120Z, PA-240Z – Defining the PA-240Z 240W Power Amplifier |
4 |

Kramer Electronics Ltd.
|
|
|
|
|
|
Figure 3: PA-240Z and PA-120Z Rear Panel |
||||
|
|
|
|
|
|
|
|
|
|
|
|
# |
|
|
|
Feature |
|
|
|
Function |
|
|
|
|
|
|
|
|
|
|
|
|
|
|
|
|
AUDIO IN |
Unbalanced Stereo |
|
|
Connect to an unbalanced stereo audio source. |
||
|
|
|
|
Connectors (1 |
Audio 3.5mm Mini |
|
|
|
|
|
|
|
|
|
and 2) |
Jack |
|
|
|
|
|
|
|
|
|
|
|
|
|
|
|
|
|
|
|
|
|
|
Balanced Stereo |
|
|
Connect to a line-level, balanced, stereo audio source. |
|
|
|
|
|
|
|
Audio Terminal Block |
|
|
|
|
|
|
|
|
|
|
Connector |
|
|
|
|
|
|
|
|
LINE OUT Balanced Stereo Audio |
|
|
Connect to a balanced, stereo audio acceptor (for |
|||
|
|
|
|
Terminal Block Connector |
|
|
example, amplified speakers). |
|||
|
|
|
|
|
|
|
|
|||
|
|
|
|
VOLUME Control Trimmer |
|
|
Master volume for speaker output – rotate to set the |
|||
|
|
|
|
|
|
|
|
|
maximum amplifier volume. |
|
|
|
|
|
|
|
|
|
|
The volume level set here defines the maximum level of |
|
|
|
|
|
|
|
|
|
|
the speaker output volume on the embedded web |
|
|
|
|
|
|
|
|
|
|
pages (see Setting the Speaker Output Parameters on |
|
|
|
|
|
|
|
|
|
|
page 15). |
|
|
|
|
|
|
|
|
|
|||
|
|
|
|
FACTORY DEFAULT Button |
|
|
Press during power-up of the device to return to the |
|||
|
|
|
|
|
|
|
|
|
factory default settings, including all the configurations |
|
|
|
|
|
|
|
|
|
|
and network settings. |
|
|
|
|
|
ETHERNET RJ-45 Connector |
|
|
Connect to an ETHERNET LAN. |
|||
|
|
|
|
|
|
|
|
|||
|
|
|
|
RS-232 (G, Tx, Rx) Port |
|
|
Connect to the RS-232 connector on the A/V equipment |
|||
|
|
|
|
|
|
|
|
|
or a PC or other Serial Controller. |
|
|
|
|
|
Hi-Z/Lo-Z and 100V/70V |
|
|
Set to Hi-Z for high impedance and Lo-Z for low |
|||
|
|
|
|
DIP-Switches |
|
|
|
impedance. |
||
|
|
|
|
|
|
|
|
|
In Hi-Z, set to 70V or 100V. |
|
|
|
|
|
Lo-Z/Hi-Z Out Terminal Block |
|
|
For Lo-Z: connect stereo output to Lo-Z speakers: |
|||
|
|
|
|
Connectors |
|
|
|
L+ and L- to the left speaker; R+R- to the right speaker. |
||
|
|
|
|
|
|
|
|
|
For Hi-Z (70V or 100V): connect Hi-Z and COM to |
|
|
|
|
|
|
|
|
|
|
mono Hi-Z speakers. |
|
|
|
|
|
|
|
|
|
|
The speaker can output either the Left side of the audio |
|
|
|
|
|
|
|
|
|
|
input or reduce the stereo input to a mono signal (see |
|
|
|
|
|
|
|
|
|
|
Selecting Hi-Z Mono Settings on page 18). |
|
|
|
|
|
|
|
|
|
|||
|
|
|
|
Power Connector with Fuse |
|
|
AC connector, enabling power supply to the unit. |
|||
|
|
|
|
|
|
|
|
|
||
|
|
|
|
POWER Switch |
|
|
|
Switch for turning the unit on or off. |
||
|
|
|
|
|
|
|
|
|
|
|
PA-120Z, PA-240Z – Defining the PA-240Z 240W Power Amplifier |
5 |

Kramer Electronics Ltd.
Connecting the PA-240Z
Always switch off the power to each device before connecting it to your PA-240Z. After connecting your PA-240Z, connect its power and then switch on the power to each device.
To connect the PA-240Z as illustrated in the example in Figure 4:
1.Connect the audio sources. For example:
▪An unbalanced stereo audio source to the AUDIO IN 1 3.5mm mini jack  (for example, an MP3 player).
▪A balanced stereo audio source to the AUDIO IN 2 5-pin terminal block connector  (for example, the Kramer VP-444 Switcher/Scaler).
2.Connect the LINE OUT balanced stereo audio 5-pin terminal block connecter  to a balanced stereo input (for example, an additional PA-240Z device).
3.Connect the Hi-Z OUT or Lo-Z OUT 4-pin terminal block connector  as follows:
▪For Hi-Z connection: connect Hi-Z and COM terminal blocks to the + and – terminals of a mono speaker (for example, the Galil 8-C ceiling speakers, daisy chained). The speakers either output the left side (L+, L-) of the audio input or the stereo input reduced to a mono signal (see Selecting Hi-Z Mono Settings on page 18).
▪For Lo-Z connection: connect the L+ and L- connectors to the left-side speaker and the R+ and R- connectors to the right-side speaker (for example, the Yarden 6-O speakers).
4.Set the DIP-switches  :
:
▪For Hi-Z operation: Set DIP-switch 1 to Hi-Z and then set DIP-switch 2 to 70V or 100V.
▪For Lo-Z operation: Set DIP-switch 1 to Lo-Z.
5.If required, connect:
▪A PC via RS-232  , see Connecting to PA-240Z via RS-232 on page 8.
▪The ETHERNET port  , see Connecting PA-240Z via the Ethernet Port on page 9.
6.Connect the power cord (not shown in Figure 4).
PA-120Z, PA-240Z – Connecting the PA-240Z |
6 |

Kramer Electronics Ltd.
Figure 4: Connecting to the PA-240Z Rear Panel
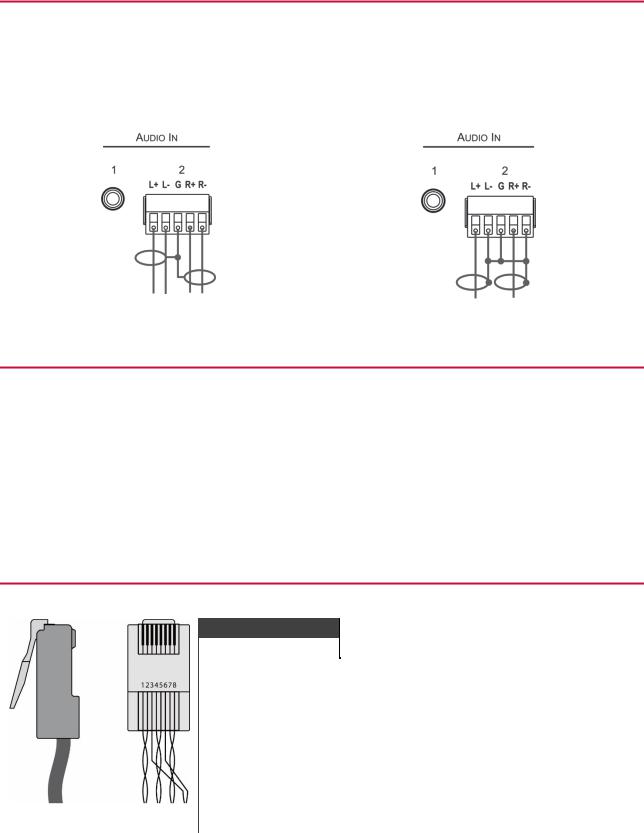
Connecting the Output to a Balanced/Unbalanced Stereo Audio Acceptor
The following are the pinouts for connecting the output to a balanced or unbalanced stereo audio acceptor:
Figure 5: Connecting to a Balanced Stereo Audio |
Figure 6: Connecting to an Unbalanced Stereo Audio |
Acceptor |
Acceptor |
PA-120Z, PA-240Z – Connecting the PA-240Z |
7 |
Kramer Electronics Ltd.
Connecting a Balanced/Unbalanced Stereo Audio Source to the Balanced Input
The following are the pinouts for connecting a balanced or unbalanced stereo audio source to the balanced input:
Figure 7: Connecting a Balanced Stereo Audio Source to the Balanced Input
Figure 8: Connecting an Unbalanced Stereo Audio Source to the Balanced Input
Connecting to PA-240Z via RS-232
You can connect to the PA-240Z via an RS-232 connection  using, for example, a PC.
From the RS-232 9-pin D-sub serial port connect:
•Pin 2 to the TX pin on the PA-240Z RS-232 terminal block
•Pin 3 to the RX pin on the PA-240Z RS-232 terminal block
•Pin 5 to the G pin on the PA-240Z RS-232 terminal block
RJ-45 Pinout
PIN EIA /TIA 568B
PIN |
|
Wire Color |
|
|
|
|
|
1 |
|
Orange / White |
|
|
|
|
|
2 |
|
Orange |
|
|
|
|
|
3 |
|
Green / White |
|
|
|
|
|
4 |
|
Blue |
|
|
|
|
|
5 |
|
Blue / White |
|
|
|
|
|
6 |
|
Green |
|
|
|
|
|
7 |
|
Brown / White |
|
8 |
|
Brown |
|
PA-120Z, PA-240Z – Connecting the PA-240Z |
8 |
Kramer Electronics Ltd.
Connecting PA-240Z via the Ethernet Port
You can connect to the PA-240Z via Ethernet using either of the following methods:
•Directly to the PC using a crossover cable (see Connecting the Ethernet Port Directly to a PC on page 9).
•Via a network hub, switch, or router, using a straight-through cable (see Connecting the Ethernet Port via a Network Hub or Switch on page 11).
If you want to connect via a router and your IT system is based on IPv6, speak to your IT department for specific installation instructions.
Connecting the Ethernet Port Directly to a PC
You can connect the Ethernet port of the PA-240Z directly to the Ethernet port on your PC using a crossover cable with RJ-45 connectors.
This type of connection is recommended for identifying the PA-240Z with the factory configured default IP address
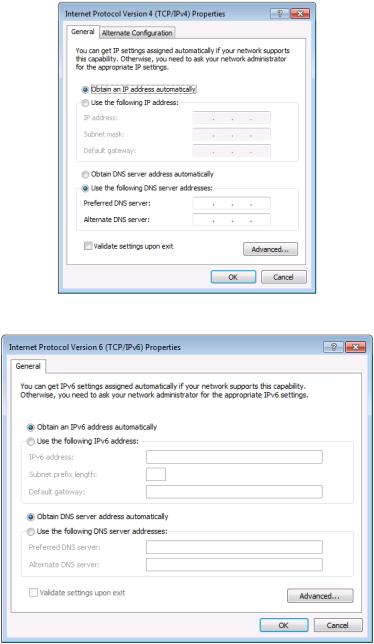
After connecting the PA-240Z to the Ethernet port, configure your PC as follows:
1.Click Start > Control Panel > Network and Sharing Center.
2.Click Change Adapter Settings.
3.Highlight the network adapter you want to use to connect to the device and click Change settings of this connection.
The Local Area Connection Properties window for the selected network adapter appears as shown in Figure 9.
Figure 9: Local Area Connection Properties Window
4.Highlight either Internet Protocol Version 6 (TCP/IPv6) or Internet Protocol Version 4 (TCP/IPv4) depending on the requirements of your IT system.
PA-120Z, PA-240Z – Connecting the PA-240Z |
9 |
Kramer Electronics Ltd.
5.Click Properties.
The Internet Protocol Properties window relevant to your IT system appears as shown in Figure 10 or Figure 11.
Figure 10: Internet Protocol Version 4 Properties Window
Figure 11: Internet Protocol Version 6 Properties Window
6.Select Use the following IP Address for static IP addressing and fill in the details as shown in Figure 12.
For TCP/IPv4 you can use any IP address in the range 192.168.1.1 to 192.168.1.255 (excluding 192.168.1.39) that is provided by your IT department.
PA-120Z, PA-240Z – Connecting the PA-240Z |
10 |

Kramer Electronics Ltd.
Figure 12: Internet Protocol Properties Window
7.Click OK.
8.Click Close.
Connecting the Ethernet Port via a Network Hub or Switch
You can connect the Ethernet port of the PA-240Z to the Ethernet port on a network hub or using a straight-through cable with RJ-45 connectors.
Control Configuration via the Ethernet Port
To control several units via Ethernet, connect the Master unit (Device 1) via the Ethernet port to the Ethernet port of your PC. Use your PC provide initial configuration of the settings (see Connecting PA-240Z via the Ethernet Port on page 9).
PA-120Z, PA-240Z – Connecting the PA-240Z |
11 |

Kramer Electronics Ltd.
Operating the PA-240Z
This section describes the following operations:
•Setting the DIP-Switches on page 12.
•Adjusting the Master Volume on page 12.
Setting the DIP-Switches
By default, the DIP-switches are set to Hi-Z and 100V.
|
DIP- |
|
|
Setting |
|
|
|
Note |
|
|
Switch # |
|
|
|
|
|
|
|
|
|
|
|
|
|
|
|
|
|
|
1 |
|
|
Set to Hi-Z for high impedance |
|
|
Use when connecting mono speakers in daisy- |
|||
|
|
|
|
configurations. |
|
|
chain. |
||
|
|
|
|
|
|
|
|
||
|
|
|
|
Set to Lo-Z for low impedance |
|
|
Use when connecting to a single pair of |
||
|
|
|
|
configurations. |
|
|
speakers, one to the left and one to the right. |
||
|
|
|
|
|
|
|
|
||
2 |
|
|
When in Hi-Z, set either to 70V or 100V |
|
|
|
|
||
|
|
|
|
according to your requirements. |
|
|
|
|
|
Adjusting the Master Volume
Use the VOLUME trimmer  on the rear panel to set the maximum level for the speaker output speaker output. Adjust the master volume (speaker output) via the web pages, see Setting the Master Volume and Balance on page 16.
PA-120Z, PA-240Z – Operating the PA-240Z |
12 |

Kramer Electronics Ltd.
Using the Embedded Web Pages
Control the PA-240Z via the web pages which are accessed using a Web browser and an Ethernet connection.
Before attempting to connect:
•Perform the procedures described in Connecting PA-240Z via the Ethernet Port on page 9.
•Ensure that your browser is supported.
The following operating systems and Web browsers are supported:
|
OS |
|
|
Browser |
|
|
|
|
|
||
|
Windows (7 and higher) |
|
IE |
||
|
|
|
|
FireFox |
|
|
|
|
|
|
|
|
|
|
|
Chrome |
|
|
Mac/iOS |
|
Safari |
||
|
Android |
|
Chrome |
||
|
|
|
|
|
|
The PA-240Z web pages enable performing the following:
•Setting the Speaker Output Parameters on page 15.
•Setting the Line Level Output Parameters on page 17.
•Selecting Hi-Z Mono Settings on page 18.
•Changing Standby Settings on page 19.
•Setting Device Parameters on page 19.
•Managing Web Page Security on page 23.
•Viewing the About Page on page 26.
To browse the PA-240Z web pages:
1.Open your Internet browser.
2.Type the IP address of the device in the address bar of your browser. For example, the default IP address:
PA-120Z, PA-240Z – Using the Embedded Web Pages |
13 |
Loading...