

Page 1
ENGLISH
Quick Start Guide
Contents
Introduction . . . . . . . . . . . . . . . . . . . . . . . . . . . . . . . . . 2
Precautions . . . . . . . . . . . . . . . . . . . . . . . . . . . . . . . . . . . . . . . . . 2
Data handling. . . . . . . . . . . . . . . . . . . . . . . . . . . . . . . . . . . . . . . 2
Copyright Warning. . . . . . . . . . . . . . . . . . . . . . . . . . . . . . . . . . . 2
About this manual . . . . . . . . . . . . . . . . . . . . . . . . . . . . . . . . . . . 3
Main features . . . . . . . . . . . . . . . . . . . . . . . . . . . . . . . . 4
Front panel . . . . . . . . . . . . . . . . . . . . . . . . . . . . . . . . . . 4
Rear panel and connections . . . . . . . . . . . . . . . . . . . . 6
Turning the power on or off . . . . . . . . . . . . . . . . . . . . 8
Getting ready to play. . . . . . . . . . . . . . . . . . . . . . . . . . . . . . . . . 8
When you’ve finished . . . . . . . . . . . . . . . . . . . . . . . . . . . . . . . . 8
Auto power-off function . . . . . . . . . . . . . . . . . . . . . . . . . . . . . . 8
The display and the modes . . . . . . . . . . . . . . . . . . . . . 9
Display . . . . . . . . . . . . . . . . . . . . . . . . . . . . . . . . . . . . . . . . . . . . . 9
Selecting a mode . . . . . . . . . . . . . . . . . . . . . . . . . . . . . . . . . . . . 9
Selecting and playing sounds . . . . . . . . . . . . . . . . . . 10
Selecting a program or combination. . . . . . . . . . . . . . . . . . . 10
Using the Favorites function. . . . . . . . . . . . . . . . . . . . . . . . . . 10
Using controllers to modify the sound . . . . . . . . . . . . . . . . . 11
Production Tools. . . . . . . . . . . . . . . . . . . . . . . . . . . . . 12
Performing with the arpeggiator . . . . . . . . . . . . . . . . . . . . . 12
Performing with the Drum Track. . . . . . . . . . . . . . . . . . . . . . 12
Performing with the step sequencer. . . . . . . . . . . . . . . . . . . 13
Easily editing a sound. . . . . . . . . . . . . . . . . . . . . . . . . 14
Quick Layer . . . . . . . . . . . . . . . . . . . . . . . . . . . . . . . . . . . . . . . . 14
Quick Split. . . . . . . . . . . . . . . . . . . . . . . . . . . . . . . . . . . . . . . . . 14
Adjusting the volume balance. . . . . . . . . . . . . . . . . . . . . . . . 14
Adjusting brightness and changes in volume . . . . . . . . . . . 15
Saving the sound you edited . . . . . . . . . . . . . . . . . . . . . . . . . 15
Recording on the sequencer . . . . . . . . . . . . . . . . . . . 16
Recording your performance as MIDI . . . . . . . . . . . . . . . . . . 16
Saving a song you created . . . . . . . . . . . . . . . . . . . . . . . . . . . 17
Recording on the audio recorder . . . . . . . . . . . . . . . 18
Recording the performance of the KROSS . . . . . . . . . . . . . . 18
Recording external audio input . . . . . . . . . . . . . . . . . . . . . . . 19
Formatting an SD card . . . . . . . . . . . . . . . . . . . . . . . . . . . . . . 19
Listening to the demo songs . . . . . . . . . . . . . . . . . . . 20
Restoring the factory settings . . . . . . . . . . . . . . . . . 20
Specifications (general) . . . . . . . . . . . . . . . . . . . . . . . 20
Page 2
Introduction
Introduction
Thank you for purchasing the Korg KROSS music
workstation. To ensure trouble-free enjoyment, please
read this manual carefully and use the product as
directed.
Precautions
Location
Using the unit in the following locations can result in a
malfunction.
• In direct sunlight
• Locations of extreme temperature or humidity
• Excessively dusty or dirty locations
• Locations of excessive vibration
• Close to magnetic fields
Power supply
Please connect the designated AC adapter to an AC outlet of
the correct voltage. Do not connect it to an AC outlet of
voltage other than that for which your unit is intended.
Interference with other electrical devices
Radios and televisions placed nearby may experience
reception interference. Operate this unit at a suitable distance
from radios and televisions.
Handling
To avoid breakage, do not apply excessive force to the
switches or controls.
Care
If the exterior becomes dirty, wipe it with a clean, dry cloth.
Do not use liquid cleaners such as benzene or thinner, or
cleaning compounds or flammable polishes.
Keep this manual
After reading this manual, please keep it for later reference.
THE FCC REGULATION WARNING (for USA)
NOTE: This equipment has been tested and found to comply with
the limits for a Class B digital device, pursuant to Part 15 of the
FCC Rules. These limits are designed to provide reasonable protection against harmful interference in a residential installation.
This equipment generates, uses, and can radiate radio frequency
energy and, if not installed and used in accordance with the
instructions, may cause harmful interference to radio communications. However, there is no guarantee that interference will not
occur in a particular installation. If this equipment does cause
harmful interference to radio or television reception, which can
be determined by turning the equipment off and on, the user is
encouraged to try to correct the interference by one or more of
the following measures:
• Reorient or relocate the receiving antenna.
• Increase the separation between the equipment and receiver.
• Connect the equipment into an outlet on a circuit different
from that to which the receiver is connected.
• Consult the dealer or an experienced radio/TV technician for
help.
If items such as cables are included with this equipment, you
must use those included items.
Unauthorized changes or modification to this system can void
the user’s authority to operate this equipment.
Notice regarding disposal (EU only)
When this “crossed-out wheeled bin” symbol is displayed on the product, owner’s manual, battery, or battery package, it signifies that when you wish to dispose
of this product, manual, package or battery you must do
so in an approved manner. Do not discard this product,
manual, package or battery along with ordinary house-
hold waste. Disposing in the correct manner will prevent harm to human health and potential damage to the
environment. Since the correct method of disposal will depend
on the applicable laws and regulations in your locality, please
contact your local administrative body for details. If the battery
contains heavy metals in excess of the regulated amount, a
chemical symbol is displayed below the “crossed-out wheeled
bin” symbol on the battery or battery package.
Keeping foreign matter out of your equipment
Never set any container with liquid in it near this equipment.
If liquid gets into the equipment, it could cause a breakdown,
fire, or electrical shock.
Be careful not to let metal objects get into the equipment. If
something does slip into the equipment, unplug the AC
adapter from the wall outlet. Then contact your nearest Korg
dealer or the store where the equipment was purchased.
DECLARATION OF CONFORMITY (for USA)
Responsible Party : KORG USA INC.
Address : 316 SOUTH SERVICE ROAD, MELVILLE
Telephone : 1-631-390-6500
Equipment Type : Music Workstation
Model : KROSS-61/KROSS-88
This device complies with Part 15 of FCC Rules.
Operation is subject to the following two conditions:
(1) This device may not cause harmful interference,and
(2) this device must accept any interference received,
including interference that may cause undesired operation.
En-2
Data handling
Incorrect usage or malfunctions may cause the contents of
the memory to be lost. Please use the included Editor to back
up your important data to your computer or removable
media. Please be aware that Korg will accept no
responsibility for any damages which may result from loss
of data.
Copyright Warning
This professional device is intended only for use with works
for which you yourself own the copyright, for which you
have received permission from the copyright holder to
publicly perform, record, broadcast, sell, and duplicate, or in
connection with activities which constitute “fair use” under
copyright law. If you are not the copyright holder, have not
received permission from the copyright holder, or have not
engaged in fair use of the works, you may be violating
copyright law, and may be liable for damages and penalties.
If you are unsure about your rights to a work, please consult
a copyright attorney.
KORG TAKES NO RESPONSIBILITY FOR ANY
INFRINGEMENT COMMITTED THROUGH USE OF
KORG PRODUCTS.
Page 3

EnglishFrançaisDeutschEspañol
About this manual
About this manual
The manuals and how to use them
The KROSS comes with the following manuals.
• KROSS Quick Start Guide (printed) (this document)
The manuals listed below can be downloaded from the Korg
website.
• KROSS Operation Guide (PDF)
• KROSS Parameter Guide (PDF)
• KROSS Voice Name List (PDF)
You can also watch video manuals on the Korg website.
• KROSS video manuals
http://www.korg.co.jp/English/Distributors/ or
http://www.korg.com/
Quick Start Guide (this document)
This provides a simple explanation of the KROSS’s
functions.
Video Manual
This video illustrates the main functionality of the KROSS.
Operation Guide
Put simply, the Operation Guide is designed to answer the
question, “How do I do this?”
Parameter Guide
The Parameter Guide is designed to answer the question,
“What does this do?”
Organized by mode and page, the Parameter Guide includes
information on each and every parameter in the KROSS.
Voice Name List
The Voice Na m e L i s t lists all of the sounds and setups that
are in the KROSS when it is shipped from the factory,
including Programs, Combinations, Multisamples,
Drumsamples, Drum Kits, Arpeggio Patterns, Drum Track
Patterns, Demo Songs, and Template Songs.
PDF versions
The KROSS PDF manuals are designed for easy navigation
and searching. They include extensive PDF contents
information, which generally appears on the side of the
window in your PDF reader and lets you jump quickly to a
specific section. All cross-references are hyper-links, so that
clicking on them automatically takes you to the source of the
reference.
Conventions in this manual
References to the KROSS
The KROSS is available in 88-key, and 61-key models. The
manuals refer to all models without distinction as “the
KROSS.”
Symbols , Note, Tips
These symbols respectively indicate a caution, a
supplementary note, or a tip.
Example screen displays
The parameter values shown in the example screens of this
manual are only for explanatory purposes, and may not
necessary match the values that appear on the LCD screen of
your instrument.
* All product names and company names are the trademarks or
registered trademarks of their respective owners.
En-3
Page 4
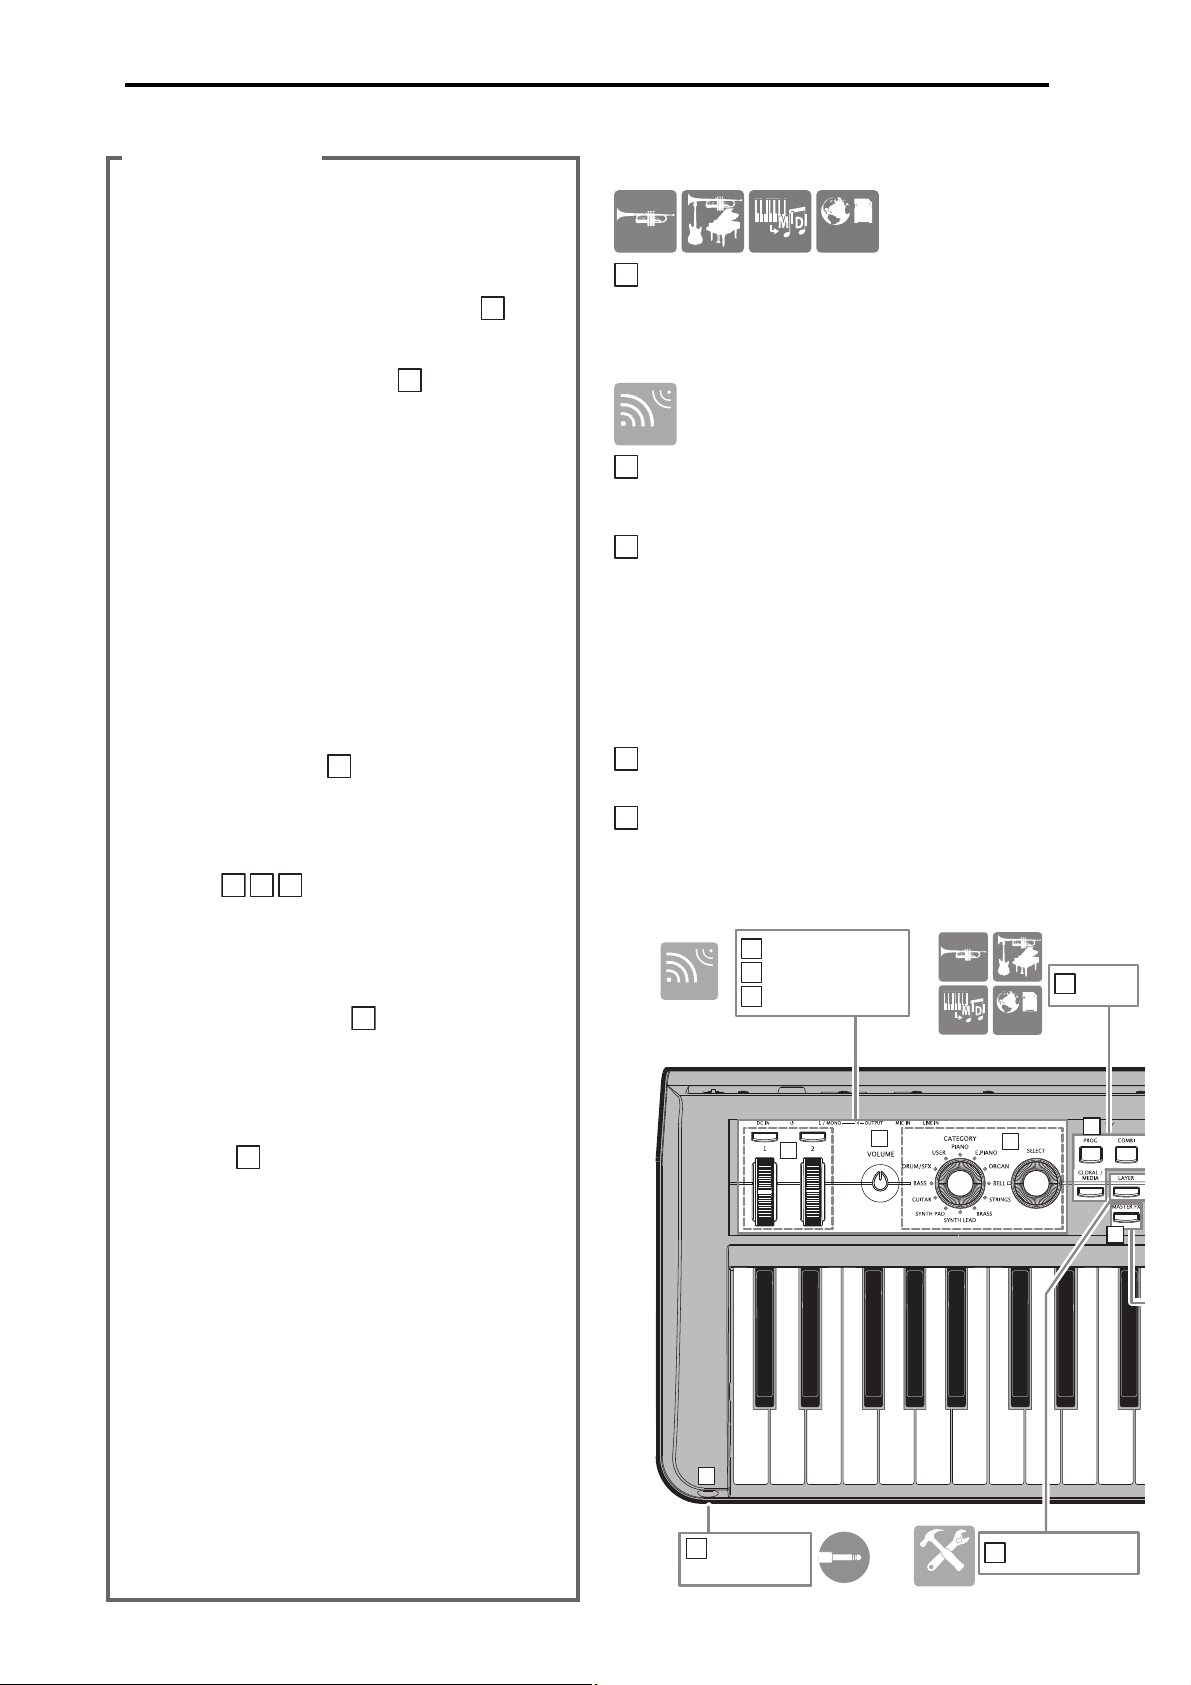
Main features
Volume
Controllers
Sound selector
Mode
Headphone
jack
Quick layer/split
GLOBAL
MEDIA
SEQ
COMBI
2
1
3
4
14
1
18
2
3
4
1
14
15
18
PROG
4
11
9
10
12
16
COMBICOMBI
SEQSEQ
GLOBALGLOBAL
MEDIAMEDIA
PROGPROG
SOUND
4
Main features
The KROSS lets you choose a sound and start playing. The
KROSS provides an easy way to express yourself, create
phrases and rhythms, and even record your vocal and guitar
— it’s a friendly music workstation that turns musical
wishes into accomplishments.
Sound selector makes it easy to choose sounds
You can use the two dedicated dials to select sounds. Finding
the sound that you want is easy and intuitive.
Front panel
Mode select
1
Mode
Here you can select the operating mode. Select the
appropriate operating mode for what you want to do:
perform, compose, adjust overall settings for the KROSS, or
save data.
Favorites function for instant recall
You can assign a total of 64 sounds to the 16 buttons on the
front panel for instant recall. This is a great feature for live
performances.
Expressive power of the EDS-i sound engine
The high-quality sounds are powered by the EDS-i
(Enhanced Definition Synthesis-integrated) sound engine
that is inherited from Korg’s professional synthesizers.
You’ll enjoy richly expressive sounds in your performances
and productions.
A wide range of preset sounds and effects
The 112 MB of PCM sample data provides numerous
instruments and sound effects. Also provided are 1,033
realistic preload sounds.
Choose from 134 types of effects. These effects include
chorus, delay, reverb, overdrive, vintage effects, amp
simulations, and even a vocoder.
Quick Layer/Split function
The Quick Layer function and Quick Split function make
it easy to layer two sounds or assign them to the left- and
right-hand regions of the keyboard.
14
Versatile functions to enhance your performances and
productions
To support your performances and productions, there’s an
arpeggiator that can automatically generate rhythmical chords
or arpeggios, a Drum Track that can instantly play drum
patterns in a variety of styles, and a step sequencer that lets
you use 16 buttons to intuitively create original drum patterns.
Sequencer for MIDI recording
The KROSS features a 16-track MIDI sequencer with /480
timing resolution. You can use it to record and play back
your performance on the keyboard and controllers of the
KROSS.
8
2
Adjusts the volume that’s output from the AUDIO OUTPUT
L/MONO and R jacks, and from the headphone jack.
3
SW1, SW2
Use these to switch octaves, or to utilize functions such as
Wheel Lock.
Modulation wheel (right)
Pitch bend wheel (left)
Use these to apply effects such as vibrato, or to raise/lower
the pitch.
Use the two dials to select the sound that you want to play.
11
Controls the Favorites function which lets you store sounds
to buttons 1–16 for quick recall.
Sound control
Volume
Controllers
Sound selector
Favorites
SOUND
PROG
SEQ
COMBI
GLOBAL
MEDIA
Multi-track audio recorder for your vocals and keyboard
performances
There’s a built-in audio recorder that can record your
KROSS performances and external audio input onto an SD
card. In addition to recording and playing back, you can
overdub, as well as import and play WAVE files.
Lightweight body that you can take with you and play
anywhere
The KROSS features a full-size keyboard, yet is even lighter
than before. Since it can be powered by AA batteries as well
as by an AC adapter, it’s easier than ever to use it anytime
and anywhere.
Computer connection via USB
You can connect the KROSS to your computer via USB for
easy exchange of MIDI data.
By using the KROSS Editor or Plug-In Editor, you can edit
while simultaneously viewing numerous parameters on your
computer, or use the KROSS as a software synthesizer
within your DAW.
* The KROSS Editor and Plug-In Editor can be downloaded
from the Korg website (http://www.korg.com/).
SETUP
En-4
Page 5
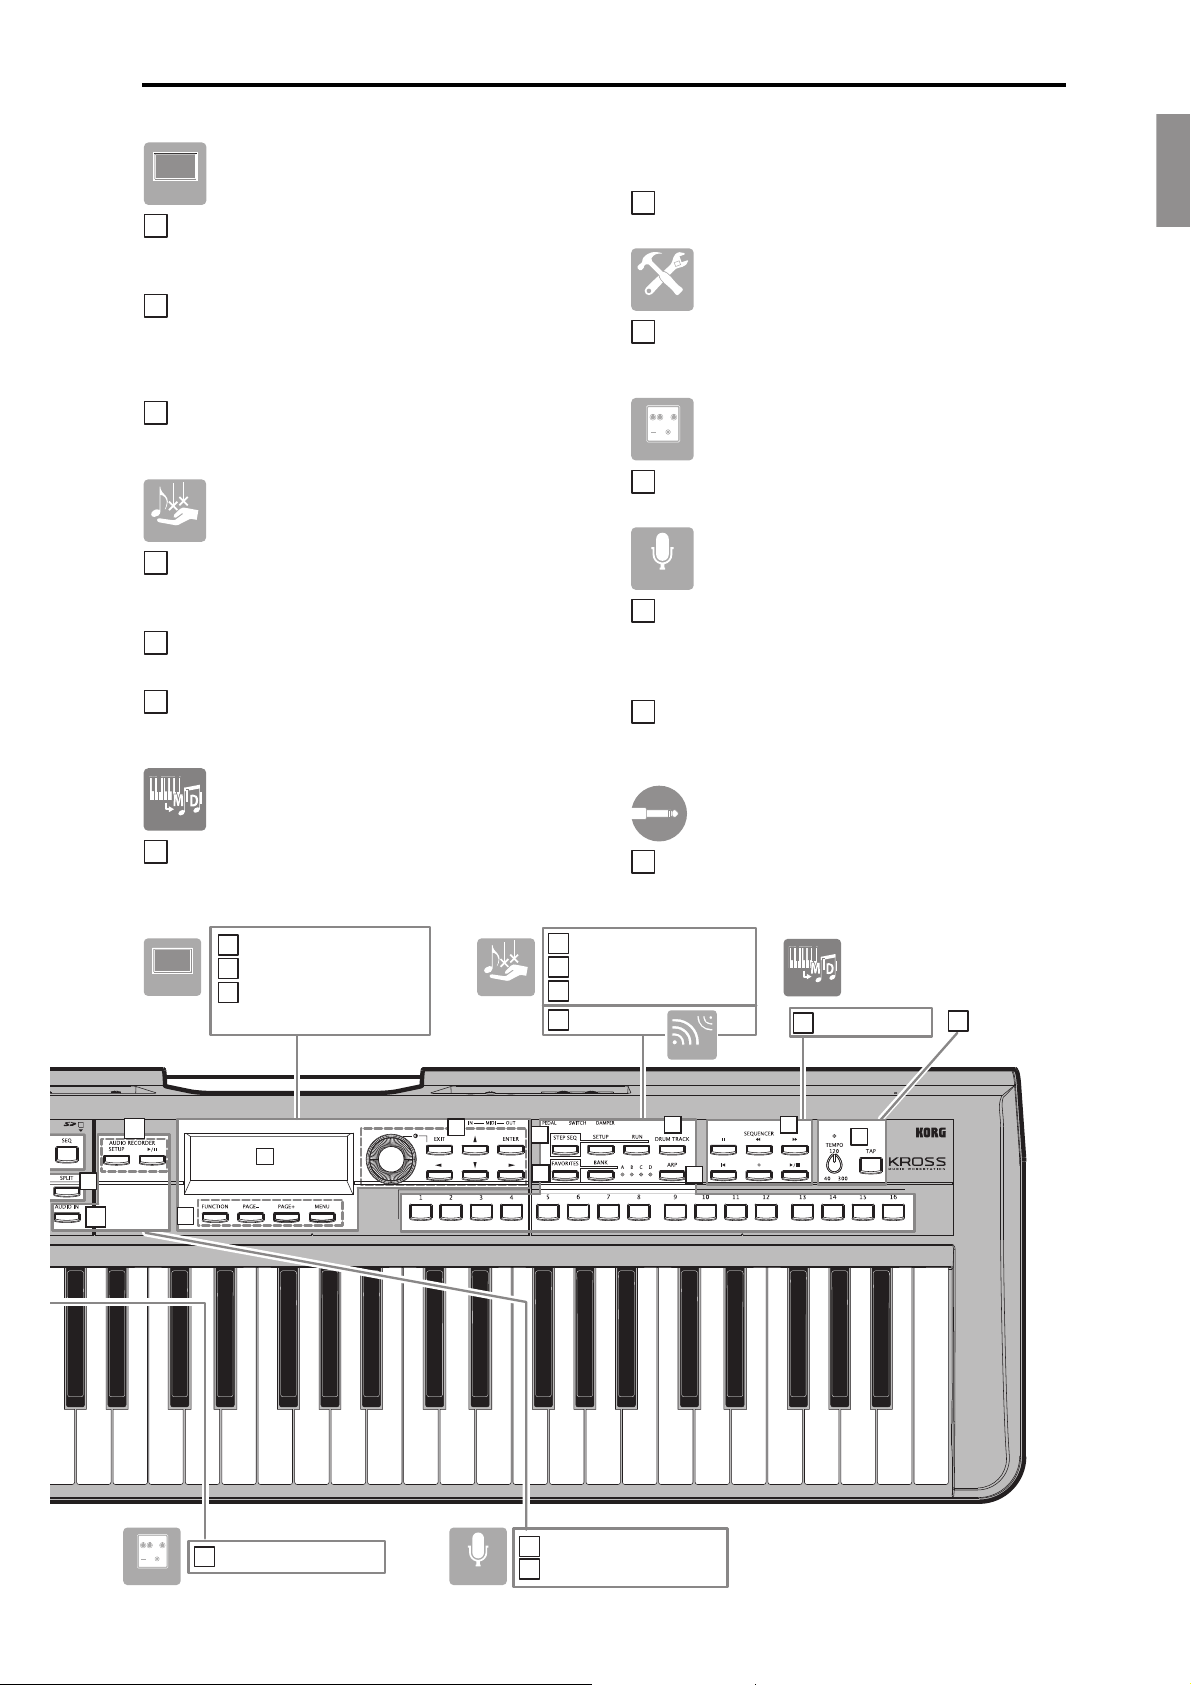
EnglishFrançaisDeutschEspañol
Audio recorder
External input on/o
Display
Cursor/value
Function / Page
controllers
Arpeggiator
Drum track
Step sequencer
Sequencer
Master eect
Favorites
Tempo
* The diagram shown is for
KROSS-61
5
6
7
8
9
10
11
12
13
15
16
16
17
17
5
6
7
12
13
14
15
8
9
10
11
SEQ
DISPLAY
5
6
7
TOOLS
8
9
10
SEQSEQ
12
13
14FX15
16
17
18
Display control
Display
Shows the sounds of the KROSS, as well as the parameters
and settings that specify how the KROSS will function.
Cursor/value controllers
Use these to control the cursor or values shown in the display.
Tip: You can adjust the display contrast by holding down the
EXIT button and turning the dial.
Function / Page controllers
Use these to move between pages in the display, to view a list
of functions in each page, or to execute a command function.
Production Tools
Front panel
The REC () button is also used to access the auto song
setup function.
Tempo
Adjusts the tempo.
SETUP
Quick layer/split
Quick layer/split
This button lets you layer two sounds or split two sounds to
the left and right regions of the keyboard.
Effect switch
Master effect
This button turns master effect 1/2 on/off in a single action.
Arpeggiator
This function plays an arpeggio (broken chord) based on the
keys that you hold down.
Drum track
This function plays the built-in drum patterns.
Step sequencer
Use buttons 1–16 to create drum loop patterns on the step
sequencer.
Sequencer
Sequencer
Here you can control the sequencer, which records MIDI
data such as your keyboard performance.
DISPLAY
TOOLS
AUDIO
Audio
Audio recorder
Here you can set up and control the audio recorder, which
lets you record your KROSS performance or an external
audio source.
External input on/off
This enables the external input. By default, this can be used
with MIC IN.
Headphones
Headphone jack
Connect your stereo headphones here.
SEQ
SOUND
FX
AUDIO
En-5
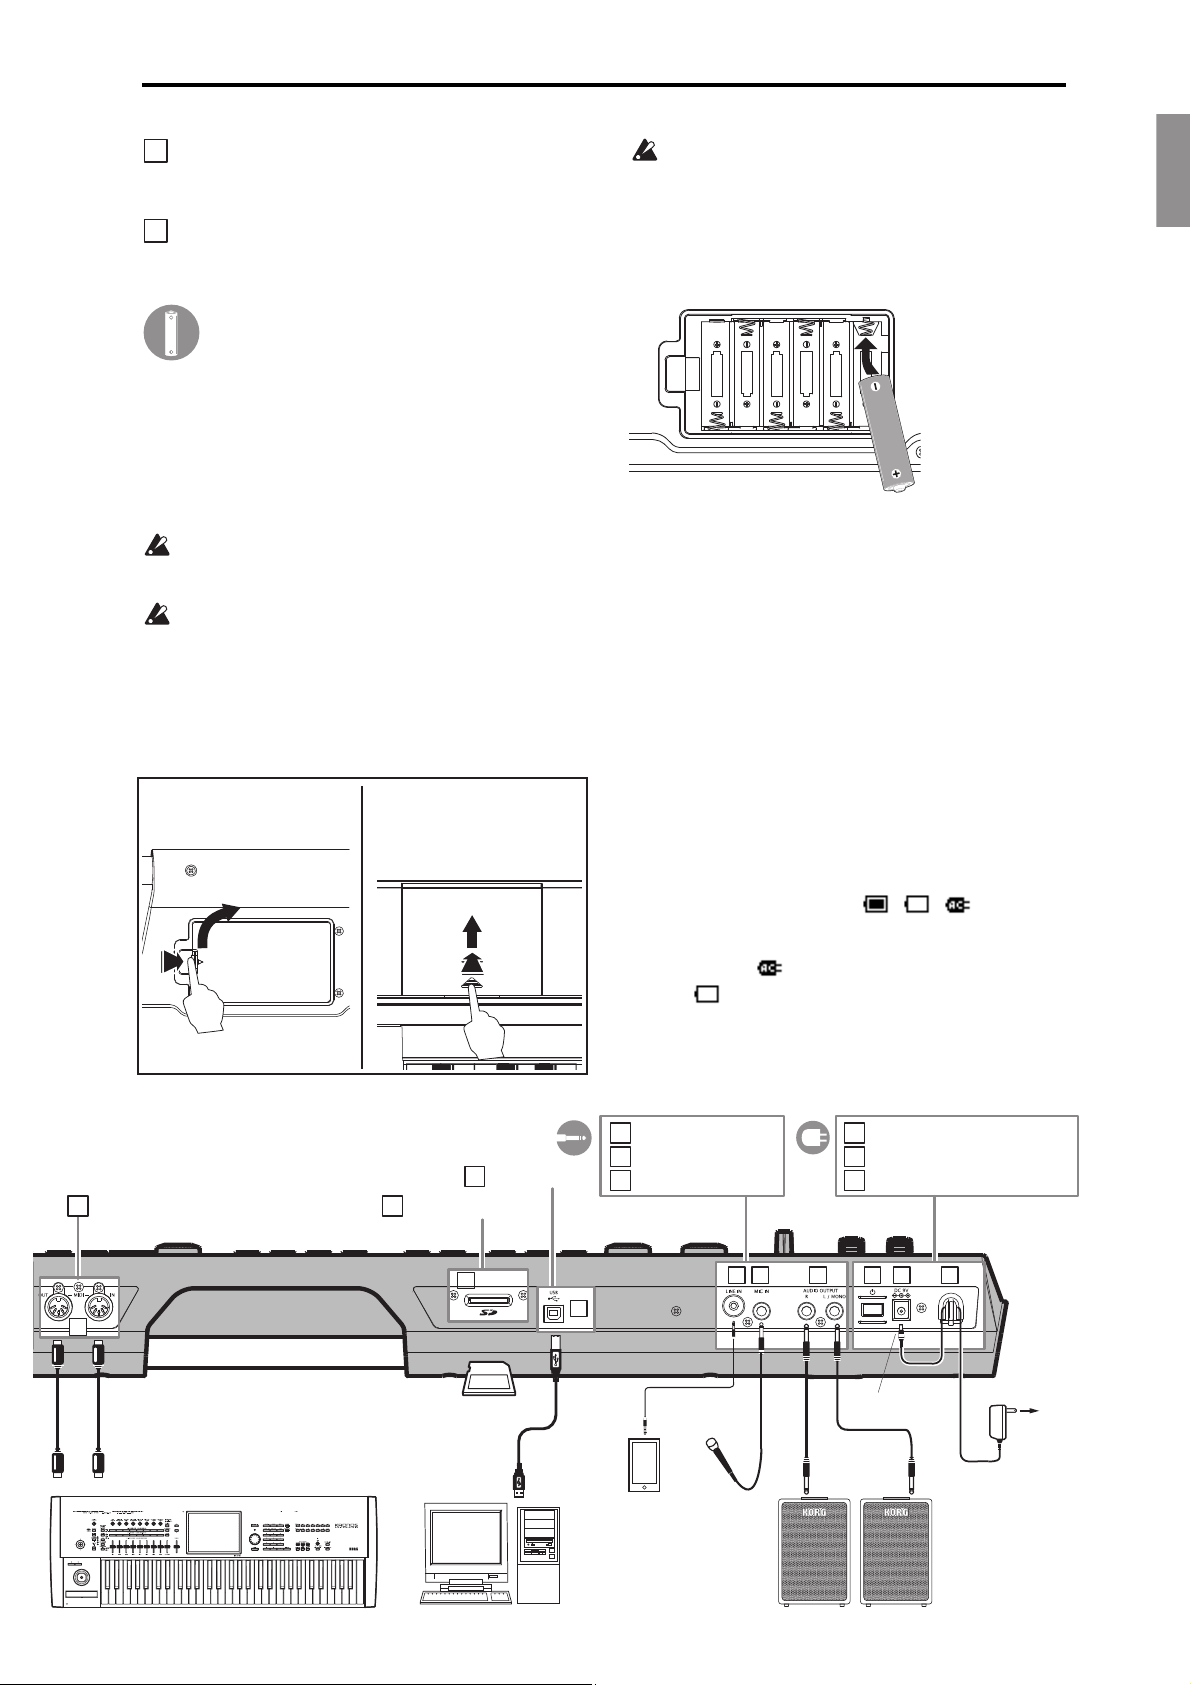
Page 6
Rear panel and connections
Damper pedal jack
Foot switch jack
Foot pedal jack
10
11
12
10 11 12
DAMPER
ASSIGNABLE
PEDAL
ASSIGNABLE
SWITCH
MIDI IN
AC
2
10
Rear panel and connections
Connecting the power
1
Power button, Power supply jack,
3
Cord hook
Using the following procedure, connect the AC power
supply adapter.
If you want to use batteries, refer to “Using batteries.”
1. Check
Check the following before you connect anything.
• Use an AC outlet of the correct voltage
• Use only the included AC adapter
2. Connect the AC adapter
a. Connect the DC plug of the included AC adapter to the
power supply jack of the KROSS.
b. Connect the plug of the AC adapter to an AC outlet.
c. To prevent the DC plug from being inadvertently
disconnected, use the cord hook of the KROSS to fasten
the cord.
The KROSS has an auto power-off function. If four
hours elapse with no user input on the KROSS, the
power will turn off automatically (factory setting).
(See “Auto power-off function” on page 8.)
Connecting your audio equipment
Turn off the power to your equipment before you
connect anything. If you connect gear while the power
is on, you risk damaging your equipment or speakers.
4
Audio output jacks
Connect these jacks to your powered monitors or mixer.
Use the VOLUME knob to adjust the volume.
5
Mic input jack
This is a monaural input jack for connecting a dynamic mic
or an electric guitar.
(This is a 1/4" phone jack. It does not support phantom
power or plug-in power.)
6
Line input jack
This is a stereo line input jack for connecting your audio
player. (Stereo mini-jack)
Note: Use the AUDIO IN dialog box to make input settings.
(See page 19)
Note: You cannot use the mic input and line input signals
simultaneously.
Preparing to save/load data
9
SD card slot
You can use an SD card to save/load sounds and song data,
and for recording/playback with the audio recorder.
The KROSS can use SD and SDHC memory cards.
You must format an SD card before using it for the first
time with the KROSS. For details on formatting, refer
to page 19.
Inserting/removing an SD card
1. Inserting an SD card into the slot
With the label facing upward, insert a commerciallyavailable SD card into the SD card slot, and push it in
until you hear it click into place.
Make sure that the card is oriented correctly.
2. Removing an SD card
Push the card inward; you will hear a click, and the card
will pop outward, allowing you to pull it completely out
of the slot.
Note: Store SD cards correctly as directed by the manual
accompanying your card.
Never insert or remove the SD card while data
access is occurring, such as while the KROSS is
starting-up or powering-off, while saving/loading, or
while playing or recording on the audio recorder.
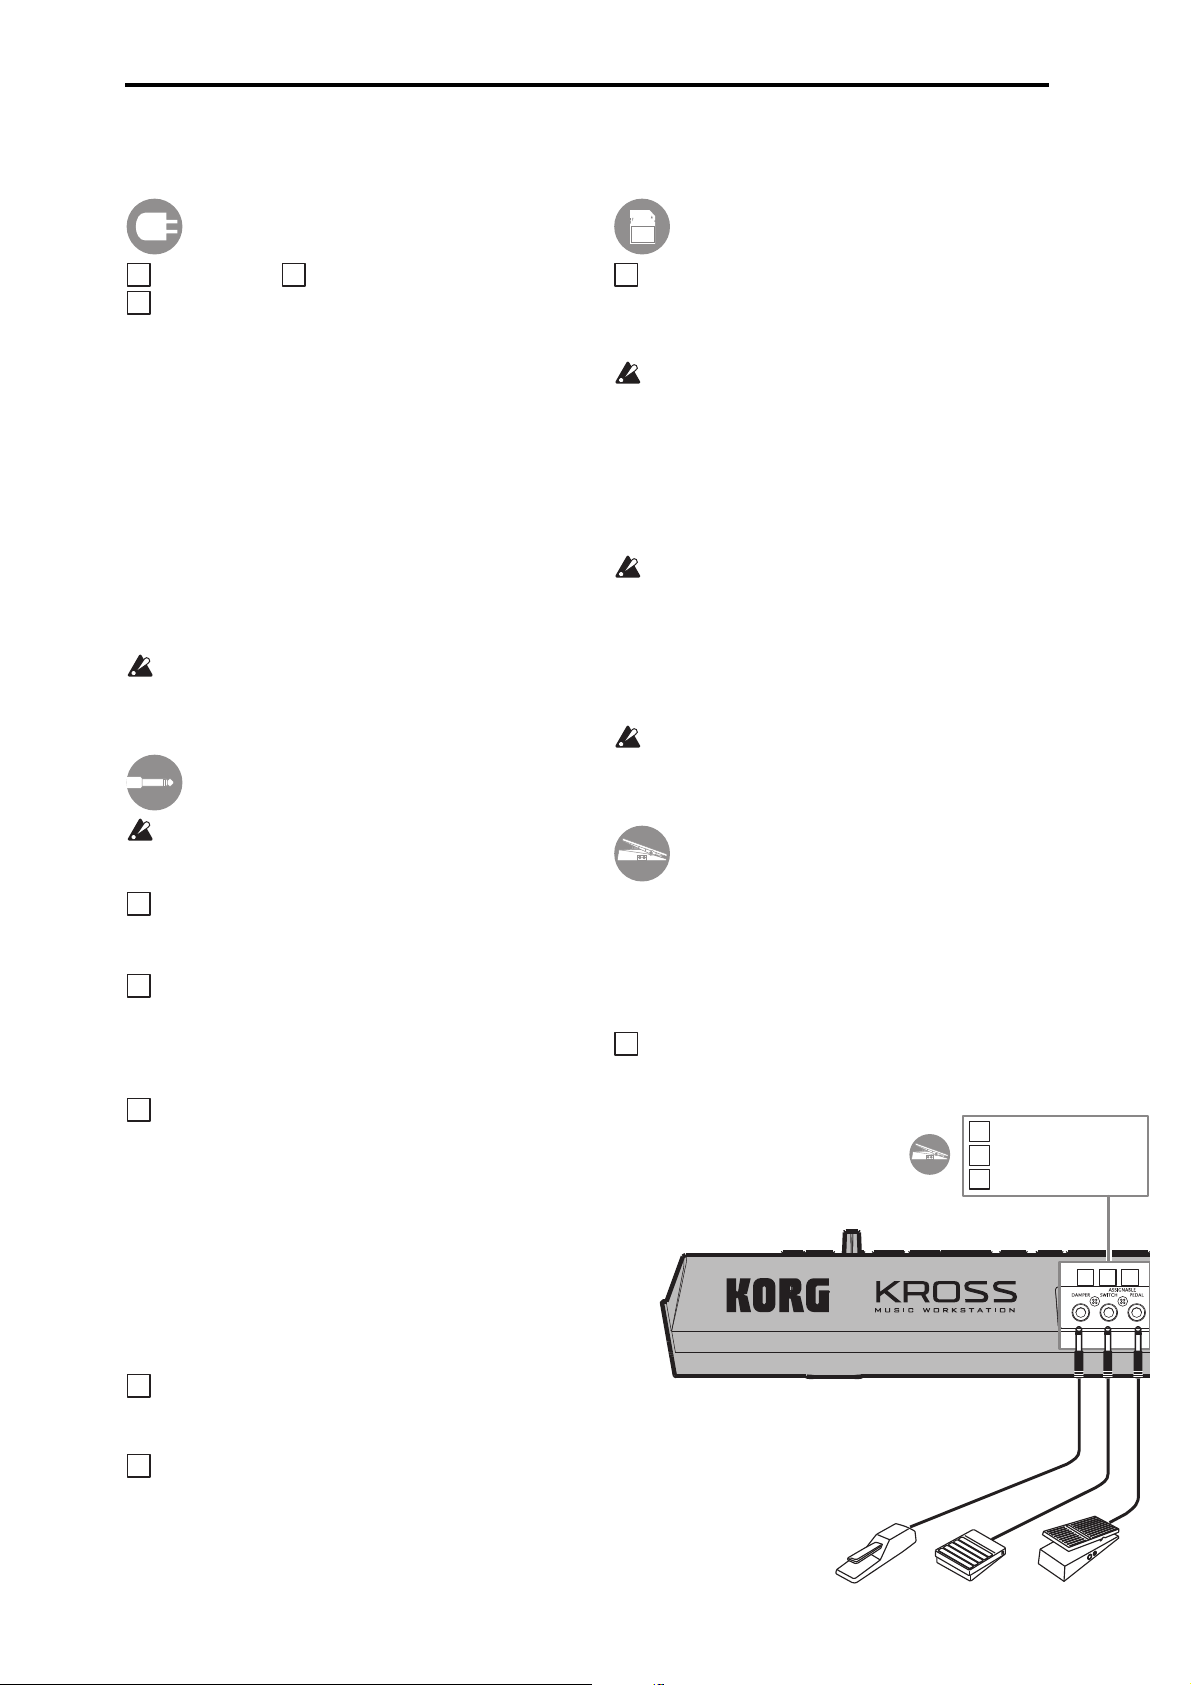
Connecting foot controllers
You can connect optional pedals (sold separately) that let
you control the KROSS with your feet.
Note: When connecting these optional pedals for the first
time, you’ll need to specify the polarity and assign their
function. (See “Connecting foot controllers” of the
Operation Guide)
Damper pedal jack
You can use a damper pedal (separately sold) to control the
damper effect, which sustains the sound even
after you take your hands off the keyboard.
Connecting your computer and MIDI
equipment
7
USB B port
You can connect your computer here, and transfer
performance data and sound settings via MIDI.
8
MIDI IN/OUT connectors
You can connect an external MIDI device here, and transfer
performance data and sound settings via MIDI.
En-6
Page 7
EnglishFrançaisDeutschEspañol
Rear panel and connections
Audio output jacks
Mic input jack
Line input jack
Power button
Power supply jack (DC 9V)
Cord hook
1
2
3
4
5
6
7
98
456
7
8
12
1 2 3
SD card slot
USB B port
9
AC adapter
(Included)
a. DC plug
b.
c.
to an
AC outlet
MIDI IN/OUT connectors
SD card
MIDI keyboard
MIDI IN MIDI OUT
MIDI cable
USB cable
Computer
Audio player, etc.
Mic
Monitor
Amplier, etc.
INPUT
11
12
KROSS-61
While pressing the latch,
pull upward and remove
KROSS-88
While pressing from above the
on the cover, slide it away
from yourself and remove
Foot switch jack
You can use a pedal switch (separately sold) to switch
sounds or to start/stop the sequencer.
Foot pedal jack
You can use a foot controller (separately sold) to control the
volume or tone.
Using batteries
Batteries that can be used
Use six AA nickel-metal hydride batteries or alkaline
batteries. Zinc-carbon batteries cannot be used.
Continuous operating time
Alkaline batteries will allow approximately four hours of
usage. Battery life will depend on the type of batteries and
on the conditions of use.
Do not mix new and old batteries, or batteries of
differing types. Mixing batteries in this way may cause
them to leak or burst.
If the batteries are exhausted, remove them
immediately. Exhausted batteries may leak or burst if
you leave them installed.
Installing batteries
Note: Batteries are not included. You’ll need to obtain them
separately.
1. Remove the battery compartment cover
The battery compartment of the KROSS-61 is located
on the bottom panel. When turning the unit upside
down, place it on a blanket or similar material to
prevent damage to the knobs and dials.
2. Installing batteries
When inserting the batteries, make sure that you observe
the correct polarity (“+” and “–”).
Note: The
illustration shows
the KROSS-61.
Note that on the
KROSS-88, the
batteries are
oriented in the
opposite way.
3. Close the battery compartment cover
Close the cover by reversing the steps you took to remove
it.
Specifying the type of batteries that you installed
After you’ve installed the batteries, turn on the power and
specify the type of batteries you’re using.
a. Press the GLOBAL/MEDIA button to enter
GLOBAL/MEDIA mode.
b. Press the PAGE+ (or PAGE-) button to access the
GLOBAL > PREF (Preferences) page.
c. Press the cursor button (or ) to select the Battery
Type parameter, and press the ENTER button to switch the
setting.
Alkaline batteries: Alkaline
Nickel-metal hydride batteries: Ni-MH
d. Save the settings (see “Saving your settings (Global
Settings)” on page 8.)
Battery remaining indication ( , , )
An indicator in the upper right of the screen shows the
remaining battery capacity. If you’re using the AC adapter,
this will indicate .
Note: If is flashing, the batteries are almost exhausted.
Immediately save any important data, and either install fresh
batteries or switch to using the AC adapter.
AC
En-7
Page 8

Turning the power on or off
AC
Turning the power on or off
Getting ready to play
1. Preparing the power supply
Prepare the power supply. The KROSS can be powered
either by an AC adapter or by AA batteries.
AC adapter: “Connecting the power” on page 6
AA batteries: “Using batteries” on page 7
2.
Connect your audio equipment, foot controllers, and SD
card.
Depending on how you’re using the KROSS, you can also
connect MIDI and USB devices at this time.
Audio equipment: “Connecting your audio equipment” on
page 6
Foot controllers: “Connecting foot controllers” on page 6
SD card: “Preparing to save/load data” on page 6
3. Turning the power on
Lower the VOLUME knob of the KROSS and
the volume of your monitor amp.
Hold down the power button until the display
backlight of the KROSS illuminates.
After the KROSS has powered-on, turn on the
power of your monitor amp.
Do not insert or remove the SD card from the slot while
the KROSS is starting-up.
4. Adjusting the volume
Adjust the volume while playing the
keyboard. Use the VOLUME knob of the
KROSS and the volume control of your
monitor amplifier to adjust the volume to an
appropriate level.
When you’ve finished
When you have finished using the KROSS, first lower the
volume by turning down the VOLUME knob of the KROSS
and the volume of your monitor amp. Then turn off the
power of your monitor amp. Finally, hold down the power
button until the backlight of the KROSS goes dark.
You must save your data before you turn off the power.
Data that you haven’t saved will be lost. Be sure to save
important data to internal memory or to an SD card.
Do not turn off the power while any operation is being
performed.
Never turn off the power while the display indicates
“Now writing into internal memory.” Doing so may
cause internal data to be damaged.
Connecting peripheral equipment
Auto power-off function
The KROSS has an auto power-off function that
automatically turns off the power when the unit has not been
played or operated (*) for a certain length of time. With the
factory settings, this is set to four hours.
* Using the VOLUME knob is not considered to be an
operation.
Auto power-off settings
If auto power-off is enabled, a window regarding auto
power-off will appear when start-up is completed.
If you want to change the time setting, or disable the auto
power-off function, proceed as follows.
1. Select GLOBAL mode
Press the GLOBAL/MEDIA button.
2. Access the setting page and change the setting
Press the PAGE+ (or PAGE-) button to access the
GLOBAL > PREF page. Use the cursor buttons / to
select the Auto Power-Off parameter, and use the VALUE
dial to set the value.
Note: If you choose Disabled, the function itself will be
disabled.
3. Saving your settings (Global Settings)
Press the FUNCTION button. Use the (PAGE-) button
to select Write Global Setting, and then press the OK
(MENU) button. Press the OK (MENU) button once
again to save the data.
Warning message before auto-off
If there has been no user input for the specified length of
time of time, a message will inform you that the power will
turn off soon.
If you want to continue using the KROSS, press a key or
button, or use a controller.
Note: The same message will appear again if the specified
length of time elapses without any user input.
En-8
Page 9

EnglishFrançaisDeutschEspañol
The display and the modes
DISPLAY
Page Page tab ParametersMode/Page title
Page menu
Function list
Move between
pages
Cursor buttons
: Choose a parameter
VALUE dial
: Change the value
Adjust the contrast
PROG
COMBI
Drums
Bass
Strings
Piano
SEQ
GLOBALGLOBAL
MEDIAMEDIA
The display and the modes
Display
The display of the KROSS provides various types
of information.
Tip: If the surrounding conditions make the display difficult
to read, you can adjust the contrast. Hold down the EXIT
button and turn the VALUE dial to adjust the contrast at
any time.
Pages and functions
One screen of displayed information is called a “page.” To
access the page you want, you can use the PAGE- and
PAGE+ buttons, or you can press the MENU button and
choose from the page menu.
Each page also contains convenient “functions.”
In the page menu and on the function page, use the PAGE-
and PAGE+ buttons to choose an item, and press the MENU
button to view or execute that function.
Selecting a mode
The KROSS has four operating modes. You’ll switch to the
appropriate mode depending on whether you want to
perform, compose, or make overall settings.
• Press a mode button to enter that mode
Creating and playing sounds
Program mode (PROG)
In this mode you can play or edit “programs,”
which are the basic sounds of the KROSS.
PROG
Combination mode (COMBI)
In this mode you can play and edit
“combinations,” which are multiple sounds used
COMBI
example you can make “layer” settings so that two programs
will be heard together, “split” settings that assign different
programs to different regions of the keyboard, or use layers
and splits together.
together.
You can combine programs in various ways; for
When you’re at the page you want, use the cursor buttons
() to select a parameter and the VALUE dial to
adjust the value of that parameter.
Press the ENTER button to confirm the value, and press the
EXIT button to cancel.
Creating phrases and songs
Sequencer mode (SEQ)
Here you can use a 16-track sequencer to create
phrases and songs.
Your performance using the keyboard and
SEQ
controllers can be recorded as MIDI data, and then
played back.
Saving/loading your settings and data
Global/Media mode (GLOBAL/MEDIA)
In this mode you can select various settings for
the KROSS itself, such as keyboard transpose
and sensitivity, controllers, and MIDI.
You can also use an SD card to save or load
KROSS sound settings and song data.
En-9
Page 10

Selecting and playing sounds
SOUND
PROGPROG
COMBICOMBI
1 2
3
2
3
4
2
Selecting and playing
sounds
Selecting a program or combination
It’s easy to select sounds on the
KROSS. The sound selector that’s
located on the left side of the front
panel makes the process of sound
selection easy.
1
2
1. Select a mode
Press a mode button to select either Program mode or
Combination mode. The top page will appear.
Category Select Icon Mode
3
Using the Favorites function
The Favorites function lets you register and recall your
favorite sounds or audio songs. If you register them using the
front panel 1–16 buttons, you’ll be able to easily recall them
at any time.
Recalling a sound
Here’s how to recall a sound that you registered. With the
factory settings, specially recommended sounds are
registered in favorites bank A and B.
1. Turn on the Favorites function
Press the FAVORITES button to turn it on.
If (the category select icon) is shown, you can also
use the sound selector to select a sound.
2. Choose the category of sound
In the sound selector, turn the CATEGORY dial to
choose the sound category that you want. The sound
select list will appear when you use the sound selector.
3. Select the sound variation, and play
In the sound selector, turn the SELECT dial to select a
variation sound in that category.
To return to the top page, press the OK (MENU) button or
the ENTER button. If you press the Cancel (FUNCTION)
button or the EXIT button, you’ll return to the sound that
you had been using.
Tip: You can also select sounds in the top page.
Use the VALUE dial or the cursor buttons / to select a
sound.
En-10
2. Select a Favorites bank
Press the BANK button to select the Favorites bank that
contains the sound that you want to recall. The A, B, C,
and D LEDs will light up consecutively. In this example,
select A.
3. Recall a sound
Press one of the 1–16 buttons to recall the sound.
Registering a sound in a button
Here’s how to register a sound to one of the 1–16 buttons.
1. Select a sound
Select the program or combination that you want to
register. (See the left column.)
2. Enter registration mode
Hold down the EXIT button and press the FAVORITES
button to enter registration mode.
3. Select the bank for registration
Press the BANK button to select the bank you want.
4. Register the sound to a button
Press one of the 1–16 buttons to register the sound to that
button.
Tip: You can also change a sound that you registered as a
favorite. (See “Registering a sound in Favorites” of the
Operation Guide)
Page 11

EnglishFrançaisDeutschEspañol
Selecting a program or combination
Raise the pitch
Deepen the vibrato
Lower the pitch
Saving your Favorites
When you’ve finished registering sounds to buttons, save
your Favorites settings. If you turn off the power without
saving your settings, they will be lost.
1. Turn on the Favorites function
Press the FAVORITES button to turn it on.
2a 2b
2. Select the Write Favorites function
Press the FUNCTION button. Use the (PAGE-) button
to select Write Favorites, and then press the OK
(MENU) button.
3. Execute save
Press the OK (MENU) button. The settings will be saved.
2c,
3
Using controllers to modify the sound
Front panel controllers
You can modify the sound by using the SW1, SW2, pitch
bend wheel (left), and modulation wheel (right) located to
the left of the panel.
SW1, SW2
SW1 and SW2 can be assigned to various functions such as
changing the octave of the keyboard, turning portamento
on/off, or locking/unlocking the pitch bend wheel.
Pitch bend wheel (left)
Move this wheel forward or backward to control the pitch.
You can adjust the range of pitch change (See “Controlling
pitch” of the Operation Guide). When you take your hand off
the pitch bend wheel, it will return to the center position.
Modulation wheel (right)
You can use this wheel to control the sound in various ways.
Although the effect will depend on the sound that’s selected,
this wheel is usually assigned to modulation. (See
“Controlling pitch” of the Operation Guide)
Foot controllers
You can connect and use various types of foot controller to
control the KROSS with your feet.
Note: When connecting a foot controller for the first time,
you’ll need to adjust the settings and adjustments for it. (See
“Connecting foot controllers” of the Operation Guide)
Damper pedal
Use this to sustain the sound after you take your
hand off the keyboard, as long as you continue
holding down the pedal. Half-damper is
supported if using the Korg DS-1H (sold
separately).
Foot switch
You can use this type of pedal to switch sounds, or
to play/stop the sequencer or Drum Track.
Foot pedal
This type of pedal can be used to adjust the
volume, tone, or effects.
En-11
Page 12

Production Tools
TOOLS
Drum Track Pattern
Drum Track Pattern
Trigger Mode:
Production Tools
Performing with the arpeggiator
The arpeggiator is a function that automatically plays
rhythmic chords or arpeggios according to the keys that you
press.
Basic operation
1. Turn on the function
Press the ARP button to turn the arpeggiator on.
2. Start playing
The arpeggiator will start when you press the
keyboard. For some sounds, the arpeggiator will
start in a specific region of the keyboard. Try
holding down keys in various regions.
3. Adjust the speed
You can adjust the speed of the arpeggiator by
setting the tempo. To set the tempo, turn the
TEMPO knob or press the TAP button several
times.
4. Stop the arpeggiator, and turn it off
The arpeggiator will stop when you take
your hand off of the keyboard. If the
arpeggiator does not stop, turn off the
ARP button. (See the following section
“Latch.”)
Changing the arpeggiator’s behavior
You can adjust the arpeggiator settings in the ARP page of
each mode. We’ll give an example in Program mode.
1. Select the page that you want to edit
Press the PROG button. Press the PAGE+ button to select
the PROG > ARP page.
Performing with the Drum Track
The Drum Track is a function that plays drum patterns in a
variety of styles.
Basic operation
1. Turn on the Drum Track function and start playing
(start/standby)
Turn on the DRUM TRACK button; the Drum
Track will start playing.
Note: If the button blinks, the Drum Track is in
the standby condition. The Drum Track will
start playing when you press the keyboard.
(See the following section “Trigger Mode.”)
2. Adjust the speed
You can adjust the speed of the Drum Track by
setting the tempo. To set the tempo, turn the
TEMPO knob or press the TAP button several
times.
3. Turn off the Drum Track to stop it
Turn off the DRUM TRACK button; the Drum Track will
stop playing.
Changing the drum sounds, patterns, and
settings
You can change the drum pattern as well as the sounds and
the volume.
You’ll make these settings in the DRUM TRACK page of
each mode.
We’ll give an example in Program mode.
1. Select the page that you want to edit
Press the PROG button. Press the MENU button (see
page 9) to access the page menu, and then press the
cursor button to select P-DRUM TRACK.
Press the OK (MENU) button to move to the DRUM
TRACK page. Use the PAGE+ and PAGE- buttons to
select the PATTERN or PROGRAM page.
En-12
Arpeggio Mod:
Arpeggio Pattern Latch
2. Adjust the settings
Use the cursor buttons to select a parameter,
and use the VALUE dial to adjust the value.
GATE: Duration of the notes, VEL: Strength of the notes
SWING: Sense of swing
Arpeggio Pattern: Selects an arpeggio pattern
Latch: Enables the Latch function that lets the arpeggio
continue after you take your hand off the keyboard
For more about the arpeggiator, refer to “Arpeggiator
function” of the Operation Guide.
2. Adjust the settings
Use the cursor buttons to select a parameter,
and use the VALUE dial to adjust the value.
PATTERN page
Drum Track Pattern: Select a Drum Track pattern
Trigger Mode:
PROGRAM page
DRUM/SFX: Select a drum program
For more about the Drum Track, refer to “Drum Track
function” of the Operation Guide.
Select how the Drum Track will start playing
Page 13

EnglishFrançaisDeutschEspañol
Tone 1
Tone 2
Step 1
Step 2
Step 3
Step 16
Tone 3
: Step On
Tone 12
ACCENT Tone (13)
Zone A Zone B
1
,
3
2
21
3
4
2
Program
Reso (Resolution)
Lgth (Length)
Performing with the step sequencer
The step sequencer is a function that lets you use buttons 1–
16 to easily create drum loop patterns.
Note: The loop patterns you create can be saved together
with the sound and song data.
Basic operation
Performing with the Drum Track
3. Enter the pattern (turn steps on/off)
Press buttons 1–16 to enter the pattern. Each step whose
button is lit will produce sound. The button will alternate
on/off each time you press it. The steps correspond to
intervals of time where the drum sounds are heard.
Note: The steps will play at timing intervals of the note
value specified by Reso (Resolution), and will repeat
after the number of steps specified by Lgth (Length). (See
“Changing the drum sounds” SETUP page illustration)
4. Switch between zones
Use the BANK button to switch between zones of the
pattern. There can be up to 64 steps (specified by Lgth),
and each zone A–D contains 16 steps. The zone is
indicated by the BANK A–D LEDs.
Changing the drum sounds
Switching the sounds of all tones (switching the drum set)
Here’s how to change the drum sounds. We’ll give an
example in Program mode.
1. Select the page that you want to edit
Access the P-STEP SEQ > BASIC page. (For the
procedure, refer to step 1 of “Changing the drum sounds,
patterns, and settings.”)
In this page you can also see a list of the steps for all
tones.
1. Start playing
Turn on the RUN button; the loop pattern will start
playing. Turn off the button to stop the pattern.
2. Adjust the speed
You can adjust the speed of the loop pattern by setting the
tempo. To set the tempo, turn the TEMPO knob or press
the TAP button several times.
3. Turn off the step sequencer to stop it
Turn off the RUN button; the step sequencer will stop
playing.
Entering a pattern
1. Turn on the function
When the STEP SEQ button is lit (or blinking), you
can use the front panel to control the step sequencer.
2. Select the tones that you want to enter, such as kick or
snare
While holding down the SETUP button, press buttons 1–
12 to select tones.
By default, the following drum instruments (drum set) are
assigned to these buttons.
Ton e 1: Kic k To ne 5: H.H O pen Tone 9: To m H
Tone 2: Snare 1 Tone 6: Crash Tone 10: Perc 1
Tone 3: Snare 2 Tone 7: Ride Tone 11: Perc 2
Tone 4: H.H Close Tone 8: Tom L Tone 12: SFX
2. Use Program to change the drum program
Changing the sounds (instruments) for each tone
Variations are provided for the sounds played by each tone.
In the STEP SEQ > INST page, use INST SELECT to select
a variation.
Adjusting how the loop pattern will play
You can adjust the volume, the sense of swing (groove), and
accent for the pattern.
Make these adjustments in the STEP SEQ > MOD page.
Ve lo ci t y: Basic volume, Swing: Sense of swing
Accent: Accent volume
To add an accent to a step
1. Select the accent tone
While holding down the SETUP button, press button 13
to select the accent tone.
2. Turn on the steps at which you want to boost the
volume
Use the 1–16 buttons and the BANK button to press the
steps to which you want to add an accent, making those
step light. The volume of all tones in the selected steps
will be emphasized.
Note: The accent volume is adjusted by the Accent
parameter in the MOD page described earlier.
En-13
Page 14

Easily editing a sound
SETUP
Piano
Bass
Split point
PROGPROG
Easily editing a sound
Quick Layer
Strings
Piano
This is a function that makes it easy to set up a layer, letting
you play two sounds that are layered together. You can also
adjust the volume balance.
Creating a sound with Quick Layer
1. Select the first sound, and then press the LAYER
button
Select the first sound in Program mode;
then press the LAYER button.
2. Select the second sound, and make adjustments
Quick Split
This function lets you make split settings so that you can
play different sounds on the left and right regions of the
keyboard. You can select two programs, adjust their volume
and octave settings, and save these settings as a combination.
Creating a sound with Quick Split
1. Select the first sound, and then press the SPLIT
button
Select the first sound in Program mode;
then press the SPLIT button. The procedure
will be smoother if you first select the
sound that you want to play in the upper
region of the keyboard.
2. Select the second sound, and make adjustments
Select the second program sound, and specify whether
that program’s volume (Volume), octave (Octave), and
arpeggiator (Use ARP) settings will be copied.
Use the cursor buttons to select a parameter,
and use the VALUE dial to adjust the value. You can use
the sound selector to choose a program.
Press the WRITE (MENU) button.
3. Save (write) your settings as a combination
The sounds that you create using Quick Layer or Quick
Split will be saved as a combination.
Specify the combination name, category, and savedestination (WRITE To). The user bank is the only savedestination allowed.
Press the OK (MENU) button; the sound settings will be
saved as a combination.
Note: The combination you save can be selected from either
of the following locations.
• The user category which you specified as the savedestination (WRITE To)
(For example, USER:000)
• Within the category you specified for Category (for
example, PIANO:030)
Select the second program sound, and make adjustments.
Refer to step 2 of “Quick Layer.”
Set the split point (Split Point) to specify the point where
the two sounds will be divided. If you select the
Lower/Upper parameter and press the ENTER button, the
two sounds will be exchanged.
Press the WRITE (MENU) button.
3. Save (write) your settings as a combination
Refer to step 3 of “Quick Layer.”
Adjusting the volume balance
You can adjust the volume balance of the sounds you’re
playing, the Drum Track, and the step sequencer.
Adjusting the volume of the program
To adjust the volume balance of the programs,
you’ll use the PROG > MIXER page. Press the
PROG button and the PAGE+ button to select this
page.
Use these parameters to adjust the volume.
Use the cursor buttons to select a parameter, and
use the VALUE dial to adjust the value.
OSC1, OSC2: Volume of the sounds you play
DRUM TRACK: Volume of the Drum Track
STEP SEQ: Volume of the step sequencer
En-14
Page 15

EnglishFrançaisDeutschEspañol
COMBICOMBI
Current Timbre Setting
All Timbre Volume
PROGPROG
EG Adjust: Time-varying change
in volume and brightness
Tone Adjust (Amp):
Volume change
produced by your
keyboard dynamics
Tone Adjust (Filter):
Brightness of the
sound
In the case of a Low Pass Filter
Frequency
HighLow
Level
Cutoff
Resonance
0
Attack
Time
Sustain
Level
Release
Time
Decay
Time
Level
note-on note-o
Time
COMBI
Adjusting the volume of the combination
To adjust the volume balance of the combination,
you’ll use the COMBI > MIXER page.
Press the COMBI button and the PAGE+ button to
select this page.
A combination contains 16 “timbres” to which you can
assign programs; the Drum Track and the step sequencer
also play these timbres. Here’s how to adjust the volume of
each timbre.
1. Select the timbre that you want to adjust
Use the cursor buttons / to select a timbre.
2. Adjust the volume of the timbre
Use the cursor buttons / to select the Volume
parameter, and use the VALUE dial to adjust the value.
Adjusting the overall volume together
Here’s how the various volume settings that you can adjust
in the MIXER page of the program or combination can be
adjusted together in a single operation.
1. Select the Hold Balance function
Press the FUNCTION button, use the (PAGE-) and
(PAGE+) buttons to select Hold Balance, and then
press the OK (MENU) button.
2. Adjust the volume
When you turn the VALUE dial, all volumes of the
program or combination will change while maintaining
their relative balance.
Adjusting brightness and changes in volume
Adjusting a combination
In Combination mode, use the C-TONE ADJ >
TONE ADJUST page to adjust the brightness,
COMBI
and use the EG ADJUST page to adjust time-
varying changes in volume or brightness.
For details on how to select a timbre and edit the values,
refer to the procedure that’s described in the “Adjusting the
volume of the combination” section.
Saving the sound you edited
If you’re happy with the edited sound, you should save it to
internal memory. If you turn off the power without saving,
the edited sound will be lost.
The procedure of saving a sound to internal memory is
called “writing.” To write a sound, proceed as follows in
either Program mode or Combination mode.
1. Select the Write function
Press the FUNCTION button, and use the (PAGE-)
button to select Write Program (or Write
Combination). Press the OK (MENU) button.
2. Choose whether to save by overwriting or as a new
item
Choose whether you want to overwrite the existing
version of the sound that you edited (Write) or save the
edited sound as a new sound (New). For this example,
select New. Use the cursor buttons to select
New, and press the ENTER button to check it.
Write/New
Name
Adjusting brightness and changes in
volume
You can use the Tone Adjust function and the EG Adjust
function to adjust the tone of the sound and to adjust the
way that the volume and brightness will change over time
during the attack and release of the note.
Adjusting a program
In Program mode, use the PROG > TONE page
to make these adjustments.
For details on selecting pages and editing values,
refer to “Adjusting the volume of the program.”
CategoryWRITE To
3. Specify the save-destination, and save (write) the data
Specify the name, category, and the user area savedestination (WRITE To).
When you’ve finished making settings, press the OK
(MENU) button to save the sound as a new sound.
Note: A combination you save can be selected from either of
the following locations.
• The user category you specified as the save-destination
(WRITE To)
(For example, USER:000)
• Within the category you specified for Category (for
example, PIANO:054)
En-15
Page 16

Recording on the sequencer
SEQSEQ
1a,1b2a,
2c
2b
3
Recording on the
sequencer
Recording functionality
is one of the most important aspects of a music workstation.
The KROSS provides two types of recording functionality;
the sequencer and the audio recorder.
The sequencer records your performance as MIDI data.
After recording, you are free to edit your performance, the
control data, and even the instruments that are played.
Recording your performance as MIDI
Auto song setup
Auto song setup is a function that instantly sets up the
sequencer according to the program or combination, the
arpeggiator, and the Drum Track settings that you’re
using. Proceed as follows.
1. Execute auto song setup
After selecting a sound in Program mode or Combination
mode, press the REC () button; the setup confirmation
dialog box will appear.
Press the REC () button once again to execute the
function; the settings will be made, and you’ll be in the
record-standby condition.
2. Start recording, perform, and then stop
When you press the START/STOP ( ) button, you’ll
hear a two-measure pre-count; then recording will start.
Play along in time with the click.
When you’ve finished playing, press the START/STOP
( ) button once again to stop. You will
automatically return to the point where you started
recording (in this case, the beginning of the song).
3. Listen to the recorded performance
Press the START/STOP ( ) button and listen to the
performance.
Note: If you decide to re-record your performance, use the
Undo function in the function list; you’ll return to the state
prior to recording.
Automatically correcting the timing of the
notes (Quantize)
Quantize
Before
After
You can use the Quantize function to correct the timing of
the notes. In addition to aligning the notes to the correct
timing, you can also adjust the settings to add a sense of
swing by shifting the timing.
Let’s try applying the Quantize function to your recorded
performance.
that lets you record phrases and songs
1. Select the page
Access the S-TRACK EDIT > SELECT MEASURE TO
EDIT page.
Press the MENU button to access the PAGES menu.
Press the (PAGE+) or (PAGE-) button to select S-
TRACK EDIT. Press the OK (MENU) button; that page
will be selected.
2. Specify the track and the range of measures that you
want to quantize
Use the / cursor buttons to select the track, use the
/ buttons to select the measures, and use the value
dial to set the measures.
3. Select the Quantize function
Press the FUNCTION button.
Use the (PAGE+) or (PAGE-) button to select
Quantize, and then press the OK (MENU) button.
4. Specify the steps that you want to correct, and the
amount of correction you wish to apply
Use the Resolution parameter to specify the timing value
to which the notes will be aligned. It’s best to specify the
shortest note value that you actually played in the phrase.
Use the Int (Intensity) parameter to specify the amount of
correction. If you specify 100%, the notes will be
corrected all the way to exact steps of the specified
timing, but your performance may feel more mechanical.
5. Apply the Quantize function with the settings that you
made
Press the OK (MENU) button to quantize the selected
data. Play back to hear the result.
Note: If you want to return to the state prior to quantizing,
use the Undo function from the function list. (See “Pages
and functions” on page 9.)
Using a template song
Template songs are a convenient way to start creating a new
song. Templates are sets of sounds, effect settings, and
drum patterns; by recalling a suitable template you can
quickly get started creating a song. Proceed as follows.
Loading a template song
1. Select the Load Template Song function
In the SEQ > MAIN page, press the FUNCTION button.
Use the (PAGE+) or (PAGE-) button to select Load
Template Song, and then press the OK (MENU) button.
En-16
Page 17

EnglishFrançaisDeutschEspañol
Saving a song you created
Track Select
Measure Location
2. Select and load a template
Use the From parameter to specify the template that you
want to load.
When you press the OK (MENU) button, the set of
sounds and effects will be loaded into the song.
Note: If you want to create a rhythm track as well, select
the Copy Pattern to MIDI Track too? option.
Creating a rhythm track
If you selected Copy Pattern to MIDI Track too? in
step 2, the following dialog box will appear after you load
the template.
3. Select the drum pattern that you want to copy
Select a pattern and press the Copy (MENU) button; the
phrase of several measures will be copied from the
pattern to track 1. You can press the Copy (MENU)
button repeatedly to copy the phrase more times.
When you’ve finished copying the phrase, press the Exit
(FUNCTION) button.
Note: Since track 1 of the template is for drums, we
recommend that you copy the drum pattern phrase to
track 1.
Recording on tracks
1. Specify the recording method
In the SEQ > REC page, use Recording Setup to specify
the type of realtime recording. By default, this will be
Overwrite. Overwrite will overwrite the performance
data as you record.
2. Select the track that you want to record
In the SEQ > MAIN page, press the cursor button to
select Track Select, and use the cursor buttons / to
select a track.
Creating a new song
You’ll use the Create New Song function.
In the SEQ > MAIN page, choose the Create New Song
function (see “Pages and functions” on page 9); in the
settings dialog box use Set Length to specify the number of
measures, and then execute. (You can change the number of
measures later.)
Saving a song you
created
A song that you created can be saved on an SD card.
You can’t save songs to internal memory.
When you turn off the power, the data in the KROSS
will disappear.
Use an SD card that you formatted with the KROSS.
Never remove the SD card while the display indicates
“Scanning Media” after you’ve inserted a card.
About the saved data
Song data is saved as an .SNG file. This contains the
performance data and the sound (program) numbers.
It does not contain the data for the sound
programs themselves. (SNG: SoNG)
Sound data is saved as a .PCG file. To ensure that
the correct sound will be used for playback, we
recommend that you save the .SNG file and .PCG
file together. (PCG: Program/Combination/Global)
Saving the song and sounds
1. Select the page
In GLOBAL/MEDIA mode, select the MEDIA > FILE
page. You can move directly to the MEDIA page by
holding down the EXIT button and pressing the
GLOBAL/MEDIA button.
2. Selecting Save All function
Press the FUNCTION button. Use the (PAGE+) or
(PAGE-) button to select Save All, and then press the
OK (MENU) button.
3. Press the REC (
mode
) button to enter record-standby
4. Start recording, perform, and then stop
Refer to step 2 of “Auto song setup” on page 16.
5. Recording on other tracks
In the Track Select area, use the cursor buttons / to
select the track that you want to record (see step 2), and
proceed to record (see steps 3 and 4).
Note: If you want to change the location for recording or
playback, use the REW ( ) and FF ( ) buttons during
playback, or use the Measure Location area. By default, the
Locate ( ) button will return to the beginning (001:01:000).
3. Name the file, and save it
Press the OK (MENU) button to save the data.
Note: To assign a name to the file that is saved, press the
ENTER button and enter a name in the text window that
appears.
Saving a song
Select and execute the Save SEQ function. All the other
steps are the same. Refer to the preceding “Saving the song
and sounds.”
En-17
Page 18

Recording on the audio recorder
AUDIO
3b
2a
4
3a,
5
2b,
3a
Recording on the audio
recorder
The audio recorder lets you record your KROSS
performance and external audio input as audio data. You can
overdub, or re-record over the previous recording.
In order to use the audio recorder, you’ll need an SD
card that was formatted by the KROSS.
Never remove the SD card while the audio recorder is
recording or playing, or while the display indicates
“Scanning Media” after you’ve inserted a card.
Display and operations (Setup window)
You’ll perform audio recorder operations in the
setup window that appears when you press the
SETUP button.
Audio Take
Audio Song
Recording the performance of the
Status/TriggerTime Location Level Meter
Undo Stop/Reset Rec Control
Tip: There’s also a function that lets you start recording the
instant you begin playing the keyboard. (See “Specifying
how recording will start” of the Operation Guide)
4. Stop recording
Press the Stop/Reset [ ] (PAGE+) button. When you
stop, you’ll automatically return to the point where you
started recording.
Note: If you press the AUDIO RECORDER button
during recording, you’ll pause while remaining in the
record-standby state. If you stop by pressing the
Stop/Reset [ ] (PAGE+) button, you’ll also return to the
point where you started recording.
5. Listen to the recording
Press the AUDIO RECORDER button to play back
the recorded performance. If you stop by pressing the
Stop/Reset [ ] (PAGE+) button, you’ll return to the
point where you started playback.
Note: If you press the Stop/Reset [ ] (PAGE+) button
while stopped, you’ll return to the beginning of the audio
song.
Overdubbing
If you want to overdub, change the time location and the
sound as desired, and then repeat the above steps.
Note: If you want to change the volume of the overall sound,
it’s convenient to use the Hold Balance function. (See
page 15)
KROSS
If you want to record the sound of the KROSS, proceed as
follows.
Basic operation
1. Get ready to perform or play back (Select a sound or
song)
Select the sound (program or combination) or the
sequencer song that you want to play, and get ready to
perform or play back.
2. Prepare to record
Press the SETUP button to access the setup window.
Press the Rec Control [ ] (MENU) button to enter
the record-standby condition. (AUDIO RECORDER
button: blinking red)
3. Start recording
Press the Rec Control [ ] (MENU) button or the
AUDIO RECORDER button; recording will start.
(AUDIO RECORDER button: lit red)
Play the keyboard or use the Drum Track or sequencer;
the performance will be recorded.
Note: Even if you close the setup window, the recording
or standby condition of the recorder will be maintained.
Returning to the state before or after
recording (Undo/Redo)
If you decide to re-record, you can use Undo to return to the
state prior to recording. If you decide to cancel the Undo
operation, use the Redo operation.
1. Access the undo list
Press the UNDO (PAGE-) button.
2. Select the take to where you want to return, and use
the Undo function
From the takes that you’ve recorded, use the VALUE dial
to select the take to where you want to return; then press
the OK (MENU) button (the UNDO indication will
change). Play back to hear the result.
If you want to cancel an Undo operation (i.e., if you want
to Redo), specify the most recent take (the highestnumbered take) and press the OK (MENU) button.
Note: If you record from the state following Undo, the
subsequent takes will be erased, and Redo will no longer be
possible (the UNDO indication will return to its original
state).
En-18
Page 19

EnglishFrançaisDeutschEspañol
2a
,
3a
4
1a
1b
2b
,
3b
1c
Level Meter [MIC] Gain
Recording external audio input
If you want to record the sound of an external audio input
source, proceed as follows.
As an example, we will explain how to record from a mic.
1. Select a mic program
Recording from a mic will be easy if you use a program
whose input and effect settings have been set up
appropriately for a mic.
Press the PROG button to enter Program mode, then
select the “067: Mic & Reverb” from the DRUM/SFX
category. (This is located before the GM programs.)
2. Turn off the AUDIO IN button, and connect a mic
Turn the AUDIO IN button off (unlit). Turn the
VOLUME knob all the way to the left to lower
the volume. Then connect a dynamic mic to the
rear panel mic input (MIC IN) jack.
You must turn the AUDIO IN button off and use the
VOLUME knob to minimize the volume before you
connect a mic or any other device.
If you fail to observe this precaution, your speaker
system or other equipment might be damaged.
Note: Also use the MIC IN jack if you’re connecting an
electric guitar. If you’re connecting a guitar equipped
with passive pickups, we recommend that you connect a
preamp or effect unit between your guitar and the
KROSS.
3. Turn the AUDIO IN button on, and adjust the input
volume
Press the AUDIO IN button to turn it on (lit). The mic
input will be enabled. Turn the VOLUME knob back
toward its original position to adjust the volume
appropriately, and play the keyboard or play back the
audio recorder while you input audio from the mic to
check the volume balance.
If you need to adjust the mic volume, hold down the
EXIT button and press the AUDIO IN button to access
the AUDIO IN -QUICK SETTING dialog box, and then
adjust the Gain value.
Formatting an SD card
4. Make effect settings
In the mic program, the Reverb Hall effect etc.,
which applies reverberation to your vocal is
assigned to Master FX. If you want to turn off
FX
the effect, turn the MASTER FX button off.
5. Record
Verify that you’re at the appropriate time location for
recording, and record as described in step 2 and following
of “Basic operation.”
Creating a new audio song
You’ll use the Create New Audio Song function.
In the setup window, select Create New Audio Song (see
“Pages and functions” on page 9) and execute.
Formatting an SD card
Before a new SD card or an SD card that has been
used by another device can be used with the
KROSS, the card must be formatted by the
KROSS.
Formatting will erase all data that had been saved on the
SD card. Before you format a card, make sure that you
don’t mind losing any of the data that was on that card.
The SD card must be formatted on the KROSS. An SD
card that was formatted by a device other than the
KROSS might not be recognized correctly.
1. Insert the SD card
Correctly insert the SD card to be formatted into the SD
card slot. (See “Inserting/removing an SD card” on
page 6.)
2. Access the MEDIA > UTILITY page
As a shortcut, you can move directly to the MEDIA page
by holding down the EXIT button and pressing the
GLOBAL/MEDIA button. Use the PAGE+ button to
access the MEDIA > UTILITY page.
3. Select the Format function
Press the FUNCTION button. Use the (PAGE+) button
to select Format, and then press the OK (MENU) button.
Note: Ideally, the level meter should be moving in
approximately 70% of its full range. If the input is
overloaded, the [MIC] indicator will be highlighted.
When you’ve finished adjusting the volume, save the
setting. (See “Global audio input settings (G-SET) and
individual settings” of the Operation Guide)
4. Execute formatting
When you press the OK (MENU) button, a message will
ask you to confirm the format procedure. Press the OK
(MENU) button once again to execute formatting.
Never remove the SD card while formatting is in
progress.
If you decide not to format the card, press the CANCEL
(FUNCTION) button.
En-19
Page 20

Listening to the demo songs
Song Select
Listening to the demo songs
This procedure will load program and combination data
and demo song data into the KROSS. This means that
any data you’ve edited or newly created will be
overwritten and lost. If you want to keep this data, save
it on an SD card (commercially available) before you
continue.
1. In Global/Media mode, select the page that you want
to load
Press the GLOBAL/MEDIA button to enter Global
mode. Access the GLOBAL > BASIC page. (If
something other than the BASIC page is shown, press the
EXIT button several times.)
2. Load the demo songs and preload programs
Press the FUNCTION button. Use the (PAGE+) and
(PAGE-) button to select “Load Preload/Demo Data.”
Press the OK (MENU) button.
In the dialog box, set the Kind field to All (Preload PCG
and Demo Songs).
Press the OK (MENU) button. A confirmation message
will appear; press the OK (MENU) button once again.
The data will be loaded.
Never turn off the power while data is being loaded.
3. In Sequencer mode, select the playback page
Press the SEQ button to enter Sequencer mode.
Access the SEQ > MAIN page. (If something else is
shown, press the EXIT button several times.)
4. Select a demo song
Use Song Select to select a demo song. Use the cursor
buttons to select a parameter, and use the
VALUE dial to make your selection.
5. Start and stop playback
Press the START/STOP ( ) button to start
playback.
Playback will stop automatically when the song ends. If
you want to stop during the song, press the START/STOP
( ) button once again.
The demo songs you loaded will disappear when you
turn off the power, so you’ll need to reload them if
necessary.
Restoring the factory settings
Here’s how to restore the KROSS to the factory settings.
As described in steps 1 and 2 of “Listening to the demo
songs,” choose All Preload PCG in the Kind field of the
dialog box, and load the data.
Specifications (general)
System:
EDS-i (Enhanced Definition Synthesis - integrated)
Keyboard section:
KROSS-61: 61 keys (velocity sensitive; aftertouch not supported)
KROSS-88: NH (natural weighted hammer action)
keyboard (velocity sensitive; aftertouch not supported)
Maximum polyphony: 80 voices (80 oscillators)
Preset PCM memory:
Approximately 112 MB (calculated as 48 kHz / 16-bit linear
PCM data equivalent)
Sounds:
384 combinations (256 preload)
905 programs (512 preload / 265 preset)
Favorites: 64 (16 favorites × 4 banks)
Drum Kit: 57 Drum Kits (32 preload / 9 preset)
Effects: 134 types, 5 insert effects, 2 master effects
Production Tools:
Dual polyphonic arpeggiator, step sequencer, Drum Track
Recorder:
16-track MIDI sequencer,
Audio recorder (audio format: PCM audio format 48 kHz /
16-bit)
Control inputs/outputs:
DAMPER (half-damper supported), ASSIGNABLE
SWITCH, ASSIGNABLE PEDAL
MIDI IN, MIDI OUT, USB (TYPE B) USB-MIDI interface
Audio output:
AUDIO OUTPUT L/MONO, R: 1/4" phone jacks
(TS unbalanced)
Headphone output: 1/8" stereo mini phone jack
Audio input:
LINE IN: 1/8" stereo mini phone jack
MIC IN: 1/4" phone jack (TS unbalanced)
Phantom power and plug-in power are not supported
Power supply:
AC adapter power supply jack (DC 9V, )
AA alkaline batteries × 6, or nickel-metal hydride batteries × 6
Battery life:
AA alkaline batteries × 6: Approximately 4 hours
AA nickel-metal hydride batteries (1900 mAh) × 6:
Approximately 5 hours
* Battery life will vary depending on the batteries used and on
the conditions of use.
Usable SD cards:
SD memory cards up to 2 GB
SDHC memory cards up to 32 GB
(SDXC memory cards are not supported)
Dimensions (width × depth × height):
KROSS-61: 942 × 281 × 91 mm / 37.09" × 11.06" × 3.58"
KROSS-88: 1,448 × 383 × 135 mm / 57.01" × 15.08" × 5.31"
Weight:
KROSS-61: 4.3 kg/9.48 lbs
KROSS-88: 12.4 kg/27.34 lbs
Power consumption: 5 W
Included items:
AC adapter, KROSS Quick Start Guide (this document)
Options:
XVP-10: Expression/volume pedal
EXP-2: Foot controller
DS-1H: Damper pedal
PS-1, PS-3: Pedal switches
* Specifications and appearance of this product are subject to
change without notice for improvement.
En-20
Page 21

4015-2 Yanokuchi, Inagi-city, Tokyo 206-0812 Japan
© 2013 KORG INC.
IMPORTANT NOTICE TO CONSUMERS
Thisproducthasbeenmanufacturedaccordingtostrictspecificationsandvoltagerequirements
thatareapplicableinthecountryinwhichitisintendedthatthisproductshouldbeused.Ifyou
havepurchasedthisproductviatheinternet,throughmailorder,and/orviaatelephonesale,
youmustverifythatthisproductisintend
WARNING:Useofthisproductinanycountryotherthanthatforwhichitisintendedcouldbe
dangerousandcouldinvalidatethemanufacturer’sordistributor’swarranty.
Pleasealsoretainyourreceiptasproofofpurchaseotherwiseyourproductmaybedisqu
fromthemanufacturer’sordistributor’swarranty.
edtobeusedinthecountryinwhichyoureside.
alified
 Loading...