

Page 1

NETWORK
SETUP
Page 2

Page 3

1998 Konica Business Technologies, Inc. and Electronics for Imaging, Inc.
The software described in this publication is furnished under license and may only be used or copied in accordance with the terms of such license.
Patents: 5,666,436; 5,553,200; 5,543,940; 5,537,516; 5,517,334; 5,506,946;5,424,754; 5,343,311; 5,212,546; 4,941,038; 4,837,722; 4,500,919
Acknowledgments
Konica and KL-3015 Force Color Printing S ystem ar e trademarks of Konica Business T echnologies, I nc. Fiery, the Fiery logo, and Rip-While-Print
are trademarks registered in the U.S. Patent and Trademark Office. Fiery Driven, the Fiery Driven logo, Continuous Print, ColorWise, NetWise,
and VisualCal are trademarks of Electronics for Imaging, Inc.
All other brands and product names are trademarks or registered trademarks of their respective companies.
Web Site Address on the Internet
http://www.konicabt.com
http://www.efi.com
Disclaimer Notice
Konica Business Technologies, Inc.has made every effort to ensure that information in this manual is complete and accurate. However, constant
efforts are also being made to improve and update the product. Therefore, Konica Business Technologies, Inc. shall not be liable for errors in this
manual or for any consequential damages resulting from the use of this manual. Information contained herein is subject to change without notice.
This publication is protected by copyright, and all rights are reserved. No part of it may be reproduced or transmitted in any form or by any means
for any purpose without express prior written consent from Electronics for Imaging, Inc., except as expressly permitted herein. Information in this
document is subject to change without notice and does not represent a commitment on the part of Electronics for Imaging, Inc.
Restricted Rights Legends
For defense agencies: Restricted Rights Legend. Use, reproduction, or disclosure is subject to restrictions set forth in subparagraph (c)(1)(ii) of the
Rights in Technical Data and Computer Software clause at 252.227.7013.
For civilian agencies: Restricted Rights Legend. Use, reproduction, or disclosur e is subject to restrictions set forth in subparagraph (a) through (d) of
the commercial Computer Software Restricted Rights clause at 52.227-19 and the limitations set forth in Electronics for Imaging, Inc.’s standard
commercial agreement for this software. Unpublished rights reserved under the copyright laws of the United States.
Proprietary Rights
You ackno wledge that the Softwar e, Coded F ont P rograms, Typefaces, Trademarks and accompanying documentation are proprietary to Electronics
for Imaging and its suppliers and that title and other intellectual property rights therein remain with Electronics for Imaging and its suppliers. Except
as stated above, this Agreement does not grant you any right to patents, copyrights, trade secrets, trademarks (whether registered or unregistered), or
any other rights, franchises or licenses in respect of the Software, Coded Font Programs, Typefaces, Trademarks or accompanying documentation.
You may not adapt or use any trademar k or trade name which is likely to be similar to or confusing with that of Electronics for I maging or any of its
suppliers or take any other action which impairs or reduces the trademark rights of Electronics for Imaging or its suppliers. The trademar ks may only
be used to identify printed output produced by the Coded Font Programs. At the reasonable request of Electronics for Imaging, you must supply
samples of any Typeface identified with a trademark.
Confidentiality
You agr ee to hold the Softwar e and Coded F ont P rograms in confidence, disclosing the Softwar e and Coded F ont P rograms only to authorized users
having a need to use the Software and Coded Font Programs as permitted by this Agreement and to take all reasonable precautions to prevent
disclosure to other parties.
Remedies
Unauthorized use, copying or disclosure of the Software, Coded F ont P r ograms, Typefaces, Trademarks or accompanying documentation will result
in automatic termination of this license and will make available to Electronics for Imaging other legal remedies.
Page 4

Page 5

Contents
Preface
Features
ENERGY STAR compliance vii
The documentation
Conventions
Chapter 1: Using the Operation Panel
Operation panel functions
Activity lights 1-1
Buttons 1-2
Display window 1-3
Top-level menu
Chapter 2: Printer Setup
Main setup menus
Specifying system information
System Setup 2-2
Specifying printer information
Printer Setup 2-4
PostScript Setup 2-5
PCL Setup 2-5
vii
viii
viii
1-1
1-3
2-1
2-2
2-4
Specifying network information
I/O Port Setup 2-7
Ethernet Setup 2-7
Token Ring Setup 2-7
Parallel Port Setup 2-8
Specifying network protocol options
Network Protocol Setup 2-9
2-7
2-9
Page 6

vi Contents
Network Service Setup
NDS Setup 2-13
Bindery Setup 2-16
SMB Setup 2-18
Language Setup
Chapter 3: Printing From Applications
Printing
Chapter 4: Printing Pages From the Operation Panel
Printing a Test page
Printing additional pages
If you have difficulty printing
Chapter 5: Setting Up Fiery WebTools
Setting up Fiery Web Tools
2-12
2-19
3-1
4-1
4-2
4-3
5-1
Appendix A: Operation Panel Messages
Operation panel system messages
Index
A-1
Page 7

vii Features
Pref
ace
The Konica KL-3015™ Printing System delivers a dramatic new level of
performance in color printing. Combining EFI's Fiery print quality and
document processing power with Konica's advanced imaging technology, the
KL-3015 printer sets the standard for affordable, high-quality, table-top color
laser printers.
Features
Ideally suited to adding the power of color to everyday business document—
presentations, proposal, newsletters, manuals—the KL-3015 delivers.
• Fast 3 ppm full-color and 15 ppm monochrome print speed
• Superb 600 dpi x 600 dpi resolution
• RIP-While-Print® & Continuous Print™ technologies provide increased
throughput and faster processing time.
• High performance Fiery Driven controller with 133MHz MIPS processor
• Fiery WebTools network printer management software gives you the power to
control and manage your print jobs via the Internet or intranets.
ENERGY STAR compliance
To conserve energy the printer incorporates a power saver mode which can reduce
the total power consumption of the printer to less than 45 watts.
The International ENERGY STAR Office Equipment Program is a global
program that promotes energy saving through the use of computer and other
office equipment. The program backs the development and dissemination of
products with functions that effectively reduce energy consumption. It is an open
system in which businesses can participate voluntarily. The targeted products are
office equipment such as computers, monitors, printers, faxes, and copiers. Their
standards, and logos are uniform among participating nations.
The ENERGY STAR emblem does not represent United States EP A endorsement
of any product or service.
Page 8

viii The documentation
The documentation
This manual is part of a set of printed documentation for the printer that includes
the following:
•
Getting Started
manual also outlines routine maintenance procedures and explains how to
install printer accessories and supplies.
•
Network Setup
up the printer for parallel or network printing, and printing sample pages.
• The
User’s Manual
how to print from various computers and workstations, what you need to know
about using the printer in a networked environment, and how to use the
software provided. Notes on the effective use of color, fonts installed on your
printer, and hardware and software feature specifications are also included in
appendices.
provides an overview of the printer and how to operate it. This
provides instructions on using the printer operation panel setting
provides instructions on how to install the user software,
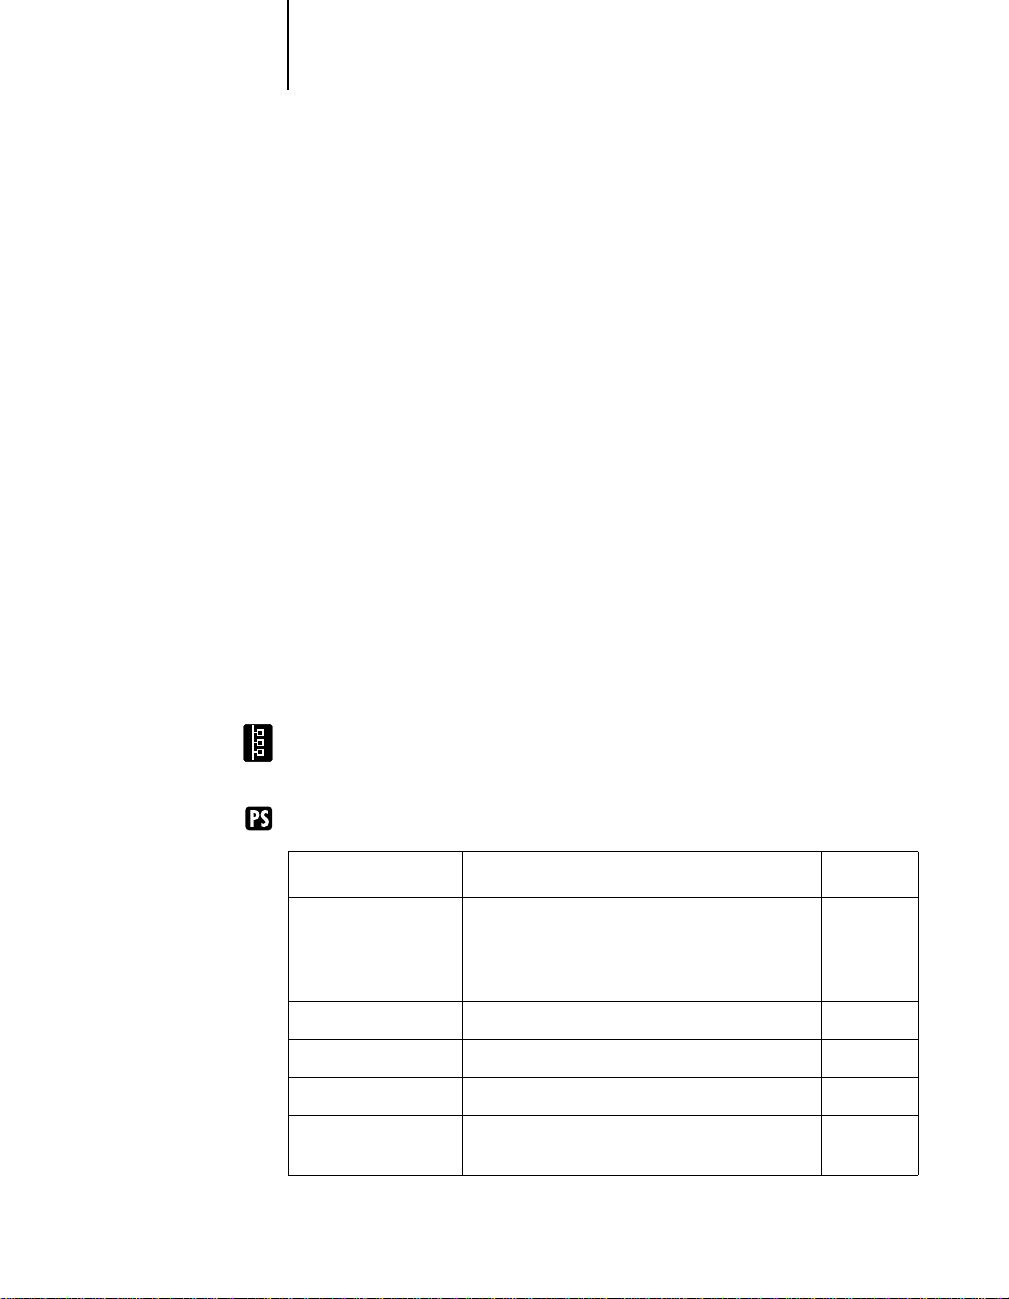
Conventions
The following icons are used in this manual:
Indicates features and functionality for which the PCL/PostScript ROM DIMM
option (PS-101) is required.
Indicates features and functionality for which 32MB of RAM is required.
32
Indicates features and functionality for which 32MB of RAM and a hard disk
3232
drive (HD-101) are required.
Indicates instructions for users working with networked printers.
Page 9
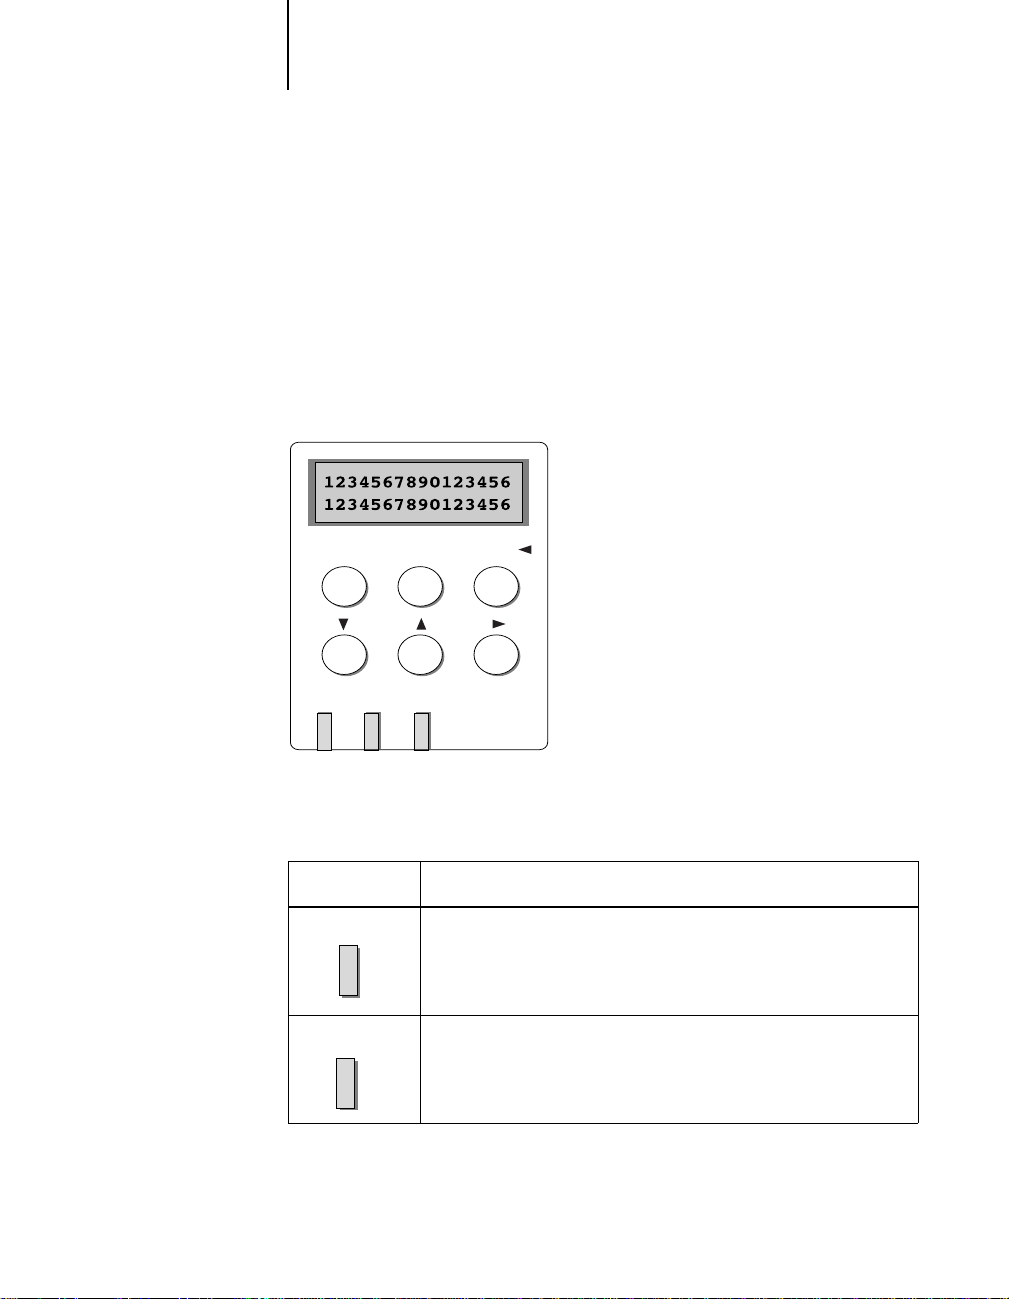
1-1 Operation panel functions
Chapter 1:
Using the
Operation
Panel
1
The operation panel on the front of the printer enables you to set options and
view the status of the printer and print jobs.
Operation panel functions
This chapter describes the functions of the operation panel, illustrated below:
Online
/Enter
Online
Data Attention
Activity lights
The activity lights indicate the status of the printer.
This light: Indicates:
Online
Data
Cancel/Menu
Online LED—Lit when the printer is on line (ready to accept and
process new jobs); flashing when the user attempts to switch to
offline while the printer is receiving data, processing data or printing
jobs, and off when the printer is offline or the power is off.
Data LED—Lit when processing data or data exists in the printer
buffer; flashing when receiving data; off when no data is in the
printer buffer, or the printer is not receiving or processing data.
Page 10
1-2 Using the Operation Panel
1
This light: Indicates:
Attention
Attention LED—Lit when the printer requires operator
intervention (for example, load paper or replace toner), flashing
when a critical error (for example, consumables need to be replaced
or paper is out) prevents printing. Off when the printer is
functioning normally.
Buttons
The operation panel’s buttons have the following meanings:
This button: Functions this way:
Online
/Menu
Menu
Cancel/
Online/Enter button—Accepts an option and advances to the next
choice. Switches between Online and Offline states.
Menu button—Cancels a setup choice and display a higher level
setup menu.
Exit/Cancel/Left arrow button—In setup menus, exits menus
entirely, returning to Ready. While printing, Cancel stops printing
or processing the current job.
Down arrow button—In setup menus, scrolls through the list of
menus or choices. When entering numbers or text, increments to
the next number or character. Hold down the button to increment
rapidly.
Up arrow button—In setup menus, scrolls through the list of menus
or choices. When entering numbers or text, decrements to the
previous number or character. Hold down the button to decrement
rapidly.
Page 11
1-3 Top-level menu
1
This button: Functions this way:
Right arrow button—When entering numbers or text, advances the
cursor.
Display window
The 2-line, 16-character LCD window on the operation panel displays printer
status messages.
Protecting the LCD display
Do not subject the printer to strong shocks. The printer has a liquid crystal
display (LCD) that is made of glass and can break. If the display window breaks
and the liquid crystal material leaks out, do not inhale, ingest, or touch it. If the
material gets on your skin or clothing, wash it off with soap and water
immediately.
Top-level menu
When the printer is not processing or printing a job, the LCD displays
POWER SAVER MODE
When you do so, you will cycle through these choices.
At this screen: Press Online/Enter:
CHECK AND PRINT
PRINT PAGES FROM LIST
CONSUMABLES
RESETS
. To view the top-level menu choices, press the Menu button.
After you check one copy, prints remaining copies or
processed jobs stored on the printer disk. For details,
see “Check and Print” on page 1-46 of the
Manual
.
Displays the printer’s resident pages. For details, see
Chapter 4.
Displays instructions for replacing consumables, such
as toner. For details, see
Clear all jobs, format the hard disk drive (if the
HD-101 option is installed), and reset other default
settings.
Getting Started
.
READY
User’s
or
Page 12

1-4 Using the Operation Panel
1
At this screen: Press Online/Enter:
SYSTEM SETUP
NETWORK SERVICES SETUP
PANEL LANGUAGE
to
Advances you to the first option on the menu.
The Setup menus enable you to specify information
about the printer. For complete Setup menus, see
Chapter 2.
Choose the language for the operation panel and the
resident pages.
This version of printer software may not
N
OTE
:
support
PANEL LANGUAGE
selection.
Page 13
2-1 Main setup menus
2
Chapter 2:
Printer
Setup
This chapter describes how to set up the printer using the operation panel. It
describes setting up the printer for parallel printing, and it also describes how to
set up the printer for use over a network.
To set up the printer, turn on the printer and press the Menu button when the
message
through the list of setup menus, use the Menu button. To view submenu options
use the up and down arrow buttons. To accept a selection press Enter.
Before you change the setup, it’s a good idea to print the current printer
configuration, in case you need to restore the original settings later. For
information on printing a Configuration page and other information pages, see
“Printing additional pages” on page 4-2.
READY
or
POWER SAVER MODE
appears in the display window. To advance
Main setup menus
The following table lists the main setup menus and their functions.
NETWORK PROTOCOL SETUP
networked printers.
PS SETUP
appears only if you have the PS-101 option installed.
and
NETWORK SERVICE SETUP
appear only for
Choose: To do this: See also:
SYSTEM SETUP
PRINTER SETUP
PCL SETUP
PS SETUP
I/O PORT SETUP
Specify system settings for the printer. Set or
change the administrator password.This
password is used to limit access to the Setup
menus.
Specify printer settings for the printer. page 2-4
Specify PCL settings for the printer. page 2-5
Specify PostScript settings for the printer. page 2-5
Specify settings for the network connections to
the printer.
page 2-2
page 2-7
Page 14
2-2 Printer Setup
2
Choose: To do this: See also:
NETWORK PROTOCOL
SETUP
NETWORK SERVICE
SETUP
PANEL LANGUAGE
Specify settings for the network protocols. page 2-9
Specify settings for network servers. page 2-12
Specify the language used by operation panel. page 2-19
Specifying system information
System Setup
The System Setup menus enable you to specify information about the printer.
(Default values, where applicable, are shown in square brackets.)
SYSTEM SETUP
To advance to the
KL-3015
Use this option to give the printer a name. The printer name can be up to 16
characters
PRINT START PAGE
YES/[NO]
PRINTER NAME
screen, press Online/Enter.
Use this option to specify whether a Start page is printed when the printer restarts
to verify that it is working properly. The Start page contains such information as:
printer name, enabled network protocols, amount of memory installed, and
options installed on the printer.
The following two options are available only on disk based systems. The
32
32
WebSpooler is available only on disk based systems with a minimum of 32MB
of memory.
Page 15

2-3 Specifying system information
2
PUBLISH PRINTED Q
YES/NO [NO]
Use this option to enable users to print to the Printed queues. The Printed queue
is a storage area that stores the most recently printed jobs, making it convenient to
reprint those jobs.
JOBS TO SAVE
1-99 [10]
This option appears only if
specify the number of jobs to be stored in the Printed Queue.
POWER SAVER (M)
10 SEC/ 30 MIN/ 1 HOUR/ 2 HOURS [30 MIN]
Use this option to select the length of time during which there is no printer
activity before the KL-3015 switches to Power Saver mode. Full power mode is
automatically restored when the printer receives a network print job or any button
on the operation panel is pressed.
CHANGE PASSWORD
YES/NO [NO]
Use this option to set or change the administrator password for the printer. In
most cases, only the system administrator should have access to this password.
When you select
the new password.
NEW PASSWORD
To enter a new password use the up arrow button to scroll through characters and
the right arrow button to move from character to character. The password can be
any combination of letters and numbers up to 16 characters. When you are
finished, press the Online/Enter button. You are then prompted to enter the new
password again to verify that you entered it correctly.
YES
ENABLE PRINTED Q
in the Change Password screen, you are prompted to enter
is set to
YES
. Use this option to
VERIFY PASSWORD
To verify a new or existing password, you must enter the password again. If you
make a mistake, you will be prompted to enter the password again.
Page 16

2-4 Printer Setup
2
Specifying printer information
Printer Setup
The Printer Setup menus are used to set the printer’s page description language
(PDL), paper size, and in some models, to specify the ability to print using low
toner. (Default values, where applicable, appear in square brackets.)
PRINTER SETUP
To advance to the PAGE DESC LANG screen, press Online/Enter.
PAGE DESC LANG
PS/PCL/AUTO [AUTO]
Use this option to select a default page description language for your printer. If
you select AUTO, the printer will automatically detect and interpret the page
description language used by the file. If the PS-101 option is not installed, this
option does not appear in the menu.
DEFAULT PAPER SIZE
LETTER/A4
Use this option to specify the default paper size to print on. Information pages
from the PRINT PAGES menu (Menu Help, Configuration page, PS or PCL Fonts
List, and Test page) are printed on the default paper size, either LETTER or A4.
NOTE: If you select a page size not supported by the paper tray specified in the
driver a message will appear on the LCD requesting you to load the correct tray.
TONER LOW
CONTINUE/STOP [STOP]
Use this option to specify the behavior of the printer when toner in a cartridge is
low. Select CONTINUE to print even when toner is low; select STOP to stop printing
when the toner is low. If stop is selected and a print job is sent while toner is low,
the printer goes offline and waits until the Online/Enter button is pressed. When
the toner has been replaced and the Online/Enter button is pressed, the job is
printed.
NOTE: The Toner Low option is available only in some models. If you select
CONTINUE is selected and your printer does not support this option, the printer
behaves as if STOP was selected.
Page 17

2-5 Specifying printer information
2
PostScript Setup
The PostScript setup menus enable you to set Postscript printing options.
(Default values, where applicable, appear in square brackets.)
NOTE: The following screens appear only if the PS-101 option is installed.
PS SETUP
To advance to the PRINT TO PS ERR screen, press Online/Enter.
PRINT TO PS ERR
YES/NO [NO]
Use this option to specify whether the portion of a print job processed before
encountering a PostScript error is printed. Select YES to print the portion of the
job that was processed and a description of the PostScript error, which may help
you troubleshoot the error; select NO to cancel printing when a PostScript error is
encountered.
COVER PAGE
ON/OFF [OFF]
Use this option to specify whether a Cover (job summary) page will be printed at
the end of each print job. Select ON to print a page with the name of the user who
sent the job, the document name, the number of pages printed, and the status of
the job.
If a PostScript error occurr ed and
be printed on the Cover page, along with the job status.
PCL Setup
The PCL Setup menus enable you to set PCL printing options. (Default values,
where applicable, appear in square brackets.)
NOTE: PCL is available only when printing from IBM PC or compatible
computers.
PCL SETUP
To advance to the DEF ORIENTATION screen, press Online/Enter.
PRINT TO ERR is set to YES, the error message will
Page 18

2-6 Printer Setup
2
DEF ORIENTATION
LANDSCAPE/PORTRAIT [PORTRAIT]
Use this option to specify the orientation of the print job on the paper. Select
PORTRAIT to print horizontally on the page; LANDSCAPE to print vertically.
FORM LENGTH
5-128 [60 LINES]
Use this option to specify the number of lines of text per page to print.
NOTE: This setting applies on a per job basis.
FONT NUMBER
0-46 [0]
Use this option to specify which PCL font to print. For a complete list of av ailable
PCL fonts and their corresponding font numbers see “PCL printer fonts” on
page B-1 of the User’s Manual.
NOTE: This setting applies on a per job basis.
PITCH (CHAR/IN)
44-99.99 [10.00]
Use this option to specify the pitch, or number of fixed space, PCL characters per
horizontal inch to print.
NOTE: This setting applies on a per job basis.
FONT SIZE (PT)
4.0-999.75 [12.00]
Use this option to specify the point size of the font to print.
NOTE: This setting applies on a per job basis.
SYMBOL SET
ISO-4, ISO-6, ISO-11, ISO-15, ISO-17, ISO-21, ISO-60, ISO-69, PC-8, PWIN 30, ROMAN8, WIN-L1, WIN-L2, WIN-L5, DESKTOP, PS TEXT, PCLLEGAL [PC-8]
Use this option to specify the PCL Symbol set to print. A symbol set is a specific
set of symbols provided by a font. In general, each set is designed with a unique
application in mind. The PC-8 symbol set, for example, was designed to support
US IBM PC applications.
NOTE: This setting applies on a per job basis.
Page 19

2-7 Specifying network information
2
Specifying network information
I/O Port Setup
The I/O Port Setup menus allow you to specify and set up network port type,
including: Ethernet (if the EC-101option is installed), Token Ring (if the TR-101
option is installed), or parallel port.
I/O PORT
SETUP
To advance to the next screen, press Online/Enter.
NOTE: Ethernet options appear only if the EC-101 option is installed.
Ethernet Setup
ENABLE ETHERNET
OFF/ON [ON]
Select YES to enable Ethernet network communication.
ETHERNET SPEED
1O TWISTED PAIR/ 10 AUI/ 10 AUTO/ 100 [AUTO DETECT]
Select AUTODETECT to automatically detect the speed at which data can be
transferred over the Ethernet network, or optionally specify the speed of your
Ethernet network.
Token Ring Setup
NOTE: Token Ring options appear only if the TR-101 option is installed.
TOKEN RING
YES/NO [NO]
Select YES to enable Token Ring network communication.
Page 20

2-8 Printer Setup
2
TR SPEED
4 MBPS/16 MBPS [AUTO]
Select AUTO to automatically detect the speed at which data can be transferred over
the Token Ring network, or optionally specify the speed of your Token Ring
network.
MAX. FRAME SIZE
0.5K, 1K, 2K, 4K [4K]
Use the arrow buttons to select a maximum frame size for Token Ring
communication.
NOTE: The Token Ring frame size must be no greater than the frame size used by
any router or Novell file server on the network.
SOURCE ROUTING
YES/NO [NO]
Select YES to allow the packet to travel to its destination through routers on the
network. The packet’s source dictates the route that the packet will take.
REQ ALL ROUTE
YES/NO [NO]
If source routing is enabled, select YES to allow all routers on the network to
broadcast the presence of the printer, enabling packets from clients on the
network to travel to the printer by any route.
RESP ALL ROUTE
YES/NO [NO]
If source routing is enabled, select YES to allow all routers on the network to
broadcast the presence of clients to the printer, enabling packets from clients on
the network to travel to the printer by any route.
Parallel Port Setup
In addition to receiving print jobs over Ethernet or Token Ring, the printer can
receive print jobs from a computer through its high speed parallel port. If no
network card is installed, the printer is connected to a computer via the parallel
port.
Page 21

2-9 Specifying network protocol options
2
PARALLEL PORT
OFF/ON [ON]
Use this option to enable printing through the parallel port.
TIMEOUT (SEC)
5-300 [30]
If parallel printing is enabled, use this option to specify how long the printer waits
without receiving data from the parallel port before deciding that the current job
is complete. During the timeout, the printer cannot receive new jobs through the
parallel port, but it continues to receive network print jobs.
IGNORE EOF
YES/NO [YES]
This option appears only if PARALLEL PORT is set to ON. Use this option to specify
that the printer should ignore end-of-file (EOF) messages in a file. To print
PostScript files in binary format (not ASCII), this option must be set to YES.
When this option is set to YES, the printer uses the value you entered for the
parallel port timeout to determine when it has reached the end of the file.
Specifying network protocol options
Network Protocol Setup
Network Protocol Setup options are used to specify and setup TCP/IP Ethernet,
TCP/IP Token Ring, AppleTalk, and IPX (Novell) network protocols.
TCP/IP Setup
TCP/IP-ETHERNET
YES/ NO [NO]
Select YES if you have a TCP/IP network connected to the printer over Ethernet
cabling.
ETH-IP ADDRESS
[127.0.0.1]
Use the arrow buttons to assign the printer an Ethernet IP address. Press Enter/
Online to accept your selection.
Page 22

2-10 Printer Setup
2
ETH-SUBNET MASK
[255.255.255.0]
Use this option to modify the subnet mask for printing with TCP/IP over
Ethernet.
If some, but not all users are able to print to the printer using TCP/IP, you may
have to set the printer’s subnet mask. Use the default setting, or see your system
administrator for this value.
TCP/IP-TOKEN R
YES/NO [NO]
Select YES if you have TCP/IP network connected to the printer over Token Ring
cabling.
TR IP ADDRESS
[127.0.0.1]
Use the arrow buttons to assign the printer a Token Ring IP address. Press Enter/
Online to accept your selection.
TR SUBNET MASK
[255.255.255.0]
Use this option to modify the subnet mask for printing with TCP/IP over Token
Ring.
If some, but not all users are able to print to the printer using TCP/IP, you may
have to set the printer’s subnet mask.Use the default setting, or see your system
administrator for this value.
NOTE: The following option appears if TCP/IP ETHERNET or TCP/IP TOKEN RING is
enabled.
GATEWAY ADDRESS
[127.0.0.1]
Use this option to specify the gateway address for printing with TCP/IP. By
default, no gateway address is set. If your TCP/IP network has a gateway and
you plan to print using TCP/IP, you must enter the gateway address.
Page 23

2-11 Specifying network protocol options
2
Appletalk Setup
ENABLE APPLETALK
YES/NO [NO]
Select YES if you have an AppleTalk network connected to the printer. You can
enable AppleTalk, TCP/IP, and IPX (Novell) communication simultaneously.
NOTE: The following option is displayed only if ENABLE APPLETALK is set to YES.
APPLETALK ZONE
Use the arrow buttons to scroll through the list to select the AppleTalk zone in
which you want the printer to appear. If you do not select a zone, the printer is
assigned to the default AppleTalk zone. If your network does not have zones, this
option does not appear.
ENABLE NOVELL
YES/NO [NO]
Select YES if you have an IPX (Novell) network connected to the printer. You can
enable AppleTalk, TCP/IP, and IPX (Novell) communication simultaneously.
The following seven options appear only if you selected YES for ENABLE NOVELL. If
you select NO, pressing Online/Enter returns you to the Network Protocol setup
screen.
NOTE: On the LCD and in this descriptive text, the terms IPX, IPX (Novell), and
NetWare are used somewhat interchangeably. In fact, IPX refers to the network
protocol, NetWare to the network operating system software that uses IPX
protocols; Novell has created and trademarked this network operating system.
NOVELL FRAME
TYPES:
Select the Ethernet frame type used for communication between your NetWare
file server (or NetWare file servers if you connect to more than one) and the
printer.
NOTE: Ethernet frame type screens appear only if the EC-101 option is installed,
and the Ethernet port is enabled.
ETHERNET 802.2
YES/NO [NO]
Select YES to enable Ethernet 802.2.
Page 24

2-12 Printer Setup
2
ETHERNET 802.3
YES/NO [NO]
Select YES to enable Ethernet 802.3.
ETHERNET II
YES/NO [NO]
Select YES to enable Ethernet II.
ETHERNET SNAP
YES/NO [NO]
Select YES to enable Ethernet SNAP.
NOTE: Token Ring frame type screens appear if the TR-101 option is installed and
the Token Ring port is enabled.
TOKEN RING 802.2
YES/NO [NO]
Select YES to enable Token Ring 802.2.
TOKEN RING SNAP
YES/NO [NO]
Select YES to enable Token Ring SNAP.
Network Service Setup
The Network Service Setup menus allow you to establish network services for
your printer.
NETWORK SERVICE SETUP
To advance to the ENABLE PSERVER screen, press Online/Enter.
ENABLE PSERVER
YES/NO [NO]
Select YES if you have a Novell network connected to the printer and if you have
already configured a NetWare printer , a print server, and one or more print queue
objects for print jobs. Pserver allows you to enter the names of the Novell objects
that are concerned with the print jobs.
Page 25

2-13 Network Service Setup
2
Pserver is a program on the printer that services all the Novell print queues that
are assigned to this printer. If you select Yes to enable Pserver, you can proceed to
set up NetWare Directory services (NDS) and/or Bindery services.
NDS Setup
ENABLE NDS
YES/NO [NO]
NetWare Directory Services (NDS) is used with Netware 4.x. Select YES to enable
NDS.
NOTE: The following screen appears only if earlier NDS settings exist.
CHANGE SETTINGS?
YES/NO [NO]
Select YES to view a list of NDS trees.
NDS TREE
Use the up and down arrows to select a tree from the NDS tree list and press
Online/Enter. If you select a tree for which earlier NDS settings exist, the
following alert screen appears:
NEW TREE DELETES BINDRY SETUP!
This alert message warns you that the Bindery setup for the tree you selected will
be deleted.
DELETE BIND SETUP?
YES/NO [NO]
Select YES if you wish to delete the Bindery setup for the previously selected tree.
LOGIN TO BROWSE?
YES/NO [NO]
Select YES to find the file server on the NDS tree you wish to login to.
FIND LOGIN
OBJECT
Use the up and down arrows to scroll through options. To display path of the
selected object, press Online/Enter.
Page 26

2-14 Printer Setup
2
CURRENT PATH
The current path of the previously selected object appears in the top line of the
LCD display. The first item in the scrollable Object list appears in the second line.
Use the arrow buttons to browse the NDS objects listed in the display.
The ‘..’ option moves you up one level on the tree; the ‘.’ option selects the same
level on the tree. From any screen, press Enter to accept an object, or Menu to
escape.
LOGIN OBJECT:
Use the up and down arrow buttons to select a login name. To accept an option,
press Enter.
ENTER PASSWORD
Use the arrow buttons to enter the password. Press Enter to accept the password.
BROWSE TREE TO
PRINT SERVER
To advance to the NDS TREE NAME OBJECT LIST screen, Press Enter.
NDS TREE NAME
The NDS tree name appears in the top line of the LCD display. The first item in
the scrollable object list appears in the second line. Use the arrow buttons to
browse the NDS objects listed in the display. Press Enter to accept an object.
CURRENT PATH
The current path of the previously selected object appears in the top line of the
LCD display. The first item in the scrollable object list appears in the second line.
Use the arrow buttons to browse the NDS objects listed in the display.
After choosing an object, press Enter to display the print server name. To display
another browse window, select the ‘.’ option (the same level on the tree), and press
Enter.
PRINT SERVER
Use the up down arrow buttons to scroll thr ough the list of available print servers.
After selecting a server, press Enter. If the print server login requires a password,
the ENTER PASSWORD screen appears. If a password is not required, the PRINT Q
SEARCH
screen appears.
Page 27

2-15 Network Service Setup
2
ENTER PASSWORD
Use the arrow buttons to enter the password. Press Enter to accept the password.
PRINT Q SEARCH
ENTIRE NDS TREE
Use the up and down arrow buttons to scroll thr ough menu options. With EN TIR E
NDS TREE
Subtree selected, press Online/Enter to display the BROWSE TO PRINT Q SUBTREE
ROOT
BROWSE TO PRINT
Q SUBTREE ROOT
To advance to the NDS TREE NAME BROWSE screen, press Online/Enter.
NDS TREE NAME
The NDS Tree name appears in the top line of the LCD display. The first item in
the scrollable object list appears in the second line. Use the arrow buttons to
browse the NDS objects listed in the display.
selected, press Online/Enter to display the ENABLE BIND ERY scr een. With
screen.
The ‘..’ option places you one level higher on the tree; the ‘.’ option selects the
same level on the tree. From any scr een, press Online/Enter to accept an object, or
Menu to escape.
CURRENT PATH
The current path of the previously selected object appears in the top line of the
LCD display. The first item in the scrollable object list appears in the second line.
Use the arrow buttons to browse the NDS objects listed in the display.
After choosing an object, press Online/Enter to display PRINT Q ROOT. To display
another browse window, select the ‘.’ option (the same level on the tree), and press
Enter.
PRINT Q ROOT:
Use the up and down arrow buttons to scroll through menu options. After
choosing an object, press Online/Enter.
Page 28

2-16 Printer Setup
2
Bindery Setup
The following screens are used for Bindery setup. Be sure that the printer is
connected to the network and that you have already configured one or more
NetWare 3.x file servers with a print server and a print queue for print jobs. You
can also configure Netware 4.x servers to run in Bindery emulation mode, but you
cannot add a 4.x server running in emulation mode that is on the tree you selected
in NDS Setup.
The NetWare server must be running. You need a login name, and a password, if
one has been set.
ENABLE BINDERY
YES/NO [NO]
Use this option to enable bindery emulation mode.
NOTE: The following two screens appear only if earlier Bindery settings exist.
BINDERY SETTINGS
VIEW/CHANGE/SKIP/REMOVE FSERVER [VIEW]
Use the up and down arrow buttons to scroll through menu options. Select VIEW
to display a list of servers connected to the network. Select CHANGE to display a list
of all available servers. Select REMOVE to display a list of connected servers that you
can disconnect. Select SKIP to advance to the POLLING INT. screen.
CONNECTED SERVRS
Use the up and down arrow buttons to scroll thr ough the connected servers. After
selecting a server, press Online/Enter.
REMOVE FSERVER
Use the up and down arrow buttons to scroll thr ough the connected servers. After
selecting a server to remove, press Online/Enter.
AVAILABLE SERVERS
Use the up and down arrow buttons to scroll thr ough a list of all av ailable servers.
After selecting a server, press Online/Enter. If a password is required to login to
the server, the FILE SERVER LOGIN screen is displayed.
Page 29

2-17 Network Service Setup
2
FILE SERVR LOGIN
Use the up and down arrow buttons to scroll through options: Supervisor,
Administrator, or Enter Login Name. Press Online/Enter to accept an option.
ENTER LOGIN NAME
This screen is displayed only if Enter Login Name is selected as file server login.
Use the arrow buttons to enter the login name. P ress E nter to accept the password.
FSERVER PASSWORD
Use the arrow buttons to enter the password.
PRINT SERVER
Use the up and down arrow buttons to scroll through the list of print servers.
After selecting a print server, press Online/Enter. If a password is required to
login, the PSERVER PASSWORD screen is displayed.
PSERVER PASSWORD
Use the arrow buttons to enter the password. Press Online/Enter to accept the
password. If fewer than eight file servers are connected, the Another FS screen is
displayed. If the maximum number of file servers are connected, the POLLING INT
screen is displayed.
ANOTHER FS?
YES/NO [YES]
Select YES to redisplay a list of available servers. Select NO to display the POLLING
INT
screen.
Polling interval
POLL INT (SEC)
1-999 [15]
Use the up and down arrow buttons to specify the interval, in seconds, at which
the printer communicates with the Novell server. If you specify 0, the printer polls
the server as frequently as possible for your network configuration.
NOTE: If you select a short interval, the amount of network traffic increases; this
may slow down other network jobs.
Page 30

2-18 Printer Setup
2
SMB Setup
Server Message Block (SMB) is a point to point, file sharing and printing
protocol, and the default printing method of most Windows applications. SMB
runs on top of TCP/IP and does not require IPX. When file and printer sharing
for Microsoft clients is enabled, SMB can be run on Windows 3.x, Windows 95,
and Windows NT.
For information on setting up SMB printing from your computer, see “Setting up
SMB printing” on page 1-26.
ENABLE SMB
YES/NO [YES]
Use this option to enable network communication using SMB.
USE NAME SERVR?
YES/NO [NO]
Select YES to designate a specific WINS (Windows Internet Name Server) server as
an SMB server. You will then be prompted to enter this server’s IP address.
IP ADDRESS
[127.0.0.1]
Use the arrow buttons to enter the IP address of the WINS server you wish to use.
SMB SERVER
Use the arrow buttons to enter a name for the printer (SMB server).
SERVER COMMENT
Use the arrow buttons to enter a comment about the printer (SMB server). This
name will identify the printer in the Windows Network Neighborhood. For
example, “Production use only.” Once set, this comment will appear in the second
line of the LCD when the SERVER COMMENT screen is displayed. When the printer
is selected on a client machine, the server comment will appear under the Details
section of the Server information window.
DOMAIN NAME
Use the arrow buttons to enter the domain name or workgroup of the printer
(SMB server).
Page 31

2-19 Language Setup
2
Language Setup
The Language Setup menus are used to select a language for the operation panel.
NOTE: This version of printer softwar e may not support P AN EL LAN GUAG E selection.
PANEL LANGUAGE
Press Online/Enter to advance to the panel language screen.
SELECT
ENGLISH, FRENCH, ITALIAN, GERMAN, SPANISH [ENGLISH]
Select a language for the operation panel.
Page 32

Page 33

3-1 Printing
3
Chapter 3:
Printing From
Applications
This chapter describes how to print a file from an application.
Printing
Once you have set up your printer to accept print jobs, installed the appropriate
PCL or PostScript printer driver on your computer, and specified the KL-3015 as
your default printer, y ou can print to the KL-3015. F rom within your application,
choose Print Setup from the file menu to specify printing to the KL-3015. When
you are ready to print, choose Print from your application’s File menu.
On computers running Windows 3.1, to select job-specific print options click the
Setup button in the application’s Print dialog box, and then click the Options
button in the Print Setup dialog box.
On computers running Windows 95 or Windows NT 4.0, to select job-specific
print options click the Printer Properties button in the application’s Print dialog
box.
On Macintosh computers, select job-specific print options directly from the Print
dialog box. When you use the Adobe PostScript driver, you can save the settings
you have selected for you print job by clicking the Save Settings button in the
Print dialog box. Saved settings will be applied to subsequent print jobs until
those settings are changed.
For information on installing the appropriate driver for your system and setting
up the environment for parallel printing with the KL-3015, see the User’ s Manual.
That manual also describes how to install and set up networking software for all
supported network types, how to connect to the printer over the network, and
how to install the KL-3015 user software.
Page 34

3-2 Printing From Applications
3
For information on custom print options you can specify for your print job, see
“KL-3015 print options for Windows” on page 1-46 of the User’s Manual.
For information on using color in printed documents, see the “Color Notes”
chapter in the User’s Manual
Page 35

4-1 Printing a Test page
4
Chapter 4:
Printing
Pages From
the Operation
Panel
There are several pages that you can print from the operation panel.
Printing a Test page
This section contains instructions for printing a Test page, and the next section
contains instructions for printing additional pages.
Page Description
Menu Help A one-page overview of the screens you can access from the
operation panel. Note that a detailed Menu Help map in
PostScript format is also available on the User Software CD.
Configuration Gives the current device configuration and lists the selected
options for all Setup menus.
PCL Font List A list of PCL fonts resident on the printer.
PS Font List
Test page Enables you to confirm that the printer is properly connected. It
A list of PS fonts resident on the printer.
PS FONT LIST appears in the list of information pages only if
the PS-101 option is installed.
also includes samples of color so you can troubleshoot printing
problems. The Test page contains such information as: printer
name, enabled network protocols, amount of memory installed,
and options installed on the printer.
You can print a Test page before you set up the KL-3015. You can also print a Test
page at other times, from the READY or the POWER SAVER MODE screen.
TO PRINT A TEST PAGE:
1. Turn on the printer and allow it to warm up.
Messages appear on the operation panel as the KL-3015 printer runs through its
power-up tests.
Page 36

4-2 Printing Pages From the Operation Panel
4
2. From the Ready screen, press the Menu button on the operation panel twice.
3. Press the Online/Enter button to display a list of available pages.
4. Press the up and down arrow b uttons until you see “TEST P A GE” in the window and
5. Examine the quality of the Test page.
The PRINT PAGES FROM LIST screen is displayed.
press the Online/Enter button.
The KL-3015 prints a Test page.
The Test page includes a color sample as well as the printer’s name, enabled
network protocols, memory configurations and installed options.
Printing additional pages
In addition to a Test page, you can also print a Menu Help page, Configuration
page, and Font list.
The Configuration page lists information about the printer, the setup, and the
number of printer fonts. It’s a good idea to print a Configuration page before you
make setup changes, in case you need to restore some settings later.
TO PRINT A CONFIGURATION PAGE OR ADDITIONAL PAGES:
1. From the Ready screen, press the Menu button on the operation panel twice.
The PRINT PAGES FROM LIST screen is displayed.
2. Press the Online/Enter button to display a list of available pages.
3. Press the arrow buttons until you see “CONFIGURATION PAGE” in the window and
press the Online/Enter button.
The KL-3015 prints a Configuration page.
4. Alternatively, press the arrow buttons to display the name of the page to print.
5. Press the Online/Enter button.
The KL-3015 prints the page you selected.
Page 37

4-3 If you have difficulty printing
4
If you have difficulty printing
If you have difficulty printing, check the printer status, take necessary actions
according to the table below, and try printing again.
Printer status Possible causes Action
None of the operation
panel lights are on, and
nothing appears in the
LCD.
The Data light neither
blinks nor stays on
constantly (it stays off)
when a print job is sent
over the network or the
parallel connection.
For a complete list of error messages and their explanations, see “Getting Started”.
The power switch has not
been turned on.
The power cord is not
securely attached.
There is no power going to
the electrical outlet itself.
The interface cable is not
connected properly.
Either the printer driver is
not installed, or the
computer has not been
correctly set up.
Check the power switch.
For more information, see
Getting Started.
Check the power cord. For
more information, see
Getting Started.
Check and see if the outlet is
turned on.
Make sure the network or
parallel cable connector is
properly attached. For more
information, see Getting
Started.
Check the settings on the
host computer. For more
information, see Getting
Started.
Page 38

Page 39

5-1 Setting up Fiery Web Tools
5
Chapter 5:
Setting Up
Fiery
WebTools
TO SET UP FIERY WEBTOOLS ON THE KL-3015:
Fiery WebT ools allo w you to manage your KL-3015 remotely from the I nternet or
from your company’s intranet. The KL-3015 has its own home page, from which
you are able to select from a variety of functions including Web Status,
W ebSpooler, WebLink, Web Downloader and Web Setup.
For information on using Fiery WebTools, see the User’s Manual.
Setting up Fiery Web Tools
In order for network users to access and use Fiery WebTools, you need to set
certain options in I/O Port Setup and Printer Setup on the KL-3015 operation
panel. You also need to prepare each user’s workstation to communicate with the
KL-3015 over the Internet or intranet.
Instructions below apply to IBM PC and Macintosh compatible computers using
Token Ring or Ethernet protocols.
1. From the Ready screen, press the Menu button on the operation panel to access
the printer setup menus.
2. Press the up and down arrow buttons until you see NETWORK PROTOCOL SETUP on
the LCD and press the Online/Enter button to access the TCP/IP screens.
In the next step you will enable TCP/IP network communication according to
your network type. If a Token Ring card is installed on your printer, you will
enable Token Ring communication; if an Ethernet card is installed on your
printer, you will enable Ethernet communication.
3. Use the arrow buttons to advance to the TCP/IP-ETHERNET or TCP/IP-TOKEN RING
screens. Select YES to enable the appropriate communication protocol.
4. Use the arrow buttons to advance to the ETH. IP ADDRESS or the T.R. IP ADDRESS
screens. Enter a valid, unique IP Address for the KL-3015.
Page 40

5-2 Setting Up Fiery WebTools
5
In order for client workstations to access Fiery WebTools, they must use a web
browser. The recommended browser versions that support Java are:
• Netscape Communicator 4.0.1 for Macintosh computers,
• Microsoft Internet Explorer 3.0.2 or Netscape Communicator 4.0.2 for
Windows computers.
NOTE: Microsoft Internet Explorer 3.x does not support the Web Downloader.
Note also that Windo ws NT 4.0 users must do wnload the W indo ws NT 4.0 Hot
Fix dated July 7, 1997 in order to run the Web Downloader with Netscape
Communicator 4.x.
TO SET UP FIERY WEBTOOLS ON EACH CLIENT WORKSTATION :
1. Enable TCP/IP networking.
2. Make sure the workstation has a vali
3. Make sure the workstation is installed with an Internet browser.
4. Make sure Java is enabled in your Internet browser.
5. Start your Internet browser application.
6. Enter the IP address or DNS name of the printer in the browser’s URL line.
The printer’s home page appears.
d, unique IP address.
Page 41

A-1 Setup Menus
A
Appendix A:
Operation
Panel
Messages
The following system errors cause the Attention LED to flash and the message to
be displayed on the operation panel until the problem is addressed. The printer
will not print while the warnings are displayed.
Operation panel system messages
Message Explanation
UNEXPECTED PAPER SIZE
LOAD MULTI TRAY
DISK
DEVICE FAILURE
OUT OF MEMORY
JOB CLEARED
MEMORY SHORTAGE
PAGE SIMPLIFIED
BUSY ADJUSTING
TONER LEVEL
IMPORTANT: Turn off and unplug the printer from the outlet and contact a
qualified service representative if the following conditions occur:
• The power cord or plug is damaged or frayed.
Paper size incorrect for the selected tray.
A disk error occurred. Reformat disk.
Not enough memory to process and print job.
Resend print job.
Not enough memory to print job. Resend print
job.
Printer is adjusting toner levels.
• Liquid has been spilled into the printer.
• The printer has been exposed to rain or water.
• The printer does not operate normally though the operating instructions are
being followed. Adjust only those controls that are described in the operating
instructions; improper adjustment of other controls may result in damage and
will often require extensive work to restore the printer to normal operation.
Page 42

Page 43

Index
A
activity lights 1-1
administrator password 2-3
Another FS option 2-17
AppleTalk
enabling 2-11
zones 2-11
AppleTalk Zone option 2-11
Attention LED activity light 1-2, A-1
Available Servers option 2-16
B
bindery emulation
configuring Netware 3.x file
servers 2-16
configuring Netware 4.x file
servers 2-16
mode 2-16
Bindery Settings option 2-16
bindery setup, options 2-13, 2-16
Browse to Print option 2-15
Browse Tree to Print Server option 2-14
buttons, operation panel 1-2
C
Change Password option 2-3
Change Settings option 2-13
Check and Print print option 1-3
Configuration page 4-1
printing 4-2
Connected Servers option 2-16
Consumables 1-3
Cover Page option 2-5
Current Path option 2-14, 2-15
D
Data LED activity light 1-1
Default Page Orientation option 2-6
Default Paper Size option 2-4
Delete Bindery Setup option 2-13
display screen, handling precautions 1-3
DNS (Domain Name Server) name 5-2
Domain Name option 2-18
E
Enable AppleTalk option 2-11
Enable Bindery option 2-16
Enable Ethernet option 2-7
Enable NDS option 2-13
Enable Novell option 2-11
Enable Pserver option 2-12
Enable SMB option 2-18
ENERGY STAR compliance vii
Enter Login Name option 2-17
Enter Password option 2-15
EPA (Environmental Protection
Agency) vii
error messages A-1
Ethernet
card 2-7, 2-11, 5-1
enabling 5-1
frame type 2-11
port 2-11
setup options 2-7
Ethernet 802.2 option 2-11
Ethernet 802.3 option 2-12
Ethernet II option 2-12
Ethernet SNAP option 2-12
Ethernet Speed option 2-7
Ethernet-IP Address option 2-9
Ethernet-Subnet Mask option 2-10
Page 44

I-2 Index
F
Fiery Web Tools
setting up 5-1
Web Downloader 5-2
File Server Login option 2-17
file server, setting password for 2-17
Find Login option 2-13
Font Size (Pt) option 2-6
fonts
PCL 4-1
printing 4-2
symbol set 2-6
Form Length option 2-6
FServer Password option 2-17
G
Gateway Address option 2-10
I
I/O Port Setup menu 2-1, 2-7, 5-1
icons, used in document viii
Ignore EOF (Character) option 2-9
Internet browsers 5-2
IP address 5-1, 5-2
IP Address option 2-18
IPX 2-11, 2-18
J
Java 5-2
Jobs to Save option 2-3
L
Language Setup menu 2-19
LCD, handling precautions 1-3
lights, on printer operation panel 1-1
Login to Browse option 2-13
M
Macintosh, printing in 3-1
Maximum Frame Size option 2-8
Menu button 2-1
Menu Help page 4-1
printing 4-2
N
NDS (NetWare Directory Services)
changing file server settings 2-16
options 2-13
setup 2-13
NDS tree
browsing 2-14, 2-15
navigating 2-15
option 2-13
NDS Tree Name option 2-15
NDS Tree option 2-13
Netscape Communicator 5-2
Network Protocol Setup option 2-1
network protocols
point to point 2-18
setup options 2-9
Network Service Setup menu 2-2, 2-12
Network Setup menu 2-7 to 2-9
networks
specifying network information 2-7
to 2-9
using printer on viii
New Tree Deletes Bindery Setup
option 2-13
Novell Frame Type option 2-11
O
Online LED activity light 1-1
operation panel, see printer operation
panel
P
Page Description Language option 2-4
Panel Language option 2-2, 2-19
Parallel Port option 2-9
parallel port setup 2-8
passwords
print server login 2-15
verifying 2-3
Page 45

I-3 Index
PC-8 symbol set 2-6
PCL
font size, specifying 2-6
Form Length, specifying 2-6
page description language, setting 2-4
setting font pitch 2-6
specifying font 2-6
specifying settings 2-1
Symbol set, specifying 2-6
PCL Font List 4-1
PCL Setup menu 2-1, 2-5, 2-6
Pitch (Char/In) 2-6
Poll Interval (Seconds) option 2-17
PostScript
page description language, setting 2-4
printing up to errors 2-5
PS-101 option 2-5
setup options 2-5
specifying settings 2-1
Power Saver (Minutes) option 2-3
Power Saver mode 2-3
print jobs, viewing information about 2-5
Print Pages from List option 1-3
Print Q Root option 2-15
Print Q Search option 2-15
print server, selecting on operation
panel 2-14, 2-17
Print Start Page option 2-2
Print to PS Error option 2-5
printer
enabling AppleTalk option 2-11
features vii
home page 5-2
power saver mode vii
printing speed vii
printing to 3-1 to 3-2
remote management 5-1
setting up 2-1 to 2-2
specifying name 2-2
specifying printer information 2-4
see also printer operation panel
Printer Name option 2-2
printer operation panel
activity lights 1-1
buttons 1-2
display window 1-3
Down arrow button 1-2
error messages A-1
Exit/Cancel/Left arrow button 1-2
Menu button 1-2
Network Port Setup menu 2-7
Network Setup menu 2-9
Online/Enter button 1-2
Right arrow button 1-3
specifying panel language 2-2
specifying PCL settings 2-1
specifying printer settings 2-2
troubleshooting A-1
Up arrow button 1-2
printer options
setting 2-1
viewing 2-1
Printer Setup menu 2-1, 2-4, 5-1
printing
Configuration page 2-1
information pages from the
LCD 2-1, 4-1
Macintosh 3-1
Menu Help page 4-1, 4-2
overview 3-1 to 3-2
Start page 2-2
troubleshooting 4-3, 5-2
Windows 3.1x 3-1
Windows 95 3-1
Windows NT 4.0 3-1
printing a Test page 4-1
problems, see troubleshooting
protocols, see network protocols
PS Setup option 2-1, 2-5
Pserver Password option 2-17
Pserver program 2-12
Publish Printed Q option 2-2
Page 46

I-4 Index
R
remote access 5-1
Removing Pserver option 2-16
Req. All Routes option 2-8
Resets option 1-3
Resp. All Route option 2-8
S
Select (Panel Language) option 2-19
Server Comment option 2-18
Server Message Block (SMB), see
Windows (SMB) printing)
SMB Server option 2-18
SMB Setup option 2-18
Source Routing option 2-8
subnet mask 2-10
supplies, ordering viii
Symbol Set option 2-6
System Setup menu 2-1, 2-2, 2-5
T
TCP/IP
enabling 5-1
setup options 2-9
SMB printing with 2-18
TCP/IP-Ethernet option 2-9
TCP/IP-Token Ring option 2-10
Test page, printing 4-1
Timeout in Seconds option 2-9
Token Ring
card 5-1
enabling 5-1
frame types 2-12
setup 2-7, 2-8
Token Ring 802.2 option 2-12
Token Ring IP Address option 2-10
Token Ring option 2-7
Token Ring SNAP option 2-12
Token Ring Speed option 2-8
Token Ring Subnet Mask option 2-10
toner levels. A-1
Toner Low option 2-4
troubleshooting
printer operation panel A-1
printing problems 4-3, 5-2
U
URL (Uniform Resource Locator) 5-2
Use Name Server option 2-18
User Software CD 4-1
V
Verify Password option 2-3
W
Web Downloader, see Fiery WebTools
WebTools, see Fiery WebTools
Windows (SMB) printing 2-18
Windows 3.1x, printing in 2-18, 3-1
Windows 95
printing in 2-18, 3-1
Windows NT 4.0
printing in 3-1
running Web Downloader with
Netscape Communicator 5-2
Windows NT 4.0 Hot Fix 5-2
Windows NT, SMB printing 2-18
WINS server 2-18
Z
zones, AppleTalk 2-11
 Loading...