

Page 1

IP-432/IP-424
PS-344/PS-346
Page 2

Thank you very much for purchasing the KONICA MINOLTA Print Controller.
This User’s Manual includes instructions for making prints, correct handling of the machine, and precautions for
safety. Please read this manual before printing.
In order to maintain a satisfactory printing performance, please keep this User’s Manual readily available for reference.
ACKNOWLEDGEMENT:
Microsoft, MS and MS-DOS are registered trademarks of Microsoft Corporation in the United States.
IBM is a registered trademark of International Business Machines, Inc. in the United States.
TM
Windows
is a trademark of Microsoft Corporation.
HP and PCL are registered trademarks of Hewlett-Packard Company.
Agfa Microtype font is a registered trademark of Agfa Corporation.
PEERLESS is a registered trademark of PEERLESS SYSTEMS CORPORATION.
Apple, Macintosh and Mac are registered trademarks or trademarks of Apple Computer, Inc.
Adobe, Adobe Logo, Acrobat, Acrobat Logo, PostScript and PostScript Logo are registered trademarks or
trademarks of Adobe Systems, Inc.
Other company names and product names used in this manual are the registered trademarks or trade-
marks of their respective companies.
COPYRIGHT
© 2004 by Konica Minolta Business Technologies, Inc. All Rights Reserved.
Page 3

Introduction
Introduction
■
The KONICA MINOLTA print controller is designed to be a built-in server for the KONICA MINOLTA printer/
copier. It enables direct printing from Windows-compliant computers. It can also enable use of the copier as
a network printer when an internal network interface card is used.
FCC Regulation (for U.S.A only)
War ning:
This equipment has been tested and found to comply with limits for a Class B digital device, pursuant to
part 15 of FCC rules. These limits are designed to provide reasonable protection against harmful interference in a residential area.
This equipment generates, uses and can radiate radio frequency energy and, if not installed and used in
accordance with the instructions, may cause harmful interference to radio communications. However,
there is no guarantee that interference will not occur in a particular installation. If this equipment does
cause harmful interference to radio or television reception, which can be determined by turning the equipment off and on, the user is encouraged to try to correct the interference by one or more of the following
measures:
• Reorient or relocate the receiving antenna.
• Increase the distance between the equipment and the receiver.
• Connect the equipment to an outlet on a circuit other than the circuit to which the receiver is con-
nected.
• Consult your dealer or an experienced radio/TV technician for help.
Canadian Department of Communications Regulations
Cet appareil numérique de la classe B est conforme á la norme NMB-003 du Canada.
This Class B digital apparatus complies with Canadian ICES-003.
Patent Notice
The product includes an implementation of LZW licensed under U.S.Patent 4,558,302.
Built-in Fonts
The print controller includes support for PCL5e Language (HP PCL clone) and includes the 80 built-in
Agfa Microtype fonts. For details on fonts, refer to [font list] ( Page 491).
Note
• A part or all of this User's Guide may not be used or copied without permission.
• KONICA MINOLTA will have no liability for any incidents caused by using the printing system and this
manual.
• Information written in this User's Guide is subject to change without notice.
• Konica Minolta Business Technologies, Inc. maintains the copyright of this printer driver.
iii
Introduction
Page 4

Introduction
SOFTWARE LICENSE AGREEMENT
This package contains the following materials provided by Konica Minolta Business Technologies, Inc. (KMBT): software included as part of the printing system, the digitally-encoded machine-readable outline data encoded in the
special format and in the encrypted form ("Font Programs"), other software which runs on a computer system for
use in conjunction with the Printing Software ("Host Software"), and related explanatory written materials
("Documentation").
The term "Software" shall be used to describe Printing Software, Font Programs and/or Host Software and also include any upgrades, modified versions, additions, and copies of the Software.
The Software is being licensed to you under the terms of this Agreement.
KMBT grants to you a non-exclusive sublicense to use the Software and Documentation, provided that you agree
to the following:
1. You may use the Printing Software and accompanying Font Programs for imaging to the licensed output device(s), solely for your own internal business purposes.
2. In addition to the license for Font Programs set forth in Section 1 ("Printing Software") above, you may use Roman Font Programs to reproduce weights, styles, and versions of letters, numerals, characters and symbols
("Typefaces") on the display or monitor for your own internal business purposes.
3. You may make one backup copy of the Host Software, provided your backup copy is not installed or used on
any computer. Notwithstanding the above restrictions, you may install the Software on any number of computers solely for use with one or more printing systems running the Printing Software.
4. You may assign its rights under this Agreement to an assignee of all of Licensee's right and interest to such
Software and Documentation ("Assignee") provided you transfer to Assignee all copies of such Software and
Documentation Assignee agrees to be bound by all of the terms and conditions of this Agreement.
5. You agree not to modify, adapt or translate the Software and Documentation.
6. You agree that you will not attempt to alter, disassemble, decrypt, reverse engineer or decompile the Software.
7. Title to and ownership of the Software and Documentation and any reproductions thereof shall remain with
KMBT.
8. Trademarks shall be used in accordance with accepted trademark practice, including identification of the trademark owner's name. Trademarks can only be used to identify printed output produced by the Software. Such
use of any trademark does not give you any rights of ownership in that trademark.
9. You may not rent, lease, sublicense, lend or transfer versions or copies of the Software that the Software Licensee does not use, or Software contained on any unused media, except as part of the permanent transfer of
all Software and Documentation as described above
10. In no event will KMBT be liable to you for any consequential, incidental or special damages, including any lost
profits or lost saving, even if KMBT has been advised of the possibility of such damages, or for any claim by
any third party. Some states or jurisdictions do not allow the exclusion or limitation of incidental, consequential
or special damages, so the above limitations may not apply to you.
11. Notice to Government End Users: The Software is a "commercial item," as that term is defined at 48 C.F.R.
2.101, consisting of "commercial computer software" and "commercial computer software documentation," as
such terms are used in 48 C.F.R. 12.212. Consistent with 48 C.F.R. 12.212 and 48 C.F.R. 227.7202-1 through
227.7202-4, all U.S. Government End Users acquire the Software with only those rights set forth herein.
Macintosh
Windows® is a registered trademark of Microsoft Corporation.
®
is a registered trademark of Apple Computer, Inc.
iv
Introduction
Page 5

Introduction
SOFTWARE LICENSE AGREEMENT
(Exclusive for PostScript3 Option)
This package contains the following materials provided by Adobe Systems Incorporated (“Adobe”) and Konica Minolta Business Technologies, Inc. (KMBT): software included as part of the printing system, including PostScript
software and other Adobe software (“Printing Software”), the digitally-encoded machine-readable outline data encoded in the special format and in the encrypted form (“Font Programs”), other software which runs on a computer
system for use in conjunction with the Printing Software (“Host Software”), and related explanatory written materials
(“Documentation”).
The term “Software” shall be used to describe Printing Software, Font Programs and/or Host Software and also include any upgrades, modified versions, additions, and copies of the Software.
The Software is being licensed to you under the terms of this Agreement.
KMBT grants to you a non-exclusive sublicense to use the Software and Documentation, provided that you agree
to the following:
1. You may use the Printing Software and accompanying Font Programs for imaging to the licensed output device(s), solely for your own internal business purposes.
2. In addition to the license for Font Programs set forth in Section 1 (“Printing Software”) above, you may use Ro-
man Font Programs to reproduce weights, styles, and versions of letters, numerals, characters and symbols
(“Typefaces”) on the display or monitor for your own internal business purposes.
3. You may make one backup copy of the Host Software, provided your backup copy is not installed or used on
any computer. Notwithstanding the above restrictions, you may install the Adobe Driver Software on any number of computers solely for use with one or more printing systems running the Printing Software.
4. You may assign its rights under this Agreement to an assignee of all of Licensee’s right and interest to such
Software and Documentation (“Assignee”) provided you transfers to Assignee all copies of such Software and
Documentation Assignee agrees to be bound by all of the terms and conditions of this Agreement.
5. You agree not to modify, adapt or translate the Software and Documentation.
6. You agree that it will not attempt to alter, disassemble, decrypt, reverse engineer or decompile the Software.
7. Title to and ownership of the Software and Documentation and any reproductions thereof shall remain with Ado-
be and KMBT.
8. Trademarks shall be used in accordance with accepted trademark practice, including identification of the trademark owner’s name. Trademarks can only be used to identify printed output produced by the Software. Such
use of any trademark does not give you any rights of ownership in that trademark.
9. You may not rent, lease, sublicense, lend or transfer versions or copies of the Software Licensee does not use,
or Software contained on any unused media, except as part of the permanent transfer of all Software and Documentation as described above.
10. In no event will KMBT or Adobe be liable to you for any consequential, incidental or special damages, including
any lost profits or lost saving, even if KMBT has been advised of the possibility of such damages, or for any
claim by any third party. Some states or jurisdictions do not allow the exclusion or limitation of incidental, consequential or special damages, so the above limitations may not apply to you.
11. Notice to Government End Users: The Software is a “commercial item,” as that term is defined at 48 C.F.R.
2.101, consisting of “commercial computer software” and “commercial computer software documentation,” as
such terms are used in 48 C.F.R. 12.212. Consistent with 48 C.F.R. 12.212 and 48 C.F.R. 227.7202-1 through
227.7202-4, all U.S. Government End Users acquire the Software with only those rights set forth herein.
12. You are hereby notified that Adobe Systems Incorporated, a Delaware corporation located at 345 Park Avenue,
San Jose, CA 95110-2704 (“Adobe”), is a third-party beneficiary to this Agreement to the extent that this Agreement contains provisions which relate to Licensee’s use of the Software, Font Programs, Typefaces and the
trademarks licensed hereby. Such provisions are made expressly for the benefit of Adobe and are enforceable
by Adobe in addition to KMBT.
®
v
Introduction
Page 6

Introduction
CONTENTS
Introduction. . . . . . . . . . . . . . . . . . . . . . . . . . . . . . . . . . . . . . . . . . . .iii
SOFTWARE LICENSE AGREEMENT . . . . . . . . . . . . . . . . . . . . . . . . . . . . . . iv
Package Contents . . . . . . . . . . . . . . . . . . . . . . . . . . . . . . . . . . . . . . . . . . . . . . . . . xiv
System Requirements . . . . . . . . . . . . . . . . . . . . . . . . . . . . . . . . . . . . . . . . . . . . . . .xv
Folder structure on the CD-ROM (Print controller) . . . . . . . . . . . . . . . . . . . . . . . . xvi
Folder structure on the CD-ROM (PostScript3 option) . . . . . . . . . . . . . . . . . . . . . xvii
About this Manual . . . . . . . . . . . . . . . . . . . . . . . . . . . . . . . . . . . . . . . . . . . . . . . . xviii
Conventions Used in this Manual . . . . . . . . . . . . . . . . . . . . . . . . . . . . . . . . . . . . . xix
Screens used with this Manual . . . . . . . . . . . . . . . . . . . . . . . . . . . . . . . . . . . . . . . xix
Usage of this Manual. . . . . . . . . . . . . . . . . . . . . . . . . . . . . . . . . . . . . . . . . . . . . . . .xx
I Set Up . . . . . . . . . . . . . . . . . . . . . . . . . . . . . . . . . . . . . 1
Chapter 1 Summary . . . . . . . . . . . . . . . . . . . . . . . . . . . . . . . . . . . . . 2
1-1. What is the Print Controller?. . . . . . . . . . . . . . . . . . . . . . . . . . . . . . . . . 3
Role of the Print Controller . . . . . . . . . . . . . . . . . . . . . . . . . . . . . . . . . . . . . . . . . . . 3
What You Can Do with the Print Controller . . . . . . . . . . . . . . . . . . . . . . . . . . . . . . . 6
Four Modes . . . . . . . . . . . . . . . . . . . . . . . . . . . . . . . . . . . . . . . . . . . . . . . . . . . . . . . 7
1-2. Flow of Processing . . . . . . . . . . . . . . . . . . . . . . . . . . . . . . . . . . . . . . . . 8
Copy Mode . . . . . . . . . . . . . . . . . . . . . . . . . . . . . . . . . . . . . . . . . . . . . . . . . . . . . . . 8
Flow for Printing . . . . . . . . . . . . . . . . . . . . . . . . . . . . . . . . . . . . . . . . . . . . . . . . . . . 8
PC-Fax Transmission Flow . . . . . . . . . . . . . . . . . . . . . . . . . . . . . . . . . . . . . . . . . . . 9
1-3. Operation Environment . . . . . . . . . . . . . . . . . . . . . . . . . . . . . . . . . . . 10
Operating Systems and Requirements . . . . . . . . . . . . . . . . . . . . . . . . . . . . . . . . . 10
Interfaces Used for Connection. . . . . . . . . . . . . . . . . . . . . . . . . . . . . . . . . . . . . . . 10
II Printer . . . . . . . . . . . . . . . . . . . . . . . . . . . . . . . . . . . 12
The Flow for Setup . . . . . . . . . . . . . . . . . . . . . . . . . . . . . . . . . . . . . . . 13
New Setup. . . . . . . . . . . . . . . . . . . . . . . . . . . . . . . . . . . . . . . . . . . . . . . . . . . . . . . 13
Updating a Printer Driver. . . . . . . . . . . . . . . . . . . . . . . . . . . . . . . . . . . . . . . . . . . . 13
Chapter 2 Preparing the Printer for Use . . . . . . . . . . . . . . . . . . . . 14
2-1. Checking the PC . . . . . . . . . . . . . . . . . . . . . . . . . . . . . . . . . . . . . . . . 15
2-2. Using the Print Controller . . . . . . . . . . . . . . . . . . . . . . . . . . . . . . . . . . 16
Printer Driver Types and Supported Operating Systems . . . . . . . . . . . . . . . . . . . 16
Page Notation Language. . . . . . . . . . . . . . . . . . . . . . . . . . . . . . . . . . . . . . . . . . . . 17
2-3. Using this Printing System with Windows 95/98/Me. . . . . . . . . . . . . . 18
PCL Driver Installation. . . . . . . . . . . . . . . . . . . . . . . . . . . . . . . . . . . . . . . . . . . . . . 18
Adobe PostScript Driver Installation . . . . . . . . . . . . . . . . . . . . . . . . . . . . . . . . . . . 25
Checking Printing . . . . . . . . . . . . . . . . . . . . . . . . . . . . . . . . . . . . . . . . . . . . . . . . . 32
2-4. Using this Printing System with Windows NT 4.0. . . . . . . . . . . . . . . . 34
Access Rights and Range of Operation . . . . . . . . . . . . . . . . . . . . . . . . . . . . . . . . 34
PCL Driver Installation. . . . . . . . . . . . . . . . . . . . . . . . . . . . . . . . . . . . . . . . . . . . . . 35
Adobe PostScript Driver Installation . . . . . . . . . . . . . . . . . . . . . . . . . . . . . . . . . . . 39
Checking Printing . . . . . . . . . . . . . . . . . . . . . . . . . . . . . . . . . . . . . . . . . . . . . . . . . 46
vi
Introduction
Page 7

Introduction
2-5. Using this Printing System with Windows 2000 . . . . . . . . . . . . . . . . . 48
2-6. Using this Printing System with Windows XP. . . . . . . . . . . . . . . . . . . 65
2-7. Using as a USB Printer (Windows 2000/XP) . . . . . . . . . . . . . . . . . . . 83
2-8. Using this Printing System with a Macintosh . . . . . . . . . . . . . . . . . . . 88
2-9. Updating the Printer Driver. . . . . . . . . . . . . . . . . . . . . . . . . . . . . . . . 100
2-10. Installation Problems . . . . . . . . . . . . . . . . . . . . . . . . . . . . . . . . . . . . 111
Access Rights and Range of Operation . . . . . . . . . . . . . . . . . . . . . . . . . . . . . . . . 48
PCL Driver Installation. . . . . . . . . . . . . . . . . . . . . . . . . . . . . . . . . . . . . . . . . . . . . . 49
Adobe PostScript Driver Installation . . . . . . . . . . . . . . . . . . . . . . . . . . . . . . . . . . . 53
Checking Printing . . . . . . . . . . . . . . . . . . . . . . . . . . . . . . . . . . . . . . . . . . . . . . . . . 62
Access Rights and Range of Operation . . . . . . . . . . . . . . . . . . . . . . . . . . . . . . . . 65
PCL Driver Installation. . . . . . . . . . . . . . . . . . . . . . . . . . . . . . . . . . . . . . . . . . . . . . 66
Adobe PostScript Driver Installation . . . . . . . . . . . . . . . . . . . . . . . . . . . . . . . . . . . 71
Checking Printing . . . . . . . . . . . . . . . . . . . . . . . . . . . . . . . . . . . . . . . . . . . . . . . . . 80
Installing a Printer Driver . . . . . . . . . . . . . . . . . . . . . . . . . . . . . . . . . . . . . . . . . . . . 83
Adobe PostScript Driver Installation . . . . . . . . . . . . . . . . . . . . . . . . . . . . . . . . . . . 88
Selecting the Printer . . . . . . . . . . . . . . . . . . . . . . . . . . . . . . . . . . . . . . . . . . . . . . . 94
Checking Printing . . . . . . . . . . . . . . . . . . . . . . . . . . . . . . . . . . . . . . . . . . . . . . . . . 99
Updating the Printer Driver with Windows 95/98/Me. . . . . . . . . . . . . . . . . . . . . . 101
Updating the Printer Driver with Windows NT 4.0 . . . . . . . . . . . . . . . . . . . . . . . . 103
Updating the Printer Driver with Windows 2000 . . . . . . . . . . . . . . . . . . . . . . . . . 105
Updating the Printer Driver with Windows XP . . . . . . . . . . . . . . . . . . . . . . . . . . . 107
Updating the Printer Driver with Macintosh . . . . . . . . . . . . . . . . . . . . . . . . . . . . . 109
An Old Version of the Driver Is Already Installed. . . . . . . . . . . . . . . . . . . . . . . . . 111
You Are Asked Which File to Use, the One You Are Installing or
a New File Already on the Computer. . . . . . . . . . . . . . . . . . . . . . . . . . . . . . . . . . 111
Test Page Cannot Be Printed.. . . . . . . . . . . . . . . . . . . . . . . . . . . . . . . . . . . . . . . 111
Chapter 3 Printing from Windows. . . . . . . . . . . . . . . . . . . . . . . . 112
3-1. Setting Printer Functions . . . . . . . . . . . . . . . . . . . . . . . . . . . . . . . . . 113
Windows 95/98/Me . . . . . . . . . . . . . . . . . . . . . . . . . . . . . . . . . . . . . . . . . . . . . . . 114
Windows NT 4.0 . . . . . . . . . . . . . . . . . . . . . . . . . . . . . . . . . . . . . . . . . . . . . . . . . 117
Windows 2000. . . . . . . . . . . . . . . . . . . . . . . . . . . . . . . . . . . . . . . . . . . . . . . . . . . 121
Windows XP . . . . . . . . . . . . . . . . . . . . . . . . . . . . . . . . . . . . . . . . . . . . . . . . . . . . 125
Image View . . . . . . . . . . . . . . . . . . . . . . . . . . . . . . . . . . . . . . . . . . . . . . . . . . . . . 129
3-2. Function List . . . . . . . . . . . . . . . . . . . . . . . . . . . . . . . . . . . . . . . . . . . 130
3-3. Basic Print Settings . . . . . . . . . . . . . . . . . . . . . . . . . . . . . . . . . . . . . 132
Setting the Printer Languages. . . . . . . . . . . . . . . . . . . . . . . . . . . . . . . . . . . . . . . 132
Setting the Number of Copies to Print (Copies). . . . . . . . . . . . . . . . . . . . . . . . . . 134
Setting the Print Direction (Orientation). . . . . . . . . . . . . . . . . . . . . . . . . . . . . . . . 136
Setting the Print Paper Size (Paper Size) . . . . . . . . . . . . . . . . . . . . . . . . . . . . . . 138
Selecting the Type of Paper (Media Type/Paper Type) . . . . . . . . . . . . . . . . . . . 140
Printing Enlarged/Reduced (Scaling) . . . . . . . . . . . . . . . . . . . . . . . . . . . . . . . . . 142
Selecting the Input Tray (Paper Source) . . . . . . . . . . . . . . . . . . . . . . . . . . . . . . . 144
Selecting the Output Tray (Output Bin) . . . . . . . . . . . . . . . . . . . . . . . . . . . . . . . . 146
Setting the Margin (Margins) . . . . . . . . . . . . . . . . . . . . . . . . . . . . . . . . . . . . . . . . 148
3-4. Printing Multiple Pages. . . . . . . . . . . . . . . . . . . . . . . . . . . . . . . . . . . 149
Printing on Both the Front and Rear of the Paper (Duplex) . . . . . . . . . . . . . . . . 153
Printing Multiple Pages on One Sheet of Paper (Pages per Sheet/Layout) . . . . 155
Folding Paper in Two to Make Booklets (Combination) . . . . . . . . . . . . . . . . . . . 158
Fold&Stitch . . . . . . . . . . . . . . . . . . . . . . . . . . . . . . . . . . . . . . . . . . . . . . . . . . . . . 161
Printing One Copy at a Time of All Pages (Collate/Sort). . . . . . . . . . . . . . . . . . . 164
Outputting Sorted into Separate Sets of Copies (Offset) . . . . . . . . . . . . . . . . . . 166
vii
Introduction
Page 8

Introduction
3-5. Making Image Settings. . . . . . . . . . . . . . . . . . . . . . . . . . . . . . . . . . . 187
3-6. Setting the Font . . . . . . . . . . . . . . . . . . . . . . . . . . . . . . . . . . . . . . . . 196
3-7. Special Printing . . . . . . . . . . . . . . . . . . . . . . . . . . . . . . . . . . . . . . . . 203
3-8. Setting the Connection between the Computer and Printer . . . . . . . 220
Stapling (Staple) . . . . . . . . . . . . . . . . . . . . . . . . . . . . . . . . . . . . . . . . . . . . . . . . . 169
Punch/Punch Holes. . . . . . . . . . . . . . . . . . . . . . . . . . . . . . . . . . . . . . . . . . . . . . . 173
Attaching a Front Cover/Back Cover (Front Cover/Back Cover). . . . . . . . . . . . . 177
Attaching a Sheet Insertion (Windows NT 4.0/2000/XP). . . . . . . . . . . . . . . . . . . 180
Halftoning . . . . . . . . . . . . . . . . . . . . . . . . . . . . . . . . . . . . . . . . . . . . . . . . . . . . . . 187
Brightness (Windows 95/98/Me) . . . . . . . . . . . . . . . . . . . . . . . . . . . . . . . . . . . . . 187
Contrast (Windows 95/98/Me). . . . . . . . . . . . . . . . . . . . . . . . . . . . . . . . . . . . . . . 187
Print Density (Windows NT 4.0/2000/XP) . . . . . . . . . . . . . . . . . . . . . . . . . . . . . . 187
Print as Black (Windows NT 4.0/2000/XP) . . . . . . . . . . . . . . . . . . . . . . . . . . . . . 188
Smoothing . . . . . . . . . . . . . . . . . . . . . . . . . . . . . . . . . . . . . . . . . . . . . . . . . . . . . . 188
Toner Save . . . . . . . . . . . . . . . . . . . . . . . . . . . . . . . . . . . . . . . . . . . . . . . . . . . . . 190
Setting the Resolution (Resolution). . . . . . . . . . . . . . . . . . . . . . . . . . . . . . . . . . . 192
Printing with Black and White Reversed (Print as a Negative Image). . . . . . . . . 193
Printing with Left/Right Reversed (Print as a Mirror Image) . . . . . . . . . . . . . . . . 195
TrueType Font Settings (Windows 95/98/Me). . . . . . . . . . . . . . . . . . . . . . . . . . . 196
PostScript Font Settings . . . . . . . . . . . . . . . . . . . . . . . . . . . . . . . . . . . . . . . . . . . 197
Printing Overlaying Another Document (Overlay) . . . . . . . . . . . . . . . . . . . . . . . . 204
Printing Watermarks (Watermark). . . . . . . . . . . . . . . . . . . . . . . . . . . . . . . . . . . . 207
Printing with a Password (Password Print) . . . . . . . . . . . . . . . . . . . . . . . . . . . . . 211
Holding the Printed Text in the Document Folder(Hold) . . . . . . . . . . . . . . . . . . . 216
Windows 95/98/Me . . . . . . . . . . . . . . . . . . . . . . . . . . . . . . . . . . . . . . . . . . . . . . . 220
Windows NT 4.0 . . . . . . . . . . . . . . . . . . . . . . . . . . . . . . . . . . . . . . . . . . . . . . . . . 224
Windows 2000/XP . . . . . . . . . . . . . . . . . . . . . . . . . . . . . . . . . . . . . . . . . . . . . . . . 228
Chapter 4 Printing from a Macintosh . . . . . . . . . . . . . . . . . . . . . 232
4-1. Setting Printer Functions . . . . . . . . . . . . . . . . . . . . . . . . . . . . . . . . . 233
4-2. Function List . . . . . . . . . . . . . . . . . . . . . . . . . . . . . . . . . . . . . . . . . . . 234
4-3. Basic Print Settings . . . . . . . . . . . . . . . . . . . . . . . . . . . . . . . . . . . . . 236
Setting the Number of Copies to Print (Copies) . . . . . . . . . . . . . . . . . . . . . . . . . 236
Setting the Print Direction (Direction) . . . . . . . . . . . . . . . . . . . . . . . . . . . . . . . . . 238
Setting the Print Paper Size (Paper) . . . . . . . . . . . . . . . . . . . . . . . . . . . . . . . . . . 240
Setting Any Paper Size . . . . . . . . . . . . . . . . . . . . . . . . . . . . . . . . . . . . . . . . . . . . 242
Selecting the Type of Paper (Media Type) . . . . . . . . . . . . . . . . . . . . . . . . . . . . . 244
Printing Enlarged/Reduced (Magnification Ratio) . . . . . . . . . . . . . . . . . . . . . . . . 246
Selecting the Input Tray (Paper Source) . . . . . . . . . . . . . . . . . . . . . . . . . . . . . . . 248
Selecting the Print Order (Reverse Print Order) . . . . . . . . . . . . . . . . . . . . . . . . . 250
Selecting the Output Tray (Output Bin) . . . . . . . . . . . . . . . . . . . . . . . . . . . . . . . . 251
Setting the Margin (Margins) . . . . . . . . . . . . . . . . . . . . . . . . . . . . . . . . . . . . . . . . 253
4-4. Printing Multiple Pages. . . . . . . . . . . . . . . . . . . . . . . . . . . . . . . . . . . 255
Printing on Both the Front and Rear of the Paper (Duplex Printing) . . . . . . . . . . 258
Printing Multiple Pages on One Sheet of Paper
(Document Pages/Print Pages/Layout Direction) . . . . . . . . . . . . . . . . . . . . . . . . 260
Folding Paper in Two to Make Booklets (Special Mode). . . . . . . . . . . . . . . . . . . 264
Printing One Copy at a Time of All Pages (Collate) . . . . . . . . . . . . . . . . . . . . . . 267
Outputting Sorted into Separate Sets of Copies (Offset) . . . . . . . . . . . . . . . . . . 269
Stapling (Staple) . . . . . . . . . . . . . . . . . . . . . . . . . . . . . . . . . . . . . . . . . . . . . . . . . 271
Punch/Punch Holes. . . . . . . . . . . . . . . . . . . . . . . . . . . . . . . . . . . . . . . . . . . . . . . 275
Fold&Stitch . . . . . . . . . . . . . . . . . . . . . . . . . . . . . . . . . . . . . . . . . . . . . . . . . . . . . 278
viii
Introduction
Page 9

Introduction
Attaching a Front Cover/Back Cover (Front Cover/Back Cover). . . . . . . . . . . . . 281
4-5. Special Printing . . . . . . . . . . . . . . . . . . . . . . . . . . . . . . . . . . . . . . . . 284
Printing with Top/Bottom or Left/Right Reversed (Mirror Image Printing) . . . . . . 284
Printing with Black and White Reversed (Negative Image Printing) . . . . . . . . . . 285
Printing Watermarks (Watermark). . . . . . . . . . . . . . . . . . . . . . . . . . . . . . . . . . . . 286
Smoothing Characters and Curved Lines (Smoothing). . . . . . . . . . . . . . . . . . . . 289
Conserving Toner (Toner Save) . . . . . . . . . . . . . . . . . . . . . . . . . . . . . . . . . . . . . 291
4-6. Making PostScript Settings (File Save) . . . . . . . . . . . . . . . . . . . . . . 293
Chapter 5 Print Count Management (Printer EKC/ECM) . . . . . . 295
5-1. Managing the Print Count. . . . . . . . . . . . . . . . . . . . . . . . . . . . . . . . . 296
5-2. Printer EKC/ECM Settings . . . . . . . . . . . . . . . . . . . . . . . . . . . . . . . . 297
Printer EKC/ECM Printing . . . . . . . . . . . . . . . . . . . . . . . . . . . . . . . . . . . . . . . . . . 297
Reading Counter Values . . . . . . . . . . . . . . . . . . . . . . . . . . . . . . . . . . . . . . . . . . . 300
EKC/ECM Limits . . . . . . . . . . . . . . . . . . . . . . . . . . . . . . . . . . . . . . . . . . . . . . . . . 300
Chapter 6 Printing Problems . . . . . . . . . . . . . . . . . . . . . . . . . . . . 301
6-1. Problems with Printing . . . . . . . . . . . . . . . . . . . . . . . . . . . . . . . . . . . 302
No Printing. . . . . . . . . . . . . . . . . . . . . . . . . . . . . . . . . . . . . . . . . . . . . . . . . . . . . . 302
The Paper Type Cannot Be Selected.. . . . . . . . . . . . . . . . . . . . . . . . . . . . . . . . . 302
Test Page Cannot Be Printed.. . . . . . . . . . . . . . . . . . . . . . . . . . . . . . . . . . . . . . . 303
The Print Settings and Print Results Do Not Match. . . . . . . . . . . . . . . . . . . . . . . 304
Duplex Printing Is Not Possible. . . . . . . . . . . . . . . . . . . . . . . . . . . . . . . . . . . . . . 304
Forms Cannot Be Printed.. . . . . . . . . . . . . . . . . . . . . . . . . . . . . . . . . . . . . . . . . . 304
6-2. Problems Printing with the Adobe PostScript Driver . . . . . . . . . . . . 305
PostScript Error Is Displayed. . . . . . . . . . . . . . . . . . . . . . . . . . . . . . . . . . . . . . . . 305
[Vmerror], [limitcheck], or Other PostScript Error Is Displayed. . . . . . . . . . . . . . 305
PostScript Error Is Displayed No Matter Which Computer Is Attempting to Print. 305
PostScript Error Is Displayed for Printing from a Specific Application. . . . . . . . . 305
PostScript Error Is Displayed for Printing a Specific File. . . . . . . . . . . . . . . . . . . 305
PostScript Error Is Displayed for Printing a Specific Page. . . . . . . . . . . . . . . . . . 305
Non Fixed Size Paper (Custom) Cannot Be Printed Correctly with a Macintosh. 305
6-3. Checking Incomplete Jobs . . . . . . . . . . . . . . . . . . . . . . . . . . . . . . . . 306
III Fax . . . . . . . . . . . . . . . . . . . . . . . . . . . . . . . . . . . . 307
Chapter 7 Fax Functions (PC-Fax) . . . . . . . . . . . . . . . . . . . . . . . 308
7-1. Sending Faxes from the Computer. . . . . . . . . . . . . . . . . . . . . . . . . . 309
7-2. Registering Recipient Names and their Fax Numbers . . . . . . . . . . . 310
7-3. Using PC-Fax . . . . . . . . . . . . . . . . . . . . . . . . . . . . . . . . . . . . . . . . . . 311
Operating Systems Supported by PC-Fax . . . . . . . . . . . . . . . . . . . . . . . . . . . . . 311
Setting the Fax Unit. . . . . . . . . . . . . . . . . . . . . . . . . . . . . . . . . . . . . . . . . . . . . . . 311
Chapter 8 Sending Faxes. . . . . . . . . . . . . . . . . . . . . . . . . . . . . . . 312
8-1. Transmission Procedure. . . . . . . . . . . . . . . . . . . . . . . . . . . . . . . . . . 313
Fax Transmission . . . . . . . . . . . . . . . . . . . . . . . . . . . . . . . . . . . . . . . . . . . . . . . . 313
8-2. Setting a Cover Sheet (Windows NT/2000/XP) . . . . . . . . . . . . . . . . 318
8-3. PC-Fax Transmission Error Reports . . . . . . . . . . . . . . . . . . . . . . . . 320
ix
Introduction
Page 10

Introduction
Chapter 9 Phonebook Registration. . . . . . . . . . . . . . . . . . . . . . . 321
9-1. Registering Phonebook . . . . . . . . . . . . . . . . . . . . . . . . . . . . . . . . . . 322
Registering Recipient Information . . . . . . . . . . . . . . . . . . . . . . . . . . . . . . . . . . . . 322
Registering Broadcast Group . . . . . . . . . . . . . . . . . . . . . . . . . . . . . . . . . . . . . . . 327
9-2. Managing Phonebooks. . . . . . . . . . . . . . . . . . . . . . . . . . . . . . . . . . . 331
Saving Phonebooks . . . . . . . . . . . . . . . . . . . . . . . . . . . . . . . . . . . . . . . . . . . . . . 331
Preparing a New Phonebook . . . . . . . . . . . . . . . . . . . . . . . . . . . . . . . . . . . . . . . 332
Switching Between Phonebooks . . . . . . . . . . . . . . . . . . . . . . . . . . . . . . . . . . . . . 333
9-3. Phonebook Usage . . . . . . . . . . . . . . . . . . . . . . . . . . . . . . . . . . . . . . 334
Sending Faxes Using the Phonebook . . . . . . . . . . . . . . . . . . . . . . . . . . . . . . . . . 334
IV Control Panel. . . . . . . . . . . . . . . . . . . . . . . . . . . . 335
Chapter 10 Printer Settings . . . . . . . . . . . . . . . . . . . . . . . . . . . . . 336
10-1. Menu Configuration . . . . . . . . . . . . . . . . . . . . . . . . . . . . . . . . . . . . . 337
Displaying the Main Menu Screen. . . . . . . . . . . . . . . . . . . . . . . . . . . . . . . . . . . . 337
10-2. Test Print . . . . . . . . . . . . . . . . . . . . . . . . . . . . . . . . . . . . . . . . . . . . . 340
PCL Demo Page . . . . . . . . . . . . . . . . . . . . . . . . . . . . . . . . . . . . . . . . . . . . . . . . . 340
PCL Font List. . . . . . . . . . . . . . . . . . . . . . . . . . . . . . . . . . . . . . . . . . . . . . . . . . . . 341
PS Demo Page (Only When PostScript Option Installed) . . . . . . . . . . . . . . . . . . 342
PS Font List (Only When PostScript Option Installed) . . . . . . . . . . . . . . . . . . . . 343
Config.Data . . . . . . . . . . . . . . . . . . . . . . . . . . . . . . . . . . . . . . . . . . . . . . . . . . . . . 344
10-3. Controller Settings . . . . . . . . . . . . . . . . . . . . . . . . . . . . . . . . . . . . . . 345
Banner Page . . . . . . . . . . . . . . . . . . . . . . . . . . . . . . . . . . . . . . . . . . . . . . . . . . . . 345
Banner Page Tray . . . . . . . . . . . . . . . . . . . . . . . . . . . . . . . . . . . . . . . . . . . . . . . . 347
PDL Select (Only When PostScript Option Installed) . . . . . . . . . . . . . . . . . . . . . 349
10-4. Print Default Setting . . . . . . . . . . . . . . . . . . . . . . . . . . . . . . . . . . . . . 351
Default Paper . . . . . . . . . . . . . . . . . . . . . . . . . . . . . . . . . . . . . . . . . . . . . . . . . . . 351
Duplex . . . . . . . . . . . . . . . . . . . . . . . . . . . . . . . . . . . . . . . . . . . . . . . . . . . . . . . . . 353
Orientation. . . . . . . . . . . . . . . . . . . . . . . . . . . . . . . . . . . . . . . . . . . . . . . . . . . . . . 355
Copies . . . . . . . . . . . . . . . . . . . . . . . . . . . . . . . . . . . . . . . . . . . . . . . . . . . . . . . . . 357
Override Paper . . . . . . . . . . . . . . . . . . . . . . . . . . . . . . . . . . . . . . . . . . . . . . . . . . 359
10-5. PCL Setup . . . . . . . . . . . . . . . . . . . . . . . . . . . . . . . . . . . . . . . . . . . . 361
Point Size . . . . . . . . . . . . . . . . . . . . . . . . . . . . . . . . . . . . . . . . . . . . . . . . . . . . . . 362
Pitch . . . . . . . . . . . . . . . . . . . . . . . . . . . . . . . . . . . . . . . . . . . . . . . . . . . . . . . . . . 363
Font Number . . . . . . . . . . . . . . . . . . . . . . . . . . . . . . . . . . . . . . . . . . . . . . . . . . . . 364
Form Lines . . . . . . . . . . . . . . . . . . . . . . . . . . . . . . . . . . . . . . . . . . . . . . . . . . . . . 365
CR/LF Mapping . . . . . . . . . . . . . . . . . . . . . . . . . . . . . . . . . . . . . . . . . . . . . . . . . . 366
Input Tray . . . . . . . . . . . . . . . . . . . . . . . . . . . . . . . . . . . . . . . . . . . . . . . . . . . . . . 367
Symbol Set . . . . . . . . . . . . . . . . . . . . . . . . . . . . . . . . . . . . . . . . . . . . . . . . . . . . . 368
Chapter 11 Key Operator Settings . . . . . . . . . . . . . . . . . . . . . . . 369
11-1. Key Operator Mode . . . . . . . . . . . . . . . . . . . . . . . . . . . . . . . . . . . . . 370
Usage Objectives for Key Operator Mode. . . . . . . . . . . . . . . . . . . . . . . . . . . . . . 370
Switching the Key Operator Mode. . . . . . . . . . . . . . . . . . . . . . . . . . . . . . . . . . . . 370
11-2. Contents of Settings . . . . . . . . . . . . . . . . . . . . . . . . . . . . . . . . . . . . . 372
Auto Reset Timer . . . . . . . . . . . . . . . . . . . . . . . . . . . . . . . . . . . . . . . . . . . . . . . . 372
Output Tray . . . . . . . . . . . . . . . . . . . . . . . . . . . . . . . . . . . . . . . . . . . . . . . . . . . . . 373
PRINT W/O Key Count . . . . . . . . . . . . . . . . . . . . . . . . . . . . . . . . . . . . . . . . . . . . 374
Moving to Power Save . . . . . . . . . . . . . . . . . . . . . . . . . . . . . . . . . . . . . . . . . . . . 375
Job Offset Operation . . . . . . . . . . . . . . . . . . . . . . . . . . . . . . . . . . . . . . . . . . . . . . 376
x
Introduction
Page 11

Introduction
V Network Print Settings. . . . . . . . . . . . . . . . . . . . . 377
Chapter 12 Summary of Network Functions . . . . . . . . . . . . . . . 378
12-1. Network Functions . . . . . . . . . . . . . . . . . . . . . . . . . . . . . . . . . . . . . . 379
Features of Network Functions . . . . . . . . . . . . . . . . . . . . . . . . . . . . . . . . . . . . . . 379
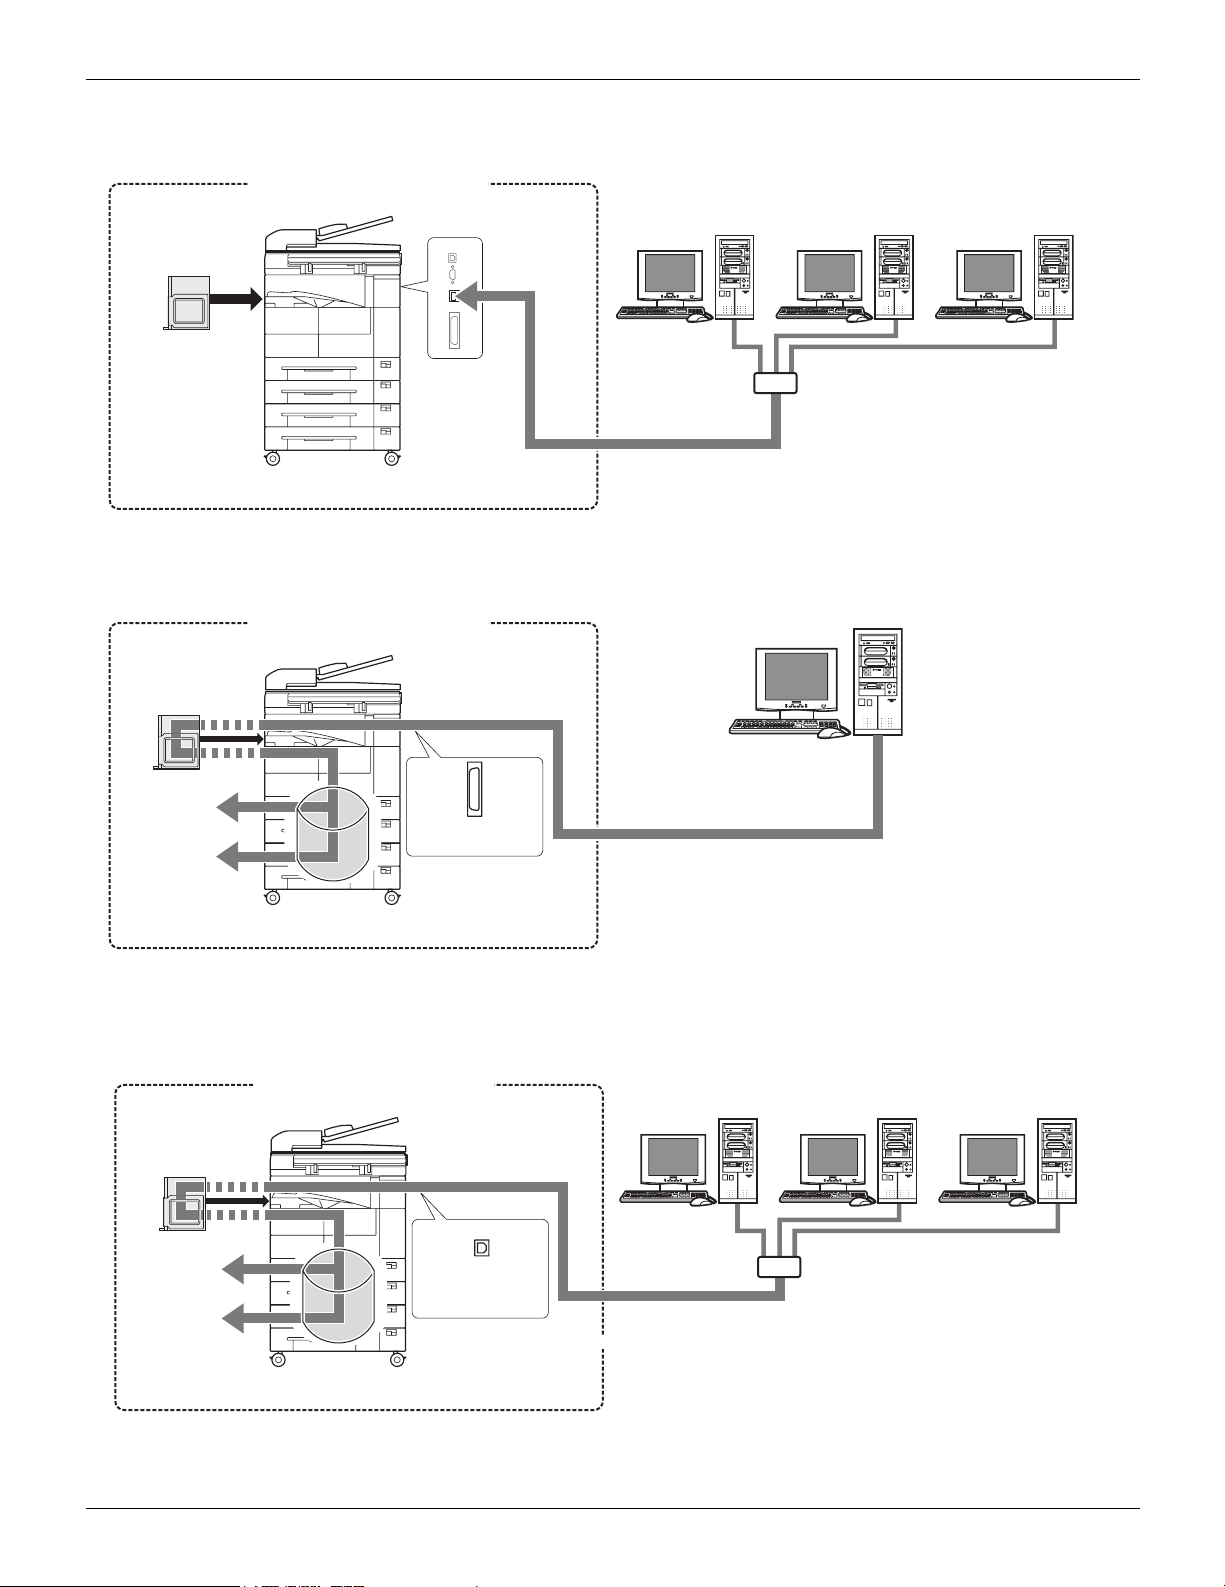
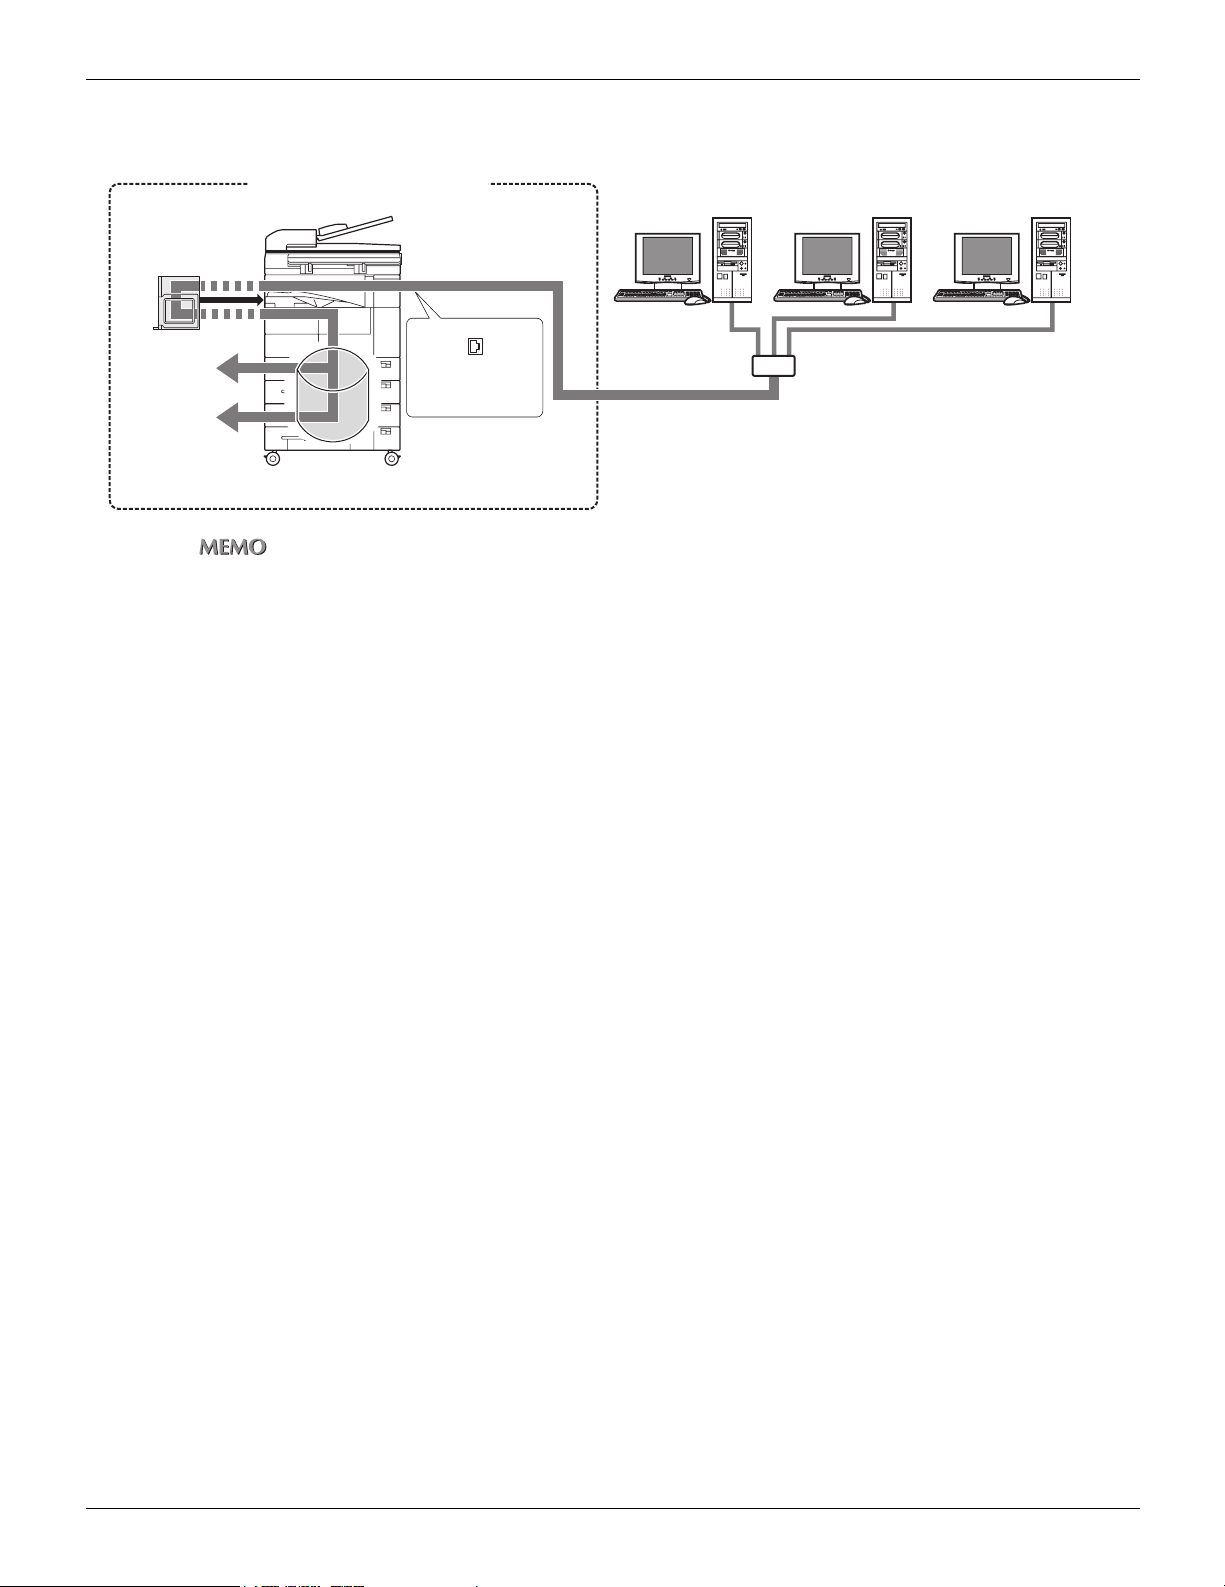
Use with Peer-to-Peer Connections (Windows 95/98/Me) . . . . . . . . . . . . . . . . . 379
Use through LPD/LPR (Windows NT 4.0/2000/XP) . . . . . . . . . . . . . . . . . . . . . . 380
Using with UNIX . . . . . . . . . . . . . . . . . . . . . . . . . . . . . . . . . . . . . . . . . . . . . . . . . 380
Using with NetWare. . . . . . . . . . . . . . . . . . . . . . . . . . . . . . . . . . . . . . . . . . . . . . . 380
Using with Macintosh (Only When PostScript Option Installed) . . . . . . . . . . . . . 380
Chapter 13 Printing with IP Peer-to-Peer
(Windows 95/98/Me only) . . . . . . . . . . . . . . . . . . . . . . . . . . . . . . . 381
13-1. IP Peer-to-Peer . . . . . . . . . . . . . . . . . . . . . . . . . . . . . . . . . . . . . . . . 382
Chapter 14 Settings for Printing with LPD/LPR
(Windows NT 4.0/2000/XP only). . . . . . . . . . . . . . . . . . . . . . . . . . 383
14-1. LPD/LPR . . . . . . . . . . . . . . . . . . . . . . . . . . . . . . . . . . . . . . . . . . . . . 384
14-2. Preparations for Printing with LPD/LPR . . . . . . . . . . . . . . . . . . . . . . 385
14-3. LPD/LPR Settings in Windows NT 4.0 . . . . . . . . . . . . . . . . . . . . . . . 386
Checking the Network Service . . . . . . . . . . . . . . . . . . . . . . . . . . . . . . . . . . . . . . 386
Adding a LPD/LPR Printer Port and Installing a Printer Driver (PCL Driver). . . . 387
14-4. LPD/LPR Settings in Windows 2000 . . . . . . . . . . . . . . . . . . . . . . . . 391
Checking the Unix Print Service . . . . . . . . . . . . . . . . . . . . . . . . . . . . . . . . . . . . . 391
Adding a LPD/LPR Printer Port and Installing a Printer Driver (PCL Driver). . . . 392
14-5. LPD/LPR Settings in Windows XP . . . . . . . . . . . . . . . . . . . . . . . . . . 396
Checking the Unix Print Service . . . . . . . . . . . . . . . . . . . . . . . . . . . . . . . . . . . . . 396
Adding a LPD/LPR Printer Port and Installing a Printer Driver (PCL Driver). . . . 396
Chapter 15 Using with NetWare . . . . . . . . . . . . . . . . . . . . . . . . . 401
15-1. Print Controller NetWare Settings . . . . . . . . . . . . . . . . . . . . . . . . . . 402
15-2. NetWare 3.x . . . . . . . . . . . . . . . . . . . . . . . . . . . . . . . . . . . . . . . . . . . 403
Before Setting NetWare . . . . . . . . . . . . . . . . . . . . . . . . . . . . . . . . . . . . . . . . . . . 403
NetWare Settings . . . . . . . . . . . . . . . . . . . . . . . . . . . . . . . . . . . . . . . . . . . . . . . . 403
15-3. NetWare 4.x–6 . . . . . . . . . . . . . . . . . . . . . . . . . . . . . . . . . . . . . . . . . 404
Features of NetWare 4.x–6 . . . . . . . . . . . . . . . . . . . . . . . . . . . . . . . . . . . . . . . . . 404
NDS Settings. . . . . . . . . . . . . . . . . . . . . . . . . . . . . . . . . . . . . . . . . . . . . . . . . . . . 406
Bindery Emulation Settings . . . . . . . . . . . . . . . . . . . . . . . . . . . . . . . . . . . . . . . . . 407
Chapter 16 Using via the Internet (Windows 2000/XP) . . . . . . . 408
16-1. Internet Printing . . . . . . . . . . . . . . . . . . . . . . . . . . . . . . . . . . . . . . . . 409
16-2. Printer Settings. . . . . . . . . . . . . . . . . . . . . . . . . . . . . . . . . . . . . . . . . 410
Printing System TCP/IP Settings. . . . . . . . . . . . . . . . . . . . . . . . . . . . . . . . . . . . . 410
IPP Attribute Settings . . . . . . . . . . . . . . . . . . . . . . . . . . . . . . . . . . . . . . . . . . . . . 410
16-3. Windows 2000 Settings . . . . . . . . . . . . . . . . . . . . . . . . . . . . . . . . . . 411
16-4. Windows XP Settings . . . . . . . . . . . . . . . . . . . . . . . . . . . . . . . . . . . . 417
Chapter 17 UNIX Configuration . . . . . . . . . . . . . . . . . . . . . . . . . . 424
17-1. UNIX Printing through TCP/IP . . . . . . . . . . . . . . . . . . . . . . . . . . . . . 425
xi
Introduction
Page 12

Introduction
17-2. Printing Overview . . . . . . . . . . . . . . . . . . . . . . . . . . . . . . . . . . . . . . . 426
17-3. lpd UNIX Printing . . . . . . . . . . . . . . . . . . . . . . . . . . . . . . . . . . . . . . . 427
Setting Up a BSD Remote Printer to Use lpd . . . . . . . . . . . . . . . . . . . . . . . . . . . 427
Setting Up an AIX Version 2.5 Remote Printer to Use lpd . . . . . . . . . . . . . . . . . 428
Setting Up an AIX 4.0 System . . . . . . . . . . . . . . . . . . . . . . . . . . . . . . . . . . . . . . . 429
Setting Up an HP-UX Remote Printer to Use lpd . . . . . . . . . . . . . . . . . . . . . . . . 430
Setting Up an AS/400 System to Use lpd . . . . . . . . . . . . . . . . . . . . . . . . . . . . . . 431
Setting Up a DEC ULTRIX 4.3 RISC or OSF1 Remote Printer . . . . . . . . . . . . . . 432
Setting Up a SCO UNIX Remote Printer to Use lpd . . . . . . . . . . . . . . . . . . . . . . 433
Setting Up System V Release 4 and Solaris 2.X to Use lpd . . . . . . . . . . . . . . . . 434
Printing on Linux . . . . . . . . . . . . . . . . . . . . . . . . . . . . . . . . . . . . . . . . . . . . . . . . . 435
Chapter 18 Use with AppleTalk . . . . . . . . . . . . . . . . . . . . . . . . . . 436
18-1. Preliminary Procedure for Using with AppleTalk . . . . . . . . . . . . . . . 437
18-2. Network Controller AppleTalk Settings. . . . . . . . . . . . . . . . . . . . . . . 438
18-3. Macintosh Settings . . . . . . . . . . . . . . . . . . . . . . . . . . . . . . . . . . . . . . 439
18-4. Installing a Printer Driver . . . . . . . . . . . . . . . . . . . . . . . . . . . . . . . . . 440
Selecting the Printer . . . . . . . . . . . . . . . . . . . . . . . . . . . . . . . . . . . . . . . . . . . . . . 446
Chapter 19 When There Is Network Printing Trouble . . . . . . . . 451
19-1. Troubleshooting Network Hardware Connections . . . . . . . . . . . . . . 452
19-2. NetWare Protocol Troubleshooting . . . . . . . . . . . . . . . . . . . . . . . . . 453
NetWare Check Items . . . . . . . . . . . . . . . . . . . . . . . . . . . . . . . . . . . . . . . . . . . . . 453
File Server Check Items . . . . . . . . . . . . . . . . . . . . . . . . . . . . . . . . . . . . . . . . . . . 453
Workstation Check Items . . . . . . . . . . . . . . . . . . . . . . . . . . . . . . . . . . . . . . . . . . 454
Setting Check Items . . . . . . . . . . . . . . . . . . . . . . . . . . . . . . . . . . . . . . . . . . . . . . 454
Print Server/File Server/Printer Check Items . . . . . . . . . . . . . . . . . . . . . . . . . . . 455
Work Station and Network Controller Connection Check Items . . . . . . . . . . . . . 455
When the Connection between the Network Controller and
the Novell File Server Is Cut . . . . . . . . . . . . . . . . . . . . . . . . . . . . . . . . . . . . . . . . 455
VI Appendix . . . . . . . . . . . . . . . . . . . . . . . . . . . . . . . 456
Chapter 20 Troubleshooting . . . . . . . . . . . . . . . . . . . . . . . . . . . . 457
20-1. When Trouble Occurs in this Printing System . . . . . . . . . . . . . . . . . 458
Chapter 21 Appendix . . . . . . . . . . . . . . . . . . . . . . . . . . . . . . . . . . 460
21-1. IP-432 Product Specifications . . . . . . . . . . . . . . . . . . . . . . . . . . . . . 461
Printer Function . . . . . . . . . . . . . . . . . . . . . . . . . . . . . . . . . . . . . . . . . . . . . . . . . . 461
PC-FAX Function . . . . . . . . . . . . . . . . . . . . . . . . . . . . . . . . . . . . . . . . . . . . . . . . 462
21-2. IP-424 Product Specifications . . . . . . . . . . . . . . . . . . . . . . . . . . . . . 463
Printer Function . . . . . . . . . . . . . . . . . . . . . . . . . . . . . . . . . . . . . . . . . . . . . . . . . . 463
PC-FAX Function . . . . . . . . . . . . . . . . . . . . . . . . . . . . . . . . . . . . . . . . . . . . . . . . 464
21-3. PostScript PS-344 Option Product Specifications . . . . . . . . . . . . . . 465
21-4. PostScript PS-346 Option Product Specifications . . . . . . . . . . . . . . 465
21-5. Options . . . . . . . . . . . . . . . . . . . . . . . . . . . . . . . . . . . . . . . . . . . . . . . 466
Memory (IP-432 only) . . . . . . . . . . . . . . . . . . . . . . . . . . . . . . . . . . . . . . . . . . . . . 466
Hard Disk (IP-432 only) . . . . . . . . . . . . . . . . . . . . . . . . . . . . . . . . . . . . . . . . . . . . 467
CF-101 compact flash ROM (IP-424 only) . . . . . . . . . . . . . . . . . . . . . . . . . . . . . 467
Problems with Optional Products . . . . . . . . . . . . . . . . . . . . . . . . . . . . . . . . . . . . 468
xii
Introduction
Page 13

Introduction
21-6. Function List . . . . . . . . . . . . . . . . . . . . . . . . . . . . . . . . . . . . . . . . . . . 470
21-7. Fonts . . . . . . . . . . . . . . . . . . . . . . . . . . . . . . . . . . . . . . . . . . . . . . . . 484
21-8. Font Number List (Control Panel-PCL Setup) . . . . . . . . . . . . . . . . . 500
21-9. Symbol Sets List (Control Panel-PCL Setup). . . . . . . . . . . . . . . . . . 503
21-10. PCL Macro and Font . . . . . . . . . . . . . . . . . . . . . . . . . . . . . . . . . . . . 505
21-11. Index According to Item . . . . . . . . . . . . . . . . . . . . . . . . . . . . . . . . . . 508
21-12. Purpose-Oriented Index . . . . . . . . . . . . . . . . . . . . . . . . . . . . . . . . . . 511
PCL Function List . . . . . . . . . . . . . . . . . . . . . . . . . . . . . . . . . . . . . . . . . . . . . . . . 470
Adobe PostScript Function List . . . . . . . . . . . . . . . . . . . . . . . . . . . . . . . . . . . . . . 478
Using the Accessory Screen Fonts . . . . . . . . . . . . . . . . . . . . . . . . . . . . . . . . . . . 484
Installing Screen Fonts . . . . . . . . . . . . . . . . . . . . . . . . . . . . . . . . . . . . . . . . . . . . 485
Installing Adobe Type Manager (ATM) . . . . . . . . . . . . . . . . . . . . . . . . . . . . . . . . 488
Downloading Fonts . . . . . . . . . . . . . . . . . . . . . . . . . . . . . . . . . . . . . . . . . . . . . . . 490
PCL Font List. . . . . . . . . . . . . . . . . . . . . . . . . . . . . . . . . . . . . . . . . . . . . . . . . . . . 491
PostScript Font List . . . . . . . . . . . . . . . . . . . . . . . . . . . . . . . . . . . . . . . . . . . . . . . 496
PCL macro . . . . . . . . . . . . . . . . . . . . . . . . . . . . . . . . . . . . . . . . . . . . . . . . . . . . . 505
xiii
Introduction
Page 14

Introduction
●
Package Contents
The following items are supplied with the print controller:
• Notice Sheet
• Interface Board
• User Software CD
(Windows)
• Printer Driver
• Network Connection Utility
Network Setup 2.0
• Adobe Acrobat Reader
• User's Manual (this manual)
Release Note (describes the latest information as well as limits of the system and the user software.)
•
• Screenfonts
(Macintosh)
• Adobe Acrobat Reader
• User's Manual (this manual)
The following items are supplied with the PostScript3 option:
• PS protection chip
• User Software CD (Including printer driver, Adobe Acrobat Reader, this User’s Manual and Release
Note*)
*Release Note describes the latest information and limits of the system and the user software.
xiv
Introduction
Page 15

Introduction
●
System Requirements
Windows
The following are required to print from Windows-compliant computers to the printing system:
• Computers on which Windows 95/98/Me/NT 4.0/2000/XP can run
• CD-ROM drive (necessary to install the printer driver or the scanner driver)
Using Windows 95/98/Me
• Microsoft Windows 95/98/Me
• 32 MB RAM or more
Using Windows NT 4.0
• Microsoft Windows NT 4.0 and NT Service Pack 3 or later
• 32 MB RAM or more
Using Windows 2000/XP
• Microsoft Windows 2000/XP
• 128 MB RAM or more
Macintosh
The following are required to print from the Macintosh to the Print Controller.
• Computers on which Mac 8.x or higher can run.
• CD-ROM drive (necessary to install the printer driver)
• Network Interface (necessary to access printing system)
Parallel Port
The following are required to print to the print controller by way of the parallel port:
• Windows-compliant computers
• IEEE 1284 parallel cable
One end of the cable is required to have a DB 36 pin male connector (connected to the print controller).
xv
Introduction
Page 16
Introduction
●
Folder structure on the CD-ROM (Print controller)
The folders included on the accompanying CD-ROM for the print controller are structured as shown below.
This illustration will be helpful for locating specific folders or files.
• In this manual, folder names and file names are not preceded by the root directory.
• You may use the files in the English folder.
User Software CD
Windows
English
Acroread (Adobe Acrobat Reader 5.0)
NetUtil (Network Setup 2.0 Program)
Printer
Win9x_Me (Printer Driver for Windows 95/98/Me)
WinNT_2000_XP (Printer Driver for Windows NT/2000/XP)
Screenfonts (TrueType Screen Fonts)
UserGuide
Others
ipmid_int_km_vxxx.pdf (User's Guide for non-USA)
(Network Setup 2.0 User's Guide)
USA
ipmid_us_vxxx.pdf (User's Guide for USA)
netset_e_km_vxxx.pdf
netset_e_km_vxxx.pdf
(Network Setup 2.0 User's Guide)
French
German
Italian
Spanish
xvi
Introduction
Page 17
Introduction
●
Folder structure on the CD-ROM (PostScript3 option)
The folders included on the accompanying CD-ROM for PostScript3 option are structured as shown below.
This illustration will be helpful for locating specific folders or files.
• In this manual, folder names and file names are not preceded by the root directory.
• You may use the files in the English folder.
User Software CD
Windows
English
Acroread (Adobe Acrobat Reader 5.0)
Driver
AdobePS
Win9x_Me (Printer Driver for Windows 95/98/Me)
WinNT (Printer Driver for Windows NT)
French
Italian
German
Spanish
n2000_XP
Wi
KONICA MINOLTA PS
Win9x_Me
Screenfonts
UserGuide
WinNT_2000_XP
ATM Light (Adobe Type Manager 4.1)
PS Screen Fonts (PS3 TrueType/Type1 Screen Fonts)
Others
ipmid_int_km_vxxx.pdf
pssw2k_int_km_vxxx.pdf
USA
ipmid_us_vxxx.pdf
pssw2k_us_vxxx.pdf (KONICA MINOLTA PS Driver User's Guide for USA)
(Printer Driver for Windows 2000/XP)
(Printer Driver for Windows 95/98/Me)
(Printer Driver for Windows NT/2000/XP)
(User's Guide for non-USA)
(KONICA MINOLTA PS Driver User's Guide for non-USA)
(User's Guide for USA)
Macintosh
French
Italian
German
Spanish
English
Acroread (Adobe Acrobat Reader 4.0)
Driver
OS8_x to 9_x (Printer Driver/PPD file for Power Mac)
OS10.2x (Mac OS X Printer Driver)
Screenfonts
ATM Light (Adobe Type Manager 4.1)
PS3 TrueType (Screen Fonts for PS3 TrueType)
PS3 Type1 (Screen Fonts for PS3 Type1)
UserGuide
Others
ipmid_int_km_vxxx.pdf (User's Guide for non-USA)
USA
ipmid_us_vxxx.pdf (User's Guide for USA)
xvii
Introduction
Page 18

Introduction
●
About this Manual
This manual is used only for the Print Controller.
This manual describes how to operate the Print Controller when the KONICA MINOLTA Copier is connected to computers and used as a printer.
This manual assumes you are familiar with the basic operation of your Operating System and the Copier.
The copier is separately supplied with user’s manuals. Refer to these manuals as needed.
For detailed operations of Windows 95/98/Me and Windows NT 4.0/2000/XP, refer to the operating manuals for each operating system. For application operations, refer to the operating manuals provided with
each application.
This manual is composed of the following five volumes and appendices.
I Set Up
This volume summarizes what you can do with the KONICA MINOLTA print controller and explains the
operation environment.
II Printer
This volume explains what is necessary when using this printing system as a printer. It covers the
printer driver installation method, print settings method, print count management, and what to do in the
event of problems.
III Fax
This volume explains what is necessary when using this printing system as a facsimile machine. It covers fax functions in summary and settings methods, transmission methods, and fax number registration method.
IV Control Panel
This volume explains the settings that can be made by the printer administrator using the control panel.
V Network Print Settings
This volume explains necessary settings to use this printing system as a network printer.
VI Appendix
The appendices explain how to handle problems and give the product specifications, a list of built-in
fonts, etc.
xviii
Introduction
Page 19

Introduction
●
Conventions Used in this Manual
Notation of each product
The following abbreviations are used in this manual:
(1) IP-432 Print Controller: Print controller
(2) IP-424 Print Controller: Print controller
(3) KONICA MINOLTA 7222/7223/
7228/7238/7145 Printer/Copier: Copier (or main body printer)
(4) Internal Network Controller: network controller
(5) A combination of the above
(1),(2),(3) and (4) products: printing system
(6) PS-344 PostScript option PostScript option
(7) PS-346 PostScript option: PostScript option
(8) Microsoft Windows 95: Windows 95
Microsoft Windows 98: Windows 98
Microsoft Windows Me: Windows Me
Microsoft Windows NT 4.0: Windows NT 4.0
Microsoft Windows 2000: Windows 2000
Microsoft Windows XP: Windows XP
Above Operating Systems: Windows 95/98/Me
Windows NT 4.0/2000/XP
Windows 95/98/Me/NT 4.0/2000/XP
Notation of names shown on the screen are written within square brackets.
(e.g., "click the [OK] button.")
Notation of folders
Folders are referred to in upper-to-lower sequence.
For example:
Select the [Printer.inf] file in the "PCL\English\Win9X" folder of the User Software CD.
Notation of a reference to this manual is written within square marks.
(e.g., [Chapter 1 Summary]).
The following indicates page reference for specific information contained in this manual.
(e.g., ( Page 1).
When you click in the page number, you are linked to the reference page.
●
Screens used with this Manual
The functional descriptions of the printer driver refer to the printer driver for the IP-432 (PS-344).
xix
Introduction
Page 20
Introduction
●
Usage of this Manual
This is the item title.
This covers restrictions when functions are
combined.
This is the contents
of the screen displayed when an operation is executed.
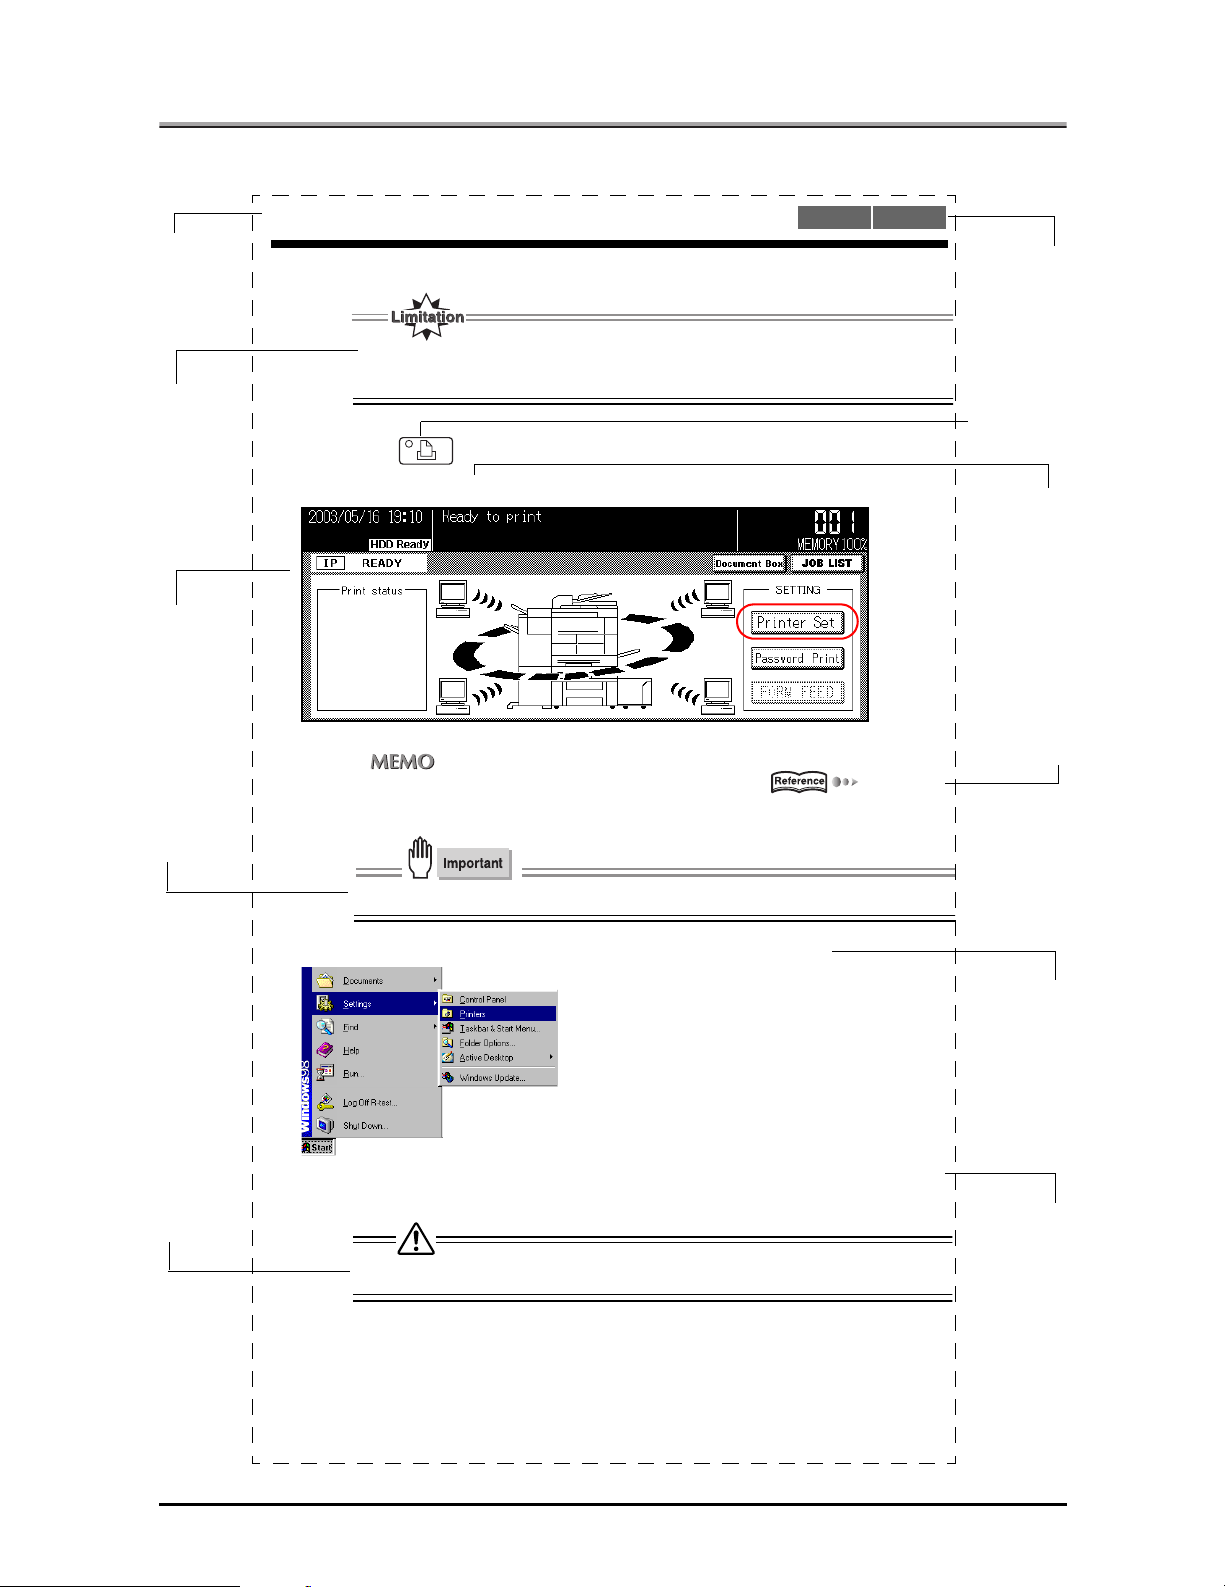
3-1. Setting Printer Functions
The printer functions are set by displaying the printer settings screen.
● When the Adobe PostScript driver is selected, the document size cannot be set.
1
Press the (PRINTER) button on the control panel.
2
Touch the [Printer Set] key.
●
Sending to an FTP server [Sending to FTP server ] ( Page 325)
PCL Adobe PS
This illustrates that
either [PCL] or
[Adobe PS] can be
used for the printer
driver setting.
This displays buttons on the control
panel.
This displays the
keys on the LCD
screen.
The related items
are explained on the
following page.
If you click the page
number on the PDF,
it moves to the referenced page.
This covers important information.
This covers items
requiring attention
or which are prohibited during operation.
● Always set irregular size paper in the copier's bypass tray.
3
From the taskbar, select [Start]- [Settings] - [Printers].
4
For [Drives:], select the CD-ROM drive. For folder, double-click the
[\English\Printer\Win9x_Me] folder.
● If there are any files that cannot be deleted, logon again.
The names of windows, dialog boxes,
and icons displayed
on the computer
screen are written in
brackets [ ].
Folder structure is
written in upper to
lower sequence.
xx
Introduction
Page 21

I Set Up
This volume summarizes what you can do
with the KONICA MINOLTA print controller
and explains the operating environment.
Chapter 1 Summary............................... 2
1
Page 22

I Set Up
Chapter 1 Summary
This chapter explains what you need to know about the print controller, before you begin
installation and printing.
1-1. What is the Print Controller? ...............................................................3
1-2. Flow of Processing ...............................................................................8
1-3. Operation Environment ......................................................................10
2
Page 23
1-1. What is the Print Controller?
Role of the Print Controller
The printer controller is embedded into the KONICA MINOLTA copier, turning it into a network-capable printing system.
You can print and send faxes from applications on the PC connected to the printing system. When using the
copier as a network printer, the print controller is used and you can print and send faxes from applications on
the PC.
Flow for printing (Using as local printer)
Printing system
Copier
Print
Controller
Parallel
interface
Flow for printing (Using as USB printer)
Printing system
Copier
Print
Controller
USB
Computer
Network
E-RDH memory
3 I Set Up Chapter 1 Summary
Page 24
1-1. What is the Print Controller?
Flow for printing (Using as network printer)
Printing system
Copier
Print
Controller
Flow for PC-Fax transmission (Using as local printer)
Ethernet
Network
HUB
Printing system
Copier
Print
Controller
Printing with
the Copier
Fax
transmission
E-RDH memory
Parallel
interface
Flow for PC-Fax transmission (Using as USB printer)
Printing system
Copier
Print
Controller
Computer
Network
USB
HUB
4 I Set Up Chapter 1 Summary
Page 25
1-1. What is the Print Controller?
Flow for PC-Fax transmission (Using as network printer)
Print
Controller
Printing with
the Copier
Fax
transmission
z To use the PC-FAX feature of the IP-432, you must install an optional fax kit.
Printing system
Network
Copier
HUB
Ethernet
E-RDH memory
5 I Set Up Chapter 1 Summary
Page 26

1-1. What is the Print Controller?
What You Can Do with the Print Controller
The print controller has the following functions.
It can receive print commands during printing.
Even while the print controller is printing or receiving data from one PC, it can receive print commands
from another.
This printing system stores data temporarily in the copier's memory and uses the Electronic Recirculating Document Handler (E-RDH) to handle the printing.
The standard E-RDH memory is 64 MB, which can hold about 360 pages of A4-size documents. The
memory can be expanded to up to 320 MB.
z For details on memory, refer to [21-5. Options] ( Page 466)
Functions used with the copier can also be utilized from the PC.
Even when using the copier as a printer, duplex printing and paper tray selection can be executed the
same as when the unit is used as a copier. Also, stapling and other such functions can be selected if
the optional finisher is installed.
Managing the number of sheets printed (Printer EKC/ECM)
If the [Printer EKC/ECM] function is set, the number of sheets printed for each user can be managed by
password. It is possible to reject users without passwords and users who have reached a preset copy
or print limit.
z For details, refer to [ Chapter 5 Print Count Management (Printer EKC/ECM)].
( Page 295)
The print controller can be used as a fax and printer.
The print controller can be used to send faxes directly from the PC.
z For details on the fax functions, refer to [ Chapter 7 Fax Functions (PC-Fax)].
( Page 308)
6 I Set Up Chapter 1 Summary
Page 27
1-1. What is the Print Controller?
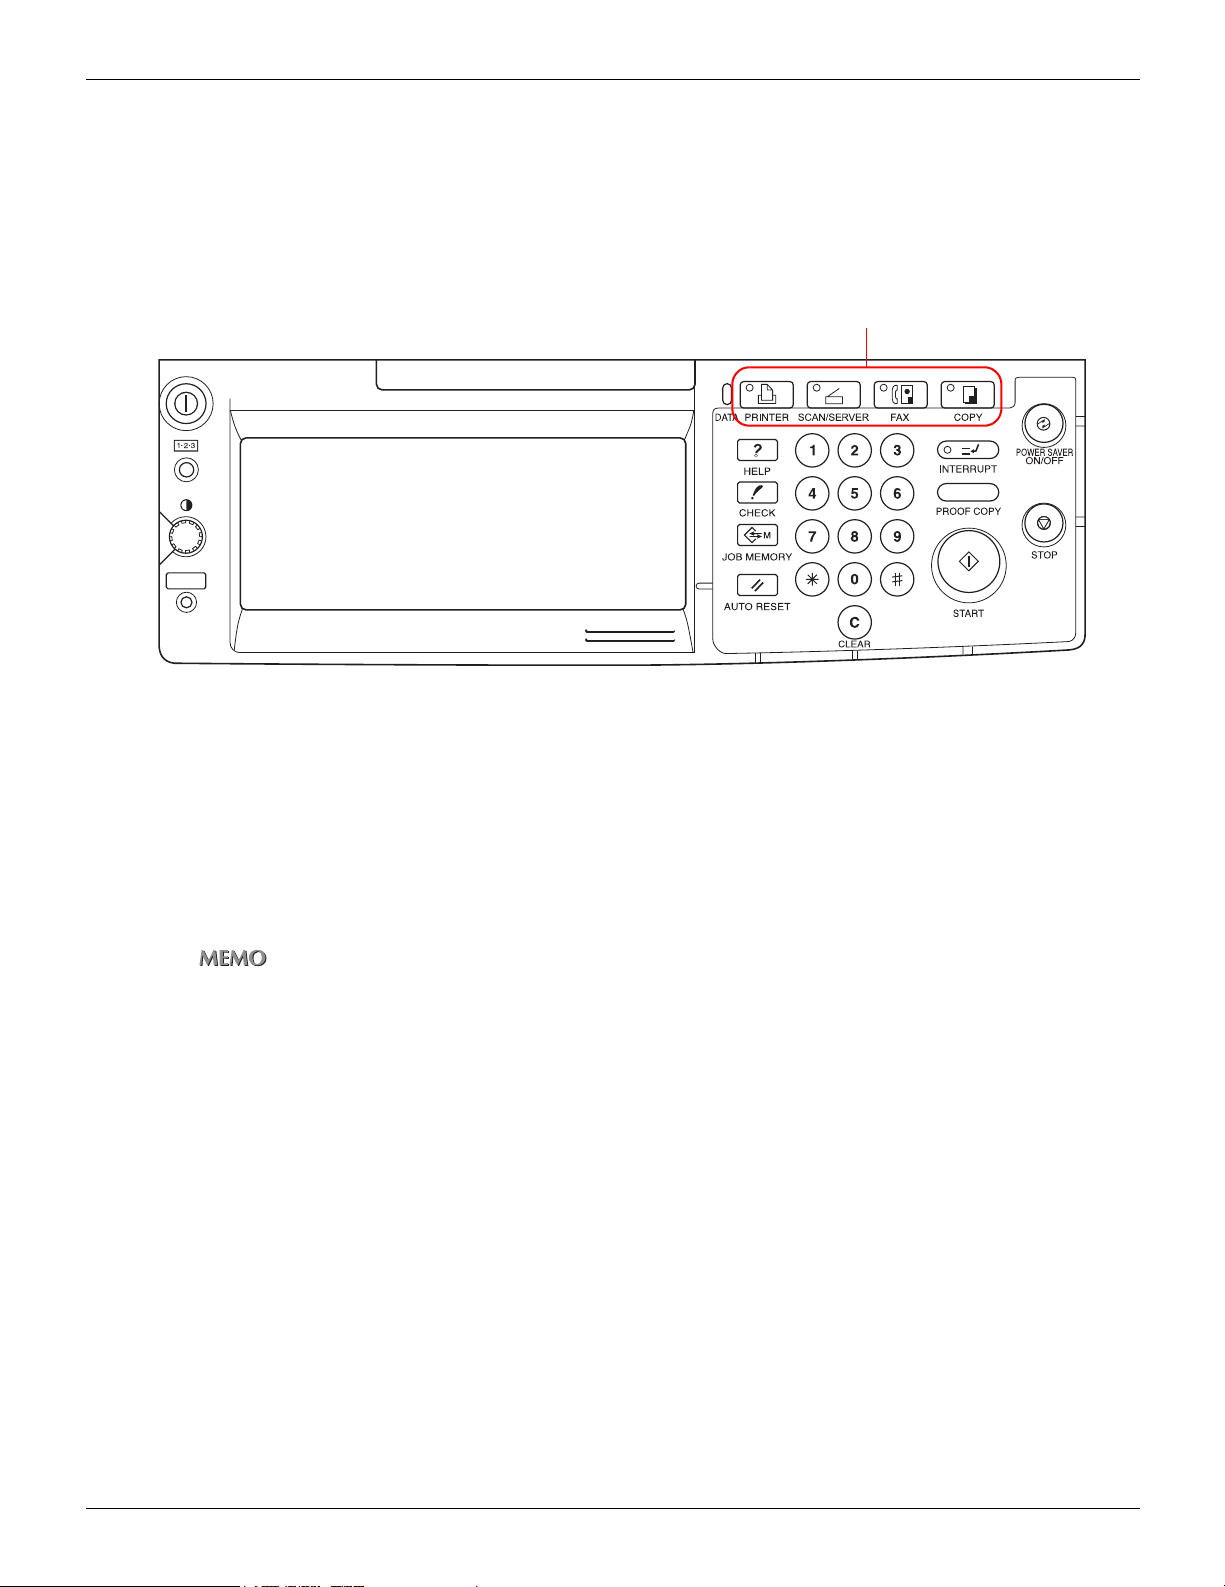
Four Modes
The printer driver settings are primarily made from the PC, but the font list printing, controller settings, and
default settings for printing can be set with the copier control panel. Also, with the print controller, the copier
can be used as a copier or scanner by changing the mode.
The mode is switched with the [Mode switch] button on the copier control panel.
[Mode switch] button
Copy mode
This uses the printer main unit as a copier.
Fax mode
This uses the printer main unit as a fax machine.
Scanner mode
This uses the copier as a scanner.
z For details on the scanner, refer to the copier user’s manual [Network Setup and Scanner Operations].
Printer mode
This mode is used for setting the printing system and for outputting lists, confidential documents, etc.
7 I Set Up Chapter 1 Summary
Page 28
1-2. Flow of Processing
The general flow of processing for using this printing system as a printer is as follows.
Copy Mode
This printing system can be used as a printer, fax, and scanner and of course, it can also be used as a copier.
To use this system as a copier, press the [Mode switch] button the control panel and light up [Copy].
To use the copier if it is receiving a fax or functioning as a printer, pressing the [Mode switch] button lets you
make copies.
When a print job or fax is received during copying, the data is stored in the copier’s E-RDH memory. When
the copying ends, the output resumes automatically.
z Whether the output is immediate or is scheduled as the next job depends on the copier status.
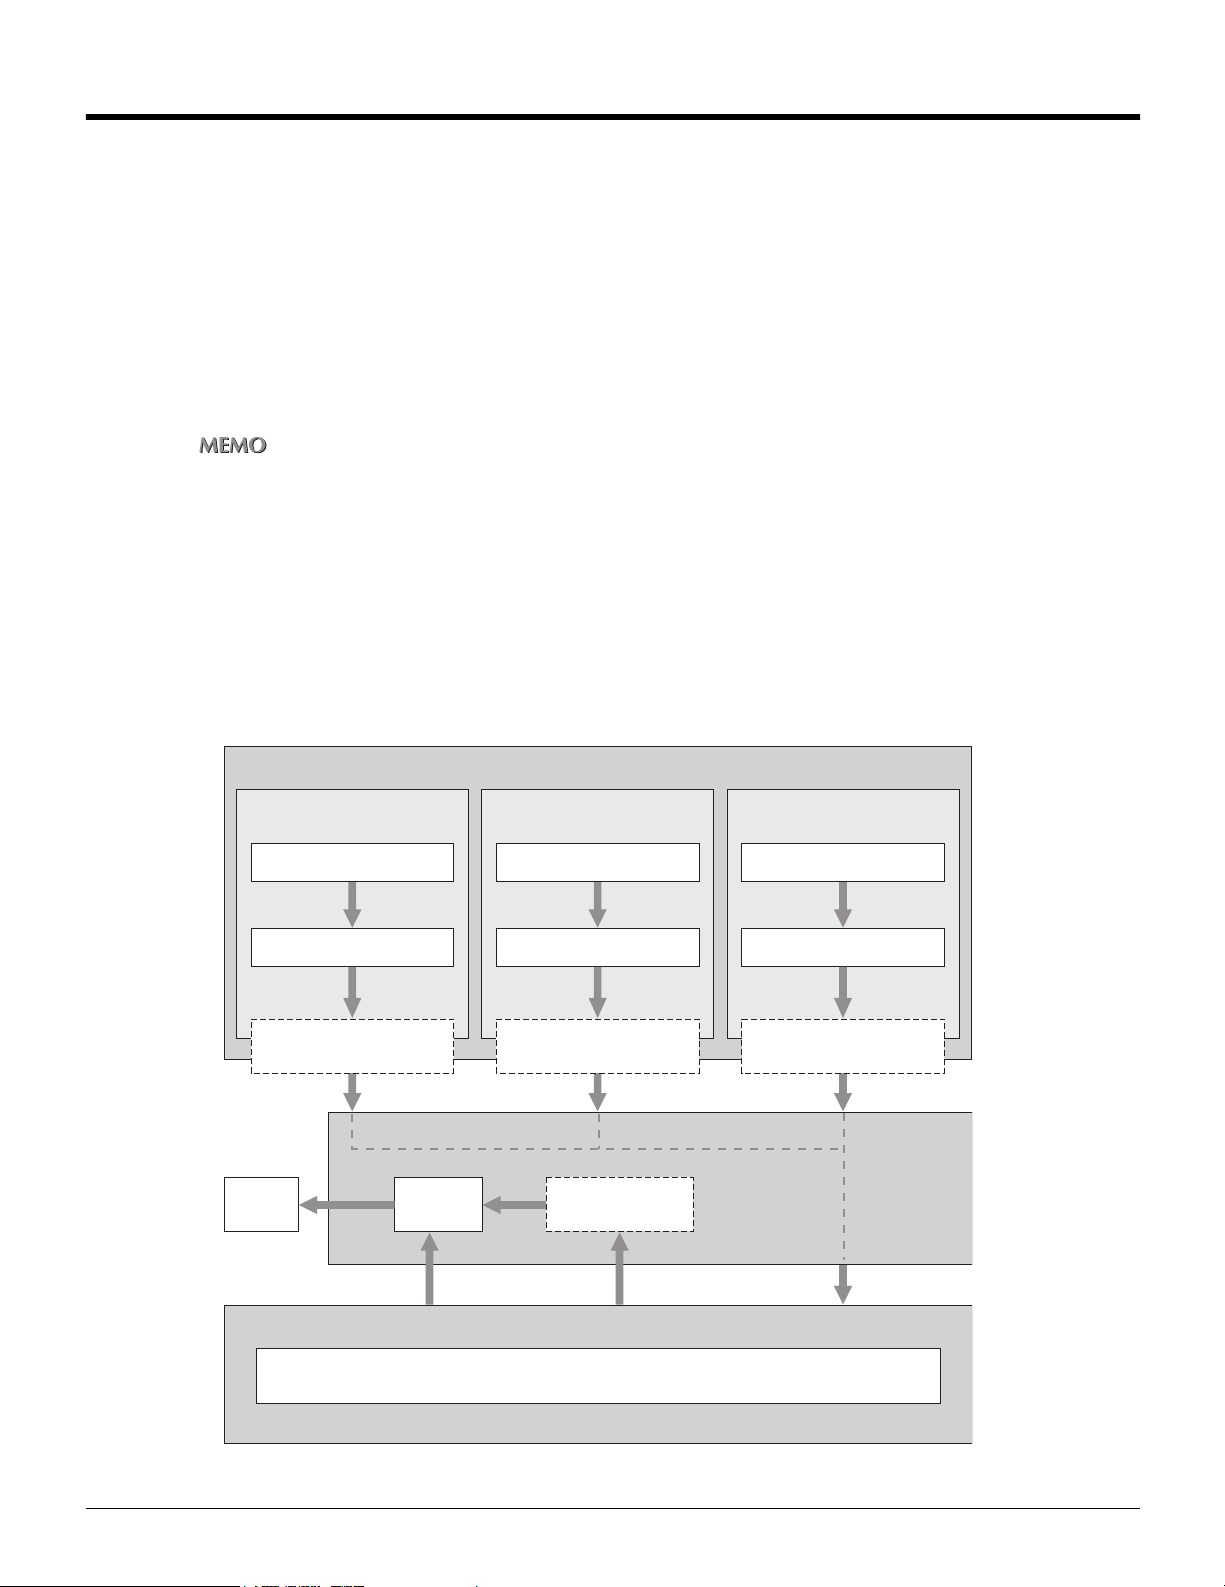
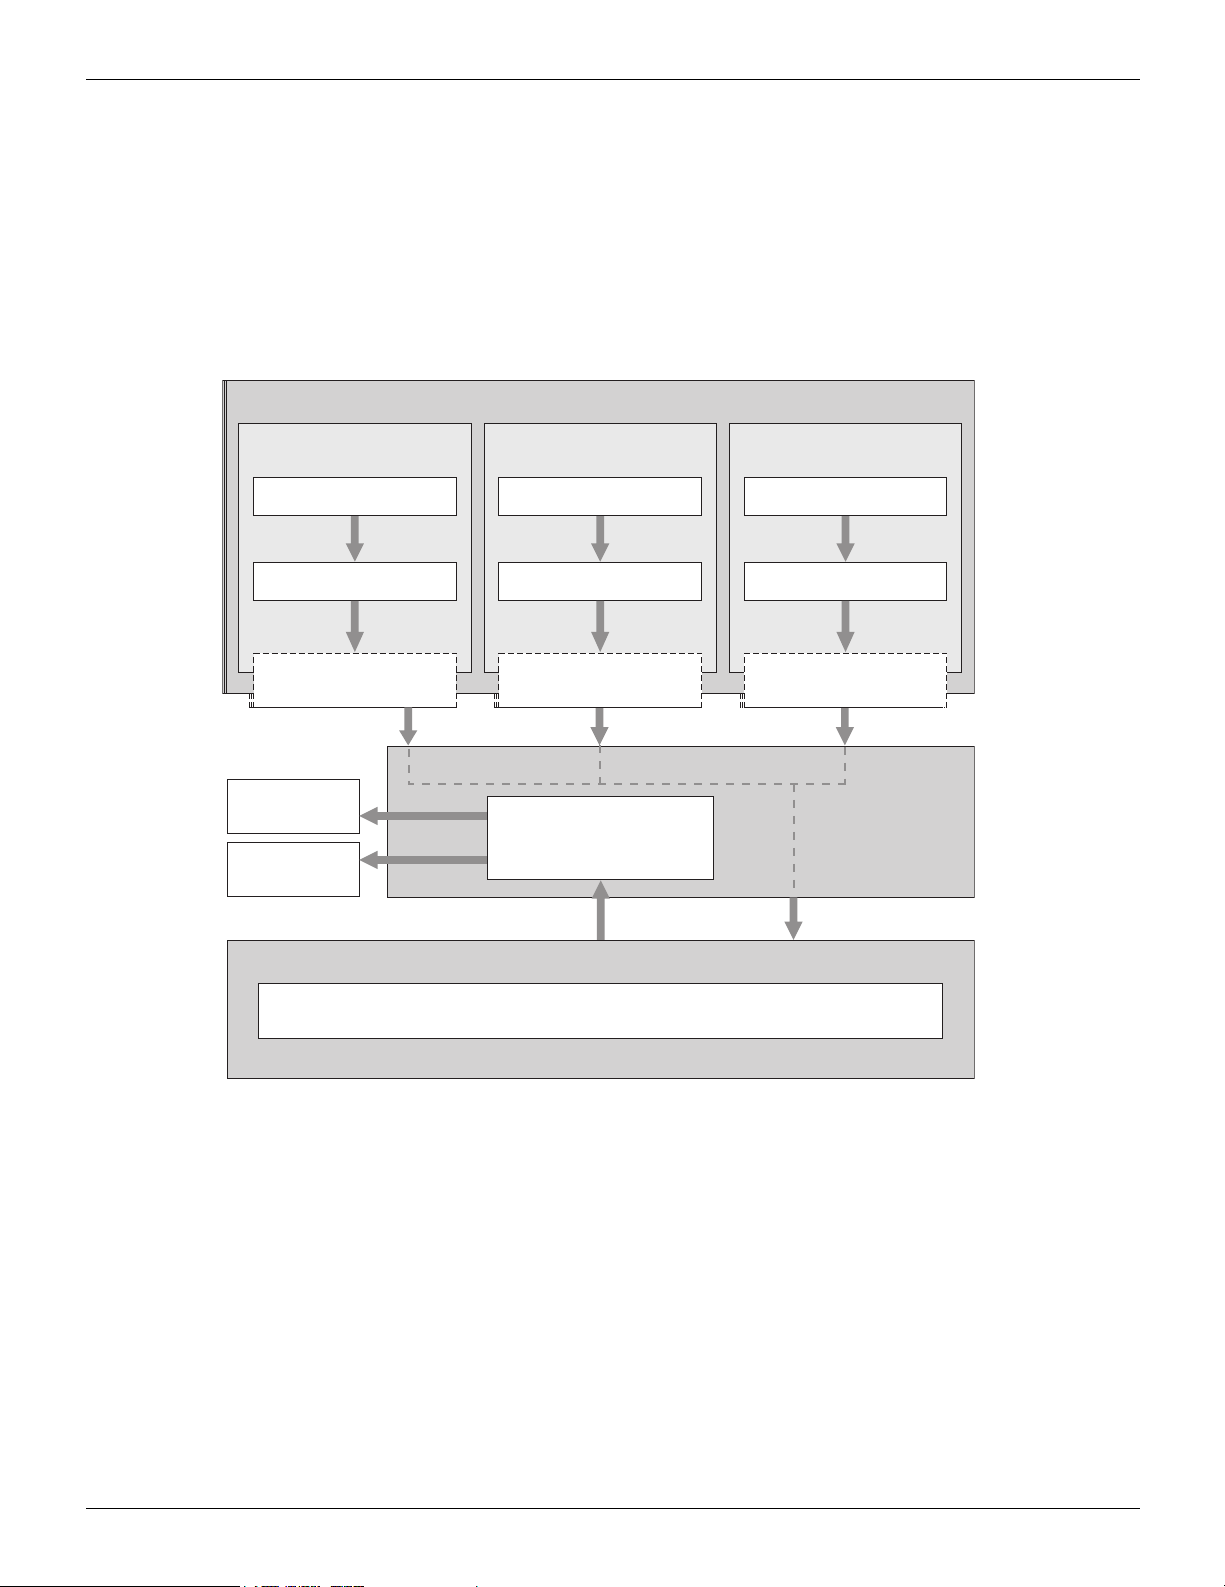
Flow for Printing
Print commands sent from the application are received by the printer driver.
When this printing system is used as a local printer, data is sent to the copier then to the print controller through
the parallel interface (IEEE1284) and when it is used as a network printer, the data is sent through the ethernet
(TCP/IP, IPX/SPX). Image rasterizing processing is executed by the print controller (the characters and images
to the output are developed into bitmap data). This data is printed from the copier.
When printing with a password, first save the data on copier
Computer
s optional hard disk (HD-103 Type-A).
’
Application
Printer driver
Parallel interface
(IEEE1294)
Print
Using as USB printer
Application
Printer driver
USB
E-RDH
memory
Print Password Print
PDL processing (rasterizing)
HD-103 Type-A
(Option)
Print Controller
Using as network printerUsing as local printer
Application
Printer driver
Ethernet
(TCP/IP, IPX/SPX)
Copier
8 I Set Up Chapter 1 Summary
Page 29
1-2. Flow of Processing
PC-Fax Transmission Flow
The transmission command sent from the application is received by the printer driver.
When this printing system is used as a local printer, data is sent to the copier then to the print controller through
the parallel interface (IEEE1284) and when it is used as a network printer, the data is sent through the ethernet
(TCP/IP, IPX/SPX). Image rasterizing processing is executed by the print controller (the characters and images to
the output are developed into bitmap data). This data is stored in the copier’s E-RDH memory is transmitted by fax
as a normal fax job.
Computer
Application
Printer driver
Parallel interface
(IEEE1294)
Fax
transmission
Print
Using as USB printer
Application
Printer driver
USB
Copier
E-RDH memory
Print Controller
PDL processing (rasterizing)
Using as network printerUsing as local printer
Application
Printer driver
Ethernet
(TCP/IP, IPX/SPX)
9 I Set Up Chapter 1 Summary
Page 30

1-3. Operation Environment
This section explains the system requirements to use this printing system and the interfaces that can be used
for connection.
Operating Systems and Requirements
Windows
Operating system: Windows 95/98/Me/NT 4.0/2000/XP
Memory: 32 MB min.
CD-ROM drive
Macintosh
Can only be used if the PostScript option is installed.
Operating system: Mac OS 8.x - 9.x/Mac OS X v10.2x
CD-ROM drive
Network controller
Interfaces Used for Connection
The following two types of interfaces can be used to connect this printing system and the PC.
Parallel interface (included with the copier)
This interface is used when using this printing system as a local printer.
Only Windows PCs can be connected through this interface and an IEEE1284 parallel cable is
required. Use a parallel cable that has an Amphenol 36-pin male connector at one end.
Parallel interface can be used in compatible, nibble, and ECP mode.
USB interface (included with the copier)
This interface is connected when using this printing system as a USB printer.
A USB cable is required for connection and only Windows 2000/XP PCs can be connected through this
interface.
Use A type (4-pin male) and B-type (4-pin male) USB cables. This interface is in compliance with
USB1.1.
Use of a USB cable which is 3m in length or less is recommended.
Ethernet (included with the copier)
This interface is used when using this printing system as a network printer.
This interface supports the 100Base-TX and 10Base-T standards. The protocols supported are TCP/IP
(LPD/LPR, Peer-to-Peer), IPX/SPX (NetWare), and AppleTalk (EtherTalk), etc..
10 I Set Up Chapter 1 Summary
Page 31

1-3. Operation Environment
Connection diagram
Each printer cable should be connected to either the Ethernet port or the Parallel port on the rear side
of the copier.
Copier (rear view)
USB cable
Parallel printer cable
USB port
Ethernet (100Base-TX/10Base-T)
Parallel port
11 I Set Up Chapter 1 Summary
Page 32

II Printer
This volume explains printer usage.
The Flow for Setup ........................................13
Chapter 2 Preparing the Printer for Use......14
Chapter 3 Printing from Windows..............112
Chapter 4 Printing from a Macintosh.........232
Chapter 5 Print Count Management (Printer
EKC/ECM) ..................................295
Chapter 6 Printing Problems ......................301
12
Page 33

The Flow for Setup
This printing system must be set up before it is used.
The setup procedures connect the copier to the computer and install the printer driver in the computer.
When using this printing system with your computer for the first time, set up as shown in [New Setup].
To install a new printer driver in a printing system already in use, set up as shown in [Updating a Printer
Driver].
New Setup
To set up the first time:
1 Connect the copier to the computer.
z When connecting the copier to the computer, refer to [1-3.Operation Environment] ( page 10).
2 Install the printer driver.
z When installing the print driver, refer to [2-2.Using the Print Controller] ( page 16).
3 Execute a test print.
Updating a Printer Driver
To update the current printer driver:
1 Delete the current printer driver.
z When deleting the current printer driver, refer to [2-9.Updating the Printer Driver] ( page 100).
2 Restart the computer.
3 Install the new printer driver.
4 Execute test print.
For some printer drivers and Operating Systems, the installation procedure for the printer driver may be different.
The procedure for deleting the old printer driver may be different on some Operating Systems.
13 II Printer
Page 34

II Printer
Chapter 2 Preparing the Printer for Use
To use the print controller, first it is necessary to install the printer driver on the PC.
This chapter explains the printer driver installation method for each operating system supported.
It also explains how to update printer drivers and how to handle problems that might arise during installation.
2-1. Checking the PC..................................................................................15
2-2. Using the Print Controller ..................................................................16
2-3. Using this Printing System with Windows 95/98/Me........................18
2-4. Using this Printing System with Windows NT 4.0............................34
2-5. Using this Printing System with Windows 2000 ..............................48
2-6. Using this Printing System with Windows XP..................................65
2-8. Using this Printing System with a Macintosh ..................................88
2-9. Updating the Printer Driver ..............................................................100
2-10. Installation Problems......................................................................111
14
Page 35

2-1. Checking the PC
To use this printing system, it is necessary to install the printer driver. A printer driver is a program that controls
processing at data output and is installed on the PC from the [User software CD] before use.
The Operating Systems on which this printer driver can be installed are as follows.
Windows 95
Windows 98
Windows Me
Windows NT 4.0 (Service Pack 3 or later)
Windows 2000
Windows XP
Mac OS 8.x - 9.x (When PostScript Option installed.)
Mac OS x v10.2x (When PostScript Option installed.)
15 II Printer Chapter 2 Preparing the Printer for Use
Page 36

2-2. Using the Print Controller
This section explains the printer driver installed to use the print controller and the page notation language types.
Printer Driver Types and Supported Operating Systems
The [User software CD] that comes with this printing system contains printer drivers. Install the required
printer driver.
PCL Driver
This driver is installed on PCs running Microsoft Windows. The Operating Systems on which this printer
driver can be installed are as follows.
Windows 95
Windows 98
Windows Me
Windows NT 4.0 (Service Pack 3 or later)
Windows 2000
Windows XP
Adobe PostScript Driver
This driver is installed when the PostScript option is installed. The Operating Systems on which this
printer driver can be installed are as follows.
Windows 95
Windows 98
Windows Me
Windows NT 4.0 (Service Pack 3 or later)
Windows 2000
Windows XP
Mac OS 8.x - 9.x
Mac OS X v10.2x
z The printer driver is not installable on Mac OS v10.0 or v10.1.
z The Adobe PostScript Driver is on the [User software CD] that comes with the PostScript option.
16 II Printer Chapter 2 Preparing the Printer for Use
Page 37

2-2. Using the Print Controller
Page Notation Language
Page notation language is a language that describes the characters, pictures, and other print images to the
printer when printing data is prepared on a PC. The page notation language used in this printing system are
as follows.
When used only with the print controller
PCL is used.
When the PostScript option installed
When the PostScript option is installed, either PCL or AdobePS is used.
The printer driver installation methods are explained on the following pages.
Using this printing system with Windows 95/98/Me Page 18
Using this printing system with Windows NT 4.0 Page 34
Using this printing system with Windows 2000 Page 48
Using this printing system with Windows XP Page 65
Using this printing system with Macintosh Page 88
17 II Printer Chapter 2 Preparing the Printer for Use
Page 38

2-3. Using this Printing System with Windows
95/98/Me
Install the printer driver on the PC running either Windows 95, 98, or Me. Have the [User software CD] CD-ROM
on hand.
PCL Driver Installation
This section explains the procedure with the screens of Windows 98.
1 Switch on the power for the computer and start Windows.
z Close down any applications that are running.
z When installing the Adobe PostScript Driver, refer to [Adobe PostScript Driver Installation].
( Page 25)
2
Put the [User software CD] in the computer's CD-ROM drive.
3 From the taskbar, select [Start] -
→ The [Printers] screen is displayed.
[
Settings] - [Printers].
4 Double click the [Add Printer] icon.
→ The [Add Printer Wizard] screen is displayed.
18 II Printer Chapter 2 Preparing the Printer for Use
Page 39

2-3. Using this Printing System with Windows 95/98/Me
5 Click the [Next ›] button.
→ The screen for selecting the connection method is displayed.
6 When the printer and the computer are directly connected, select [Local printer]. When
printing with the printing system connected to another computer via the network,
select [Network printer].
7 Click the [Next ›] button.
If you selected [Local printer], proceed to Step 8.
If you selected [Network printer], input the [Network path or queue name:], or click the [Browse…] button to select it, then click the [Next ›] button.
z For information about network settings, consult your network administrator.
19 II Printer Chapter 2 Preparing the Printer for Use
Page 40

2-3. Using this Printing System with Windows 95/98/Me
8 Click the [Have Disk…] button.
→ The [Install From Disk] screen is displayed.
9 Click the [Browse…] button.
→ The [Open] screen is displayed.
10 For [Drives:], select the CD-ROM drive. For folder, double-click the [\English
\Printer\Win9x_Me] folder.
→ [Setup.inf] is displayed as the [File name:].
11 Click the [OK] button.
→ The [Install From Disk] screen is displayed.
12 Click the [OK] button.
→ The display returns to the [Add Printer Wizard] screen.
20 II Printer Chapter 2 Preparing the Printer for Use
Page 41

2-3. Using this Printing System with Windows 95/98/Me
13 Ensure that [KONICA MINOLTA xxxx/IP-xxx PCL] is displayed in [Printers], then click the
[Next ›] button.
→ The screen for selecting the port to be used with the printer is displayed.
14 From the [Available ports:] list, select the port to which this printing system is con-
nected.
z For a local printer, select [LPT1].
15 Click the [Next ›] button.
→ A screen to confirm the printer name is displayed.
16
Check the printer name.
To change it, input a new printer name.
21 II Printer Chapter 2 Preparing the Printer for Use
Page 42

2-3. Using this Printing System with Windows 95/98/Me
17 If you want to use this printing system as your default printer, select [Yes]; if you do
not want to use this printing system as your default printer, select [No].
18 Click the [Next ›] button.
→ A screen is displayed asking whether or not you want to print a test print.
19 To print a test print, select [Yes]; to not print a test print, select [No].
z
A test print means printing a standard Windows test page. Test prints can also be executed in [Properties].
( Page 32)
20 Click the [Finish] button.
→ Install the printer driver from the user software CD to the PC and printing of the test page starts.
21
If the test page is printed correctly, click the
The icon for the installed printer driver is displayed in the [Printers] screen.
→
This completes printer driver installation.
z If the test page is not printed correctly, refer to [Test Page Cannot Be Printed.]
( Page 111)
[Yes]
button.
22 II Printer Chapter 2 Preparing the Printer for Use
Page 43

2-3. Using this Printing System with Windows 95/98/Me
Setting options
Options installed on the copier are set so that they can be used with the printer driver.
1
From the taskbar, select [Start] - [Settings] - [Printers].
→ The [Printers] screen is displayed.
2
Right click the [KONICA MINOLTA xxxx/IP-xxx] icon, then select [Properties].
→ The [KONICA MINOLTA xxxx/IP-xxx Properties] screen is displayed.
3
Click the [Setup] tab.
23 II Printer Chapter 2 Preparing the Printer for Use
Page 44

2-3. Using this Printing System with Windows 95/98/Me
4
In [Available options:], select the options that are installed on the copier.
z For details on options installed on the copier, consult the system administrator.
5
Click the [Add] button.
→ The selected options are included in [Installed options] and can be used with the printer driver.
24 II Printer Chapter 2 Preparing the Printer for Use
Page 45

2-3. Using this Printing System with Windows 95/98/Me
Adobe PostScript Driver Installation
1 Switch on the power for the computer and start Windows.
z Close down any applications that are running.
2 Put the PostScript option [User software CD] in the computer's CD-ROM drive.
3 From the taskbar, select [Start] - [Settings] - [Printers].
→ The [Printers] screen is displayed.
4 Double click the [Add Printer] icon.
→ The [Add Printer Wizard] screen is displayed.
25 II Printer Chapter 2 Preparing the Printer for Use
Page 46

2-3. Using this Printing System with Windows 95/98/Me
5 Click the [Next ›] button.
→ The screen for selecting the connection method is displayed.
6 When the printer and the computer are directly connected, select [Local printer]. When
printing with the printing system connected to another computer via the network,
select [Network printer].
7 Click the [Next ›] button.
If you selected [Local printer], proceed to Step 8.
If you selected [Network printer], input the [Network path or queue name], or click the [Browse…] button to select it, then click the [Next ›] button.
z For information about network settings, consult your network administrator.
26 II Printer Chapter 2 Preparing the Printer for Use
Page 47

2-3. Using this Printing System with Windows 95/98/Me
8 Click the [Have Disk…] button.
→ The [Install From Disk] screen is displayed.
9 Click the [Browse…] button.
→ The [Open] screen is displayed.
10
For [Drives], select the CD-ROM drive. For [Folders], double-click the [\English
\Driver\AdobePS\Win9x_Me] folder.
→ [oemsetup.inf] is displayed as the [File name:].
11 Click the [OK] button.
→ The [Install From Disk] screen is displayed.
12 Click the [OK] button.
→ The display returns to the [Add Printer Wizard] screen.
27 II Printer Chapter 2 Preparing the Printer for Use
Page 48

2-3. Using this Printing System with Windows 95/98/Me
13 Ensure that [KONICA MINOLTA IP-xxx PS] is displayed in [Printers], then click the
[Next ›] button.
→ The screen for selecting the port to be used with the printer is displayed.
14 From the [Available ports:] list, select the port to which this printing system is con-
nected.
z For a local printer, select [LPT1].
15 Click the [Next ›] button.
→ A screen to confirm the printer name is displayed.
16
Check the printer name.
To change it, input a new printer name.
28 II Printer Chapter 2 Preparing the Printer for Use
Page 49

2-3. Using this Printing System with Windows 95/98/Me
17 If you want to use this printing system as your default printer, select [Yes]; if you do
not want to use this printing system as your default printer, select [No].
18 Click the [Next ›] button.
→ A screen is displayed asking whether or not you want to print a test print.
19 To print a test print, select [Yes]; to not print a test print, select [No].
z A test print means printing a standard Windows test page. Test prints can also be executed in [Properties].
( Page 32)
20 Click the [Finish] button.
→ Install the printer driver from the user software CD to the PC and printing of the test page starts.
21
If the test page is printed correctly, click the
The icon for the installed printer driver is displayed in the [Printers] screen.
→
This completes printer driver installation.
z If the test page is not printed correctly, refer to [Test Page Cannot Be Printed.]
( Page 111)
[Yes]
button.
29 II Printer Chapter 2 Preparing the Printer for Use
Page 50

2-3. Using this Printing System with Windows 95/98/Me
Setting options
Options installed on the copier are set so that they can be used with the printer driver.
1
From the taskbar, select [Start] - [Settings] - [Printers].
→ The [Printers] screen is displayed.
2
Right click the [KONICA MINOLTA IP-xxx PS] icon, then select [Properties].
→ The [KONICA MINOLTA IP-xxx PS Properties] screen is displayed.
3
Click the [Device Options] tab.
30 II Printer Chapter 2 Preparing the Printer for Use
Page 51

2-3. Using this Printing System with Windows 95/98/Me
4
From among the [Installable options] [Finisher], [Drawer Base], [Large Capacity Tray], and
[Memory Configuration], select those options that are installed on the copier, then change
the contents.
z For details on options installed on the copier, consult the system administrator.
5
Click the [OK] button.
→ When the option settings are complete, the options can be used with the printer driver.
31 II Printer Chapter 2 Preparing the Printer for Use
Page 52

2-3. Using this Printing System with Windows 95/98/Me
Checking Printing
Once the printing system and the computer have been connected and the printer driver installed, printing is
possible. Try printing an actual document.
You can check printing by executing the test print from the printer driver properties screen or by printing from an
application.
Print settings
The basic print settings are made from the printer driver [Properties] or the application’s [Print] screen.
When making the print settings from the application’s [Print] screen, the settings you make are not
saved after that application ends. For details on making the print settings from the printer driver [Properties] screen, refer to [3-1.Setting Printer Functions] ( Page 114).
Executing a test print
The test print prints the standard Windows test page.
1
From the taskbar, select [Start] - [Settings] - [Printers].
→ The [Printers] screen is displayed.
2
Right click the printer icon, then select [Properties].
→ The printer driver [Properties] screen is displayed.
3
Select the [General] tab, then click the [Print Test Page] button.
→ The test page is printed and the check screen is displayed.
32 II Printer Chapter 2 Preparing the Printer for Use
Page 53

2-3. Using this Printing System with Windows 95/98/Me
4
After checking the printing, click the [Yes] button.
z If the test page is not printed correctly, refer to [Test Page Cannot Be Printed.]
( Page 111)
Printing from an application
This method prints data with a [Print] command from an application in use.
1
Open data with the application, then execute [Print].
→ The [Print] screen is displayed.
2
Ensure that the name of this printing system is displayed as the [Name:].
If this printer is not selected, click the [▼] button to select it.
z The [Print] screen varies according to the application.
3
Set the print range and the number of copies, then click the [OK] button.
Check that the specified pages are printed.
33 II Printer Chapter 2 Preparing the Printer for Use
Page 54

2-4. Using this Printing System with Windows NT 4.0
Install the printer driver on the PC running Windows NT 4.0. Have the [User software CD] CD-ROM on hand.
Access Rights and Range of Operation
Since Windows NT 4.0 is an operating system designed for network management, security functions are
stronger than for Windows 95, 98, or Me.
When a new printer is added, the range of allowable operations can be specified according to the security
level (access rights) of the user.
The Windows NT 4.0 printer access rights and range of global operations are as follows. After installing the
printer driver, set the access rights for users.
Access rights Range of allowable operations
Off Printer operations disabled
Document printing
Print parameter setting
Printing
Print related (paper size, input tray, and other selections)
Graphic related (resolution, half tone, and other settings)
Printer functions (selection of functions unique to a copier)
Document manage-
ment
Full control
z For details on setting printer access rights, refer to the Windows NT 4.0 System Guide.
Document setting control
Print pause, restart, reprint, cancel
All [print] and [document management] items
Printer pause, restart, all document cancel
Printer cancel
Printer access rights setting and change
Refer to the page below for the driver installed.
PCL Driver installation
Adobe PostScript Driver installation
page 35
page 39
34 II Printer Chapter 2 Preparing the Printer for Use
Page 55

2-4. Using this Printing System with Windows NT 4.0
PCL Driver Installation
1 Switch on the power for the computer and start Windows.
z Close down any applications that are running.
2 Log on with a user name that has administrator rights.
z If you cannot log on with a user name that has administrator rights, log on with a user name that has incorporating
those of a Power User.
3 Put the [User software CD] in the computer's CD-ROM drive.
4 From [My Computer], select the [CD-ROM] and then double-click [Setup.exe] in
[English] - [Printer] - [WinNT_2000_XP] folder.
5 Click the [OK] button.
→ The [Printer Driver Installer] screen is displayed.
6 Set up the following items.
35 II Printer Chapter 2 Preparing the Printer for Use
Page 56

2-4. Using this Printing System with Windows NT 4.0
[Printer Name]
1
Check the printer name. To change it, input a new printer name.
[Selecting the Printer Port]
1
Select the port to which the printer is connected.
[Install as the Default Printer]
1
If you want to use this printing system as your default printer, check the [Install as the
Default Printer] checkbox.
36 II Printer Chapter 2 Preparing the Printer for Use
Page 57

2-4. Using this Printing System with Windows NT 4.0
7 When all the settings are complete, click the [Install] button.
8 Click the [Finished] button.
This completes printer driver installation.
37 II Printer Chapter 2 Preparing the Printer for Use
Page 58

2-4. Using this Printing System with Windows NT 4.0
Setting options
Options installed on the copier are set so that they can be used with the printer driver.
1
From the taskbar, select [Start] - [Settings] - [Printers].
→ The [Printers] screen is displayed.
2
Right click the [KONICA MINOLTA xxxx/IP-xxx] icon, then select [Properties].
→ The [KONICA MINOLTA xxxx/IP-xxx] screen is displayed.
3
Click the [Options] tab.
4
In [Available options:], select the options that are installed on the copier.
z For details on options installed on the copier, consult the system administrator.
5
Click the [Add] button.
→ The selected options are included in [Installed options] and can be used with the printer driver.
38 II Printer Chapter 2 Preparing the Printer for Use
Page 59

2-4. Using this Printing System with Windows NT 4.0
Adobe PostScript Driver Installation
1 Switch on the power for the computer and start Windows.
z Close down any applications that are running.
2 Log on with a user name that has administrator rights.
z If you cannot log on with a user name that has administrator rights, log on with a user name that has rights
incorporating those of a Power User.
3
Put the PostScript option [User software CD] in the computer's CD-ROM drive.
4 From the taskbar, select [Start] - [Settings] - [Printers].
→ The [Printers] screen is displayed.
5 Double click the [Add Printer] icon.
→ The [Add Printer Wizard] screen is displayed.
39 II Printer Chapter 2 Preparing the Printer for Use
Page 60

2-4. Using this Printing System with Windows NT 4.0
6 When connecting the printer directly to the PC or when installing the printer driver on
the PC that manages the printer, select [My Computer]. When printing via the network
with the printing system connected to another PC, select [Network printer server].
( Page 41)
z Before you can select [Network printer server], the network controller and PC network settings must be complete. For
details, consult your network administrator.
When [My Computer] is selected
1
Click the [Next ›] button.
→ The printer port select screen is displayed.
2
Click on the checkbox for the port to which the printer is connected.
z When the printer and the PC are directly connected, select the [LPT port].
z When printing directly with the printing system via the network, select the [LPR port].
( Page 387)
3
Click the [Next ›] button.
→ A screen to confirm the printer manufacturer and name is displayed.
Proceed to Step 7.
40 II Printer Chapter 2 Preparing the Printer for Use
Page 61

2-4. Using this Printing System with Windows NT 4.0
When [Network printer server] is selected
1
Click the [Next ›] button.
→ The [Printer connection] screen is displayed.
2
Either input the printer path at [Printer] or select [Shared Printers:], then click the [OK] button.
→ A screen to confirm the printer manufacturer and name is displayed.
Proceed to Step 7
z For information about network settings, consult your network administrator.
7 Click the [Have Disk…] button.
→ The [Install From Disk] screen is displayed.
41 II Printer Chapter 2 Preparing the Printer for Use
Page 62

2-4. Using this Printing System with Windows NT 4.0
8 Click the [Browse…] button.
→ The [Locate File] screen is displayed.
9 From [Look in:], select the CD-ROM drive, then double-click the [\English\Driver
\AdobePS\WinNT] folder.
→ [Oemsetup] is displayed as the [File name:].
10 Click the [Open] button.
→ The display returns to the [Install From Disk] screen.
11 Click the [OK] button.
→ The display returns to the [Add Printer Wizard] screen.
42 II Printer Chapter 2 Preparing the Printer for Use
Page 63

2-4. Using this Printing System with Windows NT 4.0
12 Ensure that [KONICA MINOLTA IP-xxx PS] is selected in [Printers], then click the
[Next ›] button.
→ A screen to confirm the printer name is displayed.
13 Check the printer name.
To change it, input a new printer name.
14 Click the [Next ›] button.
→ The screen to comfirm whether or not the printer is shared is displayed.
15 To share the printer, select [Shared]; to not share it, select [Not shared].
z To assign a share name to the printer, input the share name.
43 II Printer Chapter 2 Preparing the Printer for Use
Page 64

2-4. Using this Printing System with Windows NT 4.0
16
If necessary, select the substitute driver for the network client.
17 Click the [Next ›] button.
→ A screen is displayed asking whether or not you want to print a test print.
18 To print a test print, select [Yes]; to not print a test print, select [No].
z A test print means printing a standard Windows test page. Test prints can also be executed in [Properties].
( Page 46)
19 Click the [Finish] button.
→ Install the printer driver on the PC and printing of the test page starts.
20
If the test page is printed correctly, click the
The icon for the installed printer driver is displayed in the [Printers] screen.
→
This completes printer driver installation.
z If the test page is not printed correctly, refer to [Test Page Cannot Be Printed.]
( Page 111)
[Yes]
button.
44 II Printer Chapter 2 Preparing the Printer for Use
Page 65

2-4. Using this Printing System with Windows NT 4.0
Setting options
Options installed on the copier are set so that they can be used with the printer driver.
1
From the taskbar, select [Start] - [Settings] - [Printers].
→ The [Printers] screen is displayed.
2
Right click the [KONICA MINOLTA IP-xxx PS] icon, then select [Properties].
→ The [KONICA MINOLTA IP-xxx PS Properties] screen is displayed.
3
Click the [Device Settings] tab.
4
In [Installable Options], select the options installed on the copier, then change the contents.
z For details on options installed on the copier, consult the system administrator.
5
Click the [OK] button.
→ When the option settings are complete, the options can be used with the printer driver.
45 II Printer Chapter 2 Preparing the Printer for Use
Page 66

2-4. Using this Printing System with Windows NT 4.0
Checking Printing
Once the printing system and the computer have been connected and the printer driver installed, printing is
possible. Try printing an actual document.
You can check printing by executing the test print from the printer driver properties or by printing from an
application.
Print settings
The basic print settings are made from the printer driver [Properties] or the application’s [Print] screen.
When making the print settings from the application’s [Print] screen, the settings you make are not
saved after that application ends. For details on making the print settings from the printer driver [Properties] screen, refer to [3-1.Setting Printer Functions] ( Page 117).
Executing a test print
The test print prints the standard Windows test page.
1
From the taskbar, select [Start] - [Settings] - [Printers].
→ The [Printers] screen is displayed.
2
Right click the printer icon, then select [Properties].
→ The printer driver [Properties] screen is displayed.
46 II Printer Chapter 2 Preparing the Printer for Use
Page 67

2-4. Using this Printing System with Windows NT 4.0
3
Select the [General] tab, then click the [Print Test Page] button.
→ The test page is printed and the check screen is displayed.
4
After confirming that the test printed correctly, click the [Yes] button.
z If the test page is not printed correctly, refer to [Test Page Cannot Be Printed.]
( Page 111)
Printing from an application
This method prints data with a [Print] command from an application in use.
1
Open data with the application, then execute [Print].
→ The [Print] screen is displayed.
2
Ensure that the name of this printing system is displayed as the [Name:].
If this printer is not selected, click the [▼] button to select it.
z The [Print] screen varies according to the application.
3
Set the print range and the number of copies, then click the [OK] button.
→ Check that the specified pages are printed.
47 II Printer Chapter 2 Preparing the Printer for Use
Page 68

2-5. Using this Printing System with Windows 2000
Install the printer driver on the PC running Windows 2000. Have the [User software CD] CD-ROM on hand.
Access Rights and Range of Operation
Since Windows 2000 is an operating system designed for network management, security functions are stronger than for Windows 95/98/Me.
When a new printer is added, the range of allowable operations can be specified according to the security
level (access rights) of the user.
The Windows 2000 printer access rights and range global operations are as follows. After installing the
printer driver, set the access rights for users.
Access rights Range of allowable operations
Off Printer operations disabled
Document printing
Print parameter setting
Printing
Print related (paper size, input tray, and other selections)
Graphic related (resolution, half tone, and other settings)
Printer functions (selection of functions unique to a copier)
All [Print] items
Printer management
Document
management
z For details on setting printer access rights, refer to the Windows 2000 System Guide.
Print pause, restart, and spooler settings
Printer property change
Printer access rights setting and change
Document setting control
Print pause, restart, reprint, cancel
Refer to the page below for the driver installed.
PCL Driver installation
Adobe PostScript Driver installation
page 49
page 53
48 II Printer Chapter 2 Preparing the Printer for Use
Page 69

2-5. Using this Printing System with Windows 2000
PCL Driver Installation
1 Switch on the power for the computer and start Windows.
z Close down any applications that are running.
2 Log on with a user name that has administrator rights.
z If you cannot log on with a user name that has administrator rights, log on with a user name that has rights
incorporating those of a Power User.
3 Put the [User software CD] in the computer's CD-ROM drive.
4 From [My Computer], select the [CD-ROM] and then double-click [Setup.exe] in the
[English] - [Printer] - [WinNT_2000_XP] folder.
5 Click the [OK] button.
→ The [Printer Driver Installer] screen is displayed.
6 Set up the following items.
49 II Printer Chapter 2 Preparing the Printer for Use
Page 70

2-5. Using this Printing System with Windows 2000
[Printer Name]
1
Check the printer name. To change it, input a new printer name.
[Selecting the Printer Port]
1
Select the port to which the printer is connected.
[Install as the Default Printer]
1
If you want to use this printing system as your default printer, check the [Install as the
Default Printer] checkbox.
50 II Printer Chapter 2 Preparing the Printer for Use
Page 71

2-5. Using this Printing System with Windows 2000
7 When all the settings are complete, click the [Install] button.
8 Click the [Finished] button.
This completes printer driver installation.
51 II Printer Chapter 2 Preparing the Printer for Use
Page 72

2-5. Using this Printing System with Windows 2000
Setting options
Options installed on the copier are set so that they can be used with the printer driver.
1
From the taskbar, select [Start] - [Settings] - [Printers].
→ The [Printers] screen is displayed.
2
Right click the [KONICA MINOLTA xxxx/IP-xxx] icon, then select [Properties].
→ The [KONICA MINOLTA xxxx/IP-xxx Properties] screen is displayed.
3
Click the [Options] tab.
4
In [Available options:], select the options that are installed on the copier.
z For details on options installed on the copier, consult the system administrator.
5
Click the [Add] button.
→ The selected options are included in [Installed options] and can be used with the printer driver.
52 II Printer Chapter 2 Preparing the Printer for Use
Page 73

2-5. Using this Printing System with Windows 2000
Adobe PostScript Driver Installation
1 Switch on the power for the computer and start Windows.
z Close down any applications that are running.
2 Log on with a user name that has administrator rights.
z If you cannot log on with a user name that has administrator rights, log on with a user name that has rights
incorporating those of a Power User.
3
Put the Post Scripit option [User software CD] in the computer's CD-ROM drive.
4 From the taskbar, select [Start] - [Settings] - [Printers].
→ The [Printers] screen is displayed.
5 Double click the [Add Printer] icon.
→ The [Add Printer Wizard] screen is displayed.
6 Click the [Next ›] button.
53 II Printer Chapter 2 Preparing the Printer for Use
Page 74

2-5. Using this Printing System with Windows 2000
7 When connecting the printer directly to the PC, select [Local printer]. When printing via
the network with the printing system connected to another PC, select [Network
printer]. ( Page 56)
z Ensure that the [Automatically detect and install my Plug and Play Printer] checkbox is not checked.
z Before you can select [Network printer server], the network controller and PC network settings must be complete. For
details, consult your network administrator.
54 II Printer Chapter 2 Preparing the Printer for Use
Page 75

2-5. Using this Printing System with Windows 2000
When [Local printer] is selected
1
Click the [Next ›] button.
→ The printer port select screen is displayed.
2
Select the port to which the printer is connected.
z When the printer and the PC are directly connected, select the [LPT port].
z When printing directly with the printing system via the network, select the [LPR port].
( Page 392)
3
Click the [Next ›] button.
→ A screen to confirm the printer manufacturer and name is displayed.
Proceed to Step 8.
55 II Printer Chapter 2 Preparing the Printer for Use
Page 76

2-5. Using this Printing System with Windows 2000
When [Network printer] is selected
1
Click the [Next ›] button.
→ The [Locate Your Printer] screen is displayed.
2
Input the printer name in [Name:], then click the [Next ›] button.
→ A screen to confirm the printer manufacturer and name is displayed.
Proceed to Step 8.
8 Click the [Have Disk…] button.
→ The [Install From Disk] screen is displayed.
56 II Printer Chapter 2 Preparing the Printer for Use
Page 77

2-5. Using this Printing System with Windows 2000
9 Click the [Browse…] button.
→ The [Locate file] screen is displayed.
10 From [Look in], select the CD-ROM drive, then double-click the [\English\Driver
\AdobePS\Win2000_XP] folder.
→ [OEMSETUP] is displayed as the [File name:].
11 Click the [Open] button.
→ The display returns to the [Install From Disk] screen.
12 Click the [OK] button.
→ The display returns to the [Add Printer Wizard] screen.
57 II Printer Chapter 2 Preparing the Printer for Use
Page 78

2-5. Using this Printing System with Windows 2000
13
Ensure that [KONICA MINOLTA IP-xxx PS] is selected in [Printers], then click the
button.
→ A screen to confirm the printer name is displayed.
14 Check the printer name.
To change it, input a new printer name.
[Next ›]
15 If you want to use this printing system as your default printer, select [Yes]; if you do
not want to use this printing system as your default printer, select [No].
16 Click the [Next ›] button.
→ The screen to comfirm whether or not the printer is shared is displayed.
58 II Printer Chapter 2 Preparing the Printer for Use
Page 79

2-5. Using this Printing System with Windows 2000
17 To share the printer, select [Share as:]; to not share it, select [Do not share this
printer].
z To assign a share name to the printer, input the share name.
18 Click the [Next ›] button.
→ A screen is displayed checking whether or not you want to print a test print.
19 To print a test print, select [Yes]; to not print a test print, select [No].
z A test print means printing a standard Windows test page. Test prints can also be executed in [Properties].
( Page 62)
20 Click the [Next ›] button.
→ A screen is displayed announcing that the [Add Printer Wizard] is complete.
59 II Printer Chapter 2 Preparing the Printer for Use
Page 80

2-5. Using this Printing System with Windows 2000
21 Click the [Finish] button.
→ Install the printer driver on the PC and printing of the test page starts.
22
If the test page is printed correctly, click the
The icon for the installed printer driver is displayed in the [Printers] screen.
→
This completes printer driver installation.
z If the test page is not printed correctly, refer to [Test Page Cannot Be Printed.]
( Page 111)
[OK]
button.
60 II Printer Chapter 2 Preparing the Printer for Use
Page 81

2-5. Using this Printing System with Windows 2000
Setting options
Options installed on the copier are set so that they can be used with the printer driver.
1
From the taskbar, select [Start] - [Settings] - [Printers].
→ The [Printers] screen is displayed.
2
Right click the [KONICA MINOLTA IP-xxx PS] icon, then select [Properties].
→ The [KONICA MINOLTA IP-xx PS Properties] screen is displayed.
3
Click the [Device Settings] tab.
4
In [Installable Options], select the options installed on the copier, then change the contents.
z For details on options installed on the copier, consult the system administrator.
5
Click the [OK] button.
→ When the option settings are complete, the options can be used with the printer driver.
61 II Printer Chapter 2 Preparing the Printer for Use
Page 82

2-5. Using this Printing System with Windows 2000
Checking Printing
Once the printing system and the computer have been connected and the printer driver installed, printing is
possible. Try printing an actual document.
You can check printing by executing the test print from the printer driver properties or by printing from an
application.
Print settings
The basic print settings are made from the printer driver [Properties] or the application’s [Print] screen.
When making the print settings from the application’s [Print] screen, the settings you make are not
saved after that application ends. For details on making the print settings from the printer driver [Properties] screen, refer to [3-1.Setting Printer Functions] ( Page 121).
Executing a test print
The test print prints the standard Windows test page.
1
From the taskbar, select [Start] - [Settings] - [Printers].
→ The [Printers] screen is displayed.
2
Right click the printer icon, then select [Properties].
→ The printer driver [Properties] screen is displayed.
62 II Printer Chapter 2 Preparing the Printer for Use
Page 83

2-5. Using this Printing System with Windows 2000
3
Select the [General] tab, then click the [Print Test Page] button.
→ The test page is printed and the check screen is displayed.
4
After checking the printing, click the [OK] button.
z If the test page is not printed correctly, refer to [Test Page Cannot Be Printed.]
( Page 111)
63 II Printer Chapter 2 Preparing the Printer for Use
Page 84

2-5. Using this Printing System with Windows 2000
Printing from an application
This method prints data with the [Print] command from an application.
1
Open data with the application, then execute [Print].
→ The [Print] screen is displayed.
2
Ensure that the name of the printer you want to print on is selected in [Select Printer].
If this printer is not selected, click its icon to select it.
z The [Print] screen varies according to the application.
3
Set the print range and the number of copies, then click the [Print] button.
→ Check that the specified pages are printed.
64 II Printer Chapter 2 Preparing the Printer for Use
Page 85

2-6. Using this Printing System with Windows XP
Install the printer driver on the computer running Windows XP. Have the [User software CD] CD-ROM on hand.
Access Rights and Range of Operation
When a new printer is added, the range of allowable operations can be specified according to the security
level (access rights) of the user.
The Windows XP printer access rights and range of operations are as follows. After installing the printer
driver, set the access rights for users.
Access rights Range of allowable operations
Off Printer operations disabled
Document printing
Print parameter setting
Printing
Printer management
Print related (paper size, input tray, and other selections)
Graphic related (resolution, half tone, and other settings)
Printer functions (selection of functions unique to a copier)
All [Print] items
Print pause, restart, and spooler settings
Printer property change
Printer access rights setting and change
Document
management
z For details on setting printer access rights, refer to the Windows XP System Guide.
Document setting control
Print pause, restart, reprint, cancel
Refer to the page below for the driver installed.
PCL Driver installation
Adobe PostScript Driver installation
page 66
Page 71
65 II Printer Chapter 2 Preparing the Printer for Use
Page 86

2-6. Using this Printing System with Windows XP
PCL Driver Installation
1 Switch on the power for the computer and start Windows.
z Close down any applications that are running.
2 Log on with a user name that has administrator rights.
z If you cannot log on with a user name that has administrator rights, log on with a user name that has rights
incorporating those of a Power User.
3 Put the [User software CD] in the computer's CD-ROM drive.
4 From [My Computer], select the [CD-ROM] and then double-click [Setup.exe] in the
[English] - [Printer] - [WinNT_2000_XP] folder.
5 Click the [OK] button.
→ The [Printer Driver Installer] screen is displayed.
6 Set up the following items.
66 II Printer Chapter 2 Preparing the Printer for Use
Page 87

2-6. Using this Printing System with Windows XP
[Printer Name]
1
Check the printer name. To change it, input a new printer name.
[Selecting the Printer Port]
1
Select the port to which the printer is connected.
[Install as the Default Printer]
1
If you want to use this printing system as your default printer, check the [Install as the
Default Printer] checkbox.
67 II Printer Chapter 2 Preparing the Printer for Use
Page 88

2-6. Using this Printing System with Windows XP
7 When all the settings are complete, click the [Install] button.
8 Click the [Finished] button.
This completes printer driver installation.
68 II Printer Chapter 2 Preparing the Printer for Use
Page 89

2-6. Using this Printing System with Windows XP
Setting options
Options installed on the copier are set so that they can be used with the printer driver.
1
From the taskbar, select [Start] - [Printers and Faxes].
→ The [Printers and Faxes] screen is displayed.
2
Right click the [KONICA MINOLTA xxxx/IP-xxx] icon, then select [Properties].
→ The [KONICA MINOLTA xxxx/IP-xxx Properties] screen is displayed.
3
Click the [Options] tab.
69 II Printer Chapter 2 Preparing the Printer for Use
Page 90

2-6. Using this Printing System with Windows XP
4
In [Available options], select the options that are installed on the copier.
z For details on options installed on the copier, consult the system administrator.
5
Click the [Add] button.
→ The selected options are included in [Installed options] and can be used with the printer driver.
70 II Printer Chapter 2 Preparing the Printer for Use
Page 91

2-6. Using this Printing System with Windows XP
Adobe PostScript Driver Installation
1 Switch on the power for the computer and start Windows.
z Close down any applications that are running.
2 Log on with an account that has [computer administrator] rights.
3 Put the Post Script option [User software CD] in the computer's CD-ROM drive.
4 From the taskbar, select [Start] - [Printers and Faxes].
→ The [Printers and Faxes] screen is displayed.
5 Click the [Add a printer] icon.
→ The [Add Printer Wizard] screen is displayed.
71 II Printer Chapter 2 Preparing the Printer for Use
Page 92

2-6. Using this Printing System with Windows XP
6 Click the [Next ›] button.
7 When connecting the printer directly to the PC, select [Local printer attached to this
computer]. When printing via the network with the printing system connected to
another PC, select [A Network printer, or a printer attached to another computer].
( Page 74)
z Ensure that the [Automatically detect and install my Plug and Play printer] checkbox is not checked.
z Before you can select [Network printer server], the network controller and PC network settings must be complete. For
details, consult your network administrator.
72 II Printer Chapter 2 Preparing the Printer for Use
Page 93

2-6. Using this Printing System with Windows XP
When [Local printer attached to this computer] is selected
1
Click the [Next ›] button.
→ The printer port select screen is displayed.
2
Select the port to which the printer is connected.
z When the printer and the PC are directly connected, select the [LPT] port.
z When printing directly with the printing system via the network, select the [LPR] port.
( Page 396)
3
Click the [Next ›] button.
→ A screen to confirm the printer manufacturer and name is displayed.
Proceed to Step 8.
73 II Printer Chapter 2 Preparing the Printer for Use
Page 94

2-6. Using this Printing System with Windows XP
When [A Network printer, or a printer attached to another computer] is selected
1
Click the [Next ›] button.
→ The [Specify a Printer] screen is displayed.
2
Input the printer name in [Name:], then click the [Next ›] button.
→ A screen to confirm the printer manufacturer and name is displayed.
Proceed to Step 8.
8 Click the [Have Disk…] button.
→ The [Install From Disk] screen is displayed.
74 II Printer Chapter 2 Preparing the Printer for Use
Page 95

2-6. Using this Printing System with Windows XP
9 Click the [Browse…] button.
→ The [Locate File] screen is displayed.
10 From [Look in:], select the CD-ROM drive, then double-click the [\English\Driver
\AdobePS\Win2000_XP] folder.
→ [OEMSETUP.INF] is displayed as the [File name:].
11 Click the [Open] button.
→ The display returns to the [Install From Disk] screen.
12 Click the [OK] button.
→ The display returns to the [Add printer wizard] screen.
75 II Printer Chapter 2 Preparing the Printer for Use
Page 96

2-6. Using this Printing System with Windows XP
13 Ensure that [KONICA MINOLTA IP-xxx PS] is displayed in [Printers], then click the
[Next ›] button.
→ A screen to confirm the printer name is displayed.
14 Check the printer name.
To change it, input a new printer name.
15 If you want to use this printing system as your default printer, select [Yes]; if you do
not want to use this printing system as your default printer, select [No].
16 Click the [Next ›] button.
→ A screen is displayed checking whether or not you want to print a test print.
76 II Printer Chapter 2 Preparing the Printer for Use
Page 97

2-6. Using this Printing System with Windows XP
17 To print a test print, select [Yes]; to not print a test print, select [No].
z A test print means printing a standard Windows test page. Test prints can also be executed in [Properties].
( Page 80)
18 Click the [Next ›] button.
→ A screen is displayed announcing that the [Add Printer Wizard] is complete.
19 Click the [Finish] button.
20
If the test page is printed correctly, click the
[OK]
button.
The icon for the installed printer driver is displayed in the [Printers and Faxes] window.
→
This completes printer driver installation.
z If the test page is not printed correctly, refer to [Test Page Cannot Be Printed.]
( Page 111)
77 II Printer Chapter 2 Preparing the Printer for Use
Page 98

2-6. Using this Printing System with Windows XP
Setting options
Options installed on the copier are set so that they can be used with the printer driver.
1
From the taskbar, select [Start] - [Printers and Faxes].
→ The [Printers and Faxes] screen is displayed.
2
Right click the [KONICA MINOLTA IP-xxx PS] icon, then select [Properties].
→ The [KONICA MINOLTA IP-xxx PS Properties] screen is displayed.
3
Click the [Device Settings] tab.
78 II Printer Chapter 2 Preparing the Printer for Use
Page 99

2-6. Using this Printing System with Windows XP
4
In [Installable Options], select the options installed on the copier, then change the contents.
z For details on options installed on the copier, consult the system administrator.
5
Click the [OK] button.
→ When the option settings are complete, the options can be used with the printer driver.
79 II Printer Chapter 2 Preparing the Printer for Use
Page 100

2-6. Using this Printing System with Windows XP
Checking Printing
Once the printing system and the computer have been connected and the printer driver installed, printing is
possible. Try printing an actual document.
You can check printing by executing the test print from the printer driver properties or by printing from an
application.
Print settings
The basic print settings are made from the printer driver [Properties] or the application’s [Print] screen.
When making the print settings from the application’s [Print] screen, the settings you make are not
saved after that application ends. For details on making the print settings from the printer driver [Properties] screen, refer to [3-1.Setting Printer Functions] ( Page 125).
Executing a test print
The test print prints the standard Windows test page.
1
From the taskbar, select [Start] - [Printers and Faxes].
→ The [Printers and Faxes] screen is displayed.
2
Right click the printer icon, then select [Properties].
→ The printer driver [Properties] screen is displayed.
80 II Printer Chapter 2 Preparing the Printer for Use
 Loading...