

Konica Minolta IP-711 User Manual

IP-711
Print Controller
Read this manual before printing.
Keep readily available for reference.

Welcome
This User Manual explains the functions and operations of the printer controller
model IP-711 for the Konica digital color copier Konica 8020/80 31. To ensure that
the controller is used correctly, fi rst read this manual carefully an d thoroughly; then,
keep it close at hand so you can refer to it whenever it becomes necessary.
The information contained in this manual is subject to change without notice. No
part of the contents of this manual may be reproduced, quoted, or tran slated in to any
language without the permission of Konica.
About This Manual
This manual is divided into two parts: Setup and Advanced Operations.
In Setup, the text is organized to allow the user to perform the procedures in a stepby-step fashion.
Advanced Operations mainly explains how to use the functions that can be used
when the printer controller is mounted. Read the portions that explain the specific
functions you want to use.
Images and descriptions in this manual may differ from that of the purchased
product depending on the time of shipment.
i
Naming of Equipment
Different names are used between the printer controller and the copier to identify
the same piece of equipment. Note the following.
Controller Copier
LCT Large Capacity Tray DB-432

ii
Welcome
Precautions for Using the Controller
Heading Precautions
For the U.S.A. Users
FCC Part 15-Radio Frequency Devices
This device complies with Part 15 of the FCC Rules. Operation is subject to the
following two conditions: (1) This device may not cause harmful interference,
and (2) this device must accept any interference received, including interference
that may cause undesired operation.
NOTE
This equipment has been tested and found to comply with the limits for a Class A
digital device, pursu ant to Part 15 of the FCC Rules. These limits are designed to
provide reasonable protection against harmf ul interference when the equipment is
operated in a commercial environment. This equipment generates, uses, and
radiate radio frequency energy and, if not installed and used in accordance with
the instruction manual, may cause h armful in terference to r adio comm unications.
Operation of this equipment in a residential area is likely to cause harmful
interference in which case the user will be required to correct the interference at
his own expense.
WARNING
The design and production of this unit conform to FCC regulations, and any
changes or modifications must be re gistered with the FCC and are subject to FCC
control. Any changes made by purchaser or user without first contacting the
manufacturer will be subject to penalty under FCC regulations.
This device must be used with a shielded parallel cable and a s hielded USB cable.
The use of non-shielded cables is likely to result in interference with radio
communications and is prohibited under FCC rules.

Welcome
For Canada Users
Interference-Causing Equipment Standard (ICES-003 Issue 3)
This Class A digital apparatus complies with Canadian ICES-003.
Cet appareil numérique de la classe A est conforme à la norme NMB-003 du
Canada.
For European Users
CE Marking (Declaration of Conformity)
This product complies with the following EU directives:
89/336/EEC, 73/23/EEC and 93/68 / EEC direct ives.
This declaration is valid for the area of the European Union.
This device must be used with a shielded parallel cable, a shielded USB cable and
a shielded Ethernet 10/100 B ase-T cabl e. The us e of non -shielded cab les is lik ely
to result in interference with radio communications and is prohibited under EU
directives.
iii
For users in countries subject to Class B regulations
This device must be used with a shielded parallel cable, a shielded USB cable and
a shielded Ethernet 10/100 B ase-T cabl e. The us e of non -shielded cab les is lik ely
to result in interference with radio communications and is prohibited under
CISPR 22 rules and local rules.

iv
Welcome
For users in countries not subject to Class B regulations
WARNING
This is a Class A product. In a domestic environment this product may cause
radio interference in which case the user may be required to take adequate
measures.
This device must be used with a shielded parallel cable, a shielded USB cable and
a shielded Ethernet 10/100 B ase-T cabl e. The us e of non -shielded cab les is lik ely
to result in interference with radio communications and is prohibited under
CISPR 22 rules and local rules.
Trademark Acknowledgments
Ethernet is a registered trademark of Xerox Corporation.
Microsoft, Windows and Windows NT are either registered trademarks or
trademarks of Microsoft Corporation in the United States and/or other countries.
Novell and NetWare are registered trademarks of Novell Inc., U.S.A.
LaserJet and PCL5c are registered trademarks of Hewlett-Packard Company,
U.S.A.
All other product and brand names are trademarks or registered trademarks of their
respective companies or organizations.
This product uses NEST Office SDK of Novell, Inc.
Copyright © 1999 Novell, Inc. NEST is a trademark of Novell, Inc. in the United
States and other countries.
This product uses Software Developer Kit of Peerless Systems Corporation.
Copyright © 2001 Peerless Systems Corpor ation. All rights reserved.

Welcome
Product Overview
The IP-711 controller is optional equipment used for adding printer, scanner and
network functions to the Konica 8020/8031 copier. Mounting the controller on the
Konica 8020/8031 will allow the following functions to be used:
• Print functions effected through PCL5c
• Supporting TCP/IP, NetBEUI, and IPX/SPX network protocols.
• Direct printing functions over the network using Windows Printing, LPR, IPP , and
others.
• Function to transfer and/or notify scanned image over the network.
• Fax functions using the Internet (Internet Fax)
• Setting the copier and printer controller from a client PC over the network by
means of an HTTP server (using a Web browser)
v

vi
Contents
Setup
Welcome
About This Manual .......................................................... i
Naming of Equipment ...................................................... i
Precautions for Using the Controller ............................... ii
Heading Precautions.................................................. ii
Trademark Acknowledgments. ...... ............................ iv
Product Overview ............................................................ v
1. Before Using the Controller
1.1 Operating Environment ............................................. 1
2. Connecting the Cable
2.1 Connector Locations ................................................. 5
3. Settings Required for Local Connection
3.1 Installing the Printer Driver ...................................... 7
For Windows 98, 98SE and Me:................................ 7
For Windows 2000, NT 4.0, and XP:........................ 11
Installation through Plug and Play............................. 15
Local Interface Setting............................................... 16
4. Settings Required for Network Printing
4.1 Network Connection That Can be Selected
in Each of Different Windows OSs 17
4.2 To Make the Settings on the Controller Side ............ 18
IP Address Setting ..................................................... 18
4.3 Windows Printing Setting ......................................... 20
Settings made on the controller side.......................... 20
Settings made on the Printer Driver side................... 21
4.4 Settings for Printing through LPR ............................ 22
Settings made on the controller side.......................... 22
Settings made on the Printer Driver side................... 22
4.5 Settings for Printing using IPP .................................. 23
Settings made on the controller side.......................... 23
Settings made on the Printer Driver side................... 25
4.6 Print Service Setting in NetWare .............................. 26
4.7 Operation Checks after Installation of Driver ........... 39
Test Printing from Client PC..................................... 39
5. Uninsta lling the Driver
5.1 Uninstalling the Driver ............................................. 41

Advanced Operations
6. Printing
6.1 Device Option Setting ............................................... 47
6.2 Using Easy Set .......................................................... 47
6.3 Displaying Page Layout and Printer Figure .............. 48
6.4 Effecting N-up Printing ............................................ 49
6.5 Printing Pages with Watermarks ............................... 50
6.6 Effecting Duplex/Booklet Printing ........................... 54
6.7 Effecting Staple ......................................................... 55
6.8 Effecting Folding ...................................................... 56
6.9 Effecting Hole Punch ................................................ 57
6.10Adding a Cover or Interleaf ...................................... 58
6.11Print to Suit the Paper Size ....................................... 59
6.12Printing on Paper from Manual Bypass Tray ........... 60
7. Settings and Operations for Scan Functions
7.1 Scan Settings (Basic Settings) .................................. 62
URL Notification....................................................... 63
Selectable File Format for Scanning.......................... 63
7.2 Scan to PC ................................................................. 64
Setting the FTP Application ...................................... 65
Scan Operation........................................................... 66
Details of Scan Operation Settings............................ 67
7.3 Scan to FTP Server ................................................... 69
Controller Setting....................................................... 70
Setting the Proxy Server............................................ 73
Scan Operation........................................................... 74
Details of Scan Operation Settings............................ 75
7.4 Scan to HDD ............................................................. 77
Creating a HDD Directories ...................................... 78
Scan Operation........................................................... 80
Details of Scan Operation Settings............................ 81
Downloading Scanned Data from the Hard Disk...... 83
7.5 Scan to E-mail ........................................................... 86
Controller Setting....................................................... 87
Scan Operation........................................................... 90
Details of Scan Operation Settings............................ 92
7.6 Internet Fax ............................................................... 94
Controller Setting....................................................... 96
Setting the Internet FAX Options.............................. 98
Scanning Operation for Internet Fax Transmission... 100
Details of Scan Operation Settings............................ 102
vii
Contents

viii
Contents
Internet Fax Reception............................................... 105
7.7 The Operation of Capturing Images by TWAIN ...... 106
Installing the TWAIN Driver..................................... 106
Controller Setting....................................................... 106
Capturing Images by TWAIN.................................... 107
7.8 Advance Registration of Destinations ...................... 110
One-Touch Key Registration..................................... 110
One Time Registration............................................... 115
8. Job Management
8.1 Print Job Management .............................................. 121
Specifying Operation for Job ..................................... 121
Identifying a Print Job by Name................................ 121
Transmitting a Print Job to a Copier in Which
the Copy Track Function is Active............................ 122
Printing Pages with a Distribution Number............... 123
Lock Job..................................................................... 123
Proof and Print........................................................... 124
Store to HDD............................................................. 124
Store to Memory........................................................ 125
8.2 Job Operations on Network Management Utility
Light .......................................................................... 126
Print job list................................................................ 126
Scanner job list........................................................... 127
Print job history ......................................................... 128
Scanner job history .................................................... 129
9. Troubleshooting
9.1 Unable to Print .......................................................... 131
9.2 Unable to Make Correct Settings /
Unable to Print Exactly as Set .................................. 133
Appendixes
A. Product Information............................................. 137
B. How to Use Network Management Utility Light. 138
C. Incompatible Function Combinations................... 194
INDEX
INDEX ............................................................................. 197

1. Before Using the Controller
1.1 Operating Environment
Operating Environment
The printer controller operates under the following environment.
OS Windo ws 98, Windo ws 98SE, Windo ws Me, W in do ws NT 4.0,
Windows 2000, Windows XP
PC IBM PC or compatatible
Direct
Connection
Network
Environment
Software Microsoft Internet Explorer version 5.5 (Java-compliant) or
Accessories
PCL5c Printer Driver CD-ROM 1 sheet
USB (version 1. 1)
IEEE1284 (Compatible/Nibble/ECP)
Connection scheme Ethernet 10Base-T, 100Base-TX
Protocol TCP/IP
IPX/SPX (NetWare 3.2 or later, 4x, 5x)
NetBEUI
later.
Netscape Communicator version 4.5 (Java-compliant) or later
1
• The PCL5c Printer Driver CD-ROM contains the following:
· Printer Driver (for Windows 98/98SE/Me, Windows NT4.0, and Windows
2000/XP)
·TWAIN Driver
· USB Device Driver
· Font Manager
· User Manual (this manual: PDF file)
· Latest information (Readme.txt)
■
Password for the A dministrator Mode
A password is necessary to enter the “Administrator Mode.”
For the password, ask the administrator of your copier.

2
1. Before Using the Controller

Setup
3

4
2. Connecting the Cable
Make the cable connection between the PC and the controller by using the
appropriate cable for the specific connection scheme used.
If the copier is to be used in stand-alone environment, use the IEEE1284
(Centronics) or USB cable. If the copier is used in network environment, use the
network cable.
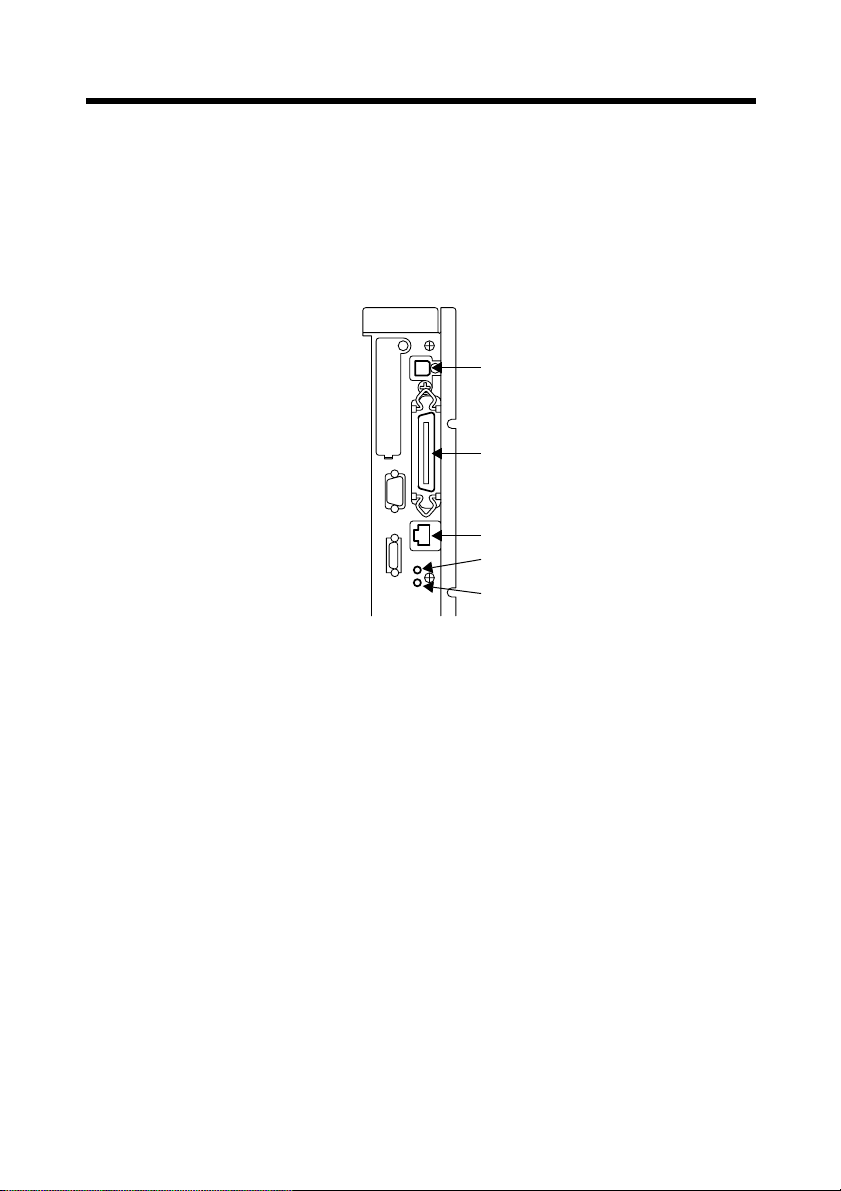
2.1 Connector Locations
(1)
(2)
(3)
LED1
LED2
4334O034AA
5
(1) USB
(2) IEEE1284 (Centronics)
(3) Network
■
Connecting the Network Cable
1. Use the cable that complies with the 10Base-T or 100Base-TX standard.
Use Category 5 or 5E cables for the network cable.
2. When the cable is connected to the connector, LED1 turns ON.
[Description of the LEDs]
LED1: LINK = Lights if the network connection is established.
LED2: ACT = Blinks depending on the data reception status.

6
2. Connecting the Cable
3. Settings Required for Local Connection
T o make a local connection between the PC and printer controller , mak e the settings
by following the procedures given below.
3.1 Installing the Printer Driver
For Windows 98, 98SE and Me:
The following procedure applies to the installation of the printer driver for W indows
98.
NOTE
To connect the copier to a PC, in which Windows 98, 98SE, or Me is installed,
through the USB, it is necessary that the USB device driver be installed in the
PC.
For the procedure to install the USB device driver, see “Installing through Plug
and Play” and “Connecting the USB Cable.” ☞p.15
1. Click the “Start” button and, from the menu that will then appear, select
“Settings” – “Printers.”
2. The Printers window will appear.
Double-click the “Add Printer” icon in the window.
7
3. The “Add Printer Wizard” will start.
Click the “Next>” button.
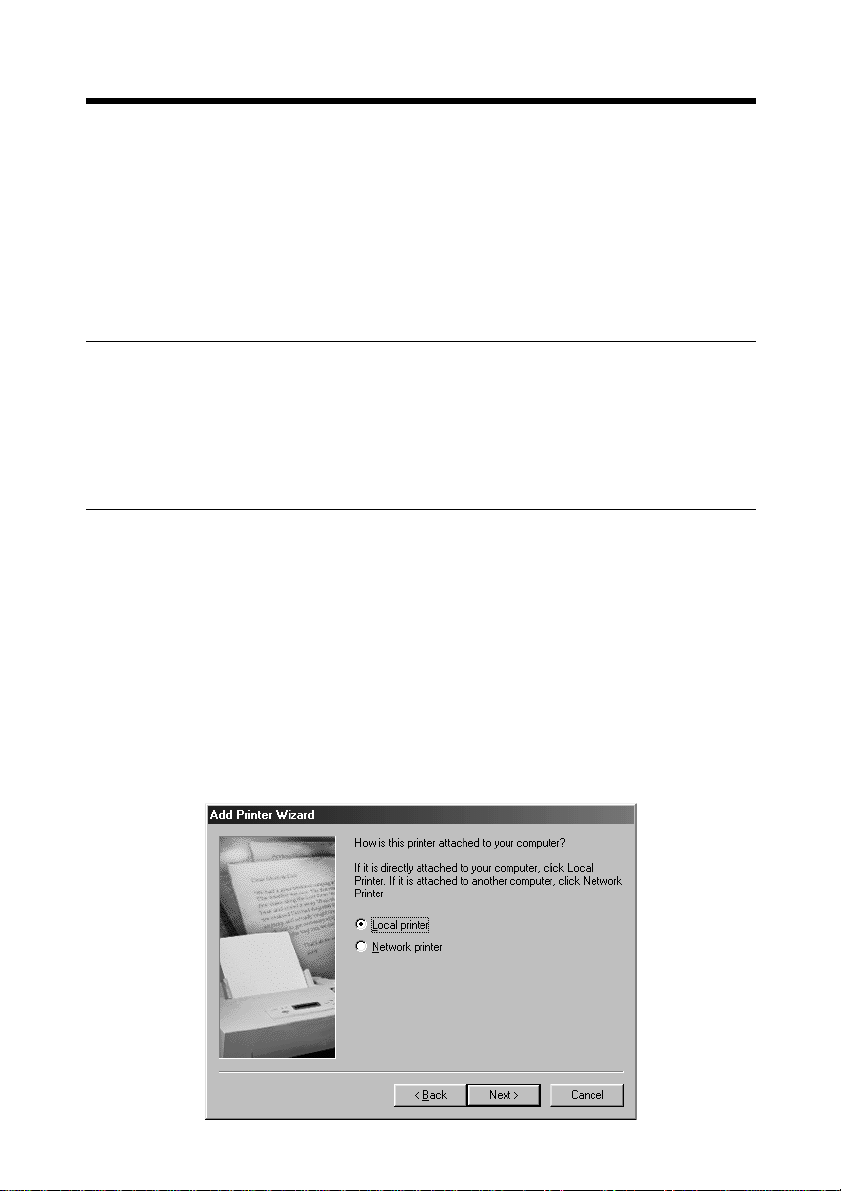
4. A window will appear, asking how the printer is to be connected.
Select “Local printer” and then click the “Next>” button.
4668P004CA
8
3. Settings Required for Local Connection
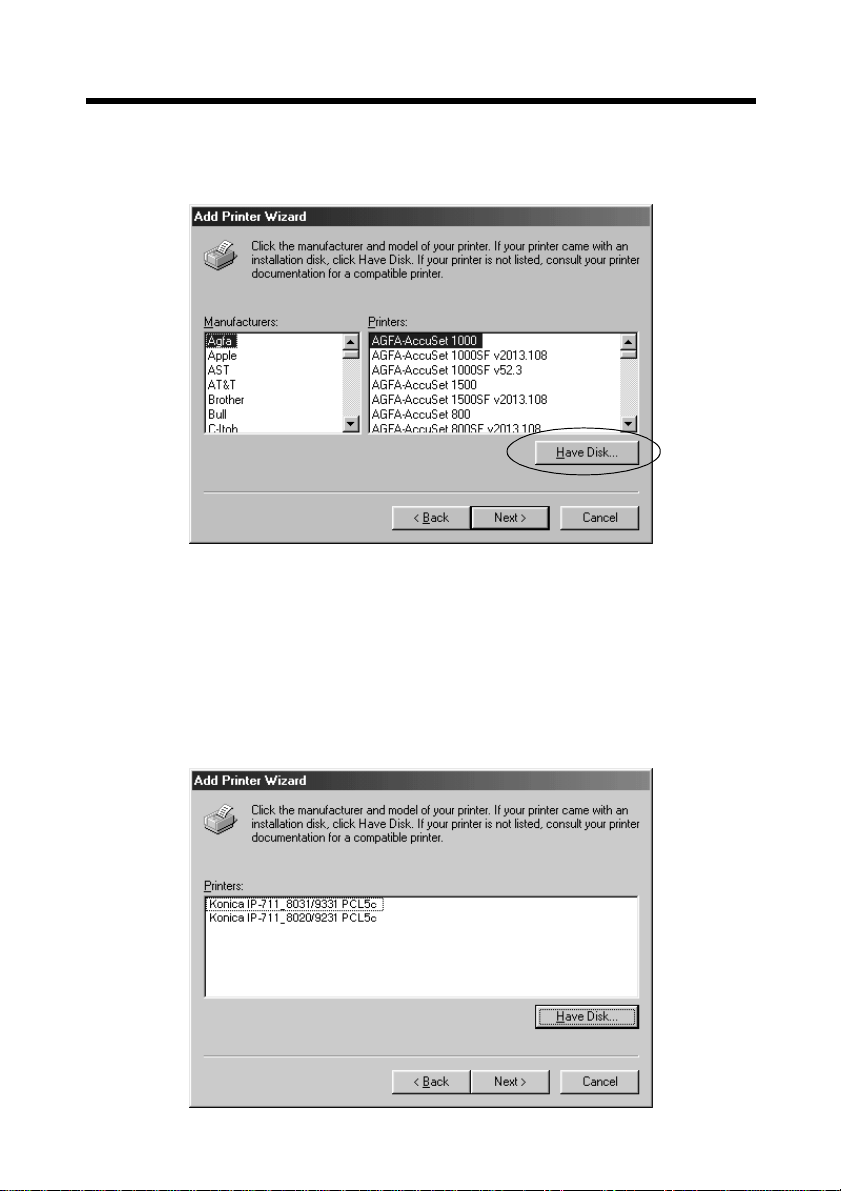
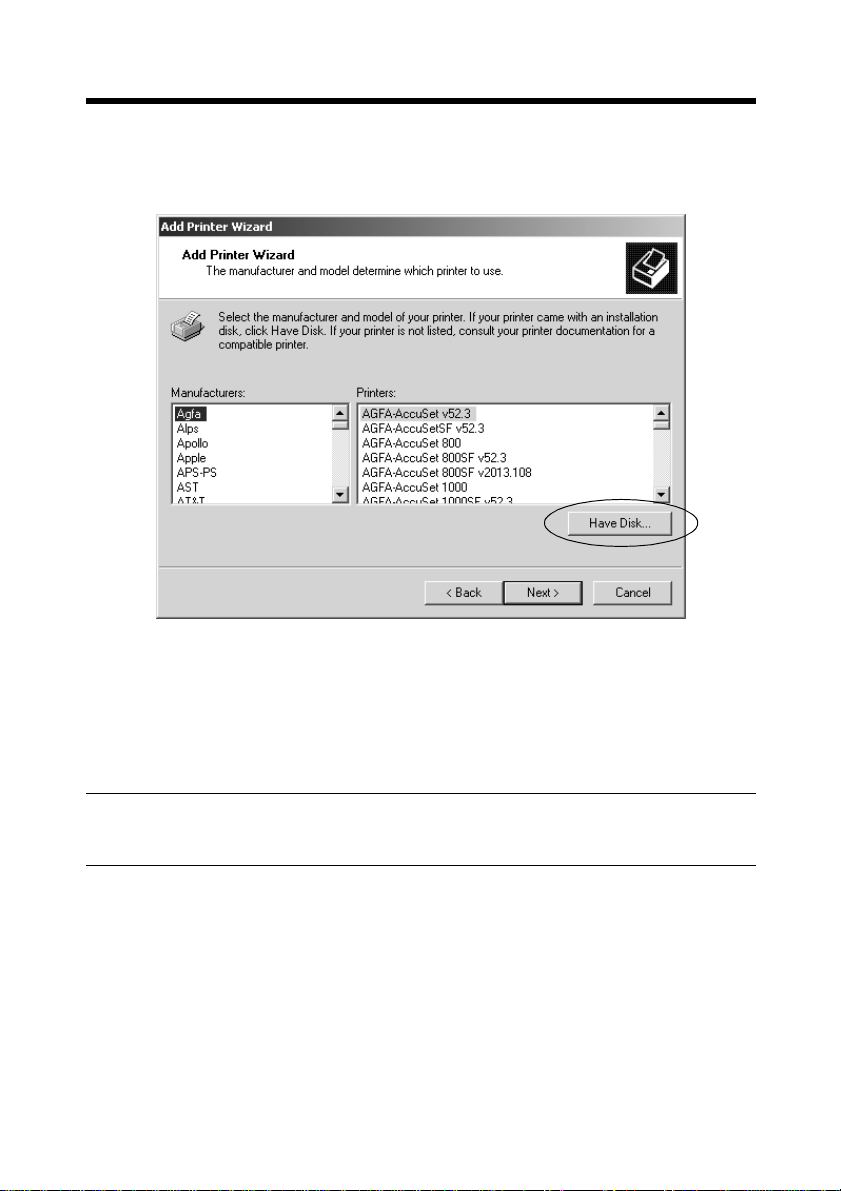
5. A window will appear, prompting you to select the manufacturer and model of
your printer.
Click the “Have Disk..” button on the lower right part of the screen.
4668P005CA
6. The “Install From Disk” dialog box will appear.
Insert the Printer Driver CD-ROM, which comes with the controller, in the CDROM drive of your PC.
7. Specify the storage of the printer driver for Windows 98/98SE/Me in the CDROM to the “Copy manufacturer’s files from:” box, then click the “OK” button.
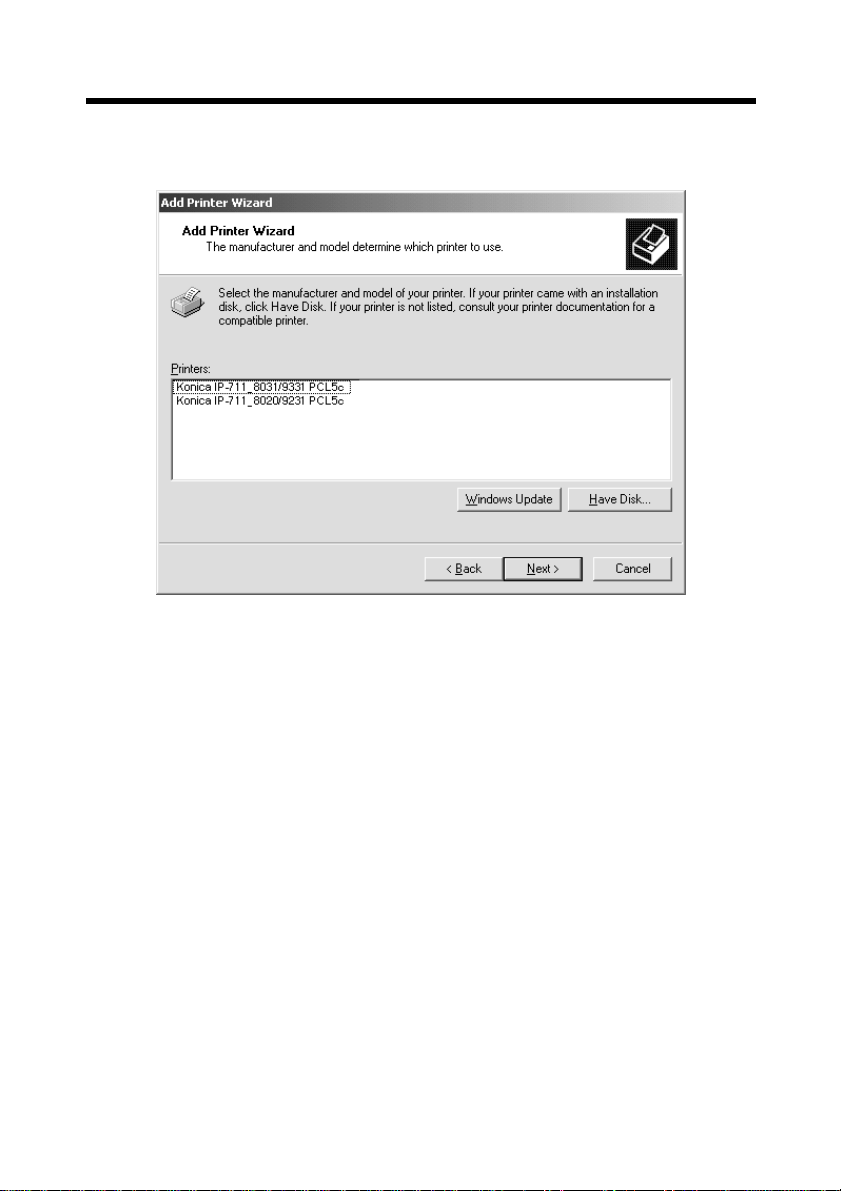
8. A “Printers” list will ap pear.
Select the printer driver to be installed and click the “Next>” button.
k4334P158CA

3. Settings Required for Local Connection
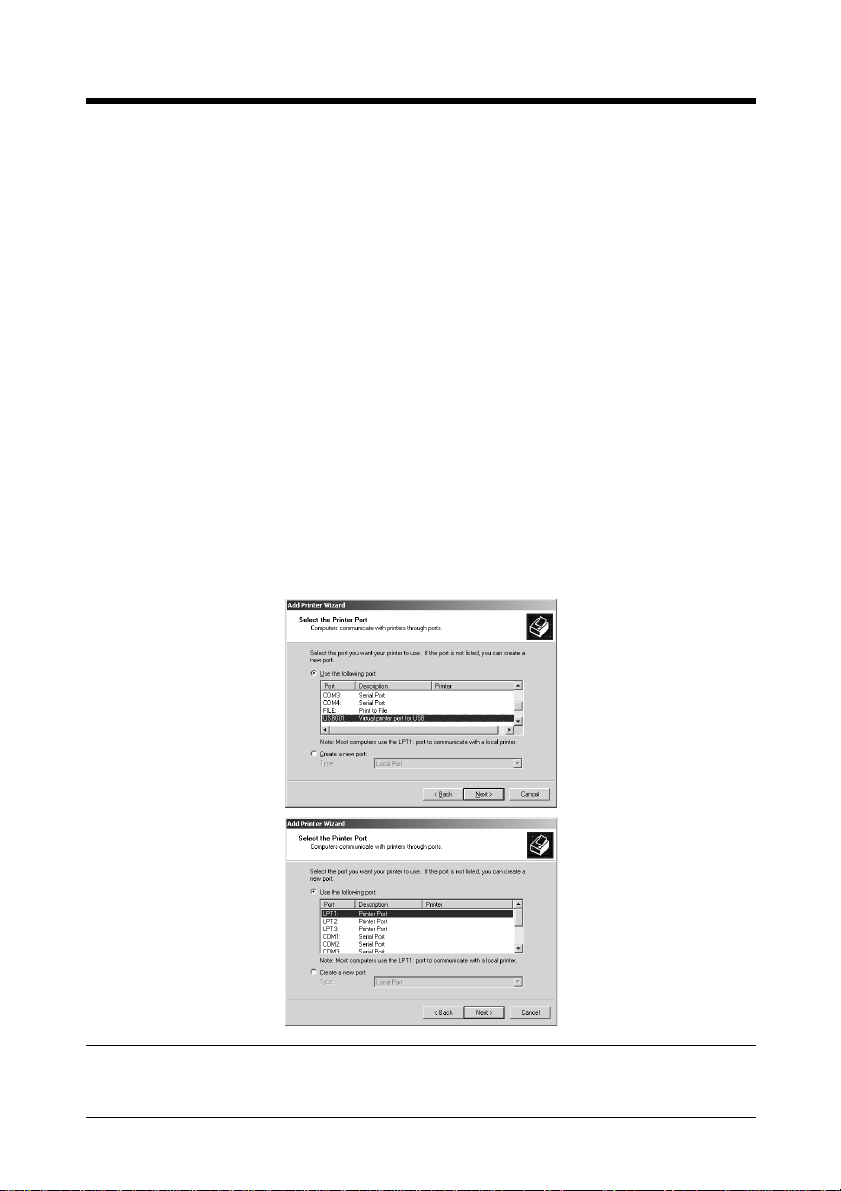
9. A window that prompts you to select the port will appear.
Select “EPUSB1” if the connection is made throu gh the USB cable a nd “LPT1”
if the connection is made through the IEEE1284 cable. Then, click the “Next>”
button.
4668P009CA
9
4334P227CA
10.A window that asks you to confirm the printer name will appear.
Check the printer name.
“Konica IP-711_8031/9331 PCL5c” or “Konica IP-711_8020/9231 PCL5c”
If you want to designate this printer as the default printer, select “Yes.”
Click the “Next>” button.
11.A screen that allows you to select printing of a test page will appear.
If you want to print a test page, select “Yes.”
10
3. Settings Required for Local Connection
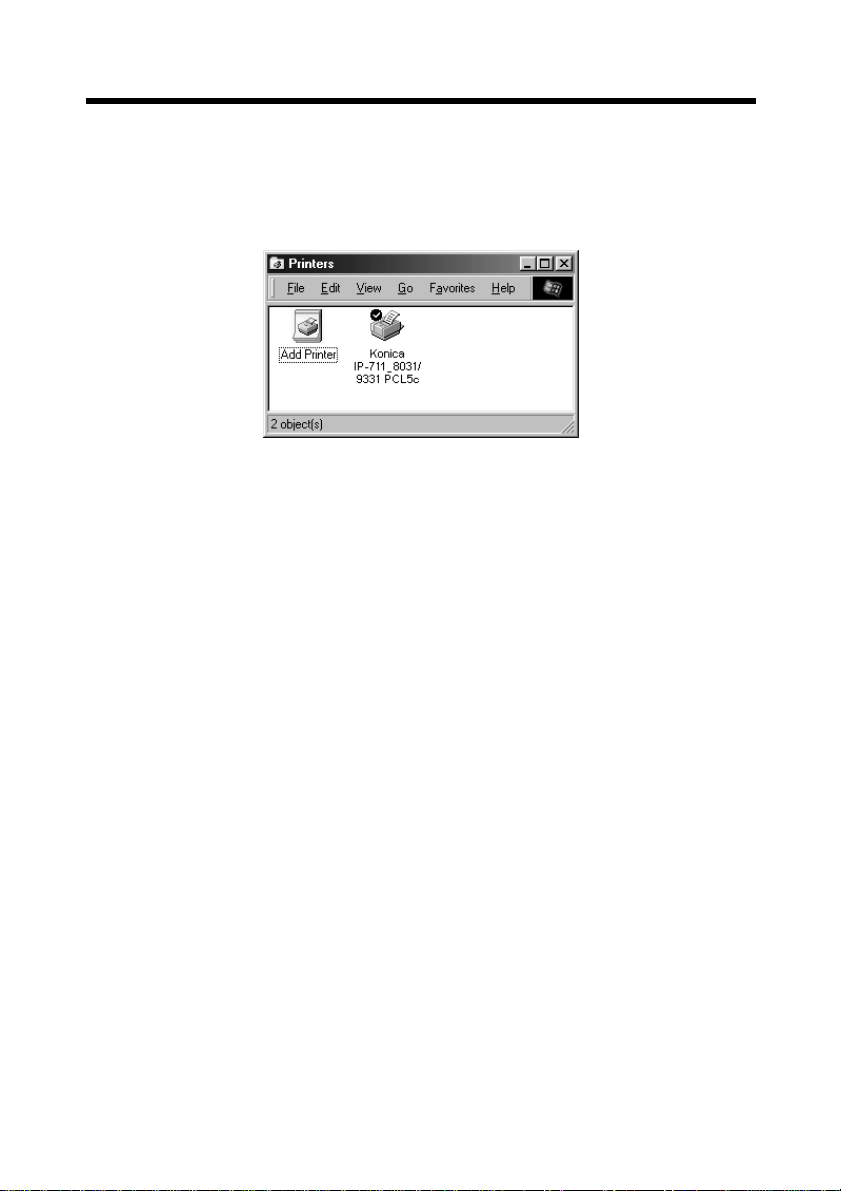
12.Installation will complete.
When all the files hav e b een copied f rom the CD-ROM, the corresponding icon will
be added to the “Printers” window.
This completes the installation.
k4334P159CA
11
3. Settings Required for Local Connection
For Windows 2000, NT 4.0, and XP:
The following procedure applies to the installation of the printer driver for W indows
2000. Note that different names are used for the Windows NT users and different
contents of displays are given for the Windows XP users.
1. Click the “Start” button and, from the menu that will then appear, select
“Settings” – “Printers.”
2. The Printers window will appear.
Double-click the “Add Printer” icon in the window.
3. The “Add Printer Wizard” will start.
Click the “Next>” button.
4. A screen that allows you to select the type of connection made of the printer will
appear.
Select “Local printer” and then click the “Next>” button.
5. A window that prompts you to select the port will appear.
Select “USB001” if the connection is made through the USB cable and “LPT1”
if the connection is made through the IEEE1284 cable. Then, click the “Next>”
button.
NOTE
Windows NT 4.0 does not support USB.
4334P228CA
4668P021CA
12
3. Settings Required for Local Connection
6. A window will appear, prompting you to select the manufacturer and model of
your printer.
Click the “Have Disk..” button on the lower right part of the screen.
4668P022CA
7. The “Install From Disk” dialog box will appear.
Insert the Printer Driver CD-ROM, which comes with the printer controller, in
the CD-ROM drive of your PC.
8. Specify the storage of the printer driver for Windows NT or 2000 in the CDROM to the “Copy manufacturer’s files from:” box, then click the “OK” button.
MEMO
For Windows XP users, use the printer driver for Windows 2000.
3. Settings Required for Local Connection
9. A “Printers” list will ap pear.
Select the printer driver to be installed and click the “Next>” button.
13
k4334P161CA
10.A window that asks you to confirm the printer name will appear.
Check the printer name.
“Konica IP-711_8031/9331 PCL5c ” or “Konica IP-711_8020/9231 PCL5c ”
If you want to designate this printer as the default printer, select “Yes.”
Click the “Next>” button.
11.A screen that allows you to select whether to share the printer or not.
If you share the printer with other users, select “Shared” and type the share
name in the box to the right of “Share Name.”
If not, select “Do not share this printer” and then click the “Next>” button.
12.A screen that allows you to select printing of a test page will appear.
If you want to print a test page, select “Yes.”
14
3. Settings Required for Local Connection
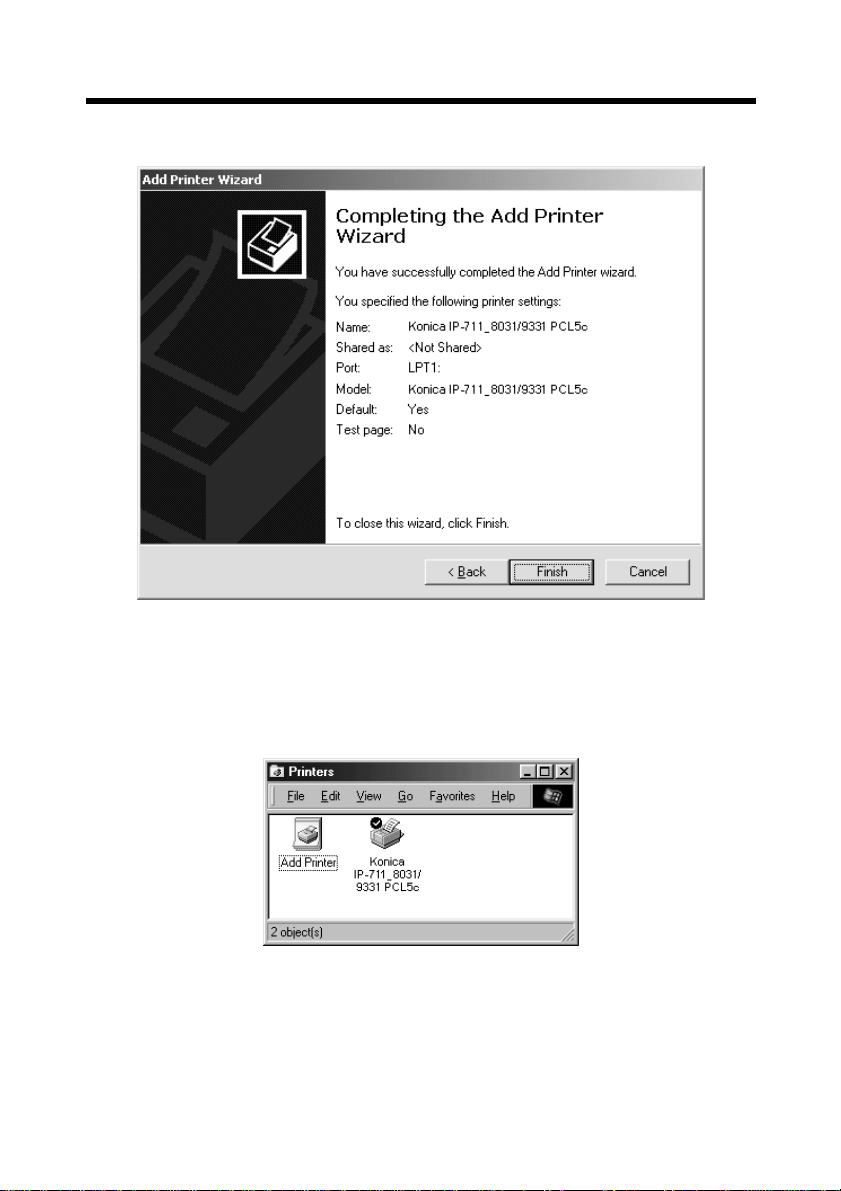
13.As the last step, click the “Finish” button.
k4334P162CA
14.Installation will complete.
When all the files hav e b een copied f rom the CD-ROM, the corresponding icon will
be added to the “Printers” window.
This completes the installation.
k4334P159CA

15
3. Settings Required for Local Connection
Installation through Plug and Play
If the local connection (IEEE1284 or USB) is made between the PC and the copier,
the printer driver can be installed through the “Plug and Play” function.
For details of how to install the printer driver, see “3. Setting Required for Local
Connection.” ☞p.7
NOTE
Windows NT 4.0 does not support “Plug and Play.”
■
Connecting the IEEE1284 (Centronics) Cable
1. Make the connection after the copier and PC have been turned OFF.
2. Plug one end of the cable into the printer controller and fix the lock springs on
both sides of the connector.
3. Connect the other end of the cable to the PC.
4. The copier and PC are turned ON in that order.
Windows is started, the installation guide for the printer driver through Plug and
Play is automatically started on the PC.
5. Install the printer driver according as instructed by the “Add New Hardware
Wizard.”
■
Connecting the USB Cable
• Windows 98, 98SE and Me:
Following the instructions given in the “Add New Hardware Wizard” that will be
automatically started through Plug and Play, install the USB device driver and then
install the printer driver.
1. Connect the USB cable to the copier and PC with the Power Switch ON.
2. The installation of the printer driver through Plug and Play is automatically
started on the PC.
3. Install the USB device driver according as instructed by the “Add New
Hardware Wizard.”
NOTE
The USB device driver is stored in the printer driver CD-ROM.
4. Following the instructions given in the “Add New Hardware Wizard” that will
automatically appear after the USB device driver has been installed, install the
printer driver.
16
3. Settings Required for Local Connection
• Windows 2000 and XP:
1. Connect the USB cable to the copier and PC with the Power Switch ON.
2. The installation of the printer driver through Plug and Play is automatically
started on the PC.
3. Install the printer driver according as instructed by the “Add New Hardware
Wizard.”
NOTE
Windows NT 4.0 does not support USB.
Local Interface Setting
If necessary, set the local interface on the copier control panel.
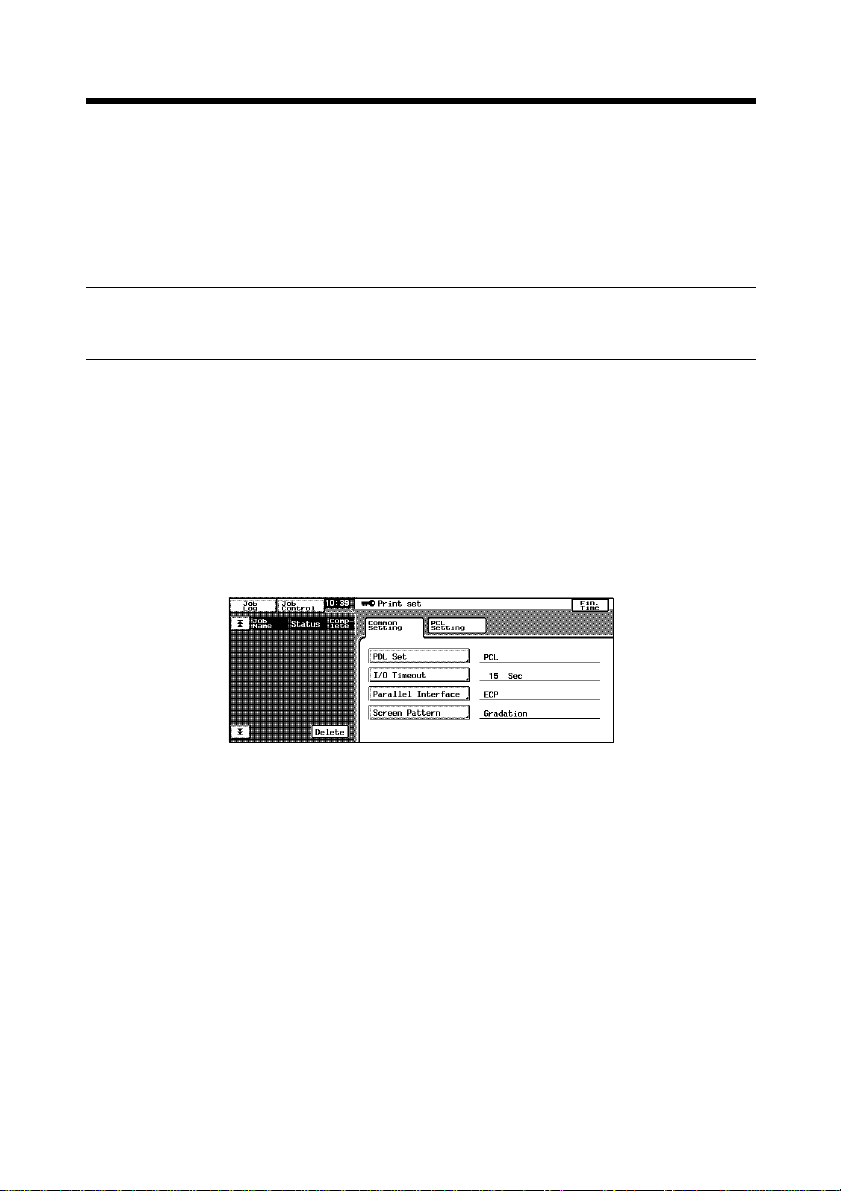
1. On the control panel of the copier, select “Utility” – “Admin. Mode” and then
enter the password.
2. Select “Print Set” – “Common Setting.”
4334P151CA
3. Make the following settings.
I/O Timeout : Set the communications timeout (10 to 300 sec.).
Parallel Interface : Set the mode for use of parallel interface
(Compatible, Nibble, ECP).

17
4. Settings Required for Network Printing
This chapter explains the settings that need to be made for network printing.
Make the necessary settings for network printing by following the procedures given
below.
1. Referring to “3. Settings Req uired for Local Connect ion,” ins tall th e prin ter
driver. ☞p.7
At this time, select “LPT1” for the port.
NOTE
Do not execute a test print at this time.
Do that after the network connections and settings have been made.
2. Following the instructions given in this chapter, make the necessary settings for
network printing.
Change the port of the printer driver installed in step 1 to one for the network
connection and change the settings on the controller side as may become
necessary.
NOTE
For the IPP connection, it is necessary to start with the step to add the printer
driver.
4.1 Network Connection That Can be Selected in Each of
Different Windows OSs
Different setting pr ocedures apply depen ding on the output method (LP R, W indo ws
Printing, IPP).
Select the connection scheme optimum for the operating environment.
LPR
Windows
Printing
IPP
Windows
98,98SE
❍❍❍❍❍
Windows MeWindows
NT4.0
❍❍❍
Windows
2000
❍❍
Windows
XP
Protocol Used
TCP/IP
NetBEUI
TCP/IP

18
4. Settings Required for Network Printing
4.2 To Make the Settings on the Controller Side
Network settings on the controller side may be made either from the copier control
panel or through Netwo rk Management Utility Light used on a P C con nected t o the
network. Use of Network Management Utility Light allows detailed settings that
cannot be made from the copier control panel to be made. For the detail s of
Network Management Utility Light, see “Appendix B. How to Use Network
Management Utility Light.” ☞p.138
To use Network Management Utility Light, it is necessary to first set the IP address
by following the procedure given below.
IP Address Setting
1. On the control panel of the copier, select “Utility” – “Admin. Mode” and then
enter the password.
2. Select “Network set” – “Common Setting” – “TCP/IP” to open the “TCP/IP”
screen.
4334P152CA
3. Make the following settings:
IP Address : Set the IP address of the controller.
Subnet Mask : Set the subnet mask for the network to be
connected.
Gateway Address : Set the default gateway address for the network to
be connected.
Check with the network administrator on these three items in advance.
4. Turn OFF the Power Switch OFF of the copier.
Turn the Power Switch ON again, then the settings are effective.

19
4. Settings Required for Network Printing
■
Accessing Network Management Utility Light
Network Management Utility Light can be accessed directly using a Web browser.
1. Start the Web browser.
2. Type the IP address of the controller as follows in the address box and press the
Enter key.
http://<controller IP address>/
E.g.: If the controller IP address is 172.16.0.100
http://172.16.0.100/
3. Network Management Utility Light will appear.
For the details of Network Management Utility Light, see “Appendix B. How to Use
Network Management Utility Light.” ☞p.138

20
4. Settings Required for Network Printing
4.3 Windows Printing Setting
The use of Windo ws Printing enables direct printing over the Microsof t network .
NOTE
To make the Windows Printing setting, it is necessary to install the NetBEUI
protocol in the PC.
Settings made on the controller side
Make the settings for Windows Printing from Network Management Utility Light.
The setting is necessary for Windo ws Printing.
1. Start Network Management Utility Light.
2. Enter the password to log on to the Administrator mode.
3. Click the “Network” tab and then select “Common Setting” – “Windows
Configuration.”
4. Make the following settings.
Enable Windows Printing Service:
Set the Windows print service.
Setting values : Enable, Disable
k4334P156CA

21
4. Settings Required for Network Printing
NetBIOS Name : Set the NetBIOS name.
Setting value : 15 alphanumeric characters or less
Printing Service Name : Set the print service name.
Setting value : 13 alphanumeric characters or less
WorkGroup Name : Set the work group name.
Setting value : 15 alphanumeric characters or less
Settings made on the Printer Driver side
• Windows 98, 98SE and Me:
1. Click the “Start” button and, from the menu that will then appear, select
“Settings” – “Printers.” Select the icon of the printer that has been installed;
then, right-click it and choose “Properties.”
2. On the “Details” tab, click the “Add Port” button.
3. Select “Network” and click the “Browse” button. On th e network configuration
that will then be displayed, select the target printer icon.
• Windows NT 4.0, 2000 and XP:
1. Click the “Start” button and, from the menu that will then appear, select
“Settings” – “Printers.” Select the icon of the printer that has been installed;
then, right-click it and choose “Properties.”
2. Select the “Port” tab. Then, select “Add Port” – “Local Port” and type the
\\NetBIOSname\PrintingService name.
3. Click the “OK” button to exit the function.
4. For the NetBIOS name and the Printing Service name to be entered, click the
“Network” tab of Network Management Utility Light and see “Windows
Configuration” by selecting “Common Setting” – “Windows Configuration.”
 Loading...