

Konica Minolta IP304 INT V121 User Manual

INSTRUCTION MANUAL
IP-304
Read this manual before printing.
Keep readily available for reference.

Thank you very much for purchasing the IP-304.
This INSTRUCTION MANUAL includes instructions for making prints, correct handling of the
machine, and safety precautions. Please read this manual before printing.
In order to maintain satisfactory printing performance, please keep this INSTRUCTION MANUAL
readily available for reference.

CONTENTS
CONTENTS
■ Introduction ........................................................................................................... iv
● Package Contents .................................................................................................... v
● System Requirements .............................................................................................. v
● About this Manual .................................................................................................... vi
● Conventions Used in this Manual ........................................................................... vii
● Folder Structure on the CD-ROM .......................................................................... viii
Chapter 1 Overview ...............................................................................1-1
■ Overview of the Print Controller ......................................................................... 1-2
● Print Controller and Main Body Printer ................................................................. 1-2
● Print Data Flow ..................................................................................................... 1-4
● Hardware Configuration ........................................................................................ 1-5
● I/O Interface .......................................................................................................... 1-5
● Printer Driver ........................................................................................................ 1-7
● Page Description Language ................................................................................. 1-7
● Memory ................................................................................................................ 1-8
Chapter 2 Printer Driver Setup ............................................................. 2-1
■ Installation of the Printer Driver ......................................................................... 2-2
● Before Installation ................................................................................................. 2-2
● Installing to Windows 95/98/Me ............................................................................ 2-3
● Installing to Windows NT 4.0/2000 ....................................................................... 2-5
● Uninstalling the Printer Driver ............................................................................... 2-8
■ Test Page Print .................................................................................................. 2-9
Chapter 3 Printer Driver Functions ......................................................3-1
■ Printer Driver Functions ..................................................................................... 3-2
● Compliant OS ....................................................................................................... 3-2
● Properties ............................................................................................................. 3-3
● Function List ......................................................................................................... 3-6
● Description of Functions ..................................................................................... 3-11
ii Print Controller INSTRUCTION MANUAL

CONTENTS
Chapter 4 Control Panel Setup ............................................................. 4-1
■ Control Panel ..................................................................................................... 4-2
● Names and Functions of the Control Panel .......................................................... 4-2
● LCD Touch Screen................................................................................................ 4-4
● Basic Screen ........................................................................................................ 4-5
● Job Status Screen ................................................................................................ 4-6
● Printer Mode Basic Screen ................................................................................... 4-8
■ Configuration of Printer Setting Menu ............................................................. 4-10
■ Functions of the Printer Setting ....................................................................... 4-11
● Test Print............................................................................................................. 4-11
● Set Defaults ........................................................................................................ 4-12
● Configuration ...................................................................................................... 4-13
● PCL Setting ........................................................................................................ 4-14
■ Print Job .......................................................................................................... 4-15
● Cancel ................................................................................................................ 4-15
● Check ................................................................................................................. 4-16
● Forced Output ..................................................................................................... 4-18
● Password Print (Confidential Output) ................................................................. 4-19
Appendix A Troubleshooting ..............................................Appendix A-1
Appendix B Product Specifications ................................... Appendix B-1
Appendix C Font List ...........................................................Appendix C-1
INDEX .............................................................................................. Index-1
Print Controller INSTRUCTION MANUAL iii

Introduction
■ Introduction
The Konica IP-304 is a print controller designed to be an external type server of the
Konica 7065/7055 or 7060/7150/Force 60 Printer/Copier and enables direct printing
from Windows-compliant computers. It can also enable use of the copier as a network
printer when an optional KN-302A network interface card is added.
Registered Trademarks
Microsoft, MS and MS-DOS are registered trademarks of Microsoft Corporation in
the United States.
IBM is a registered trademark of International Business Machines, Inc. in the United
States.
TM
Windows
HP and PCL are registered trademarks of Hewlett-Packard Company.
Agfa Microtype font is a registered trademark of Agfa Corporation.
PEERLESS is a registered trademark of PEERLESS SYSTEMS CORPORATION.
Adobe, Adobe Logo, Acrobat, Acrobat Logo, PostScript and PostScript Logo are
registered trademarks or trademarks of Adobe Systems, Inc.
is a trademark of Microsoft Corporation.
Other company names and product names written in this manual are the registered trademarks or trademarks of their respective companies.
Copyright
COPYRIGHT © 2001 Konica Corporation. All rights reserved.
Patent Notice
The product includes an implementation of LZW licensed under U. S. Patent
4,558,302.
Built-in Fonts
The print controller supports PCL5e Language (HP PCL clone) and includes the
45 built-in Agfa Microtype fonts. For a complete list, see “Appendix C Font List”.
A part or all of this INSTRUCTION MANUAL shall not be used or copied without
•
permission.
Konica shall have no liability for any influences caused by using the printing system
•
and this manual.
Information written in this INSTRUCTION MANUAL is subject to change without
•
notice.
Konica Corporation shall have the copyright of this printer driver.
•
iv Print Controller INSTRUCTION MANUAL

● Package Contents
The following items are supplied with the IP-304:
User Software CD
•
• Printer Driver
• Adobe Acrobat Reader
• INSTRUCTION MANUAL (this manual)
• Release Note (describes the latest information and limits of the system
and the user software.)
● System Requirements
Windows
The following are required to print from Windows-compliant computers to the
printing system:
Introduction
Computers on which Windows 95/98/Me/NT 4.0/2000 can run
•
CD-ROM drive (necessary to install the printer driver)
•
Using Windows 95/98/Me
• Microsoft Windows 95/98/Me
• 32 MB RAM or more
Using Windows NT 4.0
• Microsoft Windows NT 4.0 and NT Service Pack 3.0 or more
• 32 MB RAM or more
Using Windows 2000
• Microsoft Windows 2000
• 32 MB RAM or more
Parallel Port
The following are required to print to the print controller by way of the parallel
port:
Windows-compliant computers
•
IEEE 1284 parallel cable
•
One end of the cable is required to have a DB 25 pin male connector (connected to the print controller).
Print Controller INSTRUCTION MANUAL v

Introduction
● About this Manual
This manual is used only for the IP-304 Print Controller.
This manual describes how to operate the IP-304 Print Controller when the Konica 7065/
7055 or 7060/7150/Force 60 Copier is used as a printer by connecting it to computers or
to a network.
The main body printer (copier) and the optional network interface card
are separately supplied with instruction manuals. Refer to these manuals
as needed.
For detailed operations of Windows 95/98/Me/NT 4.0/2000, refer to the
operating manuals for each operating system.
For application operations, refer to the operating manuals provided with
each application.
This manual is composed of the following four chapters and Appendix:
Chapter 1: Overview
Chapter 1 describes the print controller hardware and the overview of its functions, and briefly explains how to connect the parallel ports of computers to the
print controller and the main body printer (copier).
Chapter 2: Printer Driver Setup
Chapter 2 describes how to install the printer driver (user software included on
the user software CD) to Windows-compliant computers.
It enables printing from each application of Windows-compliant computers to the
main body printer by way of a parallel port/network.
Chapter 3: Printer Driver Functions
Chapter 3 describes various functions of the printer driver installed on Windowscompliant computers.
Chapter 4: Control Panel Setup
Chapter 4 describes the layout of the control panel of the main body printer
and explains how to operate and set functions on the control panel.
Appendix
• Appendix A describes troubleshooting tips for the print controller.
• Appendix B describes product specifications.
• Appendix C lists the built-in printer fonts included with the print controller.
vi Print Controller INSTRUCTION MANUAL

● Conventions Used in this Manual
Notation of each product
•
The following abbreviations are used in this manual:
(1) IP-304 Print Controller: print controller
Introduction
(2) Konica 7065/7055 Printer/Copier:
Konica
(3) KN-302A Network Interface Card (option): network interface card
(4) A printing system that combines the above (1) and (2)
or (1), (2) and (3) products:
(5) Microsoft Windows 95: Windows 95
Microsoft Windows 98: Windows 98
Microsoft Windows Me: Windows Me
Microsoft Windows NT 4.0: Windows NT 4.0
Microsoft Windows 2000: Windows 2000
Above five OSs:
Notation of cautions in this manual are shown with the caution symbol.
•
Each mark used in this manual has the following meaning.
7060/7150/Force 60
Printer/Copier:
main body printer
printing system
Windows 95/98/Me/NT/2000
Precautions and limits at the time the operating hardware or software
was written.
Hints, advice, confirming items, etc. at the time the operating hardware or
software was written.
Notation of names shown on the screen are written within square brackets e.g.,
•
click the [OK] button.
Notation of folders
•
Folders are referred to in upper-to-lower sequence.
For example: Select the [Oemsetup.inf] file in the “IP304\Printer\Win9X&Me”
folder of the User Software CD.
Notation of the reference in this manual is written within quotation marks
•
e.g., “Chapter 1 Overview.”
Print Controller INSTRUCTION MANUAL vii
Introduction
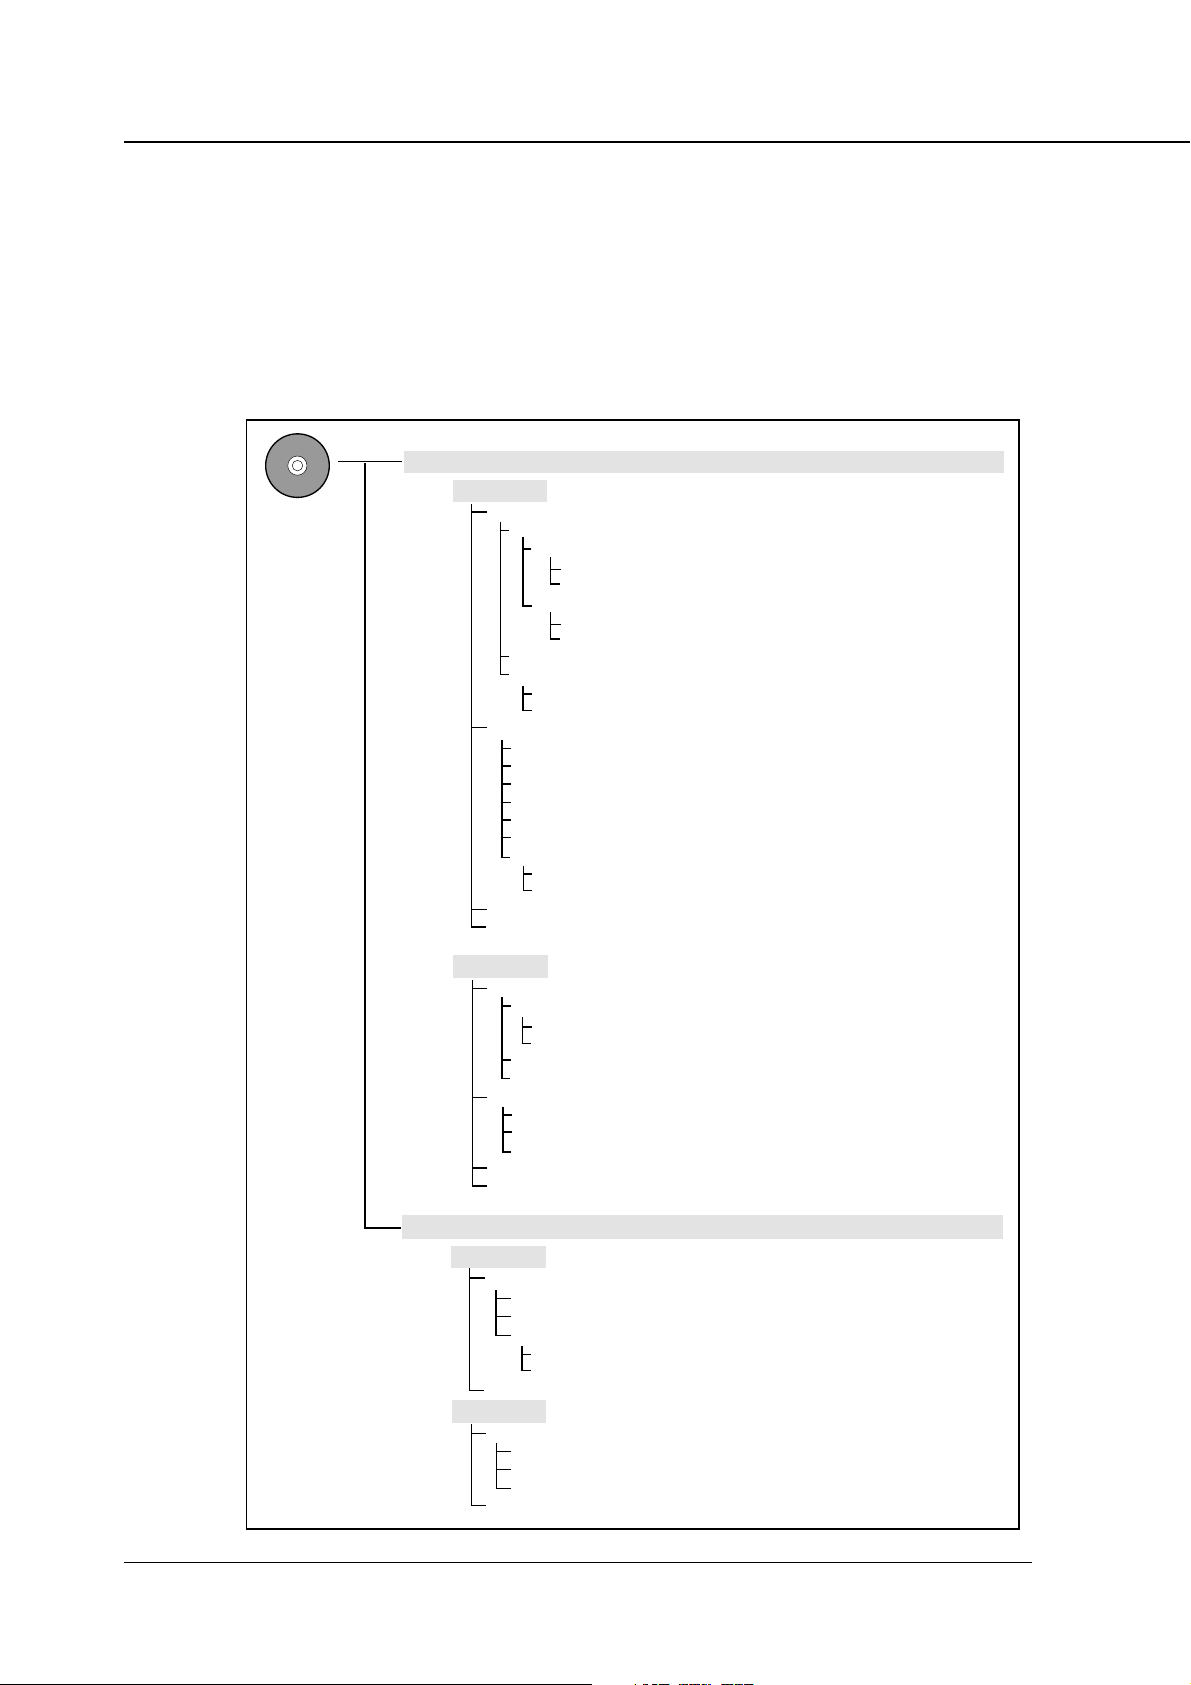
● Folder Structure on the CD-ROM
The folders included on the accompanying CD-ROM are structured as shown below.
This illustration will be helpful in locating specific folders or files.
• Each OS folder has its own structure of folders.
• In this manual, folder names and file names are not preceded by the root
directory.
• You may use the files in the English folder only.
Windows
English
IP304
KN302A
Readme.txt
ACROREAD (Acrobat Reader 4.0)
Printer
7065
Win9X&Me (Printer Driver for Windows 95/98/Me)
WinNT&2000 (Printer Driver for Windows NT/2000)
7060
Win9X&Me (Printer Driver for Windows 95/98/Me)
WinNT&2000 (Printer Driver for Windows NT/2000)
Screenfonts (Screen Fonts for PCL)
UserGuide
USA (IP-304 User's Guide for USA)
Others (IP-304 INSTRUCTION MANUAL for non-USA)
BOOTP (IP address assign program)
IP-P2P (IP base - Peer to Peer program)
IPX-P2P (IPX base - Peer to Peer program)
MAP (Management Access Program)
NWSetup (NetWare Setup Program)
UNIX (Utilities for UNIX)
UserGuide
USA (KN-302A User's Guide for USA)
Others (KN-302A INSTRUCTION MANUAL for non-USA)
Japanese
Macintosh
English
Japanese
IP304
Printer
Win9X&Me (Printer Driver for Windows 95/98/Me)
WinNT&2000 (Printer Driver for Windows NT/2000)
Screenfonts (Screen Fonts for KCPDL2)
UserGuide (IP-304 Instruction Manual for Japan)
KN302A
IP-P2P (IP base - Peer to Peer program)
MAP (Management Access Program)
UserGuide (KN-302A Instruction Manual for Japan)
ReadmeJ.txt
ACROREAD (Acrobat Reader 4.0J)
KN302A
NIManage (Program for network administrator)
ACROREAD (Acrobat Reader 4.0)
UserGuide
USA (KN-302A User's Guide for USA)
Others (KN-302A INSTRUCTION MANUAL for non-USA)
ReadmeE.txt
KN302A
NIManage (Program for network administrator)
ACROREAD (Acrobat Reader 4.0J)
UserGuide (KN-302A Instruction Manual for Japan)
ReadmeJ.txt
viii Print Controller INSTRUCTION MANUAL

Chapter 1 Overview
■ Overview of the Print Controller................ 1-2
● Print Controller and Main Body Printer ............. 1-2
● Print Data Flow.....................................................1-4
● Hardware Configuration ...................................... 1-5
● I/O Interface ..........................................................1-5
● Printer Driver ........................................................ 1-7
● Page Description Language ...............................1-7
● Memory .................................................................1-8
Print Controller INSTRUCTION MANUAL 1-1

Chapter 1 Overview
■ Overview of the Print Controller
● Print Controller and Main Body Printer
The print controller is designed to be used as an external type server of the main
body printer/copier.
The print controller can be used to connect the main body printer to computers or to a
network on which the main body printer can function as a printer/network printer from
applications on Windows 95/98/Me/NT 4.0/2000. The optional network interface card
is required for connecting to a network.
Printing System
Print Controller
For use as a local printer
Main Body Printer
For use as a networked printer
(Optional network interface card required)
When the command for printing is executed from an application on Windows 95/98/
Me/NT 4.0/2000, print data is sent to the print controller by way of a parallel Interface
(IEEE 1284) or a network.
The interpreter inside the print controller rasterizes the print data to image data
(bitmap extracting process), which is sent to the print engine in the main body printer
via the CIC (copier interface card) in the print controller and the VIC (video interface
card) installed in the main body printer to print.
Even while the main body printer is printing the previous print job data or receiving
the print data, the print controller can receive the next command for printing from an
application.
The printing system can continuously print Letter/A4-size paper at the maximum print
speed of 65 ppm (400 dpi) or 55 ppm (600 dpi).
In addition, this system supports the duplex function and the finisher function which
enables the use of seven paper trays, stapling, folding and stitching.
1-2 Print Controller INSTRUCTION MANUAL

Chapter 1 Overview
Copy Mode and Printer Mode
The control panel of the main body printer can be used in either the copy mode or
the printer mode.
Even while the main body printer is printing or copying, the print controller can
receive the next job, and while the print controller is receiving a print job, you can
use the copy mode.
E-RDH (Electronic Recirculating Document Handler)
The E-RDH system temporarily stores in memory the print data you select from
available options. The main body printer E-RDH is used to print from the print
controller.
The E-RDH memory is 32 MB (standard) and can be extended to 128 MB.
When using the E-RDH in the one-sided mode, printing will be performed simultaneously while the print controller rasterizes the pages in the print job and sends
them to the E-RDH memory. While pages are being printed from the E-RDH
memory, the print controller continues to rasterize the next print job in the sequence.
Print Controller INSTRUCTION MANUAL 1-3

Chapter 1 Overview
● Print Data Flow
Computer
Print Commands
Spooler
Interface
Print Controller
Application
Printer Driver
Parallel I/F
( IEEE 1284 )
Parallel I/F
Browser HTML
Ethernet Network I/F
( TCP/IP, IPX/SPX, AppleTalk )
Network Interface Card
( Option )
PCI bus
Input Buffer
Hard Disk
Interface
Main body
printer
PDL Processing ( Rasterization ) / Interpreter
PDL command
Page memory
CIC ( Copier Interface Card )
8 bit parallel
VIC ( Video Interface Card )
E-RDH memory
Print Engine ( Print )
Rasterized image data
Printer status
1-4 Print Controller INSTRUCTION MANUAL

● Hardware Configuration
Basic Configuration
Configuration of the print controller is as follows:
●
Architecture: IBM Compatible PC System
●
Processor: Intel Celeron 600 MHz
●
Memory: 64 MB standard / 256 MB max.
●
Hard Drive: EIDE 2.0 GB min.
●
Floppy Drive: 3.5" Floppy Disk 1.44 MB
● I/O Interface
Parallel
Centronics (IEEE 1284)
Chapter 1 Overview
Ethernet (option)
100BaseTX and 10BaseT
The optional network interface card is used to connect to the Ethernet. This card
is the internal network interface card which supports multiple protocols on the
Ethernet. This card includes a CPU and flash memory with an upgradable program.
The network interface card supports the following network protocols.
●
IPX/SPX (NetWare, Peer to Peer)
●
TCP/IP (LPD/LPR, Peer to Peer)
●
AppleTalk (EtherTalk)
Refer to the corresponding operating manual for how to use the network interface
card.
Do not use the parallel port with the Ethernet interface. Otherwise, a
system error may occur.
Use the Konica engine interface only to connect the print controller and
the main body printer. Otherwise, a system error may occur.
Print Controller INSTRUCTION MANUAL 1-5
Chapter 1 Overview
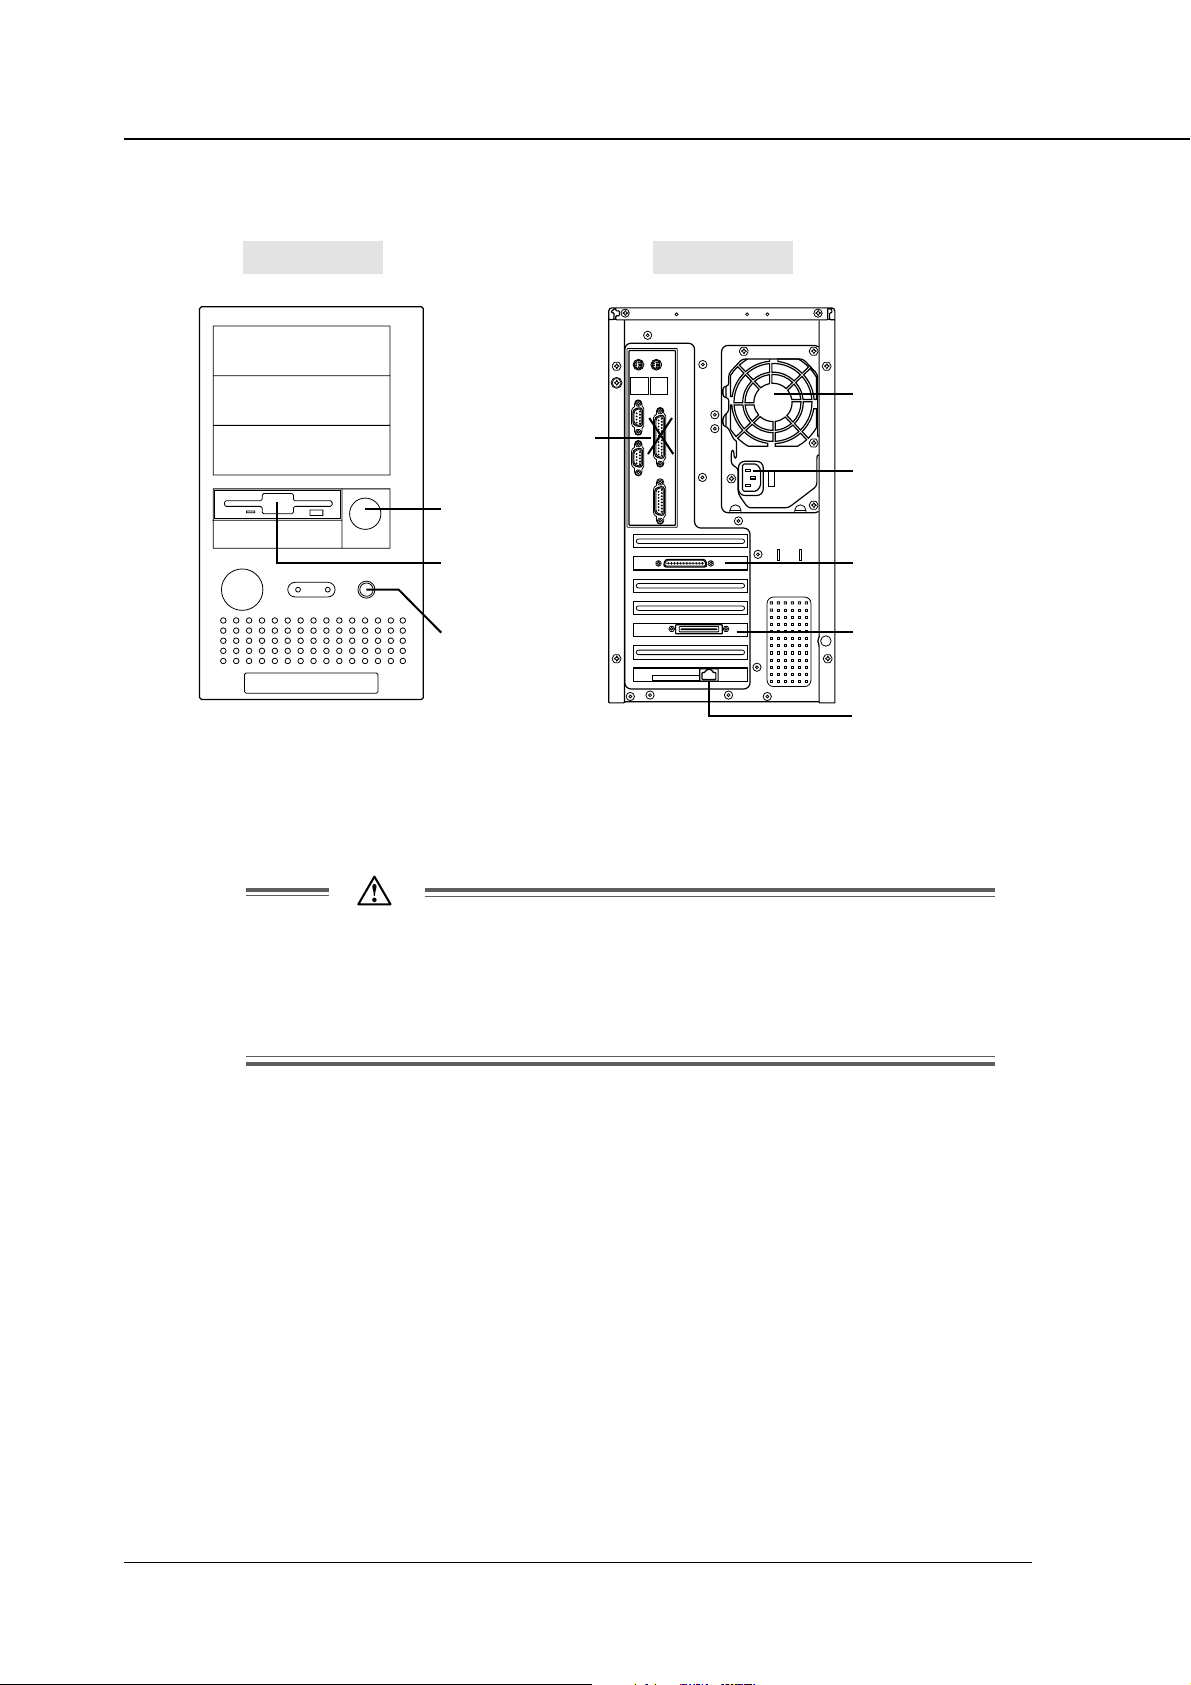
Layout
Front View Rear View
CPU fan
(Disable)
Power Cord
Power ON/OFF
Floppy Disk Drive
Reset Button
Parallel Port to PC
Video I/F
to main body printer
Ethernet I/F
(option)
Be sure to turn off the power and disconnect the power cable before
connecting the cable.
Do not use the upper parallel port on the rear side, which is marked with [X] in
the above illustration.
1-6 Print Controller INSTRUCTION MANUAL

Chapter 1 Overview
● Printer Driver
The print controller works according to the condition of the printer driver.
The printer driver can be used on the following OS:
• Windows 95
• Windows 98
• Windows Me
• Windows NT 4.0
• Windows 2000
Refer to “Chapter 2 Printer Driver Setup” (p. 2-1) for information on setting up the
printer.
Refer to “Chapter 3 Printer Driver Functions” (p. 3-1) for detailed functions of the
printer driver.
● Page Description Language
PDL (page description language) controls the transfer of information from the computer to the print controller.
“PCL5e” comes as the PDL with the print controller.
Print Controller INSTRUCTION MANUAL 1-7

Chapter 1 Overview
● Memory
Most of the print controller memory is used for rasterizing images (bitmap extracting
process), font cache, form overlay or other functions. Only a small part of it is used for
system operation.
The basic memory setting of the print controller is 64 MB. The memory of the print
controller can be expanded to 256 MB maximum.
The more memory in the print controller, the more pages that can be rasterized while
waiting for the previous job to print. When Letter/A4 size paper is used, approximately
4,345 KB memory is required to print 1 bit data in 600 dpi.
In addition, the E-RDH memory in the main body printer is used for the print process,
which can be expanded to 128 MB maximum.
For printouts using such features as multiple copies, booklet mode and wait mode, all
data about the entire set of pages rasterized by the print controller (one job) must be
first stored in the E-RDH memory.
Therefore, there are occasions when attempting to produce a very large number of
pages using those features does not lead to the correct printouts.
If this occurs installing additional E-RDH memory in the main body printer (copier) is
recommended.
Upgrading Memory
To obtain optimum printer performance, memory expansion is recommended.
Contact the nearest Konica service representative for details.
1-8 Print Controller INSTRUCTION MANUAL

Chapter 2 Printer Driver Setup
■ Installation of the Printer Driver ................ 2-2
● Before Installation ...............................................2-2
● Installing to Windows 95/98/Me ..........................2-3
● Installing to Windows NT/2000 ........................... 2-5
● Uninstalling the Printer Driver ............................ 2-8
■ Test Page Print ............................................ 2-9
Print Controller INSTRUCTION MANUAL 2-1

Chapter 2 Printer Driver Setup
■ Installation of the Printer Driver
To use the printing system, it is necessary to connect it to computers by way of the
parallel interface or Ethernet interface and install the printer driver.
The printer driver expands the Operating System (OS) functions to control the I/O of
the printing system.
● Before Installation
Models and Computer Environment
The printing system can be used with Windows-compliant computers.
The print controller includes the printer driver for Windows 95/98/Me/NT 4.0/2000.
The printer driver can be installed to computer models as long as Windows 95/98/
Me/NT 4.0/2000 has been installed.
Please keep the “User Software CD” on hand since it is required to install the
printer driver.
When an old version printer driver is installed, be sure to uninstall that
printer driver before installing the new printer driver.
Refer to “● Uninstalling the Printer Driver” (p.2-8) for how to uninstall the
printer driver.
2-2 Print Controller INSTRUCTION MANUAL
Chapter 2 Printer Driver Setup
● Installing to Windows 95/98/Me
To install the printer driver to Windows 95/98/Me, perform the following steps.
Please keep the “User Software CD” on hand since it is required to install the printer
driver.
1. Turn on the computer and start Windows.
Exit from all active Windows applications, if required.
2. Click the [Start] button of the task bar. Then, select [Settings] from the
Start menu and click [Printers] from the sub-menu.
The [Printers] window will open.
Opening from [My Computer]
To open the [Printers] window, double-click the [Printers] folder after
double-clicking the [My Computer] icon on the desktop.
3. Double-click the [Add Printer] icon of the [Printers] window.
The [Add Printer Wizard] will appear for selecting the printer.
4. Click the [Next] button.
5. Select [Local] and click the [Next] button.
When the printing system is directly connected to a computer in which the
printer driver will be installed, select [Local].
The window to select the printer manufacturer and model will appear.
Selecting [Network]
When personal computers are connected to a network and you want to
print via
install the optional network interface card in the printing system and to
complete the network settings on the network interface card and on the
personal computers. For details, see your network administrator.
For a [Network Printer], type the network path or queue name and click
the [Next] button. If you don’t know its name, click the [Browse] button to
view available network printers.
the network, select [Network]. In this case, it is necessary to
Follow procedures 6 to 15.
Once the server stores the printer driver as an available driver, go to step
13.
Print Controller INSTRUCTION MANUAL 2-3

Chapter 2 Printer Driver Setup
6. Click the [Have Disk] button.
The [Install From Disk] window will appear.
7. Click the [Browse] button.
The [Open] window will appear.
8. Set the “User Software CD” on the CD-ROM drive.
9. Select the [Oemsetup.inf] file in the “\English\IP304\Printer\7065 or
7060\Win9x&Me” folder of the “User Software CD” and click the [OK]
button.
The [Install From Disk] window will appear.
10. Click the [OK] button.
The next [Add Printer Wizard] window to select the printer manufacturer and
model will appear.
11. Select [Konica IP-304 PCL] in the list of [Printers] when you use Konica
7065/7055 as the main body printer, or select [Konica IP-304(7060) PCL]
when you use Konica 7060/7150/Force 60 as the main body printer.
Click the [Next] button.
The next [Add Printer Wizard] window to assign a port will appear.
12. Select the port to which the printing system is connected and click the
[Next] button.
Select LPT port when the printing system is used as a local printer.
The next [Add Printer Wizard] window to specify the printer name will appear.
13. Specify the printer name and click the [Next] button.
Default: [Konica IP-304 PCL] or [Konica IP-304(7060) PCL]
The next [Add Printer Wizard] window to perform the test page will appear.
14. Select whether you will perform the print test or not.
Select [Yes recommended] to perform the test page, or select [No] not to
perform it.
15. Click the [Finish] button.
Necessary files will be copied from the “User Software CD” to complete the
installation.
The printer driver of the printing system becomes available without restarting
your computer.
2-4 Print Controller INSTRUCTION MANUAL

Chapter 2 Printer Driver Setup
● Installing to Windows NT 4.0/2000
Only authorized system administrators or printer administrators should install the
printer driver to Windows NT 4.0/2000.
Please keep the “User Software CD” on hand since it is required to install the printer
driver.
Printer Management on Windows NT 4.0/2000
Since Windows NT 4.0/2000 is an operating system made specifically for network
operation, it is equipped with heavier security functions than Windows 95/98/Me.
According to the security level (permission) of the user, the range of operations
and settings of the installed printers allowed to the user is limited.
The following figure shows the permission of the Windows NT 4.0/2000 compliant
printers and its operation range.
sthgiRsseccA egnaRnoitarepO
sthgiRoN
gnitnirP
tnemucoD
tnemeganaM
lortnoClluF
printer
• gnitnirpotdetalersnoitarepO
• scihpargotdetalersnoitarepO
• snoitcnufretnirP
• gnittestnemucodfolortnoC
• stnemucodfonoiteleddna,gnitnirper,tratser,esuaP
• "tnemeganaMtnemucoD"dna"gnitnirP"follA
• stnemucodllafonoiteleddnaretnirpehtfotratserdnaesuaP
• noitamrofniretnirpfosegnahcdnasgnitteS
• retnirpehtfonoiteleD
• sthgirsseccaretnirpfosegnahcdnasgnitteS
.dewollaerasnoitarepooN
fosnoitidnoctnirpgniwollofehtdnagnitnirptnemucodfonoitucexE
.tesebotdewollaeratnemucodhcae
).cte,yartrepapdnaezisrepapafonoitceles(
).cte,enotflahdnanoituloserfognissecorp(
)reipocehtotrailucepsnoitcnuffonoitceles(
Print Controller INSTRUCTION MANUAL 2-5
Chapter 2 Printer Driver Setup
Installation using [Add Printer]
1. Turn on the computer and start Windows.
Exit from all active Windows applications, if required.
2. Log on as an administrator (or a user entitled to install a printer).
3. Click the [Start] button of the task bar. Then, select [Settings] of the
Start menu and click [Printers] from the sub-menu.
The [Printers] window will open.
Opening from [My Computer]
To open the [Printers] window, double-click the [Printers] folder (or [Control Panel] - [Printers]) after double-clicking the [My Computer] icon on
the desktop.
4. Double-click the [Add Printer] icon of the [Printers] window.
The [Add Printer Wizard] will appear for adding the printer.
5. Click the [Next] button.
6. Select [Local] and click the [Next] button.
When the printing system is directly connected to a computer in which the
printer driver will be installed, select [Local].
Windows 2000
When using Windows 2000, the default setting of the [Automatically
detect and install my Plug and Play printer] is “on”. For manual installa-
tion, turn it “off” by clicking.
Selecting [Network]
When personal computers or workstations are connected to the network
and you want to print via
interface card and select [Network].
the network, connect to the optional network
For a [Network Printer], type the network path or queue name and click
the [Next] button. If you don’t know its name, click the [Browse] button to
view available network printers then follow steps 7 to 19.
2-6 Print Controller INSTRUCTION MANUAL

Chapter 2 Printer Driver Setup
7. Select or create the Printer Port to install the printer controller and click
the [Next] button.
The next [Add Printer Wizard] window will appear.
8. Click the [Have Disk] button.
The [Install From Disk] window will appear.
9. Click the [Browse] button.
The [Open] window will appear.
10. Set the “User Software CD” on the CD-ROM drive.
11. Select the [Oemsetup.inf] file in the “\English\IP304\Printer\7065 or
7060\WinNT&2000” folder of the “User Software CD” and click the [OK]
button.
The [Install From Disk] window will appear.
12. Click the [OK] button.
The next [Add Printer Wizard] window to select the manufacturer and model
of the printer will appear.
13. Select [Konica IP-304 PCL] in the list of [Printers] when you use Konica
7065/7055 as the main body printer, or select [Konica IP-304(7060) PCL]
when you use Konica 7060/7150/Force 60 as the main body printer.
Click the [Next] button.
The next [Add Printer Wizard] window to specify the printer name will appear.
14. Specify the printer name and click the [Next] button.
Default: [Konica IP-304 PCL] or [Konica IP-304(7060) PCL]
The next [Add Printer Wizard] window to perform the test page will appear.
15. Select [Do not share this printer] or [Share as] by clicking.
In case of [Share as], type the share name of the printer.
16. Click the [Next] button.
The next [Add Printer Wizard] window to perform the print test will appear.
17. Select whether you will perform the print test or not.
Select [Yes recommended] to print the test page, or select [No] to not print it.
18. Click the [Next] button.
The [Add Printer Wizard] completion window will appear.
19. Click the [Finish] button.
Necessary files will be copied from the “User Software CD” to complete the
installation.
The printer driver of the printing system becomes available without restarting
your computer.
Print Controller INSTRUCTION MANUAL 2-7
Chapter 2 Printer Driver Setup
● Uninstalling the Printer Driver
To uninstall the printer driver, perform the following steps.
1. Turn on the computer and start Windows.
Exit from all active Windows applications, if required.
2. Click the [Start] button of the task bar. Then, select [Settings] of the
Start menu and click [Printers] from the sub-menu.
The [Printers] window will open.
Opening from [My Computer]
To open the [Printers] window, double-click the [Printers] folder (or [Control Panel] - [Printers]) after double-clicking the [My Computer] icon on
the desktop.
3. Click the printer icon of the [Printers] window and press [Delete] key.
The [Printers] dialog box will open.
4. Click the [Yes] button.
5. Restart the computer.
The printer driver will be deleted/uninstalled.
2-8 Print Controller INSTRUCTION MANUAL
■ Test Page Print
You can check whether the printer driver functions properly by performing a test page
after the printer driver has been installed.
To print the test page, perform the following steps.
1. Click the [Start] button of the task bar. Then, select [Settings] from the
Start menu and click [Printers] in the sub menu.
The [Printers] window will open.
Opening from [My Computer]
To open the [Printers] window, double-click the [Printers] folder (or [Control Panel] - [Printers]) after double-clicking the [My Computer] icon on
the desktop.
Chapter 2 Printer Driver Setup
2. Right-click [Konica IP-304 PCL] (or [Konica IP-304(7060) PCL]) icon and
click [Properties].
[Konica IP-304 PCL Properties] (or [Konica IP-304(7060) PCL]) will appear.
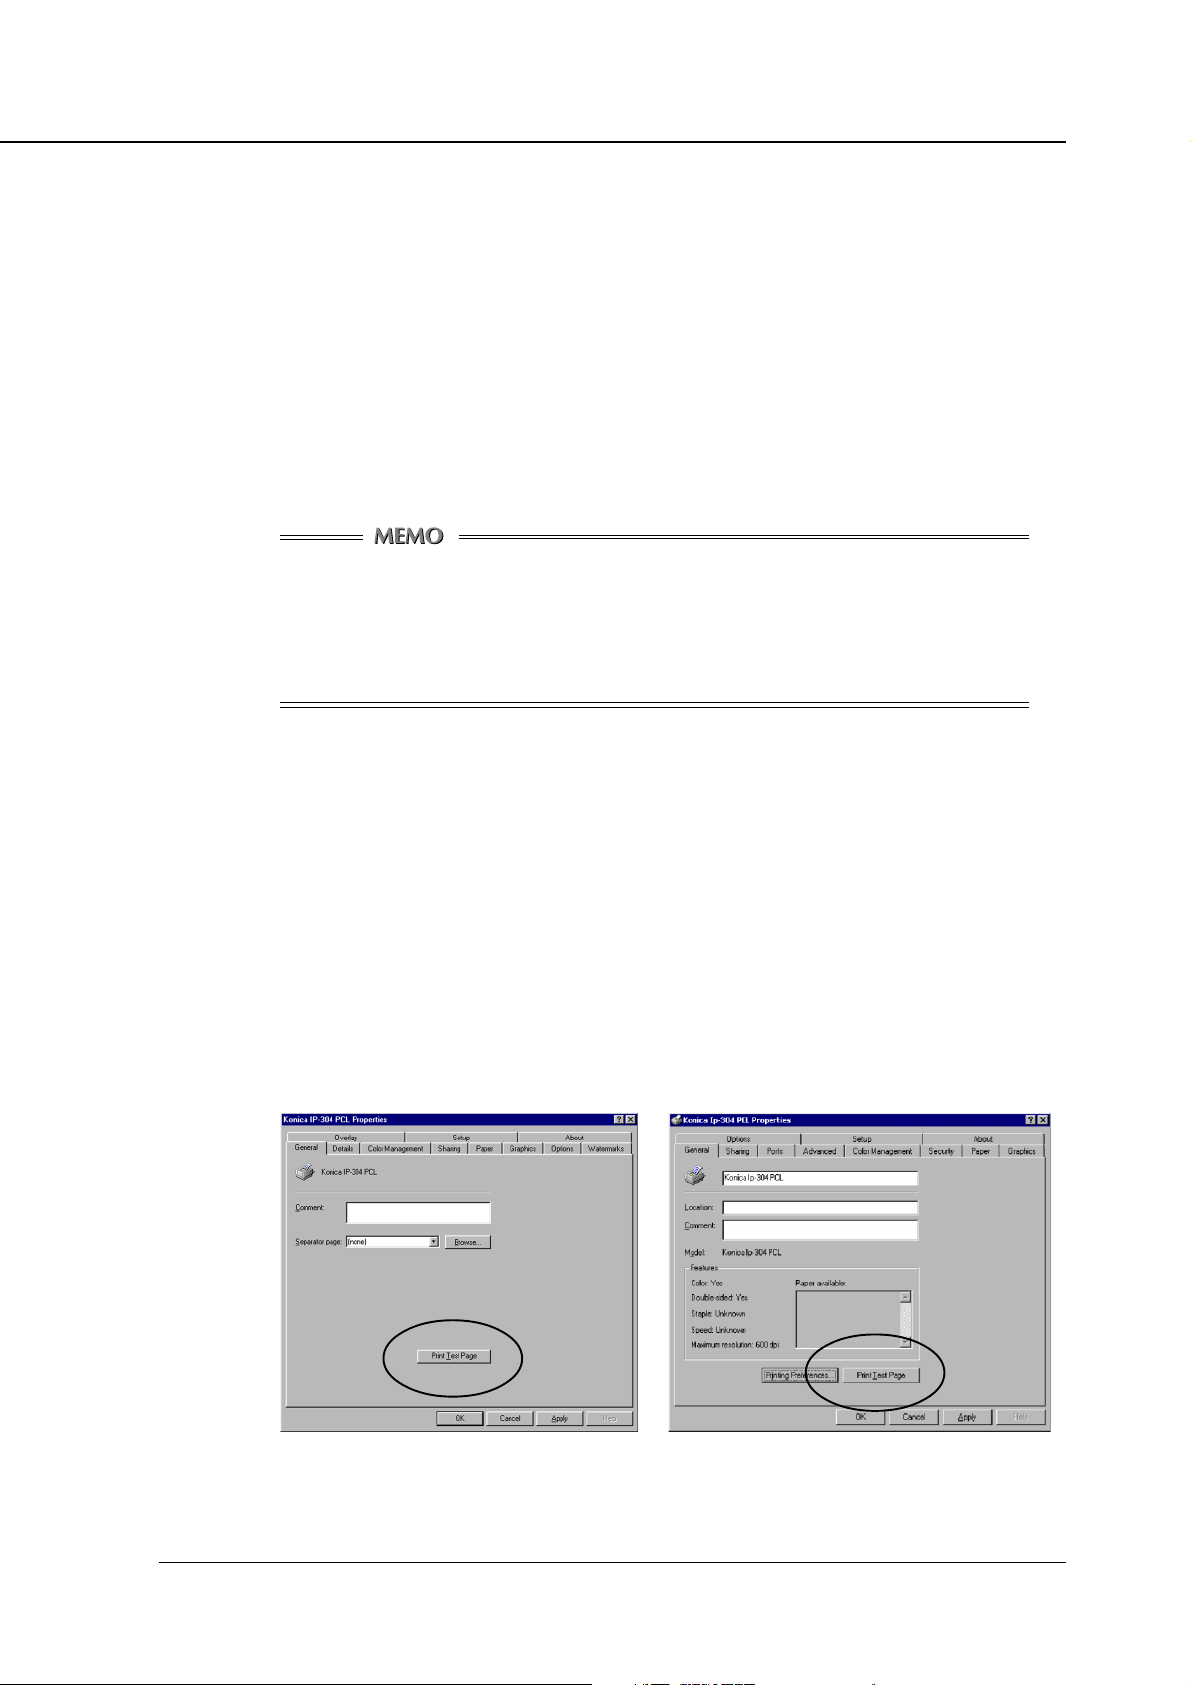
3. Select [General] of [Konica IP-304 PCL Properties] (or [Konica IP-
304(7060) PCL]) and click the [Print Test Page] button.
A test page print will start and a screen to confirm print end will appear.
4. Click the [Yes] button.
A test page print will end.
Windows 95/98/Me Windows 2000
Print Controller INSTRUCTION MANUAL 2-9

Chapter 3 Printer Driver Functions
■ Printer Driver Functions............................. 3-2
● Compliant OS .......................................................3-2
● Properties .............................................................3-3
● Function List ........................................................ 3-6
● Description of Functions ..................................3-11
Print Controller INSTRUCTION MANUAL 3-1

Chapter 3 Printer Driver Functions
■ Printer Driver Functions
The printer driver is the program which is installed in Windows-compliant computers
for using and setting up the printing system. It expands the OS functions to control the
I/O of the printing system.
This chapter fully describes the various functions of the printer driver.
● Compliant OS
The printer driver can be used on the following OS:
• Windows 95
• Windows 98
• Windows Me
• Windows NT 4.0 and NT Service Pack 3.0 or more
• Windows 2000
Refer to “Chapter 2 Printer Driver Setup” (p. 2-1) for installation of the Printer Driver.
3-2 Print Controller INSTRUCTION MANUAL

Chapter 3 Printer Driver Functions
● Properties
You have two ways of selecting or changing settings through the printer driver.
(1) The first way is by going through [Start] - [Settings] - [Printers] - [Konica IP-
304 PCL] (or [Konica IP-304(7060) PCL]) - [Properties].
Alternatively, you can select [Control Panel] - [Printers].
(2) The second way is to use applications to make settings each time you need
to produce printouts.
In advance, check to select sure of [Printer Name] by selecting [File] - [Print] [Print Dialog] on the application in use.
Settings made in the first way are effective when producing printouts, whatever the
application.
Settings made in the second way are effective only when the corresponding application is running. When launching the application the next time, settings made by going
though [Start] - [Settings] - [Printers] are applied.
Some interfaces to tabs and other options are displayed differently by the OSs.
Also, among the tabs there are some that are not shown depending on settings.
Incidentally, “Konica IP-304 PCL” ( or “Konica IP-304(7060) PCL”) is the default printer
name.
A different name may occasionally be given to the printer icon depending on the
system configurations or settings.
Refer to “Chapter 4 Control Panel Setup” (p. 4-1) for information on selecting printer
settings from the control panel of the main body printer.
Print Controller INSTRUCTION MANUAL 3-3

Chapter 3 Printer Driver Functions
Properties
Windows 95/98/Me
Windows NT
Windows 2000
[OK]
When the [OK] button is clicked, all tab settings are saved when the properties
screen is closed.
[Cancel]
When the [Cancel] button is clicked, all tab settings are canceled when the properties screen is closed.
3-4 Print Controller INSTRUCTION MANUAL
 Loading...