

OPERATION
GUIDE
Contents
Safety Information
User Instructions .................................................................................................................1
Machine Labels ...................................................................................................................2
Label Locations............................................................................................................2
Machine Installation and Power Requirements................................................................... 4
Machine Handling and Care................................................................................................6
Routine Safety.....................................................................................................................7
Finisher Capacity Requirements ......................................................................................... 8
DP65
Machine Information
Machine Configuration......................................................................................................10
External Machine.......................................................................................................10
External Machine Call-outs........................................................................................10
Optional Equipment ...................................................................................................12
Control Panel Layout.........................................................................................................14
Specifications.................................................................................................................... 15
Printing Operations
Introduction .......................................................................................................................19
Wake Up Screen........................................................................................................19
Warm Up Screen .......................................................................................................19
Control Panel ....................................................................................................................20
The Basic Screen..............................................................................................................20
Check Mode Message ......................................................................................................21
Check Screen ............................................................................................................21
Reservation List ................................................................................................................22
Screen Display...........................................................................................................22

Contents
Printing Operations (continued)
Help Mode.........................................................................................................................23
Stop Printing......................................................................................................................24
Change Job Order.............................................................................................................25
Job Deletion......................................................................................................................26
Previous Job List...............................................................................................................27
Non Complete Job List......................................................................................................28
Change Setting .................................................................................................................29
Output Modes
Non-Sort Mode Using Primary (Main) Tray.......................................................................30
Sort Mode Using Primary (Main) Tray...............................................................................31
Staple-Sort Mode Using Primary (Main) Tray ................................................................... 32
Fold Mode / Stitch & Fold Mode ........................................................................................33
Punch Mode......................................................................................................................34
Z-Fold Mode......................................................................................................................35
Three-Fold Mode...............................................................................................................36
Cover Sheet Feeder.......................................................................................................... 37
Manual Finishing ...............................................................................................................38
Output Mode for Machine without Finisher .......................................................................41
Maintenance & Supplies
Loading Paper...................................................................................................................42
Paper Indicator ( ) ......................................................................................................42
Paper Empty Indicator ( or )....................................................................................... 42
Using the HELP Key ..................................................................................................42
Loading Paper in Tray 1 and 2...................................................................................43
Loading Paper in Tray 3.............................................................................................44
Loading Paper in Multi-Sheet Bypass Tray................................................................45
Loading Paper in LCT (LT-402/LT-412) ..................................................................... 46
Loading Tabbed Sheets in Tray 1, 2, or 3..................................................................47
Loading Tabbed Sheets in Multi-Sheet Bypass Tray.................................................48
Loading Tabbed Sheets in LCT (LT-402/LT-412)...................................................... 49
Adding Toner.....................................................................................................................50
Inserting a New Staple Cartridge into FS-110/210 Finisher .............................................. 51
Empty Waste Basket of PK-110/120 Punching Kit............................................................52
Empty Waste Basket of PZ-108 Punching / Z-Folding Unit ..............................................53
Preventive Maintenance....................................................................................................54
Reading the PM Counter ...........................................................................................54
Printing the PM Counter.............................................................................................54
Clearing Mishandled Paper...............................................................................................55
Jam Location Screen .................................................................................................55
Key Operator Mode
To the Key Operator..........................................................................................................56
How to Access the Key Operator Mode.....................................................................57
Function Menu Map ..........................................................................................................58
Restrictions in Use ............................................................................................................60

Safety Information
User Instructions
The following pages include important safety information, which you must read and
understand before you attempt to operate the machine. If you have any concerns about safety
matters, please contact your service representative. Keep this manual located permanently
with the machine, so that this safety information is readily available.
Machine safety labels are attached to the internal area of the machine. The purpose of safety
labels is to alert you of imminent or potentially hazardous situations or conditions. Be sure to
heed all safety label information. If the safety labels become illegible due to soilage, etc.,
please contact your service representative for information about label replacements. Sample
safety labels are shown on the following page.
TO AVOID GETTING BURNED do not touch any part of the machine that you are advised not
to touch by a warning or caution label.
DO NOT REMOVE WARNING OR CAUTION LABELS.
Clean labels as needed to maintain legibility. If any warning or caution label is removed or
becomes illegible from soilage, please contact your service representative for information
about label replacements.
The following standard safety categories are commonly used on product labelling.
DANGER:
Danger indicates an imminent hazardous situation, which, if not avoided, will result in
death or serious injury.
Note:
The DANGER category is not required for this product, and is only included here for general user information.
WARNING:
Warning indicates a potentially hazardous situation, which, if not avoided, could result
in death or serious injury.
CAUTION:
Caution indicates a potentially hazardous situation, which, if not avoided, may result in
minor or moderate bodily injury.
NOTICE:
Notice provides information on the correct handling or use of the machine to prevent breakage of the printer
or some machine part, etc. It does not indicate concern for personal safety.
- 1 -
Safety Information
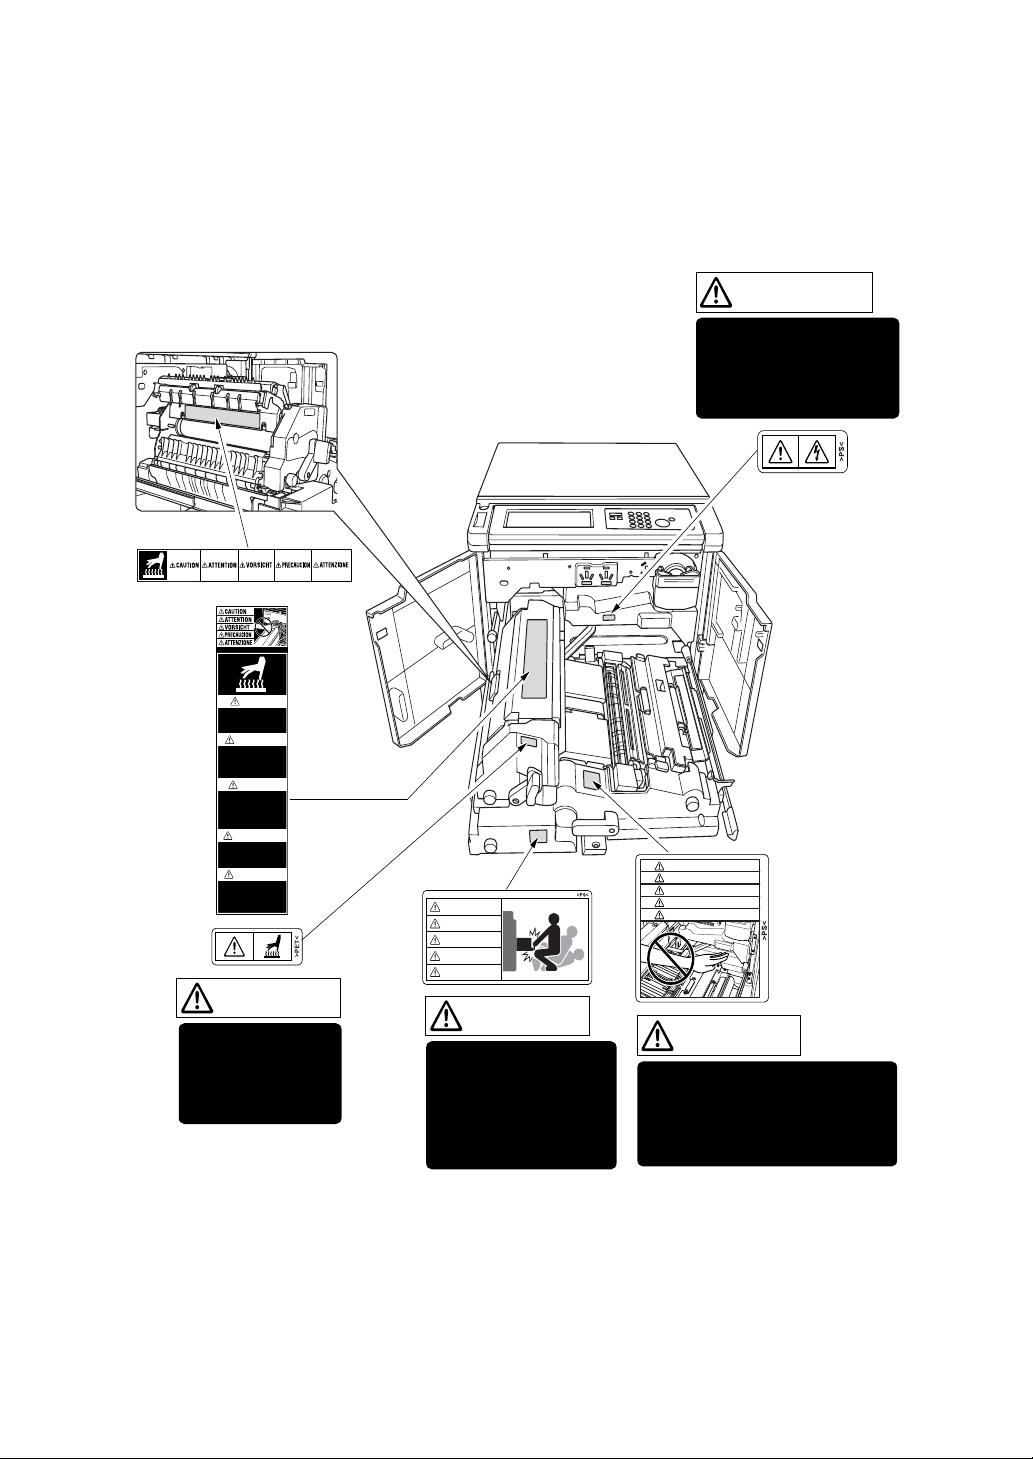
Machine Labels
Label Locations
CAUTION
High temperature!
Do not touch. Use care
when clearing paper.
ATTENTION
Température élevée!
Risque de brûlure. Soyez
prudent en retirant la
feuille coincée.
Brandverletzungsgefahr.
Bei Beseitigung von
Papierstaus vorsichtig
vorgehen.
¡Temperatura alta!
No tocar. Tener cuidado al
remover el papel.
Non toccare. Agire con
prudenza nel rimuovere la
carta.
VORSICHT
Heiße Oberfläche!
PRECAUCION
ATTENZIONE
Alta temperatura!
CAUTION
ATTENTION
VORSICHT
PRECAUCION
ATTENZIONE
WARNING
This area generates
high voltage. If touched,
electrical shock may
occur. DO NOT TOUCH.
CAUTION
ATTENTION
VORSICHT
PRECAUCION
ATTENZIONE
CAUTION
The fixing unit is
very hot. To avoid
getting burned, DO
NOT TOUCH.
CAUTION
The conveyance fixing
unit is heavy. Use care
and draw it out gently;
otherwise you may be
injured.
- 2 -
CAUTION
DO NOT put your hand between
the main body and developing
fixing unit; otherwise you may
be injured.
Safety Information
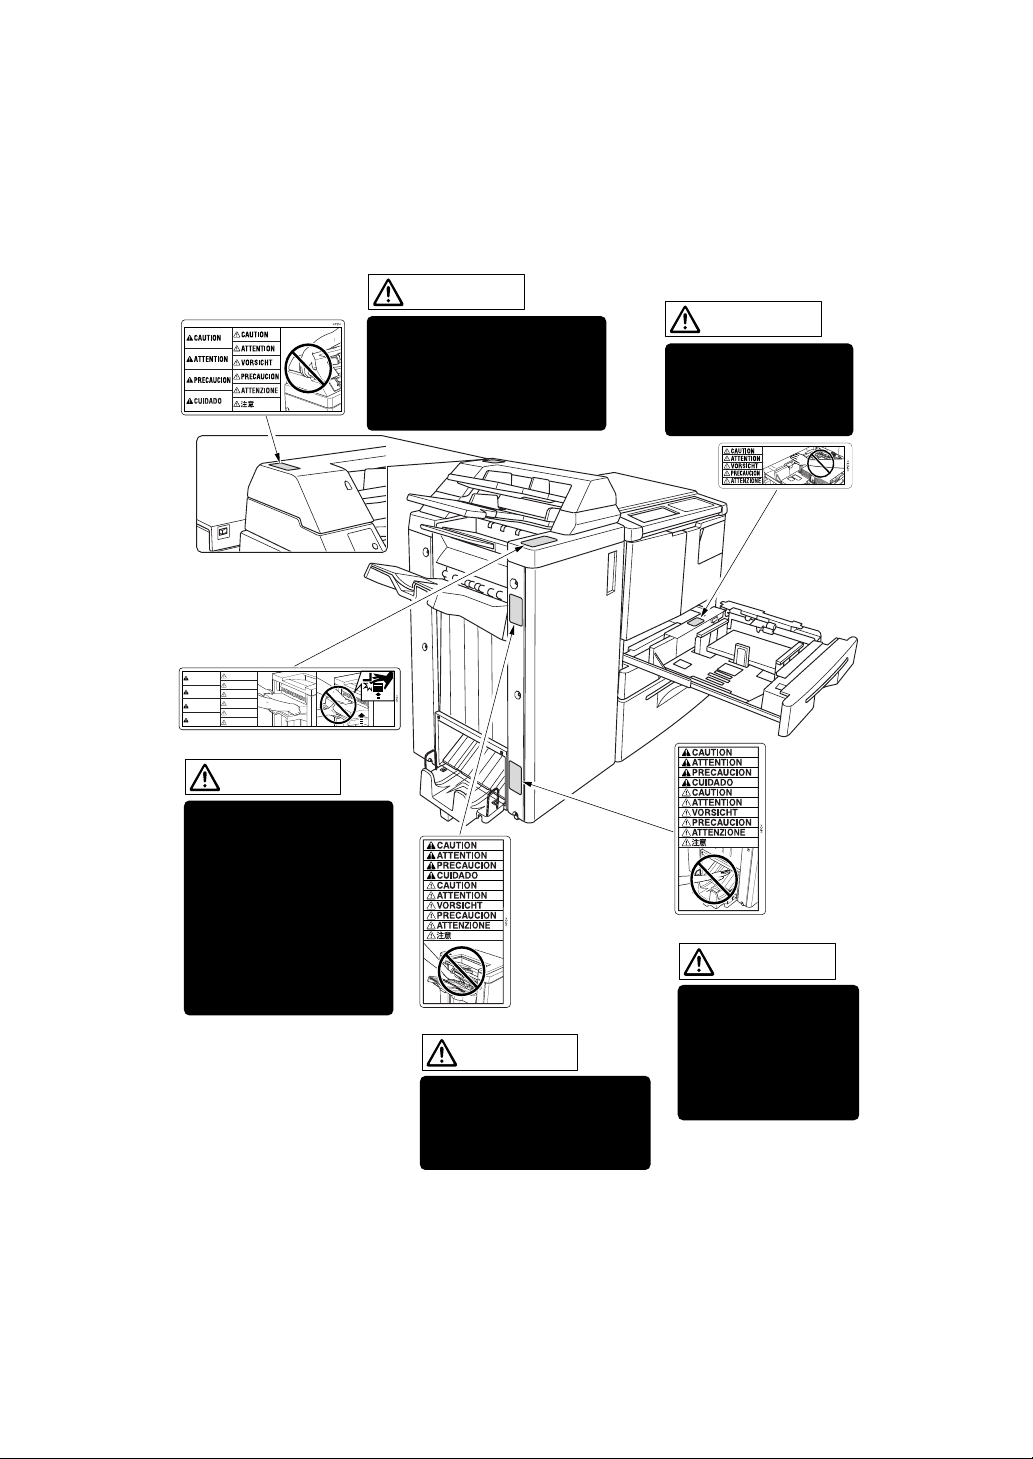
Machine Labels (continued)
Label Locations (continued)
(Finisher with PI-110
Cover Sheet Feeder only)
CAUTION
CAUTION
ATTENTION
ATTENTION
VORSICHT
PRECAUCION
PRECAUCION
ATTENZIONE
CUIDADO
(FS-110/FS-210 Finisher)
CAUTION
To avoid injury, DO NOT
put your hand on top of
the printed sheets. Be
sure to hold both sides of
the printed sheets when
removing them, and DO
NOT leave your hand on
the printed sheets while
the primary (main) tray
goes up.
CAUTION
DO NOT insert your finger into
the bottom of the upper part
of the feeder when returning
to its original position;
otherwise you may be injured.
(FS-210 Finisher)
CAUTION
Use care after opening the
paper exit outlet. DO NOT put
your hand into it; otherwise
you may be injured.
CAUTION
DO NOT put your hand
between the main body
and tray; otherwise you
may be injured.
(All trays)
(FS-210 Finisher only)
CAUTION
Inside the lower paper
exit outlet is the roller
drive unit. DO NOT put
your hand into it;
otherwise you may be
injured.
- 3 -
Safety Information
Machine Installation and Power Requirements
CAUTION:
FAILURE TO HEED THE FOLLOWING CAUTIONS MAY RESULT IN BODILY INJURY AND/OR MACHINE
DAMAG E.
❒ FIRE PREVENTION
Install machine away from flammable or volatile materials. Routinely check for abnormal heat
from power cord and/or plug.
❒ SHORT CIRCUIT FROM WATER DAMAGE
Do not install or operate this equipment outdoors near a lake, pond, or river, etc.; and do not
allow the machine to come in contact with splashes of rain, water, or any liquid.
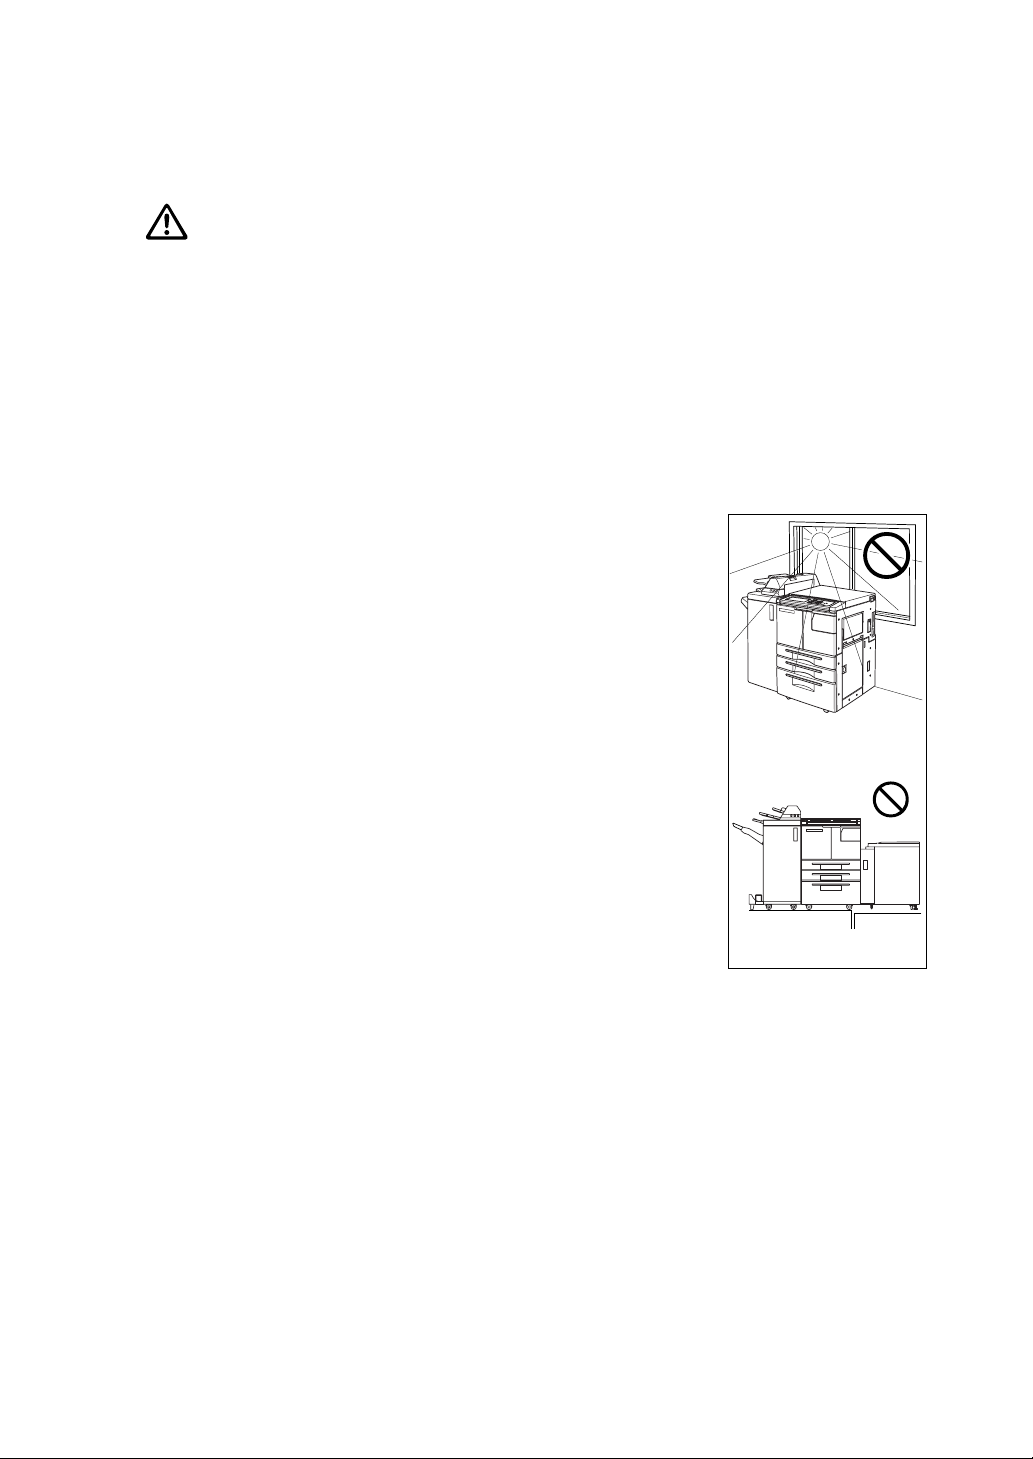
❒ TEMPERATURE AND HUMIDITY
Install the machine away from direct sunlight, heat sources (stoves,
heaters) and cold temperatures (air conditioners). Avoid any
environment that is outside 10°~30°C, with 10~80% humidity.
❒ VENTILATION
Do not allow the machine to come in contact with dust or ammonia
gas, or fumes from printing or cleaning solutions, etc.; otherwise,
image quality will be poor. Install the machine in a well-ventilated
area, for comfort; otherwise, an ozone odor will be detected during
large print runs. When in use, the printer generates ozone in
amounts too small to be hazardous to the human body.
Temperature
❒ VIBRATIONS
If the machine is constantly vibrated or jolted, trouble may occur.
Install the machine on a level, horizontal floor, free from vibrations.
❒ SPACE ALLOTMENT
Install machine in an area with adequate space for performing
Vibration
printer operations, replacing supply items, and conducting
preventive maintenance. See Site Requirements.
❒ MACHINE RELOCATION/TRANSPORTATION
Be sure to contact your service representative when moving or transporting the machine. If
you move the machine with the Memory unit installed, machine trouble may be caused by
vibration.
❒ PLUG SOCKET
A plug socket is limited in capacity. Use an exclusive power source for this machine; otherwise,
overheating and/or smoking may occur. The total power consumption of the main body, plus all
peripherals, must not exceed the capacity of the main power supply.
Be sure the socket-outlet is near the equipment and is easily accessible.
- 4 -

Safety Information
Machine Installation and Power Requirements (continued)
CAUTION:
FAILURE TO HEED THE FOLLOWING CAUTIONS MAY RESULT IN MACHINE DAMAGE, OVERHEATING,
RISK OF ELECTR ICAL SHOCK , AND/OR PERSONAL INJURY.
❒ PLUG AND CORD (LEAD)
Unless the power plug is firmly inserted into the socket, overheating and/or smoking may
occur. Firmly insert the power cord plug into the electrical outlet before turning on the printer
power switch. If the inserted plug is loose in the socket, disconnect it, and consult an
electrician for repair; do not attempt to operate the machine.
Be sure the socket-outlet is near the equipment and is easily accessible.
A damaged power cord may result in overheating, short circuit or fire. Do not bend, crush,
wind, kick, or strike the cord with any item. Do not roll up the cord. If the main body power cord
is bent or damaged, immediately contact your service representative; do not attempt to repair
it yourself; do not continue to operate the machine.
❒ ADAPTERS AND PLURAL LOADS
Never use adapters and never connect plural loads or a branched socket to one socket outlet;
otherwise, overheating or fire may occur.
❒ EXTENSION CORDS (LEADS)
An extension cord or lead is limited in capacity. Unless the cord or lead has adequate capacity,
smoking and overheating may occur. Should smoking and/or overheating occur, contact an
electrician immediately. If you require further information about power requirements, power
consumption, extension cords, adapters and connectors, please contact your service
representative, and consult your electrician.
- 5 -
Safety Information
Machine Handling and Care
WARNING:
FAILURE TO HEED THE FOLLOWING WARNING MAY RESULT IN DEATH OR SERIOUS INJURY AND/OR
MACHINE DAMAGE.
❒ MACHINE CONTACT
Never touch internal high voltage areas, indicated with a WARNING label.
Never touch the drum surface.
Never put your hand into the developing unit when removing mishandled paper.
CAUTION:
FAILURE TO HEED THE FOLLOWING CAUTIONS MAY RESULT IN MACHINE DAMAGE, OVERHEATING,
AND/OR PERSONAL INJURY.
❒ MACHINE CONTACT
Never touch internal high temperature or magnetism areas, indicated with a CAUTION label.
Never insert your hand into the fixing unit when removing mishandled paper.
Never touch the inside of the main body for any purpose except
removing mishandled paper or adding toner.
Use care when pulling out the conveyance fixing unit.
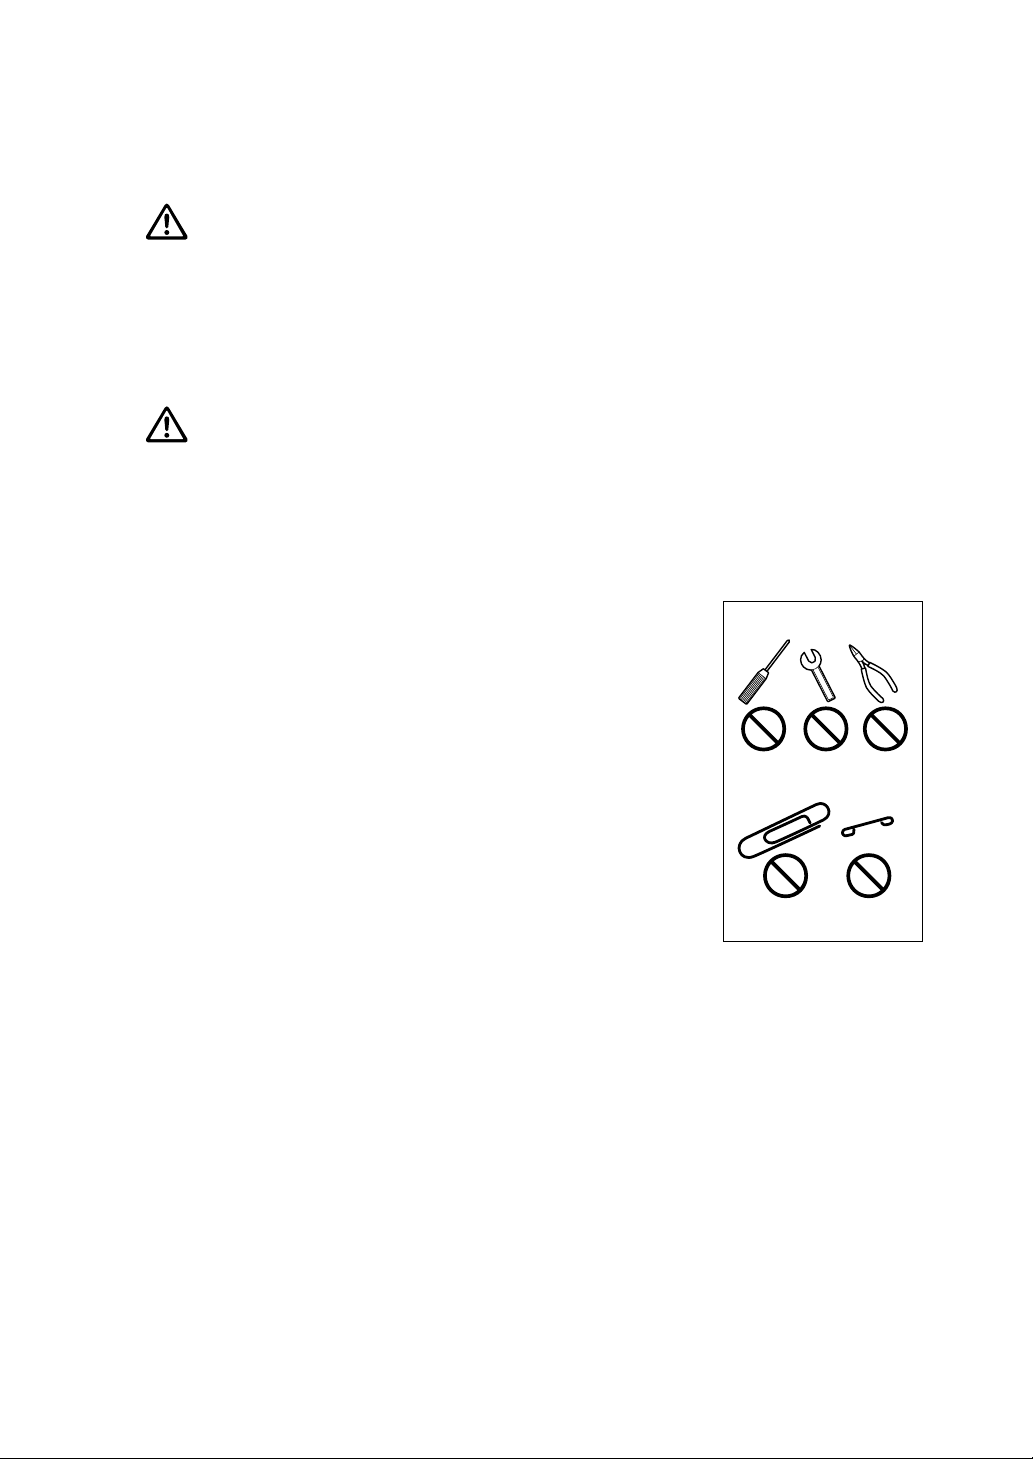
❒ MACHINE CARE
Do not drop paper clips, staples or other small metallic objects into
the printer, or spill water or any other liquid into the machine.
Do not use the machine surface to support vases, books, etc.
These items will interfere with the work space and may cause
damage to the machine.
❒ ABNORMAL CONDITIONS
If any abnor mal sound, odor, or smoke generates from the
machine, immediately stop using the printer, turn off the main
power switch, disconnect the plug and contact your service
representative.
If a circuit breaker is tripped, or if a fuse blows, stop using the
machine and contact an electrician. If more detailed information is needed regarding the
power source or power consumption of this machine, contact your service representative.
❒ MACHINE MODIFICATION
Do not modify the machine in any way or remove any part or screw. Never attempt to perform
any maintenance function that is not specifically described in this manual. Do not connect the
machine with any options other than those specified.
- 6 -

Safety Information
Routine Safety
CAUTION:
FAILURE TO HEED THE FOLLOWING CAUTIONS MAY RESULT IN MACHINE DAMAGE, OVERHEATING,
AND/OR PERSONAL INJURY.
❒ PERIODIC CHECK
Check for loose connections or excessive heat on power plug, damage to power cord and/or
plug (creased, frayed, scratched or cut, etc.). Be sure the plug is inserted fully, and ground
wire is connected correctly. If any abnormality occurs, do not continue to operate the machine.
❒ SERVICE MESSAGES
If a service message displays, turn the machine off, disconnect the power cord from the outlet,
and report the condition to your service representative.
❒ TONER
Check to be sure toner in storage is out of the reach of children, or anyone incapable of using
supplies safely. Although toner is nontoxic, do not inhale toner or allow it to come in contact
with eyes. If inhalation or eye contact occurs, immediately consult a physician. Please refer to
the appropriate material safety data sheet for additional toner safety information.
❒ PAPER
• Do not use stapled paper or paper that conducts electricity (silver, carbon, etc.), otherwise
an accident may occur as a result of fire.
• To avoid machine trouble, do not use heat-sensitive paper, paper that conducts electricity
(silver, carbon, etc.), or coloured OHP film.
❒ CLEANING MATERIALS
Check the type of cleaning material used on your machine to be sure it is recommended by
Konica. If necessary, check with your service representative. Never use cleaning materials for
purposes other than cleaning, and be sure to keep all cleaning materials out of the reach of
children or anyone who is incapable of using them safely.
❒ POWER SAVER
Use Power Saver mode for short periods of machine inactivity. When not using the machine for
long periods of time, turn power off, unless the weekly timer function is operating.
❒ DISPOSAL OF THE PRINTER AND ACCESSORIES
Dispose of this printer and accessories according to your local regulations.
- 7 -

Safety Information
Finisher Capacity Requirements
CAUTION:
FAILURE TO HEED THE FOLLOWING CAUTIONS MAY RESULT IN BODILY INJURY AND/OR MACHINE
DAMAG E.
❒ FINISHER PAPER CAPACITY
To prevent paper misfeed, do not exceed the paper capacity of the Finisher.
FS-110/FS-210 Finisher paper weight: 60 g/m2 ~ 90 g/m
When the selected print quantity exceeds the maximum paper capacity, remove the printed
sheets from the finisher while the paper is exiting.
Paper capacities below are stated for 80 g/m2 paper unless otherwise indicated.
This Finisher also accepts wide types of the regular sizes stated below.
Finisher FS-110/FS-210
Primary (Main) tray: Non-sort/Sort/Group mode
500 sheets (A5, A5R, B6R)
3,000 sheets (A4, A4R, B5R, 8.5"x11", 8.5"x11"R)(FS-110)
2,500 sheets (A4, A4R, B5R)(FS-210)
1,500 sheets (A3, F4, B4)
The Secondary (sub) tray can be unloaded while the DP65 is running. Set
production is not limited by the capacity of the Secondary (sub) tray.
2
Primary (Main) tray: Punch mode (machine with PK-110/120 only)
3,000 sheets (A4)
1,500 sheets (A3)
The Secondary (sub) tray can be unloaded while the DP65 is running. Set
production is not limited by the capacity of the Secondary (sub) tray.
Primary (Main) tray: Staple-Sort / Staple-Sort + Z-Folding mode
1,000 sheets* (A3 ~ A4/A4R)
* The maximum capacity varies according to the number of prints to be stapled.
When using Z-Fold mode with Staple-Sort mode, the maximum capacity varies
according to the number of Z-folded sheet in one stapled set.
Secondary (Sub) tray: Non-sort mode
200 sheets max.
❒ FINISHER PAPER CAPACITY (continued)
Booklet tray (FS-210 only)
100 sheets max. (A3, F4, B4)
75 sheets max. (A4, A4R)
50 sheets max. in Three-Fold mode
(The maximum number of sheets varies, depending on the number of pages in the
booklet and whether Fold or Stitch & Fold is selected.)
- 8 -

Safety Information
Finisher Capacity Requirements (continued)
CAUTION:
FAILURE TO HEED THE FOLLOWING CAUTIONS MAY RESULT IN BODILY INJURY AND/OR MACHINE
DAMAG E.
❒ FS-210 FINISHER BOOKLET MODE OUTLET
Inside the Booklet mode outlet is the roller drive unit. DO NOT put your hand into it when
removing the folded or stitched & folded sheet; otherwise you may be injured.
❒ FS-110/FS-210 FINISHER PAPER EXIT OUTLET
To avoid injury when stapling large size prints, DO NOT put your hand into the open Paper exit
outlet.
❒ FS-110/FS-210 FINISHER PRIMARY (MAIN) TRAY
When printed materials are removed from the primary (main) tray of FS-110/FS-210 Finisher,
the tray goes up automatically. To avoid injury, DO NOT put your hand on top of the printed
sheets. Be sure to hold both sides of the printed sheets when removing them, and DO NOT
leave your hand on the printed sheets while the primary tray goes up.
- 9 -
Machine Information
Machine Configuration
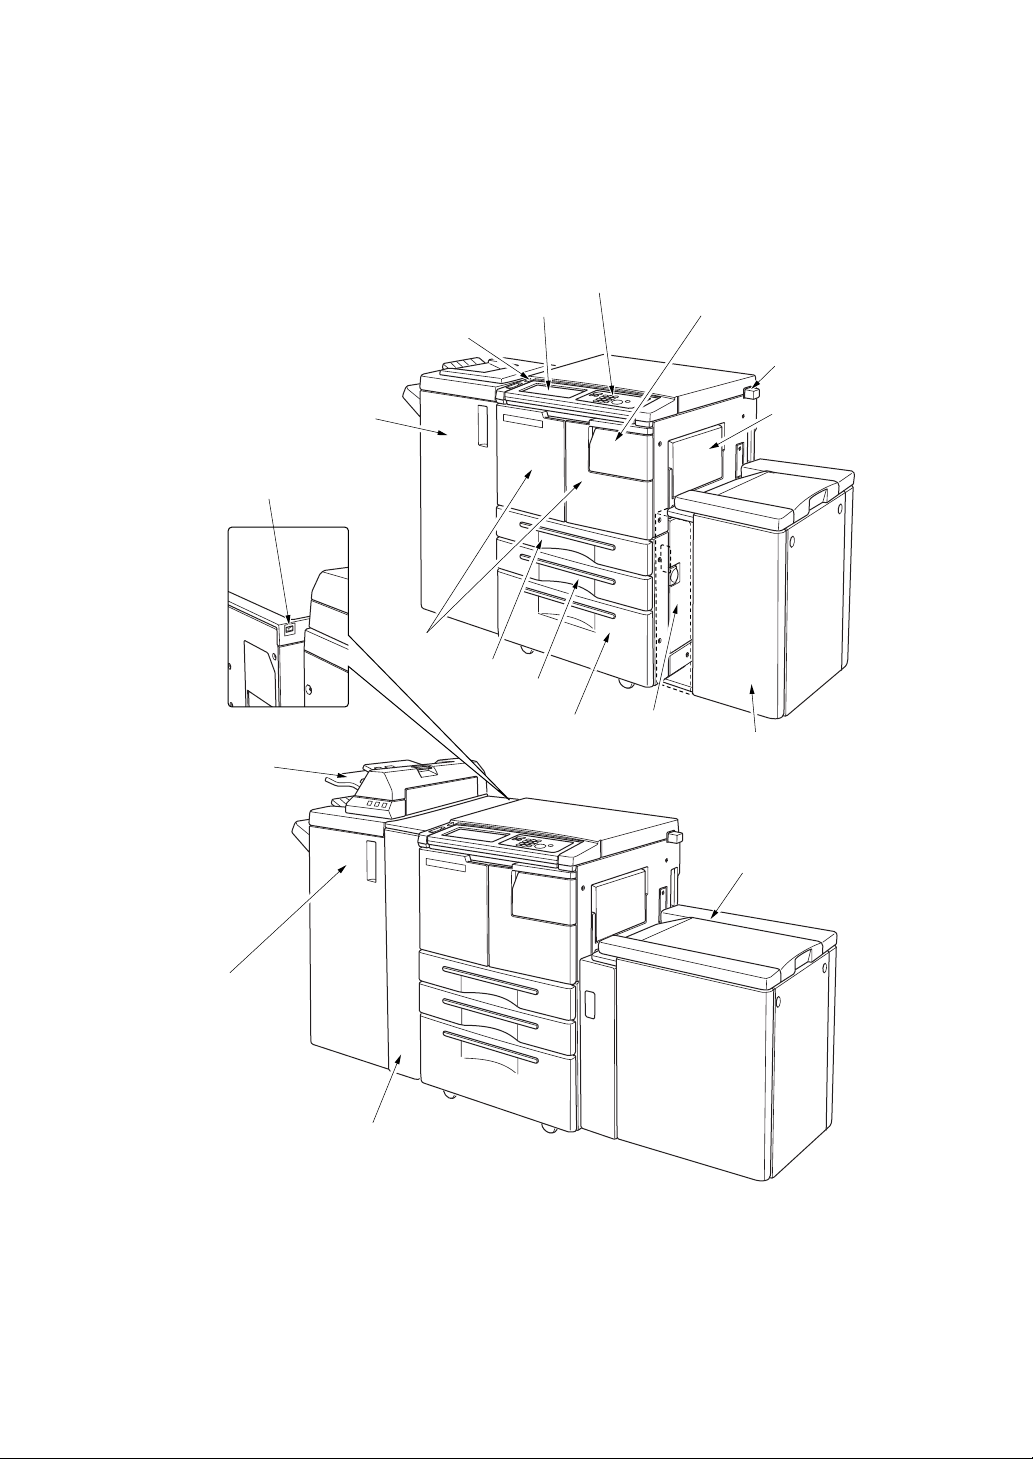
External Machine
11FS-110 Finisher
(option)
14 Main power switch
(Rear-left side of
main body)
12 PI-110 Cover
sheet feeder
(option)
15 LCD Touch screen
13 Power switch
9 Front doors
8 Tr a y 1
16 Control panel
7 Tr a y 2
6 Tr a y 3
1 Toner access door
5 Right side
door
2 Key counter
(option)
3 Multi-sheet
bypass tray
4 LT-402 Large
capacity tray
(option)
4 LT-412 Large
capacity tray
(option)
11 FS-210 Finisher
(option)
10 PZ-108 Punching /
Z-Folding Unit (option)
External Machine Call-outs
1 Toner access door opens to replenish the toner.
2 Key counter (option) manages the number of prints made on the machine.
3 Multi-sheet bypass tray used for small quantity printing onto plain paper or special
paper.
4 LCT: Large capacity tray LT-402/LT-412 option holds 4,000 sheets.
- 10 -

Machine Information
Machine Configuration (continued)
5 Right side door opens to allow removal of mishandled paper.
6Tray 3 (universal tray) is user-adjustable and holds 1,500 sheets of either A3 to A5.
7Tray 2 (universal tray) is user-adjustable and holds 500 sheets of either A3 to A5.
8Tray 1 (universal tray) is user-adjustable and holds 500 sheets of either A3 to A5.
NOTE: Tray 1, 2, 3, and LCT are available for loading wide types of the regular sizes specified above.
9 Front door opens to the internal printer to allow clearing of mishandled paper.
10 PZ-108 Punching / Z-Folding unit (option) punches file holes and/or Z-folds the output
prints.
11 FS-110/210 Finisher (option) sorts, staple-sorts, and groups into finished sets.
With PK-110/120 Punching kit (option) installed, file holes can be punched in the output
prints. FS-210 folds or stitches & folds prints into booklet-styled sets, and also folds max.
3 prints in three.
12 PI-110 Cover sheet feeder (option) loads cover sheet paper and feeds the sheet as
cover.
13 Power switch turns printer power On/Off when pressed.
14 Main power switch
15 LCD touch screen displays interactive operation screens.
16 Control panel controls printer operations.
- 11 -
Machine Information
Machine Configuration (continued)
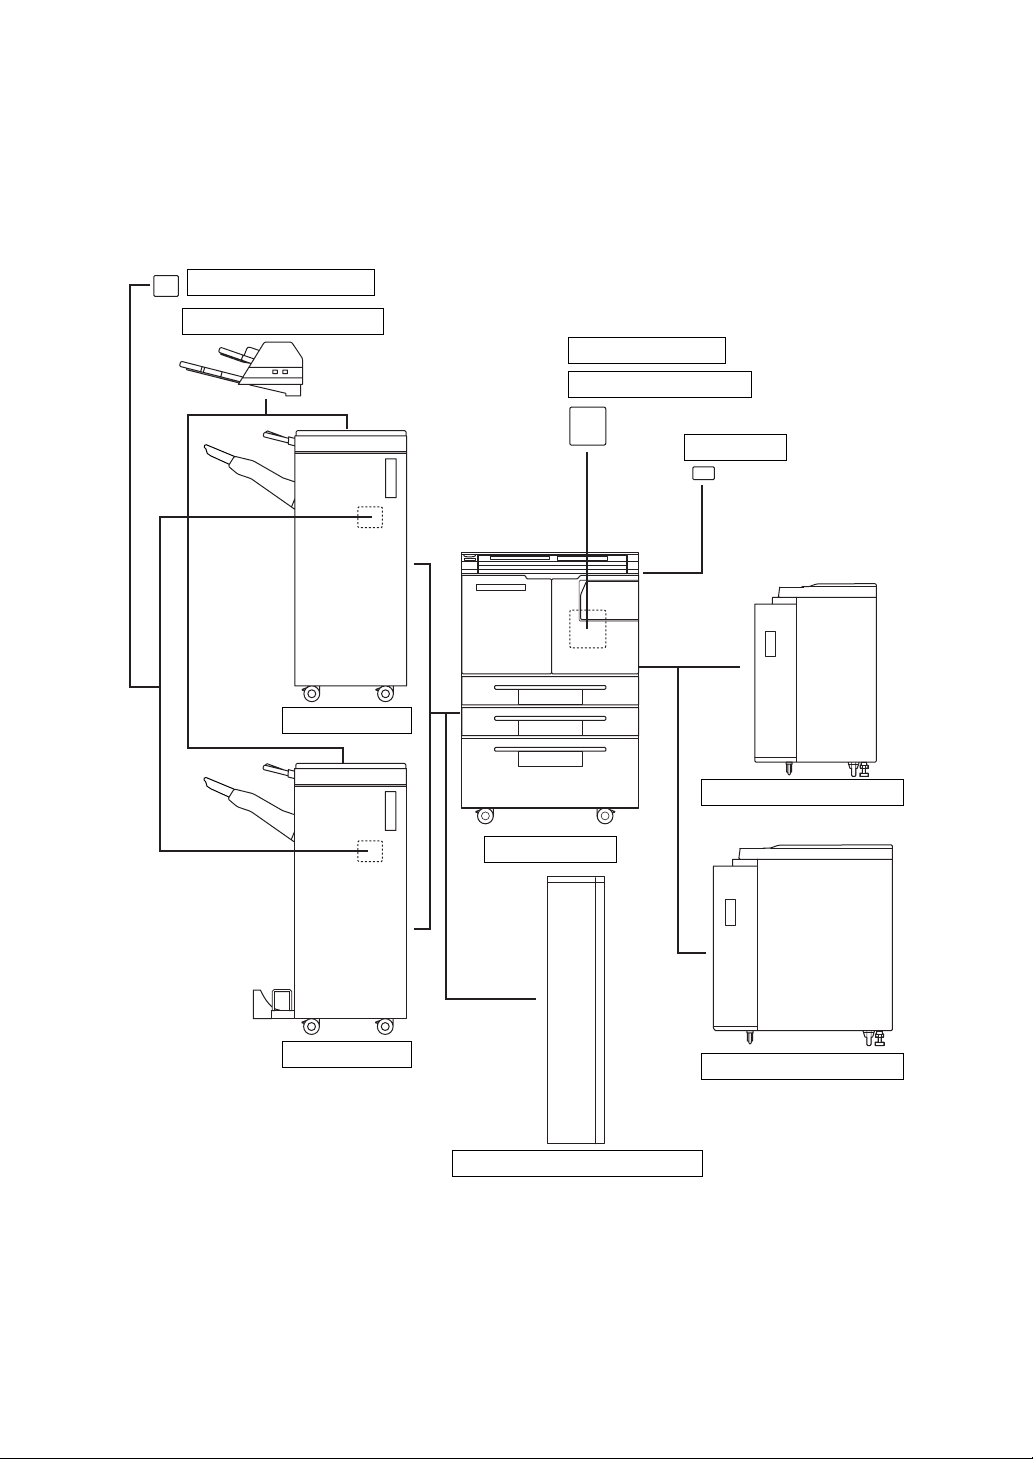
Optional Equipment
PK-110/120 Punching kit
PI-110 Cover sheet feeder
PS-351 Postscript 3
IP-511 Printer controller
Key counter
FS-110 Finisher
FS-210 Finisher
LT-402 Large capacity tray
DP65 main body
LT-412 Large capacity tray
PZ-108 Punching / Z-Folding unit
- 12 -
Machine Information
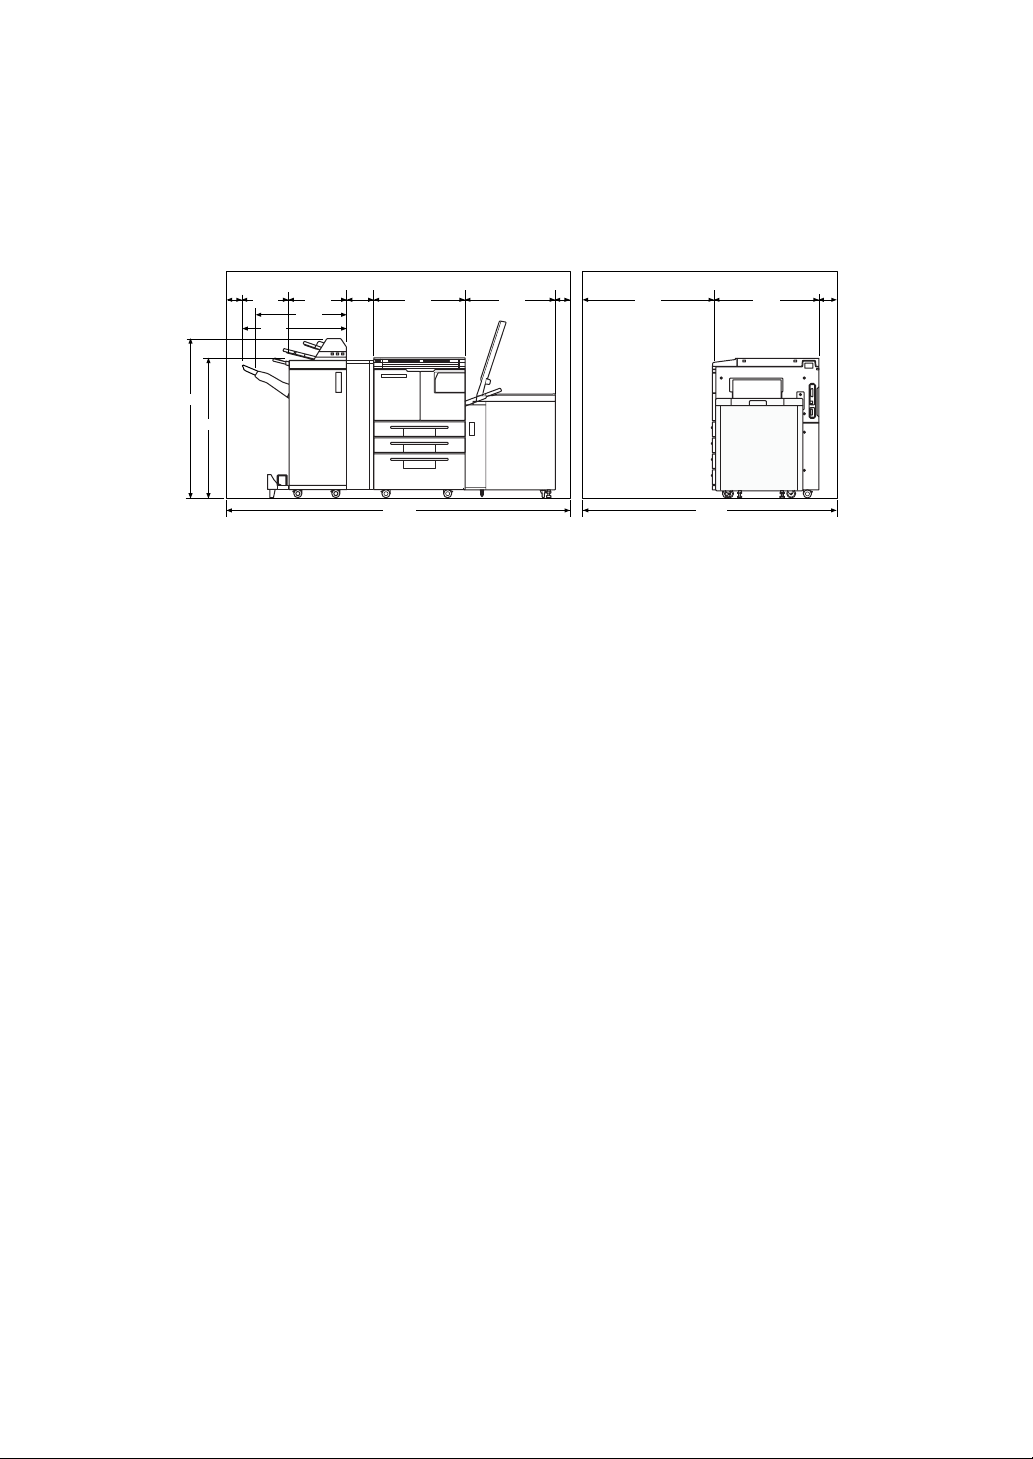
Machine Configuration (continued)
1140
990
100
331
741
656
410
174
650 670
100
950
Unit: mm
760
120
2435
1830
DP65 + FS-210 Finisher + PZ-108 Punching / Z-Folding unit
+ PI-110 Cover sheet feeder + LT-412 Large capacity tray
NOTES:
1 Dimensions are in inches with millimeters included in parentheses.
2 The Finisher main tray of the FS-110/210 Finisher gradually goes down while printed material is output. DO NOT
allow any object to interfere with the operation of the tray on the left side of the Finisher, as interference may cause
damage to the Finisher.
- 13 -
Machine Information
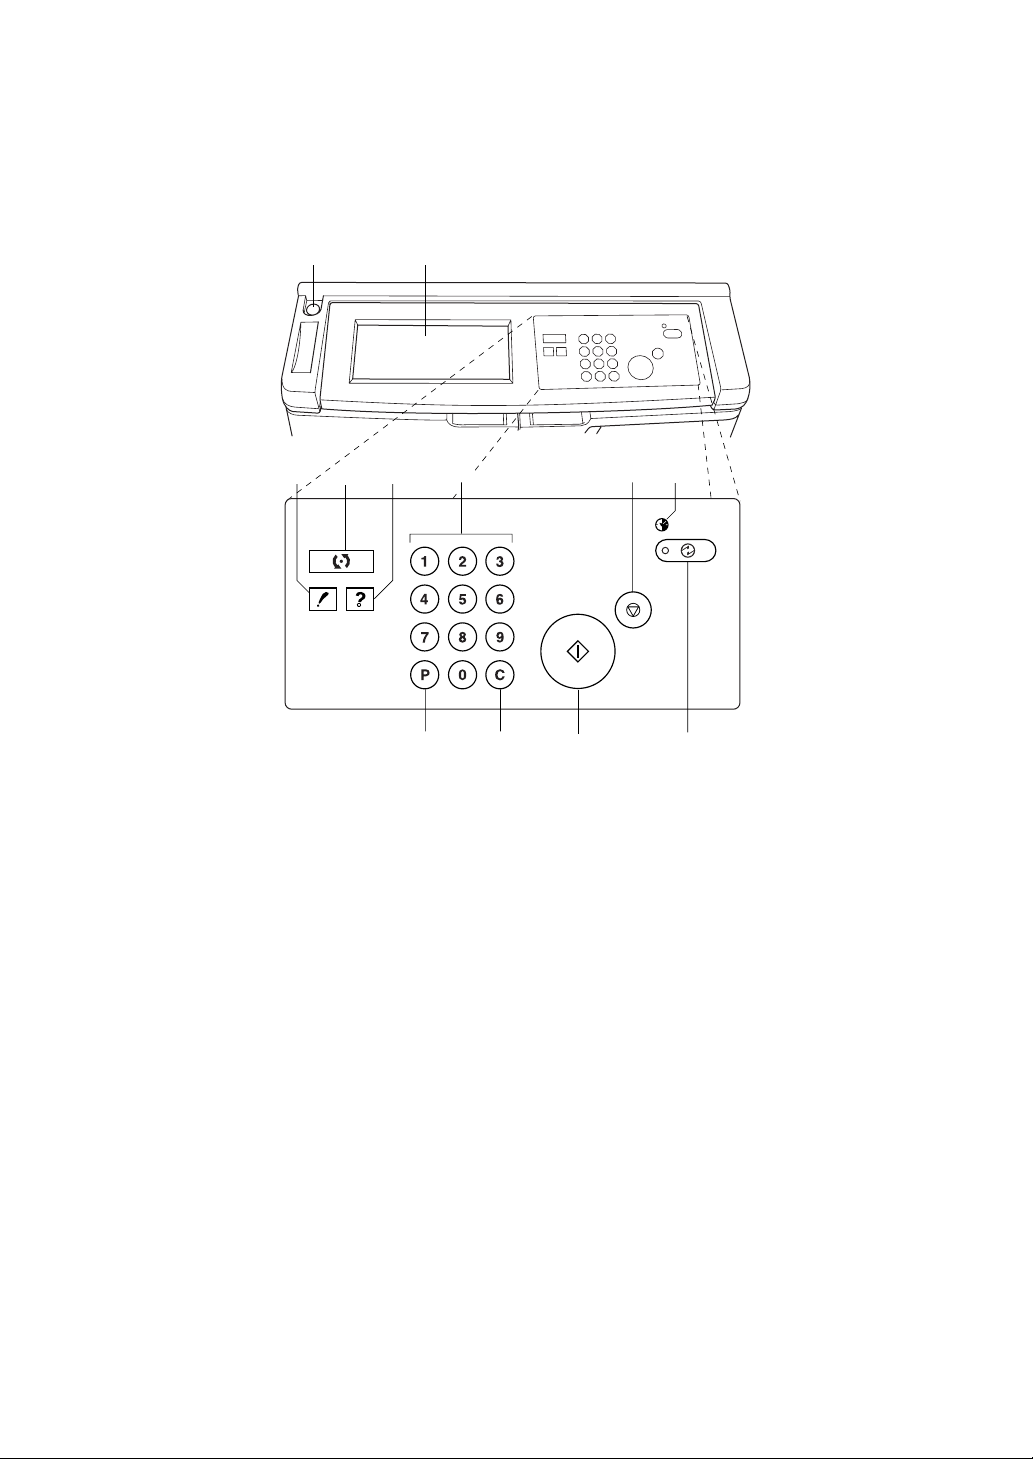
Control Panel Layout
12
34
1 Power switch turns printer power On/Off when pressed.
2 LCD touch screen displays machine and printing status, help information, interactive
screens, and touch keys for selecting all functions.
3 CHECK displays a screen showing all settings that are selected for the current job.
4 MODE switches the machine operation mode.
5 HELP displays a screen with help for the currently selected function, or to access the Key
Operator Mode Screen.
6 Keypad enters numeric values.
7 STOP/PAUSE stops the printing sequence; deletes the stored memory.
8 TIMER lights when the timer function is set.
9 POWER SAVER ON/OFF activates power-saving mode for times when the printer is
inactive, or activates timer interrupt mode when weekly timer function is active.
10 START restarts printing after mishandled paper is cleared or the paper tray is replenished
with paper.
11 CLEAR QTY. allows resetting of print quantity.
12 [P] (counter) displays the Counter Screen or accesses programming modes for setting
special functions.
5
678
1112
910
- 14 -

Machine Information
Specifications
Product Name Konica DP65
Engine Type Dual Beam Laser, Electrostatic
Engine Speed 65 pages per minute
Recommended Operating Environment 10°~30°C; 10~80% RH
Warm Up Approx. 6 min. 20°C; 50% RH
First Print Out Time Approx. 3.4 sec. for 8.5"x11"
Voltage AC230V / 50HZ
Grounding Isolation recommended
Power Consumption Max. 1,900 VA (full option)
Noise Level (full system) Approx. 78 dB (A) or less, during printing
Toner Black, cartridge type
Paper Source Main body trays 1/2/3; 500/500/1,500 sheets
LCT tray 4; 4,000 sheets
Multi-sheet bypass tray; 100 sheets
Tray 1/2/3 user adjustable
LCT adjusted by your service representative
Paper Exit Tray 100 sheets (80 g/m2)
Paper Weight 60 g/m2 ~ 90 g/m2 recommended
(Max. range: 60 g/m2 ~ 200 g/m2 in duplex mode,
50 g/m2 ~ 59 g/m2 in simplex mode)
OHP sheet, Transparency, Labels, Tab, 3-hole
Options Finisher (FS-110/FS-210)
Cover Sheet Feeder (PI-110)
Punching Kit (PK-110/120)
Punching / Z-Folding Unit (PZ-108)
Large Capacity Tray (LCT) (LT-402/LT-412)
Image Processor (IP-511)
PostScript Unit (PS-351)
Machine Weight 190 kg
+55 kg w/FS-110 Finisher
+65 kg w/FS-210 Finisher
+10.5 kg w/PI-110 Cover sheet feeder
+2 kg w/PK-110 Punching kit
+3 kg w/PK-120 Punching kit
+38 kg w/PZ-108 Punching / Z-Folding unit
+30 kg w/LCT (LT-402)
+42 kg w/LCT (LT-412)
Specifications Subject To Change Without Notice
- 15 -

Machine Information
Specifications (continued)
Machine Dimensions Main Body
Automatic Duplex Unit (ADU) Paper size: A3 to A5
Stapling Finisher (FS-110/210) Power source: Main body
Width: 650 mm
Depth: 760 mm
Height: 994 mm
Stapler-Finisher (FS-110/210)
Width: 656 mm
Depth: 656 mm
Height: 990 mm
Cover Sheet Feeder (PI-110)
Width: 511 mm
Depth: 620 mm
Height: 220 mm
Punching Kit (PK-110)
Width: 68 mm
Depth: 442 mm
Height: 120 mm
Punching Kit (PK-120)
Width: 130 mm
Depth: 470 mm
Height: 115 mm
Punching / Z-Folding Unit (PZ-108)
Width: 169 mm
Depth: 660 mm
Height: 930 mm
Paper weight: 60 g/m2 ~ 200 g/m
Non-stack type
Non-sort/Sort/Group mode:
500 sheets A5, A5R, B6R
3000 sheets A4, A4R, B5R (FS-110 Finisher)
2500 sheets A4, A4R, B5R (FS-210 Finisher)
1500 sheets A3, F4, B4
Size A3, B4, F4, A4R, A4, B5, A5
Staple-sort mode:
1000 sheets*
Size A3, B4, F4, A4R, A4, B5, A5
* Variable according to the number of pages to be
stapled.
2
Specifications Subject To Change Without Notice
- 16 -

Machine Information
Specifications (continued)
Stapling Finisher (FS-110/210) (continued)
Fold / Stitch & Fold mode (FS-210 only):
100 sheets (A3, B4)
75 sheets (A4R)
Size A3, B4, A4R
* The maximum number of sheets varies,
depending on the number of pages in the booklet
and whether Fold or Stitch & Fold is selected.
Three-Fold mode (FS-210 only):
50 sheets (folding one sheet in three)
Size A4R
Staple Cartridge 5000 staples/cartridge
Cover Sheet Feeder (PI-110) Power source: Finisher
Paper size:
Upper tray A4, A4R, B5, B5R, A5
Lower tray A3, B4, A4, A4R, B5, B5R, A5
Paper weight in cover sheet mode: 50 ~ 200 g/m
Paper weight:
Manual stapling: 50 ~ 200 g/m
Manual punch: 50 ~ 170 g/m
Manual stitch & fold: 60 ~ 200 g/m
Manual three-fold: 80 g/m
Punching Kit (PK-110/120) Paper size: A3, B4, F4, A4, B5
Paper weight: 60 ~ 170 g/m
Number of holes: 4 holes
Hole diameter: 6.5 mm ± 0.5 mm
Hole pitch: 80 mm ± 0.5 mm
Weight:
PK-110: 2 kg
PK-120: 3 kg
Power source: Finisher
Punching / Z-Folding Unit (PZ-108) Paper size: (Punch) A3, B4, F4, A4, B5
(Z-Fold) A3, B4
Paper weight: 60 ~ 170 g/m2 (60 ~ 90 g/m2 for ZFold mode)
(Punch mode)
Number of holes: 4 holes
Hole diameter: 6.5 mm ± 0.5 mm
Hole pitch: 80 mm ± 0.5 mm
(Z-Fold mode)
Folding type: Z-fold for A3, double-fold for B4
Folded width: 209 mm or less for A3
181 mm or less for B4
Weight: 38 kg
Power source: supply from outlet
Specifications Subject To Change Without Notice
- 17 -
2
2
2
2
2
2

Machine Information
Specifications (continued)
Large Capacity Tray (LT-402) Paper type: Plain paper (50 ~ 200 g/m2)
Large Capacity Tray (LT-412) Paper type: Plain paper (50 ~ 200 g/m2)
Paper size: A4
Dimensions: Width 430 mm
Depth 639 mm
Height 690 mm
Weight: 30 kg
Power source: supply from main body
Paper size: A3, B4, A4, A4R
Dimensions: Width 670 mm
Depth 639 mm
Height 695 mm
Weight: 42 kg
Power source: supply from main body
Specifications Subject To Change Without Notice
- 18 -
 Loading...