

Page 1

INSTALLATION MANUAL
DK-501
Desk
for Product Code 4036
NOTES
• Before installing, be sure to unplug the power cord of the machine.
• Keep all packing materials out of the reach of children.
4348-7784-01 Printed in Japan
Page 2
DK-501
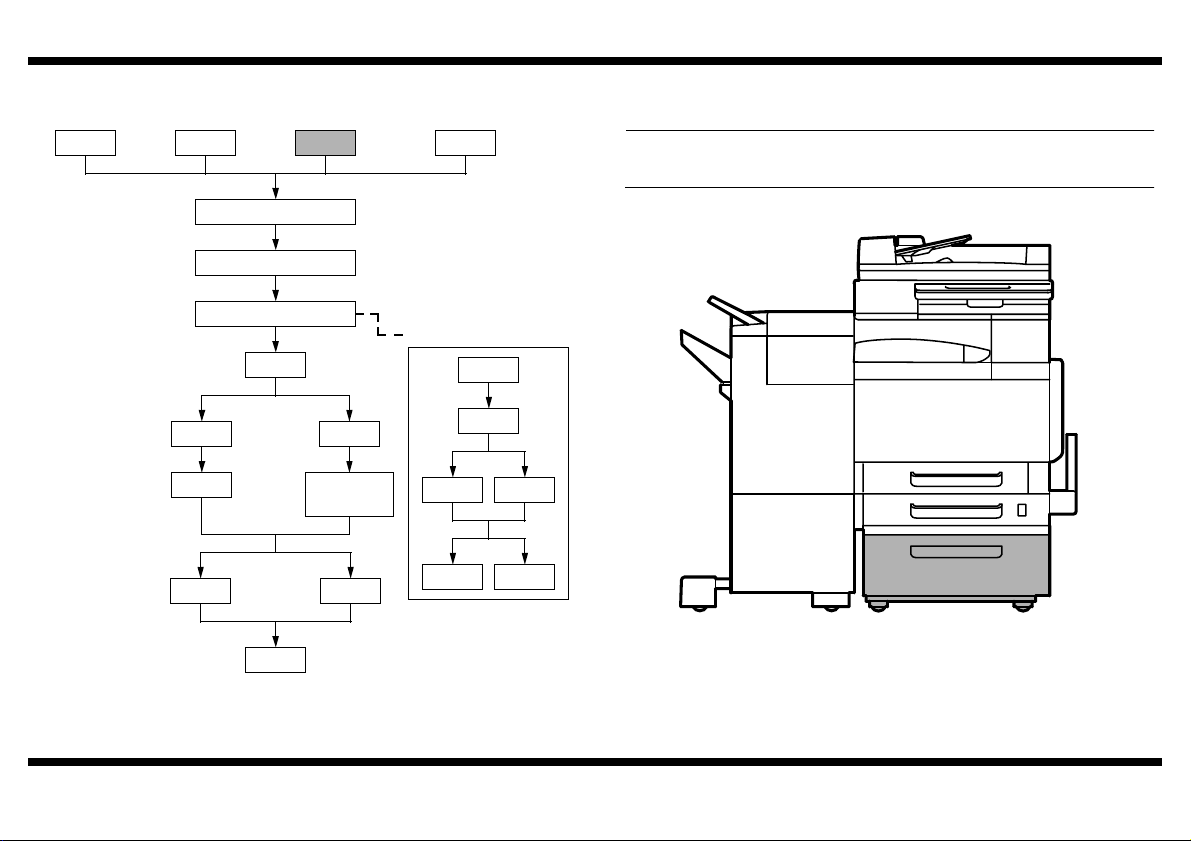
■ Outline of Installation Procedures for 4036 System
PC-101
PC-201 DK-501
Dehumidifier Heater 1C
Copier/Printer Machine
Electron System Options
FS-501
JS-601
DF-601
PC-401
✱ Electron System Options
AD-501
FS-601
PK-501/PK-4/
PK131
OC-501
WT-501
EM-301
HD-501
EK-501 VI-501
D-103DT-105
When installing the machine and associated options as a system, follow the order shown
on the left.
NOTE
For the detailed installation procedures for each option, follow the instructions given
in the corresponding Installation Manual and perform the procedures correctly.
4348U112AA
– 1 –
Page 3

■ Unpacking the Desk
NOTE
When removing the Desk from its shipping carton, do not hold onto the
reinforcement bracket (indicated by the arrow in the illustration below) (as a personal
injury or a deformed frame could result).
DK-501
1. Check that the following accessories are available in the box.
1 Fixing Leg...............................................................................................4
2 Fixing Leg Cover ....................................................................................4
3 Fixing Bracket ........................................................................................4
4 Shoulder Screw ......................................................................................4
5 Screw (9646-0408)...............................................................................12
6 Installation Manual (this manual) ...........................................................1
4348U016AA
1 2
4348U020AB
5
9646040813
4348U099AB
6
3
4658U021AA 4658U022AA
2. Remove protective tape and protective material from the Desk.
4348U120AA 4348U104AA
– 2 –
4
Page 4

DK-501
■ Attaching the machine to the Desk
1. Holding onto the transportation handles at
* Fit the rear side first.
4348U117AA
2. Remove the Drawer Rear Cover from the
4348U121AA
3. Using the Fixing Brackets and Shoulder
4348U114AA
4. Reinstall the Drawer Rear Cover which has
the front and rear of the machine, place the
machine onto the Desk. When placing the
machine, use the positioning pin in the rear
of the Desk to align the machine correctly
with the Desk.
machine (four screws).
Screws furnished with the Desk, secure the
machine to the Desk (at two places in the
rear).
been removed in step 2 (four screws).
5. Slide out the drawer from the Desk. Then,
using the Fixing Brackets and Shoulder
Screws furnished with the Desk, secure the
machine to the Desk.
4348U021AA
6. Move the machine and Desk to the
installation site. Then, adjust the two
adjusters at the front to let the Desk sit on the
floor.
4348U115AA
■ Installing the Ornamental Cover
1. Slide out the drawer from the Desk and
install the Ornamental Cover attached to the
machine (two screws).
4348U050AA
4348U116AB
– 3 –
Page 5

■ Installing the Fixing Leg and Fixing Leg covers
1. Install the Fixing Legs at two locations in the
①
③
front shown in the illustration
②
(six screws furnished with the Desk).
DK-501
③
②
4348U098AA
4348U103AA 4348U102AB
①
①
②
③
③
②
4348U024AD
4348U101AC 4348U102AB
①
2. Install the Fixing Leg Covers at two locations
in the front shown in the illustration
(2 Pieces).
NOTES
• Insert the Fixing Leg Covers in the direction shown by arrow until they click into
position.
• Insert the Protruded Portions of the cover
shown by the arrows into the Fixing Leg.
3. Install the Fixing Legs at two locations in the
rear shown in the illustration.
(six screws furnished with the Desk)
4. Install the Fixing Leg Covers at two locations
in the rear shown in the illustration
(2 Pieces).
NOTES
• Insert the Fixing Leg Covers in the direction shown by arrow until they click into
position.
• Insert the Protruded Portions of the cover
shown by the arrows into the Fixing Leg.
– 4 –
 Loading...