

Page 1
すぐに使える操作ガイド認証装置(指静脈生体認証タイプ AU-101)
このたびは弊社製品をお買い上げいただき、誠にありがとう
ございます。
この操作ガイドには、本装置の操作方法や使用上のご注意を
簡潔に記載しています。ご使用の前に最後までお読みくださ
い。本装置の詳細については、同梱の CD-ROM 内に収録さ
れている「ユーザーズガイド認証装置(指静脈生体認証タ
イプAU-101)」をごらんください。
認証装置(指静脈生体認証タイプ)AU-101 の
使い方
本装置を使用するためには、サービス技術者による設定が必
要です。詳しくはサービス技術者にご相談ください。また、
本装置を使用するために複合機で必要な設定や操作について
は、複合機の各種ユーザーズガイドをごらんください。
最初にユーザーの指静脈パターンを複合機に登録します。登
録されたユーザーは、指静脈パターンによる認証で複合機に
ログインすることができます。
ユーザー登録のしかた
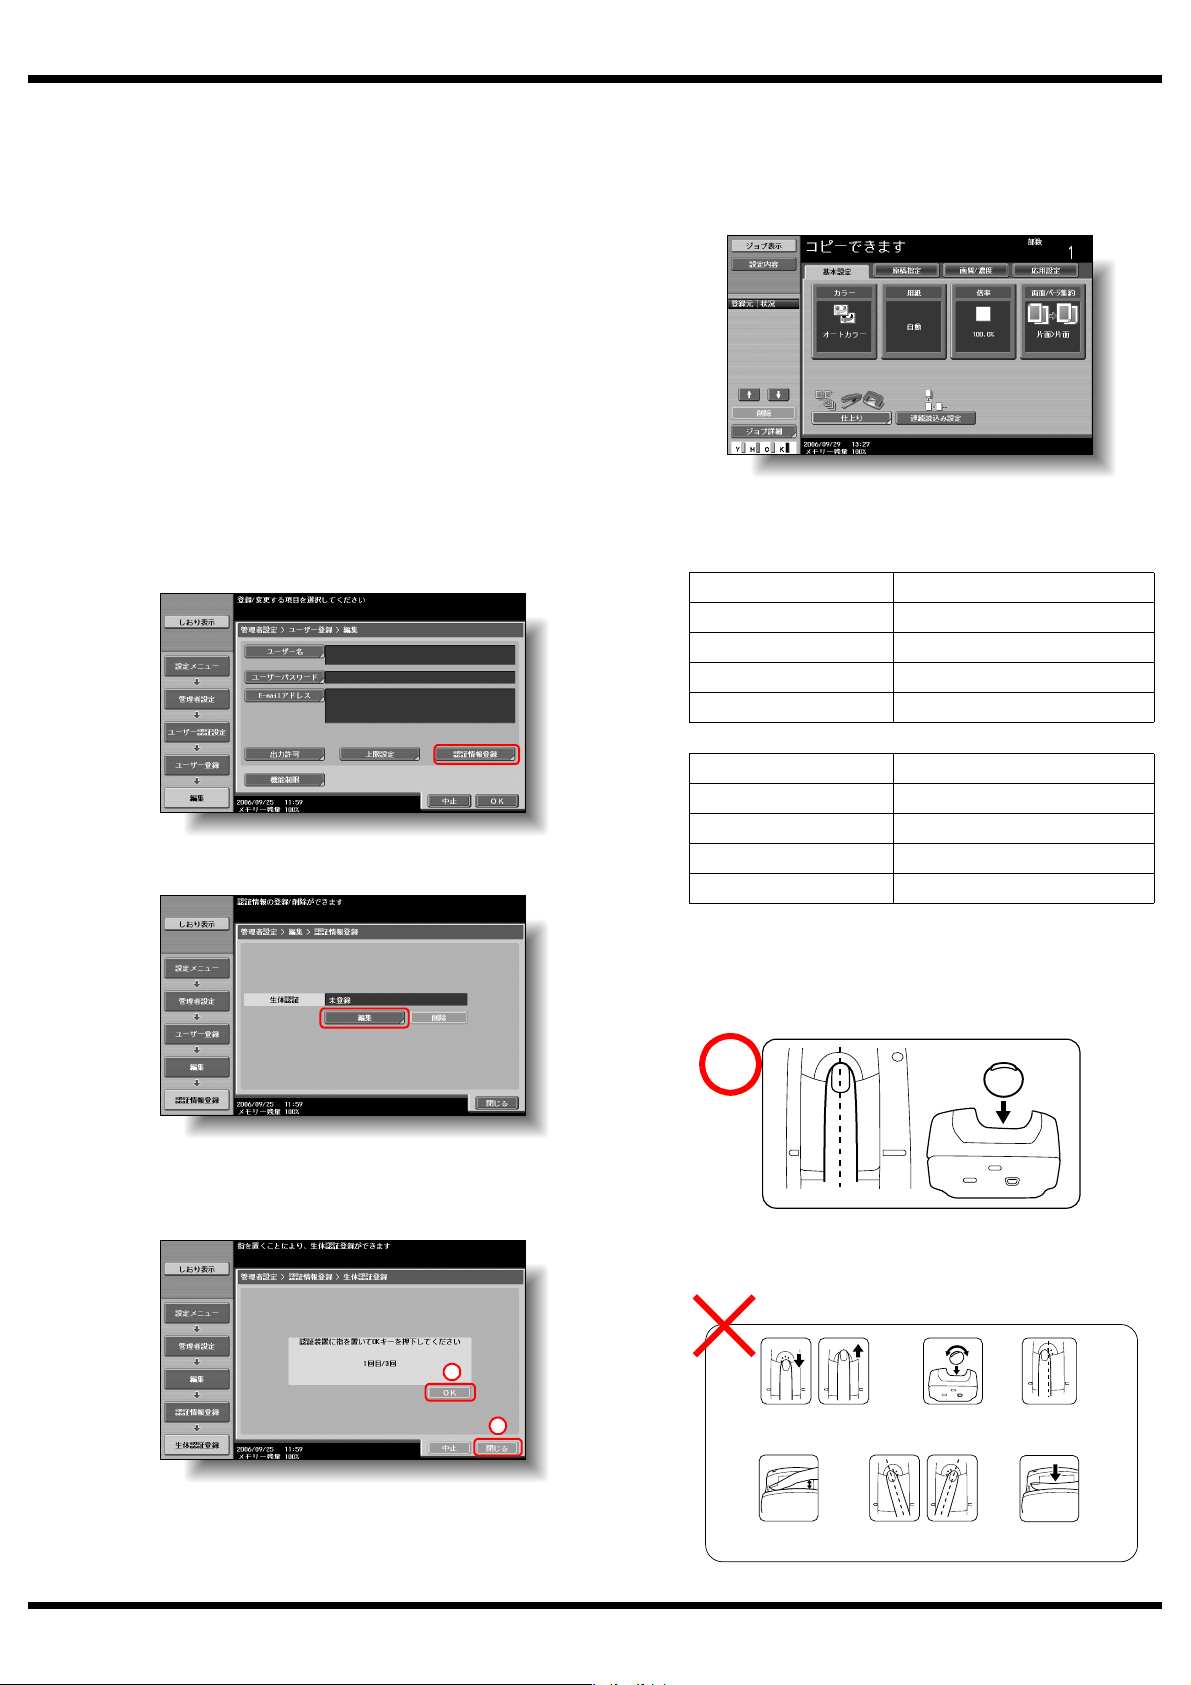
1 管理者にて認証方式の本体装置認証を設定します。
2 管理者設定にてユーザー登録画面を表示させます。
3 [認証情報登録]を押します。
ユーザー認証のしかた
1 本装置に登録した指を置きます。
− 生体認証設定で「1 対 1 認証」を設定した場合は、
ユーザー名を入力したあとで指を置きます。
ユーザー認証が行われ、基本設定画面が表示されます。
状態表示
状態表示 LED と報知音により、本装置の状態を表します。
状態表示 LED 本装置の状態
点灯(緑) 待機中・認証完了
点滅(緑) 認証中・撮影中
点灯(赤) 認証失敗・撮影失敗
消灯 本装置を認識していない状態
4 [編集]を押します。
5 本装置に指を置いて指静脈パターンの読取りを行います。
− 指静脈パターンの読取りは 3 回行い、同じ指を 1 回ご
とに置きなおし[OK]を押します。
報知音 本装置の状態
短く 1 度(ピッ) 撮影開始
短く 1 度(ピッ) 認証失敗リトライ中
短く 1 度(ピッ) 認証完了
短く 2 度(ピピッ) 認証失敗
指の置き方
手を軽く広げ、本装置の上から登録・認証させる指を置きま
す。指の先端を本装置のくぼみに合わせ、指先が突起を感じ
る位置に軽く乗せます。
登録・認証ができない場合は、下記項目を確認してくださ
い。本装置から指を離し、再度正しい位置に置きなおしてく
ださい。
6 [閉じる]を押します。
7 [閉じる]を押し、ユーザー名を入力します。
8 [OK]を押します。
A09M-9953-00
1
2
指の置く位置が前
後にずれている
指の腹が浮
いている
指が傾いている
指の置く位置が左右に
ずれている
指が左右に
寄っている
指を押し付けている
(力が入っている)
Page 2
Quick Guide Authentication Unit (Biometric Type AU-101)
Thank you for choosing this device.
This Quick Guide provides simple descriptions of the operating
procedures and precautions for using this device. Carefully
read this Quick Guide before using the device. For detailed
descriptions, refer to the User’s Guide Authentication Unit
(Biometric Type AU-101), provided on the enclosed CD-ROM.
Using Authentication Unit (Biometric Type) AU-101
In order to use this device, various settings must be specified
by the technical representative. For details, contact the
technical representative. In addition, for the settings that must
be specified and the operations that must be performed on the
multifunctional product in order to use this device, refer to the
various User’s Guides for the multifunctional product.
User finger vein patterns must first be registered with the
multifunctional product. Then, registered users can log on to
the multifunctional product by completing authentication using
their finger vein patterns.
Registering users
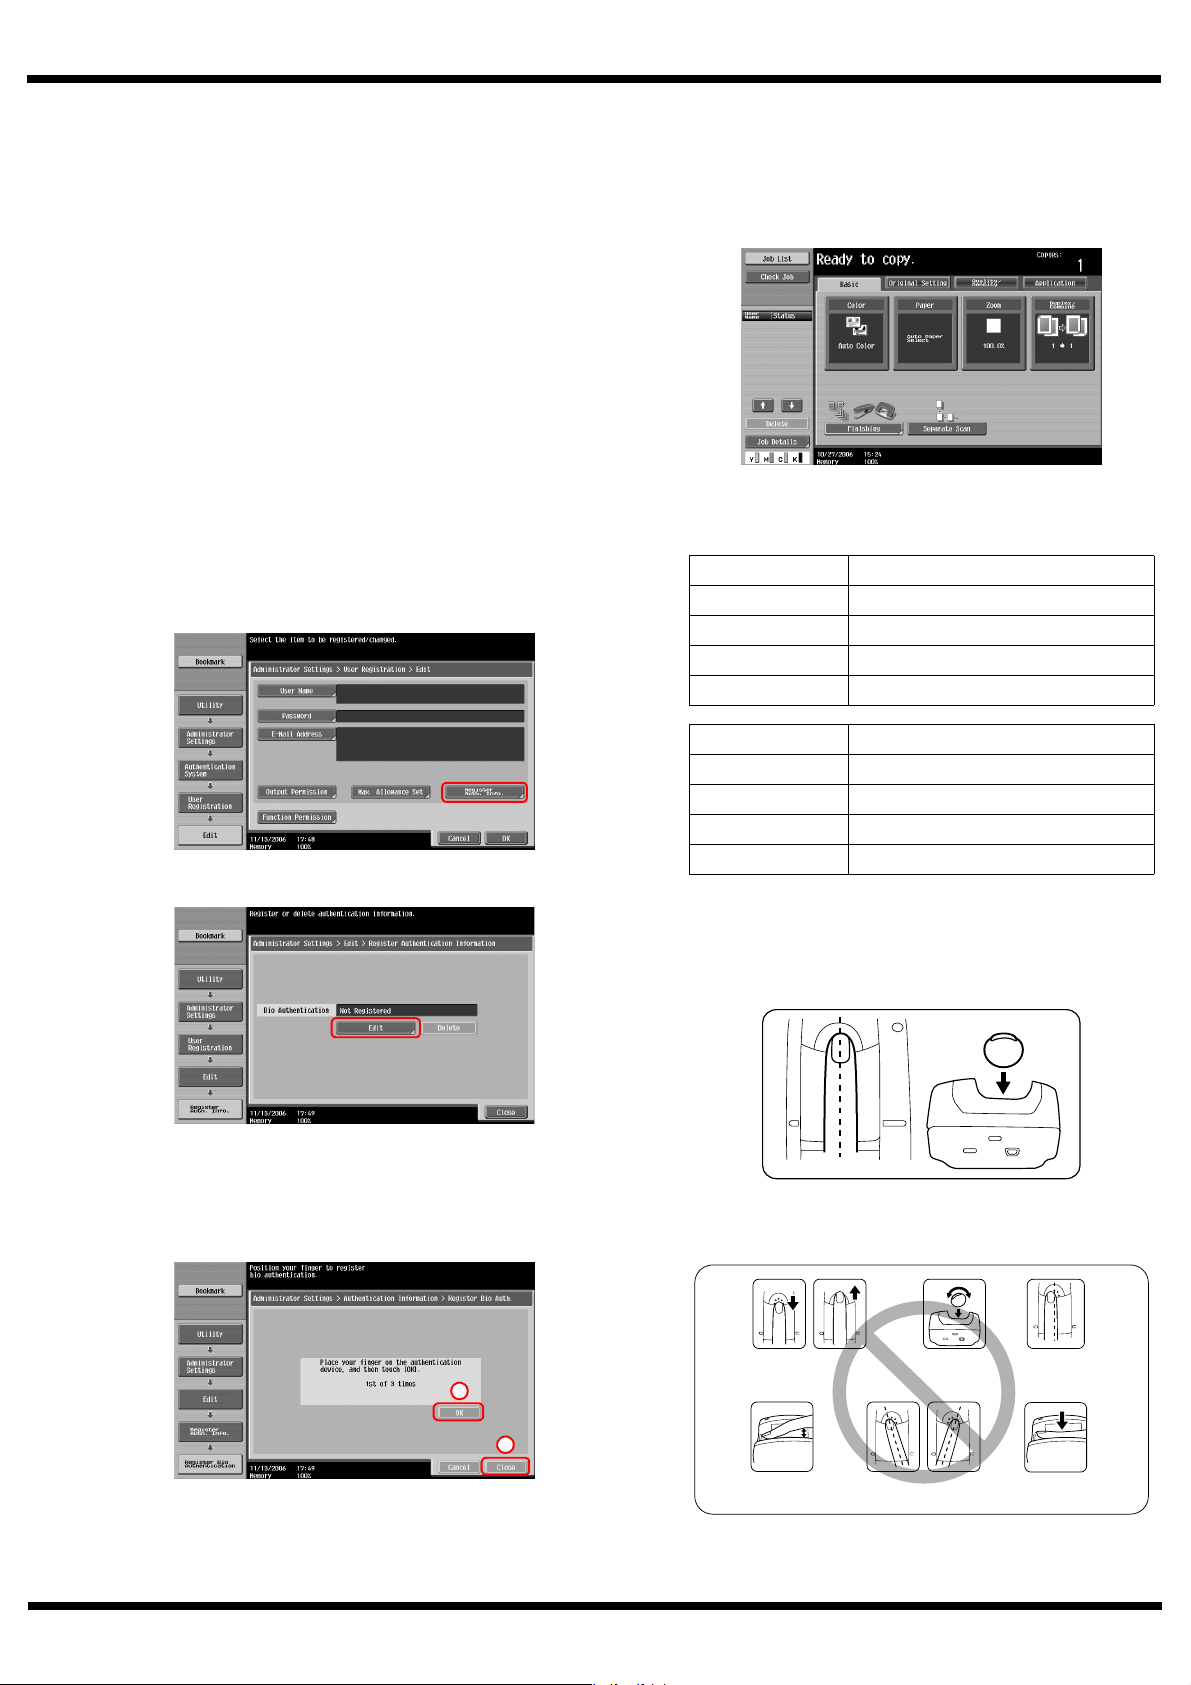
1 In Administrator mode, set “User Authentication” to “ON
(MFP)”.
2 From the Administrator Settings screen, display the User
Registration screen.
3 Touch [Register Auth. Info.].
Authenticating users
1 Position the registered finger on this device.
– If “1-to-1 authentication” was selected on the Bio
Authentication Settings screen, type in the user name,
position the finger on this device.
The user is authenticated, and the Basic screen appears.
Device indicator displays
The status of this device is indicated by a status indicator and
tone.
Status indicator Device status
Lit (green) Standing by/authentication completed
Flashing (green) Authenticating/scanning
Lit (red) Authentication failed/scanning failed
Off This device is not detected.
4 Touch [Edit].
5 Position the finger on this device to scan the finger vein
pattern.
– Scan the finger vein pattern three times, removing and
repositioning the same finger, and touch [OK] after
each time.
Tone Device status
One short beep Starting to scan
One short beep Retrying after authentication failed
One short beep Authentication completed
Two short beeps Authentication failed
Positioning your finger
Lightly stretch out your fingers, and then position the finger to
be registered or authenticated on this device. Align the tip of
the finger with the notch, and lightly position the finger so that
the tab can be felt at the tip of the finger.
If registration or authentication is not possible, check for the
following. Remove the finger from this device, and then
reposition it correctly.
6 Touch [Close].
7 Touch [Close], and then type in the user name.
8 Touch [OK].
A09M-9953-00
The finger should not
be positioned too far
1
2
forward or backward.
The middle section of
the finger is not positioned off the scanner.
The finger should
not be positioned
at an angle.
The finger should not
be positioned out of
line to the left or right.
The finger should not
be positioned too far
to the left or right side.
Do not press down
with the finger (with
pressure applied).
 Loading...