

Page 1

Authentication Unit
(IC Card Type AU-201)
A09N-9552-01
User’s Guide
Page 2

Contents
Contents
1 Introduction....................................................................... 2
1.1 Product features .................................................................................. 2
1.2 Prerequisites ......................................................................................... 3
2 Device description............................................................ 4
2.1 Part names and their functions ........................................................... 4
3 Using Authentication Unit (IC Card Type) AU-201......... 5
3.1 Multifunctional product settings ......................................................... 5
3.2 Registering users ................................................................................. 8
3.2.1 Registering from the control panel of the multifunctional
3.2.2 Registering from Data Administrator ............................................... 11
3.3 Logging on to a multifunctional product ......................................... 23
3.4 Touch & Print function ....................................................................... 25
3.4.1 Touch & Print (For Windows) ........................................................... 26
3.4.2 Touch & Print (for Macintosh) .......................................................... 30
3.4.3 Selecting the print job to be printed from the control panel ........... 32
product .............................................................................................. 9
4 Care of Authentication Unit (IC Card Type) AU-201 .... 36
5 Specifications.................................................................. 37
6 Troubleshooting.............................................................. 38
AU-201 1
Page 3

Introduction
1 Introduction
Thank you for choosing this device.
This User’s Guide provides descriptions of the operating procedures and
precautions for using Authentication Unit (IC Card Type) AU-201. Carefully
read this User’s Guide before using this device.
The actual screens that appear may be slightly different from the screen
images used in this User’s Guide.
Authentication Unit (IC Card Type) AU-201 is hereafter referred to as “this
device”.
Manual conventions
- Caution: This warns of a possibility of damage to this device.
- Important: This indicates instructions that should be followed to
ensure correct functionality and efficiency of this device.
Trademark/copyright acknowledgements
- Microsoft
trademarks of Microsoft Corporation in the United States and/or other
countries.
- All other company names and product names mentioned in this
User’s Guide are either registered trademarks or trademarks of their
respective companies.
Restrictions
- Unauthorized use or reproduction of this User’s Guide, whether in its
entirety or in part, is strictly prohibited.
- The information contained in this User’s Guide is subject to change
without notice.
®
and Windows® are either registered trademarks or
1
1.1 Product features
This device is an IC card authentication system that performs user
authentication by IC cards. Logon and print job operations can be
authenticated with IC cards when using multifunctional products with user
authentication settings specified.
AU-201 2
Page 4

Introduction
1.2 Prerequisites
- Refer to “5 Specifications” on page 37.
- The optional local interface kit and working table must be installed on
the multifunctional product.
- IC cards compatible with this device must be prepared.
2
Note
In order to use this device, multifunctional product settings must be
specified by the technical representative.
1
AU-201 3
Page 5
Device description
2 Device description
2.1 Part names and their functions
2
1
No. Part name Description
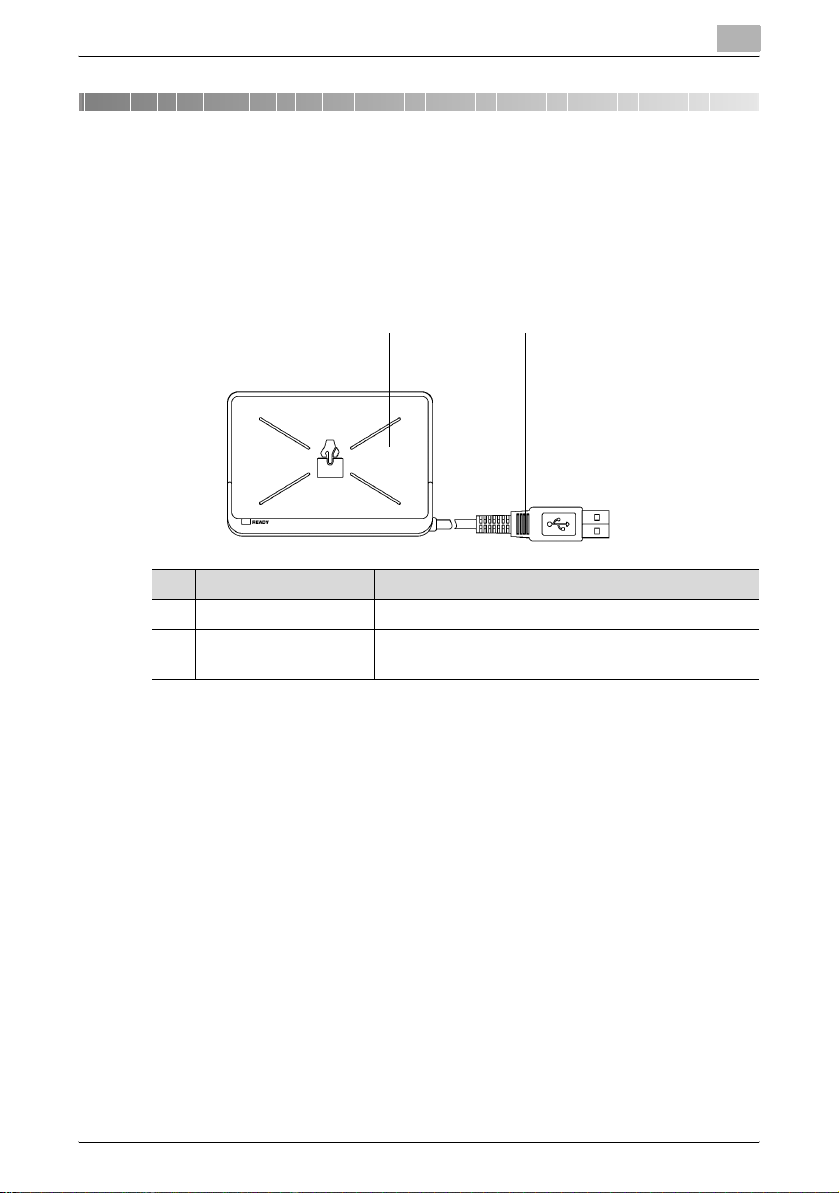
1 Card scanning area Position the IC card on this area.
2 USB cable Used for connecting this device to the
multifunctional product.
2
AU-201 4
Page 6

Using Authentication Unit (IC Card Type) AU-201
3
3 Using Authentication Unit (IC Card Type)
AU-201
In order to use this device, user IC card IDs must first be registered with the
machine. A registered user can log on to a multifunctional product or print a
print job after completing authentication with their IC card IDs. The following
procedures describe how to specify the necessary settings on the
multifunctional product, register users, and perform the logon and print job
operations after completing authentication.
2
Note
For details on positioning the IC card on this device, refer to the Quick
Guide Authentication Unit (IC Card Type AU-201).
Important
Do not disconnect the USB cable while this device is being used,
otherwise the system may become unstable.
Caution
Do not store the IC card within 40 mm of the card scanning area.
3.1 Multifunctional product settings
!
Detail
User authentication on the multifunctional product must be set for
machine authentication.
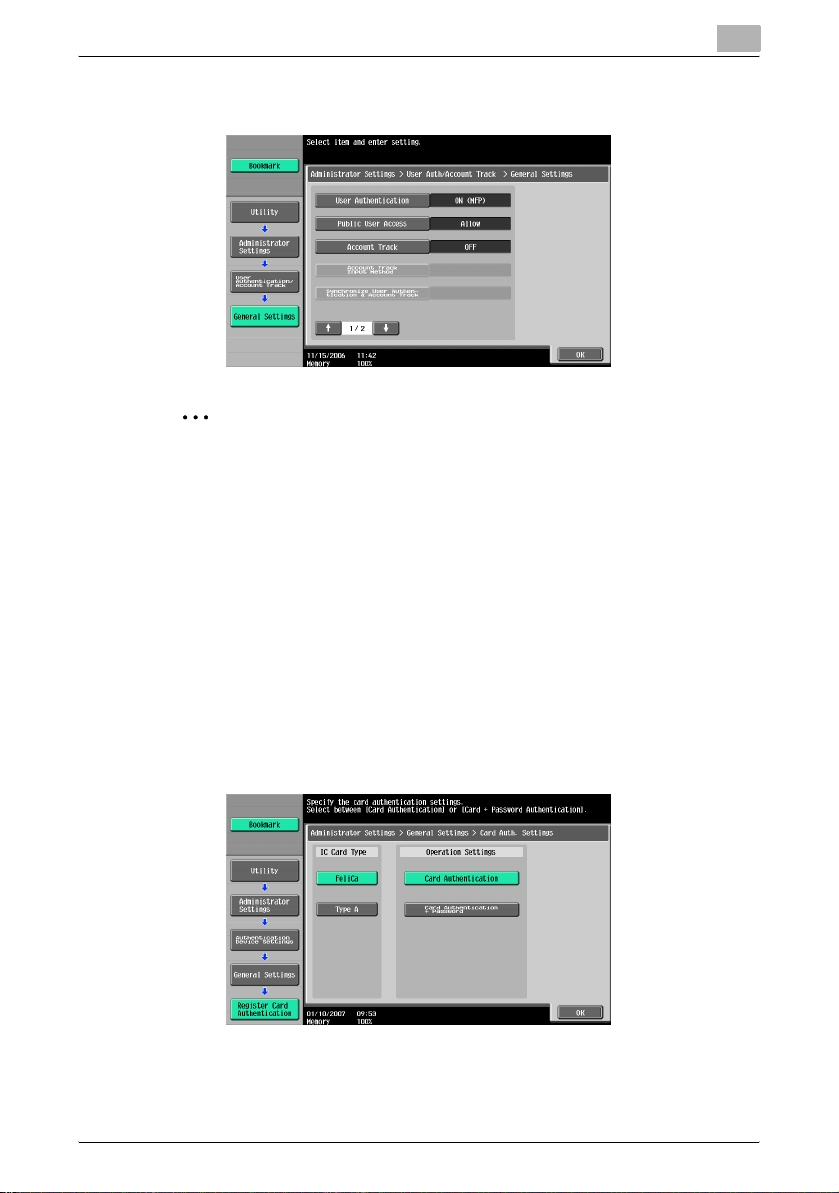
1 From the control panel of the multifunctional product, touch [User
Authentication/Account Track] on the Administrator Settings screen,
and then touch [General Settings].
AU-201 5
Page 7
Using Authentication Unit (IC Card Type) AU-201
2 Set “User Authentication” to “ON (MFP)”, and then touch [OK].
2
Reminder
External server authentication is not supported.
For details on specifying settings for “Public User Access” and “Account
Track”, refer to the User’s Guide [Copy Operations] included with the
multifunctional product.
When combined with account track settings, set “Synchronize User
Authentication & Account Track” to “Synchronize”. If “Do Not
Synchronize” is selected, the Touch & Print function cannot be used.
3
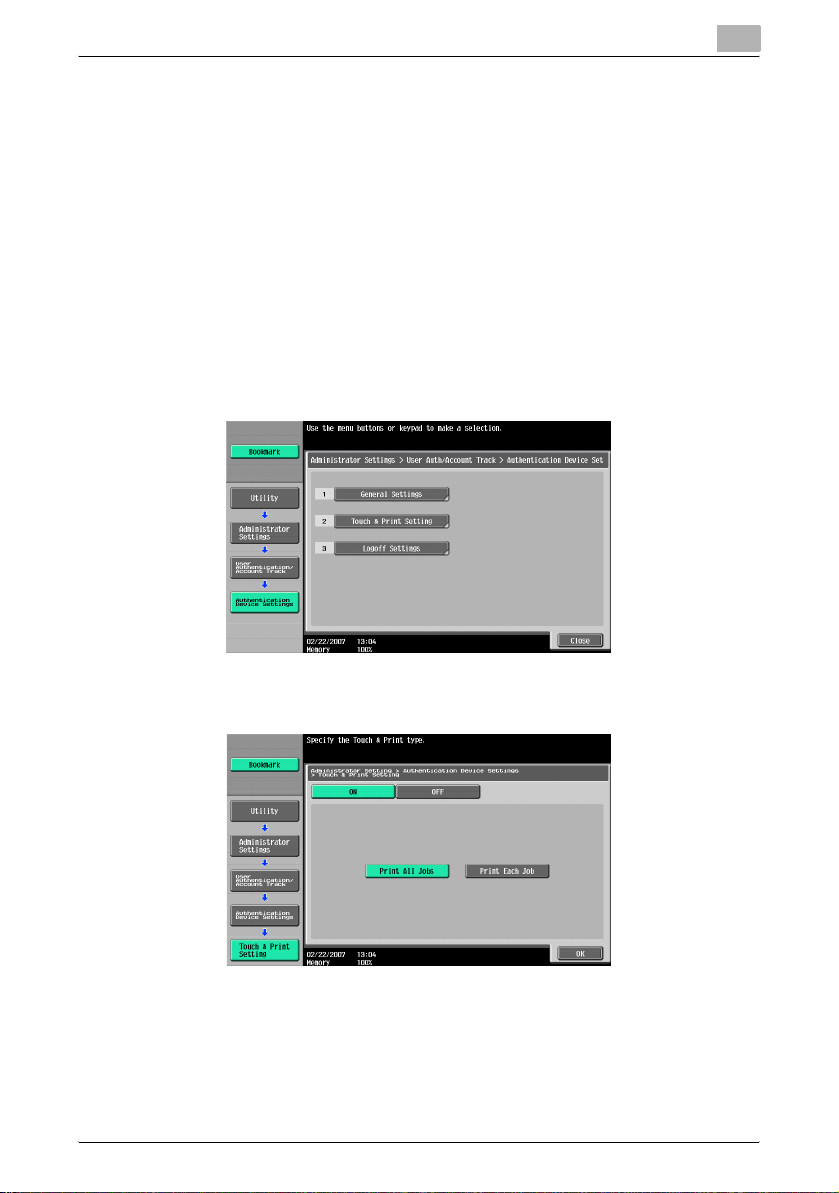
3 Touch [Authentication Device Settings], then [General Settings], then
[Card Authentication].
4 Select the desired settings under “IC Card Type” and “Operation
Settings”.
– Under “IC Card Type”, select the type of IC card to be used.
AU-201 6
Page 8
Using Authentication Unit (IC Card Type) AU-201
– Under “Operation Settings”, select the logon method after
registration.
Card Authentication: Logon is possible simply by positioning the IC
card.
Card Authentication + Password: Logon is possible by positioning
the IC card and entering the password. If users are registered with
“Card Authentication + Password” selected, the Touch & Print
function cannot be used.
– For details on logging on, refer to “Logging on to a multifunctional
product” on page 23.
5 Touch [OK], and then touch [OK] in the next screen that appears.
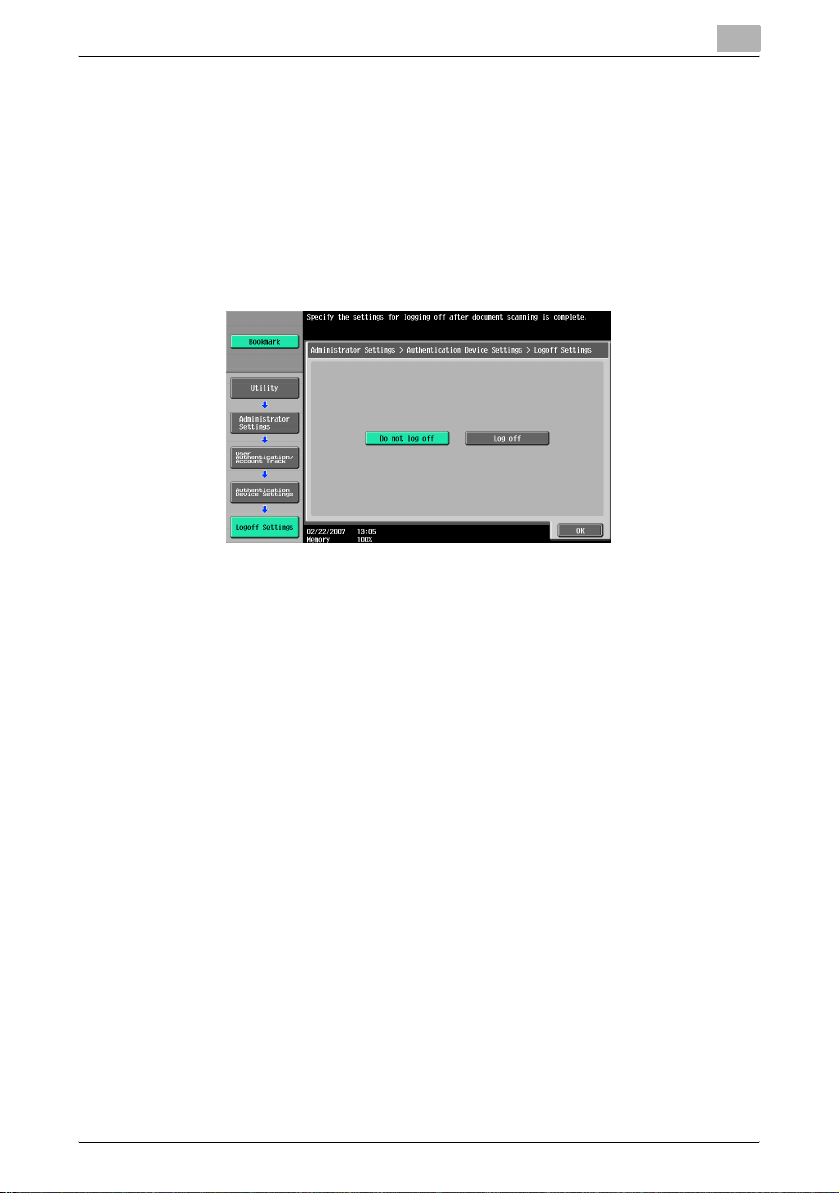
6 Touch [Touch & Print Setting].
3
7 Select the printing method for the Touch & Print function.
– Print All Jobs: Select this setting to print all documents after
completed authentication once when multiple documents are
saved in the Touch & Print user box.
– Print Each Job: Select this setting to print one document saved in
the Touch & Print user box each time authentication is completed.
– If “OFF” is selected, the Touch & Print function cannot be used.
AU-201 7
Page 9
Using Authentication Unit (IC Card Type) AU-201
– For details on the Touch & Print function, refer to “Touch & Print
function” on page 25.
8 Touch [OK].
9 Touch [Logoff Settings].
10 Select whether or not the user is logged off when scanning of the
document is finished after the user has logged on to this machine.
11 Touch [OK].
3
12 Touch [Close], and then touch [Close] in the next screen that appears.
3.2 Registering users
There are two methods for registering users.
- Connecting this device to the multifunctional product and registering
directly from the multifunctional product
- Connecting this device to a computer and registering using Data
Administrator
!
Detail
Registered user data is stored on the hard disk of the multifunctional
product. If the user authentication method on the multifunctional product
is changed or the hard disk is reformatted, the registered user data is
erased.
AU-201 8
Page 10
Using Authentication Unit (IC Card Type) AU-201
3
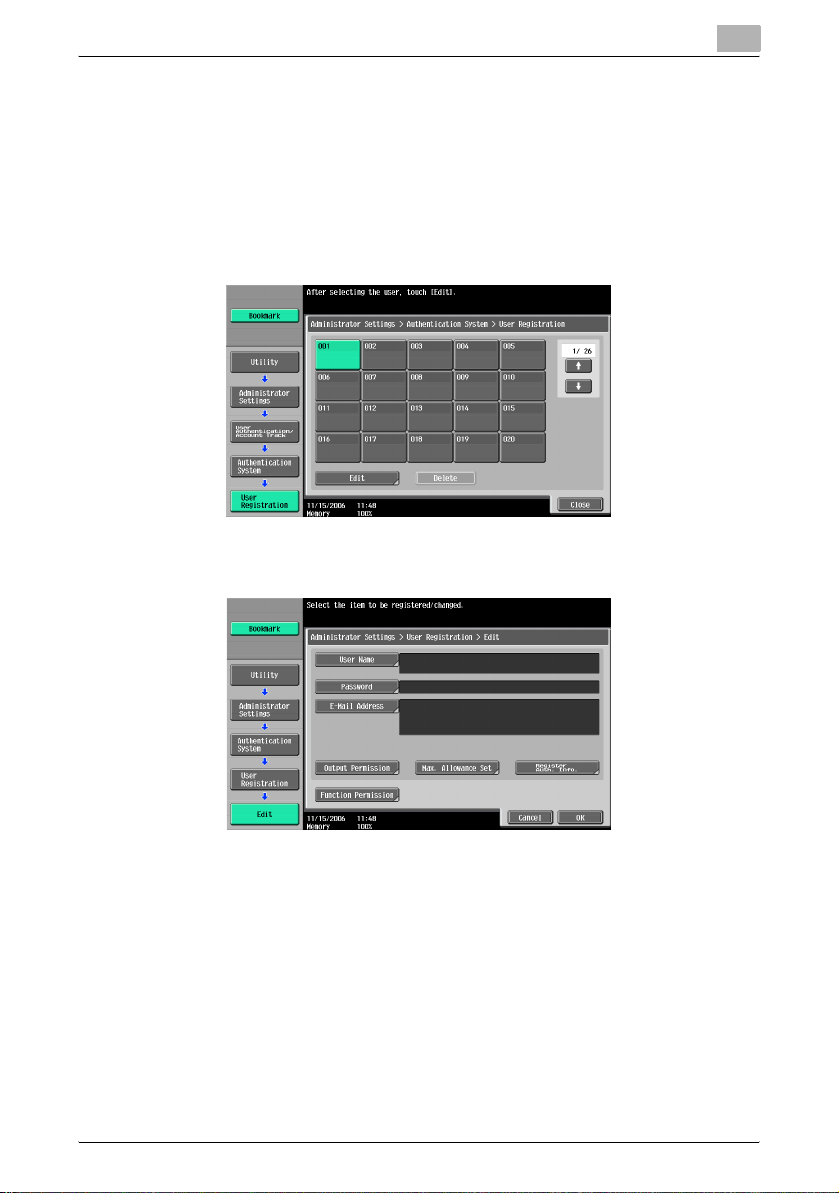
3.2.1 Registering from the control panel of the multifunctional product
1 From the control panel of the multifunctional product, touch [User
Authentication/Account Track] on the Administrator Settings screen,
and then touch [Authentication System], then [User Registration].
2 Touch the button for a registration number, and then touch [Edit].
3 Touch [Register Auth. Info.].
AU-201 9
Page 11
Using Authentication Unit (IC Card Type) AU-201
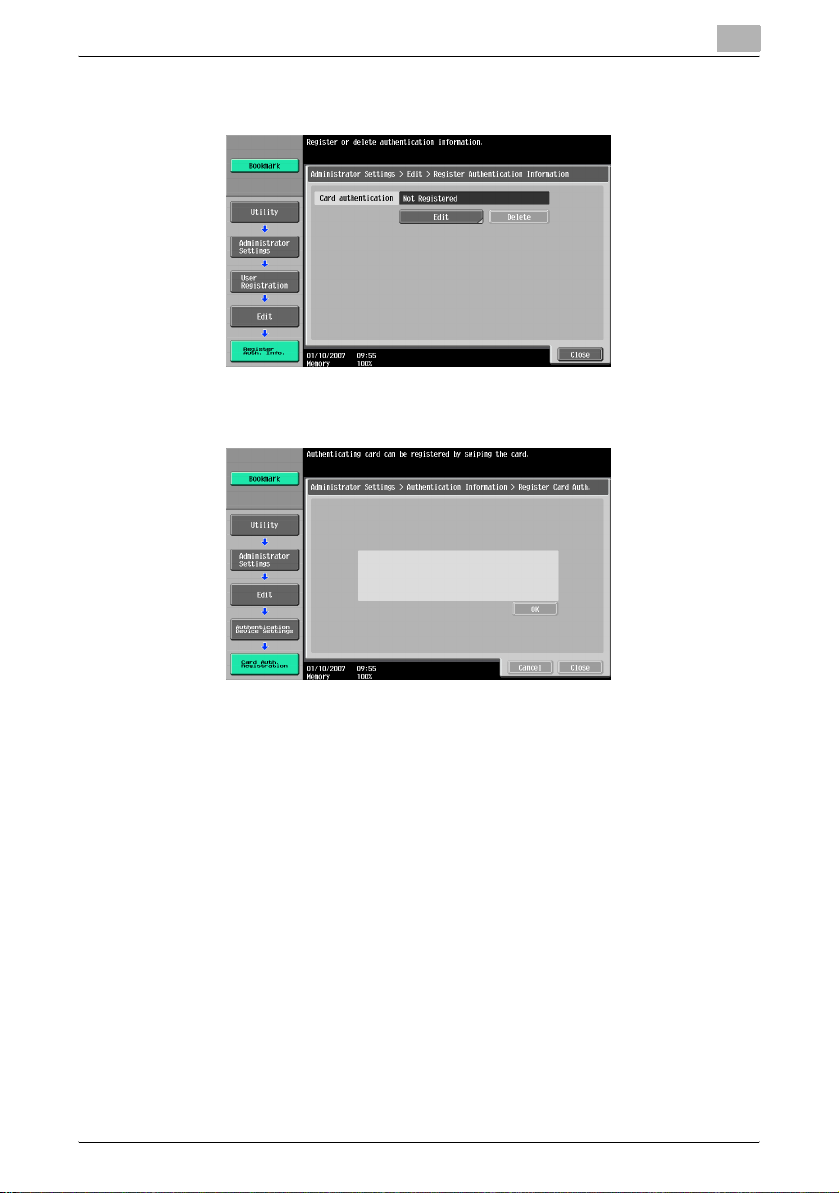
4 Touch [Edit].
5 Position the IC card on this device, and then touch [OK].
3
6 After the message “Registered” appears, touch [Close], and then touch
[Close] in the next screen that appears.
7 Type the user name and the password.
8 If desired, specify the function limitations.
9 Touch [OK].
10 Touch [Close].
AU-201 10
Page 12
Using Authentication Unit (IC Card Type) AU-201
3.2.2 Registering from Data Administrator
In order to use Data Administrator, settings must be specified on the
multifunctional product and the setup procedure must be performed. The
setup procedure includes installing this device’s IC Card Driver (USB-Driver),
then installing Data Administrator IC Card Plugin.
2
Reminder
Data Administrator ver. 3.0 or later must first be installed on the
computer. For details on the operating environment and installation
procedure for Data Administrator, refer to the User’s Guide for the Data
Administrator.
Setup
1 Turn off the multifunctional product with the main power switch, and
then disconnect this device from the multifunctional product.
2 Install IC Card Driver (USB-Driver).
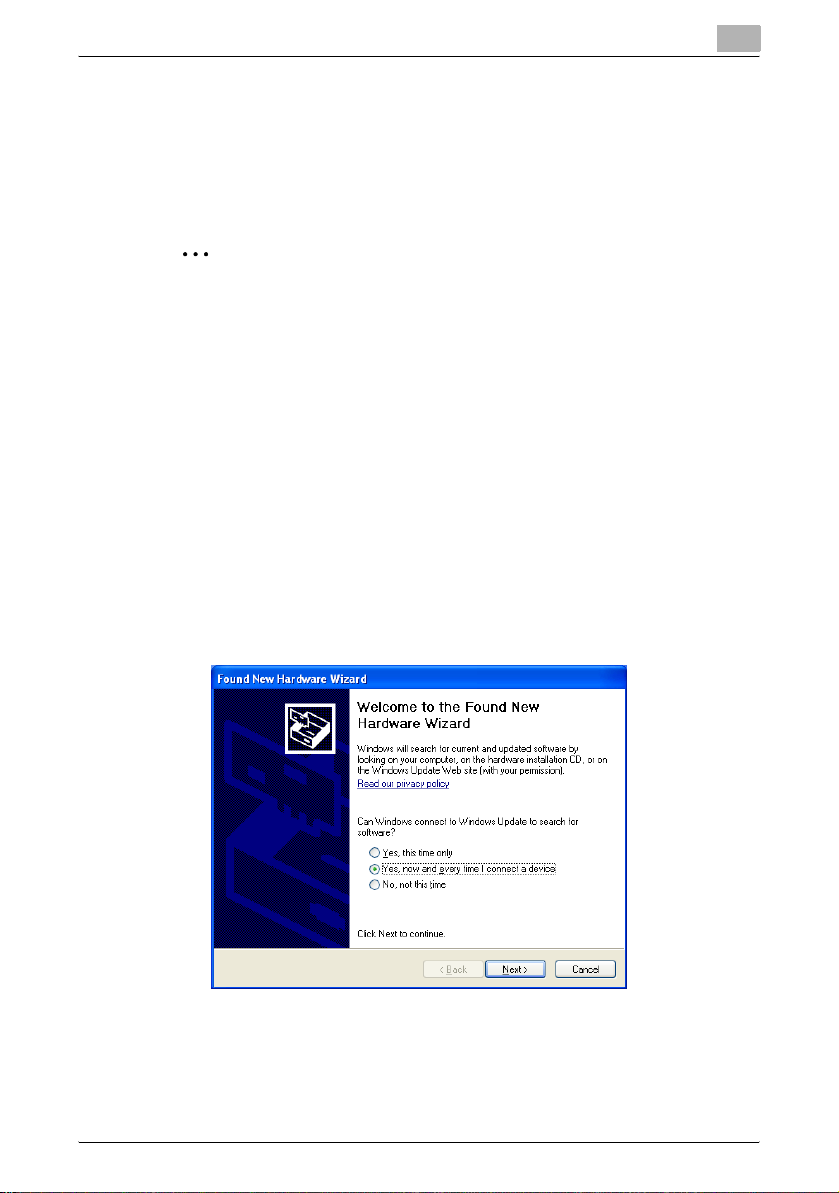
Plug the cable from this device into the USB port on the computer.
The Found New Hardware Wizard starts.
3 Select “Yes, now and every time I connect a device”, and then click
[Next].
3
4 Insert the application CD-ROM included with this device into the CD-
ROM drive of the computer.
AU-201 11
Page 13
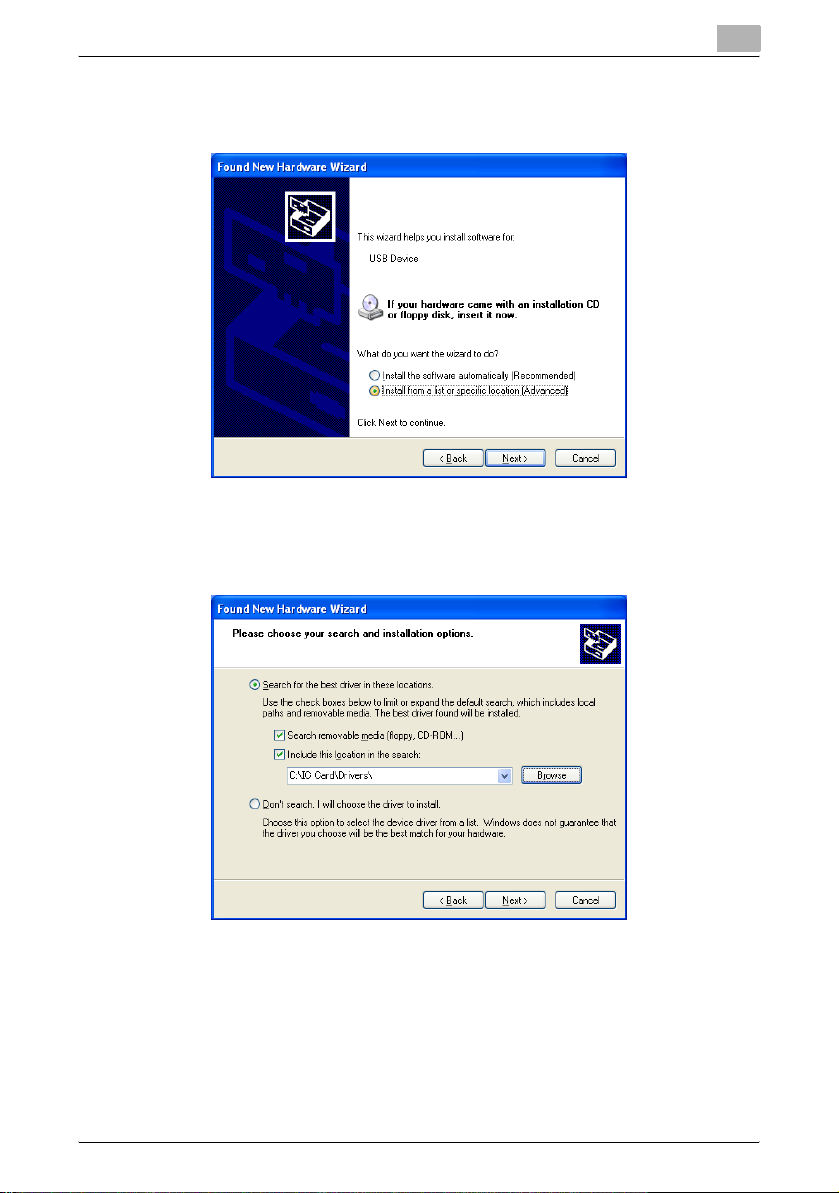
Using Authentication Unit (IC Card Type) AU-201
5 Select “Install from a list or specific location (Advanced)”, and then
click [Next].
6 Select the “Include this location in the search” check box, check that
the application CD-ROM appears as a location to be searched, and
then click [Next].
3
AU-201 12
Page 14
Using Authentication Unit (IC Card Type) AU-201
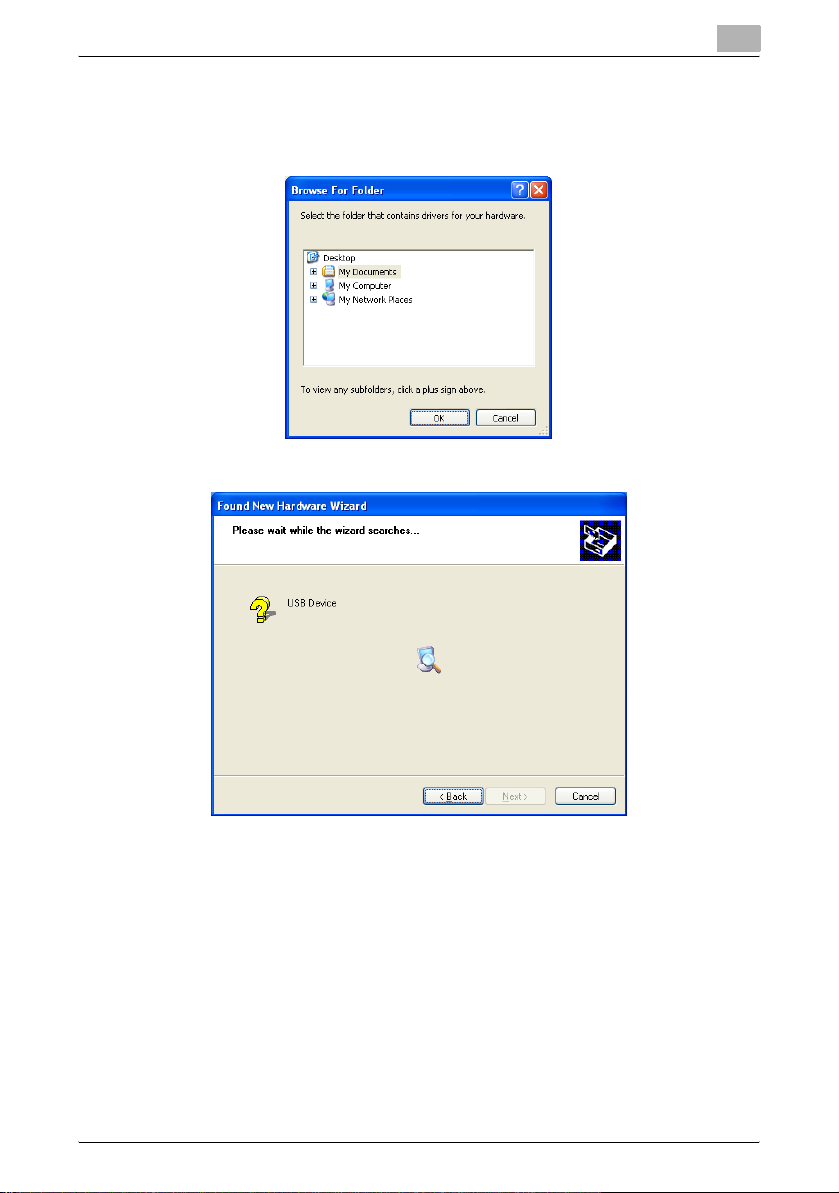
– If the application CD-ROM does not appear as a location to be
searched for the driver, click [Browse], select the IC Card Driver
(USB-Driver) folder on the CD-ROM, and then click [OK].
The installation begins.
3
AU-201 13
Page 15
Using Authentication Unit (IC Card Type) AU-201
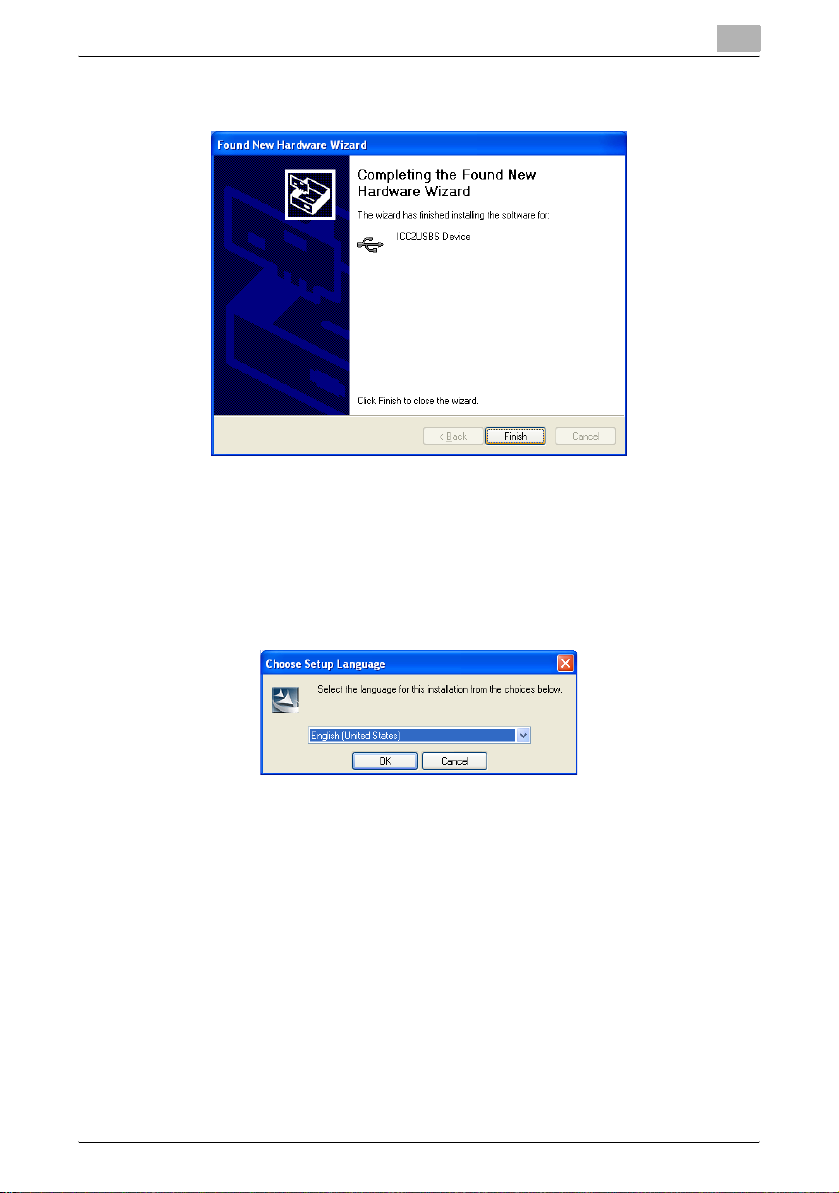
7 Click [Finish].
The installation of IC Card Driver (USB-Driver) is completed.
8 Install Data Administrator IC Card Plugin.
Open the IC_Card_Plugin folder on the application CD-ROM, and then
click “setup.exe”.
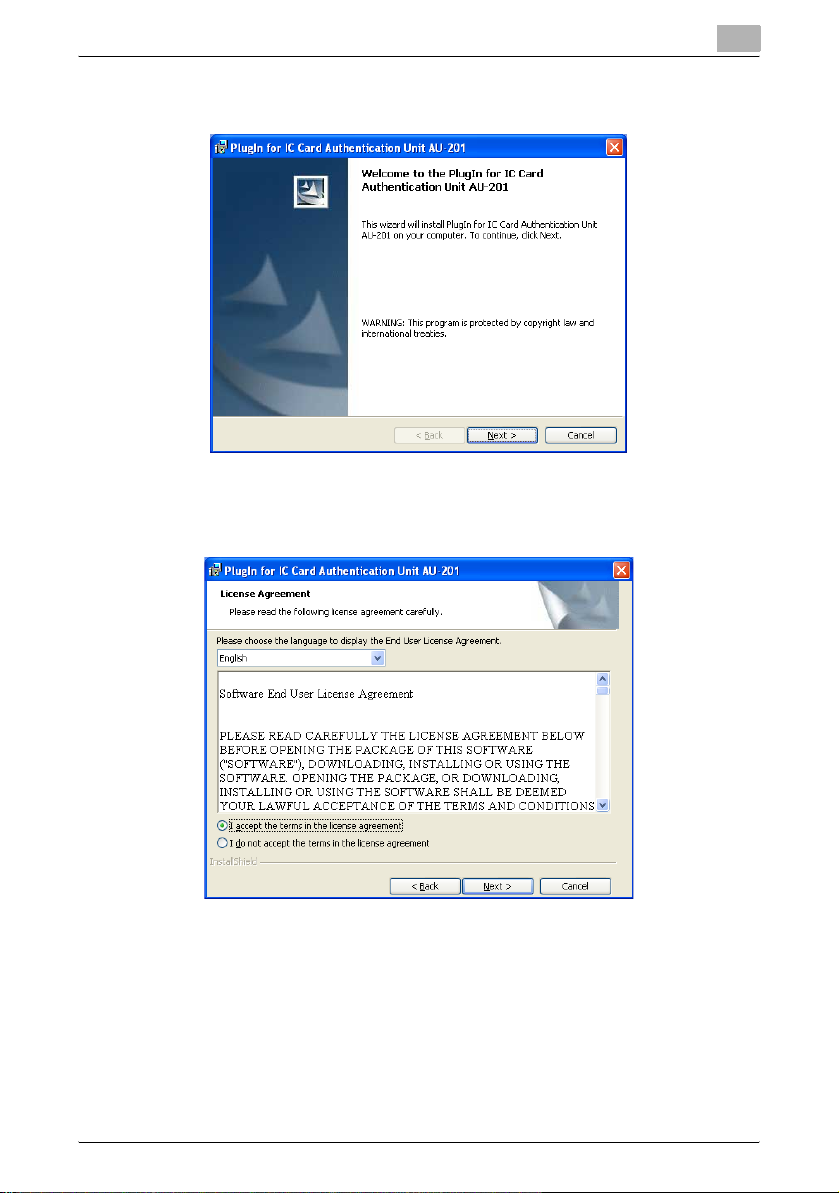
9 Select the language, and then click [OK].
3
The installer starts up.
10 Follow the instructions that appear on the screen to complete the
installation.
AU-201 14
Page 16
Using Authentication Unit (IC Card Type) AU-201
11 Click [Next].
12 Select “I accept the terms of the license agreement”, and then click
[Next].
3
AU-201 15
Page 17
Using Authentication Unit (IC Card Type) AU-201
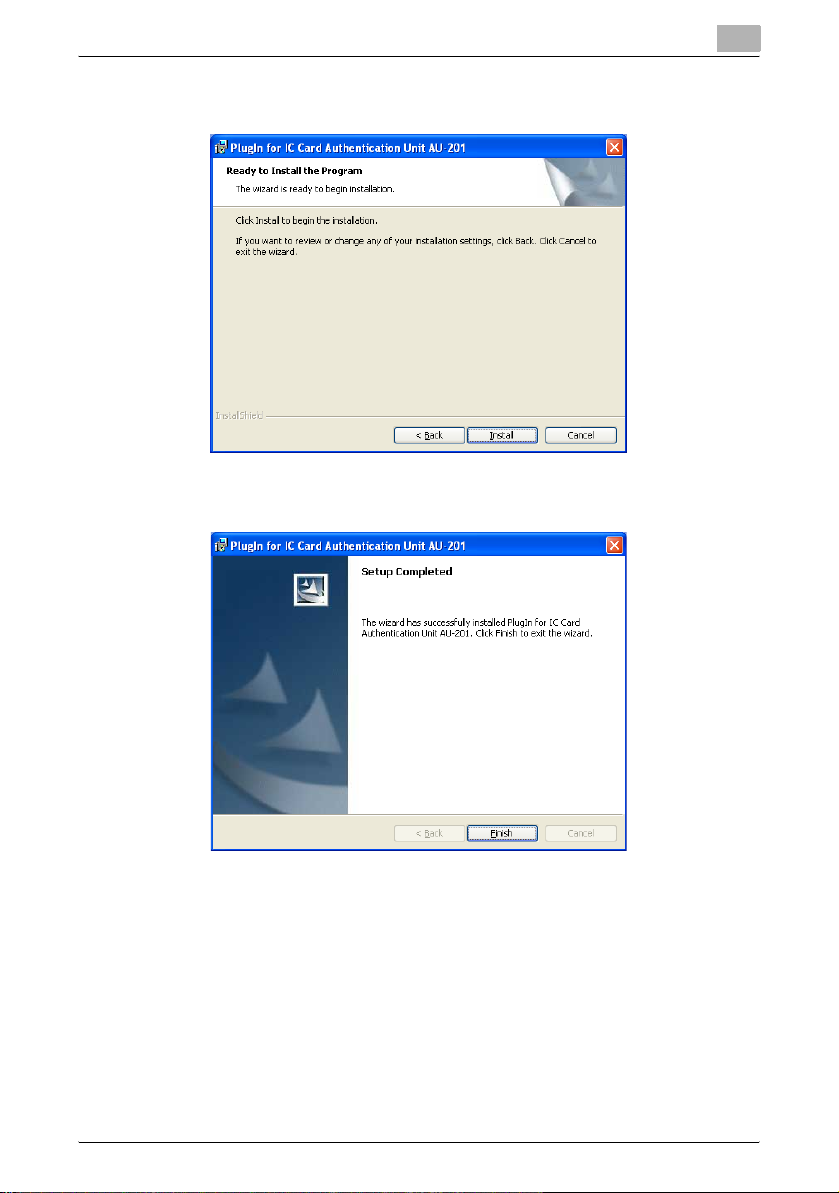
13 Click [Install].
14 Click [Finish].
3
Data Administrator IC Card Plugin is installed, and the setup is
completed.
AU-201 16
Page 18
Using Authentication Unit (IC Card Type) AU-201
Registering users
!
Detail
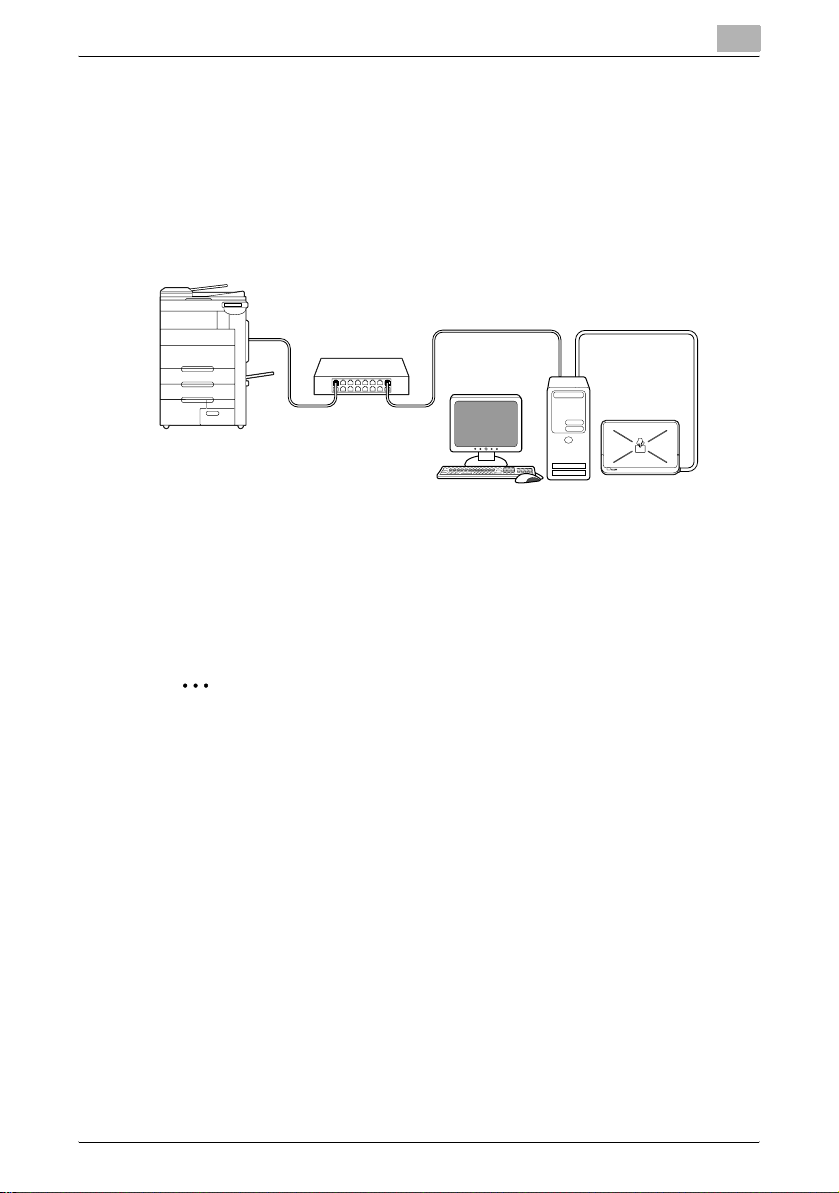
In order to register users with Data Administrator, this device must be
connected to the USB port of the computer, and the computer and
multifunctional product must be connected over a network.
Network
Multifunctional product
3
USB
Computer
This device
1 If this device is connected to the multifunctional product, turn off the
multifunctional product with the main power switch, and then
disconnect this device.
– If this device is connected to the computer, continue with step 4.
2
Note
• When the multifunctional product is turned off, then on again with the
main power switch, wait at least 10 seconds to turn the machine on after
turning it off. The machine may not operate correctly if it is turned on
immediately after being turned off.
• Hold the plug when plugging and unplugging the USB cable, otherwise
the cable may be damaged.
2 Turn on the multifunctional product with the main power switch.
3 Connect this device to the USB port of the computer installed with Data
Administrator.
AU-201 17
Page 19
Using Authentication Unit (IC Card Type) AU-201
2
Reminder
• Do not connect other USB devices to the same port where this device is
connected. If enough USB power is not provided, this device may not
operate correctly.
• When using a USB hub, be sure to use a self-powered USB hub that can
provide 500 mA or more.
• After connecting this device, wait at least 5 seconds before operating it.
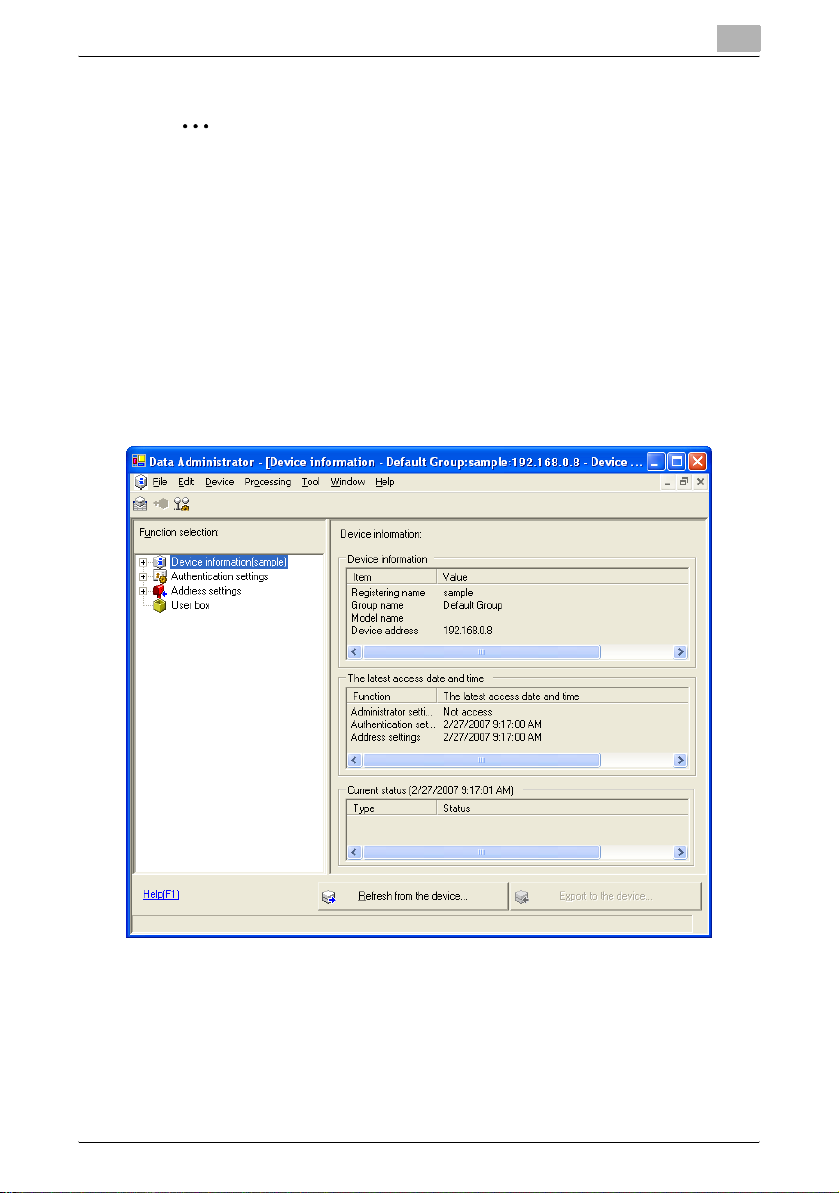
4 Start up Data Administrator, and then import the device information for
the multifunctional product.
– For details on importing the device information, refer to the User’s
Guide for Data Administrator.
The Device information pane appears.
3
AU-201 18
Page 20
Using Authentication Unit (IC Card Type) AU-201
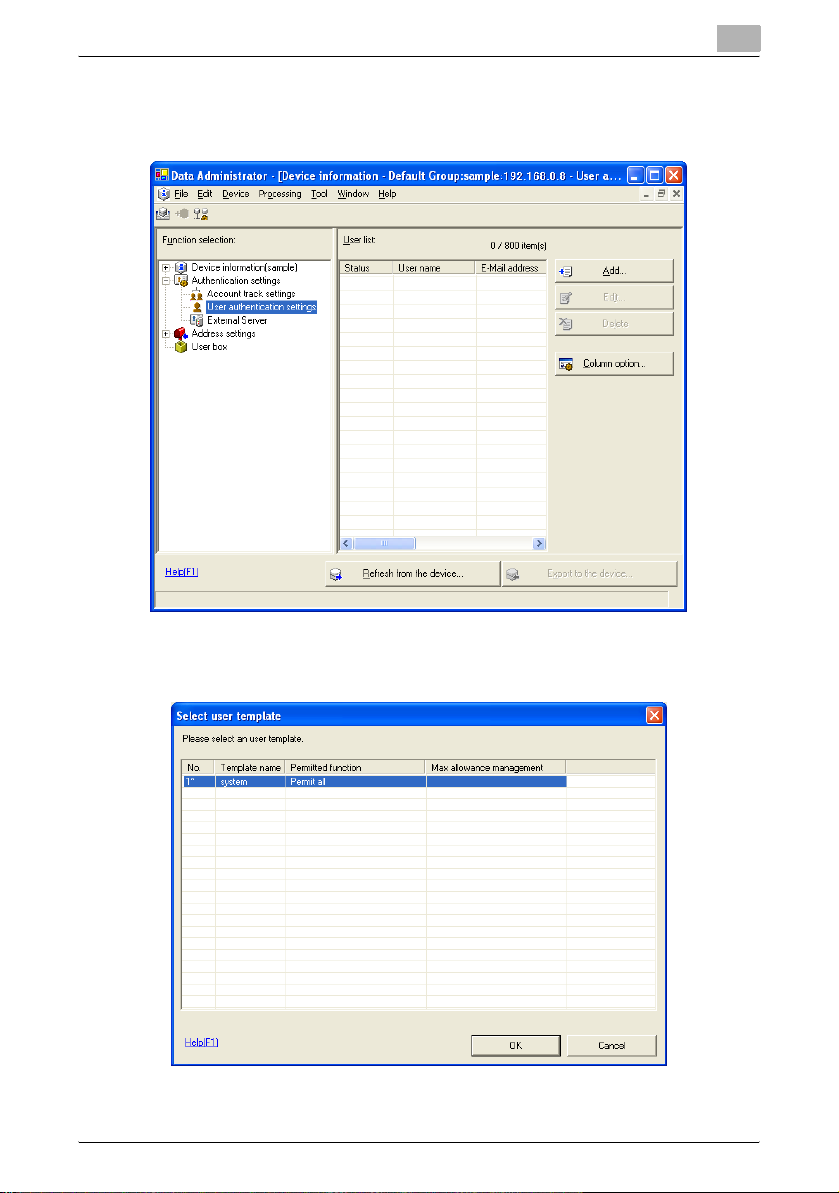
5 Select “User authentication settings” in the Function selection pane,
and then click [Add].
3
6 Select a template, and then click [OK].
The User settings dialog box appears.
AU-201 19
Page 21
Using Authentication Unit (IC Card Type) AU-201
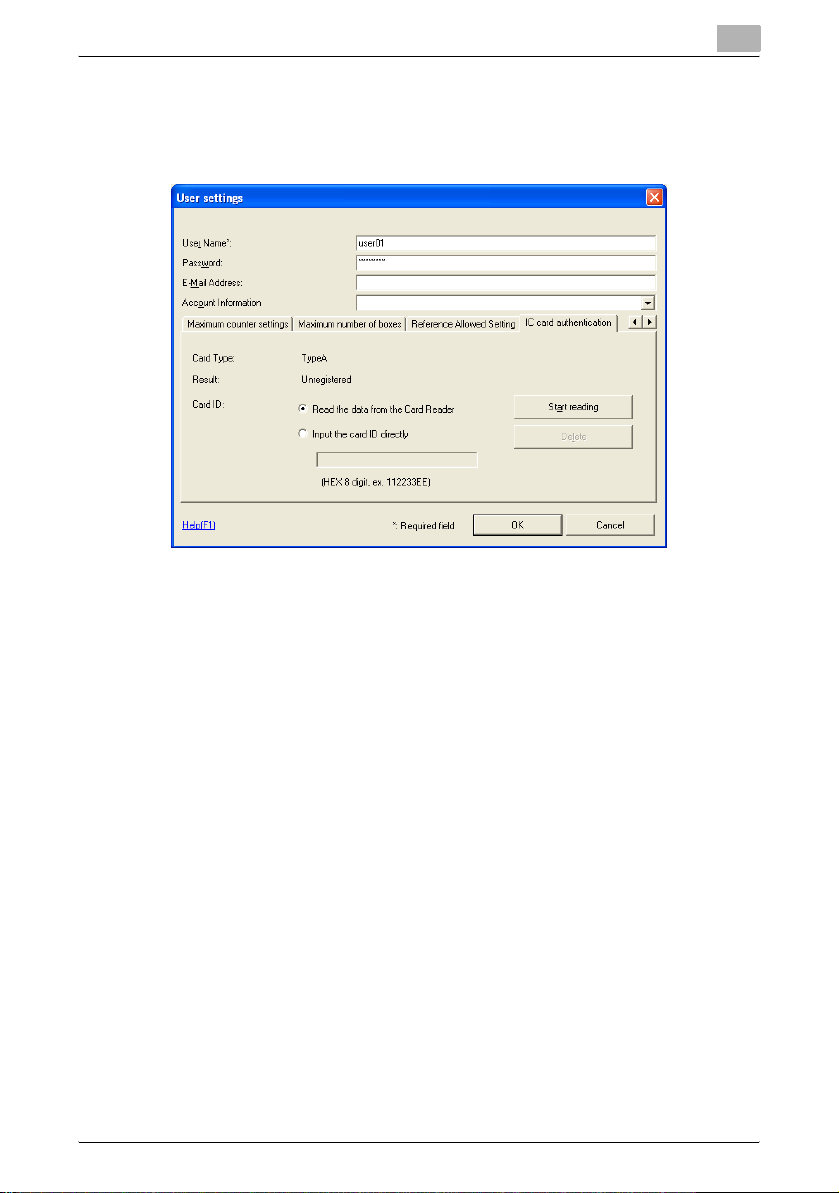
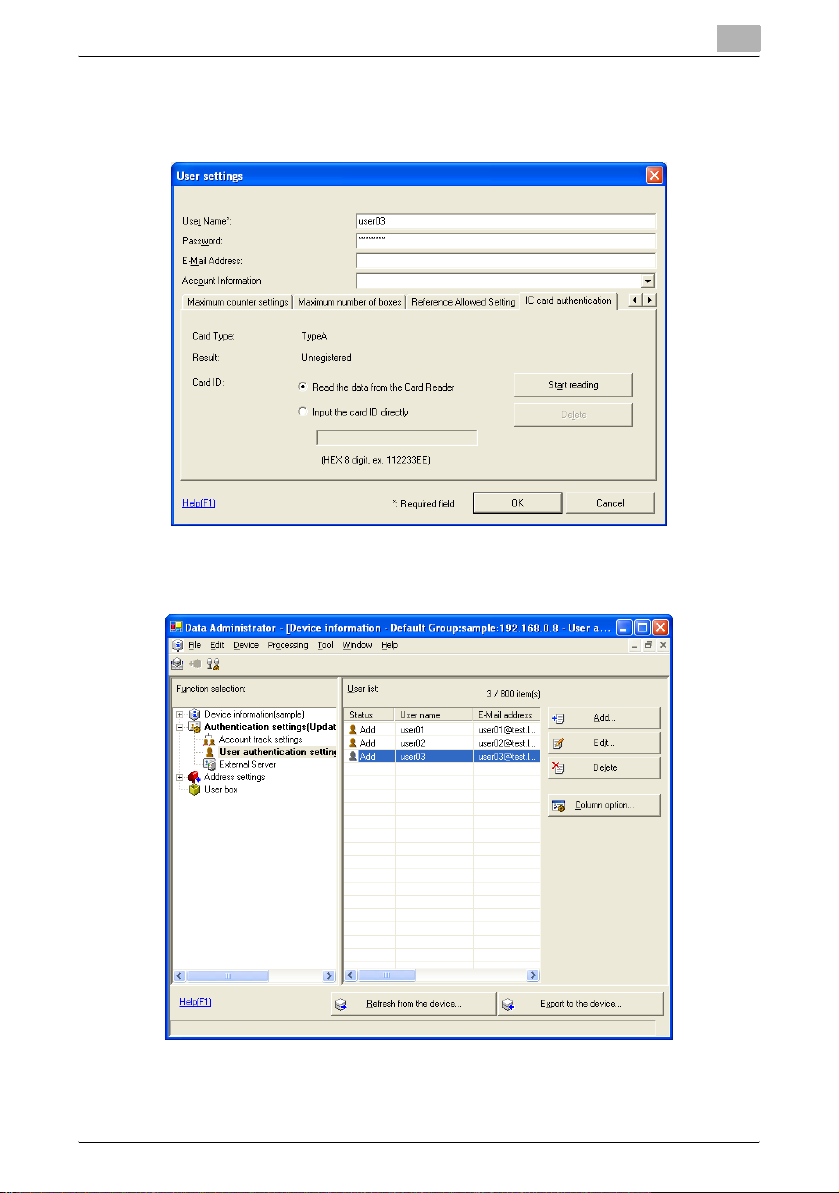
7 Type in the user name and password, and then click the IC card
authentication tab.
– If desired, type in the e-mail address.
8 Position the IC card on this device, and then click [Start reading].
– The card ID can also be registered by selecting “Input the card ID
directly”.
3
AU-201 20
Page 22
Using Authentication Unit (IC Card Type) AU-201
9 Click [OK].
– Repeat steps 5 through 9 until all users have been registered.
10 Click [Export to the device].
3
– To change the registered data, select the user name, and then click
[Edit].
AU-201 21
Page 23
Using Authentication Unit (IC Card Type) AU-201
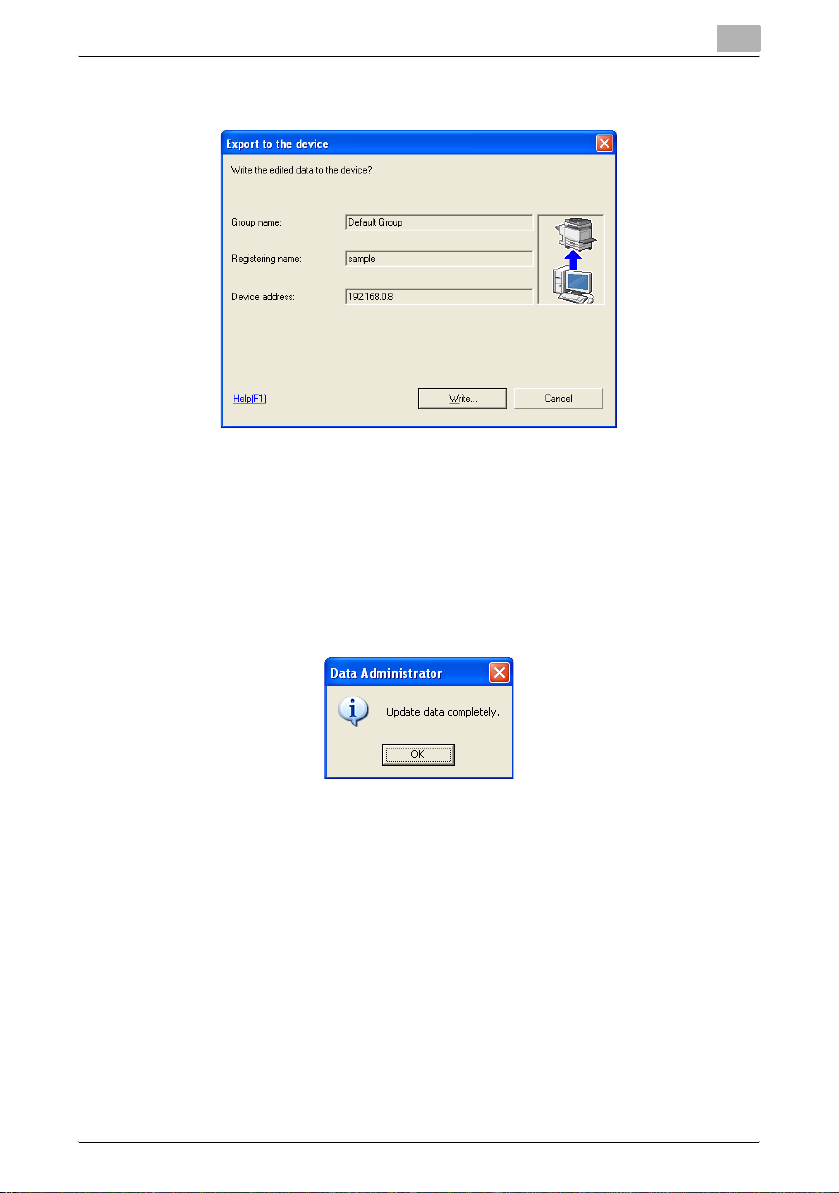
11 Click [Write].
The registered user data is specified on the multifunctional product.
!
Detail
Data Administrator is equipped with a batch copy feature that allows the
registered user data to be specified on multiple multifunctional products
specified to be used with this device.
3
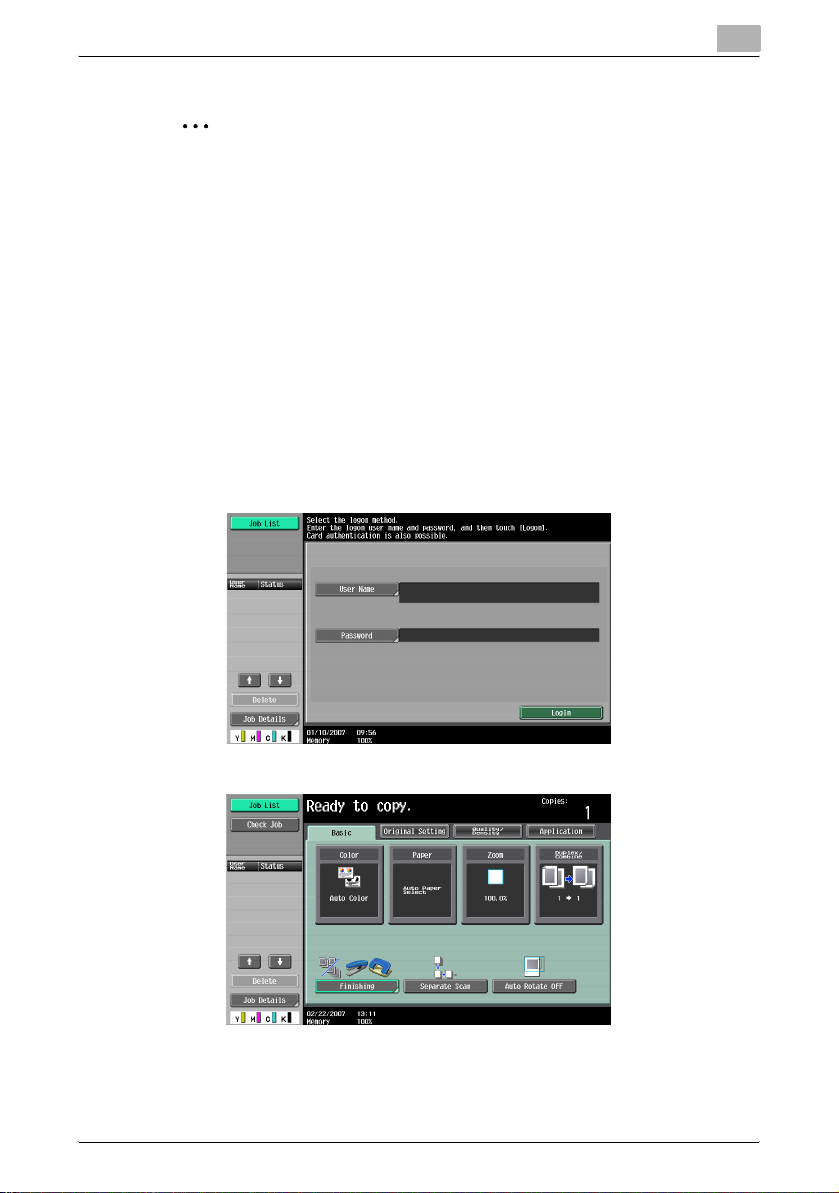
12 Click [OK].
13 Disconnect this device from this USB port of the computer.
14 Turn off the multifunctional product with the main power switch,
connect this device, and then turn on the multifunctional product with
the main power switch.
AU-201 22
Page 24
Using Authentication Unit (IC Card Type) AU-201
2
Note
• When the multifunctional product is turned off, then on again with the
main power switch, wait at least 10 seconds to turn the machine on after
turning it off. The machine may not operate correctly if it is turned on
immediately after being turned off.
• Hold the plug when plugging and unplugging the USB cable, otherwise
the cable may be damaged.
3.3 Logging on to a multifunctional product
Follow the procedures described below to log on to multifunctional products
by completing authentication with IC card IDs.
When “Card Authentication” has been specified
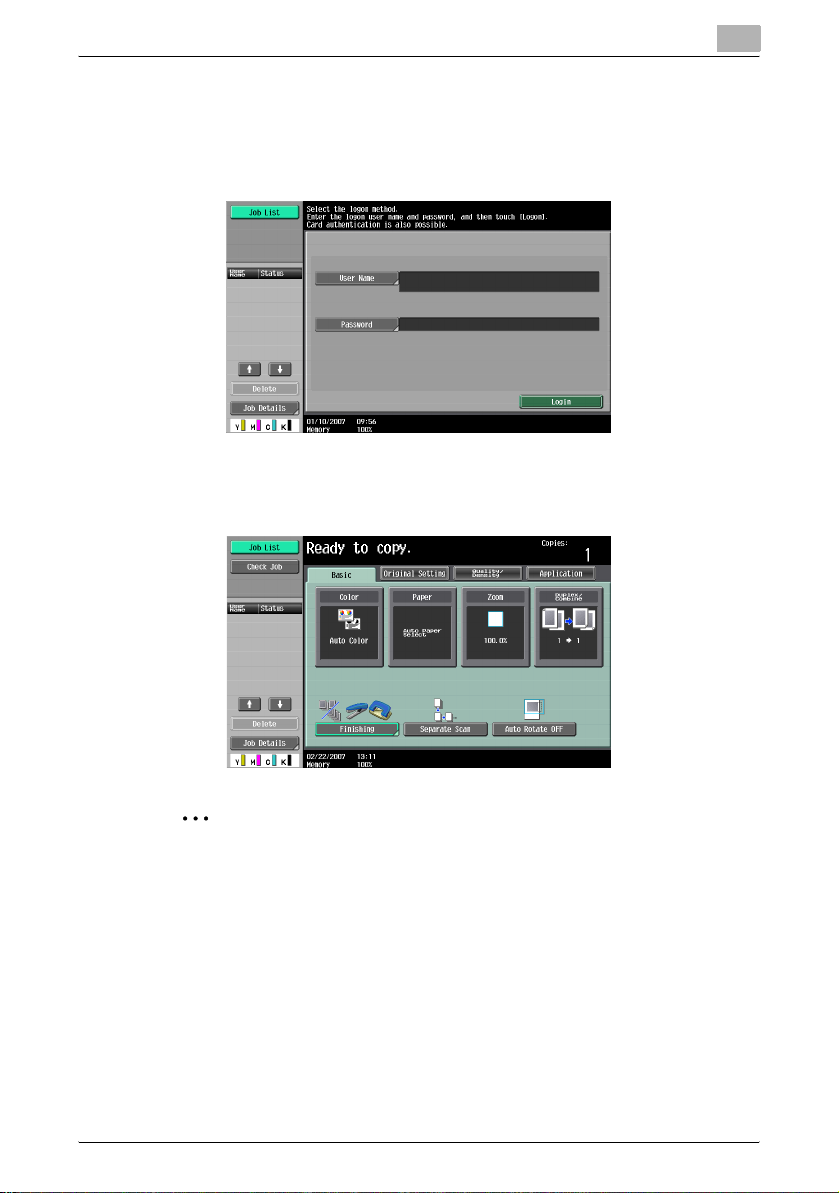
% Position the registered IC card on this device.
3
The user is authenticated, and the Basic screen appears.
AU-201 23
Page 25
Using Authentication Unit (IC Card Type) AU-201
When “Card Authentication + Password” has been specified
1 Position the registered IC card on this device, and then type in the
password.
2 Touch [Login] or press the [Access] key.
The user is authenticated, and the Basic screen appears.
3
2
Note
The notification beep sounds while scanning. The notification beep is
canceled by touching [Login] or pressing the [Access] key to complete
authentication. This is a normal operation of the device.
If authentication fails many times, the authentication data may not be
registered correctly. Therefore, register the user again.
AU-201 24
Page 26

Using Authentication Unit (IC Card Type) AU-201
3.4 Touch & Print function
Print jobs sent from a computer are saved in the Touch & Print user box on
the multifunctional product and can be printed after authentication is
completed with IC card IDs. This is called the Touch & Print function.
In addition, documents saved in the Touch & Print user box can be checked
and specified to be printed from the control panel of the multifunctional
product.
The following printer drivers and computer operating systems are
compatible with the Touch & Print function.
3
Printer driver Page
description
language
PCL Driver PCL6 Windows NT 4.0 (Service Pack 6a),
PostScript Driver
(PS driver)
PostScript PPD
driver
(PS-PPD)
PostScript3
Emulation
Supported operating systems
Windows 2000 Professional (Service
Pack 4 or later),
Windows XP Home Edition/Professional
(Service Pack 2 or later),
Windows XP Professional x64,
Windows Server 2003, and
Windows Server 2003 x64
Windows 2000 Professional (Service
Pack 4 or later),
Windows XP Home Edition/Professional
(Service Pack 2 or later),
Windows XP Professional x64,
Windows Server 2003, and
Windows Server 2003 x64
Mac OS X 10.2, Mac OS X 10.3, and Mac
OS X 10.4
!
Detail
To use the Touch & Print function, select “Card Authentication” under
“Operation Settings” and set “Touch & Print Setting” to “ON”.
2
Note
For details on the printer driver settings and Box mode functions, refer to
the User's Guide included with the multifunctional product.
AU-201 25
Page 27
Using Authentication Unit (IC Card Type) AU-201
3.4.1 Touch & Print (For Windows)
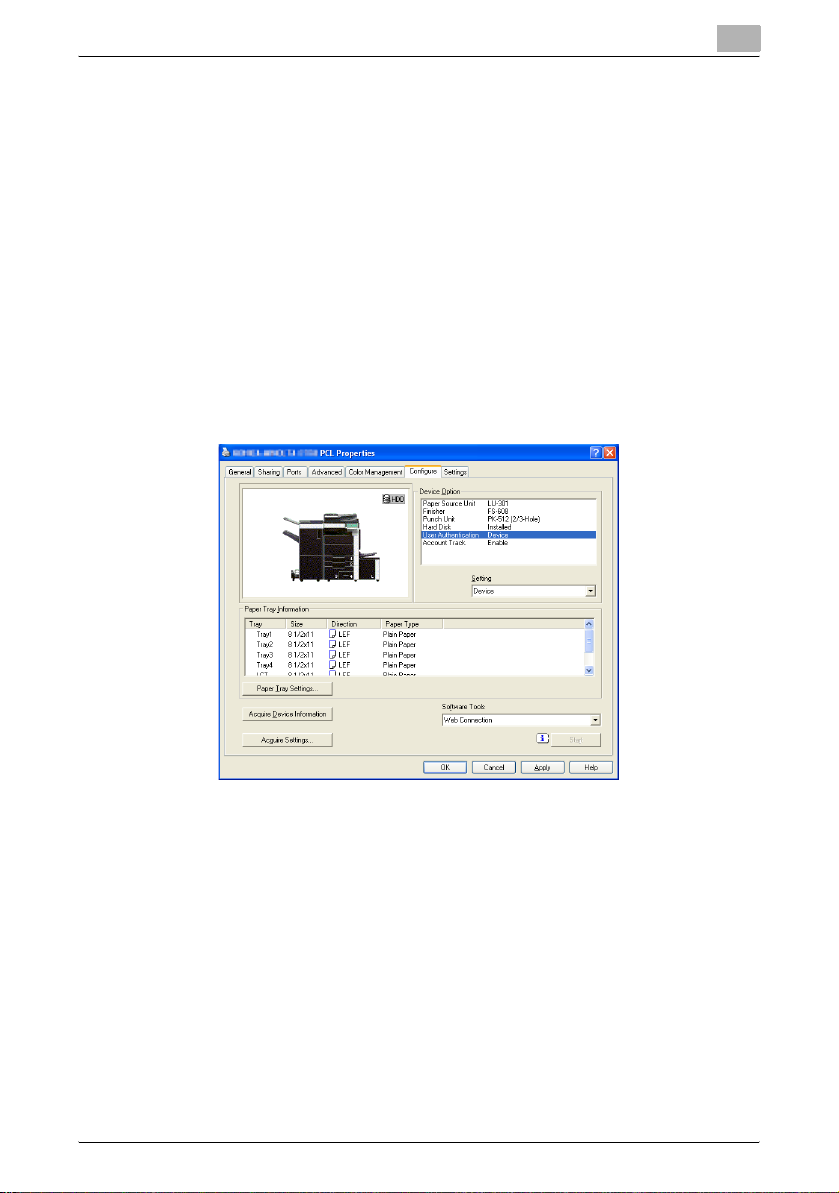
Specifying settings on the Configure tab
1 For Windows 2000/NT 4.0, click the [Start] button, point to “Settings”,
and then click “Printers”.
For Windows XP/Server 2003, click the [Start] button, and then click
“Printers and Faxes”.
– If “Printers and Faxes” does not appear in the Start menu, open the
Control Panel from the Start menu, select “Printers and Other
Hardware”, and then select “Printers and Faxes”.
2 Right-click the icon of the installed printer, and then click “Properties”.
3 Click the Configure tab.
3
4 Select “User Authentication” under “Device Option”.
5 Select “Device” from the “Setting” drop-down list.
6 Click [Apply], and then click [OK].
AU-201 26
Page 28
Using Authentication Unit (IC Card Type) AU-201
Sending a print job
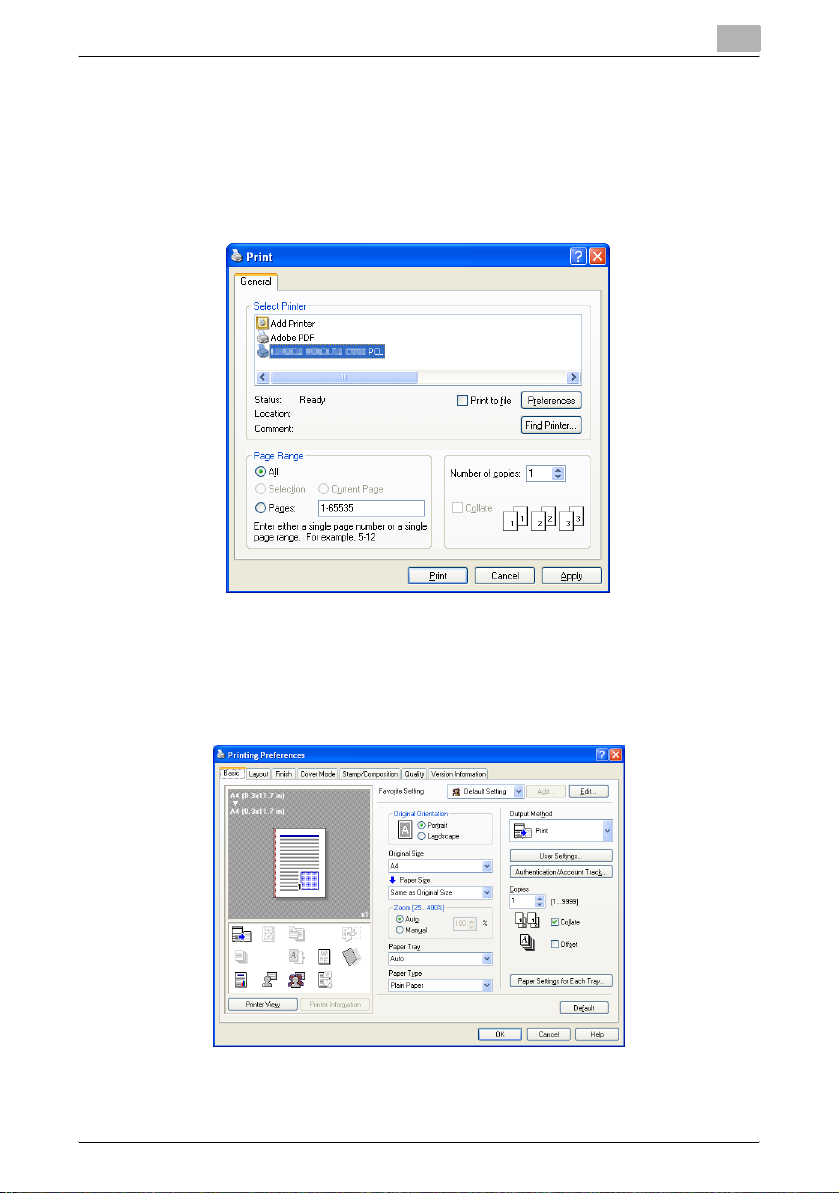
1 Open the data in the application, click [File], and then click [Print].
2 Check that the printer name has been selected in “Printer Name” or
“Select Printer”. If the printer is not selected, click to select the printer.
– The Print dialog box differs depending on the application.
3
3 Click [Preferences] (or [Properties]).
4 Click the Basic tab.
5 From the “Output Method” drop-down list, select “Print”.
AU-201 27
Page 29
Using Authentication Unit (IC Card Type) AU-201
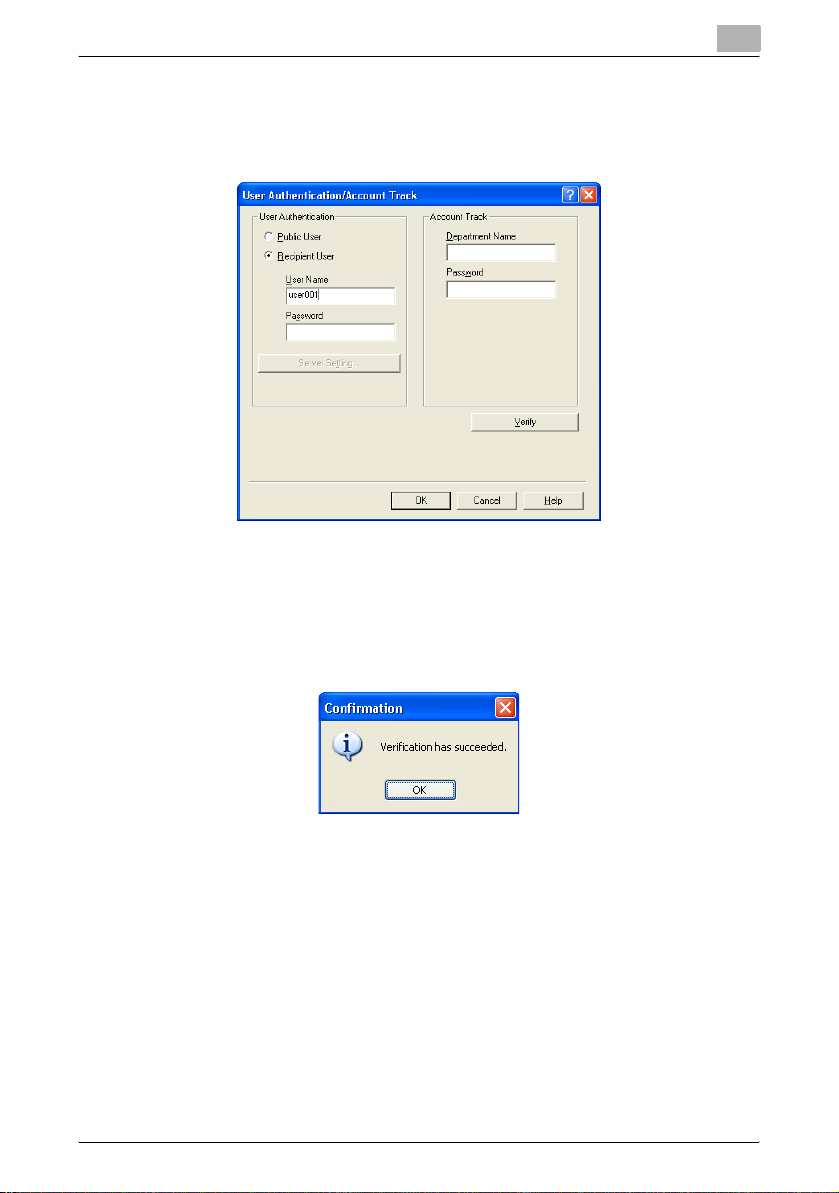
6 Click the [Authentication/Account Track] button.
7 Select “Recipient User”, and then enter the user name and password.
8 Click [Verify] to check the user ID.
9 Click [OK].
– If the user name or the password is incorrect, type in the correct
information.
3
10 Click the [OK] button.
11 Specify the desired settings, and then click [OK].
12 Click [Apply], and then click [Print].
The print job is sent.
AU-201 28
Page 30
Using Authentication Unit (IC Card Type) AU-201
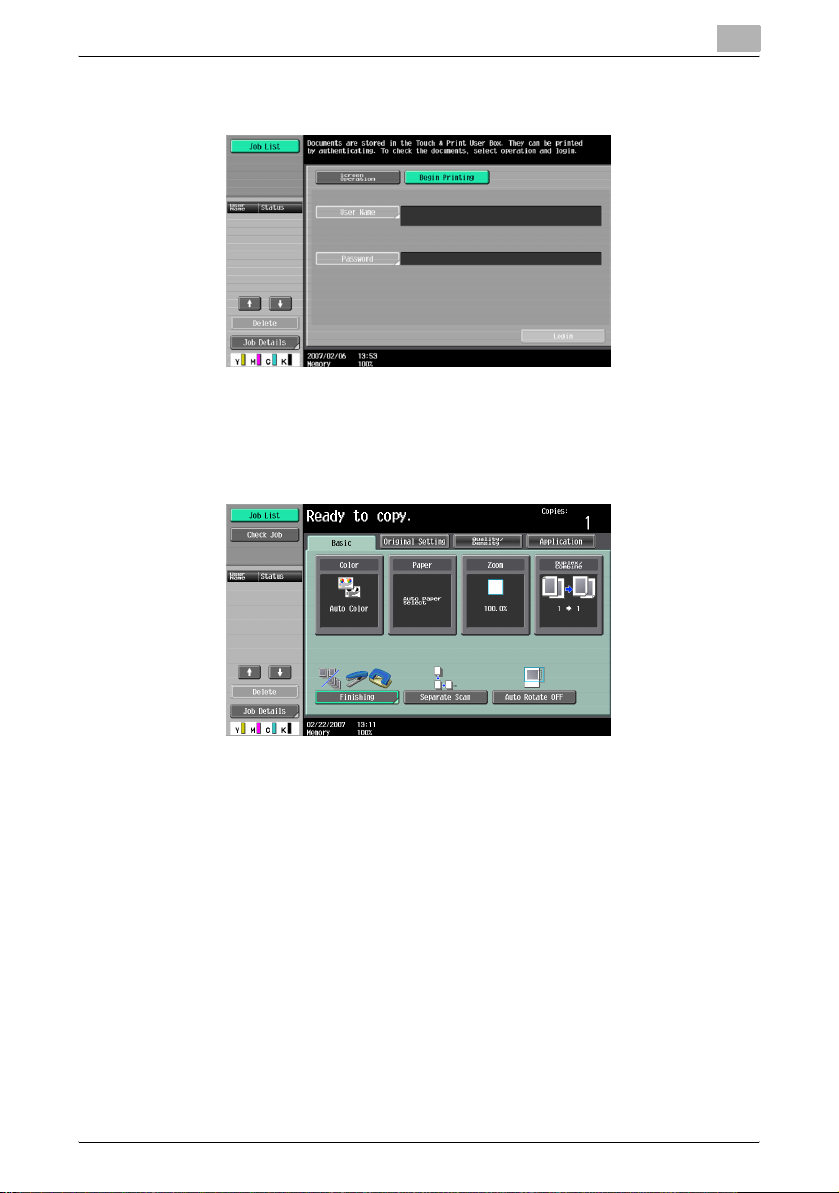
13 Position the registered IC card on this device.
– Make sure that “Begin Printing” is selected.
– To select the print job to be printed, touch [Screen Operation]. For
details, refer to “Selecting the print job to be printed from the
control panel” on page 32.
The user is authenticated, and the print job is printed.
3
AU-201 29
Page 31
Using Authentication Unit (IC Card Type) AU-201
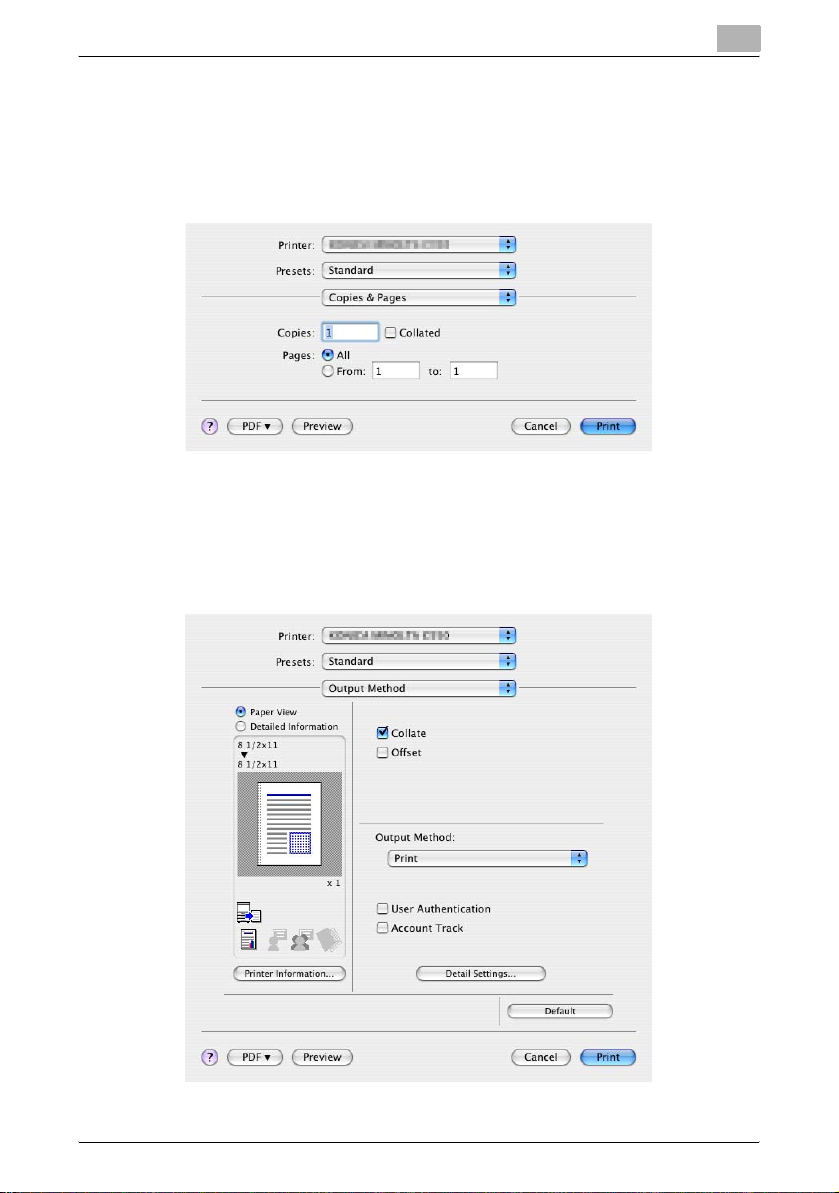
3.4.2 Touch & Print (for Macintosh)
1 Open the data in the application, click [File], and then click “Print”.
2 Check that the printer name has been selected.
– The Print dialog box differs depending on the application.
3 From the drop-down menu, select “Output Method”.
4 From the “Output Method” drop-down list, select “Print”.
3
AU-201 30
Page 32
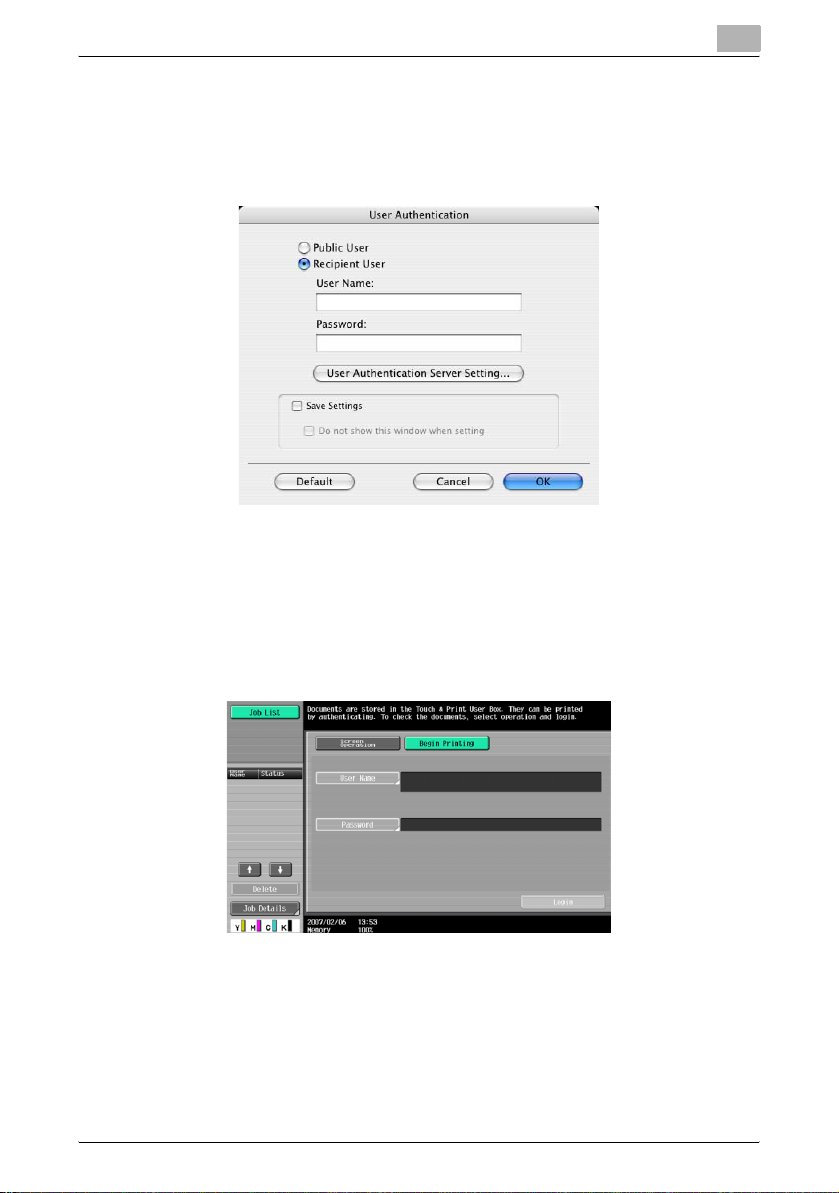
Using Authentication Unit (IC Card Type) AU-201
5 Select the “User Authentication” check box.
The User Authentication dialog box appears.
6 Select “Recipient User”, and then enter the user name and password.
7 Click the [OK] button.
8 Specify the desired settings, and then click [Print].
The print job is sent.
3
9 Position the registered IC card on this device.
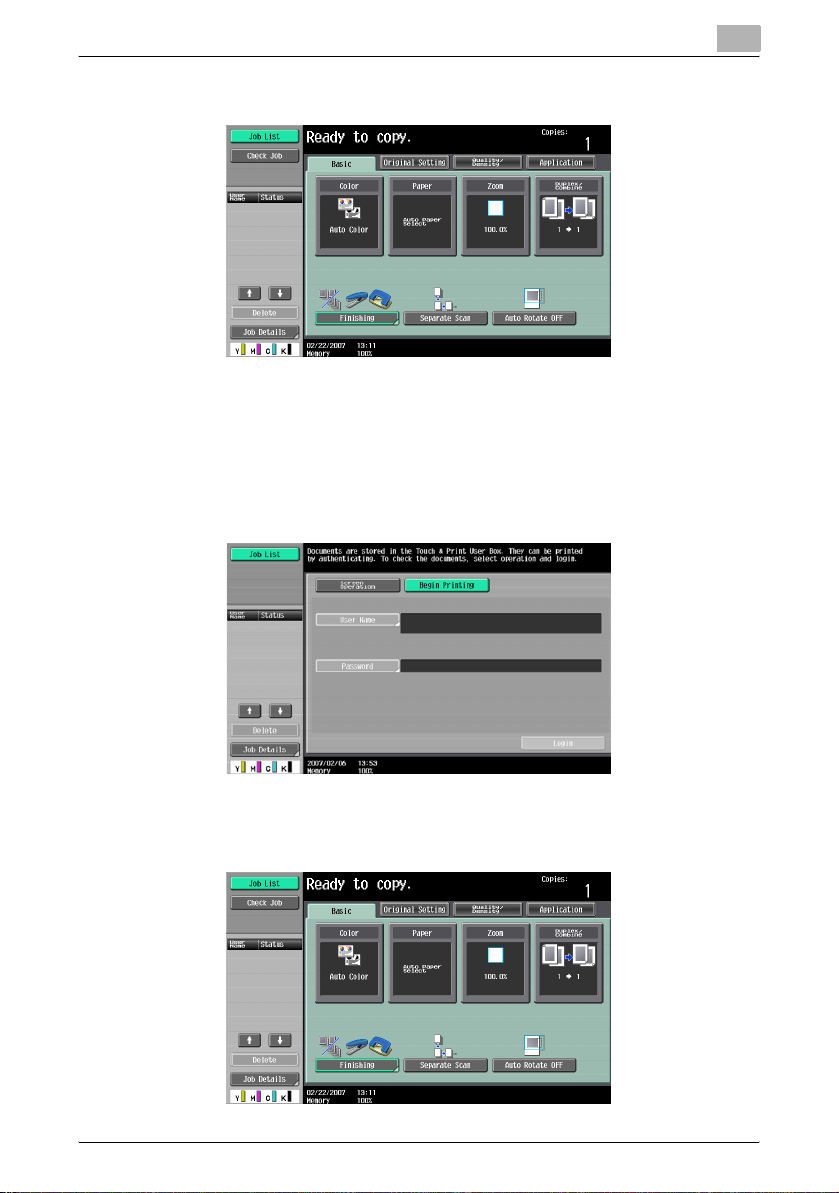
– Make sure that “Begin Printing” is selected.
– To select the print job to be printed, touch [Screen Operation]. For
details, refer to “Selecting the print job to be printed from the
control panel” on page 32.
AU-201 31
Page 33
Using Authentication Unit (IC Card Type) AU-201
The user is authenticated, and the print job is printed.
3.4.3 Selecting the print job to be printed from the control panel
Follow the procedure described below to select the document to be printed
from those saved in the Touch & Print user box.
1 Touch [Screen Operation].
3
2 Position the registered IC card on this device.
The user is authenticated, and the Basic screen appears.
AU-201 32
Page 34
Using Authentication Unit (IC Card Type) AU-201
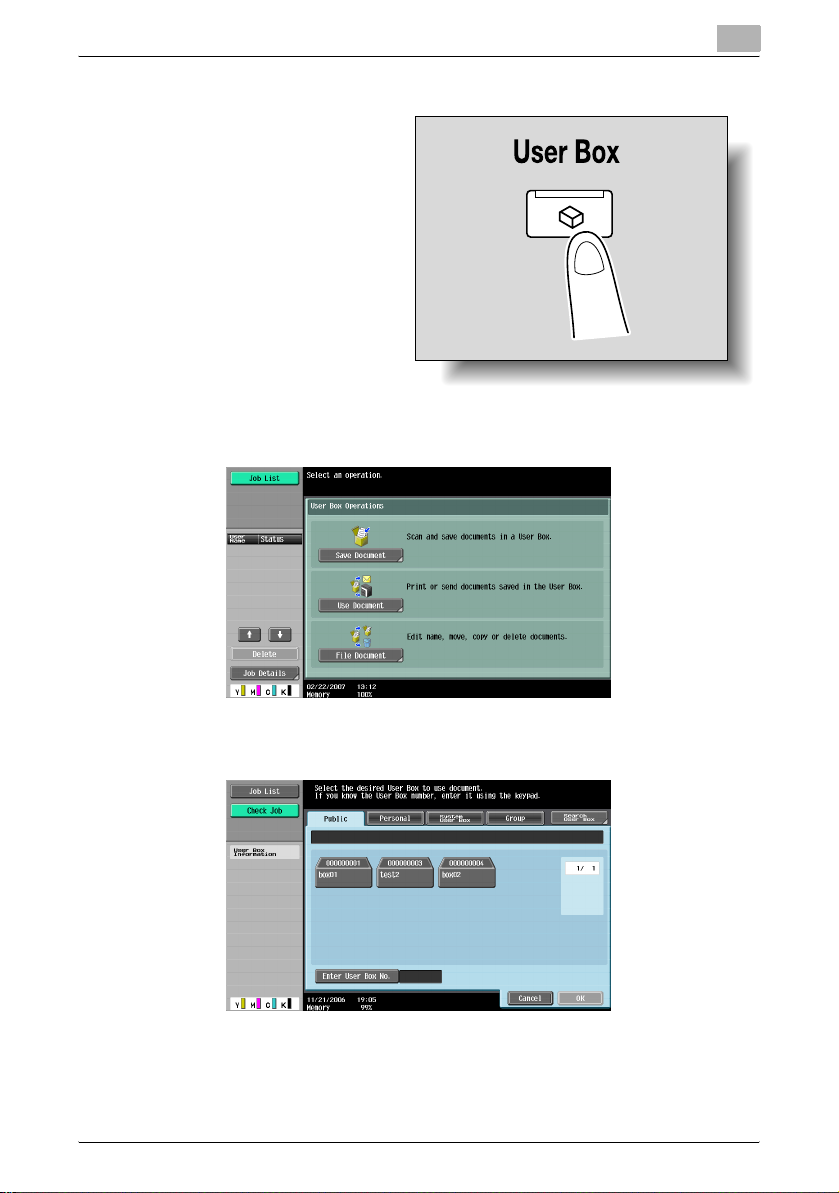
3 Press the [User Box] key in the control panel.
4 Touch [Use Document].
3
5 Touch [System User Box].
AU-201 33
Page 35
Using Authentication Unit (IC Card Type) AU-201
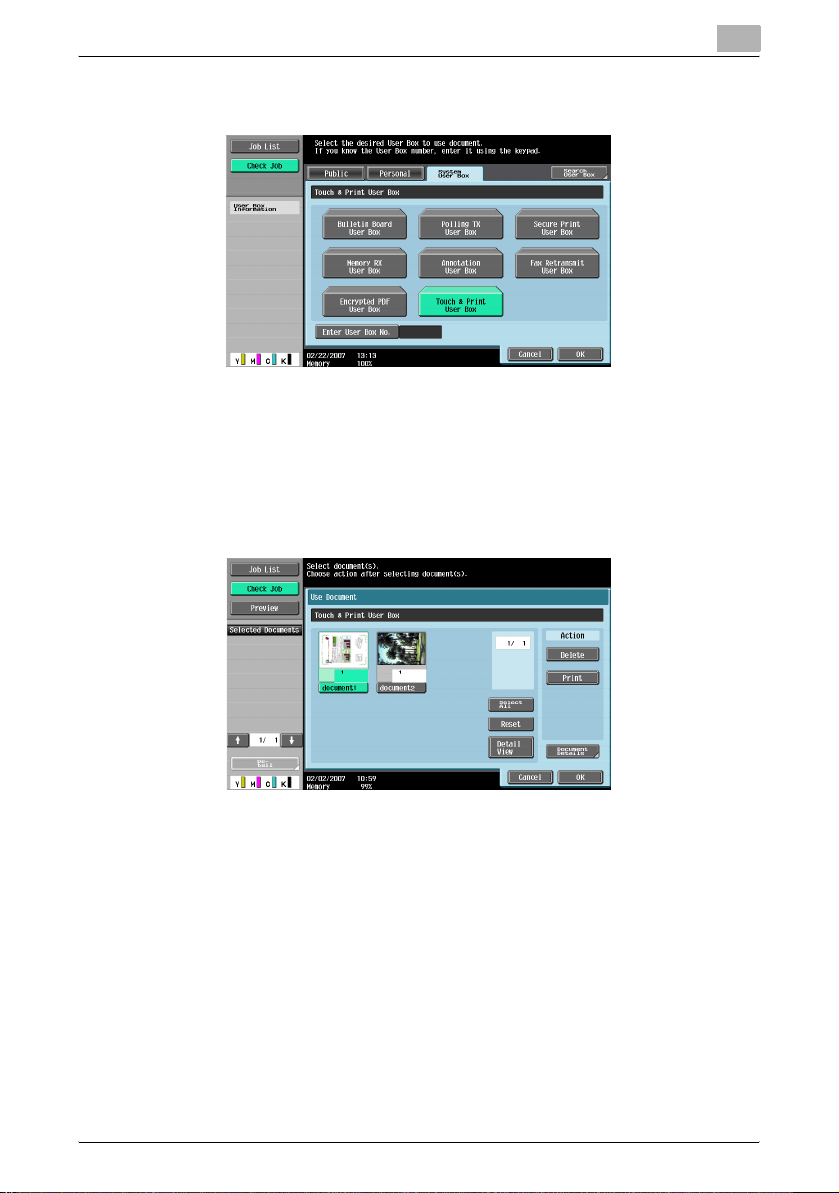
6 Touch [Touch & Print User Box], and then touch [OK].
7 Select the document to be printed.
– Multiple documents can be selected.
– To select all documents, touch [Select All].
– To cancel the selection of all documents, touch [Reset].
– To check various information, such as the date/time when the
document was stored and the document name, touch [Detail View].
3
AU-201 34
Page 36
Using Authentication Unit (IC Card Type) AU-201
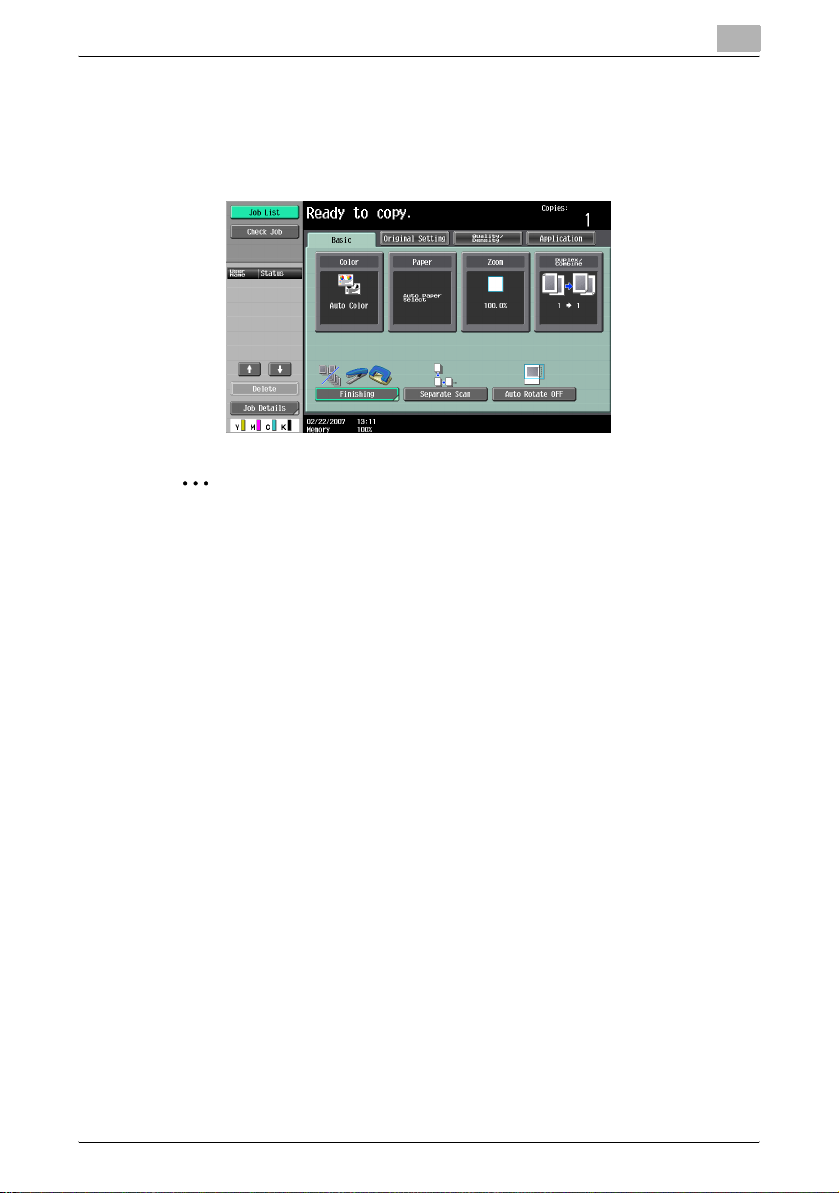
8 Touch the [Print] under “Action”, and then touch [OK].
– To delete the document, touch [Delete].
– To check the document details, touch [Document Details].
The selected document is printed.
2
Note
If authentication fails many times, the authentication data may not be
registered correctly. Therefore, register the user again.
3
AU-201 35
Page 37

Care of Authentication Unit (IC Card Type) AU-201
4 Care of Authentication Unit (IC Card
Type) AU-201
Caution
- Before cleaning this device, disconnect it from the multifunctional
product. If a force is applied to the USB port, it may be damaged.
- When cleaning this device, do not allow water to enter the device,
otherwise the system may be damaged.
- Never use organic solvents, such as benzene or alcohol, to clean this
device, otherwise it may be damaged.
2
Note
• When disconnecting or connecting this device, turn off the
multifunctional product with the main power switch, and then wait at least
10 seconds before turning it on again. The machine may not operate
correctly if it is turned on immediately after being turned off.
• Hold the plug when plugging and unplugging the USB cable, otherwise
the cable may be damaged.
Frequency: Once a month, or when it is dirty
Wipe this device with a soft, dry cloth. If this device cannot be cleaned by
wiping it, wash it with a cloth dampened with a mild detergent and wrung out
well. After this device is cleaned, rinse the cloth and wring it out well before
wiping off the detergent.
4
AU-201 36
Page 38

Specifications
5 Specifications
Product name Authentication Unit (IC Card Type) AU-
Dimensions Approx. 92 mm (W) × 64 mm (D) × 16
Weight Approx. 120 g
Power requirements Through USB port
Environment conditions
(when operating)
Environment conditions
(when not operating)
Radio waves classification Induced reading/writing
Compatible card Contactless IC card compliant with ISO
Computer Processor PC/AT compatible, 1 GHz or more
Supported operating systems Windows 2000 Professional (Service
Temperature 0 to 40 °C
Humidity 20 to 85% (Must be no condensation)
Temperature -20 to 50 °C
Humidity 20 to 85% (Must be no condensation)
Memory 128 MB or more
Hard disk drive Available hard disk space: 100 MB or
Monitor 800 × 600 pixels, 16-bit color or more
Network TCP/IP protocol
Application Microsoft Internet Explorer 6.0 (Service
Interface USB 1.1 or later
5
201
mm (H)
communication equipment
14443 Type A and Felica
more
Pack 1) or later
Microsoft .NET Framework (Service
Pack 1) or later
Pack 4)
Windows XP Professional Edition
(Service Pack 2)
AU-201 37
Page 39

Troubleshooting
6 Troubleshooting
If a problem occurs while running the system, refer to the following.
Condition Possible cause Remedy
The message “Failed to
register.” appears on a
multifunctional product
where registration failed.
The message appears on
a computer where
registration failed.
Logon failed.
The message “Failed to
Authenticate.” appears on
the multifunctional
product.
Scanning does not begin. Was the multifunctional
The Add New Hardware
Wizard starts when this
device is connected to the
computer.
With this device, the
scanning time is limited to
10 seconds. This
message appears if
scanning was not possible
within the limited period of
time.
If “Card Authentication +
Password” was selected:
Is the password typed in
correctly?
product restarted after
this device was connected
to it?
Is this device connected
to the same USB port
used when the driver was
installed?
6
Refer to the Quick Guide
Authentication Unit (IC
Card Type AU-201) and
check how to position the
IC card in order to
complete scanning within
the limited period of time.
Check the password, and
type it in correctly.
Turn the multifunctional
product off with the main
power switch and
temporarily disconnect
the USB cable from this
device or the
multifunctional product
before connecting it again
and waiting 10 seconds
before turning on the
multifunctional product
with the main power
switch.
If this device is connected
to a USB port different
from the one used when
the driver was installed,
the Add New Hardware
Wizard may start. Use the
same USB port used
when the driver was
installed.
If the problem is not corrected after the described operation is performed,
contact your technical representative.
AU-201 38
Page 40

2007. 5
 Loading...