


IP-511
Print Controller
Network Scanner
Read this manual before printing. Keep readily available for reference.
Thank you very much for purchasing the Konica IP-511 Print Controller.
This INSTRUCTION MANUAL includes instructions for printing, handling the machine correctly, and safety precautions. Please read this manual befor printing or using the equipment in any way.
In order to maintain satisfactory printing performance, please keep this INSTRUCTION MANUAL readily available for reference.

|
|
|
CONTENTS |
|
|
CONTENTS |
|
■ |
Introduction .......................................................................................................................... |
v |
|
■ |
About this Manual ............................................................................................................... |
vi |
|
■ Conventions Used in this Manual ..................................................................................... |
vii |
||
|
● |
System Requirements ......................................................................................................................... |
vii |
Chapter 1 Overview of the Scanning Features |
|
||
■ |
Available Scanning Features ........................................................................................... |
1-2 |
|
|
● |
Scan to HDD ........................................................................................................................................ |
1-3 |
|
● |
Scan to Email ...................................................................................................................................... |
1-3 |
|
● |
Scan to FTP ......................................................................................................................................... |
1-3 |
■ |
Scanning Process ............................................................................................................. |
1-4 |
|
Chapter 2 Configuring Destination/Storage Location Settings |
|||
■ Choosing destinations to transmit scanned data. ......................................................... |
2-2 |
||
■ |
Scan to HDD ...................................................................................................................... |
2-3 |
|
|
● [Select Transmission Object] screen (HDD) .................................................................................... |
2-3 |
|
|
● |
[HDD - Box No.] Screen ...................................................................................................................... |
2-4 |
■ |
Scan to Email ..................................................................................................................... |
2-5 |
|
|
● [Select Transmission Object] screen (E-Mail) ................................................................................. |
2-5 |
|
|
● [E-Mail Transmission Object] screen ............................................................................................... |
2-6 |
|
|
● [E-Mail - Title in E-Mail] screen .......................................................................................................... |
2-7 |
|
■ |
Scan to FTP ....................................................................................................................... |
2-8 |
|
|
● [Select Transmision Object] screen (FTP) ....................................................................................... |
2-8 |
|
|
● [FTP Transmission Object] screen ................................................................................................... |
2-9 |
|
|
● [FTP Port No. Entry] screen ............................................................................................................. |
2-10 |
|
Chapter 3 Scanner Operation |
|
||
■ Performing a Scanning Task ............................................................................................ |
3-2 |
||
■ |
Scanner Basic screen ....................................................................................................... |
3-4 |
|
|
● |
[File Name] .......................................................................................................................................... |
3-4 |
|
● |
[ADDRESS] .......................................................................................................................................... |
3-4 |
|
● |
File Form ............................................................................................................................................. |
3-4 |
|
● |
[SCAN MODE] ..................................................................................................................................... |
3-4 |
|
● |
[SCAN DENSITY] ................................................................................................................................ |
3-4 |
|
● |
[LENS MODE] ...................................................................................................................................... |
3-4 |
|
● |
[SCAN SIZE] ........................................................................................................................................ |
3-5 |
|
● |
[QUALITY] ........................................................................................................................................... |
3-5 |
|
● |
Functions ............................................................................................................................................ |
3-6 |
|
● |
Deciphering Tag Displays .................................................................................................................. |
3-9 |
■ Check Settings for Scanning ......................................................................................... |
3-10 |
||
|
● |
CHANGE SETTINGS ......................................................................................................................... |
3-10 |
|
● |
CANCEL SETTINGS .......................................................................................................................... |
3-10 |
iii

CONTENTS
Chapter 4 Loading In From Computers
■ Software to load in scanned data .................................................................................... |
4-2 |
■ Network Scanner Driver ................................................................................................... |
4-3 |
● To install the scanner driver (Konica Network Scanner Driver) .................................................... |
4-3 |
● TWAIN-equipped applications can be used to read in scanned data. ........................................... |
4-5 |
● Scanner Driver’s Main Screen ........................................................................................................... |
4-7 |
● Variable Option ................................................................................................................................... |
4-9 |
● To Delete Scanned Data ................................................................................................................... |
4-10 |
Appendix A Troubleshooting
■ Troubles Concerning the Scanner ................................................................ |
Appendix A-2 |
||
|
● Cannot connect to the scanner ....................................................................................... |
Appendix A-2 |
|
■ |
HD Full .............................................................................................................. |
Appendix A-3 |
|
|
● |
Cause ................................................................................................................................. |
Appendix A-3 |
|
● |
Remedy .............................................................................................................................. |
Appendix A-3 |
|
● |
NOTE .................................................................................................................................. |
Appendix A-3 |
■ |
Scan Error List ................................................................................................ |
Appendix A-4 |
|
|
● |
Listing Objects .................................................................................................................. |
Appendix A-4 |
|
● Causes of Non Output ...................................................................................................... |
Appendix A-4 |
|
|
● |
Accessing the List ............................................................................................................ |
Appendix A-4 |
|
● Content of the List ............................................................................................................ |
Appendix A-4 |
|
|
● |
Deleting List Data ............................................................................................................. |
Appendix A-4 |
Appendix B Using Scan Direct
■ Overview of Scan Direct ................................................................................. |
Appendix B-2 |
||
|
● |
Major Features .................................................................................................................. |
Appendix B-2 |
|
● |
Requirements and others ................................................................................................ |
Appendix B-2 |
■ |
Screens Explained .......................................................................................... |
Appendix B-3 |
|
|
● |
Main Window ..................................................................................................................... |
Appendix B-3 |
|
● |
File Menu .......................................................................................................................... |
Appendix B-4 |
|
● |
Setting Menu ..................................................................................................................... |
Appendix B-5 |
■ |
Saved Files ...................................................................................................... |
Appendix B-6 |
|
iv

Introduction
■Introduction
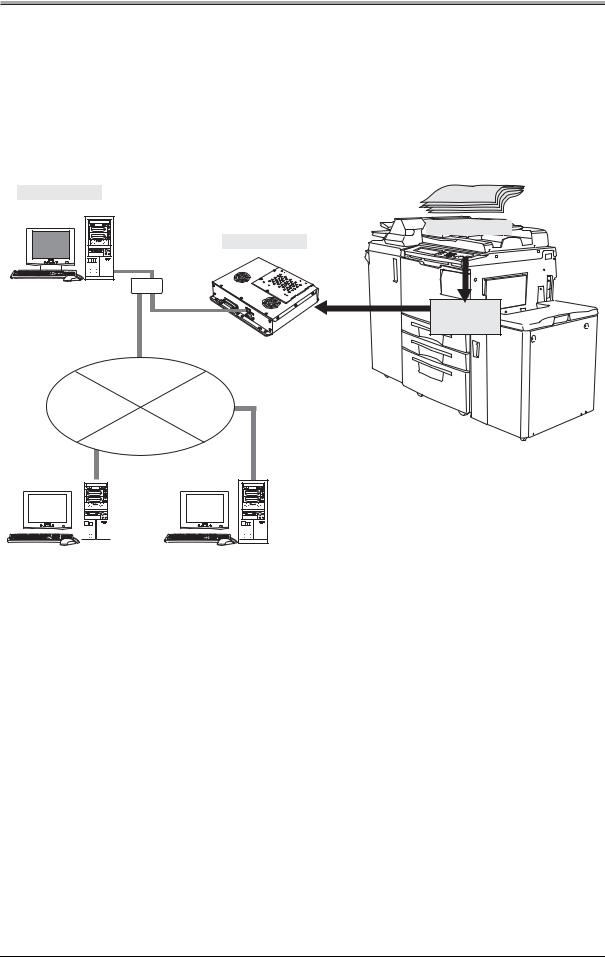
The IP-511 Print Controller is an internal print controller built into the Konica 7165 Copier that offers the capability of letting the copier function as a network scanner and so you can store image data scanned by the copier on the hard disk of the Print Controller and read these data into TWAIN-compliant applications. It also provides a way of sending scanned data as an attachment to email or uploading scanned image data to FTP servers.
Registered Trademarks
Microsoft, MS and MS-DOS are registered trademarks of Microsoft Corporation in the United States.
IBM is a registered trademark of International Business Machines, Inc. in the United States.
WindowsTM is a trademark of Microsoft Corporation.
HP and PCL are registered trademarks of Hewlett-Packard Company.
Agfa Microtype font is a registered trademark of Agfa Corporation.
PEERLESS is a registered trademark of PEERLESS SYSTEMS CORPORATION.
Adobe, Adobe Logo, Acrobat, Acrobat Logo, PostScript and PostScript Logo are registered trade-
marks or trademarks of Adobe Systems, Inc.
Other company names and product names used in this manual are the registered trademarks or trade-
marks of their respective companies.
Copyright
COPYRIGHT © 2001 Konica corporation. All rights reserved.
Patent Notice
The product includes an implementation of LZW licensed under U.S.Patent 4,558,302.
v

Introduction
■About this Manual
This is an instruction manual for use of the scanning features built into the Konica IP-511 Print Controller.
More specifically, this manual discusses how to use the scanning features of the IP-511 Print Controller and how to let the Konica copier function as a scanner controlled from computers and through networks.
This manual assumes you are familiar with the basic operations of Windows.
Instructions for using the major features of the copier and print controller, and instructions about the printer driver and networking features are discussed in the respective separate manuals. Please refer to them as the need arises.
For instructions for operating Windows95/98/Me, Windows NT 4.0 and Windows 2000, refer to their manuals.
For an explanation of using applications, refer to their individual manuals.
This manual is made up of the following four chapters and some appendices:
Chapter 1 Overview of the Scanning Features
This chapter sketches out the scanning features offered by the print controller.
Chapter 2 Configuring Destination/Storage Location Settings
This chapter discusses how to configure scanned data transfer destinations from the operation panel of the printer (copier).
Chapter 3 Scanner Operation
This chapter discusses how to use the operation panel of the printer (copier) when scanning original documents.
Chapter 4 Loading In from Computers
This chapter shows you how to install the scanner driver and how to load in scanned data from a hard disk of Windows computers connected to networks.
Appendices
Appendix A deals with troubleshooting.
Appendix B gives an explanation of the [Scan Direct], a tool for loading in scanned data.
vi
Introduction
■Conventions Used in this Manual
● System Requirements
Notation of each product
The following abbreviations are used in this manual: |
|
|
(1) |
IP-511 Print Controller: |
print controller |
(2) |
Konica 7165 Printer/Copier: |
main body printer or copier |
(3) |
Internal Network Interface Card: |
network interface card |
(4) |
A printing system that combines the above |
|
|
(1) and (2) or (1), (2) and (3) products: |
printing system |
(5) |
Microsoft Windows 95: |
Windows 95 |
|
Microsoft Windows 98: |
Windows 98 |
|
Microsoft Windows Me: |
Windows Me |
|
Microsoft Windows NT4.0: |
Windows NT4.0 or Windows NT |
|
Microsoft Windows 2000: |
Windows 2000 |
|
Above OSs: |
Windows 95/98/Me |
|
|
Windows NT4.0/2000 |
|
|
Windows NT/2000 |
|
|
Windows 95/98/Me/NT/2000 |
Notation of cautions in this manual are shown with the caution symbol.
Each mark used in this manual has the following meaning.
Precautions and limits at the time of operating hardware or software were written.
Hints, advice, confirming items, etc. at the time of operating hardware or software were written.
Things important in operating hardware and software were described.
Limitations imposed by a combined use of features offered by hardware and software were described.
vii

Introduction
Notation of names shown on the screen are written within square brackets e.g., “click the [OK] button.”
Notation of folders
Folders are referred to in upper-down-to-lower sequence.
For example:
Select the [Printer.inf] file in the “PCL\English\Win9X” folder of the User Software CD.
Notation of the reference in this manual is written within quotation marks e.g., “Chapter 1 Overview.”
Indicates where to be referred to for information concerned e.g., “ 


 (p.1-1).”
When you click page number, move reference page.
viii

Chapter 1 Overview of the Scanning Features
■ |
Available Scanning Features ....................................... |
1-2 |
■ |
Scanning Process ......................................................... |
1-4 |
1-1
Chapter 1 Overview of the Scanning Features
The following offers a brief overview of the scanning features offered by the Print Controller.
■Available Scanning Features
Originals’ image data scanned from the copier’s RADF or platen glass in scanner mode are available to be stored or uploaded as files in the TIFF or PDF format.
This illustration provides an overview of the scanning features.
|
Scan to HDD: |
TWAIN-capable Application |
|
|
|
Network Scanner Driver |
|
Import |
Scan to Email: |
Email Application |
|
Scan to FTP: |
FTP Client |
Original |
|
|
|
|
Scanning |
|
|
Scan to HDD |
|
|
Ethernet |
|
|
|
TCP/IP (FTP) |
E-RDH |
|
Print Controller
Internet
Main Body Printer/Copier
|
|
|
|
|
|
|
|
|
|
|
|
|
|
|
|
|
|
|
|
|
|
|
|
|
|
|
|
|
|
|
|
|
|
|
|
|
|
|
|
|
|
|
|
|
|
|
|
|
|
|
|
|
|
|
|
|
|
|
|
|
|
|
|
|
|
|
|
|
|
|
|
|
|
|
|
|
|
|
|
|
|
|
|
|
|
|
|
|
|
|
|
|
|
|
|
|
|
|
|
|
|
|
|
|
|
|
|
|
|
|
|
|
|
|
|
|
|
|
|
|
SMTP Server |
|
|
|
FTP Server |
||||||||||
|
|
|
|
|
|
|
||||||||||
|
Scan to Email |
|
|
|
|
Scan to FTP |
|
|||||||||
|
|
|
|
|
|
|
|
|
|
|
|
|
|
|
|
|
During scanning preparation, you can set such things as IMAGE ENHANCE, SCAN MODE, SCAN DENSITY, LENS MODE, SCAN SIZE, QUALITY, SPECIAL ORIGINAL, etc.
The scanning features fall into three groups: “Scan to HDD,” “Scan to Email,” and “Scan to FIP.”
1-2
Chapter 1 Overview of the Scanning Features
● Scan to HDD
This feature lets you save scanned data to the hard disk of the print controller.
To scan originals, you need to specify a 4-digit box number from the control panel. This box number is handled as if it were a holder in the print controller’s hard disk.
Scanned data files thus stored on the hard disk are available to be loaded in, edited and stored via networks using TWAIN-capable Windows applications. When loading in scanned data, you need to enter a box number.
Scanned data sitting on the hard disk of the print controller can be deleted only from personal computers on a network.
You can program the print controller to automatically delete scanned data sitting on the hard disk by configuring the [ScanDataAutoDel.] setting in the Print Controller Setup on the control panel. In addition, when the remaining disk space reaches less than 20 MB, your attempt to store scanned data is automatically rejected.
● Scan to Email
This feature transmits scanned data to recipients at specified addresses as attachments to email.
● Scan to FTP
This feature uploads scanned data to specified FTP servers.
1-3

Chapter 1 Overview of the Scanning Features
■ Scanning Process
The process of scanning originals, storing/transmitting and loading in scanned data, may be summed up as follows:
1.
2.
3.
Set originals on the copier, and select a destination on the control panel.


 (p.2-1).
Run a scan job. Scanned data is stored/transmitted depending on your settings.


 (p.3-1).
Load in from your personal computer scanned data stored on its hard disk.


 (p.4-1).
For information regarding using scanned data sent as an attachment to email or scanned data uploaded to FTP servers, refer to the corresponding applications’ manuals.
1-4

Chapter 2 Configuring Destination/Storage Location Settings
■ Choosing destinations to transmit scanned data...... |
2-2 |
|
■ |
Scan to HDD .................................................................. |
2-3 |
■ |
Scan to Email ................................................................ |
2-5 |
■ |
Scan to FTP ................................................................... |
2-8 |
2-1
Chapter 2 Configuring Destination/Storage Location Settings
Here is how to set the settings for destinations to which to send scanned data, as controlled from the copier’s control panel.
■ Choosing destinations to transmit scanned data.
Before you scan originals, you need to decide where to store or transmit scanned data.
1. Load the original to be scanned on the copier’s platen glass or in the RADF.
2. Press the [MODE] button on the control panel to have the SCANNER/SERVER Basic screen appear.
3.
4.
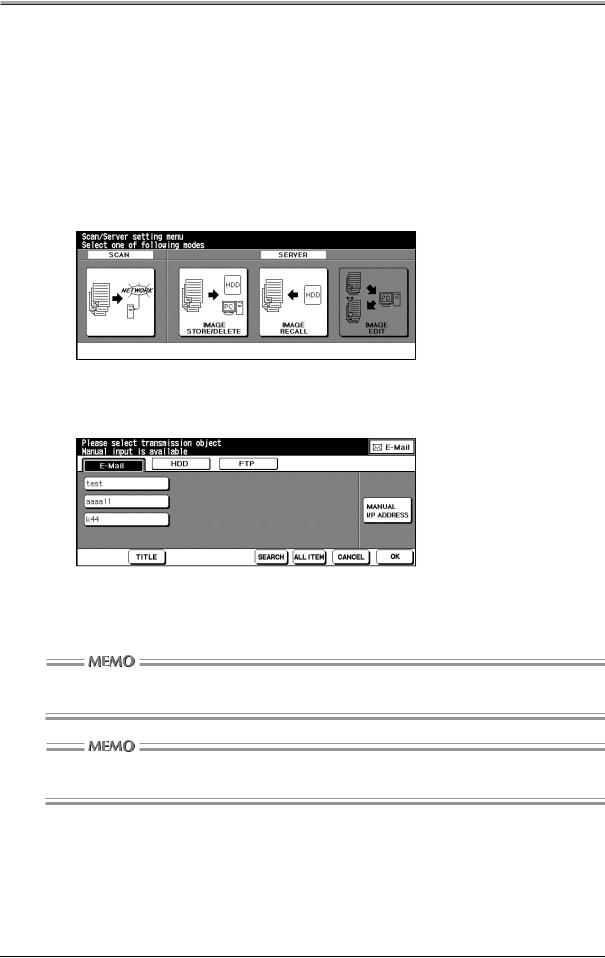
Press the [SCAN] on the SCANNER/SERVER Basic screen.
The [Select Transmission Object] screen appears.
Choose scanned data upload destinations from [E-Mail], [HDD] or [FTP].
The screen corresponding to your choice will appear on which to choose storage locations or recipients.
You can choose destinations for [E-Mail], [HDD] and [FTP] at the same time. The currently selected setting tag (E-Mail, HDD or FTP) is highlighted in reverse image.
You need to shift the copier to the key operator mode to change or delete the currently registered recipients/storage locations. For more on this, refer to the “Copier’s INSTRUCTION MANUAL.”
2-2
Chapter 2 Configuring Destination/Storage Location Settings
■ Scan to HDD
This lets you store scanned data on the hard disk of the print controller.
● [Select Transmission Object] screen (HDD)
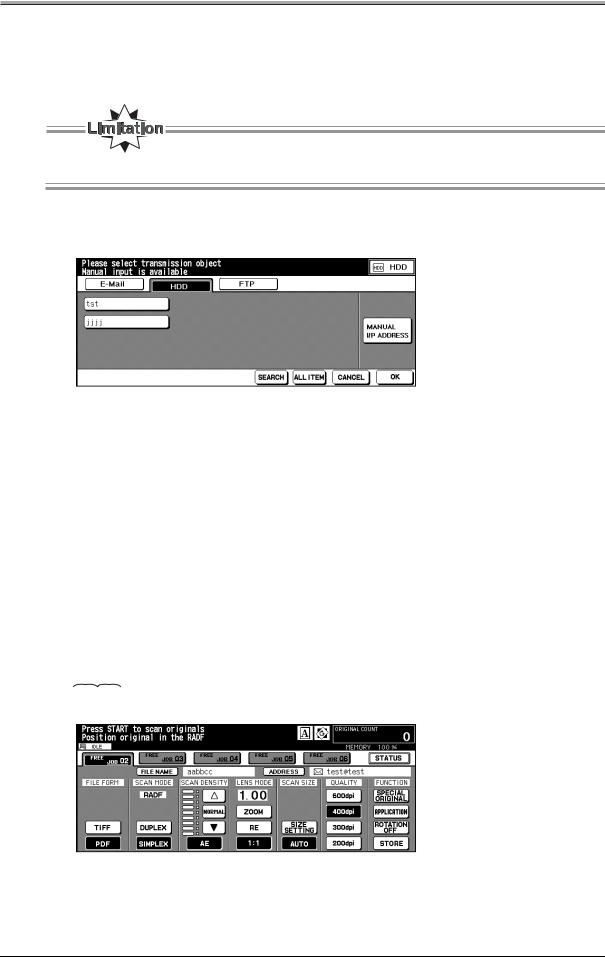
You can select only one [HDD] storage location.
1. Choose [HDD] on the [Select Transmission Object] screen.
2. Choose a storage location from the displayed listing.
•If necessary storage locations are not previously registered, you need to manually enter necessary locations at this stage.
•Pressing the [MANUAL I/P ADDRESS] key opens the [HDD - Box No.] screen at which you can enter storage locations.
•Pressing the [SEARCH] key opens the [Enter Search Letter] screen at which you can enter the first letter of registered names. When the search result is displayed, the [SEARCH] key is highlighted in reverse image. At this stage, you can press the [ALL ITEM] to have all registered options be displayed as before.
•Pressing the [CANCEL] key brings you back to the [Scanner/Server Setup Menu] screen.
3.Press the [OK] key and the Scanner Basic screen will open.
For a detailed explanation for the procedure you need to follow from this stage onwards, refer to the section, “Chapter 3 Scanner Operation” ■ Scanner Basic Screen.


 (p.3-4)
2-3
Chapter 2 Configuring Destination/Storage Location Settings
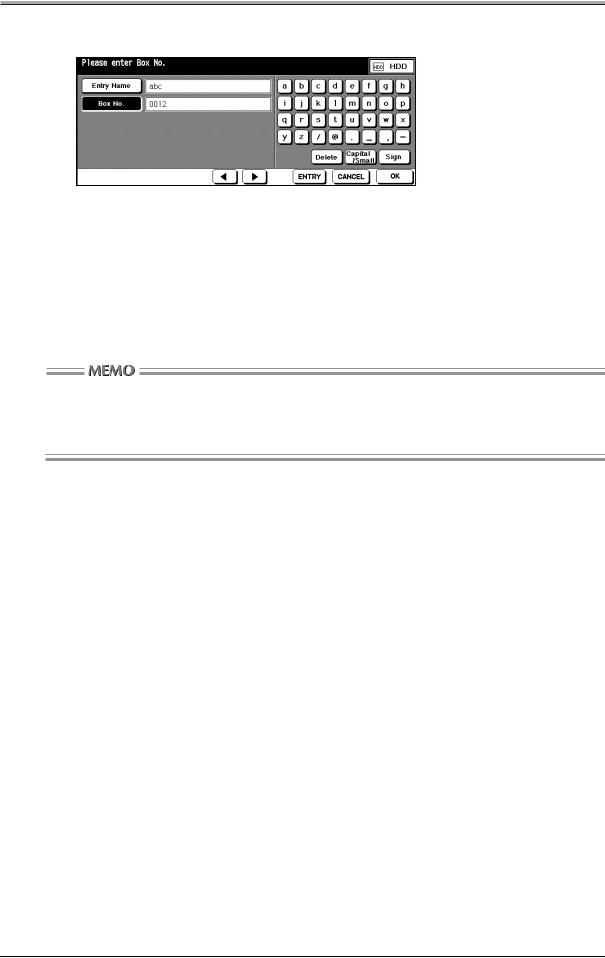
● [HDD - Box No.] Screen
Entry Name
You need to enter alphanumeric names that will be displayed on the [Select Transmission Object] screen for HDD. Any name can be up to 10 characters long. Use the touch panel to enter alphabetical letters, and the hard keypad to enter numbers. (You cannot enter signs.)
Box No.
Into this field you enter a 4-digit Box No. using the hard keypad. The Box Nos. are numbers to attach to folders when storing scanned data on the hard disk. Be sure to write down these numbers. You need them when reading scanned data from your PC.
If you intend to use your printing system as a scanner, it is recommend that you assign Box Nos. (from 1 to 9998) to the users and inform them about their allotted numbers by way of email in advance.
The Box Nos. perform the function of protecting each user’s data.
[Delete] key
Press this key to delete the character to the left of the cursor.
[Capital/Small] key
Press this key to replace an upper case letter with a lower case and vice versa.
[Sign] key
Press this key and the lowercase alphabetical letter keys produce signs. Then the [Sign] key is changed into the [Alphabet] key. Press this key again and you can enter alphabetical letters as before.
[ 
 ] keys
Pressing these keys moves the cursor. A letter enters to the left of the cursor.
[ENTRY] key
Press this key to register information you have entered and return to the [Select Transmission Object] screen.
[CANCEL] key
Press this key to go back to the [Select Transmission Object] screen without registering what you have entered.
[OK] key
Press this key to open the [Scanner Basic] screen.
2-4
Chapter 2 Configuring Destination/Storage Location Settings
■ Scan to Email
This feature sends scanned data to users as an attachment to email.
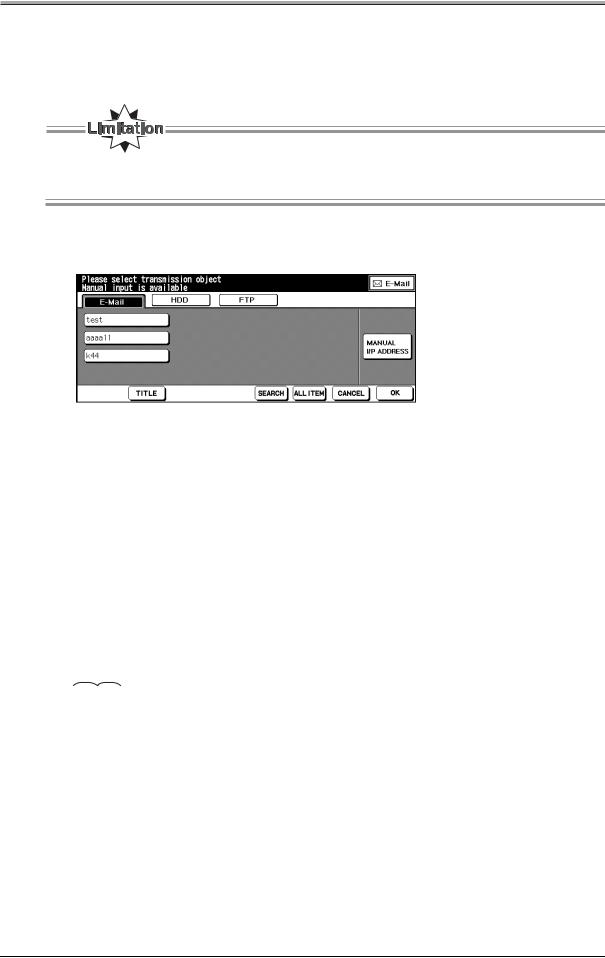
● [Select Transmission Object] screen (E-Mail)
You have the option to select multiple destinations at a time. The keys selected as destinations are highlighted in reverse image.
1. Choose [E-Mail] on the [Select Transmission Object] screen.
2. Choose recipients from the displayed listing.
•If necessary recipient names are not previously registered, you need to manually enter necessary recipient names.
•Pressing the [MANUAL I/P ADDRESS] key opens the [E-Mail Transmission Object] screen for E- Mail and you can enter email addresses.
•Pressing the [SEARCH] key opens the [Enter Search Letter] screen and you can enter the first letter of a registrant. When the search result is displayed, the [SEARCH] key is highlighted in reverse image. At this stage, you can press the [ALL ITEM] to display all registrants as before.
•Pressing the [CANCEL] key brings you back to the [Scanner/Server Setup Menu] screen.
3.Press the [OK] key and the [Scanner Basic] screen will appear.
For a detailed explanation for the procedure you need to follow from this stage onwards, refer to the section, “Chapter 3 Scanner Operation” ■ Scanner Basic Screen.


 (p.3-4)
2-5
 Loading...