


 Loading...
Konica Minolta 7135, 7020, 7045, 7022, 7030 Manual
...USER’S GUIDE
KN-304
Please read this guide before
using the board and keep readily
available for reference.
Thank you very much for your purchase of the KN-304. This Guide deals with making prints, correct handling of the machine, and precautions for safety. Please read before printing.
In order to maintain a satisfactory printing performance, please keep this Guide readily available for reference.
■Preface
The KN-304 Network Board is a network interface board for the Konica IP-011 Printer Controller.
When the KN-304 Network Board is installed in the Konica IP-011 Printer Controller, the Konica 7020 can be used as a network printer.
The printer itself and the printer controller are provided with instruction manuals individually (Konica 7020 instruction manual and Konica IP-011 Printer Controller user’s guide).
● FCC Regulations
This equipment has been tested and found to comply with limits for a Class B digital device, pursuant to part 15 of FCC rules. These limits are designed to provide reasonable protection against harmful interference in a residential installation. This equipment generates, uses and can radiate radio frequency energy and, if not installed and used in accordance with the instructions, may cause harmful interference to radio communications. However, there is no guarantee that interference will not occur in a particular installation. If this equipment does cause harmful interference to radio or television reception, which can be determined by turning the equipment off and on, the user is encouraged to try to correct the interference by one or more of the following measures:
•Reorient or relocate the receiving antenna.
•Increase the separation between the equipment and the receiver.
•Connect the equipment to an outlet on a circuit different from the circuit to which the receiver is connected.
•Consult the dealer or an experienced radio/TV technician for help.
Canadian Department of Communications Regulations
Cet appareil numérique de la classe B est conforme à la norme NMB-003 du Canada.
This Class B digital apparatus complies with Canadian ICES-003.
● Registered trademarks
Microsoft, MS and MS-DOS are registered trademarks of U.S. Microsoft Corporation.
Windows is a registered trademark of U.S. Microsoft Corporation.
Novell and NetWare are registered trademarks of U.S. Novel, Inc.
Adobe and Acrobat are registered trademarks of U.S. Adobe Systems Incorporated.
AppleTalk is a registered trademark of U.S. Apple Computer Inc.
The other company names and trademarks used in this document are the trade names and trademarks of the associated companies.
KN-304 Network Board i
● About this manual
This manual describes the procedures of installing, operating and setting up the software used to print using the KN-304 Network Board through the Konica 7020 mounted with the IP011 Printer Controller from a Windows 95/98/NT/2000 (2000 is still to be supported) or Novell NetWare system that composes a network. Be sure to read the contents of Readme.txt provided for each program contained in the CD-ROM. For more detail on operation of the associated applications, refer to the individual instruction manuals.
Konica Co., Ltd. is not responsible for the results of use of the Konica 7020 + IP-011 Printer Controller + KN-304 Network Board system and this manual.
Use and reproduction of this manual, partly or wholly, without permission is not permitted.
Information included in this manual is subject to change without prior notice.

CONTENTS
■ Preface ............................................................................................... |
i |
● Voluntary Regulations against Electromagnetic Interference ......................................... |
i |
● Registered trademarks ................................................................................................... |
i |
● About this manual ......................................................................................................... |
ii |
Chapter 1 KN-304 Network Board overview ......... |
1-1 |
■ Features of the KN-304 Network Board ......................................... |
1-2 |
■ Installation of the KN-304 Network Board ...................................... |
1-2 |
■ Package contents ........................................................................... |
1-2 |
■ How to use the CD-ROM provided ................................................. |
1-3 |
■ Network setting procedures ............................................................ |
1-3 |
● For peer-to-peer printing from Windows 95/98 ........................................................... |
1-3 |
● For lpr/lpd printing from Windows NT ......................................................................... |
1-3 |
● Use of NetWare .......................................................................................................... |
1-4 |
Chapter 2 Setting up from the Control Panel........ |
2-1 |
■ Basic operations from the LCD panel ............................................. |
2-2 |
● Network setup procedure .......................................................................................... |
2-2 |
■ TCP/IP setup .................................................................................. |
2-4 |
● Choice of IP mode ...................................................................................................... |
2-5 |
● IP setup ..................................................................................................................... |
2-5 |
● To use LPD banner .................................................................................................... |
2-6 |
■ Setup for NetWare .......................................................................... |
2-7 |
● Server name ............................................................................................................... |
2-7 |
● Server password ....................................................................................................... |
2-7 |
● Polling interval ........................................................................................................... |
2-7 |
● Ethernet frame type ................................................................................................... |
2-7 |
KN-304 Network Board Contents-1
● To disable bindery ...................................................................................................... |
2-8 |
● NDS context name .................................................................................................... |
2-8 |
● NDS tree name .......................................................................................................... |
2-8 |
■ Defining the password .................................................................... |
2-8 |
● Defining/changing the password ................................................................................ |
2-8 |
● Disabling the password .............................................................................................. |
2-8 |
■ Confirming the current network setup information.......................... |
2-9 |
● Displaying the network setup information ................................................................... |
2-9 |
● Printing the network setup information ....................................................................... |
2-9 |
Chapter 3 Peer-to-Peer Printing (Windows 95/98) 3-1
■ Basic TCP/IP setup ........................................................................ |
3-2 |
■ Use of IP Peer-to-Peer ................................................................... |
3-3 |
● Installing IP Peer-to-Peer .......................................................................................... |
3-3 |
● Setting IP Peer-to-Peer .............................................................................................. |
3-3 |
■ Printer driver setup ......................................................................... |
3-5 |
Chapter 4 Printing by lpd/lpr (Windows NT) ......... |
4-1 |
■ Basic TCP/IP setup ........................................................................ |
4-2 |
■ lpd/lpr setup .................................................................................... |
4-3 |
● Installing Microsoft TCP/IP Print Service ................................................................... |
4-3 |
● Adding a printer port and installing the printer driver ................................................ |
4-3 |
■ Printer Driver Setup from Client ..................................................... |
4-4 |
Chapter 5 NetWare Setup ....................................... |
5-1 |
■ Setup for NetWare 2.x/3.x ......................................................................... |
5-2 |
■ Setup for NetWare 4.x............................................................................... |
5-3 |
● Setup information ....................................................................................................... |
5-3 |
● NDS setup .................................................................................................................. |
5-4 |
● Setup for Bindery Emulation ...................................................................................... |
5-5 |
Contents-2 KN-304 Network Board
Chapter 6 Setup Utility MAP ................................... |
6-1 |
■ MAP (Management Access Program) overview ............................. |
6-2 |
● Requirements for installation ...................................................................................... |
6-2 |
● Installing MAP ........................................................................................................... |
6-2 |
■ MAP setup ...................................................................................... |
6-3 |
■ Web utility ....................................................................................... |
6-4 |
● Choice of printer ........................................................................................................ |
6-4 |
● TCP/IP setup .............................................................................................................. |
6-5 |
● NetWare setup ........................................................................................................... |
6-7 |
■ Setup/indications - other ............................................................... |
6-10 |
● Restarting the network card ..................................................................................... |
6-10 |
● Restoring the default values ..................................................................................... |
6-10 |
● Confirming the settings ............................................................................................ |
6-10 |
● Network address ...................................................................................................... |
6-11 |
● Changing the password ............................................................................................ |
6-11 |
● Test printer ................................................................................................................ |
6-11 |
● Configure Status Page ............................................................................................. |
6-11 |
● Printer status ............................................................................................................ |
6-11 |
● Unit Info information ................................................................................................. |
6-12 |
Chapter 7 Troubleshooting ..................................... |
7-1 |
■ LED Status Indicator ...................................................................... |
7-2 |
■ Status Page .................................................................................... |
7-3 |
■ Resetting the KN-304 Factory Default ............................................ |
7-5 |
■ How to Diagnose Problems ............................................................ |
7-6 |
● Troubleshooting Network Hardware Connections ...................................................... |
7-7 |
● Troubleshooting NetWare Protocol ............................................................................. |
7-7 |
● NetWare Checklist ...................................................................................................... |
7-7 |
● File Server Checklist .................................................................................................. |
7-8 |
● Workstation Checklist ................................................................................................. |
7-8 |
● Print Server Card Configuration Checklist ................................................................ |
7-8 |
● Printer Server/File Server/Printer Checklist ............................................................... |
7-9 |
● Workstation to Print Server Card |
|
Connection Checklist .................................................................................................... |
7-9 |
● KN-304 Loses Its File Server Connection ................................................................. |
7-9 |
● Unable to Print from a Different Context .................................................................. |
7-10 |
KN-304 Network Board Contents-3
Appendices ............................................ |
Appendices-1 |
■ KN-304 Network Board specifications ........................... |
Appendices-2 |
■ 10/100BaseT UTP cable specifications ......................... |
Appendices-3 |
■ Information for the TCP/IP network administrator ......... |
Appendices-4 |
● Use of DHCP ............................................................................................. |
Appendices-4 |
● Naming by WINS ....................................................................................... |
Appendices-4 |
● FTP printing ............................................................................................... |
Appendices-4 |
Index .................................................................. |
Index-1 |
Contents-4 KN-304 Network Board

Chapter 1 KN-304 Network Board overview
■ Features of the KN-304 Network Board ....................... |
1-2 |
■ Installation of the KN-304 Network Board .................... |
1-2 |
■ Package contents ......................................................... |
1-2 |
■ How to use the CD-ROM provided ............................... |
1-3 |
■ Network setting procedures .......................................... |
1-3 |
● For peer-to-peer printing from Windows 95/98 ....... |
1-3 |
● For lpr/lpd printing from Windows NT ...................... |
1-3 |
● Use of NetWare ....................................................... |
1-4 |
KN-304 Network Board 1-1

Chapter 1 KN-304 Network Board overview
■ Features of the KN-304 Network Board
The KN-304 Network Board enables the 7020 fitted with the IP-011 Printer Controller to connect to the
Ethernet.
The KN-304 offers the following features:
•Automatic Selection of 100Base-T (Fast Ethernet) or 10Base-T
•Supports peer-to-peer printing by TCP/IP from Microsoft Windows 95 or 98 (by using a dedicated utility)
•Supports Ipr/Ipd on TCP/IP for Microsoft Windows NT 4.0 or later (to be referred to as Windows NT).
•Supports both the bindery mode of Novell NetWare and Novell Directory Service (NDS)
•Built-in HTTP server enables printer and network board management by linking with the management Access Program (MAP) provided and a standard web browser
•Automatic IP address acquisition by DHCP
•Use of flash memory allows upgrading of firmware through network
■Installation of the KN-304 Network Board
The KN-304 Network Board should be fitted to the IP-011 Printer Controller. Request installation of the KN304 to your Konica service representative.
■ Package contents
The package of the KN-304 Network Board contains the following.
•KN-304 Network Board
•KN-304 Quick Configuration Guide
•KN-304 Installation Procedure
•Connection cable
•CD-ROM
1-2 KN-304 Network Board
Chapter 1 KN-304 Network Board overview
■ How to use the CD-ROM provided
The CD-ROM contains some utility programs used for the KN-304 Network Board and the instruction manual (same as this) in the form of PDF (Portable Document Format). The CD-ROM is compatible with Windows 95/98/NT. The software of English language version contained in the CD-ROM includes the following.
MAP (Management Access Program)
This allows to detect the network printers connected by IP/IPX and enables access to Web utilities incorporated in the KN-304 Network Board to set up the network and printers with the aid of the Web browser.
IP-P2P
This enables peer-to-peer printing by TCP/IP from Windows 95/98.
■ Network setting procedures
Before you use the KN-304 Network Board, it is needed to set up the system and perform some preparatory tasks. The procedures depend on the system environment.
● For peer-to-peer printing from Windows 95/98
A printer can be connected in the form of so-called “peer-to-peer” to produce printout without using a print server in a LAN (Local Area Network) consisting only of Windows 95/98. The setup procedure is as follows. See Chapter 2, Setting up from the LCD Panel, for more detail of Step 1, and Chapter 3, Peer-to-Peer Printing (Windows 95/98), for Steps 2-4.
Set up the KN-304 Network Board for TCP/IP from the Konica Sitios 7020’s LCD panel.
Set up your computer (Windows 95/98) for TCP/IP.
Install “IP-P2P” from the CD-ROM provided.
Install the printer driver.
● For lpr/lpd printing from Windows NT
To produce printout by lpr/lpd from Windows NT, the setup procedure is as follows. See Chapter 2, Setting up from the LCD Panel, for more detail of Step 1, and Chapter 4, Printing by lpd/lpr, for Steps 2-4.
Set up the KN-304 Network Board for TCP/IP from the Konica 7020’s LCD panel.
Set up your computer (Windows NT) for TCP/IP.
Install “Microsoft TCP/IP Print” if not installed yet.
Install the printer driver.
KN-304 Network Board 1-3

Chapter 1 KN-304 Network Board overview
● Use of NetWare
To produce printout in a network of Novell NetWare, the setup procedures depend on the NetWare version and resource management. See Chapter 2, Setting up from the LCD Panel, for more detail of Step 1, and Chapter 4, NetWare Setup, for Step 2.
With NetWare 2.x or 3.x
Define the server name, etc. of the KN-304 Network Board from the Konica 7020’s LCD panel.
Set up the print server functions by PCONSOLE.
By NDS with NetWare 4.x
Define the server name, etc. of the KN-304 Network Board from the Konica 7020’s LCD panel.
Set up the print server functions by NWADMIN.
By bindery emulation with NetWare 4.x
Define the server name, etc. of the KN-304 Network Board from the Konica 7020’s LCD panel.
Set up the print server functions by PCONSOLE.
1-4 KN-304 Network Board

Chapter 2 Setting up from the LCD Panel
■ Basic operations from the LCD panel ........................... |
2-2 |
● Network setup procedure ........................................ |
2-2 |
■ TCP/IP setup................................................................. |
2-4 |
● Choice of IP mode ................................................... |
2-5 |
● IP setup ................................................................... |
2-5 |
● To use LPD banner .................................................. |
2-6 |
■ Setup for NetWare ........................................................ |
2-7 |
● Server name ............................................................ |
2-7 |
● Server password ...................................................... |
2-7 |
● Queue Scan Rate .................................................... |
2-7 |
● Frame Type ............................................................. |
2-7 |
● Disable Bindery ....................................................... |
2-8 |
● NDS Context ............................................................ |
2-8 |
● NDS Tree ................................................................. |
2-8 |
■ Defining the password .................................................. |
2-8 |
● Defining/changing the password ............................. |
2-8 |
● Disabling the password ........................................... |
2-8 |
■ Confirming the current network setup information ........ |
2-9 |
● Displaying the network setup information ................ |
2-9 |
● Printing the network setup information .................... |
2-9 |
KN-304 Network Board 2-1
Chapter 2 Setting up from the Control Panel
■ Basic operations from the LCD panel
After the KN-304 Network Board is installed physically, you can set it up from the control panel of the Konica 7020 for networking. On the liquid crystal display (LCD) screen that is a touch panel, you select a menu item by touching the associated number key. To enter a numeric data or character string, use numeric keys or character keys displayed. The character keys are laid out on two windows and you go from one to the other by using the << or >> key.
See the instruction manual of the Konica IP-011 Printer Controller for information except network setup.
● Network setup procedure
You can set up the KN-304 Network Board from the LCD panel by the following procedure for networking.
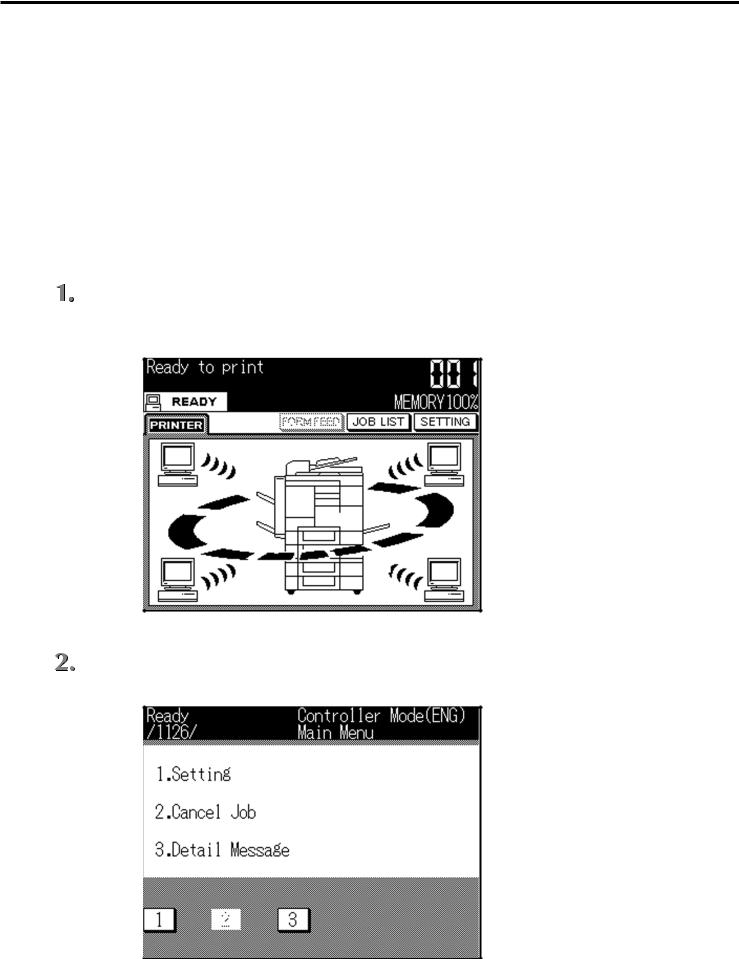
Press the [Scanner/Printer] button next to the LCD panel: the [Printer Mode Basic] window appears.
Press the [SETTING] key on the LCD panel: the [Main Menu] window appears.
2-2 KN-304 Network Board

Chapter 2 Setting up from the Control Panel
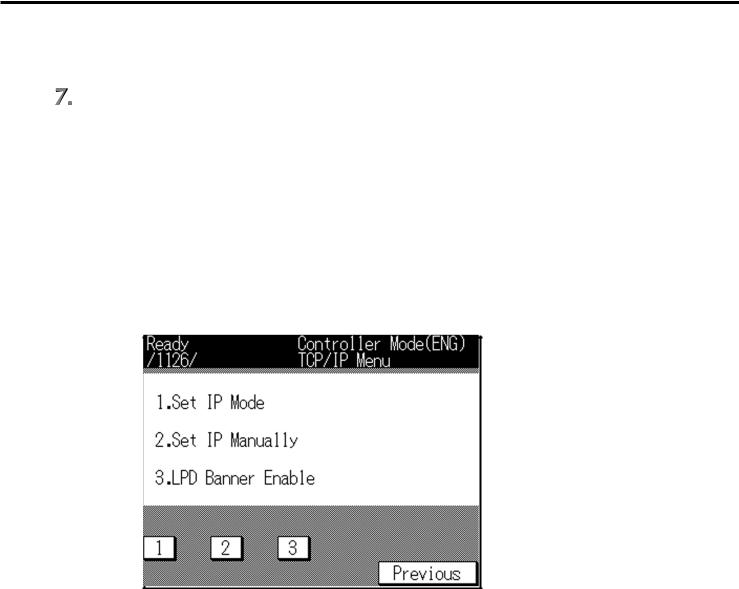
Press the numeric key “1” to select [1. Setting].
The setup mode starts and the [Setting] menu appears.
Press the numeric key “1” to select [1. Network Setup].
Press the numeric key identifying the desired menu item displayed on the window and go on with the setup procedure.
Press [Previous] to go back to the previous menu window.
Press [Main] to return to the Printer Mode Basic window.
Press [Update NIC] on completion of setup.
If a password is already defined, a prompt will urge you to enter the right password. Enter the right password. As a message appears to confirm if you really want to update NIC, select [Yes].
KN-304 Network Board 2-3
Chapter 2 Setting up from the Control Panel
You can change the password by selecting [3. Password Protection]. You can also disable the password so that no password be used. No password is defined by default.
On completion of setup, turn off the main power of the Konica 7020 and wait for about 6 seconds. Then turn on power again, and the settings you have entered are effective.
(It may take 2-3 minutes after power-on until the KN-304 is ready to work.)
■ TCP/IP setup
TCP/IP must be set up to print peer-to-peer by Windows 95/98 or to print by lpd/lpr of Windows NT.
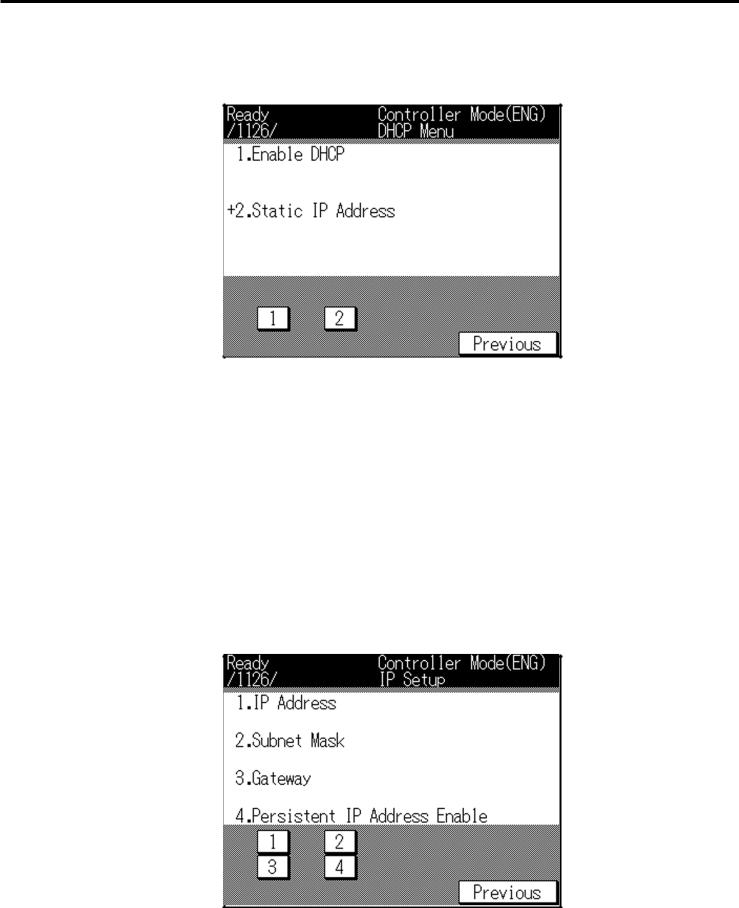
You select [1. TCP/IP Setup] from the [Network Setup] menu, and the [TCP/IP Setup] menu appears as shown below. Press the number key associated with the desired menu item. Press [Previous] to go back to the previous menu.
1. Set IP mode
You select the mode of assigning the IP address, dynamic by DHCP (Dynamic Configuration Protocol) or static (manual).
2. IP setup
You set up when the static mode of assigning the IP address is selected. You cannot select this option if “Enable DHCP” is selected.
3. LPD Banner Enable
To print by lpd/lpr, you designate whether to use LPD banner or not. The LPD banner is a piece of information on printout made by lpd/lpr, printed on a banner page. LPD banner is not used by default.
2-4 KN-304 Network Board
Chapter 2 Setting up from the Control Panel
● Set IP mode
Select [1. Choice of IP mode] from the TCP/IP Setup menu: the [DHCP Menu] window appears.
Select [1. Enable DHCP] to use DHCP and [2. Static IP Address] otherwise. Press [Previous] to go back to the previous menu.
●IP setup
If you have selected [2.Static IP Address] in the DHCP Menu, it is needed to define an IP address, sub net mask and gateway and to enable the IP address defined.
As you select [2. IP Setup] in the TCP/IP Setup menu, the screen will appear as follows. You have to define all of the four items. Press the number key associated with the corresponding menu item and enter a value. Press [Previous] to go back to the previous menu.
KN-304 Network Board 2-5

Chapter 2 Setting up from the Control Panel
1. IP address
Designate the IP address assigned to the KN-304 Network Board. The IP address is a set of four numbers (0-255 each) delimited with a dot (.), like “192.168.0.10”. The mark “+” indicates a digit which can be entered or changed. If a value you have entered is out of range, a message will say “Illegal input, try this part again!” The default is “0.0.0.0”. Press [Previous] to go back to the previous menu.
2. Subnet mask
Designate the subnet mask. The subnet mask is a set of four numbers (0-255 each) delimited with a dot (.), like “255.255.255.0”. The mark “+” indicates a digit which can be entered or changed. If a value you have entered is out of range, a message will say “Illegal input, try this part again!” The default is “0.0.0.0”. Press [Previous] to go back to the previous menu.
3. Gateway
Designate the IP address of the gateway; a set of four numbers (0-255 each) delimited with a dot (.), like “192.168.0.1”. The mark “+” indicates a digit which can be entered or changed. If a value you have entered is out of range, a message will say “Illegal input, try this part again!” The default is “0.0.0.0”.
4. To enable the IP address defined
Select [1.Yes] to enable the IP address defined and [2. No] to disable. Press [Previous] to go back to the previous menu. The default choice is [1. Yes].
● To use LPD banner
Select “3. To use LPD banner” from the TCP/IP Setup menu, and the following window appears.
Select [1.Yes] to print LPD banner and [2. No] otherwise. Press [Previous] to go back to the previous menu. The default choice is [2. No].
2-6 KN-304 Network Board
Chapter 2 Setting up from the Control Panel
■ Setup for NetWare
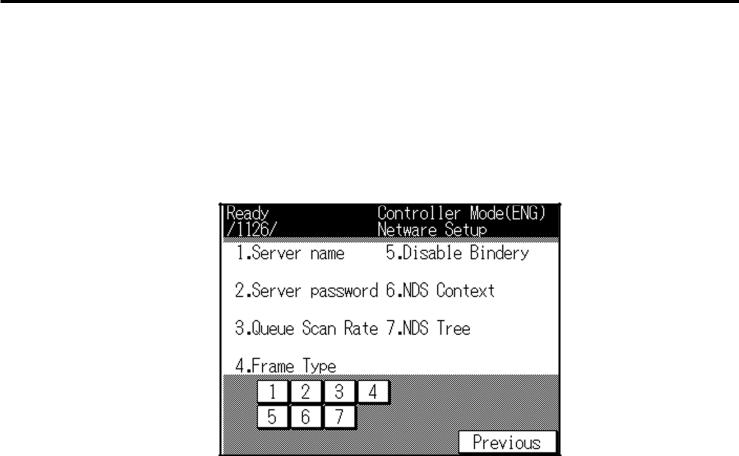
To set up for printing by NetWare, you select “2. NetWare Setup” from the Network Setup menu.
Select “2. NetWare Setup” from the Network Setup menu, and the NetWare Setup menu appears as shown below. Press the number key associated with the desired menu item. Press [Previous] to go back to the previous menu.
● Server name
Define the name of the NetWare print server given to the KN-304 Network Board. The default is “KON_nnnnnn (nnnnnn indicates its serial number)”.
● Server password
Define the password of the NetWare print server. The default is void.
● Queue Scan Rate
Enter a value, 1-255 (seconds), to designate the intervals in which the KN-304 Network Board looks for a new print queue. The default value is 1 (second).
● Frame Type
Select one out of the following as the frame type used in the LAN. The default is [1. Auto].
1.Auto
2.Ethernet 802.3
3.Ethernet II
4.Ethernet SNAP
5.Ethernet 802.2
KN-304 Network Board 2-7
Chapter 2 Setting up from the Control Panel
● Disable Bindery
You can enable/disable the Bindery Service of NetWare 4.x and up. Select Yes to enable and No otherwise. The default is No.
● NDS Context
Designate the NDS context name (e.g. ou=standard.ou=organization_1).
● NDS Tree
Designate the NDS tree name.
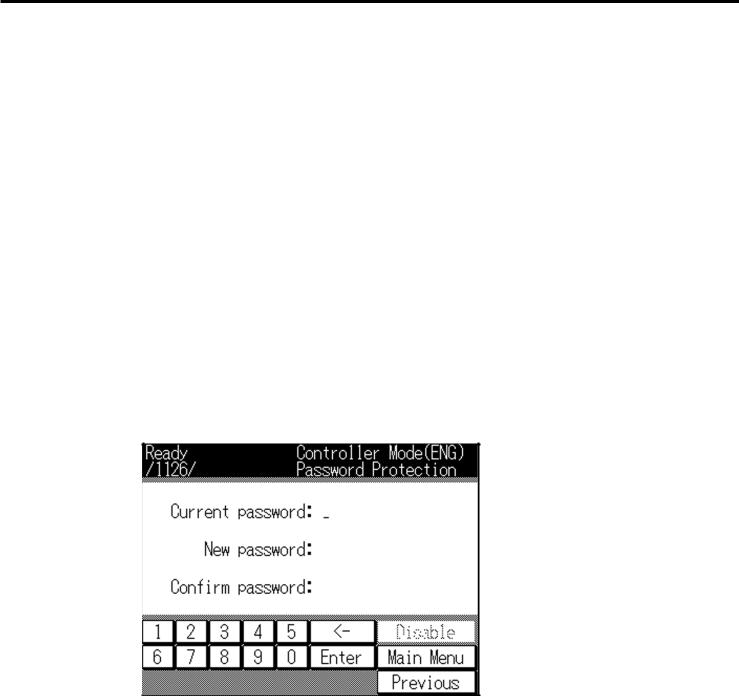
■ Defining the password
Select [3. Password Protection] from the [Network Setup] menu to define the password. If the password is already defined, you have to type the right password in the window where you are urged to do that, after pressing [Update NIC]. If you fail to respond with the right password (a number of 1-6 digits), you cannot change network settings.
● Defining/changing the password
To define the password for the first time, type the password following [New password:] (you cannot enter information following [Current password:]) and press the [Enter] button. Then type the same password following “Confirm password:” and press the [Enter] button.
To change the current password defined earlier, type the current password following [Current password:]and press the [Enter] button. Then type the new password following [New password:] and press the [Enter] button. Finally type again the new password following [Confirm password:] and press the [Enter] button.
● Disabling the password
To disable use of the password, press the [Disable] button in the [Password Protection] window.
2-8 KN-304 Network Board
Chapter 2 Setting up from the Control Panel
■ Confirming the current network setup information
You can look at the current network setup information displayed on the LCD screen and even printed out.
● Displaying the network setup information
To look at the network setup information on the LCD screen, select [3. Detail Message] from the [Main menu] and press the [NIC] button.
● Printing the network setup information
To have the network setup information printed out as status page, select [5. Test Print] - [2. NIC Configuration] from the [Setting] menu. See Printout of status page in Chapter 7, Troubleshooting, for an example of the printout of network setup information.
KN-304 Network Board 2-9
Loading...