


 Loading...
Introduction
Welcome
The Konica IP-413 is a print controller designed to be a built-in type server for the Konica 7115/7118/7115F/7118F printer/copier. It enables direct printing from Windows-compliant computers. It can also enable use of the copier as a network printer when an optional network interface card is used.
About this Manual
This manual is used only for the IP-413 Print Controller.
This manual describes how to operate the IP-413 Print Controller and Printer Driver when the Konica 7115/7118/7115F/7118F is used as a printer by connecting it to computers.
This manual assumes you are familiar with the basic operation of Windows and Copier.
The copier and the network management utility Light are separately supplied with Instruction manuals. Refer to these manuals as needed.
For detailed operations of Windows 95/98/Me and Windows NT4.0/2000, refer to the operating manuals for each operating system. For application operations, refer to the operating manuals provided with each application.
COPYRIGHT:
© 2002 Konica Corporation.
ACKNOWLEDGEMENT:
Ethernet is a registered trademark of Xerox Corporation.
Microsoft, MS, MS-DOS, Windows, and Windows NT are registered trademarks of Microsoft Corporation.
Netscape Communications, the Netscape Communications logo, Netscape Navigator, Netscape Communicator, and Netscape are trademarks of Netscape Communications Corporation.
Novell and NetWare are registered trademarks of Novell, Inc.
HP and PCL are registered trademarks of Hewlett-Packard Company Limited. Novell and NetWare are registered trademarks of U.S. Novell, Inc.
All other product names are trademarks or registered trademarks of their respective holders.
i

NOTICE:
Konica Corporation has made every effort to ensure that the information in this manual is complete and accurate. However, constant efforts are also being made to improve and update the product.
Therefore, Konica Corporation shall not be liable for errors in this manual or for any consequential damages resulting from the use of this manual.
Screen images shown in this manual may differ slightly from actual ones. In addition, the explanations are given using Internet Explorer as the Web browser. The information contained herein is subject to change without notice. FEDERAL OR STATE STATUTES MAY PROHIBIT THE COPYING OF CERTAIN DOCUMENTS OR INFORMATION, RESULTING IN FINES OR IMPRISONMENT FOR VIOLATORS.
MANUAL PART NUMBER:
OP-IP413-01
Conventions Used in This Manual
The following terminology is used throughout this manual:
1.IP-413 Print controller is a Print Controller
2.A Printer, an IP-Engine or an Engine is a Digital Copier
3.KN-305 optional Network Interface Card is a network interface card ( or NIC)
4.A printing system that combines the products listed in items1, 2 and 3 above is a printing system.
5.Windows 98 is Microsoft Windows 98 Windows Me is Microsoft Windows Me
Windows NT4.0 or Windows NT is Microsoft Windows NT4.0 Windows 2000 is Microsoft Windows 2000
6.When referencing multiple Microsoft OSs, they will appear as follows: Windows 95/98/Me
Windows NT4.0/2000 Windows NT/2000
Windows 95/98/Me/NT/2000
ii
For the U.S.A. Users
FCC Part 15-Radio Frequency Devices
This device complies with Part 15 of the FCC Rules. Operation is subject to the following two conditions: (1) This device may not cause harmful interface, and (2) this device must accept any interface received, including interface that may cause undesired operation.
NOTE: This equipment has been tested and found to comply with the limits for a Class A digital device, pursuant to Part 15 of the FCC Rules. These limits are designed to provide reasonable protection against harmful interference when the equipment is operated in a commercial environment. This equipment generates, uses, and can radiate radio frequency energy and if not installed and used in accordance with the instruction manual, may cause harmful interference to radio communications.
Operation of this equipment in a residential area is likely to cause harmful interference in which case the user will be required to correct the interference at his own expense.
WARNING: The design and production of this unit conform to FCC Regulations, and any changes or modifications must be registered with the FCC and are subject to FCC control. Any changes made by purchaser or user without first contacting the manufacturer will be subject to penalty under FCC regulations.
This device must be used with shielded interface cables. The use of nonshielded cables is likely to result in interference with radio communications and is prohibited under FCC rules.
For Canada Users
Interference-Causing Equipment Standard (ICES-003 Issue 3)
This Class A digital apparatus complies with Canadian ICES-003.
Cet appareil numerique de la classe A est conforme a la norme NMB-003 du Canada.
iii
For Europe
CE Marking (Declaration of Conformity)
This product complies with the following EU directives: 89/336/EEC, 73/23/EEC and 93/68/EEC directives.
This declaration is valid for the area of the European Union.
This device must be used with shielded interface cables. The use of nonshielded cables is likely to result in interference with radio communications and is prohibited under EU directives.
For Users of the Class B regulation’s countries
This device must be used with shielded interface cables. The use of nonshielded cables is likely to result in interference with radio communications and is prohibited under CISPR 22 rules and local rules.
For Users except the Class B regulation’s countries
WARNING
This is a Class A product. In a domestic environment this product may cause radio interference in which case the user may be required to take adequate measures.
This device must be used with shielded interface cables. The use of nonshielded cables is likely to result in interference with radio communications and is prohibited under CISPR 22 rules and local rules.
iv

|
|
|
|
Contents |
|
|
|
|
|
|
|
|
CONTENTS |
|
1 |
Getting Started .................................................. |
1 |
||
|
1.1 |
System Requirements ............................................. |
1 |
|
2 Connecting to a Computer ............................... |
2 |
|||
|
2.1 |
Connecting to the Parallel Port |
|
|
|
|
(Local Connection) .................................................. |
3 |
|
|
2.2 |
Connecting to the Ethernet 10/100Base-T |
|
|
|
|
Port (Network Connection) ..................................... |
4 |
|
3 |
Installing the Printer Driver .............................. |
5 |
||
|
3.1 |
Windows 95/98/Me ................................................... |
5 |
|
|
3.2 |
Windows NT 4.0 ....................................................... |
7 |
|
|
3.3 |
Windows 2000 ........................................................ |
10 |
|
|
3.4 |
Uninstalling the Printer Driver .............................. |
12 |
|
4 |
Printer Driver Settings .................................... |
13 |
||
|
4.1 |
Displaying the Printer Driver Setup Dialog ......... |
13 |
|
|
4.2 |
Common Settings .................................................. |
14 |
|
|
4.3 |
Setup Tab ................................................................ |
15 |
|
|
|
4.3.1 |
N-up ...................................................................... |
16 |
|
|
4.3.2 |
Watermark ............................................................ |
17 |
|
|
4.3.3 |
Paper Source ....................................................... |
19 |
|
4.4 |
Paper Tab ................................................................ |
20 |
|
|
|
4.4.1 |
Original Document Size ...................................... |
20 |
|
|
4.4.2 |
Output Paper Size ............................................... |
22 |
v

Contents |
|
|
4.4.3 |
Copies .................................................................. |
23 |
4.4.4 |
Collate at Printer ................................................. |
23 |
4.4.5 |
Orientation ........................................................... |
23 |
4.5 Quality ..................................................................... |
24 |
|
4.5.1 |
Resolution ........................................................... |
24 |
4.5.2 |
Toner Save ........................................................... |
24 |
4.5.3 |
Rendering Mode .................................................. |
24 |
4.5.4 |
Font Setting ......................................................... |
25 |
4.5.5 |
Image Adjustment ............................................... |
25 |
4.6 Device Option Tab .................................................. |
26 |
|
5 Digital Copier Control Panel Operations |
|
|
(PC Print Mode) ............................................... |
27 |
|
5.1 Operation Using the 7115/7118 ............................ |
27 |
|
5.1.1 Names of Control Panel Parts and |
|
|
|
Their Functions ................................................... |
28 |
5.1.2 |
[PRINT] Indicator/[START] Key .......................... |
29 |
5.1.3 Cancelling a Print Job ........................................ |
29 |
|
5.1.4 Using Manual Bypass Tray ................................. |
30 |
|
5.1.5 |
Outputting a Report ............................................ |
31 |
5.2 Operation Using the 7115F/7118F ........................ |
33 |
|
5.2.1 Names of Control Panel Parts and |
|
|
|
Their Functions ................................................... |
34 |
5.2.2 |
[PRINT] Indicator/[START] Key .......................... |
35 |
5.2.3 Switching to PC Print Mode ............................... |
35 |
|
5.2.4 Cancelling a Print Job ........................................ |
36 |
|
5.2.5 Using Manual Bypass Tray ................................. |
37 |
|
5.2.6 |
Outputting a Report ............................................ |
39 |
vi

|
|
|
Contents |
|
|
|
|
6 |
Digital Copier Settings for Use |
|
|
|
on a Network .................................................... |
40 |
|
|
6.1 Specifying Settings Using the 7115/7118 ............ |
41 |
|
|
6.1.1 |
IP Address ........................................................... |
41 |
|
6.1.2 |
Entering Values ................................................... |
42 |
|
6.1.3 |
Subnet Mask ........................................................ |
43 |
|
6.1.4 |
Gateway ............................................................... |
43 |
|
6.1.5 Restarting the Digital Copier ............................. |
44 |
|
|
6.2 Specifying Settings Using the 7115F/7118F ........ |
45 |
|
|
6.2.1 |
IP Address ........................................................... |
45 |
|
6.2.2 |
Subnet Mask ........................................................ |
46 |
|
6.2.3 |
Default Gateway .................................................. |
47 |
|
6.2.4 Restarting the Digital Copier ............................. |
47 |
|
7 |
Network Printing in a Windows |
|
|
|
Environment ..................................................... |
48 |
|
|
7.1 Peer-to-Peer Printing (Windows 95/98/Me) .......... |
48 |
|
|
7.1.1 |
Before You Begin ................................................ |
48 |
|
7.1.2 Settings for Windows 95/98/Me ......................... |
48 |
|
|
7.2 LPR Printing (Windows NT 4.0/2000) ................... |
50 |
|
|
7.2.1 |
Before You Begin ................................................ |
50 |
|
7.2.2 Settings for Windows NT 4.0 .............................. |
50 |
|
|
7.2.3 Settings for Windows 2000 ................................ |
51 |
|
|
7.3 IPP Printing (Windows 2000) ................................ |
53 |
|
|
7.3.1 |
Before You Begin ................................................ |
53 |
|
7.3.2 Installing the Printer Driver ................................ |
53 |
|
|
7.4 Printing via a NetWare Server ............................... |
54 |
|
|
7.4.1 |
Before You Begin ................................................ |
54 |
|
7.4.2 Settings for Windows 95/98/Me ......................... |
55 |
|
|
7.4.3 Settings for Windows NT 4.0/2000 ..................... |
56 |
|
vii

Contents
8 Troubleshooting ............................................... |
57 |
||
8.1 |
Correcting Errors for the 7115/7118 ..................... |
57 |
|
|
8.1.1 |
Main Error Messages .......................................... |
57 |
8.2 |
Correcting Errors for the 7115F/7118F ................ |
59 |
|
|
8.2.1 |
Checking Error Messages .................................. |
59 |
|
8.2.2 |
Main Error Messages .......................................... |
60 |
9 Appendix .......................................................... |
61 |
||
9.1 |
Assigning IP Parameters Using Initializer ........... |
61 |
|
|
9.1.1 Using Initializer ................................................... |
61 |
|
9.2 |
Specifications ........................................................ |
63 |
|
9.3 |
IP-413 |
Printer Configuration Page ........................ |
64 |
9.4 |
IP-413 |
PCL Font List .............................................. |
65 |
viii

1 Getting Started
1 Getting Started
1.1 System Requirements
Operating System
•Microsoft Windows 95
•Microsoft Windows 98
•Microsoft Windows Me
•Microsoft Windows NT 4.0
•Microsoft Windows 2000
When the network interface card is installed, the print controller will run in the following environments.
Client operating systems |
Windows 95/98/Me/NT 4.0/2000 |
|
|
Network interface type |
Ethernet 10/100Base-T |
|
|
Network protocol |
TCP/IP, IPX/SPX |
|
|
1
2 Connecting to a Computer
2 Connecting to a Computer
Connect the print controller to the computer using either of the following two methods.
To connect to the parallel port
Using a parallel cable, locally connect the printer directly to a computer.
Refer to “2.1 Connecting to the Parallel Port (Local Connection)” on page 3.
To connect to the Ethernet 10/100Base-T port
If the printer is to be used on a network, connect it using a 10/100Base- T cable.
Refer to “2.2 Connecting to the Ethernet 10/100Base-T Port (Network Connection)” on page 4.
Important!
•If the printer is to be used on a network, the optional network interface card KN-305 must be installed.
2

2 Connecting to a Computer
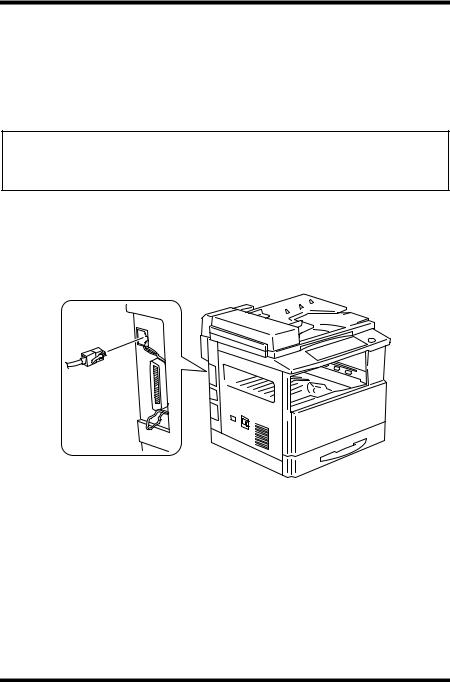
2.1Connecting to the Parallel Port (Local Connection)
Use the parallel cable to connect the parallel port of the print controller to the parallel port of the computer.
Important!
•Be sure to use a shielded parallel cable. Use of an unshielded cable may result in radio frequency interference.
•The parallel port is compatible with IEEE1284 Type B standards.
1.Make sure that the Digital Copier and the computer to be connected to the Digital Copier are both turned OFF.
2.Connect one end of the parallel cable to the parallel port (printer port) of the computer.
3.Connect the other end of the cable to the parallel port of the print controller installed in the Digital Copier.
This completes the connection of the print controller to the computer.
3
2 Connecting to a Computer
2.2Connecting to the Ethernet 10/100Base-T Port (Network Connection)
If the printer is to be used on a network, connect the network interface card to the network (LAN).
Important!
•This connection requires the optional network interface card KN-305.
•Be sure to use a shielded cable for the Ethernet 10/100Base-T cable. Use of an unshielded cable may result in radio frequency interference.
1.Make sure that the Digital Copier is turned OFF.
2.Connect one end of the Ethernet 10/100Base-T cable to the 10/ 100Base-T port of the network interface card, and then connect the other end of the cable to the hub.
This completes the network connection.
4
3 Installing the Printer Driver
3 Installing the Printer Driver
This section explains the procedure for installing the printer driver in the CD-ROM that comes with the print controller.
The installation procedure differs according to the computer’s operating system. See the page indicated below for the installation procedure corresponding to your computer’s operating system.
•“3.1 Windows 95/98/Me” on page 5
•“3.2 Windows NT 4.0” on page 7
•“3.3 Windows 2000” on page 10
3.1Windows 95/98/Me
1.Turn on the Digital Copier.
2.Turn on your computer and start up Windows 95, 98 or Me.
3.Insert the accompanying CD-ROM that comes with your print controller into your computer’s CD-ROM drive.
4.Click the [Start] button, point to [Settings], and then click [Printers].
5.Double-click the “ Add Printer” icon.
6.Click the [Next] button.
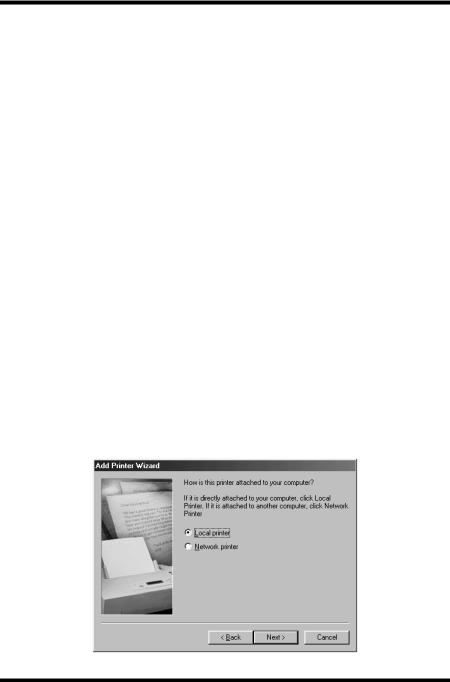
7.Select “ Local printer”.
5

3 Installing the Printer Driver
Note
•For details on specifying network settings, refer to “7 Network Printing in a Windows Environment” on page 48. Since other network settings must first be specified, temporarily install the printer driver under a local connection.
•For the network printer settings, consult with the network administrator.
8.Click the [Next] button.
9.Click the [Have Disk] button.
10.Click the [Browse] button.
11.Specify the printer driver directory on the CD-ROM for the environment being used, and then click the [OK] button. (Example: CD-ROM drive\English\Win 98\PCL6\)
Then click the [OK] button.
12.Click the [OK] button.
13.Select the model of the Digital Copier you use.
14.Click the [Next] button.
15.Specify the port (LPT1, 2, etc.) where the print controller is connected.
16.Click the [Next] button.
17.Specify the printer name and click the [Next] button. Default: “ Konica 7118 PCL6” or “ Konica 7115 PCL6”
18.Click the [Finish] button.
6
3 Installing the Printer Driver
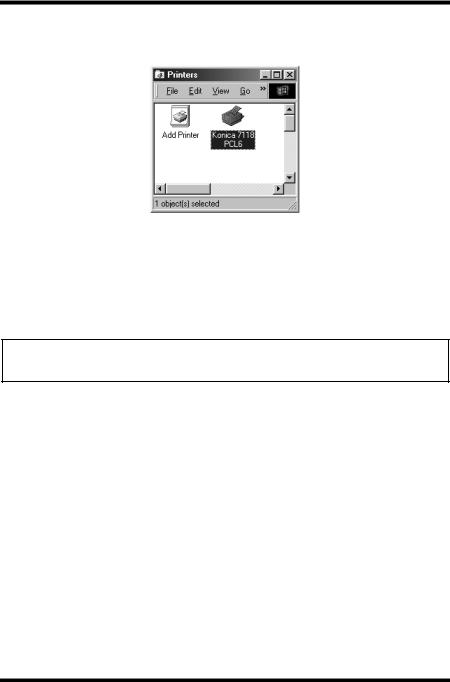
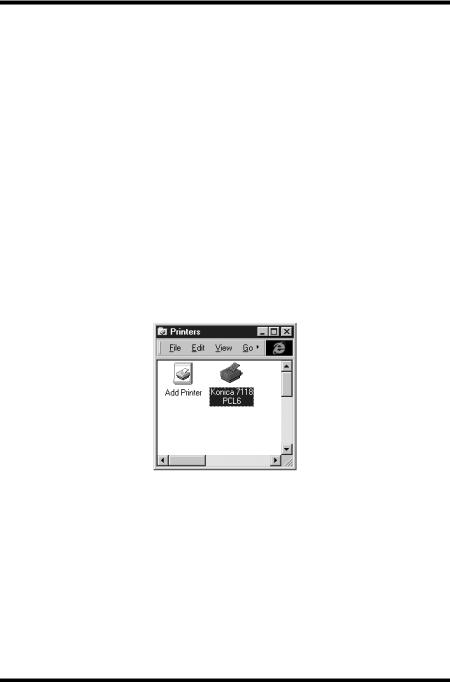
19.After installation is complete, check that the icon for the installed printer appears in the “ Printers” window.
20. Eject the CD-ROM from your computer’s CD-ROM drive. This completes the installation of the printer driver.
3.2 Windows NT 4.0
Note
•When installing the printer driver on Windows NT 4.0, be sure to log in with Power User or higher-level privileges.
1.Turn on the Digital Copier.
2.Turn on your computer and start up Windows NT 4.0.
3.Insert the accompanying CD-ROM that comes with your print controller into your computer’s CD-ROM drive.
4.Click the [Start] button, point to [Settings], and then click [Printers].
5.Double-click the “ Add Printer” icon.
7
3 Installing the Printer Driver
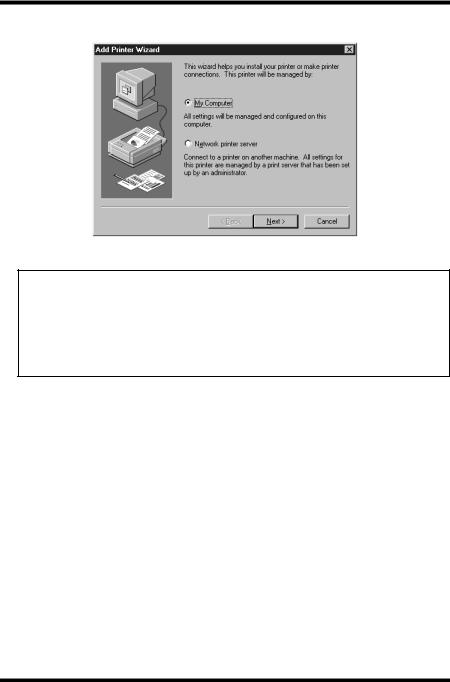
6.Select “ My Computer” and click the [Next] button.
Note
•For details on specifying network settings, refer to “7 Network Printing in a Windows Environment” on page 48. Since other network settings must first be specified, temporarily install the printer driver under a local connection.
•For the network printer settings, consult with the network administrator.
7.Specify the port (LPT1, 2, etc.) where the print controller is connected.
8.Click the [Next] button.
9.Click the [Have Disk] button.
10.Click the [Browse] button.
11.Specify the printer driver directory on the CD-ROM for the environment being used, and then click the [OK] button. (Example: CD-ROM drive\English\Win NT\PCL6\)
Then click the [Open] button.
12.Click the [OK] button.
13.Select the model of the copier you use.
14.Click the [Next] button.
8
3 Installing the Printer Driver
15.Specify the printer name and click the [Next] button. Default: “ Konica 7118 PCL6” or “ Konica 7115 PCL6”
16.If you want the Digital Copier to be the default printer select [Yes]; if not, select [No]. On Windows 98 and Windows Me, click the [Next] button.
17.Click the [Next] button.
18.Select “ Not shared” or “ Shared” by clicking.
If you choose “ Shared”, specify the share name of the printer.
19.Click the [Next] button.
20.Select whether you will print the print test or not.
Select [Yes] to print the test page, or select [No] not to perform it.
21.Click the [Finish] button.
22.After installation is complete, check that the icon for the installed printer appears in the “ Printers” window.
23. Eject the CD-ROM from your computer’s CD-ROM drive. This completes the installation of the printer driver.
9

3 Installing the Printer Driver
3.3 Windows 2000
Note
•When installing the printer driver on Windows 2000, be sure to log in with Power User or higher-level privileges.
1.Turn on the Copier.
2.Turn on your computer and start up Windows 2000.
3.Insert the accompanying CD-ROM that comes with your print controller into your computer’s CD-ROM drive.
4.Click the [Start] button, point to [Settings], and then click [Printers].
5.Double-click the “ Add Printer” icon.
6.Click the [Next] button.
7.Select “ Local printer”. (Do not check the “ Automatically detect and install my Plug and Play printer” box.)
Note
•For details on specifying network settings, refer to “7 Network Printing in a Windows Environment” on page 48. Since other network settings must first be specified, temporarily install the printer driver under a local connection.
•For the network printer settings, consult with the network administrator.
10
3 Installing the Printer Driver
8.Specify the port (LPT1, 2, etc.) where the print controller is connected.
9.Click the [Next] button.
10.Click the [Have Disk] button.
11.Click the [Browse] button.
12.Specify the printer driver directory on the CD-ROM for the environment being used, and then click the [OK] button. (Example: CD-ROM drive\English\Win NT\PCL6\)
Then click the [OK] button.
13.Click the [OK] button.
14.Follow the instructions that appear on your computer screen to complete the installation.
15.After installation is complete, check that the icon for the installed printer appears in the “ Printers” window.
16. Eject the CD-ROM from your computer’s CD-ROM drive. This completes the installation of the printer driver.
11
3 Installing the Printer Driver
3.4 Uninstalling the Printer Driver
If it is necessary to delete the printer driver, follow the procedure described below.
1.Click the [Start] button, point to [Settings], and then click [Printers].
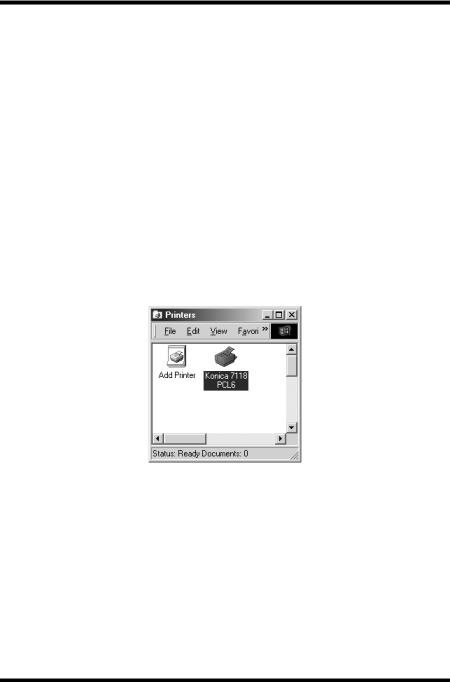
2.In the “ Printers” window, click the “ Konica 7115 (7118) PCL6” printer icon.
3.Select “ Delete” from the “ File” menu.
4.Follow the instructions that appear on your computer screen to complete the uninstallation.
For Windows 2000, follow the procedure below.
For Windows 2000:
1.Click the [Start] button, point to [Settings], and then click [Printers].
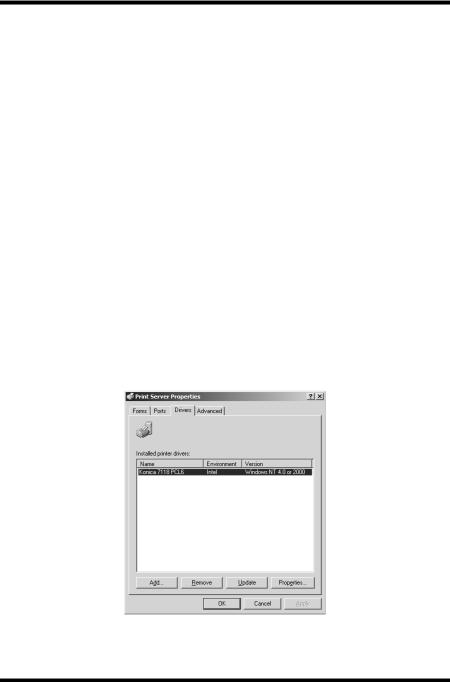
2.With no printer selected in the “ Printers” window, select “ Server Properties” from the “ File” menu.
3.Display the [Drivers] tab on the Print Server Properties dialog box.
4.Select “ Konica 7115 (7118) PCL6”, and then click the [Remove] button.
12
4 Printer Driver Settings
4 Printer Driver Settings
From the printer driver setup dialog, various printer settings can be specified from the computer. The procedure for displaying this dialog and for specifying the various settings in this dialog is described below.
4.1 Displaying the Printer Driver Setup Dialog
1.Click the [Start] button, point to [Settings], and then click [Printers].
2.In the “ Printers” window, click the “ Konica 7115 (7118) PCL6” printer icon.
3.For Windows 95, 98 or Me, select “ Properties” from the “ File” menu. For Windows NT 4.0, select “ Documents Defaults” from the “ File” menu.
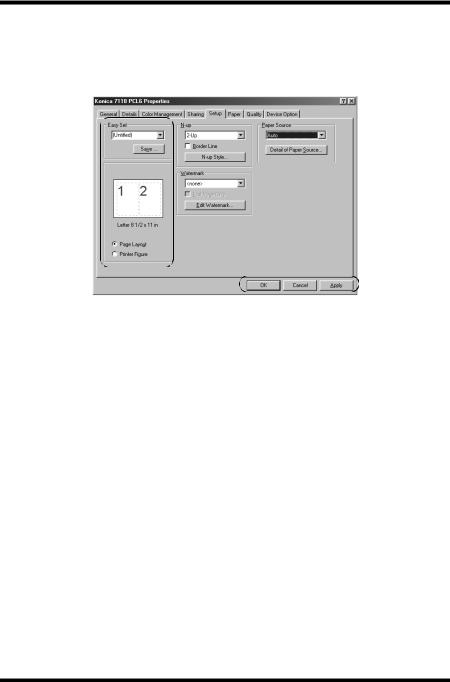
For Windows 2000, select “ Printing Preference” from the “ File” menu. The following printer driver setup dialog appears:
Tip
•The tabs other than four rightmost tabs of this dialog differ according to the computer’s operating system. With Windows NT 4.0 and 2000, these tabs do not appear.
•These four rightmost tabs can be viewed if the setup dialog is displayed by clicking the [Properties] button in the application’s print dialog.
13
4 Printer Driver Settings
4.2 Common Settings
This section contains descriptions of the settings common to all the four tabs ([Setup], [Paper], [Quality], and [Device Option]).
OK
Click to exit the Properties dialog box, saving any changes made.
Cancel
Click to exit the Properties dialog box without saving any changes made.
Apply
Click to save all changes without exiting the Properties dialog box.
Easy Set
If some settings are changed, EasySet text box is change to [Untitled], then [Save] button will be effective.
To save the current settings, enter the name of the settings into the EasySet text box, then click the [Save] button.
Select “ Factory’s Defaults” from the drop-down list to reset the functions of the tab to their original values.
If a setting is selected from the drop-down list, the button changed to the [Delete] button. If the [Delete] button is clicked, the selected setting is deleted.
14
4 Printer Driver Settings
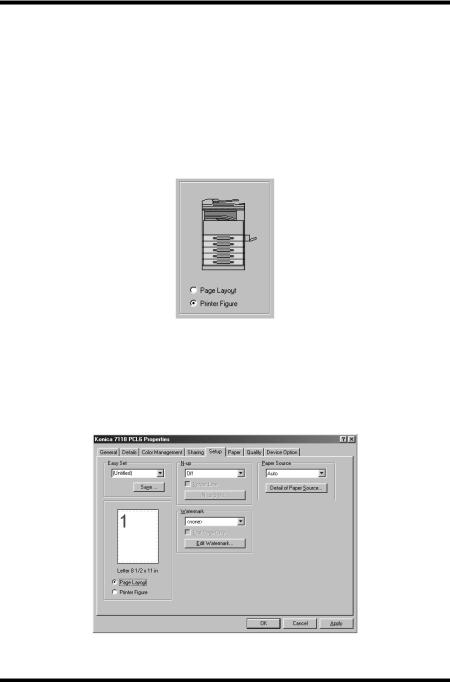
Page Layout/Printer Figure
If “ Page Layout” is selected, a sample of the page layout is displayed. This allows you to check the paper size, and “ N-up” and “ Watermark” settings.
If “ Printer Figure” is selected, a diagram of the printer construction is displayed. All installed options are displayed, and the tray currently selected under “ Paper Source” on the [Setup] tab (all trays if “ Auto” is selected) appears in light blue.
4.3 Setup Tab
The [Setup] tab contains settings for N-up, Watermark and paper source settings.
15
Loading...