

Kohler K-2200-G Installation Instructions Manual
-1-
BEFORE YOU BEGIN
NOTES
·
·
·
·
·
Use these instructions for above-counter installation.
Please follow the instructions that apply to your
installation.
You can choose between a wall-mount or
countertop faucet installation, depending upon the
setting and styling you desire. We recommended a
wall-mount .
Prior to installation, unpack the new lavatory and
carefully inspect it for damage. Return the lavatory
to its protective carton until you are ready to install it.
All information in these instructions is based upon
the latest product information available at the time of
publication. Kohler Co. reserves the right to make
changes in product characteristics, packaging, or
availability at any time without notice.
These instructions contain important care, cleaning,
and warranty information. Please leave these
instructions for the consumer.
faucet
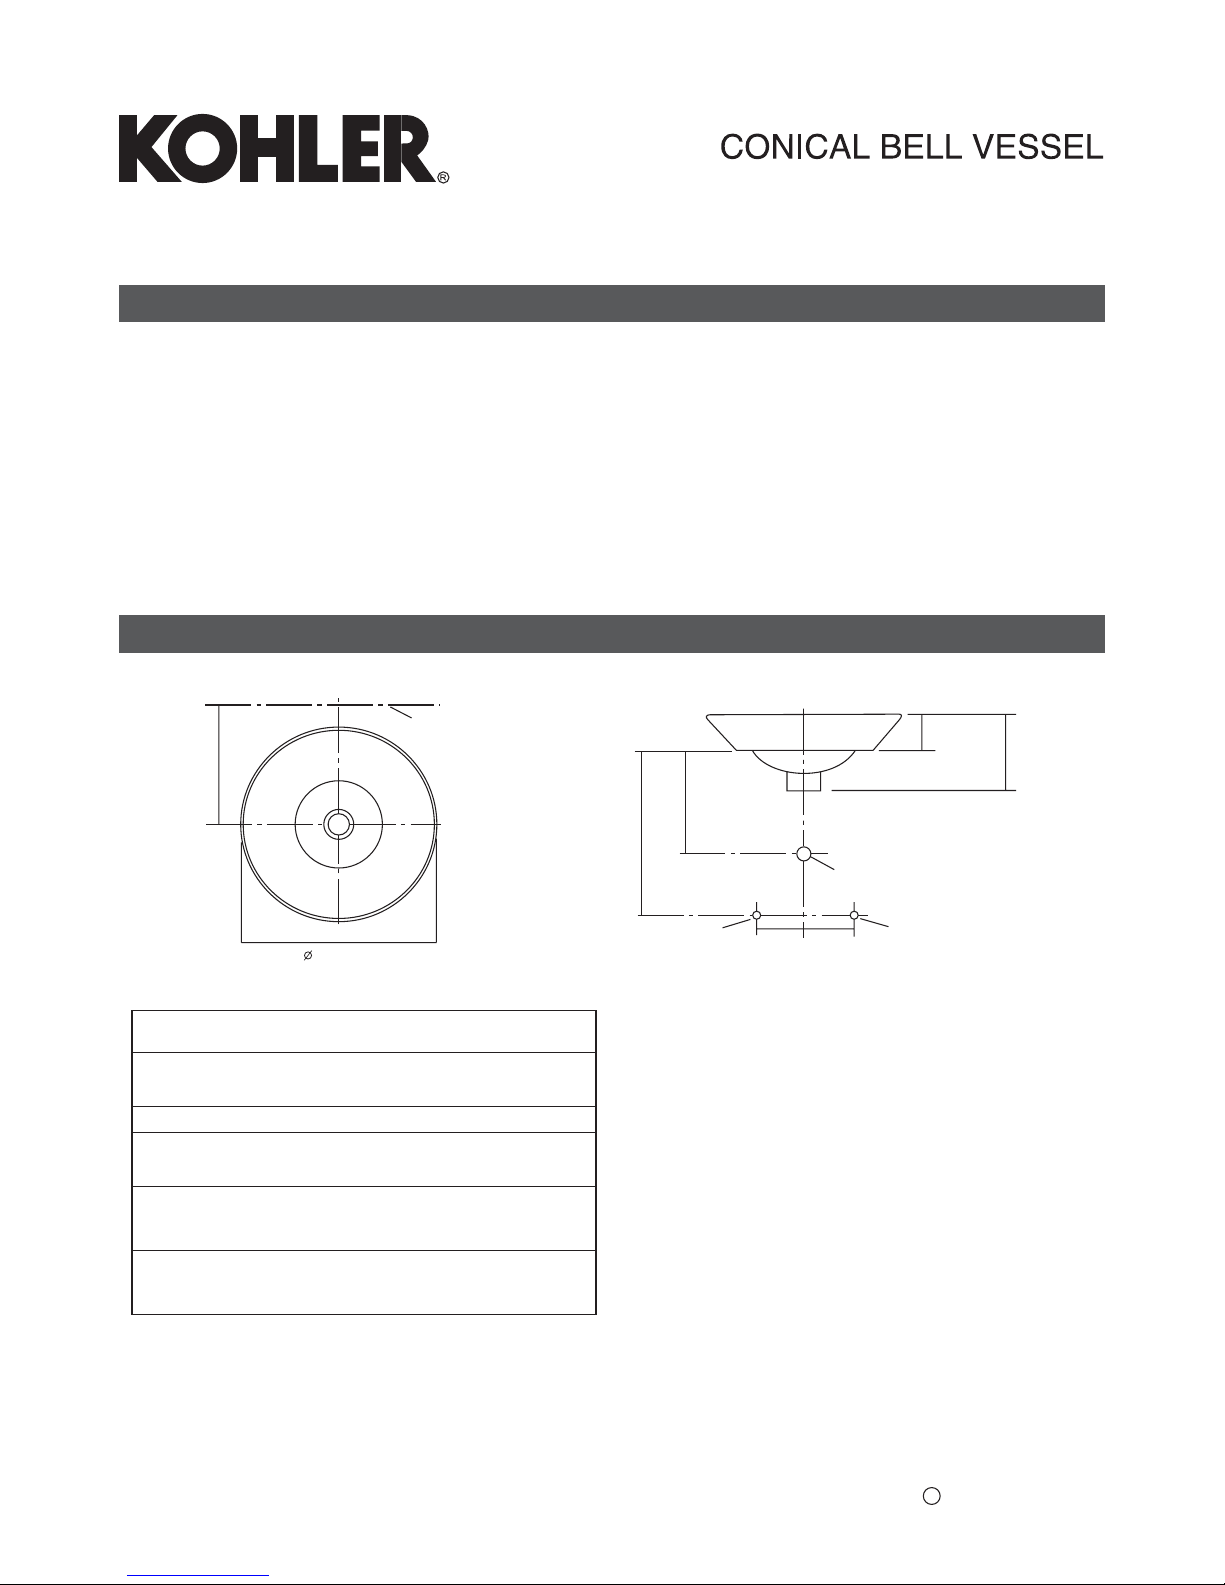
ROUGHING-IN DIMENSIONS
Fig. #1
(S)
(T)
3/8" HOT
102mm 102mm
3/8" COLD
1-1/4" OUTLET
**76mm
162mm
254mm
413mm
OF FITTING*
C
L
K-2200-G
1007250-K01-A
INSTALLATION
INSTRUCTIONS
VITREOUS CHINA
ABOVE-THE-COUNTER LAVATORY
K-2200-G
COPYRIGHT 2002 KOHLER Co.
C
Roughing-In Notes
Fixture dimensions are nominal and conform to
tolerances in ASME Standard A112.19.2M.
(T) Pop-up drain 229mm.
(S) 356mm (Based on 305mm riser which may
require cutting).
* Spout must be 127mm long (min.) for adequate
clearance into lavatory when installed with centerline
as shown.
** Spout must be tall enough to clear 76mm rim
height and provide a 25mm air gap per ASME
A112.1.2.

TOOLS AND MATERIALS REQUIRED
(Not supplied)
·
·
·
·
·
·
·
·
·
·
Sealant
Template (supplied)
Safety glasses
Pencil
Scissors
Tape Measure
Hole Saw
Keyhole saw or saber saw
Drill (1/2" dia. Drill bit, or larger)
Screwdriver
-2-
Position the template on the countertop.
Be sure to provide sufficient
spout overhang into the lavatory. See the roughing-in
notes for minimum spout length information.
Pay special attention to the
spout and handle fit clearance when locating the
faucets, as noted below. Use the template to locate the
faucet spout hole centerline on the countertop. This
centerline is recommended to provide adequate
clearance between the edge of the lavatory and the
spout.
Check for adequate clearance between the backsplash
or wall faucet spout and handles, and lavatory. We
recommend clearance of at least 25mm between:
The installed lavatory and the faucet spout,
The installed lavatory and the end of the faucet
handles, and,
The faucet spout and handles and the backsplash or
wall.
Refer to the faucets installation instructions for required
clearance, and mark the preferred faucet hole locations
using a soft lead pencil.
Trace the template on the countertop using a soft lead
pencil.
For Wall-mount Faucets:
For Countertop :Faucets
·
·
·
COUNTERTOP INSTALLATIONS
Fig. #2
25mm Min.
Clearance
Spout
Centerline
Backsplash
Cut-out line
Outside Edge
of Lavatory
Cut out the opening by carefully following the pencil line.
Large lavatories are very heavy. Get
help lifting the lavatory into place.
Temporarily position the lavatory in the countertop
cutout so the "Kohler" logo is visible. The logo is
located inside the lavatory, near the rim, and should be
positioned near the faucet.
Verify proper clearance between the lavatory, faucet,
and backsplash.
Remove the lavatory from the countertop cutout, and
return it to its protective carton. Do not stand or store
the lavatory on the drain surface.
CAUTION: Risk of personal injury or product
damage.
Fig.#3
1007250-K01-A
 Loading...