

Page 1
0510 CD-Inledning.ENG 12-03-98 16:39 Side 2
How to use this CD-Rom
This Read Me file contains the
latest Acrobat Reader information
and program installation
instructions.
1 . Install the Adobe A c robat Reader software.You
must have Adobe A c robat Reader or Exchange
installed in order to make use of the PDF files on
this CD-RO M .
Macintosh Users:
- To install A c robat Reader 2.1 on your hard disk
d r i ve,double click on the folder called AC RO _ V 2 .
Within the AC RO_V2 fo l d e r, double-click the
AC RO M AC folder and then double-click on the
ENGLISH fo l d e r.Within the ENGLISH fo l d e r,
double-click the AC RO R E A D. M AC icon and fo l l ow
the instructions on your scre e n .
W i n d ows Users:
- To install A c robat Reader 2.1 on your hard drive,
f rom the W i n d ows Program Manager,choose Run
f rom the File menu ;type [cd-drive ] : \ a c ro _ v 2 \
a c row i n \ e n g l i s h \ a c ro re a d . e xe
- Fo l l ow the instructions on your scre e n .
- Installation re q u i res ap p rox i m a t e ly 3 MB of fre e
h a rd disk space.
Unix Users:
- The Adobe A c robat 2.1 Readers have been included
on this CD RO M .
- For installation instructions, license agreement and
k n own issues please read the ap p ropriate re a d m e
file for your system.
DOS Users:
- For installation instructions, system re q u i re m e n t s
and other information please see the readme file
located at:AC RO _ V 2 / AC RO D O S / R E A D M E . T X T
2 . A c robat 2.1 users are encouraged to use the
S TA RT.PDF file to navigate through the contents
of this CD-RO M .
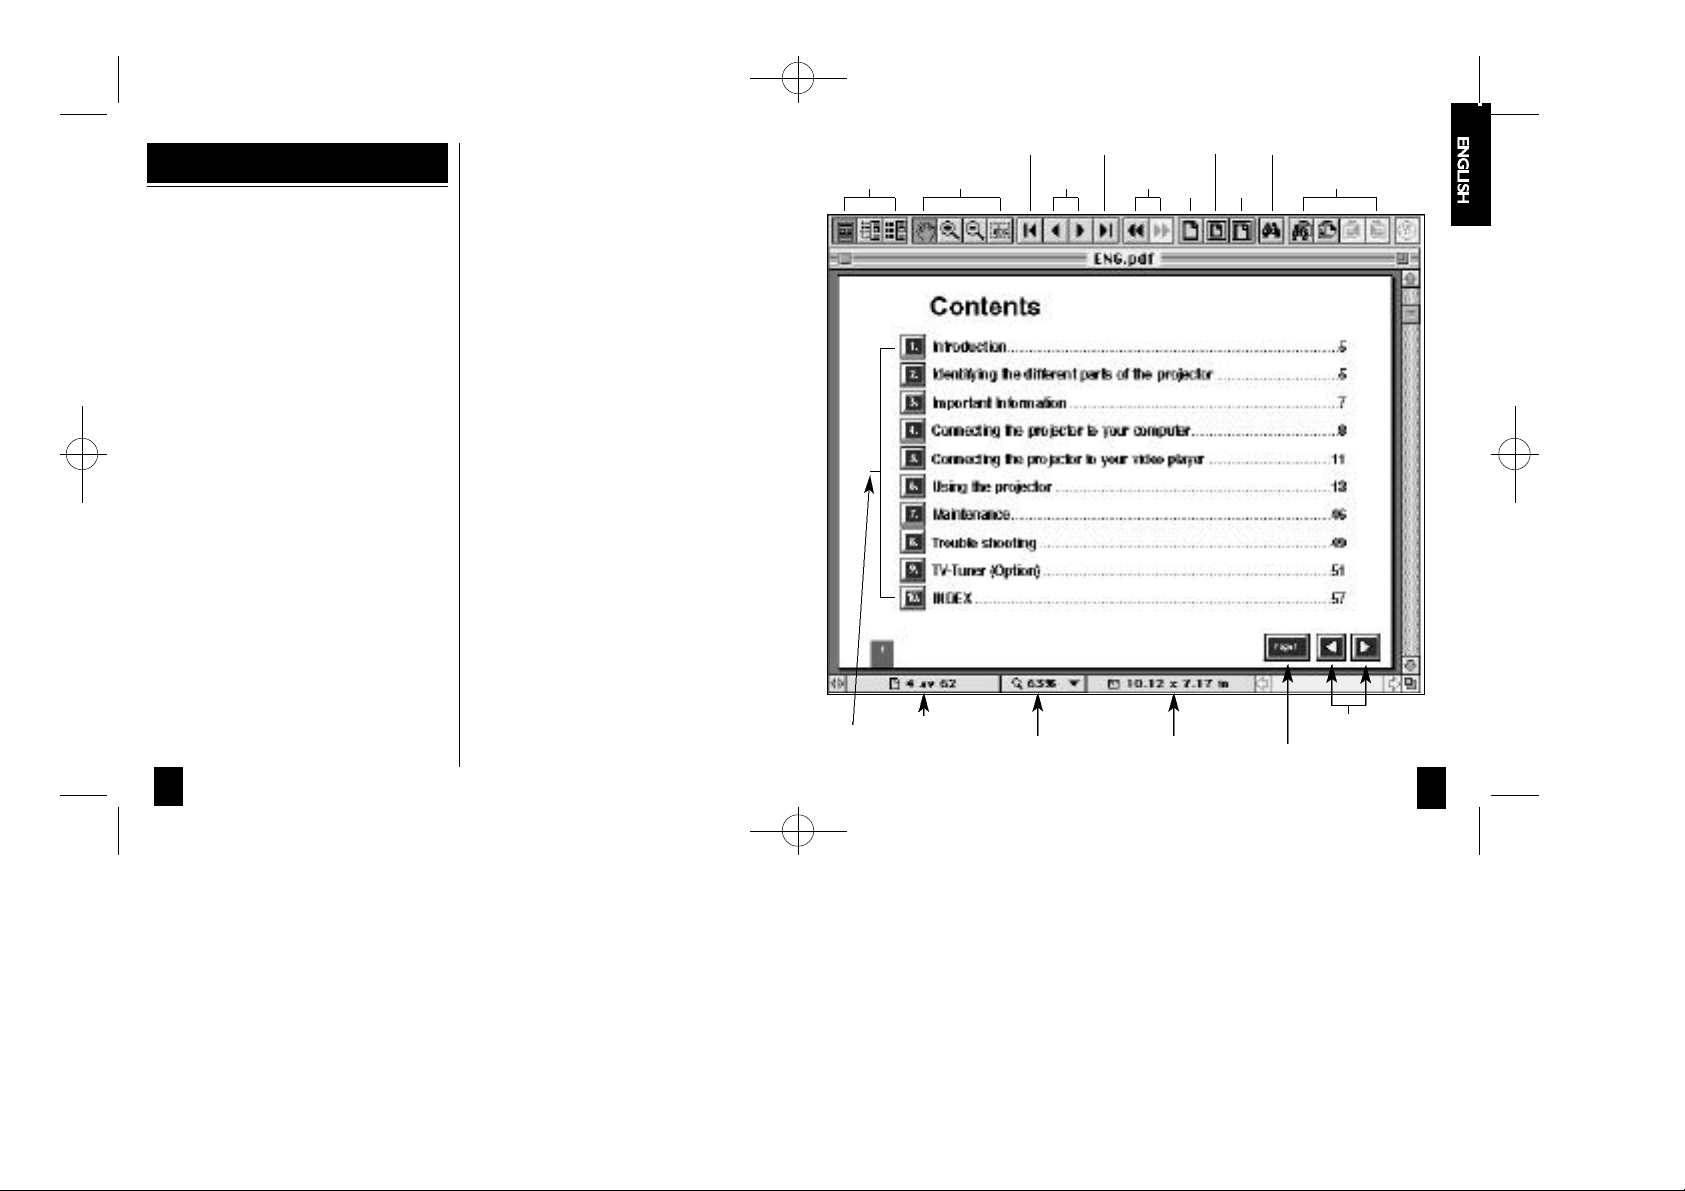
V i ew i n g S e a rc hTo o l s
Click to
s t a rt re a d i n g
Page Number
First Page Last Page D i s p l ays whole page F i n d
P revious Page /
Next Page
M ag n i f i c a t i o n Document A re a
D i s p l ays
p rev i o u s
page view
Sets page
v i ew
to 100%
Scales page to
the window
w i d t h
Page 1.
C o n t e n t s
P revious Page /
N ext Page
32
Page 2
0510 CD-Inledning.ENG 12-03-98 16:40 Side 4
1 Introduction
Thank you for buying this
Projector,and for choosing "the
brighter way of presenting".
The Projector will display high brightness images with
vivid colours,even under normal light conditions.A s
input for your presentation you can use CD-I, ( a s k
your dealer for the CD-I player),CD RO M ,P h o t o
C D s ,Laser Disks, normal VCRs or computers.You can
connect a microphone and have multiple inputs
connected simu l t a n e o u s ly for high impact true
multimedia pre s e n t a t i o n .
Thanks to the unique Graphical User interface, t h e
P rojector offer true plug and play operation fro m
remote contro l , which by the way can also contro l
your computer! For good measure we have eve n
included the Slide Works presentation utility software
with over 50 powerful presentation tools included.
Ask your dealer for information about other
p resentation products and accessories.For add e d
security and convenience try our extended warr a n t y
p ro g r a m .
2 Identifying the different
parts of the Projector
Before you start
Please take a few minutes to make sure that yo u r
system contains the necessary components for yo u r
p a rticular ap p l i c a t i o n :
1
P rojector
2
Lamp module
3
Serial cable (8 pin)
4
Super video cable (4 pin)
5
Composite video cable
6
Cable for Audio (2RCAm - 2RCA m )
7
AC cable (4m)
8
2 Macintosh adap t e r s
9
9 pin serial adap t e r
10
A d apter BNC-Composite
1 1
I n t e r a c t i ve remote contro l
1 2
D i s kette with Macintosh driver software
1 3
D i s kette with the Slideworks
p resentation utility software
1 4
Batteries for the remote contro l
1 5
5 meter (16 ft.) RGB buffer cable
If you want to use the Projector to display video
i n fo r m a t i o n ,you will need the cables for S-video or
composite video,all depending on the system you use.
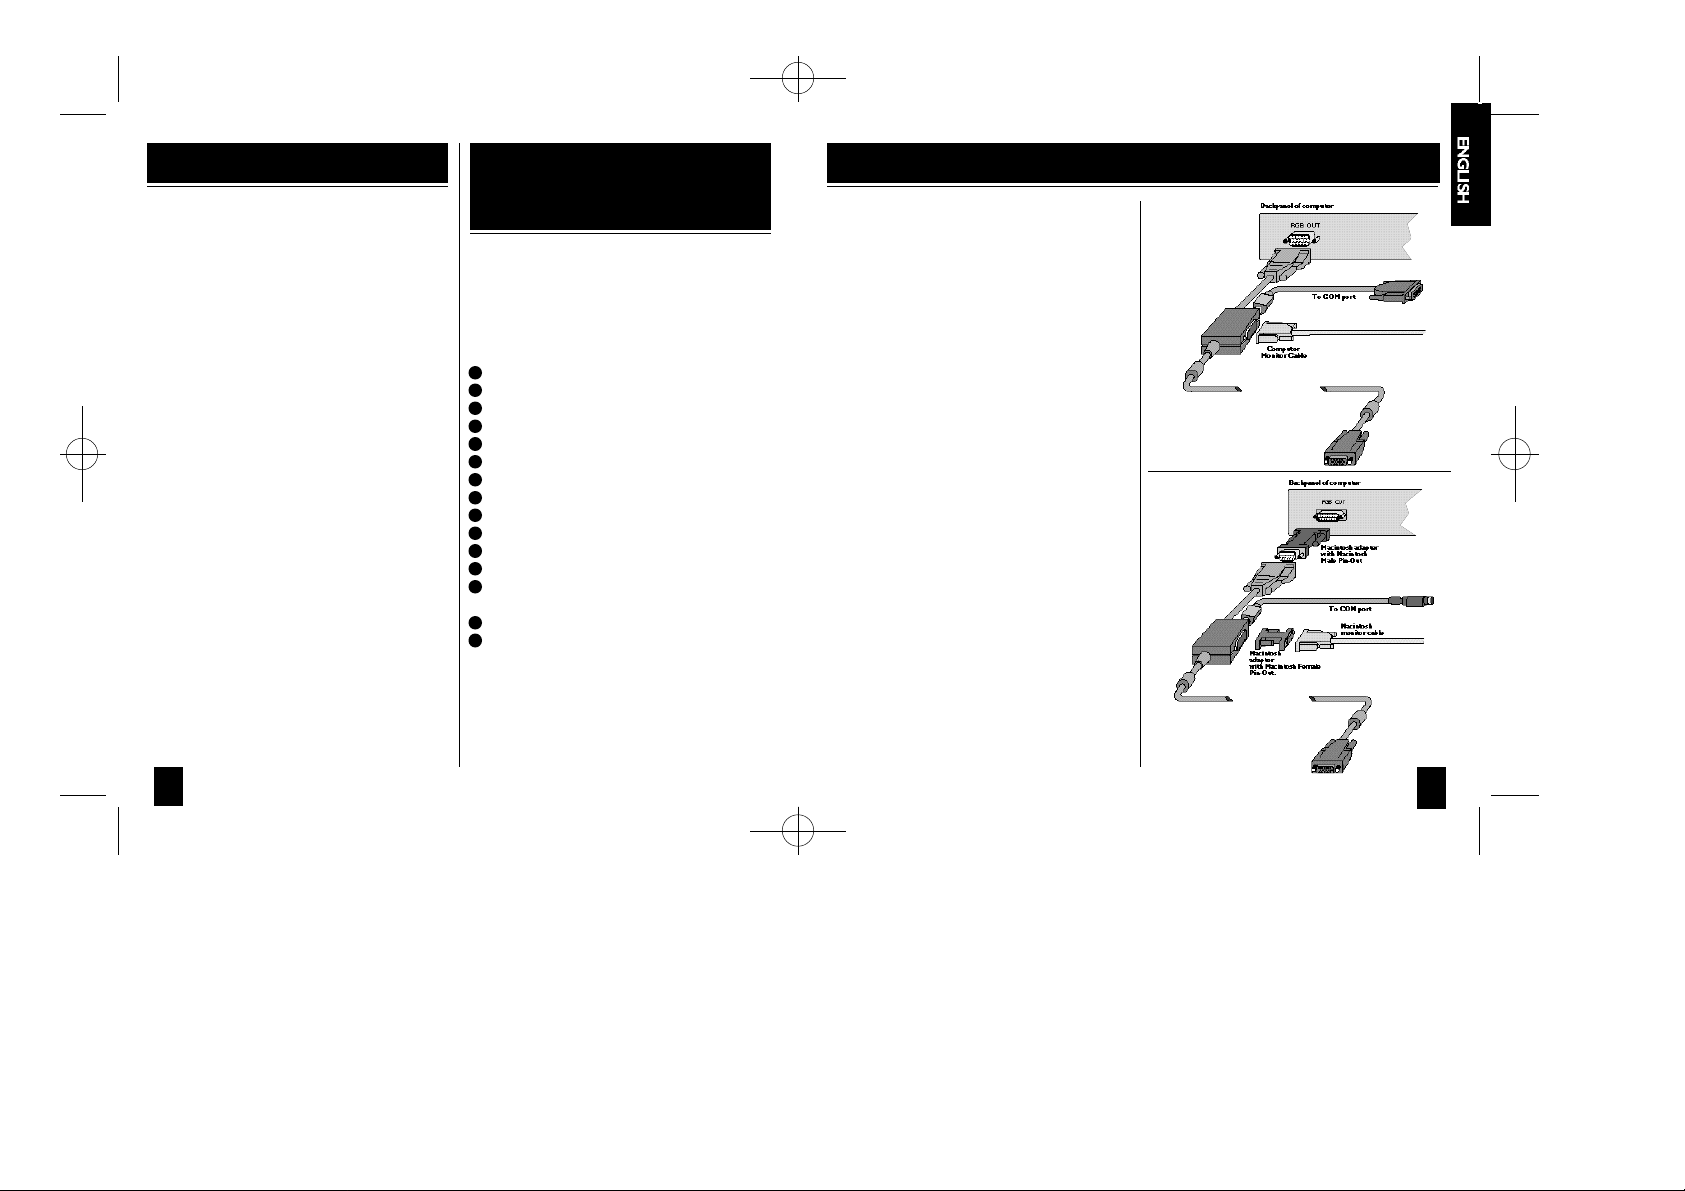
3 Connecting the Projector to your computer
This section describes how to
connect the Projector to your PC,
Macintosh, Powerbook or notebook
in order to show computer
graphics.
1 . Identify the parts needed to connect yo u r
computer with the Pro j e c t o r.
2 . Identify the RGB Out connector on the back of
your computer (the one that connects the
monitor to the computer).
3 . M a ke sure that the computer,monitor and the
P rojector are switched off.
4 . Connect the power cable from the Projector to
the wall outlet.
5 . Locate the On/Off switch on the Pro j e c t o r.W i t h
all the connections done and the screws pro p e r ly
f a s t e n e d ,the Pro j e c t o r,and computer may be
p owe red up.Switch on the units in the mentioned
s e q u e n c e.
6 . The Projector will now automatically display the
c o m p u t e r ’s image in parallel with the monitor.
7 . If you want to control your computer with the
remote contro l , also connect the serial interface
cable from the RGB buffer cable to the computer
C O M - p o rt ,see fig 2 or 3.Connecting the serial
interface cable.
Fig 2.
Connecting to a
desktop computer
or a standard
l a p t o p ,n o t e b o o k
To Projector
Fig 3.
Connecting to an
Apple Macintosh
desktop computer
or Apple Macintosh
Pow e r b o o k
To Projector
54
Page 3

0510 CD-Inledning.ENG 12-03-98 16:40 Side 6
4 Connecting the Projector to your video player
Using composite video
Plug panel
Connect to video
out part of V C R
F i g .4 . Connecting to a composite video source
1 . Find the Composite video cable,and the audio
c a b l e. All cables and adapters are provided with
the Pro j e c t o r.
2 . M a ke sure that the video source and the
P rojector are switched off. Connect the
Composite video cable from the Video out
connector of the video source to the Composite
video connector on the Projector plug panel,s e e
f i g .4 .Connect the audio cable from the Audio out
connectors of the video source to the Composite
Audio in connectors on the Pro j e c t o r.C o n n e c t
the red plug to the red connector,and the other
plug to the white connector.Red is the right
s t e reo channel.
R L
Connect to VCR audio out
3 . Connect the power cable from the Projector to
the wall outlet.
4 . When all the connections are done and ve r i f i e d ,
switch on the video sourc e,and then switch on
the Pro j e c t o r.
5 . The Projector will now automatically display the
p i c t u res from the video sourc e.If not,see the
section Trouble shooting.
You can connect external speakers to the Pro j e c t o r
f rom the Audio out connectors on the plug panel.
Using Scart video
The signals from the Scart connector are the same as
f rom the Composite connector.If you have a Scart
connector on your video,you will have to purchase a
S c a rt to Composite interc o n n e c t i o n .Connect the
S c a rt end of the interconnection cable to your video,
and then fo l l ow the pro c e d u re in the previous section,
Using composite video.
Using composite video
Plug panel
Connect to V C R , S-video out.
F i g .5 . Connecting to a SuperVideo source
1 . Find the SuperVideo cable.All cables and adap t e r s
a re provided with the Projector .
2 . M a ke sure that the video source and the
P rojector are switched off.Connect the
SuperVideo cable from the S-video out
connector on the video source to the S-video
connector on the Projector plug panel, see fig.5 .
Connect the audio cable from the audio out
connectors on the video source to the S-video
Audio in connectors on the Pro j e c t o r.C o n n e c t
the red plug to the red connector,and the other
plug to the white connector.Red is the right
s t e reo channel.
3 . Connect the power cable from the Projector to
the wall outlet.
4 . When all the connections are done and ve r i f i e d ,
switch on the video sourc e,and then switch on
the Pro j e c t o r.
5 . The Projector will now
a u t o m a t i c a l ly display the pictures from the video
s o u rc e.If not,see the section Trouble shooting.
You can connect external speakers to the Pro j e c t o r
f rom the Audio out connectors on the plug panel.
Using external speakers
You can connect external speakers to the Projector in
t wo way s :
1 . Powe red speakers (Speakers with built in
a m p l i f i e r ) .These speakers can be connected
d i re c t ly to the audio out connectors on the
P rojector amplifier.
2 . A m p l i f i e r. Connect the amplifier to the audio out
on the Pro j e c t o r.
When external speakers are connected,These can be
turned on or off from the Pro j e c t o r.
76
 Loading...