

Page 1

User’s Guide
for the
KODAK DL2100 Duplex Printer
©Eastman Kodak Company, 2010
Page 2

Contents
Safety Information .............................................................................. 2
Overview ............................................................................................... 4
Front View ................................................................................... 4
Rear View..................................................................................... 5
Using the Printer Menu ............................................................ 6
Printing the Configuration Report.......................................... 6
Loading Media ..................................................................................... 7
Loading Paper and Greeting Card Paper.............................. 7
Changing Toner Cartridges ..................................................... 8
Maintenance ........................................................................................ 11
Supplies ........................................................................................ 11
Replacing the Image Drum...................................................... 12
Replacing the Transfer Belt ..................................................... 13
Replacing the Fuser ................................................................... 15
Cleaning the LED Head............................................................. 16
Clearing Paper Jams........................................................................... 17
Troubleshooting .................................................................................. 22
Resolving Printer Error Messages.......................................... 22
Resolving Error Messages on the Kiosk ............................... 23
Resolving Error Messages on the KODAK Advanced
Picture Exchange................................................................................. 26
Correcting Print Skewing ......................................................... 29
Cleaning the Front Pick Rollers............................................... 29
Cleaning the Duplex Rollers.................................................... 30
Specifications ....................................................................................... 31
1
Page 3

Safety Information
To avoid injury or damage, follow these
instructions.
Ensure this and all other documentation
is read carefully and retained for future
reference.
Ensure all warning and instruction
labels on the product are read,
understood, and followed to prevent
any risk of injury.
Check the weight of the product and
take all necessary precautions to
prevent any risk of injury.
Place the product on a flat, solid
surface strong enough to support its
weight to prevent any risk of injury.
Ensure that there is adequate
ventilation all around the product to
prevent overheating and any risk of
fire.
Keep the product away fro m direct
heat sources such as radiators and
out of direct sunlight to prevent
overheating.
The power supply required for this
product is 220-240 VAC, 50/60 Hz.
(9.6-31.2VDC, 4-1.8A for any DC
powered product.) Refer to the
rating label on the product for full
power rating details. Ensure that you
have a suitable power supply before
connecting the product. If in doubt,
contact your dealer or check with
your local power provider.
Ensure both the product and main
power switches are in the OFF
position before connecting the AC
power cable.
Do not connect or disconnect the
power plug with a wet hand. Doing
so may cause electric shock.
Always hold the power plug to
connect/disconnect the power cable
to/from the main wall outlet.
Unplugging by pulling on the cable
can cause fraying and may lead to
fire or electric shock.
This product has an earthed plug as
a safety feature and will only
connect to an earthed socket. Do not
attempt to defeat the earthing.
Otherwise, fire or shock may occur.
If using an extension cable or power
strip, ensure that the total current
rating (amperes) of all connected
equipment is less than the maximum
rating of the extension cable, power
strip, or wall outlet. If the product is
already supplied with a fitted power
strip, then no additional power strip
or extension cable should be used to
connect to the main wall outlet.
Otherwise, fire or shock may occur.
Ensure the power cable is routed so
as not to be damaged or cause a trip
hazard. If the cable becomes frayed
or damaged, replace it immediately
to prevent any risk of shock.
Do not twist, constrict, or knot the
power cable. Doing so can cause
overheating, which may lead to fire
or electric shock.
Ensure the power socket to which
the product is connected is easily
accessible at all times and not
obstructed.
Use only the power cable supplied.
Using a power cable not intended for
this product may lead to fire or
electric shock.
To avoid risk of fire and electric
shock, do not use the power cable
supplied with this product for any
other electrical equipment.
Ensure that you connect the power
cord or any other cables only as
directed in this User's Guide,
otherwise fire may occur.
T urn off the p roduct prior to op ening
covers; otherwise there is a risk of
electric shock.
When the product cover is open, do
not touch the fuser unit. Allow it to
cool before touching.
2
Page 4

If the product casing gets extremely
hot, or if unusual smells or
abnormal noises are emitted from
the product, there is a risk of fire.
Unplug the main power cord and
contact your dealer of Kodak
products.
If the product has been knocked
over or damaged, there is a risk of
electric shock, fire and/or injury.
Unplug the main power cord and
contact your dealer of Kodak
products.
If any liquid enters the product,
there is a risk of fire. Unplug the
main power cord and contact your
dealer of Kodak products.
Do not place containers of liquid on
the product as electric shock, fire
and/or injury may occur.
If any foreign objects enter the
product, there is a risk of electric
shock, fire and/or injury. Unplug the
main power cord before removing
the object.
Do not introduce foreign objects into
the ventilation holes or operate this
product with any covers open or
doors removed as electric shock, fire
and/or injury may occur.
Do not use an extremely flammable
spray near the product as the
product contains high-temperature
parts that may cause a fire.
Turn off the product before cleaning
to prevent any risk of injury. Clean
using a damp cloth. Do not use
liquid or aerosol cleaners.
Ensure loose clothing and hair are
kept clear of moving parts when the
product is in operation to prevent
possible risk of injury.
Do not carry out any operations on
the product that are not specified in
the User's Guide. Doing so may
result in electric shock, fire and/or
injury.
Do not touch the battery if one is
fitted to the product. There is a risk
of explosion if the battery is
replaced by an incorrect type. The
product battery should not require
replacement during the life of the
product.
Do not discard toner cartridges or
image drum cartridges into a fire as
you may receive burns from a dust
explosion.
After installing additional memory,
a hard disk drive, or any other
internally fitted option, any covers
removed or doors opened must be
closed or replaced and secured to
prevent risk of fire.
The acoustic noise of this product is
less than 70 dB (A) as measured in
accordance with EN ISO 7779.
The operating condition range for
this product is: 50 to 90° F
(10 to 32° C) and 20 to 80%
Relative Humidity. Operation of the
product outside this range could
result in damage to the product.
3
Page 5

Overview
1
2
3
4
5
6
7
8
9
10
11
12
The KODAK DL2100 Duplex Printer can be used with the KODAK Picture
Kiosk or the KODAK Adaptive Picture Exchange to create photo books,
calendars, and greeting cards that are printed on both sides!
Front View
1. Exit tray
2. Operator panel
3. Front cover release lever
4. Top cover release
5. Upper paper tray—Holds up
to 250 sheets of paper.
6. Lower paper tray—Holds 100
sheets of paper.
7. Paper level indicators
8. Image Drum units (Cyan,
Magenta, Yellow, Black)
9. Duplex unit
10. LED heads
11. Fuser release levers
12. Toner cartridges (Cyan,
Magenta, Yellow, Black)
4
Page 6

Rear View
1
2
3
4
5
1. Power switch 4. USB port
2. AC power socket 5. Ethernet port
3. Duplex unit
5
Page 7

Using the Printer Menu
On Line
Cancel
Enter
Scroll Up
Scroll Down
Scroll Back
1. Press [Enter].
2. Press the up or down arrow to scroll through the Categories, Items, and
Val ue s.
3. Press [Enter] to select a Category, Item, or Value to change or to select
the new setting for a Value.
4. Press [On Line] to exit the Menu.
Printing the Configuration Report
The Configuration report provides a list of the current printer menu
settings.
1. Press:
• [Enter]
• the down arrow
2. Select “Print Information.”
3. Press [Enter].
4. Press [Enter] to select “Configuration.”
5. Press [Enter] to select “Execute.”
The Configuration report prints.
6
Page 8

Loading Media
a
b
1
3
Paper
Greeting Card
Crease
Paper
Loading Paper and Greeting Card Paper
Important:
Use the upper tray for paper and the
lower tray for greeting card paper.
1. Remove the appropriate tray
from the printer.
2. Adjust the tray to hold the
paper or greeting card paper.
a. Rear stopper
b. Paper guides
4. Fan the edges of the paper or
greeting card paper to
separate the sheets.
5. Load the paper or greeting
card paper. If you are loading
greeting card paper, make sure
that you load it:
• in the lower tray.
• with the crease facing up.
Note:
The upper tray holds 250
sheets of paper. The lower tray
holds 100 sheets of greeting
card paper.
3. Adjust the paper size dial to
your paper size. If you are
loading greeting card paper,
turn the dial to the “blank”
setting.
7
Page 9

6. Insert the tray.
Changing Toner Cartridges
Caution!
If you inhale toner, drink water. If
you get toner in your eyes, bathe
your eyes liberally in cold water.
Seek medical attention
immediately!
Important:
To avoid toner waste and possible
toner sensor errors, do not change
the toner cartridge(s) until the LCD
displays TONER EMPTY.
If the LCD displays TONER
EMPTY:
1. Make sure that you have a
sheet of paper on which to
place the used cartridge.
Important:
Do not leave the top cover open for
more than 5 minutes when the
image drums are in the printer.
2. Open the top cover.
Caution!
The fuser becomes extremely hot
during normal operation. Do not
touch it.
3. Hold the center of the toner
cartridge/image drum and lift
it out of the printer.
If the LCD displays TONER LOW,
or if print appears faded:
1. Open the top cover.
2. Use your finger to tap each
toner cartridge to evenly
distribute the toner and make
the toner cartridges last
longer.
3. Close the top cover.
4. Place the toner
cartridge/image drum on a
sheet of paper.
Important:
Avoid spilling toner. Do not shake or
jar the toner cartridge! If you spill
toner, lightly brush it off. If the toner
remains, use a cool, damp cloth to
remove any residue. Do not use hot
water or solvents of any kind. They
will make permanent stains.
8
Page 10
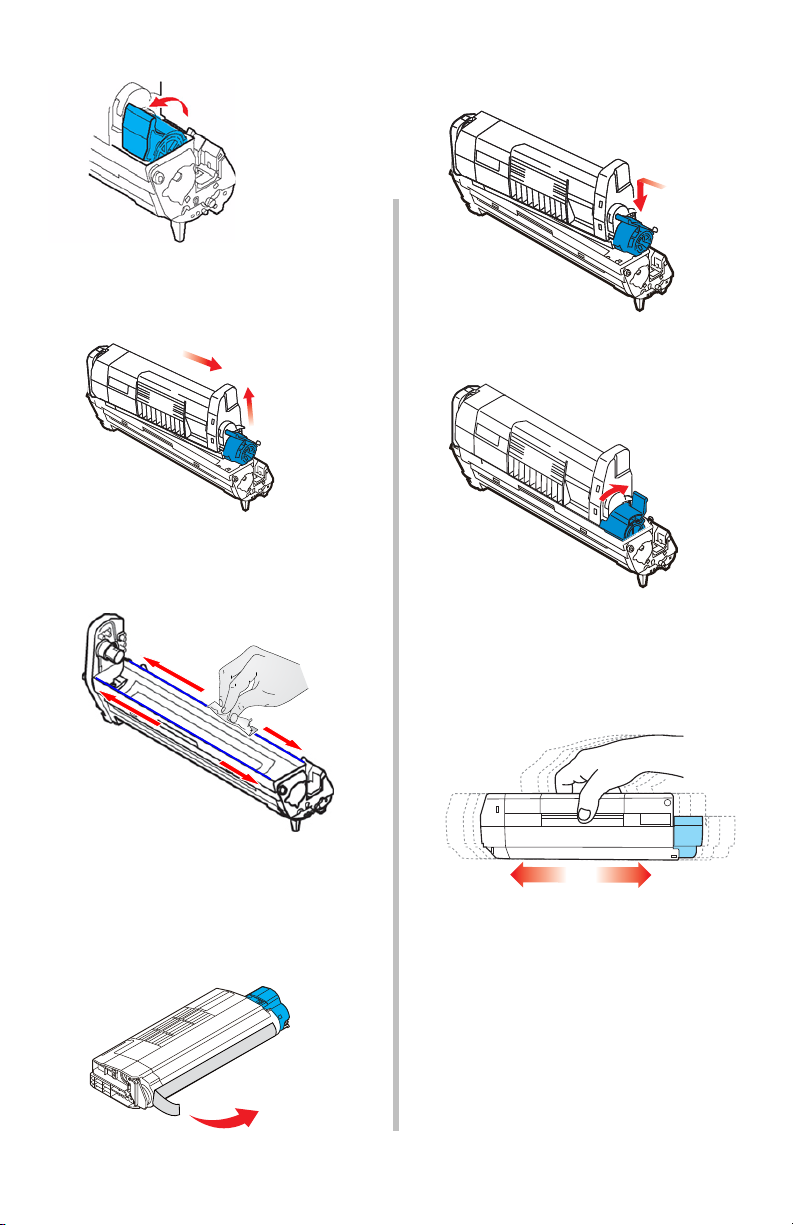
5. Lift the toner release lever.
6. Hold the right end of the
cartridge and carefully lift it
out of the drum assembly.
7. Clean the top of the image
drum unit with a clean,
lint-free cloth.
10.Carefully place the new toner
cartridge onto the image drum.
11. Press down on the toner release
lever.
12.Gently shake the
cartridge/image drum from
side to side to distribute the
toner evenly inside the
cartridge.
8. Remove the new cartridge
from the box.
9. Remove the wrapping and the
adhesive tape from the
cartridge.
9
Page 11
13. Hold the center of the toner
cartridge/image drum and
lower it into the printer. Align
the pegs on the drum
assembly with the slots on the
printer.
11. Gently wipe the LED head with
a lint-free cloth.
12. Close the top cover.
13. Place the old cartridge inside
the packaging from the new
cartridge. Recycle
appropriately.
10
Page 12

Maintenance
Supplies
Product Catalog Number Quantity
KODAK DL2100 Duplex Printer
Toner / Black
KODAK DL2100 Duplex Printer
Toner / Magenta
KODAK DL2100 Duplex Printer
Toner / Yellow
KODAK DL2100 Duplex Printer
Toner / Cyan
KODAK DL2100 Duplex Printer
Paper / Glossy / 8.5 x 11 in.
KODAK DL2100 Duplex Printer
Paper / Glossy / A4
KODAK DL2100 Duplex Printer
Greeting Card Paper / 4.8 x 6.8 in.
887-0792 1
107-8542 1
824-2323 1
103-1145 1
885-1875 250 Sheets
190-4267 250 Sheets
843-3260 200 Sheets
11
Page 13

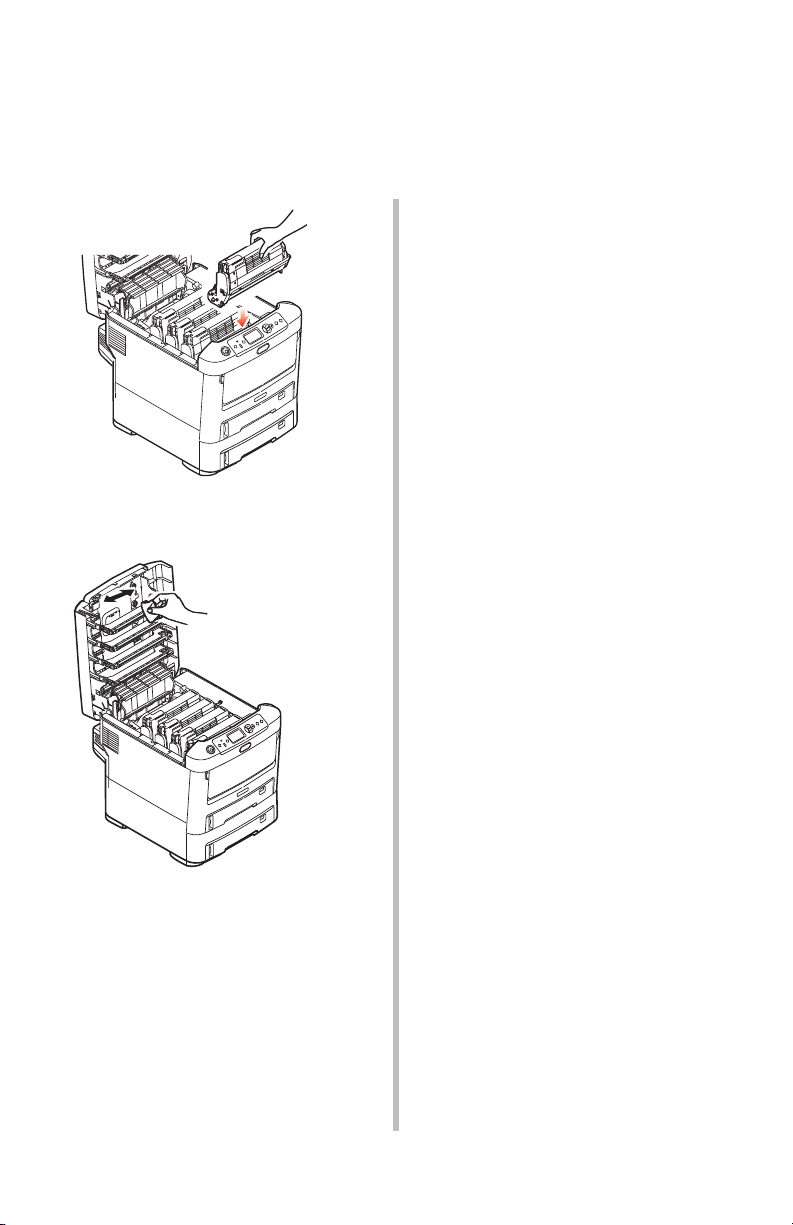
Replacing the Image Drum
The printer contains four image
drums: cyan, magenta, yellow, and
black.
1. Make sure that you have a
sheet of paper on which to
place the old image drum.
2. Open the top cover.
Caution!
The fuser becomes extremely hot
during normal operation. Do not
touch it.
The surface of the green image
area of the drum is delicate and
light sensitive. Do not touch it,
and do not expose it to normal
room light for more than 5
minutes. If the drum needs to be
out of the printer for more than 5
minutes, wrap the drum inside a
black plastic bag to protect it
from light. Never expose the
drum to direct sunlight or bright
room lighting.
4.
Place the
cartridge/image drum
sheet of
toner
on a
paper.
5. Lift the toner release lever.
6. Hold the right end of the
cartridge and carefully lift it
out of the drum assembly.
Important!
Avoid spilling toner. Do not shake or
jar the toner cartridge.
3. Hold the center of the toner
cartridge/image drum and lift
it out of the printer.
7. Place the toner cartridge on a
sheet of paper.
8. Remove the packaging from
the new image drum. Place the
image drum on a sheet of
paper.
9. Place the old image drum
inside the packaging material.
12
Page 14
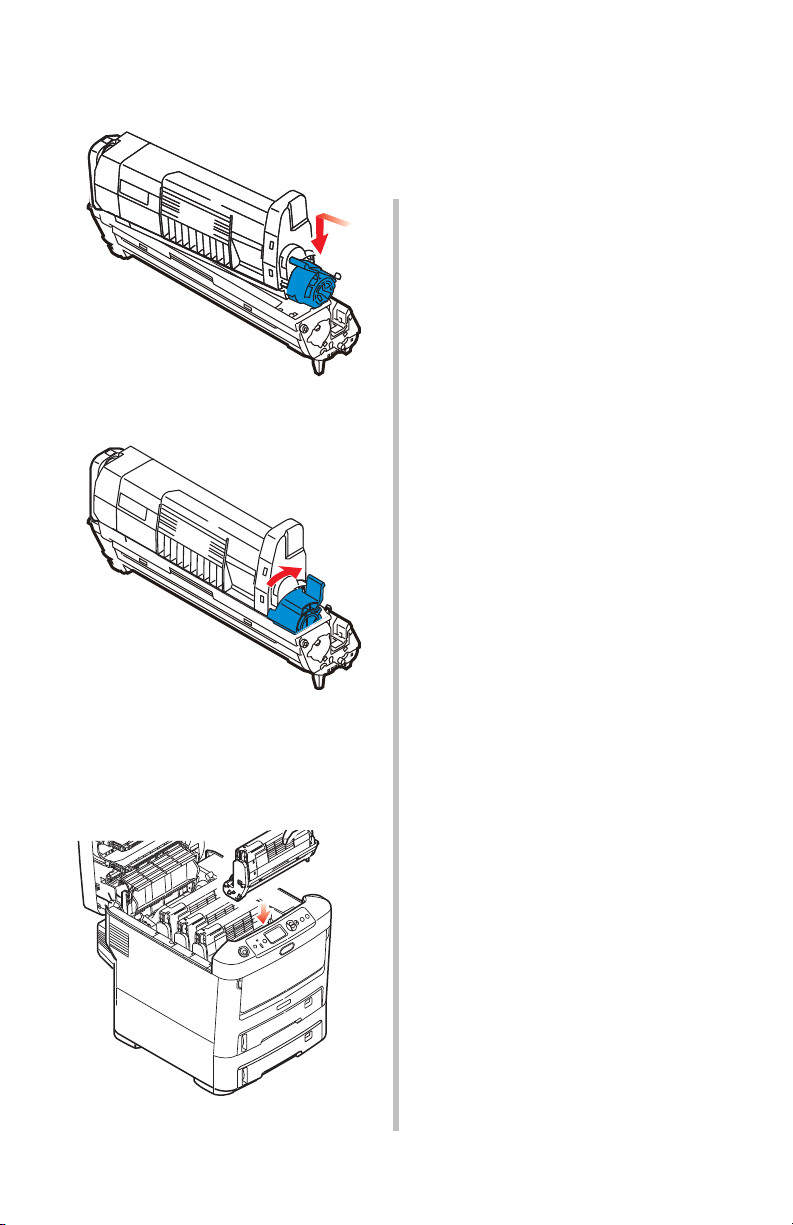
10. Carefully place the toner
cartridge onto the new image
drum as shown.
11. Press down the toner release
lever.
12. Hold the center of the toner
cartridge/image drum and
lower it into the printer. Align
the pegs on the assembly with
the slots on the printer.
13. Repeat Steps 1-12 for the
remaining image drums.
14. Close the top cover.
Replacing the Transfer Belt
The belt unit is located under the
four image drums. This unit
requires replacement after
approximately every 30,000
duplex pages.
1. Turn off the printer.
2. Wait approximately 10
minutes for the fuser to cool.
3. Open the top cover.
Caution!
The fuser becomes extremely hot
during normal operation. Do not
touch it.
The surface of the green image
area of the drum is delicate and
light sensitive. Do not touch it,
and do not expose it to normal
room light for more than 5
minutes. If the drum needs to be
out of the printer for more than 5
minutes, wrap the drum inside a
light-safe bag to protect it from
light. Never expose the drum to
direct sunlight or bright room
lighting.
4. Remove each toner
cartridge/image drum from
the printer. See “Replacing the
Image Drum” on page 12.
5. Place each toner
cartridge/image drum in a
light-safe bag.
13
Page 15

6. Remove the belt unit:
a
a
b
a
b
d
d
a. Turn the two fasteners 90°
to the left.
b. Lift the handle of the belt
unit and remove it from the
printer.
7. Remove the new belt unit from
its packaging.
8. Install the new belt unit:
a. Lower the belt unit into the
printer. Make sure that the
handle is at the front of the
printer, and the drive gear is
at the rear of the printer.
b. Align the drive gear on the
belt with the gear in the
printer.
c. Press the belt into place.
d. Turn the two fasteners 90°
to the right.
9. Install each toner
cartridge/image drum. See
Step 9 on page 20.
10. Close the top cover.
14
Page 16

Replacing the Fuser
a
b
a
a
a
b
a
b
a
The fuser is located inside the
printer just behind the four image
drums.
1. Turn off the printer.
2. Wait approximately 10
minutes for the fuser to cool.
3. Open the top cover.
Caution!
The fuser becomes extremely hot
during normal operation. Do not
touch it.
4. Remove the fuser:
a. Move the two fuser release
levers toward the front of
the printer.
b. Hold the handle of the fuser
and lift it out of the printer.
If the fuser is still warm,
place it on a flat surface that
will not be damaged by
heat.
6. Hold the new fuser by the
handle. Make sure that the
retaining levers (a) are upright
and the locating lugs (b) are
facing you.
7. Install the fuser in the printer.
Make sure that the lugs are
aligned with the slots in the
printer.
8. Move the fuser release levers
toward the rear of the printer.
5. Remove the new fuser from its
packaging.
9. Close the top cover.
15
Page 17

Cleaning the LED Head
We recommend cleaning the LED
head if the image area:
• is not clear
•has white lines
1. Turn off the printer.
Caution!
Do not use methyl alcohol or
other solvents on the LED head.
Damage to the lens surface will
occur.
2. Gently wipe the LED head
surface with a lint-free cloth.
3. Close the top cover.
16
Page 18

Clearing Paper Jams
370
373
382
383
381
372371
391
392
380, 400
390
When “Paper Jam” appears on the display, one or more sheets of print
media are jammed in the printer.
If one sheet is removed and there are still more sheets in the printer, the
initial message will go away temporarily, then “Paper Jam” will appear
again.
Paper Jam Error Message Summary
Error No. Location of Jam Error No. Location of Jam
370 Duplex unit 382 Paper exit
371 Duplex unit 383 Duplex unit
372 Duplex unit 390 Multi-Purpose tray
373 Duplex unit 391 Paper tr a y
380 Paper feed 392 Second Paper tray
381 Paper path 400 Paper size
17
Page 19

1. Make sure that you have a
sheet of paper on which to
place the toner
cartridge/image drum.
2. Open the top cover.
3. If a sheet is advanced out of
the top of the printer, gently
pull the paper out.
Caution!
The fuser becomes extremely hot
during normal operation. Do not
touch it.
4. Carefully remove all of the
toner cartridge/image drums,
and place them on a sheet of
paper.
5. Cover them to protect them
from light.
The surface of the green image
area of the drum is delicate and
light sensitive. Do not touch it,
and do not expose it to normal
room light for more than 5
minutes.
6. Carefully remove any jammed
paper.
18
Page 20

7. To remove a sheet just
entering the fuser:
a. Separate the trailing edge of
the sheet from the belt.
b. Move the paper release
lever for the fuser toward
the front, and remove the
sheet.
c. Release the lever.
8. If the sheet is well advanced
into the fuser:
a. Move both fuser release
levers toward the front of the
printer to release the fuser.
Hold the fuser by the handle
and lift it out of the printer.
c. Move the paper release lever
and pull the jammed paper
from the fuser.
d. Replace the fuser unit and
move the fuser release levers
toward the rear of the printer.
See “Replacing the Fuser” on
page 15.
b. Place the fuser on a flat
surface.
19
Page 21

9. Carefully replace the toner
Printer Front
cartridge/image drums. Make
sure that you install them in
the proper sequence.
11. Open the rear exit tray and
pull out any paper.
12. Close the rear exit tray.
13. If there is paper jammed in the
duplex unit:
a. Open the cover for the
duplex unit and remove any
paper.
1 = Cyan
2 = Magenta
3 = Yellow
4 = Black
10. Close the top cover.
b. Close the cover for the
duplex unit.
20
Page 22

14. Open the front door to access
the release lever for the front
cover.
15. Lift the release lever and open
the front cover.
16. Remove any jammed paper.
18. Remove the paper tray and
any jammed paper.
19. Insert the tray.
17. Close the front cover.
20. If there is paper jammed in the
second paper tray:
a. Remove the second paper
tray and any jammed paper.
b. Insert the tray.
21
Page 23

Troubleshooting
Use the information in this section to identify problems and follow
recommended procedures for correcting them. If you cannot solve the
problem, contact KODAK Service and Support.
Resolving Printer Error Messages
The printer has a built-in help system. When an error message
appears on the display, press [HELP] on the printer. The display shows
information that will help you correct the error.
Press the up and down arrow buttons to scroll through the Help
information.
Problem/Message Possible Solution
There is a paper jam. See “Clearing Paper Jams” on page 17.
Cover open Close the printer cover.
Out of paper Check that paper is loaded. If necessary,
load new paper. See “Loading Paper and
Greeting Card Paper” on page 7.
The toner is empty Check that there is toner. See “Changing
Toner Cartridges” on page 8.
Printing takes more
than 5 minutes per
page.
Turn off the power to the printer, and then
back on.
22
Page 24

Resolving Error Messages on the Kiosk
Problem/Message Possible Solution
Printer applications do
not appear on the Main
screen of the Kiosk.
Printer indicates NOT
FOUND on the Device
Health Check Screen
(USB connection).
1. Check that:
• the power cord is connected.
• the printer is turned on.
• the USB cable or Ethernet cable is
connected to the printer and the
console.
• there is no printer error.
• the application is enabled under User
Mode.
2. Run Application Health Check.
3. Check that the Enablement software for
the DL2100 Printer is installed.
1. Check that:
• the power cord is connected.
• the printer is turned on.
• the USB cable is connected to the
printer and the console.
• there is no printer error.
• the paper trays are set for the correct
setting.
2. Restart the Kiosk.
3. If the problem persists, contact KODAK
Service and Support.
23
Page 25

Problem/Message Possible Solution
You are having
connectivity issues and
your site uses DHCP.
“Disconnected”
appears on the
Network Configuration
screen.
1. From the Kiosk, touch:
•[Setup]
• [Configure System Settings]
• [Configure Network]
2. Use the arrows to select:
ipconfig /renew.
3. Touch [Execute].
4. Check the Network Settings with your
system administrator.
5. If the problem persists, contact KODAK
Service and Support.
1. Check that the network cable is
connected at both ends.
2. Check that the network device that the
Kiosk is connected to is powered on.
3. Check the Network Settings with your
system administrator.
4. If the problem persists, contact KODAK
Service and Support.
24
Page 26

Problem/Message Possible Solution
“No physical printers
were found. Make sure
the physical printer is
plugged into the
network on the same
subnet as the Kiosk.”
or
Printer indicates NOT
FOUND on the Device
Health Check Screen
(Ethernet Connection).
1. Check that the:
• Ethernet cable is connected to the
printer.
• console is connected to the network.
• printer is on the same subnet as the
Kiosk.
2. Touch:
•[Setup]
• [Manage Devices]
• [DL2100 Duplex Printer Options]
• [Configure Network Connection]
3. Check that you can see a printer when
you select [Search for Printers].
4. If a printer(s) is found, touch next to the
default printer and select [Save].
5. If you are unable to find your printer via
the search:
•Touch:
- [Manually Configure]
- the keyboard icon
• Use the on-screen keyboard to enter the
IP address of the printer.
•Touch:
-[Done]
- [Test Connection]
-[OK]
6. If a connection is found, touch [Save].
7. If the connection is still not found, have
your system administrator check the
Network Settings in the Pre-Installation
Requirements for the KODAK DL2100
Duplex/Network Printer.
8. If the problem persists, contact KODAK
Service and Support.
25
Page 27

Resolving Error Messages on the KODAK Advanced Picture Exchange
Problem/Message Possible Solution
Printer indicates NOT
FOUND on the Device
Health Check Screen
(USB connection).
You are having
connectivity issues and
your site uses DHCP.
1. Check that:
• the power cord is connected.
• the printer is turned on.
• the USB cable is connected to the
printer and the APEX processor.
• there is no printer error.
• the paper trays are set for the correct
setting.
2. Run Device Health Check.
3. If the problem persists, contact KODAK
Service and Support.
1. From the Main screen of the APEX, touch:
•[Setup]
• [System Configuration]
• [Configure Network]
2. Use the arrows to select ipconfig/renew.
3. Touch [Execute].
4. Check the Network Settings with your
system administrator.
5. If the problem persists, contact KODAK
Service and Support.
26
Page 28

Problem/Message Possible Solution
Printer applications do
not appear on the Main
screen of the Kiosk that
is connected to an
APEX.
1. Check that:
• the power cord is connected.
• the printer is turned on.
• the USB cable or Ethernet cable is
connected to the printer and the APEX
processor.
• there is no printer error.
2. Check that the Enablement software for
the DL2100 Printer is installed on the
Kiosk.
3. Run Device Health Check to make sure
the printer is recognized by the APEX.
4. Resatellite the Kiosk. From the Main
screen of the Kiosk, touch:
•[Setup]
• [Configure System Settings]
• [Kiosk Network]
• [Join/Leave Kiosk Network]
• next to “Single Kiosk”
•[Save]
The Kiosk restarts.
5. Touch:
•[Setup]
• [Configure System Settings]
• [Kiosk Network]
• [Join/Leave Kiosk Network]
• next to “Join Kiosk Network”
•[Save]
The Kiosk restarts.
6. If the problem persists, contact KODAK
Service and Support.
27
Page 29

Problem/Message Possible Solution
Printer indicates NOT
FOUND on the Device
Health Check Screen
(Ethernet Connection).
1. Check that the:
• Ethernet cable is connected to the
printer.
• APEX processor is connected to the
network.
2. Touch:
•[Setup]
• [Manage Devices]
• [KODAK DL2100 Duplex Printer]
3. Check that you can see a printer when
you select [Search for Printers].
4. If a printer (s) is found, touch next to the
default printer and select [Save].
5. If you are unable to find your printer via
the search:
• Touch [Manually Configure].
• Enter the IP address of the printer.
• Touch [Test Connection].
6. If a connection is found, touch [Save].
7. If the connection is still not found, have
your system administrator check the
Network Settings in the Pre-Installation
Requirements for the KODAK DL2100
Duplex/Network Printer.
8. If the problem persists, contact KODAK
Service and Support.
28
Page 30

Correcting Print Skewing
Where does the skewing occur on the print?
Top of print Bottom of print
See “Cleaning the Front Pick
Rollers” below.
Cleaning the Front Pick Rollers
Important!
Make sure that you wear lint-free
gloves to perform this procedure.
1. Turn off the printer.
2. Unplug the power cord.
3. Pull out the paper trays.
4. Dampen a lint-free cloth with
warm water. Clean the rollers
in both paper trays.
one direction only, rotating
the roller to clean the entire
surface.
Wipe in
See “Cleaning the Duplex Rollers”
below.
5. Remove the paper trays from
the printer.
6. Repeat the cleaning
procedure on the rollers
inside of the bays for the
paper trays.
7. Wait approximately 5 minutes
for the rollers to dry.
8. Plug the power cord for the
printer into the power source.
9. Turn on the printer.
29
Page 31

Cleaning the Duplex Rollers
Important!
Make sure that you wear lint-free
gloves to perform this procedure.
1. Turn off the printer.
2. Unplug the power cord.
3. Open the cover for the duplex
unit.
4. Dampen a lint-free cloth with
warm water.
5. Turn one roller while you use
the damp cloth to wipe the
other roller. Use the damp
cloth to wipe the entire surface
of the roller. Repeat the
procedure for the second roller.
6. Use the damp cloth to clean
the lower set of rollers.
Wipe
in one direction only, rotating
the roller to clean the entire
surface.
7. Wait approximately 5 minutes
for the rollers to dry.
8. Close the cover for the duplex
unit.
9. Plug the power cord for the
printer into the power source.
10.Turn on the printer.
30
Page 32

Specifications
ITEM SPECIFICATION
Dimensions
(without
Duplex unit)
Weight 78 lbs (35.3 kg)
Print method LED exposed light source, electronic photographic
Print speeds up to 13 duplex sheets per minute
Resolution 600 x 600 dpi x 1 bit, 600 x 1200 dpi x 1 bit
Paper capacity 250 sheets in upper tray
Paper weight 148 g/m² in upper tray
Paper output 100 sheets in the top exit tray @ 80 g/m²
Paper fee d Paper tray
Media size -
Upper tray
Media size -
Lower tray
Width: 17 in. (43.5 cm)
Depth: 21 in. (53.6 cm)
Height: 14.6 in. (37 cm)
method
600 x 600 dpi x 2 bit
100 sheets in lower tray
270 g/m² in lower tray
8.5 x 11 in. (22 x 28 cm), A4
6.77 x 9.6 in. (17.2 x 24.4 cm) Greeting Card Paper
Media type KODAK DL2100 Duplex Printer Paper, KODAK DL2100
Duplex Printer Greeting Card Paper
Replacement
Toner life
Image drum
life
Belt life 30,000 sheets
Fuser life 30,000 sheets
Power supply 220 to 240 V AC @ 50/60 Hz ± 1 Hz
1000 duplex sheets for cyan, magenta, and yellow
5000 duplex sheets for black
Minimum - 10,000 duplex sheets
31
Page 33

ITEM SPECIFICATION
Power
consumption
Temperature Operating: 50 to 90° F (10 to 32 °C)
Print
environment
Noise
(Sound
pressure level)
Operating: 1200 maximum; 530 W (25°C)
Stand-by: 100 maximum; 150 W (25°C)
Power saving: 17 W maximum
20 to 80% Relative Humidity
Storage: 32 to 109° F (0 to 43 °C)
10 to 90% Relative Humidity
59 to 80° F (15 to 27 °C)
20 to 80% Relative Humidity
Operating: 55dB(A)
Standby: 37dB(A)
32
Page 34

Eastman Kodak Company
343 State Street
Rochester, NY 14650
©Eastman Kodak Company, 2010 Kodak is a trademark. P/N 4J7470 04/10 Printed in U.S.A.
 Loading...