

Page 1
{PreventiveMaint}{Production}{Health Group}{Restricted}
Publication No. PM4366-1
07MAR08
Restricted
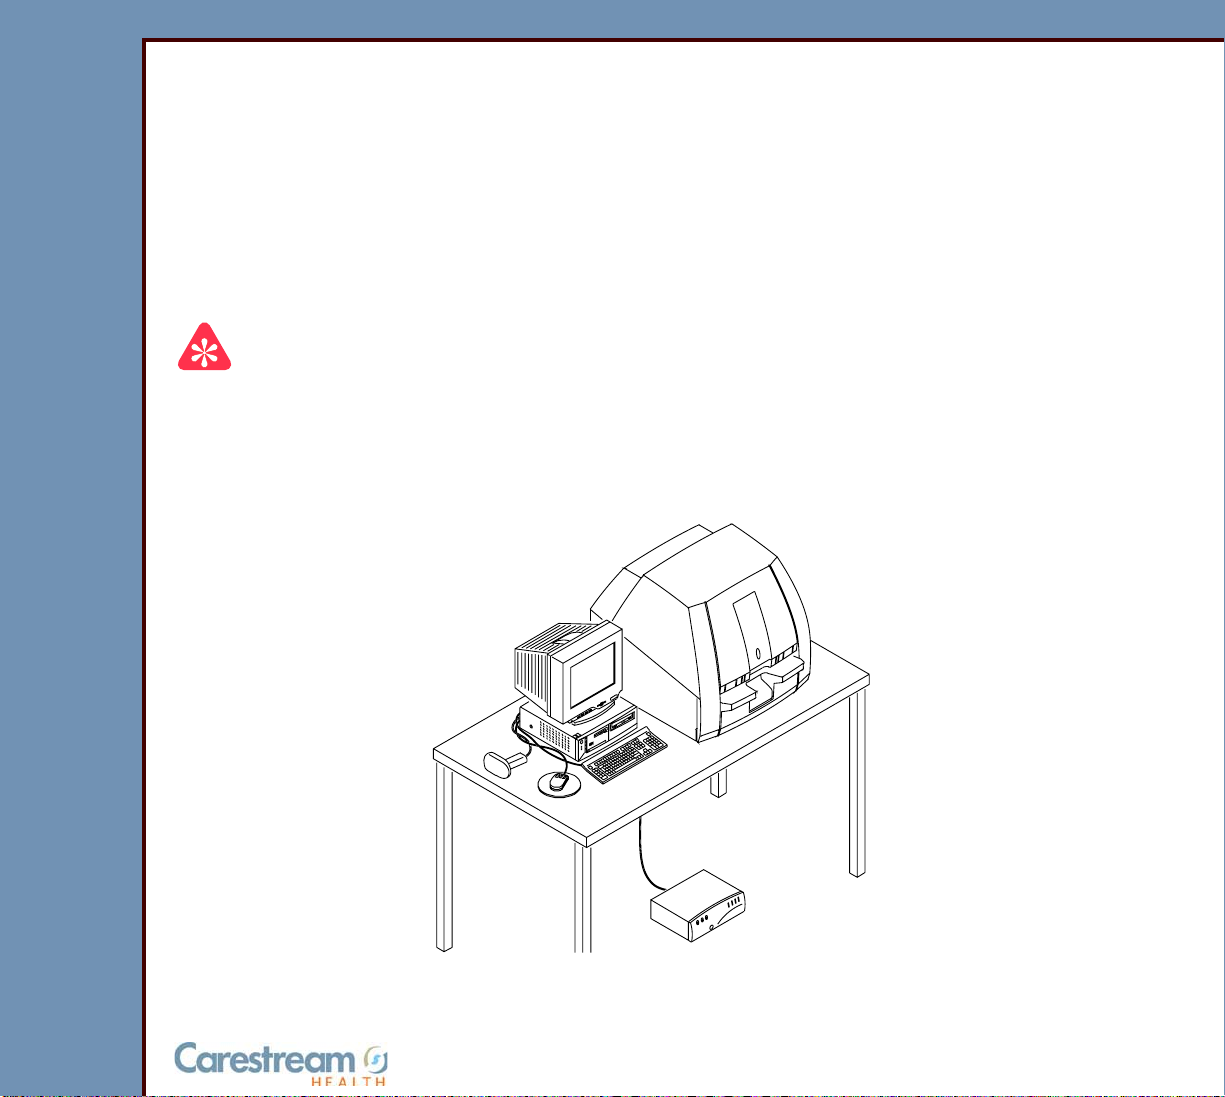
PREVENTIVE MAINTENANCE
for the
Kodak DirectView CR 500 SYSTEM
Service Code: 4366
Important
• Qualified service personnel must do these procedures.
• When doing the procedures in this document, you must use safe work practices and wear
the correct Personal Protective Equipment (for example: SAFETY EYEWEAR) according
to your Company’s Standard Operating Procedures.
H195_0016BC
© CARESTREAM HEALTH, INC.
Page 2

PREVENTIVE MAINTENANCE
07MAR08
PM4366-1
Page
2 of 31
PLEASE NOTE The information contained herein is based on the experience and knowledge relating to t he subject
matter gained by Carestream Health, Inc. prior to publication.
No patent license is granted by this information.
Carestream Health, Inc. reserves the right to chang e this information withou t notice, and ma kes no
warranty, express or implied, with respect to this infor mation. Carestr eam Health shall not be liable
for any loss or damage, including consequ ential o r special damages, resulting fr om any use of this
information, even if loss or damage is caused by Carestream Health’s negligence or other fault.
This equipment includes parts and assemblies sensitive to damage from electrostatic
discharge. Use caution to prevent damage during all service procedures.
Table of Contents
Description Page
Preventive Maintenance. . . . . . . . . . . . . . . . . . . . . . . . . . . . . . . . . . . . . . . . . . . . . . . . . 3
Necessary Materials . . . . . . . . . . . . . . . . . . . . . . . . . . . . . . . . . . . . . . . . . . . . 3
Maintenance Plan . . . . . . . . . . . . . . . . . . . . . . . . . . . . . . . . . . . . . . . . . . . . . . 3
Cleaning the CR 500 SYSTEM . . . . . . . . . . . . . . . . . . . . . . . . . . . . . . . . . . . . 4
Cleaning the SLOW SCAN AY. . . . . . . . . . . . . . . . . . . . . . . . . . . . . . . . . . . . 17
Cleaning the ERASE AY . . . . . . . . . . . . . . . . . . . . . . . . . . . . . . . . . . . . . . . . . 23
Cleaning the PHOSPHOR SCREENS . . . . . . . . . . . . . . . . . . . . . . . . . . . . . . 28
Checking the Operation . . . . . . . . . . . . . . . . . . . . . . . . . . . . . . . . . . . . . . . . . 30
Page 3
07MAR08
PM4366-1
Page
3 of 31
PREVENTIVE MAINTENANCE Preventive Maintenance
Section 1: Preventive Maintenance
Necessary Materials
Par t N o. Description
TL845 4977 Kodak SCREEN CLEANER
- - - LINT-FREE CLOTHS
- - - ESD-SAFE VACUUM CLEANER with DUST BRUSH ATTACHMENT
- - - LENS WIPES
1C8068 LENS CLEANER
Maintenance Plan
Caution
Only qualified service personnel must do the procedure Cleaning the SLOW SCAN AY.
Procedure Do:
Cleaning the CR 500 SYSTEM When necessary
Cleaning the SLOW SCAN AY When necessary
Cleaning the ERASE AY When necessary
Cleaning the PHOSPHOR SCREENS At each service call
Page 4
PREVENTIVE MAINTENANCE Preventive Maintenance
07MAR08
PM4366-1
Page
4 of 31
Cleaning the CR 500 SYSTEM
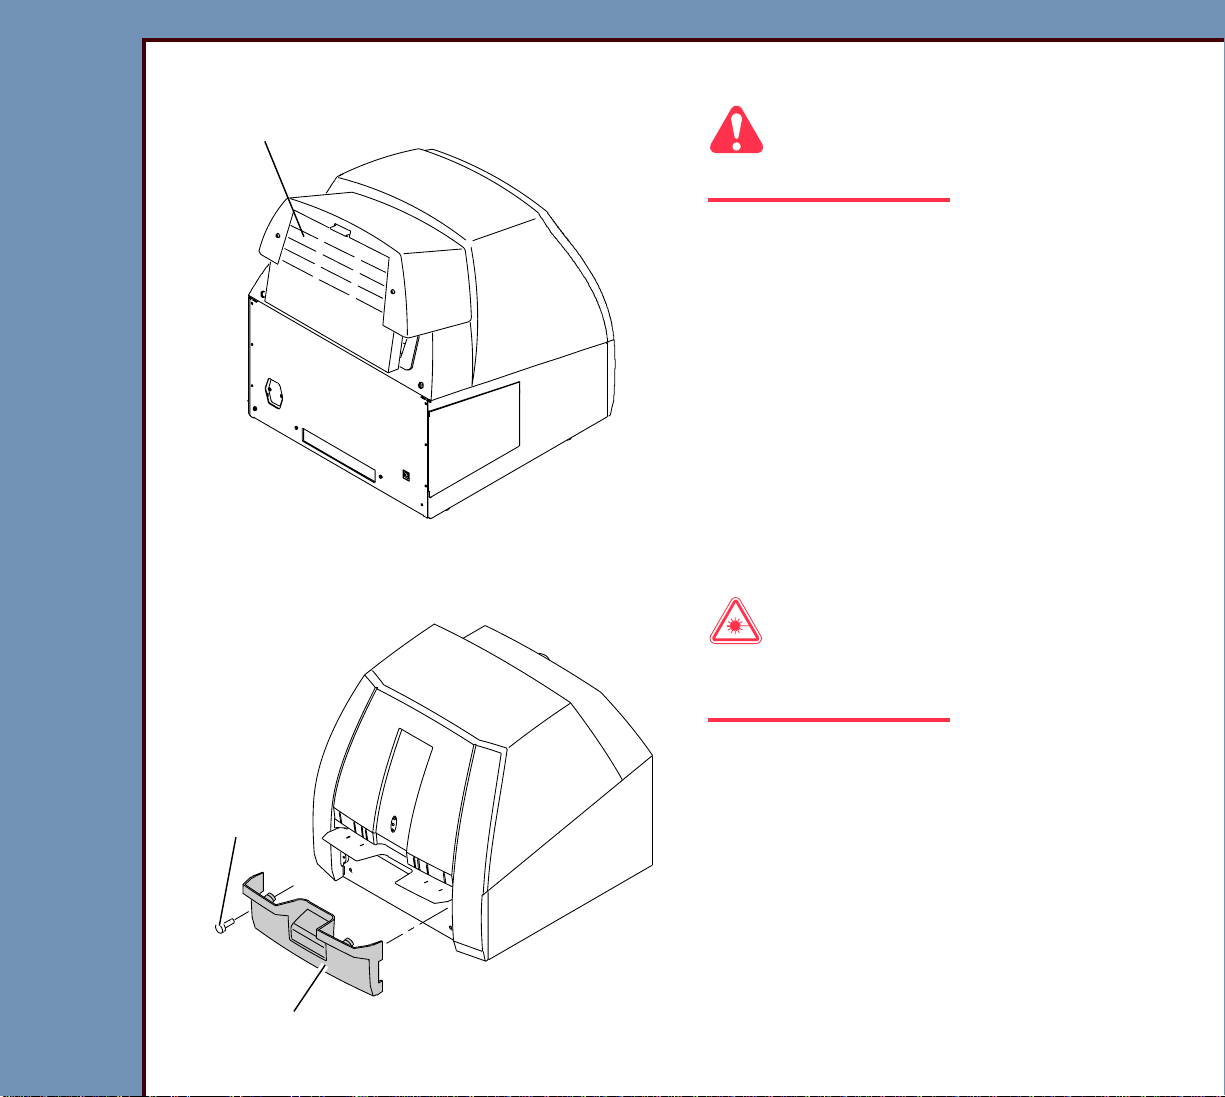
BACK DOOR AY
H195_1189ACA
H195_1189AC
Caution
Dangerous Voltage
1 De-energize and disconnect the Kodak
DirectView CR 500 SYSTEM from the
main power.
2 If necessary, remove the BACK DOOR
AY.
2 SCREWS
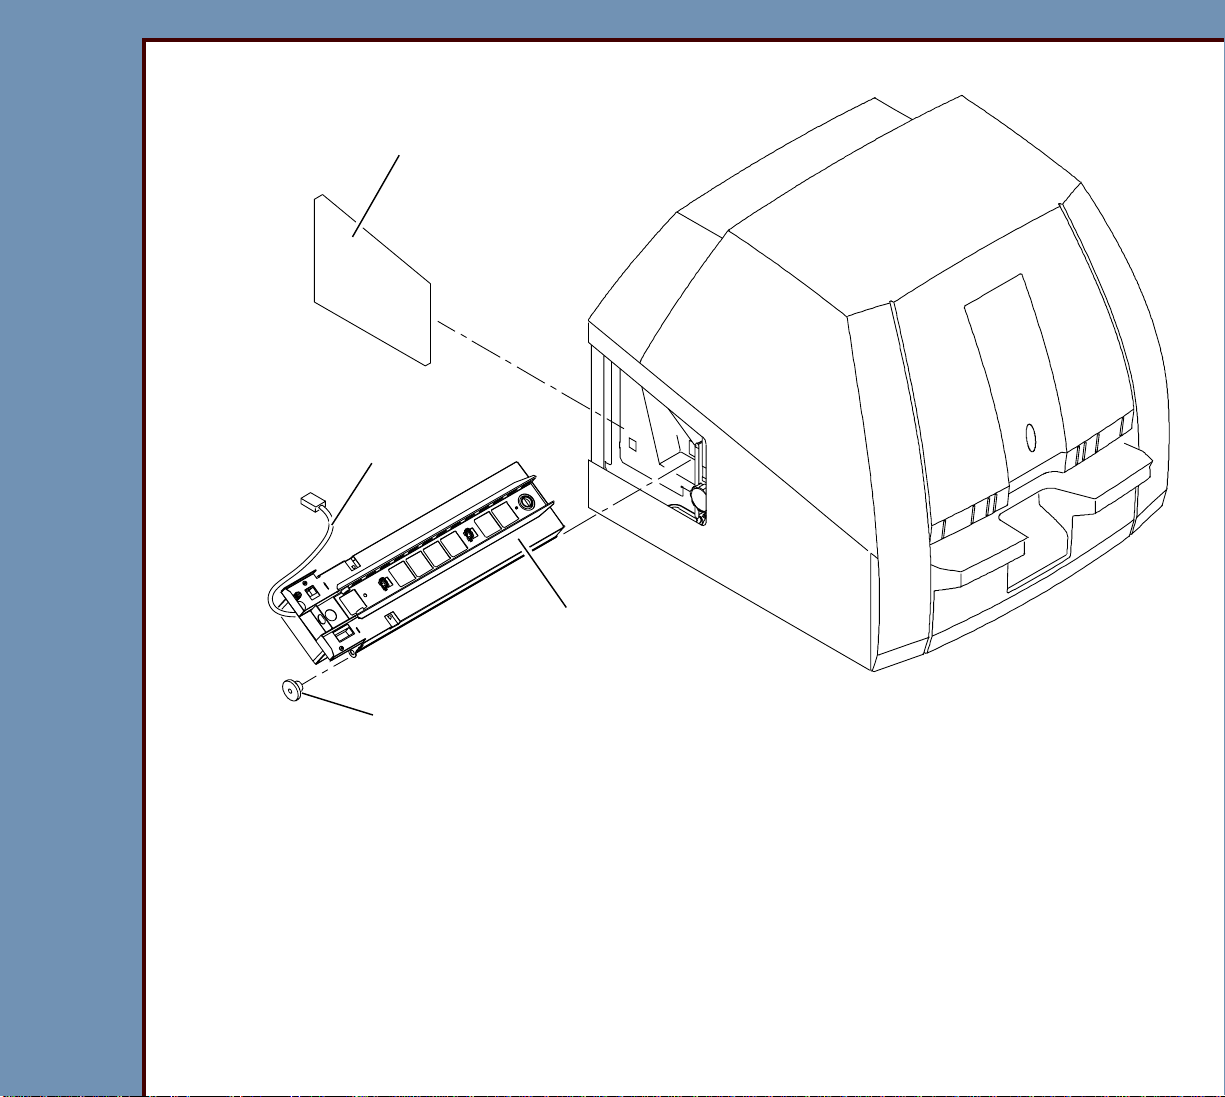
FRONT COVER
H195_1017ACA
H195_1017AC
Laser Warning
This equipment uses a visible red laser.
Prevent direct exposure to the laser beam.
3 Remove:
• 2 SCREWS
• FRONT COVER
Page 5
07MAR08
PM4366-1
Page
5 of 31
PREVENTIVE MAINTENANCE Preventive Maintenance
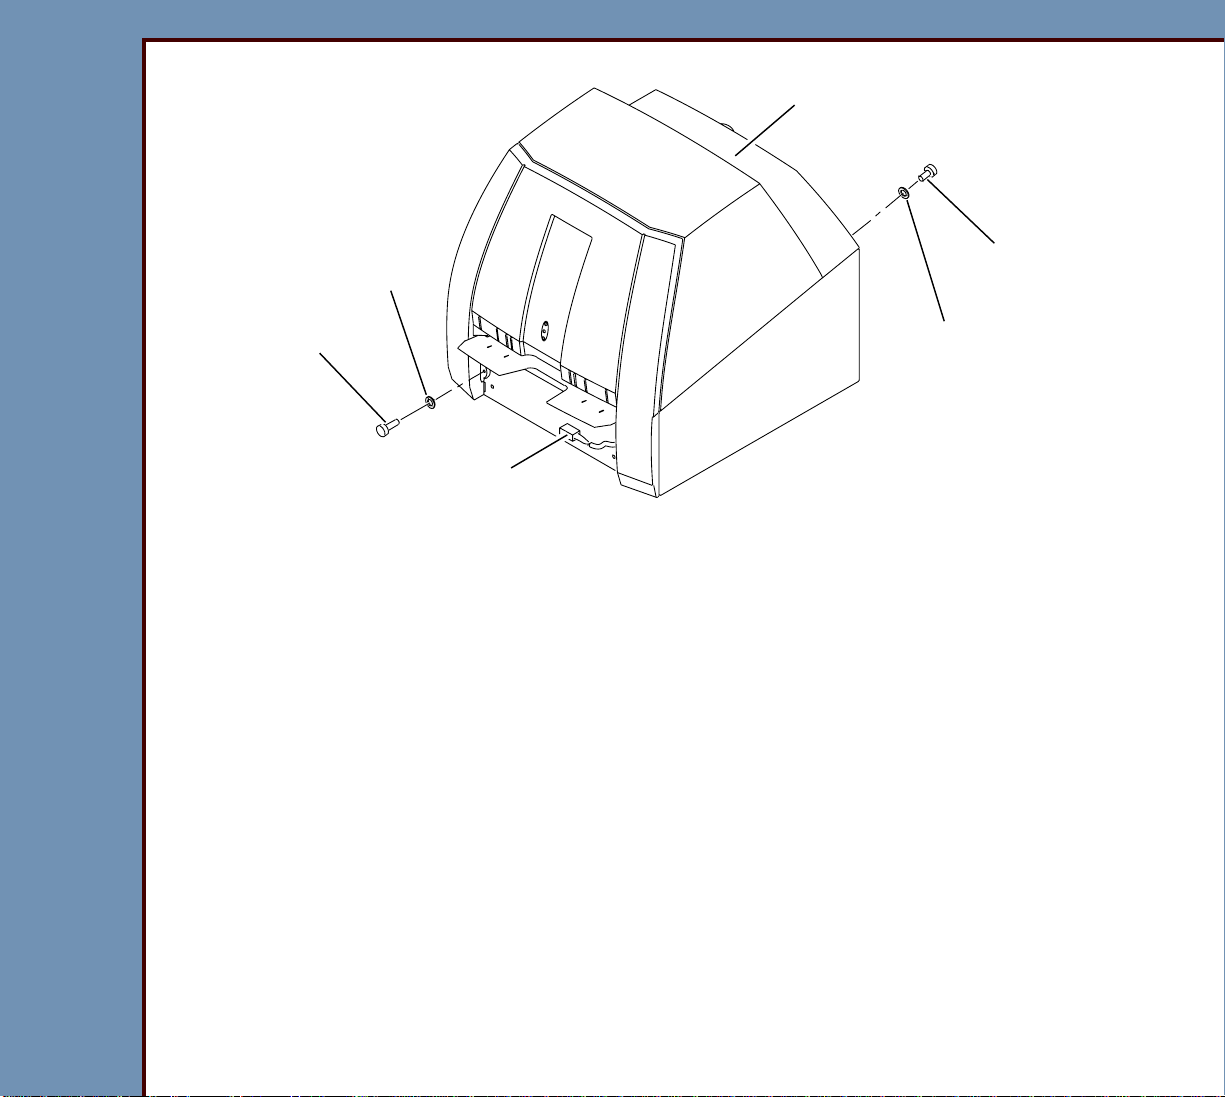
TOP COVER
2 WASHERS
2 front SCREWS
OPERATOR INTERFACE
CABLE CONNECTOR J101
2 WASHERS
4 Disconnect the OPERATOR INTERFACE CABLE CONNECTOR J101.
5 Remove:
• 2 front SCREWS
• 2 WASHERS
• 2 back SCREWS
• 2 WASHERS
• TOP COVER
2 back SCREWS
H195_1021BCA
H195_1021BC
Page 6
07MAR08
PM4366-1
Page
6 of 31
PREVENTIVE MAINTENANCE Preventive Maintenance
LEFT SIDE
ACCESS PANEL
ERASE AY
POWER CORD
ERASE LAMP
HOUSING AY
THUMBSCREW
6 Remove the LEFT SIDE ACCESS PANEL.
7 Disconnect the ERASE AY POWER CORD.
8 Remove:
• THUMBSCREW
• ERASE LAMP HOUSING AY
H195_1090HCA
H195_1090HC
Page 7
07MAR08
PM4366-1
Page
7 of 31
PREVENTIVE MAINTENANCE Preventive Maintenance
110 V
POWER
CORD
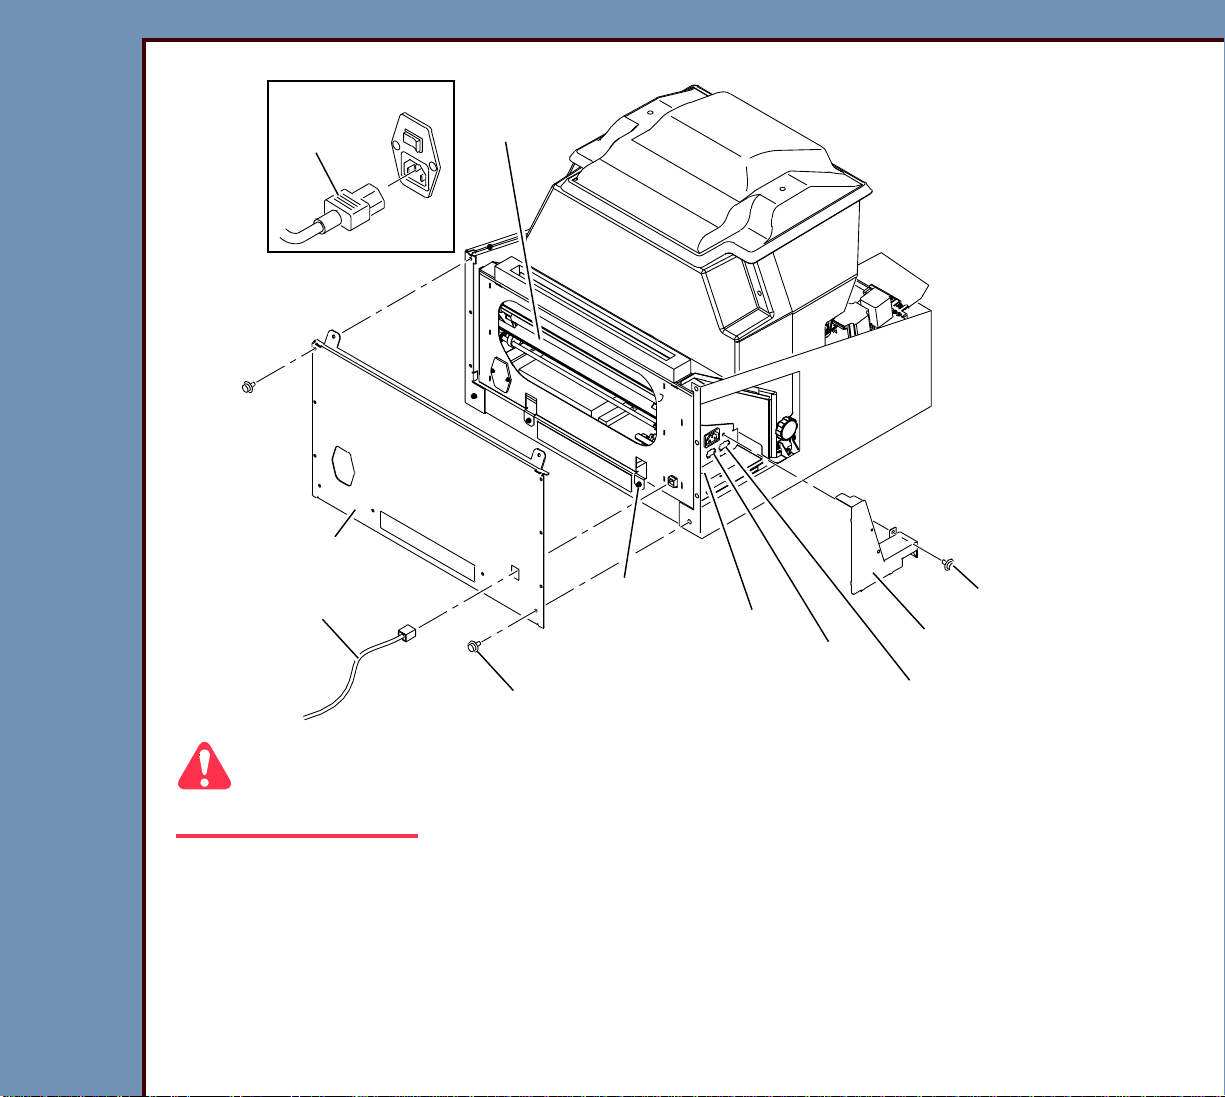
BACK COVER
ERASE AY
NETWORK
CABLE
Caution
Dangerous Voltage
9 Disconnect:
• 110 V POWER CORD
• NETWORK CABLE
8 SCREWS
2 SCREWS
CONNECTOR RJ45
CONNECTOR A9P1
DRIVE BELT COVER
CONNECTOR A9J2
2 SCREWS
H195_1216HCA
H195_1216HC
Page 8

PREVENTIVE MAINTENANCE Preventive Maintenance
07MAR08
PM4366-1
Page
8 of 31
10 Remove:
• 8 SCREWS
• BACK COVER
• 2 SCREWS
• DRIVE BELT COVER
11 Disconnect the CONNECTORS:
• RJ45
• A9P1
• A9J2
Caution
Be careful. Do not allow the ERASE AY to fall.
12 Remove:
• 2 SCREWS
• ERASE AY
13 Place the ERASE AY on a flat surface.
Page 9
07MAR08
PM4366-1
Page
9 of 31
PREVENTIVE MAINTENANCE Preventive Maintenance
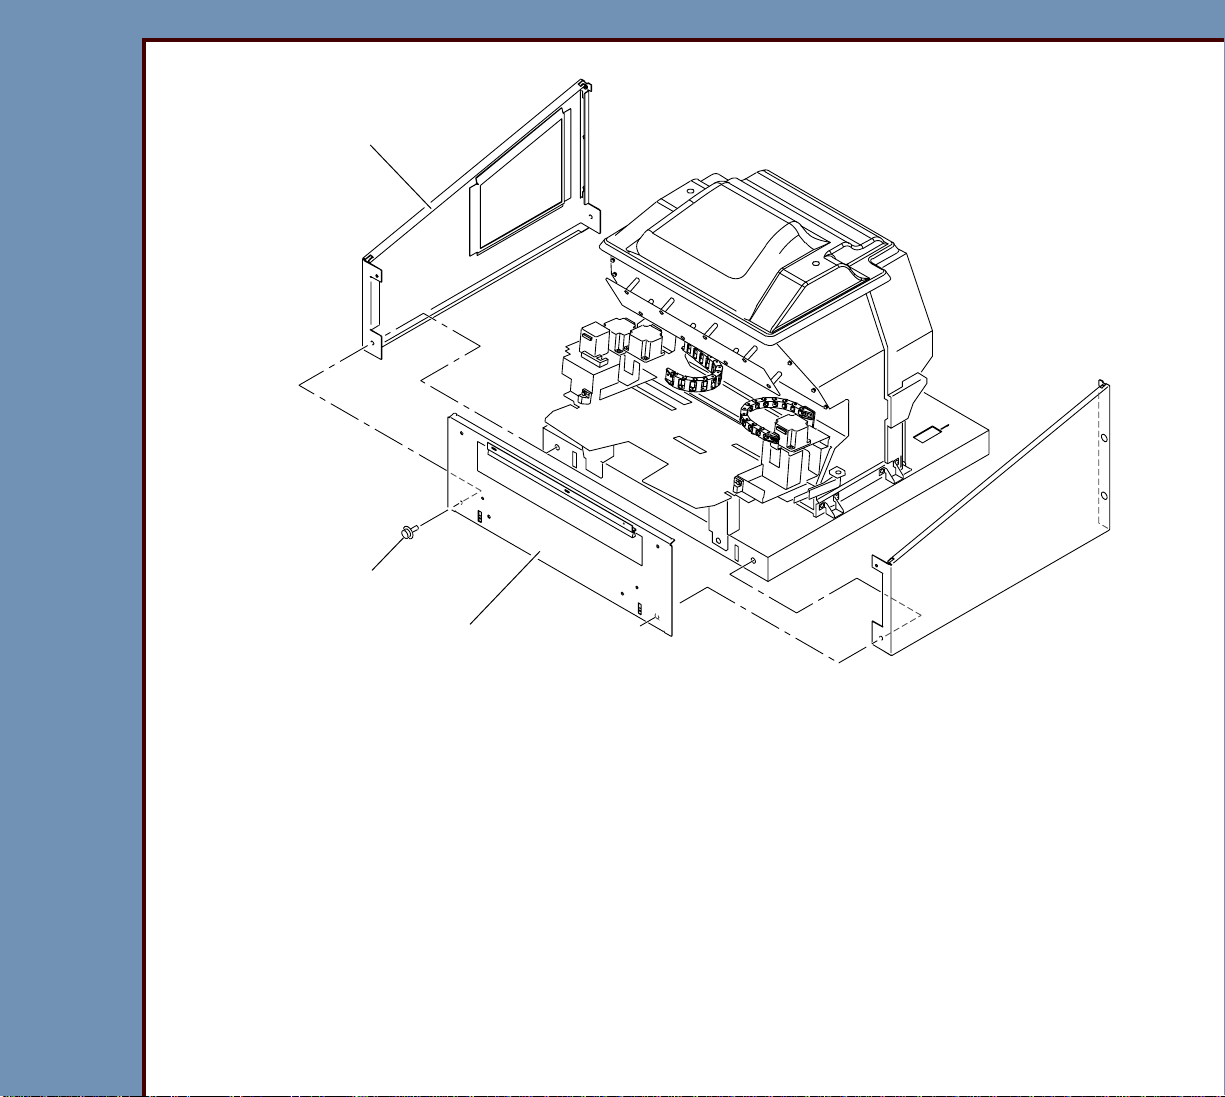
2 SIDE PANELS
6 SCREWS
14 Remove:
• 6 SCREWS
• FRONT PANEL
• 2 SIDE PANELS
FRONT PANEL
H195_1217HCA
H195_1217HC
Page 10
07MAR08
PM4366-1
Page
10 of 31
PREVENTIVE MAINTENANCE Preventive Maintenance
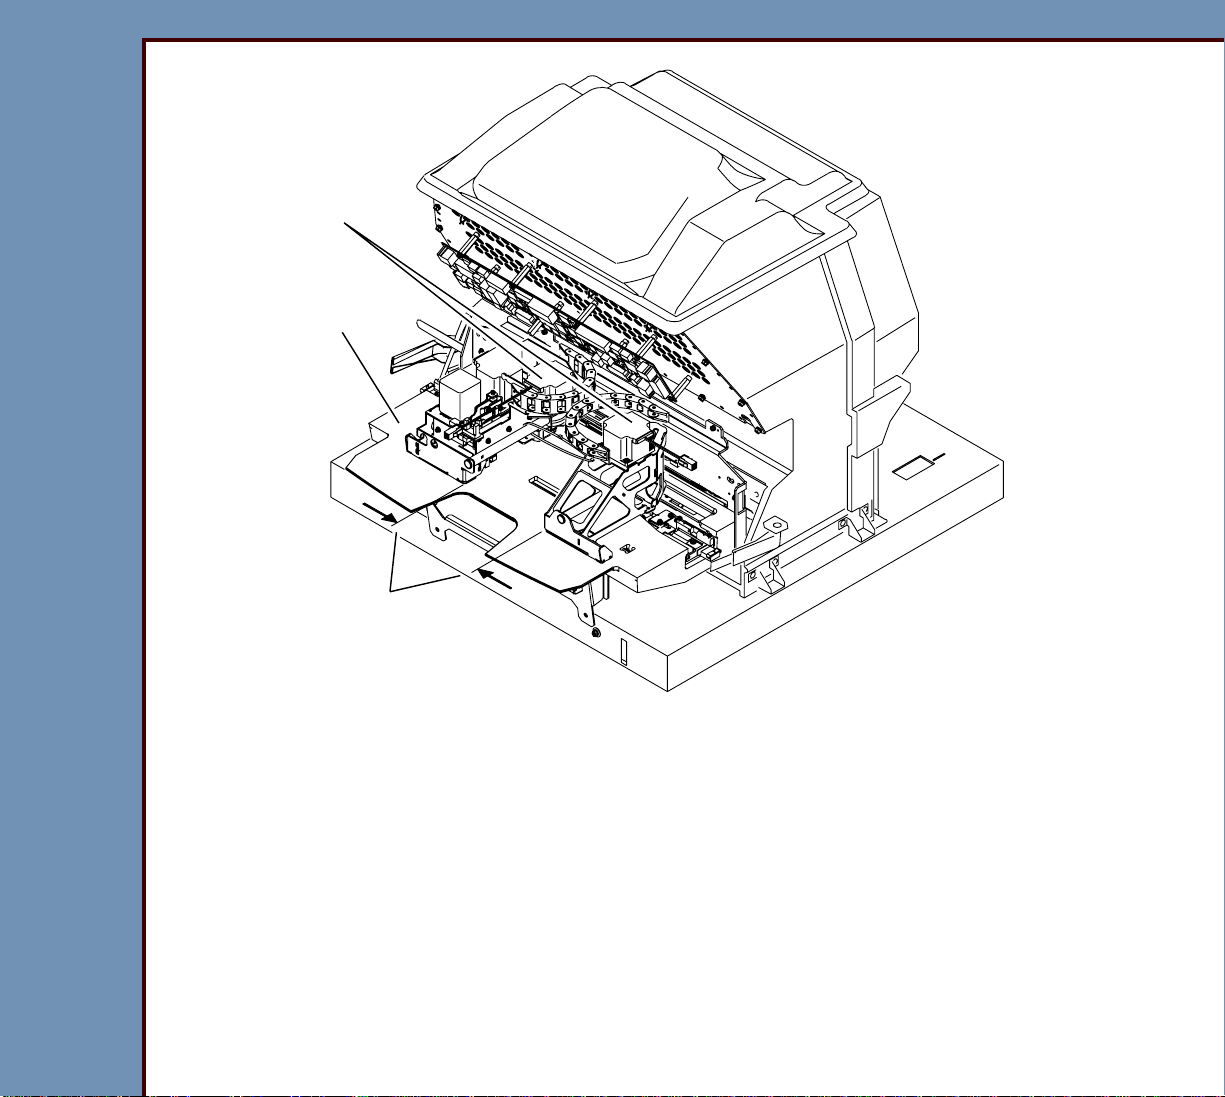
2 CASSETTE
GUIDES
CASSETTE
INTERFACE AY
center
position
H195_1234HCA
H195_1234HC
15 Use the ESD-SAFE VACUUM CLEANER to carefully remove all dust and debris from the
CASSETTE INTERFACE AY.
16 Move the 2 CASSETTE GUIDES to the outside, and continue cleaning the CASSETTE
INTERFACE AY.
17 If any dust or debris remains on the CASSETTE INTERFACE AY, carefully use a damp,
LINT-FREE CLOTH to remove it.
18 Move the 2 CASSETTE GUIDES to the center position of the CASSETTE INTERFACE
AY.
Page 11

07MAR08
PM4366-1
Page
11 of 31
PREVENTIVE MAINTENANCE Preventive Maintenance
2 SCREWS
LASER SAFETY
COVER
4 SCREWS
BACK LIGHT
LOCK COVER
19 Remove:
• 2 SCREWS
• LASER SAFETY COVER
• 4 SCREWS
• BACK LIGHT LOCK COVER
H195_1034HCA
H195_1034HC
Page 12

07MAR08
PM4366-1
Page
12 of 31
PREVENTIVE MAINTENANCE Preventive Maintenance
CONNECTOR A5J1
CONNECTOR
A5J2
H195_1167HCA
H195_1167HC
20 Disconnect from the PMT BOARD:
• CONNECTOR A5J2
• CONNECTOR A5J1
ESD
Possible damage from electrostatic discharge.
PMT BOARD
Page 13

07MAR08
PM4366-1
Page
13 of 31
PREVENTIVE MAINTENANCE Preventive Maintenance
2 SCREWS
CONNECTOR
A11P2
2 top SCREWS
2 bottom SCREWS
ENCODER CABLE
SLOW SCAN COLLECTOR BOARD
CONTROLLER BOARD
CONNECTOR A7J1
Important
The PMT BOARD is not displayed in the graphic.
21 Loosen the 2 SCREWS for the CONNECTOR A11P2.
22 Disconnect:
• CONNECTOR A11P2
• CONNECTOR A7J1 from the SLOW SCAN CONTROLLER BOARD
• ENCODER CABLE from the SLOW SCAN CONTROLLER BOARD
SLOW SCAN AY
FRAME CHANNEL
H195_1164HCA
H195_1164HC
Page 14

PREVENTIVE MAINTENANCE Preventive Maintenance
07MAR08
PM4366-1
Page
14 of 31
23 Remove from the FRAME CHANNEL:
• ENCODER CABLE
• CONNECTOR A7J1
24 Remove from the SLOW SCAN AY:
• 2 bottom SCREWS
• 2 top SCREWS
Caution
The weight of the SLOW SCAN AY is 13 kg (45 lb).
25 Tilt the SLOW SCAN AY backward to remove.
26 Place the SLOW SCAN AY on a flat surface.
Page 15

07MAR08
PM4366-1
Page
15 of 31
PREVENTIVE MAINTENANCE Preventive Maintenance
F-THETA LENS
MINI-FAST SCAN BOARD - do not touch or clean
MSC
BOARD
BASE FRAME
OPTICAL FRAME
OPTICAL CAVITY
H195_1235HCA
H195_1235HC
SLOW SCAN BOARD
ESD
Possible damage from electrostatic discharge.
27 Connect your ESD WRIST STRAP to the ground on the CR 500 SYSTEM.
Caution
Do not clean or touch the MINI-FAST SCAN BOARD.
Page 16

PREVENTIVE MAINTENANCE Preventive Maintenance
07MAR08
PM4366-1
Page
16 of 31
28 Use the ESD-SAFE VACUUM CLEANER to remove all dust and debris from:
• OPTICAL CAVITY
• OPTICAL FRAME
• SLOW SCAN BOARD
• BASE FRAME
• MSC BOARD
29 If any dust or debris remains on the CR 500 SYSTEM, carefully use a damp, LINT-FREE
CLOTH to remove it.
30 Carefully clean any dust and debris from the F-THETA LENS. Use:
• LENS WIPES, or
• LINT-FREE CLOTH
• LENS CLEANER 1C8068
Page 17

PREVENTIVE MAINTENANCE Preventive Maintenance
07MAR08
PM4366-1
Page
17 of 31
Cleaning the SLOW SCAN AY
Important
• You must:
RP 1 DRIVE ROLLER
RP 1 PRESSURE ROLLER
H195_1214BCA
H195_1214BC
– rotate the ROLLERS to clean all sides
– clean the ROLLERS until the cloth has no black debris
• If necessary, use more than one LINT-FREE CLOTH.
1 Use water and a LINT-FREE CLOTH to clean:
• RP 1 PRESSURE ROLLER
• RP 1 DRIVE ROLLER
2 Allow the ROLLERS to dry.
Page 18

PREVENTIVE MAINTENANCE Preventive Maintenance
07MAR08
PM4366-1
Page
18 of 31
3 Check that the ROLLERS are:
• clean
• dry
• free of debris
2 SCREWS
CONNECTOR
A11P2
2 top SCREWS
2 bottom SCREWS
ENCODER CABLE
SLOW SCAN COLLECTOR BOARD
CONTROLLER BOARD
CONNECTOR A7J1
SLOW SCAN AY
FRAME CHANNEL
H195_1164HCA
H195_1164HC
Page 19

07MAR08
PM4366-1
Page
19 of 31
PREVENTIVE MAINTENANCE Preventive Maintenance
Caution
• The weight of the SLOW SCAN AY is 13 kg (45 lb).
• The PMT BOARD is not displayed in the graphic.
4 Tilt the SLOW SCAN AY backward to install.
5 Install:
• 2 bottom SCREWS
• 2 top SCREWS
6 Insert into the FRAME CHANNEL:
• ENCODER CABLE
• CONNECTOR A7J1
7 Connect:
• CONNECTOR A11P2
• CONNECTOR A7J1 to the SLOW SCAN CONTROLLER BOARD
• ENCODER CABLE to the SLOW SCAN CONTROLLER BOARD
8 Tighten the 2 SCREWS for the CONNECTOR A11P2.
Page 20

07MAR08
PM4366-1
Page
20 of 31
PREVENTIVE MAINTENANCE Preventive Maintenance
CONNECTOR A5J1
CONNECTOR
A5J2
H195_1167HCA
H195_1167HC
ESD
Possible damage from electrostatic discharge.
9 Connect to the PMT BOARD:
• CONNECTOR A5J1
• CONNECTOR A5J2
PMT BOARD
Page 21

07MAR08
H195_1034HC
LOCK COVER
BACK LIGHT
4 SCREWS
COVER
LASER SAFETY
2 SCREWS
H195_1034HCA
PM4366-1
Page
21 of 31
PREVENTIVE MAINTENANCE Preventive Maintenance
10 Use the ESD-SAFE VACUUM CLEANER to remove the dust and debris from both sides
of:
• BACK LIGHT LOCK COVER
• LASER SAFETY COVER
11 Install:
• BACK LIGHT LOCK COVER
• 4 SCREWS
• LASER SAFETY COVER
• 2 SCREWS
Page 22

07MAR08
PM4366-1
Page
22 of 31
PREVENTIVE MAINTENANCE Preventive Maintenance
2 SIDE PANELS
6 SCREWS
FRONT PANEL
12 Use the ESD-SAFE VACUUM CLEANER to carefully clean:
• FRONT PANEL
• 2 SIDE PANELS
• BACK COVER
13 Install:
• 2 SIDE PANELS
• FRONT PANEL
• 6 SCREWS
H195_1217HCA
H195_1217HC
Page 23

PREVENTIVE MAINTENANCE Preventive Maintenance
07MAR08
PM4366-1
Page
23 of 31
Cleaning the ERASE AY
ERASE AY
SCREEN GUIDE
2 SCREWS
ERASE AY
TOP COVER
H195_1236HCA
H195_1236HC
1 Remove:
• 2 SCREWS
• ERASE AY TOP COVER
• 2 SCREWS
• ERASE AY SCREEN GUIDE
2 SCREWS
Page 24

07MAR08
PM4366-1
Page
24 of 31
PREVENTIVE MAINTENANCE Preventive Maintenance
ESD
Possible damage from electrostatic discharge.
2 Use the ESD-SAFE VACUUM CLEANER to carefully remove dust and debris from the
POWER SUPPLY.
3 Use a damp, LINT-FREE CLOTH to carefully clean:
• ERASE AY
• ERASE TOP COVER
• ERASE LAMP AY
• DRIVE BELT COVER
4 Install:
• ERASE AY SCREEN GUIDE
• 2 SCREWS
• ERASE AY TOP COVER
• 2 SCREWS
Page 25

07MAR08
PM4366-1
Page
25 of 31
PREVENTIVE MAINTENANCE Preventive Maintenance
110 V
110 V
POWER
POWER
CORD
CORD
BACK COVER
BACK COVER
NETWORK
NETWORK
CABLE
CABLE
ERASE AY
ERASE AY
2 SCREWS
2 SCREWS
8 SCREWS
8 SCREWS
CONNECTOR RJ45
CONNECTOR A9P1
CONNECTOR A9J2
2 SCREWS
2 SCREWS
DRIVE BELT COVER
DRIVE BELT COVER
H195_1142HCA
H195_1142HCA
H195_1142HC
Caution
Be careful. Do not allow the ERASE AY to fall.
5 Install:
• ERASE AY
• 2 SCREWS
Page 26

PREVENTIVE MAINTENANCE Preventive Maintenance
07MAR08
PM4366-1
Page
26 of 31
6 Connect the CONNECTORS:
• A9P1
• A9J2
• RJ45
7 Install:
• DRIVE BELT COVER
• 2 SCREWS
• BACK COVER
• 8 SCREWS
Caution
Dangerous Voltage
8 Connect:
• 110 V POWER CORD
• NETWORK CABLE
9 Install:
• TOP COVER
• 4 WASHERS
• 4 SCREWS
• FRONT COVER
• 2 SCREWS
Page 27

07MAR08
PM4366-1
Page
27 of 31
PREVENTIVE MAINTENANCE Preventive Maintenance
10 Remove the FOAM.
FOAM
11 Use water and mild detergent to clean
the FOAM.
12 Rinse the FOAM.
13 Squeeze the FOAM to remove all the
water.
14 Install the FOAM.
H195_1237ACA
H195_1237AC
Page 28

PREVENTIVE MAINTENANCE Preventive Maintenance
07MAR08
PM4366-1
Page
28 of 31
Cleaning the PHOSPHOR SCREENS
Caution
• Do not cause damage to the PHOSPHOR SCREENS.
• The PHOSPHOR SCREENS are sensitive to water.
• Do not use excessive force to clean the surface of the PHOSPHOR SCREENS.
• You must clean both sides of the PHOSPHOR SCREENS.
• Before starting to clean the PHOSPHOR SCREENS, you must:
– wash your hands with mild soap and water
– use Nitrile or equivalent powder-free GLOVES
– prepare a flat, clean, horizontal surface
• You must do these procedures for all the CASSETTES at the site.
Page 29

07MAR08
PM4366-1
Page
29 of 31
PREVENTIVE MAINTENANCE Preventive Maintenance
1 Move the LATCH to the left to open the
FLEXIBLE PHOSPHOR SCREEN.
FLEXIBLE
PHOSPHOR
SCREEN
CASSETTE
2 Remove the PHOSPHOR SCREEN
from the CASSETTE.
3 Apply the Kodak SCREEN CLEANER
TL845 4977 to a LINT-FREE CLOTH.
E
B E S I D
T U
KC
VM
D
SFIFJO
LZX
Important
• Do not pour the SCREEN CLEANER
directly on the PHOSPHOR SCREEN.
hole
• You must wipe the PHOSPHOR
SCREEN in only one direction.
4 Carefully wipe the PHOSPHOR
SCREEN until all dust and debris are
removed. If necessary, use a new LINT-
To
Open
LATCH
H195_1103GCA
H195_1103GC
FREE CLOTH.
5 Check that no debris remains on the
PHOSPHOR SCREEN.
Important
Do not leave the PHOSPHOR SCREEN to
dry in the air.
6 Use a LINT-FREE CLOTH to wipe the
PHOSPHOR SCREEN until it is dry.
7 Did the SCREEN CLEANER clean the PHOSPHOR SCREEN?
Yes No
Insert the PHOS PHOR SCREEN into the
Call the Technical Service Center.
CASSETTE.
Page 30

PREVENTIVE MAINTENANCE Preventive Maintenance
07MAR08
PM4366-1
Page
30 of 31
Checking the Operation
Caution
Dangerous Voltage
1 Connect the main power.
2 Check that the equipment is operating correctly.
Page 31

PREVENTIVE MAINTENANCE Preventive Maintenance
07MAR08
PM4366-1
Page
31 of 31
Table 1 Publication History
Publication
Date
Publication
No.
ECO No.
Changed
Pages
File Name Notes
07MAR08 PM4366-1 ----- --- pm4366_1.fm New Publication
Printed in U.S.A. • pm4366_1.fm
Carestream Health, Inc.
150 Verona Street
Rochester, NY 14608
DirectView is a trademark of Carestream Health.
Kodak is a trademark of Kodak used under license.
 Loading...