

Page 1

Kodak Digital Science
(TM)
DC40 camera
User’s Guide
Page 2

Contents
Introduction 1. . . . . . . . . . . . . . . . . . . . . . . . . . . . . . . . . . . . . . . . . . . . . . . . . . .
About the
Features 1. . . . . . . . . . . . . . . . . . . . . . . . . . . . . . . . . . . . . . . . . . . . . . . . .
1 Getting Started 2. . . . . . . . . . . . . . . . . . . . . . . . . . . . . . . . . . . . . . . . . . . . .
Checking Package Contents 2. . . . . . . . . . . . . . . . . . . . . . . . . . . . . . . . .
Parts of the Camera 3. . . . . . . . . . . . . . . . . . . . . . . . . . . . . . . . . . . . . . . .
Installing the Batteries 4. . . . . . . . . . . . . . . . . . . . . . . . . . . . . . . . . . . . . .
Turning the Camera On and Off 7. . . . . . . . . . . . . . . . . . . . . . . . . . . . . .
2 Using the Camera 8. . . . . . . . . . . . . . . . . . . . . . . . . . . . . . . . . . . . . . . . . .
Accessing Controls 8. . . . . . . . . . . . . . . . . . . . . . . . . . . . . . . . . . . . . . . . .
Moving Between Features 9. . . . . . . . . . . . . . . . . . . . . . . . . . . . . . . . .
Making Feature Selections 10. . . . . . . . . . . . . . . . . . . . . . . . . . . . . . . . .
Setting the Flash 11. . . . . . . . . . . . . . . . . . . . . . . . . . . . . . . . . . . . . . . . . . .
Flash Setting Descriptions 11. . . . . . . . . . . . . . . . . . . . . . . . . . . . . . . . .
Kodak Digital Science
(TM) DC40 camera 1. . . . . . . . . . . .
1/96
Setting the Timer 14. . . . . . . . . . . . . . . . . . . . . . . . . . . . . . . . . . . . . . . . . . .
Timer Setting Descriptions 14. . . . . . . . . . . . . . . . . . . . . . . . . . . . . . . . .
Setting the Exposure 17. . . . . . . . . . . . . . . . . . . . . . . . . . . . . . . . . . . . . . .
i
Page 3

Waking the Camera 19. . . . . . . . . . . . . . . . . . . . . . . . . . . . . . . . . . . . . . . .
Taking Pictures 19. . . . . . . . . . . . . . . . . . . . . . . . . . . . . . . . . . . . . . . . . . . .
Managing Pictures 21. . . . . . . . . . . . . . . . . . . . . . . . . . . . . . . . . . . . . . . . .
Storing Pictures 21. . . . . . . . . . . . . . . . . . . . . . . . . . . . . . . . . . . . . . . . . .
Erasing Pictures 21. . . . . . . . . . . . . . . . . . . . . . . . . . . . . . . . . . . . . . . . . .
3 Using Batteries 24. . . . . . . . . . . . . . . . . . . . . . . . . . . . . . . . . . . . . . . . . . . . .
Battery Charge Level 25. . . . . . . . . . . . . . . . . . . . . . . . . . . . . . . . . . . . . . .
Battery Safety Information 26. . . . . . . . . . . . . . . . . . . . . . . . . . . . . . . . . . .
Improving Battery Performance 27. . . . . . . . . . . . . . . . . . . . . . . . . . . . . .
About NiCad Batteries 28. . . . . . . . . . . . . . . . . . . . . . . . . . . . . . . . . . . . . .
4 Using a Power Adapter 29. . . . . . . . . . . . . . . . . . . . . . . . . . . . . . . . . . . . .
5 Connecting to a Computer 31. . . . . . . . . . . . . . . . . . . . . . . . . . . . . . . . . .
Connecting to a MACINTOSH Computer 31. . . . . . . . . . . . . . . . . . . . . .
Connecting to a Computer Running WINDOWS Software 33. . . . . . . .
6 Maintenance 34. . . . . . . . . . . . . . . . . . . . . . . . . . . . . . . . . . . . . . . . . . . . . . .
General Guidelines 34. . . . . . . . . . . . . . . . . . . . . . . . . . . . . . . . . . . . . . . . .
Cleaning the Lens 34. . . . . . . . . . . . . . . . . . . . . . . . . . . . . . . . . . . . . . . . . .
Cleaning the Light Sensors 35. . . . . . . . . . . . . . . . . . . . . . . . . . . . . . . . . .
Storing the Camera 35. . . . . . . . . . . . . . . . . . . . . . . . . . . . . . . . . . . . . . . .
ii
1/96
Page 4

7 Troubleshooting 36. . . . . . . . . . . . . . . . . . . . . . . . . . . . . . . . . . . . . . . . . . . .
Problems and Solutions 36. . . . . . . . . . . . . . . . . . . . . . . . . . . . . . . . . . . . .
Getting Help 41. . . . . . . . . . . . . . . . . . . . . . . . . . . . . . . . . . . . . . . . . . . . . . .
Appendix A Camera Specifications 42. . . . . . . . . . . . . . . . . . . . . . . . . . . .
Regulatory Information 44. . . . . . . . . . . . . . . . . . . . . . . . . . . . . . . . . . . . . . . .
FCC Compliance and Advisory Statement 44. . . . . . . . . . . . . . . . . . . . .
Canadian DOC Statement 45. . . . . . . . . . . . . . . . . . . . . . . . . . . . . . . . . . .
Index 46. . . . . . . . . . . . . . . . . . . . . . . . . . . . . . . . . . . . . . . . . . . . . . . . . . . . . . . . .
1/96
iii
Page 5

Introduction
About the
The
Kodak Digital Science
you to capture images and then quickly transfer the images to your
computer so that you can save or manipulate them using image
editing software.
Kodak Digital Science
(TM) DC40 camera (DC40 camera) allows
(TM) DC40 camera
Features
The DC40 camera is very easy to use and offers the following features:
– flash settings
– timer settings
– exposure settings
– energy saving “sleep” mode
– built-in lens cover
– your choice of battery or power adapter as power supply
January 1996
– battery use display
– capability for accessory lens attachments
– standard tripod mount
1
Page 6

1 Getting Started
Checking Package Contents
As you unpack your new DC40 camera, make sure the following items
are included:
– 1 DC40 camera
– 4 lithium batteries
– 1 serial cable for use with Macintosh computers
– 1 serial cable for use with Windows computers
– 1 warranty registration card
– 1 9-pin adapter for a 25-pin serial port
Kodak Digital Science
–1
– 1 camera software application kit
(TM) Digital Camera Reference CD
2
January 1996
Page 7
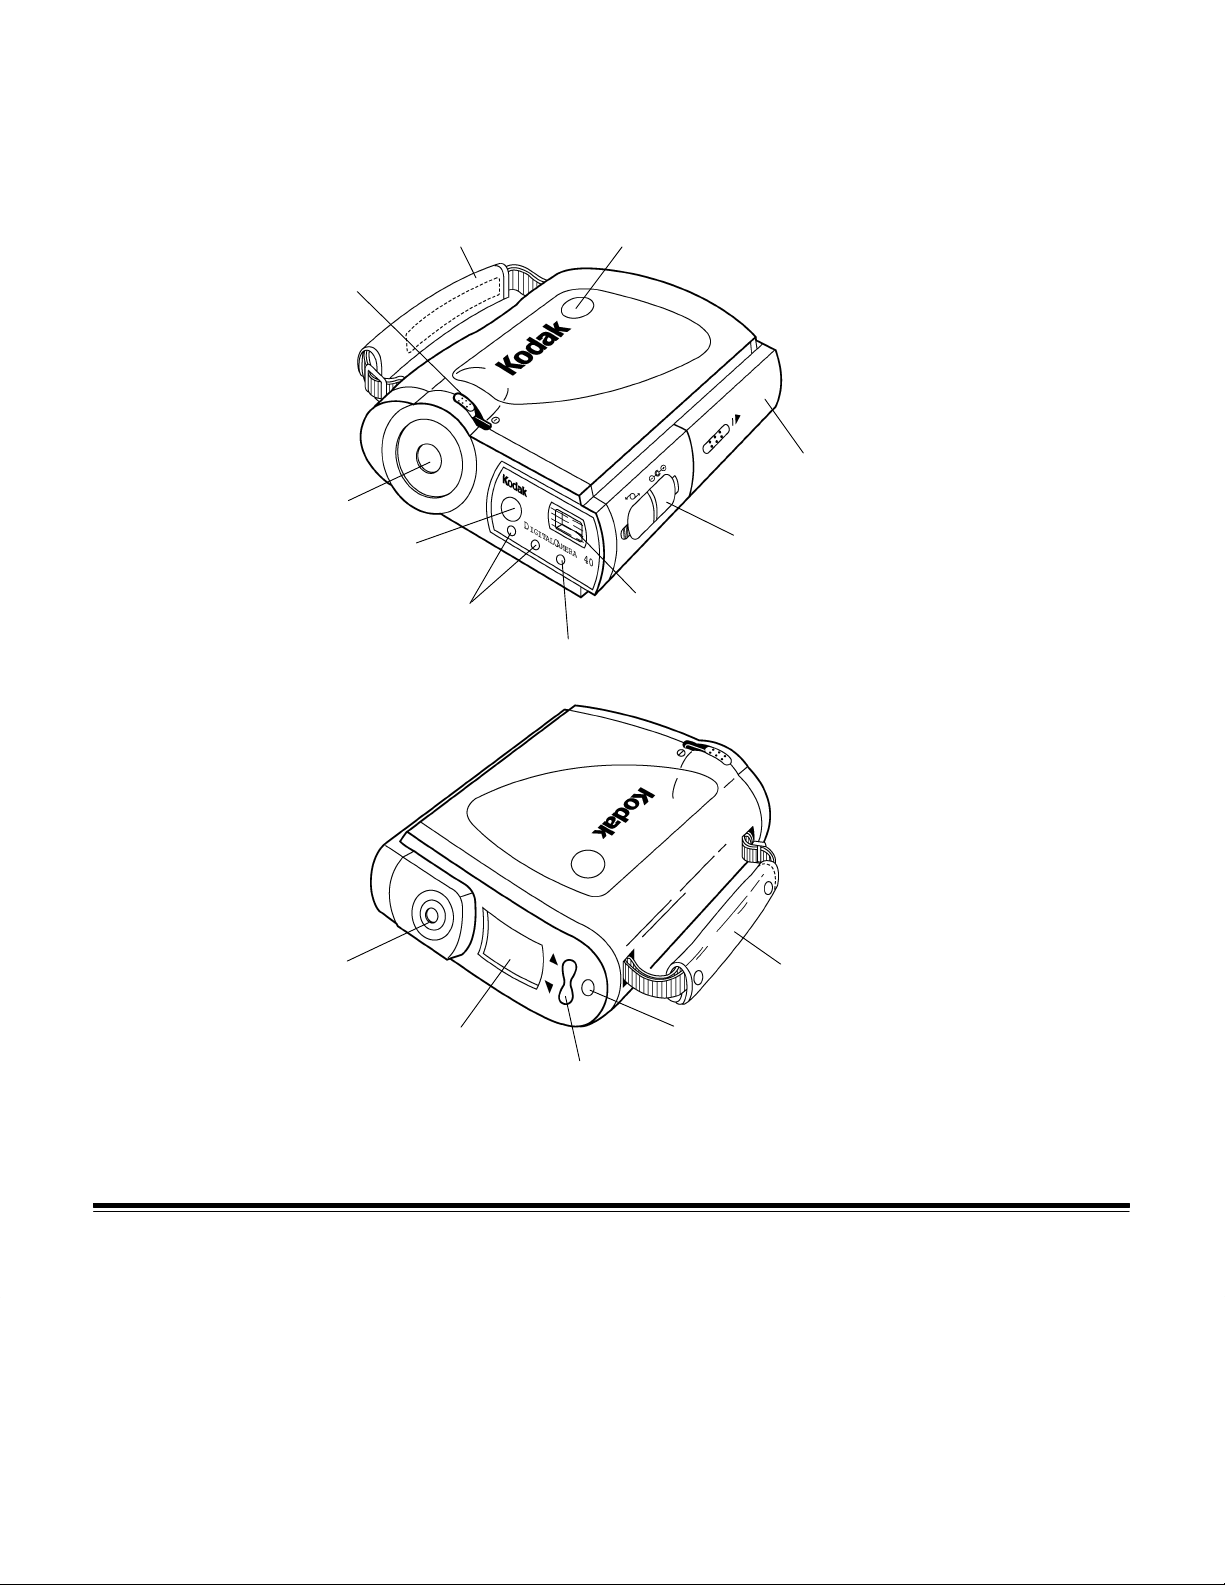
Parts of the Camera
The camera components are shown below.
Front
On/Off switch
Hand strap
(Lens cover switch)
Lens
Shutter button
Battery compartment
Back
Viewfinder
eye piece
Viewfinder
Light sensors
Display
Power adapter connection
and serial port compartment
Flash
Timer light
Hand strap
Feature button
Select button
January 1996
NOTE: Although not shown in the illustrations, a standard tripod mount
is located on the bottom of the camera.
3
Page 8
Installing the Batteries
Four lithium batteries come with your DC40 camera, however, you
can also use rechargeable NiCad or AA alkaline batteries. This
section describes how to install the batteries. Refer to Chapter 3,
Using Batteries
, for more information about battery use.
WARNING:
Mixing battery types in the camera may cause a fire
or explosion. Install only batteries of the same type
at one time.
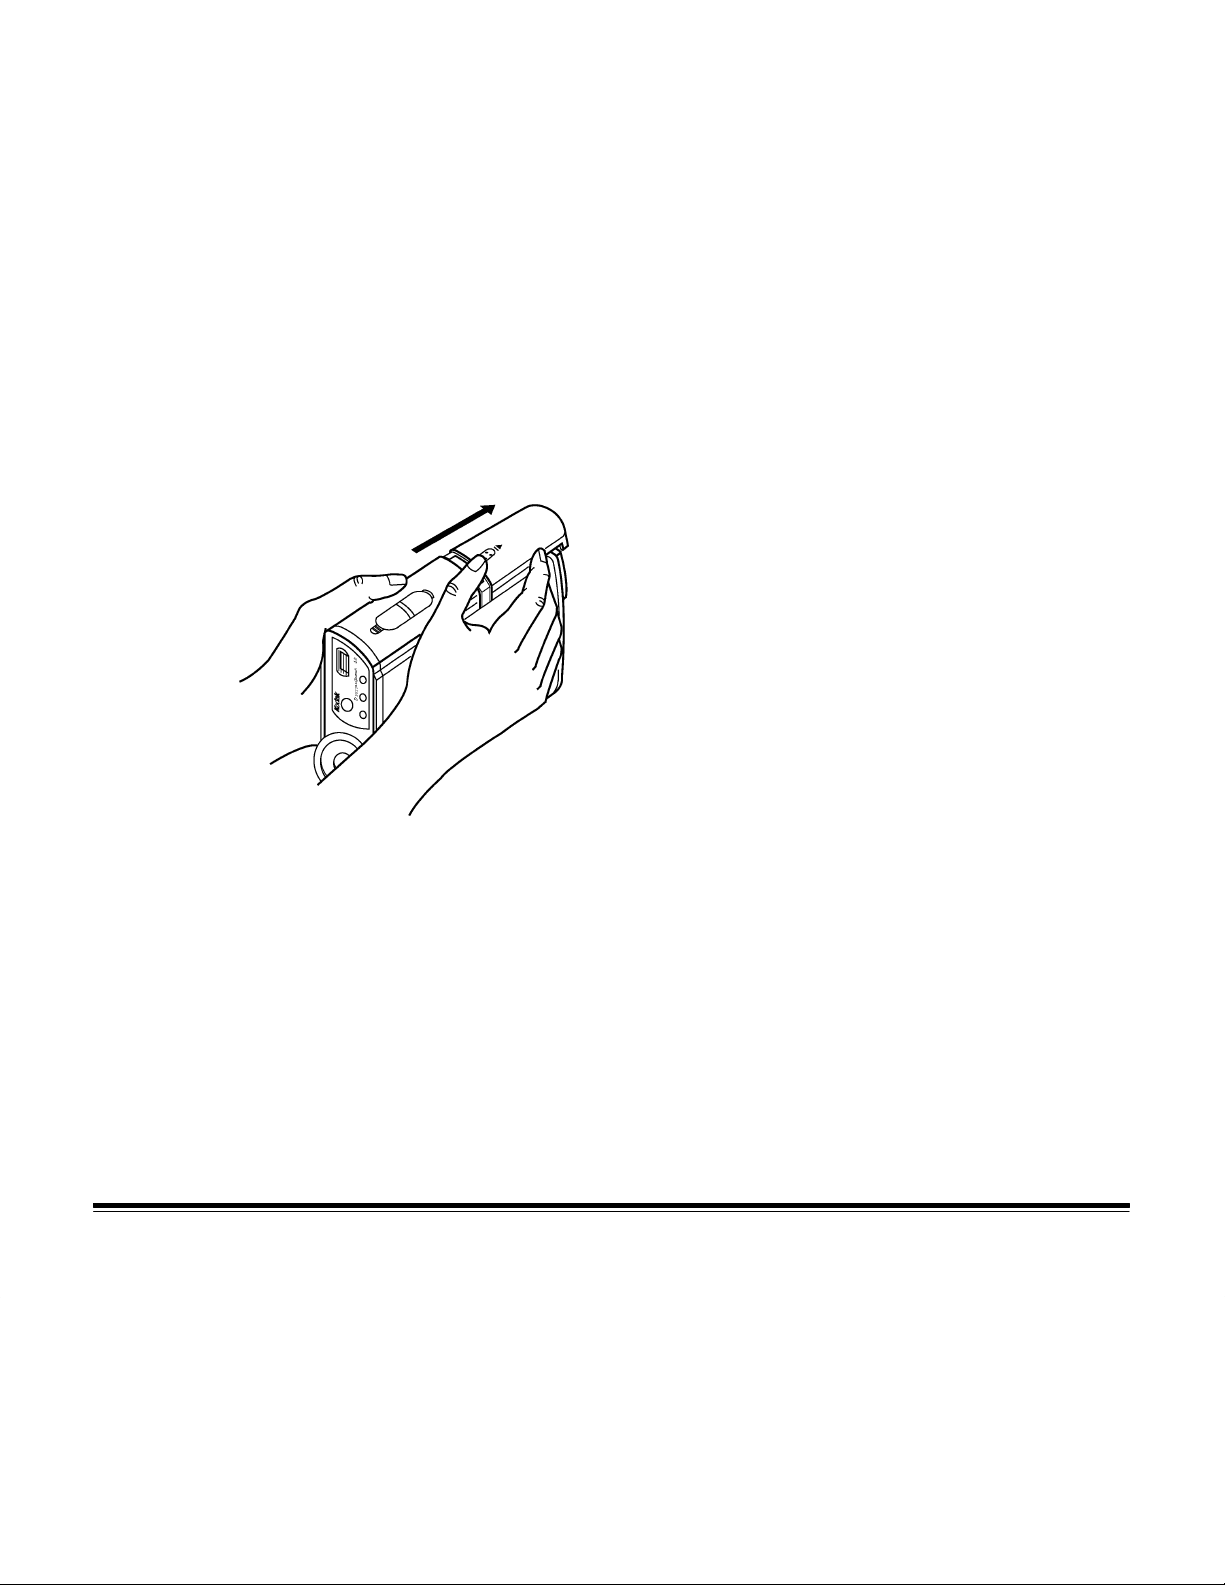
1.Push firmly on the battery compartment cover in the direction of
the arrow.
The cover will slide along its track until it can be removed.
4
January 1996
Page 9

An illustration at the bottom of the battery compartment indicates the
position for the top and bottom pairs of batteries.
2.Adjust the battery removal ribbon so that it rests on the bottom of the
battery compartment.
January 1996
Battery removal
ribbon
3.Insert the bottom pair of batteries with the positive ends (the ends
with a bump) toward the front of the camera.
5
Page 10
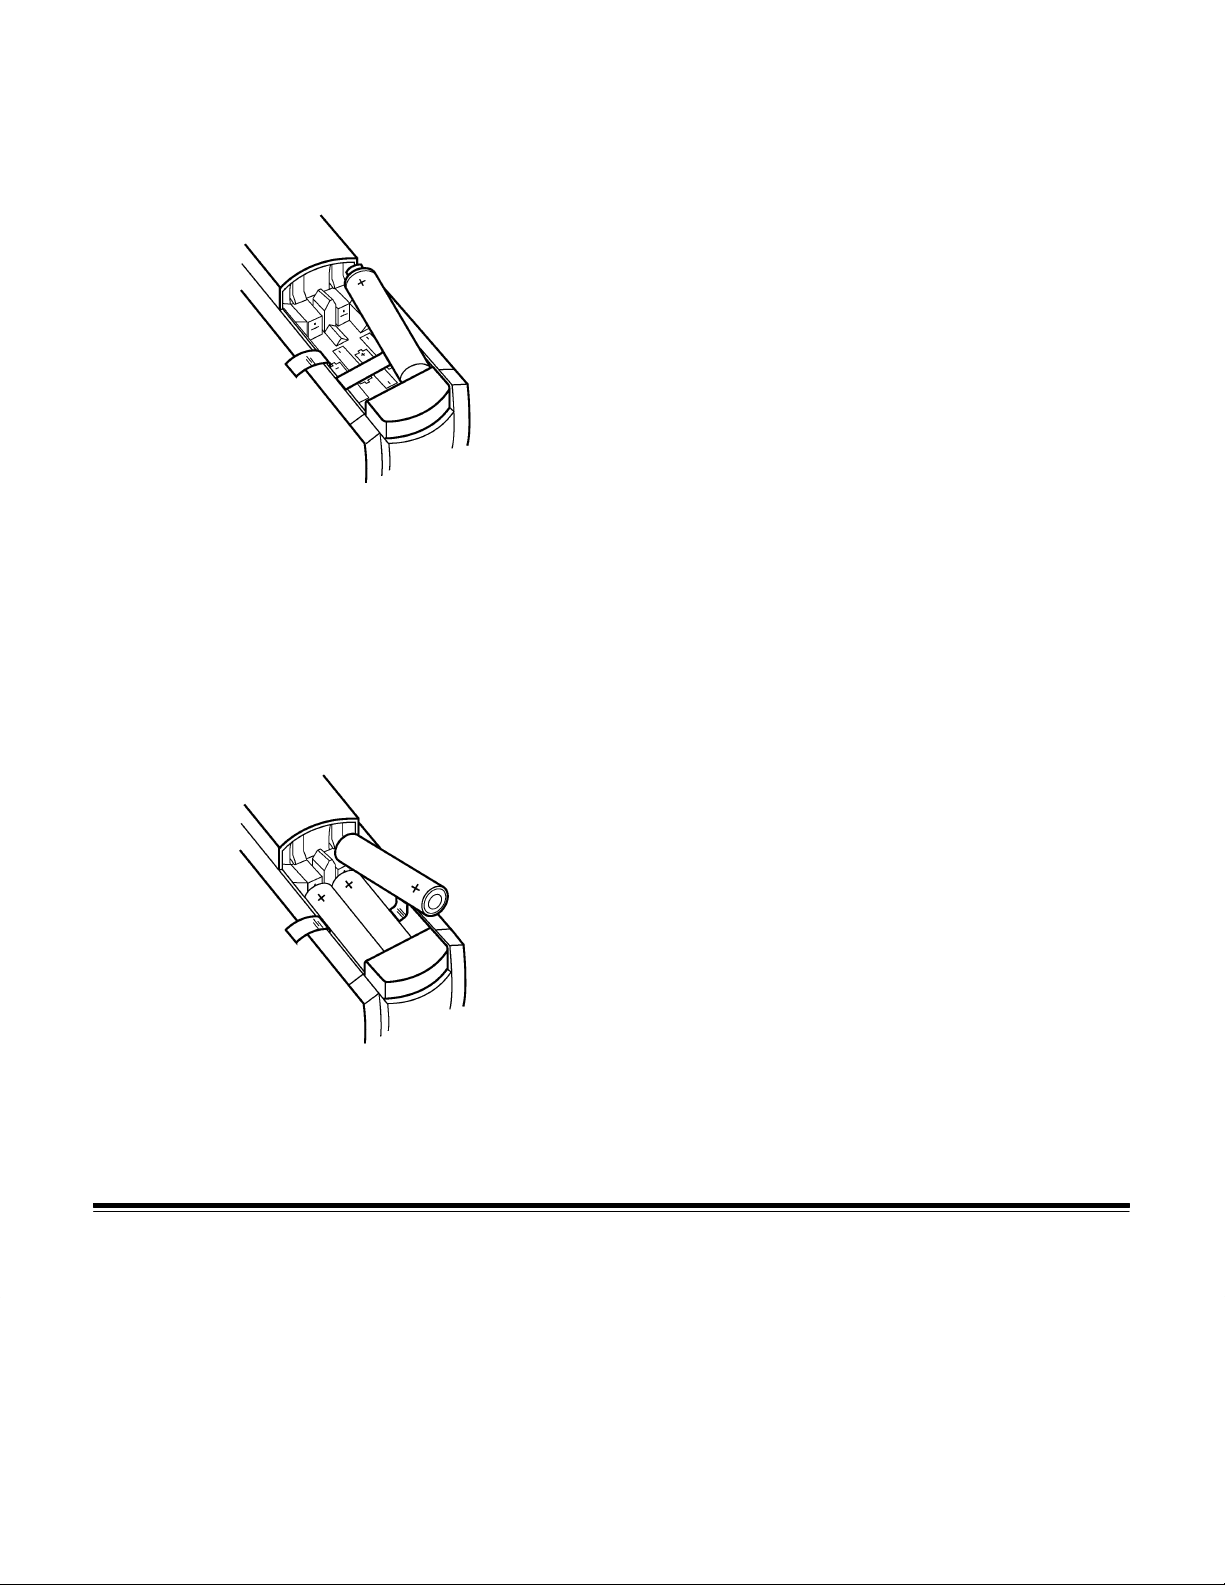
As you are installing each battery, first insert the negative (flat) end
into the recessed area toward the back of the camera, and then push
the positive end into place.
NOTE: The batteries fit snugly.
4.Insert the top pair of batteries with the positive ends (the ends with a
bump) toward the back of the camera.
As you are installing each battery, first push the negative (flat) end
against the metal tab toward the front of the camera, and then push
the positive end into place.
5.Place the battery compartment cover into its track and then slide it
back until it clicks into place.
6
January 1996
Page 11

Turning the Camera On and Off
To turn on the camera:
– Push the lens cover switch toward the ON symbol
The lens will be uncovered, the camera will beep, and the feature
control icons will appear in the display.
To turn off the camera:
– Push the lens cover switch away from the ON symbol
The lens cover will move back in place and the feature control icons
will disappear from the display.
.
.
January 1996
7
Page 12
2 Using the Camera
Before you begin taking pictures, you should become familiar with
the camera controls so you can make feature choices. The following
sections describe how to use the controls.
Camera feature selections are made through the controls on the
camera’s display. All controls revert to their default settings when the
camera is turned off and on again. Settings remain in place, however,
when the camera is wakened from its inactive state. Refer to the
“Waking the Camera” section of this chapter for more information.
Accessing Controls
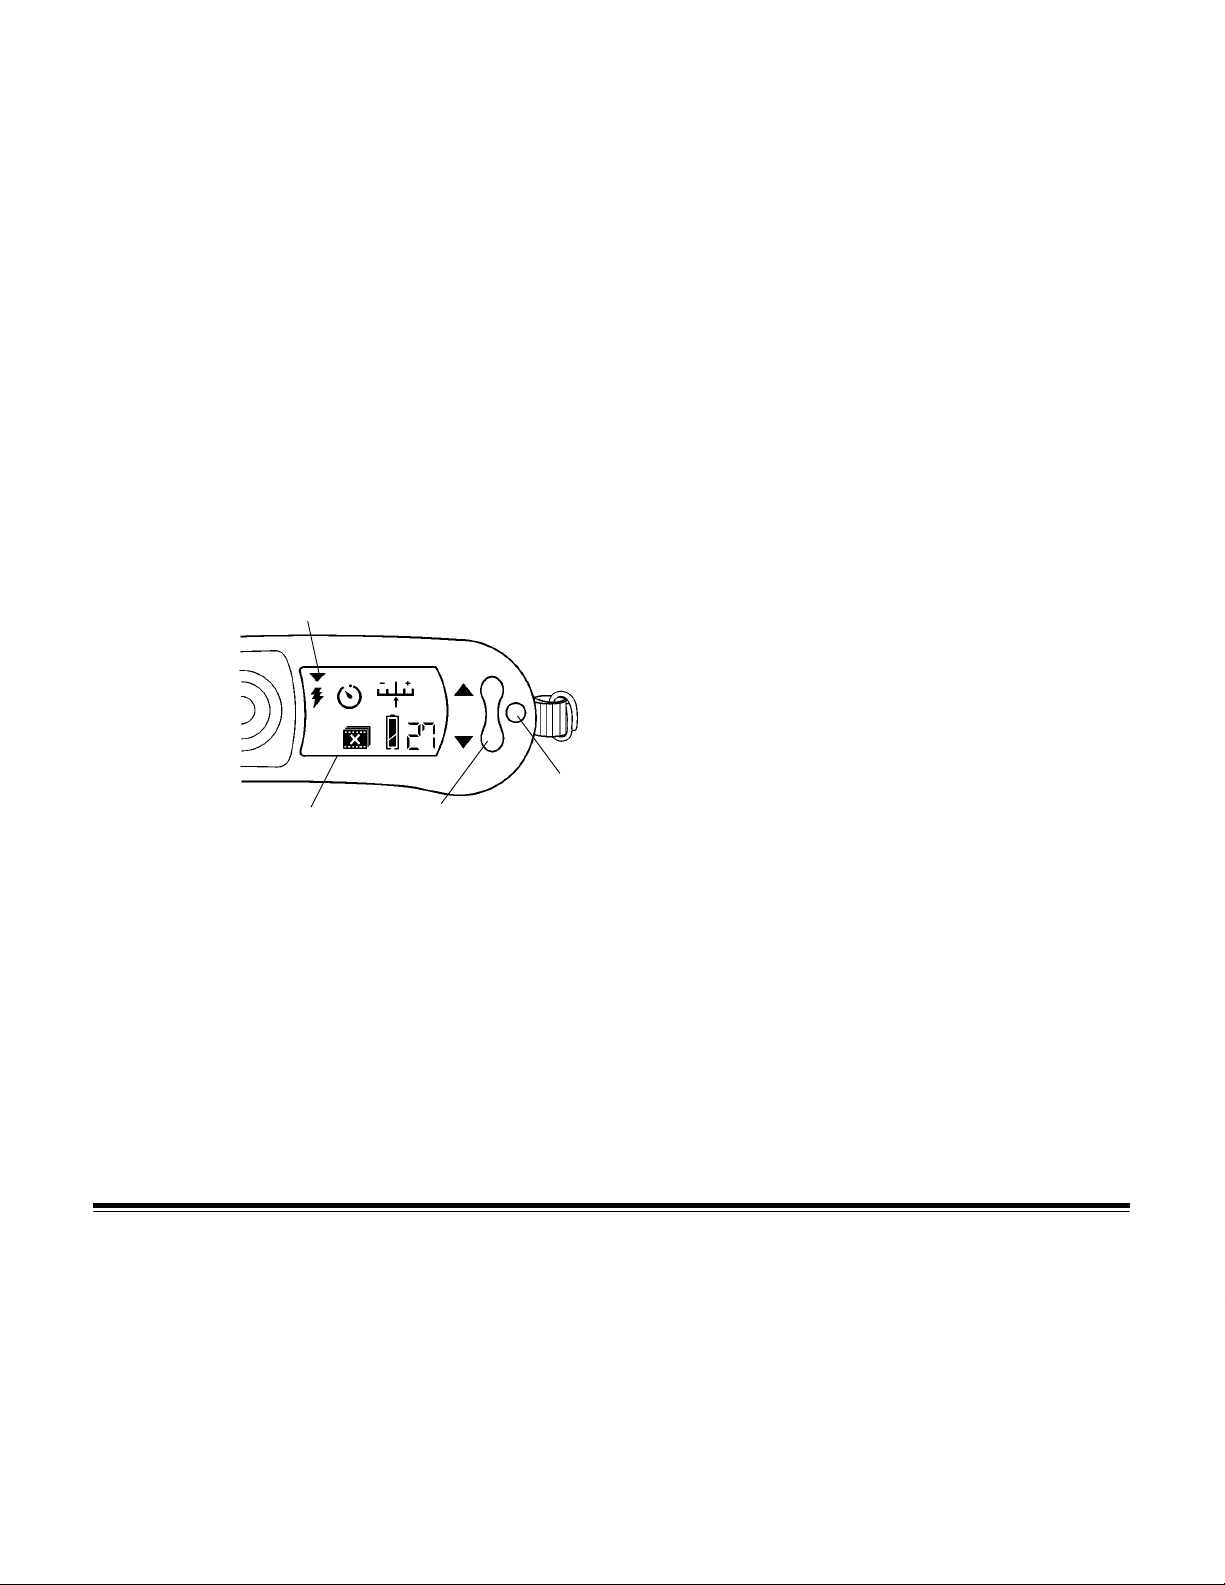
The camera controls are manipulated using the icons in the display.
Current feature marker
Feature button
Display
8
Select button
January 1996
Page 13

Moving Between Features
The Current Feature Marker
is a symbol that appears above the
B
feature icons in the display. It indicates the feature for which you can
make option selections.
Current feature marker
Feature button
The Feature button moves the Current Feature Marker from one feature
control icon to the next.
To make an icon the active feature:
– Press the Feature button until the Current Feature Marker appears
above the icon for the feature you want.
January 1996
9
Page 14

Making Feature Selections
Once the Current Feature Marker is positioned above the feature
you want to change, you can use the Select button to choose the
feature’s setting.
Select button
– Press the top or bottom of the Select button to display the various
settings available for the current feature.
The action taken when you press the top versus the bottom portion of
the Select button depends on the feature. For more information, refer
to the instructions for setting individual features.
10
January 1996
Page 15

Setting the Flash
The effective range for the flash is between four and nine feet.
In order for the flash to have an impact on the picture, make
sure you are between four and nine feet away from the subject.
The Flash icon
allows you to change flash settings.
Flash Setting Descriptions
The three flash settings are described below.
Automatic Flash
With this setting, the camera determines whether or not the flash should
be used based on the existing light. This is the default setting.
To use automatic flash, do not make any changes to the flash feature.
January 1996
11
Page 16

Flash Off
With this setting the flash is not used even when existing light is dim.
To turn off the flash:
1.Press the Feature button until the Current Feature Marker appears
above the Flash icon
if it is not already positioned there.
2.Press the Select button until the
icon appears next to the Flash icon.
12
January 1996
Page 17

Flash On
With this setting, the flash is used even when existing light is bright.
To turn on the flash:
1.Press the Feature button until the Current Feature Marker appears
above the Flash icon
if it is not already positioned there.
2.Press the Select button until the
Flash icon.
icon appears to the right of the
January 1996
13
Page 18

Setting the Timer
The timer allows you to specify the period of time that the camera
should wait after the shutter button is pressed before taking a picture.
You can set the timer and then move in front of the camera so you
can be in the picture.
The Timer icon
allows you to change timer settings.
Timer Setting Descriptions
The three timer settings are described below.
No Wait
With this setting, the camera takes the picture as soon as the shutter
button is pressed. This is the default setting.
To take pictures immediately, do not make any changes to the
timer feature.
14
January 1996
Page 19

Ten Seconds
With this setting, the camera waits ten seconds after the shutter button
is pressed before taking pictures.
When you press the shutter button, the red timer indicator on the front
of the camera illuminates for eight seconds, then blinks for two
seconds. At ten seconds, the picture is taken.
To set the timer to ten seconds:
1.Press the Feature button until the Current Feature Marker appears
above the Timer icon
.
2.Press the Select button until the “10” icon appears to the right of the
Timer icon.
January 1996
15
Page 20

Twenty Seconds
With this setting, the camera waits twenty seconds after the shutter
button is pressed before taking pictures.
When you press the shutter button, the red timer indicator on the front
of the camera illuminates for eighteen seconds, then blinks for two
seconds. At twenty seconds, the picture is taken.
To set the timer to twenty seconds:
1.Press the Feature button until the Current Feature Marker appears
above the Timer icon
.
2.Press the Select button until the “20” icon appears to the right of the
Timer icon.
16
January 1996
Page 21

Setting the Exposure
The Exposure icon allows you to control the size of the lens
opening. Changing the exposure helps adjust for dim and bright lighting.
For example, if the primary source of light is from behind your subject,
you may want to change the exposure to the highest setting.
You can use the automatic exposure level by making no change to the
Exposure icon, or you can select from two greater and two lesser
1
degrees of exposure in
The illustration below shows the effect that changing the exposure can
have on the image.
/2 f-stop steps (for a total change of 1 full stop).
Normal exposure
January 1996
1
/2 f-stop greater than
normal exposure
1 f-stop greater than
normal exposure
17
Page 22

To make an exposure selection:
1.Press the Feature button until the Current Feature Marker appears
above the Exposure icon
.
2.Press the top of the Select button to move the selector arrow below
the Exposure icon to a greater exposure level.
OR
Press the bottom of the Select button to move the selector arrow
below the Exposure icon to a lesser exposure level.
18
January 1996
Page 23

Waking the Camera
The camera reverts to an inactive mode if no action is taken for 60
seconds. This state conserves energy to extend battery life.
To return the camera to its active state:
– Press and release the shutter button.
OR
Press the Feature or Select button.
Taking Pictures
The DC40 camera focuses on subjects between distances of four feet
and infinity. Pictures taken with subjects closer than four feet may be
blurry unless an accessory adapter lens is used.
1.Hold the camera so that the handstrap is on the right side and the top
of the camera is facing up.
January 1996
2.Push the fingers of your right hand up through the handstrap, letting
the camera rest on your thumb.
Your index finger should rest on the shutter button.
19
Page 24

3.Hold the camera up to your face and look through the viewfinder.
4.Frame the subject in the viewfinder window.
If you want to frame the picture like a portrait, turn the camera so that
it is vertically oriented (with the flash at the top).
NOTE: The picture will include an area slightly larger than the image
you see framed through the viewfinder.
5.Hold the camera steady and press the shutter button.
20
There is a brief delay between the time the shutter button is pressed
and the time the picture is actually taken. Be sure to hold the camera
still until you hear the click of the shutter.
A red light will appear in the viewfinder. When the red light turns off
and the camera beeps, it is ready to take another picture.
January 1996
Page 25

Managing Pictures
Storing Pictures
Your DC40 camera can store up to 48 pictures by default, however the
camera software application allows you to change camera features
which may impact the actual number that can be stored. Refer to the
camera software documentation for more information.
By default, the display shows you the number of pictures that you can
take before the camera is full. As you take pictures, the picture count in
the display decreases. For example, let’s say that you are about to take
pictures and the count displays “27.” After taking two pictures, the count
displays “25.” When the camera is full, the count displays “0” and the “0”
flashes if you press the shutter button. No pictures can be taken at this
point until you have deleted stored pictures.
Erasing Pictures
January 1996
Once you have transferred stored pictures to your computer, you should
erase them from the camera to make room for new pictures.
21
Page 26

Erasing the Last Picture
If you have enabled this feature with the camera software, you will be
able to erase the last picture you took.
If you enable this feature through the camera software, the number of
images that the camera can store is reduced from 48 to 31.
1.Press the Feature button until the Current Feature Marker appears
above the Last Picture icon
NOTE: The Last Picture icon will appear only if the erase last picture
feature is enabled through the camera software.
2.Press the top of the Select button.
.
The Last Picture icon will blink and the Warning icon
next to the Battery icon.
3.Press the top of the Select button again.
The Last Picture icon will continue to blink, and the Warning icon will
disappear. When the picture has been deleted, the camera will beep,
and the Last Picture icon will stop blinking.
NOTE: If you want to stop the camera before the picture is deleted,
press the shutter button, the Features button, or the bottom of
the Select button. If the camera has not started deleting, the
delete process will be halted.
! will appear
22
January 1996
Page 27

Erasing All Pictures
To erase all stored pictures:
1.Press the Feature button until the Current Feature Marker appears
above the All Pictures icon
2.Press the top of the Select button.
.
The All Pictures icon will blink and the Warning icon
to the Battery icon.
3.Press the top of the Select button again.
The All Pictures icon will continue to blink, and the Warning icon
will disappear. When the pictures have been deleted, the camera
will beep, the All Pictures icon will stop blinking, and the picture
count will return to “48.”
NOTE: If you want to stop the camera before the pictures are deleted,
press the shutter button, the Features button, or the bottom of
the Select button. If the camera has not started deleting, the
delete process will be halted.
! will appear next
January 1996
23
Page 28

3 Using Batteries
The DC40 camera comes with four AA lithium batteries. You can also
use rechargeable NiCad (nickel-cadmium) or AA alkaline batteries.
NiCad or lithium batteries will give you much better performance than
alkaline batteries.
You should be able to take hundreds of pictures with each set of lithium
batteries, however, using the flash requires more of the battery charge.
Transferring pictures to your computer also uses the battery charge.
You may want to buy a power adapter to use when taking pictures
inside and when transferring files. Refer to Chapter 4,
Adapter,
the DC40 camera.
for information about the power adapters that can be used with
Using a Power
WARNING:
Mixing battery types in the camera may cause a fire or
explosion. Install only batteries of the same type at
one time.
Lithium batteries contain toxic substances and
should be disposed of properly. Follow the battery
manufacturer’s disposal instructions, or the guidelines
recommended for your area.
24
January 1996
Page 29

Battery Charge Level
The level of charge remaining in the batteries is shown by the battery
icon
a charge is left in the batteries.
– When the icon appears completely filled, the batteries are fully charged.
– When the icon appears partially filled, the battery charge is getting low.
– When the icon appears empty, the batteries must be replaced.
NOTE: Pictures remain stored even if the batteries are empty.
on the display. This icon gives you a rough idea of how much of
January 1996
25
Page 30

Battery Safety Information
Follow these guidelines when handling batteries.
– Always handle batteries carefully.
– Do not drop, puncture, disassemble, mutilate, or incinerate batteries.
– Touching both terminals of a battery with a metal object will short
circuit the battery, which could cause an explosion or a fire. Do not
carry batteries loosely if the contacts may touch coins, keys, and other
metal objects (such as in pockets or bags).
– Do not heat the batteries to try to rejuvenate their charge.
26
January 1996
Page 31

Improving Battery Performance
Follow these guidelines to extend the life of batteries.
– Replace all four batteries at the same time. Mixing new or fully
charged batteries with those that have been in use for some time
weakens the new ones.
– Clean the contacts in the battery compartment periodically by rubbing
them gently with a clean pencil eraser or a cloth.
– Keep batteries away from heat. For example, do not leave batteries in
the trunk of a car in hot weather.
– Store batteries at room temperature and keep them dry.
– Recharge NiCad batteries if they have not been used after six months.
January 1996
27
Page 32

About NiCad Batteries
NiCad batteries can be used and recharged over and over again. Using
NiCad batteries rather than disposable ones is an environmentally
friendly way to power your DC40 camera.
When buying a charger for NiCad batteries, look for one that completely
discharges the batteries before recharging them. “Conditioning” the
batteries in this way helps them hold their charge longer.
If your battery charger does not condition batteries, the batteries
eventually may not hold their charge for as long as they used to. If this
happens, try letting the batteries run out of charge completely before
recharging them. Unless the batteries are wearing out, this step should
improve their lasting power.
WARNING:
Damaged batteries may leak and burn skin and eyes.
If you come in contact with a damaged NiCad battery,
rinse the affected skin with water for at least five
minutes. Do not wash with soap.
Never charge batteries other than NiCads in the charger .
Follow the safety and battery charging instructions that come with your
battery charger.
28
January 1996
Page 33

4 Using a Power Adapter
To save the charge in your batteries, you can plug your camera into an
electrical outlet using a specific type of surge-protected power adapter.
A power adapter is especially helpful when transferring the pictures to
your computer.
You should be able to purchase a custom universal adapter (Kodak
catalog number 102 3662) from the retailer who sold you the camera.
North American customers can order 120 V input-only adapters
(Kodak catalog number 888 9933). If the retailer does not stock the
adapters, call the telephone number listed in the “Getting Help”
section of Chapter 7.
The Apple MACINTOSH PowerBook AC Adapter M4662 for use with
the PowerBook 140 or 170 will also work with your camera.
WARNING:
Using power adapters other than those recommended
for use with the DC40 camera voids the camera’s
warranty, and may result in fire, electrical shock, or
damage to the camera.
January 1996
29
Page 34

To use a power adapter:
1.T urn off the camera by sliding the lens cover switch to the OFF position.
2.Lift the rubber tab to uncover the camera’s power adapter socket.
3.Plug the cable end of the power adapter into the socket.
4.Plug the box end of the power adapter into an electrical outlet.
5.Turn on the camera by sliding the lens cover switch to the
ON position
.
NOTE: Make sure that you turn the camera off before disconnecting the
power adapter. If you do not turn the camera off first, a capacitor
in the camera will stay charged for about an hour. You will not be
able to turn on the camera during that period.
If this happens, plug the power adapter back in to the camera,
turn the camera on and off again, and then disconnect the power
adapter from it. This allows you to use the camera immediately.
30
January 1996
Page 35

5 Connecting to a Computer
Serial cables for Macintosh computers and Windows software are
included with the camera. This chapter describes how to connect the
camera to those computers.
Connecting to a MACINTOSH Computer
You can connect the DC40 camera to your Macintosh computer’s
serial port.
IMPORTANT:
1.T urn off the camera by sliding the lens cover switch to the OFF position.
2.Plug one end of the Macintosh cable into the modem port or printer
port on the back of your Macintosh computer.
If both ports are in use, disconnect the cable from the more
convenient port and then connect the camera cable.
3.Lift the rubber tab to uncover the camera’s serial port.
Use only the cable provided with the DC40 camera.
January 1996
31
Page 36

4.Plug the unused end of the cable into the camera’s serial port after
carefully lining up the notches.
NOTE: Before you run the software provided with the camera, turn off
AppleTalk and specify an external modem if your system has an
internal modem.
32
January 1996
Page 37

Connecting to a Computer Running
WINDOWS Software
Your personal computer contains either a 9-pin or a 25-pin serial port.
The cable supplied with the DC40 camera uses a 9-pin connector,
therefore, you will need to use the adapter provided with the camera if
you want to use a 25-pin serial port.
IMPORTANT:
1.T urn off the camera by sliding the lens cover switch to the OFF position.
2.Attach the 9-pin adapter to the 25-pin port IF your personal computer
uses a 25-pin serial port.
3.Plug the matching end of the cable into the serial port or adapter on
the back of your computer.
4.Tighten the connector’s thumbscrews.
5.Lift the rubber tab to uncover the camera’s serial port.
Use only the cable provided with the DC40 camera.
January 1996
6.Plug the unused end of the cable into the camera’s serial port after
carefully lining up the notches.
33
Page 38

6 Maintenance
General Guidelines
– Keep the camera away from moisture and high temperatures.
– If the outside of the camera needs to be cleaned, wipe it with a clean,
dry cloth. Never use harsh or abrasive cleaners on it.
– Keep the lens cover closed whenever the camera is not in use.
Cleaning the Lens
The steps below describe how to clean the lens.
1.Blow gently on the lens to remove loose dust and dirt.
2.Moisten the lens by breathing on it as you would breath on eyeglass
lenses when cleaning them.
Do not use cleaning solutions unless they are designed specifically
for camera lenses.
34
3.Wipe the lens gently with a soft, lint-free cloth or lens-cleaning tissue.
Do not use chemically treated eyeglass lens tissues. The lens may
be scratched if you wipe it too firmly or if it is dry.
January 1996
Page 39

Cleaning the Light Sensors
The light sensors are located below the viewfinder on the front of
the camera.
Light sensors
To clean the light sensors, rub the area gently with a soft, dry cloth.
Storing the Camera
Remove the batteries if the camera will not be used for an extended
period of time. This prevents camera damage from battery leaks
or corrosion.
January 1996
35
Page 40

7 Troubleshooting
This chapter should help you resolve any problems you may encounter
with your DC40 camera. If you cannot resolve a problem after reading
through this information, refer to the “Getting Help” section at the end of
this chapter.
Problems and Solutions
Display Does Not Appear
Cause Solution
The camera is not on. Open the lens cover.
The camera is asleep. Press the shutter button or the
Feature or Select button
36
The batteries are low,
dead, or not installed.
The batteries are not
installed correctly.
The power adapter was
disconnected from the
camera while the camera
was still turned on.
Replace the batteries or use a
power adapter .
Reinstall the batteries following the
instructions in Chapter 1.
Plug the power adapter back in to the
camera, turn the camera on and then
off again, and then disconnect the
power adapter from it.
January 1996
Page 41

Part of a Picture Is Missing
Cause Solution
Something was in front of
the lens when the picture
was taken.
Make sure that your hands and other
objects are not in front of the lens or
the flash.
Picture Is Not Clear
Cause Solution
The lens is dirty. Clean the lens as described in
the “Cleaning the Lens” section of
Chapter 6.
The subject or the camera
moved before the picture
was taken.
The subject was too close. Move so the subject is at least four
The subject was too far
away for the flash to be
effective.
Hold the camera steady until after you
hear the shutter click.
feet away OR use an adapter lens.
Move so the subject is less than nine
feet away.
January 1996
The flash should have
been used but was not.
The exposure is not
appropriate for the lighting.
Turn on the flash.
Adjust the exposure as described in
the “Setting the Exposure” section of
Chapter 2.
37
Page 42

Nothing Happens when Shutter Is Pressed
Cause Solution
The flash is recharging. Look through the viewfinder and wait
for the red light to turn off.
The camera does
not have room for
another picture.
Erase the last picture or all of the
stored pictures as described in
the “Erasing Pictures” section of
Chapter 2.
Flash Does Not Work
Cause Solution
Flash is not turned on. Turn on the flash as described in
the “Setting the Flash” section of
Chapter 2.
The batteries are low. Replace the batteries following the
instructions in Chapter 1 or use a
power adapter .
Flash tube has burned out. Have camera serviced.
38
January 1996
Page 43

Picture Is Too Light
Cause Solution
The flash was not needed. Change to automatic flash by following
the instructions in the “Setting the Flash
Section” section of Chapter 2.
The subject was too close
when the flash was used.
Exposure setting needs to
be adjusted.
The light sensors are dirty. Clean the sensors as described in the
The light sensors
are covered.
Move so there is at least four feet
between you and the subject.
Adjust the exposure as described in
“Setting the Exposure” in Chapter 2.
“Cleaning the Light Sensors” section
of Chapter 6.
Hold the camera so your hands do
not cover the light sensors. Refer to
the “Parts of the Camera” section of
Chapter 1 for the sensor location.
January 1996
39
Page 44

Picture Is Too Dark
Cause Solution
The flash is not on. Turn on the flash as described in
the “Setting the Flash” section of
Chapter 2.
The subject was too far
away for the flash to have
an effect.
The exposure is not
appropriate for the lighting.
The subject was in front of
a bright light.
Move so there is no more than nine
feet between you and the subject.
Adjust the exposure as described in
“Setting the Exposure” in Chapter 2.
Change your position so the light is
not behind the subject.
40
January 1996
Page 45

Getting Help
If you have questions about the DC40 camera, the retailer from whom
you purchased the camera may be able to answer them. Eastman
Kodak Company provides retailers with technical information.
You can also call 1–800–235–6325 for technical support between
9:00 a.m. and 8:00 p.m. Eastern Time on regular business days if you:
– have questions about your warranty
– want to know where to get accessories
– want to know where to get service
– want information about other Kodak products
– have trouble operating the camera
January 1996
41
Page 46

Appendix A Camera Specifications
Technical
Type: CCD still frame camera
Image size: 756 x 504 high resolution
Bit depth: 24-bit color
Speed: With flash—pictures can be taken every 8 seconds
Without flash—pictures can be taken every 5 seconds
Size
Depth: 6.1 in. (155 mm)
Width: 5.3 in. (135 mm)
Height: 2.2 in. (55 mm)
42
Weight
1 lb (0.5 kg)
Operating Environment
Temperature: 0_ to 40_ C (32_ to 104_ F)
Humidity: 20 to 95 percent, noncondensing
January 1996
Page 47

Power Sources
Batteries: 4 AA batteries—lithium, NiCad, or alkaline
(3.6 V DC – 5.4 V DC)
Power Adapter: 4.5 V DC/1.75 A to 8.0 V DC/1.0 A
(surge protected)
Power Consumption
Standby: <500 mW
Operating: <4.5 W
January 1996
43
Page 48

Regulatory Information
FCC Compliance and Advisory Statement
This device complies with Part 15 of the FCC Rules. Operation is
subject to the following two conditions: 1) this device may not cause
harmful interference, and 2) this device must accept any interference
received, including interference that may cause undesired operation.
This equipment has been tested and found to comply with the limits for
a Class B digital device, pursuant to Part 15 of the FCC Rules. These
limits are designed to provide reasonable protection against harmful
interference in a residential installation.
This equipment generates, uses, and can radiate radio frequency
energy and, if not installed or used in accordance with the instructions,
may cause harmful interference to radio communications. However,
there is no guarantee that interference will not occur in a particular
installation.
44
If this equipment does cause harmful interference to radio or television
reception, which can be determined by turning the equipment off and
on, the user is encouraged to try to correct the interference by one or
more of the following measures: 1) reorient or relocate the receiving
antenna; 2) increase the separation between the equipment and the
receiver; 3) connect the equipment to an outlet on a circuit different
from that to which the receiver is connected; 4) consult the dealer or an
experienced radio/TV technician for additional suggestions.
Any changes or modifications not expressly approved by the party
responsible for compliance could void the user’s authority to operate the
equipment. Where shielded interface cables have been provided with
the product or specified additional components or accessories
elsewhere defined to be used with the installation of the product, they
must be used in order to ensure compliance with FCC regulations.
January 1996
Page 49

Canadian DOC Statement
DOC Class B Compliance—This digital apparatus does not exceed
the Class B limits for radio noise emissions from digital apparatus set
out in the radio interference regulations of the Canadian Department of
Communications.
Observation des normes-Class B—Le présent appareil numérique
n’émet pas de bruits radioélectriques dépassant les limites applicables
aux appareils numériques de la Classe B prescrites dans les
règlements sur le brouillage radioélectrique édictés par le Ministère des
Communications du Canada.
January 1996
45
Page 50

Index
A
AC adapter, 24
connecting to camera, 30
using, 29–30
Automatic, flash setting, 11
B
Batteries, 24–28
charge level, 25
charging, 28
conditioning, 28
extending life of, 27
improving performance of, 27
installing in camera, 4–6
lithium, disposal of, 24
mixing types, 24
NiCad, 28
charging, 28
pictures in memory, when batteries are empty, 25
removing when storing camera, 35
safety information, 26
saving, 24
Battery icon, 25
46
January 1996
Page 51

C
Camera
activating, 19
back, 3
components, 3
controls
accessing, 8–10
activating, 9
selecting, 10
features, 9–10
front, 3
installing batteries in, 4–6
maintenance, 34–35
specifications, 42–43
taking pictures with, 19–20
turning off, 7–8
turning on, 7
“waking,” 19
Canadian DOC statement, 45
Charging batteries, 28
Cleaning
DC40 camera lens, 34
DC40 camera light sensors, 35
Components, camera, 3
Computer, connecting DC40 camera to, 31–33
Macintosh systems, 31–32
Windows systems, 33
Conditioning batteries, 28
January 1996
47
Page 52

D
DC40 camera, 1
activating, 19
back, 3
connecting to computer, 31–33
Macintosh systems, 31–32
Windows systems, 33
controls
accessing, 8–10
activating, 9
selecting, 10
features, 1, 9–10
front, 3
installing batteries in, 4–6
maintenance, 34–35
cleaning lens, 34
cleaning light sensors, 35
package contents, 2
storing, 35
taking pictures with, 19–20
“waking,” 19
Default value
flash, 11
timer, 14
Deleting pictures from camera memory, 21–23
Display, 7
does not appear, 36
icons
Exposure, 17–18
Flash, 11–12
Timer, 14–16
48
January 1996
Page 53

E
Erasing pictures in camera memory, 21–23
Exposure
changing, 17–18
icon, 17–18
F
FCC compliance and advisory statement, 44
Features, 1
Flash
does not work, 38
icon, 11–12
default setting, 11
off, 12
on, 13
setting, 11–13
automatic, 11
descriptions, 11–13
flash off, 12
flash on, 13
selecting, 11–13
G
Getting started, 2
January 1996
49
Page 54

I
Icons in display, 7
Images, transferring to computer, 31–33
Macintosh systems, 31–32
Windows systems, 33
Information, additional, 41
Installing batteries in camera, 4–6
Introduction, 1
L
Lens
DC40 camera, cleaning, 34
opening, changing exposure, 17–18
Light sensors, DC40 camera, cleaning, 35
M
Maintenance
DC40 camera, cleaning light sensors, 35
for DC40 camera, 34–35
cleaning lens, 34
Managing pictures, 21–23
deleting pictures from camera memory, 21–23
all pictures, 23
last picture, 22–23
erasing pictures in camera memory, 21–23
all pictures, 22
last picture, 22–23
saving pictures in camera memory, 21
storing pictures, 21
Mixing battery types, 24
50
January 1996
Page 55

P
Package contents, 2
Performance, battery, 27
Pictures
deleting all from camera memory, 23
deleting from camera memory, 21–23
deleting last from camera memory, 22–23
erasing all from camera memory, 23
erasing from camera memory, 21–23
erasing last from camera memory, 22–23
managing, 19–21
not clear, 37
part missing, 37
saving in camera memory, 21
storing, 21
too dark, 40
too light, 39
transferring to computer, 31–33
Macintosh systems, 31–32
Windows systems, 33
Power adapter, 24
connecting to camera, 30
using, 29–30
Problems with DC40 camera, 36–41
R
Regulatory information, 44–45
January 1996
51
Page 56

S
Safety information, for batteries, 26
Saving pictures in camera memory, 21
Serial communication cable, 31
Setting timer, 15–16
Shutter button, nothing happens when pressed, 38
Specifications, camera, 42–43
Storing
DC40 camera, 35
pictures, 21
T
Taking pictures, 19–20
Technical support, 41
Timer
icon, 14–16
default setting, 14
setting, 14–16
Transferring pictures to computer, 31–33
Macintosh systems, 31–32
Windows systems, 33
Troubleshooting, 36–41
52
U
Universal connector, 29
Using camera, 8–23
W
“Waking” camera, 19
January 1996
Page 57

EASTMAN KODAK COMPANY
Rochester, New York 14653
USA
KODAK CANADA INC.
Toronto, Ontario M6M 1V3
CANADA
KODAK PATHE
8–26 rue Villiot
75594 Paris Cedex 12
FRANCE
KODAK AG
Hedelfinger Strasse
7000 Stuttgart, 60
GERMANY
1/96 rev. Copyright Eastman Kodak Company, 1996
January 1996
KODAK S.A.
Apartado de Correos 48
28230 Las Rozas
Madrid, ESPANA
53
Page 58

 Loading...