

Page 1

KODAK DC3400 Zoom Digital Camera
Congratulations on your purchase of the KODAK DC3400 Zoom Digital Camera—
the camera that takes pictures digitally, without the use of film. With your new
camera, picture taking and print making have never been easier or faster. The
possibilities are endless. Here are just a few examples of what you can do with
your camera:
Take digital pictures in unbelievable detail, color, and sharpness.
Transfer your pictures to a computer for instant editing, enhancement,
and placement into your document.
E-mail your pictures to friends, family, and business associates anywhere
in the world.
Print high-quality pictures at home using KODAK Inkjet media and the
Kodak Personal Picture Maker.
Take your KODAK Picture Card to a KODAK Picture Maker System and
create photo-quality enlargements with a touch of a button.
Order reprints delivered directly to your home through
print@kodak.com.
Customize your pictures with a graphic using the KODAK DC3400 Border
Transfer Application.
Page 2

Eastman Kodak Company
343 State Street
Rochester, N.Y. 14650
©Eastman Kodak Company, 2000
Kodak is a trademark of Eastman Kodak Company.
P/N 6B4803
Page 3

Table of Contents
Preparing to Take Pictures . . . . . . . . . . . . . . . . . . . . . . . . . . . .2
Before you Start . . . . . . . . . . . . . . . . . . . . . . . . . . . . . . . .2
General Tips for Better Pictures. . . . . . . . . . . . . . . . . . .2
Loading Batteries . . . . . . . . . . . . . . . . . . . . . . . . . . . . . . .3
Turning the Camera On and Off. . . . . . . . . . . . . . . . . . . .3
Checking Batteries . . . . . . . . . . . . . . . . . . . . . . . . . . . . . .4
Using an AC Adapter . . . . . . . . . . . . . . . . . . . . . . . . . . . .5
Inserting a Camera Memory Card . . . . . . . . . . . . . . . . . .6
Removing a Camera Memory Card. . . . . . . . . . . . . . . . . . 7
Setting the Clock on Your Camera . . . . . . . . . . . . . . . . .8
Adjusting the LCD Brightness. . . . . . . . . . . . . . . . . . . . .9
Previewing a Picture Before it is Taken. . . . . . . . . . . . . . . . . . 12
Pressing the Shutter Button. . . . . . . . . . . . . . . . . . . . . . . . . 14
Zooming in on Your Subject . . . . . . . . . . . . . . . . . . . . . . . . . . 15
Zooming in Even Closer . . . . . . . . . . . . . . . . . . . . . . . . . . . . . .16
Viewing the Picture Just Taken . . . . . . . . . . . . . . . . . . . . . . . 17
Setting a Quickview for Each Picture . . . . . . . . . . . . . . . . . . 18
Setting the Flash . . . . . . . . . . . . . . . . . . . . . . . . . . . . . . . . . . 19
Photographing Distant Subjects . . . . . . . . . . . . . . . . . . . . . 21
Photographing Close-Ups. . . . . . . . . . . . . . . . . . . . . . . . . . . .22
Putting Yourself in the Picture. . . . . . . . . . . . . . . . . . . . . . . .23
Adding the Date to Your Pictures . . . . . . . . . . . . . . . . . . . . .24
i
Page 4

Deleting the Picture Just Taken . . . . . . . . . . . . . . . . . . . . . . 26
Adjusting the Camera Exposure . . . . . . . . . . . . . . . . . . . . . 28
Adding a Border to Your Picture . . . . . . . . . . . . . . . . . . . . . 30
Capturing in Black-and-White, Sepia Tone, or Document . 32
Adjusting the Picture Quality. . . . . . . . . . . . . . . . . . . . . . . . 34
Adjusting the Picture Resolution . . . . . . . . . . . . . . . . . . . . 36
Selecting a White Balance for Indoor Pictures. . . . . . . . . . 38
Choosing a Metering System. . . . . . . . . . . . . . . . . . . . . . . . 40
Selecting the ISO Setting. . . . . . . . . . . . . . . . . . . . . . . . . . . 42
Sharpening and Softening a Picture . . . . . . . . . . . . . . . . . . 44
Locking in an Exposure Setting . . . . . . . . . . . . . . . . . . . . . . 46
Viewing Your Pictures. . . . . . . . . . . . . . . . . . . . . . . . . . . . . . . 50
Magnifying Your Pictures . . . . . . . . . . . . . . . . . . . . . . . . . . . 52
Selecting Pictures for Printing . . . . . . . . . . . . . . . . . . . . . . . 53
Cancelling Pictures for Printing . . . . . . . . . . . . . . . . . . . . . . 55
Protecting Your Pictures . . . . . . . . . . . . . . . . . . . . . . . . . . . . 56
Deleting One or All of Your Pictures. . . . . . . . . . . . . . . . . . . .57
Running a Slide Show on Your Television. . . . . . . . . . . . . . . 59
Viewing Information About a Picture . . . . . . . . . . . . . . . . . . .61
Setting a Response Beep . . . . . . . . . . . . . . . . . . . . . . . . . . . 64
ii
Page 5

Saving Camera Power . . . . . . . . . . . . . . . . . . . . . . . . . . . . . . . 66
Viewing Camera Information. . . . . . . . . . . . . . . . . . . . . . . . . 68
Selecting a Language for the Camera. . . . . . . . . . . . . . . . . .70
Formatting Your Camera Memory Card. . . . . . . . . . . . . . . . . 71
Adjusting the Video Out Signal . . . . . . . . . . . . . . . . . . . . . . .73
Adjusting the Camera Default Settings. . . . . . . . . . . . . . . .75
Setting a Border Default . . . . . . . . . . . . . . . . . . . . . . . .75
Setting a Flash Default . . . . . . . . . . . . . . . . . . . . . . . . .77
Setting a White Balance Default. . . . . . . . . . . . . . . . . .78
Setting an Exposure Compensation Default . . . . . . . 80
Setting an Effect Default. . . . . . . . . . . . . . . . . . . . . . . 82
Setting an Auto ISO Default. . . . . . . . . . . . . . . . . . . . 84
Windows-Based System Requirements . . . . . . . . . . . . . . . 88
Macintosh System Requirements. . . . . . . . . . . . . . . . . . . . 88
KODAK Software for Windows-Based Computers. . . . . . . 89
Software Overview . . . . . . . . . . . . . . . . . . . . . . . . . . . . . 90
KODAK Software for Macintosh Computers . . . . . . . . . . . . 91
Software Overview . . . . . . . . . . . . . . . . . . . . . . . . . . . . . .92
Installing the Software. . . . . . . . . . . . . . . . . . . . . . . . . . . . . 93
Using a Serial Cable Connection . . . . . . . . . . . . . . . . . . . . . 96
Connecting to a Windows-Based Computer . . . . . . . 96
Connecting to a Macintosh Computer . . . . . . . . . . . . 98
Using a USB Cable Connection . . . . . . . . . . . . . . . . . . . . . .100
iii
Page 6

Starting KODAK Software for Windows-Based Computers101
Opening Mounter Software . . . . . . . . . . . . . . . . . . . . . 101
Opening Digital Access Software (TWAIN Acquire) . 101
Opening Camera Controls Software . . . . . . . . . . . . . .102
Opening Border Transfer Software . . . . . . . . . . . . . . .102
Starting KODAK Software for Macintosh Computers . . .103
Opening Picture Transfer Application . . . . . . . . . . . . .103
Opening Digital Access Software (Plug-In Acquire) .103
Opening Border Transfer Software . . . . . . . . . . . . . . .103
Navigating to Your Pictures . . . . . . . . . . . . . . . . . . . . . . . . .104
Connecting with Your Camera. . . . . . . . . . . . . . . . . . . . . . . 108
Communicating with the Computer. . . . . . . . . . . . . . . . . . 108
Adjusting Your Monitor for Better Viewing. . . . . . . . . . . . 108
Getting Better Results from Your Printer . . . . . . . . . . . . 109
Troubleshooting . . . . . . . . . . . . . . . . . . . . . . . . . . . . . . . . . . . 110
Software Help. . . . . . . . . . . . . . . . . . . . . . . . . . . . . . . . . . . . . 119
Online Services . . . . . . . . . . . . . . . . . . . . . . . . . . . . . . . . . . . . 119
Faxed Information . . . . . . . . . . . . . . . . . . . . . . . . . . . . . . . . .120
Customer Support. . . . . . . . . . . . . . . . . . . . . . . . . . . . . . . . .120
Where to Get Help . . . . . . . . . . . . . . . . . . . . . . . . . . . . . . . . . 121
How to Obtain Service. . . . . . . . . . . . . . . . . . . . . . . . . . . . . . 121
Packing Instructions . . . . . . . . . . . . . . . . . . . . . . . . . . . . . . .122
iv
Page 7

Limited Warranty. . . . . . . . . . . . . . . . . . . . . . . . . . . . . . . . . . 123
Retain the Original Dated Sales Receipt . . . . . . . . . . . . . . 123
Limited Warranty Coverage. . . . . . . . . . . . . . . . . . . . . . . . . .123
Limitations. . . . . . . . . . . . . . . . . . . . . . . . . . . . . . . . . . . . . . . 124
Your Rights Under State Law. . . . . . . . . . . . . . . . . . . . . . . . 125
Outside the United States . . . . . . . . . . . . . . . . . . . . . . . . . 125
Regulatory Information. . . . . . . . . . . . . . . . . . . . . . . . . . . . . 125
FCC Compliance and Advisory . . . . . . . . . . . . . . . . . . . 125
Canadian DOC Statement . . . . . . . . . . . . . . . . . . . . . .126
Original Camera Default Settings . . . . . . . . . . . . . . . . . . . .130
Camera Specifications . . . . . . . . . . . . . . . . . . . . . . . . . . . . . 131
General Maintenance and Safety . . . . . . . . . . . . . . . . . . . .133
Using Your Batteries. . . . . . . . . . . . . . . . . . . . . . . . . . . . . . .135
v
Page 8

vi
Page 9

1
Getting Started
Refer to the front inside cover for a description of the KODAK DC3400 Zoom
Digital Camera buttons and parts. This chapter covers the following
information.
Preparing to take pictures
Loading the batteries
Turning the camera on and off
Checking the batteries
Using an AC adapter
Handling a memory card
Setting the clock
Adjusting the LCD brightness
1
1
Page 10

Preparing to Take Pictures
Before you Start
Before you start taking pictures, you need to install the batteries or connect a
Kodak-specified AC adapter for power, and insert a KODAK Picture Card
(camera memory card) into the camera.
General Tips for Better Pictures
Keep your camera ready.
Get Close.
Keep people busy.
Use a simple background
Place the subject offcenter.
Include foreground in scenics.
Look for good lighting.
Hold your camera steady.
Use your flash.
Visit www.kodak.com and click Taking Better Pictures.
2
Page 11
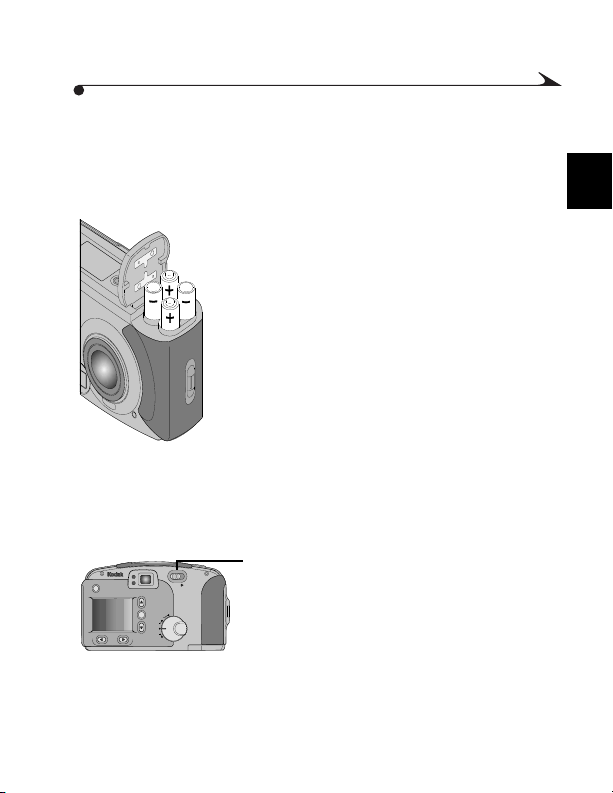
Loading Batteries
Your camera uses four AA batteries. For your convenience, alkaline batteries
are provided so you can start using your camera immediately.
For information on guidelines for battery usage, see page 135.
Place your thumb on the battery door.
1
Slide the battery door away from the camera.
2
Insert the batteries as indicated on the
3
battery cover.
Close and lock the battery door.
4
Make sure that no dirt is present when you
close the door.
Turning the Camera On and Off
Turn the camera on and off using the POWER switch, located on the back of the
camera.
To turn on the camera, slide the POWER
switch to the right.
CAPTURE
REVIEW
CONNECT
CAMERA
SETUP
The Status Display on top of the camera
turns on.
To turn off the camera, slide the POWER
switch again to the right.
1
3
Page 12
Checking Batteries
So that you are never caught with dead batteries your camera indicates the
power level of the batteries. A battery status symbol appears, on the Status
Display when you turn on the camera.
For information on guidelines for battery usage, see page 135.
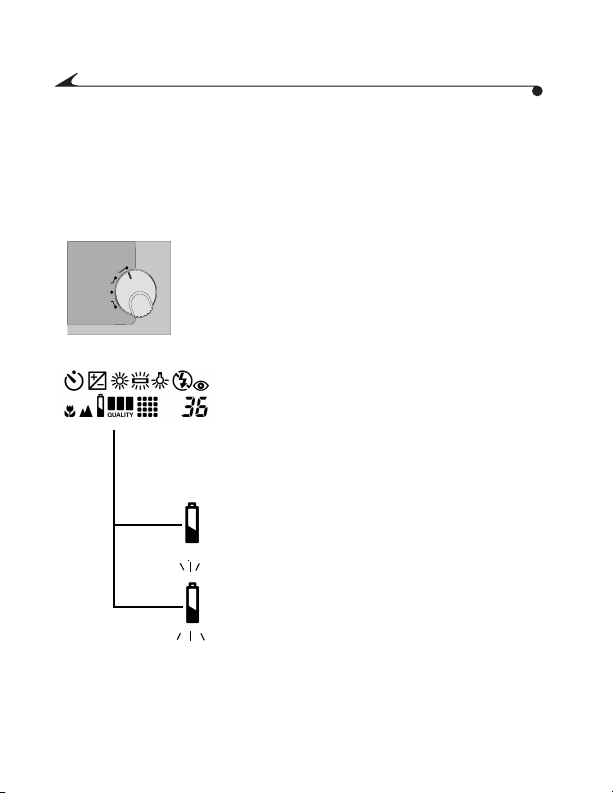
Set the Mode dial to Capture, Review, or
1
CAPTURE
REVIEW
CONNECT
CAMERA
SETUP
Camera Settings.
The battery status symbol is not visible if you
set the camera to Connect.
Slide the POWER switch to the right to turn
2
on the camera.
Check the battery status symbol on the Status
3
Display.
Full (No Icon)—indicates that
batteries are charged and ready to use.
Low—indicates batteries are not fully
charged and will soon need to be
replaced or recharged.
Exhausted (blinking)—indicates
batteries are too weak to power the
camera and need to be replaced.
4
Page 13

Using an AC Adapter
When you are taking pictures indoors or when the camera is connected to a
computer, you may want to use a Kodak-specified AC adapter to help conserve
battery power. It is important to use only a Kodak-specified AC adapter with
your camera. If you do not have a Kodak-specified AC adapter, you can
purchase one as an accessory. For details about available accessories, ask your
dealer of KODAK products.
Slide the POWER switch to the right to turn
1
off the camera.
Open the AC adapter port door on the side of
CARD
2
the camera.
Plug the appropriate end of the AC adapter
3
into the port on the camera.
Plug the AC adapter into the power outlet.
4
Depending on where you live, some AC
adapters are supplied with power plugs that
are not attached. If you have that type of
adapter, use the type of plug that matches
your power outlet.
Slide the POWER switch to the right to turn
5
on the camera.
The camera is now powered by the
AC adapter.
DC IN
VIDEO
OUT
OPEN
1
5
Page 14
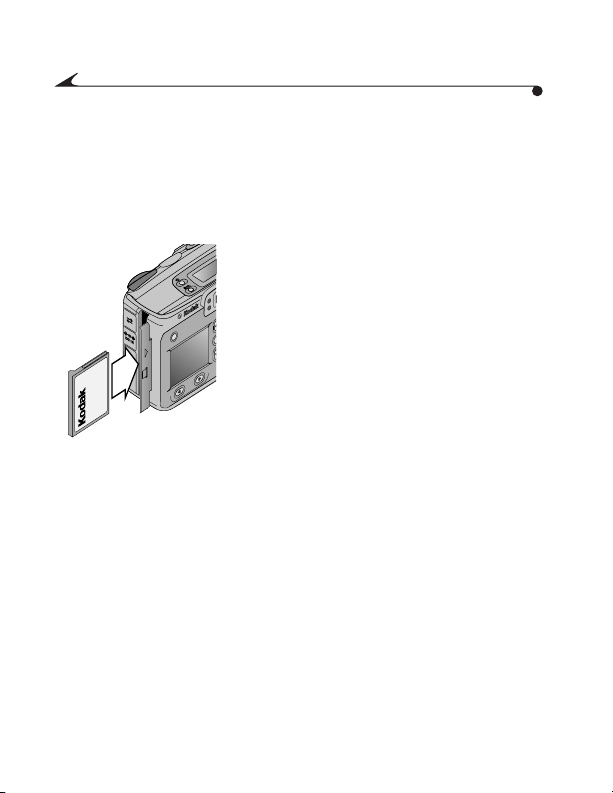
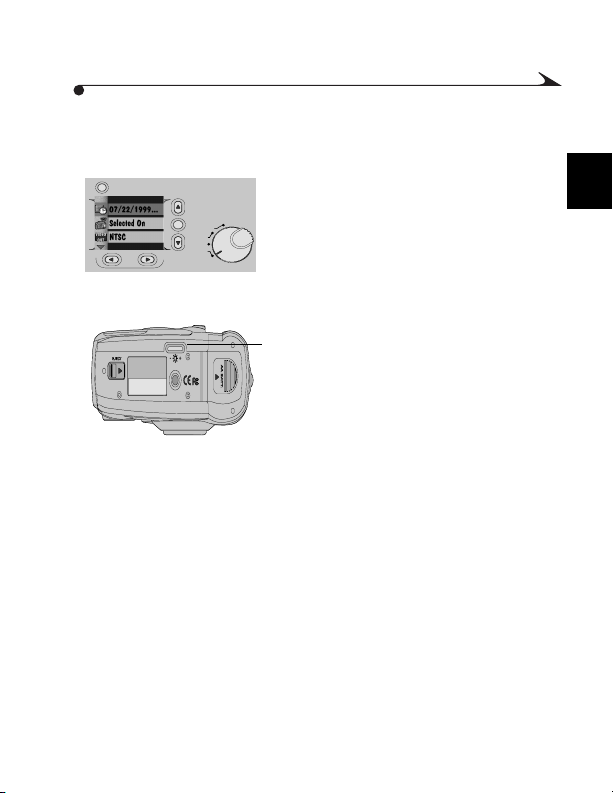
Inserting a Camera Memory Card
Your camera comes with a KODAK Picture Card (camera memory card), which
is used to store pictures you take with the camera. The camera memory card,
also referred to as a CompactFlash card, is removable and reusable for easy
storage and transfer of your pictures. You can purchase additional KODAK
Picture Cards from dealers of KODAK products.
Open the camera memory card door on the
1
side of the camera.
Insert the camera memory card into the slot
2
with the connecting end of the card facing
OPEN
CARD
the camera, and the lip on the card facing
toward the front of the camera.
CAUTION: The camera memory card can
only be inserted one way into the
camera. Forcing the card in the wrong
way may damage your camera.
Push the camera memory card all of the way
3
into the card slot and then close the door.
Make sure that no dirt is present when you
close the door.
6
Page 15
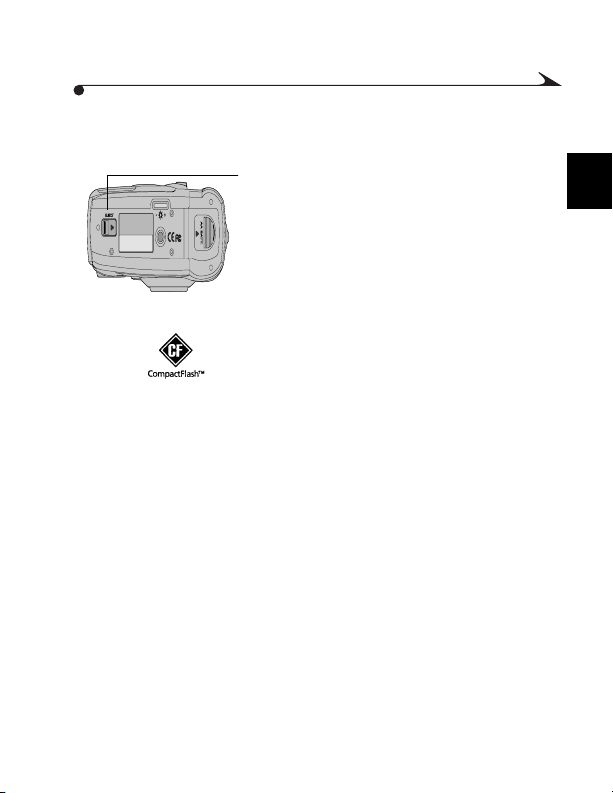
Removing a Camera Memory Card
Open the door on the side of the camera.
1
Slide the EJECT button in the direction of the
2
arrow to eject the camera memory card.
You may need to tilt the camera in order for
the card to slide out.
Remove the card and close the door.
3
Make sure that no dirt is present when you
close the door.
CAUTION: Do not insert or eject a
camera memory card when the camera
memory card light, located above the
card door, is blinking. This may damage
certified camera memory cards that carry the
CompactFlash logo.
your pictures or camera. Use only
1
7
Page 16
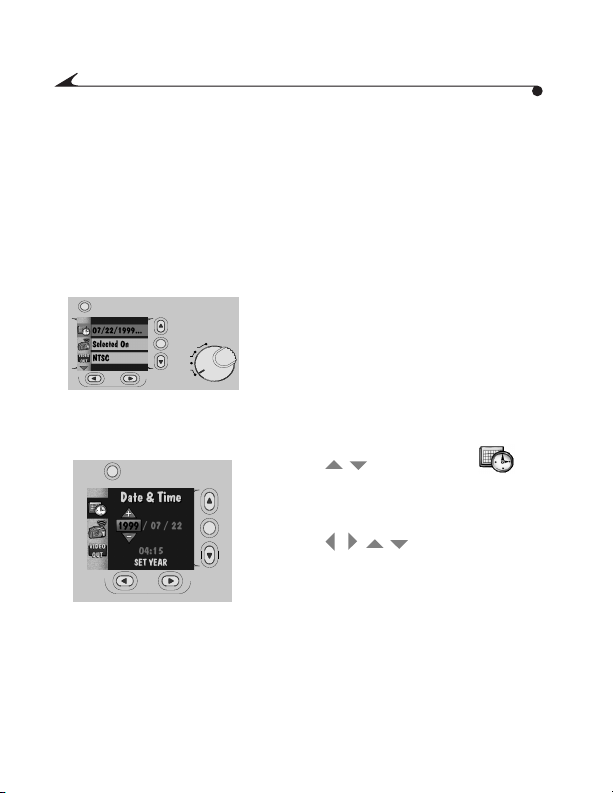
Setting the Clock on Your Camera
/
/
Your camera has a built-in clock that maintains the date and time in a
24-hour format. The camera clock needs to be set if you plan to use the Date
Stamp feature, which imprints the date on your picture. For information on
using the Date Stamp feature, see page 24.
If you remove the batteries from the camera for an extended period of time, or
the batteries become exhausted, you may need to reset the clock.
Set the Mode dial to Camera Setup.
MENU
CAPTURE
REVIEW
CONNECT
CAMERA
SETUP
1
Slide the POWER switch to the right to
2
turn on the camera.
The main Camera Setup screen appears.
Press a
3
icon is highlighted.
Press the DO-IT button.
4
button until the
The Date/Time screen appears.
Press a buttons to adjust
5
the date and time fields.
Press the DO-IT button.
6
The camera accepts the setting and
returns to main Camera Setup screen.
/
8
Page 17
Adjusting the LCD Brightness
You can adjust the brightness of the color LCD to suit your particular needs.
Set the Mode dial to Camera Setup.
MENU
CAPTURE
REVIEW
CONNECT
CAMERA
SETUP
1
You can set the Mode dial to any setting
you want as long as there is an image in
the LCD screen to adjust the
brightness level.
Slide the POWER switch to the right to
2
turn on the camera.
The main Camera Setup screen appears.
Use the dial on the bottom of the camera
3
to adjust the brightness of the LCD screen
to the brightness level you want.
1
9
Page 18

10
Page 19

2
Takin g Pic tures
Your camera makes taking pictures fun. Just set the camera to Capture and you
are on your way to creating great pictures. Everything you need is right at your
fingertips. With the camera you can:
Zoom in on your subject.
Automatically lock the focus on the subject when you press the
SHUTTER button.
View the picture you just took.
Vary the flash settings to give you control over the type of flash needed
for specific conditions.
Adjust the camera to take landscapes (Infinity Focus) and
close-ups, as well as set the Date Stamp feature and Self-Timer, all
available with the touch of a button.
Preview the picture before it is taken.
Delete unwanted pictures right away.
11
2
Page 20
Previewing a Picture Before it is Taken
To see what a picture looks like before you take it, preview the image on the
LCD on the back of your camera. The live image that appears is very helpful for
framing your subject, especially when using the Close-Up, Digital Zoom, and
Border features. If you want to take pictures in black and white or sepia tone,
or highlight text, Preview can help you make that decision. With Preview,
batteries are quickly drained, so use a KODAK-specified AC adapter
whenever possible.
Set the Mode dial to Capture.
MENU
CAPTURE
REVIEW
CONNECT
CAMERA
SETUP
1
Slide the POWER switch to the right to
2
turn on the camera.
Press the DO-IT button.
3
A live image with the icons of activated
camera features appears on the LCD.
12
Page 21
The image in the LCD appears in color
unless you have turned on an effect, such
as black and white or sepia tone, in which
case the effect is applied to the displayed
image. See page 32 for details.
Exposure Compensation—icon
appears in the LCD and Status Display
if you adjusted the camera exposure.
See page 28 for details.
Exposure Lock—icon appears in
the LCD if you locked the exposure.
See page 46 for details.
Borders—selected border appears
over the picture on the LCD. See page
30 for details.
Date Stamp—icon appears in the
LCD if you turned on the date stamp.
See page 24 for details.
To turn off Preview, press the
4
DO-IT button.
2
13
Page 22

Pressing the Shutter Button
Taking pictures is a snap with your camera. The SHUTTER button on your
camera locks in the auto focus and takes the picture.
Set the Mode dial to Capture.
MENU
CAPTURE
REVIEW
CONNECT
CAMERA
SETUP
1
Slide the POWER switch to the right to
2
turn on the camera.
Center the subject using the guide marks
3
in the viewfinder, or use Preview (page
12) and the LCD to frame your subject.
Press the SHUTTER button half-way down
4
to lock in the camera auto focus.
The camera beeps twice and the green
ready light comes on when the camera
is set to take a picture.
If the green ready light blinks, the auto
focus is not focused on the subject.
Release the SHUTTER button and
recompose your picture. Press the
SHUTTER button half-way down again to
relock the auto focus on the subject.
If the red flash indicator light blinks, the
flash is not fully charged. Wait for the
flash to charge before taking the picture.
Press the SHUTTER button completely
5
down to take the picture.
The camera beeps again to confirm
that a picture was taken and the
camera memory card light blinks as
the picture is stored on the card.
14
Page 23

Zooming in on Your Subject
With a touch of a button you can zoom from Wide Angle, which gives you more
of the surrounding area in pictures, to TelePhoto, which brings the subject in
closer.
Set the Mode dial to Capture.
1
Slide the POWER switch to the right
2
to turn on the camera.
Press the ZOOM control.
3
When you look through the
viewfinder, the subject appears closer
or farther away as you press the
ZOOM button.
2
15
Page 24
Zooming in Even Closer
If you need to get closer to your subject, use the Digital Zoom feature. With
digital zoom, the center of your picture is magnified so your pictures appear
even closer.
Press the DO-IT button to turn on
1
Preview if it is not already activated.
The LCD turns on with a live image.
Frame your subject using the LCD.
2
Press the ZOOM button until it is at
3
the farthest telephoto position.
Release and press the ZOOM button in
4
the same direction again to activate
digital zoom.
The camera beeps as the digital
zoom icon appears on the LCD.
16
Page 25
Viewing the Picture Just Taken
/
You can view or delete a picture seconds after it is. It is a handy way to check if
your subject was positioned correctly.
Set the Mode dial to Capture.
MENU
CAPTURE
REVIEW
CONNECT
CAMERA
SETUP
1
Slide the POWER switch to the right to
2
turn on the camera.
Press the SHUTTER button to take a
3
picture.
Press the button.
4
The picture just taken appears in the
LCD for several seconds with the delete
icon above the button.
If you want to view the picture again,
press the button.
To delete the picture, press the
5
button.
The Delete Picture screen appears on
the LCD.
Press a button until YES
6
is highlighted.
Press the DO-IT button.
7
The picture is permanently deleted
from the camera memory card.
2
17
Page 26
Setting a Quickview for Each Picture
/
/
You can set the camera so a quick view of the picture just taken appears in the
LCD automatically using the Quickview feature.
Set the Mode dial to Capture.
MENU
CAPTURE
REVIEW
CONNECT
CAMERA
SETUP
1
Slide the POWER switch to the right to
2
turn on the camera.
Press the MENU button.
3
The main Menu screen appears.
Press a button until is
4
highlighted.
Press the DO-IT button.
5
The Quickview screen appears on the
LCD. The current setting is checked
9
).
(
Press a button until ON is
6
highlighted.
Press the DO-IT button.
7
The main Menu screen reappears.
The image appears for several seconds
on the LCD in color unless you have
turned on an effect, such as black and
white or sepia tone, in which case the
effect is applied to the displayed image.
See page 32 for details.
To turn off Quickview, press a
8
button on the Quickview screen
/
until OFF is highlighted, then press the
DO-IT button.
18
Page 27
Setting the Flash
When taking pictures at night, indoors, or outdoors in heavy shadows, your
pictures need flash. For everyday picture-taking, use the Auto setting. However,
there are times when changing the flash option can improve your pictures. For
instance, if you are taking pictures of people indoors or at night, you can help
reduce the likelihood of red eye by using the Red-Eye setting. When your
subject is outdoors under heavy shadows, you can eliminate those shadows by
using the Fill flash. In situations where the use of flash is prohibited, as in
museums, you can turn off the flash.
Set the Mode dial to Capture.
MENU
CAPTURE
REVIEW
CONNECT
CAMERA
SETUP
1
Slide the POWER switch to the right to
2
turn on the camera.
2
19
Page 28

Press the FLASH button to scroll though
3
the flash options.
The Flash setting icon changes in the
Status Display.
Auto (No Icon)—fires the flash
automatically when needed. The
camera determines when there is not
enough light.
Off—turns off the flash.
Fill—fires the flash every time you
take a picture.
Red-Eye—fires the flash once
before the picture is taken, then fires
again when the picture is taken.
To return to the Auto setting, press the
4
FLASH button, or turn off the camera.
20
Page 29
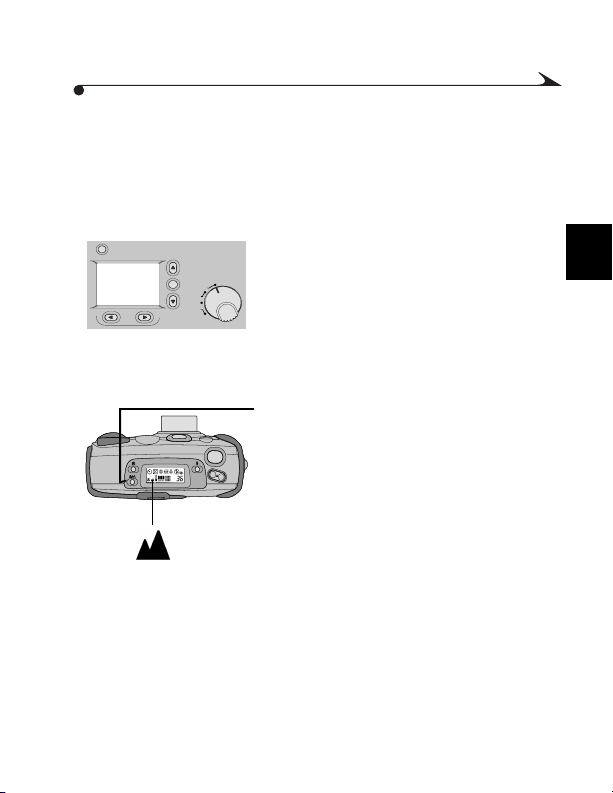
Photographing Distant Subjects
If you want to create postcard-like pictures of scenic views, such as a sunset or
mountain range, use the Infinity Focus feature. When Infinity Focus is selected,
the camera automatically turns off the flash and auto focus so you get sharp,
clear pictures.
Set the Mode dial to Capture.
MENU
CAPTURE
REVIEW
CONNECT
CAMERA
SETUP
1
Slide the POWER switch to the right to
2
turn on the camera.
Press the INFINITY FOCUS/CLOSE-UP
3
button once.
The Infinity Focus icon appears in the
Status Display.
If you press the button twice, the closeup feature is activated.
Frame your subject in the viewfinder and
4
press the SHUTTER button to take the
picture.
To turn off Infinity Focus, press the
5
INFINITY FOCUS/CLOSE-UP button two
times, or turn off the camera.
2
21
Page 30
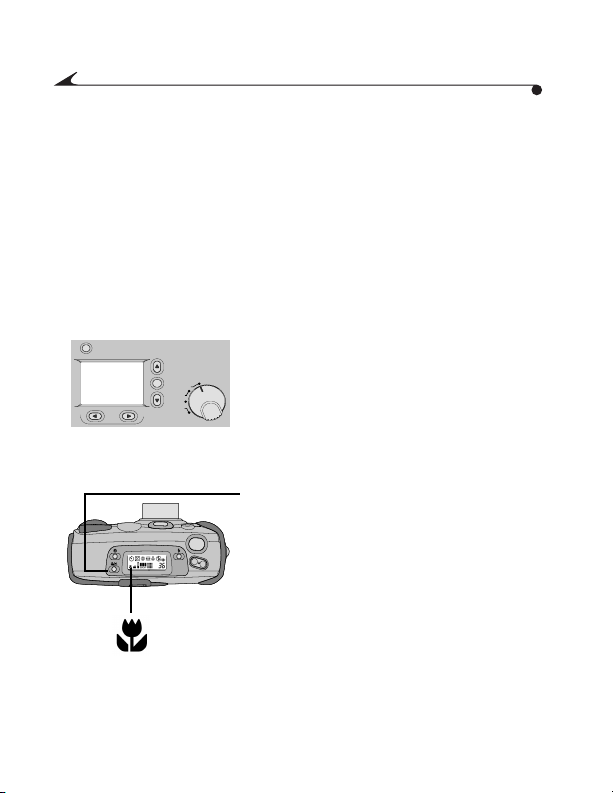
Photographing Close-Ups
If you want to take pictures of objects up close, such as flowers or artwork, use
the Close-Up feature. When selected, the camera automatically sets the focus
distance to 0.8 to 1.6 ft (0.25 to 0.5 m) and sets the flash to ensure detail and
clarity. Since the viewfinder on the camera may not accurately frame your
picture in Close-Up, the Preview option is automatically activated. For
information on Preview, see page 12.
When you use the Close-Up feature, the zoom capabilities on the camera
are disabled.
Set the Mode dial to Capture.
MENU
CAPTURE
REVIEW
CONNECT
CAMERA
SETUP
1
Slide the POWER switch to the right to
2
turn on the camera.
Press the INFINITY FOCUS/CLOSE-UP
3
button twice.
The Close-Up icon appears in the Status
Display and the LCD Preview feature
shows a live image.
Frame your subject using the LCD and
4
press the SHUTTER button.
To turn off Close-Up, press the INFINITY
5
FOCUS/CLOSE-UP button once, or turn off
the camera.
22
Page 31

Putting Yourself in the Picture
There might be times when you want everyone, including yourself, to be in the
picture. For these occasions, use the Self-Timer feature to create a 10-second
delay between the time you press the SHUTTER button and the time the picture
is taken.
Set the Mode dial to Capture.
MENU
CAPTURE
REVIEW
CONNECT
CAMERA
SETUP
1
Slide the POWER switch to the right to
2
turn on the camera.
Press the SELF-TIMER button.
3
The Self-timer icon appears in the
Status Display.
If you want to cancel self-timer before the
picture is taken, press the SELF-TIMER
button again or turn off the camera.
Place the camera on a flat, steady surface
4
or tripod.
Frame your subject in the viewfinder and
5
press the SHUTTER button.
The red Self-Timer light, on the front of
the camera, turns on and stays lit for 8
seconds, then flashes for 2 additional
seconds just before the picture is taken.
The Self-Timer turns off when the picture
is taken.
2
23
Page 32

Adding the Date to Your Pictures
/
/
You may want to keep track of when a picture was taken, perhaps to record a
child’s first picture or for an insurance claim. Whatever the reason, your
camera has the ability to record the date and time directly on your picture
using the Date Stamp feature. In order for the feature to imprint the correct
date and time, you need to set the camera clock. See page 8 for details. Once a
picture is taken with the date stamp, the date stamp cannot be removed.
Set the Mode dial to Capture.
MENU
CAPTURE
REVIEW
CONNECT
CAMERA
SETUP
1
Slide the POWER switch to the right to
2
turn on the camera.
Press the MENU button.
3
The main Menu screen appears on the
LCD.
Press a button until the
4
icon is highlighted.
Press the DO-IT button.
5
The Date Stamp screen appears on the
LCD. The current setting is checked
9
).
(
Press a button until the Date
6
Stamp option you want is highlighted.
24
Page 33

Press the DO-IT button.
7
The main Menu screen reappears.
The next time you take a picture the date
or date and time is recorded in the lower
right-hand corner of the picture. The Date
Stamp icon appears on the LCD screen if
Quickview (page 18) or Preview
(page 12) is turned on.
To turn off Date Stamp, press
8
a button until OFF is highlighted,
/
then press the DO-IT button.
2
25
Page 34

Deleting the Picture Just Taken
/
If you decide that you do not like a picture, you can delete it quickly from the
camera memory card immediately after it is taken if Quickview is turned on.
Once you delete the picture, it is permanently removed from the camera
memory card.
Set the Mode dial to Capture.
MENU
CAPTURE
REVIEW
CONNECT
CAMERA
SETUP
1
Slide the POWER switch to the right to
2
turn on the camera.
Turn on Quickview (page 18).
3
Frame your subject in the viewfinder and
4
press the SHUTTER button.
The picture appears on the LCD with the
icon displayed above the
button.
Press the button.
5
The LCD displays the Delete Picture
screen.
Press a button until YES
6
is highlighted.
Press the DO-IT button.
7
The picture is permanently deleted from
the camera memory card.
26
Page 35

3
Customizing Your Pictures
Chapters 1 and 2 explained the basics for taking great digital pictures. In this
chapter, you will learn about some of the custom features available on your
camera. Because your camera is so versatile, you have the ability to set the
camera for almost any picture taking situation you may encounter. With the
camera, you can:
Adjust the exposure for pictures that are too light or too dark.
Frame your pictures with interesting borders supplied on the camera
memory card and software CD.
Capture pictures in color, black and white, sepia tone, or highlight text
in documents.
Adjust the ISO sensitivity for low light photography without flash.
Select specific picture quality and resolution settings to meet your
demanding picture-taking needs.
Set white balancing options, so you get great color reproduction in
your pictures.
Adjust the metering system to control how light affects
your pictures.
Sharpen and soften pictures so editing in software can be
done easier.
Lock the exposure for a consistent look in all your pictures.
27
3
Page 36

Adjusting the Camera Exposure
/
/
If your pictures seem too dark or too light, adjust the amount of light allowed
into the camera so that your pictures are properly exposed. These adjustments
in lighting are called Exposure Compensation.
Set the Mode dial to Capture.
MENU
CAPTURE
REVIEW
CONNECT
CAMERA
SETUP
1
Slide the POWER switch to the right to turn
2
on the camera.
Press the Menu button.
3
The main Menu screen appears on the
LCD.
Press a button until the icon
4
is highlighted.
Press the DO-IT button.
5
The Exposure Compensation screen
appears on the LCD.
Press a button to change the
6
exposure number.
28
Page 37

If your pictures are too dark, increase
(+) the exposure number.
If your pictures are too light, decrease
(-) the exposure number.
You can adjust the exposure numbers in
+2.0 to -2.0 in 0.5 increments. An
increase of 1.0 doubles the amount of light
allowed into the camera. A decrease of 1.0
reduces the amount of light by half.
Press the DO-IT button.
7
The main Menu screen reappears and
the Exposure Compensation icon
appears in the Status Display.
To cancel Exposure Compensation, press a
8
/
button until 0.0 is highlighted,
then press the DO-IT button, or turn off
the camera, and the setting defaults to 0.0.
It is possible to select an exposure setting as
the default. See page 80 for details.
3
29
Page 38

Adding a Border to Your Picture
/
You can add a border or logo (or both) to your picture. When you use the
Border feature, the camera Preview turns on automatically to help you frame
the picture and see if the border selected works well with your subject. If you
like the border, go ahead and take the picture. If you do not like the border,
select a different one. Although borders are not included on the camera
memory card, you can create and add your own borders or logos. For more
information, refer to the KODAK DC3400 Border Transfer Application online
help or the ReadMe file. Once the picture is taken, the border cannot be
removed.
Set the Mode dial to Capture.
MENU
FPO
CONNECT
CAPTURE
REVIEW
CAMERA
SETUP
1
Slide the POWER switch to the right to
2
turn on the camera.
Press the Menu button.
3
The main Menu screen appears on the
LCD.
4
Press a
button until the
icon is highlighted.
Press the DO-IT button.
5
You can select from a list of different
borders to customize your pictures.
30
Page 39

Press a button until the Border
/
6
option you want is highlighted.
Press the DO-IT button.
7
The main Menu screen reappears.
To cancel Border, press a button
8
until No Border is highlighted, then press
the DO-IT button.
It is possible to select a specific border as the
default. See page 75 for details.
/
3
31
Page 40

Capturing in Black-and-White, Sepia Tone, or Document
With the Effect setting, you can take black-and-white pictures, use sepia tone to
give your picture an antique look, or take pictures of documents so text stands
out. When using the Effects feature, the camera Preview automatically turns on
so that you can see if the effect selected works well with your subject. If you
like the effect, go ahead and take the picture. If you do not like the effect, select
a different one before taking the picture. Once the picture is taken with the
effect, the effect cannot be removed.
Set the Mode dial to Capture.
MENU
CAPTURE
REVIEW
CONNECT
CAMERA
SETUP
1
Slide the POWER switch to the right to turn
2
on the camera.
Press the Menu button.
3
The main Menu screen appears on the
LCD.
32
Page 41

Press a button until the
/
/
4
icon is highlighted.
Press the DO-IT button.
5
Press a button until the Effect
6
option you want is highlighted.
Black & White—takes a black-and-
white picture.
Sepia Tone—takes a picture with a
reddish-brown cast.
Document—takes a picture with
added contrast so text stands out.
No Effect—takes a color picture.
Press the DO-IT button.
7
The main Menu screen reappears.
To cancel Effect, press a button
8
until No Effect is highlighted, then press
the DO-IT button, or turn off the camera.
It is possible to select a special effect as the
default. See page 82 for details.
/
3
33
Page 42

Adjusting the Picture Quality
/
/
If you intend to make large prints, you can capture more detail in the picture
using the Best setting. However, with this setting more storage room is used on
the camera memory card. For everyday pictures, use the Better setting, which
gives you great pictures and more storage space on the camera memory card.
If you need to store a large number of pictures on the camera memory card or
are going to e-mail or use the pictures online, use the Good setting.
Set the Mode dial to Capture.
MENU
CAPTURE
REVIEW
CONNECT
CAMERA
SETUP
1
Slide the POWER switch to the right to
2
turn on the camera.
Press the Menu button.
3
The main Menu screen appears on the
LCD.
Press a button until the
4
icon is highlighted.
Press the DO-IT button.
5
The LCD displays the Quality screen. The
9
current setting is checked (
Press a button until the Quality
6
).
option you want is highlighted.
34
Page 43

Best—use for printing 8x10
pictures.
Better—use for everyday pictures.
Good—use for online or for e-
mailing pictures.
Press the DO-IT button.
7
The main Menu screen reappears as the
Quality icon for the setting you selected
appears in the Status Display.
You can switch freely between these three
settings when taking pictures.
3
35
Page 44

Adjusting the Picture Resolution
/
/
If you want to send pictures through e-mail or use them online, use the
Standard resolution setting. With this setting, only the information needed for
viewing on a computer or printing small prints is captured. For pictures that
are going to be printed, use the High resolution setting. With this setting, more
information is captured, but fewer pictures fit on the camera memory card.
Set the Mode dial to Capture.
MENU
CAPTURE
REVIEW
CONNECT
CAMERA
SETUP
1
Slide the POWER switch to the right to
2
turn on the camera.
Press the Menu button.
3
The main Menu screen appears on the
LCD.
Press a button until the icon
4
is highlighted.
Press the DO-IT button.
5
The Resolution screen appears on the
LCD. The current setting is checked
9
).
(
Press a button until the
6
Resolution option you want
is highlighted.
36
Page 45

High—use this setting when you are
going to print your pictures. Picture
size is 1760 x 1168 pixels.
Standard—use this setting when you
are going to e-mail or use the
pictures online. Picture size is 896 x
592 pixels.
Press the DO-IT button.
7
The main Menu screen reappears as the
Resolution icon appears in the
Status Display.
You can switch freely between these two
settings when taking pictures.
3
37
Page 46

Selecting a White Balance for Indoor
/
/
Pictures
If you use your camera indoors where flash is prohibited, your pictures may
take on a green tint if captured under fluorescent tube lighting, or a reddishorange tint if captured under tungsten household lighting. You can correct this
problem using the White Balance feature on the camera. Use the Auto setting
for everyday pictures. Use the Daylight, Fluorescent, or Tungsten setting for
taking pictures under these lighting conditions without flash.
Set the Mode dial to Capture.
MENU
CAPTURE
REVIEW
CONNECT
CAMERA
SETUP
1
Slide the POWER switch to the right to
2
turn on the camera.
Press the Menu button.
3
The main Menu screen appears on the
LCD.
Press a button until the icon
4
is highlighted.
Press the DO-IT button.
5
The White Balance screen appears on
the LCD. The current setting is checked
9
).
(
Press a button until the White
6
Balance option you want is highlighted.
38
Page 47

Auto (No Icon)—automatically
adjusts the white balance.
Daylight—balances for natural
daylight lighting.
Fluorescent—corrects for the
green cast of fluorescent lighting.
Tungsten—corrects for the orange
cast of tungsten light bulbs.
Press the DO-IT button.
7
The main Menu screen reappears as the
White Balance icon you selected
appears in the Status Display.
Your camera automatically resets to Auto
when the camera is turned off. To change
the defaults, see page 78.
3
39
Page 48

Choosing a Metering System
You can control the way light affects your pictures using the metering systems
available on your camera. If you want a nice even exposure throughout the
picture, use the Multi-Pattern setting. This setting is great for everyday pictures.
If you want to emphasize the center of your picture, such as a person’s face,
while at the same time de-emphasizing the background, use the CenterWeighted setting.
Set the Mode dial to Capture.
MENU
CAPTURE
REVIEW
CONNECT
CAMERA
SETUP
1
Slide the POWER switch to the right to
2
turn on the camera.
Press the Menu button.
3
The main Menu screen appears on the
LCD.
40
Page 49

Press a button until the icon
/
/
4
is highlighted.
Press the DO-IT button.
5
The Auto Exposure screen appears on
the LCD. The current setting is checked
(9).
Press a button until the Auto
6
Exposure option you want is highlighted.
Multi-Pattern—evaluates the
lighting conditions of the entire
picture.
Center-Weighted—evaluates the
lighting conditions of the subject
centered in the viewfinder and sets
the overall exposure setting for the
picture based on the center of
the subject.
Press the DO-IT button.
7
The main Menu screen reappears.
You can switch freely between the two
settings when taking pictures.
3
41
Page 50

Selecting the ISO Setting
If you take pictures in low light without flash, such as in a museum, you can
select the Auto ISO sensitivity on the camera to help prevent blurred pictures
caused by camera movement. With this feature the shutter speed is
automatically increased to make the camera more responsive, while
maintaining proper exposure for the picture.
Set the Mode dial to Capture.
MENU
CAPTURE
REVIEW
CONNECT
CAMERA
SETUP
1
Slide the POWER switch to the right to
2
turn on the camera.
Press the Menu button.
3
The main Menu screen appears on the
LCD.
42
Page 51

Press a button until the
/
4
icon is highlighted.
The Auto ISO screen appears on the
LCD. The current setting is (9).
Press the DO-IT button.
5
Press a button until the option you want
6
is highlighted.
OFF—camera selects the optimal
shutter speed for pictures. Ideal for
everyday picture-taking.
ON—camera increases the shutter
speed when flash is turned off.
Ideal for indoor pictures in less
than optimal lighting.
Press the DO-IT button.
7
To cancel Auto ISO, press
8
/
a button until OFF is
highlighted, then press the DO-IT
button, or turn off the camera.
It is possible to change the ISO default
setting, see page 84.
3
43
Page 52

Sharpening and Softening a Picture
If you plan to edit your pictures using image editing software, the Sharpness
feature can make some editing processes easier. By selecting the Sharp setting,
the edges around the picture are enhanced, making it easier to cut or crop the
image. If you want to blend the image into a background, use the Soft setting to
de-emphasize the edges. For everyday picture-taking, keep the Sharpness
feature set to Standard. The Sharp or Soft settings may increase or decrease the
clarity in pictures.
Set the Mode dial to Capture.
MENU
CAPTURE
REVIEW
CONNECT
CAMERA
SETUP
1
Slide the POWER switch to the right to
2
turn on the camera.
Press the Menu button.
3
The main Menu screen appears on the
LCD.
44
Page 53

Press a button until the icon
/
/
4
is highlighted.
Press the DO-IT button.
5
The Sharpness screen appears on the
LCD. The current setting is checked
(9).
Press a button until the Sharpness
6
option you want is highlighted.
Sharp—highlights the edges in your
picture, so the edges stand out.
Standard—makes no change to the
edges in your picture.
Soft—blurs the edges in your
picture, so the edges blend in.
Press the DO-IT button.
7
The main Menu screen reappears.
You can switch freely among the three
settings when taking pictures.
3
45
Page 54

Locking in an Exposure Setting
If you take a series of pictures that require a consistent look or a constant
exposure setting, use the Exposure Lock feature. This feature is great for taking
a series of pictures, like a mountain range, and creating a mural with the
prints.
Set the Mode dial to Capture.
MENU
CAPTURE
REVIEW
CONNECT
CAMERA
SETUP
1
Slide the POWER switch to the right to
2
turn on the camera.
Press the Menu button.
3
The main Menu screen appears on the
LCD.
46
Page 55

Press a button until the
/
/
4
icon is highlighted.
Press the DO-IT button.
5
The Exposure Lock screen appears on
the LCD. The current setting is (9).
Press a button until ON
6
is highlighted.
Press the DO-IT button.
7
The “Please take a picture to lock
capture settings” screen appears.
8 Center the area you want to lock the
exposure on in the viewfinder.
9 Press the SHUTTER button to lock in the
exposure setting.
10 To cancel Exposure Lock, press
/
a button until OFF is
highlighted, then press the DO-IT
button, or turn off the camera.
3
47
Page 56

48
Page 57

4
Reviewing Your Pictures
After taking pictures with your KODAK DC3400 Digital Camera, you can take a
look at them by setting the camera to Camera Review. You can:
View your pictures and see how custom features, if any, were applied
to the shot.
Magnify the picture to check the detail.
Select specific pictures and quantities to print.
Protect pictures from being deleted from your camera
memory card.
Delete unwanted pictures to free up space on the camera
memory card.
Display and run a slide show on the camera or on a television.
View specific information about the picture.
49
4
Page 58

Viewing Your Pictures
To view each picture in full LCD size, or you can view up to three smaller
thumbnail-size pictures at a one time using the Filmstrip feature.
MENU
CAPTURE
REVIEW
CONNECT
CAMERA
SETUP
1 Set the Mode dial to Review.
2 Slide the POWER switch to the right to
turn on the camera.
The LCD displays the last picture taken
with the frame number, and the Print
Order and Protect icons, if activated.
3 Use the buttons to scroll through
/
and view the pictures on the LCD.
4 Press the Menu button to display the
filmstrip and the main Review screen.
The Review Menu icons, filmstrip, and
memory bar appear over the current
picture.
50
Page 59

The filmstrip displays up to three pictures
/
at a time, in the order taken and stored on
the camera memory card.
5 Use the buttons to scroll through the
filmstrip.
The picture on the filmstrip appears in
the LCD as the memory bar and picture
locator needle moves.
The memory bar indicates the amount of
space on the camera memory card. The
dark section represents the portion of the
card that is filled, while the needle locator
shows the position of the picture on the
card.
6 To exit, press the Menu button.
4
51
Page 60

Magnifying Your Pictures
/ / /
To zoom in on a specific part of a picture displayed on the LCD, use the Magnify
feature. This feature lets you view a section of the current picture at two times
the normal LCD size.
MENU
CAPTURE
REVIEW
CONNECT
CAMERA
SETUP
1 Set the Mode dial to Review.
2 Slide the POWER switch to the right to
turn on the camera.
The last picture taken appears on the
LCD.
3 Press the Menu button.
The main Review Menu screen appears.
4 Press a
button until the picture
you want to magnify is highlighted on
the filmstrip.
The picture appears in the LCD viewing
area.
5 Press a
button until the
icon is highlighted.
6 Press the DO-IT button.
The LCD displays a magnified view of
the selected picture.
7 Use the
and
buttons to
/
scroll to different parts of the picture.
8 To exit Magnify, press the DO-IT button.
52
Page 61

Selecting Pictures for Printing
/
You can scroll through and select certain pictures on the camera memory card
to print, as well as create an index of all of the pictures using the Print Order
feature. This feature is useful because it saves you time when printing pictures
from a KODAK Picture Maker, or Personnel Picture Maker Systems.
MENU
CAPTURE
REVIEW
CONNECT
CAMERA
SETUP
1 Set the Mode dial to Review.
2 Slide the POWER switch to the right to
turn on the camera.
The last picture taken appears on the
LCD.
3 Press the Menu button.
The main Review Menu screen appears.
4 Press a
button until the
icon is highlighted.
5 Press the DO-IT button.
The Print Order screen appears.
4
53
Page 62

/
/
/
6 Press a
want is highlighted on the filmstrip.
7 Press a
Order option you want is highlighted.
CURRENT PICTURE or EDIT
PICTURE—marks the picture
currently selected on the filmstrip.
EXIT—returns you to the main
Review screen.
ALL PICTURES or EDIT ALL—
marks all of the pictures on the
camera memory card.
INDEX PRINT or EDIT INDEX
PRINT— thumbnails of all the
pictures on the camera memory card
will print.
8 Press the DO-IT button.
The Copies screen appears, unless you
selected the Index Print option, which
returns you to the main Review screen.
9 Press a
number of prints you want appears.
10 Press the DO-IT button.
The print order is accepted and the
Print Order icon appears in the LCD of
each picture marked for printing. The
main Print Order screen reappears.
11 To exit Print Order, highlight EXIT, then
press the DO-IT button.
button until the picture you
button until the Print
button until the desired
54
Page 63

Cancelling Pictures for Printing
/
If you have second thoughts about the pictures you have selected to print, you
can go back and cancel individual pictures or the entire order.
1 Press a
Order option you want is highlighted.
CANCEL CURRENT—cancels the
print order for the selected picture.
EXIT—returns you to the main
Review Menu screen.
CANCEL PRINT ORDER—cancels
all the print orders for the pictures.
CANCEL INDEX PRINT—cancels
the print order for the index print.
2 Press the DO-IT button.
The print order is cancelled and the
Print Order icon is removed. The main
Print Order screen reappears.
3 To exit Print Order, highlight EXIT, then
press the DO-IT button.
button until the Print
4
55
Page 64

Protecting Your Pictures
/
Safeguard your pictures from being deleted accidentally from the camera
memory card by using the Protect feature. This feature is very useful if the
camera and camera memory card are used by more than
one person.
MENU
CAPTURE
REVIEW
CONNECT
CAMERA
SETUP
1 Set the Mode dial to Review.
2 Slide the POWER switch to the right to
turn on the camera.
The last picture taken appears on the
LCD.
3 Press the Menu button.
The main Review Menu screen appears.
4 Press a button until the
icon is highlighted.
The Protect screen appears.
5 Press a button until the picture you
/
want to protect is selected.
6 Press the DO-IT button.
The picture appears on the LCD with the
Protect icon.
7 To cancel a protected picture, select the
picture to be unprotected and press the
DO-IT button.
56
Page 65

Deleting One or All of Your Pictures
/
If you decide that you do not like the pictures stored on the camera memory
card, or you just want to free up space, use the Delete feature to remove one or
all of the pictures on the card. If you have marked pictures as protected, they
cannot be deleted until you turn off the Protect feature. See page 56 for details.
MENU
CAPTURE
REVIEW
CONNECT
CAMERA
SETUP
1 Set the Mode dial to Review.
2 Slide the POWER switch to the right to turn
on the camera.
The last picture taken appears on the
LCD.
3 Press the Menu button.
The main Review Menu screen appears.
4 Press a button unti7.5l the
icon is highlighted.
5 Press the DO-IT button.
The Delete screen appears.
4
57
Page 66

6 Press a button until the picture you
/
want to delete is selected.
7 Press a button until the Delete
option you want is highlighted.
8 Press the DO-IT button.
The pictures are deleted from the
camera memory card.
9 To exit Delete, highlight EXIT, then press
the DO-IT button.
/
PICTURE—deletes the selected
picture from the camera memory
card.
EXIT—returns you to the main
Review screen without deleting the
picture(s).
ALL PICTURES—deletes all the
pictures on the camera memory card.
58
Page 67

Running a Slide Show on Your Television
View your pictures on the camera LCD, or connect your camera to a television
using a video cable and display your pictures to a large audience using the
Slide Show feature. The pictures appear on the television for a period of 1 to
99 seconds, a time you set from the camera. The slide show ends after all the
pictures have been shown; or, if you are using a Kodak-specified AC adapter,
the slide show continues until you stop it. For details about available
accessories, ask your dealer of KODAK products.
MENU
CAPTURE
REVIEW
CONNECT
CAMERA
SETUP
1 Set the Mode dial to Review.
2 Slide the POWER switch to the right to turn
on the camera.
The last picture taken appears on the
LCD.
4
59
Page 68

3 Press the Menu button.
/
/
The main Review Menu screen appears.
60
DC IN
VIDEO
4 Press a
button until the
icon is highlighted.
5 Press the DO-IT button.
The Slide Show Interval screen appears.
6 Use the
buttons to select the
number of seconds you want the pictures
to appear on the television.
If you want to view a slide show on the
camera LCD, press the DO-IT to start and
stop the slide show.
7 Insert the video cable into the video-out
port on the side of your camera, and
connect the other end of the video cable to
the video-in port on the television.
8 Turn on the television.
You may need to adjust the Video Out
setting to NTSC or PAL television signals.
See page 73 for details.
9 Press the DO-IT button to start and stop
OPEN
CARD
OUT
the slide show.
Page 69

Viewing Information About a Picture
Look up specific information about a picture using the Picture Information
feature. The information that appears is for viewing and cannot be edited.
MENU
CAPTURE
REVIEW
CONNECT
CAMERA
SETUP
1 Set the Mode dial to Review.
2 Slide the POWER switch to the right to
turn on the camera.
The last picture taken appears on the
LCD.
4
61
Page 70

3 Press the Menu button.
/
The main Review Menu screen appears.
4 Press a button until the icon
is highlighted.
5 Press the DO-IT button.
The Picture Info screen appears with
that picture’s information displayed.
Quality
Resolution
File Name
Directory Name
Capture Date/Time
Flash
.
Aperture
Shutter Speed
White Balance
Metering
Exposure Compensation
6 Press a button to view information
on other pictures.
7 To exit Picture Information, press the DO-
IT button.
/
62
Page 71

5
Personalizing Your Camera
Tailor your camera to fit whatever picture-taking needs you have. When you set
the camera to Camera Setup, you can personalize your camera so it performs
the way you want, each time you use it. You can:
Set a camera response beep, so you get feedback from the camera
when you initiate an action.
Select a power-save setting to help conserve batteries.
Access camera information to view a complete history of your
cameras use.
Select the language with which you are most comfortable working.
Format other camera memory cards so they work in your camera.
Select specific default settings, so your camera is always set for the
way you need to use it.
63
5
Page 72

Setting a Response Beep
Your camera provides auditory feedback in the form of a beep anytime the
SHUTTER button is pressed, or when the camera cannot perform a selected
function. If you do not want auditory feedback, turn off the beep. This can be
especially useful when taking a spontaneous picture of someone or of wildlife.
MENU
CAPTURE
REVIEW
CONNECT
CAMERA
SETUP
1 Set the Mode dial to Camera Setup.
2 Slide the POWER switch to the right to
turn on the camera.
The main Camera Setup screen appears.
64
Page 73

3 Press a
/
/
icon is highlighted.
4 Press the DO-IT button.
The Beep screen appears. The current
setting is checked (
5 Press a button until the Beep
option you want is highlighted.
OFF—provides no auditory
feedback.
SELECTED ON—provides auditory
feedback when you press the
SHUTTER button, as well as
any warnings.
ALL ON—provides auditory
feedback anytime a button is pressed.
6 Press the DO-IT button to accept the
changes and return to the main Camera
Setup screen.
button until the
9
).
5
65
Page 74

Saving Camera Power
The Power Save feature helps extend battery life by shortening the time that the
camera power stays on when not in use. For your convenience, the Power Save
setting is automatically activated. If situations arise where you need the camera
power to stay on for a longer period of inactivity, such as connecting the
camera to a computer, turn off the Power Save feature to have more time to
work before the camera automatically shuts off.
MENU
CAPTURE
REVIEW
CONNECT
CAMERA
SETUP
1 Set the Mode dial to Camera Setup.
2 Slide the POWER switch to the right to
turn on the camera.
The main Camera Setup screen appears.
66
Page 75

3 Press a
/
/
is highlighted.
4 Press the DO-IT button.
The Power Save screen appears. The
current setting is checked (
5 Press a button until the Power
Save option you want is highlighted.
6 Press the DO-IT button to accept the
changes and return to the main Camera
Setup screen.
button until the icon
9
).
5
67
Page 76

Viewing Camera Information
Have you ever wondered how many pictures you have taken with your camera
or how many times the flash fired? The Camera Information feature keeps a
record for you.
MENU
CAPTURE
REVIEW
CONNECT
CAMERA
SETUP
1 Set the Mode dial to Camera Setup.
2 Slide the POWER switch to the right to
turn on the camera.
The main Camera Setup screen appears.
68
Page 77

3 Press a
/
icon is highlighted.
4 Press the DO-IT button.
The About screen appears.
The information that appears is
view-only and cannot be changed.
Firmware Version—displays the
latest firmware version.
# Images Captured—displays the
total number of pictures taken.
# Flash Fired—displays the total
number of times the flash fired.
5 Press the DO-IT button to return to the
main Camera Setup screen.
button until the
5
69
Page 78

Selecting a Language for the Camera
/
/
Select from many different languages for the camera. Once you select a
language, the text changes to reflect the language selected.
MENU
CAPTURE
REVIEW
CONNECT
CAMERA
SETUP
1 Set the Mode dial to Camera Setup.
2 Slide the POWER switch to the right to
turn on the camera.
The main Camera Setup screen appears.
3 Press a button until the
icon is highlighted.
4 Press the DO-IT button.
The Language screen appears. The
9
current setting is checked (
).
5 Press a button until the language
you want is highlighted.
The main Camera Setup screen
reappears.
6 Press the DO-IT button to accept the
changes and return to the main Camera
Setup screen.
70
Page 79

Formatting Your Camera Memory Card
If you own camera memory cards (CompactFlash cards) that have been used
in other digital cameras, they may not be properly formatted for use in your
camera, or the data on the card may become corrupted. When these issues
arise, your camera indicates that the camera memory card needs to be
formatted.
When you format a camera memory card, all of the information on the card is
erased. This includes pictures, borders and all other files. You can create and
add borders to the camera memory card. For more information, refer to the
KODAK DC3400 Border Transfer Application online help or the ReadMe file.
MENU
CAPTURE
REVIEW
CONNECT
CAMERA
SETUP
1 Set the Mode dial to Camera Setup.
2 Slide the POWER switch to the right to
turn on the camera.
The main Camera Setup screen appears.
5
71
Page 80

3 Press a button until the icon
/
/
is highlighted.
4 Press the DO-IT button.
The Format Memory Card screen
appears.
5 Press a button until CONTINUE
FORMAT is highlighted.
6 Press the DO-IT button to format the
camera memory card and return to the
main Camera Setup screen.
72
Page 81

Adjusting the Video Out Signal
Set your camera so that it is compatible with NTSC or PAL video signals. The
Video Out feature needs to be set correctly if you plan on running a slide show
of the pictures from the camera on a television or video monitor. For
information on setting up a slide show, see page 59.
MENU
CAPTURE
REVIEW
CONNECT
CAMERA
SETUP
1 Set the Mode dial to Camera Setup.
2 Slide the POWER switch to the right to
turn on the camera.
The main Camera Setup screen appears.
5
73
Page 82

3 Press a button until the
/
/
icon is highlighted.
4 Press the DO-IT button.
The Video Out screen appears. The
current setting is checked (9).
5 Press a button until the video out
option you want is highlighted.
NTSC—used in most countries
except Europe. The United States
uses NTSC.
PAL—used in European countries.
6 Press the DO-IT button to accept the
change and return to the main Camera
Setup screen.
74
Page 83

Adjusting the Camera Default Settings
Customize your camera so specific settings are activated automatically each
time you turn on the camera. Select settings for Flash, White Balance, Exposure
Compensation, Borders, and Effects to suit your particular picture-taking
needs. For default settings, see page 130.
Setting a Border Default
Adjust the camera so your favorite frame or graphic is added to each picture
you take. For more information about the Borders feature, see page 30.
Once the picture is taken, borders cannot be removed.
MENU
CAPTURE
REVIEW
CONNECT
CAMERA
SETUP
1 Set the Mode dial to Camera Setup.
2 Slide the POWER switch to the right to
turn on the camera.
The main Camera Setup screen appears.
5
75
Page 84

3 Press a
/
/
icon is highlighted.
4 Press the DO-IT button.
The Borders Default screen appears. The
current setting is checked (
5 Press a
option you want is highlighted.
No Borders is the main default
setting.
6 Press the DO-IT button to accept the
changes and return to the main Camera
Setup screen.
button until the
9
).
button until the Border
76
Page 85

Setting a Flash Default
/
/
Adjust your camera so that it is set to a specific flash setting every time you turn
on the camera. For more information about the Flash setting, see page 19.
MENU
CAPTURE
REVIEW
CONNECT
CAMERA
SETUP
1 Set the Mode dial to Camera Setup.
2 Slide the POWER switch to the right to
turn on the camera.
The main Camera Setup screen appears.
3 Press a
button until the icon
is highlighted.
4 Press the DO-IT button.
The Flash Default screen appears. The
current setting is checked (
5 Press a
button until the Flash
9
).
option you want is highlighted.
AUTO (Main Default)—flash fires
when needed. Ideal for everyday
picture-taking situations.
FILL—flash fires every time you take
a picture. Ideal for pictures outside
under heavy shade.
RED EYE—flash fires once so the
eyes become accustomed to the flash,
then fires again when the picture is
taken. Ideal for pictures of people.
OFF—flash does not fire.
6 Press the DO-IT button to accept the
changes and return to the main Camera
Setup screen.
5
77
Page 86

Setting a White Balance Default
If you are always using your camera indoors where flash is prohibited, you can
set the camera so it is balanced for the type of light source that you take
pictures under. For more information about the White Balance feature, see
page 38.
MENU
CAPTURE
REVIEW
CONNECT
CAMERA
SETUP
1 Set the Mode dial to Camera Setup.
2 Slide the POWER switch to the right to
turn on the camera.
The main Camera Setup screen appears.
78
Page 87

3 Press a
/
/
icon is highlighted.
4 Press the DO-IT button.
The White Balance Default screen
appears. The current setting is checked
9
(
).
5 Press a
Balance option you want is highlighted.
AUTO (Main Default)—adjusts
automatically when flash is used.
Ideal for everyday pictures.
DAYLIGHT—balances for daylight.
Ideal for indoor pictures under
natural lighting.
TUNGSTEN—balances for the red-
orange color of household lighting.
FLUORESCENT—balances for the
green color of fluorescent lighting.
6 Press the DO-IT button to accept the
changes and return to the main Camera
Setup screen.
button until the
button until the White
5
79
Page 88

Setting an Exposure Compensation Default
Adjust the Exposure Compensation setting so that it is used every time you turn
on the camera. For more information about The Exposure Compensation
feature, see page 28.
MENU
CAPTURE
REVIEW
CONNECT
CAMERA
SETUP
1 Set the Mode dial to Camera Setup.
2 Slide the POWER switch to the right to
turn on the camera.
The main Camera Setup screen appears.
80
Page 89

3 Press a
/
/
icon is highlighted.
4 Press the DO-IT button.
The Exposure Compensation Default
screen appears.
5 Press a
compensation number you want
is highlighted.
If your pictures are too dark,
increase (+) the exposure number.
If your pictures are too light,
decrease (-) the exposure number.
The main default setting for
Exposure Compensation is 0.0.
6 Press the DO-IT button to accept the
changes and return to the main Camera
Setup screen.
button until the
button until the exposure
5
81
Page 90

Setting an Effect Default
If you work for a newspaper or in an office environment where you need to
record lecture slides, you can adjust your camera so it takes pictures in black
and white, sepia tone, or to highlight text every time you turn on the camera.
For more information about the Effects feature, see page 32.
MENU
CAPTURE
REVIEW
CONNECT
CAMERA
SETUP
1 Set the Mode dial to Camera Setup.
2 Slide the POWER switch to the right to
turn on the camera.
The main Camera Setup screen appears.
82
Page 91

3 Press a
/
/
icon is highlighted.
4 Press the DO-IT button.
The Effects Default screen appears. The
current setting is checked (
5 Press a
option you want is highlighted.
No Effect (Main Default)—captures
pictures in full color.
Black & White—captures pictures
in black-and-white. Ideal for taking
pictures for newspapers.
Sepia—captures pictures in a red-
brown tone. Ideal for giving pictures
an antique look.
Document—increases picture
contrast so text stands out.
6 Press the DO-IT button to accept the
changes and return to the main Camera
Setup screen.
button until the
9
).
button until the Effects
5
83
Page 92

Setting an Auto ISO Default
If you always use your camera indoors without flash, you can set the camera so
it uses a faster shutter speed to help avoid blurry pictures from camera
movement. For more information about the Auto ISO feature, see page 42.
MENU
CAPTURE
REVIEW
CONNECT
CAMERA
SETUP
1 Set the Mode dial to Camera Setup.
2 Slide the POWER switch to the right to
turn on the camera.
The main Camera Setup screen appears.
84
Page 93

3 Press a
/
/
icon is highlighted.
4 Press the DO-IT button.
The Auto ISO Default screen appears.
The current setting is checked (
5 Press a
option you want is highlighted.
OFF (Main Default)—camera
maintains optimal shutter speed
ranges. Ideal for everyday pictures.
ON—camera increases shutter speed
when flash is off. Ideal for indoor
pictures in less than optimal lighting.
6 Press the DO-IT button to accept the
changes and return to the main Camera
Setup screen.
button until the
9
).
button until the Auto ISO
5
85
Page 94

86
Page 95

6
Installing Your Software
This chapter describes how to install the KODAK software included with your
KODAK DC3400 Digital Camera.
The KODAK DC3400 Camera Software (Installer) included with your camera
contains software for Windows-based personal computers and Macintosh
computers. These applications provide a variety of features that let you access
and use the pictures stored on the camera memory card. Detailed information
on using the software can be found in the online help supplied with each
software application.
87
6
Page 96

Windows-Based System Requirements
Windows 95, Windows 98, Windows NT 4.0, or Windows 2000,
operating system.
Pentium 90 MHz microprocessor (minimum) with CD-ROM drive.
Color display monitor with a minimum resolution of 640 x 480 (1024
x 768 preferred) and 8-bit color (16-bit or 24-bit recommended).
16 MB or more of available RAM.
120 MB of hard disk space available.
Available serial port, USB port (Windows 98 and Windows 2000), or
CompactFlash card reader.
Macintosh System Requirements
PowerPC-based Macintosh computer, with CD-ROM drive.
Operating system 7.6.1 or later for serial connection. Operating
system 8.5.1 or later for USB connections.
Color display monitor with a minimum resolution of 640 x 480 (1024
x 768 preferred) and thousands of colors recommended.
32 MB or more of available RAM.
120 MB of hard disk space available.
Available serial port, USB port, or CompactFlash card reader.
88
Page 97

KODAK Software for Windows-Based Computers
Four KODAK software applications are supplied with the camera for use on a
Windows-based computer. They are:
KODAK DC3400 Camera Mounter Software (Mounter)—
provides an easy way to view pictures from the camera memory card
and copy them to your computer.
KODAK DC3400 Digital Access Software (TWAIN Acquire)—
provides a quick way to view and acquire pictures from the camera
memory card to a TWAIN-compliant host software program, such as
ADOBE Photoshop or ADOBE PhotoDeluxe.
KODAK DC3400 Camera Controls Software (Camera
Controls)—lets you change camera, capture, and communications
settings from a computer as well as take pictures and review them.
KODAK DC3400 Border Transfer Application (Border)—lets
you convert existing Windows BMP files into the border file format
(BDR) and copy the borders to the camera memory card and to the
hard disk.
6
89
Page 98

Software Overview
A brief overview of the software is listed below. Detailed information on the
software is available in the online help for each application.
Feature Mounter
View thumbnail images
Transfer pictures
Display picture information
Open pictures on the hard
drive using other applications
Access Camera Controls
Take a picture
Delete pictures
Format camera memory card
Add borders to camera
memory card
Copy borders to hard disk
90
TWAIN
Acquire
Camera
Controls
Border
Page 99

KODAK Software for Macintosh Computers
Three KODAK software applications are supplied with the camera for use on a
Macintosh computer. They are:
KODAK DC3400 Picture Transfer Application (Picture
Tra nsfer)—provides an easy way to view pictures from the camera
memory card and copy them to your computer.
KODAK DC3400 Digital Access Software (Plug-In Acquire)—
provides a quick way to view and copy pictures from the camera
memory card to any application that supports the ADOBE Photoshop
plug-in module, such as ADOBE Photoshop or ADOBE PhotoDeluxe.
KODAK DC3400 Border Transfer Application (Border)—lets
you convert existing BMP and PICT files into the border file format
(BDR) and copy the borders to the camera memory card and to the
hard disk.
6
91
Page 100

Software Overview
A brief overview of the software is listed below. Detailed information on the
software is available in the online help for each application.
Feature
View thumbnail images
Transfer pictures
Display picture information
Change camera settings
Take a picture
Change camera Capture settings
Delete pictures
Add borders to camera memory card
Copy borders to hard disk
92
Picture
Transfer
Plug-In
Acquire
Border
 Loading...