

Page 1

KODAK DC3200 Digital Camera
User’s Guide
Visit Kodak on the World Wide Web at www.kodak.com
Page 2

©Eastman K odak Company, 2000
Kodak and Photolife are trademarks of Eastman Kodak Company.
Page 3

Table of Contents
1 Getting Started . . . . . . . . . . . . . . . . . . . . . . . . . . . . . . . . . . . . . . . . . 1
Preparing to Take Pictures . . . . . . . . . . . . . . . . . . . . . . . . . . . . . . . . . . . . . . . . 2
Attaching the Wrist Stra p . . . . . . . . . . . . . . . . . . . . . . . . . . . . . . . . . . . . . 2
Loading the Batteries . . . . . . . . . . . . . . . . . . . . . . . . . . . . . . . . . . . . . . . . . 2
Turning the Camera On and Off . . . . . . . . . . . . . . . . . . . . . . . . . . . . . . . . . 3
Checking the Batterie s . . . . . . . . . . . . . . . . . . . . . . . . . . . . . . . . . . . . . . . . 4
Inserting a Picture Car d . . . . . . . . . . . . . . . . . . . . . . . . . . . . . . . . . . . . . . . 5
Removing a Picture Card . . . . . . . . . . . . . . . . . . . . . . . . . . . . . . . . . . . . . . . 5
2 Taking Pictures . . . . . . . . . . . . . . . . . . . . . . . . . . . . . . . . . . . . . . . . . . 7
Previewing a Picture Before it is Taken . . . . . . . . . . . . . . . . . . . . . . . . . . . . . . 8
Taking a Picture . . . . . . . . . . . . . . . . . . . . . . . . . . . . . . . . . . . . . . . . . . . . . . . . . 9
Zooming in on Your Subject . . . . . . . . . . . . . . . . . . . . . . . . . . . . . . . . . . . . . . . . 9
Setting the Flash . . . . . . . . . . . . . . . . . . . . . . . . . . . . . . . . . . . . . . . . . . . . . . . .10
Adjusting the Picture Qual ity . . . . . . . . . . . . . . . . . . . . . . . . . . . . . . . . . . . . . . 11
Adjusting the White Bal ance . . . . . . . . . . . . . . . . . . . . . . . . . . . . . . . . . . . . . .12
Setting a Quickview for Each Pict ure . . . . . . . . . . . . . . . . . . . . . . . . . . . . . . .13
3 Reviewing Your Pictures . . . . . . . . . . . . . . . . . . . . . . . . . . . . . . . . . 15
Viewing Your Pictures . . . . . . . . . . . . . . . . . . . . . . . . . . . . . . . . . . . . . . . . . . . . .16
Copying Pictures from the Camera to a Picture Card . . . . . . . . . . . . . . . . .17
Protecting Picture s fro m Deletion . . . . . . . . . . . . . . . . . . . . . . . . . . . . . . . . . .18
Protecting a Particul ar Picture . . . . . . . . . . . . . . . . . . . . . . . . . . . . . . . . .18
Protecting All Stored Pictures . . . . . . . . . . . . . . . . . . . . . . . . . . . . . . . . .19
Deleting One or All of Your Pictures . . . . . . . . . . . . . . . . . . . . . . . . . . . . . . . 20
Deleting a Particular Picture . . . . . . . . . . . . . . . . . . . . . . . . . . . . . . . . . .20
Deleting All Stored Pict ur es . . . . . . . . . . . . . . . . . . . . . . . . . . . . . . . . . . . .21
Selecting Pictures for Print ing . . . . . . . . . . . . . . . . . . . . . . . . . . . . . . . . . . . . 22
Assigning a Print Order to a Particular Picture . . . . . . . . . . . . . . . . . . 22
i
Page 4

Assigning a Print Order to Thumbnai l- f or m at Pi cture s . . . . . . . . . . . . .24
Running a Slide Show on Your Television . . . . . . . . . . . . . . . . . . . . . . . . . . . 25
Formatting Your Picture Card . . . . . . . . . . . . . . . . . . . . . . . . . . . . . . . . . . . . 26
4 Installing Your Software . . . . . . . . . . . . . . . . . . . . . . . . . . . . . . . . .27
KODAK DC3200 Picture Transfer Software . . . . . . . . . . . . . . . . . . . . . . . . .27
System Requirements . . . . . . . . . . . . . . . . . . . . . . . . . . . . . . . . . . . . . . . . . . . .27
Installing KODAK DC3200 Picture Transf er Sof twa r e . . . . . . . . . . . . . . . 28
Uninstalling KODAK DC3200 Picture Transfer Software . . . . . . . . . . . . . 28
5 Using the Camer a wit h Your C o mp ut er . . . . . . . . . . . . . . . . . . . . 29
Connecting the Camera to Your Computer . . . . . . . . . . . . . . . . . . . . . . . . . 30
Using the DC3200 Picture Transfer Software . . . . . . . . . . . . . . . . . . . . . . 32
Navigating to Your Pictures . . . . . . . . . . . . . . . . . . . . . . . . . . . . . . . . . . . . . . 34
6 Troublesho o t in g . . . . . . . . . . . . . . . . . . . . . . . . . . . . . . . . . . . . . . . 35
7 Where to Get Hel p . . . . . . . . . . . . . . . . . . . . . . . . . . . . . . . . . . . . . .41
Software Help . . . . . . . . . . . . . . . . . . . . . . . . . . . . . . . . . . . . . . . . . . . . . . . . . . . 41
Kodak Online Services . . . . . . . . . . . . . . . . . . . . . . . . . . . . . . . . . . . . . . . . . . . . 41
Kodak Fax Support . . . . . . . . . . . . . . . . . . . . . . . . . . . . . . . . . . . . . . . . . . . . . . 41
Telephone Customer Support . . . . . . . . . . . . . . . . . . . . . . . . . . . . . . . . . . . . . .42
8 Warran t y an d Reg u l atory Info rmation . . . . . . . . . . . . . . . . . . . . 43
Limited Warranty . . . . . . . . . . . . . . . . . . . . . . . . . . . . . . . . . . . . . . . . . . . . . . . 43
Regulatory Information . . . . . . . . . . . . . . . . . . . . . . . . . . . . . . . . . . . . . . . . . . 44
FCC Compliance and Advisory . . . . . . . . . . . . . . . . . . . . . . . . . . . . . . . . . 44
Canadian DOC Statement . . . . . . . . . . . . . . . . . . . . . . . . . . . . . . . . . . . . 45
9 Appendix . . . . . . . . . . . . . . . . . . . . . . . . . . . . . . . . . . . . . . . . . . . . . 47
Original Camera Default Settings . . . . . . . . . . . . . . . . . . . . . . . . . . . . . . . . . .47
Camera Specifications . . . . . . . . . . . . . . . . . . . . . . . . . . . . . . . . . . . . . . . . . . 48
Getting Better Results fr om Your Pri n ter . . . . . . . . . . . . . . . . . . . . . . . . . 49
Using Your Batteries . . . . . . . . . . . . . . . . . . . . . . . . . . . . . . . . . . . . . . . . . . . 50
General Maintenance and Safety . . . . . . . . . . . . . . . . . . . . . . . . . . . . . . . . . 52
ii
Page 5

1 Getting Star ted
Congratulat ions on your purchase of a new KO DAK DC3200 Digital Camera—
the camera that takes pictures digitally, without th e us e of film. With your new
camera, picture-taking and print-making are fun and easy.
Here are just a few examples of what you can do with your camera:
Take digital pictures in unbelievable detail, color, and sharpness.
Transfer your pictures to a computer for editing, enhancement, and
placement into your document.
E-mail your pict ures to friends, family, and b usiness associat es anywhere
in the wor l d .
Print high-quality pictures at home using KODAK Inkjet Photo Paper, or
take your optional KODAK Pi cture Card to a KODAK Picture Maker
System and create photo-qua lity enlargements at a touch of a but ton.
Display your pictures to a large audience on a te levision or video monitor
using a KODAK-specif ied video cable.
1
1
Page 6
Preparing to Take Pictures
Before you ca n start taking pi ctures, you need to install t he batteries o r connect a
KODAK AC Adapter (Ca t# 122-0557) for power. The AC adapter is availabl e as
an accessory from a dealer of K ODAK products or from our Web site at http://
www.kodak.com/go/accessories.
Your camera offers 2 MB of internal memory for picture storage. This internal
memory retains picture s even if the power supp ly is interrupted. To record a
greater number of pictures, insert an option al KODAK Pictu r e Ca rd into the
camera. When a Picture Card is inserted into the camera, pictures are stored on
the card.
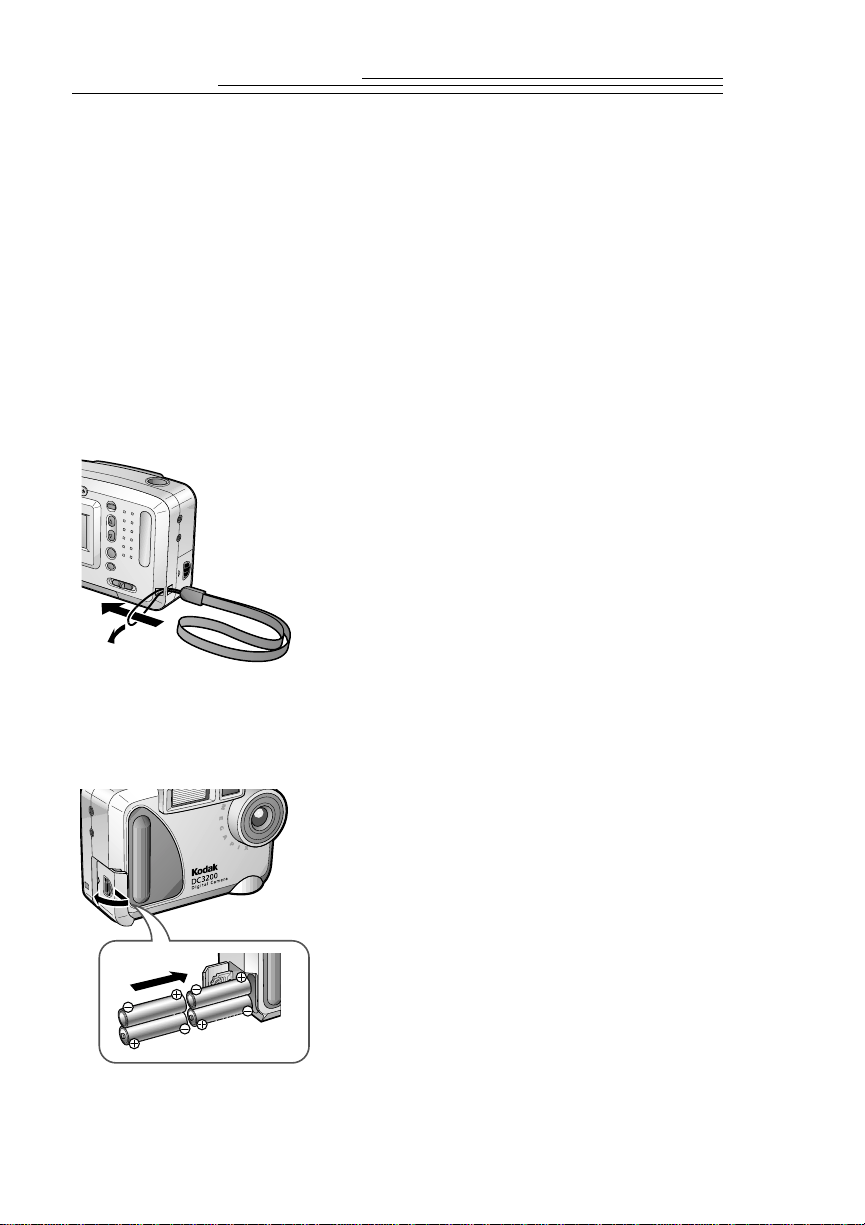
Attaching the Wrist Strap
1 Thread the small loop end of the wrist strap
through the wrist s t rap ey ele t, loc ated on the
side of the camera.
2 Thread the large lo op end of the strap
through the small loop and pull the large
loop end to tighten the strap.
Loading the Batteries
Your camera comes with four AA batteries so you can start taking pictures
immediately. For guidelines for battery usage, see page 50.
1 Make sure that the Power/Mode switch is
set to OFF.
2 Slide and open the batt ery compartment
cover (l ocated on the si d e of th e came r a) in
the direction of the arro w.
3 Insert the batteries into the battery
compartment, making su re the ir plus and
minus ends are facing as indicated in the
diagram.
4 Close the battery compartment cover and
slide it in until it locks in place.
2
Page 7
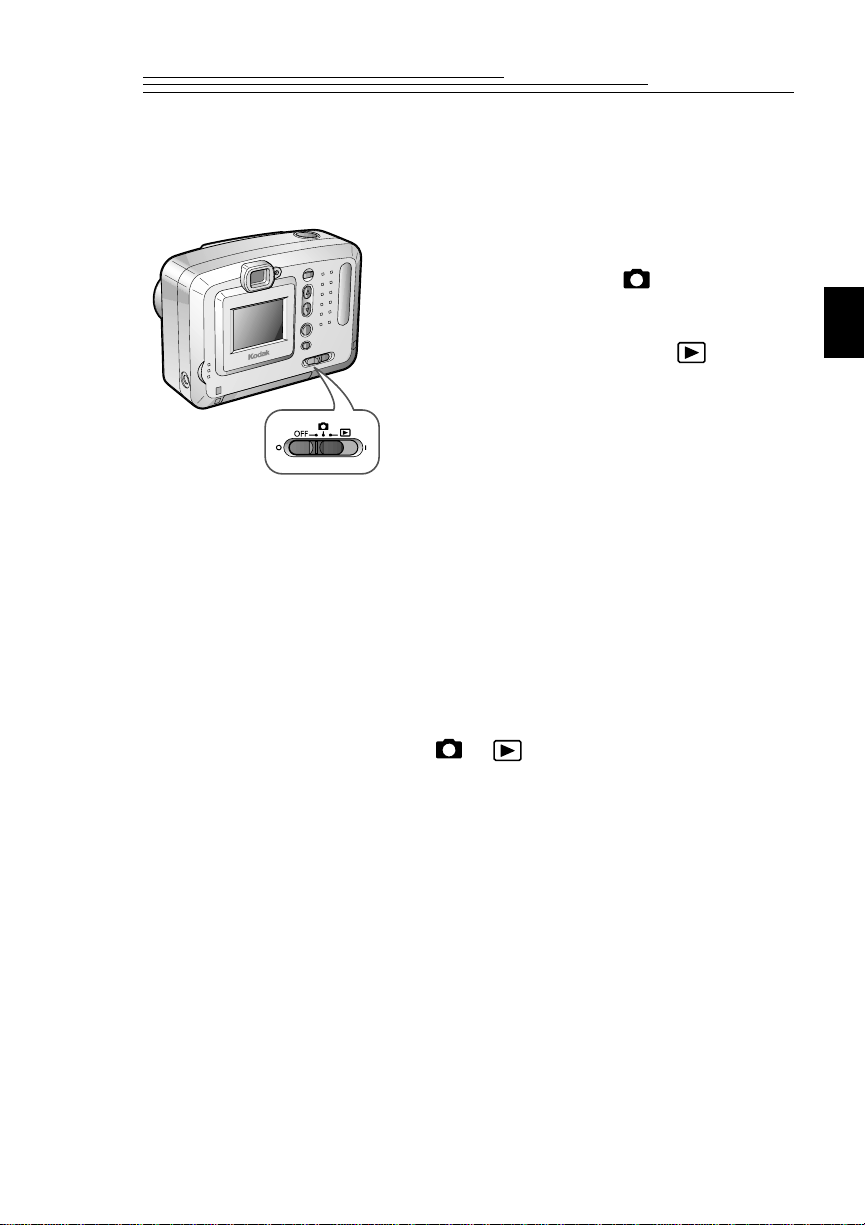
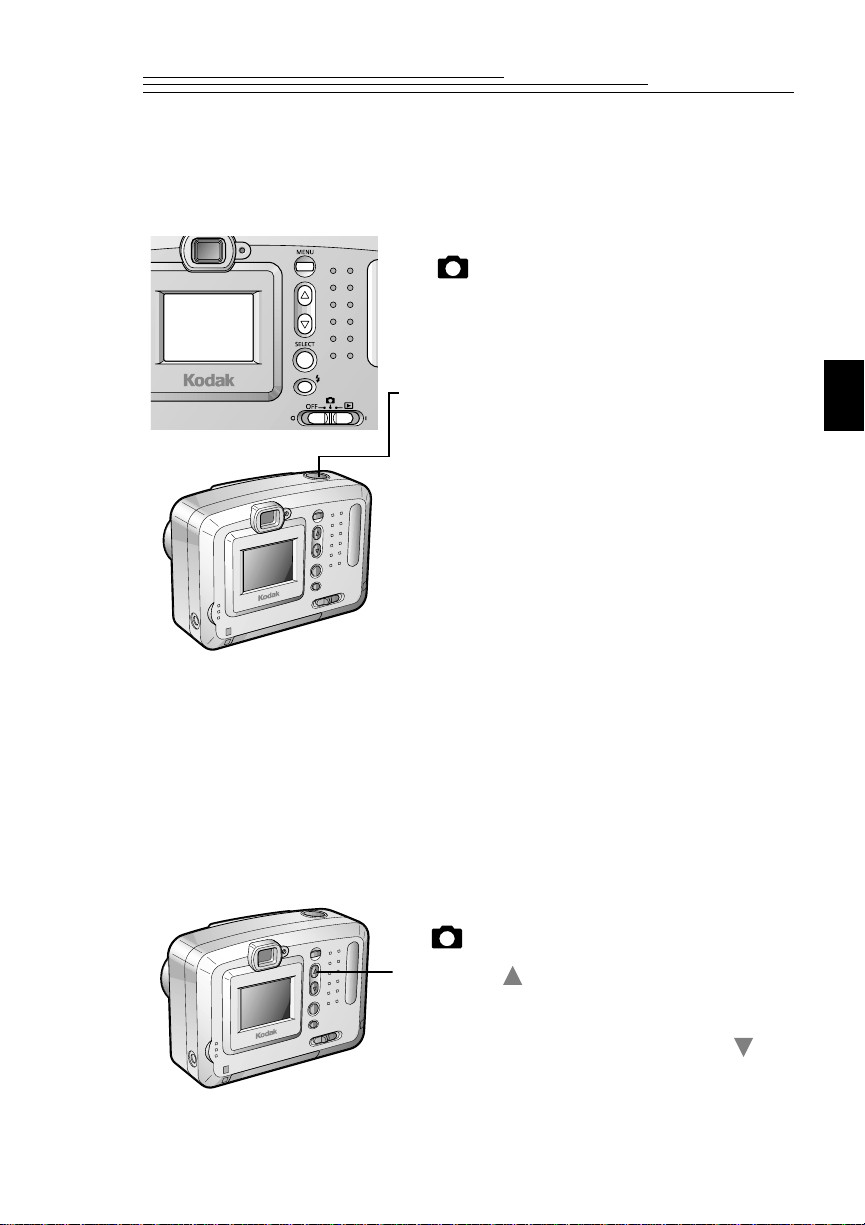
Turning the Camera On and Off
Turn the camera on and off using the Power/Mode switc h, located on the bac k of
the camera.
To turn the came ra on in the Capture
mode (to take pictures), set the Power/
Mode switch to the position. To
turn the camera on in the Review mode
(to review captured pictures), set the
Power/Mode switch to the position.
The gre en Ready light (next to the
viewfi nder) and the LCD turn on. A
message appears on the LCD for several
seconds to indica te which medium
(internal memory or a Pict ur e Card) you
are accessi n g.
To turn the camera off, set the Power/
Mode switch to OFF.
If you are using the batteries for power , and
the camera is idl e fo r approximately five
minutes, the Auto Power Off function
automatically turns the power off . To turn
the camera on again, set the Power/Mode
swit ch to OFF and then b ack to the
or position.
1
3
Page 8

Checking the Batteries
The DC3200 Digital Camera displays a battery symbol to indicate the battery
power level. For guidelines on battery usag e, See “Using Your Batteries” on
page 50.
Since digita l cameras are demanding on batteries, keep extra sets of batteries
handy. Consider purchasing either a KODAK AC Adapter (Cat# 122-0557) or a
KODAK Ni-MH/Ni-Cd Battery Charger with KODAK Ni-MH Rechargeable
Batteries. Both are available as access o r ies from a dealer of KODA K products or
from our Web site at http://www.kodak.com/go/accessories.
1 Set the Po wer /Mode switch to the
or position.
Accessed
i nt erna l memo r y.
To access ca rd,
inser t memory card
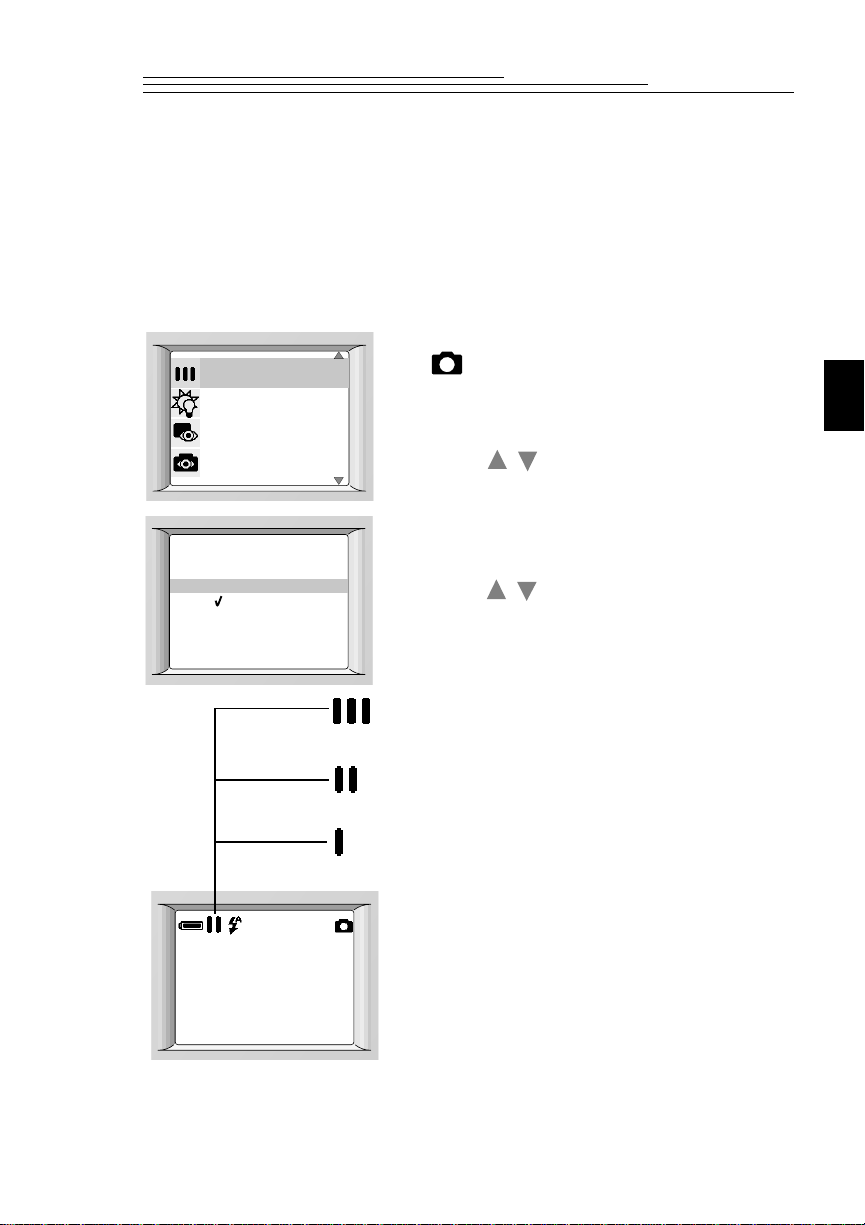
2 Check the battery sta tus symbol that appe ars
on the LCD.
005
In the Capture mode, you can turn on the
LCD by pressing the SELECT b utton. You
can also use the Pre v iew feature to keep the
LCD on constantly while the camera power
is turned on. (See “Previewing a Picture
Before it is Taken” on page 8.)
Full—indic at es t he b att er ies a re cha r ged
and ready to use.
Low—indicates the batteries are not
fully charged and will soon need to be
replaced or recharged.
Exhausted (flashing)—indicates the
batteries a r e too weak to power the
camera and need to be replaced.
The red Ready light (next to the
viewf inder) b lin ks when the ba tt eries a re
exhausted.
4
Page 9
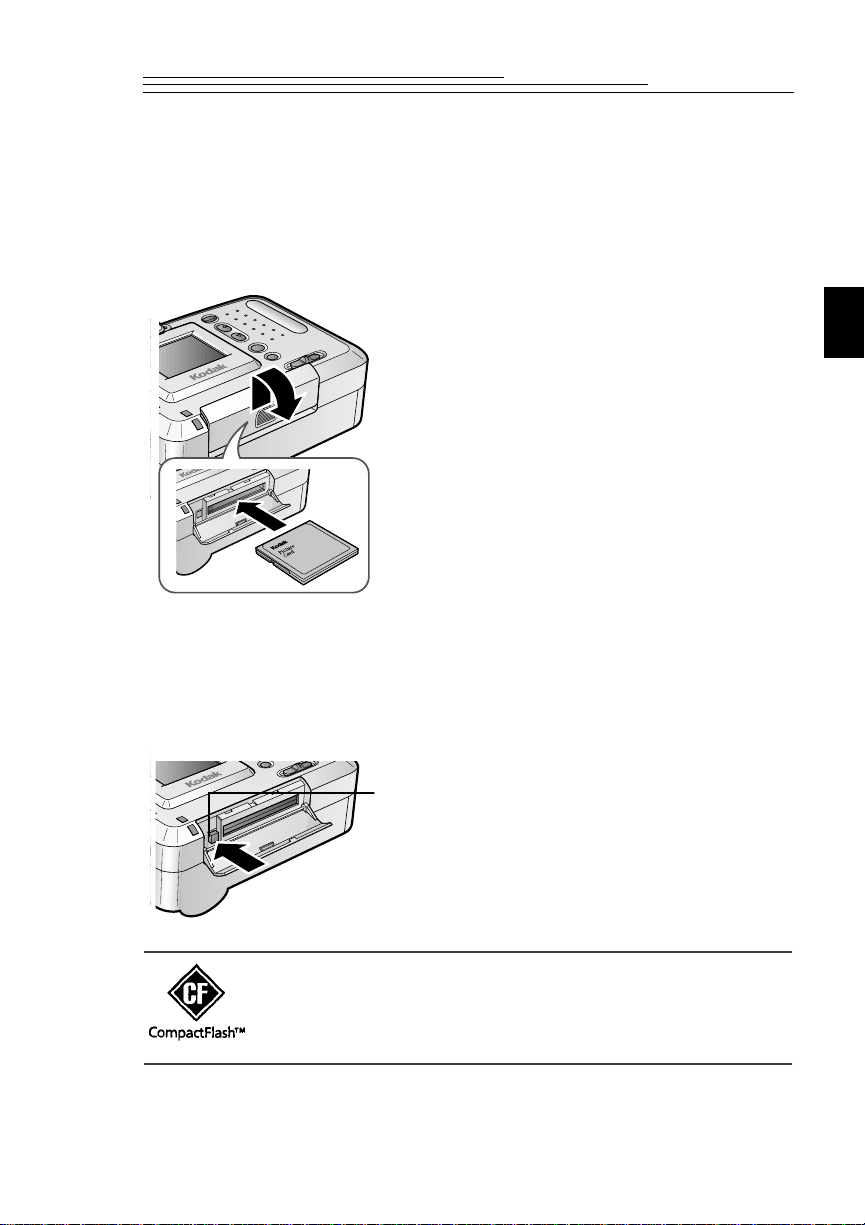
Inserting a Picture Card
Your camera accepts an optional KODAK Picture Card, which stores pictures.
The Pict u re Card (also kn own as a C ompactFl ash or came r a memory ca rd) is
removable and reusable for easy storage and transfer of your pictures. KODAK
Picture Cards are av aila bl e as an accessory th rough a dealer of KOD AK produc ts
or from our Web site at http ://www.kodak.com/go/accessories.
1 Slide and open the card slot cover (located on
the bottom of the camera) in the direction of
the arrow.
2 Hold the Picture Card so the connection end
(with tiny holes) is pointed at th e came ra, and
the small l ip on the oth er end i s fac ing the fron t
of the camera.
The Picture Card ca n only be inserted one way
into the camera. F o r cing the card may damage
your camera or the card.
3 Push the center of the Picture Card edge so the
card is inse r ted all the way int o the card slot.
4 Close the card slot cover and slide it in until it
locks in p lace.
Removing a Pict ure Card
1
1 Open the card slot cover.
2 Push the Eject button.
The Pictu re Card par ti a ll y sli d es o u t of th e
slot.
3 Remove th e Picture Ca r d from th e slo t , an d
close the card slot cover.
WARNING: Do not insert or eject a Picture Card while the green
Ready light (next to the viewfinder) is blinking; this m ay damage
your pictures or c amera. Use only certi f ie d Pictur e Cards tha t car ry
the CompactFlash logo.
5
Page 10

Page 11

2 Taking Pictures
Your KODAK DC3200 Digit al Camera makes taking pictures fun. Just set the
camera to the Capture mode and you are on your way to creating great picture s.
Everything you need is at your fingert ips. With the DC3200 Digital Camera, you
can:
Zoom in digitally (two times closer) on your subject.
Vary the flash settings to give you control over the type of flash need ed
for specific conditions.
Select a picture quality setting to meet your picture-taki ng needs.
Adjust the white balance to obtain the natural color of a subject under
different lighting conditions.
Preview a picture before it is taken.
Review a picture you just took.
2
7
Page 12
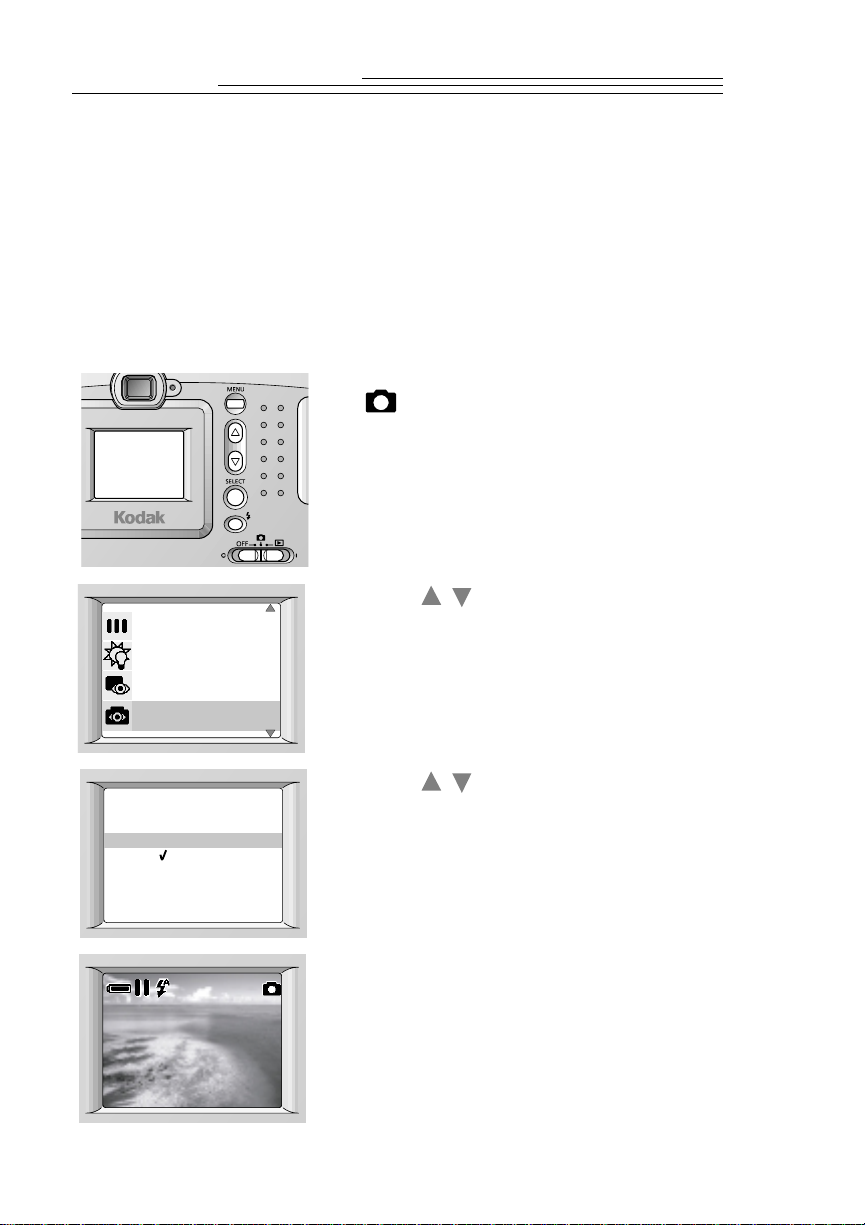
Previewing a Picture Before it is Taken
If you want to see what a picture looks like before you take it, you can preview
the image on the LCD on the back of your camera. The liv e image that appears is
helpful for framing your s ubject.
NOTE: Because any LCD is demanding on batteries, consider purchasing a
KODAK Ni-MH/Ni-Cd Battery Charger with KODAK Ni-MH Rechargeable
Batteries, available as an accessory through a dealer of KODAK products or
from our Web site at http://www.kodak.com/go/accessories.
1 Set the Power/Mo d e sw itch to th e
position.
Accessed
i nt erna l memo r y.
To access ca rd,
inser t memory card
QUA L I TY
WHI TE BALANCE
QU I CK V IEW
PRE V I EW
PREV I E
ON
OFF
2 Press the MENU button to display the Menu
screen.
3 Press a button until PREVIEW is
/
highlighted, and then press the SELECT
button.
The Preview screen app ea rs. The current
setti n g is checked .
4 Press a button unt il ON is
W
highlighted, and then press the SELECT
/
button.
The camera accepts the change and r eturns
to the Menu screen.
5 Press the MENU button to turn off the Menu
00 5005
screen.
The LCD displays a live image with status
icons.
You can turn the LCD on and off by pressing
the SELECT but ton. To turn Preview off,
highlight OFF on the Preview screen, and
then press the SELE CT button.
8
Page 13
Taking a Picture
Taking pictures is a snap with your DC3200 Digital Camera. You can take a
picture of a subject as close as 2 ft (0.6 m).
1 Set the Power/Mo d e sw itch to th e
position.
Accessed
i nt erna l memo r y.
To access ca rd,
inser t memory card
2 Center the subjec t in the viewfinder , or turn
Preview on (see page 8) and use the LCD to
frame your subject.
3 Press the Shutter button half-way down to
lock in the exposure on the subject.
The green Ready light turns on when the
camera is r eady to take a picture.
4 Press the Shutter button completely down to
take a pict u re.
The green Ready light blinks as the picture
is stored in the memory or on a Picture
Card.
If the orang e Ready li ght comes on , then th e
flash is not fully charged. Wait for the flash
to charge before tak ing a picture.
Zooming in on Your Subject
You can zoom from Wide Angle (giving you more of the surrounding area) to
Te lePhoto, which brings the subject two times closer. To use the Zoom feature,
you need to select the Good picture quality setting. For information on selecting
the picture qua lity, see “Adjusting the Pic ture Quality” on page 11.
2
1 Set the Powe r /Mode switch to the
position.
2 Press the button.
The subject on the LCD is ma gnified.
3 To return to the normal si ze, press the
button.
9
Page 14
Setting the Flash
Use the flash when taking pictures at night, indoors, or outdoors in heavy
shadows. Your camera has three different flash options and a range of 8 ft
(2.4 m), to accommoda te most picture-taki ng situations.
WARNING: Never use the flash while the camera is close to the eyes of the
subject, especially young children. Intense light from the flash can cause
permanent eye damage if used too close to the eyes. When using the flash,
the camera should be at least 5 ft (1. 5 m) away from the subject.
1 Set the Power/Mo d e sw itch to th e
position.
Accessed
i nt erna l memo r y.
To access ca rd,
inser t memory card
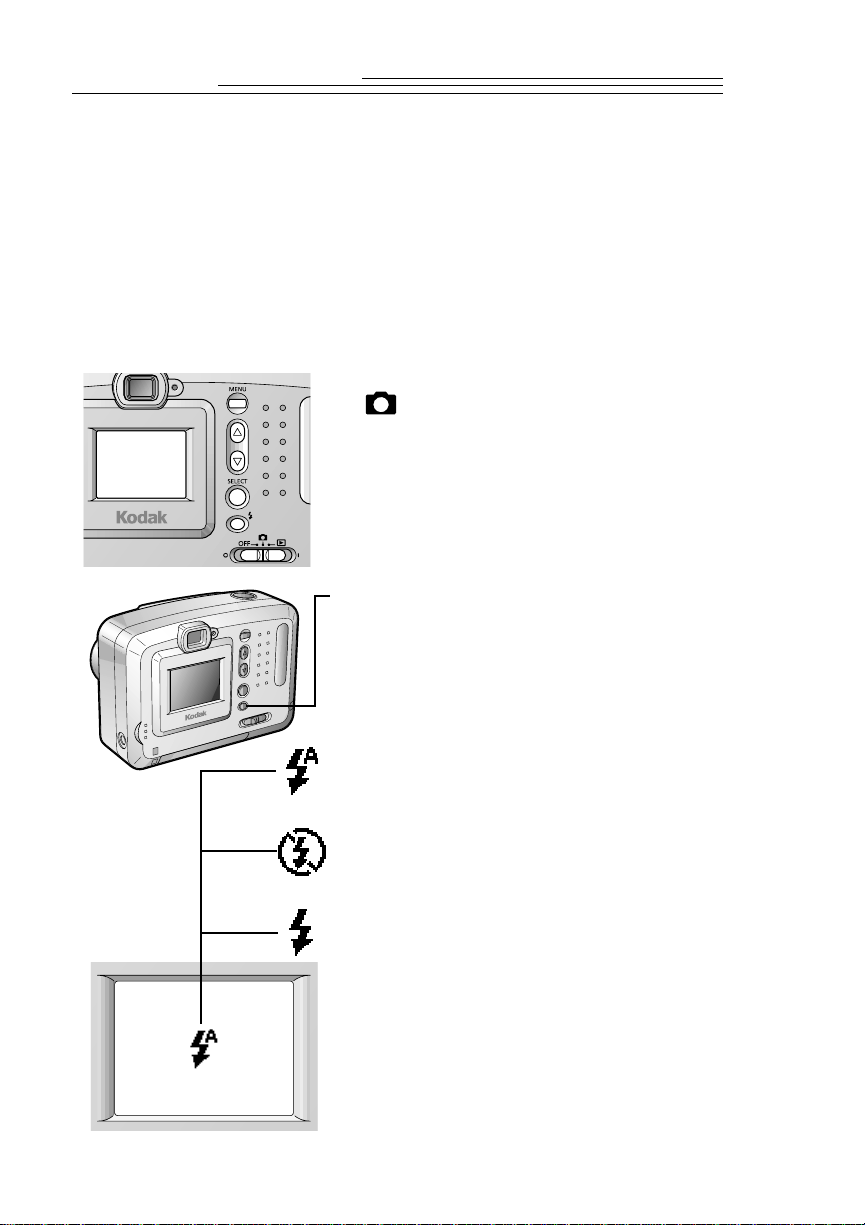
2 Press the Flash button to scroll though the
flash options.
The flash option c hang es eac h time you pr e ss
the Flash bu tt on.
10
Auto— flash fires automatically, when
needed. Ideal for everyday picture-taking.
This is the defa ult flash setting.
Off—flash does not fire. Ideal for ta king
pictures where flash is prohibited, as in
museums.
Fill—flas h fires every time you take a
picture. Ideal for outdoor pictures, when
your subject is in heavy shadow.
3 To return to the Auto se tting, press the Flash
button, or turn the camera off.
Page 15
Adjusting the Picture Quality
Your camera compresses pictures according to the picture quality setting. If you
intend to mak e la rge prints, you can capture more detail in the pi cture using the
Best setting (but you will use more spac e in the internal memory or on a Picture
Card). For everyday pictures, use the Better setting, which gives you more
pictures using less stora ge space. If you need to take a large number of pictures,
or you are going to e-ma il or use the pictures online, use the Good setting.
1 Set the Powe r /Mode switch to the
QUA L I TY
WHI TE BALANCE
QU I CK V IEW
PRE V I EW
QUAL I T Y
BEST
BET TER
GOOD
2 Press the MENU button to display the Menu
3 Press a button until QUALITY is
4 Press a butt on unti l the desire d Qualit y
position.
screen.
/
highlight ed, and then press the SELECT
button.
The Quality screen appears. The current
setting is checked.
/
option is highlighted, and then press the
SELECT button.
BEST—captures a 1,152 x 864-pixel
picture in low compression.
2
005
BETTER—captures a 1,152 x 864-pixel
picture in high compression.
GOOD—captures a 576 x 432-pixel
picture in low compression.
The camer a accepts t he c hange and r e turns t o
the Men u scre en.
5 Press the MENU b utton to turn the Menu
screen off.
The Pict u re Quali ty icon for th e se le ct ed
setting is displayed when the LCD is on.
You can switch freely among these set tings
when taking pict ures .
11
Page 16

Adjusting the White Balance
The color of the image may look different from that of the actual subject,
depending on the type of lighting source. For recording pi ctures in as natural
colors as possible, your camera has four white balance opt ions .
1 Set the Power/Mo d e sw itch to th e
position.
Accessed
i nt erna l memo r y.
To access ca rd,
inser t memory card
QUA L I TY
WHI TE BALANCE
QU I CK V IEW
PRE V I EW
W
HITE BALANCE
AUTO
DAYL I GHT
FLUORESCENT
TUNGSTEN
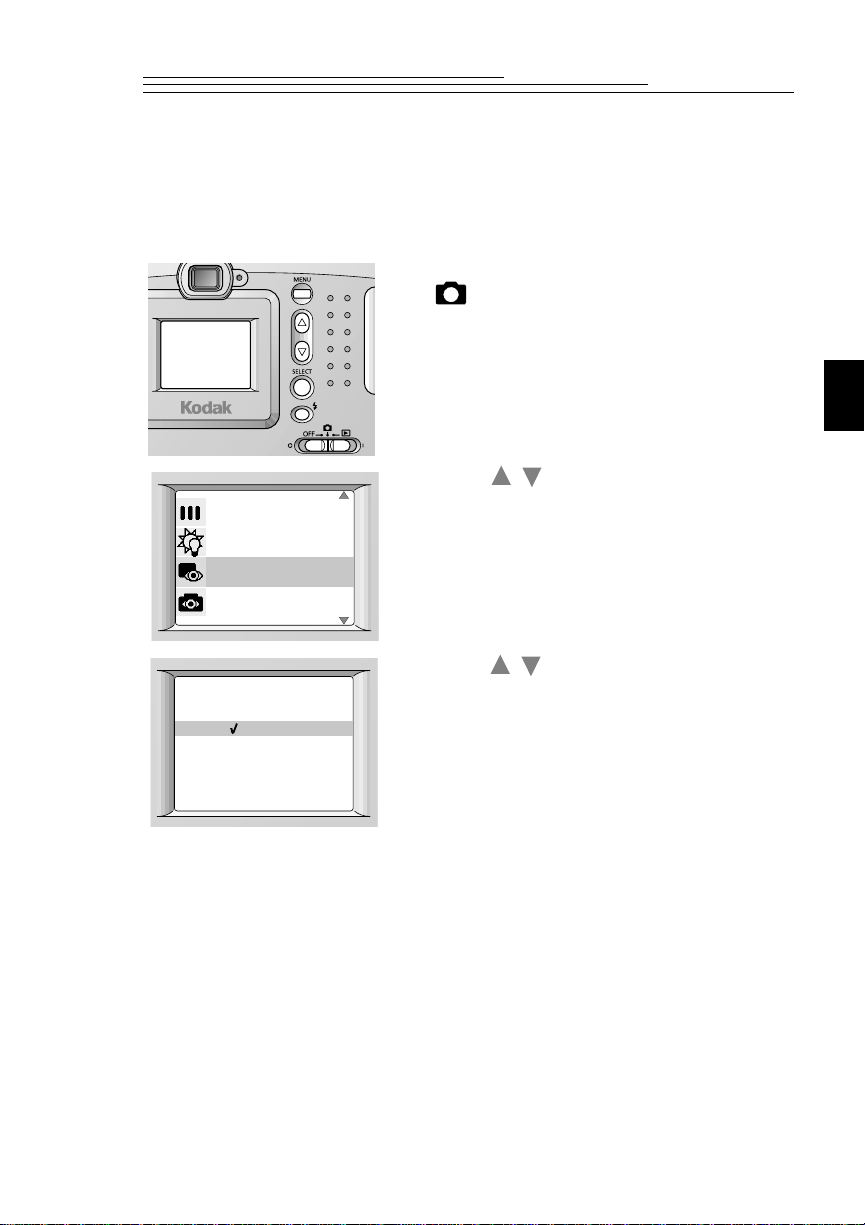
2 Press the MENU button to display the Menu
screen.
3 Press a button until WHITE
BALANCE is highli ghted, and then pre ss the
SELECT butt on.
The White Balance screen appears. The
current setting is checked.
4 Press a button until the desired white
balance option is hi ghlighted, and then press
the S ELECT bu tt on.
AUTO—adjusts the wh it e b alance
DA YLIGHT—ideal for outdoor pictures ,
FLUORESCENT—balances the green
TUNGSTEN—balances the red/orange
/
/
automatically for the current lighting
conditions. Idea l for everyday pict ures.
This is the defau lt whit e b al ance set ti n g.
or indoor pictures under na tural lighting
conditions.
color of indoor pictur es under fluore scent
lighting.
color of indoor pictures under tungsten
lighting.
12
The camera accepts the change and r eturns
to the Menu screen.
5 Press th e M E N U button to tu r n th e M en u
screen off.
To return to the Auto se tting, highlight
AUTO on the White Balance screen, and
then press the SELE CT button.
Page 17
Setting a Quickview for Each Picture
You can turn the Quickview fe ature on so tha t a picture just taken is dis played on
the LCD for a few seconds. This lets you confirm a picture immediately after it
has been taken.
1 Set the Power/M ode switch to th e
position.
Accessed
i nt erna l memo r y.
To access ca rd,
inser t memory card
QUA L I TY
WHI TE BALANCE
QU I CK V IEW
PRE V I EW
QU I CK V I E
ON
OF F
2 Press the MENU button to display the Menu
screen.
2
3 Press a button until QUICKVIEW is
highlighted , and then press the SELECT
button.
The Quickview screen appears. The current
setti ng is che cked .
4 Press a button until ON is hig hli ghted,
W
and then press the SELECT button.
The camera accept s the change and returns
to the Menu screen.
5 Press th e M E N U bu tt o n to tu r n th e Menu
scr e en off.
To turn Quickview off, highlight OFF on the
Quickview s creen, and then press the
SELECT button.
/
/
13
Page 18

Page 19

3 Reviewing Your Pictures
Now that you have taken pictures, you can review them by setting the c am era to
the Review mode. Here, you can:
View your pictures.
Copy pictures stored in the internal memory to an optional KODAK
Pictu r e Card.
Protect your important pictures from accidental erasure.
Delete unwanted pictures to free up space in the internal memory or on a
Pictu r e Card.
Select specific pictures and quantities to be printed.
Display and run a slide show from the camera to your television using a
KODAK-specifi ed video cable.
Format other Picture Cards for use in your camera.
3
15
Page 20

Viewing Your Pictures
Pictures can be displayed indi vidually in full LCD size, or as six thumbnail-size
pictu r es at one ti me.
NOTE: Because any LCD is demanding on batteries, consider purchasing a
KODAK Ni-MH/Ni-Cd Battery Charger with KODAK Ni-MH Rechargeable
Batteries, available as an accessory through a dealer of KODAK products or
from our Web site at http://www.kodak.com/go/accessories.
1 Set the Power/Mo d e sw itch to th e
position.
Accessed
i nt erna l memo r y.
To access ca rd,
inser t memory card
00 0 3
0003
0003
The LCD turns on, and the access message
appears. Then the last picture taken is
displayed in full LCD size with the status
icons and the Picture Number indicator.
2 Use the buttons to scroll through the
/
pictures.
3 To view the pic tures in a thumbnail forma t,
press th e SE L E C T bu tt on .
4 Use the buttons to scroll through the
/
thumbnails.
The selected picture is indicated by a frame.
The selection fr ame mo ves as y ou advanc e or
go back through the pictures.
5 To return to the full LCD size, pres s the
SELECT butt on.
16
Page 21

Copyin g Pi ctures from the Ca mera to a Picture Card
You can copy all the pictures store d in the internal memory to a Pic ture Card.
1 Insert a Picture Card.
2 Set the Power/M ode switch to th e
Accessed
memo ry c ar d .
To access
internal memory,
remove card.
3 Press the MENU button to display the Menu
position.
screen.
SL IDE SHO
COPY
FORMAT
Copy all from
internal memory
to card.
EX IT
YES
W
4 Press a button until COPY is
/
highlighted , and then press the SELECT
button.
The Copy sc reen appears.
5 Press a button until YES is
/
highlighted.
6 Pres s th e S E L E C T bu tt o n to co py the
pictures.
“Copying completed.” i s displayed, and then
the Menu scr ee n reappears.
If copying fails (because not all the pictures
fit on the Picture Card), a message appears.
Insert a Picture Card with more available
storage, then repeat St eps 2-6.
7 Press th e M E N U bu tt o n to tu r n th e Menu
scr e en off.
3
17
Page 22

Protecting Pictures from Deletion
Use the Delete-pro tec tion feature to prevent your important pictures (in the
internal memo ry o r on a Pi ct ure Card) fro m b eing accid en tally eras e d .
P rotecting a Particular Picture
1 Set the Power/Mo d e sw itch to th e
position.
Accessed
i nt erna l memo r y.
To access ca rd,
inser t memory card
DELETE
PC CONNEC T
PRINT ORDER
PROTECT
PROTEC T
CURRENT
EXI T
ALL
PROTE CT
DONE
NO
YES
NE XT
PRE V I OUS
2 Press a button unt il the desired picture
/
is displayed in full LCD size or is selected in
the thumbnail format.
3 Press the MENU button to display the Menu
screen.
4 Press a button until PROTECT is
highlighted, and then press the SELECT
button.
The main Protect screen appears.
5 Press a button until CURRENT is
highlighted, and then press the SELECT
button.
The Protect screen appears.
6 Press a button until YES is
highlighted, and then press the SELECT
button.
The Protect icon appears.
To protect another picture, highlight NEXT
or PREVIOUS, press the SELECT button
until the desired picture appears, and then
repeat the same procedure.
/
/
/
18
7 Highlight DONE, and then pres s the
SELECT butt on to tur n the Pr otec t scre en of f.
The protection setting is assigned to the
picture or pictures.
Page 23

8 Press th e M E N U bu tt o n to tu r n th e m ai n
Protect screen off.
To cancel the protection setting for a
particular pic ture, display the des ired picture
on the Protect screen. Highlight NO, press
the SELECT button, highlight DONE, and
press the SELECT button.
Protecting All Stored Pictur es
1 Set the Power/M ode switch to th e
position.
Accessed
i nt erna l memo r y.
To access ca rd,
inser t memory card
DELETE
PC CONNEC T
PRINT ORDER
PROTECT
PROTEC T
CURRENT
EXI T
ALL
PROTECT ALL
EX IT
NO
YES
2 Press the MENU button to display the Menu
screen.
3 Press a button until PROT ECT is
/
highlighted , and then press the SELECT
button.
The main Protect screen appears.
4 Press a button until ALL is
/
highlighted , and then press the SELECT
button.
The Protect All screen appears.
5 Press a button until YES is
/
highlighted , and then press the SELECT
button.
The protection setting is assigned to all the
pictures.
6 Press th e M E NU button to tu r n th e Pro t ect
All screen off. To cancel the protection
setting for all the pictures, highlight NO on
the Protect All screen, and then press the
SELECT button.
19
3
Page 24

Deleting One or All of Your Picture s
If you decide that you do not want the pictures in the internal memory or on a
Picture Card, or you wa nt to free up space, use the Delete feature. You can erase
one or all o f the pictur es in the memor y (e x cept those that are delete-protected) .
Deleting a Particular Picture
1 Set the Power/Mo d e sw itch to th e
position.
Accessed
i nt erna l memo r y.
To access ca rd,
inser t memory card
DELETE
PC CONNEC T
PRINT ORDER
PROTECT
DELETE?
CURRENT
EX IT
ALL
DELETE?
EXI T
YES
NEXT
PREV I OUS
2 Press a button unt il the desired picture
/
is displayed in full LCD size or is selected in
the thumbnail format.
3 Press the MENU button to display the Menu
screen.
4 Press a button until DELETE is
highlighted, and then press the SELECT
button.
The main Delete screen appears.
5 Press a button until CURRENT is
highlighted, and then press the SELECT
button.
The Delete scre en appears.
6 Press a button until YES is
highlighted, and then press the SELECT
button.
The picture is deleted.
To delete anoth er picture, hi ghlight NEXT or
PREVIOUS, press the SELECT button until
the desired picture appears, and th en repeat
the same procedure.
/
/
/
20
7 Press the MENU button to turn the Delete
screen off.
Page 25

Deleting All Stored Pictures
1 Set the Power/M ode switch to th e
position.
Accessed
i nt erna l memo r y.
To access ca rd,
inser t memory card
DELETE
PC CONNEC T
PRINT ORDER
PROTECT
DELETE?
CURRENT
EX IT
ALL
Delete all in
internal memory?
YES
NO
2 Press the MENU button to display the Menu
screen.
3 Press a button until DELETE is
highlighted , and then press the SELECT
button.
The main Delete screen appears.
4 Press a button until ALL is
highlighted , and then press the SELECT
button.
The Delete Al l screen appears, indica ti ng the
medium in which you are deleting the
pictures.
5 Press a button until YES is
highlighted , and then press the SELECT
button to delete all the pictures.
“No picture in internal memory (on memory
card). ” appears when the deleti ng ends.
/
/
/
3
If pictures that are delete-protected exist in
the memory, the camera deletes all other
pictures and r eturns to the main Delete
screen. Press the MENU button to turn the
main Delete screen off.
21
Page 26

Selecting Pictures for Printing
With the Print Order feature, you can select certain pictures on an optional
KOD A K Pi ctur e Ca rd, then pr i nt th em on the K ODAK Picture Mak er Sys te m (or
on a printer that accepts P icture Cards).
Assigning a Print Order to a Particular Picture
1 Insert a Picture Card with pictures for
printing. Set the Power/Mode switch to the
position.
Accessed
memo ry c ar d .
To access
internal memory,
remove card.
2 Press a button unt il the desired picture
/
is displayed in full LCD size or is selected in
the thumbnail format.
3 Press the MENU button to display the Menu
screen.
DELETE
PC CONNEC T
PRINT ORDER
PROTECT
PRINT ORDER
CURRENT
EX IT
ALL
INDEX
PRINT ORDER
DON E
2
–COPI E S
+COPI E S
NE XT
PRE V I OUS
4 Press a button until PRINT ORDER
/
is highlighted, and then press the SELECT
button.
The main Print Order screen appears.
5 Press a button until CURRENT is
/
highlighted, and then press the SELECT
button.
The Print Order screen appe ars.
6 Press a button until +COPIES is
/
highlighted, and then press the SELECT
button until the desired number of print s
appears.
To assign another picture to this print order,
highlight NEXT or PREVIOUS, pres s th e
SELECT butt on until the desired picture
appears, and then repeat the procedure.
7 Highlight DONE, and then pres s the
SELECT button to turn off the P r int Order
screen.
The print or der is accepted.
8 Press the MENU button to turn the main Print
Ord er screen off .
22
Page 27

To canc el th e pr i n t ord er for a part icular
picture, display the desired picture on the
Print Order screen, highlight – COPIES, and
press the SELECT button until “0” appears.
Then highlight DONE and press the
SELECT button.
Assigning a P r int Order to All Stored Picture s
1 Insert a Picture Card with pictures for
printing.
Accessed
memo ry c ar d .
To access
internal memory,
remove card.
DELETE
PC CONNEC T
PRINT ORDER
PROTECT
PRINT ORDER
CURRENT
EX IT
ALL
INDEX
PRINT ALL
#
1
DONE
–COP I E S
+COPI E S
2 Set the Power/M ode switch to th e
position.
3 Press the MENU button to display the Menu
screen.
4 Press a button until PRINT ORDER is
/
highlighted , and then press the SELECT
button.
The main Print Order screen appea rs.
5 Press a button until ALL is
/
highlighted , and then press the SELECT
button.
The Print A ll scree n appears.
6 Press a button until +COPIES is
/
highlighted , and then press the SELECT
button unt il the desired number of prints
appears.
7 Highlight DONE, and then pres s the
SELECT butt on to turn off the Print All
screen.
The print order is accepted.
8 Pres s th e MENU bu tt o n to tu r n off the mai n
Print Order screen.
To cancel the print order for all the pictures,
highlight – COPIES on the Print All screen,
and press the SELECT bu tton until “0”
appears. Then highlight DONE and press the
SELECT button.
3
23
Page 28

Assigning a Print Order to Thumbnail-f orma t Pictur e s
Using the Index Pri nt Order feature, you can create an index of all the pictures
stored on a Pic ture Card by printing them as a group of small, thumbnail images.
You can make only one index print.
1 Insert a Picture Card with pictures for
printing.
Accessed
memo ry c ar d .
To access
internal memory,
remove card.
DELETE
PC CONNEC T
PRINT ORDER
PROTECT
PRINT ORDER
CURRENT
EX IT
ALL
INDEX
INDEX PRINT
EXIT
YES
2 Set the Power/Mo d e sw itch to th e
position.
3 Press the MENU button to display the Menu
screen.
4 Press a button until PRINT ORDER is
highlighted, and then press the SELECT
button.
The main Print Order screen appears.
5 Press a button until INDEX is
highlighted, and then press the SELECT
button.
The Index Print s creen appears.
6 Press a button until YES is
highlighted, and then press the SELECT
button.
The index print order is accepted.
/
/
/
24
7 Press the MENU button to turn the main Print
Ord er screen off .
To cancel the index print order, highlight
CANCEL on the Index Pr int sc reen, and then
press th e SE L E C T bu tt on .
Page 29

Running a Slide Show on Your Television
You can show your pictures to an audience by connecting your camera to a
television with a KODAK Video Cable (Cat# 181-7774) and using the Slide
Show feature. With Slide Show activated, the camera consecutively displays
stored pictures at the selected intervals. To conserve batteries, use a KODAKspecifie d AC adap ter.
1 Turn off your television and camera.
2 Insert a video cable into the VIDEO OUT
port on the side of your camera, and connect
the other end of the cable to the video-in port
on the televi sion.
Accessed
i nt erna l memo r y.
To access ca rd,
inser t memory card
SL IDE SHO
COPY
FORMAT
SLIDE SHO
10 Sec
20 Sec
30 Sec
EX IT
3 Sec
5 Sec
3 Set the Power /M o d e sw itch to th e
position.
3
4 Turn the television on, and select the correct
channel for video in put.
The picture appears on the television.
5 Pre ss a but ton unt i l th e pi cture f ro m
/
which you want to begin the slide show
appears on the television.
6 Press the MENU button to display the Menu
screen on the television.
7 Press a button until SLIDE SHOW is
W
highlighted , and then press the SELECT
button.
The Slide Show screen appears.
8 Press a button until the time interval
option you want is hig hlighted, and then press
the SELECT button.
W
The pictur es chang e ac cor di ng to the se lect ed
time interval. After showing all the stor ed
pictures once, the slide show automatically
stops.
To stop a Slide Show, press the SELECT
button.
/
/
25
Page 30

Formatting Your Pict ure Card
If you own Picture Cards that have been used in other digital cameras, the cards
may not be properly formatted for use in your DC3200 Digital Cam era (or the
data on the cards may have become corrupted). When these is sues arise, your
camera indicate s th at the Picture Card needs to be formatted.
Format ti ng a Pict ur e Car d era ses al l of the inf orm at ion on the c ard , in clu di ng an y
delete-protected pictures. Be sure to copy important data to your computer or
other recording medium before formatting the card.
You can also format th e internal memory so that all pictures in the interna l
memory are erased, free in g u p space for new pict u res.
1 Insert a Picture Card to be formatted, or
remove the card from the camera to format
the internal memory.
Accessed
memo ry c ar d .
To access
internal memory,
remove card.
2 Set the Power/Mo d e sw itch to th e
or position.
3 Press the MENU button to display the Menu
screen.
SL IDE SHO
COPY
FORMAT
Forma t ti ng
wi l l del e te
on memo r y car d !
26
ever yth ing
CANCE L
CONTI NUE
4 Press a button until FORMAT is
W
highlighted, and then press the SELECT
/
button.
The F ormat screen appears.
5 Press a button until CONTINUE is
/
highlighted, and then press the SELECT
button to begin formatting.
“No pictur e on memory card (in internal
memory).” appears as formatting ends.
Page 31

4 Installing Your Software
The KODAK DC3200 Installation Software (Installer) i ncluded with your
camera contains softwa re for Windows-ba s ed pe rsonal computers. The features
let you access and use the pic tures stor ed in the camera me mory or on a n optiona l
KODAK Picture Card.
KODAK DC320 0 Pi c tu re Transfer Soft ware
Picture Transfer Software is included on the supplied CD-ROM, and provides an
easy way to transfer pic tures from the camera memory or Picture Card to your
computer.
System Requirements
Windows 95, Windows 98, Windows 98 Second Edition, Windows NT
Workstation 4.0 SP3 – SP6, or Windows 2000 Professional operating
system
PC/AT-compatible personal computer with Pentium 90-MHz
microprocessor (minimum) with CD-ROM drive
Color display monitor with a minimum resolution of 640 x 480 and 256
colors (16- or 24-bit recommended)
32 MB or more of available RAM for Window s 95 and Windows 98
64 MB or more of avail able RAM for Windows NT 4.0 and Windows
2000
100 MB of hard disk space available
Available serial port or CF card reader
4
27
Page 32

Installing KODAK DC3200 Picture Transfer Software
Ta ke a few minutes to register your produc t. This allows you to receive
information regarding software updates and registers some of the products
included with the camera.
1 Close all other software programs (including any background applications)
before starting the Installer.
2 Place the Installer CD into the CD-ROM drive.
3 Load th e softwar e.
With Auto Play enabled, the KODAK CD Software will start.
If the first install window does not automatically ap pear, open My Computer,
double-click the CD icon, then double-click the Setup (Setup.exe )
application.
4 Follow the on-scr een instructions to install the software.
5 Restart the computer when the software ins tallation is complete. The system
will not operate norma lly unless the computer is res tarted after installation.
Uninstalling KODAK DC3200 Picture Transfer Sof t ware
1 Click the Start button on the deskt op. From the Programs menu, choos e
Kodak , then DC3200, and then Uninstal l KODAK DC3200.
2 Follow the prompts to uninstall the software .
28
Page 33

5 Using the Camera with Your Computer
To transfer pictures from your ca mera, you need to connect the camera to your
computer. The camera can comm unicate with your computer using:
An RS-232 serial cable connection for Windows -based computers, to
transfer pictures stored in the camera memory or on an optional KODAK
Pictu r e Card.
A CompactFlash card reader, to transfer pictures stored on a Picture Card.
CF card re ad er s p rov id e a fa st an d easy alter n at ive to ser ia l cable
connections. For details about availabl e ac ce ssories, ask a dealer of
KODAK products, or visit our Web site at http://www.kodak.com/go/
accessories.
Once the camera is conne cted t o a computer an d the softwa re is in stal led, you are
ready to copy pictures from the camera to your computer.
5
29
Page 34

Conn ecting the Camera to Yo ur Comput er
An RS-232 seri al cable is provide d, so you can connect your camera to a
Windo ws-based computer. When connecting the camera, us e a KOD AKspecified AC adapter. For details about available accessori es, ask a dealer of
KODAK products, or visit our Web site at http://www.kodak.com/go/
accessories.
1 With the computer turned off, plug the
appro pri at e en d of th e serial cabl e in t o an
available 9-pin serial port on the computer.
Serial ports ar e us ually labeled COM1 and
COM2, or A and B. If your computer has a
25-pin port, you need to atta ch a 9-pin ad apter
(available at your local computer store) to the
port before atta ching the serial cable to the
computer.
If the ports are not labeled, see your computer
User’s Guide fo r a diagram that illustrates th e
externa l p or t s .
2 Plug the other end of the serial cable into the
serial port on th e side of your camera.
3 Turn the computer on.
30
4 Set the camera Power/Mode switch to the
position.
5 Press the MENU button to display the Menu
screen on the LCD.
Page 35

DELETE
PC CONNEC T
PRINT ORDER
PROTECT
6 Press a button until PC CONNECT is
highlighted, and then press the SELECT
button.
The PC Connect screen appears.
/
PC CONNECT
EXIT
ON
7 Press a button until ON is highlighted,
and then press the SELECT button.
The camera is ready to communicate with the
computer.
If you ge t a message on your computer stating
that the camera is not connected, refer to the
“Troubleshooting” chapter.
To cancel the PC Connection mode, press the
MENU button.
/
5
31
Page 36

Using th e DC3200 Picture Transfer Software
With the camera connected to your compute r, you are ready to open and use the
software that you installed. (See “4 Installing Your Software” on page 27.)
NOTE: The DC3200 Picture Transfer Software will display pictures from the
camera internal memory unless a Picture Card is present in the camera. To
display pictures from the internal memory, eject the Picture Card before sta rting
the software. To display pictures from a Picture Card, insert the Picture Card
before starting the software.
1 To start the DC3200 Picture Trans fer Software, click the Start button on the
desktop. From th e Pr ograms menu, choose Kodak, then DC3200, then
KODAK DC3200.
The DC3200 Picture Transfer Software communicates with the came ra and
retrieves pictures from the camera. Pictures are displayed as thumbnails.
Select All b utton
Thumbnail ima ge
Save button
Sett in g s bu tt on
Close button
32
Page 37

2 Click the pict ure you want to copy to your computer.
The border of the selected thumbnail picture turns light blue.
To select all pictures , click the Select All button.
To select multiple pictures, hold down the Ctrl ke y and cl ick the desired
pictures. To select all pictures that reside between tw o pictures, hold down
the Shift key and click the first and last desired pictures.
3 Click the Save button.
The Select Folder dialog box appears.
4 Specify the destination folder and click the OK button.
The pictures are copied to your computer.
Unless you specify a different folder name and location, a folder is
created based on the current date using the format [YYYY-MM-DD] in
this loca tion: c:\My Documents\My Pictures. Pictures are copied into this
new folder.
Example: If the date is August 1, 2000, the pictures are copied into the
folder named “2000-08-01”.
If a picture has the same name as a file in the destination folder, it is
automatically saved using a name with a “_n” suffix (whe re “n” is a
number).
5
Exampl e: If the file “DCP_0001. JPG” already exists, a pict ure having the
same name is sa ved using the name “DCP_0001_1.JPG”.
5 To exit the DC3200 Picture Tr ansf er Software, click the Close button.
After you save pictures to your computer, you can delete them from the ca mera
memory or Picture Card to make room for new pictures.
Changing Communication Settings—If connection erro rs occur, you may need
to adjust the se rial port and speed settings by following these steps:
1 Click the Settings button.
The Communication Port Setting dialog box appears.
2 Adjust the serial port and port speed and click the OK button.
33
Page 38

Navigating to Your Picture s
Pictures are stored in the memory of the camera or on a Picture Card according to
a standard agreed upo n by many camera manu fact urers. Th is stan dard all ows you
to use the Picture Ca rd in differ en t cameras.
The KODAK DC3200 Picture Transfer Software application guides you to your
pictures in the memory. However, if you use a card reader to retrieve your
pictures on the Pict ure Card or cannot locate your pictures using the software
provided, the following description of the camera file structure may be helpful.
Root level folder is named \DCIM. Each time you turn on the camera or
insert a Picture Card, any empty folders within the \DCIM folder are
removed.
Typically, al l pictures taken with the DC3200 Digital Camera are stored
in the \DCIM\100K3200 folder.
Pictu re s ar e n um b er ed in th e o r de r in wh ic h th ey ar e ta ke n . Th e firs t
picture in the \DCIM\100K3200 folder is DCP_0001.JPG.
When you copy pictures to the computer or delete pictures from the
memory, the camera uses consecutive numbers for subsequent pictures.
For example , if the last pictur e ta ken was DCP_0007.JPG, the next
picture is DCP_000 8.J P G.
When you insert the Picture Card into another DC3200 Digital Camera,
the next pict ure is derive d by incrementing ei ther the highest existing
picture number, or the highest picture number previously taken by that
camera.
Once you take picture DCP_9999.JPG in the \DCIM\100K3200 folder,
subsequent pic tures appear in a new folder (\DCIM\101K3200) on the Picture
Card, beginning with picture DCP_0001.JPG.
If you use the Picture Card in a camer a othe r than the KOD AK DC3200 Digital
Camera, and that camera manufacture r adhe res to this file structure standard, the
\DCIM f old er w il l co n ta i n a f ol d er na med by that camera. Pictures ta ke n wi th
that camer a a r e s to r ed in the fo lder us in g th e n aming c onven tions es t ablis he d by
the manufacturer. For more information, refer to the documentation
accom pa ny i ng th at camera.
34
Page 39

6 Troubleshooting
If you are experi encing difficulties with your camera , check the following table
for possible solutions.
Camera
Problem Cause Solution
The cam er a
does not
turn on.
The cam er a
does not
work.
The shutter
button does
not work.
The batt eries are not
properly installed.
The batteries are low or
dead.
The camera is not
turned on.
The camera is not
turned on.
The Power/Mode
switch is not set to
.
The green Ready light
is blinking. The camera
is processing a picture.
The red Ready light is
on. The internal
memory or Picture
Card is full.
The Menu screen is
displayed.
Remove an d re in s t al l the
batteries. See page 2.
The batteri es need to be
replaced. See pa ge 2.
Turn on the camera. See page 3.
Turn on the camera. See page 3.
Set the Powe r /Mode switch to
.
Wait until the Ready light s tops
blinking before attempting to
take another picture.
Transfer pic tu r es
to a computer (see page 30),
delete pi ctures (see page 20), or
insert a Picture Card with
available memory (see page 5).
Turn off the Menu screen by
pressing the MENU b u tton.
6
35
Page 40

Camera
Problem Cause Solution
The Pictures
Remaining
indicator doe s not
decrease after
taking a picture.
The quality setting
does not use up
enough space for the
Pictures Remaining
indicator to decrease.
The number of
pictures remaining is
more than 999.
The camera is operating
normally. Continue taking
pictures.
The Pictures Remaining
indicator begins counting
when the number of
pictures remaining is
below 998. The camera is
operating normally.
The power
suddenly turns
off.
The camera was not
operated for more t han
five minutes and t h e
Set the Power /M o d e
switch to OFF and then
back to or .
Auto Power Off
function turned o f f the
power.
Part of the picture
is missing.
Something was
blocking the lens
when the pi cture was
taken.
Your eye or the
picture was not
center ed co r rectly in
Keep hands, fingers, or
other objects away from
the lens when taking
pictures.
Leave spa ce around the
subject when cen tering a
picture in the viewfinder.
the viewfinder.
36
Page 41

Camera
Problem Cause Solution
The picture is
too dark.
The picture is
too light.
Stored p ictures
are damaged.
The picture is
not clea r.
Cannot delete a
picture.
The flash is not on or did
not function.
The subject is too far
away for the flash to
have an effect.
The subject is in front of
a bright light.
The flash is not needed. Change to Auto flash.
The su bj ec t was to o
close wh en the fl ash was
used.
The Picture Card w as
inse r t e d or r e moved
when the green Ready
light was blinking.
The lens is dirty. Clean the lens. S ee page
The su bj ec t was to o
close wh en a picture was
taken.
The subject or camera
moved while a picture
was taken.
Subject was too far away
for the flash to have an
effect.
The pict u r e is d el et eprotected.
Turn on th e flash . See
page 10.
Move to w it hin 8 ft
(2.4 m) of subject.
Change your position so
light is not behind the
subject.
See page 10.
Move at least 5 ft
(1.5 m) from the subject.
Make sure the Ready
light is not blinking
before inserting or
removing a Picture Card.
52.
Stand at l eas t 2 ft (0. 6 m)
away from the subject.
Hold the camera steady
until a picture is taken.
Move to w it hin 8 ft
(2.4 m) of the subject.
Cancel the protection
setting. See page 19.
6
37
Page 42

Camera Communications
Problem Cause Solution
The computer cannot
commun icate with t h e
camera.
The camera is not set
to PC Connect mode.
The camera is not
connected to a serial
cable, or the cable is
not connected to a
Set the came r a to PC
Connect mode. See
page 30.
Connect the serial
cable to th e camera
and computer port.
See page 30.
computer serial port.
The po r t se tt in g in th e
soft ware is set to an
incorrect COM port.
Change the COM port
setting to Auto- Sear ch
or to a specific COM
port.
The com m un i ca ti o n
speed setting in the
software is not
adjusted.
Set the spe ed set ting to
9,600 bps. If
communication is
successful, gradually
raise the speed to
optimize
communication time.
There is a conflict
with another serial
device, su ch as
infrared
communication,
internal fax modem, or
Refer to the serial
devi ce and/or
operating syste m
User’s Guide, or
consult the comput er
manufacturer.
other communication
system.
The software that
generates frequent
interrupts (such as a
Exit that software
before starting the
KODAK Software.
Web browser or
e-mail software) is
running.
38
Page 43

Camera Communications
Problem Cause Solution
The computer cannot
communicate with the
camera.
Computer Monitor
Problem Cause Solution
The image on the
monitor is ja gged or
inappropriate ly col ored.
The compu ter is
connecte d to a L AN or
to a special network
line.
Some Advanced
Power Management
utilities on lap tops c an
turn off port s to save
battery life.
The Battery Monitor
or other such software
runs constantly.
The monitor is not set
correctly.
Communications ma y
be hindered due to the
generation of forcible
interrupts in the
environment where
the comp u te r is
connected to the LAN
or to a special network
line.
See the Power
Management section
of the laptop User’s
Guide to disable this
feature.
Close that software
before starting the
KODAK Software.
Refer to th e co mputer
User’s Guide for
information o n how to
adjust the monitor
display settings.
6
39
Page 44

Picture Card
Problem Cause Solution
The cam era do es not re cogniz e
the Picture Card.
The Picture Card is
not CompactFlash
certified.
The Picture Card is
corrupt or formatted
Purchas e a certified
CompactFlash Picture
Card. See page 5.
Reformat the Picture
Card. See page 26.
for use in other digital
cameras.
The Picture Card is
not inserted in the
Insert a Picture Card.
See page 5.
camera.
Warning Messages
Message Cause Solution
Internal memory is full./
Memory card is full.
The internal m emory
or Picture Card is full
and cannot hold
additional pictures.
Transfer pictures
to a computer (see
page 30), delete
pictures (see page 20),
or insert a Picture
Card w it h availa b le
memory (see page 5).
Access error on memory card.
Card requires formatting.
The Picture Card is
corrupted.
Insert a new Picture
Card (see page 5) or
reformat the existing
card (see page 26).
40
Page 45

7 Where to Get Help
If you need help with your camera , it is available from place of purchase, the
“Troubleshooting” section of this manual, or at any of the resources listed in this
chapter.
Software Help
For help with any software packaged with your camera, contact the software
manufacturer.
Kodak Online Services
World Wide Web http://www.kodak.com
(click Servic e and Suppo rt)
Kodak Fax Support
U.S. and Canada 1-800-508-1531
Europe 44-0-131-458-6962
U.K. 44-0-131-458-6962
7
41
Page 46

Telephone Customer Support
If you have questions concerning the operation of KODAK softwa re or the
camera, you may speak directly to a customer support representative.
Before You Call
Before you call, please have the camera connected to the computer, be at your
computer , and have the following information ava ilable:
Operating system
Processor speed (MHz)
PC model
Amount of memory (MB)
Exact error message you received
Version of installation CD
Camera serial number
Telephone Numbers
U.S.—call toll free, 1-800-235-6325, between the hours of 9:00 a.m. and
8:00 p.m. (Eastern Standard Time) Monday through Friday.
Canada—call toll free, 1-800-465-6325, between the hours of 9:00 a.m.
and 8:00 p.m. (Easte rn St andard Time) Monday th rough F riday.
Europe—call the Kodak Digital Imaging Support Centre number
associated with your location, or the U.K. toll line, 44-0-131-458-6 714,
between the hours of 09.0 0 and 17.00 (GMT/CET) Monday through
Friday.
Outside the U.S., Canada, and Europe—visit our Worldwide Contacts
Web site at http://www.kodak.com/include/international.shtml
42
Page 47

8 W arranty and Regulatory Information
Limited Warranty
Kodak warrants the KO DAK DC3200 Digital Camera (excluding bat teries) to be
free from malfunctions and defects in both materials and workmanship for one
year from the date of purchase.
Retain the or iginal dated sales receipt. Proof of the date of purchase will be
required with any request for warranty repair.
Limited Warranty Cover age
THIS LIMITED WARRANTY WILL BE HONORED ONLY WITHIN THE
GEOGRAPHICAL LOCATION THAT THE KODAK DC3200 DIGITAL
CAMERA WAS PURCHASED.
Kodak will RE PLA CE the K OD AK DC3 200 Di gital Camer a if it fa ils t o func tion
properly duri ng the warranty period, subject to any conditions and/or limitations
stated herein . Such re placement is the sole remedy under this warranty.
If it is necessary to replace the entire product, it may be replaced with a
remanufactured product.
Limitations
Request for Warranty service will not be accepted without proof of date of
purchase, such as a cop y of the original dated K O DAK DC3200 Digital Camera
sales rec ei pt. (Always keep th e origi na l f o r you r re co r d s . )
This warranty doe s not apply to the batteries used in this camera. This warranty
does not cover circumstances beyond Kodak’s control, nor problems caused by
failure to follow the operating instructions in the KODAK DC3200 Digital
Camera User’s Guide.
THIS WARRANTY DOES NOT APPLY WHEN FAILURE IS DUE TO
SHIPPING DAMAG E, ACCIDENT, ALTERATION, MODIFICATION,
43
8
Page 48

UNAUT HORIZE D SERVICE, MISUSE, ABUSE, USE WITH
INCOMPATIBLE ACCESSORIES OR ATTACHMENTS, FAILURE TO
FOLLOW KODAK’S OPERATI ON, MAINTEN ANCE OR REPACKING
INSTRUCTIONS, F AILURE TO USE ITEMS SUPPLIED BY KODAK (SUCH
AS ADAPTERS AND CABLES), OR CLAIMS MADE AFTER THE
DURATION OF THIS WARRANTY.
Kodak mak es no other express or implied warranty for this product. In the event
that the exclus ion of any implied warran ty is ineffective under the law, the
duration of the implied warranty will be one year from the purchase date.
The option of replacement is Kodak’s only obligation. Kodak will not be
responsible for a ny s pecial, consequential or incidental damages resulting from
the sale, pur chas e, or use o f thi s produc t, re g ardless of the c ause. Liabi lit y for any
special, consequential or incidental damages (including bu t not limited to loss of
revenue or profit, downtime costs, loss of the use of the equipment, cost of
substitute e quipment, facilities or services, or claims of your customers for such
damages resulting from the purchase, use or failure of the product), regardless of
cause or for breach of any written or implied warranty is expressly disclaimed
and excluded herefrom.
Your Rights
Some states or juris dictions do not allow exclusion or lim itation of incident al or
consequent ial damages, so the above limitation or exclusi on may not apply to
you.
Some states or jur isdictions do not allow limitations on how long an implied
warranty lasts, so the abo ve limitation may not apply to you. This warranty gives
you specific rights, and you may have other rights which vary from state to state
or by jurisdiction.
Outside the United States
In countries oth er than the United States, the terms and conditions of thi s
warranty may be different. Unless specific Kodak wa rranty is communicated to
the purchaser in writing by a Kodak com pany, no warranty or lia bility exists
beyond an y min imum require ments impos ed b y l aw, even thou gh d efect , damag e,
or loss may be by negligence or other act.
Regulat o ry Informati on
FCC Compliance and Advisory
This device complies wit h Part 15 of the F CC Ru les. Operation is sub ject to the
following two conditions: 1) this device may not cause harmful interference, and
44
Page 49

2) this dev ic e m u st accept any int er f er e n ce r eceived, including in t er f e re n ce that
may cause unde sired operation.
RESPONSIBLE PARTY
EASTMAN KODAK COMPANY
Rochester, New York 14650
www.kodak.com
This equipmen t has been te ste d and found to compl y with th e limi ts for a Cl ass B
digital device, pursuant to Part 15 of the FCC Rules. The se limits are designed to
provide reasonable protection against harmful interference in a residential
installation.
This equipment generates, uses, and can radiate radio frequency energy and, if
not install ed or us ed in accordance with the in st ructions, may cause har mful
interference to radio communications. However, there is no guarantee that
interference will not occur in a particular installation.
If this equi pment does cause harmful inter fere nce to radio or t ele v ision reception ,
which can be determined by turning the equipm ent off and on, the user is
encouraged to try to corr ect the interference by one or more of the foll owing
measures: 1) reorient or relocate the receiving antenna; 2) increase the separation
between t he eq ui pme nt an d th e re cei v e r; 3) co nnec t th e equ ipm en t to an outl et on
a circuit different from that to which the receiver is connected; 4) consult the
dealer or an experienced radio/TV technic ian for additional suggestions.
Any changes or modifications not e xpressly approved by the party respons ible
for com p liance could void the user ’s authority to op e ra t e th e eq u ip ment. Wh er e
shielded interface cables have been provided with the product or specified
additional components or accessories elsewhere defined to be used with the
installation of the product, they must be used in order to ensure compl iance with
FCC regulation.
Canadian DOC Statement
DOC Class B Compliance—This Class B digital apparatus complies with
Canadian ICES-0 03.
Obervation des normes-Class B—Cet appareil numérique de la class e B est
conforme à la norme NMB-003 du Canada.
8
45
Page 50

Page 51

9 Appendix
This appendix serv es as a resource for spec if ic te chnical inf ormati on and care for
your camera, and contains the following information:
Original defa ult settings
Specifications
Printing guidelines
Battery usage guidelines
Care and maintenance
Original Came ra Defau l t Settings
Your camera is set to these values when you take the ca mera out of the box for
the first time.
Feature Setting
Preview Off
Flash Auto
Quality Better
White Balance Auto
Quickview On
Slide Show 5 seconds
PC Connect Off
9
47
Page 52

Camera Specificat ions
DC3200 Camera
CCD Resolution 1,344 x 971=1.31 millions of pixels (total
number of pixels)
Pictur e R esolution Best/ B etter 1,152 x 864=995,328 pixels
Good 576 x 432=248,832 pixels
Color 24-bit, millions of colors
Pictur e File Format JPEG
Pictur e Storage
Viewfi nder Virtual im age
ASA/ISO Sensitivity 100
Flash Range 5 to 8 ft (1.5 to 2.4 m)
Lens Type Optical qua li ty gla ss
Power Batteries (4) AA size 1.5-vol t alkaline or AA size
Vide o O ut NTSC
Dimensions Width 4. 4 in. (113 mm)
Weight 7.6 oz. (215 g) without batteries
Operating Temperature 32 to 104° F (0 to 40° C)
Internal
External
Maximum
Aperture
Focal L en gth 39 mm (equivalent to 35mm camera)
Focus Distance
(fixed)
DC Input KODAK AC Adapter (Cat# 122-0557)
Depth 2.1 in. (53.4 mm)
Height 3.2 in. (81 m m)
2 MB flash memory
ATA-compatible CompactFlash card
F/3.6
5.4 mm (actua l)
2 ft (0.6 m) to infinity
1.2-v olt Ni-MH rechargeable
48
Page 53

Getting Better Results from Your Printer
You may notice that the colors on your comp uter screen do not always match
those of your documents or prints. This is because moni tors and printers use
different color systems.
You may be able to achieve more pr edictable results in your printed
docu m ents by :
Improving the quality of your paper. Copier paper may not offer the same
results as coated paper or paper made specially for inkjet printers.
Adjusting your printer software settings.
Using fresh ink cart ridges. Do not use ink cartridges beyond their life
expectancy.
Remember these tips when printing a document:
Color printi ng takes more time. More complex pictures increase the
printing and drying ti me.
Color printing is more memory intensive than black and white. If your
computer gi ves you an insufficient memory me ssage, you may need to
close some applications, change so me se ttings, or add additional memory.
Color prints may not photocopy as clearly as black and white. If you plan
to photocopy documents, consider printing the document in grayscale.
This setting is usually changed from the Print dialog box.
Resizing the picture to a smaller size or printing the picture on glossy
paper may increase the qua lity of the print.
To improve the quality of your prints, you may want to print your pictures
on KODAK Inkjet Snapshot Paper (Snaps hot Paper). Snapshot Paper is
made to work with most inkj et printers to give you clearer, crisper, and
more detailed images on your prints.
49
9
Page 54

Using Your Batteries
Keep batteries away fr om children.
In the unlikely event that battery fluid leaks onto your skin, immediately
wash the contaminated skin with soap and plenty of water. Contact your
local hea lth care provider, or in the U.S. contact K o dak Health, Safety,
and Envi ronment Information at 1-716-722-5151.
In the un likely even t th at battery fluid leaks in side the camer a, U.S.
customers can contact the Kodak Information Center at 1-800-242-2424.
Customers outside the U.S. can contact their local Kodak Customer
Service r epresentative.
Kodak recomm ends KODAK PHOTOLIFE AA Alkaline Batteries, or
KODAK AA Ni-MH Rechargeable Batter ies for use in KOD AK digital
cameras.
Remove the batteries when the camera is stored for extended periods of
time.
Always follow your battery manufacturer’s directions full y. Do not
attempt to di sa s se mble, short circuit, or subject the battery to high
temperature or fire.
Your camera has been designed to operate cor r ec tly using a varie ty of
AA-si ze bat t er i es cu r r en t ly availa b le . Th ese inclu d e 1. 5 -vol t al k al in e and
rechargeable 1.2-vo lt Nickel Metal Hydride (Ni-MH) .
Replace all bat ter ies of a se t at the same ti me. Ne w batt eries should not be
mixed with used ones. Do not mix rechargeable and nonrechargeable
batteries. Do not mix alkaline or Ni-MH types of batteries. Do not mix
different grades or brands of batte ries. Failure to observe this precaut ion
may result in some batteries in a set being driven beyond their normal
exhaust poi nt and increase their poss ibility of leakage.
NOT ALL BATTERIES ARE CREAT ED EQUAL! Batter y life depends
significantly on age, usage conditions, type, brand, and camera. Digital
camera requirements are very demanding on batteries. Not all batteries
perform well under thes e challenging conditions. In Kodak lab tests, NiMH rechargeab le batt eries de livered the outstanding results in a v a riety of
conditions. Ni-MH batteries are designed for high-de mand devices, such
as digital cameras, and do not exhibit the “memory” effects seen with
other rechargeable technologies.
If you elect to use alkaline batteries in your camera, you will obtain better
performance from “photo-flash grade” alkaline batteries, such as
KODAK PHOTOLIFE alkaline batteries. These types of batteries last
50
Page 55

more than tw ice as long in digital cameras as ordinary alkaline batteries.
Alkaline ba tterie s are not rec har geable ; d o not att empt to rech ar ge the m in
the battery charger.
When using your camera on battery power, we recommend you limit
continuous LCD Pre v iew or R evi ew to l ess t han 10-min utes per ses sio n. If
you are using the camera for longer pe riods, it is recommended that you
do so with the camera powered by a KODAK-specified AC adapter.
When disposing of batteries, follow the manufacturer’s instructions and
all federal, state, and local regul ations. Koda k suggests customers ta ke
advantage of any community battery recycling programs that may exist in
your area. Cont ac t yo u r local waste re m o ver or re cy cl er for de ta ils.
Caution Hot Surface
When removing batteries, allow to cool before touching, since the
batteries ma y be hot.
Battery Charger Tips:
For charging Ni-Cd or Ni-MH batteries only, with a maximum
of 4 cells, and a maximum char ge of 1600mAH.
Do not charge nonrechargeable batteries.
Endast för att ladd a Ni-Cd eller Ni-MH batterier, med maximalt
4 celler och en maximal laddning av 1600mAH.
Återladda inte batterier som inte är laddningsbara.
9
51
Page 56

General Maintenance and Safety
To keep from damaging your camera, avoid exposing it to moisture and
extrem e te m p e r at ur e s .
Clean the outside of the camera by wiping with a clean, dry cloth. Never
use harsh or abras ive cleaners or organic solvents on th e camera or any of
its parts.
Do not allow any chemicals, such as suntan lotion to come into contact
with the pain ted surface of the camera.
Never dis assemble or touch the inside of the camera. This could result in
electrical shock.
If you notice smoke or a strange smell coming from the camera,
immediately turn off the camera, wait a few minutes until the came r a
cools, and then remove the batteries.
Clean the lens and back LCD screen:
Do not use cleaning solutions unless they are des igned specifically for
camera lenses. Do not wipe the camera lens or LCD screen with chem-
ically tr eated eyeglass lens tis sue as it may scratch
the lens.
1 Blow gently on the lens or LCD screen to remov e dus t and dirt.
2 Mois ten the le n s or LCD screen by bre a t h in g light ly on it.
3 Wipe the lens or LCD screen gen tly with a soft, lint-free cloth or an
untreated lens-cleaning tissue.
Service agr eements are av ailable in some count ries. Please contact a dealer of
KODAK products for more information.
52
Page 57

Index
A
AC Adapter 2
Appendix 47
Auto Flash 10
B
Battery
Charging Tips 51
Checking Power Level 4
Compartment 2
Disposal 51
Icon 4
Loading 2
Using 50
C
Camera Memory Card 5
Camera Specifications 48
Canadi an D O C S t at em e n t 4 5
Caution
Batteries 51
Flash 10
Green Ready Light 5
Orange Ready Light 9
Red Ready Light 4
Cleaning 52
Close-up Mode 9
CompactFlash
Card 5
Card Reade r 29
Card Slot 5
Computer
Communication Settings 33
Connecting 30
Connecting
Computer 30
Television 25
Copying Pictures 17
D
Daylight Sett ing 12
DC3200 Picture Transfer Software 27
Default Camera Settings 47
Deleting Pictures 20
Difficulties 35
E
Ejecting a P icture Card 5
F
FCC Complianc e and Advisory 44
Flash
Auto 10
Fill 10
Off 10
Setting 10
Warning 10
Fluorescent Setting 12
Form at ti n g a P ic t ur e Car d 26
G
Green Ready Light 5
53
Page 58

H
O
Help
Fax Support 41
Onlin e S er v ices 41
Telephone Suppo rt 42
Troubleshooting 35
I
Inserting a Picture Card 5
Installing Software 27
Internal Memory 2
K
KODAK
AC Adapter 2
Alkaline Batteries 50
Inkjet Paper 49
Ni-MH Rechargeable Batteries
Software 27
Video Cable 25
L
LCD 3
Light
Green 5
Orange 9
Red 4
Loading Batteries 2
M
Off Flash 10
On/Off, Camera 3
Orange Ready Light 9
P
Paper, KODAK Inkjet 49
Picture Card
Card Slot 5
Ejecting 5
Formatting 26
Inserting 5
Reader 29
Picture Quality Setting 11
Pictures
Copying 17
Deleting 20
Navigating to 34
50
Printing 22
Protecting 18
Reviewing 15
Taking 7
Preparing to Take Pic tures 2
Printer, Improving Results 49
Printing Pictures 22
Problem Solving 35
Protecting Pictures 18
Q
Quality Setting 11
Quickview Setting 13
Maintenanc e 52
Memory Card 5
Memory, Internal 2
N
Navigating to Pictures 34
54
R
Ready Light
Green 5
Orange 9
Red 4
Red Ready Light 4
Page 59

Regulatory Information 43
Removing a Picture Card 5
Reviewing Pictures 15
RS-232 Serial Ca ble 29
S
Using the Software 32
V
Video Cable 25
Video Out 25
Safety 52
Selecting Pictures for Printing 22
Serial Cable 29
Serial Port 30
Settings
Communication 33
Daylight 12
Default 47
Flash 10
Fluorescent 12
Pictu r e Quality 11
Quickview 13
Tungsten 12
White Balance 12
Shutter Butt on 9
Slide Show 25
Software
DC3200 Picture Tran sfer 27
Help 41
Installing 27
Using 32
Specifications 48
System Requirements 27
T
W
Warning
Batterie s 51
Flash 10
Green Ready Light 5
Orange Ready Light 9
Red Ready Light 4
Warranty 43
White Balance Setting 12
Wide Angle 9
Wrist Strap, Attaching 2
Z
Zoom 9
Taking Pictures 7
TelePhoto 9
Television, Connecting 25
Troubleshooting 35
Tungsten Setting 12
U
Using the Batteries 50
55
Page 60

 Loading...