

Page 1
Kodak Digital Science DC120 Zoom Digital Camera
UserÕs Guide
for camera and software
Page 2

Kodak, Digital Science, and the ds monogram symbol are trademarks of Eastman Kodak
Company.
FlashPixö
specification and test suite developed and published by Kodak in collaboration with Microsoft,
Hewlett-Packard, and Live Picture. Only products that meet the specification and pass the
test suite may use the
Adobe is a trademark of Adobe Systems Incorporated and its subsidiaries.
is a trademark of Eastman Kodak Company. The
FlashPix
name and logo.
FlashPix
format is defined in a
Page 3

Table of Contents
Chapter-Page
Table of Contents . . . . . . . . . . . . . . . . . . . . . . . . . . . . . . . . i
Getting Started . . . . . . . . . . . . . . . . . . . . . . . . . . . . . . . . 1-1
Package Contents . . . . . . . . . . . . . . . . . . . . . . . . . . . . . . . . . . . . . . . . . . .1-1
Your DC120 Camera . . . . . . . . . . . . . . . . . . . . . . . . . . . . . . . . . . . . . . . .1-2
Using Your DC120 Camera . . . . . . . . . . . . . . . . . . . . . . 2-1
Batteries . . . . . . . . . . . . . . . . . . . . . . . . . . . . . . . . . . . . . . . . . . . . . . . . . .2-1
Camera On/Off . . . . . . . . . . . . . . . . . . . . . . . . . . . . . . . . . . . . . . . . . . . . .2-2
Status Display . . . . . . . . . . . . . . . . . . . . . . . . . . . . . . . . . . . . . . . . . . . . . .2-3
AutoFocus . . . . . . . . . . . . . . . . . . . . . . . . . . . . . . . . . . . . . . . . . . . . . .2-4
Exposure . . . . . . . . . . . . . . . . . . . . . . . . . . . . . . . . . . . . . . . . . . . . . . .2-5
Flash . . . . . . . . . . . . . . . . . . . . . . . . . . . . . . . . . . . . . . . . . . . . . . . . . .2-7
Album . . . . . . . . . . . . . . . . . . . . . . . . . . . . . . . . . . . . . . . . . . . . . . . . .2-8
Card Status . . . . . . . . . . . . . . . . . . . . . . . . . . . . . . . . . . . . . . . . . . . . .2-9
Picture Quality . . . . . . . . . . . . . . . . . . . . . . . . . . . . . . . . . . . . . . . . .2-10
Self-Timer . . . . . . . . . . . . . . . . . . . . . . . . . . . . . . . . . . . . . . . . . . . . .2-11
Pictures Remaining . . . . . . . . . . . . . . . . . . . . . . . . . . . . . . . . . . . . . .2-12
Battery Status . . . . . . . . . . . . . . . . . . . . . . . . . . . . . . . . . . . . . . . . . .2-13
Taking Pictures . . . . . . . . . . . . . . . . . . . . . . . . . . . . . . . . . . . . . . . . . . . .2-14
Using the LCD Display . . . . . . . . . . . . . . . . . . . . . . . . . . . . . . . . . . . . .2-15
Quickview . . . . . . . . . . . . . . . . . . . . . . . . . . . . . . . . . . . . . . . . . . . . .2-15
Preview . . . . . . . . . . . . . . . . . . . . . . . . . . . . . . . . . . . . . . . . . . . . . . .2-16
Table of Contents
Reviewing Your Pictures on the LCD . . . . . . . . . . . . . . . . . . . . . . .2-17
i
Page 4

Moving Pictures into Albums . . . . . . . . . . . . . . . . . . . . . . . . . . . . . .2-19
Moving Pictures to a Kodak Picture Card . . . . . . . . . . . . . . . . . . . .2-20
Erasing Pictures from the DC120 or Kodak Picture Card . . . . . . . .2-21
INFO . . . . . . . . . . . . . . . . . . . . . . . . . . . . . . . . . . . . . . . . . . . . . . . . .2-22
Adjusting LCD Brightness . . . . . . . . . . . . . . . . . . . . . . . . . . . . . . . .2-23
Automatic LCD Turn Off . . . . . . . . . . . . . . . . . . . . . . . . . . . . . . . . .2-23
Zoom . . . . . . . . . . . . . . . . . . . . . . . . . . . . . . . . . . . . . . . . . . . . . . . . . . . .2-24
Automatic Power Off . . . . . . . . . . . . . . . . . . . . . . . . . . . . . . . . . . . . . . .2-24
Optional Accessories . . . . . . . . . . . . . . . . . . . . . . . . . . . . . . . . . . . . . . .2-25
AC Adaptor . . . . . . . . . . . . . . . . . . . . . . . . . . . . . . . . . . . . . . . . . . . .2-25
Kodak Picture Card . . . . . . . . . . . . . . . . . . . . . . . . . . . . . . . . . . . . . .2-26
General Maintenance and Safety . . . . . . . . . . . . . . . . . . . . . . . . . . . . . .2-28
DC120 Specifications . . . . . . . . . . . . . . . . . . . . . . . . . . . . . . . . . . . . . . .2-29
Using DC120 with Your Computer . . . . . . . . . . . . . . . . .3-1
Connecting the DC120 to Your Computer . . . . . . . . . . . . . . . . . . . . . . . .3-1
Checking Serial Port Availability . . . . . . . . . . . . . . . . . . . . . . . . . . . . . . .3-2
Monitor Adjustment . . . . . . . . . . . . . . . . . . . . . . . . . . . . . . . . . . . . . . . . .3-3
Printing . . . . . . . . . . . . . . . . . . . . . . . . . . . . . . . . . . . . . . . . . . . . . . . . . . .3-4
Installation Software . . . . . . . . . . . . . . . . . . . . . . . . . . . .4-1
Software included on the CD . . . . . . . . . . . . . . . . . . . . . . . . . . . . . . . . . .4-1
System Requirements . . . . . . . . . . . . . . . . . . . . . . . . . . . . . . . . . . . . . . . .4-2
Installing the Software . . . . . . . . . . . . . . . . . . . . . . . . . . . . . . . . . . . . . . .4-3
Picture Transfer Application . . . . . . . . . . . . . . . . . . . . .5-1
Installation . . . . . . . . . . . . . . . . . . . . . . . . . . . . . . . . . . . . . . . . . . . . . . . .5-1
Camera Communication Settings . . . . . . . . . . . . . . . . . . . . . . . . . . . . . . .5-1
Starting Picture Transfer Application . . . . . . . . . . . . . . . . . . . . . . . . . . . .5-2
Overview . . . . . . . . . . . . . . . . . . . . . . . . . . . . . . . . . . . . . . . . . . . . . . . . .5-2
Transferring Pictures from DC120 . . . . . . . . . . . . . . . . . . . . . . . . . . . . . .5-3
Preferences Settings . . . . . . . . . . . . . . . . . . . . . . . . . . . . . . . . . . . . . . . . .5-6
ii
Page 5

TWAIN & Plug-in Access Software . . . . . . . . . . . . . . . . 6-1
Installation . . . . . . . . . . . . . . . . . . . . . . . . . . . . . . . . . . . . . . . . . . . . . . . .6-1
Camera Communication Settings . . . . . . . . . . . . . . . . . . . . . . . . . . . . . . .6-1
Starting Access Software . . . . . . . . . . . . . . . . . . . . . . . . . . . . . . . . . . . . .6-2
Overview . . . . . . . . . . . . . . . . . . . . . . . . . . . . . . . . . . . . . . . . . . . . . . . . .6-3
Transferring Pictures from DC120 . . . . . . . . . . . . . . . . . . . . . . . . . . . . . .6-4
Picture Information . . . . . . . . . . . . . . . . . . . . . . . . . . . . . . . . . . . . . . . . . .6-7
Rotating Your Picture . . . . . . . . . . . . . . . . . . . . . . . . . . . . . . . . . . . . . . . .6-7
Enhancing Your Picture . . . . . . . . . . . . . . . . . . . . . . . . . . . . . . . . . . . . . .6-8
Preferences Settings . . . . . . . . . . . . . . . . . . . . . . . . . . . . . . . . . . . . . . . . .6-9
Changing Connection Setup . . . . . . . . . . . . . . . . . . . . . . . . . . . . . . . .6-9
Changing Display Setup . . . . . . . . . . . . . . . . . . . . . . . . . . . . . . . . . .6-10
Changing Transfer Resolution . . . . . . . . . . . . . . . . . . . . . . . . . . . . .6-11
Camera Functions . . . . . . . . . . . . . . . . . . . . . . . . . . . . . . . . . . . . . . . . . .6-12
Changing LCD settings . . . . . . . . . . . . . . . . . . . . . . . . . . . . . . . . . . .6-12
Changing Camera Functions . . . . . . . . . . . . . . . . . . . . . . . . . . . . . . .6-13
Album Setup . . . . . . . . . . . . . . . . . . . . . . . . . . . . . . . . . . . . . . . . . . .6-13
Erasing Pictures . . . . . . . . . . . . . . . . . . . . . . . . . . . . . . . . . . . . . . . .6-14
Table of Contents
PhotoEnhancer Software . . . . . . . . . . . . . . . . . . . . . . . . 7-1
Installation . . . . . . . . . . . . . . . . . . . . . . . . . . . . . . . . . . . . . . . . . . . . . . . .7-1
Starting PhotoEnhancer . . . . . . . . . . . . . . . . . . . . . . . . . . . . . . . . . . . . . .7-1
Overview . . . . . . . . . . . . . . . . . . . . . . . . . . . . . . . . . . . . . . . . . . . . . . . . .7-2
Transferring Pictures into PhotoEnhancer . . . . . . . . . . . . . . . . . . . . . . . .7-3
Editing Tools . . . . . . . . . . . . . . . . . . . . . . . . . . . . . . . . . . . . . . . . . . . . . .7-4
Enhancing Your Picture . . . . . . . . . . . . . . . . . . . . . . . . . . . . . . . . . . . . . .7-5
Enhancing in One Step . . . . . . . . . . . . . . . . . . . . . . . . . . . . . . . . . . . .7-5
Enhancing by Example . . . . . . . . . . . . . . . . . . . . . . . . . . . . . . . . . . . .7-6
Correcting for Lighting Conditions . . . . . . . . . . . . . . . . . . . . . . . . . . . . .7-8
Saving Your Pictures . . . . . . . . . . . . . . . . . . . . . . . . . . . . . . . . . . . . . . . .7-8
Printing Your Pictures . . . . . . . . . . . . . . . . . . . . . . . . . . . . . . . . . . . . . . .7-8
iii
Page 6

Mounter Software . . . . . . . . . . . . . . . . . . . . . . . . . . . . . .8-1
Installation . . . . . . . . . . . . . . . . . . . . . . . . . . . . . . . . . . . . . . . . . . . . . . . .8-1
Camera Communication Settings . . . . . . . . . . . . . . . . . . . . . . . . . . . . . . .8-1
Overview . . . . . . . . . . . . . . . . . . . . . . . . . . . . . . . . . . . . . . . . . . . . . . . . .8-2
Transferring Pictures from DC120 . . . . . . . . . . . . . . . . . . . . . . . . . . . . . .8-3
Setting and Viewing Properties . . . . . . . . . . . . . . . . . . . . . . . . . . . . . . . .8-5
Camera Memory or Memory Card Properties . . . . . . . . . . . . . . . . . .8-5
Picture File Properties . . . . . . . . . . . . . . . . . . . . . . . . . . . . . . . . . . . . .8-6
Album Properties . . . . . . . . . . . . . . . . . . . . . . . . . . . . . . . . . . . . . . . .8-7
Camera Properties . . . . . . . . . . . . . . . . . . . . . . . . . . . . . . . . . . . . . . . .8-8
Troubleshooting . . . . . . . . . . . . . . . . . . . . . . . . . . . . . . .9-1
Where to Get Help . . . . . . . . . . . . . . . . . . . . . . . . . . . . .10-1
Software Help . . . . . . . . . . . . . . . . . . . . . . . . . . . . . . . . . . . . . . . . . . . . .10-1
Online Services . . . . . . . . . . . . . . . . . . . . . . . . . . . . . . . . . . . . . . . . . . . .10-2
Faxed Information . . . . . . . . . . . . . . . . . . . . . . . . . . . . . . . . . . . . . . . . .10-2
Customer Support . . . . . . . . . . . . . . . . . . . . . . . . . . . . . . . . . . . . . . . . . .10-2
Warranty & Regulatory Information . . . . . . . . . . . . . . . W-1
Warranty Time Period . . . . . . . . . . . . . . . . . . . . . . . . . . . . . . . . . . . . . .W-1
Warranty Repair Coverage . . . . . . . . . . . . . . . . . . . . . . . . . . . . . . . . . . .W-1
Limitations . . . . . . . . . . . . . . . . . . . . . . . . . . . . . . . . . . . . . . . . . . . . . . .W-2
Application Support . . . . . . . . . . . . . . . . . . . . . . . . . . . . . . . . . . . . . . . .W-3
How to Obtain Service . . . . . . . . . . . . . . . . . . . . . . . . . . . . . . . . . . . . . .W-3
Regulatory Information . . . . . . . . . . . . . . . . . . . . . . . . . . . . . . . . . . . . .W-4
iv
Page 7

Getting Started
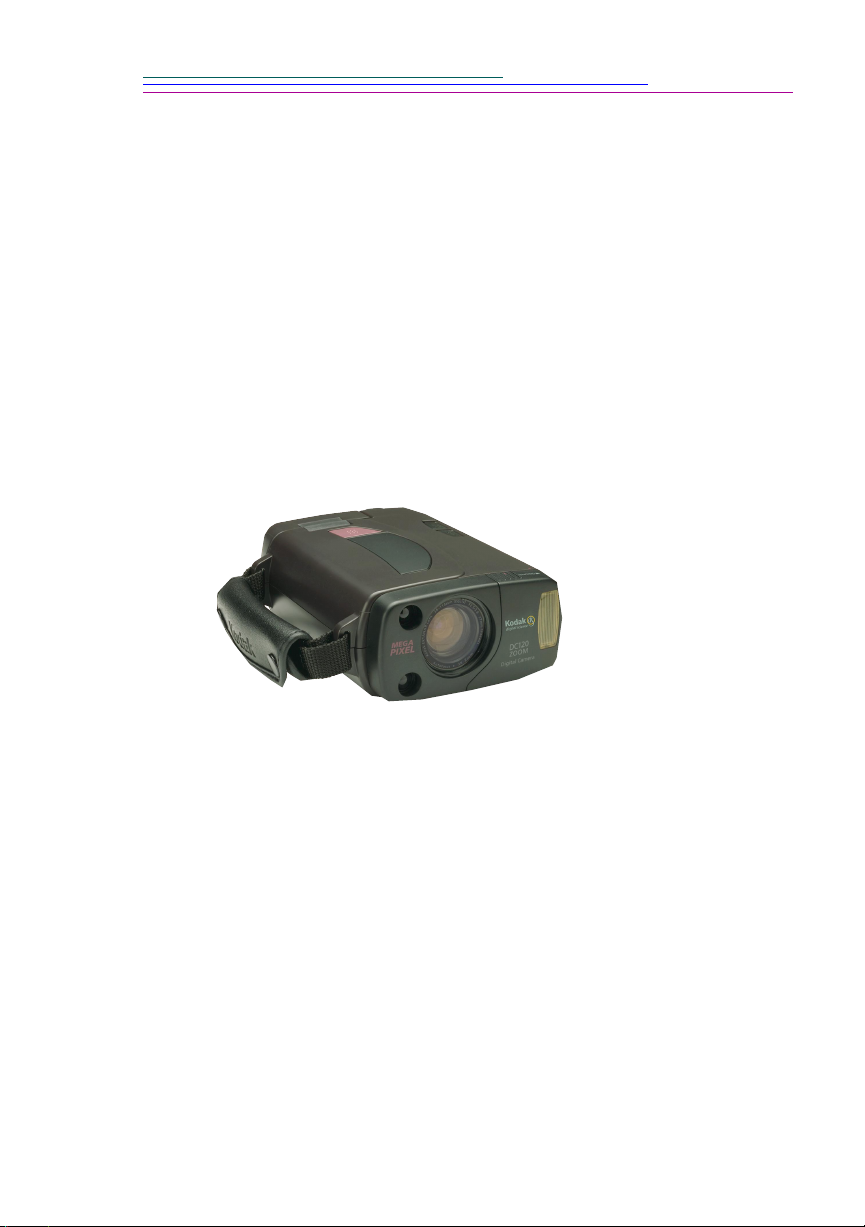
Congratulations on purchasing your new
Digital Camera (DC120). The DC120 features a 3x zoom lens, built-in flash, and
color Liquid Crystal Display (LCD) which allows you to immediately view your
pictures.
The DC120 offers 2 megabytes (MB) of internal picture storage plus the
convenience of a removable optional Kodak Picture Card, and an album feature
to easily store and organize your pictures. Use the enclosed software packages to
transfer, enhance, and save pictures from the DC120.
The pictures used throughout this manual were taken with the DC120.
Kodak Digital Science™
DC120 Zoom
Package Contents
✔
DC120 camera with handstrap
DC120 User’s Guide
✔
✔
two serial cables (one for Macintosh and one for PC)
✔
DC120 software
four AA batteries
✔
✔
quick setup guide(s)
✔
registration cards
1
Getting Started
1-1
Page 8
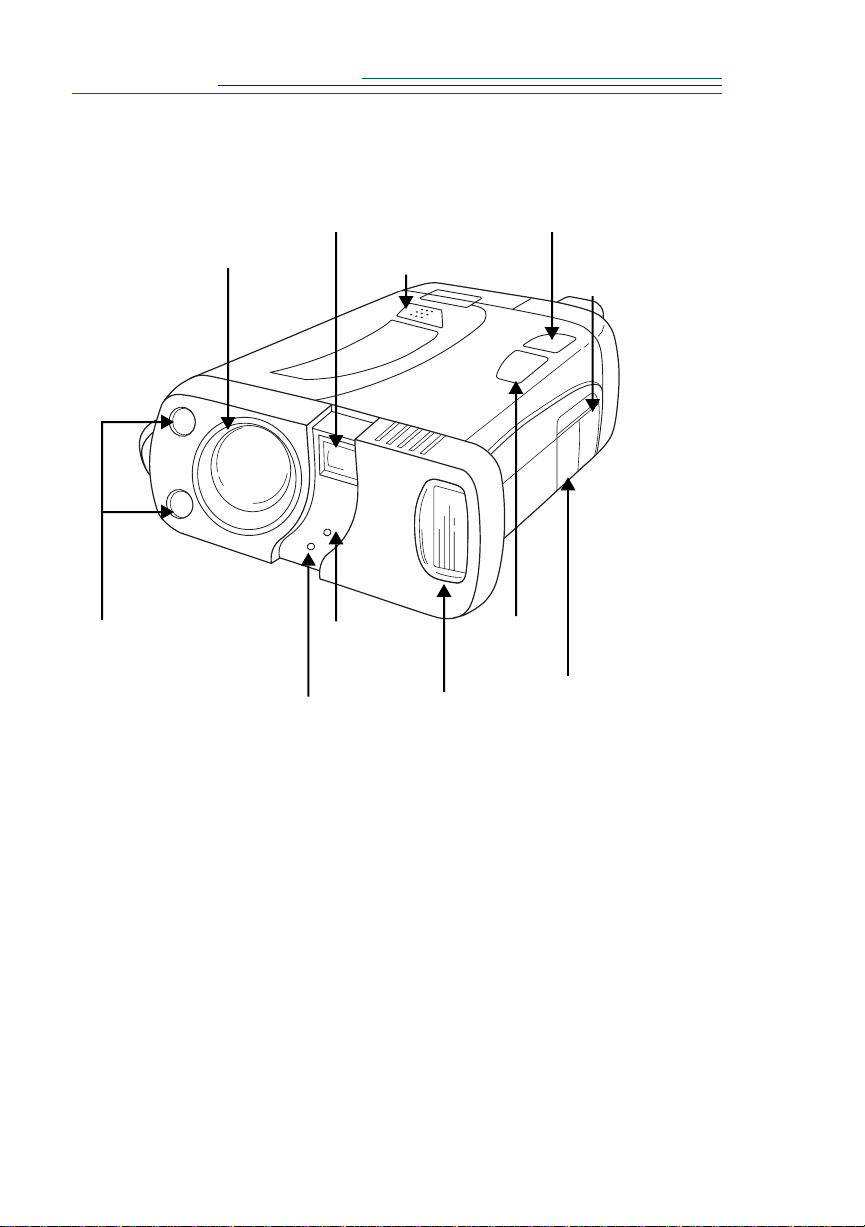
Your DC120 Camera
Camera Front
Viewfinder Lens
Camera Lens
Auto focus
Sensors
Light Sensor
*The Wide Angle and the TelePhoto buttons are also used to scroll through
previously taken pictures when the pictures are viewed on the LCD screen.
Light
Shutter Button
Self-Timer
Wide Angle Button*
TelePhoto
Button*
Flash
AC Adapter
Connection
Serial Cable
Connection
1-2
Page 9
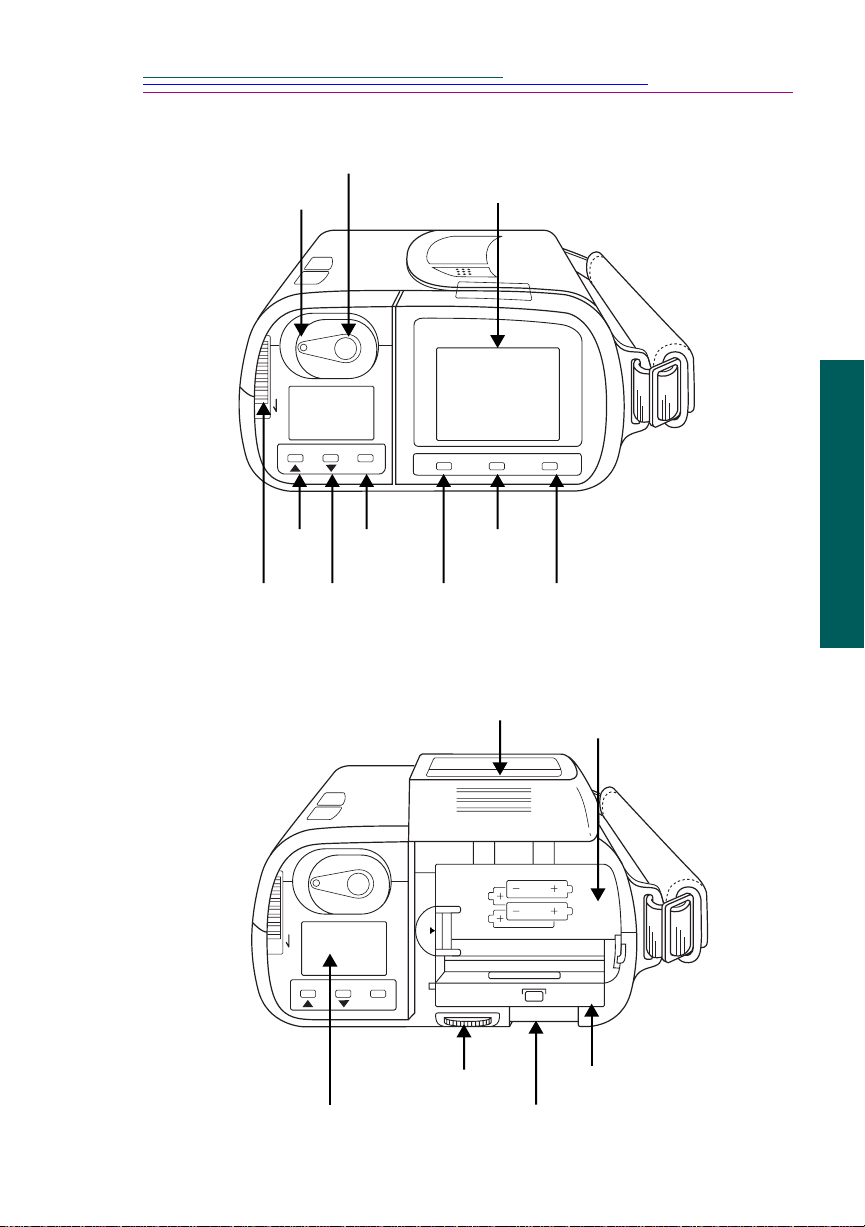
Camera Back
Ready Light LCD Screen
View Finder
PLAY • STOP
TAB SELECT ENTER
TAB
Enter
VIEW INFOMOVE • ERASE
Move-Erase
LCD Play-Stop
Switch
Select
View
Camera Back - LCD Screen Up
LCD Screen Up
PLAY • STOP
Open
1
Getting Started
Info
Battery Cover
AA
ALKALINE, LITHIUM, Ni-Cd.
TAB SELECT ENTER
Status Display
LCD Brightness
Wheel
Card Eject Button
CARD
EJECT
Card Slot
1-3
Page 10

Page 11
Using Your DC120 Camera
Batteries
The DC120 comes equipped with four AA batteries.You may use standard 1.5V
alkaline, 1.7V lithium, or rechargeable 1.2V NiCad batteries. The power level of
the batteries can be checked from the Status Display. See “Battery Status” on
page 2-13 for details.
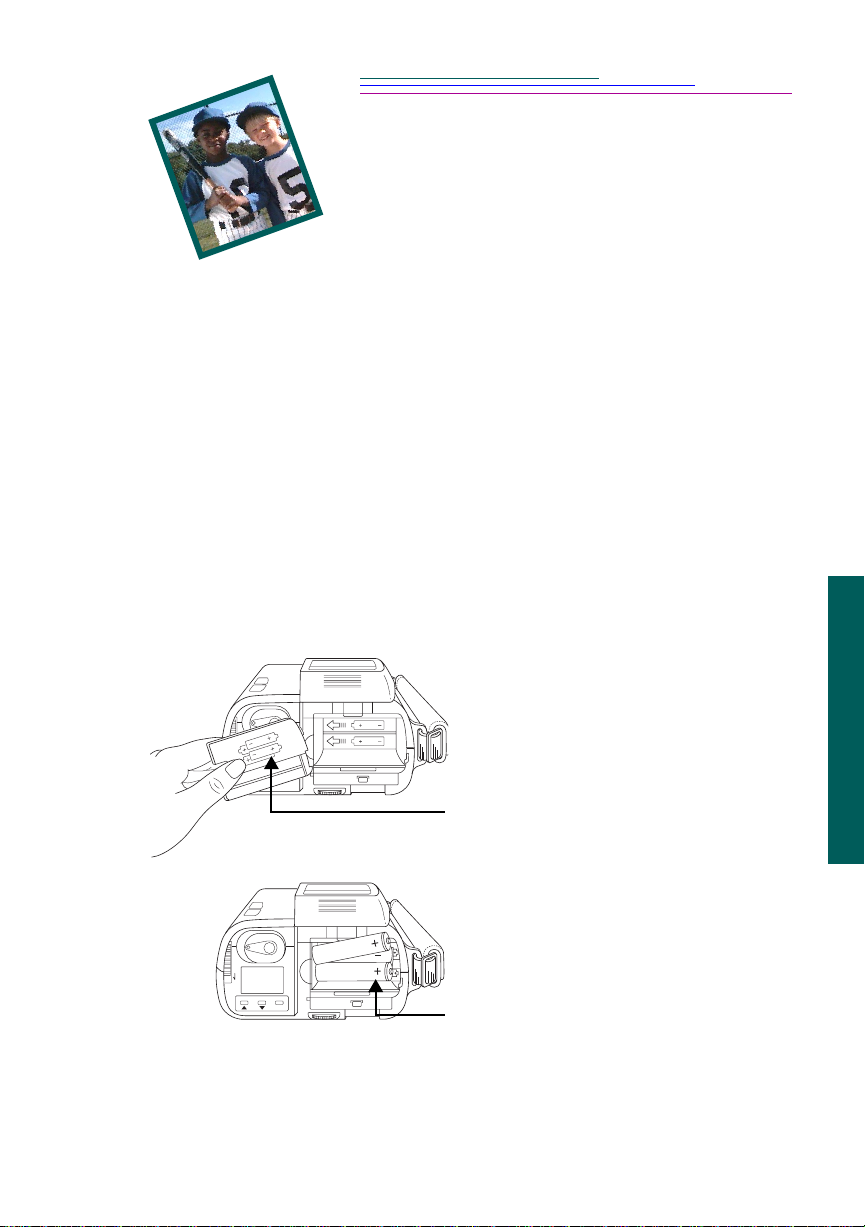
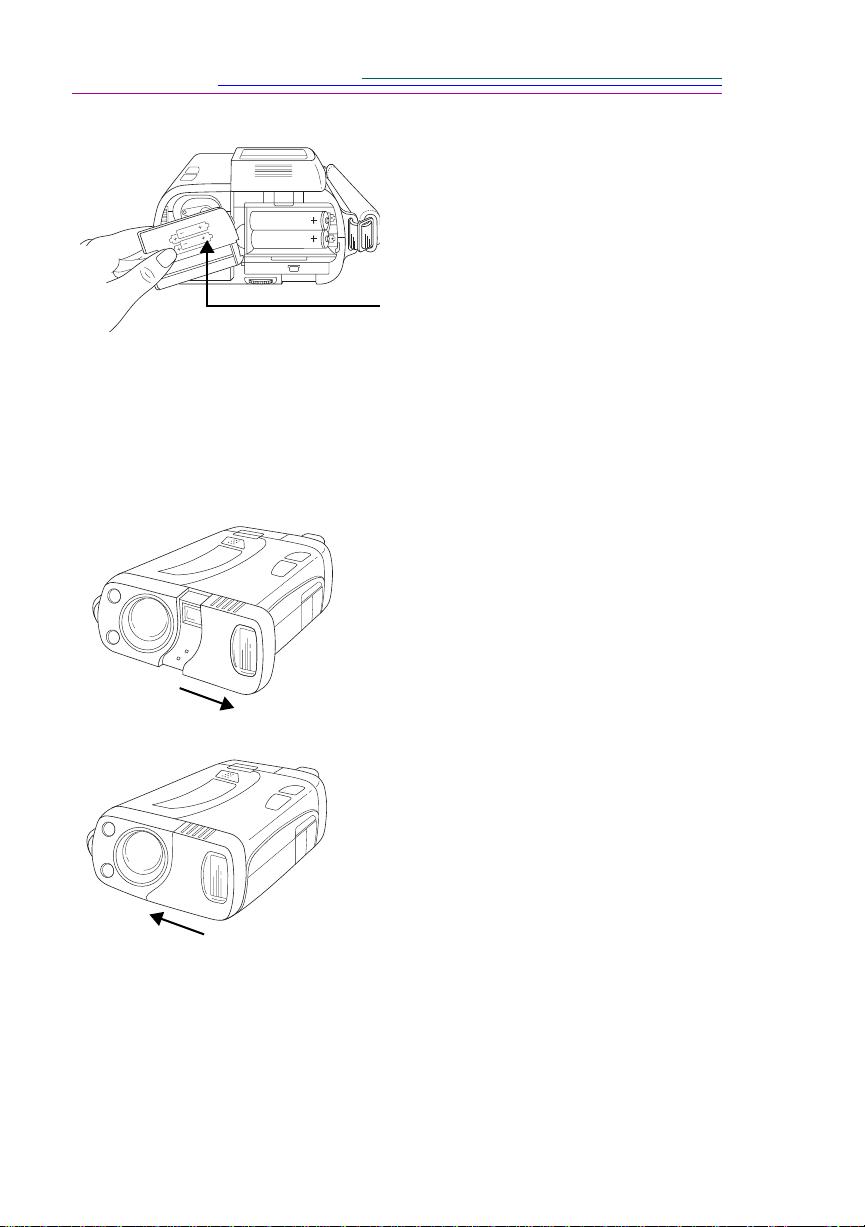
To install the batteries:
1
Flip-up the LCD screen to expose the
battery cover.
2
Using Camera
ALKALINE, LITHIUM, Ni-Cd.
PLAY • STOP
TAB SELECT ENTER
AA
CARD
EJECT
2
Remove the battery cover.
4
3
CARD
EJECT
Insert the batteries as indicated on
3
battery cover.
2-1
Page 12
4
AA
ALKALINE, LITHIUM, Ni-Cd.
3
CARD
EJECT
4
Place the battery cover over the
batteries and flip-down the LCD
screen.
☞
Remove the batteries if the DC120 will not be used for an extended period
of time. This extends battery life and prevents camera damage from battery
leaks or corrosion.
Camera On/Off
Turn the camera on—
from the camera until it clicks. The Status
Display screen turns on.
Camera On
by sliding cover away
2-2
Camera Off
T urn the camera off—
by sliding cover toward
the camera until it covers the viewfinder lens
and clicks into place.
If the camera is turned off while a picture
☞
is being processed, the camera will finish
processing the picture before turning off.
Page 13
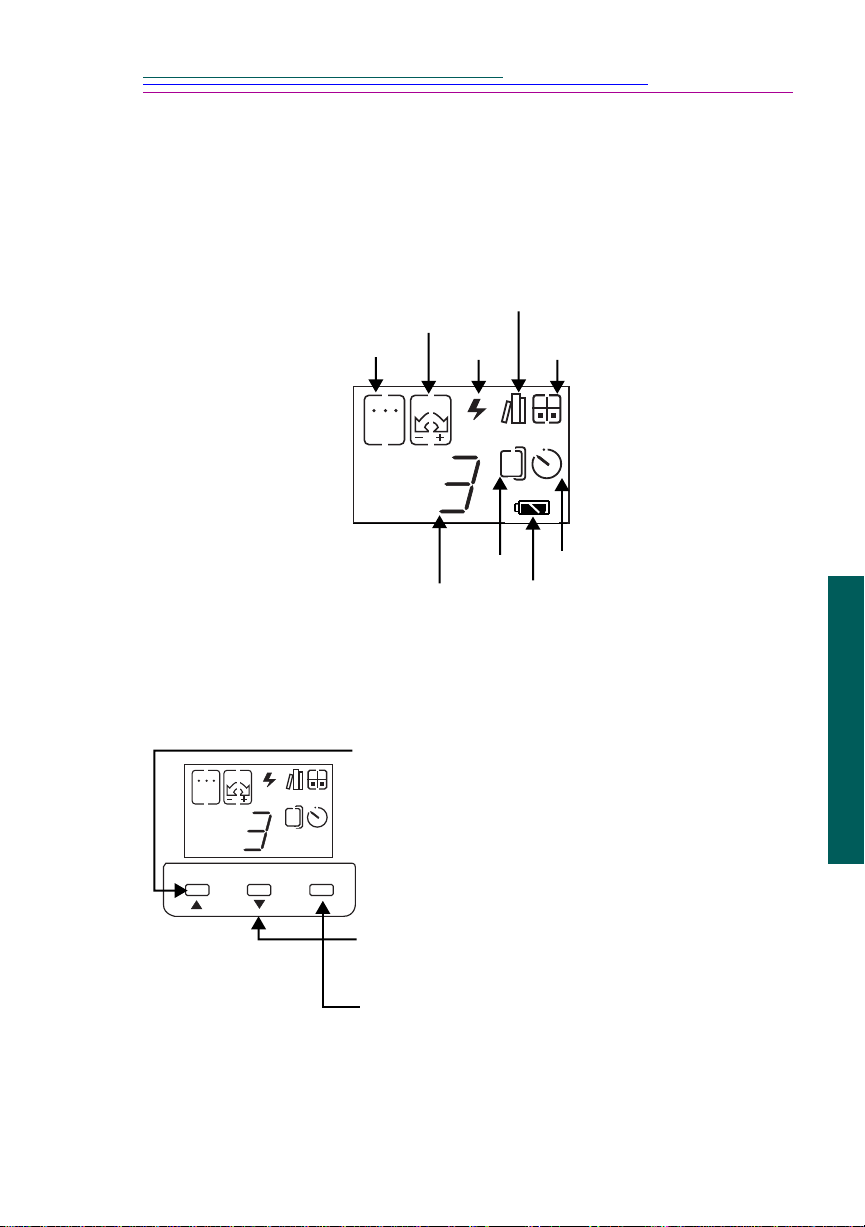
Status Display
The Status Display allows you to view, select, and change the camera settings.
The following sections offer detailed descriptions of Status Display settings.
☞
The DC120 must be turned on to view the Status Display.
Auto or Manual
Exposure
AutoFocus
AEAF
Pictures
Remaining
To select and change camera settings:
Turn the camera on.
1
Press the TAB button to select the icon.
2
AEAF
A
TAB ENTERSELECT
The icon blinks when it is selected.
Album
Flash
A
Card Self-Timer
Status
Picture Quality
Battery
Status
2
Using Camera
Press the SELECT button to scroll through
3
setting options.
Press the ENTER button to select an option.
4
2-3
Page 14

AF
AutoFocus
The DC120 has three focus settings:
AF
Auto Focus with multi-spot—
different locations in the scene and adjusts the focus to the closest
distance. This is the default focus setting.
measures the subject’s distance at three
Auto Focus with single-spot—
AF
measures the subject’s distance at the
center location and adjusts the focus to that distance.
Macro mode—
allows you to manually adjust the focus from 8 to 20
inches using the TelePhoto or Wide buttons. The focus distance (in
inches) is shown in the Status Display.
☞
You may manually change the focus distance to centimeters using
the TWAIN/Plug-in Access software. See Chapter 6 -
Plug-In Access Software
for more detailed information.
TWAIN/
To accurately capture the picture in Macro mode the Preview option
automatically starts when the Shutter button is pressed half-way down.
See “Preview” on page 2-16 for detailed information.
To set and lock in the focus, while taking a picture, press the Shutter button halfway down.The camera can then be moved and the focus distance stays set until
the Shutter button is released.
To change the AutoFocus setting:
Turn the camera on and press the TAB button once.
1
The AutoFocus icon blinks.
Press the SELECT button to scroll through the AutoFocus settings.
2
Press the ENTER button to select the appropriate AutoFocus setting.
3
The AutoFocus icon is changed to the selected AutoFocus setting. If Macro
mode is selected, use the TelePhoto or Wide buttons to set the focus distance.
The selected Focus setting returns to the default setting when the camera is
turned off.
2-4
Page 15

AE
Exposure
The DC120 has four exposure settings:
AE
Auto Exposur e—
exposure setting.
AE
Auto Exposur e-plus (+)—
in half-stop increments up to two full stops. The Status Display indicates
the level of increase when you scroll through the Auto Exposure-plus
settings using the SELECT button.
Use Auto Exposure-plus to lighten your picture.
AE
Auto Exposure-minus (-)—
exposure in half-stop increments up to two full stops. The Status Display
indicates the level of decrease when you scroll through the Auto
Exposure-minus settings using the SELECT button.
Use Auto Exposure-minus to darken your picture.
automatically adjusts the exposure. This is the default
allows you to manually increase the exposure
allows you to manually decrease the
Manual Exposure—
ME
allows you to manually adjust the shutter speed
from 1/500 to 16 seconds. The shutter speed appears in the Status
Display when you scroll through the Manual Exposure options using the
SELECT button.
The following table lists the Manual Exposure shutter speed settings and
the corresponding F-stop.
Shutter speed F-stop (Wide Angle) F-stop (T elePhoto)
1/500 f14.4 f21.4
1/430 f10.9 f16.2
1/380 f8.2 f12.2
1/330 f6.2 f9.2
1/300 f4.7 f6.9
1/250 f3.5 f5.2
1/225 f2.6 f3.9
1/125 to 16 seconds f2.5 f3.8
A longer exposure time may reduce picture clarity. The default lens position is
Wide Angle. All other lens positions are considered TelePhoto settings.
2
Using Camera
2-5
Page 16

☞
The Auto flash setting will not respond when using a Manual Exposure
shutter speed of 1/250 to 1/500 seconds. Set the flash to Fill if a flash is
needed at those shutter speeds.
To change the Exposure setting:
1
Turn the camera on and press the TAB button twice to highlight the Auto
Exposure setting or three times to highlight the Manual Exposure setting.
The Auto Exposure or Manual Exposure icon blinks.
2
Press the SELECT button to scroll through the Auto Exposure plus (+) or
minus (-) settings or to adjust the Manual Exposure setting.
3
Press the ENTER button to select the appropriate exposure setting.
The exposure icon is changed to the selected exposure setting.
The selected Exposure setting returns to the default setting when the camera is
turned off.
2-6
Page 17

Flash
A
The DC120 is equipped with a built-in sensor flash with three settings:
A
Auto—
and the DC120 determines that there is not enough light to take a
picture. This is the default setting.
Fill—
A
when the lighting is poor or when your subject is lit from behind.
Off—
☞
The Auto flash setting will not respond when using a Manual Exposure
shutter speed of 1/250 to 1/500 seconds. Set the flash to Fill if a flash is
needed at those shutter speeds.
The flash has an effective range of approximately:
✔
2.3 to 16.4 ft. (0.7 to 5 m) using the Wide Angle setting
✔
2.3 to 10.8 ft. (0.7 to 3.3 m) using the TelePhoto setting
To change the Flash setting:
1
Turn the camera on and press the TAB button four times.
flash fires automatically whenever the Shutter button is pressed
flash fires every time you press the Shutter button. Use this setting
flash is turned off and will not fire.
2
Using Camera
The Flash icon blinks.
2
Press the SELECT button to scroll through the Flash settings.
3
Press the ENTER button to select the appropriate Flash setting.
The Flash icon is changed to the selected Flash setting.
The selected Flash setting returns to the default setting when the camera is turned
off.
An external flash may be used with an optional Flash Sync cable.
☞
2-7
Page 18

Album
The DC120 allows you to store pictures in one of 8 preset albums on the camera’ s
internal memory or up to 60 albums using an optional Kodak Picture Card.
You can identify which album to store the picture in:
✔ before the picture is taken
or
✔ move it into an album after it is taken using the Change Album feature.
See “Moving Pictures into Albums” on page 2-19 for more details.
Once the picture is taken you may then view pictures by album. See “Reviewing
Your Pictures on the LCD” on page 2-17 for more details.
To change the Album setting:
1 Turn the camera on and press the TAB button five times.
The Album icon and the album number blinks.
2 Press the SELECT button to scroll through the Album settings.
The Album settings ar e displayed on the Status Display and Alb um names are
displayed on the LCD.
3 Press the ENTER button to select the appropriate Album setting.
The LCD turns off. New pictures are now automatically saved to the selected
Album setting.
The Album setting is maintained until another album is selected. This setting
does not change when the camera is turned off.
☞ Names of albums can be personalized using TWAIN/Plug-In Access
software. See Chapter 6 - TWAIN/Plug-in Access Software for more
detailed information.
2-8
Page 19

Card Status
The Card Status icon changes automatically to indicate if there is an optional
Kodak Picture Card inserted in the DC120. You may not select or change this
icon.
No card inserted—pictures are saved to the camera’s memory.
Card inserted—pictures are saved to the card’s memory.
☞ If a Kodak Picture Card is inserted into the camera and a picture is taken,
the center of the icon blinks while the camera is processing the picture.
WARNING: Do not insert or eject a Kodak Picture Card when the Ready light
is blinking, or when using the Move or Erase features. This may
damage your pictures or camera.
2
Using Camera
2-9
Page 20

Picture Quality
The DC120 captures pictures using one of four Picture Quality settings.
Setting Picture Quality Minimum number of
pictures stored
Uncompressed 2 No
Best 7 Yes
Better 12 Yes
Good 20 Yes
Pictures include more detail using the Uncompressed or Best setting, but they
will use more memory than the Better or Good setting.
You can switch freely between the four settings when taking pictures. The
number of pictures the DC120 is able to store will vary accordingly.
To change the Picture Quality setting:
Compression
1 Turn the camera on and press the TAB button six times.
The Picture Quality icon blinks.
2 Press the SELECT button to scroll through the Picture Quality settings.
3 Press the ENTER button to select the appropriate Picture Quality setting.
The Picture Quality icon is changed to the selected setting. The picture
remaining number changes to reflect the new Picture Quality setting.
The Picture Quality setting is maintained until another setting is selected. This
setting does not change when the camera is turned off.
2-10
Page 21

Self-Timer
Selecting the Self-Timer icon creates a 10-second delay between the time you
press the Shutter button and when the picture is taken. This allo ws you to include
yourself in the picture.
Self-Timer Off
Self-Timer On
To activate the Self-Timer:
1 Turn the camera on.
2 Press the TAB button seven times.
The Self-Timer icon blinks.
3 Press the SELECT button.
The Self-Timer icon is highlighted.
4 Press the ENTER button to activate the Self-Timer option
5 Place the camera on a flat, steady surface or tripod.
2
Using Camera
6 Press the Shutter button.
The red Self-Timer light, located on the front of the camera, and the green
Ready Light, located on the back of the camera, turn on and stay lit for 8
seconds. The Self-Timer light flashes for 2 seconds just before the picture is
taken.
The Self-Timer returns to the off setting once the picture is taken.
☞ To stop the Self-Timer before the picture is taken, press the TAB button.
2-11
Page 22

Pictures Remaining
The Pictures Remaining icon changes automatically to indicate the following:
✔ Focus distance of camera, while in Macro mode
✔ Auto Exposure (plus or minus) amount, while it is being changed
✔ Manual Exposure shutter speed, while it is being changed
✔ Album number, while it is being changed
✔ error codes (see Chapter 9 - Troubleshooting for more detailed
information)
✔ remaining number of pictures which can be stored at the current Picture
Quality setting in the camera’s internal memory. If an optional Kodak
Picture Card is inserted this indicates remaining space on the card. To
check the camera’s memory, the card must be removed.
☞ The Pictures Remaining number does not always change when a
picture is taken if the picture content is easily compressed.
✔ when the camera’s or optional Kodak Picture Card’s memory is full the
Status Display indicates FUL and you must erase the existing pictures to
capture additional pictures. To save pictures, transfer them to your
computer before erasing them. For more information on how to erase
pictures, see “Erasing Pictures from the DC120 or Kodak Picture Card”
on page 2-21 or the software chapters on how to move pictures from the
DC120 to your computer.
☞ If the optional Kodak Picture Card is full you will not be able to take
any more pictures. Remove the card and, if the camera memory is
not full, you can take additional pictures.
You may not select or change the Pictures Remaining icon.
2-12
Page 23

Battery Status
The battery power level is indicated on the Status Display using the following
icons.
—Batteries are fully charged.
—Batteries need to be replaced soon. Pictures stored in the camera’s
or Kodak Picture Card’s memory are not lost if the batteries are
depleted.
The DC120 may unexpectedly turn off if the batteries reach a low point and they
will need to be replaced. If the batteries should go dead while pictures are stored
in the camera’s memory or optional Kodak Picture Card, the pictures remain
stored in the camera or card.
The power level of alkaline batteries may drop suddenly when used in extreme
cold. Warming or resting the batteries may restore the batteries to a usable
condition.
The battery icon does not appear on the Status Display when the optional AC
adaptor is used.
For information on installing batteries see “Batteries” on page 2-1.
2-13
2
Using Camera
Page 24
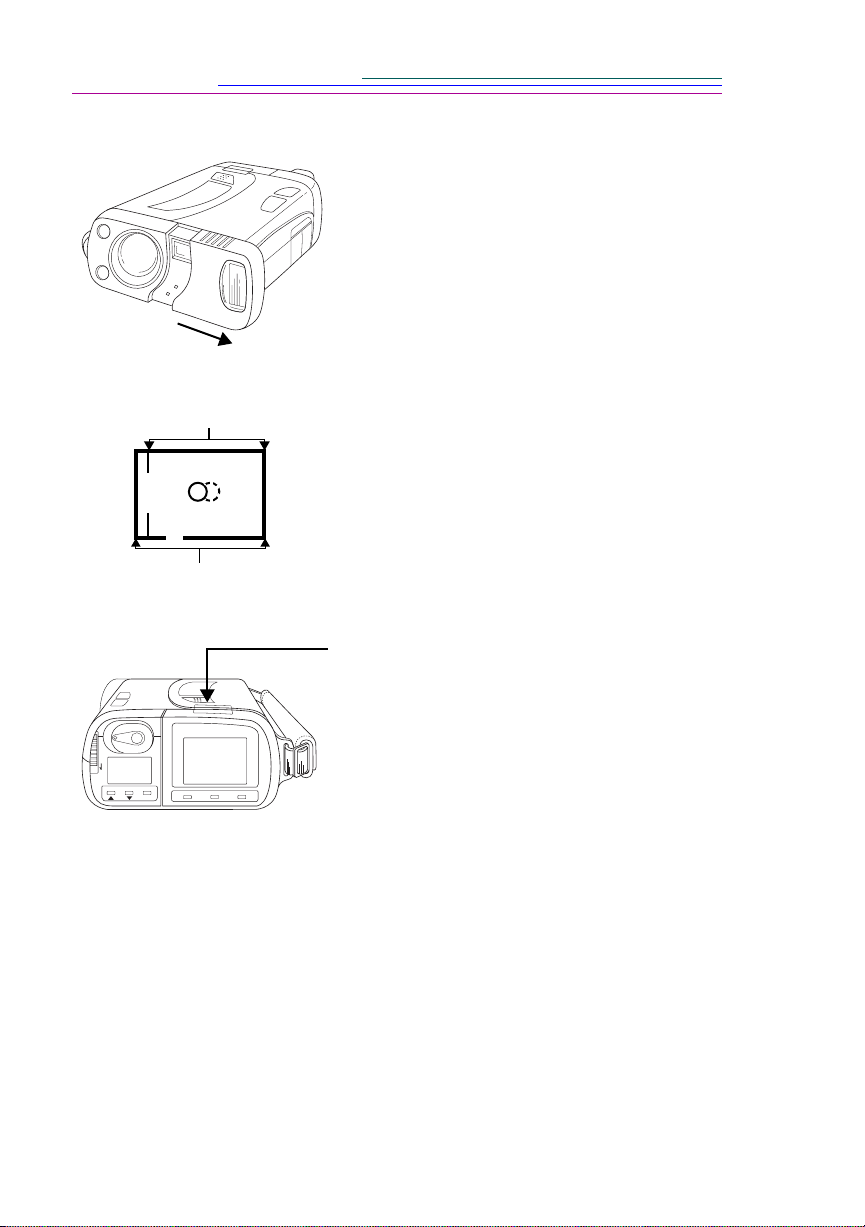
Taking Pictures
1 Turn the camera on.
Camera On
Subject range 2 to 3 ft.
(0.5 to 1 m)
Subject range 3 ft. (1 m)
to infinity
PLAY • STOP
TAB SELECT ENTER
VIEW INFOMOVE • ERASE
2 Center subject using the:
✔ entire viewfinder area and the solid
circle when your subject is more than 3
ft. (1 m) away.
✔ viewfinder’s inside line and broken
circle when your subject is 2 to 3 ft. (0.5
to1 m) away.
✔ LCD Preview display, which is
automatically activated when the focus
is set to Macro mode, and your subject
is less than 20 in. (50 cm) away.
3 Press the Shutter button half-way down to
lock-in the focus on your subject.
The green Ready light stays on to indicate
the focus is locked-in. In Macro mode the
LCD displays a Preview of the picture.
4 Press the Shutter button completely down to
take a picture.
There is a slight delay from when the
Shutter button is fully depressed and when
the picture is captur ed. The pictur e is stored
in the camera’s or optional Kodak Picture
Card’s memory.
The green Ready light and the Pictures Remaining number on the Status Display
blinks rapidly as the DC120 processes the picture. The Pictures Remaining
number on the Status Display is reduced by one.
You do not need to hold the camera still while the green Ready light is on, but
you will not be able to take another picture until it turns off.
2-14
Page 25

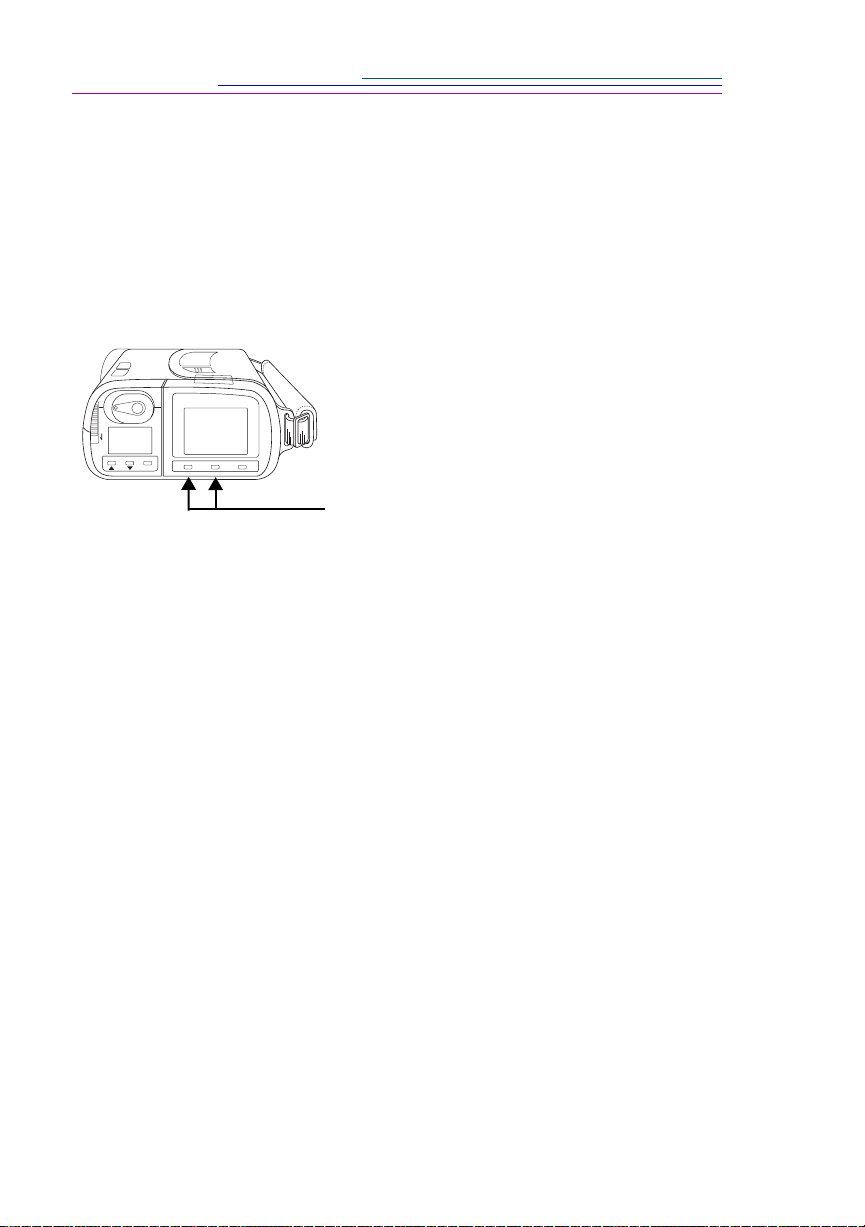
Using the LCD Display
Your DC120 comes equipped with a color Liquid Crystal Display (LCD) that
allows you to quickview, preview, or review your pictures!
Quickview
The Quickview option allows you to view each picture moments after it is taken!
To activate Quickview:
1 Turn the camera on.
Do not activate the PLAY-STOP option.
PLAY • STOP
TAB SELECT ENTER
VIEW INFOMOVE • ERASE
2 Press the VIEW and INFO buttons at the
same time.
2
Using Camera
TURN
PLAY • STOP
TAB SELECT ENTER
QUICKVIEW
OFF
VIEW INFOMOVE • ERASE
ON
The LCD displays a
QUICKVIEW ON/OFF screen.
3 Press the SELECT button to highlight the
appropriate option.
4 Press the ENTER button.
The QUICKVIEW screen turns off.
When you take a picture with Quickview ON, the picture momentarily appears
on the LCD after the picture is taken.
The Quickview setting is maintained until another setting is selected. This setting
does not change when the camera is turned off.
2-15
Page 26
Preview
You may also use the LCD as a viewfinder to preview your subject before taking
a picture.
☞ Using the preview option shortens battery life.
To activate Preview:
1 Turn the camera on.
Do not activate the PLAY-STOP option.
PLAY • STOP
TAB SELECT ENTER
VIEW INFOMOVE • ERASE
2 Press the VIEW and MOVE-ERASE buttons
at the same time.
The LCD momentarily displays a
PREVIEW ON screen.
3 Press and hold the Shutter button half-way
down.
The LCD displays the subject that is viewed
from the viewfinder. The LCD automatically
turns off after several seconds to preserve
battery life. Press the Shutter b utton half-way
down to restart.
To Exit: Press the VIEW and MOVE-ERASE buttons again. The LCD
momentarily displays a PREVIEW OFF screen.
The Preview setting automatically turns off when the camera is turned off.
2-16
Page 27
Reviewing Your Pictures on the LCD
The Play-Stop switch allows you to revie w pre viously tak en pictures on the LCD.
☞ The camera does not have to be turned on to use the PLAY-STOP option.
You cannot take a picture when PLAY-STOP is on.
To activate PLAY-STOP:
Press the PLAY-STOP switch.
The LCD displays the last picture taken.
The picture location icon disappears
PLAY • STOP
TAB SELECT ENTER
Picture location
(camera or card )
1
VIEW INFOMOVE • ERASE
after several seconds.
The Album icon only appears when a
specific album has been selected in the
PLAY OPTIONS screen.
A message appears if no pictures are in
the camera’s or optional Kodak Picture
Card’s memory.
2
Using Camera
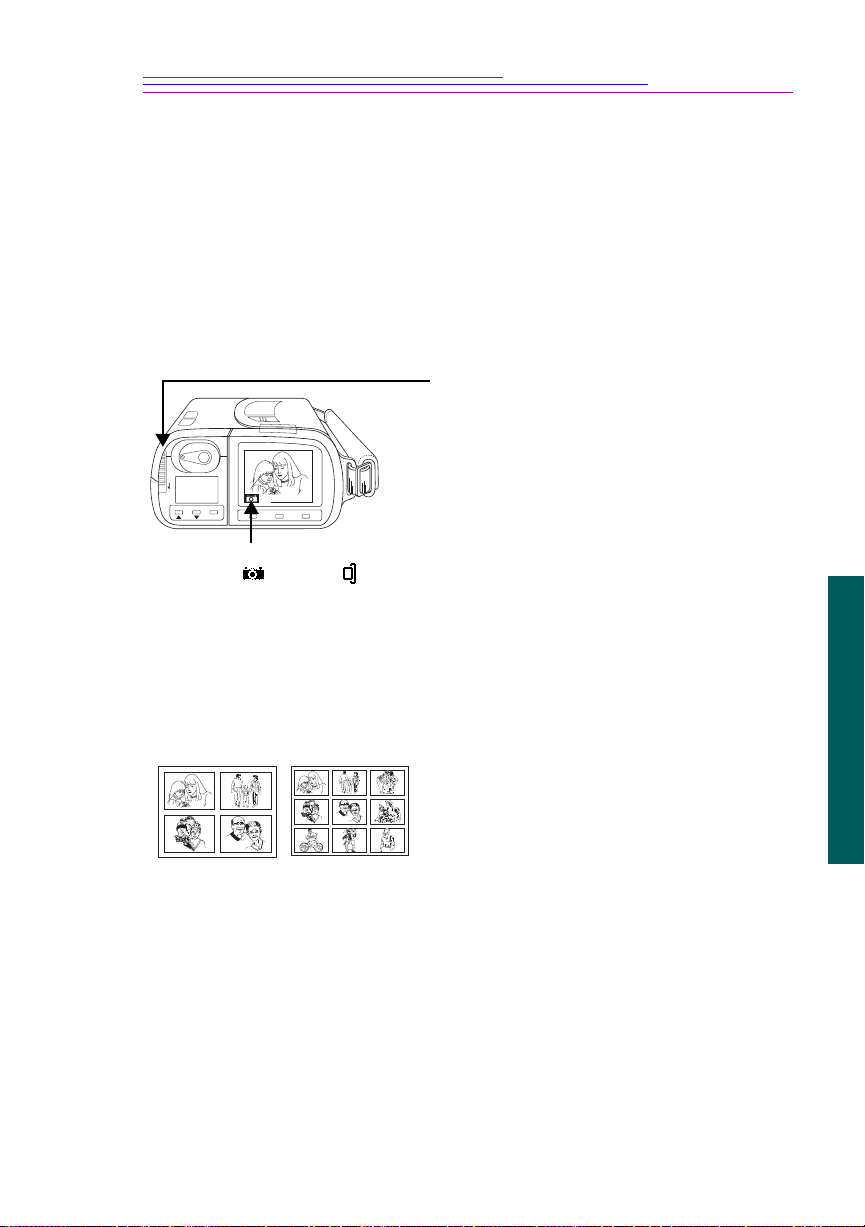
To view multiple pictures:
Press the VIEW button:
✔ once to view four pictures at once
✔ twice to view nine pictures at once
☞ When viewing multiple pictures,
you may view a larger format of a
picture by pressing the SELECT
button until the correct picture is
highlighted by the yellow box,
then press the ENTER button.
☞ Scroll through the pictures by pressing the TelePhoto or Wide Angle
buttons.
2-17
Page 28

To activate the PLAY OPTIONS screen:
PLAY OPTIONS
PLAY • STOP
TAB SELECT ENTER
ALL PICTURES
CAMERA ALBUMS:
ÒNO ALBUMÓ
ALBUM 1
ALBUM 2
VIEW INFOMOVE • ERASE
Press the VIEW button three times.
The PLAY OPTIONS screen allows
you to view pictures:
✔ in both the camera’s and/or
optional Kodak Picture Card’s
memory.
✔ not assigned to an album.
✔ assigned to albums. Selecting
an album limits playback to
pictures in that album.
To select a play option, press the
SELECT or TAB button until the
appropriate option is highlighted,
then press the ENTER button.
To Exit: Press the PLAY-STOP switch again to turn off the LCD.
2-18
Page 29
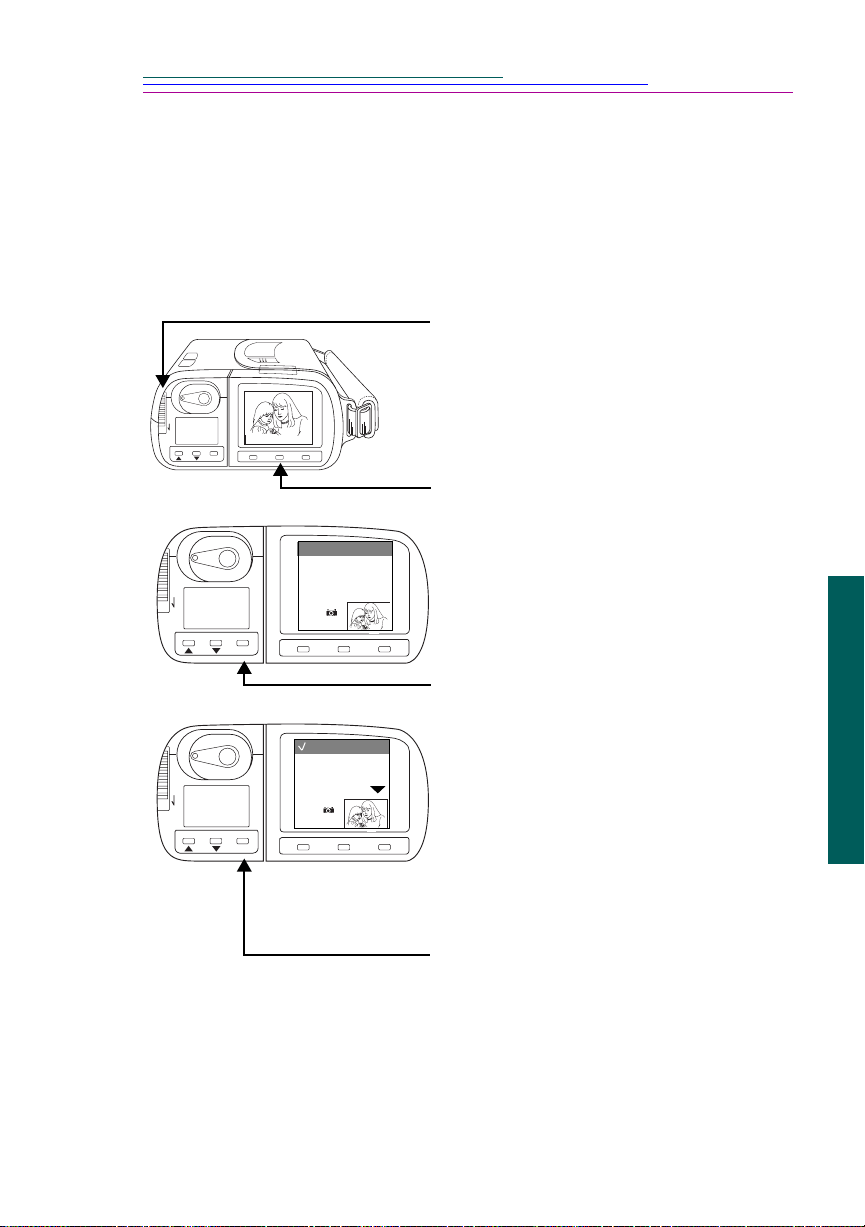
Moving Pictures into Albums
The Change Album feature allows you to move previously taken pictures into
albums on the DC120’s memory or the optional Kodak Picture Card.
☞ The camera does not have to be turned on to use the PLAY-STOP option.
You cannot take a picture when PLAY-STOP is on.
1 Press the PLAY-STOP switch.
The LCD displays the last picture taken.
PLAY • STOP
TAB SELECT ENTER
PLAY • STOP
TAB SELECT ENTER
PLAY • STOP
TAB SELECT ENTER
1
VIEW INFOMOVE • ERASE
CHANGE ALBUM
MOVE TO CARD
ERASE
MOVE PICTURE
MOVE ALL
EXIT
EXIT
12
VIEW INFOMOVE • ERASE
ÒNO ALBUMÓ
ALBUM 1
ALBUM 2
MOVE PICTURE
MOVE ALL
ALBUM 3
EXIT
12
VIEW INFOMOVE • ERASE
☞ Scroll through the pictures by
pressing the TelePhoto or Wide
Angle buttons.
2 Press the MOVE-ERASE button.
The MOVE-ERASE display appears with
CHANGE ALBUM highlighted. The
MOVE TO CARD option is grayed out if
a card is not inserted in the camera.
3 Press the ENTER button.
A display appears with NO ALBUM
highlighted.
4 Press the TAB or SELECT button until
the correct album is highlighted.
☞ If necessary, press the TelePhoto or
Wide Angle buttons until the correct
picture appears in the bottom righthand corner.
5 Press the ENTER button.
2
Using Camera
The picture is moved into the identified
album.
To Exit: Press the SELECT button until the EXIT option is highlighted and then
press the ENTER button. To return to a picture display screen, press the VIEW
button.
2-19
Page 30
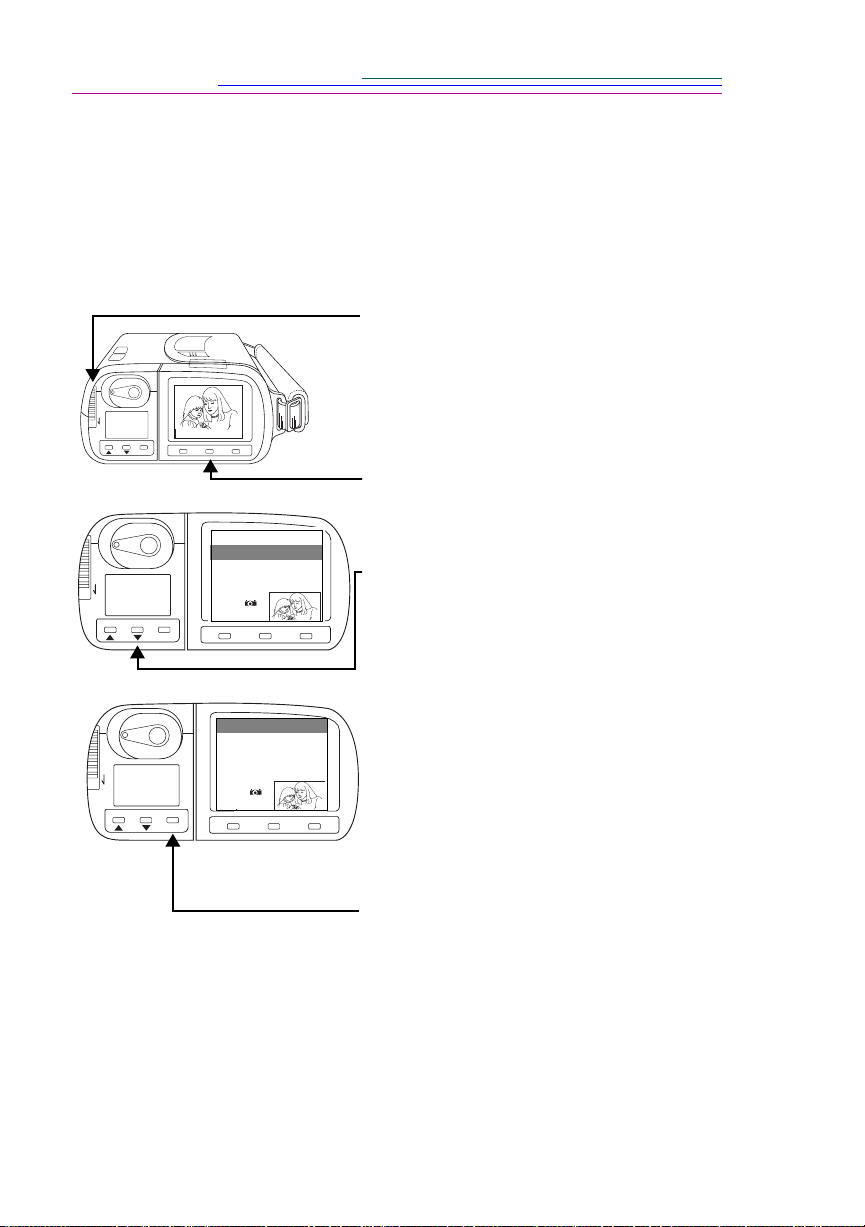
Moving Pictures to a Kodak Picture Card
Selecting the MOVE TO CARD option on the MOVE-ERASE display allows
you to move a single or all pictures from the camera’s memory onto the optional
Kodak Picture Card and erases the picture from the camera’s memory.
☞ A Kodak Picture Card must be inserted to use the MO VE T O CARD option.
1 Press the PLAY-STOP switch.
The LCD displays the last picture taken.
PLAY • STOP
TAB SELECT ENTER
PLAY • STOP
TAB SELECT ENTER
PLAY • STOP
TAB SELECT ENTER
1
VIEW INFOMOVE • ERASE
CHANGE ALBUM
MOVE TO CARD
ERASE
MOVE PICTURE
MOVE ALL
EXIT
EXIT
12
VIEW INFOMOVE • ERASE
MOVE PICTURE
MOVE ALL
EXIT
MOVE PICTURE
MOVE ALL
EXIT
12
VIEW INFOMOVE • ERASE
☞ Scroll through the pictures by
pressing the TelePhoto or Wide
Angle buttons.
2 Press the MOVE-ERASE button.
The MOVE-ERASE display appears with
CHANGE ALBUM highlighted
3 Press the SELECT button until MOVE
TO CARD is highlighted.
4 Press the ENTER button.
A display appears with MOVE PICTURE
highlighted.
5 Press the SELECT button until the
correct move option is highlighted.
☞ The MOVE ALL option moves all
the pictures. Pictures within albums
are moved with their assigned
album.
6 Press the ENTER button.
The MOVING PICTURE display appears
and the card icon blinks on the Status
Display while the picture is moved.
A message appears if the move could not be completed because all the pictures
would not fit on the optional Kodak Picture Card.
To Exit: Press SELECT until the EXIT option is highlighted and then press the
ENTER button. To return to a picture display screen, press the VIEW button.
2-20
Page 31

Erasing Pictures from the DC120 or Kodak Picture Card
The ERASE display allows you to erase individual or all pictures from the
DC120’s memory or the optional Kodak Picture Card.
☞ The camera does not have to be turned on to use the PLAY-STOP option.
You cannot take a picture when PLAY-STOP is on.
1 Press the PLAY-STOP switch.
The LCD displays the last picture taken.
2 Press the MOVE-ERASE button.
PLAY • STOP
TAB SELECT ENTER
1
VIEW INFOMOVE • ERASE
The MOVE-ERASE display appears with
CHANGE ALBUM highlighted.
3 Press the SELECT button until ERASE is
PLAY • STOP
TAB SELECT ENTER
CHANGE ALBUM
MOVE TO CARD
ERASE
MOVE PICTURE
MOVE ALL
EXIT
EXIT
12
VIEW INFOMOVE • ERASE
highlighted.
4 Press the ENTER button.
A display appears with ERASE
PICTURE highlighted.
5 Press the SELECT button until the
correct erase option is highlighted,
ERASE PICTURE
ERASE CARD
ERASE CAMERA
PLAY • STOP
TAB SELECT ENTER
MOVE PICTURE
MOVE ALL
EXIT
EXIT
12
VIEW INFOMOVE • ERASE
If erasing the entire camera or card, a display appears asking you to verify that all
the pictures should be erased. Press the SELECT button until the appropriate
response is highlighted, then press the ENTER button.
To Exit: Press the SELECT button until the EXIT option is highlighted and then
press the ENTER button.To return to a picture display screen, press the VIEW
button.
6 Press the ENTER button.
☞ If necessary, press the TelePhoto or
Wide Angle buttons until the correct
picture appears in the bottom righthand corner.
The ERASING PICTURE display
appears while the picture is erased.
Empty albums are also erased.
2
Using Camera
2-21
Page 32

INFO
Selecting the INFO button displays information about the currently selected
picture on the LCD.
☞ The camera does not have to be turned on to use the PLAY-STOP option.
You cannot take a picture when PLAY-STOP is on.
1 Press the PLAY-STOP switch.
The LCD displays the last picture taken.
PLAY • STOP
TAB SELECT ENTER
1
VIEW INFOMOVE • ERASE
☞ Scroll through the pictures by pressing
the TelePhoto or Wide Angle buttons.
2 Press the INFO button.
The INFO display appears.
ALBUM 1
File name
Location of picture
POOO254
01/01/97 12:15 AM
MOVE PICTURE
MOVE ALL
EXIT
12
To Exit: Press the INFO or VIEW button to return to the PLAY-STOP LCD
screen. Press the MOVE-ERASE button to open the MOVE-ERASE screen.
Album name
Picture date and time
Currently selected picture
2-22
Page 33

Adjusting LCD Brightness
LCD Screen Up
PLAY • STOP
TAB SELECT ENTER
ALKALINE, LITHIUM, Ni-Cd.
CARD
EJECT
AA
LCD brightness wheel
Automatic LCD Turn Off
You may adjust the brightness of the LCD by
turning the brightness wheel located at the
bottom of the DC120.
To save battery power, the LCD display
automatically turns off after 60 seconds.
2
PLAY • STOP
TAB SELECT ENTER
VIEW INFOMOVE • ERASE
Play -Stop switch
To turn the LCD on again, press the PLAYSTOP switch.
☞ When using an AC adaptor, the LCD
display automatically turns off after 20
minutes.
Using Camera
2-23
Page 34

Zoom
The DC120 comes equipped with a Wide Angle (38 mm) to TelePhoto
(39 to 114 mm) lens
TelePhoto button
Wide button
.
The subject will appear closer
or farther away when you look
through the viewfinder and
press the appropriate button.
PLAY • STOP
TAB SELECT ENTER
VIEW INFOMOVE • ERASE
☞ The TelePhoto or W ide Angle
buttons are also used to scroll
through the pictures
displayed on the LCD.
The camera’s default lens position is Wide Angle. All other lens positions are
considered T elePhoto settings.
Automatic Power Off
If you are not using an AC Power Adaptor and your DC120 is idle for
approximately 60 seconds, it automatically turns off. To turn the camera on
again, press any button on the camera. You may change the power off time using
the TWAIN/Plug-In Access Software. See Chapter 6 - TWAIN/Plug-In Access
Software for more information.
2-24
Page 35

Optional Accessories
The following optional DC120 accessories are av ailable from your K odak dealer.
✔ Universal AC Adaptor, 8 VDC supply for use with Kodak digital cameras
✔ Kodak Digital Science Picture Card
✔ Flash Sync Cable for Kodak Digital Science DC120 Zoom Digital
Camera
AC Adaptor
An AC adaptor allows you to connect your DC120 to a standard electrical outlet.
This is especially useful when you are transferring pictures into your computer.
The adaptor powers the camera, but does not charge the batteries.
WARNING: Only use the AC adaptor designed for the DC120. Use of any
other adaptor can cause camera failure, fire, electric shock, or
injury.
2
DC 7V-8V
Using Camera
Insert the AC adaptor into the AC power adaptor
connection on the side of your DC120.
2-25
Page 36

Kodak Picture Card
You can take and store more pictures on the DC120 by purchasing a removable
ATA compatible Kodak Picture Card. The card meets all CompactFlash
association requirements. The 2 MB memory card can hold approximately 13
additional pictures at the better Picture Quality setting.
Album names longer then eight characters are shortened when viewed through a
DOS file system. For example, an album named Winter 1 is viewed as Winte ~1.
☞ Memory cards containing compression or stacker software do not work
with the camera until they are reformatted. Refer to the card’ s user’ s manual
for reformatting information.
WARNING: Do not insert or eject a Kodak Picture Card when the Ready light
is blinking, or when using the Move or Erase features. This may
damage your pictures or camera.
To insert a Kodak Picture Card:
2-26
PLAY • STOP
TAB SELECT ENTER
PLAY • STOP
TAB SELECT ENTER
Card
LCD up
ALKALINE, LITHIUM, Ni-Cd.
CARD
Card door
ALKALINE, LITHIUM, Ni-Cd.
EJECT
1 Flip-up the LCD screen.
2 Open the card door.
AA
3 Hold the Kodak Picture Card face up,
with the connecting end pointed at the
camera.
AA
4 Push the card all of the way into the card
slot.
5 Close the card door.
6 Flip-down the LCD screen.
Page 37

To remove a Kodak Picture Card
LCD up
PLAY • STOP
TAB SELECT ENTER
EJECT button
PLAY • STOP
TAB SELECT ENTER
ALKALINE, LITHIUM, Ni-Cd.
CARD
EJECT
ALKALINE, LITHIUM, Ni-Cd.
AA
Card door
AA
1 Flip-up the LCD screen.
2 Open the card door.
3 Press the EJECT button.
The card partially slides out of the slot.
4 Take hold of the card and carefully
remove it from the slot.
5 Close the card door.
6 Flip-down the LCD screen.
2
Using Camera
2-27
Page 38

General Maintenance and Safety
✔ To keep from damaging your DC120, avoid exposing it to moisture and
extreme temperatures.
✔ Clean the outside of the DC120 by wiping it with a clean, dry cloth. Nev er
use harsh or abrasive cleaners or organic solv ents on the camera or an y of
its parts.
✔ Never disassemble or touch the inside of the DC120. This could result in
electrical shock.
✔ If you notice smoke or a strange smell coming from the DC120,
immediately turn the camera off, wait a few minutes until the DC120
cools, then remove the batteries.
Cleaning the Lens
1 Blow gently on the lens to remove dust and dirt.
2 Moisten the lens by breathing lightly on it.
3 Wipe the lens gently with a soft, lint-free cloth or an untreated lens-cleaning
tissue.
☞ Do not use cleaning solutions unless they are designed specifically for
camera lenses. Do not wipe the camera lens with chemically treated
eyeglass lens tissue as it may scratch the lens.
2-28
Page 39

DC120 SpeciÞcations
Picture Resolution—1.2 million pixels Lens—autofocus optical quality glass
CCD Resolution—836,400 pixels Focus Distance—2.3 ft. (0.7 m) to
infinity
Storage—2 MB internal 3X Zoom Lens—38 to 114 mm
Equivalent for 35mm camera
Actual focal length is 7 to 21mm
Color—24-bit, millions of colors Aperture—wide: f/2.5 to f/16
tele: f3.8 to f24
Sensitivity—ASA/ISO rating
equivalent to 160
Flash—effective range
wide: 2.3 to 16.4 ft. (0.7 to 5 m)
tele: 2.3 to 10.8 ft. (0.7 to 3.3 m)
Tripod Socket—1/4 in. Weight—1.15 lb. (520 g)
Power— 4 AA batteries Dimensions—5.7 X 4.3 X 2.2 in.
Close Up—0.7 to 1.6 ft. (0.2 to 0.5 m)
Shutter Speed—1/500 to 16 sec
Viewfinder—Zooming Optical
without batteries
(146 X 108 X 55 mm)
2
Using Camera
2-29
Page 40

Page 41

Using DC120 with Your Computer
Connecting the DC120 to Your Computer
1 Plug one end of the serial cable into the printer
or modem port (on a Macintosh) or a COM port
(on a PC) on the back of your computer.
Macintosh
☞ If your computer has a 25-pin port, you need to
purchase a 9-pin adapter and attach it to the
port before attaching the serial cable to the
computer.
PC
2 Pull down the rubber tab on the camera.
DC 7V-8V
3 Plug the other end of the serial cable into the
camera’s serial port.
4 Turn on the camera.
If you have already installed the software included with the DC120, you are no w
ready to transfer the pictures from the camera to your computer using the
appropriate software packages.
Refer to the appropriate chapters of this user’s guide, or the software’s quick
setup guides in the back cover of this user’s guide, for more information on the
software packages.
3-1
3
Computer Setup
Page 42

Checking Serial Port Availability
If your computer cannot communicate with the DC120, you may need to adjust
the serial port configuration on the computer. To verify that there are no serial
port conflicts with other items on your computer, refer to the serial
communication or corresponding section of your computer’s or operating
system’s (Windows, Macintosh) user’s guide.
☞ Additional technical information is available in the Technical Tips
Trouble.text document located in the DC120 folder.
Windows
If your computer does not recognize that the DC120 is attached and turned on,
and you are running Windows 95 or 3.1, you may need to adjust the serial port
and speed settings.
Each software included on the DC120 CD has an option to adjust the serial port
and speed. Refer to the software chapters for further details or complete the
following steps to adjust the settings using the Kodak Picture Transfer
Application Software (Picture Transfer).
1 Connect the DC120 to your computer and turn it on.
2 Open Picture Transfer software.
3 Click the Preferences button.
4 Select DC120 from the Camera Type field.
5 Select COM1 (or the port you have connected the camera to) from the Port
field.
6 Adjust Speed up or down by one setting.
7 Click Accept.
8 Click the Get Selected Pictures from the Camera button.
☞ If the software does not recognize the DC120, continue to adjust the serial
port speed on COM1, and the other COM ports until it is recognized.
Once your computer can communicate with your camera, gradually incr ease
speed to optimize transfer picture time.
3-2
Page 43

Macintosh
If running software on a Macintosh computer or PowerBook, you may need to:
✔ turn off or disable AppleTalk, Express Modem, GlobalFax, and any
loaded Speed RAM Doublers.
✔ specify an external or normal modem.
✔ run Extensions Manager on minimal if running Systems 7.5 or higher.
Monitor Adjustment
Your monitor display settings may need to be adjusted to view pictures from the
DC120 camera.
Windows 95
1 Double-click on the My Computer icon.
2 Double-click on the Control Panel icon.
3 Double-click on the Display icon and click on the Settings tab.
4 From the Color Palette field, select the highest available setting {256, High
(16-bit), or True (32-bit) color} and click the OK button.
Windows 3.1
Refer to the user’s guide of your computer’s video driver card or its manufacturer.
Macintosh
From the Apple icon, select the Control Panel folder.
1
2 Double-click on the Monitors icon.
3 From the Settings of Selected Monitor field, select the highest available color
setting (256, Thousands, or Millions).
☞ To display pictures from the DC120, the minimum recommended setting is
256 colors. If you are not satisfied with the quality of the picture displayed
after adjusting the monitor and/or you do not have a setting higher than 256,
you may wish to upgrade your video display card and/or monitor. Contact
your computer dealer for more information.
3-3
3
Computer Setup
Page 44

Printing
You may notice that the colors on your computer screen do not always match
those in your documents or prints. This is because monitors and printers use
different color systems.
Tips
You may be able to achieve more predictable results in your printed
documents by:
✔ improving the quality of your paper. Copier paper may not offer the same
results as coated paper or paper made especially for ink jet printers.
✔ adjusting your printer software settings.
✔ using fresh ink cartridges. Do not use ink cartridges beyond their life
expectancy.
☞ If you need extreme precision in matching printed output to your computer
screen, you may want to consider purchasing a calibration system. The aim
of a calibration system is to match, as close as possible, the printed image to
the image on your computer screen. Please consult your local computer
dealer for more information.
Remember these few tips when it comes time to print your document.
✔ color printing takes more time.
✔ the more complex your document is increases the printing and drying
time.
✔ color printing is more memory intensive than black and white. If your
computer gives you an insufficient memory message, you may need to
close some applications, change some settings, or add additional memory.
✔ color prints may not photocopy as clearly as black and white. If you plan
to photocopy documents, you may consider printing the document in
gray scale. This setting is usually changed from the print menu.
✔ resizing the picture to a smaller size or printing the picture on glossy
paper may increase the quality of the print.
To improve the quality of your prints, you may want to print your pictures on
Kodak Inkjet Snapshot Paper. Snapshot Paper is made to work with most inkjet
printers to give you clearer, crisper, and more detailed images on your prints.
3-4
Page 45

Installation
4
Software
Kodak Digital Science DC120 Zoom Digital Camera Installation Software
(Installation software) quickly and easily installs the software included on the
DC120 CD to your computer. Customize your installation using one of the
following install options:
✔ Typical or Easy—installs all software programs included on the CD.
✔ Custom—installs only the software that you select from the CD.
Software included on the CD
✔ PictureWorks PhotoEnhancer—fix, modify, or enhance your pictures
using PhotoEnhancer software. Use Kodak DC120 Digital Access
software to transfer pictures into PhotoEnhancer.
✔ Kodak DC120 Digital Access—transfer pictures from your camera or
computer to TWAIN-compliant or Plug-In compatible software
applications such as PhotoEnhancer or Adobe PhotoShop.
✔ Kodak Picture Transfer Application—download pictures quickly and
easily from the camera or your computer in one of several standard file
formats.
✔ Kodak DC120 Mounter—view and copy DC120 picture files (.KDC
format) to your computer. Mounter software treats the DC120 and
optional Kodak Picture Card as a read-only disk drive. You must have
Windows 95 to use this application.
Installation
☞ You will not be able to work simultaneously in Digital Access (TWAIN),
Picture Transfer Application, or Mounter software.
4-1
Page 46

System Requirements
Windows
Personal computer with 486/33MHz microprocessor minimum or
✔
Pentium Processor
✔ Windows 3.1 software or later, MS-DOS 6.0 or later, or Microsoft
Windows 95
✔ 8 MB or more of RAM available, 12 MB recommended
✔ available serial port and CD-ROM drive
Macintosh
Power PC, Centris, Quadra, Performa, or other systems with a 68020
✔
processor or better
✔ System 7.1 or later
✔ 8 MB or more of RAM available, 16 MB recommended
✔ available serial port and CD-ROM drive
4-2
Page 47

Installing the Software
While the Installation software is automatically loading your software, take a few
minutes to fill out and send in the DC120 product registration card. This allows
you to receive information regarding software updates and registers all the
products included with the DC120 camera.
Windows
Close all other applications before starting the Installation software.
1 Place the DC120 CD into your CD-ROM drive.
☞ If Auto Run is turned on in Windows 95, the first install window
automatically appears. Proceed to step 4.
2 Do one of the following:
✔ Windows 3.1—choose RUN from the FILE pulldown menu.
✔ Windows 95—choose RUN from the START menu.
3 Type the path to the drive that contains the CD and then the word “setup”.
For example: d:\setup
The Kodak DC120 Software
Install window appears.
4
Installation
4 Select your language.
The W elcome window
appears.
5 Click the Next button.
4-3
Page 48

6 Read the agreement and click
the Yes button to accept the
software license agreement.
☞ If you do not accept the
license you will not be
able to install the
software.
7 Select installation option:
✔ Typical—installs all
software programs
included on the CD.
✔ Custom—installs only
the software that you
select from the CD.
☞ If you select the
Custom option, a
software selection
window appears and
you are prompted to
select which software
should be installed.
4-4
8 Verify the name of the
directory where the software
should be installed on your
computer and click the Next
button.
☞ If necessary, change the
name of the directory
by clicking the Browse
button.
Page 49

4
9 Verify the name of the
Program Folder and click the
Next button.
☞ If necessary, type a ne w
folder name or select
from the Existing
Folders list.
A progress screen appears
while the software is
installed. It takes
approximately two minutes to
install all the software on
most systems.
10Select the restart option and
click the Finish button.
☞ If you have installed
the Kodak DC120
Mounter software you
must restart your
computer.
Installation
You are now ready to run the newly installed software. See the following chapters
for detailed instructions on the software.
When using DC120 software, if your computer does not recognize that the
camera is attached and turned on, you may need to adjust the serial port and
speed settings. Use the software’s Preferences or Properties window to adjust the
camera communications settings.
4-5
Page 50

Macintosh
Close all other applications before starting the Installation software.
1 Place the DC120 CD into
your CD-ROM drive.
The DC120 Software
Installer icon appears on
your desktop.
2 Double-click on the DC120
Software Installer icon.
The DC120 Installation
Software window appears.
3 Click the Continue button.
The Software License
Agreement appears.
4-6
4 Read the agreement and click
the Accept button to accept
the software license
agreement.
☞ If you do not accept the
license you will not be
able to install the
software.
Page 51

5 Select installation option:
✔ Easy—installs all
software programs
included on the CD.
✔ Custom—installs only
the software that you
select from the CD.
☞ If you select the
Custom option, a
software selection
window appears and
you are prompted to
select which software
should be installed.
6 Verify the name of the
directory where the software
should be installed on your
computer.
☞ If necessary, change the
name of the folder by
clicking on the arrow in
the Install Location
box.
4
Installation
7 Click the Install button.
A progress screen
momentarily appears. It
takes approximately two
minutes to install the
software on most systems.
8 Click the Quit button.
You are now ready to run the newly installed software by selecting the icons from
your computer’s Program Folder. See the following chapters for detailed
instructions on the software.
4-7
Page 52

Page 53

Picture Transfer Application
Kodak Picture Transfer Application (Picture Transfer) software provides an easy
way to manage pictures that are stored in the memory of your DC120 camera or
optional Kodak Picture Card using your computer. You can do the following with
Picture Transfer software:
✔ transfer pictures from the memory of the camera or the optional Kodak
Picture Card to your computer
✔ move pictures between folders on your computer
✔ convert pictures to other file formats
Picture Transfer software for Windows and Macintosh uses the same screens
except for minor differences specific to the platform. The screens displayed in
this chapter are from Picture Transfer software for Windows 95.
Installation
5
Picture Transfer
If you selected the Typical or Easy installation option when you installed the
software from the DC120 CD (see Chapter 4 - Installer Software), Picture
Transfer software will already be installed. If it is not installed, complete the
installation instructions in Chapter 4 and select the Picture Transfer option.
Camera Communication Settings
If your computer does not recognize that the camera is attached and turned on,
you may need to adjust the serial port and speed settings. See “Preferences
Settings” on page 5- 6 or Chapter 3 - Using DC120 with Your Computer for
details.
5-1
Page 54

Starting Picture Transfer Application
Windows 95 - from the Start menu select Programs, open the KODAK DC120
group and select the Picture Transfer Software.
Windows 3.1 - from the Program Manager, double-click on the Kodak Picture
Transfer icon.
Macintosh - from the KOD AK DC120 folder , double-click on the Kodak Picture
Transfer icon.
Overview
The Picture Transfer main windo w lets you select Preferences for your computer ,
identify picture file destination, and create image files in any of the supported
formats:
Select button to
transfer pictures
from your camera,
card, or computer
Select where you
want to store pictures
Select name
for picture files
Select Preferences to change the
serial port or speed, camera type,
file conversion, and notification
method.
5-2
Select to transfer
pictures
Page 55

Transferring Pictures from DC120
You have the option of transferring all the pictures in the camera or transferring
individual pictures from your camera to the computer.
When using Picture Transfer software, you cannot tak e pictures with the camera.
The camera needs to be connected to your computer and turned on to access your
picture files on the camera.The Status Display is replaced by the following
screen
1 Click the Get Selected
Pictures from the Camera
button.
☞ You may also select:
✔ Get all Pictures
from the Camera
✔ Get Selected
Pictures from My
Computer
The Picture Selection
window appears.
5
Picture Transfer
2 Select the folder where the
pictures reside:
✔ memory of your camera
✔ optional Kodak Picture
Card
☞ Check Show thumbnail
to preview the picture
file.
5-3
Page 56

3 Select the picture file from
the File Selection area.
The picture file is
highlighted. If Show
thumbnail is checked a
preview of the picture
appears.
☞ You can also select
albums which may
contain multiple files.
4 Click the Add to List button.
The picture file is listed in the
transfer window.
☞ You may also select:
✔ Remove from List
to remove a
highlighted picture
file from the Picture
Transfer List
✔ Remove All from
List to remove all
the picture files
from the Picture
Transfer List
5-4
5 Click the OK button.
The main Picture Transfer
window appears.
Page 57

6 Verify the name of the folder
where picture files should be
transferred.
☞ Click the Browse
button to select or
create a new folder on
your computer.
7 Select the file naming format
by clicking one of the
following:
✔ Use Existing Picture
Names
✔ Name Template and enter
a new file name. The
appropriate file extension
and picture number will
be automatically added to
the file name.
☞ If necessary, change the
file conversion format
using the Preferences
window. See
“Preferences Settings”
on page 5- 6 for more
information.
5
Picture Transfer
8 Click the Transfer button.
The Progress window
appears.
Picture Transfer software allows you to work in other applications while the
pictures are transferred.You are notified of transfer progress, completion, or error
messages according to the options selected on the Preferences window.
5-5
Page 58

Preferences Settings
The Preferences window is used to set camera communications, serial port and
speed, and file conversion information. It also allows you to customize progress
window options and notification options.
To change Preferences settings:
1 Click the Preferences button.
The Preferences window
appears.
2 Select appropriate options.
5-6
☞ See following field
descriptions for detailed
information on options.
3 Click the Accept button.
The Picture Transfer main
window appears.
Page 59

Field Descriptions
Copy/Move—check “Delete Pictures from Source after Transfer” to erase the
original pictures from the camera or computer after they are transferred.
Communication—adjust camera type, port, and port speed if your computer
does not recognize that the camera is attached and turned on.
☞ To decrease the amount of time it tak es to transfer a picture file, increase the
port speed. The port speed of 230400 is only available on PCs or Macintosh
PowerPCs with high-speed serial cards.
File Conversion—select the file format from the File type list. You may select:
✔ Native KDC format
✔ BMP (Bitmap, Windows only)
✔ TIFF (Tagged Image File Format)
✔ JPEG (Joint Photographic Experts Group)
✔ FPX (FlashPix, Windows 95 and Macintosh PowerPC only)
✔ PICT (Macintosh only)
☞ If you select JPEG or FPX select a Quality setting for the picture. The
final Quality setting you select for JPEG or FPX is based on the
camera’s Picture Quality setting when the picture was taken.
Progress—check an option for displaying the progress transfer dialog box.
You can select:
✔ Show Progress Window to display transfer progress messages for the
entire time the pictures are being transferred. If this option is not checked,
the progress messages dialog box is not shown.
✔ Always on Top (Windows only) to display transfer progress messages as
the top window for the entire time the pictures are being transferred.
Notification method—select how you want to be notified when the transfer is
complete or an error occurs.
You can select:
✔ Pop-up Dialog
✔ Animated Icon
✔ Notify When Complete displays the Transfer Complete dialog box after
all the pictures have been transferred to your computer.
✔ Alert Sound produces a sound when the transfer is complete or if an error
occurs.
5
Picture Transfer
5-7
Page 60

Page 61

TWAIN &
Plug-in Access
Software
Kodak DC120 Digital Access Software (Access software), (TWAIN Acquire
software for Windows and the Plug-in software for Macintosh), is a special
industry-standard “language” that allows the DC120 camera to transfer pictures
from your camera directly to your favorite TWAIN compliant or Plug-in
compatible software, such as Adobe Photoshop.
No matter which software you choose, Access software allows you to preview,
rotate, or enhance your pictures before they are transferred. It also allows you to
adjust the camera’s picture quality, flash, sleep timeout and self-timer delay
settings, and erase pictures from the DC120 while it is connected to your
computer.
Access software for Windows and Macintosh uses the same screens except for
minor differences specific to the platform. The screens displayed in this chapter
are from Access software for Windows 95.
6
TWAIN/Plug-in
Installation
If you selected the Typical or Easy installation option when you installed the
software from the DC120 CD (see Chapter 4 - Installer Software), Access
software will already be installed. If it is not installed, complete the installation
instructions in Chapter 4 and select the Access software option.
Camera Communication Settings
If your computer does not recognize that the camera is attached and turned on,
you may need to adjust the serial port and speed settings. See “Changing
Connection Setup” on page 6- 9 or Chapter 3 - Using DC120 with Your
Computer for details.
6-1
Page 62

Starting Access Software
Windows
1 Connect the DC120 camera to your computer.
See the “Connecting the DC120 to Your Computer” section in Chapter 3 -
Using DC120 with Your Computer.
2 Open a TWAIN compliant software (for example, PhotoEnhancer software).
3 Pull down the File menu and select TWAIN Source.
4 Select Kodak DC120 Digital Access.
5 Pull down the File menu and select TWAIN Acquire.
The Access software main window appears.
Macintosh
1 Connect the DC120 camera to your computer.
See the “Connecting the DC120 to Your Computer” section in Chapter 3 -
Using DC120 with Your Computer.
2 Open a Plug-in compatible software (for example, PhotoEnhancer software).
3 Pull down the File menu and select Acquire.
4 Select Kodak DC120 Digital Access.
The Access software main window appears.
6-2
Page 63

Overview
The following is the main window of Access software. More detailed information
is offered in the following sections.
Take a picture with
the camera connected
to your computer
Select appropriate button to
retrieve pictures from your
camera or computer
Select appropriate
button to rotate,
enhance, or
transfer pictures
Select Preferences to change
serial port or speed, display
set up, or transfer resolution
Picture viewing area
6
TWAIN/Plug-in
Select Camera Functions to
view or adjust camera settings,
create albums, and
erase pictures
6-3
Page 64

Transferring Pictures from DC120
☞ The DC120 needs to be turned on and connected to your computer to access
pictures from the camera.
1 Click the Get Pictures from
Camera button.
☞ You may also select:
✔ Get Pictures from
Computer to
transfer picture
from a .KDC file
✔ Take a Picture to
use the camera
when it is attached
to the computer
The Get Camera Pictures
window appears.
2 Select the folder where the
pictures reside:
✔ memory of your camera
6-4
✔ optional Kodak Picture
Card
☞ Check Show
Thumbnail to preview
the picture file.
Page 65

3 Select the picture file from
the File Selection area.
The picture file is
highlighted. If Show
Thumbnail is checked a
preview of the picture
appears.
☞ To select multiple files
at one time, hold down
the control or shift key
and click on the picture
files.
4 Click the Add to List button.
The picture file is listed in the
transfer window.
☞ You may also select:
✔ Remove from List
to remove a
highlighted picture
file from the Picture
Transfer List
✔ Remove All from
List to remove all
the picture files
from the Picture
Transfer List
6
TWAIN/Plug-in
5 Click the OK button.
A progress window
momentarily appears.
6-5
Page 66

The main Access software
window reappears with your
picture. If you selected
multiple pictures, thumbnails
of the pictures are displayed.
6 If necessary, select the Rotate
or Enhance buttons to adjust
the picture.
See “Rotating Your Picture”
on page 6- 7 and“Enhancing
Your Picture” on page 6- 8
for more information.
☞ To preview a picture
click the Preview
button.
7 Click the Transfer Pictures
button.
A window appears showing
the progress and picture(s)
being transferred.
6-6
8 Click the Close button to exit
Access software.
The open TWAIN compliant
or Plug-in compatible
software window displays
your picture.
Page 67

Picture Information
The Picture Info button displays information about the picture and camera
settings when the picture was taken. You may not select or change an y settings on
the window.
To display picture information:
Click the Picture Info button.
The Picture Information window appears and displays:
✔ Picture file and Album name
✔ Quality setting
✔ Flash information
✔ Size (in bytes) and
dimensions (in pixels)
✔ Date and time picture was
taken
✔ Aperture information
✔ Exposure time, in seconds
6
TWAIN/Plug-in
Rotating Your Picture
The Rotate button allows you to rotate your picture 90 to 180 degrees.
To rotate your picture:
1 Click the Rotate button.
The Rotate window appears.
2 Click the appropriate rotate option.
3 Click the Apply button.
The rotate option is applied to your pictur e. If
necessary, select another rotate option. until
your picture is correct.
4 Click the OK button.
6-7
Page 68

Enhancing Your Picture
The Enhance button corrects the color or lighting balance of your picture.
To enhance your picture:
1 Click the Enhance button.
The Enhance window appears.
2 Select the appropriate enhance option that
best matches the lighting conditions when
you took the picture:
✔ Auto White Balance
✔ Daylight/Flash
✔ Tungsten—use this option to improve
pictures taken under warm,
incandescent, or candle light
✔ Fluorescent lighting—use this option if
your picture has a green cast
✔ No White balance correction
✔ Custom White Balance correction—
enter the balance values for red (R),
green (G), or blue (B)
3 Click the Apply button.
6-8
The enhancements are applied to your
picture.
Page 69

Preferences Settings
The Preferences window allows you to change connection setup, display setup,
and transfer resolution settings.
☞ You must press the Apply button to activate any changes to the Preferences
window.
Changing Connection Setup
If your computer does not recognize that the camera is attached and turned on,
adjust the serial port and speed setting using the Connection Setup tab.
To Change Connection Setup:
1 Click the Preferences button.
The Preferences window appears.
2 Click the Connection Setup
tab.
3 Select appropriate serial port
setting.
6
TWAIN/Plug-in
4 Adjust the serial speed to
optimize picture transfer
time.
☞ The port speed of
230400 is only
available on PCs or
Macintosh PowerPCs
with high-speed serial
cards.
5 Click the Apply button.
6-9
Page 70

Changing Display Setup
You may customize your computer monitor setup using the Display Setup tab.
To change the Display Setup:
1 Click the Preferences button.
The Preferences window appears.
2 Click the Display Setup tab.
3 Adjust your monitor setup by
changing the settings for:
✔ Monitor gamma
✔ White temperature
✔ Phosphor (red, green, blue)
color values
4 Click the Apply button.
☞ Click the Reset to default
button to return to the default
settings.
6-10
Page 71

Changing Transfer Resolution
The Transfer Resolution tab allows adjustment of the picture’s resolution to
preset settings (in pixels) during the transfer process.
To change the Transfer Resolution:
1 Click the Preferences button.
The Preferences window appears.
2 Click the Transfer Resolution
tab.
3 Select a preset pixel setting.
4 Click the Apply button.
6-11
6
TWAIN/Plug-in
Page 72

Camera Functions
The Camera Functions window allows you to review or reset camera settings
from the Status LCD Function Setup or Other Camera Function Setup tabs while
the DC120 is attached to your computer. You may also personalize albums using
the Album Setup tab and erase pictures.
Changing LCD Settings
The Status LCD Function Setup allow you to set all the settings that are normally
set using the Status Display on the camera.
To change the LCD settings:
1 Click the Camera Functions button.
The Camera Functions window appears.
2 Click the Status LCD
Function Setup tab.
3 If necessary, change the
camera’s settings.
☞ See “Status Display” on
page 2-3 for more
information on camera
settings.
6-12
4 Click the Update Camera to
apply changes.
Page 73

Changing Camera Functions
The Other Camera Function Setup allows you to reset a limited number of
camera settings.
To change the Camera Function settings:
1 Click the Camera Functions button.
The Camera Functions window appears
2 Click the Other Camera
Function Setup tab.
3 If necessary, change
camera’s settings.
☞ See Chapter 2 - Using
Your DC120 Camera
for more information.
4 Click the Update Camera
button to apply changes.
Album Setup
The Album Setup tab allows you to personalize album names in the camera.
6
TWAIN/Plug-in
To personalize an album:
1 Click the Camera Functions button.
The Camera Functions window appears.
2 Click the Album Setup tab.
3 Personalize an album by
placing the cursor in
appropriate space and enter
the new name.
4 Click the Upload Albums to
Camera button.
Album names are updated in
the camera.
6-13
Page 74

Erasing Pictures
The Erase Pictures button on the Camera Functions window allo ws you to delete
pictures from the camera’s or optional Kodak Picture Card’s memory.
To erase pictures:
1 Click the Erase Pictures
button.
The Erase Pictures window
appears.
2 Select the folder where the
pictures reside:
✔ memory of your camera
✔ optional Kodak Picture
Card
6-14
☞ Check Show
Thumbnail to preview
the picture file.
Page 75

3 Select the picture file from
the File Selection area.
The picture file is
highlighted. If Show
Thumbnail is checked a
preview of the picture
appears.
☞ To select multiple files
at one time, hold down
the control or shift key
and click on the picture
files.
4 Click the Add to List button.
The picture file is listed in the
erase window.
☞ You may also select:
✔ Remove from List
to remove a
highlighted picture
file from the Erase
Picture List
✔ Remove All from
List to remove all
the picture files
from the Erase
Picture List
6
TWAIN/Plug-in
5 Click the OK button.
The picture file is erased
from the camera’s or card’s
memory.
6-15
Page 76

Page 77

PhotoEnhancer Software
With PictureWorks PhotoEnhancer software (PhotoEnhancer) you can view, edit,
and enhance your digital pictures quickly and easily. Use the By Example
enhancement feature to display your picture as different enhancing options are
applied to it. Use SmartPix for one-step correction for lighting, focus, or color
balance in your pictures. Pictures are transferred from your DC120 into
PhotoEnhancer software using Access software (TWAIN Acquire or Plug-in
Software). This version of PhotoEnhancer software will also work with the
following Kodak digital cameras: DC20, DC25, DC40, and DC50.
PhotoEnhancer software for Windows and Macintosh use the same screens
except for minor differences specific to the platform. The screens displayed in
this chapter are from PhotoEnhancer software for Windows 95.
Installation
If you selected the Typical or Easy installation option when you installed the
software from the DC120 CD (see Chapter 4 - Installer Software),
PhotoEnhancer software will already be installed. If it is not installed, complete
the installation instructions in Chapter 4 and select the PhotoEnhancer software
option.
7
Starting PhotoEnhancer
Windows 95—from the Start menu select Programs, open the Kodak DC120
group and select PictureWorks PhotoEnhancer Software.
Windows 3.1—from the Program Manager, double-click on the
PhotoEnhancer icon.
Macintosh—from the Kodak DC120 folder, double-click on the PhotoEnhancer
icon.
7-1
PhotoEnhancer
Page 78

Overview
Main menu bar
Name of
picture file
Picture
viewing area
Tool
palette
Brush
box
7-2
Page 79

Transferring Pictures into PhotoEnhancer
You must use the Access software (TWAIN Acquire or Plug-in Software) to
transfer pictures from your camera into PhotoEnhancer software.
1 Click on File and select
Select TWAIN Source from
the pulldown menu.
The Select Source window
appears
2 Select Kodak DC120 Digital
Access from the Select Source
window.
3 Click the Select button.
4 Click on File and select
TW AIN Acquire from
pulldown menu.
The main window of the
Access software (TWAIN
Acquire or Plug-in Software)
appears.
5 Use the Access software to
transfer pictures from your
camera into PhotoEnhancer.
See Chapter 6 - TWAIN &
Plug-in Access Software for
more information.
Once pictures are transferred into PhotoEnhancer software you may edit,
enhance, save and print them.
☞ Y ou can also open pictures from files on your computer. Simply select Open
from the File pulldown menu, and select the picture file from the
appropriate location on your computer. Select Open Slide Table to view a
table of several pictures files, from which you would double-click on a file
to open it.
7-3
7
PhotoEnhancer
Page 80

Editing Tools
PhotoEnhancer’s editing Tool Palette automatically appears when the software is
opened. Once you have opened your picture into PhotoEnhancer, use the
selection tools and brushes, along with the editing options from the main menu
bar, to edit your pictures.
Tool Palette
Hand—scrolls through a
picture.
Rectangle—makes a
rectangular selection.
Lasso—makes freehand
selection.
Sharpen—focuses area of
picture using a brush.
Lighten—lightens area of
picture using a brush.
Red Eye—corrects area of
picture for red eye using a
brush.
☞ The Brush Box automatically appears
when using the Sharpen, Smooth, Lighten,
Darken, and Red Eye tools.
To use the tool palette:
1 Click on a tool to select it.
Zoom—magnifies.To resize
select the File menu’s Image,
View option (or on PCs press
the mouse buttons).
Polygon—makes irregular
straight-sided selection.
Magic Wand—selects areas
by similar color.
Smooth—softens area of
picture using a brush.
Darken—darkens area of
picture using a brush.
Oval—makes a circular or an
oval selection.
Brush Box
2 Place the cursor on the part of the picture that you want to select or brush.
3 Click and drag the mouse to complete your selection or brush stroke.
4 Release the mouse button.
5 Use the:
✔ Edit pulldown menu to undo, cut, copy, or paste a selected area.
✔ Image pulldown menu to resize, flip, rotate, or crop a selected area.
7-4
Page 81

Enhancing Your Picture
PhotoEnhancer allows you to enhance your picture two ways. The Enhance
pulldown menu options allows you to adjust your picture automatically in one
easy step. Use By Example to see how your picture changes before the
enhancements are applied.
Enhancing in One Step
1 Open a picture file.
2 Click on Enhance and select the appropriate
enhancement option from the pulldown menu.
Your picture adjusts according to your
selection.
The Adjust options include:
✔ Negate to apply a photographic negative effect to your picture.
✔ Lightening or darkening your picture.
✔ Equalize to distribute the brightness v alues e venly across your picture and
to increase the contrast.
You may also choose to soften, sharpen, intensify, or lighten shadows a little
or a lot.
7
PhotoEnhancer
7-5
Page 82

Enhancing by Example
1 Open a picture file.
2 Click on Enhance and select
By Example from the
pulldown menu.
The Filter By Example
window appears with a
reduced version of the
original picture in the upper
right corner. The blue square
controls the part of the
picture that appears in the
nine sample boxes. Drag the
blue square in the reduced
version to view the different
areas of the picture.
The middle sample box
corresponds to the current
picture setting.
3 Click on the appropriate
Picture Enhancement option:
7-6
✔ Focus to sharpen.
✔ Exposure to adjust
lightness or darkness.
✔ Brightness/Contrast to
adjust the tones.
✔ Color to adjust the color
balance.
✔ Variations to adjust the
amount of enhancement.
Page 83

4 View the pictures in the
sample box and click on the
one you like best.
5 Click the Apply button.
The enhancement selected
from the sample is applied to
the entire picture.
The sample boxes show the
applied enhancement in
various degrees.
6 Experiment with the different
enhancement options to find
the best one for improving
your picture.
☞ Click the Undo button
to delete the last change
applied to the picture
and Revert to return the
picture to its original
state.
7 Click the Done button to exit
By Example and keep
changes.
7-7
7
PhotoEnhancer
Page 84

Correcting for Lighting Conditions
Use SmartPix to improve pictures taken in specific lighting conditions.
1 Open a picture file.
2 Click on SmartPix and select the appropriate
option from the pulldown menu.
3 Select the lighting condition in which your
picture was taken.
Your picture adjusts to compensate for a
specific lighting condition.
☞ You can also adjust for faded colors,
light or heavy shadows, or remove dot
patterns.
Optimize For indicates that the
SmartPix values were set for the DC120
camera. Optimize For also supports
other Kodak devices.
Experiment with the different SmartPix options to find the best one for improving
your picture.
☞ You can also apply SmartPix to multiple pictures at the same time from a
slide table. Simply hold down the shift key and click the slides you want to
enhance, then select a SmartPix option.
Saving Your Pictures
Save your enhanced pictures by selecting Sav e or Sav e As from the File pulldo wn
menu.
Printing Your Pictures
Print your enhanced pictures by selecting Print from the File pulldown menu.
Use SmartPrint from the File pulldown menu to print a representative area of
your picture several times on one page. This allows you to view how different
printer settings affect your print. You would then select the best one for your
picture.
7-8
Page 85

Mounter
8
Software
Kodak DC120 Mounter software (Mounter software) is an easy way to manage
pictures stored in the camera’s or optional Kodak Picture Card’s memory using
your PC computer and Windows 95 software.
You can view or transfer picture files to different locations on your computer
using the My Computer or Explorer window options. The My Computer icon
allows you to display and copy your files from your desktop. The Explorer
window provides access to all your files through an explorer shell. For more
detailed information on working with files through the My Computer or Explorer
window options, refer to your Windows 95 software user’s guide.
Installation
If you selected the Typical installation option when you installed the software
from the DC120 CD (see Chapter 4 - Installation Software), Mounter software
will already be installed. If it is not installed, complete the installation
instructions in Chapter 4 and select the Mounter software option.
Camera Communication Settings
Mounter
If your computer does not recognize that the camera is attached and turned on,
you may need to adjust the serial port and speed settings. See “Serial Port” on
page 8- 9 or Chapter 3 - Setting up Computer, for details.
8-1
Page 86

Overview
Mounter software uses the following icons:
Camera icon—displays the DC120 Camera.
Camera Memory icon—displays picture files or albums stored in
the DC120 camera.
Memory Card icon—displays picture files or albums stored in the
optional Kodak Picture Card.
☞ Do NOT delete the album.ctl file on the optional Kodak
Picture Card.
Album icon—displays picture files stored in an album.
Picture File icon—displays picture files with .KDC extensions.
8-2
Page 87

Transferring Pictures from DC120
When using Mounter software, you cannot take pictures with the camera.
The camera needs to be connected to your computer and turned on to access
your picture files. The Status Display on the camera is replaced by the
following screen.
1 Double-click on the My
Computer icon.
☞ To open Mounter
software from the
My Computer window
2 Double-click on the Kodak
Exploring - Kodak DC120 window
Explorer window,
select Programs from
the Start menu and then
select Windows
Explorer.
The My Computer or
Explorer window appears.
DC120 Digital Camera icon.
The Camera Memory icon
appears either in a separate
window when using My
Computer or on the split
screen when using Explorer.
A Memory Card icon also
appears if an optional Kodak
Picture Card is inserted in
the camera.
8
Mounter
3 Double-click on the Camera
Memory or Memory Card
icon.
8-3
Page 88

The Camera Memory
window appears. Album
icons and individual picture
files appear.
☞ Double-click on an album
to open it. Double-click on
a picture file to open it into
a registered application.
T o change the w ay files are
displayed, use the
commands listed on the
View menu.
4 Select a picture file (or
album) to highlight it and
hold the mouse button down.
Camera Memory window
☞ Make sure the location
where you want to drag the
picture file into is visible.
5 Drag the picture file to where
you want it positioned and
then release the mouse
button.
The picture file is copied to
the new location.
☞ To select multiple pictures,
Picture file is copied to
new location on computer
Mounter software does not allow you to copy picture files or albums into the
camera’s or optional Kodak Picture Card’s memory. You can only copy picture
files from the camera’s or card’s memory into your computer.
hold down the shift key and
click on additional files.
8-4
Page 89

Setting and Viewing Properties
Mounter software displays camera, serial port, picture, or album information
from the Properties window of the following icons:
✔ Camera Memory ✔ Album
✔ Memory Card ✔ Camera
✔ Picture File
Camera Memory or Memory Card Properties
The General Info tab on the Camera or Camera Card Memory Properties window
displays the current setting of the camera’s or optional memory card’s memory.
You cannot change settings on this window.
☞ You must have an optional K odak Picture Card inserted to vie w the Camera
Card Memory Properties window.
To open the Camera Memory Properties window:
1 Click on the Camera Memory icon with the right mouse button.
2 Select Properties from the popup menu.
8
Mounter
The Camera Memory Properties window appears and displays:
✔ Picture Quality setting of
camera
✔ Number of pictures
remaining that can be stored
in the memory of your
camera
✔ Number of pictures stored
in the memory of your
camera
8-5
Page 90

Picture File Properties
The General Info tab on the Picture File Properties window displays information
about the current picture file. You cannot change any settings on this window.
To open the Picture File Properties window:
1 Click on the Picture File icon with the right mouse button.
2 Select Properties from the popup menu.
The Picture File Properties window appears and displays:
✔ Picture Quality setting of
the picture file
✔ Picture Size in bytes
✔ Date and time the picture
was taken
✔ Name of the picture file
8-6
Page 91

Album Properties
8
The General Info tab on the Camera Album Properties window displays
information on the current album. You cannot change any settings from this
window.
To open the Camera Album Properties window:
1 Click on the Album icon with the right mouse button.
2 Select Properties from the popup menu.
The Camera Album Properties window appears and displays:
✔ Picture Quality Setting of
the album
✔ Number of pictures
remaining that can stored in
the album
✔ Number of pictures stored
in the album
Mounter
8-7
Page 92

Camera Properties
The Camera Properties window displays general information on the camera and
serial port settings.
General Information Tab
The General Info tab on the Camera Properties window allows you to view the
camera’s current settings. You cannot change any settings from this window.
To open the General Information window:
1 Click on the Camera icon with the right mouse button.
2 Select Camera Properties from the popup menu.
The Camera Properties window appears.
3 Click the General Info tab.
The General Info tab displays:
✔ Picture Quality and Flash
setting
✔ Auto and Manual Exposure
Mode setting
8-8
✔ Focus Mode
✔ Whether an optional Kodak
Picture Card is inserted
✔ Number of pictures
remaining that can be stored
in the camera’s or optional
Kodak Picture Card’s
memory
✔ Number of pictures taken
and stored in the camera’s or
optional Kodak Picture
Card’s memory
Page 93

Serial Port
The Serial Port tab on the Camera Properties window allows you to view and
change the serial port and port speed settings while the camera is attached to your
computer.
See the “Checking Serial Port Availability” section in Chapter 3 - Using DC120
with Your Computer for more detailed information.
To open the Serial Port window:
1 Click on the Camera icon with the right mouse button.
2 Select Camera Properties from the popup menu.
The Camera Properties window appears.
3 Click the Serial Port tab.
The Serial Port Tab appears.
4 If necessary adjust the:
✔ serial port if your computer
does not recognize the
camera
8
Mounter
✔ port speed to optimize picture
transfer time
☞ The port speed of 230400 is
only available on PCs or
Macintosh PowerPCs with
high-speed serial cards.
8-9
Page 94

Page 95

Troubleshooting
If you are experiencing difficulties with your DC120 camera, check the following
table for possible solutions. If the difficulties persist, refer to Chapter 10 - Where
to Get Help.
☞ Additional technical information is available in the Technical Tips
Trouble.text document located in the DC120 or KODAK DC120 folder.
Computer Monitor
Problem Cause Solution
The image on your monitor is
jagged or inappropriately
colored.
Windows/DC120 Camera Communications
Problem Cause Solution
Open slide table in software
indicates the wrong number of
pictures or zero pictures stored
in the camera.
Monitor is not set
correctly.
Possibly a serial port
speed problem.
Adjust your monitor
display settings. See
the “Monitor
Adjustment” section
in Chapter 3 - Using
DC120 with Your
Computer.
Lower the port speed
by one setting using
the Preferences
window in Picture
Transfer or Access
(TW AIN Acquire)
software, or the
Camera Properties
window in Mounter
software.
9
Troubleshooting
9-1
Page 96

Windows/DC120 Camera Communications
Problem Cause Solution
Camera does not respond after
selecting camera options from
the software.
Some Advanced
Power Management
utilities on laptops can
turn off ports to save
battery life.
Conflict with another
serial device, such as a
modem.
Camera power is off. Slide the cover open to
Camera is not
connected to serial
cable or cable is not
connected to the
computer’s COM port.
Port settings in
software’s AcquirePreferences may be set
to the incorrect COM
port.
See the Power
Management section
of your laptop’s user
guide to disable this
feature.
Refer to the serial
communication or
corresponding section
of your computer’s,
modem, and/or
operating system’s
(Windows 95 or
Windows 3.1) user’s
guide.
turn the camera on.
Connect serial cable to
camera and COM
port. See the
“Connecting the
DC120 to Your
Computer” section in
Chapter 3 - Using
DC120 with Your
Computer.
Change the COM port
settings to AutoSearch or to a specific
COM port using the
Preferences window in
Picture Transfer or
Access (TWAIN
Acquire) software, or
the Camera Properties
window in Mounter
software.
9-2
Page 97

Macintosh/DC120 Camera Communications
Problem Cause Solution
Camera does not respond after
selecting camera options from
the software.
Camera power is off. Slide the cover open to
turn the camera on.
Camera is not
connected to serial
cable or cable is not
connected to the
computer’s serial port.
AppleTalk is
conflicting with serial
port communications.
Modem or fax
software is conflicting
with serial port
communications.
Extensions may be
conflicting with serial
port communications.
Connect serial cable to
camera and serial port.
See the “Connecting
DC120 to Your
Computer” section in
Chapter 3 - Using
DC120 with Your
Computer.
Disable AppleT alk.
Turn off or disable
Express Modem,
GlobalFax, and any
speed doublers.
Run Extensions
Manager on minimal
if running 7.1 systems
or higher.
9
Troubleshooting
9-3
Page 98

DC120 Camera
Problem Cause Solution
Ready light does not turn on
and the camera does not work.
Shutter button does not work. Camera is not turned
Camera does not turn on. Batteries are not
Part of the picture is missing. Something was
Batteries are low or
empty.
Camera is not turned
on.
on.
Ready light is
blinking. Camera is
processing picture.
The Status Display
reads FUL. The
camera memory or
optional Picture Card
is full.
Camera is connected
to the computer.
properly installed.
blocking the lens
when the picture was
taken.
Y our e ye or the picture
was not centered
correctly in the
viewfinder
Replace the batteries.
Pictures remain in the
camera’s memory
when the battery is
removed.
Turn the camera on
and verify that the
green Ready light
turns on.
Turn the camera on
and verify that the
green Ready light
turns on.
Wait until Ready light
stops blinking before
attempting to take
another picture.
Transfer pictures to
your computer and
erase them from the
camera’s memory.
Disconnect camera
from computer.
Remove the batteries
and install them
according to the
directions on the
outside of the battery
door.
Keep hands, fingers,
or other objects away
from the lens when
taking pictures.
Leave space around
subject when
centering picture in
viewfinder.
9-4
Page 99

DC120 Camera
Problem Cause Solution
Picture is too dark. Flash is not on or did
not go off.
The subject is too far
away for the flash to
have an effect.
The subject is in front
of a bright light.
Picture is too light. The flash is not
needed.
The subject is too
close when the flash
was used.
The light sensor is
covered.
Stored pictures are damaged. The memory card was
inserted or removed
when the Ready light
was blinking.
Pictures remaining number
does not decrease.
The image resolution
does not take up
sufficient space to
decrease the picture
remaining number.
Turn on the flash. See
the “Flash” section in
Chapter 2 - Using
Your DC120.
Move so there is no
more than 16.4 feet
(5 m) between the
camera and the
subject.
Change your position
so the light is not
behind the subject.
Change to automatic
flash. See the “Flash”
section in Chapter 2 -
Using Your DC120.
Move so there is at
least 2.3 feet (0.7 m)
between the camera
and the subject.
Hold the camera so
your hands or other
objects do not cover
the light sensor.
Make sure the Ready
light is not blinking
before inserting or
removing the memory
card.
Continue taking
pictures.
9
Troubleshooting
9-5
Page 100

DC120 Camera
Problem Cause Solution
Picture is not clear. The lens is dirty. Clean the lens. See the
“Cleaning the Lens”
section in Chapter 2 -
Using Your DC120.
Subject too close
when taking picture
Subject or the camera
moved while the
picture was taken.
The subject is too far
away for the flash to
be effective.
Camera Memory Error
appears on the LCD.
Stand at least 8 in.
away when taking
pictures using Macro
mode.
Hold camera steady
until you the picture is
taken.
Move so the subject is
less than 16.4 feet (5
m) away.
Press the TAB and
INFO buttons at the
same time to reformat
the Camera’s memory.
Any picture files
stored on the camera
are lost.
9-6
 Loading...