


Kia, THE COMPANY
Thank you for becoming the owner of a new Kia vehicle.
As a global car manufacturer focused on building high-quality, value
for money prices, Kia Motors is dedicated to providing you with a
customer service experience that exceeds your expectations.
All information contained in this Owner’s Manual is accurate at the
time of publication. However, Kia reserves the right to make changes
at any time so that our policy of continual product improvement can
be carried out.
This manual applies to all Kia models and includes descriptions and
explanations of optional as well as standard equipment. As a result,
you may encounter material in this manual that is not applicable to
your specific Kia vehicle.
Drive safely and enjoy your Kia!

i
Thank you for choosing a Kia vehicle.
When you require service, remember that your dealer knows
your vehicle best. Your dealer has factory-trained technicians,
recommended special tools, genuine Kia replacement parts and
is dedicated to your complete satisfaction.
Because subsequent owners require this important information
as well, this publication should remain with the vehicle if it is
sold.
This manual will familiarize you with operational, maintenance and safety information about your new vehicle. It is supplemented by a Warranty and Consumer Information manual
that provides important information on all warranties regarding
your vehicle.
W e ur ge you to read these publications carefully and follow the
recommendations to help assure enjoyable and safe operation
of your new vehicle.
Kia offers a great variety of options, components and features
for its various models.
Therefore, the equipment described in this manual, along with
the various illustrations, may not all be applicable to your particular vehicle.
The information and specifications provided in this manual
were accurate at the time of printing. Kia reserves the right to
discontinue or change specifications or design at any time
without notice and without incurring any obligation. If you
have questions, always check with your Kia Dealer.
We assure you of our continuing interest in your motoring
pleasure and satisfaction in your Kia vehicle.
© 2013 Kia Canada Inc.
All rights reserved. Reproduction by any means, electronic or
mechanical, including photocopying, recording, or by any
information storage and retrieval system or translation in
whole or part is not permitted without written authorization
from Kia Canada Inc..
Printed in Korea
Foreword
ii
1
2
3
4
5
6
7
I
Introduction
Your vehicle at a glance
Features of your vehicle
Driving your vehicle
What to do in an emergency
Maintenance
Specifications
Index
table of contents

1
How to use this manual / 1-2
Fuel requirements / 1-2
Vehicle break-in process / 1-3
Introduction
Introduction
21
We want to help you get the greatest
possible driving pleasure from your vehicle.Your Owner’s Manual can assist you
in many ways. We strongly recommend
that you read the entire manual. In order
to minimize the chance of death or injury ,
you must read the WARNING and CAUTION sections spread throughout the
manual.
Illustrations complement the words in this
manual to best explain how to enjoy your
vehicle. By reading your manual, you
learn about features, important safety
information, and driving tips under various road conditions.
The general layout of the manual is provided in the Table of Contents. A good
place to start is the index;it has an alphabetical listing of all information in your
manual.
Sections: This manual has seven sections plus an index. Each section begins
with a brief list of contents so you can tell
at a glance if that section has the information you want.
You’ll find various WARNING’s,
CAUTION’s, and NOTICE’s in this manual.These were prepared to enhance your
personal safety.You should carefully read
and follow ALL procedures and recommendations provided in these
WARNING’s, CAUTION’s and NOTICE’s.
✽✽
NOTICE
ANOTICE indicates interesting orhelpful information is being provided.
Your new Kia vehicle is designed to use
only unleaded fuel with a minimum
Octane Rating of 87 Anti-Knock Index
(AKI).
HOW T O USE THIS MANUAL
WARNING
A WARNING indicates a situation in
which harm, serious bodily injury or
death could result if the warning is
ignored.
CAUTION
A CAUTION indicates a situation in
which damage to your vehicle could
result if the caution is ignored.
CAUTION
NEVER USE LEADED FUEL. The
use of leaded fuel is detrimental to
the catalytic converter and will
damage the engine control system’s oxygen sensor and affect
emission control.
Never add any fuel system cleaning
agents to the fuel tank other than
what Kia has specified. (Consult an
Authorized Kia Dealer for details.)
FUEL REQUIREMENTS
13
Introduction
Gasoline containing alcohol and
methanol
Gasohol, a mixture of gasoline and
ethanol (also known as grain alcohol),
and gasoline or gasohol containing
methanol (also known as wood alcohol)
are being marketed along with or instead
of leaded or unleaded gasoline.Pursuant
to EPA regulations, ethanol may be used
in your vehicle. Do not use gasohol containing more than 10% ethanol, and do
not use gasoline or gasohol containing
any methanol. Ethanol provides less
energy than gasoline and it attracts
water, and it is thus likely to reduce your
fuel efficiency and could lower your MPG
results. Methanol may cause drivability
problems and damage to the fuel system. Discontinue using gasohol of any
kind if drivability problems occur. Vehicle
damage or drivability problems may not
be covered by the manufacturer's warranty if they result from the use of:
1.Gasoline or gasohol containing
methanol.
2. Leaded fuel or leaded gasohol.
Fuel Additives
Kia recommends that you use good quality gasolines treated with detergent additives such as TOP TIER Detergent
Gasoline, which help prevent deposit formation in the engine. These gasolines
will help the engine run cleaner and
enhance performance of the Emission
Control System. For more information on
TOP TIER Detergent Gasoline, please
go to the website (www
.toptiergas.com).
For customers who do not use TOP Tier
Detergent Gasoline regularly, and have
problems starting or the engine does not
run smoothly, additives that you can buy
separately may be added to the gasoline.
If TOP TIER Detergent Gasoline is not
available, one bottle of additive added to
the fuel tank at every 12,000 km or every
engine oil change is recommended.
Additives are available from your authorized Kia dealer along with information on
how to use them. Do not mix other additives.
No special break-in period is needed. By
following a f e w simple precautions for the
first 1,000 km (600 miles) you may add to
the performance, economy and life of
your vehicle.
• Do not race the engine.
• Do not maintain a single speed for long
periods of time, either fast or slow.
Varying engine speed is needed to
properly break-in the engine.
• Avoid hard stops, except in emergencies, to allow the brakes to seat properly.
• Avoid full-throttle starts.
CAUTION
Never use gasohol which contains
methanol. Discontinue use of any
gasohol product which impairs drivability.
VEHICLE BREAK-IN PROCESS

2
Interior overview / 2-2
Instrument panel overview / 2-3
Your vehicle at a glance
Your vehicle at a glance
22
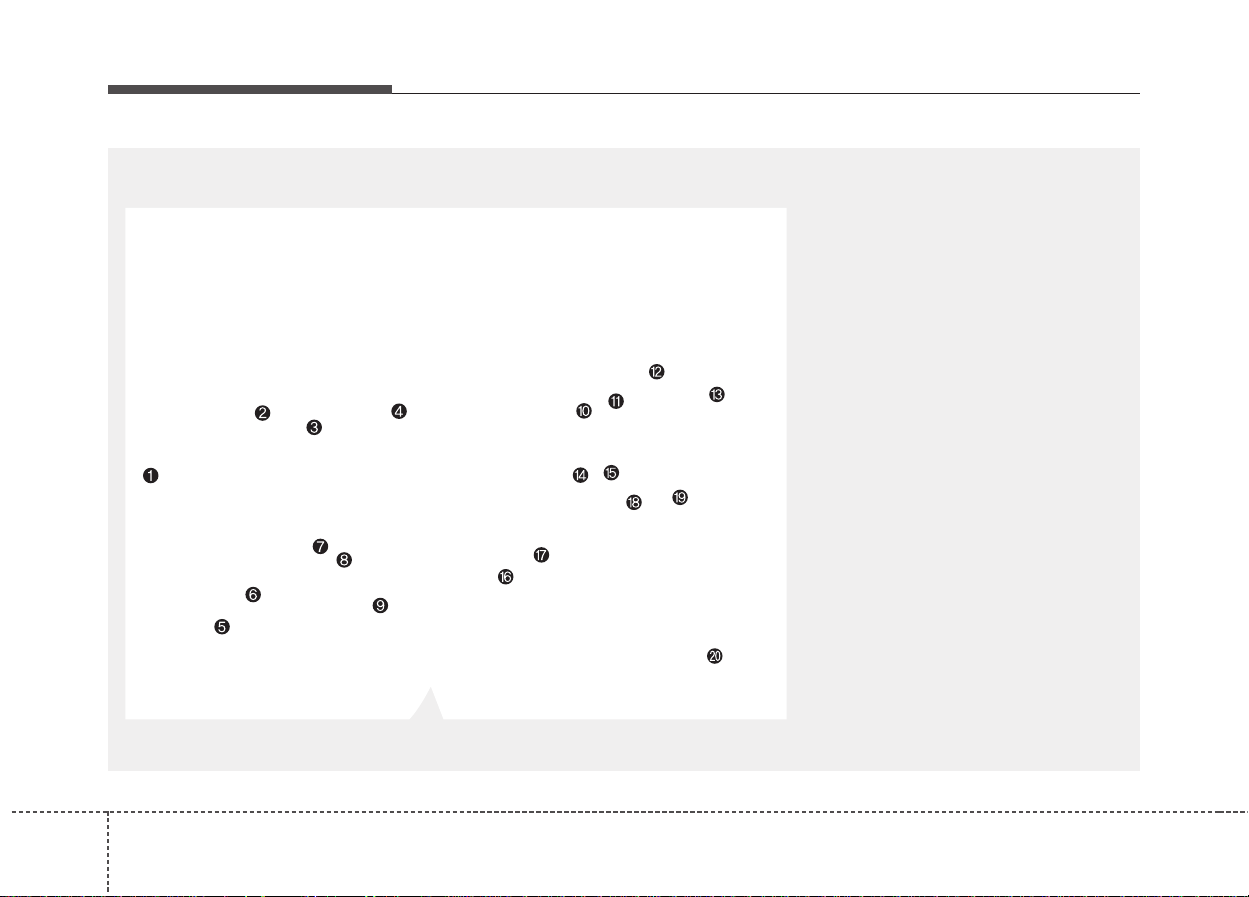
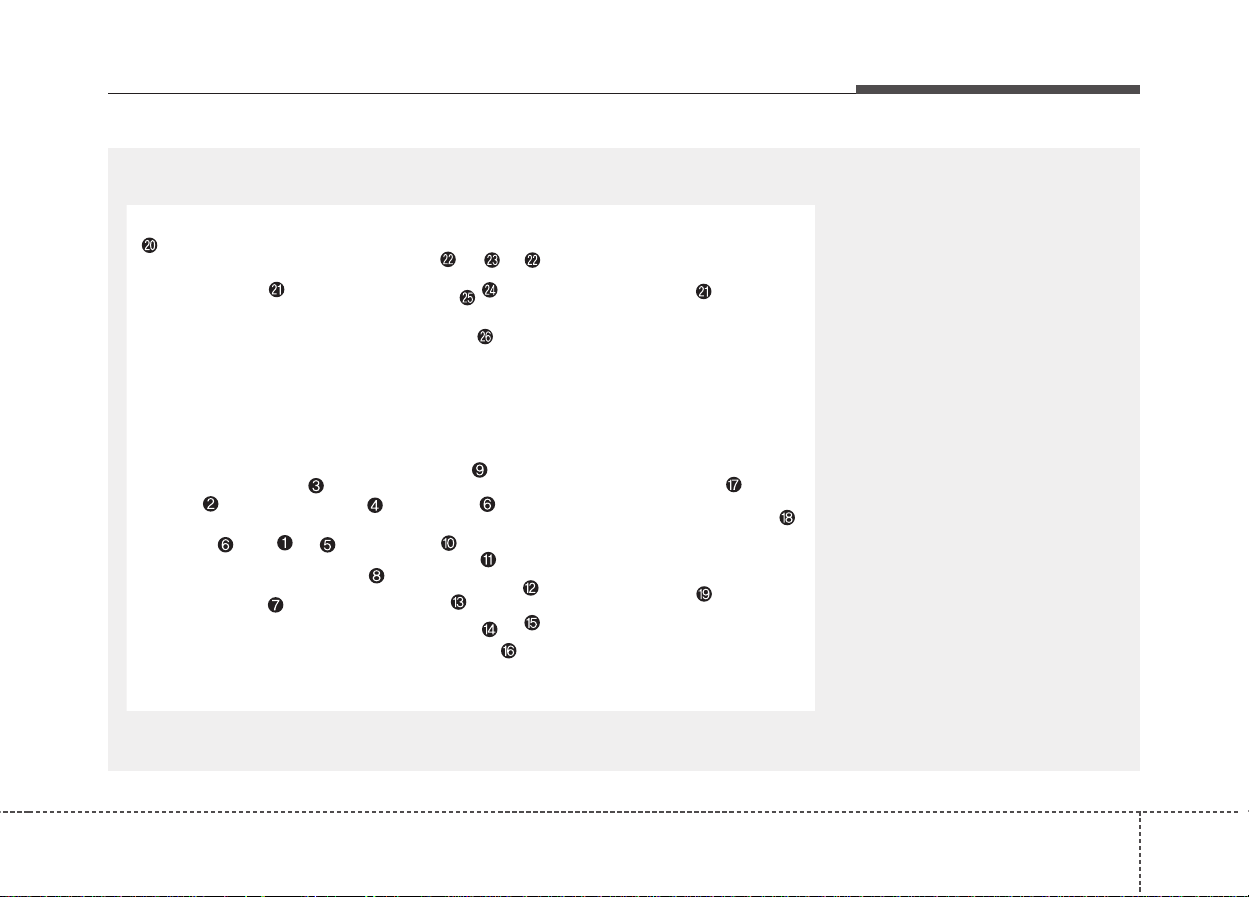
INTERIOR OVERVIEW
OVQ020001N
1. Door lock/unlock button ....................3-13
2. Driver position memory system*.......3-59
3. Seat adjust knob*..............................3-40
4. Outside rearview mirror control
switch .............................................3-109
5. Power rear quarter window
switches*...........................................3-26
6. Power window switches ....................3-26
7. Central door lock switch....................3-13
8. Power window lock switch.................3-28
9. Fuel filler lid release button...............3-30
10. Instrument panel illumination* ......3-120
11. Room light main control switch .....3-133
12. Power adjustable pedal control
switch*.............................................3-61
13. Steering wheel tilt .........................3-107
14. Parking brake release lever*...........4-16
15. Fuse box.........................................6-23
16. Hood release lever .........................3-29
17. Parking brake pedal ........................4-16
18. Brake pedal.....................................4-14
19. Accelerator pedal
20. Seat.................................................3-37
* : if equipped
23
Your vehicle at a glance
INSTRUMENT PANEL OVERVIEW
1. Driver’s airbag................................3-93
2. Light control / Tur n
signals...............................3-137, 3-139
3. Instrument cluster .........................3-116
4.Wiper/Washer...............................3-141
5. Auto cruise control*........................4-11
6. Audio controls*.............................3-197
7. Steering wheel .............................3-106
8. Ignition switch ...................................4-3
9. Digital clock..................................3-193
10. Climate control system*..3-147, 3-159
11. Hazard warning flasher switch...3-146
12. Seat warmer* ...............................3-45
13. Shift lever .......................................4-5
14. Cigar lighter or Power outlet*.....3-189
15. Power outlet................................3-193
16. Ashtray*......................................3-189
17. Passenger’s airbag.......................3-94
18.Vent controls ...................3-151, 3-166
19. Glove box...................................3-187
20. Sunglass holder*........................3-187
21. Sunvisor .....................................3-192
22. Power sliding door and power
tailgate controls*...........................3-17
23. Sunroof* .......................................3-33
24. Conversation mirror ....................3-115
25.Trip computer*............................3-121
26. Day/night rearview mirror...........3-110
* : if equipped
OVQ029002N

3
Keys / 3-3
Remote keyless entry / 3-4
Theft-alarm system / 3-7
Immobilizer system / 3-9
Door locks / 3-11
Power sliding door and power tailgate / 3-17
Window / 3-26
Hood / 3-29
Fuel filler lid / 3-30
Sunroof / 3-33
Seat / 3-37
Driver position memory system / 3-59
Power adjustable pedals / 3-61
Safety belts / 3-62
Child restraint system / 3-76
Air bags-advanced restraint system / 3-83
Steering wheel / 3-106
Mirrors / 3-108
Instrument cluster / 3-116
Gauges / 3-117
Trip computer/ 3-121
Warnings and indicators / 3-127
Features of your vehicle

Interior lights / 3-133
Lighting / 3-137
Wipers and washers / 3-141
Horn / 3-145
Defroster / 3-145
Hazard warning flasher / 3-146
Manual climate control system / 3-147
Automatic climate control system / 3-159
Windshield defrosting and defogging / 3-173
Cluster ionizer / 3-176
Luggage net holder / 3-176
Roof rack / 3-177
Homelink® wireless control system / 3-178
Homelink® Wireless control system with
rearview display / 3-182
Storage compartment / 3-186
Interior features / 3-189
Antenna / 3-195
Steering wheel mounted controls / 3-196
Audio system / 3-197
Sirius satellite radio information / 3-215
Rear seat entertainment system / 3-231
Features of your vehicle
3
33
Features of your vehicle
The key code number is stamped on the
plate attached to the key set. Should you
lose your keys, this number will enable
an authorized Kia Dealer to duplicate the
keys easily. Remove the plate and store it
in a safe place. Also, record the code
number and keep it in a safe and handy
place, but not in the vehicle.
Key operations
Master key
Used to start the engine, lock and unlock
the doors, lock and unlock the glove box
and center console storage (if equipped).
KEYS
WARNING - Ignition key
Leaving children unattended in a
vehicle with the ignition key is dangerous even if the key is not in the
ignition. Children copy adults and
they could place the key in the ignition. The ignition key would enable
children to operate power windows
or other controls, or even make the
vehicle move, which could result in
serious bodily injury or even death.
Never leave the keys in your vehicle
with unsupervised children.
1VQA2001
WARNING
Use only Kia original parts for the
ignition key in your vehicle. If an
aftermarket key is used, the ignition
switch may not return to ON after
START. If this happens, the starter
will continue to operate causing
damage to the starter motor and
possible fire due to excessive current in the wiring.
Features of your vehicle
43
(1) Lock ( )
All doors are locked if the lock button
is pressed.
If all doors are closed, the hazard
warning lights blink once to indicate
that all doors are locked. However, if
any door remains open, the hazard
warning lights are not operated. After
this, if all door are closed, the hazard
warning lights blink.
If the lock button is pressed once
more whithin 4 seconds after locking
all door by pressing the lock button,
the hazard warning lights and horn
will operate once to indicate that all
doors are locked.
(2) Unlock ( )
Driver's door is unlocked if the unlock
button is pressed once.
The hazard warning lights will blink
twice to indicate that the driver's door
is unlocked.
All doors are unlocked if the unlock
button is pressed twice within 3 seconds.
The hazard warning lights will blink
twice again to indicate that all doors
are unlocked.
After depressing this button, the
doors will be locked automatically
unless you open any door within 30
seconds.
(3) Power tailgate opening or closing
( , if equipped)
The tailgate is opened or closed
automatically if the button is pressed
and held.
The hazard warning lights will blink
and the chime will sound 3 times to
indicate that the tailgate will swing
upward or downward.
(4) Left power sliding door opening or
closing (
,
if equipped)
The left sliding door is opened or
closed automatically if the button is
pressed and held.
(5) Right power sliding door opening or
closing ( , if equipped)
The right sliding door is opened or
closed automatically if the button is
pressed and held.
REMOTE KEYLESS ENTRY (IF EQUIPPED)
1VQA2002B
1VQA2002A
1VQA2002
Type B
Type A
Type C
35
Features of your vehicle
✽✽
NOTICE
The power sliding door and power tailgate are not opened by pressing the corresponding button on the transmitter
directly when all power sliding doors
and power tailgate are locked and
closed. To open the power sliding door
or power tailgate from outside vehicle,
press the unlock button twice within 3
seconds first and press corresponding
power sliding door or power tailgate
opening button.
(6) Alarm ( )
The horn sounds and hazard warning
lights flash for about 27 seconds if
this button is pressed and held. To
stop the horn and lights, press any
button on the transmitter.
✽✽
NOTICE
The transmitter will not work if any of
following occur:
• The ignition key is in ignition switch.
• You exceed the operating distance
limit (about 30 m [90 feet]).
• The battery in the transmitter is
weak.
• Other vehicles or objects may be
blocking the signal.
• The weather is extremely cold.
• The transmitter is close to a radio
transmitter such as a radio station or
an airport which can interfere with
normal operation of the transmitter.
When the transmitter does not work
correctly, open and close the door with
the ignition key. If you have a problem
with the transmitter, contact an authorized Kia Dealer.
• If the transmitter is in close proximity
to your cell phone or smart phone, the
signal from the transmitter could be
blocked by normal operation of your
cell phone or smart phone. This is
especially important when the phone
is active such as making call, receiving
calls, text messaging, and/or sending/receiving emails. Avoid placing the
transmitter and your cell phone or
smart phone in the same pants or
jacket pocket and maintain adequate
distance between the two devices.
Operational distance may vary depending upon the area the transmitter is used
in. For example, if the vehicle is parked
near police stations, government and
public offices, broadcasting stations, military installations, airports, or transmitting towers, etc.
This device complies with Industry
Canada Standard RSS-210. Operation
is subject to the following two conditions:
1.This device may not cause interference, and
2. This device must accept any interference, including interference that may
cause undesired operation of the
device.
CAUTION
The power doors can be operated
when the engine is not running.
However ,the power doors consume
large amounts of vehicle electric
power. To prevent the battery from
being discharged, do not operate
them consecutively (more than
approximately 10 times).
CAUTION
Keep the transmitter away from
water or any liquid. If the keyless
entry system is inoperative due to
exposure to water or liquids, it will
not be covered by your man ufacturer vehicle warranty.
WARNING
Changes or modifications not
expressly approved by the party
responsible for compliance could
void the user's authority to operate
the equipment.
Features of your vehicle
63
Battery replacement
Transmitter uses a 3 volt lithium battery
which will normally last for several years.
When replacement is necessary, use the
following procedure.
1. Insert a slim tool into the slot and gently pry open the transmitter center
cover (1).
2. Replace the battery with a new one.
When replacing the battery, mak e sure
the battery is positioned properly.
3. Install the batter y in the reverse order
of removal.
For replacement transmitters, see an
Authorized Kia Dealer for reprogramming.
✽✽
NOTICE
The keyless entry system transmitter is
designed to give you years of troublefree use, however it can malfunction if
exposed to moisture or static electricity.
If you are unsure how to use your transmitter or replace the battery, contact an
authorized Kia dealer.
CAUTION
• Using the wrong battery can
cause the transmitter to malfunction. Be sure to use the correct
battery.
• To avoid damaging the transmitter, don't drop it, get it wet, or
expose it to heat or sunlight.
1VQA2003
CAUTION
An inappropriately disposed battery can be harmful to the environment and
human health.
Dispose the battery according to
your local law(s) or regulation.
IC WARNING
This device complies with Industry
Canada licence-exempt RSS standard(s).
Operation is subject to the following two conditions: (1) this device
may not cause interference, and (2)
this device must accept any interference, including interference that
may cause undesired operation of
the device.
37
Features of your vehicle
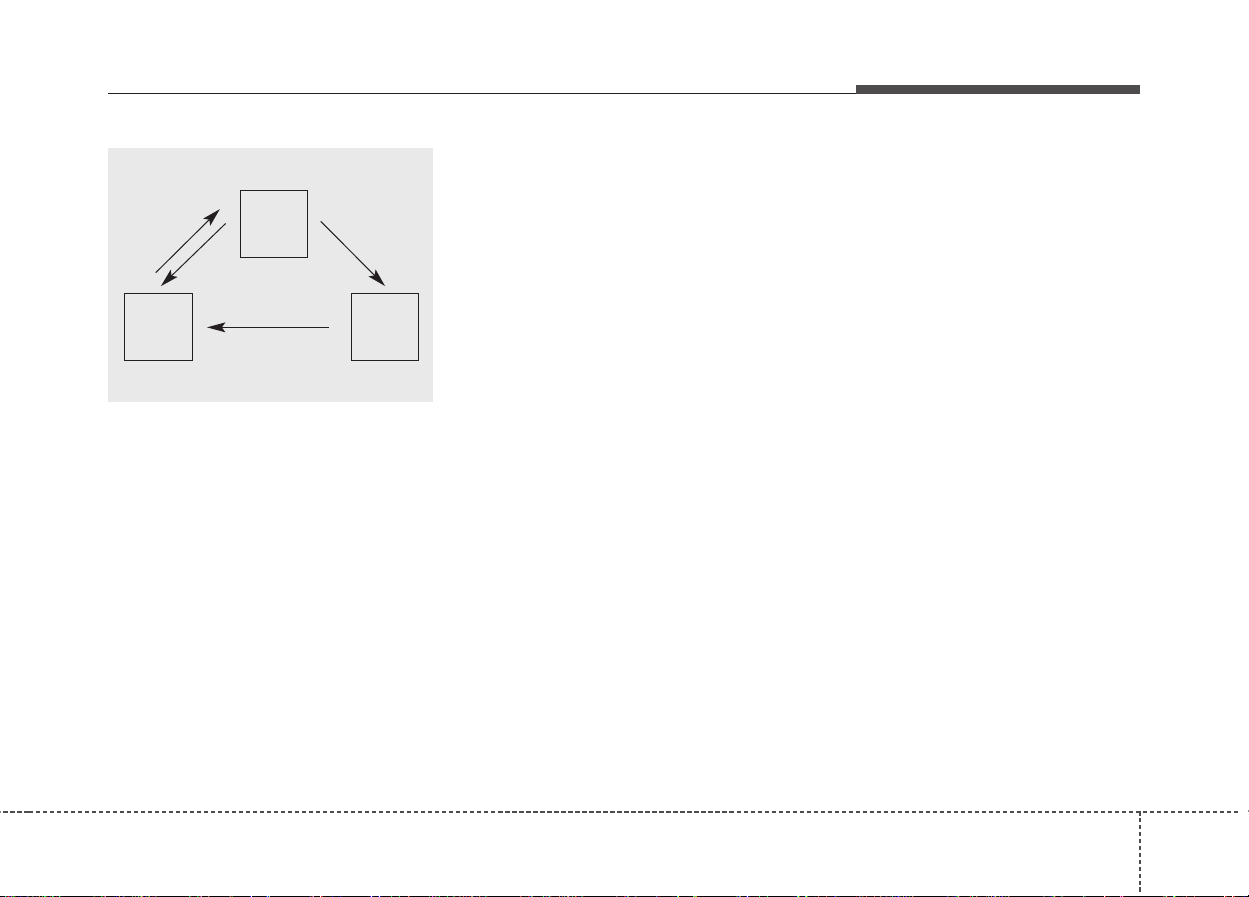
This system is designed to provide protection from unauthorized entry into the
car. This system is operated in three
stages: the first is the "Armed" stage, the
second is the "Theft-alarm" stage, and
the third is the "Disarmed" stage. If triggered, the system provides an audible
alarm with blinking of the hazard warning
lights.
Armed stage
Park the car and stop the engine. Arm
the system as described below.
1. Remove the ignition key from the ignition switch.
2. Make sure that all doors, the engine
hood and tailgate are closed and
latched.
3. Lock the doors using the transmitter of
the keyless entry system.
After completion of the steps above, the
hazard warning lights will blink once to
indicate that the system is armed.
If any door, tailgate or engine hood
remains open, the hazard warning lights
won’t operate and theft-alarm will not
arm. After this, if all doors, tailgate and
engine hood are closed, the hazard
warning lights blink once.
The system can be armed by locking the
doors with the key from the front doors or
tailgate. However, the hazard warning
lights are not operated.
• If any door, tailgate or engine hood
remains open, the system will not
be armed. If this happens, re-arm
the system as described previous.
• Do not arm the system until all passengers have left the vehicle. If the
system is armed while a passenger(s) remains in the vehicle, the
alarm may be activated when the
remaining passenger(s) leave the
vehicle. If any door, tailgate or
engine hood is opened within 30
seconds after entering the armed
stage, the system is disarmed to
prevent unnecessary alarm.
THEFT-ALARM SYSTEM (IF EQUIPPED)
Armed
stage
Theft-alarm
stage
Disarmed
stage
Features of your vehicle
83
Theft-alarm stage
The alarm will be activated if any of the
following occurs while the system is
armed.
• A front or rear door is opened without
using the ignition key or transmitter.
• The tailgate is opened without using
the ignition key or transmitter.
• The engine hood is opened.
The siren will sound and the hazard
warning lights will blink continuously for
27 seconds, and repeat the alarm 3
times unless the system is disarmed. To
turn off the system, unlock the doors with
the ignition key or transmitter.
✽✽
NOTICE
Avoid trying to start the engine while
the alarm is activated. The vehicle starting motor is disabled during the theftalarm stage.
Disarmed stage
The system will be disarmed when the
doors are unlocked by depressing the
unlock button on the transmitter or
unlocked with the ignition key.
After depressing unlock button, the hazard warning lights will blink twice to indicate that the system is disarmed.
After depressing unlock button, if any
door is not opened within 30 seconds,
the system will be rearmed.
If the system is not disarmed with the
ignition key or transmitter, inser t the key
in the ignition switch, turn the key to the
ON position and wait for 30 seconds.
Then the system will be disarmed.
CAUTION
Do not change, alter or adjust the
theft-alarm system because it could
cause the theft-alarm system to
malfunction and should only be
serviced by an authorized Kia dealer.
Malfunctions caused by improper
alterations, adjustments or modifications to the theft-alarm system
are not covered by your vehicle
manufacturer warranty.
39
Features of your vehicle
Your vehicle is equipped with an electronic engine immobilizer system to
reduce the risk of unauthorized vehicle
use.
Your immobilizer system is comprised of
a small transponder in the ignition key,
and antenna coil in the key cylinder and
Immobilizer Control Unit (or Smartra
Unit).
With this system, whenever you insert
your ignition key into the ignition switch
and turn it to ON, the antenna coil in the
ignition switch receives a signal from the
transponder in the ignition key and then
sends the signal to the ECU (Engine
Control Unit).
The ECU checks the signal whether the
ignition key is valid.
If the key is determined to be valid, the
engine will start.
If the key is determined to be invalid, the
engine will not start.
To deactivate the immobilizer
system:
Insert the ignition key into the key cylinder and turn it to the ON position.
To activate the immobilizer system:
Tur n the ignition key to the OFF position.
The immobilizer system activates automatically. Without a valid ignition key for
your vehicle, the engine will not start.
✽✽
NOTICE
When starting the engine, do not use the
key with other immobilizer keys around.
Otherwise the engine may not start or
may stop soon after it starts. Keep each
key separately not to have any malfunction after you receive your new vehicle.
✽✽
NOTICE
If you need additional keys or lose your
keys, consult your authorized Kia dealer.
Limp home (override) procedure
When you turn the ignition key to the ON
position, if the IMMO indicator goes off
after blinking 5 times, your transponder
equipped in the ignition key is out of order .
You cannot start the engine without the
lime home procedure.To start the engine,
you have to input your password by using
the ignition switch.
The following procedure is how to input
your password of “2345” as an example.
1.Turn the ignition key to the ON position.
The IMMO indicator ( ) will blink 5
times and go off indicating the beginning of the limp home procedure.
2.Tur n the ignition key to the ACC position.
IMMOBILIZER SYSTEM (IF EQUIPPED)
CAUTION
Do not put metal accessories near
the key or ignition switch.
The engine may not start for the
metal accessories may interrupt the
transponder signal from normally
transmitting.
WARNING
In order to prevent theft of your
vehicle, do not leave spare keys
anywhere in your vehicle. Your
Immobilizer password is a customer unique password and should
be kept confidential. Do not leave
this number anywhere in your vehicle.
Features of your vehicle
103
3.To enter the first digit (in this example
“2”), turn the ignition key to the ON and
ACC position twice. Perform the same
procedure for the next digits between 3
seconds and 10 seconds (for example ,
for “3”, turn the ignition ON and ACC 3
times).
4. If all of the digits have been input successfully, you have to start the engine
within 30 seconds. If you attempt to
start the engine after 30 seconds, the
engine will not start and you will have
to input your password again.
After performing the limp home procedure, you have to see an authorized Kia
dealer immediately to inspect and repair
your ignition key or immobilizer system.
This device complies with Industry
Canada Standard RSS-210. Operation
is subject to the following two conditions:
1.This device may not cause interference, and
2. This device must accept any interference, including interference that may
cause undesired operation of the
device.
CAUTION
The transponder in your ignition
key is an important part of the
immobilizer system. It is designed
to give years of trouble-free service,
however you should avoid exposure to moisture, static electricity
and rough handling. Immobilizer
system malfunction could occur.
CAUTION
Do not change, alter or adjust the
immobilizer system because it
could cause the immobilizer system to malfunction and should only
be serviced by an authorized Kia
dealer.
Malfunctions caused by improper
alterations, adjustments or modifications to the immobilizer system
are not covered by your vehicle
manufacturer warranty.
WARNING
Changes or modifications not
expressly approved by the party
responsible for compliance could
void the user's authority to operate
the equipment.

311
Features of your vehicle
Operating door locks from outside the vehicle
• Turn the key toward rear of vehicle to
unlock and toward front of vehicle to
lock.
• Turn the key toward front of vehicle to
lock all doors.
• Turn the key to the right once to unlock
the driver’s door and to the right twice
within 3 seconds to unlock all doors.
• Turn the key to the left once to unlock
the passenger’s door and to the left
twice within 3 seconds to unlock all
doors. (if equipped)
• Doors can also be locked and unlocked
with the transmitter key (if equipped).
• Once the doors are unlocked, they may
be opened by pulling the door handle.
• When closing the door, push the door
by hand. Make sure that doors are
closed securely.
✽✽
NOTICE
In cold and wet climates, door lock and
door mechanisms may not work properly due to freezing conditions.
• Once the doors are unlocked, it may be
opened by pulling the door handle and
sliding the door towards the rear of the
vehicle.
DOOR LOCKS
1VQA2004
Lock
Unlock
Front doors
1VQA2005
Rear sliding doors
WARNING
• If you don't close the door
securely, the door may open
again.
• Be careful that someone's body
and hands are not trapped when
closing the door.
WARNING
When the rear sliding door is not
fully open, it is not latched and may
move unintentionally. This could
result in a serious injury.

Features of your vehicle
123
• When the door is fully open, the door
will lock into an open position.To close
the door, pull out the door handle (1)
and sliding the door (2) towards the
front of vehicle.
• If the window on the rear sliding door is
open (more than 80 mm/3 in.), the rear
sliding door will not open fully but will
open to the 3/4 position.
To lock a door without the key, push the
inside door lock button (1) or door lock
switch (2) to the “Loc k”position and close
the door (3).
✽✽
NOTICE
If the door is locked/unlocked multiple
times in rapid succession with either the
vehicle key or door lock switch, the system may stop operating temporarily in
order to protect the circuit and prevent
damage to system components.
OVQ036001N
1VQA2327
Front door
Rear door
CAUTION
The left sliding door cannot be
opened when the fuel filler lid is
open. However, if the fuel filler lid is
opened after the door is opened
slightly, the left sliding door can be
slide rearward.Close the left sliding
door to prevent possible damage to
the door or the fuel filler lid.
WARNING
Always remove the ignition key,
engage the parking brake, close all
windows and lock all doors when
leaving your vehicle unattended.
OVQ047205
Rear sliding doors
Slide
Pull

313
Features of your vehicle
Operating door locks from inside
the vehicle
With the door lock button
• To unloc k a door, pull the door lock button (1) to the “Unlock” position. If the
door is unlocked, the red part (2) of the
button becomes visible.
• To lock a door, push the door lock button (1) to the “Lock”position. If the door
is locked, red part (2) of the button
becomes invisible.
• To open a door, pull the door handle
(3).
• If the inner door handle of the front
door is pulled when the door lock button is in lock position, the button is
unlocked and door opens.(if equipped)
• Front doors cannot be locked if the
ignition key is in the ignition switch and
door is open.
✽✽
NOTICE - Door lock malfunction
If a power door lock ever fails to function while you are in the vehicle, try one
or more of the following techniques to
exit:
• Operate the door unlock feature
repeatedly (both electronic and manual) while simultaneously pulling on
the door handle.
• Operate the other door locks and handles, front and rear.
• Lower a front window and use the key
to unlock the door from outside.
With central door lock switch
The central door locking switch is located
on the front door arm rest. It is operated
by depressing the door lock switch.If any
door is open when the switch is
depressed, the door will remain locked
when closed.
1VQA2007
1VQA2008
Front door
Rear door
Lock
Unlock
Lock
Unlock
OVQ026021N
Driver’s door
Features of your vehicle
143
• When pushing down on the front portion (1) of the switch, all vehicle doors
will lock.
• When pushing down on the rear portion (2) of the switch, all vehicle doors
will unlock.
• However, if the key is in the ignition
switch and any front door is open, the
doors will not lock when the front portion of central door lock switch is
pressed.
Auto door lock/unlock feature
• All doors will be automatically locked
when shifting the transaxle shift lever
out of P (Park) with engine is running.
• All doors will be automatically unlocked
when shifting the transaxle shift lever
into P (Park) with engine is running.
1VQA2012
Passenger’s door (if equipped)
WARNING - Unlocked
vehicles
Leaving your vehicle unlocked can
invite theft or possible harm to you
or others from someone hiding in
your vehicle while you are gone.
Always remove the ignition key,
engage the parking brake, close all
windows and lock all doors when
leaving your vehicle unattended.
WARNING - Unattended
children
An enclosed vehicle can become
extremely hot, causing death or
severe injury to unattended children or animals who cannot escape
the vehicle. Furthermore, children
might operate features of the vehicle that could injure them, or they
could encounter other harm, possibly from someone gaining entry to
the vehicle. Never leave children or
animals unattended in your vehicle.
WARNING - Doors
• The doors should always be fully
closed and locked while the vehicle is in motion to prevent accidental opening of the door.
Locked doors will also discourage potential intruders when the
vehicle stops or slows.
• Be careful when opening doors
and watch for vehicles, motorcycles, bicycles or pedestrians
approaching the vehicle in the
path of the door. Opening a door
when something is approaching
can cause damage or injury.
315
Features of your vehicle
Child-protector rear door lock
The child safety lock is provided to help
prevent children from accidentally opening the rear doors from inside the vehicle.
The rear door safety locks should be
used whenever children are in the vehicle.
1. Open the rear door.
2. Push the child safety lock located on
the front edge of the door to the “Lock”
position. When the child safety lock is
in the “Lock ( )” position, rear door
will not open when the inner door handle is pulled inside the vehicle or the
sub control button of the power sliding
door is pressed.
3. Close the rear door.
To open the rear door, pull the outside
door handle or push the main control button of the power sliding door.
Even though the doors may be unloc ked,
the rear door will not open by pulling the
inner door handle or pushing the sub
control button until rear door child safety
lock is unlocked ( ).
Tailgate
Opening the tailgate
• Tailgate is locked or unlocked with a
key. (if equipped)
• To open the tailgate, insert the key into
the lock, turn it to the unlock position
and pull up the tailgate by pressing the
handle.
You can also lock/unlock the latch (but
not release it) with the central door lock
system.
• If unlocked, the tailgate can be opened
by pressing the handle and pulling it up.
WARNING - Rear door
locks
If children accidentally open the
rear doors while the vehicle is in
motion, they could fall out and be
severely injured or killed.To prevent
children from opening the rear
doors from the inside, the rear door
safety locks should be used whenever children are in the vehicle.
1VQA2013
Lock
Unlock
OEP036009
Features of your vehicle
163
Closing the tailgate
To close the tailgate, lower and push
down the tailgate firmly. Make sure that
the tailgate is securely latched.
✽✽
NOTICE
• In cold and wet climates, door lock
and door mechanisms may not work
properly due to freezing conditions.
• When jacking up the vehicle to
change a tire or repair the vehicle, do
not operate the tailgate. This could
cause the tailgate to close improperly.
1VQA2010
WARNING - Tailgate
The tailgate swings upward. Make
sure no objects or people are near
the rear of the vehicle when opening the tailgate.
CAUTION
Make certain that you close the tailgate before driving your vehicle.
Possible damage may occur to the
tailgate lift cylinders and attaching
hardware if the tailgate is not
closed prior to driving.
WARNING - Exhaust
fumes
If you drive with the tailgate open,
you will draw dangerous exhaust
fumes into your vehicle which can
cause serious injury or death to
vehicle occupants.
If you must drive with the tailgate
open, keep the air vents and all windows open so that additional outside air comes into the vehicle.
WARNING - Rear cargo
area
Occupants should never ride in the
rear cargo area where no restraints
are available. To avoid injury in the
event of an accident or sudden
stops, occupants should always be
properly restrained.
317
Features of your vehicle
(1) Left power sliding door main control
button
(2) Right power sliding door main control
button
(3) Power tailgate main control button*
(4) Power ON/OFF button
(5) Right power sliding door sub control
button
(6) Left power sliding door sub control
button
(7) Power tailgate sub control button*
*: if equipped
The power sliding doors and power tailgate can be opened and closed automatically with the transmitter key, the main
control buttons on the overhead console
or the sub control buttons on the center
pillar trim and the tailgate.
When the power ON/OFF button (PWR)
is OFF (not depressed), the power sliding door and power tailgate can be
opened and closed manually by pulling
the door handles from inside or outside
vehicle.
However, it is possible to control the
doors and tailgate with the transmitter or
the main control buttons on the overhead
console even though the power ON/OFF
button (PWR) is OFF (not depressed).
✽✽
NOTICE
If the power sliding door or power tailgate is open approximately 6 hours, the
ECU will enter Sleep mode to conserve
battery power and the door or tailgate
might not close automatically. Close the
door or tailgate manually and then
operate the door or tailgate with the
power operating system.
✽✽
NOTICE
In cold and wet climates, power sliding
doors and tailgate may not work properly due to freezing conditions.
✽✽
NOTICE
When the sliding doors are opened manually (power OFF), more effort will be
required to open and close than on nonpower sliding doors.
POWER SLIDING DOOR AND POWER TAILGATE (IF EQUIPPED)
1VQA2014
OVQ036002N
1VQA2016
On the center pillar trim
On the tailgate
On the overhead console
WARNING
Never leave children or animals
unattended in your vehicle.
Children or animals might operate
the power sliding door or power
tailgate that could result in injury to
themselves or others or damage to
the vehicle.

Features of your vehicle
183
✽✽
NOTICE
• The power sliding door and power
tailgate can be operated when the
engine is not running. However the
power operation consumes large
amounts of vehicle electric power. To
prevent the battery from being discharged, do not operate them excessively e.g.: more than approximately
10 times repeatedly.
• To pr event the battery from being discharged, do not leave the power sliding door and power tailgate at open
position for a long lime.
• Do not apply excessive force while
operating the power sliding door or
power tailgate. This could cause damage to the power sliding door or power
tailgate.
• Do not modify or repair any part of
the power sliding door or power tailgate by yourself. This must be done by
an authorized Kia dealer.
• When jacking up the vehicle to
change a tire or repair the vehicle, do
not operate the power sliding door or
power tailgate. This could cause the
power sliding door or power tailgate
to operate improperly.
Automatic stop and reversal
If the power opening or closing is block ed
by an object or part of the body, the
power sliding door and power tailgate will
detect the resistance, then the chime will
sound 3 times, and stop movement or
move to the full open position to allow the
object to be cleared.
However, if the resistance is weak such
as an object that is thin or soft, or the
door is near latched position, the automatic stop and reversal may not detect
the resistance and closing operation will
continue. Also, if the power sliding door
or power tailgate is forced by strong
impact, the automatic stop and reversal
may operate.
If the automatic stop and reversal feature
operates continuously more than twice
during one opening or closing operation,
the power sliding door or power tailgate
may stop at that position. At this time,
close the doors manually and operate
the door automatically again.
1VQA2346
1VQA2347
319
Features of your vehicle
How to reset the power sliding door
and power tailgate
If the battery has been discharged or disconnected, the related fuse has been
replaced or disconnected, and the power
sliding door or power tailgate doesn't
work properly , the po wer sliding door and
power tailgate must be reset as follows:
1. Put the shift lever in the P (Park) for
automatic transaxle.
2. Close the sliding door's windows and
fuel filler lid.
3. Pull the SHUNT connector on the driver's side fuse panel and reinstall it
after 1 minute.
4. Close the sliding door or tailgate manually.
5. Open the sliding door or tailgate completely using the transmitter or main
control button on the overhead console.
6. Close the sliding door or tailgate completely using the transmitter or main
control button on the overhead console.
For the left/right power sliding doors and
power tailgate, follow above steps to
reset.
If the power sliding door or power tailgate
doesn't work properly after above procedure, have the system checked by an
authorized Kia dealer.
WARNING
• Never intentionally place any
object or part of your body in the
path of the power sliding door or
power tailgate to make sure the
automatic stop operates.
• Make sure rear passengers are
seated and there are no people or
objects around the door before
operating the power sliding door.
• Make sure all faces, arms, hands,
body parts and any other obstructions are safely out of the way
before operating the power sliding doors or power tailgate.
• Never place any object or part of
your body in the path of the
power sliding door or power tailgate. This could result in serious
injury or cause damage to the
vehicle.
• Make sure there are no people or
objects around the door before
operating the power sliding door
or power tailgate. Have rear passengers or cargo get in or out of
the vehicle after the door is open
fully and stopped.
1VQA4005
On the driver’s side fuse panel
Features of your vehicle
203
Power ON/OFF button
• When the power ON/OFF button
(PWR) is ON (depressed), the power
sliding door and power tailgate can be
controlled with the sub control buttons
on the center pillar trim or tailgate.
Also, the doors can be opened and
closed automatically by pulling the
inside or outside door handles.
• When the power ON/OFF button
(PWR) is OFF (not depressed), the
power sliding door and power tailgate
can not be controlled with the sub control buttons or door handles. However,
the doors can be controlled with the
transmitter or the main control buttons
on the overhead console even though
the power ON/OFF button (PWR) is
OFF (not depressed).
Also, the doors can be opened and
closed manually by pulling the inside or
outside door handles.
✽✽
NOTICE
Close the sliding door and tailgate, and
keep the power ON/OFF button (PWR)
in the OFF (not depressed) position
before washing the vehicle in an automatic car wash.
✽✽
NOTICE
When the sliding doors are opened manually (power OFF), more effort will be
required to open and close than on nonpower sliding doors.
1VQA2017
WARNING
Do not allow children to play with
the power sliding door or power
tailgate. Keep the power ON/OFF
button (PWR) in the OFF (not
depressed) position when not in
use. Serious injury or death can
result from unintentional power
operation by child.

321
Features of your vehicle
Power sliding door operation
• Push the corresponding main control
button on the overhead console to
open or close the power sliding door.
However, the power sliding door will
not open with the transmitter or the
main control button when all power
sliding doors and power taligate are
locked and closed.
• When the power ON/OFF button
(PWR) is ON (depressed), do as follows to open or close the power sliding
doors:
- Push the corresponding sub control
button on the center pillar trim.
- Pull the door handle from inside or
outside vehicle.
- If the sub control button is pushed
while the door is locked or child safety lock is engaged, the chime sounds
once, and the power sliding door will
not open.
- If the door handle is pulled from
inside or outside while the door is
locked or child safety lock is
engaged, the power sliding door will
not open. However, the power sliding
door can be opened by pulling the
outside door handle while the door is
unlocked and child safety lock is
engaged.
• When the power ON/OFF button
(PWR) is OFF (not depressed), the
power sliding door can not be controlled with the sub control buttons or
door handles, and if the sub control
button is pushed, chime sounds once.
However, the doors can be opened
and closed manually by pulling the
door handles from inside or outside
vehicle.
• On a steep grade, the power sliding
door will slide faster when closing.And
the drive unit motor may operate additionally for a moment after the door is
closed. This is a normal operation to
ensure door closing, not a malfunction.
1VQA2018
On the overhead console
OVQ036003N
On the center pillar trim

Features of your vehicle
223
OVQ036004
WARNING
If your vehicle is facing downward
on a steep grade (15 percent or
more), the door may not stay open
and could slam shut, possibly injuring someone. To make sure the
door does not slam shut, turn on
the power sliding door feature.
Then if the door closes, it will close
under the control of the power door
system.
WARNING
If children accidentally open the
power sliding doors while the vehicle is in motion, they could fall out
and be severely injured or killed.To
prevent children from opening the
power sliding doors from the
inside, the child safety locks should
be used whenever children are in
the vehicle.
WARNING
When the rear passenger operates
the power sliding door, make sure
there are no people or objects
around the door, and have all occupants get in or out of the vehicle
after the door is open fully and
stopped.
WARNING
• Let the rear passengers get in or
out of the vehicle after the door is
open fully. Sudden closing could
cause a serious injury.
• Close the door by pulling the
door handle after the door is open
fully. Do not pull the door handle
while rear passengers are getting
in or out.The door could suddenly close by itself and cause a serious injury.
• It takes about 5 seconds for the
power sliding door to close and
latch completely.
Sudden starting or accelerating
the vehicle before the door closes
and latches completely could
cause it to open the door and
result in a serious injury or damage to cargo. Do not start the
vehicle before the door closes
and latches completely.

323
Features of your vehicle
• If the window on the power sliding door
is open (more than 80 mm/3 in.), the
power sliding door will not power open
fully but will open to the 3/4 position
and the chime will sound 3 times. To
close the door, use the transmitter or
main control button with the power
ON/OFF button in OFF position (not
depressed), or sub control button or
door handle with the power ON/OFF
button in ON position (depressed).
• The left power sliding door cannot be
opened while the fuel filler lid is open
fully. If the main or sub control button is
pushed, the chime sounds once. Also,
if the fuel filler lid open button is
pushed while the left power sliding
door is opening, the chime sounds
once.
✽✽
NOTICE
If the fuel filler lid is opened when the
left sliding door is not closed completely,
the door may be opened. Close the left
sliding door before refueling to prevent
possible damage to the door or the fuel
filler lid.
• If the power sliding door is not closed
and latched completely after power
closing operation, the chime sounds 3
times. Open and close the door again.
• If the power sliding door is operated
while the door is in partially opened
position (less than 300 mm/12 in.), the
door is automatically opened fully.
• If the power sliding door is operated
while the door is in half-opened position (more than 300 mm/12 in.), the
door is automatically closed completely.
• If the power sliding door is operated
again while the door is closing, the
door is automatically opened fully.
• If the power sliding door is operated
again while the door is opening, the
door is automatically closed completely. However, If the power sliding door is
operated again when the door is in partially opened position (less than 300
mm/12 in.), the door is opened continuously.
• The half-opened power sliding door is
automatically opened or closed fully by
pushing the door forward or backward
without pulling the door handle while
the power ON/OFF button is in ON
(depressed). However, when the door
is in partially opened position (less
than 300 mm/12 in.), the door is not
closed automatically.
WARNING
Do not leave the power sliding door
in a partially opened position. Close
the window and then open the door
fully .A partially opened door is held
and then released after 10 minutes.
The chime sounds 3 times to indicate the door is released. If the
vehicle is stopped on a downward
slope, it may move and cause an
injury.

Features of your vehicle
243
Power sliding door non-opening conditions
The power sliding door is not automatically opened, but closed under the following conditions.If the main or sub control button is pushed for power opening
operation, the chime sounds once.
When the ignition switch is in the ON
position,
1.Vehicle is moving abo ve 5 km/h (3 mph).
2.The gearshift lever is not in P (P ark) for
automatic transaxle.
Power tailgate operation
(if equipped)
• Push the power tailgate main control
button on the overhead console to
open or close the power tailgate.
However, the power tailgate will not
open with the transmitter or the main
control button when all power sliding
doors and power tailgate are locked
and closed.
• When the power tailgate is operated
with the main or sub control button or
transmitter, the chime sounds and hazard warning lights flash 3 times.
• When the power ON/OFF button
(PWR) is ON (depressed), do as follows to open or close the power tailgate:
- Pushing the sub control button on the
bottom of the tailgate will close the
power tailgate automatically.
- Pressing and pulling up the tailgate
handle slightly will open the power
tailgate automatically when the tailgate is unlocked.
1VQA2019
On the overhead console
1VQA2016A
On the tailgate
WARNING
Do not open the sliding doors while
the vehicle is in motion.Passengers
or cargo may be ejected from the
vehicle, possibly resulting in property damage, severe injury, or
death.

325
Features of your vehicle
• When the power ON/OFF button
(PWR) is OFF (not depressed), the
power tailgate can not be controlled
with the sub control buttons or tailgate
handle, and if the sub control button is
pushed, the chime sounds once.
However, the tailgate may be opened
manually by pulling the exterior handle
and lifting the tailgate upward.The tailgate may be manually closed by pushing the tailgate downward.
• If the power tailgate is not closed and
latched completely after power closing
operation, the chime sounds 3 times.
• If the power tailgate is operated while
the tailgate is in partially opened position (less than 20 degrees), the tailgate
is automatically opened fully.
If the power tailgate is operated while
the tailgate is in half-opened position
(more than 20 degrees), the tailgate is
automatically closed completely.
• If the power tailgate is operated again
while the tailgate is closing, the tailgate
is automatically opened fully.
• If the power tailgate is operated again
while the tailgate is opening, the tailgate is automatically closed completely. However, if the power tailgate button
is pressed again when the tailgate is
open less than 20 degrees, the tailgate
will continue to open.
Power tailgate non-opening conditions
The power tailgate will not open automatically, but will close under the following conditions. If the main or sub control
button is pushed for pow er opening operation, the chime sounds once.
When the ignition switch is in the ON
position,
1.Vehicle is moving abo ve 5 km/h (3 mph).
2.The gearshift lever is not in P (P ark) for
automatic transaxle.
WARNING
Even though the power ON/OFF
button (PWR) is in the OFF (not
depressed) position, the tailgate
will still be propelled upward by
mechanical force if the tailgate is
manually opened more than 20
degrees beyond the fully closed
position. In addition, if the tailgate
is manually closed to the secondary
latch position, the tailgate will be
electrically moved to the fully
latched position. Make sure that
face, arms, hands, and other
obstructions are safely out of the
way before operating the tailgate.
WARNING
Make sure there are no people or
objects around the tailgate before
operating the power tailgate. Wait
until the tailgate is open fully and
stopped before loading or unloading cargo or passengers from the
vehicle.
WARNING
Make sure the tailgate is closed
firmly before driving. If the tailgate
is open, you will draw dangerous
exhaust fumes into your vehicle
which can cause serious injury or
death to vehicle occupants.

Features of your vehicle
263
Power windows
(1) Driver’s door power window switch
(2) Front passenger’s door power win-
dow switch
(3) Rear door (left) power window switch
(4) Rear door (right) power window
switch
(5) Power rear quarter window (left)
switch*
(6) Power rear quarter window (right)
switch*
(7) Power window lock switch
(8) Window opening and closing
(9) Automatic power window down
(Driver’s window)
*: if equipped
✽✽
NOTICE
In cold and wet climates, power windows may not work properly due to
freezing conditions.
WINDOWS
OVQ030005N

327
Features of your vehicle
The ignition switch must be in the ON
position for power windows to operate.
Each door has a power window switch
that controls that door’s window.
However, the driver has a power window
lock switch which can bloc k the oper ation
of passenger windows.
The power windows can be operated for
approximately 30 seconds after the ignition key is removed or turned to the ACC
or LOCK position. However, if the front
doors are opened, the power windows
cannot be operated even within the 30
seconds after the ignition key removal.
✽✽
NOTICE
While driving with the rear windows
down or with the sunroof in an open (or
partially open position), your vehicle
may demonstrate a wind buffeting or
pulsation noise. This noise is a normal
occurrence and can be reduced or eliminated by taking the following actions.
If the noise occurs with one or both of
the rear windows down, partially lower
both front windows approximately one
inch. If you experience the noise with
the sunroof open, slightly reduce the size
of the sunroof opening.
Window opening and closing
The driver’s door has a master power
window switch that controls all the windows in the vehicle.
• To open or close a windo w , press do wn
(8) or pull up (8) the front portion of the
corresponding switch.
• To open or close a rear quarter win-
dow, push (8) the corresponding
switch.
CAUTION
• To prevent the power window
system from the possibility of
damage, do not open or close two
windows at the same time. This
will also ensure the longevity of
the fuse.
• Never try to operate the main
switch on the driver's door and
the individual door window
switch in opposing directions at
the same time. If this is done, the
window will stop and cannot be
opened or closed.
WARNING - Windows
• Always double check to make
sure all arms, hands, head and
other obstructions are safely out
of the way before closing a window.
• Do not allow children to play with
the power windows. Keep the driver’s door power window lock
switch in the LOCK position
(depressed). Serious injury can
result from unintentional window
operation by the child.
• Do not extend face or arms outside through the window opening
while driving.

Features of your vehicle
283
Automatic power window down
(driver’s window)
Depressing the power window switch
momentarily to the second detent position (9) completely lowers the driver’s
window even when the switch is
released. To stop the window at the
desired position while the window is in
operation, pull up the switch momentarily
to the opposite direction of the window
movement.
If the power window is not operated correctly, the automatic power window system must be reset as follows:
1.Tur n the ignition key to ON position.
2. Close driver’s window and continue
pulling up on driver’s power window
switch for at least 1 second after the
window is completely closed.
Power window lock switch
The driver can disable the power window
switches on the front and rear passengers' doors by pressing the power window lock switch to lock position
(pressed).
When the power window lock switch is
pressed, the driver's master control cannot operate the front and rear passengers' power windows and rear quarter
windows.
Manual flip - open (rear quarter
windows, if equipped)
To open the quarter windows, pull the
rear portion of the latch out. Swing the
latch forward and out, then lock it into the
open position by pushing outward until
you hear a click. To close the windows,
pull the handle inward. Then push the
handle rearward until you hear a click.
✽✽
NOTICE
In cold and wet climates, rear quarter
panel windows may not work properly
due to freezing conditions.
1VQA2024OVQ026023N

329
Features of your vehicle
Opening the hood
1. Pull the release lever to unlatch the
hood. The hood should pop open
slightly.
2. Go to the front of the vehicle, raise the
hood slightly, pull the secondar y latch
(1) inside of the hood center and lift (2)
the hood.
3. Raise the hood. It will raise completely
by itself after it has been raised about
halfway.
Closing the hood
1. Before closing the hood, check the following:
• All filler caps in engine compartment
must be correctly installed.
• Gloves, rags or any other combustible material must be removed
from the engine compartment.
2. Lower the hood halfway and push
down to securely lock in place.
HOOD
WARNING - Hood
• Before closing the hood, ensure
that all obstructions are removed
from the hood opening. Closing
the hood with an obstruction present in the hood opening may
result in property damage or
severe personal injury.
• Do not leave gloves, rags or any
other combustible material in the
engine compartment. Doing so
may cause a heat-induced fire.
1VQA2028 1VQA2029
WARNING
Make sure the hood is properly
locked before driving.
WARNING
Open the hood after turning off the
engine on a flat surface, shifting the
shift lever to the P(Park) position
for automatic transaxle.

Features of your vehicle
303
1. Stop the engine.
2.To open the fuel filler lid, push the
release button located on the driver’s
lower door.
3. Pull the fuel filler lid out to open.
4. To remove the cap, turn the fuel tank
cap counterclockwise.
5. Refuel as needed.
6.To install the cap, turn it clockwise until
it clicks once. This indicates that the
cap is securely tightened.
7. Close the fuel filler lid and push it lightly and make sure that it is securely
closed.
FUEL FILLER LID
1VQA2026
WARNING
To avoid injury from sharp edges, it
is recommended that protective
gloves be worn if there is a need to
open the fuel filler door manually.
WARNING - Refueling
If pressurized fuel sprays out, it can
cover your clothes or skin and thus
subject you to the risk of fire and
burns. Always remove the fuel cap
carefully and slowly. If the cap is
venting fuel or if you hear a hissing
sound, wait until the condition
stops before completely removing
the cap.
1VQA2025

331
Features of your vehicle
WARNING - Refueling dan-
gers
Automotive fuels are flammable
materials. When refueling, please
note the following guidelines carefully. Failure to follow these guidelines may result in severe personal
injury,severe burns or death by fire
or explosion.
• Before refueling note the location
of the Emergency Gasoline ShutOff, if available, at the gas station
facility.
• Before touching the fuel nozzle,
you should eliminate potentially
dangerous static electricity discharge by touching another metal
part of the vehicle, a safe distance
away from the fuel filler nec k,nozzle, or other gas source.
(Continued)
(Continued)
• Do not get back into a vehicle
once you have begun refueling
since you can generate static
electricity by touching,rubbing or
sliding against any item or fabric
(polyester, satin, nylon, etc.)
capable of producing static electricity. Static electricity discharge
can ignite fuel vapors resulting in
rapid burning. If you must reenter the vehicle, you should
once again eliminate potentially
dangerous static electricity discharge by touching a metal part
of the vehicle, away from the fuel
filler neck, nozzle or other gasoline source.
• When using a portable fuel container be sure to place the container on the ground prior to refueling. Static electricity discharge
from the container can ignite fuel
vapors causing a fire. Once refueling has begun, contact with the
vehicle should be maintained
until the filling is complete.
(Continued)
(Continued)
Use only portable plastic fuel
containers designed to carry and
store gasoline.
• Do not use cellular phones while
refueling. Electric current and/or
electronic interference from cellular phones can potentially ignite
fuel vapors causing a fire.
• When refueling, always shut the
engine off. Sparks produced by
electrical components related to
the engine can ignite fuel vapors
causing a fire. Once refueling is
complete, check to make sure the
filler cap and filler door are
securely closed, before starting
the engine.
• DO NOT use matches or a lighter
and DO NOT SMOKE or leave a lit
cigarette in your vehicle while at a
gas station especially during
refueling. Automotive fuel is highly flammable and can, when ignited, result in fire.
(Continued)

Features of your vehicle
323
When fuel filler lid does not open
with the release button
If the fuel filler lid does not open using
the remote fuel filler lid release, you can
open it manually .Unsnap and remove the
panel in the cargo area. Pull the handle
outward.
(Continued)
• If a fire breaks out during refueling, leave the vicinity of the vehicle, and immediately contact the
manager of the gas station and
then contact the local fire department or 911. Follow any safety
instructions they provide.
CAUTION
• Make sure to refuel your vehicle
according to the “Fuel requirements” suggested in section 1.
• Check to make sure the fuel filler
cap is securely closed after refueling. A loose fuel filler cap may
cause the "Check Engine"
(Malfunction Indicator) light in the
instrument panel to illuminate
unnecessarily.
• If the fuel filler cap requires
replacement, use only a genuine
Kia cap or the equivalent specified for your vehicle. An incorrect
fuel filler cap can result in a serious malfunction of the fuel system or emission control system.
• Do not spill fuel on the exterior
surfaces of the vehicle. Any type
of fuel spilled on painted surfaces
may damage the paint.
• If the fuel filler lid will not open in
cold weather because the area
around it is frozen, push or lightly
tap the lid.
OVQ036007N

333
Features of your vehicle
(1) Slide button
(2) Tilt button
(3) Close button
If your vehicle is equipped with this fea-
ture, you can slide or tilt your sunroof
with the sunroof control buttons located
on the overhead console.
✽✽
NOTICE
In cold and wet climates, sunroof may
not work properly due to freezing conditions.
The sunroof can only be opened, closed,
or tilted when the ignition switch is in the
ON position.
The sunroof can be operated for approximately 30 seconds after the ignition key
is removed or turned to the ACC or
LOCK position. However, if the front door
is opened, the sunroof cannot be operated even within the 30 seconds after the
ignition key is removed or turned to the
ACC or LOCK position.
✽✽
NOTICE
The sunroof cannot slide when it is in
the tilt position nor can it be tilted while
in an open or slide position.
Sliding the sunroof
SUNROOF (IF EQUIPPED)
1VQA2031
1VQA2032
CAUTION
Do not continue to press the sunroof control button(s) after the sunroof is in the fully open, closed, or
tilt position(s). Damage to the motor
or system components could occur.
1VQA2030

Features of your vehicle
343
Open
Autoslide
To use the autoslide feature, momentarily (less than 0.4 second) press the slide
button on the overhead console.
The sunroof will slide all the way open.To
stop the sunroof sliding at any point,
press any sunroof control button.
Manual slide
Press the slide button on the overhead
console and hold it until the sunroof is
opened to the desired position.
Close
To close the sunroof, press the close button on the overhead console and hold it
until the sunroof is closed.
Tilting the sunroof
Open
Autotilt
To use the autotilt feature, momentarily
(less than 0.4 second) press the tilt button on the overhead console. The sunroof will tilt all the way open.To stop the
sunroof tilting at any point, press any
sunroof control button.
Manual tilt
Press the tilt button on the overhead console and hold it until the sunroof is
opened to the desired position.
Close
To close the sunroof, press the close button on the overhead console and hold it
until the sunroof is closed.
OVQ049034
1VQA2035

335
Features of your vehicle
Sunshade
The sunshade will be opened with the
glass panel automatically when the glass
panel is slid.You will have to close it manually if you want it closed.
1VQA2039
WARNING - Sunroof
• Do not extend face, neck, arms or
body outside through the sunroof
opening while driving.
• Make sure hand and face are
safely out of the way before closing a sunroof.
CAUTION
• Do not press any sunroof control
button longer than necessary.
Damage to the motor or system
components could occur.
• Periodically remove any dirt that
may accumulate on the guide rail.
• If you try to open the sunroof
when the temperature is below
freezing or when the sunroof is
covered with snow or ice, the
glass or the motor could be damaged.
• While using sunroof for a long
time, a dust between sunroof and
roof panel can make a noise.
Open the sunroof and remove
regularly the dust using clean
cloth.
• The sunroof is made to slide
together with sunshade. Do not
leave the sunshade closed while
the sunroof is open.

Features of your vehicle
363
Resetting the sunroof
Whenever the vehicle battery is disconnected or discharged, you have to reset
your sunroof system as follows:
1. Turn the ignition key to the ON position.
2. According to the position of the sunroof, do as follows.
1) in case that the sunroof has closed
completely or been tilted :
Press the tilt button until the sun-
roof has tilted upward completely.
2) in case that the sunroof has slide-
opened:
Press and hold the close button
(for more than 5 seconds) until the
sunroof has closed completely.
Press the tilt button until the sunroof has tilted upward completely.
3. Release the tilt button.
4. Press and hold the tilt button (for
more than 10 seconds) until the sunroof has returned to the original position of tilt after it is raised a little higher than the maximum tilt position.
Then, release the button.
5. Press and hold the tilt button (for
more than 5 seconds) until the sunroof is operated as follows;
TILT DOWN → SLIDE OPEN →
SLIDE CLOSE
Then, release the button.
When this is complete, the sunroof system is reset.

337
Features of your vehicle
Front seat
(1) Forward and backward
(2) Seatback angle
(3) Seat cushion height (Driver’s seat)*
(4) Seat warmer*
(5) Headrest
(6) Armrest
(7) Lumbar support (Driver’s seat)*
Rear seats
(8) Forward and backward
(9) Seatback angle
(10) Headrest
(11) Armrest
(12) Stowing*
* if equipped
SEAT
OVQ036201N
Long wheelbase
Short wheelbase
Power seat
Manual seat
WARNING
- Loose objects
Loose objects in the driver’s foot
area could interfere with the operation of the foot pedals, possibly
causing an accident. Do not place
anything under the front seats.

Features of your vehicle
383
(Continued)
• Always drive and ride with your
seatback upright and the lap portion of the safety belt snug and
low across the hips. This is the
best position to protect you in
case of an accident.
• In order to avoid unnecessary
and perhaps severe airbag
injuries, always sit as far back as
possible from the steering wheel
so that your chest is at least 250
mm (10 inches) away from the
steering wheel.
WARNING - Driver’s seat
• Never attempt to adjust seat while
the vehicle is moving.This could
result in loss of control, and an
accident causing death, serious
injury,or property damage.
• Do not allow anything to interfere
with the normal position of the
seatback. Storing items against a
seatback or in any other way
interfering with proper locking of
a seatback could result in serious
or fatal injury in a sudden stop or
collision.
(Continued)
WARNING - Uprighting
seat
When you return the seatback to its
upright position, hold the seatback
and return it slowly and be sure
there are no other occupants
around the seat. If the seatback is
returned without being held and
controlled, the back of the seat
could spring forward resulting in
accidental injury to a person struck
by the seatback.
WARNING - Rear Seatback
• The rear seatback must be
securely latched. If not, passengers and objects could be thrown
forward resulting in serious
injury or death in the event of a
sudden stop or collision.
• Luggage and other cargo should
be laid flat in the cargo area. If
objects are large, heavy, or must
be piled, they must be secured.
Under no circumstances should
cargo be piled higher than the
seatbacks.
(Continued)
(Continued)
Failure to follow these warnings
could result in serious injury or
death in the event of a sudden
stop, collision or rollover.
• No passenger should ride in the
cargo area or sit or lie on folded
seatbacks while the vehicle is
moving. All passengers must be
in seats and restrained properly
while riding.
• When resetting the seatback to
the upright position, make sure it
is securely latched by pushing it
forward and backwards.
• To avoid the possibility of burns,
do not remove the carpet in the
cargo area. Emission controls
beneath this floor generate high
exhaust temperatures.
• Use extreme caution so that
hands or other objects are not
caught in the seat mechanisms
while the seat is moving.
• Do not put a cigarette lighter on
the floor or seat. When you operate the seat, gas may gush out of
the lighter and cause fire.

339
Features of your vehicle
Front seat adjustment - manual
Forward and backward
To move the seat forward or backward:
1. Pull the seat slide adjustment lever
under the front edge of the seat cushion up and hold it.
2. Slide the seat to the position you
desire.
3. Release the lever and make sure the
seat is locked in place.
Adjust the seat before driving, and make
sure the seat is locked securely by trying
to move forward and backward without
using the lever. If the seat moves, it is not
locked properly.
Seatback angle
To recline the seatback:
1. Lean forward slightly and lift up on the
seatback recline lever located on the
outside of the seat, at the rear.
2. Carefully lean back on the seat and
adjust the seatback of the seat to the
position you desire.
3. Release the lever and make sure the
seatback is locked in place. (The lever
MUST return to its original position for
the seatback to lock.)
1VQA2041
1VQA2043
WARNING - Driver respon-
sibility for front seat passenger
Riding in a vehicle with a front seatback reclined could lead to serious
or fatal injury in an accident. If a
front seat is reclined during an accident, the occupant’s hips may slide
under the lap portion of the safety
belt applying great force to the
unprotected abdomen. Serious or
fatal internal injuries could result.
The driver must advise the front
passenger to keep the seatback in
an upright position whenever the
vehicle is in motion.

Features of your vehicle
403
Seat cushion height (for driver’s seat)
To change the height of the seat cushion,
push the lever up or down located on the
outside of the seat cushion.
• To lower the seat cushion, push down
the lever several times.
• To raise the seat cushion, pull up the
lever several times.
Front seat adjustment - power
The front seat can be adjusted by using
the control knob on the front door.Before
driving, adjust the seat to the proper
position so as to easily control the steering wheel, pedals and switches on the
instrument panel.
1VQA2328
WARNING
The power seats are operable with
the ignition OFF.
Therefore, children should never be
left unattended in the car.
CAUTION
• Power seats are driven by an
electric motor. Stop operating
once the adjustment is completed. Excessive operation may
damage the electrical equipment.
• When in operation, the power
seats consume large amounts of
electrical power.To prevent unnecessary charging system drain,
don’t adjust the power seats
longer than necessary while the
engine is not running.
• Do not operate two or more power
seat control buttons at the same
time. Doing so may result in
power seat motor or electrical
component malfunction.
1VQA2044

341
Features of your vehicle
Forward and backward
Push the control knob forward or backward to move the seat to the desired
position. Release the knob once the seat
reaches to the desired position.
Seatback angle
Push the control knob forward or backward to move the seatbac k to the desired
angle. Release the knob once the seat
reaches to the desired position.
1VQA2045 1VQA2047
WARNING - Driver respon-
sibility for front seat passenger
Riding in a vehicle with a front seatback reclined could lead to serious
or fatal injury in an accident. If a
front seat is reclined during an accident, the occupant’s hips may slide
under the lap portion of the safety
belt applying great force to the
unprotected abdomen. Serious or
fatal internal injuries could result.
The driver must advise the front
passenger to keep the seatback in
an upright position whenever the
vehicle is in motion.

Features of your vehicle
423
Seat cushion height (for driver’s seat)
Push the control knob up to raise or
down to lower the seat cushion. Release
the knob once the seat reaches to the
desired position.
Headrest (front)
The driver's and front passenger's seats
are equipped with a headrest for the
occupant's safety and comfort.
The headrest not only provides comfort
for the driver and front passenger, but
also helps to protect the head and neck
in the event of a collision.
OVQ039046 OVQ039300N-1
WARNING
• For maximum effectiveness in
case of an accident, the headrest
should be adjusted so the middle
of the headrest is at the same
height of the center of gravity of
an occupant's head.
Generally, the center of gravity of
most people's head is similar with
height of the top of their eyes.
Also, adjust the headrest as close
to your head as possible. For this
reason, the use of a cushion that
holds the body away from the
seatback should not be recommended.
• Do not operate vehicle with the
headrests removed as injury to
the occupants may occur in the
event of an accident. Headrests
may provide protection against
neck injuries when properly
adjusted.
• Do not adjust the headrest posi-
tion of the driver's seat while the
vehicle is in motion.

343
Features of your vehicle
Active headrest (if equipped)
The active headrest is designed to move
forward and upward during a rear impact.
This helps to prevent the driver's and
front passenger’s head from moving
backward and thus helps prevent neck
injuries.
Forward and backward adjustment
(if equipped)
The headrest may be adjusted forw ard to
three different positions by pulling the
headrest forward.To adjust the headrest
backward, pull it fully forward to the farthest position and release it. Adjust the
headrest so that it properly supports the
head and neck.
Adjusting the height up and down
To raise the headrest, pull it up to the
desired position (1). To lower the headrest, push and hold the release button (2)
on the headrest support and lower the
headrest to the desired position (3).
1VQH3900N 1VQA2049 1VQA2050
WARNING
A gap between the seat and the
headrest release button may appear
when sitting on the seat or when
you push or pull the seat.Be careful
not to get your finger,etc. caught in
the gap.

Features of your vehicle
443
Removal
To remove the headrest, raise it as far as
it can go then press the release button (1)
while pulling upward (2).
To reinstall the headrest, put the headrest
poles (3) into the holes while pressing the
release button (1). Then adjust it to the
appropriate height.
Armrest (if equipped)
The front seats have the armrest located
on the side of seatback.
To use the armrest, swing down the armrest to the lowest position.
Seatback pocket
A seatback pocket is provided on the
back of the front passenger and drivers
seatbacks.
WARNING
Make sure the headrest locks in
position after adjusting it to properly protect the occupants.
OVQ039001 OVQ027052
WARNING
- Seatback
pockets
Do not put heavy or sharp objects
in the seatback pockets. In an accident they could come loose from
the pocket and injure vehicle occupants.
OVQ028053

345
Features of your vehicle
Seat warmer (if equipped)
The seat warmer is provided to warm the
front seats during cold weather.With the
ignition switch in the ON position, push
either of the switches to warm the driver's
seat or the front passenger's seat.
During mild weather or under conditions
where the operation of the seat warmer
is not needed, keep the switches in the
OFF position.
✽✽
NOTICE
With the seat warmer switch in the ON
position, the heating system in the seat
turns off or on automatically depend
❈ The location of the seat warmer switch may
be changed depending on your model.
OVQ039010N
CAUTION
For proper operation of the occupant detection system:
• Do not place any items cumulatively weighing over 1 kg (2.2 lbs)
in the seatback pocket or on the
seat.
• Do not hang onto the front passenger seat.
CAUTION
• When cleaning the seats, do not
use an organic solvent such as
thinner, benzene, alcohol and
gasoline. Doing so may damage
the surface of the heater or seats.
• To prevent overheating the seat
warmer, do not place anything on
the seats that insulates against
heat, such as blankets, cushions
or seat covers while the seat
warmer is in operation.
• Do not place heavy or sharp
objects on seats equipped with
seat warmers. Damage to the seat
warming components could
occur.

Features of your vehicle
463
Lumbar support (driver’s seat only)
(if equipped)
You can adjust the lumbar support by
moving the lever on the outside of the driver’ s seatback.Pivoting the lever increases or decreases the lumbar support.
Rear seat adjustment
Adjusting the seat forward and backward
- 2nd row seat
To move the seat forward or backward:
1. Pull the seat slide adjustment lever
under the front edge of the seat cushion up and hold it.
2. Slide the seat to the position you
desire.
3. Release the lever and make sure the
seat is locked in place.
Adjust the seat before driving, and make
sure the seat is locked securely by trying
to move forward and backward without
using the lever. If the seat moves, it is not
locked properly.
WARNING - Seat heater
burns
Passengers should use extreme
caution when using seat warmers
due to the possibility of excess
heating or burns. The seat warmer
may cause burns even at low temperatures, especially if used for
long periods of time. In particular,
the driver must exercise extreme
care for the following types of passengers:
1. Infants, children, elderly or handicapped persons, or hospital outpatients
2. Persons with sensitive skin or
those that burn easily
3. Fatigued individuals
4. Intoxicated individuals
5. Individuals taking medication
that can cause drowsiness or
sleepiness (sleeping pills, cold
tablets, etc.)
1VQA2042 OVQ030203N

347
Features of your vehicle
Seatback angle
To recline the seatback:
1. Lean forward slightly and lift up on the
seatback recline lever (or strap) located on the outside of the seat at the
rear.
2. Carefully lean back on the seat and
adjust the seatback of the seat to the
position you desire.
3. Release the lever (or strap) and make
sure the seatback is locked in place.
(The lever MUST return to its original
position for the seatback to lock.)
Armrest
The 2nd row seats have the armrest
located on the side of seatback.
To use the armrest, swing down the armrest to the lowest position.
OVQ027052
OVQ030204N
OVQ036205N
2nd row seat
3rd row seat

Features of your vehicle
483
Headrest (rear)
The rear seat(s) is equipped with headrests in all the seating positions for the
occupant's safety and comfort.
The headrest not only provides comfort
for the passengers, but also helps to protect the head and neck in the event of a
collision. For best protection, adjust the
headrest so its center is as high as your
ears.
Adjusting the height up and down
To raise the headrest, pull it up to the
desired position (1). To lower the headrest, push and hold the release button (2)
on the headrest support and lower the
headrest to the desired position (3).
WARNING
• For maximum effectiveness in
case of an accident, the headrest
should be adjusted so the middle
of the headrest is at the same
height of the center of gravity of
an occupant's head.
Generally, the center of gravity of
most people's head is similar with
height of the top of their eyes.
Also, adjust the headrest as close
to your head as possible. For this
reason, the use of a cushion that
holds the body away from the
seatback should not be recommended.
• Do not operate vehicle with the
headrests removed as injury to
the occupants may occur in the
event of an accident. Headrests
may provide protection against
neck injuries when properly
adjusted.
• Do not adjust the headrest position of the driver's seat while the
vehicle is in motion.
OVQ039300N-3
1VQA2050
1VQA2057
2nd row seat
3rd row seat

349
Features of your vehicle
Removal
To remove the headrest, raise it as far as
it can go then press the release button
(1) while pulling upward (2).
To reinstall the headrest, put the headrest
poles (3) into the holes while pressing the
release button (1). Then adjust it to the
appropriate height.
Full flat seat
When the vehicle is parked, you can
place the front seat in a reclined position,
nearly flat.
1. Move the rear seat to the farthest rearward position.
2. Move the front seat to the farthest forward position.
3. Remove the headrest.
4. Recline the seatback as far as it can
go to allow the rear seat passenger to
support their legs in the reclined position.
WARNING
Make sure the headrest locks in
position after adjusting it to properly protect the occupants.
1VQA2329
OVQ039001
OVQ039002
2nd row seat
3rd row seat

Features of your vehicle
503
Folding the rear seatback
The rear seatbacks fold forward to provide additional cargo space and to provide access to the cargo area.
To fold the rear seat:
- 2nd row seat
1. Lower the headrest to the lowest position.
2. Pull the seatback recliner (or strap)
and double-fold the seat forward.
3. Push down the seat backward firmly to
lock the catches into the rear anchors
until an audible "click" is heard.
OVQ030211N OVQ036209N
WARNING -
Full flat seat
Never allow a passenger to use the
full flat seat feature while the vehicle is in motion because severe
injury or death could occur in an
accident.
WARNING - Uprighting
seat
When you return the seatback to its
upright position, hold the seatback
and return it slowly. If the seatback
is returned without holding it, the
back of the seat could spring forward resulting in accidental injury
from being struck by the seatback.

351
Features of your vehicle
4. Make sure the green mark on the rear
seat cushion frame is visible and the
catches are locked in position by moving the seat forward and backward or
lifting the front portion of the seat. If the
green mark is invisible and the seat
moves, it is not locked properly.
- 3rd row seat
1. Lower the headrest to the lowest position.
2. Hold the seatback and pull out the
folding strap.
3. Fold the seatback forward and down
firmly until it clicks into place.
To unfold the rear seat:
1. Pull up the seatback recline lever (or
strap).
2. Lift and push the seatback backward
firmly until it clicks into place.
Make sure the seatback is locked in
place.
3. Return the rear safety belt to the proper position.
Double-folding the rear seat
- 2nd row seat
To fold the rear seat:
1.Lower the headrest to the lowest position.
2. Move the seat to rear-most position.
3. Double-fold the rear seat forward by
pull up the seatback recline lever (or
strap).
OVQ036208NOVQ036210N OVQ030211N
2nd row seat

Features of your vehicle
523
4. Pull the folding strap out of the pocket
located under the seat cushion. (2nd
row seat)
5. Lift the entire folded seat forward and
tie the folded seat to the assist handle
using the strap.(2nd row seat)
To unfold the rear seat
1. Untie the strap from the assist handle
and insert the strap into the pocket.
(2nd row seat)
2. Push down the seat backward firmly to
lock the catches into the rear anchors
until an audible “click”is heard.
3. Make sure the green mark on the rear
seat cushion frame is visible and the
catches are locked in position by moving the seat forward and backward or
lifting the front portion of the seat. If the
green mark is invisible and the seat
moves, it is not locked properly.
4. Pull up the seatback recline lever (or
strap).
5. Lift and push the seatback backward
firmly until it clicks into place.
Make sure the seatback is locked in
place.
6. Return the rear safety belt to the proper position.
OVQ036213N
OVQ036209N
OVQ036210NOVQ036212N
2nd row seat

353
Features of your vehicle
Removing the rear seat
- 2nd row seat
To remove a rear seat:
1. Double-fold the rear seat forward by
pulling up the seatback recline lever
(or strap).
2. 2nd row seat
Pull up the catch release lever under
the front of the seat cushion while
reclining the folded seat rearward
slightly to release the front catches
from the anchors.
✽✽
NOTICE
Only use the strap to remove the seat.
3. Remove the entire seat from the floor.
OVQ030211N
2nd row seat
OVQ036214N
2nd row seat
OVQ036215L
2nd row seat

Features of your vehicle
543
To install the rear seat:
1. Put the front anchor strikers along the
front anchors on the floor.
2. Insert two front anchor strikers into the
front anchors.
3. Lift the rear portion of the seat cushion
then push down firmly to lock the
catches into the rear anchors until an
audible “click” is heard.
4. Make sure the green mark on the rear
seat cushion frame is visible and the
catches are locked in position by moving the seat forward and backward or
lifting the front portion of the seat. If the
green mark is invisible and the seat
moves, it is not locked properly.
5. Pull up the seatback recline lever (or
folding strap).
6. Lift and push the seatback backward
firmly until it clicks into place.
Make sure the seatback is locked in
place.
7. Retur n the rear seat belt to the proper
position.
OVQ036209N OVQ036210NOVQ036216N

355
Features of your vehicle
If the rear catches of the seat are locked
into the rear anchors (2) while the front
catches are not locked into the front
anchors (1), do the followings to release
the rear catches from the rear anchors.
1. Lift the seatback (2) while pulling up
the seatback recline lev er (1) and push
the seatback backward firmly until it
clicks into place. Be careful not to fold
the seat backward because the front
catches are not locked.
2. Pull out the seatback recline strap (4)
while lifting up the rear portion of the
seat cushion (3).
3. Then the seatback will be folded forward and rear catches will be released
(5).
4. Remove the seat while lifting up the
rear portion of seat cushion (6).
OVQ037401N/OVQ037402NOVQ036400L OVQ037403N

Features of your vehicle
563
Stowing the rear seat
- 3rd row seat
The rear seat can be folded and stowed
in the luggage compartment to provide
additional cargo space.
To stow the rear seat:
1. Lower the headrest to the lowest position.
2. Fold the seatback by pulling out the
folding strap.
3. Pull the seat by using the stowing
strap.
4. Stow the seat by pushing down firmly.
OVQ036219N
OVQ036220N
WARNING
• Make sure there is no body or
object around the seat and be
careful not to injure your hands or
body under the seat or in the moving parts when stowing or reinstalling the seat.
• Do not sit on the seat stowed with
the seatback upright in the luggage compartment. Sitting on the
unstable and unlocked seat could
cause serious injuries in an accident.
OVQ036218N

357
Features of your vehicle
To use the rear seat:
1. Lift the seat by pulling out the stowing
strap.
2. Release the strap and push the seat
forward firmly until it clicks into place to
insert the catches into the anchors.
✽✽
NOTICE
Do not push down the upper part of the
seatback when pushing the seat forward. Doing so can prevent the catches
from being locked in position.
3. Make sure the catches are locked in
position by moving the seat forward
and backward or lifting the front portion of the seat. If the seat moves, it is
not locked properly.
4. Pull out the folding strap.
5. Lift and pull the seatback backward
firmly until it clicks into place.
Make sure the seatback is locked in
place.
6. Return the rear safety belt to the proper position.
OVQ036222N OVQ036223NOVQ036221N

Features of your vehicle
583
WARNING - Cargo
Cargo should always be secured to
prevent it from being thrown about
the vehicle in a collision and causing injury to the vehicle occupants.
Special care should be taken of
objects placed in the rear seats,
since those may hit the front seat
occupants in a frontal collision.
CAUTION - Rear safety
belts
When returning the rear seatbacks
to the upright position, remember
to return the rear shoulder belts to
their proper position. Routing the
safety belt webbing through the
rear safety belt guides will help
keep the belts from being trapped
behind or under the seats.
WARNING - Cargo loading
Make sure the engine is off, the
transaxle is in P and the parking
brake is applied whenever loading
or unloading cargo. Failure to take
these steps may allow the vehicle to
move if shift lever is inadvertently
moved to another position.
CAUTION - Avoid damag-
ing rear safety buckles
When you fold the rear seatback or
put luggage on the rear seat cushion, insert the buckle in the pocket
between the rear seatback and
cushion. Doing so can prevent the
buckle from being damaged by the
rear seatback or luggage.
CAUTION
Before changing seat position, slip
the seat belt into the trim panel and
close the power outlet cap.
1VQA2190A
1VQA2074B/1VQA2074C
2nd row
3rd row

359
Features of your vehicle
A driver position memory system is provided to store and recall the driver seat,
outside rearview mirror and adjustable
pedal positions with a simple button
operation. By saving the desired positions into the system memory, different
drivers can reposition the driver seat,
outside rearview mirror and adjustable
pedal based upon their driving preference.
If battery is disconnected, the position
memory will be lost and the driving positions should be restored in the system.
Storing positions into memory
using the buttons on the door
Storing driver’s seat positions
1. Shift the transaxle lever into P while
the ignition switch is ON.
2.Adjust the driver seat, outside
rearview mirror and adjustable pedal
to positions comfortable for the driver.
3. Press SET button on the control panel.
The system will beep once.
4. Press one of the memory buttons (1 or
2) within 5 seconds after pressing the
SET button. The system will beep
twice when memory has been successfully stored.
Recalling positions from memory
1. Shift the transaxle lever into P while
the ignition switch is ON.
2.To recall the position in memory, press
the desired memory button (1 or 2).
The system will beep once, then the
driver seat, outside rearview mirror
and adjustable pedal will automatically
adjust to the stored positions.
Adjusting one of the control knobs for the
driver seat, outside rearview mirror and
adjustable pedal while the system is
recalling the stored positions will cause
the movement for that component to stop
and move in the direction that the control
knob is moved. Other components will
continue position recalling.
DRIVER POSITION MEMORY SYSTEM (IF EQUIPPED)
WARNING
Never attempt to operate the driver
position memory system while the
vehicle is moving.
This could result in loss of control,
and an accident causing death,
serious injury,or property damage.
WARNING
Use caution when recalling adjustment memory while sitting in the
vehicle. Push the seat position control knob to the desired position
immediately if the seat moves too
far in any direction.
OVQ039094

Features of your vehicle
603
Storing and recalling with transmitter
Storing with the transmitter
Remove the key from the ignition switch
and lock all the doors using the transmitter.The driver seat, outside rearview mirror and adjustable pedal positions will be
stored in the system memory.
Driver’s position recalling with transmitter
Unlock the door with the transmitter,
positions stored in the system memory
will be recalled automatically.
✽✽
NOTICE
The buzzer sounds 10 times if there is a
malfunction of the memory system.
Have the driver position memory system
checked by an authorized Kia dealer.
Easy access function
When the AUTO button is ON (the indicator light illuminates) with the shift lever
in P position, the system will move the
driver’s seat forward or rearward automatically so you can comfortably enter
and exit the vehicle.
• It will move driver’s seat rearward when
the ignition key is removed.
• It will move driver’s seat forward when
the ignition key is inserted.
Reverse parking aid function
(if equipped)
While the vehicle is moving backward,
the outside rearview mirror(s) will move
downward to aid reverse. depending on
the position of the outside rearview mirror switch (1), the outside rearview mirror(s) will operate as follows:
OVQ039095
1VQA2109

361
Features of your vehicle
L/R : When the remote control outside
rearview mirror switch is selected to
the L (left) or R (right) position, both
outside rearview mirrors will move
downward.
Neutral : When the remote control out-
side rearview mirror switch is
placed in the middle position,
the outside rearview mirrors
will not operate while the vehicle is moving backward.
✽✽
NOTICE
The outside rearview mirrors will automatically revert to their original positions under the following conditions:
1. Ignition switch is in the LOCK position.
2. Shift lever is moved to any position
except R.
3. Remote control outside rearview mirror switch is placed in the middle
position.
To adjust the position of the accelerator
and brake pedals, push the switch with
the shift lever in the P position.
If you push the ▲ portion of the switch,
the pedals move toward the driver.
If you push the ▼ portion of the switch,
the pedals move away from the driver.
Setting the adjustable pedal position
1. Be sure the parking brake is engaged.
2. Move the accelerator and brake pedals to the front most position by pushing the ▼ portion of the switch.
3. Adjust the seat position and the steering wheel angle properly.
4. Move the pedals toward you until you
can fully depress the brake pedal by
pushing the ▲ portion of the switch.
5. Depress the pedals a few times to get
used to the feel after adjusting.
POWER ADJUSTABLE PEDALS (IF EQUIPPED)
1VQA2066
WARNING
• Adjust the pedals after parking
the vehicle on level ground.Never
attempt to adjust the pedals while
the vehicle is moving.
• Never adjust the pedals with your
foot on the accelerator pedal as
this may result in increasing the
engine speed and acceleration.
• Make sure that you can fully
depress the brake pedal before
driving. Otherwise, you may not
be able to hold down the brake
pedal firmly in an emergency
stop.

Features of your vehicle
623
Safety belt restraint system
We strongly recommend that the driver
and all passengers be properly
restrained at all times by using the safety
belts provided with the vehicle. Proper
use of the safety belts decreases the risk
of severe injury or death in accidents or
sudden stops. In most states, and in
Canada, the law requires their use.
All seats have lap/shoulder belts.Inertial
locks in the safety belt retractors allo w all
of the lap/shoulder safety belts to remain
unlocked during normal vehicle operation. This allows the occupants some
freedom of movement and increased
comfort while using the safety belts. If a
force is applied to the vehicle, such as a
strong stop, a sharp turn, or a collision,
the safety belt retractors will automatically lock the safety belts.
Since the inertial locks do not require a
collision in order to lock up, you may
become aware of the safety belts locking
while braking or going around sharp corners.
Always use the rear seat position(s) to
install your child restraint(s).
The rear (or front passenger) safety belts
use a special auto-lock feature designed
to allow a child restraint to be used in
these positions without an added locking
clip. They normally lock only under
extreme or emergency conditions (emergency lock mode). However they can be
adjusted so that they remain fixed and
locked when a child restraint system is
placed in these positions. (Use this autolock mode only to secure a child
restraint, never f or passengers restr ained
by the safety belts.)
The drivers safety belt can only operate
in the emergency lock mode.
Safety belts provide the best restraint
when:
• The seatback is upright.
• The occupant is sitting upright (not
slouched).
• The lap belt is snug across the hips.
• The shoulder belt is snug across the
chest.
• The knees are straight forward.
SAFETY BELTS
WARNING - Safety belts
To minimize the risk of serious or
fatal injury in an accident, the driver
and all passengers should use the
appropriate safety restraints for
their age and size. The presence of
air bags does not change the need
to be properly restrained by a safety belt or size-appropriate child
restraint. In fact, air bags are
designed to work the best when
passengers are correctly restrained
in the vehicle.
• Be sure you are familiar with the
information in this section,
including the information on
infant and child restraints.
• Read the safety warnings on the
sun visors of your vehicle also.
WARNING - Child restraint
in front seat
Never install a child restraint system in the front passenger position,
as an inflating air bag could cause
serious or fatal injury to a child in
that position.

363
Features of your vehicle
WARNING - After a colli-
sion
• Lap/shoulder belt assemblies
may be stretched or damaged
when subjected to the stress and
forces of a collision.
• The entire restraint system
should be inspected following
any collision. All belts, retractors,
anchors and hardware damaged
by a collision should be replaced
before the vehicle is operated
again.
WARNING - Cargo area
Passengers should never be
allowed to ride in the cargo area of
a vehicle. No safety belts are provided for the cargo area. Persons
riding in the vehicle without a fastened safety belt are much more
likely to suffer serious bodily injury
or death during an accident.
WARNING - Twisted belts
A twisted or jammed safety belt
cannot restrain you properly. If you
cannot untwist or unjam the safety
belt, have an authorized Kia dealer
service it immediately. Never drive
or ride with a twisted or jammed
safety belt.
WARNING - Belt use
Safety belts must be used correctly
to work properly in an accident.
Each seating position in your vehicle has a specific safety belt assembly that includes a buckle and
tongue designed to be used together.
Failure to heed these warnings and
follow these instructions will
increase the risk and severity of
injuries and the likelihood of death
in an accident.
(Continued)
(Continued)
• Use the shoulder portion of the
safety belt on the outside shoulder only . Never wear the shoulder
portion under the arm or place it
between your back and seatback.
• Never swing the safety belt
around your neck to fit over the
inside shoulder.
• Never wear the shoulder portion
of the safety belt across the neck
or face.
• Wear the lap portion as low as
possible. Be sure that the lap belt
fits snugly around the hips.
Never wear a lap portion of a
lap/shoulder belt over your waist;
it should always go over the
stronger area of your hips.
• Never use a single safety belt for
more than one person.
• The front seatbacks should
always remain in a comfortable,
upright position when the vehicle
is moving.

Features of your vehicle
643
Safety belt warning light and chime
If the driver's safety belt is not fastened
when the key is turned ON or if it is disconnected after the key is turned ON, the
safety belt warning light will blink until the
belt is fastened.
If the driver's safety belt is not fastened
when the key is turned ON or if it is
unfastened after the key is ON, the safety belt warning chime will sound for
approximately 6 seconds.
WARNING - Safety belt
care
• A damaged belt may not give you
the protection you need in an
accident.
• Inspect your safety belts periodically for excessive wear or damage. Pull out each belt fully and
look for fraying, cuts, burns or
other damage. Pull the safety belt
out and let it retract a number of
times. Make sure that the
lap/shoulder belts return smoothly and easily into the retractor.
• Check the latches to make sure
they latch and release without
interference or delay.
• Never close the doors on any part
of the lap or shoulder belt.
• Any belt not in good condition or
in good working order should be
promptly replaced.
WARNING
Never close the doors on any part
of the lap or shoulder belt. It can
damage the safety belt or buckle
which could increase the risk of
injury in case of an accident.
1GQA2083
WARNING
• When you fasten the seat belt, be
careful not to latch the seat belt in
buckles of other seat.It's very dangerous and you may not be protected by the seat belt properly.
• Do not unfasten the seat belt and
do not fasten and unfasten the
seat belt repeatedly while driving.
This could result in loss of control, and an accident causing
death, serious injury, or property
damage.
• When fastening the seat belt,
make sure that the seat belt does
not pass over objects that are
hard or can break easily.
• Make sure there is nothing in the
buckle. The seat belt may not be
fastened securely.

365
Features of your vehicle
Lap/shoulder belt
To fasten the lap/shoulder belt:
1. Grasp the buckle and tongue plate.
2. Slowly pull the lap/shoulder belt out
from the retractor.
3. Insert the tongue plate (1) into the
open end of the buckle (2) until an
audible “click” is heard, indicating the
belt is locked in the buckle.
4. Position the lap portion (2) of the belt
across your lap as LOW ON THE HIPS
as possible to reduce the risk of sliding
under it during an accident. Adjust the
belt to a SNUG FIT by pulling up on
the shoulder portion (1) of the safety
belt. The belt retractor is designed to
take up excess webbing automatically
and to maintain tension on the belt.For
your safety, do not put any excess
slack into the safety belt at any location.
✽✽
NOTICE
If you are not able to pull out the safety
belt from the retractor, firmly pull the
belt out and release it. Then you will be
able to pull the belt out smoothly.
1GHA2262 1VQH2263
1VQH2264

Features of your vehicle
663
5. Adjust the shoulder anchor position to
your size.To raise the anchor position,
push the anchor up (1). To lower the
anchor position, press (2) the button
(A) and slide the anchor down (3).
After adjustment, make sure the
anchor is locked in position. (if
equipped)
If the height of the adjusting seat belt is
too near your neck, you will not be getting
the most effective protection.The shoulder portion should be adjusted so that it
lies across your chest and midway over
your shoulder nearest the door and not
your neck.
To unfasten the lap/shoulder belt:
Press the release button on the buckle
and allow the belt to slowly retract.
4GQB0338
WARNING
• The height adjuster must be in
the locked position when the
vehicle is moving.
• The misadjustment of height of
the shoulder belt could reduce
the effectiveness of the seat belt
in a crash.
1VQA2068
1st / 2nd row

367
Features of your vehicle
3 Point rear center belt
- 3rd row
To fasten the rear center belt
1. Extract the tongue plate from the hole
on the belt assembly cover and slowly
pull the tongue plates out from the
retractor.
2. Insert the tongue plate (A) into the
open end of the buckle (C) until an
audible “click" is heard, indicating the
latch is locked. Make sure the belt is
not twisted.
3. Pull the tongue plate (B) and insert the
tongue plate (B) into the open end of
the buckle (D) until an audible “click”is
heard, indicating the latch is locked.
Make sure the belt is not twisted.
1VQH3903
CAUTION - Cargo
Be sure that the cargo is securely
loaded in the rear cargo area.
Failing to do so may damage the
rear center safety belt in sudden
stop or certain collisions.
OVQ036225N OVQ036097N

Features of your vehicle
683
There will be an audible “click” when the
tab locks in the buckle. The safety belt
automatically adjusts to the proper length
only after the lap belt is adjusted manually so that it fits snugly around your hips,
if you lean forward in a slow, easy
motion, the belt will extend and let you
move around.If there is a sudden stop or
impact, the belt will lock into position. It
will also lock if you try to lean forward too
quickly.
When using the rear center seat belt, the
buckle with the “CENTER”mark must be
used.
To unfasten the rear center belt
1. Press the release button on the buckle
(D) and remove the tongue plate (B)
from the buckle (D).
2. Retract the rear center seatbelt.
WARNING
When using the rear safety center
belt, you must lock all tongue plates
and buckles. If any tongue plate or
buckle is not locked,it will increase
the chance of injury in the event of
collision.
OVQ036226N 1VQH3904

369
Features of your vehicle
3. Insert the key or similar small rigid
device into the web release button (E)
on the anchor connector. Pull up on
the seat belt web (A) and allow the
webbing to retract automatically.
4. Insert the tongue plate (A) into the
hole on the belt assembly cover.
Stowing the rear safety belt
The rear safety belt can be stowed in the
pocket between the rear seatback and
cushion when not in use.
OVQ036098N
OVQ036227N
CAUTION
When using the seat belt, use it
after taking it out of the guides. If
you pull the seat belt when it is
stored in the guides, it may damage
the guides and/or belt webbing.
OVQ036099N
3rd row seat

Features of your vehicle
703
Proper use and care of the safety
belt system
To ensure that the safety belts provide
the maximum protection, please follow
these instructions:
• Use the belts at all times - even on
short trips.
• If the safety belt is twisted, straighten it
prior to use.
• Keep sharp edges and damaging
objects away from the belts.
• Periodically inspect belt webbing,
anchors, buckles and all other parts for
signs of wear and damage. Replace
damaged, excessively worn or questionable parts immediately.
• To clean the belt webbing, use a mild
soap solution recommended for cleaning upholstery or carpets. Follow the
instructions provided with the soap.
• Do not make modifications or additions
to the safety belt.
• After wearing a safety belt, make sure
it fully retracts to the stowed position.
Do not allow the belt to get caught in
the door when you close it.
Restraint women
Pregnant women should wear lap/shoulder belt assemblies whenever possible
according to specific recommendations
by their doctors. The lap portion of the
belt should be worn AS SNUGLY AND
LOW AS POSSIBLE.
Infants and small children
To increase their safety, infants and
young children should always be
restrained by a restraint system
approved for their age and size.
Never allow a child to stand or kneel on
the seat of a moving vehicle.Never allow
a safety belt to be placed around both a
child and an adult or around two children
at the same time.
It is best for children to be seated in the
rear seats.
Many companies manufacture child
restraint systems (often called child
seats) for infants and small children. An
acceptable child restraint system must
always satisfy Canadian Motor Vehicle
Safety Standards. Make sure that any
child-restraint system you use in your
vehicle is labelled as complying with
Federal Safety Standards.
The child-restraint system should be
chosen to fit both the size of the child and
the size of the vehicle seat.Be sure to follow any instructions provided by the
child-restraint system manufacturer
when installing the child-restraint system.
WARNING - Pregnant
women
Pregnant women must never place
the lap portion of the safety belt
over the area of the abdomen where
the fetus is located or above the
abdomen where the belt could
crush the fetus during an impact.
WARNING - Belt cleaning
Do not bleach or dye the webbing
because this may weaken the webbing fibers and cause them to fail
when restraining an occupant in a
collision.

371
Features of your vehicle
Larger children
As children grow, they may need to use
new child-restraint systems, including
larger child seats or booster seats, which
are appropriate for their increased size.
A child who has outgrown availab le childrestraint systems should use the belts
provided in the vehicle. When seated in
the rear outboard seats, the child should
be restrained by the lap/shoulder belt.
If the shoulder belt portion slightly touches the child’s neck or face, try placing the
child closer to the center of the vehicle. If
the shoulder belt still touches their face
or neck they need to be returned to a
child restraint system. In addition, aftermarket devices are available from independent manufacturers which help pull
the shoulder belt down and away from
the child’s face or neck.
WARNING - Infants and
young children
• Infants and young children are at
much greater risk of serious injury
or death in an accident or sudden
stop if they are unrestrained or
restrained improperly. Follow all
instructions in this section and the
instructions that came with an
approved child safety system.The
child restraint must be correctly
installed in the vehicle, and the
child must be correctly placed in
the child restraint.
• All children under 12 are safest in
the back seat.
• Never install a rear facing infant
seat in the front passenger position. The baby will be injured or
killed by the air bag if it deploys.
•
Never allow a child to stand or
kneel on the seat of a moving vehicle.
WARNING - Shoulder belts
on small children
• Never allow a shoulder belt to be
in contact with a child’s neck or
face while the vehicle is in
motion.
• If safety belts are not properly
worn and adjusted on children,
there is a risk of death or serious
injury.
WARNING - Children on
laps
Never hold a child on your lap or in
your arms in a moving vehicle.
Even a very strong person cannot
hold onto a child in the event of
even a minor collision.
WARNING - Hot metal
parts
Safety belts and seats can become
hot in a vehicle that has been
closed during warm/hot weather;
they could burn a child. Check seat
covers and buckles before you
place a child anywhere near them.

Features of your vehicle
723
Pre-tensioner seat belt
Your vehicle is equipped with driver's and
front passenger's pre-tensioner seat
belts (retractor pretensioner and EFD
(Emergency Fastening De vice)).The pretensioner seat belts may be activated,
when a frontal collision is severe enough,
together with the air bags.
When the vehicle stops suddenly, or if
the occupant tries to lean forward too
quickly, the seat belt retractor may lock
into position. In cer tain frontal collisions,
the pre-tensioner will activate and pull
the seat belt into tighter contact against
the occupant's body.
(1) Retractor Pretensioner
The purpose of the retractor preten-
sioner is to make sure that the shoulder belts fit in tightly against the occupant's upper body in certain frontal
collisions.
(2) EFD (Emergency Fastening Device)
The purpose of the EFD is to make
sure that the pelvis belts fit in tightly
against the occupant's lower body in
certain frontal collisions.
If the system senses excessive tension
on the driver or passenger's seat belt
when the pre-tensioner system activates,
the load limiter inside the retractor pretensioner will release some of the pressure on the affected seat belt.
OXMA033101
WARNING
• Do not put anything near the
buckle. Placing objects near the
buckle may increase the risk of
personal injury in the event of a
collision.
• For your safety, be sure that the
belt webbing is not loose or twisted and always sit properly on
your seat.

373
Features of your vehicle
The seat belt pre-tensioner system consists mainly of the following components.
Their locations are shown in the illustration:
1. SRS air bag war ning light
2. Retractor pre-tensioner assembly
3. SRS control module
4. Emergency fastening device (EFD)
✽✽
NOTICE
• Both the driver's and front passenger's seat belt pre-tensioner system
may be activated not only in certain
frontal collision but also in certain
side collision, if the vehicle is equipped
with a side or curtain air bag.
• When the pre-tensioner seat belts are
activated, a loud noise may be heard
and fine dust, which may appear to be
smoke, may be visible in the passenger
compartment. These are normal operating conditions and are not hazardous.
• Although it is harmless, the fine dust
may cause skin irritation and should
not be breathed for prolonged periods. Wash all exposed skin areas thoroughly after an accident in which the
pre-tensioner seat belts were activated.
• Because the sensor that activates the
SRS air bag is connected with the pretensioner seat belt, the SRS air bag
warning light on the instrument
panel will illuminate for approximately 6 seconds after the ignition switch
has been turned to the ON position,
and then it should turn off.
ODMESA2024
WARNING
To obtain maximum benefit from a
pre-tensioner seat belt:
1. The seat belt must be worn correctly and adjusted to the proper
position. Please read and follow
all of the important information
and precautions about your vehicle’s occupant safety features –
including seat belts and air bags
– that are provided in this manual.
2. Be sure you and your passengers always wear seat belts properly.

Features of your vehicle
743
CAUTION
If the pre-tensioner seat belt system
are not working properly, this warning light will illuminate even if there
is no malfunction of the SRS air
bag. If the SRS air bag warning light
does not illuminate when the ignition switch is turned ON, or if it
remains illuminated after illuminating for approximately 6 seconds, or
if it illuminates while the vehicle is
being driven, have an authorized
Kia dealer inspect the pre-tensioner
seat belt and SRS air bag system as
soon as possible.
WARNING
• Pre-tensioners are designed to
operate only one time. After activation, pre-tensioner seat belts
must be replaced. All seat belts,
of any type, should always be
replaced after they have been
worn during a collision.
• The pre-tensioner seat belt
assembly mechanisms become
hot during activation. Do not
touch the pre-tensioner seat belt
assemblies for several minutes
after they have been activated.
• Do not attempt to inspect or
replace the pre-tensioner seat
belts yourself.This must be done
by an authorized Kia dealer.
• Do not strike the pre-tensioner
seat belt assemblies.
• Do not attempt to service or
repair the pre-tensioner seat belt
system in any manner.
(Continued)
(Continued)
• Improper handling of the pre-tensioner seat belt assemblies, and
failure to heed the warnings not
to strike, modify, inspect, replace,
service or repair the pre-tensioner seat belt assemblies may lead
to improper operation or inadvertent activation and serious injury.
• Always wear the seat belts when
driving or riding in a motor vehicle.
• If the vehicle or pre-tensioner
seat belt must be discarded, contact an authorized Kia dealer.

375
Features of your vehicle
Load limiter (if equipped)
When the pre-tentioner activates, if the
system senses excessive seat belt tension on the driver or passenger’s seat
belt, the load limiter inside the pre-tensioner will release some of the pressure
on the affected seat belt.
WARNING - Air bag/pre-
tensioner seat belt warning
light
If the SRS air bag warning light
does not illuminate when the ignition key is turned to “ON”, or if it
remains illuminated after approximately 6 seconds,or if it illuminates
while the vehicle is being driven,
please have an authorized Kia dealer inspect the pre-tensioner and air
bag system as soon as possible.
WARNING - Hot parts
The pre-tensioner assembly mechanism may become hot during activation. Do not touch the pre-tensioner seat belt assembly for several minutes after they have been activated.
WARNING
If the vehicle or pre-tensioner seat
belt must be discarded, contact an
authorized Kia dealer.
WARNING - Replacing
used pre-tensioners
• Pre-tensioners are designed to
operate once. After activation,
pre-tensioner seat belts must be
replaced. All seat belts, of any
type, should always be replaced
after they have been worn during
a collision.
• Do not attempt to replace the pretensioners yourself. This must be
done by an authorized Kia dealer.
WARNING - Damaging the
pre-tensioners
• Do not hit or strike the pre-tensioner assemblies, especially
with a tool or heavy object.
• Do not attempt to service or
repair the pre-tensioners.
WARNING - Air bag/Pre-
tensioner seat
belt dust
When the air bags and pre-tensioners are activated, a loud noise may
be heard and fine dust, which may
appear to be smoke, may be visible
in the passenger compartment.This
dust is not toxic. The dust may
cause skin irritation and should not
be breathed for prolonged periods.
Ventilate the vehicle after impact
and wash your hands and face thoroughly after an accident.

Features of your vehicle
763
We strongly recommend the use of a
child seat or infant seat for small children
and babies, and it is required by law in
almost all states.This child seat or infant
seat should be of appropriate size for the
child and should be installed in accordance with the manufacturer's instructions.
Children riding in the car should sit on
the rear seat and must always be properly restrained to minimize the risk of injury
in an accident, sudden stop or sudden
maneuver. According to accident statistics, children are safer when properly
restrained in the rear seats than in the
front seat.
Child restraint systems are designed to
be secured in vehicle seats by lap belts
or the lap belt portion of a lap/shoulder
belt or by a LATCH system (if equipped).
Children could be injured or killed in a
crash if their restraints are not properly
secured.For small children and babies, a
child seat or infant seat must be used.
Before buying a particular child restraint
system, make sure it fits your car and
seat belts, and fits your child. Follow all
the instructions provided by the child
seat manufacturer when installing the
child restraint system.
CHILD RESTRAINT SYSTEM
WARNING - Child
restraints
• A child restraint system must be
placed in the rear seat. Never
install a child or infant seat on the
front passenger's seat.
Should an accident occur and
cause the passenger air bag to
deploy, it could severely injure or
kill an infant or child seated in the
front seat.
• Since a safety belt or child
restraint system can become very
hot if it is in a closed vehicle, be
sure to check the seat cover and
buckles before placing a child
there.
(Continued)
(Continued)
• When the child restraint system
is not in use, store it in the luggage area or fasten it with a safety belt so that it will not be thrown
forward in the case of a sudden
stop or an accident.
• Children who are too large to be
in a child restraint should sit in
the rear seat and be restrained
with the available lap/shoulder
belts.
• When using the vehicles
lap/shoulder safety belts, always
make sure that the shoulder belt
portion is positioned midway
over the shoulder, never across
the neck or behind the back. The
lap belt portion of the lap/shoulder belt must always be positioned as low as possible on the
child's hips and as snug as possible.
• If the vehicle’s safety belt will not
properly fit the child, you must
use an appropriate child restraint
or booster seat in the rear.
(Continued)
1JBH3051

377
Features of your vehicle
Installing a child restraint system
For safety reasons, we recommend that
the child restraint system be used in the
rear seats.
Since all passenger safety belts move
freely under normal conditions and only
lock under extreme or emergency conditions (emergency lock mode), you must
manually change these safety belts to
the auto lock mode to secure a child
restraint.
WARNING - Child seat
installation
• Before installing the child
restraint system, read the instructions supplied by the child
restraint system manufacturer.
• If the safety belt does not operate
as described in this section, have
the system checked immediately
by your authorized Kia dealer.
• Failure to observe this manual's
instructions regarding child
restraint system and the instructions provided with the child
restraint system could increase
the chance and/or severity of
injury in an accident.
WARNING
Never place a rear-facing child
restraint in the front passenger
seat, because of the danger that an
inflating passenger side air bag
could impact the rear-facing child
restraint and kill the child.
(Continued)
• Never allow a child to stand up or
kneel while the vehicle is moving.
• Never use an infant carrier or
child seat that "hooks" over a
seatback. It will not provide adequate protection in an accident.
• Never allow a child to be held
while they are in a moving vehicle, as this could result in serious
injury to the child in the event of
an accident or a sudden stop.
Holding a child in a moving vehicle does not provide the child
with any protection during an
accident, even if the person holding the child is wearing a seat
belt.
• After an accident, have an authorized Kia dealer check the child
restraint system, seat belt, tether
anchor and lower anchor.
• If there is not enough space to
place the child restraint system
because of the driver's seat,
install the child restraint system
in the rear right seat.

Features of your vehicle
783
Securing a child restraint seat
Tether anchor system
Child restraint hook holders are located
on the back of the rear seat cushions.
1. Route the child restraint seat strap
over the seatback.
For vehicles with adjustable headrest,
route the tether strap under the headrest and between the headrest posts,
otherwise route the tether strap over
the top of the seatback.
2. Connect the tether strap hook to the
appropriate child restraint hook holder
and tighten to secure the seat.
WARNING - Tether strap
If the tether strap is secured incorrectly ,the child restraint seat may not
be restrained properly in the event of
a collision. Do not mount more than
one child restraint seat to a tether
anchorage, since the anchorage can
then fail in a collision.
WARNING - Child restraint
check
Check that the child restraint system is secure by pushing and
pulling it in different directions.
Incorrectly fitted child restraints
may swing, twist, tip or come away
causing death or injury.
OVQ036230R
OVQ036228N
OVQ037229N
2nd row seat
3rd row seat

379
Features of your vehicle
Child seat lower anchors
Some child seat manufacturers make
child restraint seats that are labeled as
LATCH or LATCH-compatible child
restraint system. LATCH stands for
"Lower Anchors and Tethers for
Children". These seats include two rigid
or webbing mounted attachments that
connect to two LATCH anchors at specific seating positions in your vehicle. This
type of child restraint seat eliminates the
need to use seat belts to attach the child
seat in the rear seats.
LATCH anchors have been provided in
your vehicle. The LATCH anchors are
located in the left and right outboard rear
seating positions. Their locations are
shown in the illustration. There is no
LATCH anchor provided for the center
rear seating position.
The LATCH anchors are located between
the seatback and the seat cushion of the
rear seat left and right outboard seating
positions.
WARNING
- Child restraint anchorage
• Child restraint anchorages are
designed to withstand only those
loads imposed by correctly fitted
child restraints. Under no circumstances are they to be used for
adult seat belts or harnesses or
for attaching other items or
equipment to the vehicle.
• The tether strap may not work
properly if attached somewhere
other than the correct tether
anchor.
OVQ036231NOVQ037300N-1

Features of your vehicle
803
Follow the child seat manufacturer’s
instructions to properly install child
restraint seats with LATCH or LATCHcompatible attachments.
Once you have installed the LATCH child
restraint, assure that the seat is properly
attached to the LATCH and tether
anchors.Also, test the child restraint seat
before you place the child in it. Tilt the
seat from side to side. Also tr y to tug the
seat forward.Check to see if the anchors
hold the seat in place.
Placing a passenger safety belt
into the auto lock mode
The use of the auto lock mode will
ensure that the normal movement of the
child in the vehicle does not cause the
safety belt to be pulled out and loosen
the firmness of its hold on the child
restraint system. To secure a child
restraint system, use the following procedure.
WARNING
If the child restraint is not anchored
properly, there is a significant risk
of a child being seriously injured or
killed in a collision.
WARNING - LATCH lower
anchors
LA TCH lo wer anchor s are onl y to be
used with the left and right rear outboard seating positions. Never
attempt to attach an LATCH
equipped seat in the center seating
position. You may damage the
anchors or the anchors may fail and
break in a collision.
WARNING
Install the child restraint seat fully
rearward against the seatback with
the seatback in a vertical position,
not reclined.
WARNING
• When using the vehicle's
"LATCH" system to install a child
restraint system in the rear seat,
all unused vehicle rear seat belt
metal latch plates or tabs must be
latched securely in their seat belt
buckles and the seat belt webbing
must be retracted behind the
child restraint to prevent the child
from reaching and taking hold of
unretracted seat belts. Unlatched
metal latch plates or tabs may
allow the child to reach the unretracted seat belts which may
result in strangulation and a serious injury or death to the child in
the child restraint.
• Do not place anything around the
lower anchors. Also make sure
that the seat belt is not caught in
the lower anchors.
CAUTION
Do not allow the rear seat belt webbing to get scratched or pinched by
the Child-seat latch and LATCH
anchor during the installation.

381
Features of your vehicle
Installing a child restraint system by
lap/shoulder belt
To install a child restraint system on the
outboard or center rear seats, do the following:
1. Place the child restraint system in the
seat and route the lap/shoulder belt
around or through the restraint, following the restraint manufacturer’s
instructions. Be sure the safety belt
webbing is not twisted.
2. Fasten the lap/shoulder belt latch into
the buckle.Listen for the distinct “click”
sound.
Position the release button so that it is
easy to access in case of an emergency.
3. Pull the shoulder por tion of the safety
belt all the way out.When the shoulder
portion of the safety belt is fully
extended, it will shift the retractor to
the “Auto Lock” (child restraint) mode.
E2MS103005 E2BLD310
MMSA3028

Features of your vehicle
823
4. Slowly allow the shoulder portion of
the safety belt to retract and listen for
an audible “clicking” or “ratcheting”
sound.This indicates that the retractor
is in the “Auto Loc k”mode. If no distinct
sound is heard, repeat steps 3 and 4.
5. Remove as much slack from the belt
as possible by pushing down on the
child restraint system while feeding the
shoulder belt back into the retractor.
6. Push and pull on the child restraint
system to confirm that the safety belt is
holding it firmly in place. If it is not,
release the safety belt and repeat
steps 2 through 6.
7. Double check that the retractor is in
the “Auto Lock” mode by attempting to
pull more of the safety belt out of the
retractor.If you cannot, the retractor is
in the “Auto Lock” mode.
To remove the child restraint, press the
release button on the buckle and then
pull the lap/shoulder belt out of the
restraint and allow the safety belt to
retract fully.
When the safety belt is allowed to
retract to its fully stowed position, the
retractor will automatically switch
from the “Auto Lock” mode to the
emergency lock mode for normal
adult usage.
MMSA3029 MMSA3030
WARNING - Auto lock
mode
The lap/shoulder belt automatically
returns to the “emergency lock
mode” whenever the belt is allowed
to retract fully. Therefore, the preceding seven steps must be followed each time a child restraint is
installed.
If the safety belt is not placed in the
“Auto lock” mode, severe injury or
death could occur to the child
and/or other occupants in the vehicle in a collision, since the child
restraint will not be effectively held
in place.

383
Features of your vehicle
AIR BAG
- ADVANCED SUPPLEMENTAL RESTRAINT SYSTEM
Driver’s air bag
Front passenger’s
air bag
Curtain Air bag
SRS control module
OVQ031094N-1/1VQA2076/OVQ028077/OVQ037900N/OVQ036017N/OVQ031700/1VQA2323/1VQA2080/OVQ036096N/OVQ036095N/1VQA2081
Side air bag
Occupant detection system
Front seat position
sensor
Side impact sensor
Front impact sensor

Features of your vehicle
843
(1) Driver’s air bag
(2) Front passenger’s air bag
(3) Side air bag*
(4) Curtain Air bag*
(5) Side impact sensor*
(6) Front impact sensor
(7) Occupant detection system
(8) Front seat position sensor
(9) SRS Control Module
■ Air bag inflation conditions
■ Air bag non-inflation conditions
■ Air bag warning light
■ SRS care
■ Air bag warning label
*: if equipped
What your air bag system does
Driver’s air bag and front passenger’s air
bag are designed to supplement the protection offered by the safety belt in certain frontal collisions. Likewise, side air
bag and curtain air bags are designed to
supplement the protection offered by the
safety belt in side collisions. Safety belts
are designed to reduce the injury of the
driver or passengers in case of impact or
collision. No safety belt or air bag system
can completely eliminate injuries that
may cause in collisions or impacts. To
help reduce impact on driver or passengers in any collision, safety belts must be
correctly worn.
What your air bag system does
not do
The air bag system is designed to supplement the protection offered by the
safety belt system. IT IS NOT A SUB-
STITUTE FOR THE SAFETY BELT.
The importance of using
safety belts
There are four very important reasons to
use safety belts ev en with an air bag supplemental restraint system.They:
• help keep you in the proper position
(away from the air bag) when it inflates .
• reduce the risk of harm in rollover, side
impact (vehicles not equipped with
side and curtain air bags) or rear
impact collisions, because an air bag is
not designed to inflate in such situations and even a side curtain air bag is
designed to inflate only in certain side
impact collisions.
• reduce the risk of harm in frontal or
side collisions which are not severe
enough to actuate the air bag supplemental restraint system.
• reduce the risk of being ejected from
your vehicle.

385
Features of your vehicle
Occupant detection system
The occupant detection system detects
the presence of a passenger in the front
passenger's seat and will turn off the front
passenger's air bag under certain conditions.
The occupant detection system is
designed to detect the presence of a
properly-seated occupant and determine
if the front passenger's air bag should be
enabled (may inflate) or not.
Only the front passenger front air bag is
controlled by the Occupant Detection
System.
WARNING - Air bags &
safety belts
• Even in vehicles with air bags,
you and your passengers must
always wear the safety belts provided in order to minimize the risk
and severity of injury in the event
of a collision or rollover.
• Always wear your safety belt. It
can help keep you away from the
air bags during heavy braking
just before a collision.
• If occupants are not wearing safety belts or correctly seated, they
cannot be protected, and thus
face serious injury or death.
• Driver’s and front passenger’s air
bag are designed to inflate only in
certain frontal collision, and side
and curtain air bags are designed
to inflate in certain side impacts.
Frontal air bags will generally not
provide protection in side impacts
(vehicles not equipped with side
and curtain air bags) or rear
impacts, rollovers, less severe
frontal collisions.They will not provide protection from later impacts
in a multi-impact collision.
(Continued)
(Continued)
• If your vehicle has been subjected to flood conditions (e.g.
soaked carpeting/standing water
on the floor of the vehicle, etc.) or
if your vehicle has become flood
damaged in any way, do not
attempt to start the vehicle or put
the key in the ignition before disconnecting the battery.
Disregarding this precaution may
cause air bag deployment, which
could result in serious personal
injury or death. If your vehicle is
subjected to flooded conditions,
before starting the vehicle, have
the vehicle towed to an authorized Kia dealer for inspection
and necessary repairs.
OVQ036096N

Features of your vehicle
863
Main components of occupant detection system
• Detection devices located under the
front passenger seat frame.
• Electronic system to determine
whether passenger air bag systems
(both front and side) should be activated or deactivated.
• A indicator light ocated on the instrument panel which illuminates the words
“PASSENGER AIR BAG OFF” passenger air bag system is deactivated.
• The instr ument panel air bag indicator
light is interconnected with the occupant detection system.
If there is no passenger in the front passenger seat or if the passenger in the
front passenger seat is very light, (such
as a child), the front PASSENGER AIR
BAG OFF indicator may illuminate.
When this indicator is ON, the front passenger’s air bag will not operate.
If there is no passenger in the front passenger's seat, the PASSENGER AIR
BAG OFF indicator comes on, and the
system shuts off the front passenger's
front air bag.
Always be sure that you and all vehicle
occupants are seated and restrained
properly (sitting upright with the seat in
an upright position, centered on the seat
cushion, with the person's legs comfortably extended, feet on the floor, and
wearing the safety belt properly) for the
most effective protection by the air bag
and the safety belt.
• The OCS may not function properly if
the passenger takes actions which can
defeat the detection system. These
include:
(1) Failing to sit in an upright position.
(2) Leaning against the door or center
console.
(3) Sitting towards the sides or the front
of the seat.
(4) Putting legs on the dashboard or rest-
ing them on other locations which
reduce the passenger weight on the
front seat.
(5) Improperly wearing the safety belt.
(6) Reclining the seat back.
OVQ038012N

387
Features of your vehicle
• The "PASSENGER AIR BAG OFF"
indicator illuminates after the ignition
key is turned to the "ON" position or
after the engine is started. If the front
passenger seat is unoccupied or is
occupied by very small person, or is
occupied by someone who is improperly seated, the "PASSENGER AIR
BAG OFF" indicator will remain illuminated. If the front passenger seat is
occupied by someone of adult size and
body shape, the "PASSENGER AIR
BAG OFF" indicator will turn off after
approximately 4 seconds.
• If the front passenger's seat is unoccupied, the “PASSENGER AIR BAG
OFF” indicator will turn on, and the
front passenger's air bag will not
deploy in frontal crashes.
• If the “PASSENGER AIR BAG OFF”
indicator illuminates, the front passenger’s air bag will not deploy in frontal
crashes.
• If the front passenger’s seat is occupied by a person of adult size, the
“PASSENGER AIR BAG OFF” indicator is not illuminated and the front passenger’s air bag will deploy in frontal
crashes.
Condition and operation in the front passenger occupant detection system
Condition detected by
the occupant detection
system
1. Adult *
1
2. Child*2or child
restraint system
3. Unoccupied
Off
On
On
Off
Off
Off
Activated
Deactivated
"PASSENGER AIR
BAG OFF" indicator
light
SRS warning light
Front passenger
air bag
Deactivated
Indicator/Warning light Devices
*1The system detects a person who is generally adult size as an adult, thus allowing the pas-
senger air bag to deploy. When a smaller adult sits in the front passenger seat, the system
may detect their body shape as that of a child, thus preventing air bag deployment.
*
2
When a larger child who has outgrown a child restraint system sits in the front passenger seat,
the system may recognize him/her as an adult depending on his/her body shape or seating
position, thus permitting air bag deployment.
CAUTION
If the "PASSENGER AIR BAG OFF" indicator illuminates or blinks continuously when a person of adult size sits in the front passenger's seat, it could be
because that person isn't sitting properly in the seat. If this happens, turn the
vehicle off, make sure the seat back is not reclined, have the passenger center on the seat cushion, with legs comfortably extended, and the safety belt
properly positioned. Restart the vehicle and have the person remain in this
position long enough to allow the system to detect the person and activate the
passenger air bag.

Features of your vehicle
883
WARNING
• Even though your vehicle is
equipped with the occupant
detection system, do not install a
child restraint system in the front
passenger seat. The child could
be severely injured or killed if the
air bag deploys. Children are
afforded the most protection in
the event of an accident when
they are restrained by the proper
restraint system in the rear seat.
• If the "PASSENGER AIR BAG
OFF" indicator is illuminated
when the front passenger's seat
is occupied by a person of adult
size who is seated properly, or if
the "PASSENGER AIR BAG OFF"
indicator" is not illuminated when
the front passenger's seat is
unoccupied or occupied by a very
small person,the occupant detection system is not working properly. Have your vehicle immediately inspected by your Kia dealer
if the occupant detection system
is not working properly.
(Continued)
(Continued)
• If a very low weight adult is seated in the front passenger seat,the
occupant detection system may
or may not turn off the right front
passenger air bag, depending
upon the person's seating position and body type. Everyone in
your vehicle should wear a safety
belt properly -- whether or not
there is an air bag for that person.
• If the front seat passenger
changes their seating position
(for example, by not sitting
upright, by sitting on the edge of
the seat, or by otherwise being
out of position), the "PASSENGER AIR BA G OFF" indicator ma y
be turned on, and the passenger
air bag may not deploy in a collision. Always be sure to sit properly in the front passenger seat
and wear the safety belt properly
and do not do any of the following.
(Continued)
CAUTION
If the occupant detection system is
not working properly, the air bag
warning light on the instrument
panel will illuminate because the
passenger’s air bag is connected
with the occupant detection system.
If there is a malfunction of the occupant detection system, the
"PASSENGER AIR BAG OFF" indicator will not illuminate and the
front passenger's air bag will deploy
in either a side or frontal crashes
even if there is child or no occupant
in the front passenger's seat.
Have an authorized Kia dealer
inspect the occupant detection system with the SRS air bag system as
soon as possible if any of following
occur;
• The SRS air bag warning light
does not illuminate when the ignition key is turned to "ON" position.
• The SRS air bag warning light
remains illuminated after illuminating or blinking for approximately 6 seconds.
• The SRS air bag warning light illuminates while the vehicle is being
driven.

389
Features of your vehicle
1KMN3663
1KMN3664
1KMN3665
- Never sit with hips shifted
towards the front of the seat.
- Never lean on the door or center
console.
- Never sit on one side of the front
passenger seat.
- Never place feet on the dashboard.
(Continued)
OVQ036013N
1KMN3662
- Never put a heavy load in the
front passenger seat or seatback
pocket.
- Never excessively recline the
front passenger seatback.
OVQ036014N
- Never place feet on the front passenger seatback.
(Continued)

Features of your vehicle
903
✽✽
NOTICE
• If luggage or other objects are placed
on the front passenger's seat or if the
temperature of the seat changes while
the seat is unoccupied, the "PASSENGER AIR BAG OFF" indicator may
blink. These conditions do not indicate a problem.
•
Do not put heavy objects on the front
passenger's seat. This may cause front
passenger air bag deployment in the
event of an accident, thus increasing
your repair costs.
WARNING
• The front seat passenger air bag
is much larger than the steering
wheel air bag and inflates with
considerably more force. It can
seriously hurt or kill a passenger
who is not in the proper position
and wearing the safety belt properly.The front passengers should
always move their seat as far
back as practical and sit back in
their seat.
•
It is essential that the front passenger always wears their safety
belts, even when the vehicle is
moving in a parking lot or up a driveway into garage.
(Continued)
(Continued)
Any other such replacement or
modification could adversely
affect the operation of the occupant detection system and your
advanced air bags. For the same
reason, do not attach anything to
the seat, dashboard or door,even
temporarily. If the system is
adversely affected, it could cause
severe personal injuries or death
in a collision.
•
Do not put a heavy load in the front
passenger seatback pocket or on
the front passenger seat. Do not
hang onto the front passenger
seat. Do not hang any items such
as seatback table on the front passenger seatback. Do not place feet
on the front passenger seatback.
Do not place any items under the
front passenger seat. Any of these
could interfere with proper sensor
operation.
(Continued)
• Kia does not endorse nor will it
support any changes to any part
or structure of the vehicle that
could affect the advanced air bag
system, including the occupant
detection system.
Specifically, the front passenger
seat, dashboard or door should
not be replaced except by an
authorized Kia dealer using original Kia parts designed for this
vehicle and model.
(Continued)
1KMN3666
- Always sit in a proper seating
position.

391
Features of your vehicle
Air bag system components
The main components of your SRS are:
• To indicate that your vehicle is
equipped with air bags, the corresponding air bag covers are marked
with “SRS AIR BAG”.
- Driver’s air bag
- Passenger’s air bag
- Side air bag
- Curtain air bag
• A diagnostic system that continually
monitors the system operation.
• An indicator light to warn you of a possible problem with the system.
• Emergency power backup in case your
car’s electrical system is disconnected
in a crash.
The SRS uses a collection of sensors to
gather information about the driver’s seat
position, the driver’s and front passenger’ s
safety belt usage and impact severity.
The driver’s seat position sensor, which
is installed on the seat track, determine if
the seat is fore or aft of a reference position. Similarly, the safety belt usage sensors determine if the driver and front passenger’s safety belts are fastened.These
sensors provide the ability to control the
SRS deployment based on how close the
driver’s seat is to the steering wheel,
whether or not the safety belts are fastened, and the severity of the impact.
(Continued)
• If the driver brakes the vehicle
heavily prior to an impact, unbelted occupants will be thrown forward. If the front passenger is not
wearing the safety belts, they will
be directly in front of the storage
compartment when deployment
occurs. In that situation, serious
injury or death is possible.
• Never allow front passenger to
put their hands, feet or face on or
close to the instrument panel. In
the event of air bag deployment,
such a mispositioned occupant
would be likely to suffer severe
injury or death.
• Never allow children, pregnant
women or weak persons to sit in
the front passenger seat. Do not
put child restraint system on the
front passenger's seat either.
They may be seriously injured by
the air bag inflation when air bag
deploys.
(Continued)
(Continued)
• Do not put objects or stickers on
the instrument panel. Do not
apply any accessory to the front
windshield. Do not install aftermarket mirrors or accessories on
the factory-installed rearview mirror. Any of these could interfere
with the deployment of the air bag
or could hit your body at high
speed and cause severe bodily
injury and even death.
 Loading...