

Page 1
General information / 1
How to use this manual / 1
Notes on operating instructions / 2
Class 1 laser product / 2
Safety instructions / 2
RDS (Radio Data System) / 3
Notes on audio CDs / 3
Handling CDs / 3
Cleaning the unit / 3
Operation / 4
Control elements / 4
Menu operation / 5
Audio / 6
Sound settings / 6
Radio mode / 7
RDS on FM / 8
CD mode / 9
MP3 mode / 10
CDC mode / 11
USB Hub / 12
Auxiliary In / 12
Steering wheel remote control / 13
Setup / 14
Troubleshooting / 16
Contents
1
Page 2
WARNING
CAUTION
CAUTION
expose the user to invisible laser rays
which exceed the limits for Class 1 laser
products.
WARNING
Don’t use a cellular phone when you are driving. You must stop at a safe place to use a celluar phone.
WARNING
When driving you vehicle, be sure to keep the
volume of the unit set low enough to allow you
to hear sounds coming from the outside.
CAUTION
• Do not place beverages close to the audio
system. The audio system mechanism may
be damaged if you spill them.
• Do not strike or allow anything to impact the
audio system, damage to the system mechanisms could occur.
CLASS 1
LASER PRODUCT
WARNING
Make all inputs via the remote control only
when the vehicle is stationary, or have the passenger make them. Otherwise, you may endanger the occupants and other road users.
Safety instructions
WARNING
Avoid inserting any foreign objects into the
slot of this player. Failure to observe this may
cause malfunction due to the precise mechanism of this unit.
WARNING
Keep the volume level low enough to be aware
of road and traffic conditions.
WARNING
Do not open covers and do not repair yourself.
Refer servicing to qualified personnel.
Notes on USB stick (thumb drive)
WARNING
• We strongly recommend only using USB
sticks (thumb drives) of well-known manufacturers.
• On no account must other USB devices
such as hard discs or other digital equipment or multi plug USB hub be connected to
the USB hub. Connecting other devices can
cause malfunction or even destroy the audio
equipment.
• Avoid using the USB memory when it might
hinder your safety driving.
• It is possible that noise is heard during playback when using the AUX-IN together with
the power outlet due to system-related not a
malfunction. If this happens, use the power
source of the AUX device.
• In rare cases it is possible that an USB stick
(thumb drive) is not recognized by the unit
or may cause a malfunction. Please only use
USB sticks that comply with the USB thumb
drive specifications.
Page 3
3
General information
of station name.
mation concerning the radio station.
program type.
retuning to best alternative frequency.
announcements.
Automatic fade-in of traffic announcements onother stations.
Notes on CD formats
The following CD formats are supported by
the CD player:
CD Audio (CD-DA in accordance with
the Red Book Standard);
CD-R/RW (in accordance with
Orange Book, part 2/3)
Multisession CD (in accordance with
multisession CD specification 1.0)
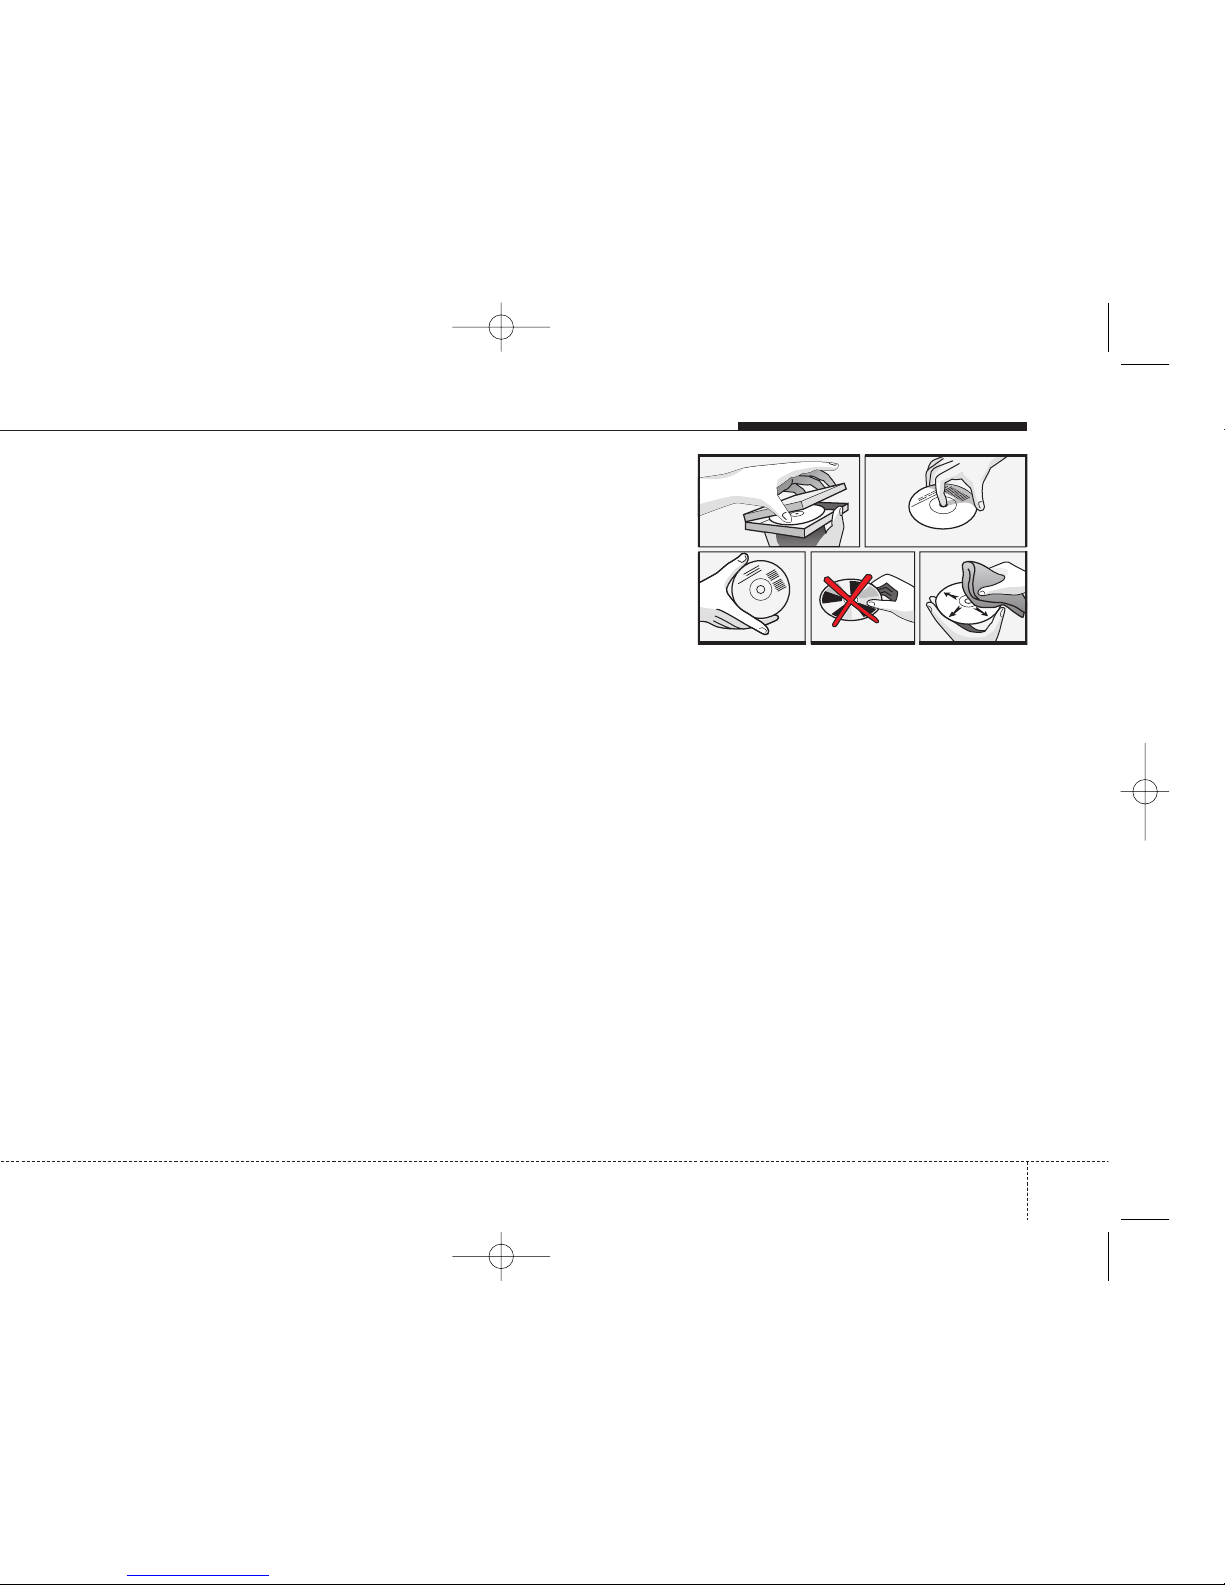
Handling CDs
Avoid leaving fingerprints on the CD
when removing it.
Always store map and audio CDs in their
protective covers.
Always ensure that CDs are clean and
dry before inserting.
Protect CDs from heat and direct sunlight.
Cleaning the unit
Do not clean using cleaning fluid, alcohol
or other solvents. Use only a damp cloth.
Page 4
2
3
4
5 6
7
8
9
10
11
12
13
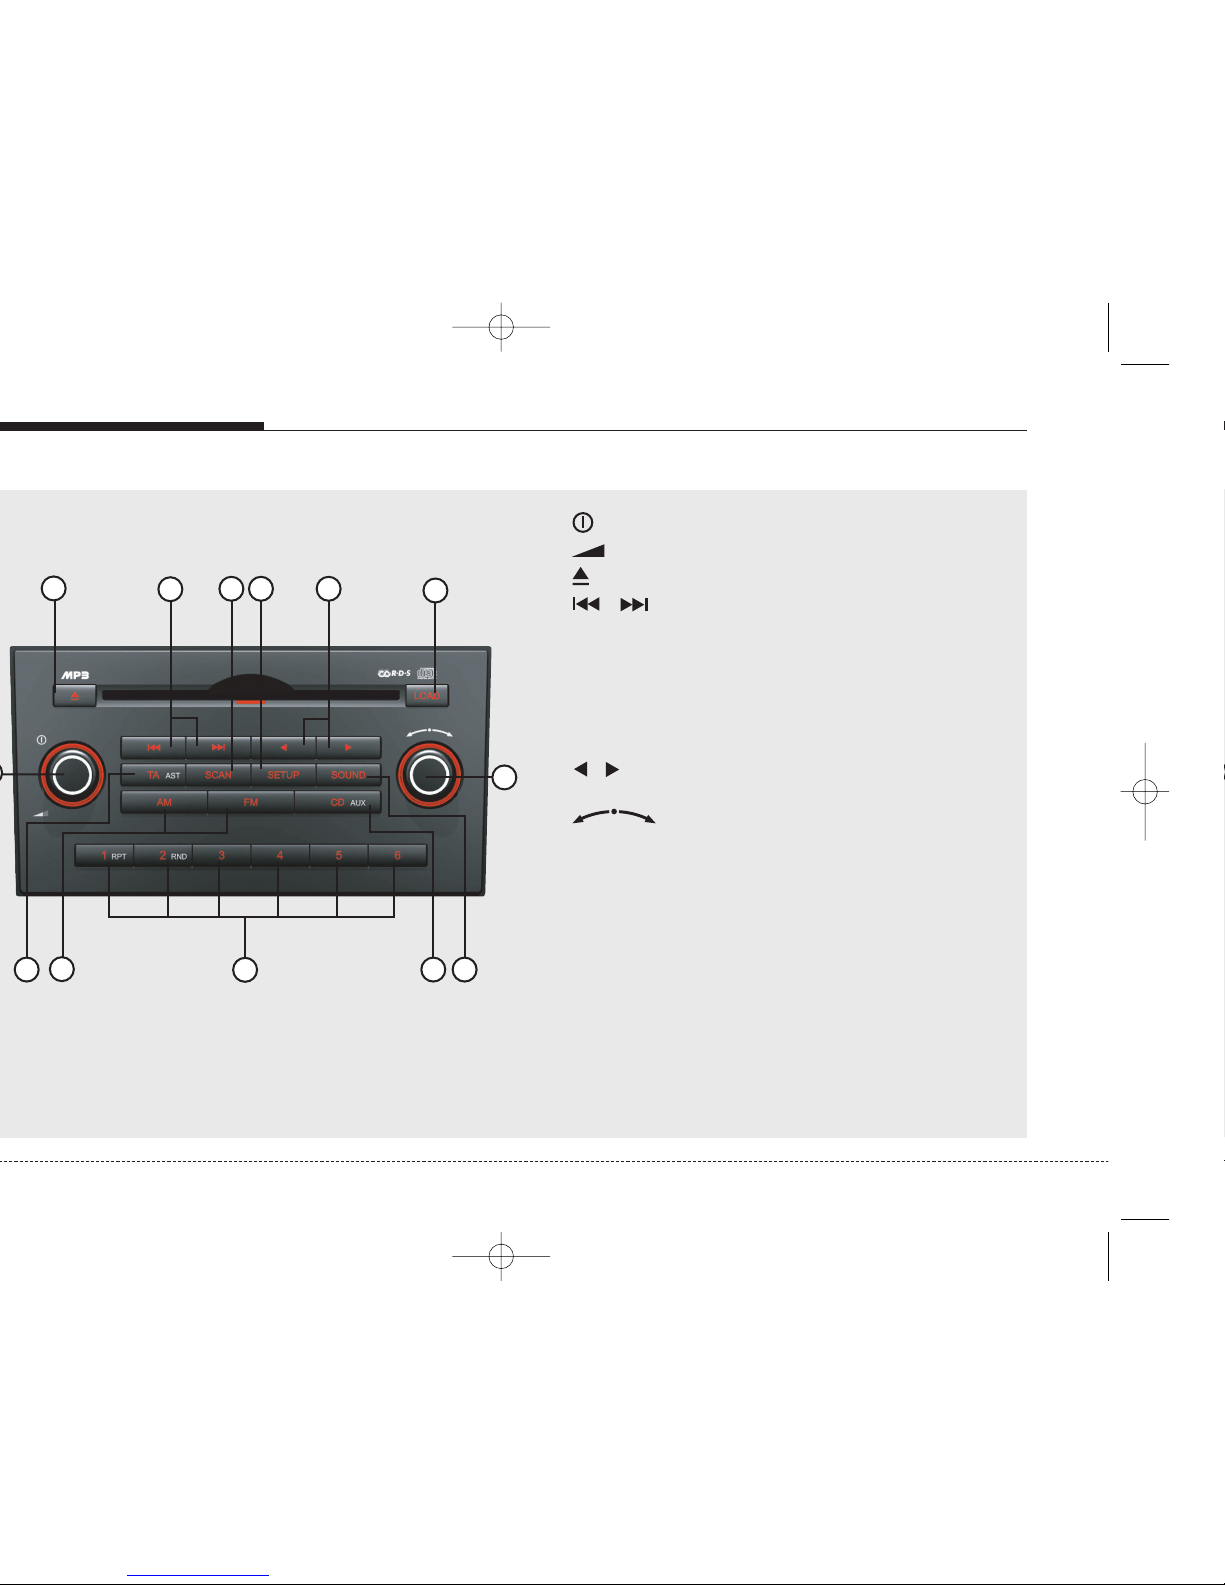
1 . . . . . . . . . Press: Switching on/ off
Turn: Volume control
2 . . . . . . . . . . CD eject button
3
/
. . . . FM: Previous or next station
CD: Previous or next track
CDC: Previous or next track
4 SCAN . . . . . . . . FM: Frequency scans
CD/CDC: Scan first 10 secs of each
track of the CDs.
5 SETUP . . . . . . . Opens the setup menu containing
setting at each feature.
6
/
. . . . . . . . . MP3 only: change the current playback folder.
7 LOAD* . . . . . . . CDC: Load CDs into the unit.
8 . . . FM/CD/CDC: Rotary knob to manually
seek up/down.
SETUP: To adjust settings.
9 SOUND . . . . . . Opens the menu for the sound settings.
10 CD (AUX) Short press: Change the current source to
CD mode or USB (if connected).
Long press: Auxiliary (if connected)
11 1 to 6 . . . . . . . . FM/CD/CDC: Press to tune to desired stored
station or to select desired disc in CDC.
RPT . . . . . . . . . CD/CDC: To activate repeat track
RND . . . . . . . . . CD/CDC: To activate random track
12 FM/AM . . . . . . . . Change current source to FM/AM mode.
13 TA (AST) . . . . . Short press: to activate TA.
Long press: to activate Autostore (Tuner)
* Depend on version
Page 5
5
Insert the CD into the drive (printed
side up).
automatically.
Press the button and carefully
remove the CD.
Press the button to switch the unit
on or off.
Volume
Turn the button to set the volume.
Menu operation
The central element for operating the
menus is the knob.
Turn the knob to select a
menu option.
Operation
WARNING
When setting the volume, please
make sure that traffic noises (horns,
sirens, emergency vehicles, etc.) are
still audible.
Page 6

Press the SOUND button.
access the following submenus.
desired settings.
buttons.
Set the required bass level setting
between -10 to +10.
Set the required treble level setting
between -10 to +10.
Set the required volume balance
between L10 to R10.
Fader
Set the required volume balance
between R10 to F10.
Fader level is only transmitted via the
front loudspeakers, the rear signals
are muted.
Volume settings
Adjusts the volume level between its
minimum and maximum. Settings: 0
... 35
Equalizer
Set the frequency response of the selected sound sources with the 5-band equalizer (EQ OFF, JAZZ, POP, CLASSICAL,
ROCK)
Press and hold SOUND button.
Turn the knob to select
desired setting.
BASS
FADER
TREBLE
BALANCE
Page 7
7
waveband.
ally programmable FM stations.
matically stored FM stations.
programmable MW stations.
matically stored MW stations.
programmable LW stations.
vate/deactivate this function.
stations for each band is 6.
Execute “Autostore” to update the list
of the stations with strong reception
(e.g. when driving through different
receiving areas).
Automatic search
Press the or button for the
previous/next station receivable station in the currently selected waveband.
It will always starts to search for
strong signal station at LOCAL
search level. If no station can be
found at LOCAL level, it will search at
DISTANCE level.
To exit, press or button
respectively.
Manual seek
Manual reception frequency setting.
Rotate the knob clock-
wise or anti-clockwise to increment or
decrement the frequency.
Frequency Scan
Radio will tune to each available station
from the current waveband for 10 seconds before scanning for the next higher
frequency station.
Press SCAN button to activate/ deac-
tivate the scan function.
Station memory
In the FM 123 waveband there are 18
station memories, in the “123” wavebands for MW and LW there are 6 station
memories each
(also see “Select waveband”).
Storing preset stations
Tune to the desired station.
Press and hold one of the preset (1 -
6) buttons until you hear a confirmation tone.
The station selected is stored on the
preset button.
You can also select a station in a dif-
ferent waveband (e.g. FM AST or FM
123) and then store this on one of the
preset buttons.
Recalling preset stations
Tune to the desired station.
Select the button (1 - 6) for memo-
rized station.
Radio
Page 8
funtion.
for TP stations.
stations.
announcements in the SETUP menu.
Traffic info has been activated.
every 30 secs until TP station is found.
Traffic announcements from other
stations – EON
With the RDS function EON (Enhanced
Other Networks) you will hear traffic
announcements even if the set station
does not provide this service but is operating on a network with other stations.
If you have activated Traffic info, sta-
tions with EON will be treated like
traffic stations, i.e. the search will also
stop at these stations.
When a traffic announcement is
made, the unit switches to a traffic
information station linked to EON.
After the announcement, the unit
returns to the previous programme.
Alarm Messages
(PTY ALARM / EON network)
The unit automatically receives emergency messages made by the broadcaster.
Display shows ‘ALARM’.
Press TA button to stop current
announcement message and it will
not disable alarm functions.
Alternative Frequency
This function enable or disable the automatic tuning to an alternative frequency
with the best reception condition.
AF symbol will be displayed when AF
feature has been activated at the
SETUP menu.
PTY search (FM only)
Searching for stations by programme
type.
Select the required programme type
from the list.
The search begins and finds the
nearest station that transmits this programme type.
PI seek
This function performs an automatic
seek for the best-received frequency of a
RDS station with a specific PI-code.
System will trigger to search for a bet-
ter quality AF at recall/preset station.
The unit will display ‘PI SEARCH’.
Page 9
9
disc and 8cm disc with adaptor only
and can read both audio and MP3 format CD.
CD.
played. Due to varying quality of CDs,
surface condition of the disc, as well
as the performance and condition of
the CD writer, certain CD-R/CD-RW
CD may not operate normally on this
unit.
source becomes active.
Previous/Next Track
Press the or buttons to
select previous or next song track OR
Rotary knob in clockwise
direction to seek up and anticlockwise
direction to seek down.
Fast Forward/Reverse
Press and hold or buttons to
for fast foward and reverse.
Random Track
Press RND button to activate/deacti-
vate track random.
Repeat Track
Press RPT button to activate/deacti-
vate track repeat.
Scan Track
Press SCAN button to activate/deac-
tivate track scan.
CD plays the first 10 seconds of the
song.
CD
Page 10
Layer 3.
Level 1 or Level 2 or Joliet with sector
format in Mode 1 or Mode 2 Form 1.
Other formats cannot be played reliably.
number of files is 345, maximum number of folders is 254 (total number of
characters displayed are 24).
stant or variable.
kHz.
MP3 tracks can contain addition information such as artist, track and album
names (ID3 tags with maximum not
more than 12 characters). Characters
other than uppercase/lowercase letters
(“Aa to Zz”) and underscore (“_”) may
not be displayed.
recognized as MP3 files.
order that you wrote them to the disc.
the disc contains both CD audio
tracks and MP3 files.
When playing a disc of 8k bps or vari-
able bit rate (VBR), the elapsed playing time in the display window may
not be correct.
Make sure that a MP3 CD-R/CD-RW
is burned that is formatted as a data
disc and NOT as an audio disc.
MP3 files are not compatible with
packet write data transfer.
The MP3 symbol will be shown in the
display if an MP3 is being played.
Starting/Stopping playback
Press CD button to start playback.
Playback will stop when another
source becomes active.
Previous/Next Folder
Press the or buttons to select
previous or next folder.
Previous/Next Track
Press the or buttons to
select previous or next song track OR
Rotary in clockwise direc-
tion to go to next track and anticlockwise
direction to previous track.
Fast Forward/Reverse
Press and hold or buttons to
for fast foward and reverse.
Random
CDC mode*: Press and hold RND
button to activate or deactivate random in the tracks.
CDP mode: Press RND button to acti-
vate or deactivate random in the tracks.
Repeat
CDC mode*: Press and hold RPT but-
ton to activate or deactivate repeat track.
CDP mode: Press RPT button to acti-
vate or deactivate repeat tracks.
Scan
Press the SCAN button to activate or
deactivate scan track.
CD plays the first 10 seconds of the
song.
When a folder ends: scanning contin-
ues with the first file of the next folder.
When a CD ends: scanning continues
with the first file of the first folder.
Setting Text
To retrieves text information from the
MP3 files for display.
Press and hold SETUP button in
MP3 mode to set information in
available sequence
Filename/Playtime/Title/Artist/Album/
Directory Name.
* CD Changer version only
Page 11
11
LOAD button.
up. CDC playback begins.
ton.
button.
position in the magazine.
CD.
played as “CDC 1, 2, 3, 4, 5, 6” etc.
Previous/Next Track
Press the or buttons to
select previous or next song track OR
Rotary knob in clockwise
direction to go to next track and anticlockwise direction to previous track.
Fast Forward/Reverse
Press and hold or buttons to
for fast foward and reverse.
Random Track
Press and hold RND button to acti-
vate or deactivate random in the
tracks.
Repeat Track
Press and hold RPT button to activate
or deactivate repeat track.
Scan Track
Press the SCAN button to activate or
deactivate scan track.
CD plays the first 10 seconds of the
song.
When a last track of CD ends: scan-
ning continues with the first track of
current disc.
CDC
Page 12
use.
Previous/Next Folder
Press the or buttons to select
previous or next folder.
Previous/Next File
Press the or buttons to
select previous or next song file OR
Rotary knob in clockwise
direction to go to next track and anticlockwise direction to previous file.
Fast Forward/Reverse
Press and hold or buttons to
for fast foward and reverse.
Random File
CDC*: Press and hold RND button to
activate or deactivate random in the
file.
CDP: Press RND button to activate or
deactivate random in the file.
Repeat File
CDC*: Press and hold RPT button to
activate or deactivate repeat file.
CDP: Press RPT button to activate or
deactivate repeat file.
Scan File
Press the SCAN button to activate or
deactivate scan file.
CD plays the first 10 seconds of the
song.
When a last track of CD ends: scan-
ning continues with the first track of
current disc.
Setting Text
To retrieves text information from the
MP3 files for display.
Press and hold SETUP button in
MP3 mode to set information in
available sequence
Filename/Playtime/Title/Artist/Album/
Directory Name.
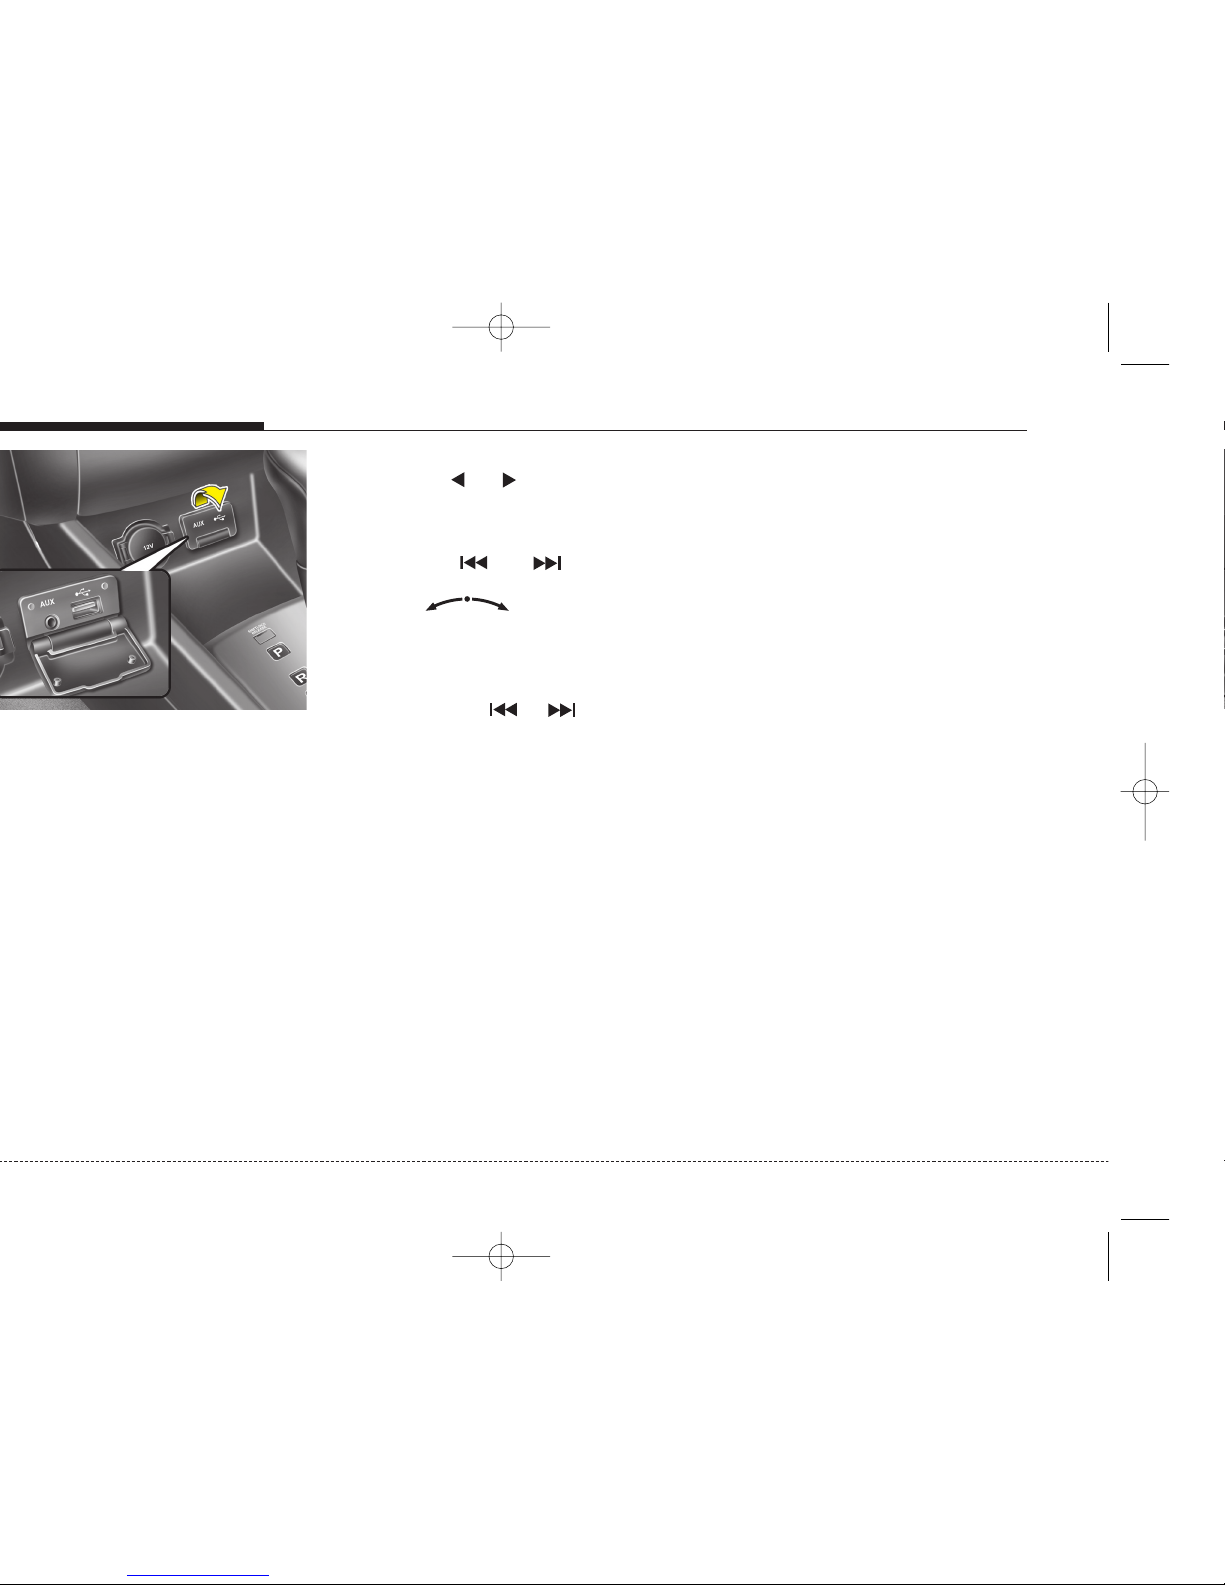
Auxiliary In
You can input Aux in to this unit.
Press and hold CD button when an
auxiliary is connected.
Playback will stop when another
source becomes active.
Page 13
13
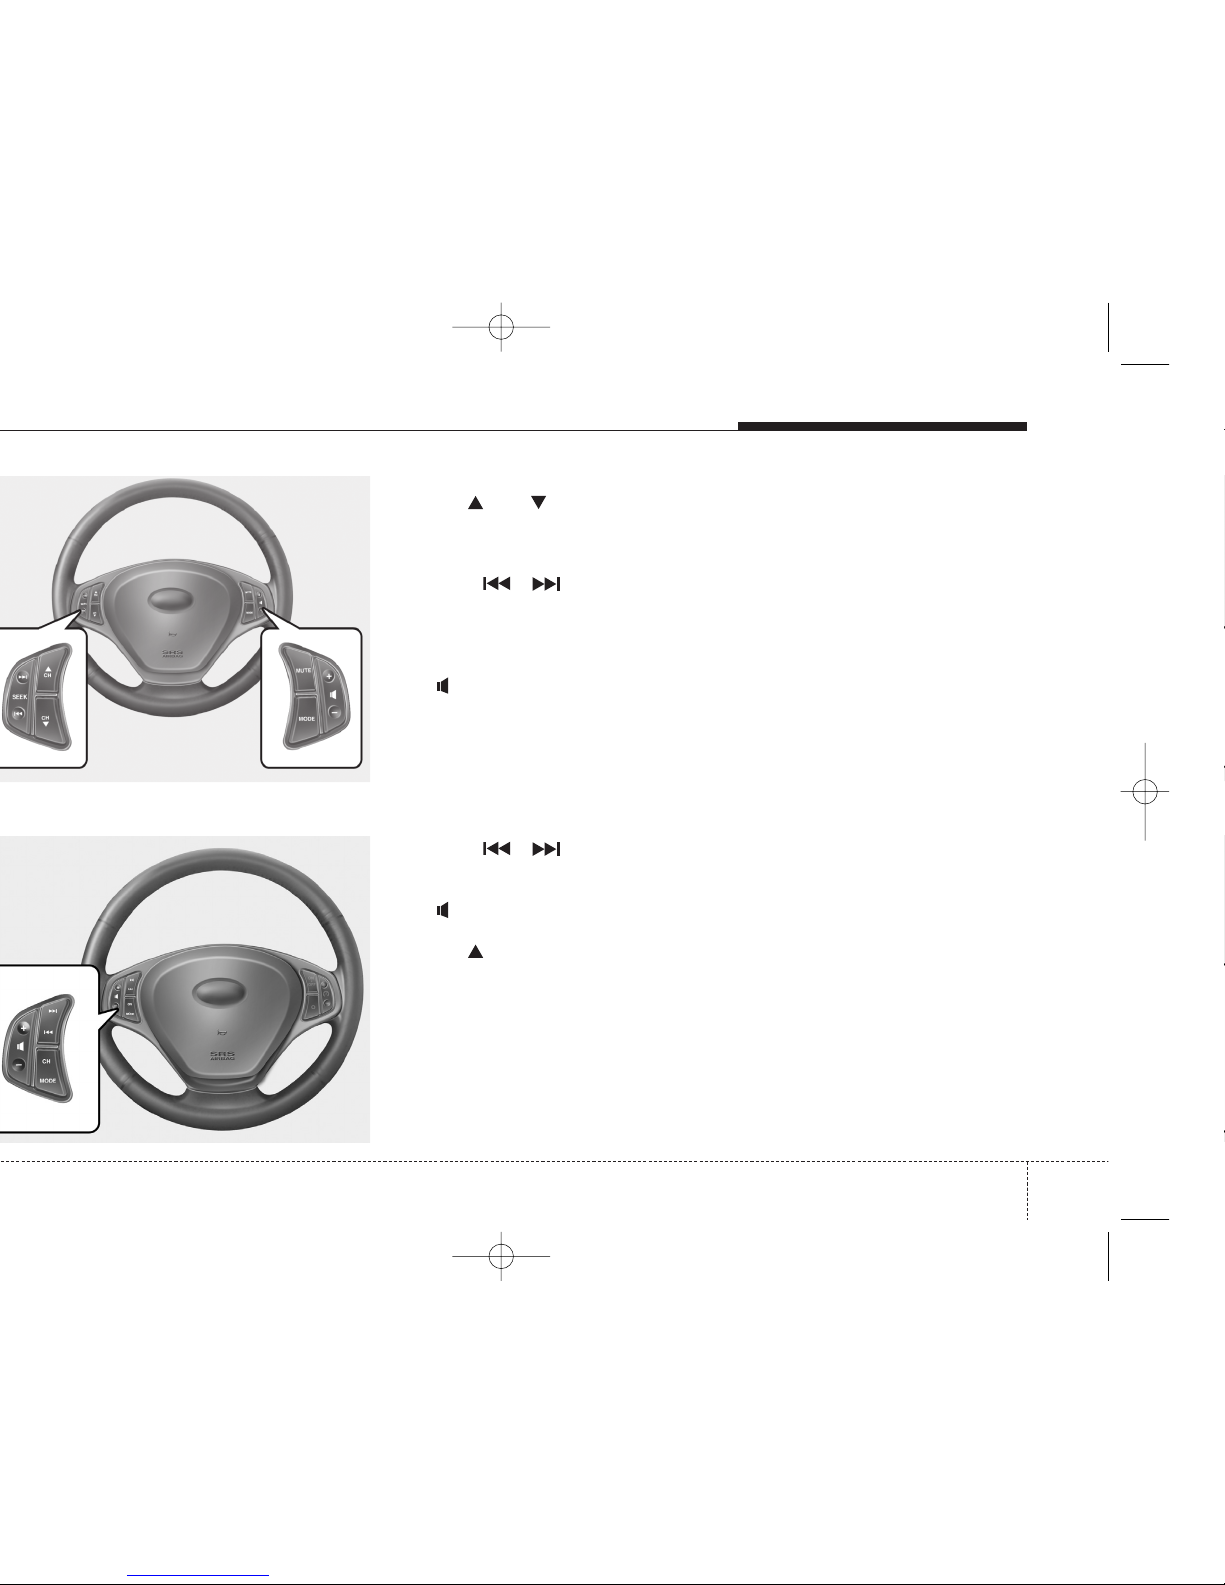
Steering wheel remote control
CH / CH .... Radio mode: Select preset up/down from the
preset list of the current waveband
CDC : Select next or previous disc
Seek / . . . Radio mode: Select previous/next station
CD/CDC/USB: Select previous/next track
Mute . ...........Muting the system
+ / - ..........Volume control up / down
Mode ..........Switchover between TUNER (FM)/CD/USB/AUX
mode
Seek / . . . Radio mode: Select previous/next station
CD/CDC/USB: Select previous/next track
+ / - ..........Volume control up / down
CH ........... Radio mode: Select Preset up
CDC: Next disc
Mode............ Switchover between TUNER (FM)/CD/USB/AUX mode
Note: To enable the following functions to be controlled by the steering
wheel keys, please ensure there is CD in the unit and USB/AUX
is connected.
* Depend on version
Page 14

setup menu.
access the following submenus.
•START VOL
•TA VOL
•SDVC
• PTY
• REGIONAL
•AF
• MP3
• SECURITY CODE
desired settings.
buttons.
will always be set to this level if the volume was louder than this level when you
switched off.
SDVC Adjustment for speeddependent volume control.
Settings:
1 ... 5: Small (1) to large (5) increase
in volume on acceleration.
0: OFF, no speed-dependent volume
control.
PTY search
Searching for stations by programme
type.
None: No PTY
1 ... 29: PTY programme type
30 ... 31: Cannot be selected. For
emergency test and alarm only.
Press the knob once to
enter the selected PTY.
The search begins and finds the near-
est station that transmits this programme type.
Regional
Setting the RDS regional function.
Settings:
ON: The radio only tunes to alternative
frequencies of the selected station
which transmit the same regional programme.
OFF: The radio tunes to all the alter-
native frequencies of the selected
station even if different regional programmes are transmitted.
AF retuning
Setting the RDS AF function.
Settings:
ON: Automatic retuning to alternative
frequencies for the same station.
OFF: No automatic retuning to alter-
native frequencies.The radio keeps to
the receiving frequency set.
MP3 Display
Activating/ deactivating text display with
MP3 playback. The text appears in the
middle line of the screen.
Settings:
FILENAME: The filename the user
defined
PLAYTIME: Song duration
TITLE: Song title
ARTIST: Artist of the song
ALBUM: Song album
DIRECTORY NAME: Song directory
Page 15

15
SETUP menu
setup menu.
to access the submenus ("SECURITY CODE")
SECURITY CODE.
(Refer 'To enter PASSWORD ')
(Refer 'To enter PASSWORD')
has been set, the default password
will remain to be '0000'
To enter PASSWORD:
Turn the knob to change
the digits of security code.
Press knob once to go to
next digit.
Repeat this until you have finished
entering 4 digits.
To confirm new password, press and
hold knob button.
Your new password has been saved.
In the event if you have forgotten the
password and the unit is ‘locked’, please
approach your car authorised dealers for
assistance.
Page 16

player’s specifications.
heat.
volume can no longer be increased.
temperature in the unit from exceeding a
certain value.
volume).
Radio
> Poor or no radio reception.
• Check if the antenna is completely
and correctly connected.
• Check whether the supply voltage’s negative pole (brown cable) is correctly connected to earth (vehicle chassis).
> FM ABC and FM AST station list has
only few or no stations.
• Antenna (disc antenna) obscured, antenna
rod bent or antenna defective.
• Please arrange for an authorised dealer to check the antenna.
> The frequency instead of the station
name is displayed.
• The unit is tuned to a station that
does not transmit RDS signals or the
transmitter is too weak.
> The required station cannot be tuned
to using automatic search.
• The desired station is too weak.
• Set desired station manually (manu.
tuning).
• Check whether the antenna is completely and correctly connected.
> No traffic announcements are switched
through (during CDC playback).
• Activate the traffic announcement by
pressing TA button
CDC / MP3
> Distorted sound/ skips during CD
play.
• Player cannot read CD. CD is damaged or soiled.
> CD player does not work.
• In cold weather conditions, condensation may occur on the laser.
• With the set on, wait for 5 minutes until
the condensation evaporates.
> No sound during CD playback.
• Some CDs contain multimedia data
which is not recognised by the unit.
• Advance the tracks until music is
heard.
• See “Notes on audio and MP3 CDs”.
> Problems with new copy-protected
audio CDs.
• Some copy protection procedures are
incompatible with accepted standards
for audio CDs. This is not a fault on
the unit
• See “Notes on audio and MP3 CDs”.
 Loading...