

Page 1

INSTRUCTION MANUAL
STSTA
CONCON
PACKETACKET
9696
BCONBCON
DUP
9
7
CONCON
ENHANCED FEATURES
144/440 MHz FM DUAL BANDER
TH-D7A(G)
KENWOOD CORPORATION
B62-1359-00 (K)
09 08 07 06 05 04 03 02 01 00
Page 2
CONTENTS
CHAPTER 1 AUTOMATIC PACKET/ POSITION REPORTING
SYSTEM
OPERA TION FLOW ..................................................2
CONNECTING WITH A GPS RECEIVER ..................3
SETTING UTC OFFSET............................................3
SELECTING DATA BAND.......................................... 3
SELECTING PACKET TRANSFER RATE ................. 3
RECEIVING APRS DA T A........................................... 4
ACCESSING RECEIVED APRS DATA ...................... 5
PROGRAMMING A CALL SIGN................................. 7
SELECTING YOUR STATION ICON.......................... 8
PROGRAMMING POSITION DATA ...........................9
SELECTING A POSITION COMMENT .................... 10
STORING STATUS TEXT........................................ 11
PROGRAMMING A GROUP CODE ......................... 12
PROGRAMMING A PACKET PATH .........................13
SELECTING PACKET TRANSMIT METHOD .......... 15
SELECTING PACKET TRANSMIT INTERVAL......... 16
SELECTING PACKET TRANSMIT DELA Y .............. 16
SELECTING STATUS TEXT TRANSMIT RATE ....... 16
RESTRICTING RECEPTION OF APRS DATA......... 16
PROGRAMMING POSITION AMBIGUITY............... 17
SELECTING A DISPLA Y AREA ...............................17
®
CHAPTER 2 APRS® MESSAGE
OPERA TION FLOW ................................................18
RECEIVING A MESSAGE ....................................... 19
ACCESSING RECEIVED APRS MESSAGES .........20
ENTERING A MESSAGE......................................... 21
TRANSMITTING A MESSAGE ................................22
AUTO ANSWER REPL Y.......................................... 22
PROGRAMMING A GROUP CODE ......................... 23
CHAPTER 3 MENU REVISIONS
CHAPTER 4 SUMMARY OF ENHANCEMENT
BAND A & B ............................................................. 26
KEYPAD DIRECT ENTRY ....................................... 26
TRANSMITTING A 1750 Hz TONE ..........................26
KEY BEEP ON/OFF................................................. 26
ADJUSTING VOLUME BALANCE ........................... 27
SELECTING DATA BAND........................................ 27
DX P ACKETCLUSTERS MONITOR ........................ 27
DCD SENSE ...........................................................28
This instruction manual describes only the
functions improved or newly designed for
the TH-D7A(G) model. For the functions
not described in this manual, see the other
instruction manual (original).
Page 3
AUTOMATIC PACKET/ POSITION REPORTING SYSTEM
nocinoitatS
rotacolerauqsdirG/atadnoitisoP
tnemmocnoitisoPtxetsutatS
noitatsmorfecnatsiDnoitatsfonoitceriD
noitatseliboM
edutitlA/deepsgnivoM/noitceridgnivoM
noitatsdexiF
/annetnafothgieH/rewoptimsnarT
ytivitceridannetnA/niagannetnA
noitatsdexiF
desserpmocgnisu(
)tamrofatadSRPA
egnartimsnarT
noitatsrehtaeW
/deepsdniW/noitceriddniW
ruohtsalnillafniaR/erutarepmeT
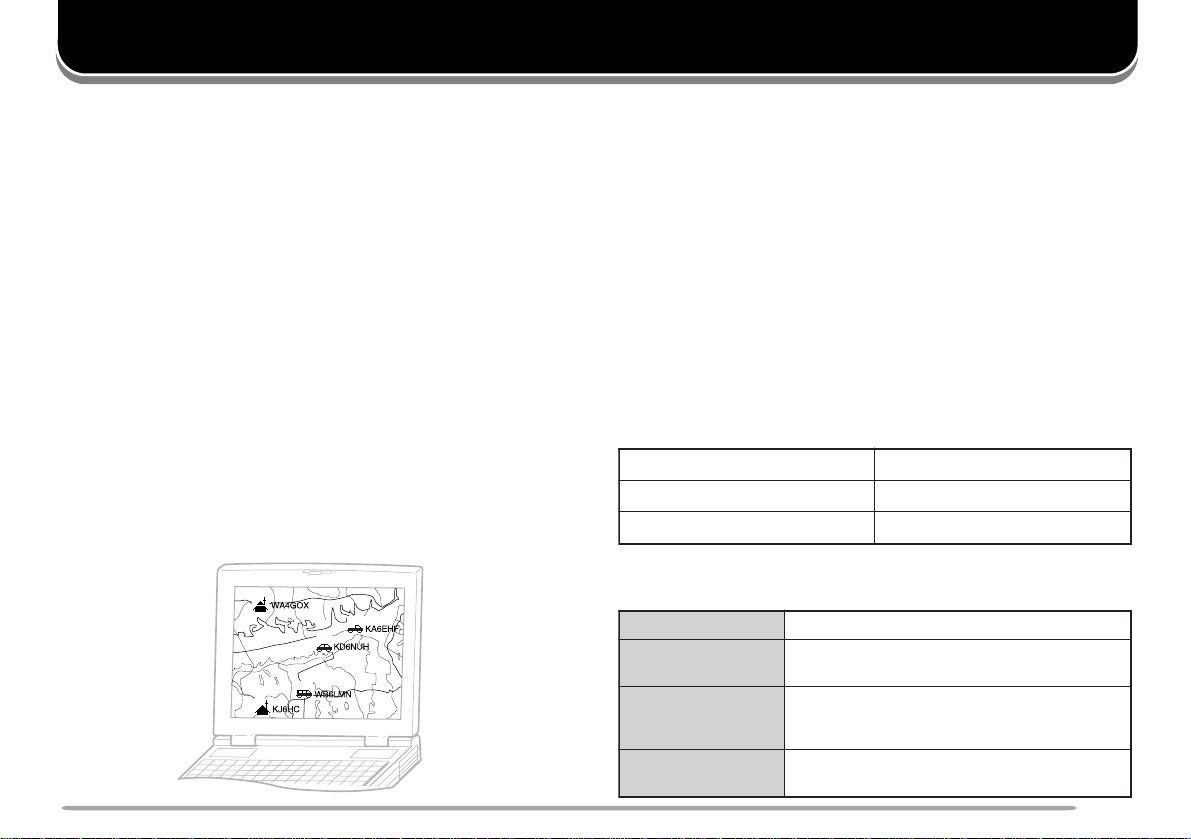
The Automatic Packet/ Position Reporting System
(APRS) is a software program and registered
trademark of Bob Bruninga, WB4APR. He has made
packet communications much more exciting than before.
This program allows you to track mobile stations on a
map which you recall on a computer screen. Imagine
seeing one mobile station moving on the map which can
be scaled from .5 to 2000 miles. You also may be
tracked on the computer screen of another station.
Stations to be tracked must transmit beacons at certain
intervals. To track other stations, you usually need a
computer running the APRS, a transceiver, and a TNC.
To have them track you, you also need a GPS receiver.
It receives signals from the satellites to inform you of
your current geographical position. GPS stands for
Global Positioning System. The APRS interprets the
National Marine Electronics Association (NMEA) data
strings coming from the GPS receiver. For further
information, consult Internet Web pages relating to the
APRS. You may use one of the Internet search engines
to find correct URLs.
This transceiver includes a TNC and a program for
dealing with data formats supported by the APRS. That
is, you need no other equipment to transmit, receive, or
display APRS packets. You do not need even a GPS
receiver if you manually enter position data to transmit.
For hams who want to fully enjoy APRS operations, this
transceiver has connection ports with a personal
computer and a GPS receiver; this manual, however,
does not describe APRS operations which require a
personal computer.
Using this transceiver, you can transmit a station icon,
position data, position comment, and status text. With a
GPS receiver, you can also transmit moving speed,
moving direction, and altitude data. From any type of
station you will receive information listed below:
Depending on the types of stations, you will also receive
the following information:
1
Page 4
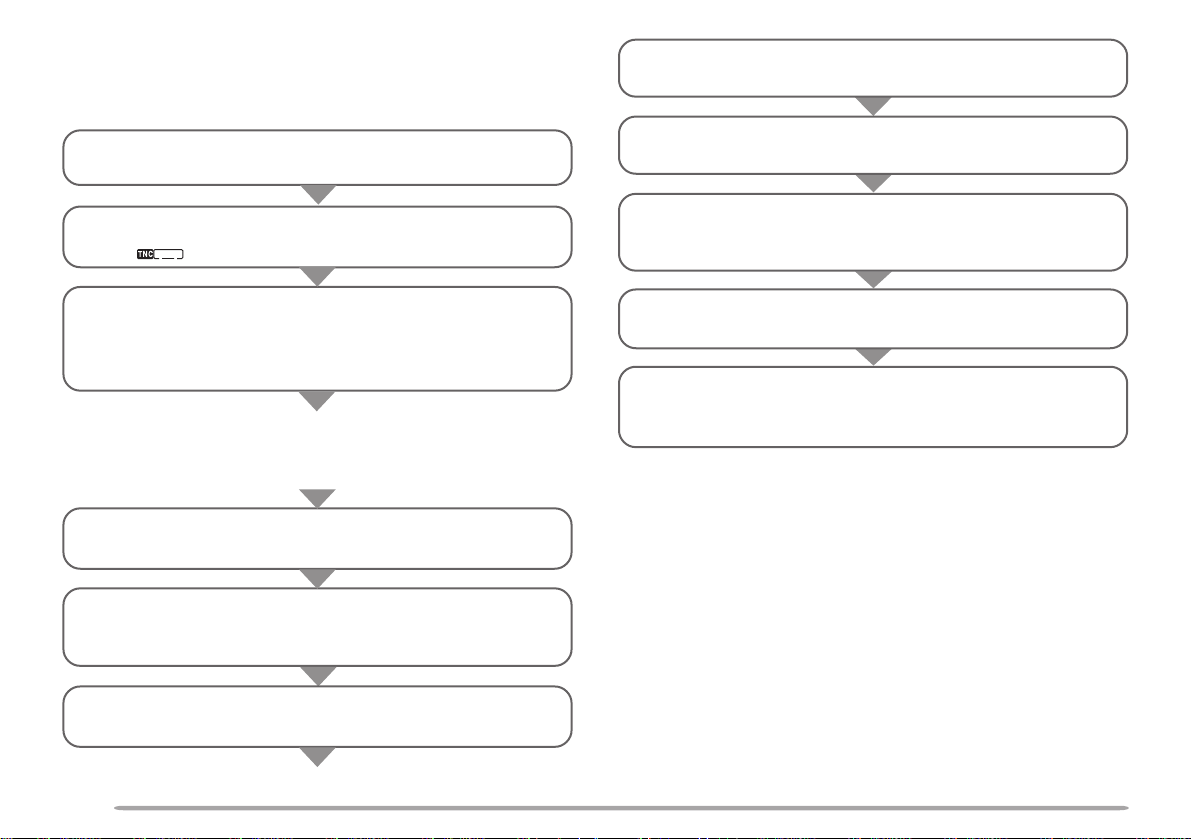
OPERATION FLOW
The following flow chart includes only the steps to give
APRS a quick try.
q Access Menu 2–M to select band A or B as the
data band {page 3}. The default is band A.
u Access Menu 2–4 to program position data
{page 9}.
i Access Menu 2–6 to select from 15 position
comments {page 10}.
w Press [TNC] to enter APRS mode.
•“ ” should appear.
e On the data band select the same frequency as
other stations in your group.
• You may tune to the frequency of an appropriate
digipeater (144.390 MHz in the U.S.A.) {page 13}.
Now you are ready to receive APRS data from other
stations. Refer to “RECEIVING APRS DATA” {page 4}.
To transmit your APRS data, proceed to step r.
r Access Menu 2–1 to program your call sign
(9 digits max.) {page 7}.
t If you have connected a GPS receiver, access
Menu 2–2 and select “NMEA” or “NMEA96”
{page 3}. The default is “NOT USED”.
y Access Menu 2–8 to select your station icon
{page 8}.
2
o If you want, access Menu 2–9 to enter status
text using up to 20 alphanumeric characters
{page 11}.
!0 Access Menu 2–C to select the operation method
for transmitting APRS data {page 15}.
!1 Press [BCON]. If you selected “PTT” in step !0,
then press and release the PTT switch. See
page 15.
When using a personal computer, press [TNC] repeatedly
in step q until “PACKET” appears. All further operations
should be performed on your computer. For the cable
connection with a personal computer, see page 53 on the
other instruction manual (original).
Menu Set-up allows you to change various default
settings for APRS operations. See the appropriate
sections in this chapter.
Note:
◆
To distinguish your various stations or nodes, you can have up to 15
Secondary Station IDentifiers (SSIDs); ex. WD6BQD-1 to WD6BQD-
15. You always have to put a dash between your call sign and SSID
number.
◆
If you have blanked the data band by pressing [DUAL], you cannot
select APRS mode in step q.
Page 5
CONNECTING WITH A GPS RECEIVER
STSTA
CONCON
9696
BCON
DUP
9
7
5
STSTA
CONCON
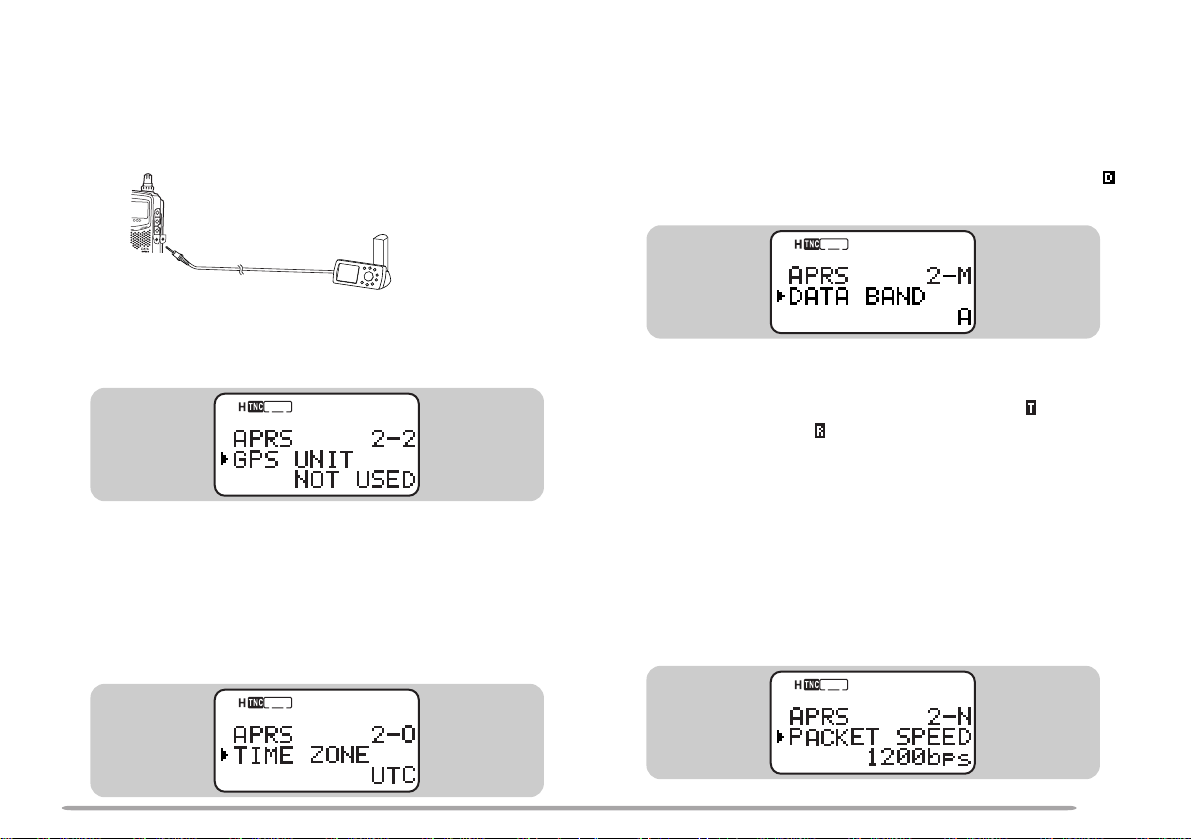
The GPS jack on this transceiver accepts a 2.5 mm (1/10")
3-conductor plug. If necessary, use the supplied cable to
modify the cable end of your GPS receiver .
Note: Turn OFF the transceiver power before making the connections.
To GPS jack
GPS receiver
In order to use the connected GPS receiver, access
Menu 2–2 (GPS UNIT) to select “NMEA” or “NMEA96”.
The default is “NOT USED”. Select “NMEA96” when
using a 9600 bps GPS receiver.
CONCON
STSTA
9696
DUP
BCON
9
7
5
SELECTING DATA BAND
On this transceiver you can select data band for APRS
mode independent of the selection (in Menu 1–4–1)
for Packet mode. Access Menu 2–M (DATA BAND)
and select band A or B as the data band for receiving
or transmitting APRS data. The default is band A. “ ”
indicates the current data band.
Note: In Menu 2–M, the selection switches among A, B, A:TX B:RX, and
A:RX B:TX. Select A:TX B:RX or A:RX B:TX if APRS networks which use
two separate frequencies become available in the future. “ ” appears for
the data transmit band and “ ” appears for the data receive band.
SELECTING PACKET TRANSFER RATE
SETTING UTC OFFSET
This transceiver allows you to correct the UTC offset;
UTC stands for Universal Time Coordinated. Access
Menu 2–O (TIME ZONE) and select the appropriate UTC
offset in the range from +12:00 to –12:00 in steps of 30
minutes.
CONCON
STSTA
9696
DUP
BCON
9
7
5
The default APRS packet transfer rate set on the built-in
TNC is 1200 bps which is the standard among the
current APRS networks. If APRS networks which use
9600 bps transfer rate become available in the future,
access Menu 2–N (PACKET SPEED) and select “9600
bps”. “96” will appear.
3
Page 6
RECEIVING APRS DATA
rotacidnI gninaeM ?dedulcnIsitahW
Pn
}71egap{
noitisopweNtnemmocnoitisopweN
Sn
}71egap{
sutatsweNtxetsutatsweN
Pd
noitisopetacilpuDtnemmocnoitisoP
deviecerydaerla
Sd
sutatsetacilpuDydaerlatxetsutatS
deviecer
P>
noitisopdnoyeB
timil
noitatsamorfataD
detcelesehtedistuo
}61egap{egnar
Q?
1
yreuQgnidnesroftseuqeR
noitamrofni
??
dedocedebtonnactahttekcaP
snoitceleS tekcaPweN
etacilpuD
tekcaP
tekcaPdilavnI
FFOpeeboNpeeboNpeeboN
ENIM
egasseMSRPArofylnodilavsinoitcelessihT
.}91egap{
WENLLApeeBpeeboNpeeboN
LLApeeBpeeBpeeB
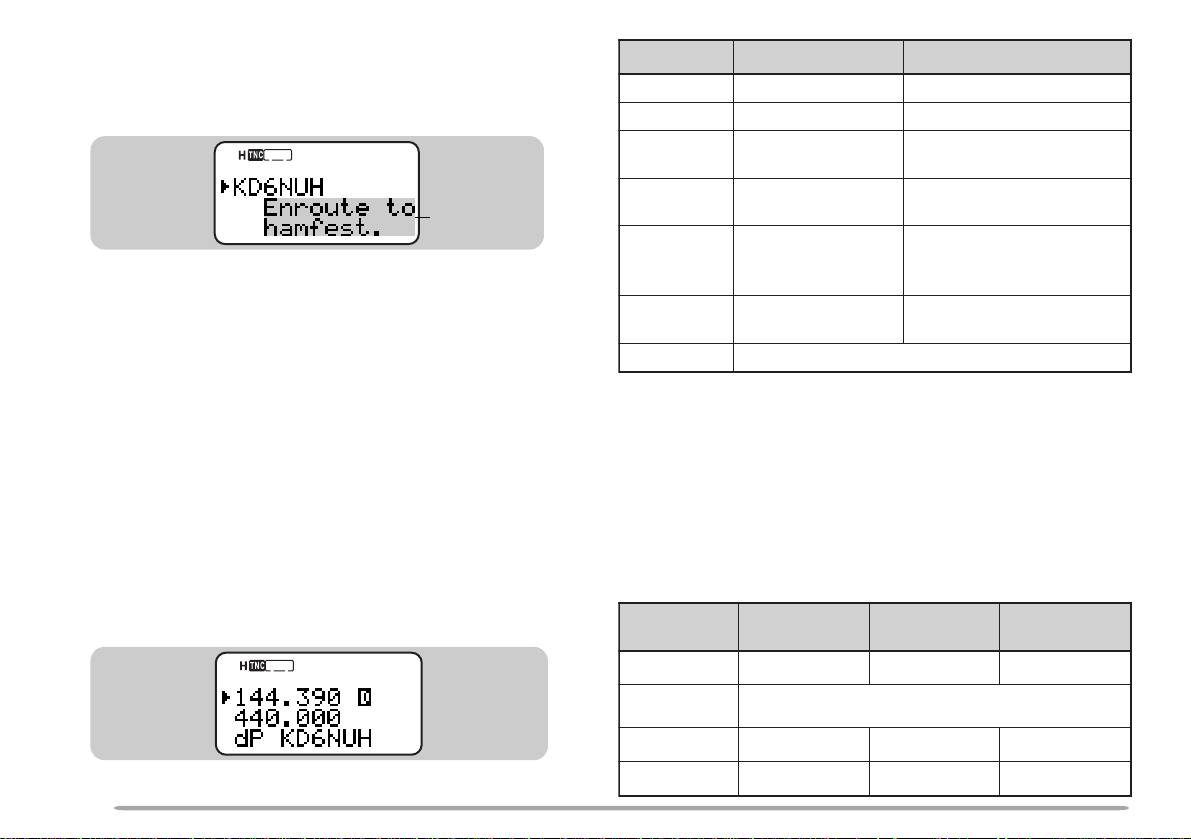
Each time new APRS data is received, the frequency
display is interrupted to show information as below:
CONCON
STSTA
9696
DUP
BCON
9
7
5
Position
comment
(or status text)
• The received APRS data may include information on an
object such as a hurricane or tornado. In this case, the
name of the object appears instead of a call sign.
• The transceiver restores the frequency display after
approximately 10 seconds pass or when you press any key.
Note:
◆
When you receive APRS data including an “Emergency” comment, a
different format of display from the above will appear and a different
beep will sound.
◆
When you receive APRS data that you transmitted, the frequency
display is not interrupted. “MY POSITION” will appear at the bottom
of the display. This could happen when one or more digipeaters
{page 13} are used.
If a received packet does not include new (or proper)
APRS data, the frequency display is not interrupted. An
indicator such as “dP” appears depending on the types
of data. See the table.
4
STSTA
7
5
CONCON
9696
DUP
BCONBCON
9
1
The transceiver automatically transmits the appropriate
information in approximately 2 minutes after receiving a request.
Note: The APRS programs for PCs have entry fields for a position
comment and status text. The data entered to these two fields are
transmitted as separate packets. This transceiver, however, includes
both of a position comment and status text in one packet to transmit.
This transceiver beeps each time it receives any type of
APRS packet. You may access Menu 2–F (BEEP) to
change this setting. The default is “ALL”. The selection
in this menu is shared with APRS Message {page 19}.
Page 7
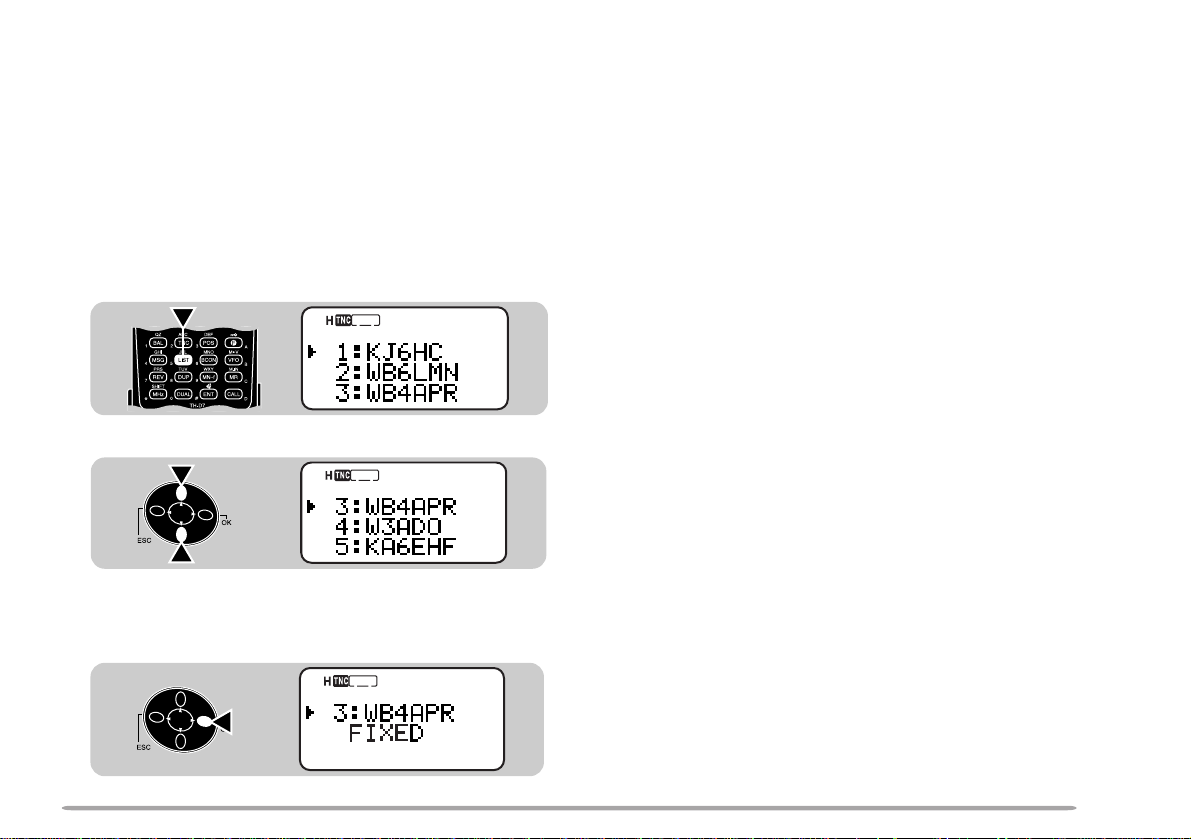
ACCESSING RECEIVED APRS DATA
This transceiver is capable of receiving and storing
APRS data from up to 40 stations in memory. You can
select the desired station and access the desired
information, by switching the display.
1 Press [LIST].
• The display for selecting a station appears.
• The numbers beside the call signs indicate the order in
which data is received. The data received last is
assigned 1.
CONCON
STSTA
9696
DUP
BCONBCON
9
7
5
2 Press [UP]/ [DWN] to select the desired station.
CON
STA
9696
DUP
BCONBCON
9
7
5
3 Press [OK].
• The display for accessing the desired information
appears.
CONCON
STSTA
9696
DUP
BCON
9
7
5
4 Press [OK] repeatedly until you can access the
desired information.
• The next page shows how displays will be switched.
• You may press [ESC] to restore the previous display.
5 Press [LIST] twice to restore the frequency display.
You may want to delete all information of the desired
station. Press [A/B] instead of [OK] in step 3 or 4.
“DELETE?” appears. Press [OK] to delete the
information.
To delete the information of all stations, press [A/B] (1 s)
in step 2. “DELETE ALL?” appears. Press [OK]. Then
“SURE?” appears. Press [OK] again to delete the
information.
The types of information accessible in step 4 differ
depending on the types of stations. For details, see the
next page.
Note:
◆
When data from the 41st station is received, the oldest data in
memory is replaced by that data.
◆
Each time new APRS data is received from the same station, the old
data from that station (in memory) is replaced by new data.
◆
When APRS data is received with a GPS receiver connected, included
position data is sent to the receiver, using the NMEA-0183 $GPWPL
format (or Magellan format). This data is registered in the Waypoint List of
the receiver. Access Menu 2–3 (WAYPOINT) and select the number of
characters to be input. You can select 6 to 9 digits for NMEA, 6 digits for
Magellan, DGPS, or OFF (default) . With NMEA 6 digits selected, the right
6 characters of the call sign is used as a name (ex. for KJ6HC-3, J6HC-3).
Select DGPS to input differential position data to a DGPS-compatible
receiver if it is connected.
5
Page 8

q
w
q Situation
w Position comment
(TH-D7/ TM-D700/ Mic
Encoder only)
or call sign
(object only)
q
OK
CONCON
STSTA
Fixed station Mobile station Weather station
qw
q Transmit power
w Height of antenna
(elevation)
’ : Feet M: Meter
e Antenna gain
r Antenna directivity
omni: Omnidirectional
UP
DWN
OK
Fixed station
q Transmit range
1
Using compressed
APRS data format
qer
(mile or km)
1
ESC
UP
DWN
ESC
q
we
q Altitude
’ : Feet M: Meter
w Moving direction
e Moving speed
m: Mile/hour
k: km/hour
CONCON
STSTA
CONCON
STSTA
q Wind direction
w Wind speed
m: Mile/hour
k: km/hour
e Temperature
F: ° F c: °C
r
Amount of rainfall in
the past hour (" or mm)
q
e r
w
q status text
q
w
q Grid square locator
w Distance from
the station
(mile or km)
q Latitude/ longitude
q
data
N: North S: South
W: West E: East
6
Page 9
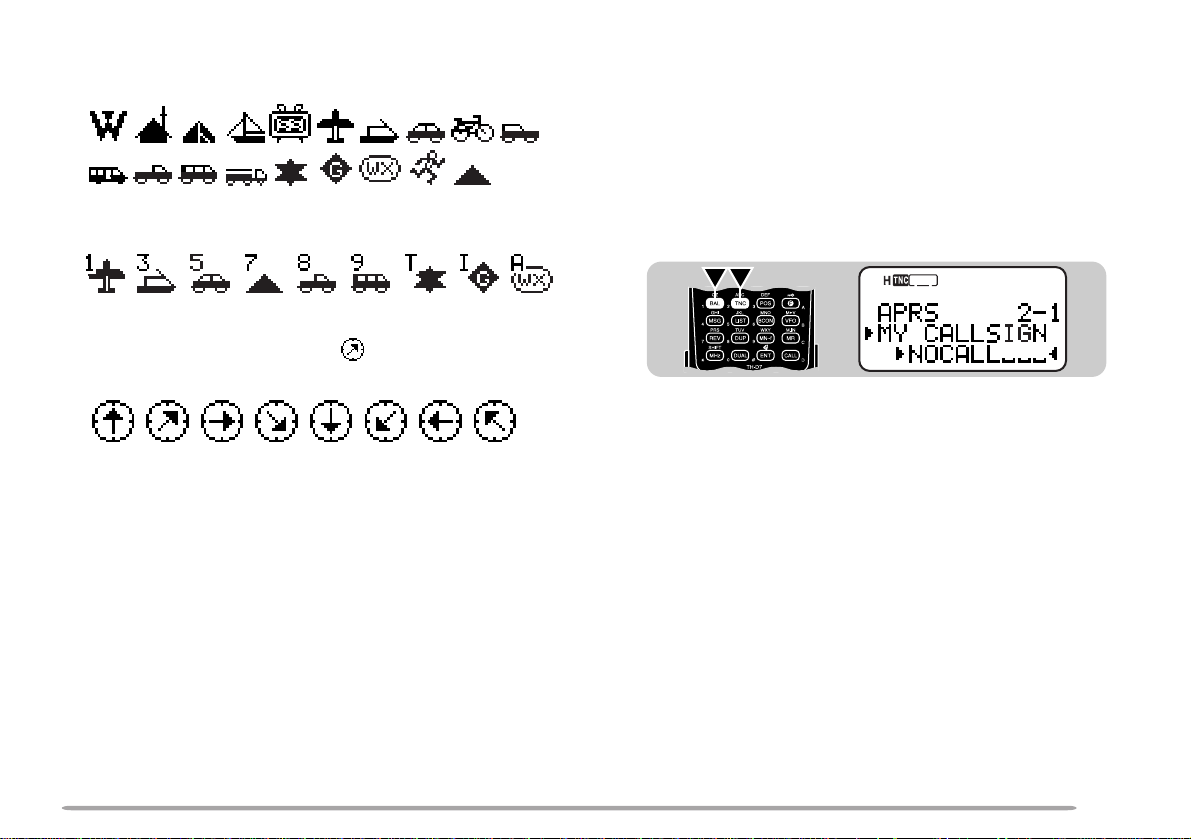
This transceiver is capable of displaying the following 19
icons as station IDs. When icon data other than these is
received, the display will show an icon code such as /$ or \$.
Some icons may appear with overlay characters as below if
the received icon data includes them.
The following icons show the directions of stations relative
to your position. For example, “ ” indicates the other
station is located at the northeast relative to your position.
0.0 to 9999 miles (or km) are shown for distances from
other stations. “xxxxmi” (or “xxxxkm”) is shown for
distances over 9999 miles (or km). If you do not change
the position data in Menu 2–4 from the default, “----mi”
(or “----km”) is shown.
On the TH-D7A(G), the default units for distance and
temperature are mile and °F. If necessary, access Menu
2–H (mile/km) and/or Menu 2–I (TEMPERATURE) to
change the setting(s).
Note: Some stations transmit APRS data through TNCs connected to
GPS receivers. If you receive data from those stations, “GOOD”
(satellites tracked) or “LAST” (satellites not tracked) will be shown as the
situation, with GLL, GGA, or RMC which designates $GPGLL, $GPGGA,
or $GPRMC format.
PROGRAMMING A CALL SIGN
Program your call sign using a maximum of 9 alphanumeric
characters; you may include SSID characters. Unless you
program a call sign, you cannot transmit APRS data.
1 Press [MENU] to enter Menu mode.
2 Press [2], [1] to select “2–1 (MY CALLSIGN)”.
• The display for entering characters appears; the first
digit blinks. The default is “NOCALL”.
CONCON
STSTA
9696
DUP
BCONBCON
9
7
5
3 Press [UP]/ [DWN] to select a character, then press
[OK].
• You can enter 0 to 9, A to Z, and –.
• The cursor moves to the next digit.
4 Repeat step 3 to enter up to 9 digits.
• Pressing [OK] after selecting the 9th digit completes the
programming.
• To complete programming after entering less than 9
digits, press [OK] twice.
• Each press of [ESC] causes the cursor to move backward.
• Pressing [A/B] deletes the digit at which the cursor is
blinking.
5 Press [MENU] to exit Menu mode.
You can also use the keypad to enter alphanumeric
characters in step 3. For example, each press of [TNC]
switches entry as A, B, C, then 2. Press [ENT] to enter –.
7
Page 10

SELECTING YOUR STATION ICON
Select an icon which will be displayed on the monitors of
other stations as your ID. You may select an icon
depending on your current location.
1 Press [MENU] to enter Menu mode.
2 Press [2], [8] to select “2–8 (ICON)”.
CONCON
STSTA
9696
DUP
BCON
9
7
5
3 Press [UP]/ [DWN] to select from 15 icons plus
“OTHERS”, then press [OK].
• The following 15 icons are selectable:
DOOWNEK
reggoJ
emoH
elbatroP
)tnet(
thcaY
VTSSelgnairT
tfarcriApeeJ
taoB
raCkcurT
elcycrotoMnaV
elcihev
APRS supports approximately 200 icons. It allows users
to select each icon by specifying a combination of two
ASCII codes, for example, / and !. One is a symbol
code, and the other is a table identification code (either /
or \). If you select “OTHERS” in step 3, use the following
procedures:
4 Press [UP]/ [DWN] to select a symbol code, then
press [OK].
5 Press [UP]/ [DWN] to select a table identification
code, then press [OK].
• For icons that can include overlay characters, 0 ~ 9 and
A ~ Z are also selectable.
6 Press [MENU] to exit Menu mode.
Note: Because the icon code table is occasionally revised,
download the latest icon code table from Mr. Bruninga's Web page
(http://web.usna.navy.mil/~bruninga/aprs.html). Click on
“DOWNLOAD APRS” on its home page, then download APRSnnn.zip
from the FTP directory where nnn is a 3-digit number. After
uncompressing the zip file, you will find a created README
directory. Open and see Symbols.txt under this directory.
noitaerceR
4 Press [MENU] to exit Menu mode.
8
Page 11

PROGRAMMING POSITION DATA
STSTA
CONCON
9696
BCON
DUP
9
7
5
STSTA
CONCON
9696
BCON
DUP
9
7
5
This transceiver has 3 memory channels for storing
position data. Program latitude and longitude data for up
to 3 locations from which you will often transmit APRS
data.
Note: Grid squares were developed to shortly identify locations
anywhere on the Earth. The world is first divided into 324 areas (AA ~
RR) called “fields”. Each field is then divided into 100 “squares” (00 ~
99). Each square is further divided into 576 “sub-squares” (AA ~ XX).
The world is eventually divided into 18, 662, 400 grids; each grid is
expressed with 6 digits.
1 Press [MENU] to enter Menu mode.
• You may press [POS] instead. Then you can skip
step 2.
2 Press [2], [4] to select “2–4 (MY POSITION)”.
• A channel number blinks.
CONCON
STSTA
9696
DUP
BCON
9
7
5
3 Press [UP]/ [DWN] to select from channels 1 to 3.
• If you intend to use the current channel after exiting
Menu mode, press [
]. An asterisk appears at the left
of the channel number.
4 Press [OK].
• “N” (or “S”) blinks.
5 Press [UP]/ [DWN] to switch between north latitude
(default) and south latitude.
Grid square
locator
6 Press [OK].
• The degree digits blink.
7 Press [UP]/ [DWN] to select data for degrees.
8 Press [OK].
• The minute digits blink.
9 Repeat steps 7 and 8 to select data for minutes
(down to one hundredth digit).
10 Press [UP]/ [DWN] to switch between west longitude
(default) and east longitude.
11 Press [OK].
• The degree digits blink.
12 Press [UP]/ [DWN] to select data for degrees.
13 Press [OK].
• The minute digits blink.
14 Repeat steps 12 and 13 to select data for minutes
(down to one hundredth digit).
9
Page 12

15 As necessary, press [OK] then repeat steps 3 to 14 to
)tluafed(ytuDffOetuoRnEecivreSnI
gninruteRdettimmoClaicepS
1
ytiroirP
1
!ycnegremE
2
6~0motsuC
STSTA
CONCON
9696
BCON
DUP
9
7
5
store in up to 3 memory channels.
16 Press [MENU] to exit Menu mode.
To select and set from up to 3 programmed channels,
repeat steps 1 to 3. In step 3 press [UP]/ [DWN] to
select the desired channel, then press [ ].
Note:
◆
If you have selected “NMEA” or NMEA96” in Menu 2–2, pressing
[POS] does not allow you to access the display for entering position
data. The position data received via the GPS receiver most lately will
be displayed.
◆
If using a GPS receiver, you can also copy the measured data to the
position entry display for Menu 2–4. Press [POS] to display the
measured data, then press [OK]. A message which asks the channel
number appears. Press [UP]/ [DWN] to select the channel number,
then press [OK].
SELECTING A POSITION COMMENT
The APRS data which you transmit always include one
of the 15 predetermined position comments. Select an
appropriate comment depending on your situation.
1 Press [MENU] to enter Menu mode.
2 Press [2], [6] to select “2–6 (POS COMMENT)”.
CONCON
STSTA
9696
DUP
BCON
9
7
5
3 Press [UP]/ [DWN] to select the desired comment.
4 Press [OK] to complete the setting.
5 Press [MENU] to exit Menu mode.
The selectable comments are listed below:
1
Selecting these comments will highlight your station on all
other APRS computer displays.
2
Select this comment only when absolutely necessary. You
will activate alarms in all monitoring APRS stations.
Note: Custom 0 ~ 6 selectable in Menu 2–6 are not defined; these are
reserved for personal definition.
10
Page 13

STORING STATUS TEXT
Status text is another comment to transmit with position
data. Unlike a position comment, you can make any
desired comment using a maximum of 20 alphanumeric
characters. This transceiver has 3 memory channels for
preprogramming.
Note: Attaching a long comment can double the size and length of the
packet. Enter a comment only if necessary.
1 Press [MENU] to enter Menu mode.
2 Press [2], [9] to select “2–9 (STATUS TEXT)”.
• A channel number blinks.
CONCON
STSTA
9696
DUP
BCON
9
7
5
3 Press [UP]/ [DWN] to select from channels 1 to 3.
• If you intend to use the current channel after exiting
Menu mode, press [
of the channel number.
4 Press [OK].
• The display for entering a comment appears; the first
digit blinks.
]. An asterisk appears at the left
CONCON
STSTA
9696
DUP
BCON
9
7
5
5 Press [UP]/ [DWN] to select a character.
• You can enter alphanumeric characters plus special
ASCII characters.
6 Press [OK].
• The cursor moves to the next digit.
7 Repeat steps 5 and 6 to enter up to 20 digits.
• Pressing [OK] after selecting the 20th digit completes
the programming.
• To complete programming a comment after entering less
than 20 digits, press [OK] twice.
• Each press of [ESC] causes the cursor to move
backward.
• Pressing [A/B] deletes the digit at which the cursor is
blinking.
8 As necessary, press [OK] then repeat steps 3 to 7 to
store in up to 3 memory channels.
9 Press [MENU] to exit Menu mode.
To select and set from up to 3 programmed channels,
repeat steps 1 to 3. In step 3 press [UP]/ [DWN] to
select the desired channel, then press [ ].
You can also use the keypad to enter alphanumeric
characters in step 5. For example, each press of [TNC]
switches entry as a, b, c, 2, A, B, then C. Press [DUAL]
to switch 0 and space. Press [ENT] to switch among the
special ASCII characters.
11
Page 14

PROGRAMMING A GROUP CODE
STSTA
CONCON
9696
BCON
DUP
9
7
5
Using a group code relieves you from receiving
unwanted packets. The APRS on this transceiver
supports the following three types of group codes.
All calls:
Program a 6-digit code that always starts with AP. You
will receive all APRS packets which include AP in group
codes. It does not matter whether or not the subsequent
4 digits match. The default on this transceiver is
APK002; K002 stands for KENWOOD Ver. 2.
Note: APRS packets, which are generated via various methods, include
various codes instead of group codes. Using “All calls” allows you to
receive packets which include the following codes.
SPGMYSTSQQCNOCAEB
LLANRWYKSLIAMDILCPS
Special:
Enter “SPCL”. You will receive only APRS packets that
include SPCL as a group code. This code is generally
programmed by all stations at a special event.
Alternate net:
Program any other code with a maximum of 6 digits.
You will receive only APRS packets that include the
exact same code. In order to reject other packets, this
code should not include characters specified by the
above two types.
Note: The display shown in step 1 has a field for entering up to 9 digits
(not 6 digits) because of possible future enhancement of the group code
system.
1 Access Menu 2–E (UNPROTOCOL), then press
[OK].
• The display for entering characters appears; the first
digit blinks. The default is APK002 (All calls).
2 Press [UP]/ [DWN] to select a character.
• You can enter 0 to 9, A to Z, and –.
3 Press [OK].
• The cursor moves to the next digit.
4 Repeat steps 2 and 3 to enter up to 6 digits.
• Each press of [ESC] causes the cursor to move
backward.
• Pressing [A/B] deletes the digit at which the cursor is
blinking.
5 Press [OK].
• If the cursor is blinking over the last digit that you have
entered, press [OK] twice.
6 Press [MENU] to exit Menu mode.
You can also use the keypad to enter alphanumeric
characters in step 2. For example, each press of [TNC]
switches entry as A, B, C, then 2. Press [ENT] to enter –.
12
Page 15

PROGRAMMING A PACKET PATH
STSTA
CONCON
9696
BCON
DUP
9
7
5
A packet path specifies how APRS data should be
transferred via one or more repeaters. A repeater, which
is used for packet transfer, is commonly called a
digipeater. This came from a digital repeater. A
digipeater is usually located on a mountain top or high
building. Unlike a voice repeater, it operates on a
simplex frequency. Each volunteer who installs a
digipeater programs it either as a WIDE or RELAY type.
Generally a WIDE transmits packets over much greater
distances than a RELAY.
On this transceiver, you can edit a packet path using a
maximum of 32 alphanumeric characters. The default is
“RELAY,WIDE” that is one of the common settings. With
this setting, packets will be transferred to a RELAY first,
then to a WIDE. The APRS supports various methods
for specifying a packet path. Some of those methods
are described on the next page.
Note:
◆
This transceiver is incapable of functioning as a digipeater.
◆
To serve for mobile stations who always use the RELAY,WIDE path,
most WIDEs also respond to packets addressed to a RELAY.
WIDE-type
RELAY-type
1 Access Menu 2–B (PACKET PATH), then press [OK].
• The display for entering characters appears; the first
digit blinks.
2 Press [UP]/ [DWN] to select a character.
• You can enter 0 to 9, A to Z, , (comma), and –.
3 Press [OK].
• The cursor moves to the next digit.
4 Repeat steps 2 and 3 to enter up to 32 digits.
• Use a comma to separate each path segment.
• Pressing [OK] after selecting the 32nd digit completes
the programming.
• To complete programming after entering less than 32
digits, press [OK] twice.
• Each press of [ESC] causes the cursor to move
backward.
• Pressing [A/B] deletes the digit at which the cursor is
blinking.
5 Press [MENU] to exit Menu mode.
You can also use the keypad to enter alphanumeric
characters in step 2. For example, each press of [TNC]
switches entry as A, B, C, then 2. Press [ENT] to switch
between , and –.
13
Page 16

retemaraP
forebmuN
sretaepigid
noitceriD
11 llA
22 llA
33 llA
44 llA
55 llA
66 llA
77 llA
8)eromro(2
1
htroN
9)eromro(2
1
htuoS
01)eromro(2
1
tsaE
11)eromro(2
1
tseW
21ynaM
2
htroN
31ynaM
2
htuoS
41ynaM
2
tsaE
51ynaM
2
tseW
Let us describe five basic methods for editing a packet
path. Methods 3 to 5 are supported only by advanced
APRS networks.
Method 1 (Specific Path):
Program the call signs of one or more digipeaters in the
sequence of transfer relay; ex. “KD6ZZV,KF6RJZ”.
Method 2 (Generic Path):
Program RELAY and/or WIDE; ex. “RELAY,WIDE” (or
simply “R,W”). In this example, your APRS packet is
transferred to any RELAY digipeater near your position
first, then to any WIDE digipeater. You can also program
more than one WIDE. If you enter “WIDE,WIDE” for
example, your APRS packet will be transferred to any
WIDE near your position first, then to another WIDE.
Method 3 (WIDEN-N Path):
Program WIDEN-N, where both Ns indicate the number
of WIDE digipeaters to be used for relay. If you enter
“WIDE3-3” (or simply “W3”) for example, your APRS
packet will be relayed by three WIDEs in any direction.
Method 4 (TRACEN-N Path):
The operation is the same as WIDEN-N except that
digipeaters add their call signs to your packet before
forwarding. You may program “TRACE3-3” (or simply
“T3”) for example.
Method 5 (SSID Path):
Program a single number 1 to 15. You can easily specify
the number of digipeaters that will be used for relay. You
can also specify which directions of digipeaters relative
to your position will be used. See the table.
14
1
The first digipeater which receives your APRS data specifies
the entire route to the destination before forwarding; often 2
digipeaters are used in total.
2
The digipeater which receives your APRS data specifies the
call sign of the next digipeater before forwarding. This is
repeated until your APRS data reaches the destination.
Page 17

SELECTING PACKET TRANSMIT METHOD
LAUNAM
fosserphcaE ]NOCB[ SRPAehtstimsnart
.atad
TTP
1 sserP ]NOCB[ noitcnufehthctiwsot
.NO
•.sknilbdnasraeppa”NOCB“
2 ehtdlohdnasserP TTP neht,hctiws
.enohporcimehtotnikaeps
3 ehtesaeleR TTP .hctiws
•ehtstimsnarthctiwsehtgnisaeleR
.atadSRPA
•atadSRPAehttimsnartertonnacuoY
D–2uneMnidetcelesemitehtsselnu
litnutiaW.sessap)LAVRETNIXT(
etacidniotgniknilbstrats”NOCB“
.ydaersignittimsnart
4 sserp,FFOnoitcnufehthctiwsoT
]NOCB[ .niaga
OTUA
1 sserP ]NOCB[ noitcnufehthctiwsot
.NO
•.sraeppa”NOCB“
•ehtstimsnartNOnoitcnufehtgnihctiwS
atadSRPA,tahtretfA.ecnoatadSRPA
slavretnitadettimsnartyllacitamotuasi
XT(D–2uneMnidetcelesdoirepehtfo
.)LAVRETNI
2 sserp,FFOnoitcnufehthctiwsoT
]NOCB[ .niaga
Select the operation method for transmitting APRS data.
The table concludes how operations differ depending on
the selection:
1 Access Menu 2–C (DATA TX), then press [OK].
2 Press [UP]/ [DWN] to select Manual (default), PTT, or
Auto.
3 Press [OK] to complete the setting.
4 Press [MENU] to exit Menu mode.
Note: When using a GPS receiver, this transceiver transmits APRS data
for the first time after any NMEA data is received.
STSTA
7
5
CONCON
9696
DUP
BCON
9
CONCON
STSTA
9696
DUP
BCON
9
7
5
15
Page 18

SELECTING PACKET TRANSMIT INTERVAL
STSTA
CONCON
9696
BCON
DUP
9
7
5
STSTA
CONCON
9696
BCON
DUP
9
7
5
SELECTING STATUS TEXT TRANSMIT RATE
You can change the interval for automatically transmitting
APRS data. Access Menu 2–D (TX INTER VAL) and
select 0.2, 0.5, 1, 2, 3, 5, 10, 20, or 30 minutes. The
default is 5 minutes.
CONCON
STSTA
9696
DUP
BCON
9
7
5
Note:
◆
With “AUTO” in Menu 2–C and Beacon ON, pressing [OK] to
complete the setting causes the APRS data to be immediately
transmitted. After that, APRS data is transmitted at intervals of the
selected period.
◆
While signals are present, APRS data is not transmitted after the
interval. Approximately 2 seconds after signals drop, transmitting is
executed.
SELECTING PACKET TRANSMIT DELAY
If necessary , adjust the time delay between keying up of the
transmitter and the start of APRS data to the transmitter .
Increase this delay, for example, when recipients miss the
initial part of your packets and thus fail to decode the data.
Access Menu 2–P (TX DELA Y) and select 100, 200, 300,
400, 500, 750, or 1000 msec. The default is 500 msec.
A long status text string can double the size and length of the
APRS packet. Access Menu 2–A and specify how frequently
status text is included in APRS packets to be transmitted.
The selectable range is 1/1 to 1/8 and OFF (default). If you
select 1/3 for example, status text is included in your packets
once every 3 times; accordingly stations who receive your
packets will see your status text once every 3 times.
RESTRICTING RECEPTION OF APRS DATA
If APRS is popular in your country, you may receive too
many APRS packets for a short period. If this disturbs
your APRS activities, specify a distance from your
location. You will not receive APRS data from stations
beyond this distance. Access Menu 2–7 (POS LIMIT)
and select the range from 10 to 2500 in steps of 10, plus
OFF (default). The unit is mile or kilometer depending
on the selection in Menu 2–H (mile/km) {page 7}.
16
CONCON
STSTA
9696
DUP
BCON
9
7
5
Page 19

PROGRAMMING POSITION AMBIGUITY
STSTA
CONCON
9696
BCON
DUP
9
7
5
SELECTING A DISPLAY AREA
There may be cases where you do not know or do not
want to report your precise locations. For position data,
you can select the number of digits not to be included in
your packets. Access Menu 2–5 (POS AMBIGU) and
select 1 to 4, or OFF (default). The table shows how the
digits will be cleared on a recipient.
CONCON
STSTA
9696
DUP
BCON
9
7
5
FFO 1 2 3 4
’83.05˚33’3.05˚33’.05˚33’.5˚33’.˚33
’08.31˚811’8.31˚811’.31˚811’.1˚811’.˚811
Each time new APRS data is received, the frequency
display is interrupted. If this interruption annoys you too
much, access Menu 2–G (DISPLAY AREA) to select
“ONE LINE”. The transceiver then will not exit the
frequency display when receiving new data. It will use
the bottom of the frequency display to show an indicator
(nP or nS) and a call sign; “nP” and “nS” designate New
Position and New Status respectively {page 4}. The
default is “ENTIRE DISP”.
17
Page 20

APRS MESSAGE
The APRS supports a function for transmitting and
receiving a message independent of position reports.
You can transmit a message to a single station only or a
bulletin to all other stations in your group. If you specify
a station, the entered message is transmitted up to 5
times until an acknowledgment is returned.
Each message which you transmit can consist of up to
45 alphanumeric characters. A maximum of 16 incoming
or outgoing messages can be held in the message
memory.
OPERATION FLOW
The following steps should guide you to a good start of
APRS Message operation.
q Press [TNC] to switch ON the TNC.
•“ ” appears.
w Access Menu 2–M to select band A or B as the
data band {page 3}.
e On the data band select the same frequency as
other stations in your group.
• You may tune to the frequency of an appropriate
digipeater (144.390 MHz in the U.S.A.) {page 13}.
r Access Menu 2–1 to program your call sign
(9 digits max.) {page 7}.
Now you are ready to receive a message from other
stations. Refer to “RECEIVING A MESSAGE” {page 19}.
To transmit a message, proceed to step t.
t If necessary, access Menu 2–B to program a
packet path {page 13}.
y Enter a message (or bulletin) using up to 45
alphanumeric characters {page 21}.
Completing step y causes the transceiver to automatically
transmit the message (or bulletin). When you send a
message (not a bulletin), an acknowledgment should be
returned; “ack0 ~ 9 (or A ~ Z)” appears.
18
Page 21

RECEIVING A MESSAGE
snoitceleS tekcaPweN
etacilpuD
tekcaP
tekcaPdilavnI
FFOpeeboNpeeboNpeeboN
ENIM
egassemagniviecernehwylnospeeB
.uoyotdesserdda
WENLLApeeBpeeboNpeeboN
LLApeeBpeeBpeeB
Each time a proper message is received, the frequency
display is interrupted to show information as below:
CON
STA
9696
DUP
BCONBCON
9
7
Indicator
5
When a duplicate message from the same station is
received, an error beep sounds. In addition, “dM”
(indicator) and a call sign appear on the display.
CON
STA
9696
DUP
BCONBCON
9
7
5
• The display shows only the first 24 characters of the message.
• The transceiver restores the frequency display after
approximately 10 seconds pass or when you press any key.
” appears and stays at the bottom left of the display until
•“
you use the List function {page 20}.
CONCON
STSTA
9696
DUP
BCONBCON
9
7
5
The following indicators appear depending on types of
received messages:
1
#
2
6~1G
1
#B
!ecivreSrehtaeWlanoitaNehtybtropeR
nitelluB
1
# designates an ASCII character used for indicating the
sequence of message (or bulletin) packets; ex. 0 to 9.
2
1 to 6 designates a group identification number {page 23}.
uoyotdesserddaegasseM
egassemruoyottnemgdelwonkcA
• When a message to other stations is received, “oM”
appears as an indicator.
• When a new message not addressed to only you is received
with “ONE LINE” selected in Menu 2–G {page 17}, “nM”
appears as an indicator.
This transceiver beeps each time it receives any type of
APRS packet. You may access Menu 2–F (BEEP) to
change this setting. The default is “ALL”.
}32egap{puorgruoyotdesserddaegasseM
Note:
◆
When you receive a message that you transmitted, the frequency
display is not interrupted. “MY MESSAGE” will appear at the bottom
of the display. This could happen when one or more digipeaters
{page 13} are used.
◆
This transceiver allows you to receive a message also when the SSID
does not match. However, it will not return an acknowledgment.
◆
When a message addressed to you is received, the transceiver
display and keypad are illuminated. If you do not press any key in
approximately 5 seconds, the light goes off.
19
Page 22

ACCESSING RECEIVED APRS MESSAGES
<
–
>
–
STSTA
CONCON
9696
BCON
DUP
9
7
5
wq e
This transceiver is capable of storing a maximum of 16
messages in memory. You can access the desired
massage by switching the display.
1 Press [MSG].
2 Press [UP]/ [DWN] to select “LIST”.
CONCON
STSTA
9696
DUP
BCONBCON
9
7
5
3 Press [OK].
4 Press [UP]/ [DWN] to select the desired station.
• Press [OK] to see the 25th and subsequent digits of the
message.
” indicates the end of the message.
•“
• Pressing [A/B] (1 s) deletes all the messages.
5 Press [ESC] twice to restore the frequency display.
Pressing [MSG] in step 4 allows you to enter a message
to be returned to the station. You can skip steps 1 to 6 in
“ENTERING A MESSAGE” {page 21}.
Note:
◆
The dedicated memory is used for storing both received messages
and messages for transmitting. Receiving a new message when the
memory is full causes the oldest message to be deleted. A message
not yet transmitted 5 times may be unexpectedly deleted. If “ ” stays
at the bottom left of the display when memory is full, a new message
does not replace the oldest message. This transceiver returns a reject
command and shows “rM” and a call sign at the bottom of the display.
◆
A message already transmitted can be easily sent to the same
station. Select the message in step 4 and press [MSG]. The call
sign and message are copied to the recalled entry display {page 21}.
20
Besides the call sign and message, the display will show
the following types of information:
Time (minutes)
elapsed after
receiving. “--”
Message
appears after 99
minutes have
elapsed.
q epyTegasseM
1
#
2
6~1G
1
#B
nitelluB
uoyotdesserddaegasseM
puorgruoyotdesserddaegasseM
!ecivreSrehtaeWlanoitaNehtybtropeR
w ?XTroXR
)nitellubro(egassemdevieceR
3
gnittimsnartrof)nitellubro(egasseM
e sutatS
3
5
~1
3
rofsemitforebmungniniameR
.)nitellubro(egassemehtgnittimsnart
tnemgdelwonkcanahcihwrofegasseM
denrutersaw
3
.
semit5dettimsnart)nitellubro(egasseM
).denruterton
1
# designates an ASCII character used for indicating the
sequence of message (or bulletin) packets; ex. 0 to 9. For
outgoing messages or bulletins, only sequence numbers appear.
2
1 to 6 designates a group identification number {page 23}.
3
These indicators appear for outgoing messages {page 22}.
sawtnemgdelwonkcana,egassemaroF(
Page 23

STSTA
CONCON
9696
BCONBCON
DUP
9
7
5
ENTERING A MESSAGE
To transmit a message, first enter the call sign of the target
station. To transmit a bulletin, enter “BLN#” instead; where
# must be 0 to 9 or A to Z. When the length of your bulletin
exceeds 45 digits, you may transmit more than one packet
to send the entire bulletin. Use # to indicate the sequence
of the bulletin portions. For example, enter “BLN0” (or
“BLNA”) to send the first packet, then “BLN1” (or “BLNB”)
to send the second packet.
1 Press [MSG].
2 Press [UP]/ [DWN] to select “INPUT”.
CONCON
STSTA
9696
DUP
BCONBCON
9
7
5
3 Press [OK].
• The display for entering a call sign appears; the first digit
blinks.
CONCON
STSTA
9696
DUP
BCONBCON
9
7
5
4 Press [UP]/ [DWN] to select a character.
• You can enter 0 to 9, A to Z, and –.
• You may use the keypad. For example, each press of
[TNC] switches entry as A, B, C, then 2. Press [ENT] to
enter –.
5 Press [OK].
• The cursor moves to the next digit.
6 Repeat steps 4 and 5 to enter up to 9 digits.
• Pressing [OK] after selecting the 9th digit causes the
cursor to move to the start of the next field.
• To complete programming the call sign after entering
less than 9 digits, press [OK] twice.
• Each press of [ESC] causes the cursor to move
backward.
• Pressing [A/B] deletes the digit at which the cursor is
blinking.
7 Press [UP]/ [DWN], then [OK] to select the first digit
of a message (or bulletin).
• You may use the keypad. For example, each press of
[TNC] switches entry as a, b, c, 2, A, B, then C. Press
[ENT] to switch among the special ASCII characters.
8 Repeat step 7 to enter a message (or bulletin) with up
to 45 digits.
• To complete programming after entering less than 45
digits, press [OK] twice.
• Completing step 8 causes the transceiver to
automatically transmit the message (or bulletin). If you
send a message to a single station, an acknowledgment
should be returned; “ack 0 ~ 9 (or A ~ Z)” appears.
Note: You may enter % as the initial character of the message. Some
APRS systems are capable of announcing characters one by one when
receiving a message which starts with %. Those systems include TMD700s with VS-3 units.
21
Page 24

TRANSMITTING A MESSAGE
STSTA
CONCON
9696
BCON
DUP
9
7
5
STSTA
CONCON
9696
BCON
DUP
9
7
5
AUTO ANSWER REPLY
When entry of a message (or bulletin) is completed, this
transceiver automatically starts transmitting it at intervals
of 1 minute. With a message entered, the transceiver
repeats transmitting up to 5 times until an
acknowledgment is returned. With a bulletin entered,
the transceiver always repeats transmitting 5 times; an
acknowledgment is not returned.
CON
STA
9696
DUP
BCONBCON
9
7
5
The table given on page 20 also shows indicators that
appear for outgoing messages (or bulletins). You can also
manually transmit all of those regardless of the 5-minute
timer.
1 Press [MSG].
2 Press [UP]/ [DWN] to select “TRANSMIT”.
CONCON
STSTA
9696
DUP
BCONBCON
9
7
5
3 Press [OK] to start transmitting.
• After transmission, the frequency display is restored.
This transceiver is capable of automatically returning a
programmed message when any message is received.
1 Access Menu 2–J (AUTO REPLY), then press [OK].
2 Press [UP]/ [DWN] to select “ON”, then press [OK].
3 Access Menu 2–K (REPLY MSG), then press [OK].
• The display for entering a message appears; the first
digit blinks.
4 Press [UP]/ [DWN] to select a character, then press
[OK].
• The cursor moves to the next digit.
• You can enter alphanumeric characters plus special
ASCII characters.
• You may use the keypad. For example, each press of
[TNC] switches entry as a, b, c, 2, A, B, then C. Press
[ENT] to switch among the special ASCII characters.
5 Repeat step 4 to enter a message with up to 45 digits.
• To complete programming after entering less than 45
digits, press [OK] twice.
22
Page 25

PROGRAMMING A GROUP CODE
Use a message group code to exchange messages only
among your group members. With one or more
message group codes programmed, you will receive
messages that include the same group code(s), besides
messages addressed to you. You can program any
desired code using up to 9 alphanumeric characters.
You can also program up to 6 codes at the same time. If
you program 3 message group codes, for example, you
will receive all messages that include one of the 3 codes.
1 Access Menu 2–L (MSG GROUP), then press [OK].
• The display for entering one or more group codes
appears; the first digit blinks.
CONCON
STSTA
9696
DUP
BCON
9
7
5
2 Press [UP]/ [DWN] to select a character.
• You can enter 0 to 9, A to Z, , (comma), –, and .
3 Press [OK].
• The cursor moves to the next digit.
4 Repeat steps 2 and 3 to enter up to 6 codes.
• Use a comma to separate each code.
• You can enter up to 45 alphanumeric characters in total.
• To complete programming after entering less than 45
digits, press [OK] twice.
5 Press [MNU] to exit Menu mode.
You can also use the keypad to enter alphanumeric
characters in step 2. For example, each press of [TNC]
switches entry as A, B, C, then 2. Press [ENT] to enter
, (comma), –, or .
You may use as a wildcard character. If you program
ABC for example, you will receive all messages
including group codes which start with ABC.
When a message which matches one of the group codes
is received, # and G1 ~ 6 appear alternately {page 19}.
1 to 6 after G designates a group identification number.
Let us assume that you have not changed the default
group codes; ALL, QST, CQ, KWD. If a message with
“QST” is received, G2 appears to indicate the 2nd code.
If a message with “KWD” is received, G4 appears to
indicate the 4th code.
In order to include a message group code in your
outgoing packet, enter a group code in place of a call
sign {page 21}, using up to 9 characters.
23
Page 26

MENU REVISIONS
On a TH-D7A(G), the menu configuration under TNC (1–4–), AUX (1–5–), and APRS (2–) has been revised as below.
For the reference pages in parentheses, see the other instruction manual (original).
1leveL 2leveL 3leveL snoitceleS tluafeD egap.feR
1dnabtekcaP.egapecnerefereeSAdnaB72
4CNT
2esnesDCD
1tesffOretaepeRcitamotuAFFO/NONO)32(
2emuseRnacS
DCDerongI
/detarepO-emiT
/sdnabhtoB/dnabro
keeS/detarepO-reirraC
dnabro82
-emiT
detarepO
)43(
24
1OIDAR
2SRPA
3peeByeKFFO/NONO62
5XUA
1ngisllacyM.egapecnerefereeS—7
2reviecerSPG69AEMN/AEMN/desutoNdesutoN3
3tniopyaW.egapecnerefereeSFFO5
4noitisopyM.egapecnerefereeS—9
5ytiugibmAnoitisoPFFO/stigid4/3/2/1FFO71
4elbanEgninuTFFO/NOFFO)05(
5tibihnIXTFFO/NOFFO)15(
6tnioPtpecretnIdecnavdAFFO/NOFFO)15(
7noitcnuFyeKllaCXTzH0571/llaCllaC62
8zH0571,dloHXTFFO/NOFFO62
9teseRoN/lluF/)OFV(laitraP—)23(
Page 27

2SRPA
1leveL 2leveL snoitceleS tluafeD egap.feR
6tnemmocnoitisoP.egapecnerefereeSytuDffO01
7ecnatsidnoitcirtsernoitpeceR
FFO/01
fospetsni0052~01
FFO61
8nocinoitatS.egapecnerefereeS—8
9txetsutatS.egapecnerefereeS—11
AetartimsnarttxetsutatS.egapecnerefereeSFFO61
BhtaptekcaP.egapecnerefereeS
EDIW,YALER
CdohtemtimsnarttekcaPotuA/TTP/launaMlaunaM51
DlavretnitimsnarttekcaP
setunim03
/02/01/5/3/2/1/5.0/2.0
setunim561
EedocpuorG.egapecnerefereeS200KPA21
FpeeBFFO/llA/wenllA/eniMllA91,4
GaerayalpsiDeniLenO/yalpsideritnE
yalpsideritnE
HecnatsidroftinUretemoliK/eliMeliM7
IerutarepmetroftinU ° /F °C °F7
JylpeRrewsnAotuAFFO/NOFFO22
KegassemylpeR.egapecnerefereeS—22
LpuorgegasseM.egapecnerefereeS
,TSQ,LLA
DWK,QC
MdnabataD.egapecnerefereeSA3
NetarrefsnarttekcaPspb0069/0021spb00213
OenoZemiT.egapecnerefereeS—3
PyaledtimsnarttekcaP
.cesm0001/057
/005/004/003/002/001
.cesm00561
31
71
32
25
Page 28

SUMMAR Y OF ENHANCEMENT
CONCON
9696
BCON
DUP
9
7
5
CONCON
9696
BCON
DUP
9
7
5
Besides APRS functions, the TH-D7A(G) has several
functions improved or newly added, as below. You may
refer to the given pages to identify differences from a
TH-D7A.
BAND A & B
Without switching ON the TNC, you will not see “ ”
which indicates the current data band. This modification
has been made because the TH-D7A(G) allows you to
select a different band (A or B) as the data band
between Packet and APRS operations. Refer to page
12 on the other instruction manual (original).
KEYPAD DIRECT ENTRY
When programming a memory channel name, PowerON message, status message, or APRS message, each
press of [TNC], for example, switches entry as a, b, c, 2,
A, B, then C. Refer to page 15 on the other instruction
manual (original).
TRANSMITTING A 1750 Hz TONE
The TH-D7A(G) allows you to program [CALL] as a key
for transmitting a 1750 Hz (burst) tone. Access Menu 1–
5–7 (CALL KEY) and select “1750 Hz”. To transmit a
1750 Hz tone, press [CALL] without pressing the PTT
switch. Release [CALL] to quit transmitting.
In order to cause the transceiver to remain in the
transmit mode for 2 seconds after transmitting a 1750 Hz
tone, access Menu 1–5–8 (TX HOLD,1750), then select
“ON”.
KEY BEEP ON/OFF
If you are distracted by beeps generated when pressing
a key on the keypad, switch OFF the Key Beep. The
transceiver will beep only when it receives appropriate
APRS or DX cluster data. Access Menu 1–5–3 (KEY
BEEP) and select “OFF”. The default is “ON”. Refer to
page 47 on the other instruction manual (original).
26
Page 29

ADJUSTING VOLUME BALANCE
CONCON
9696
BCON
DUP
9
7
5
DX PACKETCLUSTERS MONITOR
The TH-D7A(G) allows you to adjust volume balance
even after blanking one band. Refer to page 48 on the
other instruction manual (original).
SELECTING DATA BAND
When accessing a PACSAT, access Menu 1–4–1
(PACKET BAND) and select “A:TX B:RX” (or “A:RX
B:TX”). “ ” appears for the data transmit band and “ ”
appears for the data receive band.
CONCON
9696
DUP
BCON
9
7
5
PACSATs refer to satellites designed and launched for
digital communications using the AX.25 protocol. The
PACSATs usually receive (uplink) on VHF and transmit
(downlink) on UHF. For further information, consult
Internet Web pages relating to the PACSATs. You may
use one of the Internet search engines to find those Web
pages.
Note: If you have blanked the data band by pressing [DUAL], pressing
[TNC] does not allow you to select Packet mode.
If the common transfer rate in your local PacketCluster
network is 9600 bps, access Menu 2–N (PACKET
SPEED) and select “9600 bps”. Refer to page 56 on the
other instruction manual (original).
When new DX cluster data is received with “ONE LINE”
selected in Menu 2–G {page 17}, “nD” appears as an
indicator.
27
Page 30

DCD SENSE
The TH-D7A(G) provides three methods for inhibiting the
built-in TNC from transmitting. Access Menu 1–4–2
(DCD SENSE) and select one of the methods. The
default is “ OR BAND”. Refer to page 55 on the
other instruction manual (original). The tables below
conclude when the TNC is allowed to transmit,
depending on the selection.
2–4–1uneM dnaBataDrofdetceleSBroA
eraslangisnehwtimsnarttonseoD
DNABRO
.snoitacinummocatad
SDNABHTOB
.dnab
DCDERONGI
.noitpeceratadtnatsnoc
tceleS.dnabatadehtnotneserp
gnimrofrepylniamnehwdohtemsiht
eraslangisnehwtimsnarttonseoD
sihttceleS.BroAdnabnotneserp
eciovgnimrofrepnehwdohtem
,dnabniamehtnosnoitacinummoc
busehtnosnoitacinummocataddna
eraslangisnehwnevestimsnarT
tceleS.dnabatadehtnotneserp
CNTehtnehwylnodohtemsiht
foesuacebtimsnartotsliafnetfo
2–4–1uneM
dnaBataDrofdetceleSXT:BXR:AroXR:BXT:A
eraslangisnehwtimsnarttonseoD
tceleS.dnabXTatadehtnotneserp
DNABRO
atadgnimrofrepnehwdohtemsiht
roTASCAPaaivsnoitacinummoc
ataddnab-ssorcyranidro
.snoitacinummoc
eraslangisnehwtimsnarttonseoD
.dnabXTroXRatadehtnotneserp
SDNABHTOB
gnimrofrepnehwdohtemsihttceleS
ataddnab-ssorcyranidro
.snoitacinummoc
eraslangisnehwnevestimsnarT
.dnabXTroXRatadehtnotneserp
DCDERONGI
gnimrofrepnehwdohtemsihttceleS
TASCAPaaivsnoitacinummocatad
.yrassecennehwylnodna
Note: When in APRS mode, the TNC functions exactly as described in
the tables. The TNC, however , does not function as described in the
shaded sections when in Packet mode or KISS mode; it functions as
below. Avoid using the shaded configurations when in one of these
modes.
Packet mode:
The TNC fails to receive an acknowledgment after transmitting. It then
makes retries and unexpectedly disconnects the linkage.
KISS mode:
The TNC transmits when no signals are present on the data band or data
RX band.
28
 Loading...